
Isofix Base - Baby products CHICCO - Free user manual and instructions
Find the device manual for free Isofix Base CHICCO in PDF.
| Product Type | ISOFIX Base for Car Seat |
| Brand | Chicco |
| Model | Isofix Base |
| Approximate Dimensions | 45 x 35 x 20 cm |
| Approximate Weight | 5 kg |
| Power Supply | None (mechanical) |
| Main Functions | ISOFIX attachment with support leg; installation with 3-point seat belt; green/red indicators for checking |
| Compatibility | Chicco Autofix Fast Group 0+ car seat (0-13 kg) |
| Approval | ECE R44/04, semi-universal |
| Attachment Indicator | Green for correct ISOFIX connection and support leg |
| Support Leg | Height-adjustable with floor contact indicator |
| ISOFIX Connectors | Retractable with protective caps |
| Installation | On rear seat, rear-facing |
| Care and Cleaning | Damp cloth, no abrasive detergents |
| Storage | Dry place, away from heat and sunlight |
| Safety | Do not use on seat with active airbag; replace after an accident |
| Spare Parts | Protective caps for ISOFIX connectors |
| Repairability | Do not modify; replace if damaged |
Frequently Asked Questions - Isofix Base CHICCO
User questions about Isofix Base CHICCO
0 question about this device. Answer the ones you know or ask your own.
Ask a new question about this device
Download the instructions for your Baby products in PDF format for free! Find your manual Isofix Base - CHICCO and take your electronic device back in hand. On this page are published all the documents necessary for the use of your device. Isofix Base by CHICCO.
USER MANUAL Isofix Base CHICCO
GR. 0+ 0 - 13 ~Kg
Istruzioni d'uso
Mode d'emploi
- Gebrauchsanleitung
Instructions for use
Instrucciones de uso
Instruções de utilização
- Gebruiksaanwijzing
Kullanim bilgileri
- Brukerveiledning
Bruksanvising
O8nyieoxpno
- Upute za uporabu
Navodila za uporabo
- Návod k použití
- Návod k použitiu
Instrukcja sposobu uzycia
Hasznalatiutasitas
Instruetiuni defolosinta
HCTpykqna no3Kcnyataun
JLcoewyIolalej

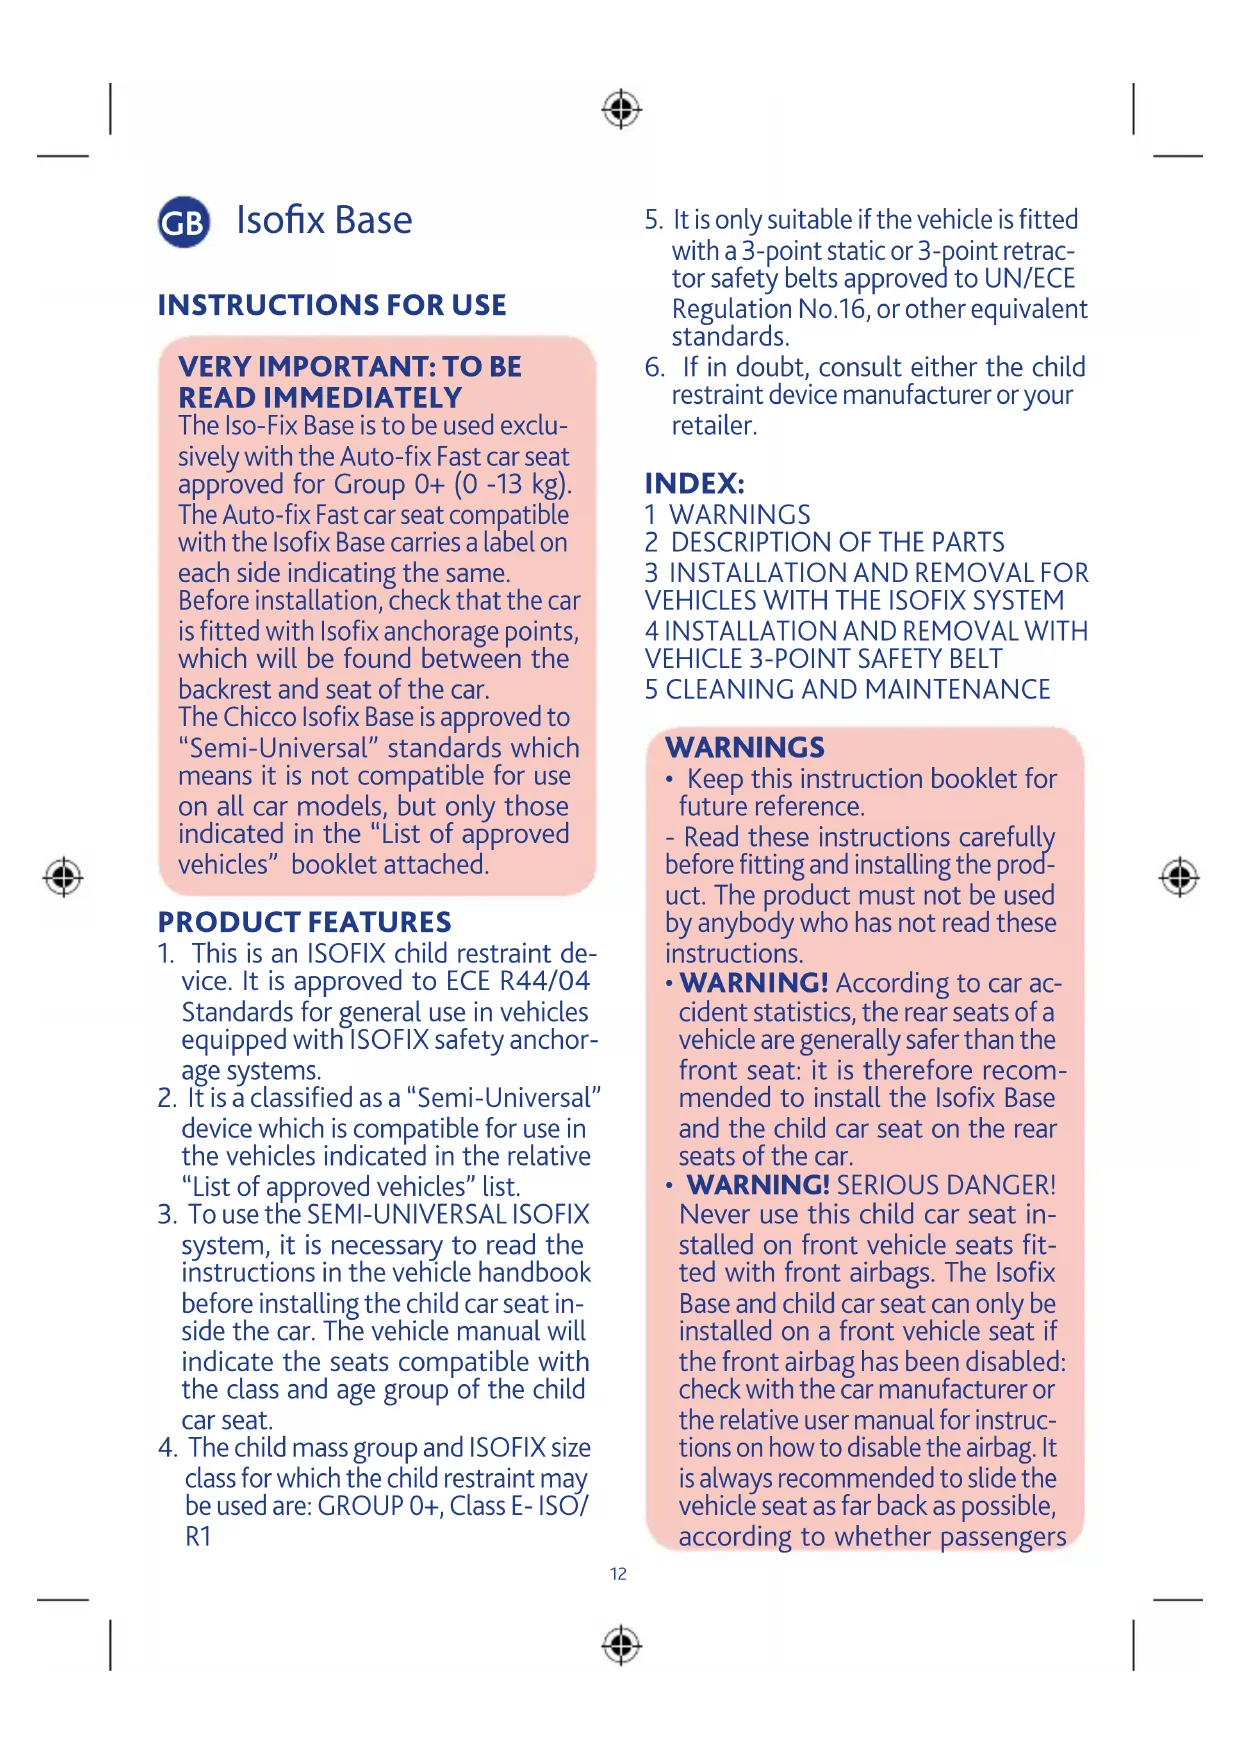
The Iso-Fix Base is to be used exclusively with the Auto-fix Fast car seat approved for Group 0+ (0 - 13kg) The Auto-fix Fast car seat compatible with the Isofix Base carries a label on each side indicating the same. Before installation, check that the car is fitted with Isofix anchorage points, which will be found between the backrest and seat of the car.
The Chicco Isofix Base is approved to "Semi-Universal" standards which means it is not compatible for use on all car models, but only those indicated in the "List of approved vehicles" booklet attached.
PRODUCT FEATURES
- This is an ISOFIX child restraint device. It is approved to ECE R44/04 Standards for general use in vehicles equipped with ISOFIX safety anchorage systems.
- It is a classified as a "Semi-Universal" device which is compatible for use in the vehicles indicated in the relative "List of approved vehicles" list.
- To use the SEMI-UNIVERSAL ISOFIX system, it is necessary to read the instructions in the vehicle handbook before installing the child car seat inside the car. The vehicle manual will indicate the seats compatible with the class and age group of the child car seat.
-
The child mass group and ISOFIX size class for which the child restraint may be used are: GROUP 0+, Class E-ISO/ R1
-
It is only suitable if the vehicle is fitted with a 3-point static or 3-point retractor safety belts approved to UN/ECE Regulation No.16, or other equivalent standards.
- If in doubt, consult either the child restraint device manufacturer or your retailer.
INDEX:
1 WARNINGS
2 DESCRIPTION OF THE PARTS
3 INSTALLATION AND REMOVAL FOR VEHICLES WITH THE ISOFIX SYSTEM 4 INSTALLATION AND REMOVAL WITH VEHICLE 3-POINT SAFETY BELT
5 CLEANING AND MAINTENANCE
WARNING
- Keep this instruction booklet for future reference.
- Read these instructions carefully before fitting and installing the product. The product must not be used by anybody who has not read these instructions.
- WARNING! According to car accident statistics, the rear seats of a vehicle are generally safer than the front seat: it is therefore recommended to install the Isofix Base and the child car seat on the rear seats of the car.
WARNING! SERIOUS DANGER! Never use this child car seat installed on front vehicle seats fitted with front airbags. The Isofix Base and child car seat can only be installed on a front vehicle seat if the front airbag has been disabled: check with the car manufacturer or the relative user manual for instructions on how to disable the airbag. It is always recommended to slide the vehicle seat as far back as possible, according to whether passengers
are travelling in the back.
- It is recommended to ensure that all passengers know how to release the child from the car seat in the case of an emergency.
- Pay close attention on how to install the Isofix Base and the child car seat inside the vehicle, to prevent a loose seat or car door from interfering with it.
- No child car seat can guarantee the total safety of your child in the event of an accident, but the use of this product reduces the risk of serious injuries or death.
- The risk of serious injuries to the child increases, not only in the case of accidents, but also in other circumstances (e.g. sudden braking, etc.) if the instructions provided in this manual are not followed carefully: always check that the Isofix Base and the child car seat are fastened correctly onto the vehicle seat.
- If the Isofix Base and the child car seat are damaged, deformed or worn out, they must be replaced, as their original safety features and standards may have been compromised.
- This product must not be modified in any way, unless the modification is approved by the manufacturer.
- Do not install accessories, spare parts, or any component not supplied by the manufacturer.
- Never leave your child unattended in the car seat.
- Never place the child seat on a vehicle seat without fastening it securely in place; it could hurt or injure other passengers in the car.
- Never place anything except an accessory specifically approved for use with the product between Isofix
Base and the vehicle seat, between the vehicle seat and the child car seat or between the child car seat and the child: in the event of an accident, Isofix Base and the child car seat may not operate correctly.
After an accident, even a minor one, the Isofix Base and the child car seat may incur damage, even if it is not visible to the naked eye: they must therefore be replaced.
- Do not use second hand devices or equipment: they may have suffered structural damage which is not visible to the naked eye but however compromise the safety of the product.
- Do not transport loose or unsecured objects or baggage on the back shelf of the vehicle: in the event, of an accident or sudden braking, they may injure the passengers.
- Ensure that all the car passengers fasten their seat belts, for their own safety and because, during the journey, they may injure the child in the event of an accident or sudden braking of the car.
- On long journeys make frequent stops. Children tire easily. Never, for any reason, remove your child from the child car seat whilst the car is moving. If your child needs attention, find a safe place and pull over.
- If the vehicle has been left in the sun, check that the different parts of the child car seat are not too hot: in such an event, let the child car seat cool down first before placing the child into the it, in order to avoid burns.
- Artsana declines all responsibility in cases of incorrect use of this product.
DESCRIPTION OF THE PARTS
A Isofix connectors
B Abdominal seat belt passage guide
C Compartment for storing the instruction booklet and 2 protective Isofix connector caps
D Red/green indicator to signal that the child car seat has, or has not, been fitted correctly
E Support leg
F Isofix system adjuster lever
G Protective caps for Isofix connectors
H Release buttons
I Isofix system correct installation indicator
L Support foot adjuster lever
M Red incorrect installation indicator
N Green support leg correct installation indicator
INSTALLATION AND REMOVAL FOR VEHICLES WITH THE ISO-FIX SYSTEM
Installation
- Remove the Isofix (A) connectors from the base using the adjuster lever (F) (Diag. 8).
Keep the lever up, and pull out the ISOFIX system COMPLETELY (Diag. 8). Ensure that the system has been pulled out as far as possible.
- Remove the Isofix connectors protection caps (G) using the release buttons (H) (Diag. 9a and 9b). Repeat this procedure for both connectors. Place the two caps in their compartment (C)
WARNING! Store the caps carefully, since they are indispensable for reinserting the ISOFIX system on the base when the system is not in use.
- Position the Isofix base on the rear vehicle seat and fasten the Isofix connectors to the anchorage points found between the back rest and the car seat (Diag. 10). You will hear a "click" when the connectors fit into place.
WARNING! Check that the two indicators (I) are green which means the system has been installed correctly.
- Push Isofix Base firmly against the backrest of the car seat (Diag. 11) to ensure maximum adherence.
- Pull the base towards you a couple of times to ensure the two connectors are locked in place.
- Position the support foot (E) and use the adjuster lever to fix it in place (L) (Fig. 12). Check the indicators (M and N) on the foot to ensure it is fitted correctly. When you can see the green indicator (N), this means you have installed it properly.
WARNING: Before attaching the child car seat onto the base, check that the stabiliser block is closed (Diag. 13).
- Attach the child car seat onto the base (in a rear-facing position) and push it downwards until you hear it click into place (Diag. 14).
- The indicator on the side (D) will turn green (Diag. 15) when the child car seat is securely and correctly locked in place.
- Check that the child car seat is correctly fitted to the base by trying to lift the front and rear sections.
- When it has clicked into position, turn the child car seat handle bar as far as possible (A) against the vehicle seat backrest (Diag. 15).
To remove the child car seat from the base:
Return the handgrip to the vertical position (B) (Diag. 15) and release the child car seat by pulling the release lever whilst using the handgrip to lift it upwards (Diag. 22).
Removing the base
Repeat the above process in the reverse order.
Press the adjuster lever (L) on the support foot and shorten it all the way to the end.
Lift the ISOFIX adjuster lever and pull the base away from the backrest as far as possible
Press the release buttons (H) to release the ISOFIX connectors
Take the protective caps previously hidden away in the compartment and replace them on the ISOFIX connectors.
Push the ISOFIX system inside the base as far as it will go.
INSTALLING AND REMOVAL WITH VEHICLE 3-POINT SAFETY BELT
Installation
- Position the base on the chosen vehicle seat, position it so that it touches the vehicle seat backrest (Diag. 16).
- Position the support foot (E) and use the adjuster lever to fix it in place (L) (Fig. 17).
- Check the indicators (M and N) on the foot to ensure it is fitted correctly. When you can see the green indicator (N), this means you have installed it properly.
- Pull the vehicle safety belt and connect it to the relative buckle, threading the horizontal abdominal belt through the two slots (B) highlighted in blue
(Diag. 18).
- Attach the child car seat onto the base (in a rear-facing position) and push it downwards until you hear it click into place (Diag. 19).
- The indicator on the side (D) will turn green (Diag. 20) when the child car seat is securely and correctly locked on place.
- Check that the child car seat is correctly fitted to the base by trying to lift the front and rear sections.
- Pull the diagonal car safety belt and thread it through the relative slot, highlighted in blue, on the back of the child car seat backrest (Diag. 22)
- Pull the belt as tight as possible around the child car seat, without leaving any slack and making sure it is not twisted.
- Turn the child car seat handlebar as far as possible (B) against the vehicle seat backrest (Diag. 21).
WARNING: NEVER INSERT THE CAR SAFETY BELT IN ANY POSITION OTHER THAN THOSE INDICATED IN DIAGRAM 22.
To remove the child car seat from the base:
free the diagonal safety belt from the slot on the backrest, return the handlebar to the vertical position (A) (Diag. 21) and release the child car seat by pulling the relative lever whilst using the handgrip to lift it upwards (Diag. 23).
WARNING! After installing the child car seat, ALWAYS check that the vehicle safety belt is tightened properly and the buckle clasps do not push the belt out of the belt slot on the base and does not interfere with the belt slots themselves.
Removing the base
Press the adjuster lever (L) on the support leg and shorten it all the way to the end. Release the car safety belt and free the abdominal belt from the blue slot. 3) The base can now be removed from the vehicle seat.
CLEANING AND MAINTENANCE
How to Clean the Plastic or Metal Parts
Clean the plastic and coated metal parts with a damp cloth only. Never use abrasive detergents or solvents.
Checking the condition of the components
Check on a regular basis that the plastic parts are not worn out and there are not signs of damage or fading.
WARNING! If the child car seat is deformed or worn out, it must be replaced: it may no longer comply with the original safety standards.
Storing the Product
When it is not fitted in the car, it is recommended to store the child car seat in a dry place, away from sources of heat and protected from dust, humidity and direct sunlight.
Disposing of the product
When the child car seat no longer complies with the original safety standards, stop using it and dispose of it at an appropriate collection point. Dispose of the product as laid down in the environmental regulations in force in the Country of use.

Base Isofix
NOTICE D'UTILISATION
TRÉS IMPORTANT: À LIRE IMMÉDIATEMENT
CHARACTERISTIQUES DU PRODUIT
PYKOBODCTBO NOLb3OBATEJIa
OUEHb BAXHO: CPA3y JXE O3HAKOMbTECb C CODEPJKAHIEM
OchOBaHne IsofIx DoJxHo NcNoIb- 3OBaTbcra ToIbKO BMeCTe C aBTOKpeCnOM Autofix Fast, cepTnΦuNPOBaHHbIM dI rpynnbl 0+ (0-13 kr). OCOBMeCTUMOCrNe DeTCKOro aBTOKpeCna Autofix Fast c OCHOBaHNem Isofix CBnTeJIbCTByET 3TuKeTka, paCnoLoXeHHa C obEnx CTOpOH. IpeE yCTaHOBko OCHOBaHNs CJeDyET yBeENtbcra B TOM, YTO B aBTOMo6nIe Mekdy CnIHKO n CnDeHNem PpeDyCMOTpeHbI CneUaNbHbIe KpOuKn IsofIX.
Ochobahne Isofix ot Chicco ceptn-phiunpoBaHo KaK «PonyuHbepCaIbHOe》,To eCTb OHO NOxO He KO BcEM MoJeM aBTOMo6nJIa TOnbKO K TeM, KOTOpbly yKa3aHbI B npnilaraem6pOshope «CncocOMOJOrnpOBaHHbIX aBTOMo6nJIeN」.
XAPAKTEPNUCTUKN N3DEJIIN
1.Изделпрсдтавлгет соби рпсncoc6ненue ISOFIX дя удерхиваня peбенka.Оно оdoбрeho lamentom 3KE R44/04 дя обшero ИсплььзованяВ ТраHCNOPTHbIX cpeдтвax,Осhaшених систем amи креленя ISOFIX.
2.Данhoe npucnocoblene Knaaccn-phiunpyetcKaK «ПolyuHbepcaIb-Hoe》,COBmecTUMOE c TpaHCnOpTHbIMN CpeDCTBaMn,yKa3aHHbIMN B Cneun-aIbHOM «Cpncke OMOJOrnpOBaHHbIX aBTOMO6nJIeN
3.ДЯ nCNoIb3OBAHnI NOUyHnBepcaIbHOcNCTeMbI ISOFIX SEMIUNIVERSALE 6o3aTeJbHo cJeNyETnpOueCTb INHCTpyKuIN K aBTOTpaHC-NOpTHOMy CpeDCTBy N TOJIbKO NocJe3TOrO pInCTynaTb K yCTaHOBKe aBTO-KpecNa.B INHCTpyKuIN yKa3bIBaHTcMeCTa,COBMeCTmMbIe C pa3MepHbIM
KnaCCOM DeTCKORO aBTOKpeCna.
- Becobárgpynpa n pa3Meρhbl Knacc ISOFIX,Дя кOTOpbIX NOxOaNT npn-cnoc6bIeHne:ΓPyPNA 0+,Knacc EISO/R1
- CpeIcTBo npedHa3HaueHo ncklHouNTeIbHO IJI npIMeHHeHn Ha TpaHC-NOpTHbIX CpeIcTBax, Cha6XeHHbIX peMHm 6e3ONaCHOCTN, CTaTNUeCKM NII CO BTRIBaIOUIM MExAHN3MOM N C KpeIJIeHNEM B Tpex ToKax, cepTnΦnIupOBaHHbIMn Ha OCHOBAHN CtaHdApTa UN/ECE N° 16 nII npyInx paBHO3HaUHBIX CtaHdApTOB.
- B clyuae comHeHnC bXitecb C npOn3BoDnteIem npncnocO6neHnIydepKnBaHn IIN NOCTaBzIKOM.
CODEPKAHNE:
1 MEpbI INPEDOCTOPOXHOCTN
2 ONICAHNE KOMNOHEHTOB
3 YCTAHOBKA N CHRTNE ABTOKPECJIA NT C CNTTEMOJ ISOFIX
4 UCTAHOBKA I CHRTNE ABTOKPECJIAC PEMHEM BE3OPIACHOCTN ABTOMOBIJC KPEIIEHNIEM B 3-X TOCHKAX
5 YXODI OBCJYKUBAHNE
MEPbI IPEDOCTOPOXHOCTN
- CoxpaHnte daHHoe pyKOBoIDCTBO C nHCTpyKUaMn dIЯ o6paueHnB 6yduem.
-Дя MONTажа u yctaHOBKN n3dJIeNToUH cIeDyIte NHCTpyKcUN. N36eRaITe NCnOJb3OBaHIN N3dJIeN8beIpeiBaPHTeJIbHOrO O3HaKOMJIeHInC INHCTpyKcNeJ.
BHUMAHNE! CorlaCHO cTATNCTUeCKIM daHHbIM O dTI 3aHHe cnDeHbA bTOMO6nJI aBnIOTc 6oJee 6e3OpacHbIM N o cpaBHeHIO C nepeHNMI: NOtomy peKOMeHNyETc yTaHaBnBaTb Base Isofix n ABTOKpeCNO Ha 3aHHe cnDeHbY.
BHIMAHNE!CEPbE3HÄOPIACHOCTb!HeBkoemcnyae He nCnoIb3yIte3TO npncnoc6leHneHa nepedhem cndeHn,ochaueHNOMΦpONTaIbHOB BO3dUshOHNoDyKo.YctaHOBKa Base Isofix
DeTCKORO aBTOKpeCna Ha nepeHem cnJeHn BO3MOxHa TOnbKO npu ycIIOBn OTKJIoueHHo OpoHTaJIbHOI BO3dyuHoi NOyUKN 6e3OpacHocTn: yToCHNeY aBTOMo6nIbHoro DInepa nn B pyKOBoDCTBe NOLb-3OBaTeJI, BO3MOxHO JN OTKJIouHTb BO3dyuHyIO NOyUKN 6e3OpacHocTn. B IIO6OM cNoyae peKomeHdyETcA OTOdBHNyt CNDeHne MaKcImaJIbHO Ha3aI, HAcKoJIbKO 3TO BO3MOxHO npn HApuN naccKnpOB Ha 3a- dHnx CNDeHnx.
Heo6xoJMo npOHΦOpMnPOBaTb BCex naccKnPOB aBTOMO6nla O cnoc6e OTcENk pe6eHka B cly- yae abapnn.
- YctaHaBnBaIte Base IsofIX n ABToKpeCNo B aBTOMo6Nle TaK, uTO6bI He dOnyCTnTb erO cToJKNHOBeHn C nepeDnXKnblm cnDeHbem DBepbIO.
Hn Ondo aBtOKpeCNo He rapaHTnpOBaTb noIHyIO 6e3ONaCHOCTb pe6eHka B Cnyae DOpOXHO-TPaHCnOPTHORO nPoNCseCTBnA, HO NCNoJIb3OBaHne DaHHoro N3dEIny UMeHbShaET pNCK cepBe3HbIX TpaBM IIN CMEPTN.
- Puck cepbe3hbx TpaBM pe6eHky, He ToIbKO B Clyuae DOpOxHO-TpaHCnOpTHoro npOnCwecTBnA, HO TaKKe n B dpyrnx o6ctOaTeNbCTBax (Ha-npImep, npi pe3kX TOPMOxHnAx n T.D.), yBeInuBaetc npn HeToU-HOM cJeOBaHnnpNBedeHHbx B DaHHOM pyKOBOdCTBe yKa3aHn: Bcerda npOBepaIte, uTO6bl OCHOBaHne Isofix n aBtOKpeCNo 6bln npabNlbHO 3aKpePHeHbI K cnDeHIO.
-Повржденhoe,дeформіюванhoe ИИСи СИьно ИЗношенио оchobане lsofix n aВТОКпесл noДлжкат заме, tak kaK OНи 6Олee He OTbeuaIOT IСХОДнБIM XapakTepeNTiKam 6e3ONaCHOCTN.
3aPpeaOTcMaOnΦnKaun nn DOnoJIHeHnK n3JeIIO, He BepXdEHHbI npOu3BODNTeIeM.
3aPpeaaeTcayTaHaBnBaTbak
ceccyapbl, cmeHHbIe qactn IN KOM- NOHeNTbl, He NoCTaBJIeMbIe npOuN3BOdnteJeM.
- Hukorda He ocTabny Te pe6eHka 6e3 npncmToPa B aBtOKpeCne.
-
Hukorda He octabnIte aBtOKpecIIO He 3aKpeJIeHHbIM K cndeHNUo ABTomO6nJI, 3TO MOKeT npNBecTN K TpaBMnPOBaHNU naccxNUPOB.
He BCTaBnIte HnUero, yTo He ABJIaReTcY TBePjKeHHbIM npOn3BOJNTeJIem akceccyapOM, Hn MeKdy OCHOBaHnEM IsofIX n ABTOMO6nIbHbIM CNDehnEM, HN MeKdy ABTOMO6nIbHBIM CNDehnEM n ATOKpeCLOM, Hm MeKdy ATOKpeCLOM n pe6EHKOM: B Clyuae DOpOxHO-TPaHCnOpTHORo IponCwecTBne OCHOBaHne IsofIX n ATOKpeCLO MoKet NcNoHrTb CBON FyHKsIN HeNpaBnIbHO. -
DopoJHO-TpaHcnpTHe npOncseCTBHe, B TOM YnCne JereKoe, TMOKeT Bbl3BaTb NOBpeJdeHnOc-HOBaHn Isofix n aBToKpeCna, He BCerDa 3aMeTHbIe: N03TOMy O NODexKaT 3aMeHe.
He nCnoJb3yIte 6bIBwne B yNOTpe6JIeHn npncnocO6JIeHn: OHMOrYT NmEtb KOHCTpyKTHBhIe NOBpeXJeHn, HeBnIMbIe He BOOpYKeHHbIM rla3OM, HO OTPuCaTeNbHO BnnaIOUne Ha 6e3oNaCHOcTb n3dJIa.
- PpOBeBbTe, UTo6bI He nepeBo3nIINcB, OCo6eHNo Ha 3aJHei NOJIKe BHyTpN aBTOMo6nIa, BeuN nn 6aRax, KOTOpblE He npNKpePnIeHbI nn HyeCTaHOBLeHbI 6e3OJaChbIM O6pa3OM: B Cnyuae DopoXHo-TPaHCnOpTHOrO IpnCwecTBnI nn pe3KOrTOpMOxKeHn OHN MOrTy HaHeCTNu TpaBMbl NaCCaKnIpaM.
- Y6eIntecb B TOM, yTO BCE naccakn-pbl aBTOMOBnla NcNoJIb3yIOT CO6CTBeHHbIe peMHn 6e3OnaChOCTN. 3To Heo6xOJIMo dJa Ix Co6CTBeHHoH 6e3OnaChOCTN, a TaKKe BO n36e-JkaHne TpaBMnpOBaHnra pe6eHka B Cnyuae DOpOxHO-TpaHCnOpTHOro npONCseCTBnA INn pe3KOrO TOP
MOXeHn.
B cnyuae JnteBhbx Noe3 deaute yactbte OCTaHOBKn. 6eHOKIerKoYtOMJareTcBnyTu. Hn B Koem cnyuae He BbIHMaHTe pe6eHka n3 aBtOKpeCna, noka abTOMO6uNb HaxoNTcB DvIXeHN. Ecnn pe6eHok Tpe6yeT BHMAmn, Heo6xOIMO NaHTN 6e3OnacHoe MeCTO N OCTaHOBITbcra.
- Ecnn aBTOMO6nIb B TeueHne dIINTeIbHO BpeMeHN HaxoDInCnPOd cOnHcEm, BHIMaTeIbHO OcIeMyIte DeTCKoe KpcSNo,IpeKJeYem ycAdNtB H Hero pe6EHaKa, yTObbly6eINTbcra,HTO He KeKOTOpbI erO acTHe HaKaJIuINCb: BO n36ExKaHneOxKOrOB y pe6EHa Ka NDoJXnTPOKA OHN OCTbHyT.
KOMPnHaNr Artsana cHmMaET Cce6a KaKyIO-lIbO OTBeTCTBeHHoCTb Pn INcNoJIb3OBaHNn N3dEIny He No Ha-3HaueHnIO.
ONICAHNE KOMNOHEHTOB
A CoeinnHnten Isofix
B HanpaBnaIouaJ dIg 6pIooHoro oTpe3Ka peMHra 6e3ONaChOCTn
C Hnwa nI pyKOBoDCTBa C nHcTpkyKuYMaN I 2 3aIHTbIX KOIIaUka dIra coeHNHTeNe IsofIX
D INHdNkaTOp (KpaChbIy/3eJIeHbI) npaBnJIbHOY yCTaHOBKn aBTOKpeCna
E Onopna cToiKa
F PerynipoBoHna pyka cnCTembl Isofix
G 3aunthbte KOnnauKn dny coeHnte ne Isofix
H Khonkn dans paçenneenh
I HndkaTop cquenneHn cnCTembl Isofix
L PerynipoBouHbI pbUar onOpHou HOXKu
M KpaChbI INHnKaTOp HenpaBnJbHOy yCTaHOBKn
N 3eIeHbI nHdNkaTOp npaBnblHOu cTaHOBKn ONOPHOI CToIKN
YCTAHOBKA IN CHATNE ABTOKPECIA C CNCTEMOIN ISOFIX
YCTaHOBKa
k1.ИЗВЕΚΙΤΕ coeДиΝΗΝΙΝι Isofix (A)
Pe- OCHOBaHnA c NOMOUsbIO peryIInpoBOuHOu pyuKn (F) (Pnc. 8).
YdepnBaa pyky BbTMyTo, NOHOCtbIO n3BneKeNte cncTeMy ISOFIX (Pnc.
8). y6eHNTecb B TOM, yTO CNCTema n3Bne-ueHa do ynopa.
2. BbHbTe 3aunTHbIe KOnnauKn (G) coeHNHTeNe IsofIX, Haxmam Ha KhoNkn pacenneHn (H) (Pnc. 9a n 9b).
o6- IOBTOPte 3TN DeiCTBnI dIy o6Ox coeHNHTeIe. IomeCTte 6a KOnnaKa B cneuaNbHyIO HnUy (C)
BHUMAHNE! AkkypaTHo xpaHnTe KONnauKN, NockoJbky OHN Heo6xOdImbI dny UcTaHOBKn CnCTembl ISOFIX B OCHOBaHneB MOMeHTbl ee HEnCNoJb3ObaHnY.
3. YctaHOBInTe OCHOBaHne Isofix Ha 3a-dHem CndeHnn ABTomO6nJI n 3aue-nITE coeHNHTeNl Isofix K KpOuKam, KOtOpbIe HaxoJrTcM MeKdy CnIHKO n ABTomO6nJIbHbIM CnDeHnEM (pnc.10). 3auePJIeHne coeHNHTeN e conpo-BOxJaetc XapaKTePnhBIM IeLqKOM.
BHUMAHNE! Y6eNTecb B TOM, yTO 3auePJIeHne BbINoJHeHO KOppeKTHO, npOBepbTe, yTO DBA INHdNkATopa (I) ro- pRt 3eJIeHbIM CBeTOM.
- Θeprnuyno npoToJKNHte aBtOKpeIIO K cnnHke aBTOMO6nIbHOro KpeCna (Pnc.11),uTo6bl oBeceNeHTb erO MaKcImaJIbHoE npUJIeRaHne.
- PpOBepbTe HeoHOKpaTHO npaBnJIbHOe KpePJIeHne DByX CoeINHITeJe: IJRA 3TOrO NotAHTE HeCKoJIbKO pa3 3a OCHOBaHne.
6.Помecntte onopnyo HOxky (E) n otperyu npyte ee cneuaJIbHbIM pbUarom (L) (Pnc.12).IpaBnIbHoe paCNOJoxKeHne HOxKn yKa3bIBaetc r HndIkatopamn (M n N),pacnoJoxKeHbIMn Ha camoHoxKe.IoABHeHne 3eJeHoro INdIkatopa (N) cBnIeTeNbCTByeT O TOM,HTO HOxKa yCTaHOBJIeHa npaBnIbHo.
BHIMAHNE: Ipejde yem BCTaBnTb aB-TOKpeCNo B OCHOBaHne, y6eIntecb Ha-DeJxHOM 3akpyITn cToNopa (Pnc.13).
- BCTaBbTe aBtOKpecNo B OCHOBaHne (NOBepHyToe B HApPaBJeHn, 6paTHOM DnJXKeHnO), IpotaJIKNBaB Bn3 Do 3auePHeHn (DolKeH pa3DaTbCra «UeHcK», NODTBepKdAIOuN 3aKpePHeHne) (Pnc.14).
- Nocne npabnIbHoro 3aKpeIeHna ABTOKpeCna 6OKOBu INdNkaTOp (D) 3aROpNTc 3eJIeHbIM CBeTom, CnHaJIn3npy CoCTOABWeecr CcEJIeHne (pnc.15).
- Пюверьтейнаджноctь креленя abTOKpeслК OCHOBAHIO, nbITaЯС припODнгь erO KaK cpeДи, TaK n c3aДN.
- После закpenпеня повернite руку abtOKpeсna до уnpа (A) к спнке abTOMobиьног Кресна (pnc. 15)
4TO6bl CHaTb aBtOKpecNo c OCHOBaHHa:
IIOBepHnTe nepeHoCHyIO pyUky B BepTnKaJIbHoe nOIoXeHne (B) (pnc. n OTcENITe aBTOKpeCNo, nOTaHyB CNeuaJIbHyIO pyUky N OndHOBpeMeHHo C 3a nepeHoCHyIO pyUky (pnc.22).
CHATNE OCHOBAHNA
BbInonHnTe npoceDpy, 6paTHyU Bbl-WeOpncAHHO:
Haadabnte Ha perynilpoBOHbI pbUar (L) onopHoi HOxKn, yKopaunBaJ erO do ynpa.
PpHIOdHMITE peryIIpOBOUHyIO pyuKy ISOFIX, oToDvIraO cHOBaHne OT cINHKn do ynpa.
OTcENTe coeHNHTeIN ISOFIX, HaxnMaHa KaHONKn paCuePHeHHa (H)OCTaHbTe paHee cHrTble 3aunKoJIpaKN n3 COOTBeTCTBHyUoSeHnHiuN uCTaHOBHTe INx Ha coeHNHTeIN ISOFIX.PpToJKNITE CnCTemy ISOFIX BHyTpbo OCHOBAHn, y6eINBWHncB TOM, qTO OHa DOCTnIgna yNopa.
YCTAHOBKA IN CHR'TNE ABTOKPECJIAC PEMHEM BE3ONACHOCTN AB- TOMOBUNC KPEINJEHNEM B 3-X TOCHKAX
yCTaHOBka
erb Tomecntte OCHOBAHne aBTOKpecna Ha Bbl6paHHoe cndeHne aBTOMO6nla, NOBepHyB erO TaK, YTO6bl OHO npInerana K CnNHKe aBTOMO6nIbHOro cndeHnra (Pnc.16).
2. Nomecnte onopHyIO HOxKy (E) n otpepynpyTe ee cneuaIbHbIM pbIa-rom (L) (Pnc. 17).
3.ПравиьhoepacnoLOXKeHne HOKKu yka3bIbaeTcra HndNKaTopamu (M u N), pacnoLOXKeHHbIMn Ha cAmOi HOxKe. IoRbIeHne 3eJeHoro HndNKaTopa (N) CBnTeJIbCTByeT O TOM, YTO HOxKa ycTaHOBNeHa ppaBnIbHo.
4.ПOTAHHTepeMeHb6e3ONaCHOCn aB- TOMo6nIaNpNCTeHHTeeroHa COOTBeTCTByUOyIO pRJkK,IpONyCTNTe TOpN3OHTaNbHyIO yAcTbpeMnB DBe HAnpaBIAIOUne(B),06O3HaueHHbIe CINHMzBEtom(pnc.18)
55BCTaBbTe aBTOKpeCNo B OCHOBaHne 3IOBepHyToe B HAppaBHeHn, o6paT HOM DnHexeHnO), npotaKnbAer O Bn3 Do 3auePHeHn (doJxeh pa3- DaTbcra «UeIyOK», noTBePkaIoUnn 3aKepeHne) (Pnc.19).
6. Nocne npabnIbHoro 3aKpeIeHna ABTOkpcna 6OKOBU INHnKaTOp (D) 3aROpNTc3eJIeHbIM CBeTom, CNHa-n3npycoCTOABWeecr cCepIeHne (pnc.20).
7. Поберп Te HaendexHocTb KpeJIeHnabTOKpeCna K OCHOBaHnIO, nbITaRcB npINoDnHrTb erO KaK cpeDi, TaK n C3aIu.
8.Bo3bMntecb 3a dnaarOHaIbHbI OTepe3OK peMH 6e3oNaChOCTn ABTOMO6nIe I N npOnyCTNTe erO B CneuaJIbHyIO HapabJIAUOyU, pacnoJooKeHHyIO NO3aIN cINHKn ABTOKpeCna I 6o3-HaueHHyIO cINHM UBeTOM (Pnc.22).
9. MaKcImaJIbHO npOTAHte peMeHb, He OCTaBnJ nnuHnx KOHcOB, npOBepb-
Te, UTO OH He NepeKpyeH.
CbaJIaHe Ha OCHOBaTa
HaTnchHeTe loCTyeTo 3a HacTpOuKa (L) Ha onOpHTo Kpaue, KaTo ro n36yTaTe HaBbTppe Do ynp. OTKoNuaTe npedna3HnKoJah OCBO6OJeTe OHa3n Yact, KOrTO npiDbpxa 6e6eTo npe3 Kpbcta,OT CnHnY NKcaTop. 3) Cera MoKeTe da CBaInTe OCHOBaTa OT CeJaIKAta.
G Chicco 5 0 wS gswl ocl J
aLg o wai Lai X gila 1J :Jolw a
ooll cllg go fae Liog Cll Lggo
"aaagll lalll aale
gilll cieolgo
gag jaii pi gao s g 1-1
aeg g21 aix no ggi lc Jolc
oogjll iLswi g plall alw .RE
wsgwii icil
a1c aiao jgs c ojlc go wSgWJ-1
g ooll 0 waiy Jolw a
Jolll 4 wS gW pLi Jlao 8-1
JbI I y Sj j jy I y I y
20 Wai j SLo 5i y 5u
Sgill alga1 atg wall acgno 1-2
acg:La Logo wSg wI plbi Jlae iW
E-ISO/R1 aJIg.
101 0g jll lal aai 5c -0 gglg 2ggl gJSLuI ggl JoLai Li Lgic 11 p, UNI/CEEAunl CLaLj Lc
iL11llo
jge jai Jai 1sgl 1-7 aioogai jil gJg
m - 1 0 ;
b_1 = 32 - 1
S OBC = S COD + S BOC - S BOC
uSg u| pLi: Lg 1
LaijIgJyJyJyJyJyJyJyJyJyJyJyJyJyJyJy
aIg aIb
m = 311
1
Lolalglly Lc g 1s y 1
JLoaiy Jg a 8. 15
Lolalglg 2g 81
Jy 2g 81
aolc oog 81
aolc 81 clll
Sj Cai: golx 81
cll lgc 81
121 111 100 Jao 8! pws jas! aaii.
"airbag" aig oLwog oJg ool Jao 1c
uS gwi 1 acIe 5y j 8 aolol
j 121 21 golo81 2aill lc Jalll wSg
Jlc: aolo81 aig gll oLwgl Jac al
elb81 gl aiaill 4sull JLao 2L
aes 4eol oJgll clog Jl Jlc
oals g waii aig gll oLwgl Joc Lao
Jl 131 11 galo81 2aill elg Jggo
L5Jggo wLoJIy Aie
131 2011 1c 1111111111111111111111111111111111
Jalll aolll 2011 1 5 8 Jlaoiwl j 1 10 10 10 10
gll jog aill jyab Jellal Lla!
Lag aag aag Jellal a!
Lag aag
Lag Lg. lo gag all g
Lag
Lall oagj i0i Li!
JL Jd1 1o cLaJe EJI pJl (Li
Oclc uoo no Loil Sll
J 10000000000000000000000000000000000000000000000000000000
Log.
y1 1111111111111111111
gjLg glaLo Sj
aaii 15
L 5
A 1000000000000000000000000000000000000000000000000000000000000000000000000000000000000000
s#g w! pblc i aas lc Jy, sgo-1
LwJpJzaiic-L
Sjlll jlc JyaoM
JLW Sjiaoc lc JyaoN
uS.1g uU 101111
11g ocll (A) u5g w! 100g 1-1
bI .(A oJgll) (F) Jieill jao JLoeiuw
cI. aaii cagll g aeg aaii uu u Lc
pIaII I eL i .(A oJgall) u5g w! pIaI
abgi
cIog: aol31 (G) aIgll aIac21 cI -1
(H) clll ljj lc hiaiiy llig u5g w!
e.o. Iogll go aIaeell acI .(9bg 9a JIgwl)
(C) Log: aol31 ojrl
8 ghs lg 8 aagll a hcky lai! aai jusogw! pabi cii olc! gic iis w. algwiipac sic acclg
1 1 1 1 1 1 1 1 1 1 1 1 1 1 1 1 1 1 1 1 1 1 1 1 1 1 1 1 1 1 1 1 1 1 1
aagaaagaaagaaagaaagaaagaaagaaagaaagaaagaaagaaagaaagaaagaaagaaagaaagaaagaaagaaagaaagaaagaaagaaagaaagaaagaaagaaagaaagaaagaaagaaagaaagaaagaaagaaagaaagaaagaaagaaagaaagaaagaaagaaagaaagaaagaaagaaagaa
jll jll jll jll jll jll jll jll jll jll jll jll jll jll jll jll jll jll jll jll jll jll jll jll jll jll jll jll jll jll jll jll jll jll jll jll jll jll jll jll jll jll jll jll jll jll jll jll jll jll jll
aclal Jabll yS Jss! 4: aii i
J 12000000000000000000000000000000000000000000000000000000000000000000000
aaiy aaii wlll lloell wai j
a_ g ≤ 0
(L)slw81paaJaeiaicglbcnol-1
loggjglj
Lalal Lai Lae
logill aygi jgbln noocclll
Ie IaiaJy Jg uS aguag Lxuao
(H) Lj1j2j
Sg 1000000000000000000000000000000
0g
i
Jgaoaclal Js1uogmulpki
ab a = a + 1
aJg21 10j
1
a jil 0jll 1eao lcc
LgS: Lg: 1
(1) (2) (3) (4)
JLaeWly Lgbn: gE Sliw81 pgs
(1) 1,2,3 , 1,2,3 , 1,3
M) jyjgll no paell cuiu aao glc Jaiu
jg jg jg jg jg jg jg jg jg jg jg jg jg jg jg jg jg jg jg jg jg jg jg jg jg jg jg jg jg jg jg jg jg jg jg jg jg jg jg jg jg jg jg
p111 1000 1c(N)
yaa 11. wll 4a, yj. wll Lol pJ> -
(B) 15
(1)A,g,AJI)gJgLLgJI,LI
0gS 1
jai jai aeg gai oai jai
( 1,9, , , - 3) . ( 23, 3, 3)
Jabal gws iue jao Jaiw
aigj gill (D) jil 1g c ggl
.(f·a)
olalglc lalalwS caiy aao 5i-V
131 0g ploxl g wKJgLc
7
11111 1 a1s1g o1uU g1n21 p1jL L100-9
JabSgbsiMo aIggl Ja
()
Lo gai jiebllgjogjbj1
0 251g buii j 00 1s1j a i jii j 00
1c0g2g11Uu11ucg311cPj31
Lgme dlll 20 J,2 aJ jog oacLaJI
(1)slw81paablaicglclni-1
gai jia Jaa
gibai jaiy jaojia
·s 21
aaii 10000000000000000000000000000000
iL
a.aaa 2.5.
aiaiabjolaiabe Jleil
aelll aegialll 1
cbill plsiwi ic elioy Ls. bll
. ai + 1 = bi - c_i
5j-81 205w no 5j31
511g 4jgsogjag 1j81 4oLw jaa
i 1
ailll lcl oLc a 10 aLLs 5
gU1 1a
aai g aag aIg jai Jaiu w 1y iuii
oio ai Ioo s Js
aoolln n nn anan
11 111 111 111 111 111 111 111 111 111 111 111 111 111 111 111 111 1
jll jalil Jlceiw8 waiy 1gill ic
laie gao yw gaiw wu ic gill
gaiy bwl lc alslb gliui Lw8
jlgall lc qai Los lgclgwl cia IJaeW21 Lg W


Ochoba Isofix
Ihctpykci3 BnKOpncTahHcCTop.
IHCTPYKIZI3 BVKOPNCTAHHNAID3BNUAHO BAXJIINBO!HEAHO PPOUYTAITE!
OCHOBa Isofix Maé BUKOPNCOTByBaTnCBAKJIIOUHO 3 DNTAQUHMA BTOKlOM Autofix Fast, cepTuΦIKOBaHmДЯ Frpyu0+ (0-13 Kr).Дntaue ABToKpICNo Autofix Fast, Ake cymichm 3 OCHOBOI Isofix,po3Pi3HaεTbca 3a eTNKeTKOIO,po3TaUObaHO 3 06ox 6OKiB Bnpo6y.
Nepsh Hix po3noaTu BCTaHOBJeHn ABTOkpicla, nepeKoHaItecra, 0o aTOMo6ilb OchaueHH CneuaJIbHUMN cKo6amn lsofIX, kpi po3taWOBaHI cINHKOIO i CNDiHHAM aBTOMo6ilbHOrc NdiHH. Qauoe Iocfy pR Chioe
Ochoba Isofix BiD Chicco ceptnfo BaHa JK HAniB-yHibepcaIbHa>. Lc O3Haaye, 0 BOHa He iXoNDtB BCix MoJeNe aBTOMo6iIB, a MoKe BNKOpNCTOyBaTnCra IINHe 3 TUMN, kI HaBeDeHi B «CnNcKy 3aTBepdxKeHnx aBTOMo6iINB》,AKN DoJaCTbcra DO Bnpo6y.
XAPAKTEPNCTNKN BUNPOBY
1.Цen npncptiIN ISOFIX npn3haeHn IyTpMaHHaHTuHn.BiH 3aTe DxKeHn EbponecBKM CtaHdapTOM ECE R44/04 nla3araIbHoro BVKOpNC-TaHHaBtOMO6Jnx,OchaueHnx CnCTeMaMn KpInJeHHIA SOFIX.
2.Пистрий сретунфikobанякпib-yHIBepcaJIbHn》,TO6To,BINMOKe BHKOPNCTOBYBaTNC3 aBTOMO6IJaMn HabeDeHMM B «Cnucky 3aTBepdxe Hnx aBTOMo6iJIB
3. Правильно 3аctocуbaнг «HaniB yHibepcalbHOi» CNTeMn KpInneHnRA ISOFIX (SEMI UNIVERSALE) Bmarae o6OB'ra3KOBOrO O3HaIOMNeHHr 3 Ke pIBHnTBMo Do aBTOMo6iIO. YBaXn
IpoHTaTe IHCTpyKcii, nepu HIX BCTaHOBJIbObATn aBTOKpicNo B caLoHi aBTOMo6iIO. B kepiBHuTBI 3a3HaueHi Micu, npN3HaueHi dJa BCTaHOBJeHHa bTOKpicNa, BiINOBiINO Do NOro po3-Mipib.
4.Ппсстри ISOFIX може Викоростовыbatия 3 ГулоIO O+ 3a BaroIO ДИтун i Клас Com poЗміріВ E- ISO/R1.
5.ПиЗнayeн TINbKn DЯ BnKOpNC- TaHnB TpaHCnOPTHnx 3acO6ax, OchA- UeHnx CTaTnUHM a6o iHepciiHnM peMeHem 6e3neKn 3 KpinJIeHHnM B Tpbox ToUkax, ceTpNphiKOBaHm Ha NiIcTaBi CtaHdapTy UN/ECE No 16 a6o iHux pIBHO3HaUHnx CTaHdapTiB.
6.у pa3i cyMHIBy 3B'jxitbCra 3 Bnpo6- HNKOM yTpmyuOnx npucTpoIb a6o 3 NOCTaHaJIbHnikOM.
3MICT:
T3ACTEPEXEHH
2 ONIC KOMNOHEHTIB
BCTAHOBJIeHHI BID'ENHHAHBANKPICJ3A DONOMOIO CNTEMUISOFIX
4 BCTAHOBJIENH I BIД'EDHAHHA BTOKPCJIA 3A DONOMOIO 3-TOKOBOTOPEMEHBAE3NEKN ABTOMOBIJI
5OuHEnHrI DOrnA
3ACTEPEXKEHH
36epejitb tio IHctpykciIO dIra man-
OyTHIX KOHCyIbTaCiJ.
DJIa MOHTaKU i BCTaHOBHeHHaBPO6y
peTeIbHO DOTpIMyIteCb HaBeJeHx
IHcTpkyi. He Do3BOJnTe KOpNCTy
BaHHaBPO6OM, kUo IHcTpkyi He
IpoHTaHi.
YBArA! 3rIINO CTaTNCtHuNX DaHnx 3
IDopOxHbO-TpaHCnOPTHNX PnIrOd, kK
IpaBnlo, 3aDi Hi CNDIHnA bTOMo6iIno E
HaIDIHIshmN 3a NepeDHe: TOMy peKO-
MeHnyETbcR BCTaHOBJIbOBaTH N OCHOBY
IsofiX i DiITaue aBTOkPicNo Ha ODNOMy
3 3aDHIX CNDINb.
YBArA! CEPIO3HA HEBE3NEKA!
Hi B JAKOMy pa3i He BNKOpNCTOBuyTe
cei npicpi Ha nepeHbomy cniiHHi, HeNTiB, 3aIacnX qactn a6o akcecy OchaueHomy pOHTaIbHOIO NOBiTPra- apiB.
HOIO NOyUkoIO 6e3neKn. YcTaHOBKaHi B YaKOMy pa3i He 3aJIuMaIte dHTNHy OCHOBn IsoFix i DITrAuro aBTOKpCaMy B aBTOMo6iI -Ce He6e3neuHo.
Ha nepeHbomy cnDInHi MOxJnBa - HikOn He 3aIIuAte aBTOKpicNo He TIlbKn npn BIDKnUoyehi fpoHTaIbHi 3akpInIeHm Do cnDiHHa ABTomO6iN, NOBITpyHni Noduyu: 6e3neKn: yToU- ce MoKe npN3BeCTn Do TpaBMyBaHHa HiTb y aBTOMo6IbHorO dInepa a6o B nacaxnpiB.
iHCTpykui 3 BnKOpncTaHHa, u MoxHa He BcTabnTe HiOro, Okpim CxBaneBidKnIouHTN NOBITpyH NODyShky 6eBHX BnPo6HnKOM akcecyapib, aHI mixNeKN. OCHOBOIO Isofix i cnDiHHaM aB
y 6yb-akomy BnnaKy, pekomeHdy6iIO, aHI mixK cnDInHHaBTOM06iIO HO Ha3ad 3 ypaxyBaHHaM nacaxnipIB dHTNHO: y pa3i dopoxhbo-TpaHHa 3aHix cnDInHHx. cnOPTHOI npnroOn OCHOBa Isofix i
Bci nacaxnpn Maotb 6ytn npoiHphiopMObaHI npo 3BilbHeHHaNTuHn B pa3i DOPOXHbo-tpaHCnOpTHOI npiroDn.
-Пд уас BCtaHOBJIeHHЯ OCHOBи lsofix B TOMy uNcni JERka, MoJKe BnKJIHKaTN 3 aBTOkpiCnOM B aBTOMo6iN i6yIbMouKOJKeHHa OCHOBи lsofix i aBTO- oBepeXHi, 06 yHnKHyTn iX 3iTKHeHHa Kpicna, He 3aBKnI NOMiTHe: TOMy BOH N 3 nepeCyBnHm CndIHnA m6O DBepu- PdJaRaOTb 6OB'3KOBiN 3amHl.
TaMn aBTOMo6iIIO. He BnKOpNCToByTe BxNBAHIpu-TyBaTn NOBHy 6e3neKy dHTHH Npa3i TNBHI yKoJKeHHa KHe NOMtHi D0POXHbO-TPaHCnOpTHOI npiroDn, HEo36pocHm OKOM, aJe HeraTUBHO aLe BnKOpNCaHHa boro BNpo6y BnINBaOTb Ha 6e3neKy BNpo6y.
3MeHwye pN3NK cepNo3Hnx TpaBM a6o - PepeBipJte, 0o6 He nepeBo3nncmepTi. c8, Oco6nBO Ha 3aHi NOnu ci yce- HeDToPImaHHa 3axOrib 6e3neKn, peHNi ABTomO6ilra, peyi a6o 6araK, BnKlaedeHx y ciin IHCTpyKcii, nIDKi He HadiHNO npnkpinIeHI a6o He uye IMOBipHicTb cepNo3Hnx TpaBMBCtAHOBJIeHI 6e3neHm YHOM: y pa3i y dHTnHn He TiJIbKn y BUnaNDy abapii, abapii a6o pi3KOrO raIbMyBaHHa BOHn a B 6yd-baXn IHsX CNTyaUix (Ha- MOKyTB 3aBdaTI TpaBMn NaCAXnpam.
PnKlaD, npi pi3komy raIbMyBaHHi, NepekoHaTecB TOMy, 10 Too). 3aBXKn nepeBipAte, 6o6 caKnpn aBTOMO6iIN BVKOpNCTOByt b OCHOBa IsofIX i ABToKpicNo 6yIn BnApHi peMeHi 6e3neKn. Lc Heo6xIDHO BNbHo PnCTe6HyTi Do cnDiHHra. IJX BlaChoi 6e3neKn, a TaKox 6o6
- NowkoJxehi, DeOpMoBaHia 60 cnIbHO 3HOweHi OCHOBa Isofix i aBtOKpicNo NiJaRaIOb 3amH, TaK JK BOHn 6IbWe He BiINOBIAIOb BUXIDHM xaPakTepncTKam 6e3neKn.
3a60pOHaOTbCMAOniKaui a6o Kpicni DHTnHa WBNKO CTOMIOE DOOBHeHH Bnpo6y IHsMMN akceHi BAKOMy pa3i He BNMaIte DHTnHy apAM, kUO BOHn He 3aTBePjKeHABTOKpicna NiJ cac pyxy ABTomO6iJa. Bnpo6HnKOM.
3a6opohraetbca BnKOpncTaHH He nTu 6e3neuHmicue i 3ynnHHTnca.
noCTabIeHIX BIno6HnKOM KOMNo- -AaTOMo6iNb npotraGM TpNaB
Ioro yacy 3haxoDnBcra nIepHix NocaHTN B HbOro DNTHy, yBaJxHO o6Te Te dTae Kpicno, 06 nepeKoHaTncra, 0o Ioro YactnHn 3aHaTO HaRpiINcra: 06 yHnKHyT onikib y DntHH, NOeKaTe, BOHN OXOLOHYt.
- Kompania Artsana He Hece HiaKoi BiNIOBIDaIbHOCTi B pa3i HenpaBnIbHoro BnKOpNCtAHnRA Bnp6y.
ONMC KOMNOHEHTIB
A KpinJIeHHa IsofIX
B HanpMaHa IJn noaCHOro 6e3neKn
C KnueHЯ dny iNctpyKuii i 2 3axncnX KOBnaUka dny KpInneHb IsofIX
D YepBoHn/3eHeHn iHdNkaTOp, kN CBiDHTb npo npaBnIbHO a6O He npaBnIbHO BCTaHOBHe aBTOKpICNo E OnopHa HixKa
F PykoTka dIypeRyIIOBaHHcNCTeMIsofix
G 3axnchi KOBnauchn Iy KpiInneHb Isofix
H Khonkn IJIa Bi'edHaHH KpinIe npnraHH.
Isofix 5. Ipebeipte dekiIbka pa3IB npabnIb- I INdkaTOp npabInbHo 3aikcoBaHOi He 3eIeHHr 06ox KpInIeHb, cnCTeml Isofix HByu 3a OCHOby.
L PeryIIOBaJIbHn BaKilb onOpHO 6. Nomicitb onOpHy HixKy (E) i BiDpe-HixKu ryIIOte II BiIDNOBIDHM BaxKeJEM (L)
M YepBoHn iHdNkAToP HenpaBnIb(MaI. 12).Ha npaBnIbHe nOLOKeHHa HOro BCTaHOBJIeHHa onOpHOi HiXKn BKa3yIOTp b iHdNkATO-
N 3eJHn iHnKaTOp npaBnIbHro (Mi N), aKi 3hAxOJaTbcHa cAmi BCTaHOBHeHHoNopHOi HIXKu. IOnBa iHdNKaTOpy 3eJeHOro KOJIbOpY (N) Bka3ye Ha Te, 10 HIXK KPINJIeHHI BID'EDHAHHA ABTO- BCTaHOBHeHa npaBnIbHo.
KPIINJIENHЯ I BID'€IHAHHA BTOKPCJIA 3A DONOMOFOIO CNTEMN ISOFIX
BcTaHOBJeHHa
- BnmiB kpiHnHa Isofix (A) 3 OCHO Bu 3a DOnOMoHO peryIIOBaIbHoI pyKoRTKn (F) (MaI.8).
Tpmaouy pykoy B HataHyTOMnpoToBxyOuN Noro Bn3 Do 3amnoJooKeHHI, IOBHICTIO BnMIb CnKaHn (Ma e npolyhATN «KlaaHnra》, Temy ISOFIX (MaI. 8). IpekeohaiTeca JKe NiTBePdxKyE 3aKpInJIeHHa) (MaI. B TOMy, 10 CNCTema KpInJIeHHa NOBHC- 14).
TIO BIVBedeHa Ha3OBHi. 8.Ipo npabnIbHe 3aKpInIeHHaABTO- 2.IpoWToBxHItb KHOJKN BiD'EDHaHHa Kpicna CBiDyHTb 3eJIeHn iHNkAToP,


po3TaWOBaHn 3 6Oky (D) (MaJ. 15).
- IpepebiTe HaDiIHe KpInJIeHHa ABTOKpicna Do OCHOBn, HAmaraOuYncb NiHrTn Ioro YK CpepeNy, TaK i 33aNy.
HaTnCHiB Ha perynIOBaIbHn BaxInb 7. IpepeBiPe TnHHe KpinneHnA bTO(L) onopHO HIXKN, CKOpOTnbu IIKpiOa Do OCHOBn, HamaraIOUncb NiD-ynopy. Hrtn NOrO JaK Cpepey, TaK i 33aNy.
IiIMitb peryHOBaIbHy pyKoTky 8. Bi3bMitbc3a diarOHaNbHn peMihb ISOFIX, BiDaanJouH oCHOBy BID cNHN- ABTomO6iia nponyciTb noRo B Kn aBTOMO6iibHO rO ynpy. iAInbHy HAnpymHy (O), po3taoBa IpoWTOxHITb KHONKn PO3eHNHeHH N03aHy cINHKn aBTOkPicna i No3Haue-(H), uo6 Bi'd'edHATn KpinHeHHaISOFIX. Hy cNHiM KOJIbOpom (MaI. 22).
Bi3bmitb 3axnchi KOBnauchn, kki 6yMakcmaIbHO HataRHiTb peMiHb
nonepednbo 3nrti i noklaedehi y HaeJIO abTOKpicna, He 3aIIuauO
NOBIDHy Hnuy, i HndarHITb ix HaaBpi- TaCbMI, nepeBipTe, 0o Bi
PneHHra ISOFIX. nepekpyeHni.
IpoTobxHItb cnCTemy ISOFIX BCEpeDnHy OCHOBn Do yNopy.
3AKPINJIENHЯ I BID'€INHAHHA AB-TOKPICLA 3A DOJOMOTOO 3-TOU-KOBOTO PEMEHЯ BE3NEKN ABTOMOBII
BctaHOBJIeHH
1.ПомICTITb OCHOBy aBTOKpicna BKA3AHNX HA MAJ.22.
Bn6paHe cndiHnA aBTOMo6iJa, NOBep- 3N8Tn aBTOKpicNo 3 OCHOBn:3Hi-
HyBwn II TaK, 0o6 BOHa npinraaiaI b diaroHaIbHn peMihb 3 Hapym-
DO CnIHKn aBTOMo6iInbHoro cnDINHHoHa CNHci, nepeBeIDtB pyky B
(Man.16). BepTKKaJIbHe noLoXeHHa (A) (MaI.
2.Pomictb onOpHy hIXkY (E)i BiJe- 21), BiD'EDHaIte aBTOKpicNo, Notar-
rynIOte ii BiINOBiIDHM BaKeIem HbWn 3a BiINOBiIDHy pyKOaTKy i OHO-
(Man.17). YacHo 3 ZIMPiHimaOuH n ABTOKpicNo
3.Ha npabInbHe noLoXeHHa onOpHOi 3a pyUKy (MaI.23).
HIXKn Bka3yIOb IHdkaTopn (M iYBAfA! Picnay 3akpinleHHra 3ABXdN
Aki 3hAxODaTbcHa Ha cami HIXci. nepeBipraYe, 0o6 aBTOMo6iNbHn
Ява iндикатopy 3elenho konbopy (N)
Вka3ye Ha Te, ξо Hixka BCTaHOBneHa
празвлбHo.
-
Notarytbp pemihb 6e3neKn aBTOMO- 6iIO i npncTe6HITb Noro BiINOBiHOIO npjKkoIO, npoBIBuN TOpn3OHTaIbHy dIinHKy Kpi3b Dbi cneuaIbHi HanpamHi (B), no3HaueHi CnHIM KOJbOpom (MaI.18).
-
BCTaBTe aBtOKpicNo B OCHOBY (no-
HaepeHe npOTn pyxu aBTOMo6iJa),
HPOsTObxUOuN Ioro BHN3 Do 3aMn-
KaHHa (MaE npolyHaTN «KlaCaHHa》,
Ke nIqTBepdxKye 3akpinneHHa) (MaI.
19). -
Прправильные зашиленья вток Picla CBiДчИть Зelenн iHДИКaТОР, розашовани 3бokedy(D) (MaI.20).
-
Ipebeipte hadiinHe KpinlenHnA BTOKpiqa Do OCHOBn, HamaraOuNCb NiHrTn NOrO YK CnepeDy, TaK i 33aNy.
-
Bi3bmitbcra 3a diaroHaBnHn peMHb
aBTOMo6iI npOnyctitb Noro B CneuJIaIbHy HAnpymHy (O), po3TaWObaHy
No3aDy cINHKn aBToKpicna i No3HaueHy cInHIM KOJbOpom (MaI.22).
MakcmaIbHo HaTgHiTb peMiHb HabiToaBtOKpicna, He 3aIIuOuH aaiBpi- TaCbMI, nepeBiPe, 0 BIn He nepeKpyeHn.
10.ПиязakpinlenHHOBepTaHTe pyKoRTky aBtOKpicna TAK,IO6 BCTaHOBNiNoRo Do yNopy (B)Ha cINHKy aBTOMo6ibbHoro cnDInHn (MaI.21).
YBAGA! HI B YAKOMY PA3I HE IPO-TAYUITE ABTOMOBIJIbHI PEMEHIB NOLOXJEHHJX, BIDMIHHNX BIDBA3AHNX HA MAJI.22.
peMHb 6e3neKn 6yB npaBnIbHo HaTAYHtN, a Ioro npJkKa He BNUTOB-XYBaIa peMHb 3 BiINOBiDnX HApMHNX BOCHOI i He CTnKanacr 3 CammHnAPRMHMn.
3HRTTOOCHOBN
HaTnchItb Ha peryIIOBaJIbHn BaXKiJIb
(L) onophoi Hixk, ckopoTbBun ii do ynpoy. BiDcTe6HITb peMHb 6e3neKn i BiD'EdHaIte NORCHy qACTnHy peMeHIO 3 BiIDNOBIDHOI CINbOi HanpMHOI.
3) Tenep MOxHa 3HrTu OCHOBy 3 Cn- dIHHra.
OuHHeHHI DOrJaI
OuHHeHH PnactNKOBux i MeTaJIeBUX YACTINH.
Дя чишени пл actmacobnx a60 MeTaleBnX noap6oBaHnx qactNH BnKOpNCTOBuYTe TInbKn BOJORY TkaHHHy. 3a6opOHaETbCra BnKOpNCTaHHa6pa3NBnX MnOChx 3acO6iB a6o po3- YHHNKiB.
Ipebipka zijichocti KOMnoHeHTB.
PekomeHnyetbce peryIapHo nepeBiprTu ciinichictb i cTaH 3HOweHHaPiactMacOBnx qactnH,aki He NOBHHiMaTu NOMITHNX cIidIB ySKoJKeHHa60 3He6apBNIObaHH.
YBAGA! DeΦopMoBaHn a6o cnIbHO 3HOWeHn Bnpi6 NiDJaRaε 3aMiHi, TOMy ⅢO BIH MoKe BTPaTHTN BUXiDiHi BNaCTNu BOCTi 6e3neKn.
36epirahnnBnpo6y.
Kuio Bnpi6 He BcTaHOBneHo Ha aTO-mo6ini, peKomeHdyetbcra 36epiratn Ioro B cyxomy npoxoJOnHOMy Micci, 3axnueHOMy BiD nIy, BOJorOCTi i npramoro coHryHOr npomHHa.
Ytulizuaia Bnpo6y.
Iicra 3akHcHn TepmiHy cny6n, nepe6aueHoro dna Bnpo6y, npnnHitb NOro BnKOpncTaHHiaBnpaTe Ha ytni3aciIO. BiNobIDHO Do BmOR 3axncty DOBkInla i uHHoro 3aKOHO-dABCTBa BlacHOi KpaIHn, po3coptyute KOMNOHeHTn 3a TINOM IJI NaJIoAJIbWo- ro DnOepeHciHoro 36Opy BIXoDiB.


Note


ARTSANA S.P.A. Via Saldarini Catelli,1 22070 Grandate-Como-Italia 800-188898 www.chicco.com

ARTSANA FRANCE S.A.S.
17/19 Avenue De La Metallurgie
93210 Saint Denis La Plaine - France
0820 87 00 41 (0.12€Ttc/Mn)
www.chicco.fr

ARTSANA GERMANY GMBH
Borsigstrasse 1-3
D-63128 Dietzenbach-Deutschland
+49 6074 4950
www.chicco.de

ARTSANA UK Ltd.
Prospect Close - Lowmoor Road Business
Park Kirkby In Ashfield
Nottinghamshire - Ng17 7Lf
England U.K.
01623 750870 (office hours)
www.chicco.co.uk

ARTSANA SPAIN S.A.U.
C/Industria 10
Pol. Industrial Urtinsa
Apartado De Correos 212 - E
28923 Alcorcon (Madrid)-Spain
902 117 093
www.chicco.es

ARTSANA PORTUGAL S.A.
Rua Humberto Madeira, 9
2730-097 Queluz De Baixo Barcarena
Portugal
21 434 78 00
800 20 19 77
www.chicco.pt

ARTSANA BELGIUM N.V.
Temselaan 5 B-1853 Strombeek - Bever
Belgium
+32 23008240
www.chicco.be

ARTSANA TURKEY BEBEKVE SAGLIK URUNLERAS.
Eski Uskudar Yolu, Erkut Sokak
Uner Plaza No. 4/1 Kat 12
Kozyatagi - Kadikoy
34710 Istanbul - Turkey
0214 444 2444
www.chicco.com

ARTSANA POLAND Sp.zo.o.
Aquarius, UI. Polczynska 31 A
01-377 Warszawa
+48 22 290 59 90
www.chicco.com

Dec V. Ruben Dario 1015
Colonia Lomas De Providencia 44647
Guadalajara, Jalisco-Mexico
018007028983
www.chicco.com.mx

ARTSANA ARGENTINA S.A.
Uruguay 4501
Victoria Cp(1644)
San Fernando-Buenos Aires-Argentina
0810-888-2442
www.chicco.com.ar

ARTSANA INDIA PRIVATE LIMITED,
7Th Floor, Tower B, Paras Twin Towers,
Golf Course Road, Sector 54
Gurgaon-122002
Haryana, India
(+91)(124)(4964500)
www.chicco.in


ARTSANA S.p.A.
22070 Grandate (CO)- Italy
Tel. (+39) 031 382 111
Fax (+39) 031382400
www.chicco.com

96901.L.1
46079807300000
i


ARTSANA S.p.A. - Via Saldarini Catelli, 1-22070 Grandate (CO)- Italy Tel. (+39) 031 382 111 - Fax (+39) 031 382 400 - www.chicco.com


- PRODUCT FEATURES
- INDEX:
- WARNING
- DESCRIPTION OF THE PARTS
- INSTALLATION AND REMOVAL FOR VEHICLES WITH THE ISO-FIX SYSTEM
- Installation
- To remove the child car seat from the base:
- Removing the base
- INSTALLING AND REMOVAL WITH VEHICLE 3-POINT SAFETY BELT
- WARNING: NEVER INSERT THE CAR SAFETY BELT IN ANY POSITION OTHER THAN THOSE INDICATED IN DIAGRAM 22.
- CLEANING AND MAINTENANCE
- Checking the condition of the components
- Storing the Product
- Disposing of the product
- Base Isofix
- NOTICE D'UTILISATION
- TRÉS IMPORTANT: À LIRE IMMÉDIATEMENT
- CHARACTERISTIQUES DU PRODUIT
- PYKOBODCTBO NOLb3OBATEJIa
- OUEHb BAXHO: CPA3y JXE O3HAKOMbTECb C CODEPJKAHIEM
- XAPAKTEPNUCTUKN N3DEJIIN
- CODEPKAHNE:
- MEPbI IPEDOCTOPOXHOCTN
- MOXeHn.
- ONICAHNE KOMNOHEHTOB
- YCTAHOBKA IN CHATNE ABTOKPECIA C CNCTEMOIN ISOFIX
- YCTaHOBKa
- 4TO6bl CHaTb aBtOKpecNo c OCHOBaHHa:
- CHATNE OCHOBAHNA
- YCTAHOBKA IN CHR'TNE ABTOKPECJIAC PEMHEM BE3ONACHOCTN AB- TOMOBUNC KPEINJEHNEM B 3-X TOCHKAX
- CbaJIaHe Ha OCHOBaTa
- gilll cieolgo
- m - 1 0 ;
- m = 311
- Log.
- Ochoba Isofix
- Ihctpykci3 BnKOpncTahHcCTop.
- IHCTPYKIZI3 BVKOPNCTAHHNAID3BNUAHO BAXJIINBO!HEAHO PPOUYTAITE!
- XAPAKTEPNCTNKN BUNPOBY
- 3MICT:
- 3ACTEPEXKEHH
- ONMC KOMNOHEHTIB
- KPIINJIENHЯ I BID'€IHAHHA BTOKPCJIA 3A DONOMOFOIO CNTEMN ISOFIX
- 3AKPINJIENHЯ I BID'€INHAHHA AB-TOKPICLA 3A DOJOMOTOO 3-TOU-KOBOTO PEMEHЯ BE3NEKN ABTOMOBII
- BctaHOBJIeHH
- YBAGA! HI B YAKOMY PA3I HE IPO-TAYUITE ABTOMOBIJIbHI PEMEHIB NOLOXJEHHJX, BIDMIHHNX BIDBA3AHNX HA MAJI.22.
- OuHHeHHI DOrJaI
- Note
Brand : CHICCO
Model : Isofix Base
Category : Baby products