
Airy Hip Fit - Baby products CHICCO - Free user manual and instructions
Find the device manual for free Airy Hip Fit CHICCO in PDF.

| Product Type | 3-in-1 Baby Carrier with Inflatable Base |
| Brand | Chicco |
| Model | Airy Hip Fit |
| Category | Baby Products |
| Recommended Age (inflatable base) | From birth to 15 kg |
| Recommended Age (carrier only) | From birth to 9 kg |
| Recommended Age (carrier + base) | From 3 months up to 15 kg |
| Carrying Positions | Front facing inward, front facing outward, back carry (from 6 months), inflatable base in central or hip position |
| Materials | Washable fabric, inflatable base |
| Care and Cleaning | Hand wash in cold water; do not bleach, tumble dry, iron, or dry clean. Remove inflation system before washing base |
| Safety | Warnings: constant supervision, do not leave unattended, risk of falling, do not use for sports activities or car travel |
| Spare Parts | Additional straps, inflation pump |
| Warranty | Warranty against conformity defects under normal use; excludes improper use, wear, or accidents |
| Included Accessories | Inflatable base with pump, baby carrier with adjustable headrest, additional straps |
| Product Weight | Not specified in the manual |
| Dimensions | Not specified in the manual |
| Power Supply | None (mechanical product) |
Frequently Asked Questions - Airy Hip Fit CHICCO
User questions about Airy Hip Fit CHICCO
0 question about this device. Answer the ones you know or ask your own.
Ask a new question about this device
Download the instructions for your Baby products in PDF format for free! Find your manual Airy Hip Fit - CHICCO and take your electronic device back in hand. On this page are published all the documents necessary for the use of your device. Airy Hip Fit by CHICCO.
USER MANUAL Airy Hip Fit CHICCO
natural_image
Line drawing of a person wearing a helmet and safety vest (no text or symbols)


natural_image
Line drawing of a folded fabric or material with a red arrow labeled 'Z' pointing to a feature (no text or symbols beyond the label)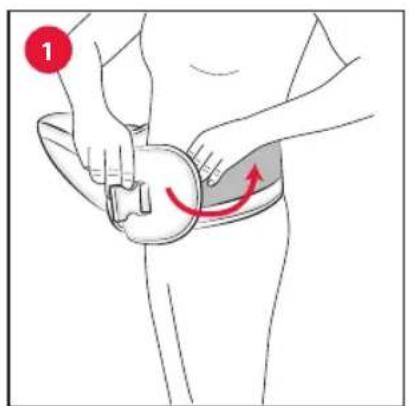
natural_image
Line drawing of a car seatbelt with a red circular marker labeled '1C' (no text or symbols on the main diagram)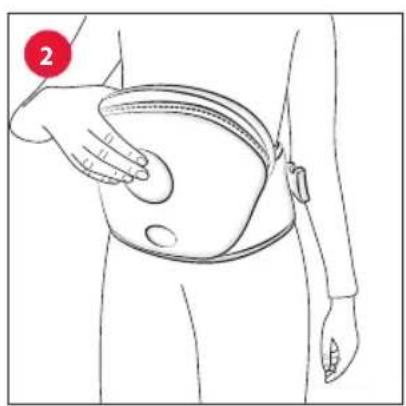
natural_image
Line drawing of a person's abdomen with a hand holding the belly, no text or symbols present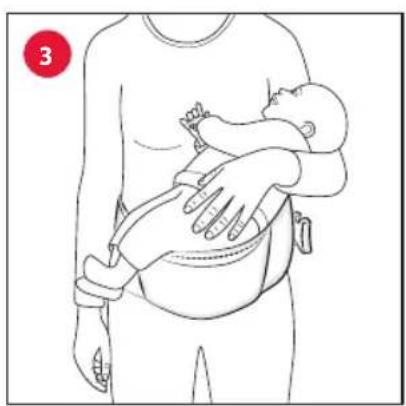
natural_image
Line drawing of a person carrying a baby in a sling (no text or symbols)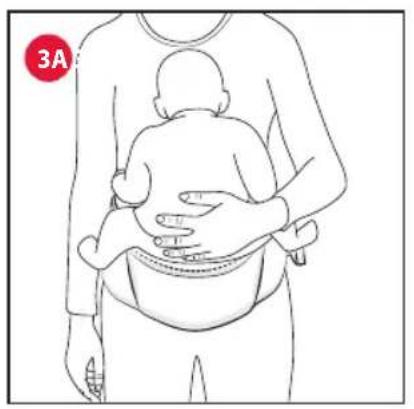
natural_image
Line drawing of a person holding a baby's back, viewed from behind (no text or symbols)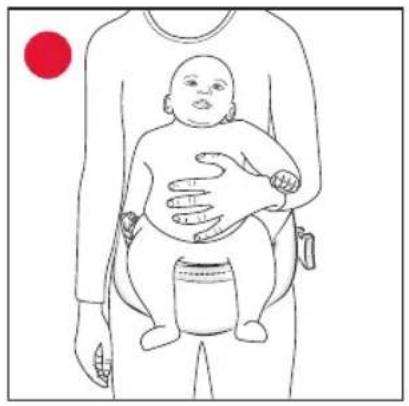
natural_image
Line drawing of a baby holding a bottle, with a red circular marker in the top-left corner (no text or symbols)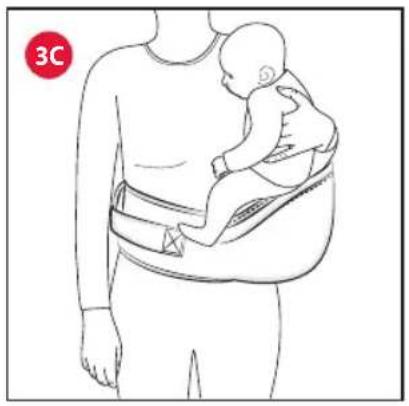
natural_image
Line drawing of a person holding a baby in a full-body sash, with a red circular badge labeled '3C' in the corner (no text or symbols on the diagram itself)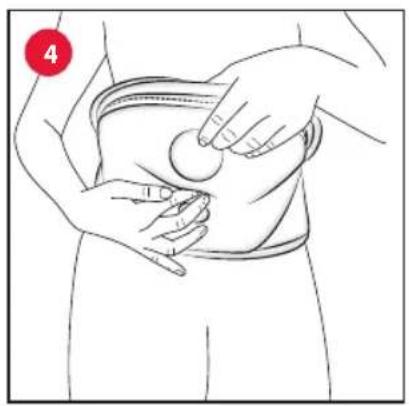
natural_image
Illustration of a person performing a medical or physical procedure on a circular object, with no visible text or symbols.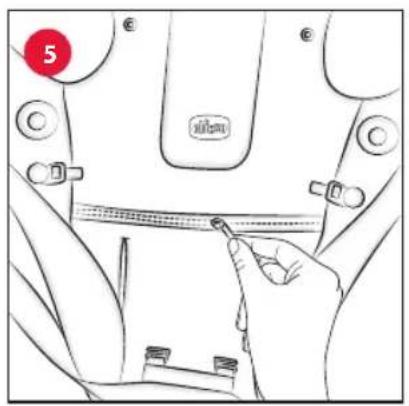
natural_image
Illustration of a baby wearing a helmet and holding a device, with a red arrow pointing to the ear area (no text or symbols present)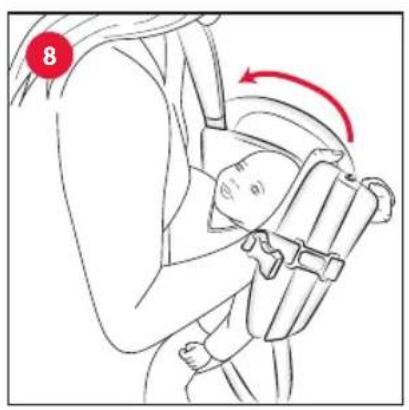
natural_image
Illustration of a person tying a ribbon, with a red circular badge labeled '10B' (no text or symbols on the diagram itself)
natural_image
Technical line drawing of a mechanical assembly with no visible text or symbols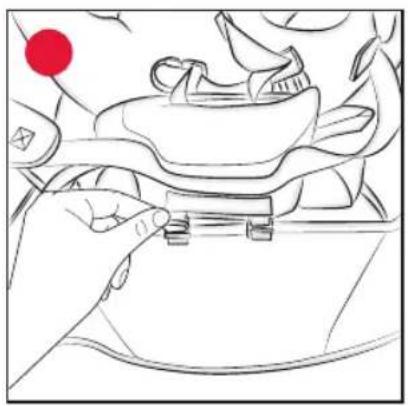
natural_image
Line drawing of a hand adjusting a small object on a surface, with a red dot marker in the top-left corner (no text or symbols)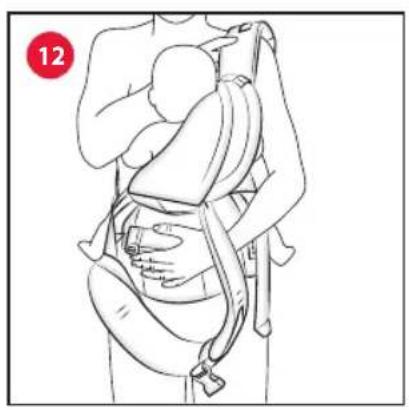
natural_image
Line drawing of a person in a baby car seatbelt, no text or symbols present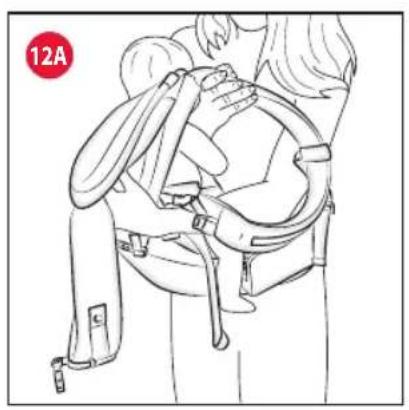
natural_image
Line drawing of a person wearing a seatbelt and harness, holding a baby (no text or symbols)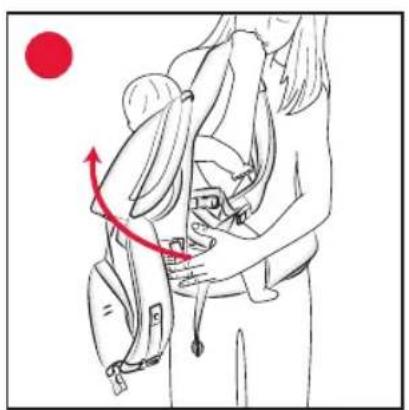
natural_image
Illustration of a person carrying a backpack with a red arrow indicating motion (no text or symbols)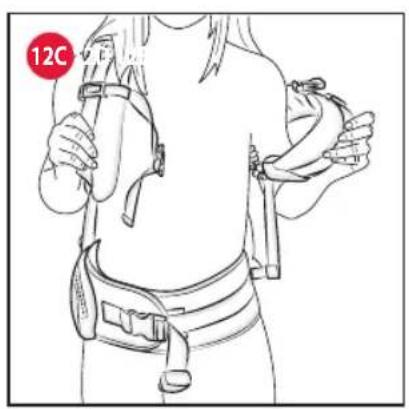
natural_image
Line drawing of a person wearing a full-body safety harness and belt, with no visible text or symbols.
natural_image
Illustration of a person wearing a full-body medical harness and belt, with red arrows indicating pressure points (no text or symbols)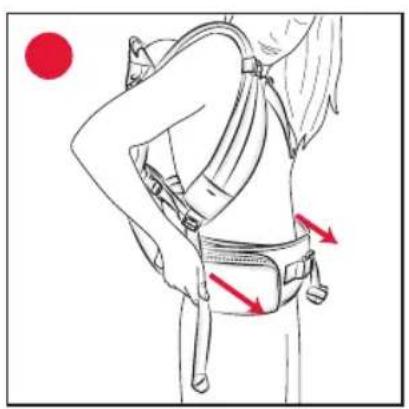
natural_image
Illustration of a person wearing a harness and belt, with red arrows indicating movement or pressure points (no text or symbols)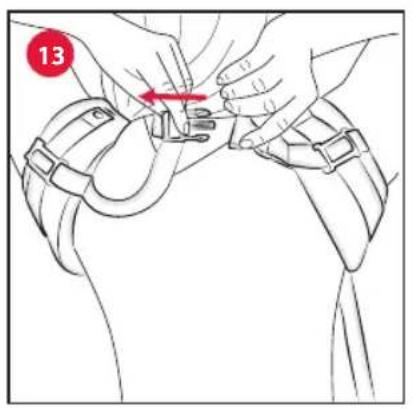
IT ISTRUZIONI D'USO
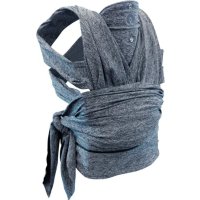
Chicco's Airy Hip Fit is the 3-in-1 solution designed to meet all baby wearing needs from birth. It consists of an inflatable base and a baby carrier, which can be used either alone or combined, and ensures multiple positions and configurations, while respecting the ergonomics of parent and child and best satisfying the needs of growth and comfort, month after month.
IMPORTANT! READ CAREFULLY AND KEEP FOR FUTURE REFERENCE.
WARNING: BEFORE USE, REMOVE AND DISPOSE OF ALL PLASTIC BAGS AND PACKAGING MATERIALS AND KEEP THEM OUT OF REACH OF CHILDREN.
WARNINGS
- WARNING:Failure to meet these instructions may compromise your child's safety.
- WARNING: Never leave the child unattended inside the baby carrier when it is not being worn and keep the product out of reach of children when not in use.
- WARNING: Ensure that the person using the baby carrier and base knows how to use it safely. Do not allow anyone to use the product if they have not read and understood all warnings and instructions.
• Make sure that all users have the necessary physical ability to use this product.
- WARNING: Take care when bending or leaning forward or sideways.
- WARNING: Your balance may be adversely affected by your movement and that of your child.
•WARNING:This carrier is not suita-
ble for use during sporting activities.
- WARNING: Constantly monitor the child and always check that there is enough space around the child's face to provide a good amount of air so that the mouth and nose are not obstructed.
- WARNING: Take care when using the product in a domestic environment (e.g. beware of sources of heat or hot beverages).
- Use the product only when standing or walking. - Keep in mind that the child transported in the product will react to any climatic changes before the person carrying it.
- Do not use the product for more than one child at a time.
- Do not use this product if any part is broken, torn or missing.
- Do not fit any accessories, spare parts or components on the product that were not supplied or approved by the manufacturer.
• This product must only be used by an adult.
- Do not use the product when transporting the child in the car.
- Do not use the product while driving or if you are the passenger in a motor vehicle.
- Do not use the product when cooking or cleaning, to avoid exposing your child to sources of heat or chemical substances.
- WARNING: Always check on your child when using the product.
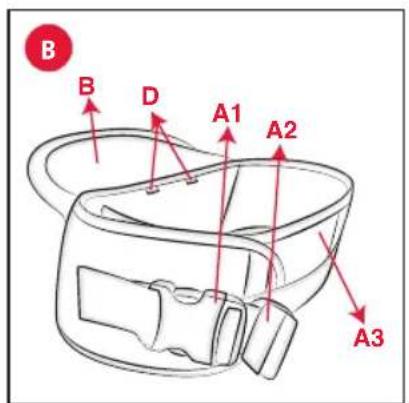
INFLATABLE BASE COMPONENTS (Fig. A-B)
A - Waist strap
A1-Buckle
A2 - Adjustment strap
A3 - Hook-and-loop fastener
A4 - Carry-all bag
B - Non-slip seat
C - Zipper to fasten baby carrier
D - Safety rings to fasten baby carrier
E - Inflation/deflation system compartment zipper
F - Pump for inflating the base
G - Valve for deflating the base
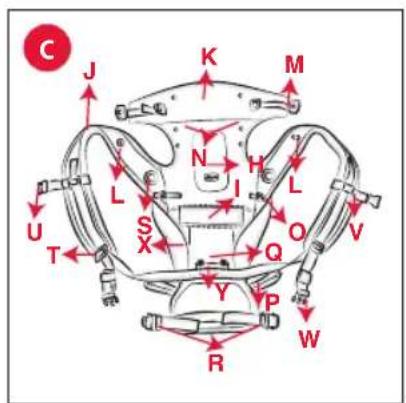
BABY CARRIER COMPONENTS (Fig.C)
H - Baby carrier backrest
I - Zipper to fasten baby carrier
J - Shoulder straps
K - Headrest
L - Coupling for headrest adjustment
M - Headrest adjustment buckle
N - Buttons for headrest adjustment
O - Buckle for backrest height adjustment
P - Slots for additional baby pod adjustment
Q - Baby pod
R - Buckles for adjusting the baby pod (leg passage)
S - Baby pod buckle attachment
T - Shoulder strap adjustment buckles
U - Breastbone/scapular buckle
V - Breastbone/scapular buckle height adjustment system
W - Buckle for additional support belt attachment
X - Slots for passing additional support belt
Y - Base attachment hooks
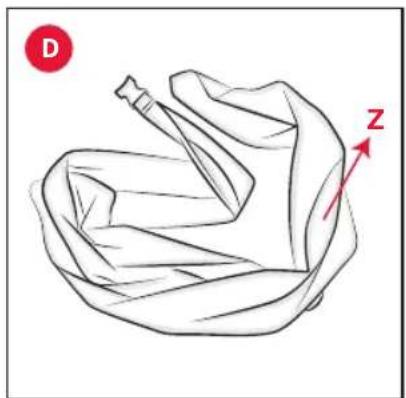
SUPPORT BELT PHOTO (Fig. D)
Z - additional support belts
TIPS FOR CLEANING AND MAINTENANCE CLEANING
Please refer to the care label. After cleaning, check the sturdiness of the fabric and the seams every time.
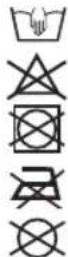
Hand wash
Do not bleach
Do not tumble dry
Do not iron
Do not dry clean
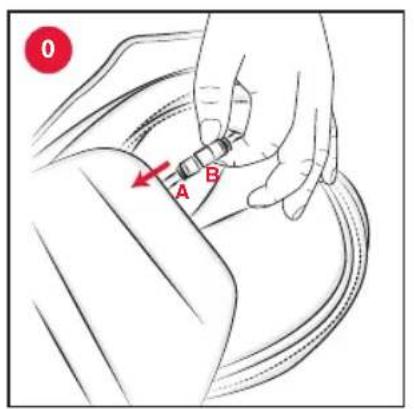
WARNING: Before washing the base, remove the inflating/deflating system from the compartment by opening zipper E. The zipper is self-locking; to open it, a paper clip must be used by inserting it in the hole for the puller.
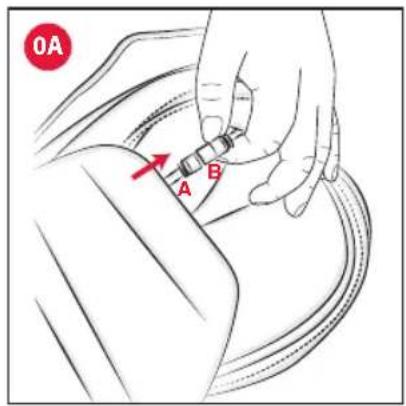
To remove the inflation system, detach tube A from valve B, keeping the white ring pressed down (Fig.0). Leave the valve attached to the other end of the tube. To refit the inflation system, insert tube A into valve B (Fig. 0A).
MAINTENANCE
Check the seams and product regularly to ensure that they are not worn or damaged and that no part is missing. If any part is worn or missing, do not use the product.
INFLATABLE BASE
The inflatable base is the ideal support for holding your child in a simple, fast and safe way, even with just one hand, without taking the wrong position and feeling less weight on your back.
The base can be used in a central position or on the hip, whether right or left depending on your preference and necessity of the moment.
WARNINGS
•WARNING:Range of use: from
birth to 15 kg.
- WARNING: This product helps support the child, but does not allow the child to be carried hands-free. The child's back must be supported at all times while sitting on the product, as indicated in the instructions.
- WARNING: To prevent, hazards from falling ensure that your child is securely seated in the product.
- WARNING: Always fasten the base before accommodating your child.
- WARNING: When using the base, never release the waist strap before removing your child.
- WARNING: The possible risk of the child falling increases if the child becomes more active.
USE OF THE BASE
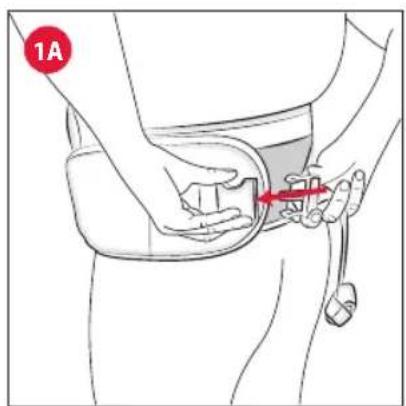
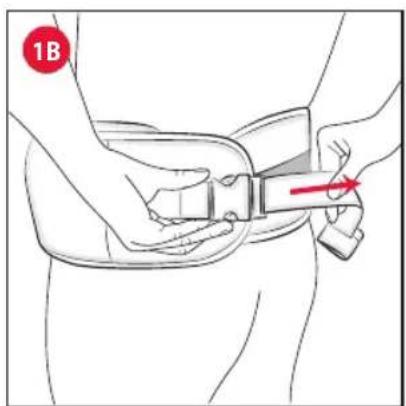
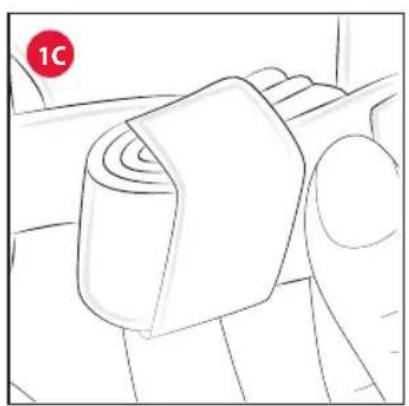
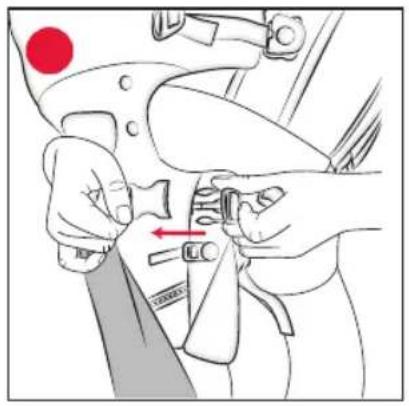
- Wrap the support belt tightly around the waist, securing it with the A3 hook-and-loop fastener (Fig. 1) and fasten buckle A1 (Fig. 1A) by adjusting the fit with the appropriate strap A2 (Fig. 1B). Excess strap can be wound around itself and secured with the relevant elastic band (Fig. 1C).
- Inflate the base using pump F, this will also inflate support A, for more lumbar support (Fig.2)
- The inflatable base can be used as a support to hold your child in your arms:
- from birth in a nursing position (Fig. 3)
- from 3 months onwards in a sitting position facing mum (Fig. 3A), forward facing (Fig. 3B) or sideways, facing mum, on the hip (right or left) (Fig.3C)
- To deflate the base, press the valve G and at the same time compress the base so that air escapes. (fig.4)
BABY CARRIER
The baby carrier can be used to carry your child from birth up to 9 kg in weight, in the parent facing position.
WARNINGS
- WARNING: Range of use: from birth to 9 kg.
- WARNING: Always fit the baby carrier onto your shoulders before putting your child in.
- Once the child is placed inside the baby carrier, carefully check that the waist and leg-width adjusters are correctly adjusted. If necessary,
act on them until they are brought to the correct level of tension.
- Before use, check that the adjustment straps are fitted and adjusted correctly, and that the buckles are fastened.
• To prevent risk of falling, ensure that your child is securely positioned in the harness. - For infants and underweight children with medical prescriptions, seek the advice of a doctor before using this product.
• Make sure that the child's chin does not rest on his or her chest as this may limit breathing and cause choking.
USE OF THE BABY CARRIER
WARNING: We recommend carrying out placing the child into the baby carrier when seated or using a flat, level surface so that you are able to control any sudden movements of the child.
- Place the flap with the zip fastener I inside the underlying pocket and close the zipper. (Fig. 5)
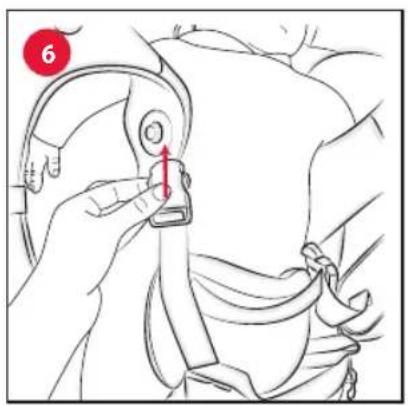
- Lay the child on the product and fasten the baby pod Q using the buckles R (Fig. 6), adjusting them to the best position for the child's build, ensuring that the baby pod is never too wide or too narrow. If necessary, also use the adjustment slots P to reduce the leg opening.
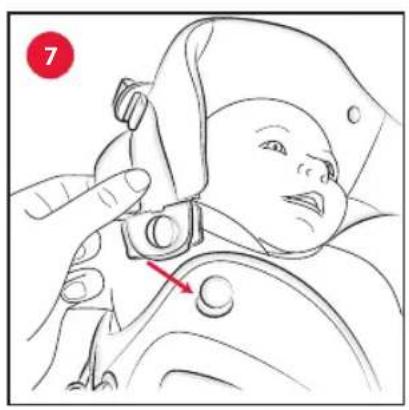
- Attach the adjustment buckles M to the hooks L on the shoulder straps (Fig. 7). Ensure that all buckles are properly engaged.
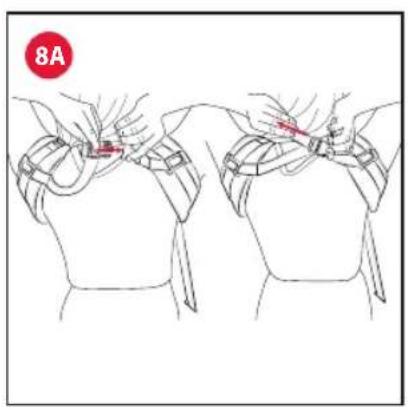
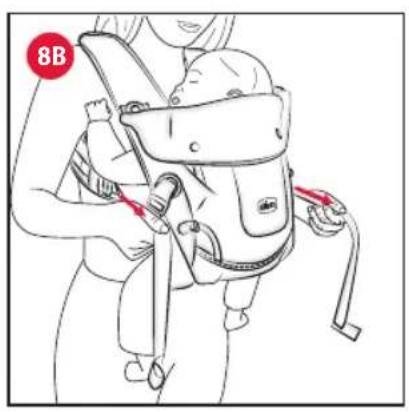
- Wear the baby carrier by threading the shoulder straps J (fig. 8), then fasten and adjust the breastbone/scapular buckle U (fig. 8A) and finish putting on the baby carrier by adjusting the shoulder straps (Fig. 8B).
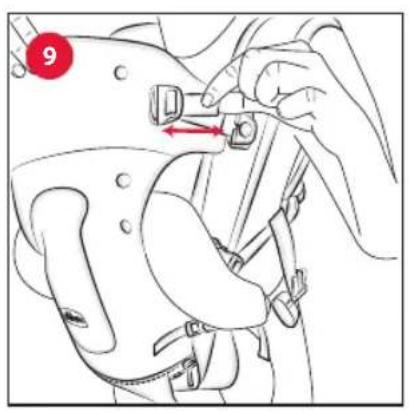
- If necessary, adjust the headrest using the buttons N and the side adjustment buckles for depth. (Fig. 9)
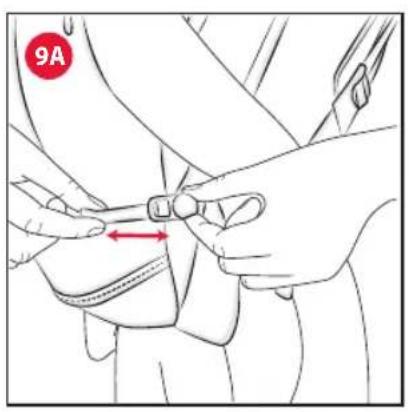
If necessary, adjust the size of the backrest, using the adjustment buckle O (fig.9A), making sure that the product is snug against the child's back.
WARNING: Hold your child safely while carrying out this operation.
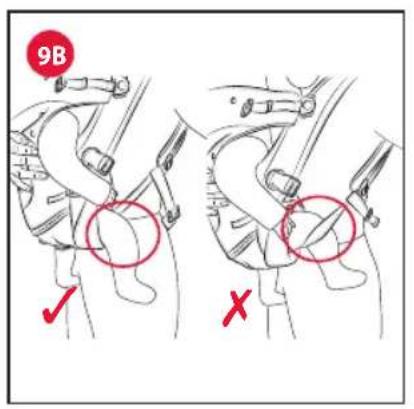
WARNING: Make sure that the child's legs are astride the seat and inserted inside the padded saddle.
WARNING: Ensure that the child's legs are in the correct position as shown in figure 9B.
WARNING: it is a good idea to sit down to remove your the child from the baby carrier.
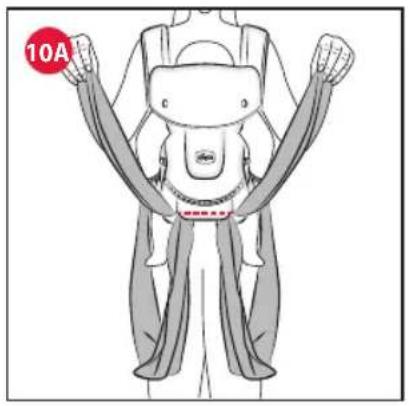
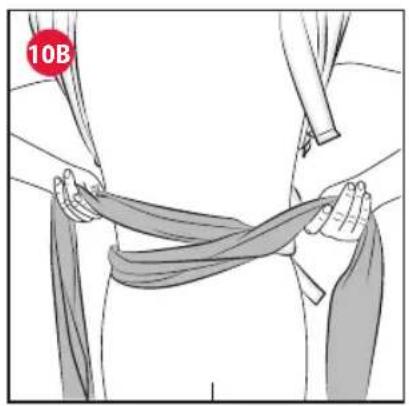
- Additional Z support belts can also be used for greater support Hook the support belts to the buckle W (fig. 10). Pass them through the pocket X as shown in Fig. 10A, then pass the support belts behind the back by crossing them and then knotting them together (Fig. 10B).
BABY CARRIER WITH INFLATABLE BASE
Use in this configuration is up to 15kg of baby weight.
The baby carrier in combination with the rigid base is ideal for carrying the child from 3 months in the mother-facing configuration, while from 6 months onwards it is also possible to carry the child on the back in addition to the world-facing configuration.
The rigid base ensures that the child is in the correct "sitting" posi-
tion and unloads the weight from the parent's shoulders, making baby wearing even more comfortable even when the child becomes heavier.
WARNINGS
•WARNING:Range of use: from three months onward to 15 kg.
- WARNING: Baby must be transported parent facing until they are able to keep their head straight and their shoulders in a vertical position (approximately up to the 6th month of age).
- WARNING: When your child is able to keep its head up and its shoulders in a vertical position, approximately from six months of age, they can be transported facing forward or on their parents' back.
- WARNING: Always fit the baby carrier with the base onto your shoulders before putting your child in.
- WARNING: When using the baby carrier with the base, never release the waist strap before removing your child.
- After having placed the child within the baby carrier, check carefully that the width adjusters around the child's waist and legs are set to the correct position. If needed, adjust them until the proper level of tension is achieved.
- Before use, check that the straps are fitted and adjusted correctly, and that the buckles are safely fastened into position.
• To prevent risk of falling, ensure that your child is securely positioned in the harness.
- It is advisable to sit down when placing the baby into the baby carrier with base and when removing the baby from the baby carrier.
- For infants and underweight children with medical prescriptions, seek the advice of a doctor before using this product. Make sure that the child's chin does not rest on his or her chest as this may limit breathing and cause choking.
- WARNING: Hold your child safely while carrying out these operations.
HOW TO ATTACH THE BASE TO THE BABY CARRIER
- Attach the baby carrier to the base using the zipper C (Fig. 11) and attach the hooks Y to the rings D of the base (Fig. 11A).
FRONT TRANSPORT - PARENT FACING
Fasten the waistband A with the buckle A1 (Fig. 1A) and adjust its length by adjusting the strap A2 (Fig. 1B) so that it fits snugly around the waist.
Then follow the instructions in paragraphs 6-9.
To wear and place the child in the baby carrier, fasten waist strap A with the relevant buckle, adjusting the length with adjustment strap A2, and follow the instructions in paragraphs 6-9
- Remove the right arm from the shoulder strap and, passing it through the inside of the baby carrier, take the opposite shoulder strap with the same hand (Fig. 12), taking care to grasp it firmly. Pull the left arm from the shoulder strap as well and externally support your child in the baby carrier (Fig. 12A). Insert the right arm, which is holding the left shoulder strap, into the shoulder strap (Fig. 12B) and start rotating the baby carrier. The baby carrier, attached to the support belt, will turn with the harness and will be positioned correctly on the back.
To complete the operation, insert the second arm into the free shoulder strap (Fig. 12C), so that the weight of the baby carrier is evenly distributed across the back and shoulders. Close the breastbone/scapular buckle U on the breastbone (Fig. 12D) and adjust all the straps of the baby carrier (Fig. 12E).
WARNING: Do not carry children less than 6 months on your back or who are not able to sit up alone.
WARNING: Regularly check that the child is comfortable and safe and that his or her airways have sufficient space.
HOW TO REMOVE THE CHILD FROM THE BABY CARRIER
WARNING: Hold your child safely while carrying out these procedures.
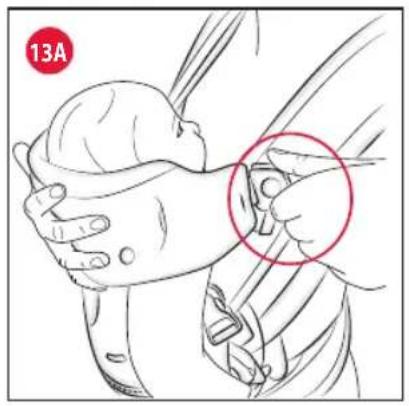
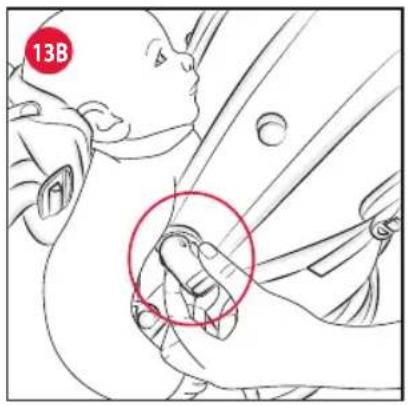
- Before removing the child, release the intrascapular buckle U (Fig. 14) and, while supporting the child, release the buckles M of the headrest (Fig. 13A) and the buckles R of the baby pod (Fig. 13B). After these operations, the child can be removed. Only then (if used in the baby carrier with base configuration) unfassten the waist belt A.
WARRANTY
The product is guaranteed against any lack of conformity under normal use as specified in the instructions.
The warranty shall not therefore apply in the case of damage caused by improper use, wear or accidental events.
For the duration of the warranty on conformity defects please refer to the specific provisions of applicable national laws in the country of purchase, where appropriate.

NOTICE D'EMPLOI
COMMENT ACCROCHER LA BASE AU PORTE-BÉBÉ
Handwas in koud water

Niet bleken

Niet in de droogtrommel drogen

Niet strijken


- IT ISTRUZIONI D'USO
- IMPORTANT! READ CAREFULLY AND KEEP FOR FUTURE REFERENCE.
- WARNINGS
- INFLATABLE BASE COMPONENTS (Fig. A-B)
- BABY CARRIER COMPONENTS (Fig.C)
- SUPPORT BELT PHOTO (Fig. D)
- TIPS FOR CLEANING AND MAINTENANCE CLEANING
- MAINTENANCE
- INFLATABLE BASE
- USE OF THE BASE
- BABY CARRIER
- USE OF THE BABY CARRIER
- BABY CARRIER WITH INFLATABLE BASE
- HOW TO ATTACH THE BASE TO THE BABY CARRIER
- FRONT TRANSPORT - PARENT FACING
- HOW TO REMOVE THE CHILD FROM THE BABY CARRIER
- WARRANTY
- NOTICE D'EMPLOI
- COMMENT ACCROCHER LA BASE AU PORTE-BÉBÉ
Brand : CHICCO
Model : Airy Hip Fit
Category : Baby products