
AS 31 E - Snow blower ALPINA - Free user manual and instructions
Find the device manual for free AS 31 E ALPINA in PDF.
| Product type | Electric snow blower |
| Brand | Alpina |
| Model | AS 31 E |
| Power supply | 230 V ~ 50 Hz |
| Electrical protection | Residual-current circuit breaker max. 30 mA |
| Double insulation | Yes |
| Motor type | Electric |
| Starting system | Handle with safety lock |
| Ejection direction | Adjustable via control rod |
| Auger | Rotating |
| Snow clearing capacity | Small jobs, up to 15 cm of powdery snow |
| Use | Paved surfaces, sidewalks, driveways |
| Safety | Ignition lock, automatic stop when releasing handle |
| Recommended protections | Safety goggles, hearing protection, non-slip shoes |
| Maintenance | Clean with a brush, apply silicone spray on the auger |
| Cleaning | Do not rinse with water |
| Storage | Clean and dry place |
| Wear parts | Auger, belts, bolts |
| Warranty | Covers material defects and manufacturing faults, excludes wear parts and incorrect use |
| Included accessories | Power cable, documentation |
Frequently Asked Questions - AS 31 E ALPINA
User questions about AS 31 E ALPINA
0 question about this device. Answer the ones you know or ask your own.
Ask a new question about this device
Download the instructions for your Snow blower in PDF format for free! Find your manual AS 31 E - ALPINA and take your electronic device back in hand. On this page are published all the documents necessary for the use of your device. AS 31 E by ALPINA.
USER MANUAL AS 31 E ALPINA
KASUTUSJUHISED ET. 70
NAUDOJIMO INSTRUKCIJOS LT 74
LIETOSANAS INSTRUKCIJA LV. 78

1 ALLMÄNT

2.4 VEDLIKEHOLD OG OPPBEVARING
This symbol indicates WARNING. Serious personal injury and/or damage to property may result if the instructions are not followed carefully.
The following symbols appear on the machine. They are there to remind you of the care and attention required in use. This is what the symbols mean:
Warning. If the regulations are not followed, there is a risk of danger to life and machine breakdown.
Warning. Risk of fatal electric shocks
Warning. The power supply must be disconnected before carrying out cleaning or maintenance. Shut off the motor before unclogging the discharge shute.
Read the owner's manual before operating the machine.


Keep bystanders at a safe distance from the machine.
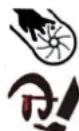
Warning of hard objects flying off.
Keep hands and feet away from rotating parts. Risk of death and maiming. Avoid injury from the rotating augcr, keep hands, feet and clothing away.
Do not touch any rotating parts before the machine has stopped.
Always use ear protections.
Always use eye protections.
The machine is double insulated.
Conforms to relevant safety standards.
Disposed product shall be recycled according to local regulations.
1.1 REFERENCES
1.1.1 Figures
The figures in these instructions for use are numbered 1,2,3, etc.
Components shown in the figures are marked A, B, C, etc.
A reference to component E in figure 5 is written "5:E".
1.1.2 Headings
The headings in these instructions for use are numbered in accordance with the following example:
"2.3.2" is a subheading to "2.3" and is included under this heading.
When referring to headings, only the number of the heading is normally specified. E.g. "See 2.3.2".
2 SAFETY INSTRUCTIONS
2.1 GENERAL
- Please read through these instructions carefully. Learn all the controls and the correct use of the machine.
- Never allow children or anyone who is not familiar with these instructions to use the snow thrower. Local regulations may impose restrictions as regards the age of the driver.
- Never use the machine if others, particularly children or animals, are in the vicinity.
- Remember that the driver is responsible for accidents that happen to other people or their property.
- Be careful not to trip or fall, especially when reversing the machine.
- Never use the snow thrower under the influence of alcohol or medication and if you are tired or ill.
2.2 PREPARATIONS
- Check the area to be cleared and remove any loose or foreign objects.
- Never use the snow thrower unless properly dressed. Wear footwear that improves your grip on a slippery surface.
- Check that the mains voltage corresponds with the snow thrower's rated voltage.
- Never, under any circumstances, make adjustments while the engine is running (unless otherwise specified in the instructions).
- Allow the snow thrower to adjust to the outdoor temperature before using it.
Always use protective goggles or a visor during use, maintenance and service.
2.3 OPERATION
- Keep hands and feet away from rotating parts. Always avoid the discharge chute opening.
- The snow thrower must never be used to remove anything but snow
- Be careful when driving on or crossing gravel paths, pavements and roads. Be aware of hidden dangers and traffic.
- Never direct the discharge chute towards a public road or traffic.
- If the snow thrower hits a foreign object, stop the engine, disconnect and carefully inspect the machine for damage. Repair the damage before using the machine again.
- If the machine starts vibrating abnormally, stop the engine and look for the cause. Vibration is normally a sign of something wrong.
-
The snow thrower may only be connected to power sockets that are supplied with earth leakage circuit breakers. The earth leakage circuit breaker must have a trip current of max. 30mA .
-
Risk of tripping over the electric cable. Always be aware of the whereabouts of the electric cable so that it does not get in the way of your feet or anything else moving about in the area.
- The snow thrower may only be connected with a cable that is approved for outdoor use.
- The electric cable with which the snow thrower is connected must always be intact. It must never be used if it displays signs of damage.
- The snow thrower must never be used if its plug, electric cable or other electrical equipment is damaged.
- Repairs to the electrical equipment may only be carried out by an authorised electrician.
- Never drive over the electric cable for the snow thrower while working.
- If the electric cable for the snow thrower has been damaged while working, the following instructions must be followed:
A. Stop the motor.
B. Leave the site in the opposite direction from the damaged point on the cable.
C. Disconnect the cable from the power socket.
- Stop the motor and disconnect the power supply:
A. If the driver leaves the machine.
B. If the auger housing or discharge chute is blocked and must be cleaned.
C. Before beginning repairs or adjustments.
- Always make sure the rotating parts have stopped and all the controls are disengaged before cleaning, repairing or inspection.
- Never drive across a slope. Move from the top down, and from the bottom to the top. Be careful when changing direction on a slope. Avoid steep slopes.
- Never operate the machine with insufficient protection or without the safety devices in place.
- Existing safety devices must not be disconnected or disengaged.
- Never use the snow thrower near enclosures, cars, windowpanes, slopes etc. without properly setting the discharge chute deflector.
- Always keep children away from areas to be cleared. Get another adult to keep the children under supervision.
- Do not overload the machine by driving it too fast.
- Take care when reversing. Look behind you before and during reversing to check for any obstacles.
- Never point the discharge chute towards bystanders. Do not allow anyone to stand in front of the machine.
- Only use accessories that are approved by the machine's manufacturer.
- Never drive the snow thrower in bad visibility or without satisfactory lighting.
- Always ensure you have a good balance and a tight grip on the handle.
2.4 MAINTENANCE AND STORAGE
- Tighten all nuts and screws so that the machine is in safe working condition.
- Never flush the machine with water. It will make damage to the electrical equipment and risk of electrical shocks.
-
Check all electrical equipment before use. The snow thrower must never be used if its insulatings, fittings or other electrical equipment is damaged.
-
Always use genuine spare parts. Non-genuine spare parts can entail a risk of injury, even if they fit the machine.
- Before a long storage, check the instructions for recommendations.
- Replace damaged warning and instruction stickers.
- Let the engine run a couple of minutes with the auger connected after use. This prevents the auger from freezing solid.
3 ASSEMBLY
3.1 UNPACKING
- Open the box carefully.
- Take care of any documentation in the box, for example these instructions.
- Lift the snow thrower from the box.
- Cut the tie straps and remove all protecting plastic from the machine.
- Dispose of the box and packaging according to local regulations.
3.2 ASSEMBLY
- Assemble the snow thrower as follows.
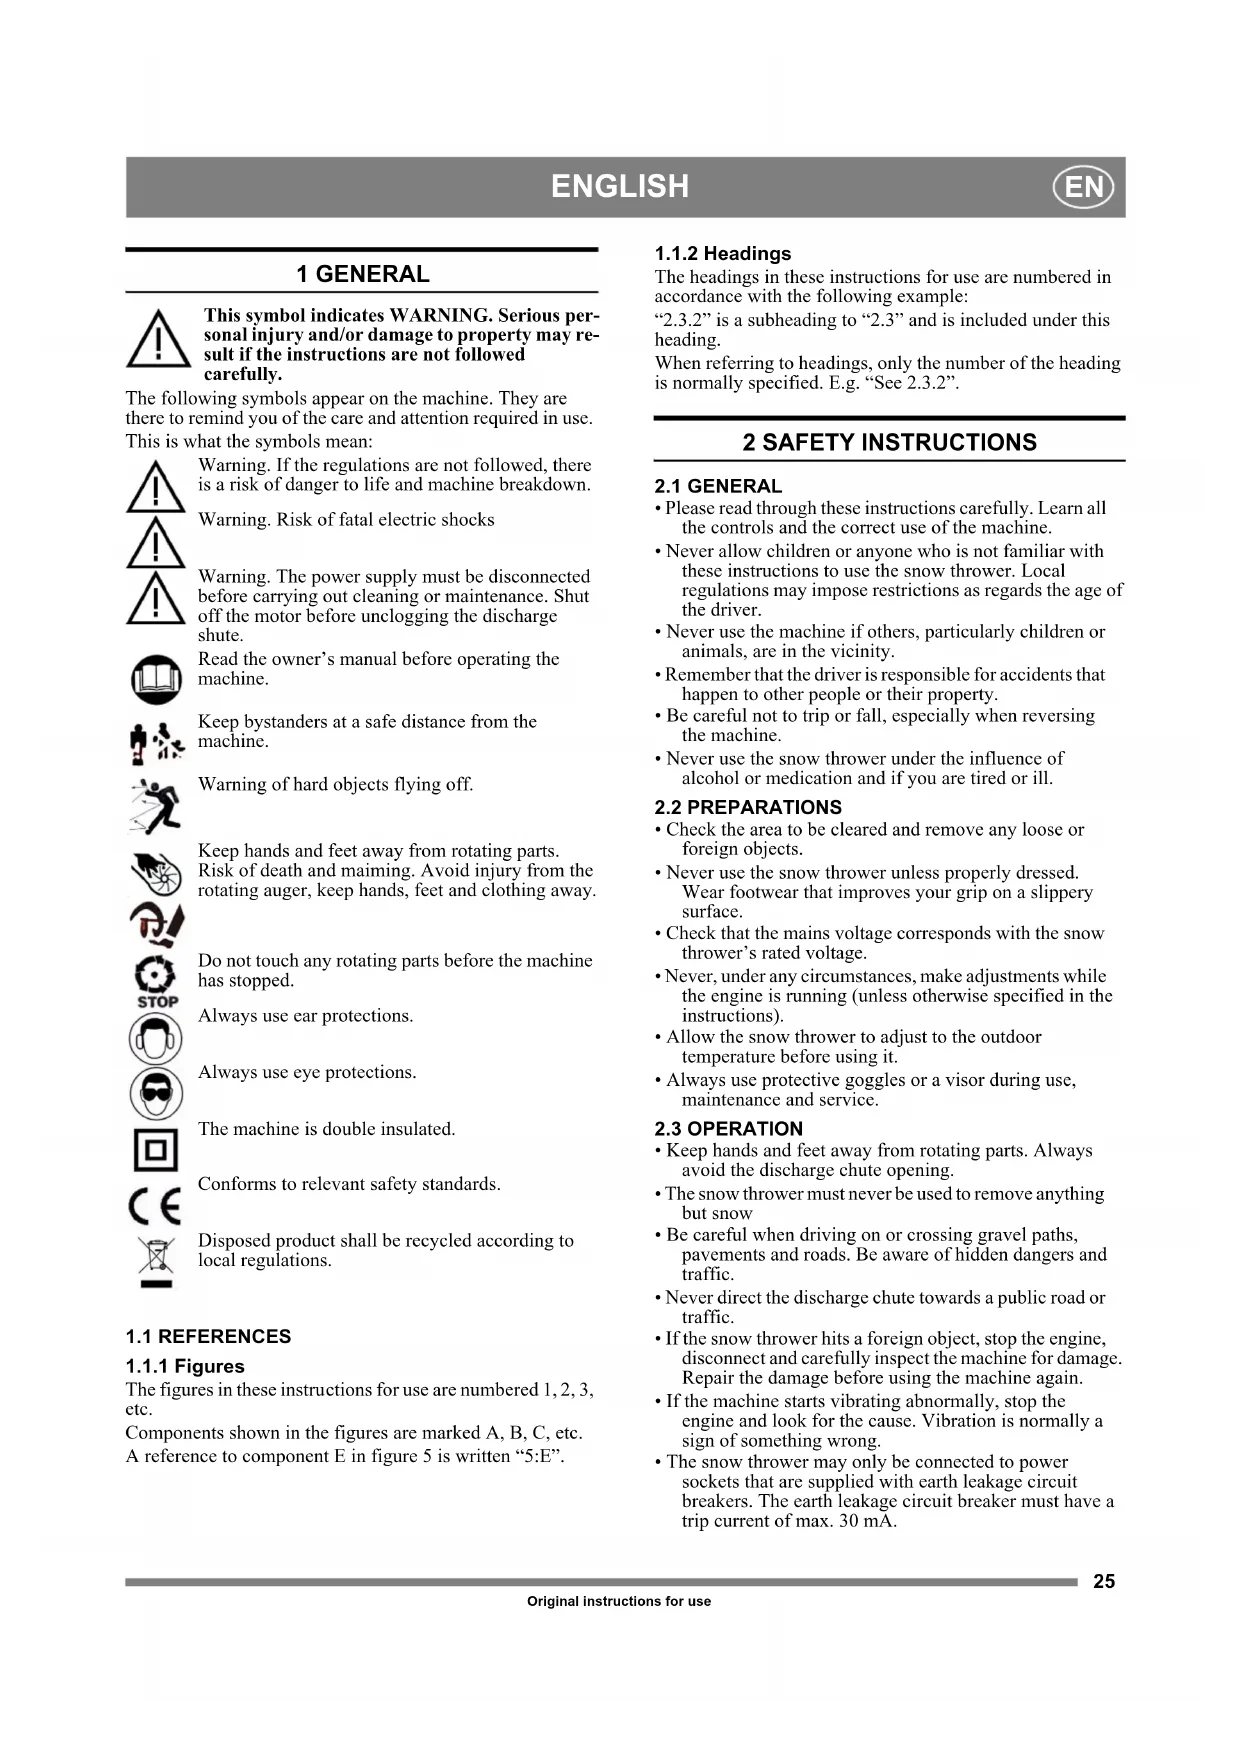
- See fig. 2. Align the square dog at the shank against the recess in the handle.
-
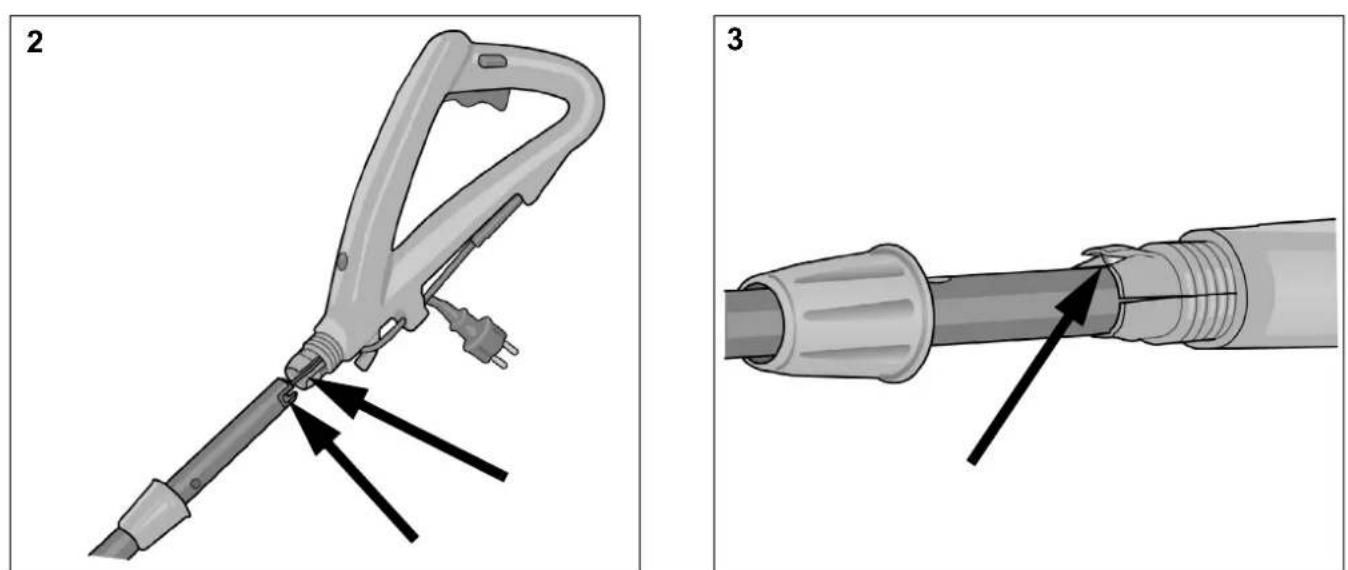
Se fig. 3. Slide the shank and the handle together until the tap locks in the shank.
-
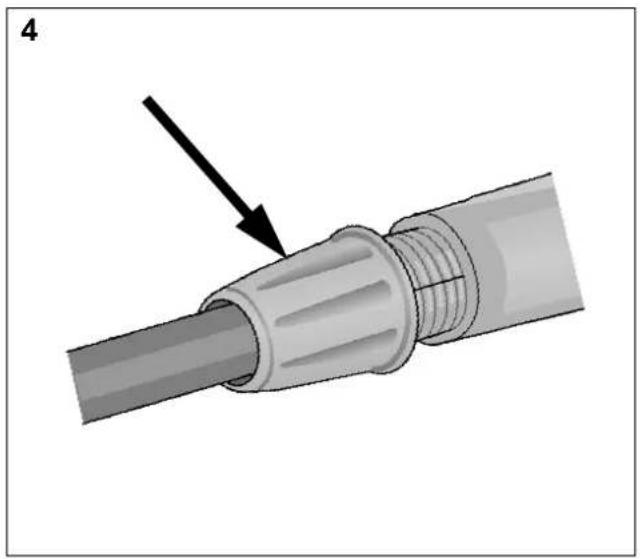
See fig. 4. Screw on, and tighten the big plastic nut.
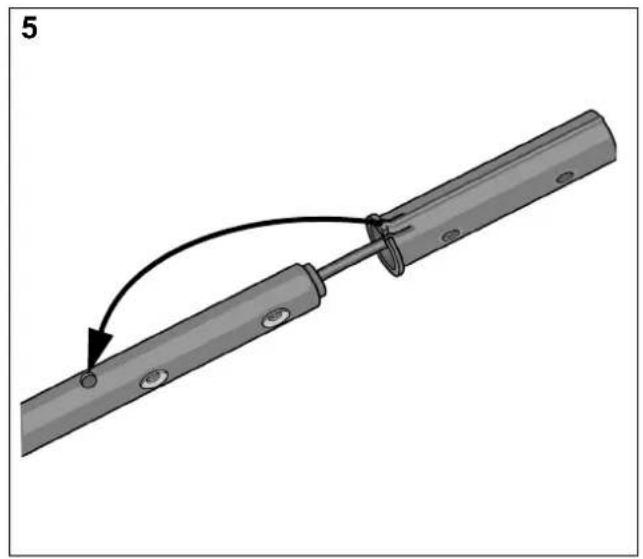
- See fig. 5. Assemble the black plastic sleeve on the shank until the tap locks in the shank hole.
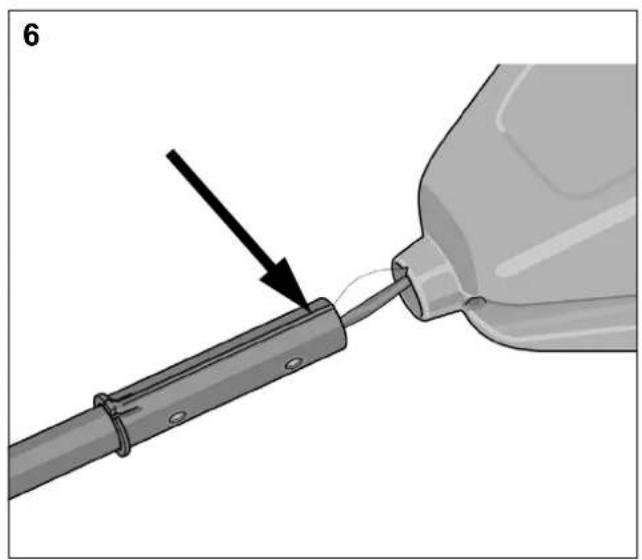
- See fig. 6. Align the shank against the snow thrower so the sleeve groove fits against the hole bar.
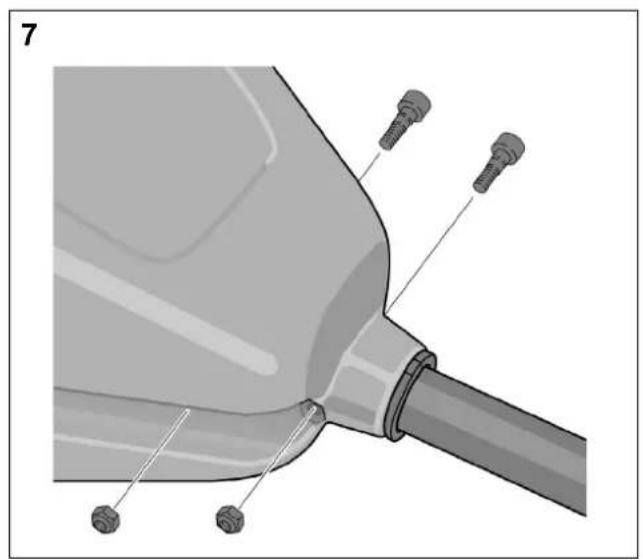
- See fig. 7. Slide the shank into the snow thrower and assemble the two screws with nuts. Tighten with a Philips screwdriver.
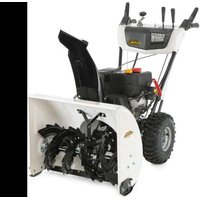
4 DESCRIPTION
The snow thrower is intended for small snow cleaning works quite close to houses with stationary 230 VAC electric net. The snow thrower controls are shown in fig. 1 and described below.
| Pos | Denomination | Description |
| A | Starting lockout Prev | entst the start lever to be activated unintentionally. |
| B | Start lever | Starts the engine. The lever can be activated if the starting lockout A is depressed. |
| C | Connecting device For | connection of current. |
| D | Cable support For | supporting the connection cable. |
| E | Lock handle | For securing the shank handle. |
| F | Handle | |
| G | Shank | The length can be adjusted. |
| H | Lock handle | For securing the shank. |
| J | Auger housing | |
| K | Auger |
5 USING THE MACHINE
5.1 GENERAL
Never start the engine until all the above measures under 'ASSEMBLY' have been carried out.

Never use the snow thrower without first reading and understanding the enclosed instructions and all the warning and instruction stickers on the snow thrower and in these instructions.

Always wear protective goggles or a visor during use, maintenance and service.
5.2 BEFORE STARTING
The connection cable and its plugs must be fault free and approved for outdoor use.

The connection cable may only be connected to power sockets equipped with an earth leakage circuit breaker with a trip current of max. 30mA
The connection cable must be suspended on the cable support. Otherwise there is a risk of damage alongside the plug which is potentially life-threatening.
Connect the snow thrower with the electric cable from the property's power socket.
Suspend the cable on the cable support (1:D) and connect to the connector (1:C).
5.3 START
Start the motor and the auger as described below.
- Lean the snow thrower back slightly so that the auger is raised a little above the ground.
- Press in and hold the starting lockout (1:A). Squeeze the start lever (1:B).
- Release the starting lockout, lower the auger towards the ground and start to clear the snow.
5.4 SAFETY TEST
After starting and before use of the machine, it is essential to perform the safety test below.
If the unit fails to operate as described, DO NOT operate it. In this case, contact an authorised workshop for repair.
Auger test
Release the start lever. The motor and the auger should stop immediately.
5.5 STOP
Stop the motor and the augcr by releasing the start lever (1:B).
5.6 SNOW CLEARANCE
Never aim the snow at bystanders.
Always stop the engine before unclogging.
Always wear eye protection when operating the snow thrower.
If the auger is blocked, never try to keep the motor engaged for more than 20 seconds. Extensive engagement will damage the motor.
- Start the motor as described above and check the ejection distance and direction.
- Push the snow thrower slowly forwards and hold it in a slight angle to throw the snow to the left or to the right.
- Stop working by releasing the start lever (1:B).
5.7 OPERATING TIPS
- Clear away the snow immediately after snowfall.
- For complete snow clearance, slightly overlap each clearance pass.
- If possible, discharge the snow downwind.
- For safety and to prevent damage to the snow thrower, keep the area to be cleared free of stones, toys and other foreign objects.
- The snow thrower's capacity depends on the depth and density of the snow. Learn how the snow thrower works in different snow conditions.
5.7.1 Dry and normal snow
Snow up to 15cm deep can be removed quickly and easily by clearing at an even speed. Plan for downwind discharge of the snow.
5.7.2 Wet, packed snow
Chop packed snow using a spade or similar. Then push the snow thrower slowly forward. Never hoe with the snow thrower. This will destroy it.
5.8 AFTER USE

The snow thrower must never be rinsed with water. Risk of damage to the electrical system and risk of electric shocks.
- Stop the motor.
- Disconnect the electric cable from the snow thrower and the property's power socket.
- Clean the inside and outside of the snow thrower with a suitable brush.
- Check that there are no damaged or loose parts. Repair/ replace parts if necessary.
6 MAINTENANCE

The electrical connection must be disconnected before carrying out maintenance work.
6.1 BEFORE USE
- Every time the snow thrower is to be used, check that the electrical equipment is intact and free of faults. The snow thrower must not be used if there are any faults or if anything is missing.
- Check that the auger rotates easily.
- Check that all screw joints are tightened. Tighten if necessary.
- Apply silicon spray to the auger. This prevents icing.
- Check that the starting handle cannot be activated without the ignition lock being moved to the left.
6.2 FAULT-TRACING
The faults described below can usually be rectified directly by the user. If there is any doubt, contact an authorised agent. The motor does not start:
- The electric cable is not connected or is defective.
- The fuse has blown. If a higher amp fuse needs to be installed, contact an authorised electrician.
The motor hums, but does not start:
- Auger or discharge chute blocked.
- The capacitor is defective. Contact your GGP agent.
The motor stops suddenly:
- Loose plugs.
- The overload protection has been tripped. Wait for 10 minutes, then attempt to start again.
The snow thrower vibrates:
- Loose parts.
Defective auger.
7 STORAGE
When the snow thrower is to be stored for an extended period, such as during that part of the year when snow clearance does not need to be carried out, the following measures must be taken.
- Clean the whole snow thrower thoroughly.
- Inspect the snow thrower for damage. Repair if necessary.
- Store the snow thrower in a clean, dry place.
8 PURCHASE TERMS
A full warranty is issued against manufacturing and material defects. The user must carefully follow the instructions given in the enclosed documentation.
The warranty does not cover damage due to:
- Neglect by users to acquaint themselves with accompanying documentation
- Carelessness
- Incorrect and non-permitted use or assembly
- The use of non-genuine spare parts
- The use of accessories not supplied or approved by GGP
Neither does the warranty cover:
- Wear parts such as drive belts, augers, wheels
- Normal wear
- Engines. These are covered by the engine manufacturer's warranties, with separate terms and conditions.
The purchaser is covered by the national laws of each country. The rights to which the purchaser is entitled with the support of these laws are not restricted by this warranty.
9 RECYCLING
9.1 WASTE MANAGEMENT IN ACCORDANCE WITH THE WEEE DIRECTIVE (2002/96/EC)
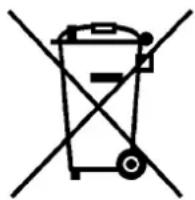
Take care of the environment!
Do not discard with household waste!
This product contains electrical and electronic components that must be recycled.
Hand the product in for recycling at the indicated location, e.g. the municipal recycling station.
1 ALGEMEEN

Attention: projections dangereuses.
IpeaTeM KAK IpiHCTyHnTB K EKcIIyatauHH MaHHbI, IpoHTaTc pyKOBOCTBO IIra HOJIb3OBaTeJIa.

CneHnte 3a TEM,HTO6bIIOCTOPOHHe JIOHN HAXOINHCb Ha 6e301acHom pacctOAHN O T MaHHbI.

OCTpcraTccbOT6paBCbMbIX B CTOpOHy TBepbIX IpeIMetOB.
PyKN Hn HOJINHb HaxoHTbcHa 6c30IacHom pacctoHHOTBpaiaioxxCsJeTaJIe.
OHaCHOCTb HaHeceHHyBeuHn CmepTN. OTepeTaNrTcB BpaAioIOeROCa 6bpa, DcpKHTe B cToPOHc pyKN, CTYINH N OJExkIy.
He IpiHKacaiTcB K JIO6bIM BpaiaIOHmCg YacTAM IOIOJHOOCTaHOBKn MaHHbI.
O63aTeIbHIO NOJIb3yIteCb cpeIcTBamn IJIa 3aIIHTbOpraHOB CJIyxa.
O63aTeJIbHO IOJIb3yItecB cpeICTBAHn IJIa3aIIHTbI rIa3.
MaHaHnHa HMeet DBOHyIO H3OJIaIIO.


B COOTBCCTCBH B CTAHJaPTaMn TEXHHKN 6c30NaC-HOCTH.

YTHIN3aHIO IPOyKTA HeO6XoHMO BbIIOHHB COOTBETCTBHN C MeCTHBIM 3aKOHOJATEJIbCTBOM.
1.2 CcbJIKN
1.2.1 PucyHKn
HcyHKB HactoTHNX HnCTpyKunx IIO 3KcNlyaataHH Hy-MepyOTcKa1,2,3 nT.Ⅱ.
KOMIOHeHbI, IOKa3aIIHbIe Ha pHcyHKax, HymepyIOTcKaK A,B,CnT.Ⅱ.
CcbIkaHaKOMIOHeHTEHaPnc.5aIHNCbIBaTeTcKaK“5:E”.
1.2.2 3arOJOBKn
3aIIOBKN B HAcToHIN HHCpyKunx IIO EKJIyAtuHN HYMePyOTcB COOTBcTbHn CO CJeDyKOUM IIpIMePOM:
"2.3.2" ABJIEETc qacTbIO pa3JeJa "2.3" H BKJIIOueH B HeFO II 3THM 3aROIOBKOM.
IIpH cCbIJKax Ha 3aROIOBKn O6bIyHO yKa3bIbAcTcR TOJIbKO HOMep 3aROIOBka, HAIIPHMep "CM. II. 2.3.2".
2 MEPbl BE3ONACHOCTN
2.1OBUINE CBEDEHNA
BHHMaTeJIbHO IPOuHTaIte HAcTObIyIO HnCTpyKlHIO. O3HaKOMbTEcC b Ha3HaueChmOpraHOB yIpaBJIchHn IIpaBNIAMH IOJIb3OBAHnMaIHHOH.
Hcpa3pcIIaHTcIOJIb3OBAIbC8CHcROOHCTHTcIeM DCETM HIN JINiAM, He 3HaKOMbIM C HactoIe HnctpyKuHe. MecTHbIM 3aKOHOdaTeJbCTBOM MOyT 6bITb yCTaHOBJE- Hbl OtpaHHChHH B OTHIOeHHN BO3paTa JINI, DoIyckaembIX K yipabJIeHHIO MaIHHHoH.
He HcnoJb3yIeMaIIHHy,ccJIN No6JIH3OCTH HaxoJATcApyTne JIOU (B Oco6eHHOCTH DeTH) HJIN KHBOTHbIe.
IOMHNTc,TO ONcpaTOp Hccct OTBCTcTBCHOCb 3a HcchactTHbe cJIyuaH, KOTOpBe MOrY cJIyHTbc8 C JpyHMJHOJBMN, H 3a yIIep6, HaHeceHHbI IN HMyIecETBy.
IIpHmHTe MepbI IIO IpeIOTBpaIeHHIO HaIeHHN I nepeBOPaIHHBaHHMaIHHHbI Ipi H3MeHeHH HaIpaJIeHHN ee DBHXCHHa IPOTHBOIOJIOKHOc.
3aIIpeIaetcIIOJIb3OBaTbC8CHEIROOHCTHTEJEMBCOCTOHHaJIKOROIbHOROONbHCHN,IOI DCHeCTBHCm JCKapCTBeHHbIX IpeIAPAToB IN B COCTOHHyCTaJIocTH HIN 60JIc3HH.
2.2 NOДΓΟТOBKA
Y6cIHTccB TOM, YTO Ha yuaCTKc, KOTOpbI Tpe6yctcra OHCTHTb OT CHeRa, HET Mycopa HIOCTOPOHHHX IIpeIMTeTOB.
Onepatop cheeroohnctnte IIOJIkeH Hochtb pa6oyuO 0ckny COOTBCCTBYIOIcRO THIIa. PekOMchNyctraKKe HIOJIb3OBaTb ObyBb, IIpeOTBpaIIaIOUyIO cKOJIbKeHHe.
Y6eHNTec, TTO HAIPRKeHHe cETn HHTaHn COOTBcTByeT HOMHaJIbHOMy paOoemy HAIPRKeHHo CheroOHCITCJIA.
Hn np KaKHX 06cTcTbCTBax He BbIIOIHrTe pepyHPOBky np paOtaIOOM dBHrATcJIe (ccJIN TOJBKO 3TO cneHaJIbHO He OIIpeJeIEHO HHHCTpyKUnx).
IpcEITcKAKPnHCTyTTbKCHCTKcHcra,JaHTcMaIIHHeaAHTHPoBaTbcKaTeMIIepaTypeOKpykaIOIero BO3Iyxa.
Bo Bpem BoKdHn, TexHueCKoO 6cIyKbHaHH n peMOHTa MaIHINbI O63aTeJIbHO HcIOJIb3yIte 3aIIHTHe oIKH IIIN IITOK.
2.3 INHCTPYKUNI NO 3KCNJYATAUIN
PyKN HOrn JIOJIKHBHAXOHTbcHa 6e30IacHom paCctoHHN OT BpaIIaIOHHcxc DeTaeJe. I36eraTe HaxoJITbcB 60JIN3N OTBepCTTH pa3rpy3O4Horo JeJIO6a.
3TOTCHEROOHTHTEJIBDIOJIKeHHCIOJB3OBATbCCTPOHOHA3HaueHHU.T.e.TOJIbKOJINy6OpKn CHERa.
Co6HJaTe octopOKHOCTb Ipr BOKJeHH MaHHbI IO rpaBnIO, TpoTyapAM H IOpOKHOMY IOKpbTHIO. CJIcIHTc 3a cKpbTbIMN IIpeIITCTBnMn H IBHXeHHem IpyTX TpaHCIOPTbIX cpeIDTB.
He HanpaBJIte pa3rpy3OHTHbI JeIO6 B CTOpOHy aBToMo6HbHbIX IOpOR HIN DpyTHX DBHXUHXcra TpaHCIOpTHbIX cpeCTB.
- PnCTOJIKHOBEHH CHEROOHCTHTE J C IIpeIITCTBHE M BHKIOHHTe IIBHATeJIb H BHIMATEJIbHO IIPOBepBeMaIIHNHy Ha HAJIINHC IOBpKJEHNI. Ipcd TcM KAK BHOBB IIpHcTyrIHb K pa6Ote, yctpaHInTe HeHcPiPaBHocTB.
- PnO6HApyKeHH CNJbHOB Bn6paun MauHHbI, BbIKJIIOHTe DBHrAteJB H BbIcHHTe PnPHHy. O6bHIO B6paYka3bBAeT Ha HauHne HeNCIIpaBHOCTH.
CHEROOHCTHTIEMOJHOIOIKIHOATbTOJIbKO K TaKHM IITEIICEIBHBMPO3eTKAM,KOTOpBc CHa6KEHBi ABTomATHCCKHM BbIKIOHaTeICm yTeKN Ha 3cMIIIO.TOK cpa6aTbIBaHHA BtOMaTHueCKO BbIKIOHaTeJyTeKN H3cMIIIO He JOJIKeH IIpeBBHAtb 30 mA.
CyIeCTBycT OAnchocTb HAc3Ja Ha 3JIeKTPnueckn Ka6JIb.BceIa CJIeNTe 3a TEM, YTO6bI 3JIeKTPnueckn Ka6JIb HC OKa3aJcRy BAC IOI HORAMN, HIN HA IYTH JIO-6bIX IIpeMeuAIOUHXcN IO yuaCTky O6BeKTOB.
IIIOIIOJIIOHHeHH CHEROOHNCTHTEJIeJyET HcIOJIb3OBaTb TOJIbKO TAKOH Ka6JIb, KOtOpBII IpeHa3HaueH IIINCHIOJIb3OBAHnB HE IOMeHn.
3JIcktpHcckn Ka6Jb, HIOJIb3yEmbI JIIIOIKJIOOCHHH CHEROOHcHTeJIa BcerIa DOJIkeH 6bITb HcIIpaB-HOM COCToHH. EcIN HC Ka6CJIe HMCIOCTc IIpH3AKN IOBpeKdHI, TAKHM Ka6eJIem IIOJIb3OBaTbCHeJIb3J.
HeIb3HIOJIb3OBaTbCCHeroOoHCTHTeIeM,ecIIINIOBpeK-1Ha cro IITcENCCbHbA HnIka,0JIeKTPnueckn Ka6cJIb HIN dpyToe 3JIeKTPnueckoe 06OpdyOBaHne.
KpcMOHTyJIEKTPHcCCKOROo6OpyIOBaHHIIOYcKaTcToJIbKO KBAJIHΦHIpOBaHHIeKTPHK.
Bo BpMa paObTI Hc IOnyCaKaTc, YTO6bl cHcerooHCTnTeJIb IIPOe3KaJI IO 3JIeKTPNHeCKOMy Ka6JIIO.
EcJIN3JIeKTPnueckn Ka6eJIb CHeROOuHCTHTeJIIOJUynI IOBpeKeJeHHN BO Bpempa0Tb, BblIOJIHHTe cJIeDyIO- IIHe yKa3aHH:
A.OctaHOBHTC IBHrTaTb.
B.ПОКИНБЕУСТOK,HAKOTOPOMpa6OtaeCHEROOYHCTHTCJIb,IBHITaRcB TaKOMHaIIpaBICHH,YTO6bIyJaIITbcr OT TOUKH NOBpeKdEINKa6cJI.
C. OTKJIIOHTe Ka6eJIb OT IITeNceJIbHOH po3eTKH.
OcTaHOBHTc IBHrAeTcIb H IpcKpaTHTe NDoaUy OJIckTpO-NTaIIIA:
A. ECJIN MCCTO BOINTCJH HC 3aHHTO.
B. EcII KOKyX IIHcKa HII pa3rpy3OHHb JKeIIO6 3a6H-TbI I Tpe6yOT OYHCTKN.
C. IlepeTcM, KaK IIpHcTyIHTb K pcMOHTy HIIH pcryIINPOBKe.
IpcTeKAKPnHcTyrHbKuHcTke,pcMOHTy HINOCOTpy,IOKHTecbOCTaHOBA BCEX BpaHauOHHXcJeTaJIeHIIpeBeJITe BCE opraHbI ynpAbeHHB Hepa6ooye HOIOKeHHe.
3aIpeaaetc IepMeMaTb MaHHHy NIOpeK cKIOHa. IBnraTeCb CBePxy BHN3 H CN3y BBepx. Byte octopokHBIpH H3McHCHN HAIIpaBJIChN HBNKcHNAckHO. H36eAHTe IepMeEeHHN IO KpyTbIM cKIOHAM.
3aippeiaactc9KcIIlyaTHPOBaTB MaHHHy c HcIOCTaOHTHOH 3aIHHToH HIN 6e3 yCTaHOBJIeHHbIX Ha MeCTO 3aIHHTbIX yCTPOIcTB.
He IOnyckaetc OTeOeHHHTb HIN HepeBOHtB Hepa- 6ooyee HIOJOKeHHe cyIecTByHOJIHe 3aIIHTbIe yCTpOHcTBA.
3aipaeaeTc HIOJB30BaTb CHERIOOHCTHTeJI B6JIN3n ORpaKdHn, ABTOMO6HICn, OCTKJIcHcHn, YKIOHOB n T.II., He BBIOHNHB HaIIeKaUyIO peYINpOBky DeJIeKT Topa pa3rpy3OuHO JKeJIO6a.
CJeIHe 3a TeM, Yo6bHa OuHIIaEMbIX OT cHera yAcT KAX He 6bIIO IeTe. IeTN IOJIKNbI HAXOHTbcra IIOI np-CMOTPOM B3POcJIbIX.
He neperpkaite MaHHHy, BeJe ee Ha BbICOKo CKopoCTH.
ByIbTeOCTOpOKHbI Iprn BKJIIOHeHH 3aIHHeRo XoJa. PepeI IBNKeCHHcM 3aJHM XoIOM H BO BpEm JIBHXeHHcJIeHTe 3a BO3MOKHbIM IIpeIIrTCTBHN M C3aHn.
CJIeIHTe3aTeM,TO6bIpa3rpy30HbJKeIO6He6bIIHaIIpaBIEH B cTOpOHy HAXOJIINIXcpeiOM C MaIIHHoI JIOE.CJIeITe 3aTeM,TO6bI HIKTO He HAXOINICnpeiMaIHHOI.
HIOJIb3yIte TOJbKO IINHAJIeKHOCTN,peKOMeHNIOBAHHBIE H3TOTOBHTCEJEM MaIIHHbl.
3aippeaaetc yipabTb cheeroohCTHTeJIeM BycIOBHX IOXOBHIMOCTH HIN IIOXOTO OCBCIeHH.
Bo Bpem BoJceHHB OoHTeJIb JOJIkeH HAXOHTbcB COcToHHy yTOHBOrpaBHOBeCnHaJeKHO yIep-KHBaTb pyKoTky npabJIeHH.
2.4 TEXHnueCKOE OBCJyKnBAHNE IN XPAHEHNE
3aTAHHTE BCE raiKN H BNIITb TaKHM 06pa3OM, TTO6b MaIIHHa HAXOJIJIacb B 6eOIIaIcHOM pa6ooyem COCTOHHN.
HeB3I IpOMbIBaTb CHEROOHCTHTeJIb BOIOJ. 3TO MOKET IIINBEcTH K IOBpeKJEHIO 3JIeKTpueCKORO 6OpuyIOBAH H N IOBJeYb 3a COoBI ONAHOCTb IopajKeHHN 3JIeKTpn- CCKHM TOKOM.
IpeepTeM, KaKaHaatb 3KcNlYaTauHIO cHeroOoHCT HcJIa, CJIeYET IPOBepHTb Bcc 3JIeKTpHuCecKoc o6OpyOBAHHe. B cJUYae IOBpeKJEnHn H3OJIaHn, KpeJIeHn, HIN IIpH HaJIiHn INpyTHx HcHcPiBaBHocTe, cHeroOoHC THTeJEM IOJb3OBaTbCS HeJIb3J.
HcIOJIb3yIe ToJbKO hIpMeHHbIe 3aIacHbIe qactn. PpH HcIOJIb3OBAHHN 3aIacHbIX qactcI, BblIyckAcMbIX dpyTHM H3ROTOBHTCJIHM, MOKHO IOJIyHTb TpaBMbI, JaXc cJIN 3TN qACTH IIOXoJrT K MaIIHHe.
- IpeEIOCTaHOBKOIMAHHHbHaIINHTeJIbHoe xpaHeHne IIpHMITE Bce peKOMeHIDyEmbIe Mepbl.
3aMeHHTeIOBpeKJHeHHbIe Ta6JIuKc IIpeIOCTepKeHHaMn HHCtpyKUHMN.
IocJe y6OpKn chera daHrTe IINrAteIIO IopApOaTb B Te-ueHHe HeCKoJIbKnx MmHyT CIOIOeINHeHHbIM IIHEkOM. 3To IpcIoTbPaHT 3Amcp3aHHe IIHeKa.
3 CBOPKA
3.1 PACIAKOBKA
- Octopokho otKpoHte Kopo6ky.
2.ИЗБЛЕКНТЕИЗΚОРБКДOKУМЕHTAПИЮ,HAПЧМЕРДАн-НБICИНСТPyKINH. - IIOHIMHTe CHEROOHCTHTeJIb H3 yIaKOBOHON Kopo6-KN.
- 06peKbTe coeHHTeJIbHbIe HaKaJdKN, KOTOpbIMN IIIaHra peryHnPOBcHOrO IIITOka KpcIHNTcR K cTopoHc pyKoTKn.
- YTHJIN3aIIHNO KOPo6Kn H yIaKOBOuHOro MaTePnaJa IpoHn3BOJInTE B COOTBcTCTBHH C MecTHbIMN 3aKOHOJaTeJIb-HbIMn aKTAMn.
3.2 CBOPKA
- Co6npaIte chero0oHCTHTeJIb CJJeIyHOIM o6pa3OM.
- Cm.pnc.2.BbipOBHnIe KBaIpaTHbI KOHeI XBOCTOBHka OTHOCHTEJIbHO yIyOJIeHNB pyuKe.
- Cm. pnc. 3. HAnchbTe pyuKy Ha XBOcTOBnK IO 3aIIcIKNBAHnA.
- Cm. pnc. 4. HABHHTHc II 3aTARHTC 6OJIbIyIO IJaCTHKOBYIO raiKy.
5.CM.pHC.5.YcTaHOBHTe Ha XBOCTOBHK YcPhyIO IJIaCTHKOBYIO BTyJIKYIIO 3aIIeJIKNBAHHN BbICTyIIa B OT-BepCTHN XBOCTOBHKa. - Cm.pnc.6.BbipoBHHrTcXBOCTOBHKOTHOCHTCJIbHO CHEROOHCTHTeJI, YTO6bI KaHABKa Ha BTyJIke 6blJa yCTaHOBJChHa IPOTHB IIOJOro CTepKHe.
7.CM.pHC.7.BcTaBBTe XBOCTOBHK B CHEROOHCTHTEJIb H yctaHOBHTE IBA BHHTa C raiKaMH.3aTHHTe C IIMOIIbIO KpeCTOO6pa3HOI OTBepTKH.
4 ONUCAHNE
CHEROOHCTHTeJIbIpeHnHa3HaueHEnHe6oJIbIIHX cHERO OHCTHTeJIbHbIX pa6OT BO3JIe IOMa OT cETN 230 B Iep. ToKa. OprAhbl ynpabJIeHHra CHEROOHCTHTeJIyIOKA3aHbI Ha pHC.1, a Hx ONHcaHNC npHBcECHO HHKe.
6 TEXHnueCKOE OBCJYKBAHNE

IpeE BbHIOJIHcHHeMa60T NO TEXHHueCKomy 06c.IyKHBaIIHO Heo6xOIMo pa3OpBaTb JIEKTPHueCKoe coeINHeHHe.
6.1 INPEENCNOJIb3OBAHHEM
KaJbIpa3HepeHcIOb3OBaHNem CheroOoHCTHTeJI IPOBcPnTe ccktpncceobpyOBaHnHa HcnpabHocTB nOTcyTCTBn IOBpeKdeHH. HeJb3 HcnoJIb3OBaTB cHcTOOHCTHTCJIb,ccIH HmCIOT McTo KaKHeJIb60 HeHCpABHOCTH, HIN IIpH OTcyTCTBn KAKoJ-JH60 JETAHN.
- Y6eHntecb, yTo potop bpaaetc CBO60HIO.
Y6eHITecb, TTO BCE pe3b6OBBE coeHNHeHHa 3aTHHyTbI. Pn Hc06XoHMOCTN pON3BcNTHe 3aTJKKy.
C HOMOIIbHO paIbJIHTeJI HAHeCHTE Ha IIHEK cIOH cnJIKoHa.3To IpeIOBpArTH 06JIeIeHHeHcIIHeKa.
- Y6eIITecb, yTO IyCKOBa pyKoTka He MoKet 6bITb IIpH BcIChA B DCNCTBHe, cCJIN 3aMOK 3aXnHaHH Hc IOBCpHyT BJCBO.
6.2 NOUCK N YCTPAHEHNE HENCPABHOCTEIN
HeHCnPaBHOCTH, OHnCaHHbE HNKe, KAK PpaBnIO, MOrYT 6bHTy cTpaHcHbI CaHM IOJIb3OBaTeCJEM. B CInyAc COMHcHN O6paHNTecb K OoHnHaHBOMy IpeCTaBHTIO KOMHaHN.
He 3aIyccaetc3 IeKtpoBnRaTeJIb:
HeIOKJIHOCH, HIN HCNCIIpaBcH 3JIeKTPnueckN Ka6eJb.
IpeperopeJI ppeOxpaHHTeJIb.BcIyue,ecJIH HxKHO yTaHOBHT bIIaBKn IIpeOxpaHHTeJIb c60JIbIHMH HOMHaIOM IO TOKy, OpaTHTeCB K cepTHHINPOBAHHOMY 3IEKTPNKy.
3JektpoBnHrataeIb H3daet ryeHHe, Ho He 3anyckaetc:
3a6IOKpOBAH Hnck Hn pa3rpy30HbI KcIio6.
BbHJI H3 cTPOKOHHeHCaTOP.06paHTReCb K dJIepy KOMIIaHHN.
JKeKtpoBnHraTeJIb HeOxKnDaIIHO octaHaBJIINBaTcI
OcIa6IIpa3bcmbl.
Cpa6oTao ycpoCTBO 3aunHTb Hn Hepepy3ke. IIOJ0KJNTc 10 MHHT, 3ATCM IOBTOpHtC IOIbHTKy 3aIyCTHTB3JEKTPOIBHrTaJIb.
OnyuaactcBn6paunchrooohctntcna
Ocna6n KpeJIeHHaTeaJIeH.
HeHIIpaBcH IIHeK.
7 XPAHEHNE
EcJIN cHeroOoHcHTeJIb CTaBHTcHa JIINTeJIbHOe XpaHeHHe, HApIMcp,IO CJIcDyIOIIcN 3HMbI, CJIcDyCT BbIIOJIHNITb CJElyIOUIne DeIcTBHn.
- TuaTeJIbHo OuaHCTnTe BeCb aIperat.
- IIpoBepbTe CHEROOHCTHTeJIb Ha HAJIHNe IOBpeKJeiHHI. IIpn HEo6XIOHMOCTN BblIOJIHNTE peMOHT.
- CHEROOHCTHTeJIb DOJIKeH XpaHHtbcB YHCtOM, cyXOM MecTe.
8 YCJIOBnI PPODAxKIN
HaIeKbH3ROBJIeHHn MaTepeHaIOB JaetcnoIIHHa Ra paHTH. IIOJb3OBaTcIb 063AH cTporO cIcIOBaTH HHeTpkyKHNM, INPHEDeHHBM NIOCTABIAEMoI DOKYMeHTaHH.
TapaHTHHe paCipPoCTpaHReTcHa HIOBpeKJeHHa, BO3HNK- IINHe BCJIeIcTBHe:
OTKa3a HIOJIb3OBaTeJIA OT O3HaKOMJIeHHN C COIIPOBOXJaI IOIeJIOKUMeHTaIIHcH
He6peKHOOobpaHnH,
HeIpaBnHbHO Hn3aIpeHcHOrO cNooc6a HcNOJIb3OBaHHn HnC6OpKn,
HCIOJIb3OBaHHaIaIacHbIX YAcTeIpyTHX IIpOHN3BOJNTcJIeI,
HIOJIb3OBAHHIINPINAJIEXKHOCTe,HeIOCTaBJIReEMbIX HINHE OIO6peHHbIX KOMIIaHHne GGP
TapaHTnTaKaKe He pacIpoCtpaHaeTcHa:
H3HaHHBaemble KOMIOHeHTbI, TaKHe KaK IIpHBODHbIe peMHN, IINHEKN, KOJIeca;
- HOPMaJIbIbIиH3IOc;
- IBHrareJn. Ha HnX IIpeIOCTABJHOITc rapaHTn H3rOToBHTeJIe, cOTJeIbIbIMH ycIOBHmH CpOKaMn.
TOKyIaTeJIb 3aIIuHHeH HauHOnHaJIbHbIMn 3aKoHaMn OXPaHbI IpaB Notpc6ntcJI. IIpaBa, KOTOpBic IpCeoCTabJIcHbI NOKyIaTeJIHO 3THMn 3aKoHaMn, He ORpaHHuHbAOTcHactOHTeI rapaHTHeI.
1 OBECNE

8 SMLUVNI PODMINKY PRODEJE
Motors duc, bet to nevar palaist:
- Bloketa gliemezskrue vai izlades tekne.
- Bojats kondensators. Sazinicties ar savu GGP agentu.

- ALLMÄNT
- VEDLIKEHOLD OG OPPBEVARING
- REFERENCES
- Figures
- Headings
- SAFETY INSTRUCTIONS
- GENERAL
- PREPARATIONS
- OPERATION
- MAINTENANCE AND STORAGE
- ASSEMBLY
- UNPACKING
- ASSEMBLY
- DESCRIPTION
- USING THE MACHINE
- GENERAL
- BEFORE STARTING
- START
- SAFETY TEST
- Auger test
- STOP
- SNOW CLEARANCE
- OPERATING TIPS
- Dry and normal snow
- Wet, packed snow
- AFTER USE
- MAINTENANCE
- BEFORE USE
- FAULT-TRACING
- STORAGE
- PURCHASE TERMS
- RECYCLING
- WASTE MANAGEMENT IN ACCORDANCE WITH THE WEEE DIRECTIVE (2002/96/EC)
- ALGEMEEN
- CcbJIKN
- PucyHKn
- 3arOJOBKn
- MEPbl BE3ONACHOCTN
- 2.1OBUINE CBEDEHNA
- NOДΓΟТOBKA
- INHCTPYKUNI NO 3KCNJYATAUIN
- TEXHnueCKOE OBCJyKnBAHNE IN XPAHEHNE
- CBOPKA
- PACIAKOBKA
- CBOPKA
- ONUCAHNE
- TEXHnueCKOE OBCJYKBAHNE
- INPEENCNOJIb3OBAHHEM
- NOUCK N YCTPAHEHNE HENCPABHOCTEIN
- XPAHEHNE
- YCJIOBnI PPODAxKIN
- OBECNE
- SMLUVNI PODMINKY PRODEJE
Brand : ALPINA
Model : AS 31 E
Category : Snow blower