Primonido New Culla - Stroller PEG PEREGO - Free user manual and instructions
Find the device manual for free Primonido New Culla PEG PEREGO in PDF.
| Product Type | Travel System Group 0 (baby carrier) with stroller functions on Ganciomatic frame |
| Brand | Peg Perego |
| Model | Primonido New Culla |
| Approval | UN/ECE R44/04, universal category for vehicles |
| Child weight (car) | 0 to 10 kg |
| Child weight (stroller) | Up to 9 kg |
| Car use | Installation perpendicular to direction of travel, rear seat with 2 or 3-point belt |
| Hood and apron | Removable, attachment by buttons and inserts |
| Backrest adjustment | Rotary lever for recline |
| Rocking position | Foldable feet for rocking or fixed position, also foldable bed |
| Four seasons system | Lever adjusting air circulation (blue: summer, red: winter) |
| Attachment system to frame | Ganciomatic: press-fit until click |
| Carrying straps | Integrated in side pockets, Ganciomatic handles |
| Changing bag included | Bag with small changing mat, can be attached to the chassis |
| Cover and mattress | Removable cover, original cover mandatory for safety |
| Maintenance of fabric parts | Brush, wash according to label (no chlorine, ironing, dry cleaning or tumble drying) |
| Cleaning of plastic parts | Damp cloth, no solvents |
| Recommended lifespan | 7 years from date of manufacture |
| Spare parts | Available in several colors, only original Peg Perego |
| After-sales service | Contact Peg Perego S.p.A. or retailer |
| Manufacturer certification | ISO 9001 |
Frequently Asked Questions - Primonido New Culla PEG PEREGO
User questions about Primonido New Culla PEG PEREGO
0 question about this device. Answer the ones you know or ask your own.
Ask a new question about this device
Download the instructions for your Stroller in PDF format for free! Find your manual Primonido New Culla - PEG PEREGO and take your electronic device back in hand. On this page are published all the documents necessary for the use of your device. Primonido New Culla by PEG PEREGO.
USER MANUAL Primonido New Culla PEG PEREGO
EN Instructions for use
FR Notice d'emploi

natural_image
Line drawing of a backpack with two side handles and a pocket (no text or symbols)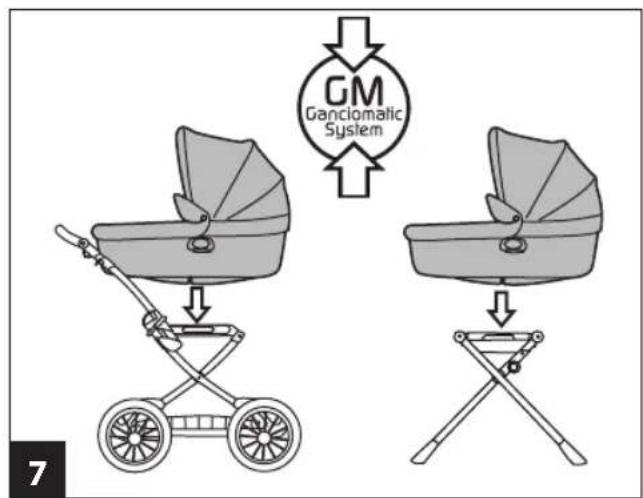
flowchart
graph TD
    A["Car with two children"] --> B["Car with two children"]
    B --> C["Chair with a chair"]
    D["GM Ganciomatic System"] --> E["Car with two children"]

AUTO - CAR - VOITURE
natural_image
Line drawing of a baby's seat with a folded top and seatbelt (no text or symbols)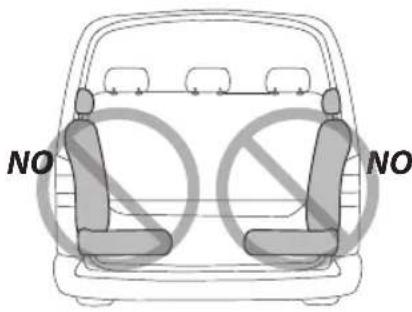
13
natural_image
Two identical diagrams of a baby seatbelt device with side connectors, shown from different angles (no text or symbols)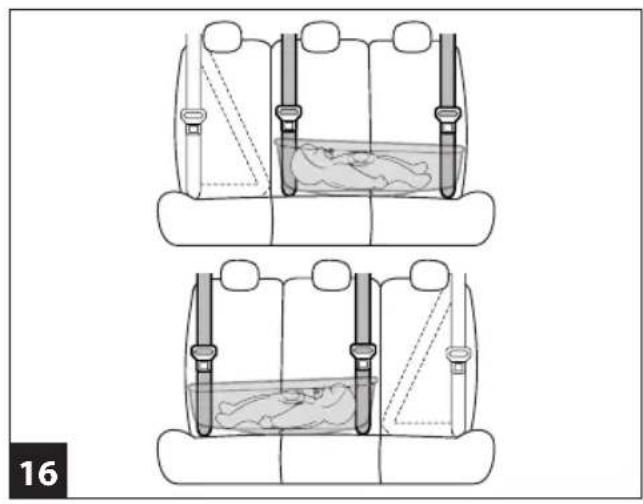
natural_image
Two identical diagrams of a car backseat with seatbelt covers, showing internal seating and seat structure (no text or symbols)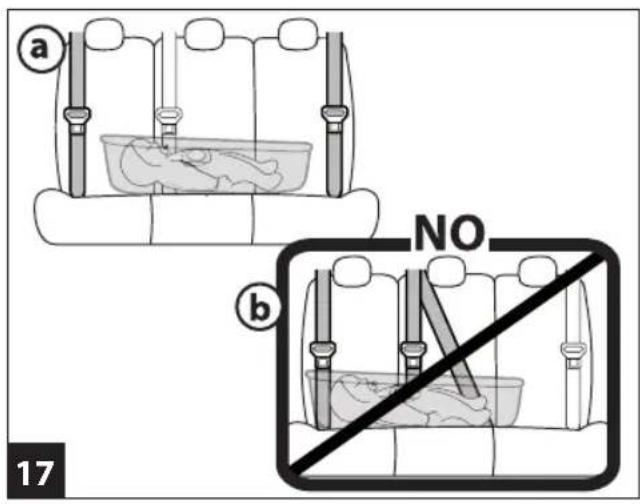
natural_image
Two identical diagrams of a car seat with seats and legs, showing internal seating arrangement (no text or symbols)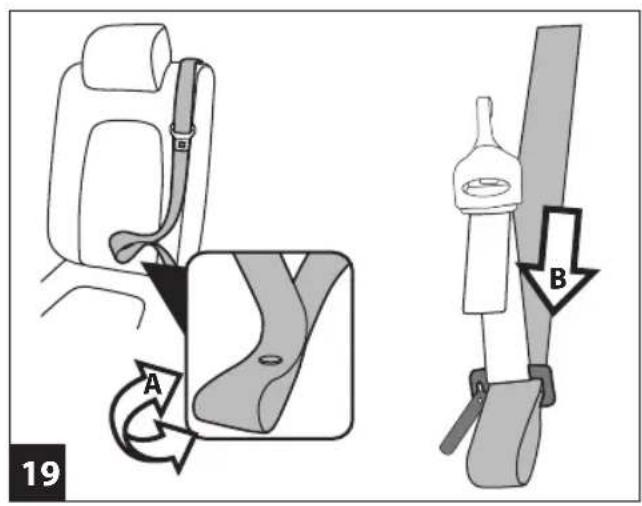
natural_image
Two identical line drawings of a car seatbelt device, showing front and side views (no text or symbols)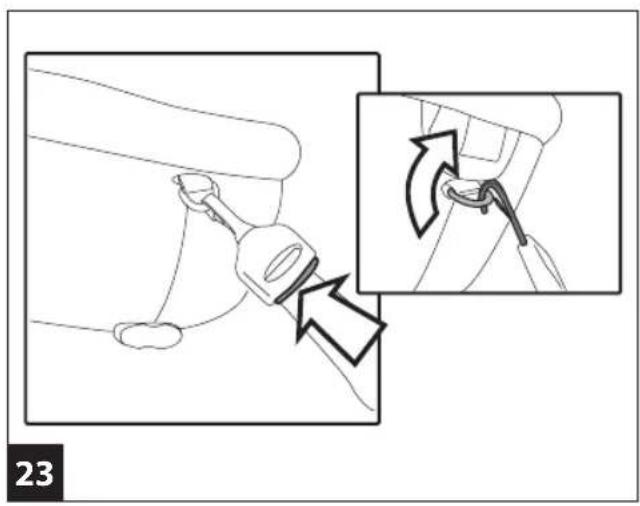
natural_image
Diagram showing a car seatbelt buckle being inserted, with an inset illustrating the mechanism of locking the seatbelt (no text or symbols present)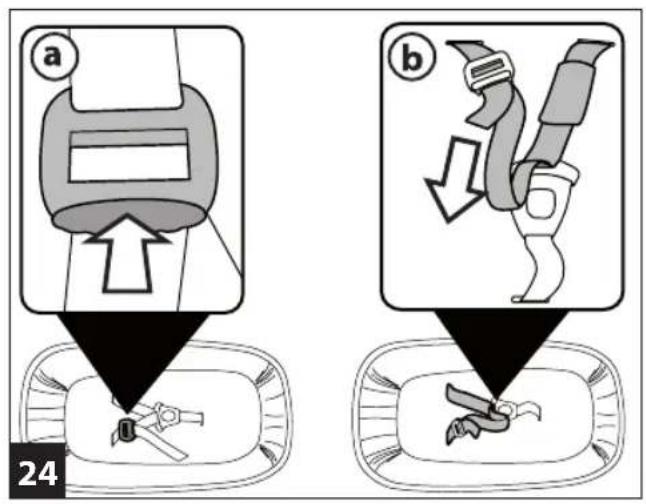
natural_image
Line drawing of a mechanical component with a downward arrow indicating motion (no text or symbols)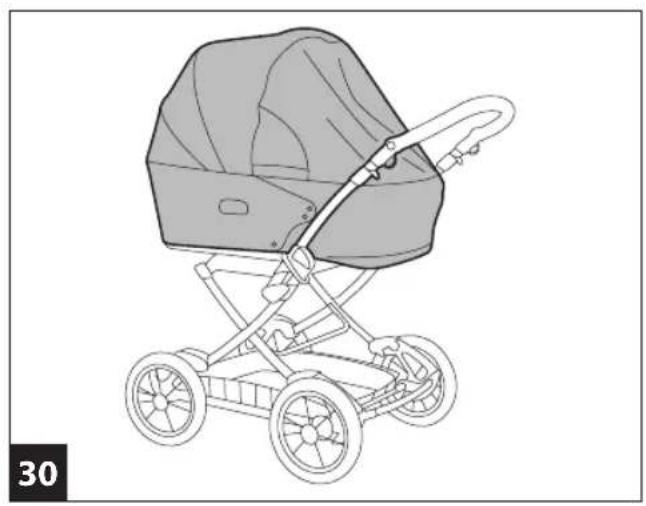
natural_image
Line drawing of a baby stroller with a gray canopy and two wheels (no text or symbols)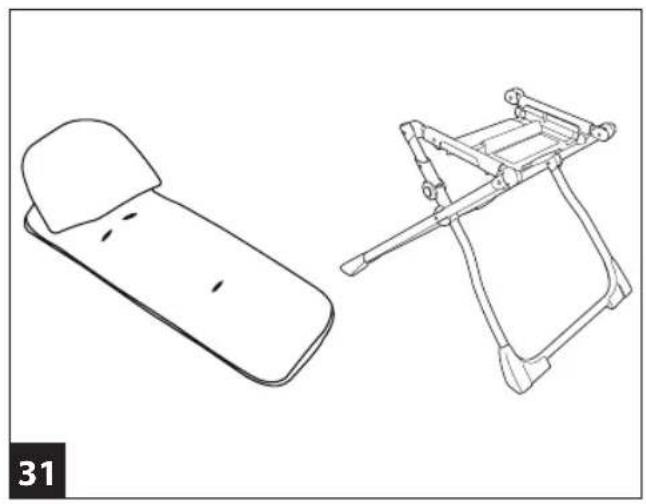
natural_image
Line drawings of two different types of mechanical devices, one flat and one angled with a handle (no text or symbols)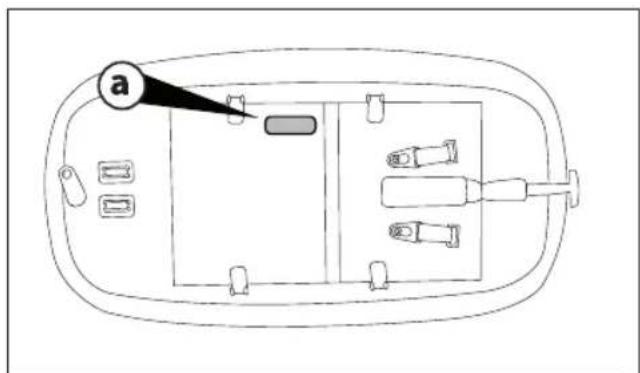
32
Primonido New [Culla]
EN• Spare parts available in different colours to be specified when ordering.
Thank you for choosing a Peg-Pérego product.
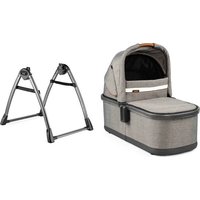
The pram Primonido New is available in the model Culla.
Product characteristics
Pram-auto, Group 0, "Universal" category
- The pram is approved under regulation UN ECE R44/04 for children weighing from 0-10 kg. It is suitable for installation on the majority of vehicle seats, but not all.
- The pram can be properly installed if the vehicle's use and maintenance manual states that it is compatible with "Universal" Group 0 restraint systems.
- The pram is classified as "Universal" in compliance with stricter approval criteria than previous models that do not have this label.
- The device can only be used on vehicles with 2 or 3 rear seats fitted with 2- or 3-point safety belts, approved in compliance with UN ECE R16 or equivalent regulations.
- For any questions or further information on installing the pram in specific vehicles, contact the manufacturer or the retailer.
IMPORTANT
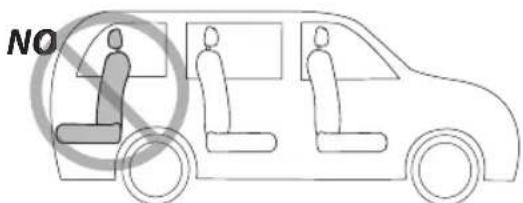
- "The pram" (Group 0) must be fitted perpendicular to the vehicle's normal direction of travel.
- Do not fit the pram on vehicle seats that face away or sideways with respect to the normal direction of travel of the vehicle.
• The item is given a serial number.
WARNING
IMPORTANT: Read these instructions carefully and store them in the holder provided throughout the lifecycle of the product. The child's safety could be put at risk if these instructions are not followed.
- WARNING Never leave your child unattended.
- Assembly and preparation of the item must be carried out by adults.
- Do not use the product if there are missing or broken parts.
- Before use make sure that all of the attachment mechanisms are connected properly.
- Do not insert fingers into the mechanisms.
- Do not use near heat sources, open flames or dangerous objects that are within reach of the child.
- It could be dangerous to use accessories which are not approved by the manufacturer.
• Make sure the belts fastening the pram to the vehicle are always taut and adjust the straps securing the child. - Never twist the belts.
- Replace the item if it undergoes significant strain in an accident or shows clear signs of breakage or deformation.
- The safety device should not be modified by users in any circumstances.
- Carefully follow the instructions supplied by the manufacturer of the child restraint system.
- Never leave the child unattended in the pram in a vehicle.
- The pram must always be secured with the vehicle's safety belts, even when the child is not present. In the event of sudden braking, it could injure the occupants of the vehicle.
- When travelling in vehicles, never hold the child in your arms and never put him/her anywhere but in the pram. In the event of sudden braking, even at low speeds, the child would be flung forward.
• Take particular care to make sure that luggage or other objects are not located where they may injure the child in the pram in the event of an accident.
- Do not leave the pram in vehicles exposed to the sun. Some parts might heat up and be harmful to the delicate skin of the child – check before placing the child in the seat.
- Make sure that the pram is not obstructed by any moving parts of the vehicle's seat or by one of the doors.
- Do not use the pram without its fabric covering, which cannot be replaced with one not approved by the manufacturer since it is an integral part of the pram and the safety system. If replacing it, use an official spare part.
• The design of the pram features a polystyrene shock
absorption device built directly into the shell, below the padding: do not remove it.
- This product is only suitable for children who are unable to sit up by themselves.
- This product is designed for children from birth up to a weight of 9 kg. When used in vehicles it is designed for weights of up to 10 kg.
- Only use the product on surfaces that are hard, horizontal and dry.
- Do not leave other children playing unattended near the carriage.
• Take care when adjusting the mechanisms (handle, backrest) with the child present. - Regularly check the handle (or the handles) and the bottom of the pram to make sure that there are no signs of breakage or damage.
- When using the pram with a stand, check the maximum length of the carriage specified on the stand.
- The pram is intended for transportation purposes and should not replace the cot at home.
- Do not use this product after 7 years from the date of production indicated on the structure. The natural ageing of the materials may mean that it is no longer compliant with standards.
Instructions for use Using the pram
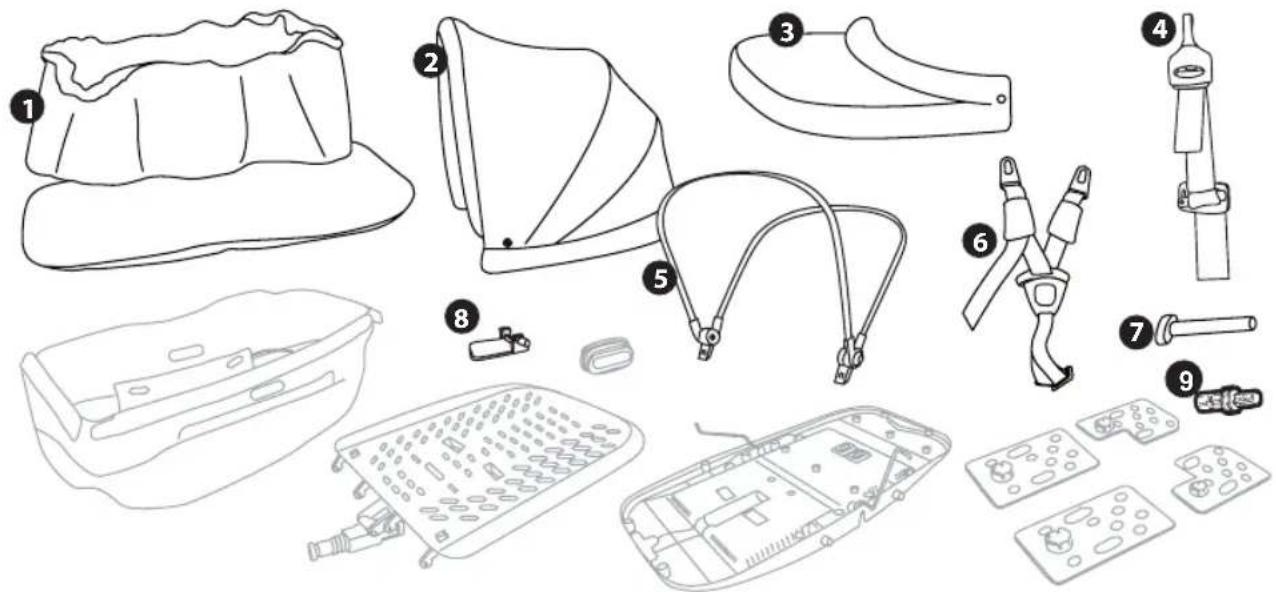
- HOOD AND COVER: to attach the hood, insert the clips into the holes (fig_a) and button it onto the back. Fasten the press studs on both sides of the cover (fig_b).
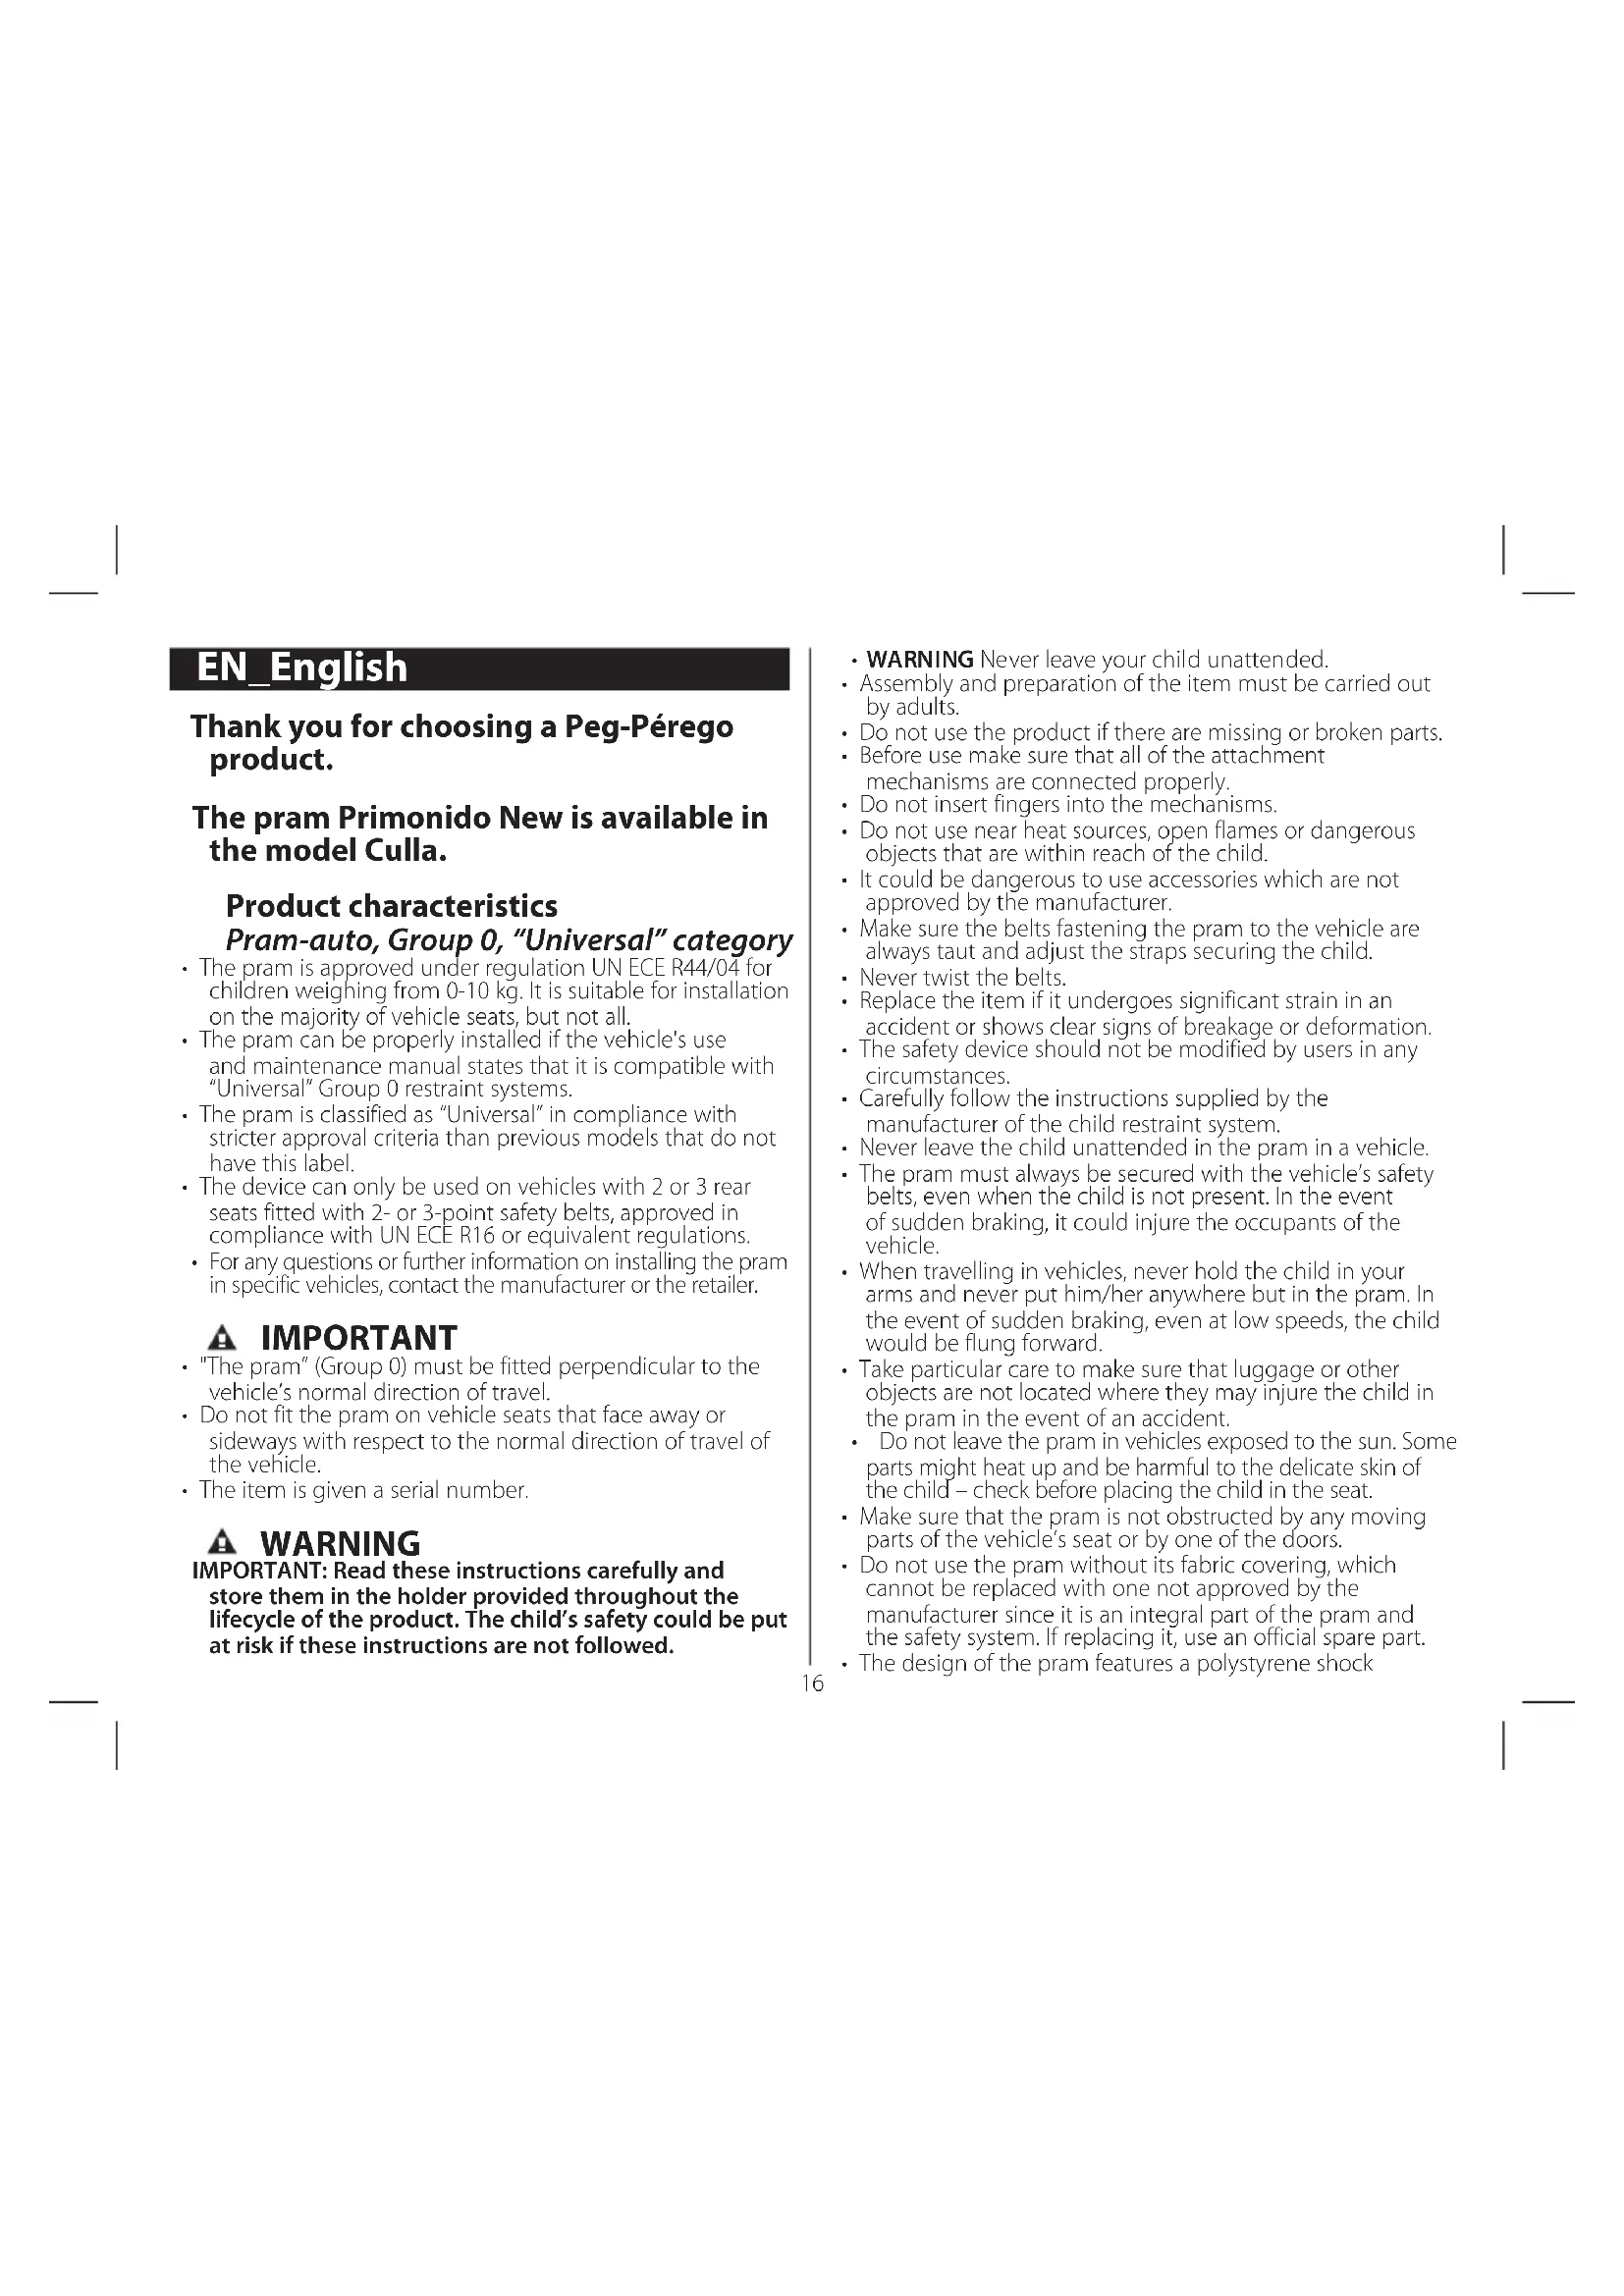
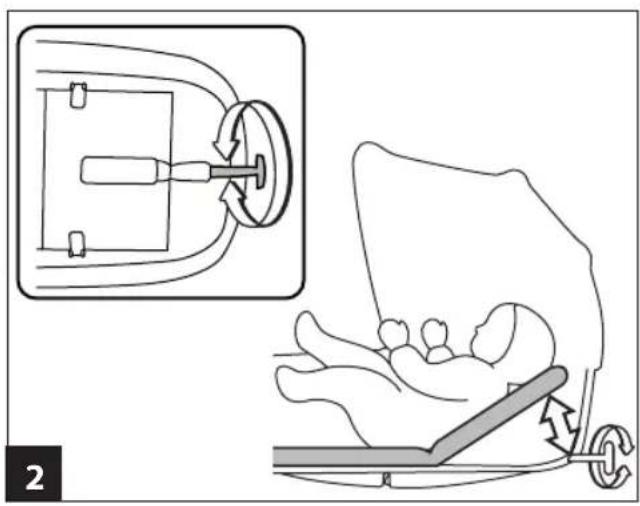
2• BACKREST ADJUSTMENT: pull the handle outwards and rotate it clockwise to raise the backrest or anticlockwise to lower it. - ROCKING POSITION: the pram has extractable feet under the base which can be adjusted to allow the child to rock (fig_a) or a remain still (fig_b). Rotate the feet outwards to transform the pram into a comfortable cot (fig_c).
4• FOUR SEASONS SYSTEM: as shown in the figure, it is possible to adjust the product's air circulation from the base in order to prevent condensation. Move the lever to blue for a cool, well-ventilated
environment (summer), or to red to limit the intake of air (winter).
- CARRIER STRAPS: to move the pram, lower the hood and extract the carrier straps from the side pockets (fig_a). It can also be carried by the Ganciomatic handles (fig_b).
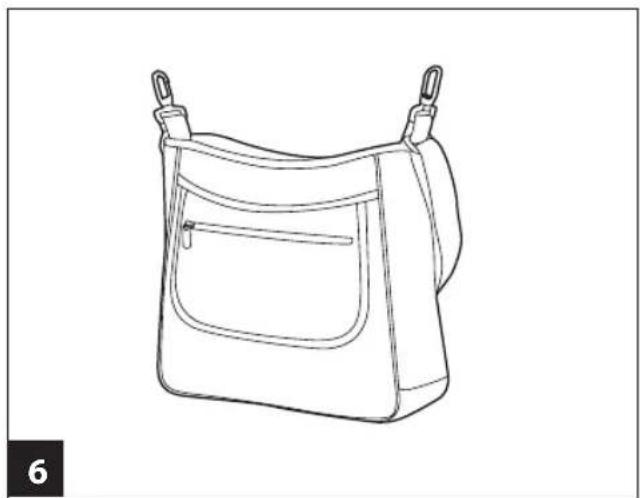
6• BORSA: satchel with pad for changing baby's diaper. Fastens to the chassis.
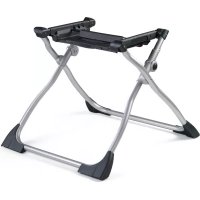
Ganciomatic System
- The Ganciomatic System enables you to fasten the bassinet quickly and easily, with one simple operation, to the Ganciomatic base of the Bassinet Stand and to all the PegPerego Ganciomatic chassis, excluding the Duette and Triplette SW chassis (to be bought separately).
To attach the pram, put it on the chassis and press with both hands until it clicks into place.
Always apply the brakes on the chassis before attaching and removing the pram.
IMPORTANT: Check that the pram is properly attached.
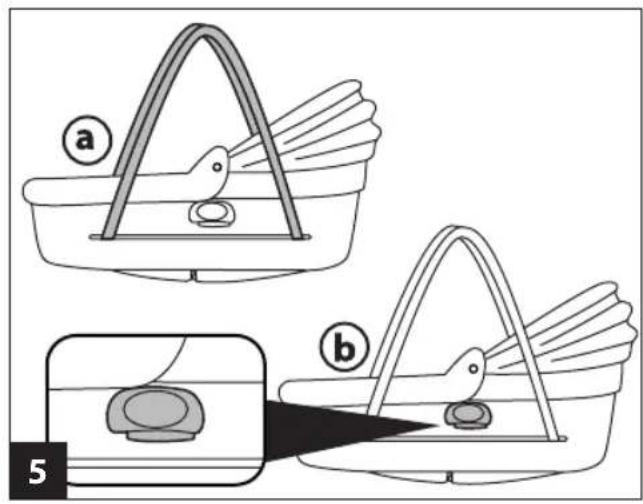
- IMPORTANT: exclusively for the BOOK chassis, before fastening the bassinet, extract the two little feet on the exterior base of the bassinet, level with the child's head (as shown in the figure). Place the carrycot on the chassis and press down with both hands until it clicks into place.
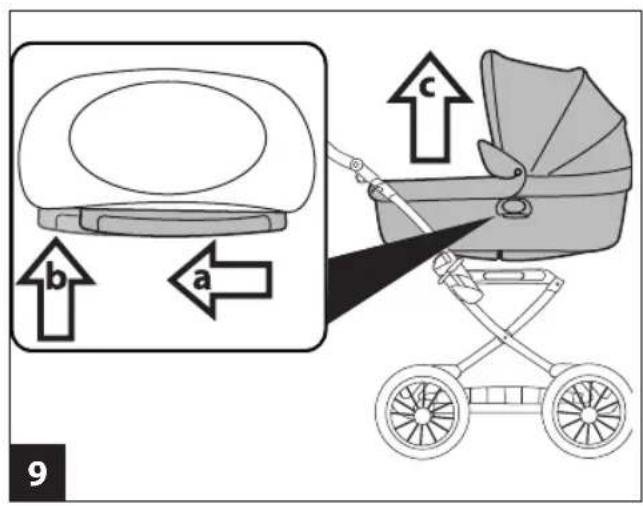
- To release the pram, move the clip on the Ganciomatic handle in the direction of arrow_a while pressing it in (arrow_b) and lift the pram until it comes free (arrow_c).
Removing the lining
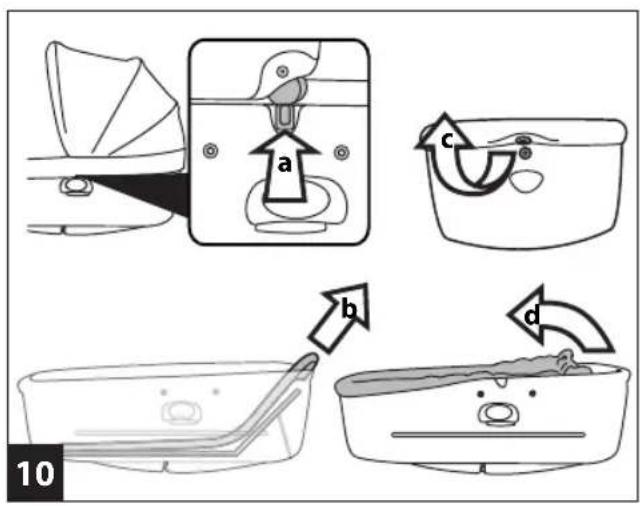
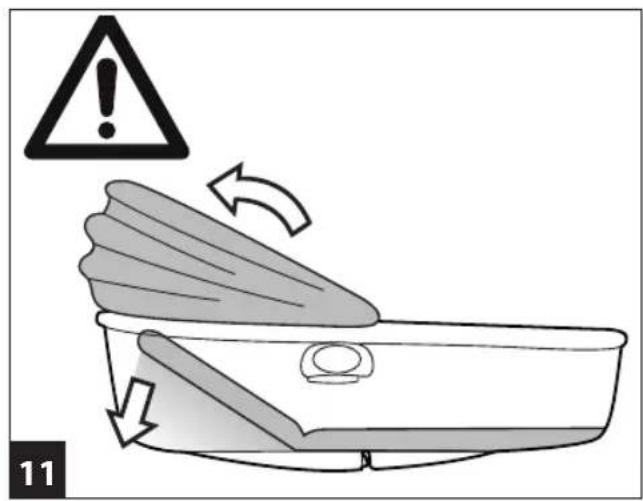
10• REMOVING THE LINING OF THE PRAM: Unbutton the cover and the hood. Press the fasteners and pull the hood upwards to release it (fig_a). Raise the backrest and remove the mattress pad (fig_b). Unbutton (fig_c) and remove the inner lining (fig_d).
Padding cleaning instructions
Brush the fabric parts to remove dust.
- When washing, closely follow the instructions stated on the label sewn into the cover.
-
Do not use chlorine bleach.
-
Do not iron.
- Do not dry clean.
- Do not remove stains with solvents and do not tumble dry.
Product cleaning
- This product requires a small amount of maintenance. Cleaning and maintenance must only be carried out by adults.
- Keep all moving parts clean and if necessary lubricate them with light oil.
- Clean the plastic parts periodically with a damp cloth. Do not use solvents or similar substances.
- Brush the fabric parts to remove dust.
- Do not clean the polystyrene shock absorbing device with solvents or other similar products.
- Protect the product from atmospheric agents: humidity, rain or snow. Extended exposure to sunshine can cause colour changes in many materials.
- Store the product in a dry environment.
- Remember to regularly ventilate the interior of the carrycot.
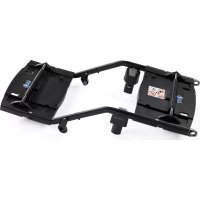
Car Kit
How to fit the safety harness
11• Fit the pram with the backrest and hood lowered.
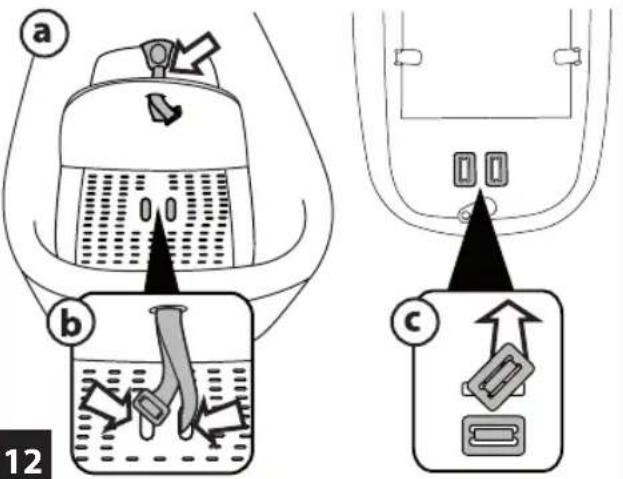
12• 3-POINT SAFETY HARNESS: Pass the leg divider straps through the slot in the mattress pad (fig_a) and the slots in the shell (fig_b) so that they come out on the other side (fig_c).
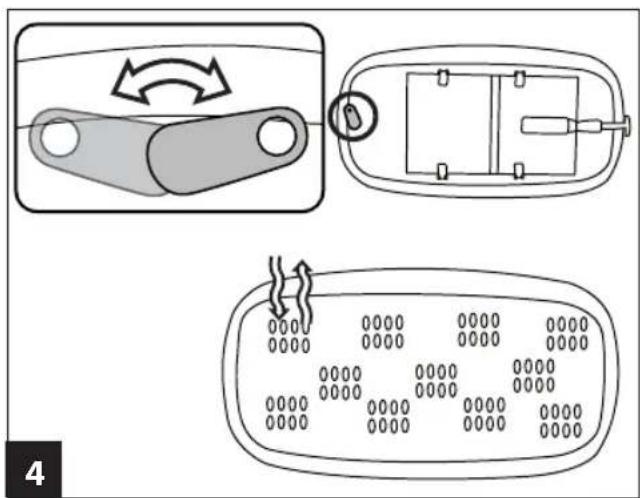
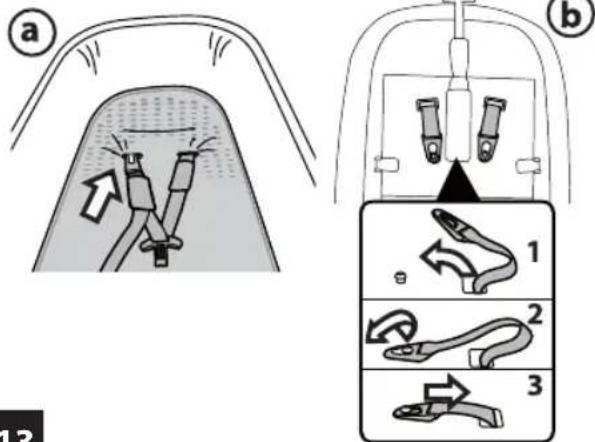
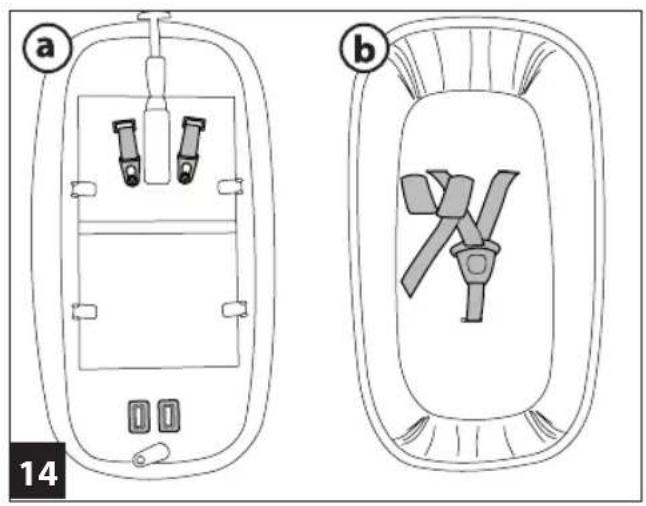
13• Pass the two ends of the shoulder straps through the slots in the mattress pad and the shell (fig_a), then clip them to the pins (fig_b).
14• Straps attached under the shell (fig_a) and inside the pram (fig_b).
Attachment in vehicles with safety belts
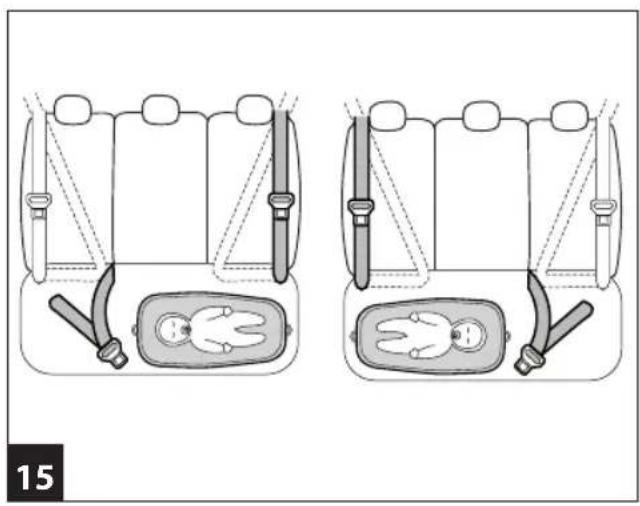
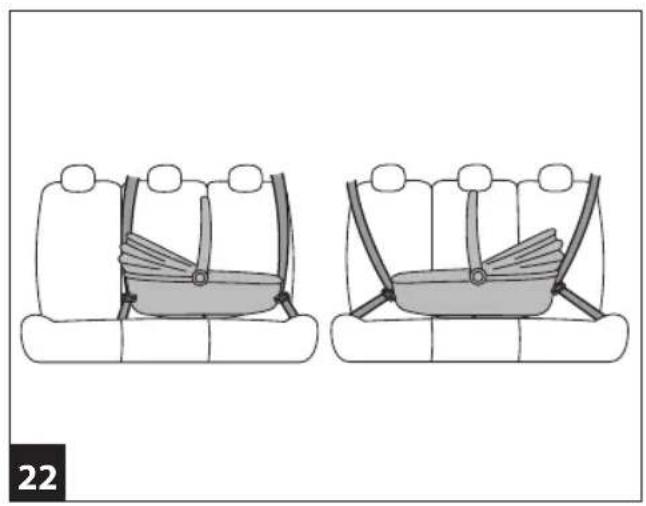
ATTACHING THE PRAM UNIT IN VEHICLES: It is possible to install the pram in cars if there are 3 rear seats with 3 safety belts. The central one can be 3-point or a lap belt. We recommend positioning the pram on the vehicle's rear seats with the end for the child's head above the central seat.
15• The pram fitted in a vehicle with a lap belt.
16• The pram fitted in a vehicle with a 3-point belt.
17• The pram can also be positioned in the centre of a 3-person rear seat, using the two outer safety belts (fig_a). It cannot be positioned as in fig_b because it can only be secured in vehicles using safety belts that come from opposite sides.
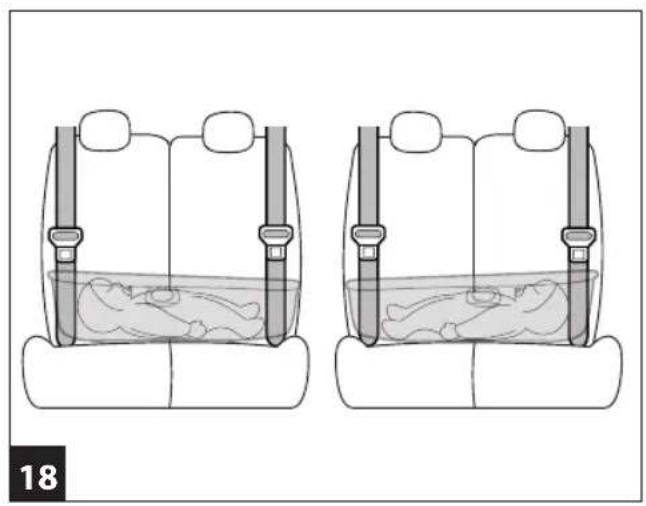
18• Position of the pram on a 2-person rear seat. The pram can be positioned with the child's feet on either side of the vehicle. If the seat of the vehicle inclines, towels can be used to provide a horizontal surface.
19• Take the rear seat belt, fold it as shown in the figure (arrow_a) and insert it in the slot of the car kit's metal fastener (arrow_b).
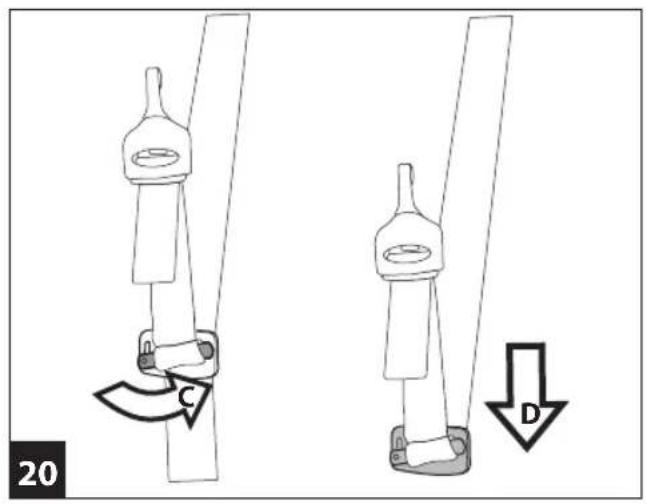
20• Insert the red lever on the metal fastener of the car kit inside the folded belt (arrow_c).
16. The pram fitted in a vehicle with a 3-point belt.
17. The pram can also be positioned in the centre of a 3-person rear seat, using the two outer safety belts (fig_a). It cannot be positioned as in fig_b because it can only be secured in vehicles using safety belts that come from opposite sides.
18. Position of the pram on a 2-person rear seat. The pram can be positioned with the child's feet on either side of the vehicle. If the seat of the vehicle inclines, towels can be used to provide a horizontal surface.
19. Take the rear seat belt, fold it as shown in the figure (arrow_a) and insert it in the slot of the car kit's metal fastener (arrow_b).
20. Insert the red lever on the metal fastener of the car kit inside the folded belt (arrow_c).
Move the metal fastener as near as possible to the seat in order to enable it to be fastened to the Carrycot (arrow_d).
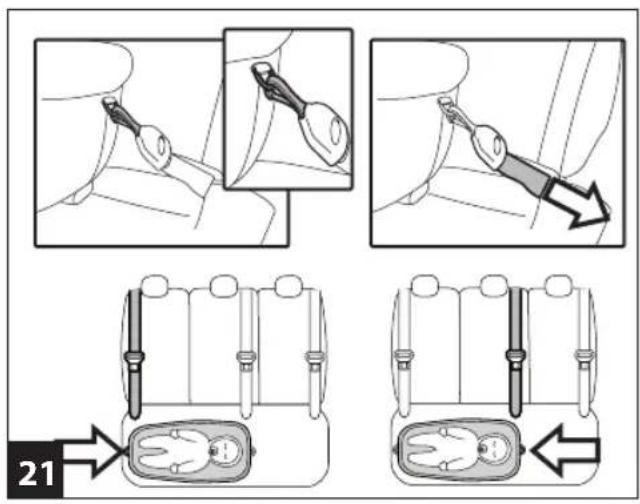
21• Hook the car kit connector to the ring on the Carrycot and pull firmly on the belt to ensure the Carrycot fits as well as possible to the seat.
- Repeat the same operations on the other side of the Carrycot.
22• Car Carrycot installed in the car.
23• UNFASTENING THE CARRYCOT FROM THE CAR: press the control button on the connector to loosen the belts, as shown in the figure. Unhook the fastener of the car kit connector from the ring on the Carrycot.
IMPORTANT: the car kit can remain fastened to the seat belts of your car. The car kit fastener can easily be attached to or removed from the ring on the Carrycot (point 22).
IMPORTANT: do not leave the car kit fastened onto the vehicle's safety belt when this is being used by an adult.
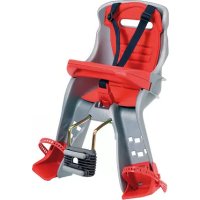
How to put the child in the pram
24• 3-POINT SAFETY HARNESS: Slacken the straps by pressing on the buckle (fig_a) and lengthen them (fig_b).
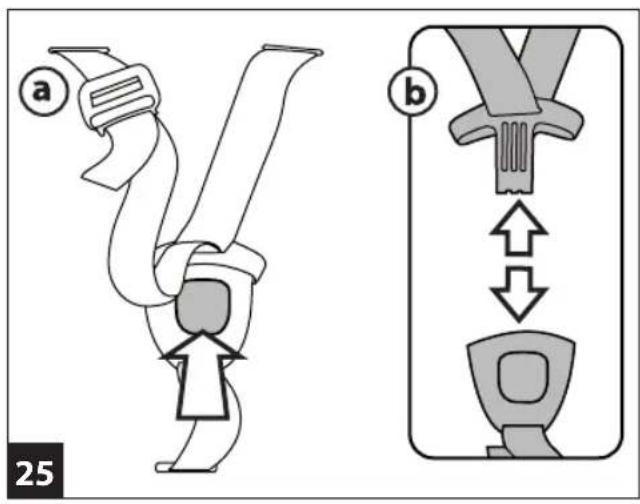
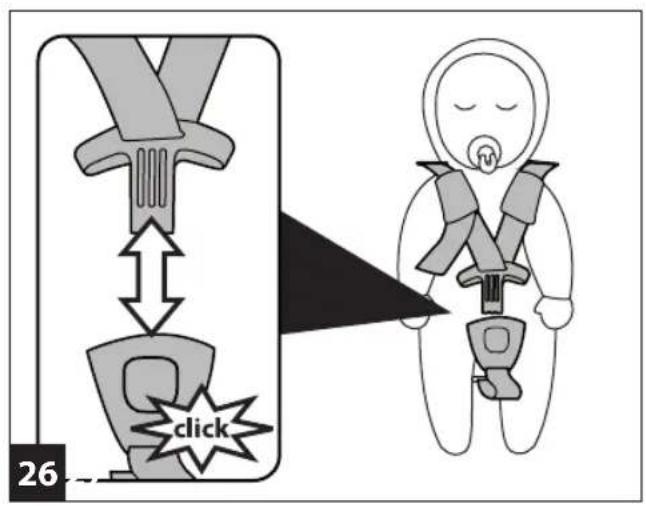
25• Press the red button (fig_a) and release the straps from the leg divider (fig_b).
26• Place the child in the pram then buckle together the straps and the leg divider.
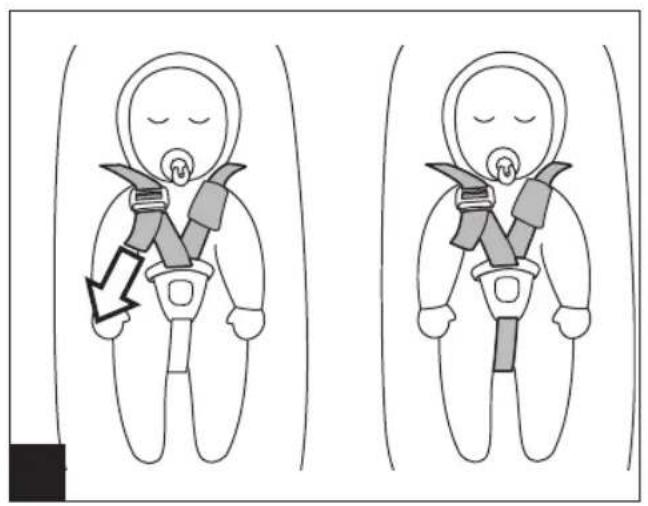
- The child must be securely fastened in the pram. If the straps are loose, tighten them by pulling on the end. The straps must be as tight as possible to protect the child in the event of an accident. Leave a minimal amount of play (the width of a finger between the harness and the child's chest).
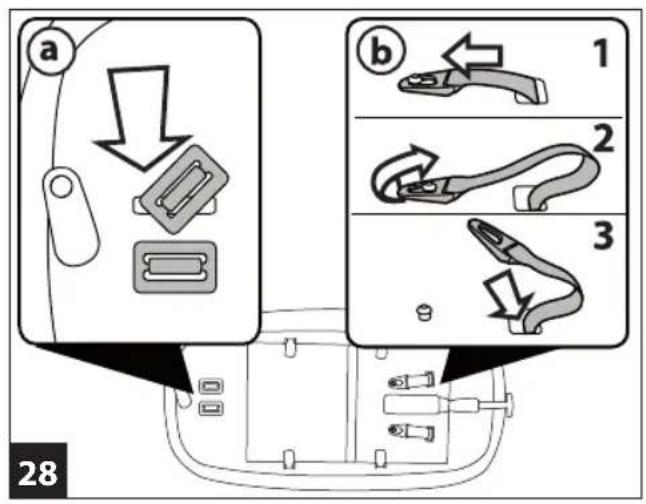
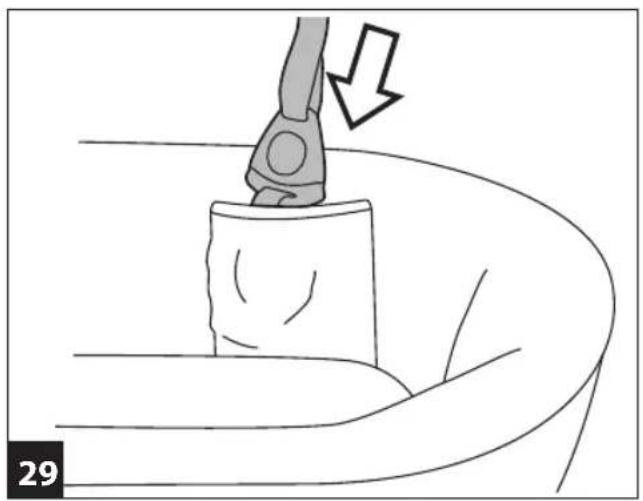
28• REMOVE THE STRAPS: To remove the straps from the shell of the pram, pass the buckles of the leg divider through the slots under the shell and pull them through (fig_a). To remove the strap fasteners from under the shell, release them from the clips and pass them through the slots (fig_b).
- Put the harness back in its pocket once it has been removed.
Accessories
30• RAIN COVER ALL : rain canopy made of clear.
31• BASSINET STAND: Practical, compact support base. COMPLETO TRASPIRANTE: mattress plus cushion. Compatible with our 3-point car kit.
Serial numbers
32• Information about the production date of pram can be found under the base.
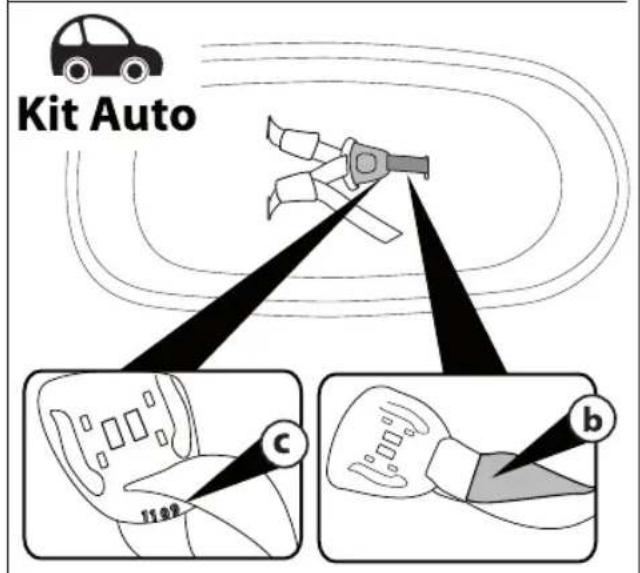
- Product name, production date and serial number (fig_a). Car Kit:
- Approval label (fig_b).
- Harness production date (fig_c). In the event of problems with the product, these details will be of use to customers.
How to read the approval label
- This paragraph explains how to interpret the approval label (the orange one).
• The top of the label displays the trademark of the manufacturing company and the name of the product. - 0-10 kg Y means that the product is approved for children from birth up to 10 kg in weight and that it is fitted with a 3-point safety harness.
• The letter E in a circle indicates the European approval mark and the number indicates the country that issued the
approval (1: Germany, 2: France, 3: Italy, 4: Netherlands, 11: Great Britain and 24: Republic of Ireland).
- Approval number: if it starts with 04, this indicates the fourth amendment (the one currently in force) of Regulation R44.
• Reference standard: UN ECE R44/04. - Production serial number: on issue of approval, each pram is given its own unique number.
PEG-PÉREGO S.p.A.

Peg-Pérego S.p.A. is an ISO 9001 certified company. This certification is a guarantee for customers and consumers of the transparency and trustworthiness of the company's procedures and working methods. Peg Pérego can make changes at any time to the models
described in this publication for technical or commercial reasons. Peg Pérego is at the disposal of its customers and consumers to ensure that all their demands and queries are fully satisfied. It is a key part of our policy to ensure we are always aware of our customers' views and requirements. We would therefore be very grateful if, after using a Peg Pérego product, you take the time to fill in our CUSTOMER SATISFACTION QUESTIONNAIRE, making a note of any comments or suggestions you might have. You can find the questionnaire on the Peg Pérego website: www.pegperego.com
Peg-Pérego after-sales service
If any parts of the item get lost or damaged, only use genuine Peg Pérego spare parts. For any repairs, replacements, information on the products and sales of genuine spare parts and accessories, contact the Peg Pérego Assistance Service and state the serial number of the product, if present.
tel. 0039/039/60.88.213
fax 0039/039/33.09.992
All intellectual property rights on the contents of this manual are property of PEG PEREGO S.p.A. and are protected by the laws in force.
FR\_Français
Declaration of conformity
Product name Primonido Evolution
Product reference
number INCB77* INCL77* INYG77* INCR77MA
Reference Standards (origin) UNI ECE R44/04 (EU) (in combination with kit IKNAVXL00)
Declaration of conformity
PegPerego S.p.A. declares under its sole responsibility that the article to which this declaration relates has undergone internal testing and has been approved, in accordance with regulations in force, by external, independent testing laboratories.
Date and place of issue Arcore, 27th June 2011
PegPerego S.p.A. via De Gasperi, 50 20043 Arcore (Mi), ITALY
FR Français
All of the intellectual property rights for the contents of this instruction manual belong to PEG PEREGO S.p.A. and are protected by the laws in force.

Primonido New [Culla]
FI001501I199
24/03/2015