
Orion - Stroller PEG PEREGO - Free user manual and instructions
Find the device manual for free Orion PEG PEREGO in PDF.
| Product Type | Front-mounted child bike seat |
| Brand | Peg Perego |
| Model | Orion |
| Category | Child bike accessory |
| Dimensions (H x W x D) | 54 × 45 × 33 cm |
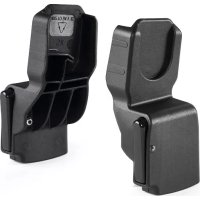
| Maximum child weight | 15 kg (33 lbs) |
| Recommended age | From 12 months (child able to sit up alone) |
| Compatible head tube diameter | 32 to 52 mm (1.25" to 2") |
| Main functions | Safe child transport on bike, front installation between handlebar and saddle, adjustable seat with adjustable support arm |
| Restraint system | Adjustable safety belts + anti-lift safety chain |
| Adjustments | Footrest height (3 positions) and support arm (3 positions) |
| Seat material | Polypropylene |
| Care and cleaning | Clean with warm water and mild detergent. Do not use solvents or abrasive detergents. Air dry. Do not iron. |
| Recommended lifespan | 3 years in normal use and exposure to weather |
| Safety | Secure attachment to head tube, regular checks, do not use if parts are missing or damaged |
| Spare parts and repairability | Diameter reducers, screws, nuts, caps, safety chain, footrests, etc. Repairs by authorized personnel only. |
| Supplied accessories | Support arm, fixing block, U-brackets, reducers, hex key, screws, nuts, covers, overlays |
| Warranty | Refer to manual or manufacturer |
Frequently Asked Questions - Orion PEG PEREGO
User questions about Orion PEG PEREGO
0 question about this device. Answer the ones you know or ask your own.
Ask a new question about this device
Download the instructions for your Stroller in PDF format for free! Find your manual Orion - PEG PEREGO and take your electronic device back in hand. On this page are published all the documents necessary for the use of your device. Orion by PEG PEREGO.
USER MANUAL Orion PEG PEREGO
ORION Front-Mounted Child Bike Seat
Read the instructions and keep them for future reference. Follow and comply with the safety precautions! Make sure you know how to mount and use the Orion child bike seat before using it.
Product Description:
Orion is a front-mounted child bike seat that is mounted on the head tube with a round section diameter between 32 to 52mm (1.25^ - 2^ ) . Orion is designed for carrying children who are up to a maximum of 15kg (33lbs).
Components:
1 Seat
2 Padding (fixed with Velcro system)
3 Safety belts
4 Footrests with their respective straps
5 Fastening shackle
6 Support arm
7 Fastening block
8 2 U-shaped brackets
9 2 plastic covers
10 2 M6x20 screws and their respective nuts with toothed washers
11 Set of five reductions for different sized bicycle frames
12 Seat fixing plate
13 2 closing caps and relative M5x50 screws with M5 nuts (when the fastening shackle is to be removed)
14 Hexagon ring wrench
15 2 rotating pins
16 4 M6 hexagonal flanged nuts
17 2 screw casings
CAUTION
1) The Orion child bike seat must be mounted on the head tube, as shown in this manual (Illustration 10). Tighten fasteners securely, and check them frequently.
2) Check that the bicycle is in good working order and is suitable for adding supplementary loads. The bicycle should be of proper size and adjustment of the rider. Check the information supplied with the bicycle or ask for information and advice from the bicycle manufacturer.
3) Do not carry a child who is less than 12 months of age in the
Orion Instruction Manual - Peg Perego
Child Bike Seat. A child must be able to sit independently and comfortably in the child bike seat. Please consult a pediatrician regarding children under 12 months.
4) Ensure initially and periodically that the child's weight does not exceed 15kg (33lbs).
5) Additional luggage or accessories should not be attached to the child bike seat, as they may exceed the load limit and lessen the stability. The total load limit for the child bike seat is 33 pounds.
6) The load of a child bike seat may lessen the stability and alter the riding characteristics of the bicycle, particularly regarding steering and braking.
7) Do not make any modifications to the child bike seat.
8) Do not allow any of the child's body, clothing, shoe laces, or toys to come in contact with moving parts of the bicycle.
9) Always attach the retention system snugly around the child.
10) Ensure that the safety belts are not loose and do not come into contact with the moving parts of the bicycle. When no child is being carried, fasten the safety belts so the straps are not hanging loosely.
11) Never ride in inclement or hazardous conditions.
12) Never leave the child unattended in the child bike seat.
13) Never leave the child in the child bike seat with the bicycle supported only by a kickstand.
14) Never ride bicycle at night without adequate lighting.
15) The rider and child should wear approved bicycle helmets.
16) Check that the seat is not too hot (e.g., overheated by the sun) prior to placing the child in it.
17) Remove the child bike seat when the bicycle is transported by motor vehicle. Strong wind could damage the seat or detach it from the bicycle, causing accidents or damage the child bike seat to the point it will not perform reliably.
18) It is recommended to change the type of handlebar if the steering angle for each side is less than 45^ .
19) Before each use, check the seat is fitted onto the fastening block correctly: on pulling the support arm upwards, the fastening block must hold the seat down firmly.
20) Before each use, ensure the child bike seat does not interfere with braking, pedaling or steering of the bicycle.
21) Presence of a child bike seat on a bicycle may require alteration of the method used by the rider to mount or dismount the bicycle. Care must be taken whenever the rider gets on or off of
the bicycle.
22) A front mounted seat can reduce the manoeuvrability of the handlebar.
23) Check the existence of any laws present in your State that govern the use of bicycle seats to carry children.
24) Ensure that there are no sharp edges that could come into contact with the child (for example, frayed or deteriorated wires etc.).
25) Cover any saddle springs to avoid a child's fingers being trapped and/or squashed by them.
26) The child in the seat must be clothed and protected from the cold more than the person riding the bicycle. Protect the child from rain.
27) Do not use the seat if any part is missing or broken.
28) The seat material (polypropylene) loses some of its mechanical properties with ageing if exposed for longer periods to environmental conditions (sun, rain, ice, etc.). In the case of normal use and exposure to environmental conditions, the seat should be replaced after 3 years.
WARNING!
Failure to comply with the manufacturer's instructions can lead to serious injury or death of the passenger/rider!
Mounting and Assembling the Child Seat:
Illustration 1:
Holding the seat upside-down, insert the support arm (6).
Illustration 2:
After having lifted up the padding in the seating area, insert the shortest two screws (10) in the holes.
Illustration 3:
Place the fixing plate (12) in correspondence with the screws (10) protruding from the bottom of the seat. Attach the clamp using the two M6 hexagonal nuts with the toothed washers.
Illustration 4:
With the screws loosened, place the support arm in one of three possible positions, then tighten the nuts using the wrench (14) until they are tightly fastened.
Illustration 5A-5B
Choose the plastic reduction (11) which is adapted to the diameter of the bicycle's head tube and insert it in the fastening block (7).
Each reduction shows the reference diameters. Apply the covers (9) to the U-shaped brackets (8). Choose one of the possible configurations based on the type of bicycle frame you have, as
Orion Instruction Manual - Peg Perego
shown in figure 5B. Insert the ends of the U-shaped brackets (8) in the fastening block (7), in the rotating pins (15) and then secure them with the 4 hexagonal nuts (16). Apply the casings(17) to cover the protruding parts of the U-shaped brackets (8).
Illustration 6:
Take the seat and insert the two ends of the support arm (6) into the fastening block holes. Verify that the support arm is correctly inserted and locked by the safety spring release: pulling the seat upwards, this should not exit the fastening block.
In case the seat interferes with the handlebar or with pedalling, return to the illustration 4 and adjust the support arm of the seat, moving it forwards or backwards as required.
Illustration 7:
To remove the seat, hold the centre button of the fastening block (7) and pull the seat upwards.
Illustration 8:
Insert each footrest (4) with the respective strap in the relative housing.
Illustration 9:
Pass the four hooks (18) in the housings provided and press down until the catch snaps (19).
To adjust the height of the footrests:
- Push the catch (19) with a finger from the outside, while raising the footrest with the other hand, then remove the footrest from its housing.
- Insert the footrest in the desired position.
Use of the Seat:
Illustration 10:
Only mount the seat between the handlebar and the bicycle saddle. Illustration 11:
Apart from the safety belts, the Orion child's seat has a fastening shackle that prevents the child from getting up and moving around dangerously while being carried. To open the fastening shackle, push the button (20). Take the fastening shackle out of its housing by rotating it until it stops.
Illustration 12:
After having seated the child, close the fastening shackle until the button (20) is completely inserted in its housing. Check that the fastening shackle is blocked.
Illustration 13:
When the child is seated in the seat, secure his/her feet by passing the strap under the connector (21), and blocking the strap on the pin (22) in the desired position. To release the child's feet, pull the strap outwards to release it from the pin (22).
Illustration 14:
The fastening shackle is suitable for children who are a few months old (weighing about 7 to 10Kg / 15 - 22 lbs). When the child weighs over 10kg (22 lbs), the fastening shackle could squeeze the child and it would therefore be necessary to remove it. In this way the seat can be used up to a maximum child weight of 15kg (33 lbs). To remove the fastening shackle, exercise pressure with a normal screwdriver, removing the cap blocking the pin.
Illustration 15:
At this point the pin can be extracted from the housing, releasing the fastening shackle.
Illustration 16:
Using light pressure, snap the two closing caps (13) into place to close the openings that have been formed due to the absence of the fastening shackle.
Illustration 17:
If you want to replace the fastening shackle, remove the closing caps (13) and put the fastening shackle back into place using the relative screw and nut, tightening it with the wrench supplied (14).
Illustration 18:
- Fasten the child with the seat belts by adjusting the length based on the child's height. The adjustment is achieved by sliding the buckles on the belts. To unfasten the belts, simultaneously press the two buttons (front and rear) on the clasp.
Maintenance:
1) Clean the seat, the padding and the belts with warm water and a mild detergent. Do not use solvents or abrasive or corrosive detergents. Leave the padding to dry in the open air. Do not iron
2) Repair of the seat and replacement of damaged components must only be performed by authorized personnel.
Technical Specifications:
Product Child Bike Seat
Model ORION
Size 54× 45× 33cm / (24.3^ × 17.7^ × 13^ ) HxLxP
Weight 2,2kg (4.85lbs)
Orion Instruction Manual - Peg Perego
FRANÇAIS

Poids 2,2kg (4.85lbs)
ESPANOL

- ORION Front-Mounted Child Bike Seat
- Product Description:
- Components:
- CAUTION
- WARNING!
- Mounting and Assembling the Child Seat:
- Illustration 6:
- Illustration 7:
- Illustration 8:
- Illustration 9:
- Use of the Seat:
- Illustration 10:
- Illustration 12:
- Illustration 13:
- Illustration 14:
- Illustration 15:
- Illustration 16:
- Illustration 17:
- Illustration 18:
- Maintenance:
- Technical Specifications:
- FRANÇAIS
- ESPANOL
Brand : PEG PEREGO
Model : Orion
Category : Stroller