Uno - Stroller PEG PEREGO - Free user manual and instructions
Find the device manual for free Uno PEG PEREGO in PDF.
| Brand | Peg Perego |
| Model | Uno |
| Product type | Stroller |
| Maximum child weight | 20 kg (45 lbs) |
| Maximum child height | 110 cm (43 inches) |
| Maximum basket load | 5 kg (11 lbs) |
| Maximum cup holder load | Indicated on the cup holder itself |
| Maximum pocket/bag load | 0.2 kg (0.44 lbs) each |
| Backrest positions | 3 positions (variable recline) |
| Footrest positions | 2 positions |
| Basket positions | 3 positions (normal, lowered, raised) |
| Handlebar height adjustment | Yes, via side buttons |
| Front bar adjustment | 2 positions (telescopic) |
| Braking system | Foot brake on rear wheels |
| Safety harness | 5-point harness, adjustable height |
| Swivel front wheels | Yes, with lock in fixed position |
| Fold | Compact fold (stands upright when folded) |
| Transport | Side carry handles (usable folded or unfolded) |
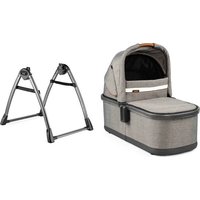
| Ganciomatic system | Yes, to attach Primo Viaggio car seat (sold separately) |
| Canopy | Removable, adjustable, convertible into sunshade |
| Apron (reclined position) | Included, with zipper and eyelets |
| Removable cover | Yes, accessible for washing |
| Rain cover | Optional (mentioned in manual) |
| Diaper bag | Optional (mentioned in manual) |
| Frame maintenance | Clean with a damp cloth; avoid solvents; grease moving parts if necessary |
| Fabric care | Hand wash at 30°C max; do not wring; do not use bleach; do not tumble dry |
| Spare parts | Available in several colors; use exclusively original Peg Perego parts |
| After-sales service (Canada) | Tel. 905.839.3371 / Fax 905.839.9542 |
Frequently Asked Questions - Uno PEG PEREGO
User questions about Uno PEG PEREGO
0 question about this device. Answer the ones you know or ask your own.
Ask a new question about this device
Download the instructions for your Stroller in PDF format for free! Find your manual Uno - PEG PEREGO and take your electronic device back in hand. On this page are published all the documents necessary for the use of your device. Uno by PEG PEREGO.
USER MANUAL Uno PEG PEREGO
EN Spare parts available in different colours to be specified when ordering.
Thank you for choosing a Peg-Pérego product.
WARNING
IMPORTANT: READ THESE INSTRUCTIONS CAREFULLY AND KEEP THEM FOR FUTURE REFERENCE. FAILURE TO FOLLOW THESE INSTRUCTIONS COULD PUT THE CHILD'S SAFETY AT RISK. THIS PRODUCT IS DESIGNED FOR A CHILD WHOSE MAXIMUM WEIGHT IS 45 POUNDS (20 KG) AND WHOSE MAXIMUM HEIGHT IS 43 INCHES (110 CM). THIS SHOPPER BASKET IS DESIGNED TO CARRY A MAXIMUM WEIGHT OF 11 POUNDS (5 KG). ANY CUPHOLDER EVENTUALLY PROVIDED WITH THIS UNIT IS DESIGNED TO CARRY A MAXIMUM WEIGHT SPECIFIED ON THE CUPHOLDER ITSELF. ANY POACH OR POCKET PROVIDED WITH THIS UNIT IS DESIGNED TO CARRY A MAXIMUM WEIGHT OF 0.44 POUNDS (0.2 KG). FAILURE TO FOLLOW
MANUFACTURER'S SPECIFICATIONS OR USE OF ACCESSORIES OTHER THAN THOSE APPROVED BY THE MANUFACTURER MAY CAUSE THE UNIT TO BECOME UNSTABLE.
- AVOID SERIOUS INJURY FROM FALLING OR SLIDING OUT. ALWAYS USE COMPLETE 5 POINT SEAT BELT. NEVER LEAVE YOUR CHILD UNATTENDED.
- ALWAYS USE ALL THE BRAKES WHENEVER PARKED.
TO AVOID SERIOUS INJURY, WHEN MAKING ADJUSTMENTS ENSURE THE CHILD'S BODY IS CLEAR OF ALL MOVING PARTS.
ALL OPERATING AND ASSEMBLY PROCEDURES SHOULD BE PERFORMED BY AN ADULT.
DO NOT LIFT THE STROLLER BY GRIPPING THE FRONT BAR. THE FRONT BAR IS NOT DESIGNED TO
WITHSTAND LOADS.
ENSURE THAT THE STROLLER IS OPENED CORRECTLY AND LOCKED IN POSITION OF USE.
- CHECK TO MAKE SURE THAT THE CAR SEAT OR THE BABY CARRIAGE IS CORRECTLY FASTENED TO THE STROLLER (WHERE APPLICABLE).
DO NOT DRIVE THIS PRODUCT
AROUND STAIRS OR STEPS; CARE MUST BE TAKEN IF UNIT IS USED ON STAIRS OR ESCALATORS.
-DO NOT USE THE PRODUCT IF IT HAS BROKEN OR MISSING PARTS.
-DO NOT USE NEAR FIRE OR EXPOSED FLAME.
- CHILD MAY SLIP INTO LEG OPENINGS AND STRANGLE, NEVER USE IN RECLINE CARRIAGE POSITION UNLESS FOOTREST ENCLOSURE IS FULLY INSTALLED/ IMPLEMENTED (SEE MANUAL INSTRUCTIONS FOR CORRECT USE).
NOTICE:
THIS ARTICLE MEETS OR EXCEEDS ALL REQUIREMENTS COVERED IN ASTM F833 STANDARD AND LATEST REVISIONS.
INSTRUCTIONS
1 OPENING: press both buttons on the handlebar at the same time and lock it in the vertical position (fig_a). Release the two clips (fig_b), pull the handle up firmly (fig_c) then push it down until it locks into position.
2 FITTING THE HANDLE: Use a screwdriver to remove the two screws, taking care not to lose them (fig_a). Remove the caps on the ends of the handle and slot it into the tubes (fig_b). Check the position with the figure to ensure it is not on backwards. Fully tighten the screws on both sides of the handle (fig_c), but do not force them.
3 FITTING THE WHEELS: Place the large wheels alongside their slots and push them in until they click into place.
4 BASKET: to fit the basket, press the side buttons (fig_a) and pull out the basket ring (fig_b). Check that it is correctly positioned (fig_c).
5 Slide the ring into the basket fabric (fig_a) and push it into the housing on the stroller until it clicks into position. Clip the basket onto the buttons on the side (fig_b) and slip the two loops onto the stroller at the front. (fig_c).
6 The stroller basket has three positions. The normal position can be seen in Figure A.
The basket can be lowered to allow it to be used even when the backrest is completely lowered. By pressing on it, it is easier to fill it without disturbing the baby (fig_b). The basket can also be raised to allow access to the rear footboard (fig_c).
7 FRONT BAR: insert the front bar (fig_a) and press until the first click. Pull the levers under the front bar towards you (fig_b) and insert it completely by pushing it forwards (fig_c).
8 The front bar can be lengthened to two positions. To move it to the first position, pull the two levers underneath towards you (fig_a) and pull it until the first click (fig_b). To move it to the second position, pull the two levers and the front bar towards you again until the second click (fig_c). It is dangerous to put hot drinks on the tray.
9 BRAKE: to brake the stroller, push the brake levers on the wheels downwards with your foot, as shown in the figure. Always set the brake when the stroller is not moving.
10 5-POINT SAFETY HARNESS: to attach the safety harness, insert the two buckles of the waist strap (with shoulder straps attached - arrow_a) into the leg divider strap until it clicks into place (arrow_b). To release, push the round button placed in center of the buckle upwards (arrow_c) and pull the waist strap to the sides (arrow_d).
11 To tighten the waist strap, pull on both sides in the direction of the arrow (arrow_a). To loosen it do the opposite. The waist strap can be tightened as far as the safety lock (fig_b).
12 To adjust the height of the safety harnesses, release the two buckles on the rear of the backrest.
Pull the shoulder straps towards you (arrow_a) until the buckles are released and insert them in the backrest loops (arrow_b). Remove the shoulder straps from the sack (arrow_c) and insert them in the most appropriate loop (arrow_d), then re-attach the two buckles on the rear of the backrest (arrow_e).
13 ADJUSTING THE BACKREST: the stroller backrest can be reclined in three positions. To lower it, raise the handle (fig_a) and at the same time lock it into the desired position (fig_b); push upwards to raise it.
14 ADJUSTING THE FOOTREST: the footrest has two positions. To lower it, pull the two switches downwards and lower the footrest at the same time (fig_a). To raise it, pull it up until it clicks (fig_b).
15 SWIVEL WHEELS: the smaller wheels on the stroller swivel. To make them swivel, raise the lever (fig_a). Lower the level to set them in their fixed position (fig_b).
16 HANDLEBAR: to make the handlebar reversible, pull the clips on it upwards at the same time (fig_a) and move it to the other side until the final click. IMPORTANT: take care not to hurt the child's hands or arms when doing this. Adjust the height of the handlebar by pressing on both side buttons at the same time (fig_b).
17 DRINK HOLDER: the drink holder can be attached to both sides of the stroller. Simply click it into place.
18 CARRIAGE AND/OR STROLLER: Uno becomes a carriage when the backrest is in its lowest position, the footrest is raised, the handlebar is on the opposite side to the backrest and the swivelling wheels are also on the opposite side to the backrest (fig_a). Uno becomes a stroller when the backrest is raised, the footrest is lowered, the handlebar is on the same side as the backrest and the swivel wheels are on the opposite side to the backrest (fig_b).
19 HOOD: turn back the front edge of the hood (fig_a), insert the clips in the slots in the stroller arms (fig_b) and button them to the rear of the backrest. Button the hood to the insides of the armrests (fig_c) and stretch it, lowering the joints (fig_d). To transform the hood into a sun canopy, open the zip (fig_e) and unbutton the rest of the hood.
20 COVER: to transform Uno into a carriage, first lengthen the front bar to the second position and raise the footrest, slide out the lower part of the cover from under the footrest sack and insert the tabs of the lower part of the front cover in the slots of the front bar (fig_b). The slots in the front bar will come out when the front bar is lengthened. If the slots slide back into position, push the two levers under the front bar towards you. Finally, slip the side eyelets onto the armrests (fig_c). The carriage version without a cover can be seen in Figure D.
21 Zip the upper part of the cover to the lower part, slip the side eyelets onto the armrests in sequence (fig_a) and button the cover to the armrests (fig_b). The carriage version with a cover can be seen in Figure C.
22 REMOVING THE WHEELS: to remove the large wheels, press the button (fig_a) and slide the wheel out (fig_b). To remove the small wheels, press the switch inwards (fig_c) and slide out the wheel at the same time (fig_d).
CLOSING: Before closing the stroller, make sure that the handlebar is positioned on the backrest side and ensure that all the wheels are in the fixed position. If the hood is on, loosen the joints.
23 To close the stroller, press lever 1 and then lever 2 (fig_a), turn the handlebar forwards and push it downwards. Complete the procedure by fastening the clips (fig_b). When
the UNO stroller is closed, it is freestanding.
24 TRANSPORT: the stroller has two carrying handles on the sides that allow it to be transported both when closed and when open (for example, when going down stairs).
25 REMOVING THE COVER: To take the cover off the stroller, remove the tab of the fabric covering from the backrest (fig_a) and pull the others out of the armrests (fig_b). To release the lower part of the cover for washing, detach the fasteners from the points on the frame of the footrest (fig_c).
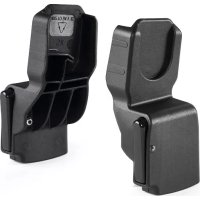
The swift, practical Ganciomatic System allows you to attach the Primo Viaggio car seat (sold separately) to the Ganciomatic points on the stroller in one easy step.
26 GANCIOMATIC POINTS ON THE STROLLER: to raise the Ganciomatic points on the stroller, lift the sack at the corners of the seat and turn the two points upwards (fig_a). To lower the Ganciomatic points on the stroller, pull the switch upwards and lower the point at the same time (fig_b). Uno can be closed when the Ganciomatic points are raised.
27 UNO + PRIMO VIAGGIO: to fasten the car seat to the stroller: activate the brake on the stroller, remove the hood, position the backrest in the middle position and raise the Ganciomatic points. Turn the handlebar to the side opposite the backrest, position the car seat facing the handlebar and attach it by pushing down until it clicks into place (fig_a). Ensure that the handlebar is positioned on the side of the backrest, pull out the front bar until the first click, position the car seat facing the backrest and attach it by pushing down until it clicks into place (fig_b). Always activate the brake on the chassis or stroller before attaching and removing the products (see the respective instruction manuals). Check that the transport unit for the child is attached correctly.
ACCESSIONS
28 RAIN CANOPY: Rain canopy which zips to the hood.
29 This rain canopy has been designed for use also when the Uno stroller has the Primo Viaggio car seat attached.
30 CHANGING BAG: bag with changing pad for the baby that can be attached to the stroller.
SERIAL NUMBERS
31 Information relating to the date of manufacture of the product are found under the UNO footrest.
Product name, date of manufacture and serial number.
This information is required for any
complaints.
CLEANING AND MAINTENANCE
PRODUCT MAINTENANCE: protect from the weather: water, rain, or snow; prolonged and continuous exposure to bright sunlight may give rise to colour changes of various different materials; store this product in a dry place.
CLEANING THE CHASSIS: periodically clean all plastic parts with a damp cloth. Do not use solvent or similar cleaning products; keep all metal parts dry to prevent rusting; keep moving parts clean (adjustment mechanisms, locking mechanisms, wheels, ...) and free of dust and sand and, if necessary, lubricate with light machine oil.
CLEANING THE RAIN CANOPY: wash with a sponge and soapy water; do not use detergents.
CLEANING FABRIC PARTS: brush fabric parts to remove dust and wash by hand at a maximum temperature of 30^ ; do not wring; do not use chlorine bleach, do not iron; do not dry clean; do not apply solvent-based stain removers and do not dry in a tumble dryer.

PEG-PEREGOS.p.A.
Peg Pérego can make changes at any time to the models described in this publication for technical or commercial reasons.
PEG-PEREGO AFTER-SALES SERVICE
If any parts of your Peg Pérego product should be accidentally mislaid or damaged, use exclusively genuine original Peg Pérego replacements. For any repairs, replacements, product information, and orders for genuine original replacement parts and accessories, contact Peg Pérego After-Sales Service:
USA
tel.800.671.1701 fax 260.471.6332
call us toll free 1.800.671.1701 website www. pegperegco.com
CANADA
tel.905.839.3371 fax 905.839.9542
call us toll free 1.800.661.5050 website www. pegperegco.com
ES_Espanol
call us toll free 1.800.671.1701 website www. pegperegco.com
FR_Français
PLACE (SE REPORTER AU MANUEL
D'INSTRUCTIONS POUR UNE
CONDITIONS REQUISES PAR LA
NORME ASTM F833 ET REVISIONS
RECENTES OU SATISFAIT À DES
CONDITIONS PLUS SEVERES.
INSTRUCTIONS D'UTILISATION
ACCESSIONS EN OPTION
call us toll free 1.800.661.5050 site Internet www.
pegperegco.com
Call us toll free: 18006711701
PEG PEREGO CANADA Inc.
585 GRANITE COURT PICKERING ONTARIO CANADA L1W3K1
phone 905 839 3371 fax 905 839 9542
Call us toll free: 1 800 661 5050
www.pegperegoo.com
WARNING
AVOID SERIOUS INJURY FROM FALLING OR SLIDING OUT.
ALWAYS USE COMPLETE 5 POINT SEAT BELT.
ADVERTENCIA
EVITE LESIONES DE CAIDAS O DESLIZAMIENTOS HACIA FUERA.