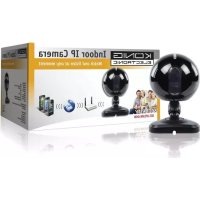
SECTRANS60 - Surveillance Camera KONIG - Free user manual and instructions
Find the device manual for free SECTRANS60 KONIG in PDF.

User questions about SECTRANS60 KONIG
0 question about this device. Answer the ones you know or ask your own.
Ask a new question about this device
Download the instructions for your Surveillance Camera in PDF format for free! Find your manual SECTRANS60 - KONIG and take your electronic device back in hand. On this page are published all the documents necessary for the use of your device. SECTRANS60 by KONIG.
USER MANUAL SECTRANS60 KONIG
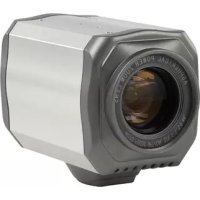
SEC-TRANS60
SEC-TRCAM40
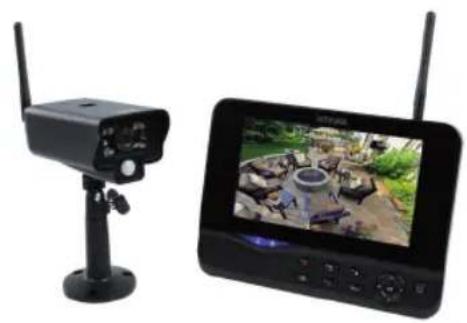
MANUAL (p. 2)
Wireless Camera System
MANUAL DE USO (p. 51)
Watch over your properties with this new 2.4 GHz digital wireless security camera system. The 7" LCD monitor can support up to 4 cameras and has an integrated digital video recorder. The camera offers a very sharp and stable image with night vision and the technology used improves the image quality even further. The system uses digital wireless technology and is equipped with advanced frequency signal encryption capabilities, which reduce interference caused by other applications using the 2.4 GHz frequency band. This digital technology ensures your privacy and allows you to use it over an extra long distance. THE BEST THAT WIRELESS HAS TO OFFER.
The monitor and camera are paired by factory default already. When adding the additional camera SEC-TRCAM40 (4 cameras max.) to the system, please refer to the section PAIRING for adding cameras.
- We recommend that you read this manual before installing/using the camera system.
- Keep this manual in a safe place for future reference.
Packaging content:
1x camera with bracket
1x7"monitor
2x antenna
1x AV output cable
2x AC/DC power supply
Technical specifications:
Camera:
Transmitting frequency: 2.4-2.4835 GHz Digital
Modulation: 16QAM,
QPSK,
Range: Indoor ± 50m open area ± 150m (depending on local conditions)
Image chip: 1/4" CMOS
Lens: 2.0mm
View angle: 73^
Infrared illumination (LED): 5 M
Protection: IP54
Microphone: mono
Working temperature: -10^ 50^
Voltage: 5 V DC/400 mA
Dimensions: 132x64x57mm
(without
BPSK
Weight: 287 g (included cable)
LCD monitor:
Receiving frequency: 2.4-2.4835 GHz Digital
Channels: 4
Size: 7"
Max. resolution: 800 RGB (H)^*480 (V) pixels
SD card: up to 32 GB (not included)
Video frame rate: 25 fps (max.) 10 fps (4x cameras)
Recording frame rate: 25 fps per channel
Video resolution: CIFVGA
Video format: AVI
USB: 2.0
Menu language: English, German, French and Dutch
Video output level: 1 Vp-p/75 Ohm
Audio output level: 2Vrms@600ohm mono
Audio/video output connector: 2.5mm jack (2.5mm cable to 3 x RCA included)
Range: Indoor ± 50m open area ± 150m (depending on local conditions)
Operating temperature: 0^ to +40^
Voltage: 5 V DC/650 mA
Dimensions:
214x157x26
mm
Weight:
488
9
Safety precautions:
- Do not open the camera or monitor in the event of a malfunction. These products should only be opened by a qualified engineer.
- Do not submerge the camera in liquid.
- Do not expose the monitor to water or humidity.
- Do not expose the monitor or camera to high temperatures (see technical specifications).
- Do not install the system close to strong magnetic fields, such as a speaker. This may affect the quality.
Product description:
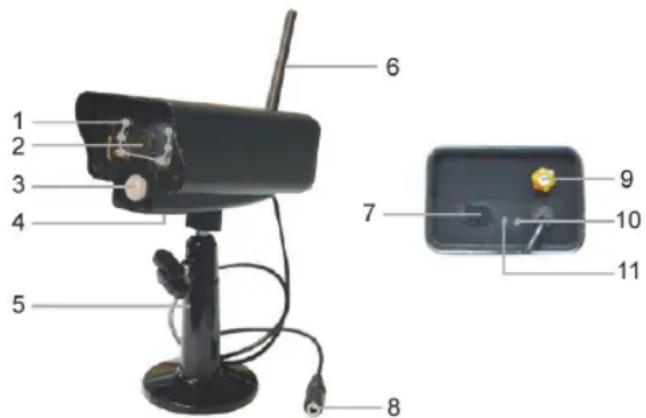
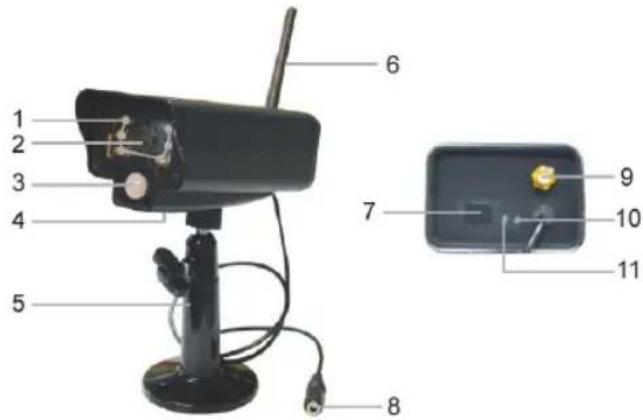
Camera:
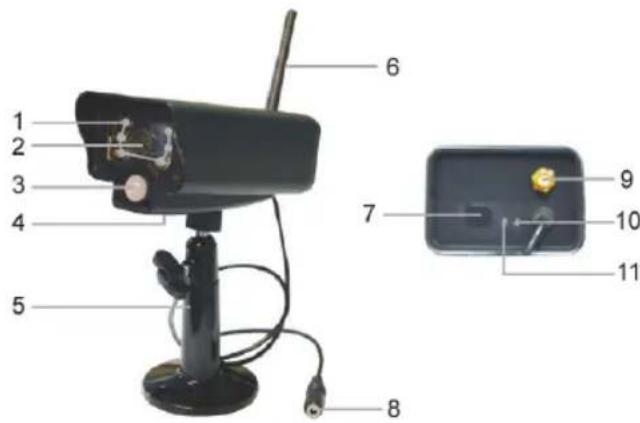
- Infrared LEDs
- Lens
- PIR infrared sensor
- Microphone
- Bracket
- Antenna
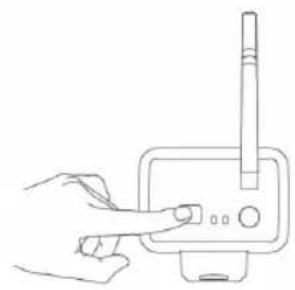
- Pair Button
- Power Input
- Antenna Socket
- Link Indicator
- Power Indicator
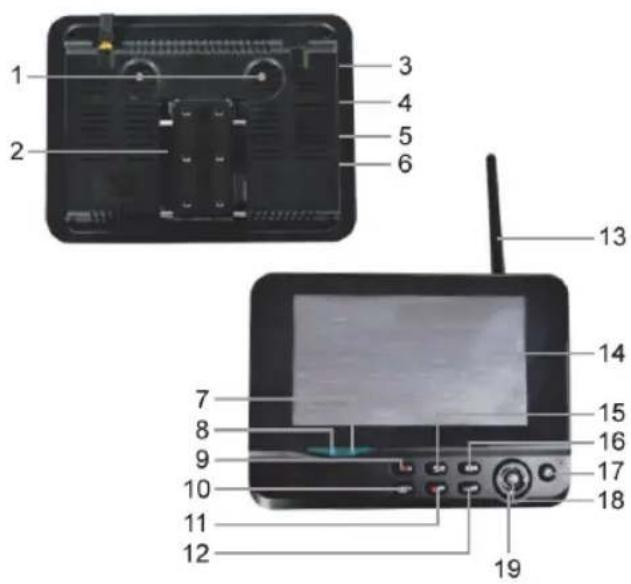
Monitor:
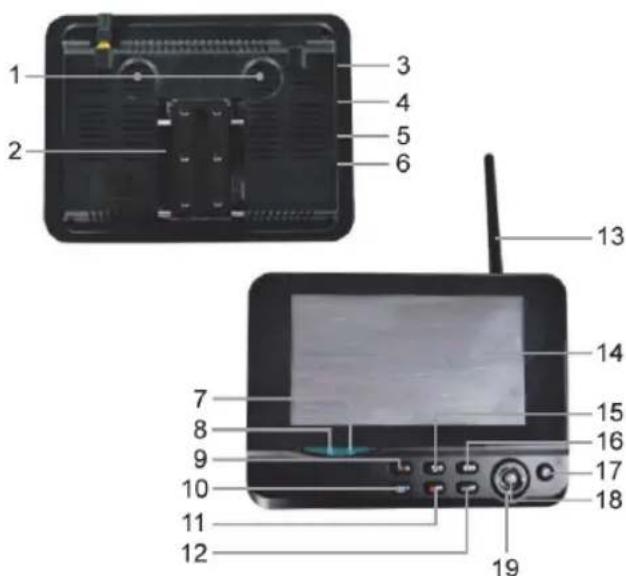
- Speaker
- Bracket
- USB Port
- SD Card Slot
- AV Output
- Power Port
- Link Indicator
- Power Indicator
- Record/stop Video
- Quarter Display Button
- Delete file/LCD, TV Switch
- Menu
- Antenna
14.7" TFT-LCD - Display Mode
- Playback Video
- Power on/off
- OK Button
- Navigate Button
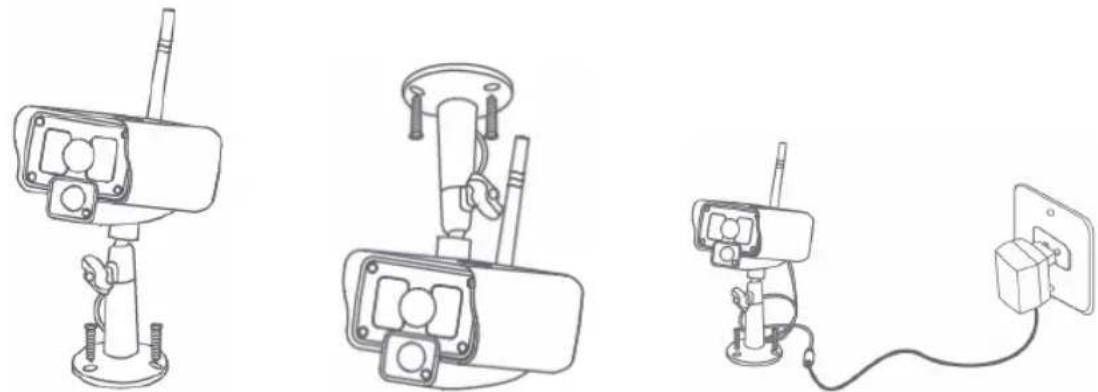
Installation instructions:
Camera:
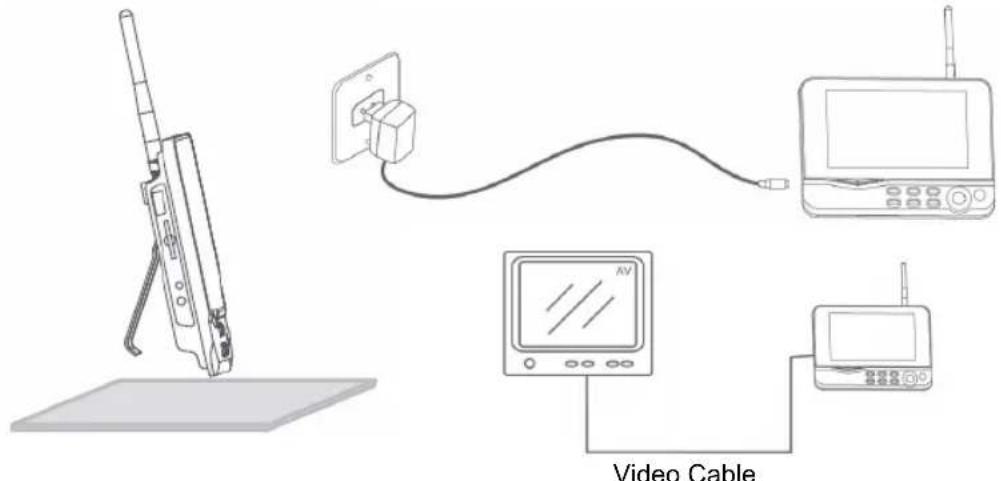
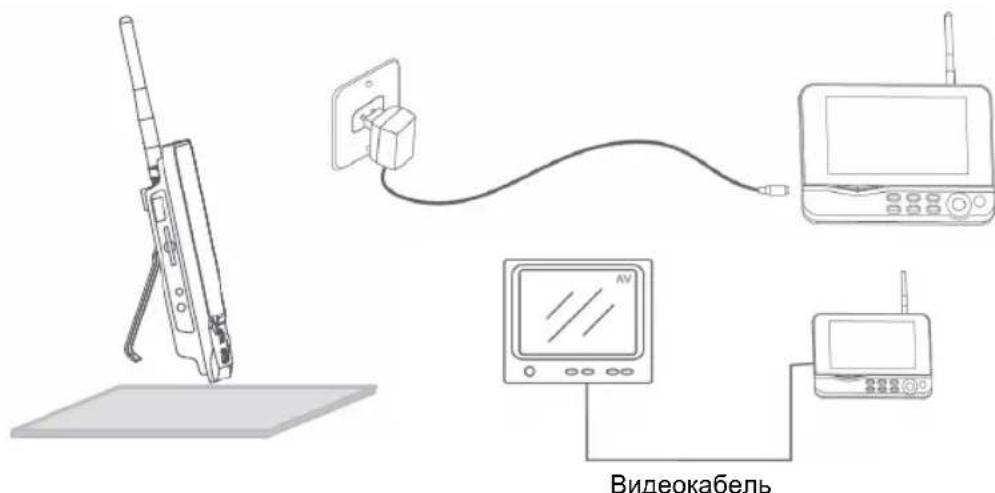
The camera can be mounted in different ways. For ceiling mounting use the screw thread on top of the camera. After mounting the camera connect the AC/DC power supply to the camera and a wall outlet.
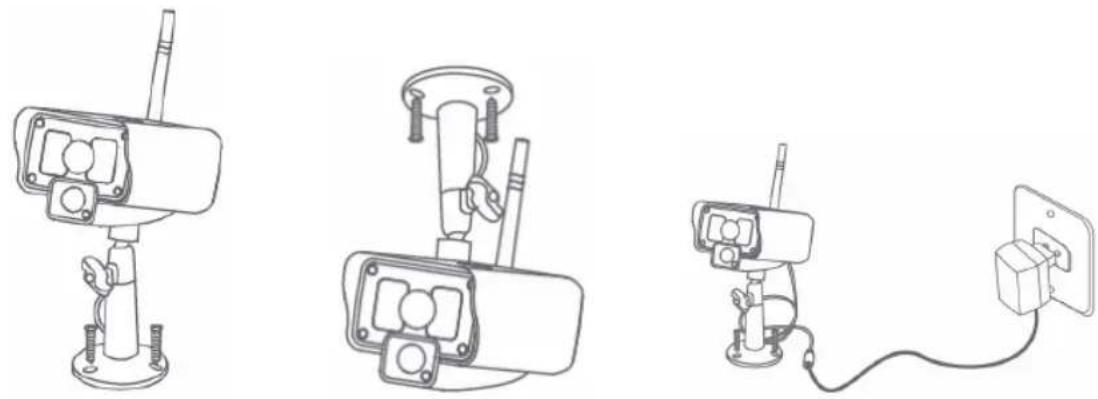
Monitor:
The monitor can be placed on a flat surface or mounted to the wall. After placing the monitor connect the AC/DC power supply to the monitor and a wall outlet. The camera is powered on automatically after connecting the AC/DC power supply. Optional: the monitor can be connected to a monitor with the video output of the monitor.
User instructions:
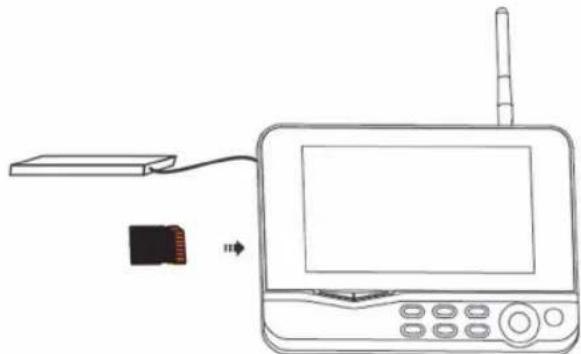
- Insert an SD card in the SD card slot of the monitor. Or connect an external hard disk drive to the USB port of the monitor.

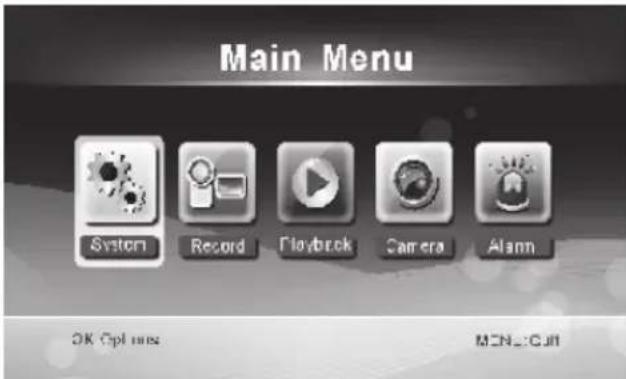
- Press the power on/off button for about 2 seconds to power on the monitor. The power indicator should light up and the picture appear.
- For systems settings press the menu button to open the main menu. The following screen should appear. Use the navigate, OK and menu buttons to navigate through the menu.
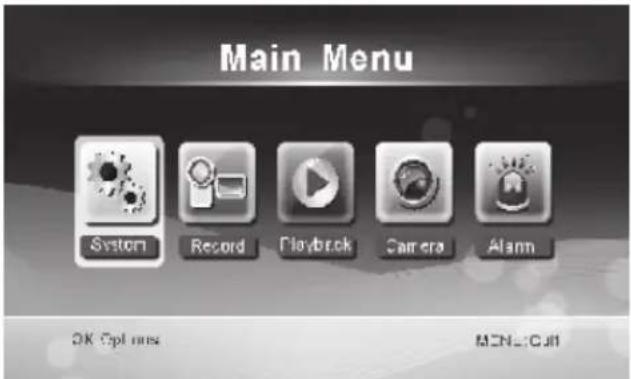
System
- Press OK to enter the system settings. The system offers the following options:
Date / Time Set the time and date.
Language Set the language.
Record Mode Set to stop recording or overwrite the first video record when the storage medium is full.
Format SD/USB Set to format the storage medium.
Storage for Recording Set the storage medium.
Display Items Set to display RSSI, Time, SD/USB status and camera on the screen and the recorded video.
TV System Select a TV system (PAL for Europe).
System Information Shows the system information.
Scan Mode Period Set the cyclic display interval of the monitoring picture on the camera.
Mute Turns on/off the speaker on the monitor.
Load Default Reset the factory default settings.
Record Date/Time Set to display the current recording time and date on the recorded video.
Brightness Adjust brightness of the picture.
Volume Adjust the volume.
-
Select date/time with the navigate button and press OK to enter the date/time setting.
-
Press the left or right arrow button to select.
- Press the up or down arrow button to adjust.
- Press the OK button to confirm.
-
Press the MENU button to exit.
-
Select language with the navigate button and press OK to enter the language setting.
-
Press the down or up arrow button to select language.
-
Press the OK button to confirm and exit.
-
Select record mode with the navigate button and press OK to enter the record mode setting.
-
Press the up or down arrow button to select "Normal" or "Overwrite".
- Press the OK button to confirm and exit.
Remarks:
Normal: When the SD card or the mobile hard disk is full, the system stops recording automatically. Overwrite: When the SD card or the mobile hard disk is full, the system automatically deletes the first video and reserves sufficient storage space to guarantee latest recording.
-
Select format SD/USB with the navigate button and press OK to enter the format SD/USB setting.
-
Press the up or down arrow button to select "Cancel", "SD Card" or "USB Device";
-
Cancel: cancels formatting.
- SD Card: formats the SD card.
-
USB Device: formats the external hard disk drive (if connected)
-
Press the OK button to format:
-
After formatting, the system shows "Format Successfully", indicating that formatting succeeds.
-
Press the OK button to confirm and exit.
-
Select storage for recording with the navigate button and press OK to enter the storage for recording setting.
-
Press the up or down button to select "SD Card" or "USB Device".
-
Press the OK button to confirm and exit.
-
Select display items with the navigate button and press OK to enter the display items setting.
-
Press the up or down arrow button to select.
-
Click the OK button to confirm the display items in the picture.
-
RSSI: Signal intensity icon
- SD USB status: Whether the SD card or mobile hard disk is inserted
-
Camera: Camera name icons
-
After setting, press the MENU button to confirm and exit.
-
Select TV system with the navigate button and press OK to enter the TV system setting.
-
Press the up or down button to select NTSC or PAL (PAL for Europe).
-
Press OK button to confirm and exit.
-
Select system information with the navigate button and press OK to enter the system information setting.
-
Press OK to see the information about the system.
-
Press the menu button to exit.
-
Select system upgrade with the navigate button and press OK to enter the system upgrade setting.
-
Press the up or down arrow button to select.
Press OK. -
Press the record/stop video button to confirm.
-
Select scan mode period with the navigate button and press OK to enter the scan mode period setting.
-
Press the up or down arrow button to select the period for scanning the connected cameras.
-
Press the OK button again to confirm and exit.
-
Select mute with the navigate button and press OK to enter the mute setting.
-
Press the up or down arrow button to select "On" or "Off".
-
Press the OK button again to confirm and exit.
-
Select load default with the navigate button and press OK to enter the load default setting.
-
Press the up or down button to select "Cancel" or "OK".
-
Cancel: Cancel option default settings.
-
OK: Resets default settings.
-
Press the OK button to confirm and exit.
-
Select brightness with the navigate button and press OK to enter the brightness setting.
-
Press the left or right arrow button to adjust the brightness.
-
Press the OK button to confirm and exit.
-
Select volume with the navigate button and press OK to enter the volume setting.
-
Press the left or right arrow button to adjust the volume.
- Press the OK button to confirm and exit.
Note: The volume can also be adjusted with the up or down arrow in live view monitoring.
- Press menu to return to the main menu.
Record
Press the right arrow button in the main menu to select the record settings and press OK.
Timer Recording:
Set the recording start/stop time through the "Timer Recording" menu. The device automatically records according the set start/stop time.
-
Select timer recording with the navigate button and press OK to enter a new schedule setting.
-
Press OK to enter the timer recording menu.
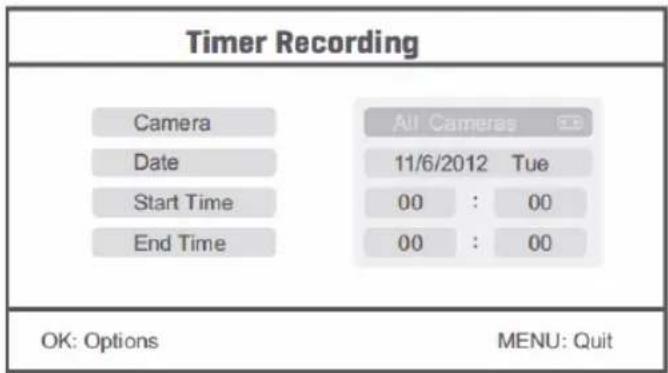
- Press the up or down arrow button to select;
- Press the left or right button to adjust;
-
Press the OK button to confirm and exit.
-
After setting, the device automatically records according to the set start/stop time.
- If you press the record/stop video button on the device during the recording process, set by timer recording, the recording stops.
Manual Recording:
- In live view monitoring, press the left and right arrow buttons to select the camera for video recording.
- Press the record/stop video button on the device. The recording icon is displayed on the screen, indicating that recording is starting.
- Press the button on the device again to stop recording.
PIR Recording:
PIR Recording: If there is human motion detected by any accessed camera, recording can be triggered.
-
Select PIR recording with the navigate button and press OK to enter the PIR recording setting.
-
Press the up or down button to select the camera.
- Press the left or right arrow button to select "On".
- Press the OK button to confirm and exit.
Note: when "Off" is set, the motion detection function is turned off. The infrared sensing distance of PIR is 5m. If the distance exceeds 5m, sensing may fail.
Playback
Press the right arrow button in the main menu to select the playback settings and press OK.
Note: for playback functions it's necessary that an SD card is inserted or an external hard disk drive is connected.
The playback function can also be accessed in live view monitoring by pressing the playback video button.
- Press the up or down arrow button to select the folder.
- Press the OK button to confirm and enter.
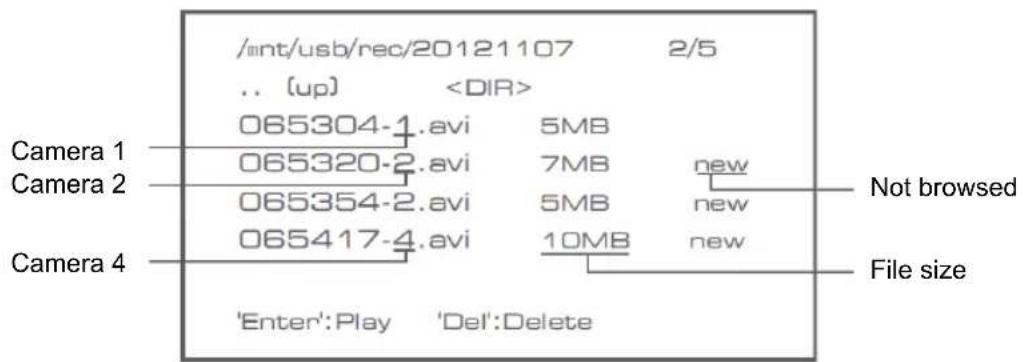
- Press the up or down arrow button to select the video file.
- Press the OK button for playback.
- Press the left or right arrow button to go backward/forward in fastforward.
- Press the OK button again to pause.
- Press the MENU button to quit the playback.
Delete video
In video playback mode, press the up or down arrow button to select the video or video folder to be deleted.
- Press the delete file/LCD button on the monitor to delete it.
Note: only an empty folder can be deleted as folder.
Camera
When adding the additional camera SEC-CAMTR40 (max. 4) the camera needs to be paired to the system for the system to recognize the camera.
Press the right arrow button in the main menu to select the camera settings and press OK.
Pairing:
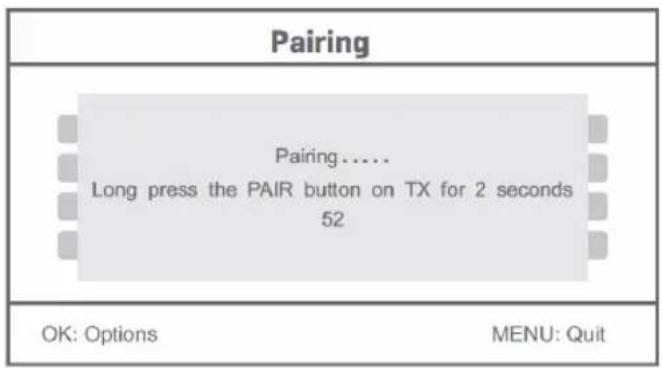
- Press OK to enter the pairing menu.
- Select the camera with the up and down arrow buttons.
- Press OK, and the following screen will appear.
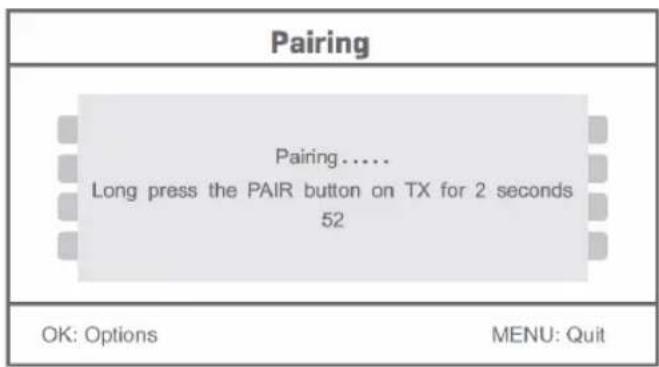
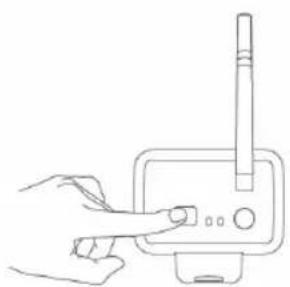
- Press the pair button within 60 seconds for 2 seconds on the backside of the camera.
- After the successful pairing of the camera and the monitor, the monitor shows PAIRING OK.
- Press the menu button to return to the camera menu.
Note: if pairing fails, retry the above steps and be sure that the monitor and camera are not further away than 2 metres for pairing procedure.
Active:
- Select active with the down arrow button and press OK.
- Press the up or down arrow button to select the camera.
- Press the left or right arrow button to select "On" or "Off".
- Press the OK button to confirm and exit.
Note: only paired cameras can be set to active or not active. When a camera is set to off, it cannot be seen in live view, recorded, etc.
PIP setting:
Set the picture resolution size and recording quality.
- Select PIP setting with the up and down arrow buttons and press OK.
- Select the camera with the up and down arrow buttons and press OK. The following screen appears.
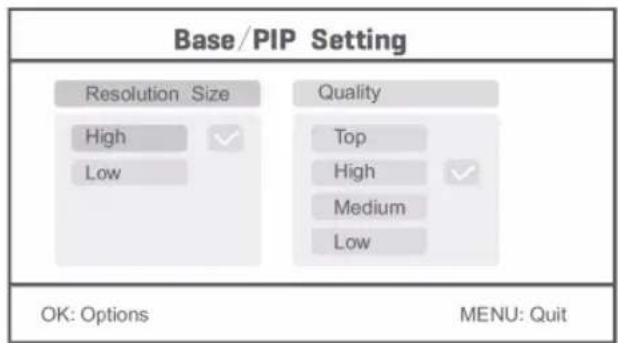
- Press the left or right arrow button to select "Resolution Size" or "Quality".
- Press the up or down arrow button to select "Top", "High", "Medium" or "Low".
- Press the OK button to adjust.
- Press the MENU button to confirm and exit.
Note: the high resolution size is VGA and low is CIF.
Alarm
When PIR detection is set to on, the system will give an alarm when motion is detected.
- Select alarm in the main menu and press OK.
- The screen shows PIR detection, press OK.
- Press "On" or "Off" with the up and down arrow button.
- Press OK to confirm and exit.
Live view:
Press the quarter display button to select the type of view.
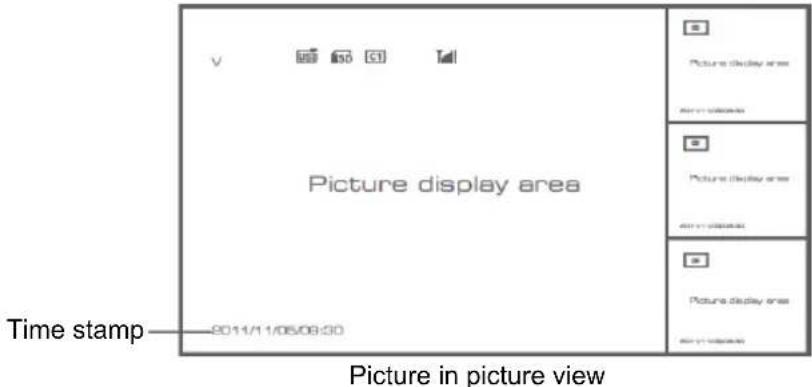
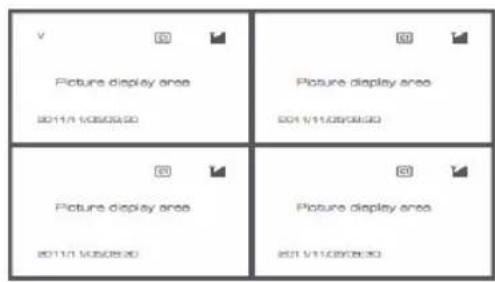
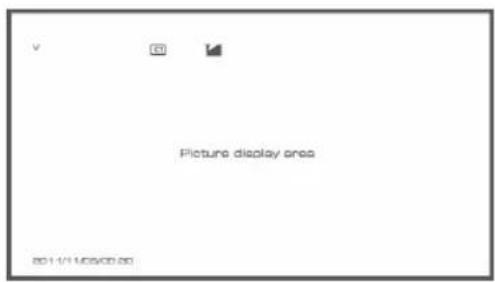
Quad view Full screen view
Note: use the left and right arrow button to select a camera
Press the display mode button to enter cyclic mode view. Five cyclic intervals are available: 5s, 10s, 15s, 20s, and 30s and can be set under "System" > Scan Mode Period in the mean menu.
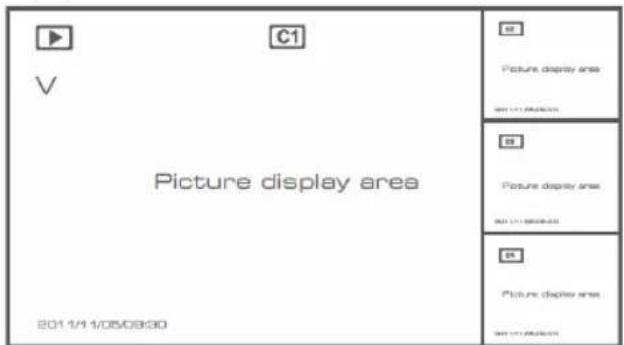
| USB | Mobile hard disk inserted successfully |
| LED | SD card inserted successfully |
| C1 C2 C3 C4 | Camera name |
| V | Current camera |
| Recording status | |
| Tull | Signal intensity |
Maintenance:
Clean the camera and the monitor with a dry cloth.
Do not use cleaning solvents or abrasives.
Warranty:
No guarantee or liability can be accepted for any changes and modifications of the product or damage caused due to incorrect use of this product.
Disclaimer:
Designs and specifications are subject to change without notice. All logos, brands and product names are trademarks or registered trademarks of their respective holders and are hereby recognised as such.
Disposal:
- This product is designated for separate collection at an appropriate collection point. Do not dispose of this product with household waste.
- For more information, contact the retailer or the local authority responsible for waste management.
This product has been manufactured and supplied in compliance with all relevant regulations and directives, valid for all member states of the European Union. It also complies with all applicable specifications and regulations in the country of sales.
Formal documentation is available upon request. This includes, but is not limited to: Declaration of Conformity (and product identity), Material Safety Data Sheet and product test report.
Please contact our customer service desk for support:
via website: http://www.nedis.com/en-us/contact/contact-form.htm
via e-mail: service@nedis.com
via telephone: +31 (0)73-5993965 (during office hours)
NEDIS B.V., De Tweeling 28, 5215 MC 's-Hertogenbosch, THE NETHERLANDS
DEUTSCH
Einleitung:
Tension: 5 V CC/650 mA
Dimensiones: 214× 157× 26mm
Peso: 488g
PIP setting (PIP beallitas):
Storage for Recording
Greutate: 287 g (inclusive cabul)
Monitor LCD:
Frecventa de receptionare: 2,4-2,4835 GHz digital
Canale: 4
m = 311
00
:
00
OK: Options
MENU:Quit
Spending: 5 V DC/400 mA
Mäl: 132x64x57 mm (uden monteringsbøjle)
Spenning: 5 V DC/650 mA
Dimensjoner: 214 × 157 × 26 ~mm
Vekt: 488 g
Forholdsregler for sikkerhet:
- du mä违法犯罪 kamerae etter monitoren ved feilfunksjon. Disse protokollene mä kun apnes av en kvalifisert tekniker.
du ma seksen senke kameraet ned i vaeske. - du mä ikke utsette monitoren for vann eller fuktighet
- du mä ikke utsette monitoren eller kameraet for høye temperaturer (se tekniske spesifikasjoner).
- du mä ikke montere systemet inntil sterke magnetfelt, som f.eks en høytaler. Dette kan påvirke kvaliteten.
Produktbeskrivelse:
Kamera:
- Infrarode LED-lamper
- Linse
- PIR infrarod sensor
- Mikrofon
- Feste
- Antenne
- Knapp for paring
- Strøminntak
- Kontakt for antennen
- Koblingsindikator
- Strömindikator
Monitor:

- Høyttaler
- Feste
- USB-port
- Sportil SD-kort
- AV-utmating
- Strømport
- Koblingsindikator
- Strömindikator
- Ta opp / stopp video
- Knapp for firedelt visning
- Slett fil/LCD, TV-bryter
- Meny
- Antenne
- 7" TFT-LCD
- Visningsmodus
- Videoavspilling
- Strøm paaav
- OK-knappen
- Navigasjonsknappen
Monteringsinstruktener:
Kamera:
Kamepa KpoHHTeHOM 1 wT.
MoHntOp 7"1 wT.
AHTehHa 2 wT.
Ka6eJb BbIXoJa AV 1 wT.
IcTouHnK nHTaHnNoCT./nepem. ToKa 2 wT.
TexHnueckne xapaKTepeNCTnKn:
Kamepa:
Yactota nepedaun: 2,4-2,4835 TU, uippoBaJ
MoDyIaIa: 16QAM, QPSK,
Papnyc deiCTBn: B nomeeHnn ± 50M , Ha otKpbItoT TeppntOpnn ± 150M (B 3aBncmocTN OT IOKaJIbHbIX ycIOBn)
Yin n3o6paXeHn: 1/4" CMOS
OBeKtINB: 2,0 MM
Yron3peHn: 73°
IK-ocbeueHne (CBeToIOHOHoe): 5M
3aunta: IP54
MnKpoΦoH:MOHO
Paboua Temnepa: -10°C ~ 50°C
HapjkeHe: 5B noct. toka/400 mA
「a6apntbI: 132x64x57MM(6e3KpoHHTeHa)
Bec: 287 r (BkIIOUaJ Ka6eJIb)
KK-MOHNTOP:
Yactota npema: 2,4-2,4835 TU, ufo poBa
KaHabl: 4
Pa3mep: 7" TFT/KK
MaKc. pa3peSeHne: 800 RGB (Γ)* 480 (B) nIKceIeI
KapTa SD: 32 6 (He npunaeraetc)
YacToTa BnDeoKaIpOB: 25 KaIPOB B ceKyHny (MaKc.) 10 fps (4 Kamepebl)
Yactota Kaapob 3aHncn: 25 Kaipob B cekyHny Ha KaHa
Pazpeшень Виdeo: CIF/VGA
Bnneoopmat: AVI
USB: 2,0
J3bIK MeHIO: aHrnnckn, Hemeucn, ppaHcy3ckn n rOJIaHdCKn
YpOBeHbBbIOa BnDeo: 1Vp-p/75OM
YpOBeHbBbIbOaaynO: 2Vrms np600OM,MOHO
Pa3bem aydno/Bndeo BbIXOa: Pa3bem 2,5 MM (ka6eJIb 2,5 MM nIg 3 RCA, npunaraetc)
Papnyc deiCTBn: B nomueeHm ± 50 M, Ha otKpbToI TeppntOpnn ± 150 M
(B 3aBnCIMOCTN OT JOKaJIbHbIX YcIOBnI)
Papayam Temnepa: oT 0^ do +40^
HapjkeHe: 5B noct. toka/650 mA
T6apn7b: 214 x 157 x 26 MM
Bec: 488
F
Mepb6e3onacHocTn:
He OTKpbIbAte KaMepy IIN MOHITOp B CNYaee HEnCnpaBHOCTN. 3TN npOdyKTbIM MoryT 6bITb OTKpbITb TObKO KBaJIHΦUInPOBaHHbIM INHXeHepOM.
He norpykaaTe kamepy B KxNkOcTn.
He noDBepraTe MOHToP BO3DeICTBnIO BObI IN BnaI.
He noDBepraIte MOHITOp n KaMepy BO3dEiCTBnIO BbICOKNX TeMnepaTpy (cm. TexHnuecknex xapaKTepeNCTkN).
He yctaHaBJIbAitc CnCTemy pROM C NCTOCHNKAMN CNJbHbIX MaHHTHBIX NOJE, HApPIMep DInHAMKAMN. 3TO MOKeT NOBJIaRrTa Ha KaueCTBO.
Onncahne npodykta:
Kamepa:
- IK-CBETOIOIOIbI
2.ObbeKTHB - HΦpaKpaChbI DaTynk PIR
- Minkpooh
- KpoHsTeH
- AHTeHHa
- Khonka CoopjekHe
- BxOJHnA MoUHOCtB
- The third person
- INHdkaTOp Cbllkn
- INDINKATOP NITAHN
MOHHTop:
1.ДиHamNK
2. KpoHsTeH
3. USB-nopt
4. Pa3bEm dIg KApTbI SD
5. BbIXoAV
6. IopT nCTOuHnka nTaHn
7. INHdNKaTOp CcbIKN
8.Инданкоторптуня
9. 3aHcB/OctaHObKa BnDeo
10. Khonka pexkma c qtebipm Okhamn
11. YdaIbTb paai/JK, nepeKIOuATEJIb TeJeBn3opa
12. MEHIO
13. AHTeHHa
14.7"TFT-KK-DinCnnei
15.PeknM OTo6paKeHn
16. Bocnpo3BeHneBnDeo
17. BbIKJIOyATEJI bITaHnA
18. KhoNka OK
19. KhoNka Habirraun
Hctpkun no yctaHOBKe:
Kamepa:
Kamepy MoXHO yCTaHOBtB HeCKoJIbKIMM CnOCo6AmN.ДЯ KpeIeHnHa NOTOnOK NcNoJb3yIte OTBepCTne DnBnHTa B BepxHeu qactn KamepbI. PocIe KpeIeHnKaMEpbI NODKnIOChTe NCTOHHNK NOCT./nepeM. TOKA K Kamepe HnAcTeHHoP o3eTKe.
MOHTop:
MOHITOP MOXHO NOMECTNtB Ha IIOCKyO NOBepxHOCtB HIN npIKpeNTb Ha CTeHy. IocNe yCTaHOBKn MOHTOPa NOkJIIOHTe ICTOCHNK IOCT./IepeM. TOKa K MOHITOpY I HAcTeHHoI po3eTke. Kamepa BKJIOUaETcA ABTOMATNUeCKN IocNe NOkJIIOUeHn ICTOCHNka PNTaHnI NOCT./IepeM. TOKa.
IOnOHIneJIbHO:MOHITOP MOXHO NOKJIIOHTb K MOHITOPy C NOMOsbIO BnDeOBbIXoJa MOHITOpa.
Hnctpykun noJb3ObaTeIa:
- Bctabbte KapTy SD b rhe3do dnnk KapTbI SD MOHITopa. NIO6o NOdkNHOHTe BHeuHn JxecTKn DnCK K npTy USB MOHITopa.
- Haxmte KONky BKNIOUeHn/BBKIIIOUeHn NITaHn y UepxNBAite B TeueHne 2 cekyHd nla BKNIOUeHn MOHTopa. DOnJKeH 3arOpetbCn INDnKaTOp NITaHn n NOBnTbcN 3O6paXeHne.
3.ДЯВыINONHeHЯСИCTeMHbIXHAcTpoE KHaKMITEKHOKNyMeHIO,YTO6blOTKpbITbIJIaBHOE MeHIO.IoRbNTcCpeDyUOuN 3KpaH.NcNoNb3yIte KhoNKn HABrAciuN,OK n MeHIO dIra HabrAciuN no MEHIO.
CmTeMa
- Haxmnte OK nIy BXoDa B CnCTemHbIe HaCTpoKn. CnCTema NMeET cNeDyUOuNe npaMaTePbI:
Data/Bpemr
YcTaHObKa DaTbI N BpeMeHn.
R3bIK
YctaHOBka 3bika.
Pekim 3aHNCN
Icnoj3yeTcIgOCTaHOBKn 3aNNCn nn nepe3annc
ΦopMaTnpoBaHne SD/USB
HocntenbIa3anci
3nemEmtB DcInner
TB CNTema
HOpMaunCnTeMbI
PepnoD pexIma cKaHnpoBaHnA
OTKJIIOUHeHne 3Byka
HacpoiKn no ymoJuaHHIO
Data/Bpem3aIncN
RpkocTb
PpOMKoCTb
NepBoi BnDeo3aHNC,ecn HocnteB namrTn 3aNoJIHeH.
YcTaHObKaΦopMaTIpOBAHnH HocTeJIa.
Bb6op HocHTeJIa.
YcTaHOBKa OTo6paKeHHa RSSI, BpeMeHN, CoCToHnSA D/USB n KaMepbHa 3KpaHe n 3aIIncAHHom BInDeo.
BbI6epnte TB-cnCTemy (PAL dIa Ebponbl).
OTo6paKeHne cIcTeMHo INHOpMaUIN.
YcTaHOBka ZKlnueckoro INHTepBaIa OTo6paXeHn I3O6paXeHn C KaMepbl.
BkJIOueHHe/OTKJIIOUeHHe DnHaMnKa Ha MoHTope.
C6pocdo3aBOcknxHacTpoeknoymoHaHHIO.
Hacpoika OTo6paKeHn BpeMeHn I DaTbI 3aIncN Ha 3aIncaHHOM BIDEO.
PeryunpoBkA npKocn n3o6paKeHn.
Hacptponka rpoMkoCTn.
- Bb6epnte daTy n Bpemc nOMOsbIO KHOPIKn HABNIGuIN, 3aTeM HaxmTe OK nnBbOda daTbI/BpeMeHn.
-ДяВыбogaиспONSьутКнОнкуСоТрЕнковВлевоИИNВпаво.
- pyerpynpoBkn nCnoB3yIe KhoNky co CTopeKoB BBePx nnBn3.
- Дя подеверхдени нахмп Te Khoиу OK.
- HaxmTe KhoNkMy MENUДЯ BBIXOJa.
- BbI6epnte y3bIK c nOMOuBIO KHOKN HABNraCIN, 3aTeM HAXMNTE OK dnn BxOda B a3bIKOBbIE NaCTpOKn.
Hakmte KhoNky OK nIy noTBePKeHnE HneMeHTOB dncnE Ha n3o6paKeHH.
RSSI: 3NaOH CINJI CINHana
- CoctoHne SD nnn USB: OTo6paKaet, yCTaHOBnHa Jn KapTa SD nnn Mo6nIbHbI JeecTkni DNCK
- Kamepa: 3Hauchn ImeH kamep
- Nocne Hacptponn Haxmnte KhoNkY MEHIO nna noTbePckdHn y BbIXoJa.
-
Bb6epnte TB-cnCTemy c nmoou KhoNKn Habnraun, 3aTe M hKmTe OK dJa BXoJa B HaCtpoKn TB-cnCTembl.
-
HaxmTe KhoNkO co cTpeKoB BBePx nIi Bn3 dIy Bb6opa NTSC nIi PAL (PAL dIe EbpOnbl).
-Дя поТьержденя в ВixOda нахмп Te KhoNky OK. -
Bb6epnte cncTeMHyIO IHΦopMaunio C nOmoBIO KHOIN HABnraun, 3aTeM HAXMITE OK IJIY BXoDA B HAcTPOIKN CnCTeMHoH INΦopMaun.
Haxmnte OK, yTo6bI npocMOTpeb INHOpMaUHO o cnCTeme.
- Haxmnte KhoNkMy MeHIO DnIy BbIXOJa.
- Bb6epnte 6OBHBeHHe CnCTEmbl C NOMOuB KOHN HABURAuN, 3aTeM HAXMTte OK nBxoDa B HAcTPOKn 6OBHBeHn CnCTEmbl.
-ДяВыбopaинользуITEKHONKY CO cTppeKoB BBePx UNI BHN3.
- Haxmnte OK.
-Дя подевержденин Наимite KhoIGNу 3annc/OctaHOBKn BndeO.
- Bb6epnte nepnoi pekma cKaHnpoBaHnC nOMOu bIO KHOKn HABnraun, 3aTe m Haxmnte OK dIy BXoDa B HAcTpoKn nepnoa pekma Habnraun.
HaKMMTe KhoNk y co cTpeIKoB BBePx IJIN BHN3 dJa BbI6opa nepNoa cKaHnpOBaHn noKnIOueHHbIX KaMep.
-Дя подеверждени в Быхда нахмпту кону OK.
- Bb6epnte OTKIIOHHe IpOMKoCTn C NOMOuBHO KHOHN HABNraCn, 3aTeM HAXMMTe OK nBxoDA B HAcTPOIN OTKJIIOHHe IpOMKoCTn.
Haxmnte OK nBxAoBa MeHIO 3aNcNo TaImepy.
Timer Recording
Camera
Date
Start Time
End Time
All Cameras
11/6/2012 Tue
00 00
00 00
OK: Options
MENU:Quit
-Дявьбopaинользут ekHONky co cTepeNKoB BBepx uNn BHN3;
- Pny npOBKn nCIOJIb3yIe KHOKyo Co CTePJIKO BNEBO nnBnPaBO;
-Длп подеверждении вьхда нахмпткногку OK.
2.Послнгусгдьуггсгдьуггсдьуггсдьуггсдьуггсдьугgн
<|im_start|>assistant
Hauana/OKOHuaHnA.
3.Пинжати KHONK 3aINCS/OCTaHOBKN BIneO Ha yCTpoNCTBe BO BpeM npocecca 3aINcN, 3aDaHHoro C NOMOJIbTO TaIMepa, 3aINCb OCTaHOBNTCra.
3auncbBpyHyu:
1.Пи npocmoTe BndeO BpeKmme peaJIbHO BpeMeHn HaxMnte KhoNky Co CTePknOB BnEBO nBnpaBO dIy Bb6opa KaMepbl IJra 3anCn BndeO.
2. Haxmte Ha yctpoCTBE KhoNky 3aIncn/OctaHOBKn Bndeo. Ha 3kpaHe OTo6paxKaetc 3HaocK 3aIncn, obo3Haay Haayano 3aIncn.
3. Haxmte KhoNkY Ha yCToPocTBe eue pa3, YTObbl OCTaHOBnTB 3anncb.
3anucbPIR:
3aIncb PIR: Ecn Kamepo 6ydt 3aNcnpoBaHO DnKHeHne, HauHcTc 3aINCb.
- Bb6epnte 3anncb PIR c nmoou KhoNKn HauRauu, 3aTeM haxmTe OK dnn BxoJa B hacTpoKn 3anncn PIR.
- Haxmte Ha MOHTope KhoNky ydaJeHnna faJa/KK dny ydaJeHnna.
PnimeaHne. YdaJIbTb MoXHO ToIbKO ncyTO naKy.
Kamepa
При добавлидопоннтьнй камерbl SEC-CAMTR40 (MaKc. 4) Heo6xOДМо BbIOnHnTb coprajkeHne kamepbic cnCTeMo, yTO6bl cnCTema paCNo3HaJa kamepy.
HaxmTe KhoNky Co CtePikO BnpaBO B INaBHOM MeHIO dIy BbI6pa HacTpoE KamepbI, a 3aTeM HaxmTe OK.
ConpJKeHne:
- Haxmte OK Дя BXOД B MeHIO copjKeHnI.
- BbIbepuTe Kamepy c NOMOJIbIO KHONOK CO CTpeNkAMN BBepx IN BHN3.
- Haxmte OK, nocJe yero oTo6pa3nTc cneDyUoee OKHO.
- HaxmTe KhoNky cOpJKeHnHa 3aDHeuactn KaMepbI B TeueHne 60 ceKyHn u ydepXnBaIte ee 2ceKyHdbI.
- Nocne BbINOJIHeHnA CONpJKeHnKaMepbI N MOHTopa Ha MOHTope OTO6pa3ntc CoO6uHeHn COPPJKeHnE BblONHEHO.
6.ДЯ BO3BpaTa B MeHIO kAMEpbI HAXMnTe KHOKNy MEHIO.
PnmeaHne. B cnyae c6oB conpXeHn IOBtOpIe ONncAHbIe BblIe DeIcTBn I y6eIITecb, YTO MOHTOP n KaMepa paCNOIOKeHbI dpyr OT dpyra Ha pacCTOaHN He 60nee 2 MeTPOB BO BpeMa BBINOHHeHn CONpXeHn.
AKTNBHbI:
B cnyae n3meHnna moNnKauuyn yCTpoNCTBa nn B cnyae, nobpeKeHnna yCTpoNCTBa BCneCTBne ero HnpabunbHorO nCNoJb3OBaHnra rapaHTna nn o6ra3aTeNbCTBa He neCTbyOT.
OROBOPK:
IIN3aH IN TexHnueckne XapakTeepntKMOrT 6bITb N3MeHeHbI 6e3 npedBapNTbHO rYBeOMJIeHNIA. Bce IOROTnbIb 6peHIOB IN HA3BaHnpyoKTOB YBJIaOTcTobAPbHIMN 3HaKaMn IIN 3apeHCTpnpoBAHHbIMN TOPROBbIMN MapkAMN IX COOTBetCTByUxN BnaJeJIbCeB IN CNeOBoTaJIbHO npu3HAOTc TaKOBbIMN.
BHHMaHHe:

3To yctpoiCTBO npedha3hauheO dIpa 4a3dienbHoro c6opa B COOTBETCTBYIOUeM nyHKTe c6opa OTOxOIOB. He BB6paCbBaIte 3TO yCTPOiCTBO BMECTe C 6bITOBIM NTOXoAMN.
- IJRAIIOyueHnIOnIHNTeHbHOINHΦOpMaunO6paTntecb K npOaBcy NJI B MeCThbl OprAH Bnactn, OTBeTCTBeHHb3aYtUN3aCNUOOTXoDOb.
IaHHOeN3dEne 6bIIO N3rOToBNEHO INoCTabNEHO B COOTBeTCTBnCO BCEMN PpIMEHIMbIMN NOIOXeHnMn IupeKtNBAMn, DeiCTByUcIMn IINBCExC TpaH-JIeHOB Ebponeckoro CoIO3a. OHO TAKKe COOTBeTCTByET BcEM HOpMaMn IN paBUNAMn, DeiCTByUcIMN B CTpaHe npOdaXn.
OΦηuaJIbHaJa DOKyMeHtAaIg NpeIoCTaBnEaTc No 3anpocy. ΘTa DOKyMeHTaIaIg BKNIOUaET (Ho He orpaHnUBaETcA 3TNM):ДeKnapaIaIg COOTBeTcTBnI (u n3dJIi), nacnopT 6e3oNaChOcTn, OTcET no npOBepKe npOdykTa.
IpyeHnnooBbHaCyKbNoDepKKnJHeTOB:
Чебец Воб-cайт: http://www.nedis.com/en-us/contact/contact-form.htm
no 3neKtpoHHo nOte: service@nedis.com
no Tepeohy: +31 (0)73-5993965 (B pa6oynacbl)
NEDIS B.V., De Tweeling 28, 5215 MC's-Hertogenbosch, THE NETHERLANDS (HINDEPJIAHdbI)