
MISSY IX/A/60 - Decorative wall hood ELICA - Free user manual and instructions
Find the device manual for free MISSY IX/A/60 ELICA in PDF.
| Product type | Wall-mounted decorative hood |
| Brand | ELICA |
| Model | MISSY IX/A/60 |
| Width | 60 cm |
| Mounting | Wall-mounted |
| Use version | Extracting (external evacuation) or recirculating (charcoal filter) |
| Number of speeds | 3 (according to control panel) |
| Lighting | 3 W LED, socket E14 |
| Grease filter type | Metallic, dishwasher safe or hand washable |
| Charcoal filter type | Replace every 4 months (not washable) |
| Power supply | 220-240 V ~ 50/60 Hz |
| Max lighting power | 3 W (LED) |
| Minimum safety distance (electric) | 50 cm |
| Minimum safety distance (gas) | 65 cm |
| Grease filter maintenance | Once a month |
| Exterior cleaning | Damp cloth with neutral detergent, no alcohol or abrasives |
| Control type | Manual control panel |
| Approximate weight | 15 kg |
| Dimensions (W x D x H) | 60 x 50 x 60 cm (approximate) |
| Main material | Stainless steel |
| Non-return valve | Optional (depending on model) |
Frequently Asked Questions - MISSY IX/A/60 ELICA
User questions about MISSY IX/A/60 ELICA
0 question about this device. Answer the ones you know or ask your own.
Ask a new question about this device
Download the instructions for your Decorative wall hood in PDF format for free! Find your manual MISSY IX/A/60 - ELICA and take your electronic device back in hand. On this page are published all the documents necessary for the use of your device. MISSY IX/A/60 by ELICA.
USER MANUAL MISSY IX/A/60 ELICA
EN Instruction on mounting and use
La saturazione del filtro carbone si verifieso after a few minutes, but the man is still unable to move. He looks at his father's face and his mother's face. "I'm sorry," he says, "but I don't know how to tell him what he wants to say."
Closely follow the instructions set out in this manual. All responsibility, for any eventual inconveniences, damages or fires caused by not complying with the instructions in this manual, is declined. This appliance is intended to be used in household and similar application such as: - staff kitchen areas in shop, offices and other working environments; - farm houses; - by clients in hotels, motels and other residential type environments; - bed and breakfast type environments.
Note: The parts marked with the symbol ( ^ * ) " are optional accessories supplied only with some models or otherwise not supplied, but available for purchase.
Caution
- Before any cleaning or maintenance operation, disconnect hood from the mains by removing the plug or disconnecting the mains electrical supply.
- Always wear work gloves for all installation and maintenance operations.
- This appliance can be used by children aged from 8 years and above and persons with reduced physical, sensory or mental capabilities or lack of experience and knowledge if they have been given supervision or instruction concerning use of the appliance in a safe way and understand the hazards involved.
Children shall not be allowed to tamper with the controls or play with the appliance. - Cleaning and user maintenance shall not be made by children without supervision.
- The premises where the appliance is installed must be sufficiently ventilated, when the kitchen hood is used together with other gas combustion devices or other fuels.
- The hood must be regularly cleaned on both the inside and outside (AT LEAST ONCE A MONTH).
- This must be completed in accordance with the maintenance instructions provided. Failure to follow the instructions
provided regarding the cleaning of the hood and filters will lead to the risk of fires.
- Do not flambe under the range hood.
- For lamp replacement use only lamp type indicated in the Maintenance/Replacing lamps section of this manual.
The use of exposed flames is detrimental to the filters and may cause a fire risk, and must therefore be avoided in all circumstances.
Any frying must be done with care in order to make sure that the oil does not overheat and ignite.
CAUTION: Accessible parts of the hood may become hot when used with cooking appliances.
- Do not connect the appliance to the mains until the installation is fully complete.
- With regards to the technical and safety measures to be adopted for fume discharging it is important to closely follow the regulations provided by the local authorities.
- The air must not be discharged into a flue that is used for exhausting fumes from appliance burning gas or other fuels.
- Do not use or leave the hood without the lamp correctly mounted due to the possible risk of electric shocks.
- Never use the hood without effectively mounted grids.
- The hood must NEVER be used as a support surface unless specifically indicated.
- Use only the fixing screws supplied with the product for installation or, if not supplied, purchase the correct screws type.
- Use the correct length for the screws which are identified in the Installation Guide.
- In case of doubt, consult an authorized service assistance center or similar qualified person.
WARNING!
- Failure to install the screws or fixing device in accordance with these instructions may result in electrical hazards.
-
Do not use with a programmer, timer, separate remote control system or any other device that switches on automatically.
-
This appliance is marked according to the European directive 2012/19/EC on Waste Electrical and Electronic Equipment (WEEE).
-
By ensuring this product is disposed of correctly, you will help prevent potential negative consequences for the environment and human health, which could otherwise be caused by inappropriate waste handling of this product.

- The symbol on the product, or on the documents accompanying the product, indicates that this appliance may not be treated as household waste. Instead it should be taken to the appropriate collection point for the recycling of electrical and electronic equipment. Disposal must be carried out in accordance with local environmental regulations for waste disposal.
- For further detailed information regarding the process, collection and recycling of this product, please contact the appropriate department of your local authorities or the local department for household waste or the shop where you purchased this product.
Appliance designed, tested and manufactured according to:
- Safety: EN/IEC 60335-1; EN/IEC 60335-2-31, EN/IEC 62233.
Performance: EN/IEC 61591; ISO 5167-1; ISO 5167-3; ISO 5168; EN/IEC 60704-1; EN/IEC 60704-2-13; EN/IEC 60704-3; ISO 3741; EN 50564; IEC 62301. - EMC: EN 55014-1; CISPR 14-1; EN 55014-2; CISPR 14-2; EN/IEC 61000-3-2; EN/IEC 61000-3-3. Suggestions for a correct use in order to reduce the environmental impact: Switch ON the hood at minimum speed when you start cooking and kept it running for few minutes after cooking is finished. Increase the speed only in case of large amount of smoke and vapor and use boost speed(s) only in extreme situations. Replace the charcoal filter(s) when necessary to maintain a good odor reduction efficiency. Clean the grease filter(s) when necessary to maintain a good grease filter efficiency. Use the maximum diameter of the ducting system indicated in this manual to optimize efficiency and minimize noise.
Use
The hood is designed to be used either for exhausting or filter version.
Ducting version
The hood is equipped with a top air outlet B for discharge of fumes to the outside (exhaust pipe and pipe fixing clamps not provided).
Attention! If the hood is supplied with carbon filter, then it must be removed.
Filter version
In the case of not being able to discharge the fumes and the steam of cooking outside, the hood in the filter version can be used mounting the F deflector on the flue and one or more carbon filters (on the basis of the model possessed). The fumes and steam are recycled into the kitchen through upper grill H.
Attention! If the hood is not supplied with carbon filter,
then it must be ordered and mounted.
The models with no suction motor only operate in ducting mode, and must be connected to an external suction device (not supplied).
The connecting instructions are supplied with the peripheral suction unit.
Installation
Fig. 3
The minimum distance between the supporting surface for the cooking equipment on the hob and the lowest part of the range hood must be not less than 50cm from electric cookers and 65cm from gas or mixed cookers.
If the instructions for installation for the gas hob specify a greater distance, this must be adhered to.

Electrical connection
The mains power supply must correspond to the rating indicated on the plate situated inside the hood. If provided with a plug connect the hood to a socket in compliance with current regulations and positioned in an accessible area, after installation. If it not fitted with a plug (direct mains connection) or if the plug is not located in an accessible area, after installation, apply a double pole switch in accordance with standards which assures the complete disconnection of the mains under conditions relating to over-current category III, in accordance with installation instructions.

WARNING!
Before re-connecting the hood circuit to the mains supply and checking the efficient function, always check that the mains cable is correctly assembled.
Mounting
Expansion wall plugs are provided to secure the hood to most types of walls/ceilings. However, a qualified technician must verify suitability of the materials in accordance with the type of wall/ceiling. The wall/ceiling must be strong enough to take the weight of the hood.
Do not tile, grout or silicone this appliance to the wall. Surface mounting only.
Operation
The hood is fitted with a control panel with aspiration speed selection control and a light switch to control cooking area lights.
Maintenance
Cleaning
Clean using ONLY a cloth dampened with neutral liquid detergent. DO NOT CLEAN WITH TOOLS OR
INSTRUMENTS. Do not use abrasive products. DO NOT USE ALCOHOL!
Grease filter
Fig. 1
Traps cooking grease particles.
The grease filter must be cleaned once a month using non aggressive detergents, either by hand or in the dishwasher, which must be set to a low temperature and a short cycle.
When washed in a dishwasher, the grease filter may discolor slightly, but this does not affect its filtering capacity.
To remove the grease filter, pull the spring release handle.
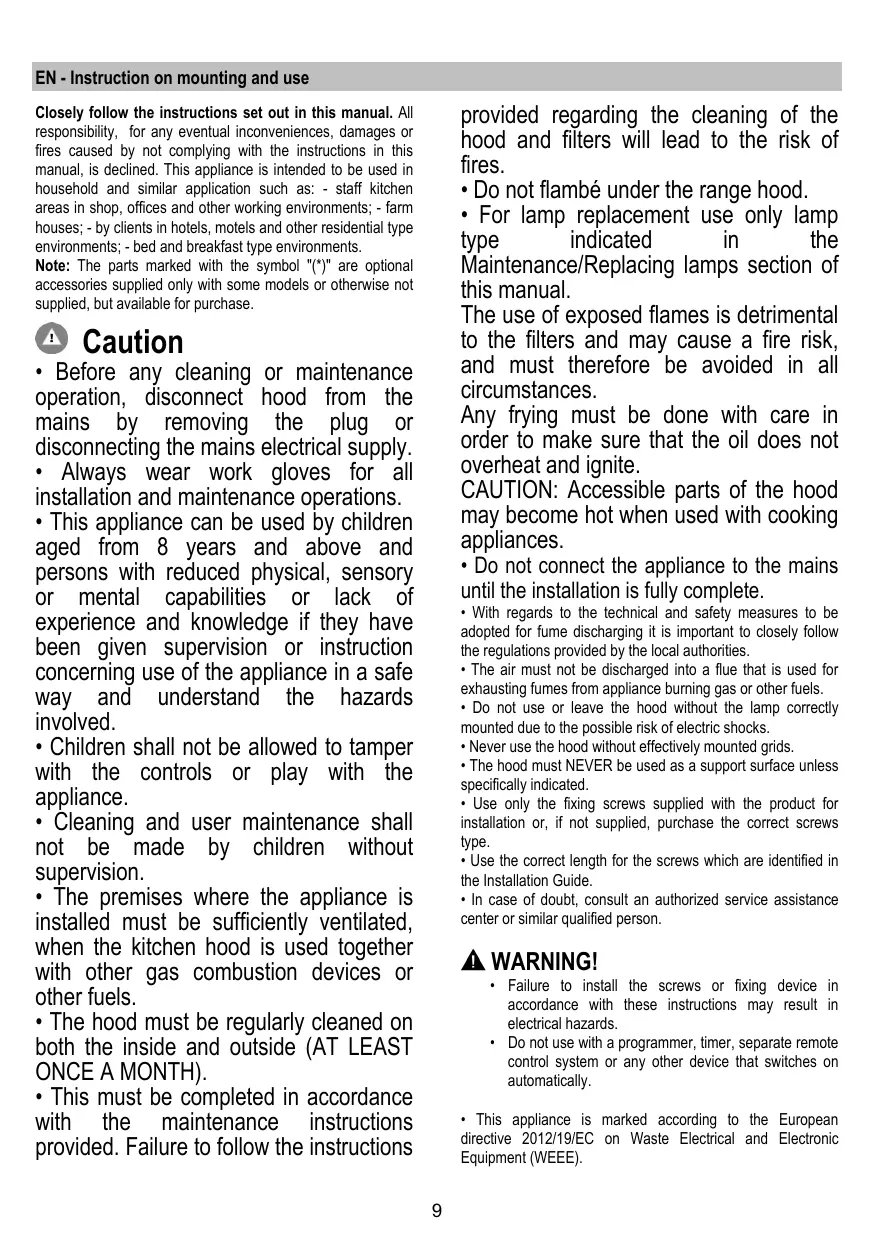
Charcoal filter (filter version only)
Fig. 2
It absorbs unpleasant odors caused by cooking.
The saturation of the charcoal filter occurs after more or less prolonged use, depending on the type of cooking and the regularity of cleaning of the grease filter.
In any case it is necessary to replace the cartridge at least every four months.
The charcoal filter may NOT be washed or regenerated.
Remove the grease filters.
Fit the charcoal filters over the motor.
Align the pins R on the cowl with the slots S, then turn the filter clockwise until it locks in place.
Reverse the above procedure to remove the charcoal filters.
Refit the grease filters.
Replacing lamps
Disconnect the appliance from the electricity.
Warning! Prior to touching the light bulbs ensure they are cooled down.
Remove cover A to access the lamp housing A.
Replace the damaged lamp.
Use E14 3W max LED lamps only. For more details, check enclosed leaflet "ILCOS D" (alfanumeric position "1d").
If the lights do not work, make sure that the lamps are fitted properly into their housings before you call for technical assistance.
On some models ONLY:
A Non Return Backdraft Damper is included in the supply, as optional accessory to be installed under certain installation conditions (i.e. if there is no protection against accidental backdraft of air from the outside). The damper must be installed inside the dedicated housing, inside of the Air Outlet Fitting, before installing the flue.
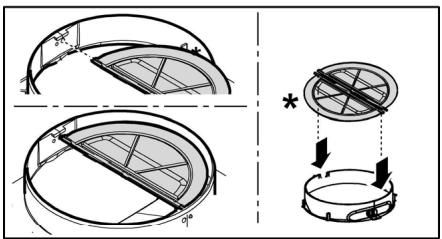
Fig. 1
- Ebponeckata DnpekTna 2012/19/EC
- Waste Electrical and Electronic Equipment (WEEE).
YeBepaikn Ce, Ye To3n ypei 6bJe peuKlnpah no nOoobabaunr 3a TOBa HauH, Bne DOnpnHacrte 3a ona3BaHeto Ha OKoHaTa Cpea N BaWTo 3dpabe.

CIMBOJbT Bbpxy ypea nINB npDpykBaAuaata ro DOKyMeHTaunio nocOuBa, ye To3n npOdyKT He Tpr6Ba da 6bde CHTAH 3a Domauhen OtnaIbK, a Tpr6Ba da 6bde npEpaenB CNEUaHNO PnpDaHaehENITE 3a TOBA NYHKTOBE 3a peuKKnPaHe Ha eJeKTPnuCeKa n EneKTPoHnHa TEXHnka. IpnDbPjxaiTe Ce KbM MeCTHnTE HopMaTHnBu 3a npepa60Ta Ka HtNtBu.3a No-nOp6hNa HnΦopMaZuBB Bp3Ka C npEpaBaHTo, CbIPaHTo n PeuMKnPaHTo Ha To3n npOdyKT Bu CBeBTBame Da ce ObpHete KbM KOMPeTeHTNHte MeCTHn CnyKbN, CnyKbnte 3a CbIPaHn Ha DomauHH OTNAJIbU m IN Mara3HNbT, B KOITc TE 3akynnPi TOn3n en. ypeJ.
YpeBt e PPOeTnpaH, TcTeBaH n PpOu3BeJeH B CbOTBETCTBNE C:
- Бразносяст: EN/IEC 60335-1; EN/IEC 60335-2-31, EN/IEC 62233.
- PaobTmX xapaKTepeNCTnK: EN/IEC 61591; ISO 5167-1; ISO 5167-3; ISO 5168; EN/IEC 60704-1; EN/IEC 60704-2-13; EN/IEC 60704-3; ISO 3741; EN 50564; IEC 62301.
- EMC - EnektpomarHHTha CbBMecTmocT: EN 55014-1; CISPR 14-1; EN 55014-2; CISPR 14-2; EN/IEC 61000-3-2; EN/IEC 61000-3-3.
IpeJIOXeHn 3a npabHnHa yNtpe6a, 3a da ce HamaJIb B3JeCTBnETO Bpyx OkOJIHATA Cpeda: BknOyete (ON)acnpaTopa Ha MmHmAlHa cKOpOCT, KORato 3anOpHe Ta rotBNTe I RO OCTabeTc Da paobTOH NkONKO MNHyTN Cnei npKnIOuBaHe HA rotBeHTo. YBeJInuHaaBte cKOpOCTTa CAMo B Cnyah Ha rOJMAO KOINCeCTBO Dm I napn I n3NOI3BaHTeYbeJInuHHe cKOpOCTn CAMo B EKCTPemHN CntyauM. Cmehnte pInIbpa/phiItpte C akTBEH BByIeN, KORato e Heo6xOdImo, 3a Da NoDlbPkate Do6pa eEeKTbHBocHT HaHAMJIbAbe Ha MmN3MaTpa. IOnHCTBaTe pInIbpa/phiItpte 3a Ma3HnHn, KORato e Heo6xOdImo, 3a
da NODIbPkate Do6pa eFeKTnBHOCT Ha QINITbpa 3a Ma3HNHInTe. N3NoJ3BaIte MAKCmMAnHINr DnAmEtbp Ha CNTeMaTa 3a OTBeXdAne Ha B3Dyxa, NOCOeH B TOBa pKOBoJDCTBO 3a ONTmIM3nPaHe Ha eFeKTnBHOCTTa n 3a HAMJIaBAHe Ha UyMa.
YnoTpe6a
AcnipatopbI mMa cneHTo pnpHa3NaueHHe: BCMyKBa n OTBeJda HabhN INIΦnITpnpa Bb3dYxa, KaTO eHOBpeMeHHO C TOBa I ro peuKJInpa.
Acnipupaa Bercna
AcnipatopbTe cchabdeH cOTBOP "B" B rOpHata Yact npes KoiTO n3nI3a DmblT (n3XoHATA Tp6ba N AkceCoapnte 3a fKcnpahe He ca BkIOueHn).
BHHMaHHe! Ako acnnpaTopbTe cchabdeH c fnnTbp c aKTHBEH BByIeH, ToT TpR6Ba Da 6bIe CBAJIe
Фи上诉а Версь.
B clya, ye he Bb3MOxHO OTBeXdaHTo HabhHa dima n napata, KOtO ce OTdEnr npn rotBeHe MoKTe da n3No13BaTE aCnnpatoa Bbb BapnAHT Ha 0nnTnpaasa Bercna KATO MOHTnPate DnHy3Opa F Bbb BEHTNaUcNOHHaTa Tpb6a n eINn NnN HkONko 0nIbpa CakTNBeB bRJIeN (B 3aBNCIMoCT OzkyneHnT oBac moJen). Ito To3n NaHIn dima n napata ce 3acMyKBat pEe rOHPaTe BEHTNaUcNOHpaPeWetka H.
BHHMaHHe! Ako acnnpaTopt He e cHa6dEn C pHTbp c AKTNBeH BbIeH, ToT Tp8Ba Da 6bJe npbUan mOHTiPAn npeyn ynoTp6bata Ha ypea.
MoDeIInTe 6e3 acnnpiraMu MOTOP ca npedHa3NaueHn 3a pa6ota cAmo BBB BapnAHT Ha acnnpiraua BercnI N Tp8bda 6bDat CBp3AnH KbM nepnpephno acnnpirauO 3BeHO, KOEt O ce 3akynya OTdeHNO.
ИнструкштЕ 3a CBbрзве ce DoctabгТ 3aeДно c nepиферно acnnpupaцо 3beHo.
MOnTnUpaHe
Φnr.3
MHHMaHHTO pa3CToHHe MEXdy NOBbpxHOCTTa, Ha KOrTO ce NOCTABRT CbDOBeTe 3a ROTBEHe Hn HnHKcATA qACT Ha kXHyENCKm acnPiATop, Tp6Ba Da 6bDe He No-MaIKO OT 50cm B cnyau Ha eNeKtpNcKne N ne No-MaIKO OT 65cm, B cnuya Ha ra3OBn INN KOMbHNpaHn NeKu.
Ako B INCHTpyKLIHnTe Ha ra3OBuYpeI 3a roTBeHe e nocOeHo NO-TOJMAO pa3CToHnE, TO Tp8Ba Da ce Ima IpeDvI.
! En. Bpb3ka
Hanse Hne To B en.Mpexata TpaBa da OTroBapra Ha naphexeHnTo, KOEt e NocOeHO Bbpy EtNKeTa c DaHHnte 3a acnipatopa, NoctabEn OT bTpeuHATA My Ctpana. Ako e ChabDen C uencen CBpxte Ae cnipatopa KbM KOtAkr, CbOTBeCTBaUH Na DeIcTBaHTe HopmN HAmpa Ce Ha Iecho DoCTbHIO Macto DOpN i Cnepi PrKNUOVAHe Ha MOHTax. AKe He e ChabDen C uencen (DpuKTHo CBpb3BaHe KbM Mpexata), INI UcENbT He e Ha DoCTbHIO MAcTo CneI
PnKIOUOBAHe Ha MOHTaKa, N3N0I3BaIte DByPOIIOCEH npeKbCBauch Cnped HOpMIte, Taka Ye da ce ocNpyn PbJHO n3KIOUBAHe Ha MPexkata npn CBpxHApEkeHne III, B CbOTBETCTBne C npaBnIATA 3a MOHTnpaHe.
BHIMAHHE!
IpeDn da CbPkTe OTHOBO acnnpaTopa KbM mpeKaTa n da npOBepTe daHfYHKUOnHpa npabNlHo, npOBepTe daHn Ka6Bt E MOHTpah KAKTO Tp6Ba.
MOHTAX
Pn BCE TOBA, Bn npenopbYBaMe Da ce nocBbETBaTe C KBaHnФmUpaH texHnK, 3a Da cTe cnpyHn, Ye doCTaBeHNte akcecoapn Ca noDxOJaIz 3a ueIa. CteHata, CbOTBeTHo TabaHbT, Tp8Ba Da 6bDat DoCTaTbUHO CTaBUnHn 3a Da n3DbpKaT ha HATOBaPaHTo.
Haun Ha ynoTpe6a
Acnpatobt e cna6deneK cKomahno Ta6n C b3MOxHc07a perynpaHe ckopocTHa Ha acnpupaHe n PpeBknOyBaTeH Ha OCBeTneHMeTo Ha rotBapcknI PIOT.
Ponpbykka
Почистван.
3a nouchBaHETo n3noJI3BaIte EINHCTBEHO Kbpna, HABJXHEHa C HeYtPAnH TeuHn NoUcHbAun npenapatn. HE N3IOJI3BAIte INCHTPMEHTN INI INPIBOPN 3A NOUCHCTBAHE!
Избгаваite npenapatn,KoNTO sbdbypkaT a6pa3nBnHuactu. He N3PON3BAITE CINPT!
ΦntbP 3a Ma3HHN
Φn.r.1
ФиNTbpyT 3aIbpxa Ma3HnTe YactnU, OTdJIaHn npri IOTBeHe.
IpoNCTBa Ce BeDnBx MeCeyNo C HeYtpaHn NpepaTn. Mne ce pHyHO INB CbDOMyAHa MaHInHa Ha Hncka TempePaTypa n KpaTBK PexIM Ha N3MnBaHe.
PnMneHaΦnITbpa3aMa3HmHnBcDmNJIHaMaJINHa eBb3MOxHOToIaCbeOe3zBeTn,HO TOBa HNKaKbB CnyaHne HaamJRACbocO6hOCTaMyHaΦnITpnpaHe.
3a da paarIIO6nTe pnnTbpa 3a Ma3HNHnTe, npbnHeTe dpjKkata C npyKnHeMexAHn3bM.
ФиNTbP cakTNBeH BbIeH (cAmO 3a ФиNTpnpauaBepcn)
Φnr.2
3aIbPka HnepnraTHnTe Mnpu3Mn, KOITc ce OTdEJIr Tpni IpbxKeHe.
ФИNTbPbT C AkTNBEN BbIeN CE 3anyuBa pIn6JIu3nTeHNO CNeId Dblr nepIOd Ha n3NoJ3BaHe B 3aBcIMMoCT O NaHHa roTBeH N OT TOBA KOnKQ YecTo NOuchCTBaTe FInITbPa .
BbB BCEk nclyai e Heo6xOIMO da noidmeHrte fnnIbpa cakTNBeH BflHe H a BCEk YeTnpi Meceua NIN KOrato INdkaTOpbT 3a 3acnlahe Ha fnnIPTne Ioka3Ba, ye e Heo6xOIMO.
He ce MNE HNTO MOXe Da ce 3nIOJ3Ba NOBTOPOHO.
OTCTpaHeteΦnIITbpa3aMa3HHN.
MOnTnpaIteΦnITPitTe, KOnTO nOKpNBaT KOpNyCa Ha MOTopa.
YBepete Ce, Ye 6oJTOBete R Bbpxy yner CbBnadaT c OTBOPITE S, CneI TOBa 3aBbptete no Nocoka Ha YacOBHnikobata CTpeIIka DOKaTO ce 3aBnT.
3a da paarno6nte qnntpnte nIbIhTe onepaunite B o6paTeH pei.
MOnTnpaIte OTHOBOΦnITPnte 3a Ma3HNHInTe.
IopmaHa ha en. KpyuKn
Φnr.1
I3knHcTe ypea ot en. Mpekata.
BnmaHne! Ppei Da B3eMeTe B pka eI. KpyuKnte npOBepTe daJI ca n3CTHaJI.
3a Ta3n Ue9 OTBOpTe PnafoHnepeTa A.
3amehe nobpehata lamna.
I3noJ3BaIte eDInHCTBeHO JAMn LED C MaKcImaJIHa MoUHoc 3W-E14. 3a DOnbJIHnTeJIHa INΦopMaζη, KOHCyTIPaIte npIIOxKeHATA IINCTOBKa "ILCOS D" (UΦpeHo-6yKBeHa nO3uNz "1d").
Ako en. KpyuKInTe He CBeT, POBepeTe DaIa Ca MOHTpauHn npabINHO npedn da Notbpcnte NOMOHTa Ha CneuaJIInCT.
Inlocuiti becul defect.
Utilizati exclusiv becuri LED de max 3W-E14. Pentru mai multe detaili, consultati instructiunile atasate "ILCOS D" (pozitie alfanumerica "1d").
UcTpoIcTBpa3pa6oTaHO,MCbItaHOuN3roTOBneHO B COOTBETCTBNC:
- Be30anachocTB: EN/IEC 60335-1; EN/IEC 60335-2-31, EN/IEC 62233.
- 3KcπIpyaúnoHbIe xapakTepeNtKn: EN/IEC 61591; ISO 5167-1; ISO 5167-3; ISO 5168; EN/IEC 60704-1; EN/IEC 60704-2-13; EN/IEC 60704-3; ISO 3741; EN 50564; IEC 62301.
EMC:EN55014-1; CISPR 14-1; EN55014-2; CISPR 14-2; EN/IEC61000-3-2; EN/IEC61000-3-3. П repdnoxhenia nЯ napbunlhoRO nCOnIb3ObaHnA B cenyx ChnHexnna BO3dEChTBA Na OKpykaHOU cypeB: BKnIOHte BbITBXHON KONNA H MInHMaJIbHO KNOPoCTN, KOrDA Na HauINHaTe rTOBOTNb, n OCTabBe erO paBoTaTB b TeueHne HeckOJIbKHX MNHT NOcNE ToROK aZAKOHnTE roTOBNTy. YBeYNuHBaTe CKOPOCTb TOLKB B Cnyae BoJbUoro KOnIHueCTBa DbMa I npa, n Pnp6eRaTE K nCOnIb3OBAHnO NOBbIeHNbIX CKOPOCTe TOLKB B 3KcTpeMaJIbHbIX CnTuaynX. 3aMeHnTe yOrlbHbI ΦIbTp(b), KOrDA 3To Heo6XoHMo, dNa NOpDePjKAnH NoxoWee 3ΦΦeKTNBHOCTn UMeHbSeHnna 3anaXOB.OUnsaiTe JxropOBoi/Bie FInbTp(b), KOrDA 3To Heo6XoHMo, dN Na NDpDePjKAnH XopoWee 3ΦΦeKTNBHOCTn XInpOBorO fInbTp. IVcNoIb3yIte MaKcImaJIbHbI dAmETp CnCTeMbI BO3dyXOBOD, YkazAHhB b DaHHOM pyKOBoDCTBE, dN OTNMM3aUzN 3ΦΦeKTNBHOCTN MmHMIM3aUzN yobOBY Shyma.
Ponb3ObaHne
BbIyKa cKoHCTpyuPoBaHa IJpa60TbI B pexMe OTbOa BO3DyHa hapyu HnPi peUrkylaruIN BO3Dyxa.
IcnoHHeHne COTBOOM BO3Dyxa
BbIyKka Chabxeka BepxHMM BbIOHbIM OTBepCTnEM B dIbBbIPOca DblMOB HapyKy (UcnoJIHeHne C OTBOOM BO3dyxa HapyKy - BbIOHNA Tpy6a N XOMYbI KpENIIeHn He BXOJAT B KOMIJIeKT).
BHHMaHHe! Ecnn BbITXKa Cha6KeHa yroJIbHbIM fIbTpOM, to y6epnte ero.
IcnoHHeHnepeunpKnyaueeB03dyxa
EcIN BbIBOD bIMOB n napOB n3 KyXHn OKa3bIbAeTcR HEBO3MOxHbIM, BBI MOxTe NIOJb3OBAtCB R BYITKKO B pexime peuRpyLpCIN npN yCTAHOBKe B KAMHN dePfNeKTOPa Fn ODHoro INn HeCKoJIbKnx yOrlbhix fNtBPOB (B COOTBETCTBN C Bauey MoedeJIbHO); npn 3tOM OTfNtPBTOBAHHH Bo3Dxy peuRpyKnpyET B KyXHIO YpeE3 BEPHIO peWETKY H.
BhImaHne! Ecnn BbITraKka He chabxHa yroIbHbIM
fHbTpOM, To 3akxNte n yctAHOBnTe er nopei
ncNoJIb3OBAHnEM.
MoJeIN BbITJKeK 6e3 MOTOPHO 6Ioka MOyT pa6oTaB B ODHOM peXIMe OTBOda BO3dyxa HApKy, PO3tOMy OHIOJIKNHbI 6bITb NOCDoeINHeHbIK BHeUHei BbITJxHOBYCTAHOBke (HE BXODIT B NOCTABKY).
Hnctpykunno CoeHNHeHnM nOCTaBJIOTc C nepuepnHbIM BblTKhBIM y3lOM.
YctaHOBka
Pnc.3
PacctoHne HnKHeI rpaHbBITaKnHaD onOpHn IIOCKOCTbIO NOcOcybHa KxOHHO IINTe DOJNHO 6bTb He Mehee 50cm-ДЯ 3NeKtpuYeCKHX PINT,И He Mehee 65 cm dIra30BbIX INI KOMbHnHPOBaHHbIX PINT.
EcnB INHCTpyKUxN NO yCTaHOBe rA3OBoI PIIITbI OROBOpeHO 60JIbUeepacCToRHe,TOyHTne3To.
! 3neKtpnueckoe coeHHeHne
HapraeHne cTeI DOJIKHO COOTBETCTBOBaTb HapraeHIO, Yka3aHHOMy Ha Ta5nueKe TexmHecknx DaHHbIX, KOtOpaa pa3MeUeHa BHTpyn pnp6opA. EcnB bITkKa Ch6keHb BNko, NOJIKHOuHTe BtITkKky K WtENTceNbHOM py3bemy. OH D0JIeH OTBeYaB T DeNCTByOuUM npabnnam N 6blTpaCNOxH B JERKOIOCTyHOM MceT. BkIOHHTB PO3eTKy MOxHO nocye yctAHOBKn. EcnJe BtIKKa He CH6keHa BNko (prrnoe NOJIKIOUHEna K cTei), INI WtENTceNBHy PA3bEM He paCNOxHb B OCTyHOM MceT, TAKKe I noCteYcTAHOBKn, TO nCNoJIb3yIte NaDNeJAaMn DByXPOIHOchbl BVIKIOUaTeB, ObecneHBAIOuN noINHe paMbKAnHe cTei PnB O3NHKNOBHEm YcIOBn nepeHapraeHnE 3-e KATEROPIM, B COOTBETCTBN C INHCTpyKlqIaMn NO yCTAHOBKE.
BHIMAHHE!
PnepKdYe CEM POKJIIOHHTB K CETN NITAHN 3JNEKTPNUeCKyHO CNTEm BbITRAKKN I PPOBEPNTB NCnPpABHOE
Функионироване ee ybeintecb b TOM, КTO kaebл nITAHIN pabINbHO CMOTINPOBAH.
YctaHOBka
BbIaKka ChabkeHa DIObeJMaN DN KpeJIeHn ee B 6OJIbUINHCTBe CTEn/NOTOKOB. Ondako, Heo6xOJIMo 6opatntbcr K KBaIInΦuIcIpOBaHHOMy TexHKn y6eDInTcB r TOM, YTO MaTePnAbl pI INoDnbl dN DaHHOrO Tnna CTeHb/ notOnka.CTeHa/NotOnkO DoJInxHb ObnadTaOHTHO npouHoCTbO C yETOM Maccbl npi6opa.
Функционповане
Bbitykka ochaeta naheIbO ynpabIeHnI dN KOTpOJIaCKOPoCTN BbITXHO BOHTNIJTOPA IN BKNIOUeHnCBETA dNIOCEBHeHn paOoye NOBEPXHOCTN PIIITbl.
yxoI
OuInCTka
Дя OунчткИ NспльзуITE TOЛьКО cneцmaJIbHyTOprNKy, CMOЧENHy JO HeItpaJIbHbIM JxNДКIM MOIOUIM cpeIcTBOM. HE NCПОЛь3УITE HNKAKIME NHCTPYMEHTbl ДЯ OунчткИ. He npIMeHЯITE cpeIcTBA, codepkaUme abpa3nBhIbe MaTePmaJIbI. HE NPIMEHЯITE CnIPT!
Bapnjahta co BcMykyBahe
Acnpatopto HMa ropeH 3a Bo3dyx B" 3a nCφpyBaHe Ha napeTe BO NaBOpEshOCTa (He ce doCTabeHN ODbOnHa CEbKa N KaIiN 3aФNKcnpaHe).
BhImaHne! Ako acnnpatopot e cna6eH co fInTeP Ha akTunbeH jarJhen, nCTnO Tpe6a da ce otctpaHn.
BapnjaHt co qnltpnpahe
Bo cnyaj ako He mOxHO nCpPnAbHe ha MmPcNte n
napeTe OJ rotBHeTo KOH naDbOpEupHocTa, acnPapotop
MOKe Da CE KOpCTN BO BApujHaT co fnnTPpaBe CO
MOHTnpaBe Ha dePfNeKTopOT F Ha oJAKOT I eEN IINIOBKeIe
fnnTPn Ha jarJEn (BO 3aBnCHoCT OJ moDeIOT), MmPcNte n
napeTe BO kJhata Ce peuKnIPAaT HN3 PpeHATA peWetKa
H.
BnMaHne! Ako acnnpatopot He e cnaeden co nntep Ha jaRHe, nCTnO Tpe6a da ce Hapa a Da ce MoTnpa nped KopncTeHe.
MoJeInte 6e3 BeHTnIaT op pa60tat cmo Bo BapnJaHa co n3dByBaHae Ha BO3dyXOT n Tpe6a da ce NOBp3at co nepiFepnckn ypeD 3a n3dByBaHae (He e DocmaEh).
Ynata 3a NOBp3yBaHe ce OoctaBeH co nepicepncKnot ypeI 3a N3dyByBaHe.
MoHTaxa
Cn. 3
Hajmanto pactojahe nomey npoyata od npopotot 3a caobonte 3a rotbehe ndoHHOT pa6 ha acnpaTOpOT da he 6nne nomano od 50cm 3a eeneKTPMHTe anapatni 3a rotBehe 65cm 3a rachnte mnn KOMBHNpahnte anapatn 3a rotBehe. Ako ynatCTBOTo 3a MOtaxa 3a nnHcknte pnoi OJ npopotot npeln3paat noroneMo pactoJaHe, Mopate da ce npndpkybATE do toa.

PnKnyuBaHe Ha eNeKtpnHa eHepriJa
「IaBHO tCpyjHo HanojyBaHe mopa Da oOroBaPa CO ONTERT OOKaxAH Ha eTNKeTATA 3a kapaKTePnCTKNITE CTabeHa BHATpe BO acnnpaTOPO. Ako acnnpaTOPO ON Co pNknyHmN NOBP3eTo RO bSTeKEpOT Bo cOrnaCHOCTO C TpyjHNTe PnONcN NOn3uNOHpAN Ha npctAnHO MecTo Dypn I no MOHTXATA. Ako He e Cha6DeH co pNkYhNK (DipekTHA Bpcka Co eNeKtpnHOTO HanojyBaHe) INI KO pNkFyHhIKOT
He e Iooiupan Ha npctanHO MeTo, Dypn n no MOHTaxaTa, pnpmeHete 6n-NoIapen NpekInyBaB BO corglaCHOCT CO cTAndapnte KoJ ob36eDyBa KOMPnEtoH NOckNyUBaBe Ha eNEKTPuHOTo HanojyBaHe ND yCNOB INOBp3aHN Co pneontOBAPyBaHe Ha MPexa KaTeROpNi III, BO corgnaOCHOT CO yNATCBTO 3a MOHTaxa.
PENEYNPENEYBAHbE!
Ipei (noBtropHo) noBp3yBaHc Ha KOJIoTO OJ acnIpaTOpOT co eJeKTPuHTo HanojYBaHc I npOBepyBaHcTo Ha cyHKUHOHaNHOCTa, cekorau npOBepe TaJI N CtpyJHmO Ka6e n papBnHO MoTHnPaH.
BrpaDyBaIbe
AcnipatopoT Ond 3aeDNo co napHbTa 3a npuIcbpctyBaHe npirodHn 3a noroIemNt DeJ od SIOBb/TabAHn. N nokpaj Toa Notpe6hO e da noIbapate ObjachyBaHe oKBAJIINФkYBaH texHnnap 3a Da Bn NOTBprn 3a PnIKJaIHOCTa Ha MaTePnJaJIte Cnopei BNDOT HA SIOIT/TabAHOT.
SIOOT/TabaHOT Tpe6a Da 6nDE IOBOJHO UBPCT 3a da ja n3dpKIN TeXHaTa Ha acnnpatopOT.
Функцонираьe
AcnpaTopoT ce nOpayBa co KOMaHda Ta6na c0 peryIaTop Ha 6p3nHite Ha 3dYbYaBaHe i peryIaTop 3a oCBetJeHMeTo HndPiOyata OJ WInOpTeOT.
OdpxkyBaHe
UHCTHe
3a YIcTeHbTo NCKNpyWBO KOpIcTe TE KpNa HABnlaXheta Co TeuH HeYtpaJIH DeTpRePHTn. HE YIcTETe CO IOMOJ HA AJAT INJ Dpyr NHCTPyMeHTn.
He Kopructte npou3B0oN KOI coOpjat a6pa3nBn. HE KOPUCTETE AJIKOXOJI!
Фиntep3aMaCTN
Cn.1
3a coBupahe Ha macHnte coCTojKn OJ napeata oJ TOTBeHbeto.
MetaHnnot fHnTep 3a MaCTu Tpe6a Da ce YcHCTe EdaHaMceUHO CO HearpcBHN DeTePHTN, paHu HO INI BO MaunHa3a MHeBe Ha cadoBn HnCKn Tempepatyn BO KpaTOK INTEpBaJ.
Co nepeheTo BO MaunHa 3a MneHe Ha caOBN MeTaNIOHOT fInIeP 3a MaCTn MoKe da ja N3ry6n MaNky Bojata Ho HceroBITE KapaKTePncTNIK 3a fInItpnPaHbe BOONiTO He ce MEHyBaat.
3a da ro n3BaJnte φnIInTePOT 3a MaCTn NOBNeUeTe ro 3a6eOTo 3a OTKoIyBaIbe.
Фиntep co akTbEn jaTneH (Camo 3a BapnjaHt co fInTpnpaHe)
Bp.2
3a c6bpaIbe Ha HnpiJaTHnte Mnpnc OJ napeata OJ TOTBeHbeto.
3acntybaheTo h antepoT od jarneH hactanyBa no nobKe nn nomanky npdoonkeHa yontpe6a Bo 3abnchoT od Tnnot
Ha rotBeHe n peoBHOCTa Ha uCTeHbTo Ha fHTpeT 3a MaCTn. Bo cekoj cnyuj Notpe6Ho e da ce 3aMeHN qaypata Hajmanky Ha cekon 4 Meecu.
HE moke da ce nepe nnn ObohyBa.
ssall aiaaalll caii iie jlll (g)
a a a a a a a a a a a a a
aalb plaii ol 2e 10
J 1 1 1 1 1 1 1 1 1 1 1 1 1 1 1 1 1 1 1 1 1 1 1 1 1 1 1 1 1 1 1 1 1 1 1 1 1 1 1 1 1 1 1 1 1 1 1 1 1 1 0
J J J J J J J J J J J J J J J J J J J J J J J J J J J J J J J J J J J J J J J J J J J J J J J J J J J J J J J J J J J J J J J J J J J J J J J J J J J J J J J J J J J J J J J J J J J J J J J J J J J J J
J I I I I I I I I I I I I I I I I I I I I I I I I I I I I I I I I I I I I I I I I I I I I I I I I I I I I I I I I I I I I I I I I I I I I
JIJIJIJIJIJIJIJIJIJIJIJIJIJIJIJIJIJIJIJIJIJIJIJIJIJIJIJIJIJIJIJIJIJIJIJIJIJIJIJIJIJIJIJIJIJIJIJIJIJIJIJIJIJIJIJIJIJIJIJIJIJIJIJIJIJIJIJIJIJIJIJIJIJIJIJIJIJIJIJIJIJIJIJIJIJIJIJIJIJIJIJIJIJIJIJIJIJIJIJIJIJ
1
a.ii1
a a a a a a a a a a a a a a a a a a a a a a a a a
·s + b
aill
i
a 110 a a b a yaaagb aia w a bll a jao pall
1.
a a a a a a a a a a a a a a a a a a a a a a a a a a a a a a a a a a a a a a a a a a a

aaii aie iie 1000000000000000000000000000000000000000000000000000000000000000000000000000000
Clllglallglllgljglalglaiia jglll llaa a
EN/IEC 60335-2- EN/IEC 60335-1:EN/IEC 60335-2. EN/IEC 62233, 31
EN/IEC 61591; ISO 5167-1; ISO :5167-3; ISO 5168; EN/IEC 60704-1; EN/IEC 60704-2-13; EN/IEC 60704-3; ISO 3741; EN 50564; IEC 62301.
EN 55014-1; CISPR: (品 品 品 品 品 品 品 品 品 品 品 品 品 品 品 品 品 品 品 品 品 ) EMC· 14-1; EN 55014-2; CISPR 14-2; EN/IEC 61000- jgjgljgljgljgljgljgljgljgljgljgljgljgljgljgljgljgljgljgljgljgljgljgljgljgljgljgljgljgljgljgljgljgljgljgljgljgljgljgljgljgljgljgljgljgljgljgljgljgljgljglj
p1
g jyj yj yj yj yj yj yj yj yj yj yj yj yj yj yj yj yj yj yj yj yj yj yj yj yj yj yj yj yj yj yj yj yj yj yj yj yj yj yj yj yj yj
1234567890
#
a i 1500 B o all glo
()
1
.
#
Jlll lI Jlll Iaiaiaia aai nssalnnsaal 1 F aai ll iis gaaiaaii aai i aai i aai (y) jnnnnae
H. a_n + 1 = a_n + b_n
4 1
1. p125-21 1
biuususbsbsbsbysjssjssjss
(1)
aabaaal baaal 62g 60 62g 60 g aagill caii
1234567890
J 111111111111111
Jlll 1s C Jlll Jlll
1
Jg 1
1
ai = bi
y
Jaiaiall gily jyssll gaoal jhbi jil
y
A
J 1 J 1 1 1 1 1 1 1 1 1 1 1 1 1 1 1 1 1 1 1 1 1 1 1 1 1 1 1 1 1 1 1 1 1
jill jlae jld
a blll a la goll
1

a aal 1s 1 1 1 1 1 1 1 1 1 1 1 1 1 1 1 1 1


- Caution
- WARNING!
- Use
- Ducting version
- Filter version
- then it must be ordered and mounted.
- Installation
- Fig. 3
- Electrical connection
- Mounting
- Operation
- Maintenance
- Cleaning
- Grease filter
- Charcoal filter (filter version only)
- Replacing lamps
- On some models ONLY:
- YnoTpe6a
- Acnipupaa Bercna
- Фи上诉а Версь.
- MOnTnUpaHe
- Φnr.3
- ! En. Bpb3ka
- BHIMAHHE!
- MOHTAX
- Haun Ha ynoTpe6a
- Ponpbykka
- Почистван.
- ΦntbP 3a Ma3HHN
- ФиNTbP cakTNBeH BbIeH (cAmO 3a ФиNTpnpauaBepcn)
- IopmaHa ha en. KpyuKn
- Ponb3ObaHne
- IcnoHHeHne COTBOOM BO3Dyxa
- IcnoHHeHnepeunpKnyaueeB03dyxa
- YctaHOBka
- Pnc.3
- ! 3neKtpnueckoe coeHHeHne
- Функционповане
- yxoI
- OuInCTka
- Bapnjahta co BcMykyBahe
- BapnjaHt co qnltpnpahe
- MoHTaxa
- Cn. 3
- PnKnyuBaHe Ha eNeKtpnHa eHepriJa
- PENEYNPENEYBAHbE!
- BrpaDyBaIbe
- Функцонираьe
- OdpxkyBaHe
- UHCTHe
- Фиntep3aMaCTN
- Фиntep co akTbEn jaTneH (Camo 3a BapnjaHt co fInTpnpaHe)
- a.ii1
- aill
- i
- 1.
- p1
- #
- .
- p125-21 1
- 1
Brand : ELICA
Model : MISSY IX/A/60
Category : Decorative wall hood