
PRF0032793C - Range hood ELICA - Free user manual and instructions
Find the device manual for free PRF0032793C ELICA in PDF.




| Product type | Extractor hood / filter hood (internal recirculation or external evacuation) |
| Brand | ELICA |
| Model | PRF0032793C |
| Usage | Domestic use only |
| Configuration | Extracting (external evacuation) or filtering (internal recirculation) depending on connection and presence of charcoal filter |
| Minimum safety distance (hob) | 45 cm for electric cooker, 65 cm for gas or mixed |
| Power supply | See rating plate (voltage and frequency); standardised circuit breaker required if no accessible socket |
| Number of speeds | 4 (speeds 1 to 3 + intensive speed 4) |
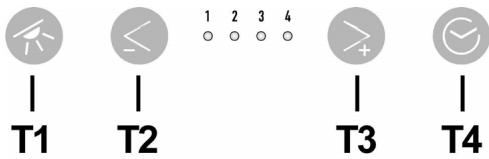
| Controls | Buttons T1 (light), T2 (speed - / stop), T3 (speed +), T4 (timer) |
| Lighting | Integrated LED; lifespan up to 10 times longer than traditional bulbs, energy saving of 90% |
| Grease filter | Hand washable or dishwasher-safe (short cycle, low temperature); saturation signal after 40 hours of operation |
| Activated charcoal filter (filtering version only) | Replace every 4 months or saturation signal after 160 hours; not washable nor regenerable |
| Timer | Available for each speed: 20 min (speed 1), 15 min (speed 2), 10 min (speed 3), 5 min (intensive speed); automatic shutdown at end of timer |
| Saturation indicator | Indicator 1 flashes for grease filter (40h); indicator 2 flashes for charcoal filter (160h) – resettable by long press on T4 |
| Safety | Disconnect before maintenance; do not use without grid; do not flambé under the hood; automatic shutdown at end of timer |
| Panel maintenance | Removable: slide upward then pull; clean with damp cloth and mild detergent (no alcohol or abrasives) |
| Installation | By qualified personnel; screws provided; comply with local regulations; exhaust duct diameter equal to connection flange |
| Repairability / Spare parts | Contact the authorised service centre for replacement of LED lamps and other parts |
| Standards | Compliant with EN/IEC 60335-1, 60335-2-31, 61591, 60704, 55014, etc.; WEEE directive 2012/19/EC |
Frequently Asked Questions - PRF0032793C ELICA
User questions about PRF0032793C ELICA
0 question about this device. Answer the ones you know or ask your own.
Ask a new question about this device
Download the instructions for your Range hood in PDF format for free! Find your manual PRF0032793C - ELICA and take your electronic device back in hand. On this page are published all the documents necessary for the use of your device. PRF0032793C by ELICA.
USER MANUAL PRF0032793C ELICA
EN Instruction on mounting and use
RU Instruction for mounting and use
UK Instruction for mounting and use
KK Instruction for mounting and use
EN - Instruction on mounting and use
Closely follow the instructions set out in this manual. All responsibility, for any eventual inconveniences, damages or fires caused by not complying with the instructions in this manual, is declined. This appliance is intended to be used in household and similar application such as: - staff kitchen areas in shop, offices and other working environments; - farm houses; - by clients in hotels, motels and other residential type environments; - bed and breakfast type environments.
The hood can look different to that illustrated in the drawings in this booklet. The instructions for use, maintenance and installation, however, remain the same.
It is important to conserve this booklet for consultation at any moment. In the case of sale, cession or move, make sure it is together with the product. - Read the instructions carefully: there is important information about installation, use and safety. - Do not carry out electrical or mechanical variations on the product or on the discharge conduits. - Before proceeding with the installation of the appliance verify that there are no damaged all components. Otherwise contact your dealer and do not proceed with the installation.
Note: The parts marked with the symbol "(^)" are optional accessories supplied only with some models or otherwise not supplied, but available for purchase.
Caution
- Before any cleaning or maintenance operation, disconnect hood from the mains by removing the plug or disconnecting the mains electrical supply.
- Always wear work gloves for all installation and maintenance operations.
- This appliance can be used by children aged from 8 years and above and persons with reduced physical, sensory or mental capabilities or lack of experience and knowledge if they have been given supervision or instruction concerning use of the appliance in a safe way and understand the hazards involved. Children shall not be allowed to tamper with the controls or play with the appliance.
- Cleaning and user maintenance shall
not be made by children without supervision.
- The premises where the appliance is installed must be sufficiently ventilated, when the kitchen hood is used together with other gas combustion devices or other fuels.
- The hood must be regularly cleaned on both the inside and outside (AT LEAST ONCE A MONTH).
- This must be completed in accordance with the maintenance instructions provided. Failure to follow the instructions provided regarding the cleaning of the hood and filters will lead to the risk of fires.
- Do not flambe under the range hood.
- For lamp replacement use only lamp type indicated in the Maintenance/Replacing lamps section of this manual.
The use of exposed flames is detrimental to the filters and may cause a fire risk, and must therefore be avoided in all circumstances.
Any frying must be done with care in order to make sure that the oil does not overheat and ignite.
CAUTION: Accessible parts of the hood may become hot when used with cooking appliances.
- Do not connect the appliance to the mains until the installation is fully complete.
- With regards to the technical and safety measures to be adopted for fume discharging it is important to closely follow the regulations provided by the local authorities.
- The air must not be discharged into a flue that is used for exhausting fumes from appliance burning gas or other fuels.
- Do not use or leave the hood without the lamp correctly mounted due to the possible risk of electric shocks.
- Never use the hood without effectively mounted grids.
- The hood must NEVER be used as a support surface unless specifically indicated.
- Use only the fixing screws supplied with the product for installation or, if not supplied, purchase the correct screws type.
- Use the correct length for the screws which are identified in the Installation Guide.
- In case of doubt, consult an authorized service assistance center or similar qualified person.
WARNING!
- Failure to install the screws or fixing device in accordance with these instructions may result in electrical hazards.
- Do not use with a programmer, timer, separate remote control system or any other device that switches on automatically.
- This appliance is marked according to the European directive 2012/19/EC on Waste Electrical and Electronic Equipment (WEEE).
- By ensuring this product is disposed of correctly, you will help prevent potential negative consequences for the environment and human health, which could otherwise be caused by inappropriate waste handling of this product.

- The symbol on the product, or on the documents accompanying the product, indicates that this appliance may not be treated as household waste. Instead it should be taken to the appropriate collection point for the recycling of electrical and electronic equipment. Disposal must be carried out in accordance with local environmental regulations for waste disposal.
- For further detailed information regarding the process, collection and recycling of this product, please contact the appropriate department of your local authorities or the local department for household waste or the shop where you purchased this product.
Appliance designed, tested and manufactured according to:
- Safety: EN/IEC 60335-1; EN/IEC 60335-2-31, EN/IEC 62233. Performance: EN/IEC 61591; ISO 5167-1; ISO 5167-3; ISO 5168; EN/IEC 60704-1; EN/IEC 60704-2-13; EN/IEC 60704-3; ISO 3741; EN 50564; IEC 62301.
- EMC: EN 55014-1; CISPR 14-1; EN 55014-2; CISPR 14-2; EN/IEC 61000-3-2; EN/IEC 61000-3-3. Suggestions for a correct use in order to reduce the environmental impact: Switch ON the hood at minimum speed when you start cooking and keep it running for a few minutes after cooking is finished. Increase the speed only in case of large amount of smoke and vapor and use boost speed(s) only in extreme situations. Replace the charcoal filter(s) when necessary to maintain a good odor reduction efficiency. Clean the grease filter(s) when necessary to maintain a good grease filter efficiency. Use the maximum diameter of the ducting system
indicated in this manual to optimize efficiency and minimize noise.
Use
The hood is conceived for the suction of cooking fumes and steam and is destined only for domestic use.
The hood is designed to be used either for exhausting or filter version.

Extraction version
In this case the fumes are conveyed outside of the building by means of a special pipe connected with the connection ring located on top of the hood.

CAUTION!
The exhausting pipe is not supplied and must be purchased apart.
Diameter of the exhausting pipe must be equal to that of the connection ring.

CAUTION!
If the hood is supplied with active charcoal filter, then it must be removed.
Connect the hood and discharge holes on the walls with a diameter equivalent to the air outlet (connection flange).
Using the tubes and discharge holes on walls with smaller dimensions will cause a diminution of the suction performance and a drastic increase in noise.
Any responsibility in the matter is therefore declined.
Use a duct of the minimum indispensable length. Use a duct with as few elbows as possible (maximum elbow angle: 90°). Avoid drastic changes in the duct cross-section.

Filtration version
The aspirated air will be degreased and deodorised before being fed back into the room.
In order to use the hood in this version, you have to install a system of additional filtering based on activated charcoal.
Installation
The minimum distance between the supporting surface for the cooking equipment on the hob and the lowest part of the range hood must be not less than 45 cm from electric cookers and 65 cm from gas or mixed cookers.
If the instructions for installation for the gas hob specify a greater distance, this must be adhered to.

Electrical connection
The mains power supply must correspond to the rating indicated on the plate situated inside the hood. If provided with a plug, connect the hood to a socket in compliance with current regulations and positioned in an accessible area, after installation. If it is not fitted with a plug (direct mains connection)
or if the plug is not located in an accessible area, after installation, apply a double pole switch in accordance with standards which assures the complete disconnection of the mains under conditions relating to over-current category III, in accordance with installation instructions.
WARNING!
Before re-connecting the hood circuit to the mains supply and checking the efficient function, always check that the mains cable is correctly assembled.
The hood is provided with a special power cable; if the cable is damaged, request a new one from Technical Service.
Mounting
Before beginning installation:
- Check that the product purchased is of a suitable size for the chosen installation area.
- Remove the charcoal (*) filter/s if supplied (see also relative paragraph). This/these is/are to be mounted only if you want to use the hood in the filtering version.
- Check (for transport reasons) that there is no other supplied material inside the hood (e.g. packets with screws ( ), guarantees ( ), etc.), eventually removing them and keeping them.
Expansion wall plugs are provided to secure the hood to most types of walls/ceilings. However, a qualified technician must verify suitability of the materials in accordance with the type of wall/ceiling. The wall/ceiling must be strong enough to take the weight of the hood.
Do not tile, grout or silicone this appliance to the wall.
Surface mounting only.
In the case of the presence of panels and/or walls and/or lateral wall units check that there is sufficient space to install the hood and that access to the command panel is easy.
Only for some models
An aesthetic flue can be purchased as an optional accessory.
Check with the authorized dealer whether the model in your possession envisages this possibility.
We advise installing the hood after having purchased the flue to check with certainty the most suitable installation.
Fig. 5-14-15-16-17
Operation



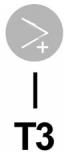

T1. Lights ON/OFF T2. Speed decrease
Press "T2" button to decrease the speed from 4 (intensive) to 1.
Press "T2" button during operation at speed 1, the hood sets to OFF.
T3 Speed increase
Press T3 button and the hood sets from OFF to speed 1. Press the button (hood ON) to increase the speed of the motor from 1 to 4 (intensive).
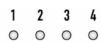
The respective LED goes on for each speed.
Speed 1 - LED 1
Speed 2 - LED 2
Speed 3 - LED 3
Speed 4 (Intensive) - LED 4 (flashing)
The intensive speed is timed. Standard timing is 5 minutes, at the end of which the hood sets to speed 2.
To deactivate the function before time is up press T2 button, the hood sets to speed 3.
T4 Speed timing
Speed timing is activated by pressing T4 button, when timing is up the hood switches off.
Timing is divided as follows:
Speed 1 - 20 minutes (LED 1 flashing)
Speed 2 - 15 minutes (LED 2 flashing)
Speed 3 - 10 minutes (LED 3 flashing)
Speed 4 (Intensive) - 5 minutes (LED 4 flashing)
During timed operation, press the T2 button and the hood quits the timed mode and decreases the speed.
Press the T3 button and the hood quits the timed mode and increases the speed.
Press the T4 button and the hood quits the timed mode, maintaining the set speed.
Grease filter signal
After 40 hours of operation, LED 1 flashes.
When this signal appears, the installed grease filter needs to be washed.
To reset the signal, keep the T4 button pressed for 5 seconds.
The hood gives out a "BEEP" and LED 1 stops flashing.
Charcoal filter signal
After 160 hours of operation, LED 2 flashes.
When this signal appears, the installed charcoal filter must be replaced.
To reset the signal, keep the T4 button pressed for 5 seconds.
The hood gives out a "BEEP" and LED 2 stops flashing.
In case of contemporaneous signalling of both filters, LEDs 1 and 2 flash alternatively.
To reset, carry out the procedure described above for 2 times.
The first time it resets the charcoal filter signal, the second time it resets the grease filter signal.
The charcoal filter signal is not active in the standard mode.
In case the hood is used in filter version it is necessary to enable the charcoal filter signal.
Activating charcoal filter signal:
Set the hood to OFF and press T4 button for 5".
Once the button has been pressed, the LEDs related to the filter signals currently active light up.
The hood gives out a "BEEP" and LED 2 flashes for 2n
LEDs 1 and 2 remain on for about 2 before the hood goes back to OFF.
Deactivating charcoal filter signal:
Set the hood to OFF and press T4 button for 5".
Once the button has been pressed, the LEDs related to the filter signals currently active light up.
The hood gives out a "BEEP" and LED 2 switches off.
LED 1 remain on for about 2n before the hood goes back to OFF.
Maintenance
Cleaning
Clean using ONLY a cloth dampened with neutral liquid detergent. DO NOT CLEAN WITH TOOLS OR
INSTRUMENTS. Do not use abrasive products. DO NOT USE ALCOHOL!
Panel
Fig. 8-9_22-23
Maintenance of the panel
Dismantling:
- Slide the panel upwards (for a distance of approximately 2cm);
- Pull the panel towards yourself
Cleaning:
the panel should be cleaned with the same frequency as the fat filters, using a cloth soaked in neutral liquid detergents.
Avoid the use of products containing abrasives. DO NOT USE ALCOHOL!
Assembly:
Proceed in the reverse direction for dismantling.
Attention! Always check that the panel is fixed in its place well.
Grease filter
Fig. 10-21
Traps cooking grease particles.
This must be cleaned once a month (or when the filter saturation indication system - if envisaged on the model in possession - indicates this necessity) using non aggressive detergents, either by hand or in the dishwasher, which must
be set to a low temperature and a short cycle.
When washed in a dishwasher, the grease filter may discolor slightly, but this does not affect its filtering capacity.
To remove the grease filter, pull the spring release handle.
Charcoal filter (filter version only)
Fig. 20
The saturation of the charcoal filter occurs after more or less prolonged use, depending on the type of cooking and the regularity of cleaning of the grease filter.
In any case it is necessary to replace the cartridge at least every four months (or when the filter saturation indication system - if envisaged on the model in possession - indicates this necessity). The charcoal filter may NOT be washed or regenerated.
Circular carbon filter
Apply one on each side as cover to both the shield grids of the motor impeller, then turn clockwise.
For the disassembly, turn counter-clockwise.
Replacing lamps
Fig. 24
The hood is equipped with a lighting system based on LED technology.
The LEDs guarantee an optimum lighting, a duration up to 10 times as long as the traditional lamps and allow to save 90% electrical energy.
To replace lights, contact authorised spare part center.
Activation signal charcoal filter:
When the appliance is switched on, a "BEEP" sounds and the LED 2 lights up.
The LED 1 remains lit for 2 minutes before the appliance turns off.
Maintenance
Cleaning
For cleaning, use only a damp cloth and neutral detergents. DO NOT USE ABRASIVE PRODUCTS OR CLEANING AGENTS!
Dispose of cleaning agents properly. DO NOT USE ALCOHOL!
Table
Removal:
- Pull the panel towards the top (via a path of about 2 centimeters); pull the panel towards the bottom
Cleaning:
The panel must be cleaned with the same frequency as the maintenance of the filters for the hoods. For cleaning, use a liquid for grease or neutral detergents. Avoid the use of abrasive products.
DO NOT USE ALCOHOL
ASSEMBLY:
Signal for grease filter
DO NOT USE ALCOHOL!
Mounting:
Signal for dirty grease filter
After 40 hours of use, LED light 1 blinks.
When this signal is activated, the installed grease filter needs to be washed.
Hold button T4 pressed for 5 seconds to reset the dirty grease filter signal.
The ventilator emits a "BIP", and LED light 1 stops blinking.
Signal for dirty carbon filter
After 160 hours of use, LED light 2 blinks.
When this signal is activated, the installed carbon filter must be replaced.
Hold button T4 pressed for 5 seconds to reset the signal.
The ventilator emits a "BIP", and LED light 2 stops blinking.
If signals for both filters are given simultaneously, LED lights 1 and 2 will blink alternately.
Before starting installation:
Circular filter
The installation of the exhaust duct must be carried out under supervision, so that the connection can be made quickly.
WARNING: When the appliance is in operation, the accessible parts of the extractor may become hot.
Do not connect the appliance to the electrical supply until it has been properly installed.
In these cases, the manufacturer accepts no responsibility.
The duct must have the necessary ventilation. The duct must be installed with as few bends as possible (maximum bends: 90°). Do not reduce the cross-section of the duct!

Extractor with filter
This appliance is intended for use in household and similar applications such as staff kitchens in shops, offices, and other working environments; farm houses; by clients in hotels, motels, and other residential type environments; bed and breakfast type environments.
Installation
The minimum distance between the surface on which the cooking vessels are placed and the lower part of the kitchen hood must be not less than 45 cm for electric cookers and not less than 65 cm for gas or combined cookers.
If the instructions for the gas cooker specify a greater distance, this must be taken into account.

Electrical connection
The electrical connection must comply with
the voltage indicated on the rating plate of the hood, located on its inner side. If the hood is supplied with a plug, connect it to a socket that complies with the regulations in force, placed in an accessible position after installation. If it is not supplied with a plug (direct connection to the mains), or if the plug is not in an accessible position after installation, use a double-pole switch that complies with the regulations, ensuring complete disconnection from the mains under overvoltage category III, in accordance with the installation rules.

WARNING!
Before connecting the hood to the mains and checking that it functions correctly, always check that the power cable is correctly installed.
The hood is supplied with a special power cable; if the cable is damaged, contact the after-sales service to obtain a new one.
Installation
Before proceeding with installation:
- Check that the product you have purchased is the right size for the chosen installation location.
- Remove the filter(s) (if the model you have chosen includes them). To do this, follow the operations described in the relevant paragraph. Reinstall the filter(s) only if you wish to use the hood in the recirculation version.
- Check that during transport no foreign objects have entered the inside of the hood, such as screws, protective cards, etc.; if you find any, remove them and keep them.
Before use, make sure that the accessories are suitable for the appliance. The wall, according to the type, must be installed according to the table to maintain the product.
When installing the appliance, wall or panel, make sure you have enough space to install the extractor and that you have unobstructed access to the control panel.
Only for this model
As an optional accessory for this model, there is the possibility of purchasing a decorative panel. Check with the authorized distributor for the available options and specifications.
Before installing the extractor, follow the steps to purchase the decorative panel to choose the most suitable mounting option.
FIG. 5-14-15-16-17
Use
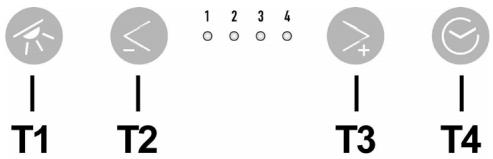
T1. Switching on/off (ON/OFF) the light
T2. Starting the speed
When pressing the "T2" button, the speed starts and the extractor switches from 4th speed (intensive) to 1st.
When pressing the "T2" button again from the 1st speed, the extractor switches to OFF position.
T3 Increasing the speed
When pressing the T3 button, the extractor switches from OFF position to 1st speed.
When pressing the button (with the extractor on), the motor speed increases and the extractor switches from 1st to 4th speed (intensive).
Each speed corresponds to a different light.
Speed N1 - light 1
Speed N2 - light 2
Speed N3 - light 3
Speed N4 (intensive) - light 4 (blinking)
The intensive speed is with a preset time.
The standard interval of operation is 5 seconds, after which the aspirator switches to 2-speed.
To activate the function, press button T2; after the preset time, the aspirator will switch to 3-speed.
T4 - time setting of the speed
The set interval is activated by pressing button T4; after the preset time, the aspirator turns off.
Time settings of the individual speeds are as follows:
Speed N1 - 20 minutes (light 1 blinks)
Speed N2 - 15 minutes (light 2 blinks)
Speed N3 - 10 minutes (light 3 blinks)
Speed N4 (intensive) - 5 minutes (light 4 blinks)
When pressing button T2, the speed is activated with a preset time; the aspirator switches to the set speed after the preset time.
Press the T3 button, when the activated speed with a set time delay, the aspirator will switch from the set speed to a higher speed.
Press the T4 button, when the activated speed with a set time delay, the aspirator will switch from the set speed to a lower speed.
Indicator for filter replacement for grease filter
After 160 working hours the light signal will warn you.
When the light signal is activated, the grease filter must be replaced.
To reset the indicator, press the T4 button and hold it for 5 seconds.
The aspirator will emit a sound signal "BIP" and the light signal No. 1 will stop flashing.
Indicator for filter replacement with activated carbon filter
After 160 working hours the light signal will warn you. When the light signal is activated, the carbon filter must be replaced.
To reset the indicator, press the T4 button and hold it for 5 seconds.
The aspirator will emit a sound signal "BIP" and the light signal No. 2 will stop flashing.
Simultaneously activating the indicator for filter replacement and the two filters will warn sequentially with light signals 1 and 2.
The reset is done by repeating the above procedure twice.
The first time the indicator for the carbon filter is reset, and the second time respectively for the grease filter.
In standard operating mode, the indicator for filter replacement with activated carbon filter is not activated.
If you intend to use the vacuum cleaner in the filtration mode, you must activate the filter clogging indicator in active mode.
Activating the filter clogging indicator in active mode:
Turn off the vacuum cleaner (position OFF), press button T4 and hold it for 5 seconds.
The white wall of the button press will light up with LEDs, which indicate the activation in the moment of the filter indicators.
The vacuum cleaner will emit a sound signal "BIP" and LED No. 2 will flash for 2 seconds.
LED No. 1 and No. 2 will remain lit for 2 seconds, after which the vacuum cleaner will return to position OFF.
Deactivating the filter clogging indicator in active mode:
Turn off the vacuum cleaner (position OFF), press button T4 and hold it for 5 seconds.
The white wall of the button press will light up with LEDs, which indicate the activation in the moment of the filter indicators.
The vacuum cleaner will emit a sound signal "BIP" and LED No. 2 will flash.
LED No. 1 will remain lit for 2 seconds, after which the vacuum cleaner will return to position OFF.
Maintenance
Cleaning
For cleaning, use ONLY a cloth dampened with neutral cleaning agents. DO NOT USE INSTRUMENTS OR ABRASIVE FOR CLEANING!
Use agents that contain abrasives. DO NOT USE SPIRIT!
Panel
Fig.8.8-9 22-23
Replacement of the panel
Dismantling:
-Press the panel (at a distance of approximately 2 cm); -Remove the panel
Cleaning:
The suction panel is cleaned with a vacuum cleaner at the recommended frequency for the grease filter. For thorough cleaning, use a mild detergent and neutral cleaning agents.
Avoid using products containing
abrasive parts! DO NOT CLEAN WITH ALCOHOL!
Mounting:
Perform the dismantling operations in reverse order.
Attention! Make sure the panel is properly locked.
Grease filter
Fig.10-21
The filter retains grease particles, separated during cooking.
If the indicator light for replacing the filter does not light up (this is checked in case your model is equipped with such an indicator).
Using too much detergent or fabric softener in the washing machine can cause excessive foam, but this does not affect the washing performance.
The filter for lint in the washing machine can be cleaned, but this does not in any way limit its filtering capabilities.
To clean the lint filter, press the tab with the release mechanism.
The filter with activated carbon (only for filtering versions)
Fig. 20
The filter with activated carbon should be replaced approximately every 6 months of use, depending on how often you use the filter.
In any case, it is necessary to replace the filter with activated carbon at least every four months, or when the indicator light for replacement (if your model is equipped with one) indicates it is necessary.
Do not reuse it.
Cover the filter with activated carbon
Insert the new filter into the slot, aligning it with the guide grid on the motor's working wheel, then turn it clockwise.
When removing, turn it counterclockwise.
Top of the cover
Fig. 24
The aspirator is equipped with a lighting system with LED.
Energy-saving lighting, up to 10 times more efficient than traditional lamps, allowing 90% savings on electricity.
To replace your lamps, please contact an authorized service center for spare parts.
Do not connect the appliance to the electrical network until the installation is completely finished.
Regarding technical measures and safety precautions during steam release, strictly adhere to the requirements stipulated by local competent authorities. The extracted air must not be discharged into a flue used for exhausting fumes from appliances burning gas or other fuels. - Do not use or install the extractor without correctly installed lamps with a risk of electric shock. - Never use the extractor without the correctly installed grille! - The extractor must never be used as a support surface, unless indicated on the appliance. - Use only screws for fixing supplied with the product for installation, or if not supplied, procure screws of the correct type. - Use the correct screw length, as indicated in the installation manual. In case of doubt, consult the authorized service center or qualified personnel.
WARNING!
- Failure to install the appropriate screws and fixing accessories in accordance with these instructions may lead to risks of electric shock. Do not use the device with a programmer, timer, separate remote control, or any other device that switches on automatically.
This product is marked in accordance with European Directive 2012/19/EC on the recycling of electrical and electronic equipment (WEEE).
By ensuring the correct disposal of this product, you will help prevent potential negative consequences for the environment and human health.

The symbol on the product or its accompanying documentation indicates that this product must not be treated as ordinary household waste. Instead, it should be handed over to the appropriate collection point for the recycling of electrical and electronic equipment.
Electrical and electronic equipment recycling.
Disposal must be carried out in accordance with local regulations for waste disposal.
For more detailed information on the treatment, recycling, and disposal of this product, please contact your local city office, your waste disposal service, or the store where you purchased the product.
The device has been designed, tested, and manufactured in accordance with:
- Safety: EN/IEC 60335-1; EN/IEC 60335-2-31, EN/IEC 62233.
- Characteristics: EN/IEC 61591; ISO 5167-1; ISO 5167-3; ISO 5168; EN/IEC 60704-1; EN/IEC 60704-2-13; EN/IEC 60704-3; ISO 3741; EN 50564; IEC 62301. EMC: EN 55014-1; CISPR 14-1; EN 55014-2; CISPR 14-2; EN/IEC 61000-3-2; EN/IEC 61000-3-3. Recommendations for correct use in order to reduce the impact on the environment: Turn on the extractor hood at minimum speed when you start cooking, and leave it running for a few minutes after you finish cooking. Increase the speed only in case of a large amount of smoke and steam, and avoid using the higher speeds except in extreme situations. Replace the charcoal filter when necessary to maintain good efficiency in reducing odors. Clean the grease filters when necessary to maintain good efficiency of the grease filter. Use the maximum diameter of the air exhaust system indicated in this manual to optimize efficiency and minimize noise levels.
Use
The hood is intended for aspirating fumes and vapors during food preparation and is designed exclusively for domestic use.
The hood is designed to operate in either exhaust mode (air discharged outside) or recirculation mode.

Exhaust mode (air discharge outside)
In this mode, the vapors are discharged outside through the flexible duct connected to the connecting ring.
WARNING!
The exhaust pipe is not supplied and must be purchased separately.
The diameter of the exhaust pipe must match the diameter of the connecting ring.
WARNING!
If the hood is equipped with a charcoal filter, remove
it.
Connect the hood to the exhaust pipe with a diameter corresponding to the air outlet opening (connecting flange).
Installing pipes with a smaller diameter will reduce the air suction power and cause a sharp increase in noise.
The manufacturer declines all responsibility regarding the above.
Bend the pipe with the minimum necessary force. Use a pipe with the smallest number of bends (maximum bend angle: 90°) and avoid sharp changes in pipe cross-section.

Use of recirculation mode
Air
If using a charcoal filter, it must have the characteristics of your ducting. The air is filtered and deodorized before being returned to the room through the top grille.
Installation
The distance between the lower edge of the exhaust outlet and the hob must be at least 45 cm for electric hobs, and at least 65 cm for gas or combined hobs.
If the installation instructions for the gas hob specify a greater distance, take that into account.

Electrical connection
The mains voltage must match the voltage indicated on the technical data plate located inside the appliance. If the plug is fitted, connect the plug to a suitable socket. It must comply with current regulations and be located in an accessible place. It can be plugged in only after installation. If the plug is not fitted (direct connection to the mains), and the mains socket is not in an accessible place, also after installation, use an approved double-pole switch that ensures complete disconnection from the mains under overvoltage category III, in accordance with installation instructions.

WARNING!
Before connecting the electrical system of the hood to the power supply, check that it is functioning correctly and make sure that the power cable is properly installed.
The hood has a special power cable; in case of damage, it must be ordered from the technical support service.
Installation
Before starting installation:
Check that the dimensions of the hood you purchased fit the chosen installation location. - Remove the charcoal filter(s), if present (see also the relevant section). The filter(s) are installed only if you want to use the hood in recirculation mode. Check that no objects have been left inside the hood during transport (e.g., bags of screws, warranty cards, etc.), and if any, remove and keep them.
The appliance must be fixed to walls/ceilings that are sufficiently sturdy. However, it is necessary to contact a qualified technician to verify that the material of the wall/ceiling is suitable for this type of wall/ceiling. The wall/ceiling must have sufficient strength, taking into account the mass of the appliance.
In the case of installation on walls or suspended ceilings, check that there is enough space for installing the extractor and that there is always the possibility of free access to the control panel.
Only for some models
For a fireplace, you can purchase decorative stones; check with an authorized dealer whether this option is available for your model.
We recommend installing the extractor after purchasing the fireplace and carrying out the installation in the most suitable way.
Fig.5-14-15-16-17
Operation
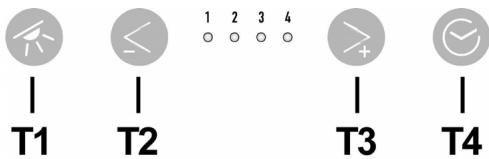
T1. ON/OFF light
T2. Decrease speed
Press the "T2" button to decrease the speed, moving from speed 4 (intensive) to speed 1. Pressing the "T2" button while at speed 1 turns the extractor off.
T3. Increase speed
Press the T3 button, the extractor switches from the off state to speed 1.
Pressing the button (extractor is on) increases the motor speed from speed 1 to speed 4 (intensive).
Each speed corresponds to the activation of the corresponding indicator light.
Speed 1 - indicator light 1
Speed 2 - light indicator 2
Speed 3 - light indicator 3
Speed 4 (intensive) - light indicator 4 (flashing)
The intensive speed can be programmed for a time. Standard programming is 5 minutes, after which the extractor switches to speed 2.
To switch off the intensive speed before the programmed time has elapsed, press button T2; the extractor switches to speed 3.
T4 speed programming
Press button T4 to activate speed programming. After the programmed time has elapsed, the extractor switches off.
The programming is distributed as follows:
Speed 1 - 20 minutes (light indicator 1 flashing)
Speed 2 - 15 minutes (light indicator 2 flashing)
Blood filter saturation indicator
After 40 hours of operation, light indicator 1 will start flashing.
When the saturation data appears, the metal filter must be replaced.
The extractor will emit a "BEEP" signal and light indicator 1 will stop flashing.
Charcoal filter saturation indicator
Pocne 160 yacob paobtby hauhet Mrratb cBeToND 2.
Korda noaBnTcA daHna CnHaN3aun yOrnbHbI pInbTp Heo6xOIMo 3aMeHHTb.
BbIKJIOUHTb BbITaKky (OFF) n depKaTb hKaToi KhoNkTy T4 Ha npOraKeHm 5".
Pn Haxatni KhoNknpa3y BbICBETTc8 CBToDIObl CnHahJIn3aun,JeIcTBkyOuNX Ha daHbIMOMeHTfNbTPOB.
BbIgKpa npo3BeDc nHnal "BEEP" n CBeToIOo 2 BblIOHHTcra.
CBeTOnIObI 1 octaHeTcB BKnUoyHbIM Ha npotrJxHnOKoNo 2" nepeTTEM, KaK bByTjXKa BbIKNouHTcR (OFF).
yxo
OuInCTka
ДлгочнctкинсплььутETOLьКСецmaNBHyTOрнky, CMOeHHyNO HeTpaJIbHbIM KJNkIM MMOJUM CpeDCTBOM. HE
HNCIOb3yIe HNKAKNE INCHPTMENTbl IJIa
OuCTKn. He npIMeHnTe cpeIcTbA, codepKaUne a6pa3nBhIbe MaTePnAbl. HE NPIMeHnTE CnIPT!
PanaheJIb
Pnc.8-9 22-23
06cIyKbAHne naHeJI
DEmoHTaK:
Do not touch the lamp (at a distance of about 2 cm); -Do not touch the lamp itself.
Cleaning:
Clean the filter as often as the grease filter, wiping it with a soft cloth moistened with a neutral liquid detergent.
Do not use products containing abrasive substances. Do not use alcohol!
INSTALLATION:
Perform the operations in the reverse order of disassembly.
Attention! Always check that the lamp is well secured in its place.
Grease filter
Fig. 10-21
Retains the fatty particles coming from cooking.
Saves energy.
Washing in a dishwasher may cause some discoloration of the grease filter, but its filtering characteristics remain absolutely unchanged.
The product has been designed, tested and manufactured according to:
- Safety: EN/IEC 60335-1; EN/IEC 60335-2-31, EN/IEC 62233.
- Performance: EN/IEC 61591; ISO 5167-1; ISO 5167-3; ISO 5168; EN/IEC 60704-1; EN/IEC 60704-2-13; EN/IEC 60704-3; ISO 3741; EN 50564; IEC 62301. EMC: EN 55014-1; CISPR 14-1; EN 55014-2; CISPR 14-2; EN/IEC 61000-3-2; EN/IEC 61000-3-3. For correct use and to reduce environmental impact: Turn on the hood at minimum speed before starting cooking, and let it run for a few minutes after finishing cooking. Increase the speed only in case of a large amount of fumes and use the boost speed only in extreme situations. To maintain high efficiency in odor extraction, replace the charcoal filter(s) if necessary. To maintain high efficiency in grease filtration, replace the grease filter(s) if necessary. Use the maximum diameter of the exhaust system indicated in the instructions to optimize efficiency and minimize noise.
Use
The exhaust hood is designed for domestic use and for use in the preparation of food and for household use only.
The hood is designed for operation in recirculation mode, with the air passing through a carbon filter or in extraction mode with air recirculation.

Extraction mode
In extraction mode, the air is discharged outside through an exhaust pipe connected to the flange.
WARNING!
The exhaust pipe is not supplied and must be purchased separately.
The diameter of the exhaust pipe must match the diameter of the ring flange.
WARNING!
If the hood is used in recirculation mode, it must be fitted with carbon filters.
Connect the exhaust pipe to the exhaust outlet using a pipe with the same diameter as the air inlet (connecting flange).
The use of smaller diameter exhaust pipes and outlets will lead to a reduction in extraction efficiency and a significant increase in noise levels.
We therefore decline any responsibility for any issues arising from the above.
Use the shortest possible exhaust duct.
Use an exhaust duct with the minimum number of bends (maximum bend angle: 90°). Avoid sharp changes in the cross-section of the exhaust duct.

The hood must be installed so that the lower edge of the hood is at least 45 cm above the cooking surface for electric hobs, and 65 cm for gas and combination hobs. To use the hood in recirculation mode, it is necessary to install a filter system with activated carbon.
Installation
Install the lower part of the hood over the cooking surface at a distance of at least 45 cm for electric hobs, and 65 cm for gas and combination hobs.
It is necessary to take into account the heights indicated in the instructions for installing the gas hob.

The voltage in the electrical network must correspond to the characteristics indicated on the plate located inside the hood. If the plug is included in the delivery set, plug the hood into a socket that complies with current standards and is in an accessible place, so that it can be unplugged after installation. If the plug is not included in the delivery set (direct connection to the electrical network), or the socket is not in an accessible place, also after installation, it is necessary to install a reliable two-pole switch that ensures complete disconnection from the network under overload conditions of category III, in full compliance with the installation rules.

ATTENTION!
Before reconnecting the hood to the electrical network, check the correctness of the work, make sure that the network switch was installed correctly.
The hood plug must have a special grounding conductor; in case of damage to the cord, contact the technical service.
Installation
Before installation:
- Check the dimensions of the hood outlet against the chosen installation location. Remove the protective film if present (see also the corresponding section). The filter(s) will be reinstalled if you want to use the hood in recirculation mode.
- Check that the inside of the hood has not been damaged by foreign objects, packaging materials, warranty documents, etc. during transport. If they are present, remove them and
keep them.
The kit includes brackets for mounting on most types of walls/ceilings. However, it is necessary to contact qualified technicians to verify the suitability of materials depending on the type of wall or ceiling. The wall/ceiling must be strong enough to support the weight of the bracket.
Before drilling holes or screwing in screws, check that there is enough space for installing the bracket and that it will be without obstacles for the control panel.
For some models
Additional accessories can be purchased. Decorative boxes, check with your local dealer for the model you purchased, whether this option is available.
It is recommended to install the bracket after you have purchased the box, so that you can determine the most suitable installation.
Fig. 5-14-15-16-17
Operation
T1. ON/OFF light
T2. Speed change
Pressing the "T2" button, we get a change of 1.
Pressing the "T2" button during operation at speed, the bracket switches to OFF mode.
T3. Speed increase
Pressing the T3 button, the bracket switches from OFF mode to speed 1.
Pressing the button (bracket in ON state) increases the speed gradually from speed 1 to speed 4 (intensive).
Each speed corresponds to the activation of the corresponding light.
Speed 4 (Intensive) - Light 4 (Mirage)
The intensive speed can be programmed in the appliance. Standard programming - after the end of the set time, the extractor will switch to speed 2.
To switch to a previously programmed speed, press the T2 button, the extractor will switch to speed 3.
T4 Programming the timer
Timer programming
Press the T4 button, after the set time has elapsed, the extractor will turn off.
The timer programming is divided into the following steps:
Speed 1-20 minutes (Light 1 and Mirage)
Delay shutdown, 10 minutes after cooking.
Clean the grease filter once a month (or when the filter saturation indicator, if present in your model, indicates the need), using neutral detergents or in a dishwasher at low temperature and short cycle.
When washing in a dishwasher, some discoloration of the filter may occur, but its filtering characteristics remain unchanged.
To remove the delay, pull the spring handle towards you and detach it.
ByrilbHm fIbTp (TilbKn B pexnmi peunpkylauii) Man. 20
HacuHicTb ByrInbHoro fipItpy nepeBipReIc nicIa 6IbI a0e MeHs DoBOrO BnKOpNCTAHnB B 3aJexKHOCTi BiD Tmny PnITn Ta perynpHoCTi YnueHHn XkpOnorlnHaUOro
φínbtpy. y 6ydb-яkomy Bnnaikky Heo6xidno 3amHraTn karptndk npinhaMnHi cepe3 KOxHi QOTpN MiCraI (a60 KOJI NcStema iHnkaQi HacnueHoCTi φiNbTpB - JAKIo Taka nepe6bauheHa bawij MoedeI - Bka3ye Ha Taky Heo6xIdHictb) HE niDnlae MmTIOu NoHOBLeHHO.
KpynnBvyrnbHnPfIbTp
PnKnactn pInbTp n no 0nbDi CTOpOnn IJn NOkpnTTa3axnCHnx pNsiTOK potopa DnBHyna, nicJyoro NOBepHytn pInbTp 3a roDHHNKOBHO CTpiKIO.
ДяЗHA附T-NOBEPHyTN pINbTp npOTn rOdiHHNKOBoi CTPIIK.
3aHaJaMa
Man. 24
Bintjcka 6bnadnha CnCTeMOIOOCBITNEHHa OCHOBI texHONorii diOJB (LED).
IIOIN 3a6e3neuyoT oNTnMaJIbHe OCBiTIeHHra, TpBaNlICTb ix B 10 pa3 Bmua BiJ 3BvayHnx lamNooy Ta daOt b 90% ekOHOMII eIeKTPoeHeprii.
ДяЗамилamнКоТakTaTyBaTn abTopn3OBaHn cepBicHn ceHTp 3anachnx YactMH.
JaBnIaaybI acnantbI naIaNanhy 6apbcihda 6yn Hycayda 6enrileHren KOndany wapTtapBH cKaTamaFaHHbIH Kecipinen 60nfAH ONkbIbIK ePT nEH 3akIM yuiH xayan 6epMeiDi. Copfblw TEK KaHa Ynde naIaNanahyfa 6onatbIHd aetin Xo6anaHfAn.
KaKnak ocbi KITanwada KepcetinreH cypeTepen e3rewe 6oBIn Kepiny MyMknH. DeReHMeH, KonJaHy, TexNkAlbIK KbImET Kepcy XHe OPhATy HycKaynapbl 6ipJeB60nAbI.
Ke3keIreH yaKbTTa 6yn HycKayMeH naJaHaHy yuIH aKaTaH MaHbI3dI. ByhIM caTbJnFaH, TaCbIPfAH HeMece XoBnIFAH Ke3de ON OHBMeH 6ipre KaNFAHbHa Ke3 JeKti3iH3. HcyaydbmykTOKbHb3:OHda6yamdbI KOHdbpy,naiDaJahy KHe Kaybinc3dkxehiHdeMaHb3dbMeJIMet6ap. BvibHbIH 3NeKTPoHdbIK Hemece MexaHnKaIbIK KOHCTpyKUyraCbIHda Hemece copfbiWeHTINJIaYraNbIK KaHaJdapbIHda eKhAhdai Da e3repicTeP JakacamaHbI3. OphaTydbOpbHdAmac 6pbHb6epiReh 6apNbIK KypamdaactapDbH 3aKbIMdaImaFaHbIH TeKcepiH3 Hemece opHaTydb JaIrafTbIpMac 6pbH DeJaIra xa6abpNaCbHbI3.
EckenTre: (*) TaH6acbI 6ap 6JIikTeP TK Kei6ip yInepmeh 6epineTIN (6aca KaFdaJnapDa 6epimTIN), 6ipak catbn anyfa 6oJatbH KocbIMsa akceccyapnap 6Obn TaBJaNb.

Hycaynap
Ke3 KeIReH Ta3aJay HEmecTexHNkaIbIK Kbl3MeT KepCetYxMbICTapbIH opbIHdAmac 6ypbIH aShaNbI ShbIFapy HEmec XeJIiIK Kyat Ke3IH axbIpaTy apKblIcsOpfbIUtBtI 3JeKtp XeJIicHeH axbIpaTbIHbI3.
OpHaTy XaHe TexHnKaIbIK Kbl3MeT KepeTy XyMbICTapbIH Kypri3reH Ke3e epaIbIM XyMbIC Kofra6bIH KniHi3. -Бул Крьлгынь 8жастбл ЖэHe Oдан унken балanap, DeNe, ce3y Имece aKblN-Ои КабileTtepi Шектулар Hemece Tэхірибeci мен Білімi ЖOK Тулгалap OНы Kayinci3
JOJMeH NaIdaIaHaYfA KaTbICTbl Hycay aJIbI, bIKTMaJI KayiInTePdi YfBlnFaH XaFdaNda XeHe 6akblayda 6oJFaHda NaIdaIaHa aIaNbl.
BaIaIapDbIH 6acKapy 3JIeMeHTTePiH e3repTyiHe XaHe KpybIINfBIMeH OINHaybHa XOJ 6epMey KepeK.
Ta3aay XHe 36eTihwe TexHnKaJIbIK Kbl3MeT KOpceTy XyMbICTapbIH 6aIaanapdbIH 6aKblaycbl 6yprizyHe 60ImaIbI. - Acy copfblbI baca ra3 kafy KypblfblnapbImeH HeMece baca OTbIHapMeH naJaHaNbIFaH Ke3De, Kypblfbl OPhaTbIFaH 6JIme JkETKIJIKTI Typde JeJTeTIyI KaKet. CopfbIbTbI iHNeNe De, cbiptbHaN da JyneJI Tpyde (KEM DEFEHDe AHyBA H BIP PET) Ta3aJay Kepek, aRpaIbIM TexHNkaJIbIK Kbl3MeT KOpceTy HcCKayIbIFbIHda 6epinre HcCKayIapDbI OpbIHDaHbI3. CopfbIbTBiH Ta3aJAY CTaHdapTTapbIH XHe cy3rInepdi aImactbipy XHe Ta3aJAY BoBbIHwa epxeJepdi - yctaH6ay HəTnxkeiHne ept TybIHdaybl MymKIN. TamaKTbl TIkeIeN COPfblu aCTbIHda KaHdbpyfa KaTaH TblbIM caJIbHaDbI. -ШаMDы aybICTbipy yushi TEK Ocbi
HvCKayIbIKTbIH «TexHnKaIbIK Kbl3MeT Kepcety/ShaMapdabl aybICTbipy> 6eImiHde KepcetilrReH ShAM TpyiH PaiDaIaHbIHbI3.
AusbIK KaIbIHDbI naJaIaHcy3riJep ysiH 3nH XHe ePTKayin H TybHdaTybl MymKiH,COHdbIKTaH OfAH eWkaWah KOJIbepMey KepeK.
MaIdbIH 7aMaHaTbIC KbI3bIN Hemece XaHbIN KeTneyiH KaMTaMaCbI3 eTy yWih, TaMaKTbI a6aJIan KybIpyKaJcET.
CAK BOJbIHbl3: CopfbIUtbIH KOJIKeTImDi 6eJIikTepi TaMaK DaIbIHday Kypblfblnapbl NaIdaIaNbIFaH Ke3De KbI3bIN KeTyi MymKiH.
- Ophaty TOJIbIK aIaKTaJIMaBbIHwa KypblfblHbI 3JIeKTp JxEJIciHe KocpHaB13.
- BydibH 乌bIyBHa Kapcbl KOndaHbIaTbH TexHnKaIbIK XHe Kayinc3ik WapanapbH eckepe Otbpln, JepriJIkiT biNik OpraHdpbl bekITkeh epexeIepdi MyKnT OPbIHay MaHb3bl. Ocb KpyblfblHbI TYtIK apKbIbI 6aftTay Kyyneicnra3 HeMece backc OtbHdbJ xaraTbH KpyblfnapdAn sbkkah BynapDbI sbIfapy CnKtBb 6bacKa Da MaKCaTAPda naDanaHbIaNbTH Ke3 KeIReH KOndaHCTarb JxEnDeTy Kyyncie XaNfay KaKet. 3NeKtp TorblbH cory Kaynihe BaJaNbHcTbI WAmbl Dpybc 6eKITINmerE COPfblWbI naDanaHbAbH3 KHe KaNdbIpMaHbI3.
- TopnapbI Tnicti Typde 6ekitImereH copfbltbeukaan naDanaHaB3. AphaIb KepcetIImMeIHHe, copfblTbELKAAUAH TIpek 6eTI petiHne naJaIaHa6aHb3.
- Tek opnaty yuin Ehimmen bipre bepiireh 6ekitybpaHdaIapbIn naIaIahbIb3, erep bepiimece,6paHdaHbTHticti TypiH catbIn anlbHb3. ByapahdapanapdbiH opHaTy HcKayIbIfbIHda KepceTinreH dypbic y3blHbIfbIH naDanaHbHbI3. KymHdaHcaHb3, 0kIeTTi KbI3MeT KepcTey 6oBbHwa XaPdEm KepcTeY opTaIbIbHa HemeC Tnicti MaMaHaHraH TyIraF aXabapnaCbHb3.
ECKEPTY!
-Бураздаларди Неме Беку Крьлгссн Oсы hyckaynapra caikec opHaTNay 3NeKtpnik KayinTepe ekenyi MymkiH. - BaFapnAmaybIme, TaMepMeH, 6eIek KaBkTah Baskapy KJYecimeh Hemece ABTomaTTb Tpyde KocblaTbIH Ke3 KeJIreH Baca KypblfBIme KOJaHaHaBl3.
3JNeKtpnik JxHe 3JNeKtpoHdbI acnTapdbI KaI TaanJaTa acbpy xHHiDeri 2012/19/EC EbponaIbIK dIpuKeTbBke (WEEE) caiKeC bepiInreH eHIM TaHbanaHdbI.
BepinreH eHIMDi Dypbc KaTaNaiDara acbpydbi KaMTamaccb3 etUmeH, C3 KopuHaH optFa KHe aadam DeHCayNbIfbHa Kepi acepin Tnri3y di 6oNdbpMayra KEmekTececic3.

Acnantarbl Hemece KOndama Kykattarbl TaHbacbl Bepinren acnantbl KaTaNadaa acbipyda aetteri TpMbictbK Kanlblk petIHnde nirepyre 6oImaTbHbH Kepcetei. OhInOpbHa3neKTPIK XaHE 3NeKTPOHdbIK acnantapbl KaTa naNdara acbipyra apHaflan Ka6blday NHTIHe tancblyKepek.
Byyra tancbipy acnantbI kaTaNJaDara acbipy XeHInderi XepriniKTI epexenepre caikec 1blrapnybl Tnic.
BHydai eHIMdepi naIaIaNHy, KaTaNadara acbipy epexenepi XeHInDe TOnbIK aKnapaTTbl KepriikTI ekimwiinik OpbHapbHaH, KandbIKTapbl KaTaNada ra acbipy Kb3MetiHeH HeMece 6epinreh eHIMdi C3 catbin anfah dyKeHen ana analacbi3.
KypbIbI Kelenecinepre cai K06aHaHaH, CbHaHaH XHe Xacan sbIrapbIraH:
Kayinci: EN/IEC 60335-1; EN/IEC 60335-2-31, EN/IEC 62233. - ΘΗΠДΙΙΚ: EN/IEC 61591; ISO 5167-1; ISO 5167-3; ISO 5168; EN/IEC 60704-1; EN/IEC 60704-2-13; EN/IEC 60704-3; ISO 3741; EN 50564; IEC 62301. EMC: EN 55014-1; CISPR 14-1; EN 55014-2; CISPR 14-2; EN/IEC 61000-3-2; EN/IEC 61000-3-3.
Kopuaf anpTaF acepiaaayuHnypbic naandaany TpaBHyckaynap:
3ipnyi bactaHaJa KaKaNTbI eH a3 KbldAmdbkneh KocbHb3 XHe 3iipney AAKTANFAHN KeHH bpa3 MmHT BoBj XMybIC icTeiH3. KbldAmdbkTa TEK TYtHiN hXe6 BydbH YKHe MeJIwepi XaRdaMbHaDA apTbIPbH3 XHe KYuEeTy XbldAmdbfBn(KTapbH) TEK WKeTI XaRdaNapDa naJdAnahbHb3. XaKcbi XaFbIMCb3 Niicti a3aiTy TImdInirin CaKtay YwiH KaaKet
60nfaHda kemip cyricih(lepih) aybictbplbHb3. Kakcbi MaCy3rici Tmimdiniirh CaTay yuhi KaXet 60nfaHda MaCy3rici(lepih) aybictbplbHb3. TmimdiNkTI OHtaIaNDbipy XaHe uydbi 6apbIHwa a3aHTy yuHcOsbHyckaynbkTa KepcetinreH eTKi3y KyueneHIne HYJIKeH dnaMeTpH naJaIaNbHb3.
PaiDanaHy
The filter is designed to be used with the specified type of filter element, intended for the purpose of achieving the maximum degree of purification.
The filter has a bypass valve, which is designed to open in case of clogging or excessive contamination of the filter element.

Filter housing
This housing is designed for installation of the filter element in the filter housing.

WARNING!
The filter element diameter must be equal to the diameter of the sealing surface of the housing.

WARNING!
The filter element must be installed in the filter housing with the correct orientation, and it must be secured properly.
The filter element must be replaced with a new one when the filter element is clogged, or when the pressure drop across the filter element exceeds the allowable value (see installation instructions).
When replacing the filter element, ensure that the new element is installed correctly, and that the filter housing is properly sealed.
! Minimum bending radius of the hose must be observed. ! The minimum bending radius of the hose must be at least 90 degrees. ! Do not subject the hose to excessive bending or twisting.

Hose connection
The hose connection is designed for connecting the hose to the filter.
The hose connection must be tightened to the specified torque, and it must be checked for leaks after installation.
Connection
The device is intended for use in household and similar applications, such as in staff kitchens in shops, offices and other working environments, in farm houses, by clients in hotels, motels and other residential type environments, in bed and breakfast type environments, and in catering and similar non-retail applications.
If the supply cord is damaged, it must be replaced by the manufacturer, its service agent or similarly qualified persons in order to avoid a hazard.
If the supply cord is damaged, it must be replaced by the manufacturer, its service agent or similarly qualified persons in order to avoid a hazard.

Electrical connections
The installation must be carried out in accordance with the manufacturer's instructions and in compliance with local regulations. If the appliance is not properly earthed, there is a risk of electric shock. If the appliance is not properly earthed (e.g., if the earth wire is not connected), or if the earthing is not effective, the installation must be checked by a qualified electrician. If the supply cord is damaged, it must be replaced by the manufacturer, its service agent or similarly qualified persons in order to avoid a hazard.

WARNING!
Before connecting the appliance, ensure that the electrical supply is properly earthed and that the installation complies with local regulations.
The appliance must be connected to a suitable power supply. If the supply cord is damaged, it must be replaced by the manufacturer, its service agent or similarly qualified persons in order to avoid a hazard.
Warning
During installation:
- Ensure that the appliance is disconnected from the power supply before any maintenance or cleaning.
- If the supply cord is damaged, it must be replaced by the manufacturer, its service agent or similarly qualified persons in order to avoid a hazard. Do not use the appliance if the cord is damaged. If the cord is damaged, it must be replaced. Do not use the appliance if the plug is damaged. If the plug is damaged, it must be replaced. Do not use the appliance if it has been dropped or damaged. If the appliance is damaged, it must be checked by a qualified person.
If the supply cord is damaged, it must be replaced by the manufacturer, its service agent or similarly qualified persons in order to avoid a hazard. Do not use the appliance if the cord is damaged. If the cord is damaged, it must be replaced. Do not use the appliance if the plug is damaged. If the plug is damaged, it must be replaced. Do not use the appliance if it has been dropped or damaged. If the appliance is damaged, it must be checked by a qualified person.
If the supply cord is damaged, it must be replaced by the manufacturer, its service agent or similarly qualified persons in order to avoid a hazard. Do not use the appliance if the cord is damaged. If the cord is damaged, it must be replaced. Do not use the appliance if the plug is damaged. If the plug is damaged, it must be replaced. Do not use the appliance if it has been dropped or damaged. If the appliance is damaged, it must be checked by a qualified person.
Only for specified models
The pump is designed for use in any boiler. The pump must be installed in accordance with the instructions and the safety regulations. For proper operation, the pump must be installed in the correct position.
Fig. 5-14-15-16-17
Installation




T1. Pump connection
T2. Pump disassembly
To disassemble the pump from 4th (rear) to 1st (front), press the «T2» button.
When the pump is in operation, press the T2 button, then the pump will stop.
T3 Pump assembly
Press the T3 button, then the pump will start and operate in the 1st mode.
To assemble the pump from 1st to 4th (rear), press the (stop) button.
Each pump has a check valve.
1st mode - 1st speed
If the T2 button is pressed while the pump is running, the pump will stop and enter standby mode.
If the T3 button is pressed, the pump will start and operate in the selected mode.
If the T4 button is pressed, the pump will stop and enter standby mode.
Redundant signal
160 cm of cable, 2-core channel.
The signal is transmitted through the main and backup channels.
To raise the signal, use a 5" pipe.
The "Redundant signal" switch is set to the 2-core channel position.
The transmitters are turned on alternately, first the 1st and then the 2nd channel.
To raise the signal, the experts installed 2 repeaters.
The first repeater raises the redundant signal, and the second repeater raises the main signal.
The redundant signal is not standard in the mode.
If the main signal is lost, the redundant signal is switched on.
To raise the redundant signal:
Set the switch to the operating position, use a 5" pipe.
After the pipe is laid, the main signal channels are connected.
The "Redundant signal" switch is set to the 2nd channel.
If the switch is set to the operating position, the 1st and 2nd channels are connected with 2" pipes.
Remove the protective film:
Check the device for damage, then connect the power cord to the socket.
After connecting the power cord, the device will be ready for use.
The "READY" indicator will light up and the device will start operating.
For information about the device's operation, see the first section of the manual.
Technical service
Cleaning
Before cleaning, disconnect the device from the power supply and let it cool down. Do not immerse the device in water! Use a soft, damp cloth for cleaning. Do not use abrasive cleaners!
Panel
8-9_22-23-figure
Panel technical service
Removal:
Remove the version
tilt the panel towards you.
Cleaning
- atrums - led 1
- atrums - led 2
- atrums - led 3
- atrums (intensive) - led 4 (flashing)
∴ ab ≥ 2 ac ≥ 2 ac
∴ gall
a i a j = f( x i)
y j 12012/19/EC
jll jlll lill (WEEE) 1y 1y 1y 1y 1y 1y 1y 1y 1y 1y 1y 1y

12i gilll plabll sb Lidy Lioe
y jll
i
1
J 1
jll jll jll
C. uai 羽 ball 2. go pfuli wul ic a iii
aiai 1
y
1.5 jill iLac o Lalai elgii 21 21
aLwllg aolly balaal llg ailll 1
Ld 1
124 a 1250 all aalall clll wulw yol wolw lae lo
- jjN j
gill jj 100
.5j
Jaiil
1
y
J 1
c. 1111111111111111111111
g Lai j gill a aal ll bbl c l y
∴ S JL
aalaaai aiee ai eai jss
a laal
j 1 j 1 j 1 j 1 j 1 j 1 j 1 j 1 j 1 j 1 j 1 j 1 j 1 j 1 j 1 j 1 j 1 j 1 j 1 j 1 j 1 j 1 j 1 j 1 j 1 j 1 j 1 j 1 j 1 j 1 j 1 j 1 j 1 j 1 j
1
e 1 1 1 1 1 1 1 1 1 1 1 1 1 1 1 1 1 1 1 1 1 1 1 1 1 1 1 1 1 1 1 1 1 1
joo jnil gaiiail jaliy jilgai jia jao jao jao jao jao jao jao jao jao jao jao jao jao jao jao jao jao jao jao jao jao jao jao jao jao jao jao jao jao jao jao jao jao jao jao jao jao jao jao jao jao jao jao jao jao jao jao jao jao jao jaej
g E g J 1 1 1 1 1 1 1 1 1 1 1 1 1 1 1 1 1 1 1
j j 1
15 jill a lac 6 g
Therefore, {b} {i} = {b} {j} - {b}_{k}
A and a' are related to the axis
- y/x = 1 ②
Therefore, ↓ l_{6} = ↓ l_{4}
- EN - INSTRUCTION ON MOUNTING AND USE
- CAUTION
- WARNING
- USE
- EXTRACTION VERSION
- FILTRATION VERSION
- INSTALLATION
- ELECTRICAL CONNECTION
- MOUNTING
- BEFORE BEGINNING INSTALLATION
- ONLY FOR SOME MODELS
- OPERATION
- GREASE FILTER SIGNAL
- CHARCOAL FILTER SIGNAL
- ACTIVATING CHARCOAL FILTER SIGNAL
- DEACTIVATING CHARCOAL FILTER SIGNAL
- MAINTENANCE
- CLEANING
- PANEL
- MAINTENANCE OF THE PANEL
- DISMANTLING
- ASSEMBLY
- GREASE FILTER
- FIG
- TRAPS COOKING GREASE PARTICLES
- CHARCOAL FILTER (FILTER VERSION ONLY)
- CIRCULAR CARBON FILTER
- REPLACING LAMPS
- ACTIVATION SIGNAL CHARCOAL FILTER
- TABLE
- REMOVAL
- SIGNAL FOR GREASE FILTER
- DO NOT USE ALCOHOL
- SIGNAL FOR DIRTY GREASE FILTER
- SIGNAL FOR DIRTY CARBON FILTER
- BEFORE STARTING INSTALLATION
- CIRCULAR FILTER
- EXTRACTOR WITH FILTER
- BEFORE PROCEEDING WITH INSTALLATION
- ONLY FOR THIS MODEL
- T1. SWITCHING ON/OFF (ON/OFF) THE LIGHT
- T2. STARTING THE SPEED
- T3 INCREASING THE SPEED
- T4 - TIME SETTING OF THE SPEED
- INDICATOR FOR FILTER REPLACEMENT FOR GREASE FILTER
- INDICATOR FOR FILTER REPLACEMENT WITH ACTIVATED CARBON FILTER
- ACTIVATING THE FILTER CLOGGING INDICATOR IN ACTIVE MODE
- DEACTIVATING THE FILTER CLOGGING INDICATOR IN ACTIVE MODE
- THE FILTER WITH ACTIVATED CARBON (ONLY FOR FILTERING VERSIONS)
- COVER THE FILTER WITH ACTIVATED CARBON
- TOP OF THE COVER
- EXHAUST MODE (AIR DISCHARGE OUTSIDE)
- USE OF RECIRCULATION MODE
- AIR
- T1. ON/OFF LIGHT
- T2. DECREASE SPEED
- T3. INCREASE SPEED
- T4 SPEED PROGRAMMING
- BLOOD FILTER SATURATION INDICATOR
- CHARCOAL FILTER SATURATION INDICATOR
- YXO
- OUINCTKA
- PANAHEJIB
- CIYKBAHNE NAHEJI
- DEMOHTAK
- EXTRACTION MODE
- ATTENTION
- BEFORE INSTALLATION
- FOR SOME MODELS
- T2. SPEED CHANGE
- T3. SPEED INCREASE
- T4 PROGRAMMING THE TIMER
- BYRILBHM FIBTP (TILBKN B PEXNMI PEUNPKYLAUII) MAN
- KPYNNBVYRNBHNPFIBTP
- AHAJAMA
- MAN
- HYCAYNAP
- ECKEPTY
- PAIDANAHY
- FILTER HOUSING
- HOSE CONNECTION
- CONNECTION
- ELECTRICAL CONNECTIONS
- DURING INSTALLATION
- T1. PUMP CONNECTION
- T2. PUMP DISASSEMBLY
- T3 PUMP ASSEMBLY
- REDUNDANT SIGNAL
- TO RAISE THE REDUNDANT SIGNAL
- REMOVE THE PROTECTIVE FILM
- TECHNICAL SERVICE
- REMOVE THE VERSION
Brand : ELICA
Model : PRF0032793C
Category : Range hood