RY36CSX35A - Chain saw RYOBI - Free user manual and instructions
Find the device manual for free RY36CSX35A RYOBI in PDF.
User questions about RY36CSX35A RYOBI
0 question about this device. Answer the ones you know or ask your own.
Ask a new question about this device
Download the instructions for your Chain saw in PDF format for free! Find your manual RY36CSX35A - RYOBI and take your electronic device back in hand. On this page are published all the documents necessary for the use of your device. RY36CSX35A by RYOBI.
USER MANUAL RY36CSX35A RYOBI
Safety, performance, and dependability have been given top priority in the design of your cordless chainsaw.
INTENDED USE
The product is intended for outdoor use only. For safety reasons, the product must be adequately controlled by using two-handed operation at all times.
The product is designed for cutting branches, trunks, logs and beams of a diameter determined by the cutting length of the guide bar. It is designed to cut wood only. It is only to be used in domestic application by adults who have received adequate training on the hazards and preventative measures/actions to be taken while using the product.
The product is not to be used by children or by persons not wearing adequate personal protective equipment and clothing. It is also not to be used for professional tree services. Do not use the product for any other purpose.
WARNING
When using the product, the safety rules must be followed. For your own safety and that of bystanders, you must read and fully understand these instructions before operating the product. You should attend a professionally organised course on the use and maintenance of chainsaws, preventative actions and first aid. Please keep these instructions safe for later use.
WARNING
Chainsaws are potentially dangerous tools. Accidents involving the use of chainsaws often result in loss of limbs or death. It is not just the product that is the hazard. Falling branches, toppling trees, rolling logs can all kill. Diseased or rotting timber poses additional hazards. Assess your capability of completing the task safely. If there is any doubt, leave it to a professional tree surgeon.
GENERAL POWER TOOL SAFETY WARNINGS
WARNING
Read all safety warnings, instructions, illustrations and specifications provided with this power tool. Failure to follow all instructions listed below may result in electric shock, fire and/or serious injury.
Save all warnings and instructions for future reference.
The term “power tool” in the warnings refers to your mains-operated (corded) power tool or battery-operated (cordless) power tool.
WORK AREA SAFETY
- Keep work area clean and well lit. Cluttered or dark areas invite accidents.
- Do not operate power tools in explosive atmospheres, such as in the presence of flammable liquids, gases or dust. Power tools create sparks which may ignite the dust or fumes.
- Keep children and bystanders away while operating a power tool. Distractions can cause you to lose control.
ELECTRICAL SAFETY
■ Power tool plugs must match the outlet. Never modify the plug in any way. Do not use any adapter plugs with earthed (grounded) power tools. Unmodified plugs and matching outlets will reduce risk of electric shock.
- Avoid body contact with earthed or grounded surfaces, such as pipes, radiators, ranges and refrigerators. There is an increased risk of electric shock if your body is earthed or grounded.
- Do not expose power tools to rain or wet conditions. Water entering a power tool will increase the risk of electric shock.
- Do not abuse the cord. Never use the cord for carrying, pulling or unplugging the power tool. Keep cord away from heat, oil, sharp edges or moving parts. Damaged or entangled cords increase the risk of electric shock.
- When operating a power tool outdoors, use an extension cord suitable for outdoor use. Use of a cord suitable for outdoor use reduces the risk of electric shock.
If operating a power tool in a damp location is unavoidable, use a residual current device (RCD) protected supply. Use of an RCD reduces the risk of electric shock.
PERSONAL SAFETY
■ Stay alert, watch what you are doing and use common sense when operating a power tool. Do not use a power tool while you are tired or under the influence of drugs, alcohol or medication. A moment of inattention while operating power tools may result in serious personal injury.
■ Use personal protective equipment. Always wear eye protection. Protective equipment such as a dust mask, non-skid safety shoes, hard hat or hearing protection used for appropriate conditions will reduce personal injuries.
■ Prevent unintentional starting. Ensure the switch is in the off-position before connecting to power source and/or battery pack, picking up or carrying the tool. Carrying power tools with your finger on the switch or energising power tools that have the switch on invites accidents.
■ Remove any adjusting key or wrench before turning the power tool on. A wrench or a key left attached to a rotating part of the power tool may result in personal injury.
- Do not overreach. Keep proper footing and balance at all times. This enables better control of the power tool in unexpected situations.
■ Dress properly. Do not wear loose clothing or jewellery. Keep your hair and clothing away from moving parts. Loose clothes, jewellery or long hair can be caught in moving parts.
If devices are provided for the connection of dust extraction and collection facilities, ensure these are connected and properly used. Use of dust collection can reduce dust-related hazards.
- Do not let familiarity gained from frequent use of tools allow you to become complacent and ignore tool safety principles. A careless action can cause severe injury within a fraction of a second.
POWER TOOL USE AND CARE
- Do not force the power tool. Use the correct power tool for your application. The correct power tool will do the job better and safer at the rate for which it was designed.
- Do not use the power tool if the switch does not turn it on and off. Any power tool that cannot be controlled with the switch is dangerous and must be repaired.
■ Disconnect the plug from the power source and/or remove the battery pack, if detachable, from the power tool before making any adjustments, changing accessories, or storing power tools. Such preventive safety measures reduce the risk of starting the power tool accidentally.
■ Store idle power tools out of the reach of children and do not allow persons unfamiliar with the power tool or these instructions to operate the power tool. Power tools are dangerous in the hands of untrained users. - Maintain power tools and accessories. Check for misalignment or binding of moving parts, breakage of parts and any other condition that may affect the power tool's operation. If damaged, have the power tool repaired before use. Many accidents are caused by poorly maintained power tools.
- Keep cutting tools sharp and clean. Properly maintained cutting tools with sharp cutting edges are less likely to bind and are easier to control.
Use the power tool, accessories and tool bits etc. in accordance with these instructions, taking into account the working conditions and the work to be performed. Use of the power tool for operations different from those intended could result in a hazardous situation. - Keep handles and grasping surfaces dry, clean and free from oil and grease. Slippery handles and grasping surfaces do not allow for safe handling and control of the tool in unexpected situations.
BATTERY TOOL USE AND CARE
■ Recharge only with the charger specified by the manufacturer. A charger that is suitable for one type of battery pack may create a risk of fire when used with another battery pack.
■ Use power tools only with specifically designated battery packs. Use of any other battery packs may create a risk of injury and fire.
- When battery pack is not in use, keep it away from other metal objects, like paper clips, coins, keys, nails, screws or other small metal objects, that can make a connection from one terminal to another. Shorting the battery terminals together may cause burns or a fire.
■ Under abusive conditions, liquid may be ejected from the battery; avoid contact. If contact accidentally occurs, flush with water. If liquid contacts eyes, additionally seek medical help. Liquid ejected from the battery may cause irritation or burns.
- Do not use a battery pack or tool that is damaged or modified. Damaged or modified batteries may exhibit unpredictable behaviour resulting in fire, explosion or risk of injury.
- Do not expose a battery pack or tool to fire or excessive temperature. Exposure to fire or temperature above 130°C may cause explosion.
■ Follow all charging instructions and do not charge the battery pack or tool outside the temperature range specified in the instructions. Charging improperly or at temperatures outside the specified range may damage the battery and increase the risk of fire.
SERVICE
■ Have your power tool serviced by a qualified repair person using only identical replacement parts. This will ensure that the safety of the power tool is maintained.
■ Never service damaged battery packs. Service of battery packs should only be performed by the manufacturer or authorised service providers.
ADDITIONAL GENERAL SAFETY WARNINGS
■ Some regions have regulations that restrict the use of the product. Check with your local authority for advice.
■ Never allow children or people who are unfamiliar with the instructions to use the product. Local regulations may restrict the age of the operator.
- Ensure before each use that all controls and safety devices function correctly. Do not use the product if the "off" switch does not stop the motor.
■ Wear full eye and hearing protection, strong sturdy boots and gloves, and head protection while operating the product. Use a face mask if operation is dusty.
■ Use of hearing protection reduces the ability to hear warnings (shouts or alarms). The operator must pay extra attention to what is going on in the work area.
- Keep firm footing and balance. Do not overreach. Overreaching can result in loss of balance and can increase the risk of kickback.
- Do not wear loose-fitting clothing, short trousers, or jewellery of any kind.
- Secure long hair so it is above shoulder level to prevent entanglement in moving parts.
■ Beware of thrown, flying, or falling objects. Keep all bystanders, children, and animals at least 15 m away from the work area.
- Do not operate the product in poor lighting. The operator requires a clear view of the work area to identify potential hazards.
- Operating similar tools nearby increases both the risk of hearing injury and the potential for other persons to enter your work area.
- Keep all parts of your body away from any moving part.
- Inspect the product before each use. Check for correct operation of all controls, including the chain brake. Check for loose fasteners, and make sure that all guards and handles are properly and securely attached. Replace any damaged parts before use.
- Do not modify the product in any way or use parts and accessories which are not recommended by the manufacturer.
WARNING
If the product is dropped, suffers heavy impact or begins to vibrate abnormally, immediately stop the product and inspect for damage or identify the cause of the vibration. Any damage should be properly repaired or replaced by an authorised service centre.
ADDITIONAL BATTERY SAFETY WARNINGS
WARNING
To reduce the risk of fire, personal injury, and product damage due to short circuit, never immerse your tool, battery pack, or charger in fluid or allow a fluid to flow inside them. Corrosive or conductive fluids, such as seawater, certain industrial chemicals, and bleach or bleach-containing products, etc., can cause a short circuit.
OVER-TEMPERATURE PROTECTION
The battery pack has an over-temperature protection, which is designed to protect the battery cells from damage in the event of high temperatures. This feature may cause the battery to stop powering the product until the battery cells cool down. Feel the battery pack; if it is warm to touch, allow it to cool down before resuming operation. If the product still does not work, connect the battery pack to the charger, which can also indicate over-temperature protection. When the battery cells cool down, the charger begins to charge the battery.
NOTE: High ambient temperatures above 30^ C and high power tools, such as chainsaw, can cause the battery cells to heat up faster. Monitor the battery pack regularly, and if it is warm to touch, change the battery or allow the battery to cool down.
NOTE: The battery pack LED indicator stops working if the battery protection feature has caused the battery pack to stop powering the product.
CHAINSAW SAFETY WARNINGS
- Keep all parts of the body away from the saw chain when the chainsaw is operating. Before you start the chainsaw, make sure the saw chain is not contacting anything. A moment of inattention while operating chainsaws may cause entanglement of your clothing or body with the saw chain.
■ Always hold the chainsaw with your right hand on the rear handle and your left hand on the front
handle. Holding the chainsaw with a reversed hand configuration increases the risk of personal injury and should never be done.
- Hold the chainsaw by insulated gripping surfaces only, because the saw chain may contact hidden wiring or its own cord. Saw chains contacting a "live" wire may make exposed metal parts of the chainsaw "live" and could give the operator an electric shock.
■ Wear eye protection. Further protective equipment for hearing, head, hands, legs and feet is recommended. Adequate protective equipment will reduce personal injury by flying debris or accidental contact with the saw chain. - Do not operate a chainsaw in a tree, on a ladder, from a rooftop, or any unstable support. Operation of a chainsaw in this manner could result in serious personal injury.
■ Always keep proper footing and operate the chainsaw only when standing on fixed, secure and level surface. Slippery or unstable surfaces may cause a loss of balance or control of the chainsaw. - When cutting a limb that is under tension, be alert for spring back. When the tension in the wood fibres is released, the spring loaded limb may strike the operator and/or throw the chainsaw out of control.
■ Use extreme caution when cutting brush and saplings. The slender material may catch the saw chain and be whipped toward you or pull you off balance. - Carry the chainsaw by the front handle with the chainsaw switched off and away from your body. When transporting or storing the chainsaw, always fit the guide bar cover. Proper handling of the chainsaw will reduce the likelihood of accidental contact with the moving saw chain.
■ Follow instructions for lubricating, chain tensioning and changing the bar and chain. Improperly tensioned or lubricated chain may either break or increase the chance for kickback. - Cut wood only. Do not use chainsaw for purposes not intended. For example: do not use chainsaw for cutting metal, plastic, masonry or non-wood building materials. Use of the chainsaw for operations different than intended could result in a hazardous situation.
- Do not attempt to fell a tree until you have an understanding of the risks and how to avoid them. Serious injury could occur to the operator or bystanders while felling a tree.
Causes and operator prevention of kickback:
Kickback may occur when the nose or tip of the guide bar touches an object, or when the wood closes in and pinches the saw chain in the cut.
Tip contact in some cases may cause a sudden reverse reaction, kicking the guide bar up and back towards the operator.
Pinching the saw chain along the top of the guide bar may push the guide bar rapidly back towards the operator.
Either of these reactions may cause you to lose control of
the saw which could result in serious personal injury. Do not rely exclusively upon the safety devices built into your saw. As a chainsaw user, you should take several steps to keep your cutting jobs free from accident or injury.
Kickback is the result of tool misuse and/or incorrect operating procedures or conditions and can be avoided by taking proper precautions as given below:
- Maintain a firm grip, with thumbs and fingers encircling the chainsaw handles, with both hands on the saw and position your body and arm to allow you to resist kickback forces. Kickback forces can be controlled by the operator, if proper precautions are taken. Do not let go of the chainsaw.
- Do not overreach and do not cut above shoulder height. This helps prevent unintended tip contact and enables better control of the chainsaw in unexpected situations.
■ Use only replacement bars and chains that are specified by the manufacturer. Incorrect replacement bars and chains may cause chain breakage and/or kickback. - Follow the manufacturer's sharpening and maintenance instructions for the saw chain. Decreasing the depth gauge height can lead to increased kickback.
ADDITIONAL CHAINSAW SAFETY WARNINGS
It is recommended to cut logs on a saw-horse or cradle when operating the product for the first time.
■ Ensure that all guards, handles, and spiked bumper are properly fitted and are in good condition.
■ Persons using this chainsaw should be in good health. The chainsaw is a heavy unit so the operator requires to be physically fit. The operator should be alert, have good vision, mobility, balance and manual dexterity. If there is any doubt, do not operate the chainsaw.
- Do not start using the product until you have a clear work area, secure footing, and a planned retreat path away from the falling tree.
■ Beware of the emission of lubricant mist and saw dust. Wear a mask or respirator if required.
- Do not cut vines and/or small undergrowth (less than 75 mm in diameter).
■ Always hold the chainsaw with both hands when operating the saw. Use a firm grip with thumbs and fingers encircling the chainsaw handles. Right hand must be on the rear handle and left hand on the front handle.
■ Before starting the product, make sure that the saw chain is not contacting any object.
- Do not modify your tool in any way or use it to power any attachments or devices that are not recommended by the manufacturer for your saw.
There should be a first-aid kit containing large wound dressings and a means to summon attention (e.g., whistle) close to the operator. A larger more comprehensive kit should be reasonably nearby.
■ Wear a helmet at all times when operating the product. A helmet, equipped with mesh visor, can help reduce
the risk of injury to the face and the head if kickback occurs.
An incorrectly tensioned chain can jump off the guide bar and could result in serious injury or fatality. The length of chain depends on the temperature of the chain and chain wear. Check the tension frequently.
- You should get used to your new chainsaw by making simple cuts on securely supported wood. Do this whenever you have not operated the saw for some time.
■ To reduce the risk of injury associated with contacting moving parts, always stop the motor, apply chain brake, remove the battery pack, and make sure that all moving parts have come to a stop before:
– cleaning or clearing a blockage
– leaving the product unattended
– installing or removing attachments
– checking, maintenance or working on the product
The size of the work area depends on the job being performed as well as the size of the tree or work piece involved. For example, felling a tree requires a larger work area than making other cuts, i.e., bucking cuts, etc. The operator needs to be aware and in control of everything happening in this work area.
- Do not cut with your body in line with the guide bar and chain. If you do experience kickback this will help prevent the chain from coming into contact with your head or body.
- Do not use a back and forward sawing motion, let the chain do the work, keep the chain sharp and don't try to push the chain through the cut.
- Do not put pressure on the saw at the end of the cut. Be ready to take on the weight of the saw as it cuts free from the wood. Failure to do so could result in possible serious personal injury.
- Do not stop the saw in the middle of a cutting operation. Keep the saw running until it is removed from the cut.
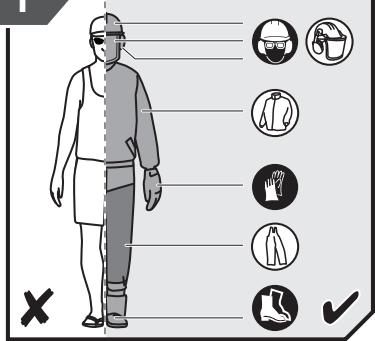
Personal protective equipment
Good quality personal protective equipment as used by professionals will help to reduce the risk of injury to the operator. The following items should be used when operating your chainsaw:
Safety helmet
■ should comply with EN 397 and be CE marked
Hearing protection
■ should comply with EN 352-1 and be CE marked
Eye and face protection
■ should be CE marked and comply with EN 166 (for safety glasses) or EN 1731 (for mesh visors)
Gloves
■ should comply with EN381-7 and be CE marked
Leg protection (chaps)
■ should comply with EN381-5, be CE marked and provide all-round protection.
Chainsaw safety boots
■ should comply with EN ISO 20345:2004 and be marked
with a shield depicting a chainsaw to show compliance with EN 381-3. (Occasional users may use steel toe-cap safety boots with protective gaiters which conform to EN 381-9 if the ground is even and there is little risk of tripping or catching on undergrowth)
Chainsaw jackets for upper body protection
■ should comply with EN 381-11 and be CE marked
GETTING STARTED
See page 277.
- Wear full eye protection, ear protection, non-slip heavy-duty gloves, substantial footwear, and protective clothing at all times while operating the product. Do not operate the product when barefoot or wearing open sandals.
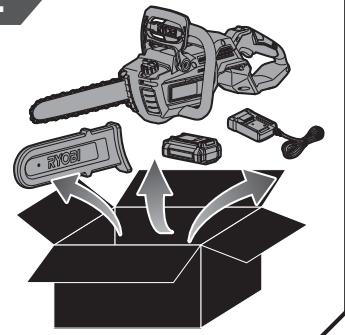
- Remove the parts from the packaging. Inspect the product carefully for damage. If any parts are damaged or missing, contact an authorised service centre.
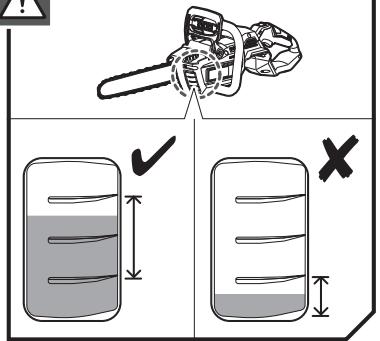
- Add chain lubricating oil. Clear the surface around the oil cap to prevent contamination. Remove the cap from the oil tank. Pour the oil into the oil tank and monitor the oil level gauge. Ensure that no dirt enters the oil tank while filling. Close the oil tank, and tighten the cap. Wipe away any spillage.
WARNING
Never work without chain lubricant. If the saw chain is running without lubricant, the guide bar and the saw chain can be damaged. It is essential to frequently check the oil level in the oil level gauge and before starting to use the chainsaw.
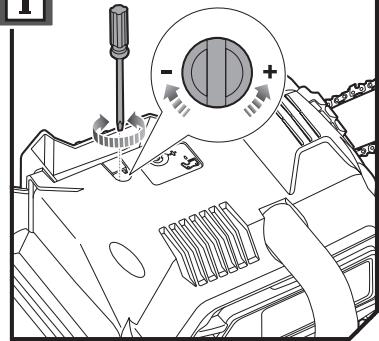
NOTE: Ensure that the lubricant flow screw is set to open for chain and bar oil to be released.
- Turn the screw counterclockwise to open and increase the oil flow to the chain and bar.
- Turn the screw clockwise to decrease the oil flow to the chain and bar.
A properly functioning chain and bar lubricating system will normally discharge oil from the chain during use. To check the functionality of the chain and bar lubricating system, point the tip of the chain at a light coloured surface, such as a newspaper. A distinct line of oil splatter should be observed after a short time.
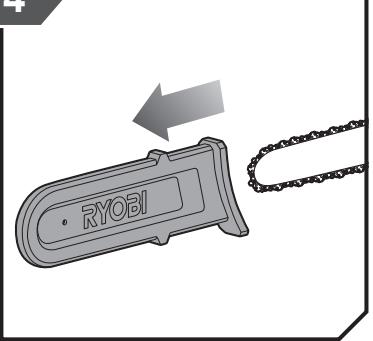
- Remove the guide bar cover.
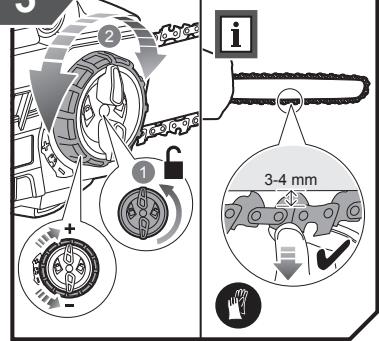
- Adjust the chain tension. Turn the chain tensioner knob counterclockwise to unlock the chain tensioner adjustment ring. Check the chain tension frequently while adjusting the tension.
- To increase the chain tension, turn the chain tensioner adjustment ring clockwise.
- To reduce the chain tension, turn the chain tensioner adjustment ring counterclockwise.
NOTE: The chain tension is correct when the gap between the cutter in the chain and the bar is between 3-4 mm. Pull the chain in the middle of the lower side of the bar downwards (away from the bar), and measure the distance between the bar and the chain cutters.
NOTE: The temperature of the chain increases during normal operation causing the chain to stretch. Check the chain tension frequently and adjust as required. A chain tensioned while warm may be too tight upon cooling. Make sure that the chain tension is correctly adjusted as specified in these instructions.
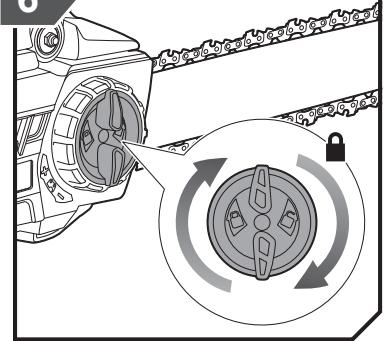
- Tighten the chain tensioner knob by turning it clockwise.
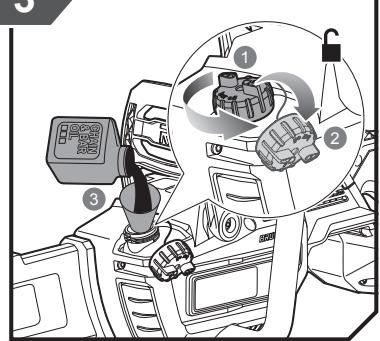
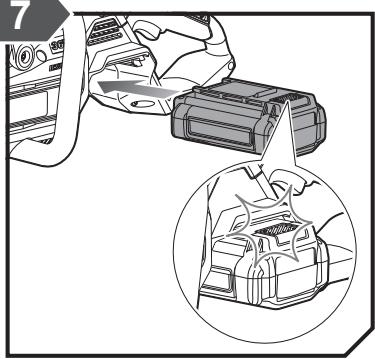
- Align the raised ribs on the battery pack with the grooves in the product's battery port. Make sure that the latch of the battery pack snaps in place and that the battery pack is fully seated and securely attached before beginning operation.
WARNING
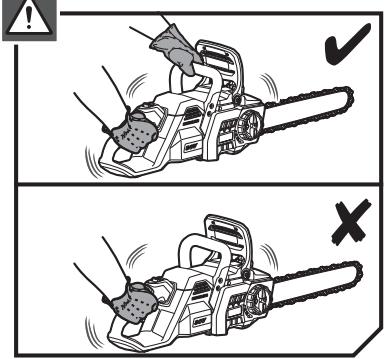
Always hold the product with your right hand on the rear handle and your left hand on the front handle.
WARNING
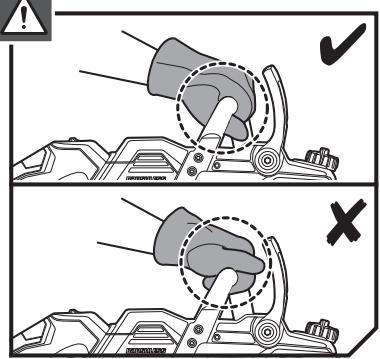
Grip both handles with the thumbs and fingers encircling the handles. Ensure that your left hand is holding the front handle so that your thumb is underneath.
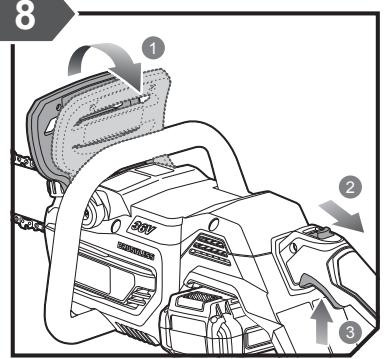
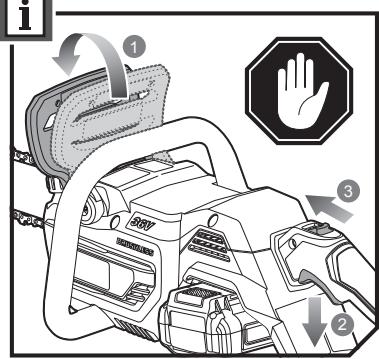
- Start the product. Set the chain brake into the run position by grasping the top of the chain brake lever/hand guard and pulling towards the front handle until you hear a click. Pull the trigger release. Press the throttle trigger.
NOTE: To stop the product, engage the chain brake by rotating your left hand around the front handle. Allow the back of your hand to push the chain brake lever/hand guard toward the bar while the chain is rotating rapidly. Push the trigger release and release the throttle trigger.
INSTRUCTIONS CONCERNING THE PROPER TECHNIQUES FOR BASIC FELLING, LIMBING, AND CROSS-CUTTING
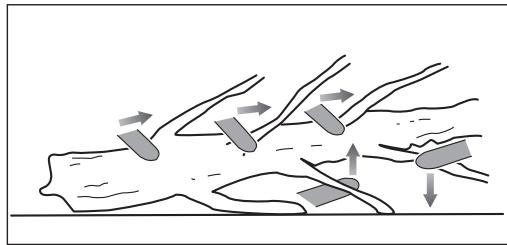
Understanding the forces within the wood
When you understand the directional pressures and stresses inside the wood you can reduce the “pinches” or at least expect them during your cutting. Tension in the wood means the fibers are being pulled apart and if you cut in this area, the “kerf” or cut will tend to open as the saw goes through. If a log is being supported on a saw horse and the end is hanging unsupported over the end then tension is created on the upper surface due to the weight of the overhanging log stretching the fibers. Likewise, the underside of the log will be in compression and the fibers are being pushed together. If a cut is made in this area, the kerf will have the tendency to close up during the cut. This would pinch the blade.
Push and pull
The reaction force is always opposite to the direction the chain is moving. Thus, the operator must be ready to control the tendency for the product to pull away (forward motion) when cutting on the bottom edge of the bar and the push backwards (towards the operator) when cutting along the top edge.
Saw jammed in the cut
Stop the chainsaw and make it safe. Do not try to force the chain and bar out of the cut as this is likely to break the chain, which may swing back and strike the operator. This situation normally occurs because the wood is incorrectly supported and forcing the cut to close under compression thereby pinching the blade. If adjusting the support does not release the bar and chain, use wooden wedges or a lever to open the cut and release the saw. Never try to start the chainsaw when the guide bar is already in a cut or kerf.
Skating/Bouncing
When the chainsaw fails to dig in during a cut, the guide bar can dangerously begin hopping or skidding along the surface of the log or branch, possibly resulting in the loss of control of the chainsaw. To prevent or reduce skating or bouncing, always use the saw with both hands. Make sure that the saw chain establishes a groove for cutting.
Never cut small, flexible branches or brushes with your chainsaw. Their size and flexibility can easily cause the saw to bounce towards you or bind up with enough force to cause a kickback. The best tool for that kind of work is a hand saw, pruning shears, an axe or other hand tools.
Felling a tree
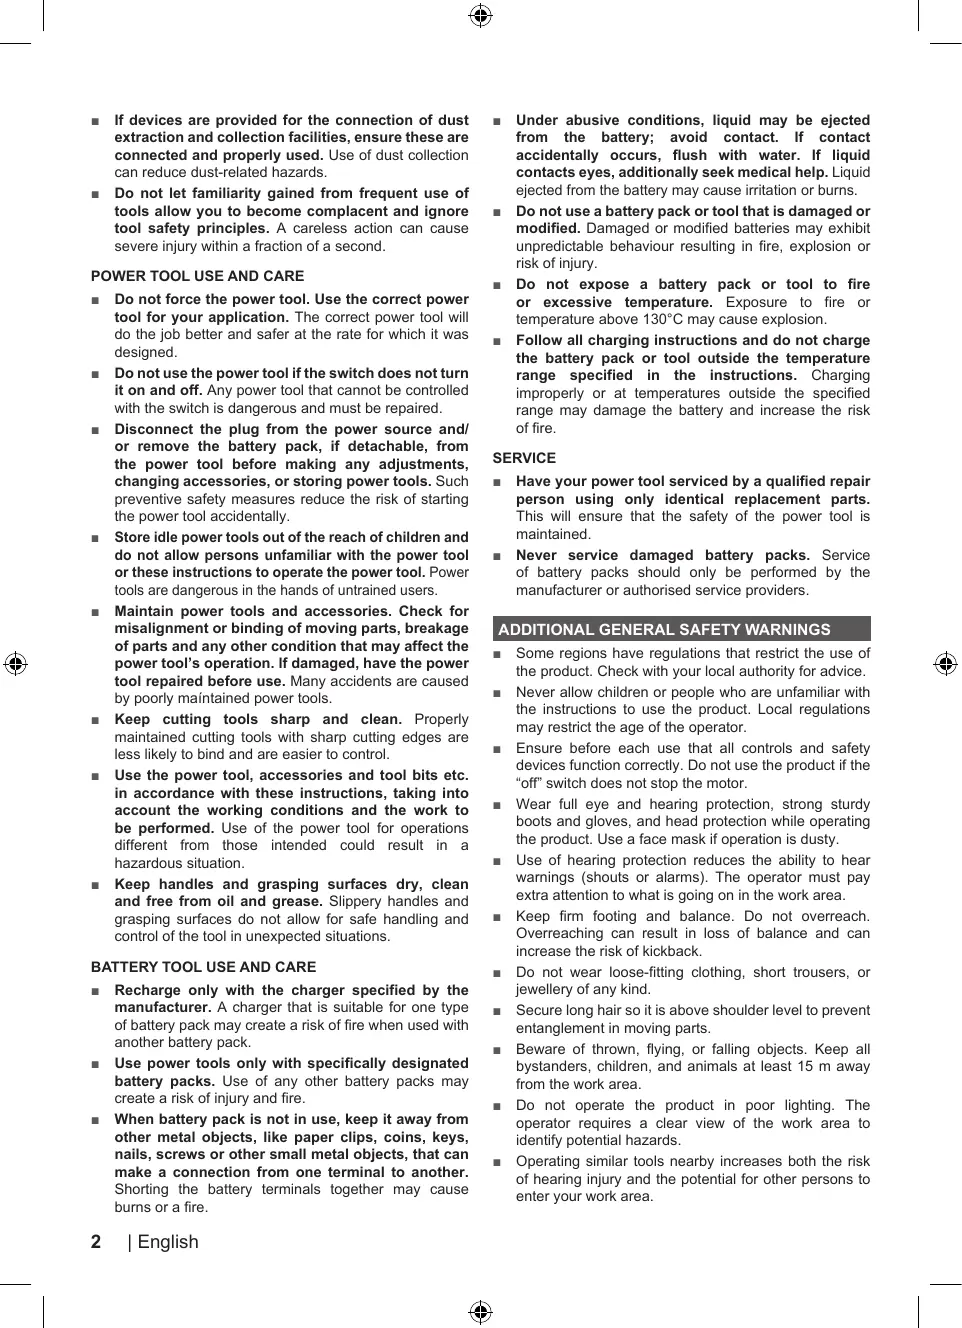
When bucking and felling operations are being performed by two or more persons at the same time, the felling operations should be separated from the bucking operation by a distance of at least twice the height of the tree being felled. Trees should not be felled in a manner that would endanger any person, strike any utility line, or cause any property damage. If the tree does make contact with any utility line, the company should be notified immediately.
The chainsaw operator should keep on the uphill side of the terrain as the tree is likely to roll or slide downhill after it is felled.
An escape path should be planned and cleared as necessary before cuts are started. The escape path should extend back and diagonally to the rear of the expected line of fall.
flowchart
graph TD
    A["Start"] --> B{Condition}
    B --> C["Action"]
    B --> D["Failure"]
    C --> E["Warning Symbol"]
    D --> F["Warning Symbol"]
    E --> G["End"]
    F --> G
    style A fill:#f9f,stroke:#333
    style G fill:#bbf,stroke:#333
Before felling is started, consider the natural lean of the tree, the location of larger branches and the wind direction to judge which way the tree will fall.
Remove dirt, stones, loose bark, nails, staples and wire from the tree.
Do not attempt to fell trees that are rotten or have been damaged by wind, fire, lightning, etc. This is extremely dangerous and should only be completed by professional tree surgeons.
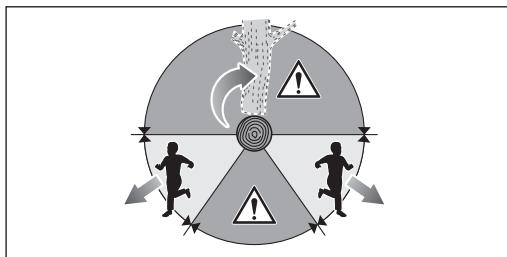
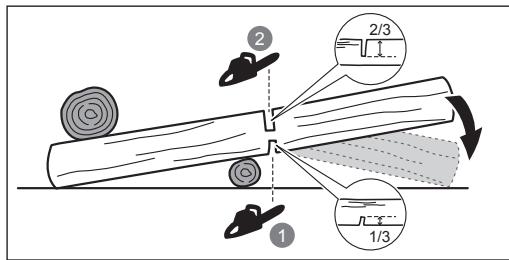
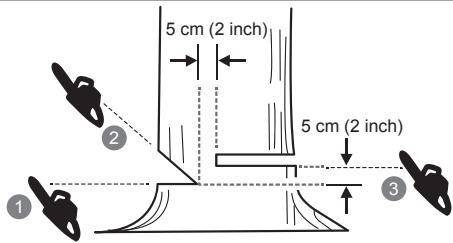
1. Notching undercut
Make the notch 1/3 the diameter of the tree, perpendicular to the direction of falls. Make the lower horizontal notching cut first. This will help to avoid pinching either the saw chain or the guide bar when the second notch is being made.
2. Felling back cut
Make the felling back cut at least 50 mm (2 inches) higher than the horizontal notching cut. Keep the felling back cut parallel to the horizontal notching cut. Make the felling back cut so enough wood is left to act as a hinge. The hinge wood keeps the tree from twisting and falling in the wrong direction. Do not cut through the hinge.
As the felling gets close to the hinge, the tree should begin to fall. If there is any chance that the tree may not fall in desired direction or it may rock back and bind the saw chain, stop cutting before the felling back cut is complete, and use wedges of wood, plastic or aluminium to open the cut and drop the tree along the desired line of fall.
When the tree begins to fall, remove the chainsaw from the cut, stop the motor, put the chainsaw down, then use the retreat path planned. Be alert for overhead limbs falling, and watch your footing.

text_image
Technical diagram illustrating mechanical assembly steps with labeled arrows and warning symbol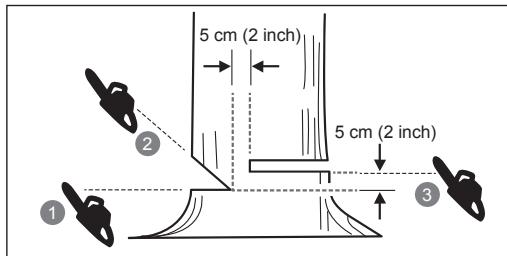
text_image
5 cm (2 inch) 5 cm (2 inch)Removing buttress roots
A buttress root is a large root extending from the trunk of the tree above the ground. Remove large buttress roots prior to felling. Make the horizontal cut into the buttress first, followed by the vertical cut. Remove the resulting loose section from the work area. Follow the correct tree felling procedure after you have removed the large buttress roots.
text_image
Diagram illustrating two different methods of using a tree to generate a single tree, labeled with step numbers 1 and 2.Bucking a log
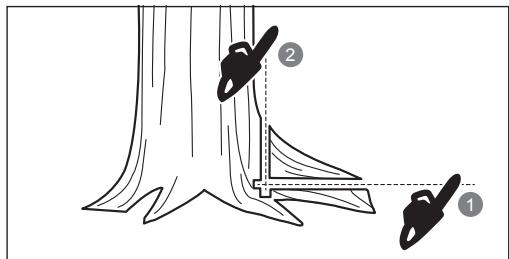
Bucking is cutting a log into lengths. It is important to make sure that your footing is firm and your weight is evenly distributed on both feet. When possible, the log should be raised and supported by the use of limbs, logs, or chocks. Follow the directions for easy cutting. When the log is supported along its entire length, it is cut from the top (overbuck).
When the log is supported on one end, cut 1/3 the diameter from the underside (underbuck). Make the finished cut by overbucking to meet the first cut.
text_image
2 1 2/3 1/3When the log is supported on both ends, cut 1/3 the diameter from the top (overbuck). Make the finished cut by underbucking the lower 2/3 to meet the first cut.

text_image
1/3 2/3When bucking on a slope, always stand on the uphill side of the log. When “cutting through”, to maintain complete control release the cutting pressure near the end of the cut without relaxing your grip on the chainsaw handles. Do not let the chain contact the ground. After completing the cut, wait for the saw chain to stop before you move the chainsaw. Always stop the motor before moving from tree to tree.
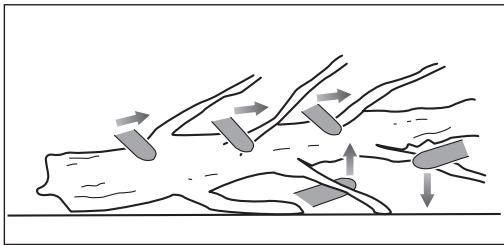
Limbing a tree
Limbing is the process of removing the branches from a fallen tree. When limbing, leave larger lower limbs to support the log off the ground. Remove the small limbs in one cut. Branches under tension should be cut from the bottom up to avoid binding the chainsaw.
natural_image
Diagram showing hand positioning with arrows indicating movement, no text or symbols presentSpringpoles
A springpole is any log, branch, rooted stump, or sapling that is bent under tension by other wood so that it springs back if the wood holding it is cut or removed.
On a fallen tree, a rooted stump has a high potential of springing back to the upright position during the bucking cut to separate the log from the stump. Watch out for springpoles—they are dangerous. Do not attempt to cut bent branches or stumps that are under tension unless you are professionally trained and competent to do so.

natural_image
Diagram illustrating tree growth with arrows indicating movement, no text or symbols presentWARNING
Springpoles are dangerous and could strike the operator, causing the operator to lose control of the chainsaw. This could result in severe or fatal injury to the operator. This should be done by trained users.
TRANSPORTATION AND STORAGE
■ Stop the product, remove the battery pack, and allow the product to cool down before storing or transporting.
■ Clean all foreign material from the product. Store it in a cool, dry, and well-ventilated place that is inaccessible to children. Keep the product away from corrosive agents such as garden chemicals and de-icing salts. Do not store the product outdoors.
■ Fit guide bar cover before storing the product, or during transportation.
■ For transportation, secure the product against movement or falling to prevent injury to persons or damage to the product.
TRANSPORTING LITHIUM BATTERIES
Transport the battery in accordance with local and national provisions and regulations.
Follow all special requirements on packaging and labelling when transporting batteries by a third party. Ensure that no batteries can come in contact with other batteries or conductive materials while in transport by protecting exposed connectors with insulating, non-conductive caps or tape. Do not transport batteries that are cracked or leaking. Check with the forwarding company for further advice.
MAINTENANCE
WARNING
Use only original manufacturer's replacement parts, accessories and attachments. Failure to do so can cause possible injury, can contribute to poor performance, and may void your warranty.
WARNING
Servicing requires extreme care and knowledge and should be performed only by a qualified service technician. Have the product serviced by an authorised service centre only. When servicing, use only original replacement parts.
WARNING
Remove the battery before adjustment, maintenance or cleaning. Failure to do so could result in serious personal injury.
- You may make adjustments or repairs described in this manual. For other repairs, contact the authorized service agent.
■ Consequences of improper maintenance, removal, or modification of safety features, such as the chain brake, ignition switch, hand guard (front and back), spiked bumper, chain catcher, guide bar, and low kickback saw chain may cause the safety features to not function correctly, thus increasing the potential for serious injury. Keep your chainsaw professionally maintained and safe.
■ Sharpening the chain safely is a skilled task. Therefore the manufacturer strongly recommends that a worn or dull chain is replaced with a new one, available from your authorised RYOBI service centre. The part number is available in the product specification table in this manual.
■ Follow instructions for lubricating and chain tension checking and adjustment.
■ After each use, clean the product with a soft, dry cloth. - Check all nuts, bolts, and screws at frequent intervals for security to ensure the product is in safe working condition. Any part that is damaged should be properly repaired or replaced by an authorized service centre.
MAINTENANCE SCHEDULE
| Daily check | |
| Bar lubrication | Before each use |
| Chain tension | Before each use and frequently |
| Chain sharpness | Before each use, visual check |
| For damaged parts | Before each use |
| For loose fasteners | Before each use |
| Chain brake function | Before each use |
| Inspect and clean | |
| Bar | Before each use |
| Complete saw | After each use |
| Chain brake | Every 5 hours* |
* Hours of operation
RESIDUAL RISKS
Even when the product is used as prescribed, it is still impossible to completely eliminate certain residual risk factors. The following hazards may arise in use and the operator should pay special attention to avoid the following:
■ injury caused by vibration
- Always use the right tool for the job, use designated handles and restrict working time and exposure.
■ damage to hearing due to exposure to noise
– Wear hearing protection and limit exposure.
■ injury caused by contact with exposed saw teeth of the chain (cutting hazards)
■ injury caused by unforeseen, abrupt movement or kickback of the guide bar (cutting hazards)
■ injury caused by parts ejected from the saw chain (cutting/injection hazards)
■ injury caused by thrown-out pieces of the workpiece (wood chips, splinters)
■ injury caused by dust and particles
■ injury to the skin caused by contact with lubricants
RISK REDUCTION
It has been reported that vibrations from hand-held tools may contribute to a condition called Raynaud's Syndrome in certain individuals. Symptoms may include tingling, numbness, and blanching of the fingers, usually apparent upon exposure to cold. Hereditary factors, exposure to cold and dampness, diet, smoking and work practices are all thought to contribute to the development of these symptoms. There are measures that can be taken by the operator to possibly reduce the effects of vibration:
- Keep your body warm in cold weather. When operating the product. Wear gloves to keep the hands and wrists warm. It is reported that cold weather is a major factor contributing to Raynaud's Syndrome.
■ After each period of operation, exercise to increase blood circulation.
■ Take frequent work breaks. Limit the amount of exposure per day.
■ Protective gloves available from professional chainsaw retailers are designed specifically for chainsaw use, which give protection, good grip, and reduce the effect of handle vibration.
If you experience any of the symptoms of this condition, immediately discontinue use and see your physician.
WARNING
Injuries may be caused, or aggravated, by prolonged use of a tool. When using any tool for prolonged periods, ensure you take regular breaks.
KNOW YOUR PRODUCT
See page 276.
- Saw chain
- Guide bar
- Front hand guard/Chain brake
- Front handle
- Rear handle
- Chain lubricant cap
- Guide bar cover
- Chain tensioner knob
- Chain tensioner adjustment ring
- Sprocket cover
- Switch trigger
- Trigger release
- Spiked bumper
SAFETY DEVICES
Low kick-back saw chain
A low-kick-back saw chain helps to reduce the possibility of a kickback event.
The rakers (depth gauges) ahead of each cutter can minimize the force of a kick-back reaction by preventing the cutters from digging in too deeply. Only use replacement guide bar and chain combinations recommended by the manufacturer.
As saw chains are sharpened, they lose some of the low kickback qualities and extra caution is required. For your safety, replace saw chains when cutting performance decreases.
Spiked bumper
The integral bumper spike may be used as a pivot when making a cut. It helps to keep the body of the chainsaw steady while cutting. When cutting, push the product forward until the spikes dig into the edge of the wood, then by moving the rear handle up or down in the direction of the cutting line it can help ease the physical strain of cutting
Guide bars
Generally, guide bars with small radius tips have somewhat lower potential for kick-back. Use a guide bar and matching chain that is just long enough for the job. Longer bars increase the risk of loss of control during sawing. Regularly check the chain tension. When cutting smaller branches (less than the full length of the guide bar), the chain is more likely to be thrown off if the tension is not correct.
Chain brake
Chain brakes are designed to quickly stop the chain rotating. When the chain brake lever/hand guard is pushed towards the bar, the chain should stop immediately. A chain brake does not prevent kick-back. It only lowers the risk of injury should the chain bar contact the operator's body during a kick-back event. The chain brake should be tested before each use for correct operation in both the run and brake positions.
WARNING
If the chain brake does not stop the chain immediately, or if the chain brake will not stay in the run position without assistance, take the product to an authorised service centre for repair prior to use.
Chain catcher
A chain catcher prevents the saw chain from being thrown back towards to the operator if the saw chain comes loose or breaks.
SYMBOLS ON THE PRODUCT

Safety alert

Read and understand all instructions before operating the product. Follow all warnings and safety instructions.

Wear eye, ear, and head protection.

Wear non-slip safety footwear when using the product.

Wear non-slip, heavy-duty gloves.

Beware of chain saw kickback and avoid contact with bar tip.

Do not expose the product to rain or damp conditions.

Hold and operate the saw properly with both hands.

Do not operate the saw using only one hand.

Set the chain brake to the RUN position.

Set the chain brake to the BRAKE position.


Conforms to all regulatory standards in the country in the EU where the product is purchased.
EurAsian Conformity Mark
Ukrainian mark of conformity
Waste electrical products should not be disposed of with household waste. Please recycle where facilities exist. Check with your local authority or retailer for recycling advice.
The guaranteed sound power level is 101 dB.
Bar and chain lubricant
Minimum lubricant level
Lock
Unlock
Rotate to adjust chain tension
+ = Tighten the chain
- = Loosen the chain
Moving direction of the chain.
(Marked under the sprocket cover)
V_0 : 21m/s
No-load chain speed is 21 m/s
L max: 356mm
Maximum guide bar length is 356 mm
SYMBOLS IN THIS MANUAL


Parts or accessories sold separately
Note
Warning

Wear eye and face protection.

Wear upper body protection.

Wear leg protection.

Stop the product.
The following signal words and meanings are intended to explain the levels of risk associated with this product.
! DANGER
Indicates an imminently hazardous situation, which, if not avoided, will result in death or serious injury.
WARNING
Indicates a potentially hazardous situation, which, if not avoided, could result in death or serious injury.
CAUTION
Indicates a potentially hazardous situation, which, if not avoided, may result in minor or moderate injury.
CAUTION
Without safety alert symbol Indicates a situation that may result in property damage.

flowchart
graph TD
    A["Start"] --> B{Decision}
    B -->|Yes| C["Action: Arrow to Circle"]
    B -->|No| D["Action: Red Arrow to Circle"]
    C --> E["End"]
    D --> F["End"]
text_image
Technical diagram illustrating mechanical assembly steps with directional arrows and warning symbol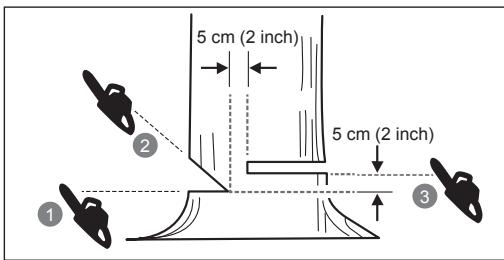
text_image
5 cm (2 inch) 5 cm (2 inch)text_image
Diagram showing two chains attached to a tree trunk, labeled with numbers 1 and 2, likely illustrating a safety or installation scenario.Coupe d'un tronçon
natural_image
Diagram showing hand positioning with arrows indicating movement, no text or symbols presentTiges ressorts
natural_image
Diagram illustrating tree growth with arrows indicating movement, no text or symbols present! AVERTISSEMENT
SYMBOLES APPLIQUES SUR LE PRODUIT


Alerte de sécurité
text_image
Technical diagram illustrating mechanical assembly steps with directional arrows and warning symbol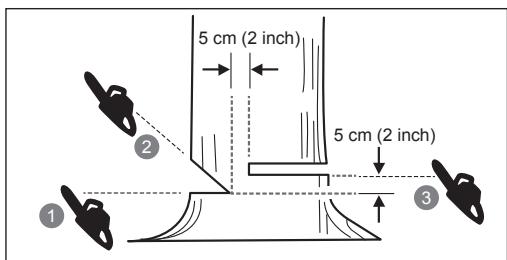
text_image
5 cm (2 inch) 5 cm (2 inch)text_image
Diagram illustrating a tree with two chains, labeled 1 and 2, showing structural differences.Baumstamm ablängen
natural_image
Diagram showing hand positioning with arrows indicating movement, no text or symbols presentFederstöcke
natural_image
Diagram of a tree with leaves and branches, showing growth from a branch to a leafy branch (no text or labels)! WARNING
MACHEN SIE SICH MIT IHREM PRODUKT VERTRAUT
Siehe Seite 276.
SYMBOLE AUF DEM PRODUKT

Sicherheitswarnung

natural_image
Diagram showing two mechanical joint states with arrows indicating motion, one with a hand pressing a component and the other with a warning sign (no text or symbols present)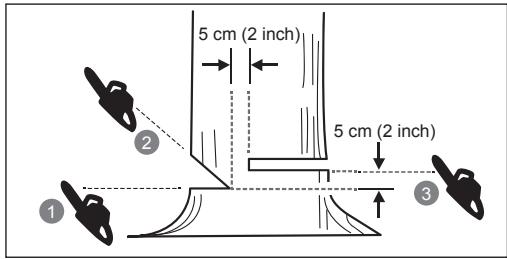
text_image
5 cm (2 inch) 5 cm (2 inch)text_image
Diagram showing two chains attached to a tree trunk, labeled with numbers 1 and 2, likely illustrating a safety or installation procedure.natural_image
Diagram showing fluid flow around a surface with directional arrows indicating movement (no text or labels)Barras elásticas
natural_image
Diagram illustrating tree growth with leaves and branches, showing a curved arrow indicating direction (no text or labels)ADVERTENCIA
text_image
Technical diagram illustrating mechanical assembly steps with labeled components and directional arrows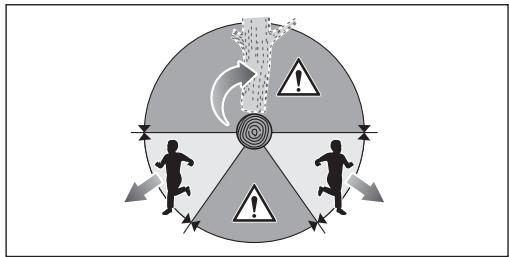
flowchart
graph TD
    A["Running Person"] --> B["Target"]
    C["Alert Icon"] --> B
    D["Running Person"] --> E["Target"]
    F["Alert Icon"] --> E
    B --> G["Arrow Right"]
    E --> H["Arrow Left"]
    style B fill:#ccc,stroke:#333
    style E fill:#ccc,stroke:#333
text_image
5 cm (2 inch) 5 cm (2 inch)text_image
Diagram illustrating a tree with two chains, labeled 1 and 2, showing structural differences.natural_image
Diagram showing hand positioning with arrows indicating movement, no text or symbols presentPoli a molla
natural_image
Diagram of a tree with branches and leaves, showing growth or movement (no text or symbols)! AVVERTENZA
VEILIGHEIDSWAARSCHUWINGEN KETTINGZAAG
Beenbeschermers (chaps)
flowchart
graph TD
    A["Start"] --> B{Decision Point}
    B -->|Yes| C["Action: Red Arrow"]
    B -->|No| D["Action: Grey Arrow"]
    C --> E["Warning: An exclamation mark"]
    D --> F["Warning: An exclamation mark"]
text_image
Technical diagram illustrating mechanical assembly steps with labeled arrows and warning symbol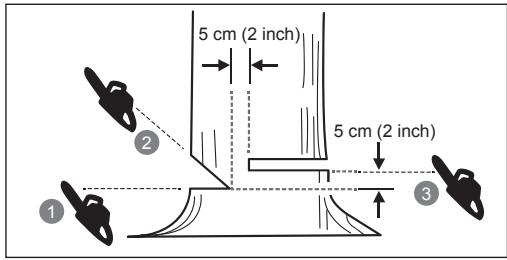
text_image
5 cm (2 inch) 5 cm (2 inch)text_image
Diagram illustrating a tree with two chains, labeled 1 and 2, showing structural differences.Afkorten
natural_image
Diagram showing hand positioning with arrows indicating movement, no text or symbols presentVeerstok
natural_image
Diagram of a tree with leaves and branches, showing growth from a branch to a leafy branch (no text or labels)WAARSCHUWING
- = Ketting losmaken
natural_image
Diagram showing two mechanical or structural states with arrows indicating motion, no text or symbols present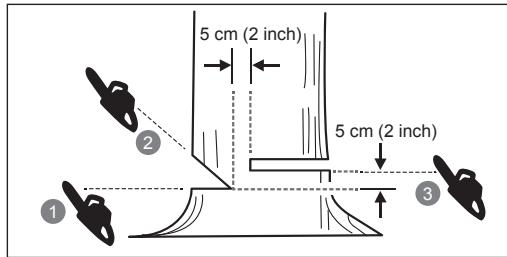
text_image
5 cm (2 inch) 5 cm (2 inch) ① ② ③text_image
Diagram showing two chains attached to a tree trunk, labeled with numbers 1 and 2 indicating positions or features.natural_image
Illustration of a medical procedure with arrows indicating movement or force (no text or symbols)Galhos
natural_image
Diagram showing a tree with branches and leaves, no text or symbols presentADVERTÊNCIA
flowchart
graph TD
    A["Start"] --> B{Decision}
    B -->|Yes| C["Action: Arrow to Circle"]
    B -->|No| D["Action: Red Arrow to Circle"]
    C --> E["Warning: An exclamation mark"]
    D --> F["Warning: Red arrow pointing inward toward Circle"]
    E --> G["End"]
    F --> G
text_image
Technical diagram illustrating mechanical assembly steps with labeled arrows and warning symbol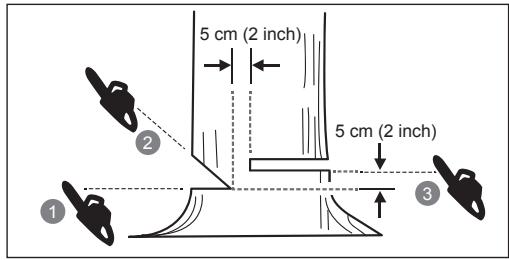
text_image
5 cm (2 inch) 5 cm (2 inch)text_image
Diagram illustrating a tree stump with two chains, labeled 1 and 2, showing structural details.natural_image
Diagram showing hand positioning with arrows indicating movement, no text or symbols presentFjederstænger
natural_image
Diagram of a tree with leaves and branches, showing airflow or erosion (no text or symbols)ADVARSEL
SYMBOLER PÅ PRODUKTET


Sikkerheds Varsel
flowchart
graph TD
    A["Start"] --> B{Decision}
    B -->|Yes| C["Action: Arrow to Circle"]
    B -->|No| D["Action: Red Arrow to Circle"]
    C --> E["Warning: An exclamation mark"]
    D --> F["Warning: An exclamation mark"]
natural_image
Two-step diagram illustrating a mechanical or structural change, showing a presser pressing a component before and after motion, with no text or symbols present.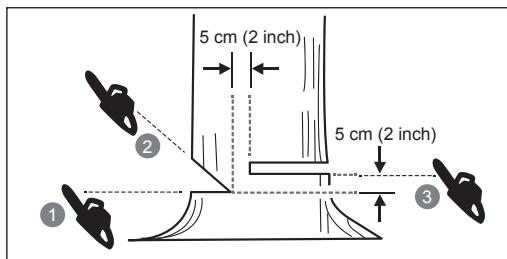
text_image
5 cm (2 inch) 5 cm (2 inch)Avlägsna rotben
text_image
Diagram illustrating a tree stump with two chains, labeled 1 and 2, showing structural differences.Kapa upp en stam
natural_image
Diagram showing hand positioning with arrows indicating movement, no text or symbols presentFjäderstänger
natural_image
Diagram illustrating tree growth with leaves and branches, showing a curved arrow indicating direction (no text or labels)! WARNING
TRANSPORT OCH FÖRVARING
SYMBOLER PÅ PRODUKTEN

Säkerhetsvarning

(Märkt under locket)
SYMBOLER I MANUALLEN

text_image
Technical diagram illustrating mechanical assembly steps with labeled arrows and warning symbol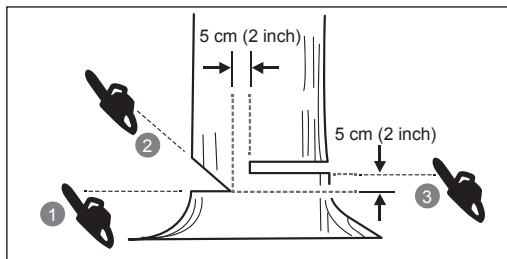
text_image
5 cm (2 inch) 5 cm (2 inch)text_image
Diagram illustrating a tree stump with two chains, labeled 1 and 2, showing structural details.Tukin apteeraus
text_image
Diagram illustrating a mechanical or structural process with labeled components and directional arrows indicating flow or movement.natural_image
Diagram showing hand positioning with arrows indicating movement, no text or symbols presentKireydet
natural_image
Diagram showing a tree with branches and leaves, illustrating natural growth or erosion (no text or symbols)! VAROITUS
ARBEIDSOMRÅDETS SIKKERHET
BRUK OG VEDLIKEHOLD AV ELEKTROVERKT∅Y
flowchart
graph TD
    A["Start"] --> B{Decision}
    B -->|Yes| C["Action: Arrow to Circle"]
    B -->|No| D["Action: Arrow to Right"]
    C --> E["End"]
    D --> F["End"]
text_image
Technical diagram illustrating mechanical assembly steps with labeled arrows and warning symbol
text_image
5 cm (2 inch) 5 cm (2 inch)Fjerne støtterøtter
text_image
Diagram showing two chains attached to a tree trunk, labeled with numbers 1 and 2, likely illustrating a safety or installation scenario.Kappe opp stammen.
natural_image
Diagram showing fluid flow around a surface with directional arrows indicating movement (no text or labels)Fjærstenger
natural_image
Diagram of a tree with leaves and branches, showing water flow and erosion (no text or labels)! ADVARSEL
KJENN PRODUKTET DITT
Se side 276.
SYMBOLER PÅ PRODUKTET

Sikkerhetsalarm

SYMBOLER I DENNE MANUALLEN


text_image
Technical diagram illustrating mechanical assembly steps with directional arrows and warning symbol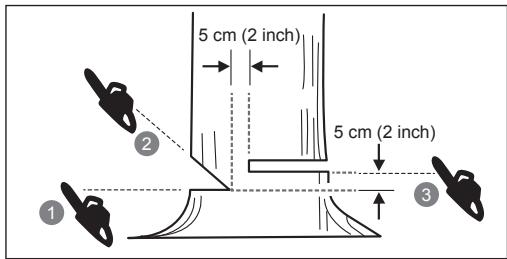
text_image
5 cm (2 inch) 5 cm (2 inch)text_image
Diagram illustrating a tree with two chains attached to a slope, labeled with numbers 1 and 2.Раскряжевка бревен
natural_image
Diagram showing hand positioning with arrows indicating movement or force direction (no text or symbols)Пружинящие деревья
natural_image
Diagram of a tree with leaves and branches, showing growth from ground to water (no text or labels)! ОСТОРОЖНО
flowchart
graph TD
    A["Start"] --> B{Decision}
    B -->|Yes| C["Action: Arrow to Circle"]
    B -->|No| D["Action: Red Arrow to Circle"]
    C --> E["Warning: An exclamation mark"]
    D --> F["Warning: An exclamation mark"]
text_image
Technical diagram illustrating mechanical assembly steps with directional arrows and warning symbol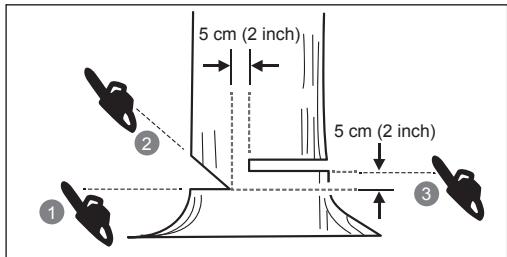
text_image
5 cm (2 inch) 5 cm (2 inch) ① ② ③text_image
Diagram illustrating tree canopy damage with two chains labeled 1 and 2, showing structural damage.Ciecie kłody
natural_image
Diagram showing hand positioning with arrows indicating movement, no text or symbols presentNapreżone gałęzie
natural_image
Diagram showing a tree with leaves and branches, illustrating soil or vegetation change (no text or symbols)⚠ OSTRZEŻENIE
ZAPOZNAJ SIE ZE SWOIM PRODUKTEM
Patrz str. 276.
flowchart
graph TD
    A["Start"] --> B{Decision}
    B -->|Yes| C["Action: Arrow to Circle"]
    B -->|No| D["Action: Arrow to Triangle"]
    C --> E["Warning: An exclamation mark"]
    D --> F["Warning: An exclamation mark"]
natural_image
Two-step diagram showing a mechanical press or lever mechanism with directional arrows and a warning symbol (no text or labels present)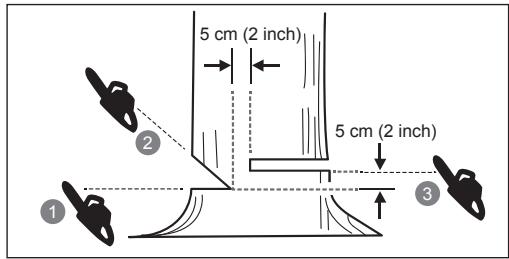
text_image
5 cm (2 inch) 5 cm (2 inch) ① ② ③text_image
Diagram illustrating a tree with two chains, labeled 1 and 2, showing structural differences.Rozřezávání kmene
text_image
① ② 1/3 2/3natural_image
Diagram showing hand positioning with arrows indicating movement, no text or symbols presentOdpružené větvě
natural_image
Diagram illustrating tree growth with arrows indicating movement, no text or symbols present! VAROVÁNÍ
flowchart
graph TD
    A["Running Person"] --> B{Warning}
    B --> C["Accident"]
    C --> D["Failure to Running"]
    D --> E["Warning"]
    E --> F["Accident"]
    F --> G["Failure to Running"]
    G --> H["Warning"]
    H --> I["Accident"]
    I --> J["Failure to Running"]
    J --> K["Warning"]
    K --> L["Accident"]
    L --> M["Failure to Running"]
    M --> N["Warning"]
    N --> O["Accident"]
    O --> P["Failure to Running"]
    P --> Q["Warning"]
    Q --> R["Accident"]
    R --> S["Failure to Running"]
    S --> T["Warning"]
    T --> U["Accident"]
    U --> V["Failure to Running"]
    V --> W["Warning"]
    W --> X["Accident"]
    X --> Y["Failure to Running"]
    Y --> Z["Warning"]
natural_image
Diagram showing two mechanical joint states with arrows indicating motion, one with a shaded area and the other with an exclamation mark (no text or symbols present)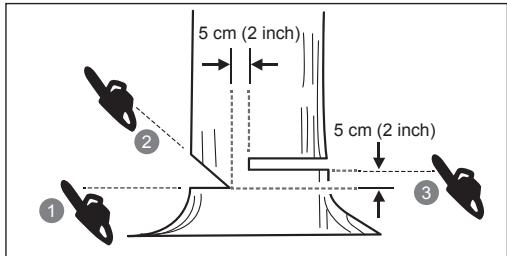
text_image
5 cm (2 inch) 5 cm (2 inch) ① ② ③text_image
Diagram showing two chains attached to a tree trunk, labeled with numbers 1 and 2, likely illustrating a safety or installation scenario.Rönk méretre vágása
natural_image
Diagram showing hand positioning and movement of a mechanical component (no text or symbols)Ágrészek
natural_image
Diagram of a tree with leaves and branches, showing growth and erosion (no text or labels)! FIGYELMEZTETÉS
text_image
Technical diagram illustrating mechanical assembly steps with labeled components and directional arrows indicating motion or movement.
text_image
5 cm (2 inch) 5 cm (2 inch)text_image
Diagram illustrating two different methods of using a tree to generate a single tree, labeled with numbers 1 and 2.natural_image
Diagram showing fluid flow around a surface with directional arrows indicating movement (no text or labels)Tije de suspensie de amortizare
natural_image
Diagram illustrating tree growth with leaves and branches, showing water flow and disturbance (no text or labels)! AVERTISMENT
text_image
Technical diagram illustrating mechanical assembly steps with directional arrows and warning symbol
text_image
5 cm (2 inch) 5 cm (2 inch)text_image
Diagram illustrating two different methods of using a tree to generate a single tree, labeled with step numbers 1 and 2.Balka sagarumošana
natural_image
Diagram showing fluid flow around a surface with directional arrows indicating movement (no text or labels)Atsperīgi krūmi
natural_image
Diagram of a tree with leaves and branches, showing water flow and soil layers (no text or labels)! BRĪDINĀJUMS
flowchart
graph TD
    A["Start"] --> B{Decision}
    B -->|Yes| C["Action: Arrow to Circle"]
    B -->|No| D["Action: Red Arrow to Circle"]
    C --> E["Warning: An exclamation mark"]
    D --> F["Warning: An exclamation mark"]
natural_image
Diagram showing two mechanical or structural states with arrows indicating motion, no text or symbols present
text_image
5 cm (2 inch) 5 cm (2 inch)Atramos šaknu pjovimas
text_image
Diagram showing two chains attached to a tree trunk, labeled with numbers 1 and 2, indicating positions or positions.Rąsto pjovimas
natural_image
Illustration of a hand performing a medical or therapeutic procedure with arrows indicating movement (no text or symbols present)natural_image
Diagram of a tree with leaves and branches, showing airflow direction (no text or labels)! ISPÉJIMAS
TÄIENDAVAD ÜLDISED OHUTUSJUHISED
flowchart
graph TD
    A["Running Person"] --> B{Warning}
    B --> C["Accident"]
    C --> D["Warning"]
    D --> E["Accident"]
    E --> F["Warning"]
    F --> G["Warning"]
    G --> H["Warning"]
    H --> I["Warning"]
    I --> J["Warning"]
    J --> K["Warning"]
    K --> L["Warning"]
    L --> M["Warning"]
    M --> N["Warning"]
    N --> O["Warning"]
    O --> P["Warning"]
    P --> Q["Warning"]
    Q --> R["Warning"]
    R --> S["Warning"]
    S --> T["Warning"]
    T --> U["Warning"]
    U --> V["Warning"]
    V --> W["Warning"]
    W --> X["Warning"]
    X --> Y["Warning"]
    Y --> Z["Warning"]
text_image
Technical diagram illustrating mechanical assembly steps with labeled components and directional arrows indicating motion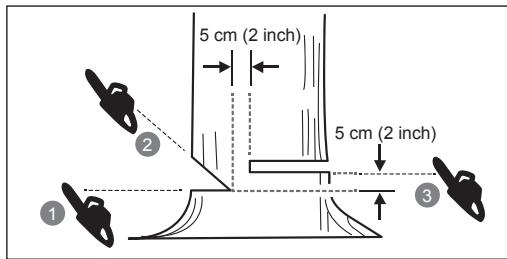
text_image
5 cm (2 inch) 5 cm (2 inch)text_image
Diagram illustrating two different methods of using a tree to generate a single tree, labeled with step numbers 1 and 2.Palgi järkamine
natural_image
Diagram showing hand positioning with arrows indicating movement, no text or symbols presentTagasilöögioksad
natural_image
Diagram of a tree with curved branches and leaves, showing growth or movement (no text or symbols)HOIATUS
SIGURNOST RADNOG PROSTORA
text_image
Technical diagram illustrating mechanical assembly steps with labeled arrows and warning symbol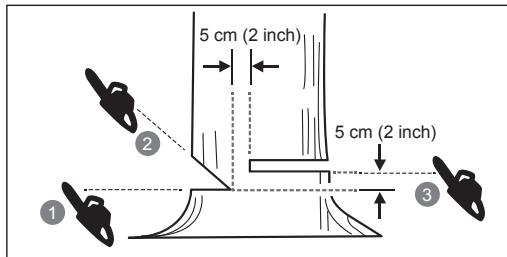
text_image
5 cm (2 inch) 5 cm (2 inch) ① ② ③text_image
Diagram illustrating a tree stump with two chains, labeled 1 and 2, showing structural differences.text_image
Diagram illustrating a mechanical or structural process with labeled components and directional arrows indicating movement or flow.Kada je trupac podložen s oba kraja, reže se 1/3 promjera od gornje strane (ispod trupca). Potom izvršite završni rez s donje strane manje 2/3 kako biste susreli prvi rez.

text_image
1/3 2/3Kada režete trupac na kosini, uvijek stanite na gornju stranu trupca. Kada „režete kroz trupac“, za održavanje potpune kontrole otpustite pritisak rezanja blizu kraja reza bez opuštanja zahvata na ručkama pile. Ne dozvolite da lanac dodiruje zemlju. Nakon dovršetka reza pričekajte da se zaustavi lanac pile prije nego maknete pilu. Prije prebacivanja sa stabla na stablo uvijek zaustavite pilu.
Obrezivanje stabla
Obrezivanje je uklanjanje grana s palog stabla. Prilikom obrezivanja ostavite velike niže grane da podupiru trupac sa zemlje. Uklonite male grane u jednom rezu. Grane koje su zategnute treba rezati odozdo prema gore kako bi se izbjeglo zahvaćanje lanca pile.
natural_image
Diagram showing hand positioning with arrows indicating movement or force direction (no text or symbols)Napete grane
Savijeno šiblje je grana, panj bez korjena ili grm koji je savijen zbog nekog drugog komada drveta, tako da se naglo otpušta kad odrežemo ili uklonimo komad tog drveta koji ga drži.
natural_image
Diagram illustrating tree growth with leaves and branches, showing water flow and disturbance (no text or labels)! UPOZORENJE
Savijeno šiblje je opasno je jer vas može udariti i možete izgubiti kontrolu nad motornom pilom. Što može dovesti do teških ili smrtonosnih ozljeda. Ovo trebaju vršiti obučeni korisnici.
PRIJEVOZ I SKLADIŠTENJE
Maximum guide bar length is 356 mm
SIMBOLI U OVOM PRIRUČNIKU

Dijelovi ili pribor prodan odvojeno

Napomena

Upozorenje

Nosite sredstva za zaštitu vida i lica.

Nosite zaštitu za gornji dio trupa.

Nosite sredstva za zaštitu nogu.

Zaustavite proizvod.
Slijedeće riječi upozorenja i značenja imaju namjeru da objasne nivo rizika u vezi s ovim proizvodom.
! OPASNOST
Ukazuje na neposrednu opasnu situaciju, koja, ukoliko se ne izbjegne, može rezultirati smrću ili opasnim povredama
⚠️ UPOZORENJE
Ukazuje na moguću opasnu situaciju, koja, ukoliko se ne izbjegne, može rezultirati smrću ili opasnim povredama
⚠ UPOZORENJE
Ukazuje na moguću opasnu situaciju, koja, ukoliko se ne izbjegne, može rezultirati manjim ili blažim povredama
UPOZORENJE
Bez sigurnosnog simbola upozorenja
Naznačuje situaciju koja može rezultirati oštećenjem imovine.

text_image
Technical diagram illustrating mechanical assembly steps with labeled arrows and warning symbol
text_image
5 cm (2 inch) 5 cm (2 inch)text_image
Diagram illustrating two different methods of using a tree to generate a single tree, labeled with step numbers 1 and 2.Krojenje debla
natural_image
Diagram showing hand positioning with arrows indicating movement, no text or symbols presentVzmetne palice
Odskočno deblo je vsako deblo, veja, ukoreninjen štor ali mlado drevesce, ki je upognjeno pod pritiskom zaradi drugega lesa, tako da odskoči nazaj, će odžagamo ali odstranimo les, ki ga zadržuje.
natural_image
Diagram of a tree with branches and leaves, showing growth from a branch to a leafy ground (no text or symbols)OPOZORILO
natural_image
Abstract diagram with circular background, triangular patterns, and silhouettes of running figures (no text or symbols)text_image
Diagram illustrating two mechanical or structural states with directional arrows and a warning symbol, likely illustrating a turning or disassembly process.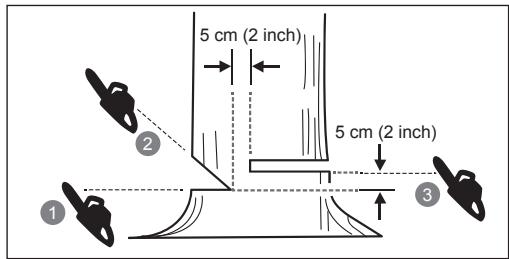
text_image
5 cm (2 inch) 5 cm (2 inch)text_image
Diagram illustrating two different methods of using a tree to generate a single tree, labeled with step numbers 1 and 2.Skracovanie gul'atiny
text_image
Diagram illustrating a mechanical or structural process with labeled components and directional arrows indicating movement or flow.natural_image
Diagram showing hand positioning with arrows indicating movement or force direction (no text or symbols)Napnuté konáre
natural_image
Diagram showing a tree with leaves and branches, illustrating soil erosion or vegetation change (no text or labels)! VAROVANIE
OBOZNÁMTE SA S VAŠÍM PRODUKTOM
Pozrite stranu 276.
flowchart
graph TD
    A["Running Person"] --> B{Warning}
    B --> C["Accident"]
    C --> D["Warning"]
    D --> E["Accident"]
    E --> F["Warning"]
    F --> G["Warning"]
    G --> H["Warning"]
    H --> I["Warning"]
    I --> J["Warning"]
    J --> K["Warning"]
    K --> L["Warning"]
    L --> M["Warning"]
    M --> N["Warning"]
    N --> O["Warning"]
    O --> P["Warning"]
    P --> Q["Warning"]
    Q --> R["Warning"]
    R --> S["Warning"]
    S --> T["Warning"]
    T --> U["Warning"]
    U --> V["Warning"]
    V --> W["Warning"]
    W --> X["Warning"]
    X --> Y["Warning"]
    Y --> Z["Warning"]
text_image
Technical diagram illustrating mechanical assembly steps with directional arrows and warning symbol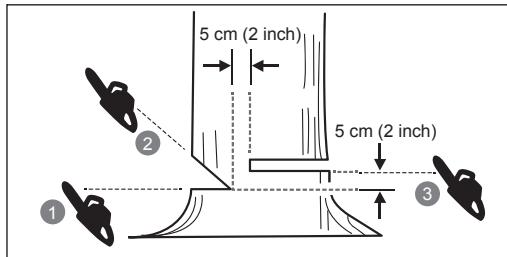
text_image
5 cm (2 inch) 5 cm (2 inch)text_image
Diagram illustrating two chains attached to a tree trunk, labeled with numbers 1 and 2.Бичене на дънера
natural_image
Diagram showing hand positioning with arrows indicating movement or force direction (no text or symbols)Пружинни пръти
natural_image
Diagram of a tree with leaves and branches, showing growth from a branch to a leafy branch (no text or labels)! ПРЕДУПРЕЖДЕНИЕ
natural_image
Diagram showing two mechanical or structural states with arrows indicating motion, no text or symbols present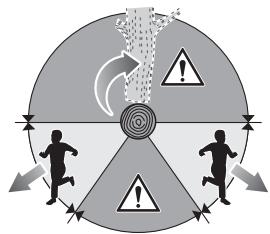
flowchart
graph TD
    A["Start"] --> B{Decision Point}
    B -->|Yes| C["Action 1"]
    B -->|No| D["Action 2"]
    C --> E["Warning Symbol"]
    D --> F["Warning Symbol"]
    E --> G["End"]
    F --> G
    style A fill:#f9f,stroke:#333
    style G fill:#bbf,stroke:#333
text_image
5 cm (2 inch) 5 cm (2 inch) 1 2 3text_image
Diagram showing two chains attached to a tree trunk, labeled with numbers 1 and 2, likely illustrating a safety or installation scenario.Підтримка колоди
natural_image
Diagram showing fluid flow around a surface with directional arrows indicating movement (no text or symbols)Пружні штанги
natural_image
Diagram illustrating tree growth with leaves and branches, showing a curved trajectory (no text or labels)! Попередження
flowchart
graph TD
    A["Running Silhouette"] --> B{Warning Symbol}
    B --> C["Arrow Right"]
    B --> D["Arrow Down"]
    C --> E["Circle with Tail"]
    D --> F["Circle with Arrow"]
    E --> G["Warning Shape"]
    F --> H["Warning Shape"]
text_image
Technical diagram illustrating mechanical assembly steps with directional arrows and warning symbol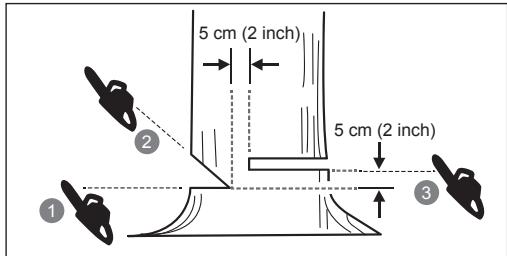
text_image
5 cm (2 inch) 5 cm (2 inch)text_image
Diagram showing two chains attached to a tree trunk, labeled with numbers 1 and 2, likely illustrating a safety or mechanical hazard.Tomruk dilmek
natural_image
Diagram showing hand positioning with arrows indicating movement, no text or symbols presentYaylı direkler
natural_image
Diagram illustrating tree growth with leaves and branches, showing a curved arrow indicating movement (no text or labels)! UYARI
natural_image
Line drawing of a chain-link robotic device with visible gears and mounting brackets (no text or symbols)
text_image
RYOBIx 1

x 1


natural_image
Illustration of a rectangular electronic device connected to a coiled cable (no text or symbols visible)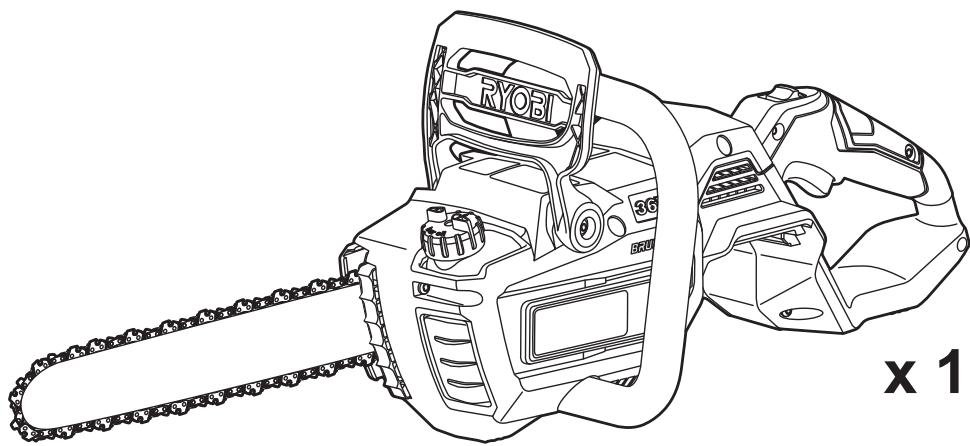
natural_image
Line drawing of a chain-link robotic device with visible gears and control panel (no text or symbols)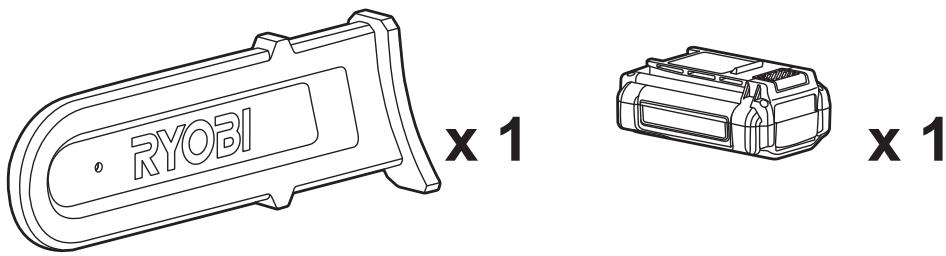
text_image
RYOBI x 1 x 1
text_image
x 1 x 1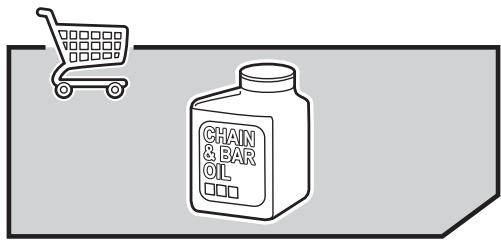
text_image
CHAIN & BAR OIL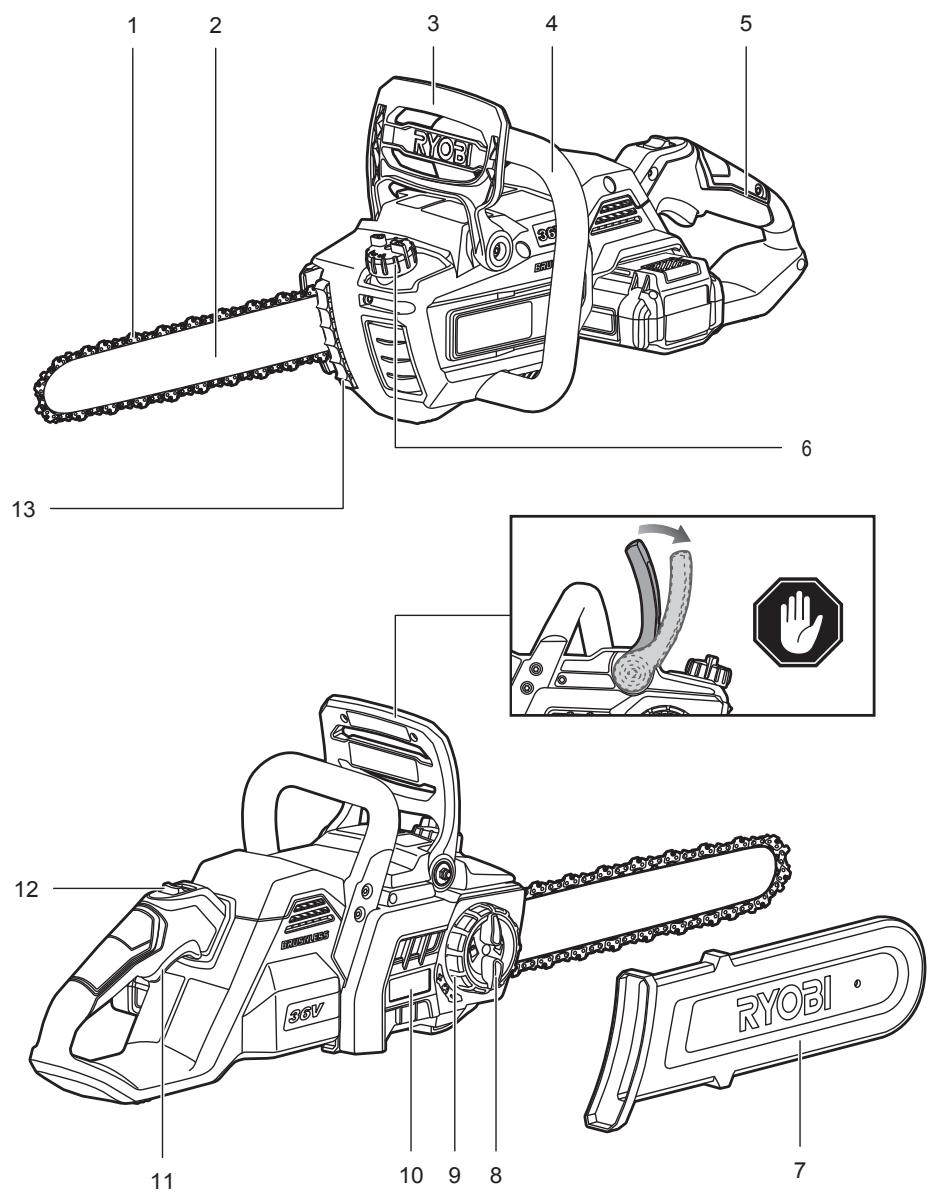
1
text_image
Diagram illustrating safety compliance with a person wearing various protective gear and safety symbols2
natural_image
Illustration of a chain saw emerging from an open box with arrows indicating process flow (no text or symbols)3
text_image
Diagram showing car seatbelt switch mechanism with labeled parts and a lock mechanism diagram!
text_image
Diagram illustrating a mechanical device with checkmark and cross symbols indicating inspection or testing conditions.i
text_image
Technical diagram showing mechanical assembly with labeled components and directional arrows indicating movement or force4
text_image
RYOBI5
text_image
Diagram illustrating mechanical assembly steps with labeled components and a 3-4 mm scale indicator6
natural_image
Mechanical assembly diagram showing a gear-like component with rotational arrows and a lock mechanism (no text or symbols)7
natural_image
Diagram showing a hand inserting a device into a car interior, with an inset close-up of the internal components (no text or symbols visible)!
text_image
Instructional diagram showing two scenarios of a chain mill being cleaned, with check and cross symbols indicating inspection or failure.!
text_image
Diagram illustrating a mechanical tool manipulation step with check and disassembly instructions8
text_image
8 ① ② ③i
text_image
Diagram of a camera with labeled parts including hand gesture and safety symbols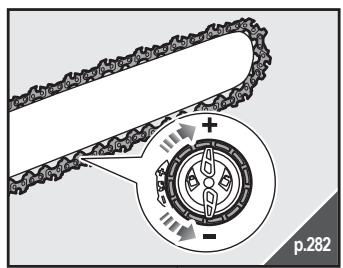
text_image
p.282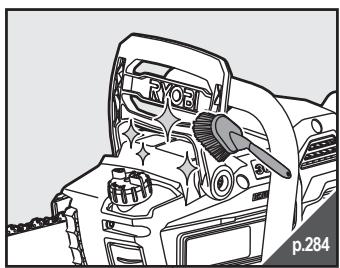
natural_image
Line drawing of a car interior showing dashboard and steering wheel (no text or symbols)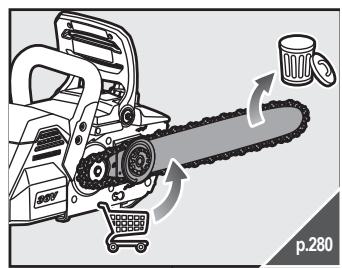
natural_image
Illustration of a chain-linking machine with a shopper and a cup, showing motion arrows (no text or symbols)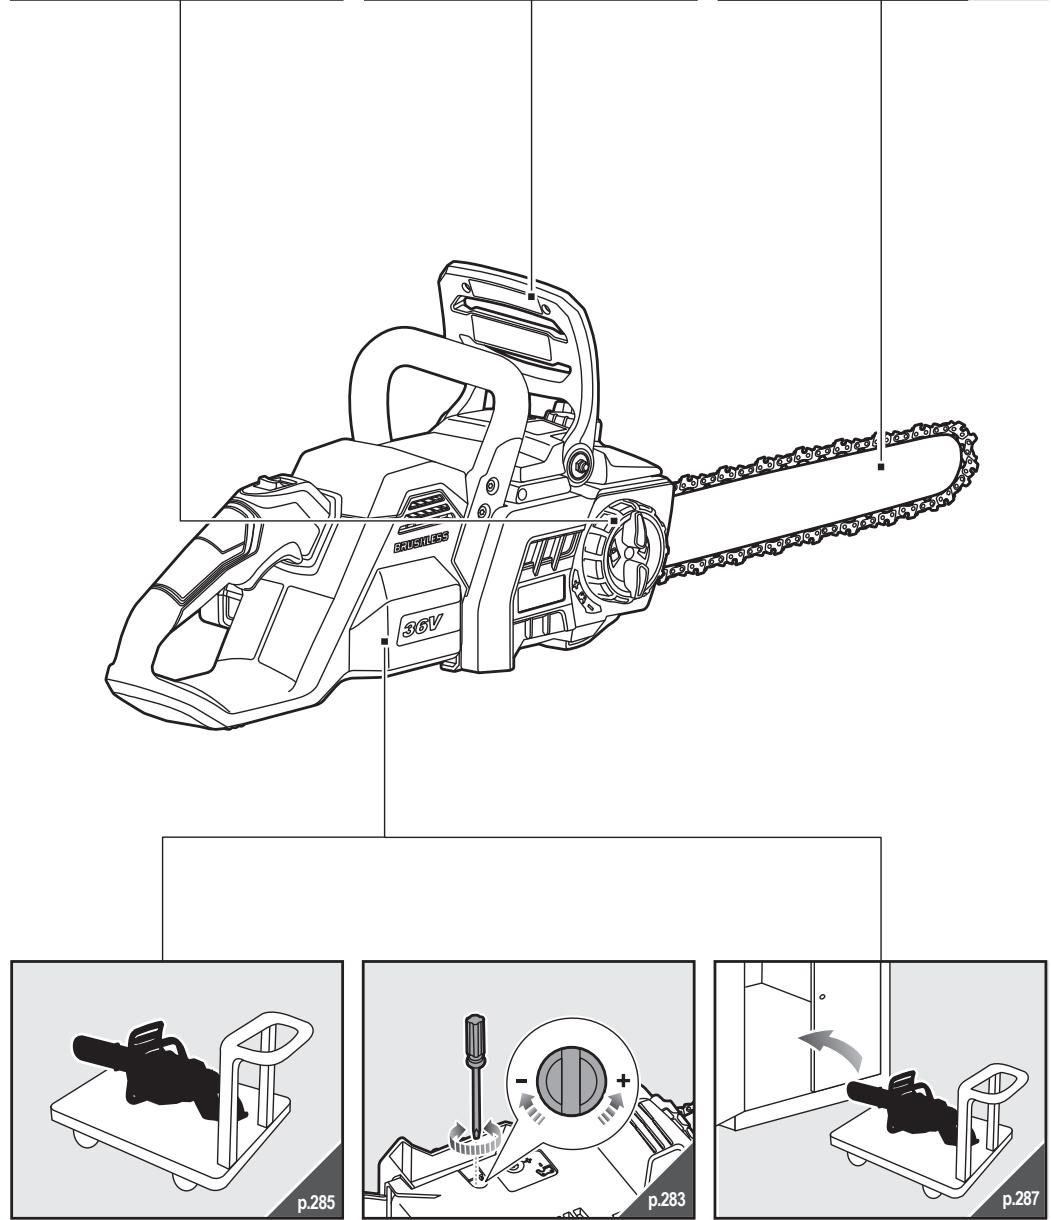
text_image
36V p.285 p.283 p.287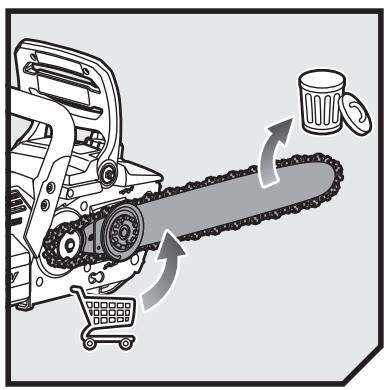
natural_image
Illustration of a chain-linking machine with arrows indicating process flow, no text or symbols present
text_image
Diagram showing a car chain with a close-up of the internal components, labeled with parts 1 and 2.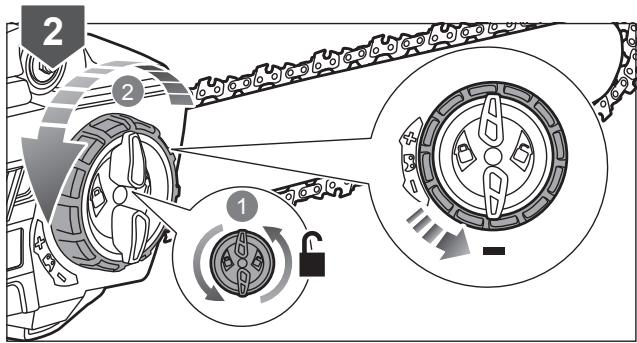
text_image
Diagram illustrating mechanical assembly steps with labeled components and directional arrows indicating motion or locking.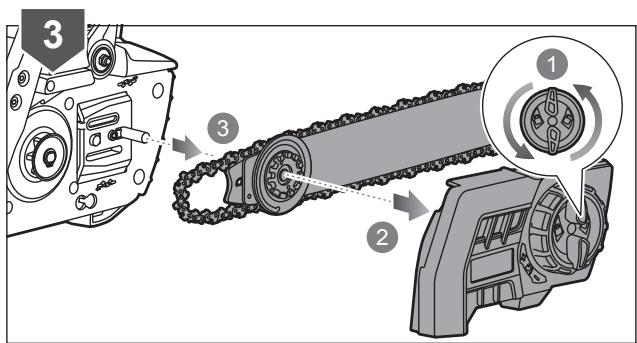
text_image
Technical diagram illustrating a chain drive mechanism with labeled components and motion arrows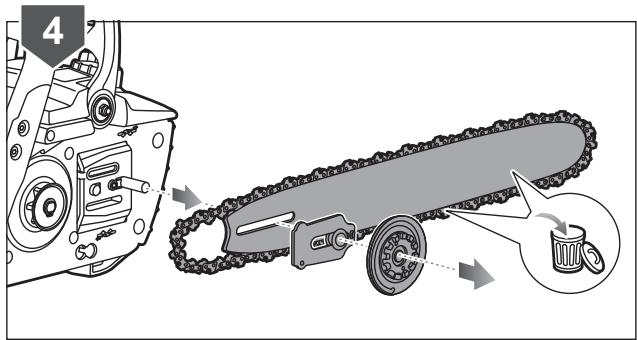
text_image
4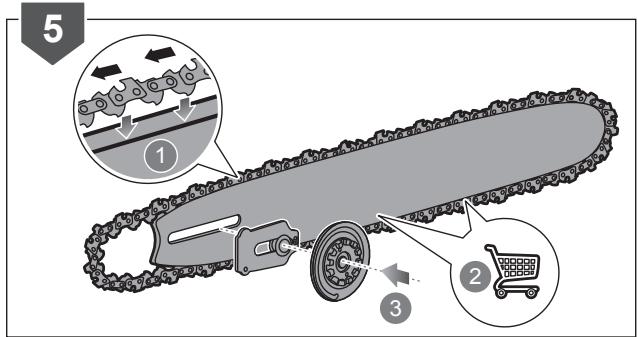
text_image
5 ① ② ③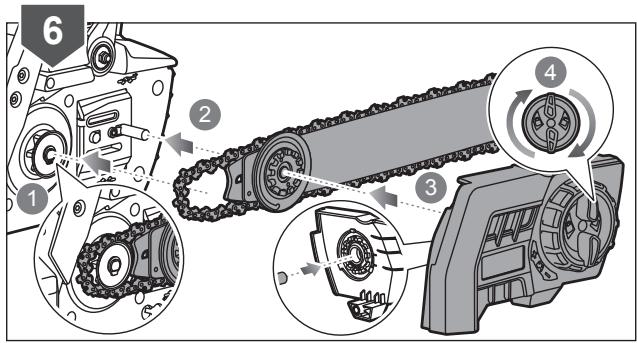
text_image
Technical diagram illustrating mechanical assembly steps with numbered components and labeled parts
text_image
7 i 3-4 mm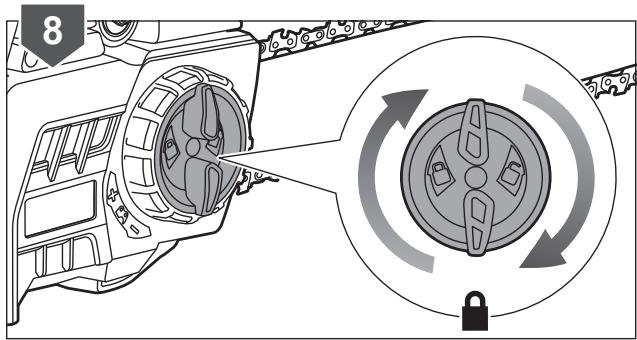
text_image
8
text_image
Diagram illustrating a mechanical gear system with labeled components and directional arrows, including a circular component with polarity indicators.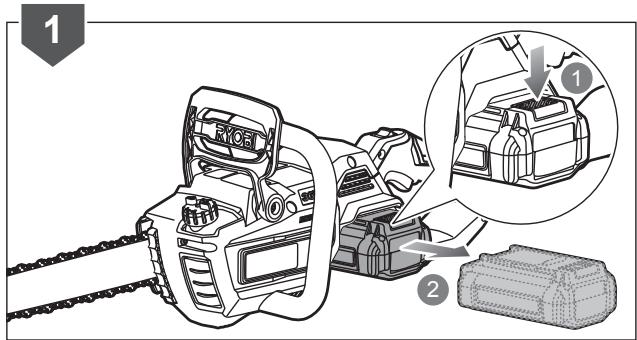
text_image
Diagram showing a camera module with labeled parts and a magnified inset of the device's internal components.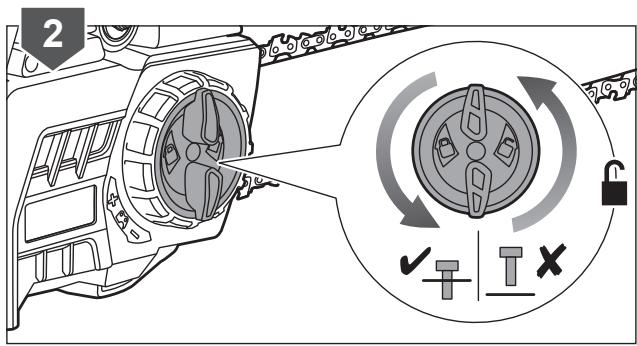
text_image
2 ✓ T X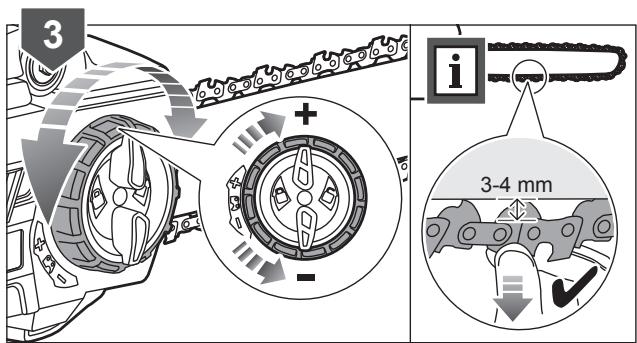
text_image
3 i 3-4 mm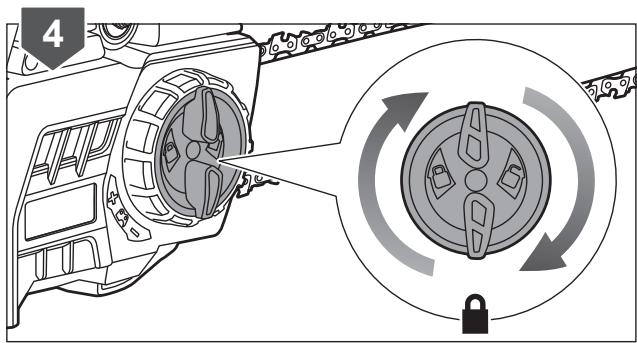
text_image
4
text_image
Diagram illustrating screwdriver tool application with magnified view showing circular component and directional arrows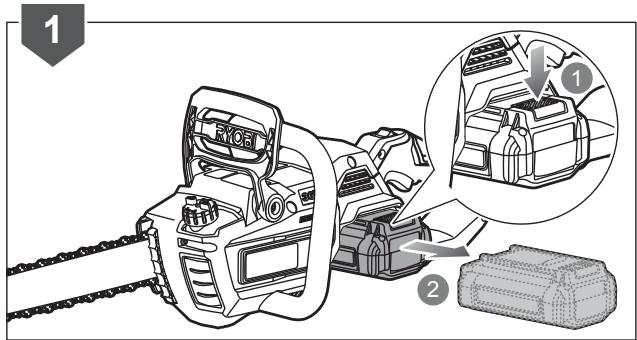
text_image
Diagram showing a car head panel with labeled parts and an inset close-up of the component, likely illustrating a mechanical or automotive assembly.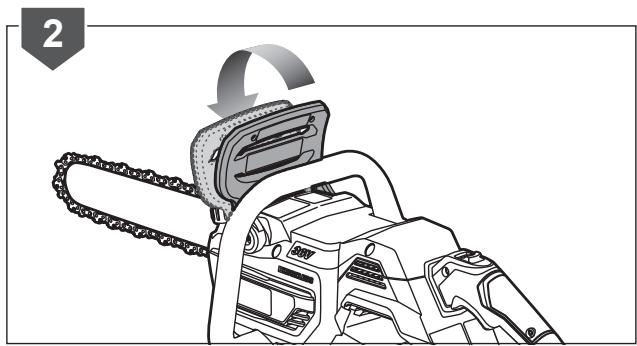
natural_image
Diagram of a chain-link robotic device with gear and blade assembly (no text or symbols)
natural_image
Illustration of a chainsaw with a gear mechanism, showing blade and jaw components (no text or symbols)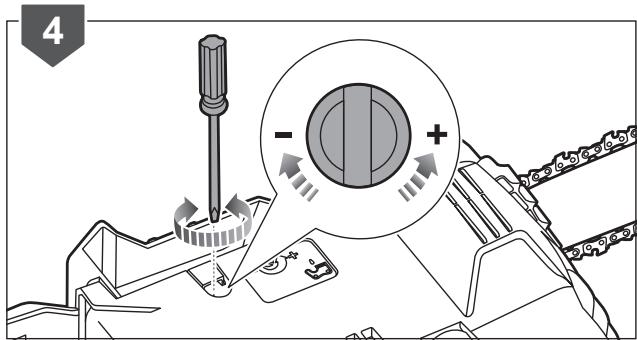
text_image
4 - +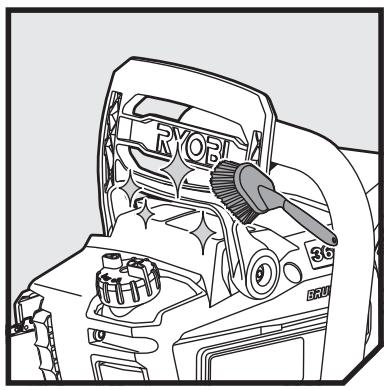
natural_image
Line drawing of a car interior showing engine compartment with no visible text or symbols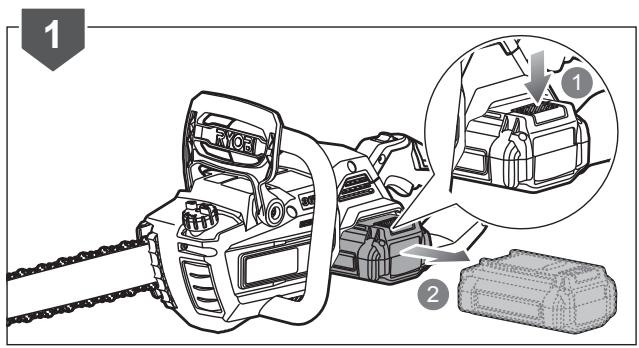
text_image
Diagram showing a chain car with labeled parts and a magnified inset of the device's internal structure, likely illustrating a mechanical assembly or inspection.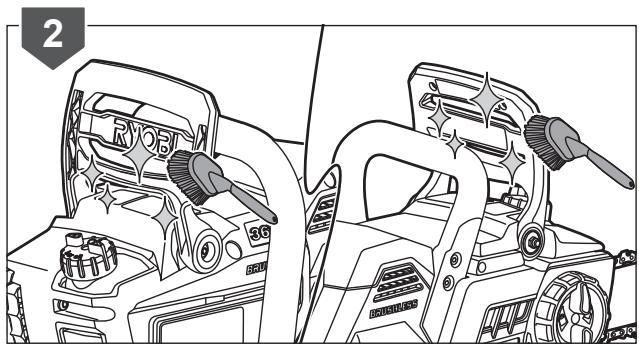
natural_image
Line drawing of a car interior showing front and side views with no visible text or symbols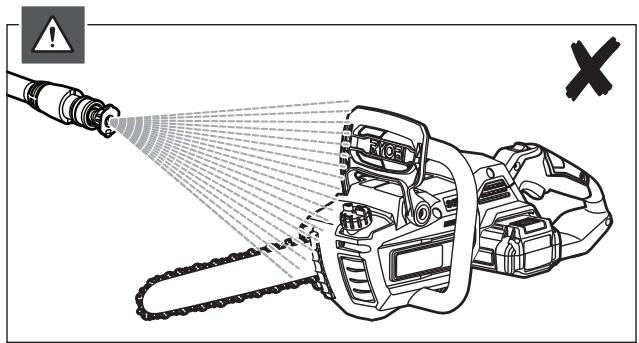
text_image
Diagram illustrating a chain operating principle with warning symbols and a cross symbol indicating failure or absence.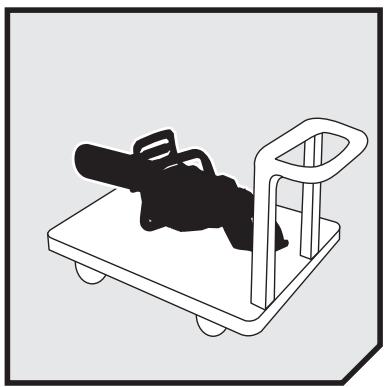
natural_image
Illustration of a toy car with wheels and handle (no text or symbols)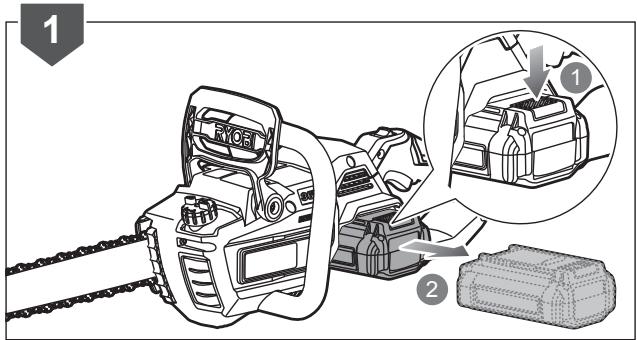
text_image
Diagram showing a chain attachment device with labeled parts and a magnified inset highlighting the internal components.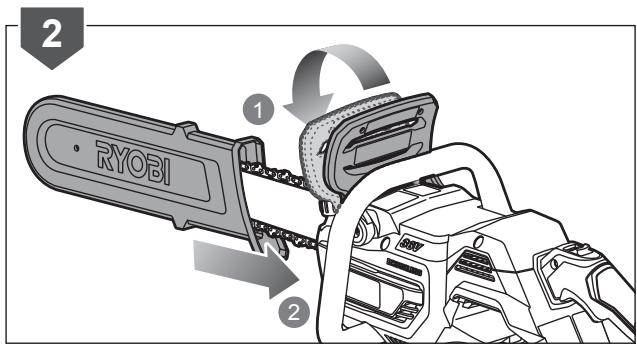
text_image
2 RYOBI 1 2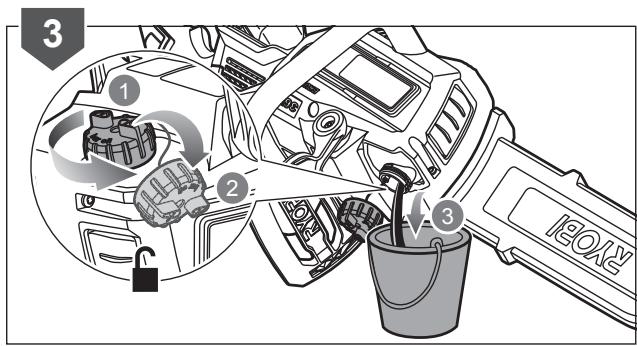
text_image
3 1 2 3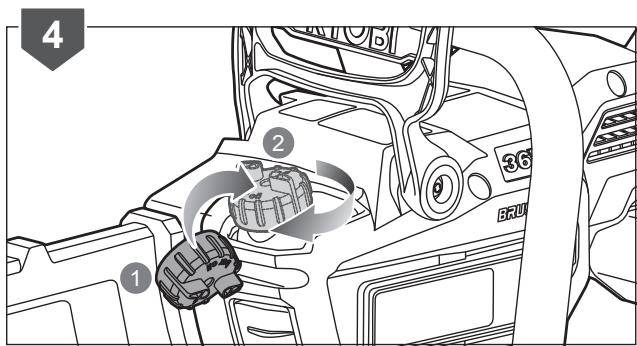
text_image
4 1 2 36 3505
natural_image
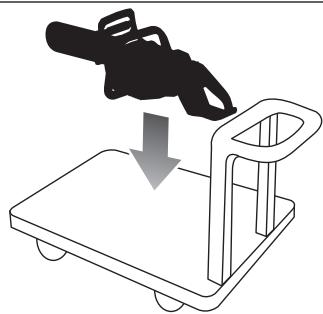
Illustration of a hand using a power tool to lift a cart (no text or symbols)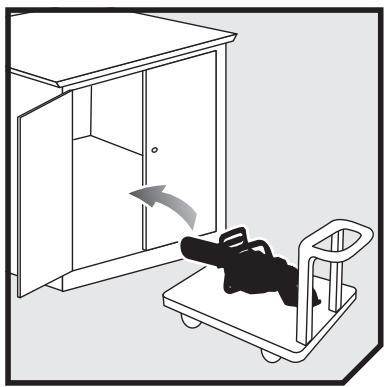
natural_image
Illustration of a toy car being pulled into a cabinet with an arrow indicating motion (no text or symbols)
text_image
Diagram showing a chain-link device with labeled parts and an inset close-up of the component, likely illustrating a mechanical or automotive assembly.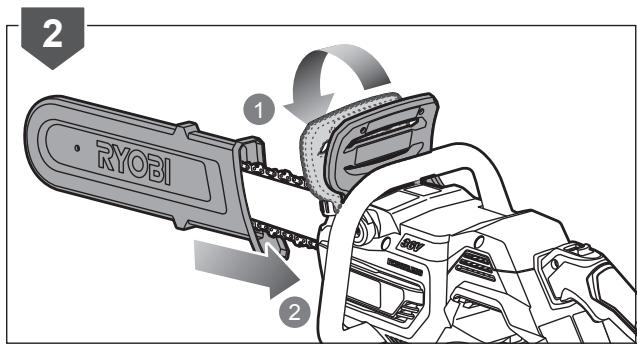
text_image
2 RYOBI 1 2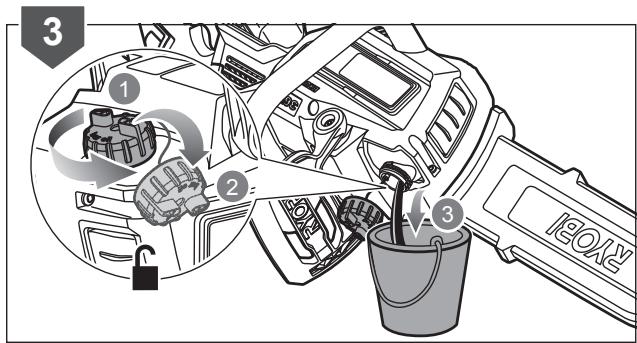
text_image
3 ① ② ③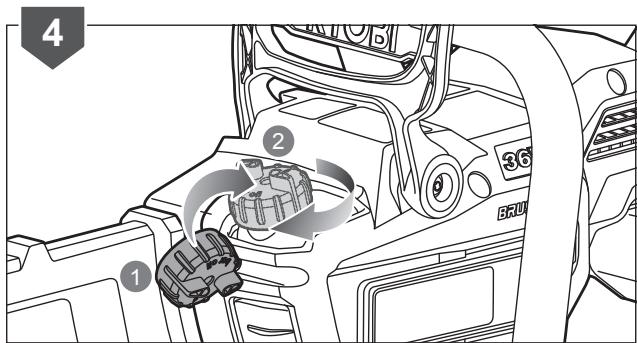
text_image
4 1 2 36 350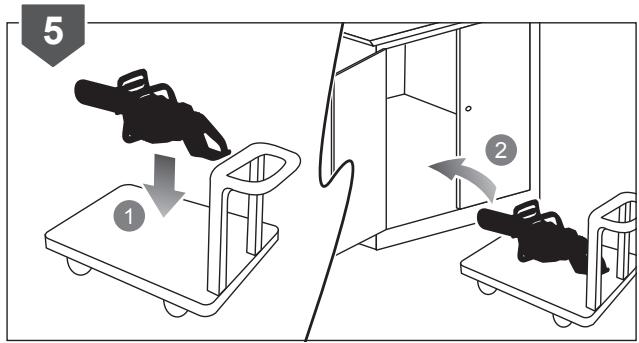
text_image
5 ① ②
| English | Français | Deutsch | Español | Italiano | Nederlands |
| Product specifications | Caractéristiques produit | Produkt-Spezifikationen | Características del producto | Caratteristiche del prodotto | Productgegevens |
| Cordless Chainsaw | Tronçonneuse sans fil | Akku-Kettensäge | Motosierra inalámbrica | Sega a catena senza filo | Snoerloze kettingzaag |
| Model | Modèle | Modell | Modelo | Modello | Model |
| Rated voltage | Tension nominale | Nennspannung | Tensión nominal | Voltaggio nominale | Toegekende spanning |
| No-load speed | Vitesse de rotation à vide | Leerlaufgeschwindigkeit | Velocidad sin carga | Velocità senza carico | Snelheid zonder lading |
| Guide bar length | Longueur du guide-chaîne | Länge der Führungsschiene | Longitud de la barra guía | Lunghezza barra di guida | Zwaardlengte |
| Usable cutting length | Longueur de coupe utile | Anwendbare Schnittlänge | Largo de corte | Lunghezza di taglio disponibile | Bruikbare zaaglengte |
| Chain stop | Arrêt de chaîne | Kettenstop | Parada de la cadena | Arresto catena | Kettingstop |
| Chain oil tank capacity | Contenance du réservoir d'huile de chaîne | Kettenöltankkapazität | Capacidad del depósito de aceite de la cadena | Capacità serbatoio olio catena | Kettingolietankcapaciteit |
| Weight (without battery pack, with guide bar, chain and empty tank) | Poids (Sans batterie, avec chaîne, guide-chaîne et réservoir vide) | Gewicht (Ohne Akku, mit Schwert, Kette und leerern Tank) | Peso (Sin batería, con barra guía, cadena y depósito vacío) | Peso (Senza batteria, con barra di guida, catena e serbatoio vuoto) | Gewicht (Zonder accupak, met zwaard, ketting en lege tank) |
| Vibration level (in accordance with EN 60745-1 & EN 60745-2-13) | Niveau de vibration (selon EN 60745-1; EN 60745-2-13) | Vibrationsgrad (gemäß EN 60745-1; EN 60745-2-13) | Nivel de vibración (de acuerdo con EN 60745-1; EN 60745-2-13) | Livello vibrazioni (in accordo con la direttiva EN 60745-1; EN 60745-2-13) | Trillingsniveau (in overeenstemming met EN 60745-1; EN 60745-2-13) |
| Front handle | Poignée avant | Vorderer Handgriff | Mango delantero | Manico anteriore | Voorste handvat |
| Rear handle | Poignée arrière | Hinterer Handgriff | Mango trasero | Manico posteriore | Achterste handvat |
| Uncertainty of measurement | Incertitude de la mesure | Unsicherheit der Messung | Incertidumbre de medición | Incertezza delle misurazioni | Onzekerheid bij meting |
| Noise emission level (in accordance with EN 60745-1 & EN 60745-2-13) | Niveau d'émission sonore (selon EN 60745-1; EN 60745-2-13) | Geräuschemission (gemäß EN 60745-1; EN 60745-2-13) | Nivel de emisión de ruido (de acuerdo con EN 60745-1; EN 60745-2-13) | Livello di emissione rumore (in accordo con la direttiva EN 60745-1; EN 60745-2-13) | Geluidsemissieniveau (in overeenstemming met EN 60745-1; EN 60745-2-13) |
| A-weighted sound pressure level at operator's position | Niveau de pression sonore pondéré-A au niveau de l'opérateur | A-bewerteter Schalldruckpegel an der Position des Anwenders | Nivel de presión sonora ponderado A en la posición del operario | Livello di pressione sonora ponderata A alla posizione dell'operatore | A-gewogen geluidsdrukniveau bij positie van gebruiker |
| Uncertainty of measurement | Incertitude de la mesure | Unsicherheit der Messung | Incertidumbre de medición | Incertezza delle misurazioni | Onzekerheid bij meting |
| A-weighted sound power level | Niveau de puissance sonore pondéré-A | A-bewerteter Schallleistungspegel | Nivel de potencia acústica ponderada en A | Livello di potenza sonora pesato A | A-gewogen geluidsniveau |
| Uncertainty of measurement | Incertitude de la mesure | Unsicherheit der Messung | Incertidumbre de medición | Incertezza delle misurazioni | Onzekerheid bij meting |
| Chain lenght | Longueur de la chaîne | Kettenlänge | Longitud de la cadena | Lunghezza catena | Kettinglengte |
| Chain pitch | Gouge de la chaîne | Kettenteilung | Paso de la cadena | Passo catena | Kettingsteek |
| Chain guage | Pas de la chaîne | Kettenstärke | Calibre de la cadena | Sezione catena | Tanddiepte |
| Drive links quantity | Nombre de maillons d'entraînement | Anzahl der Antriebsglieder | Cantidad de eslabones del accionamiento | Quantità maglie guida | Aantal aandrijfschakels |


| Português | Dansk | Svenska | Suomi | Norsk | Русский | |
| Características do aparelho | Produktspecifika-tioner | Produktspecifika-tioner | Tuotteen tekniset tiedot | Produktspesifika-sjoner | Характеристики изделия | |
| Electroserra Recarregável | Ledningsfri kædesav | Sladdlös motorsåg | Langaton moottorisaha | Kabelløs motorsag | Беспроводная цепная пила | |
| Modelo | Model | Modell | Malli | Modell | Модель | RY36CSX35A |
| Tensão nominal | Mærkespænding | Spänning | Nimellisjännite | Nominell spenning | Номинальное напряжение | 36 V d.c. |
| Velocidade sem carga | Tomgangshastighed | Hastighet utan belastning | Nopeus ilman kuormaa | Tomgangshastighet | Холостая скорость | 21,0 m/s |
| Comprimento da lâmina-guia | Sværdets længde | Klingans långd | Terälevyn pituus | Sagsverdlengde | Длина пильной шины | 356 mm |
| Comprimento de corte útil | Anvendelig skærer længde | Användbar sågningslängd | Leikkuupituus | Brukbar kuttelengde | Используемая режущая длина | 300 mm (12") |
| Paragem da corrente | Kædestop | Kedjestopp | Ketjun pysähtyminen | Kjedestopp | Останов цепи | <2 s |
| Capacidade do depósito do óleo da corrente | Kædeolietank-kapacitet | Kapacitet för oljebehållaren | Ketjun öljysäiliön tilavuus | Kjeldeolje tankkapasitet | Емкость масляного бака пилы | 190 ml |
| Peso (Sem bateria, com barra guia, corrente e depósito vazio) | Vægt (Ingen batteri, med sværd, kæde og tom tank) | Vikt (Utan batteri, med stödarm, kedja och tom tank) | Paino (Ilman akkua, terälevy, ketju ja tyhjä säilio) | Vekt (Uten batteri, med føringsskinne, kjede og tom tank) | Вес (Без аккумулятора, с пильной шиной, цепью и пустым топливным баком) | 4,2 kg |
| Nível de vibração (em conformidade com EN 60745-1; EN 60745-2-13) | Vibrationsniveau (iht. EN 60745-1; EN 60745-2-13) | Vibrationsnivå (enligt EN 60745-1; EN 60745-2-13) | Tärinätaso (standardin EN 60745-1; EN 60745-2-13 mukaisesti) | Vibrasjonsnivå (iht. EN 60745-1; EN 60745-2-13) | Уровень вибрации (в соответствии с EN 60745-1; EN 60745-2-13) | |
| Pega frontal | Forhåndtag | Främre handtag | Etukädensija | Fremre håndtak | Передняя ручка | 4,3 m/s^2 |
| Pega traseira | Baghåndtag | Bakre handtag | Takakädensija | Bakre håndtak | Задняя ручка | 3,1 m/s^2 |
| Incerteza de medições | Målingsusikkerhed | Osäkerhet för mått | Mittausten epätarkkuus | Usikkerhet ved måling | Погрешность измерения | 1,5 m/s^2 |
| Nível de emissão de ruído (em conformidade com EN 60745-1; EN 60745-2-13) | Støjemissionsniveau (iht. EN 60745-1; EN 60745-2-13) | Bullerutsläppsnivå (enligt EN 60745-1; EN 60745-2-13) | Melutaso (standardin EN 60745-1; EN 60745-2-13 mukaisesti) | Støyutslipsnivå (iht. EN 60745-1; EN 60745-2-13) | Уровень шума (в соответствии с EN 60745-1; EN 60745-2-13) | |
| Nível de pressão sonora ponderada A na posição do operador | A-vægtet lydtryksniveau ved operatørens position | A-viktad ljudtrycksnivå vid operatørens plats | A-painotettu käyttäjään kohdistuva äänenpainetaso | Støynivåvekting ved operatørens posisjon | Амплитудно-взвешенный уровень звукового давления в рабочем месте оператора | 88,6 dB(A) |
| Incerteza de medições | Målingsusikkerhed | Osäkerhet för mått | Mittausten epätarkkuus | Usikkerhet ved måling | Погрешность измерения | 2,5 dB |
| Nível de potência sonora ponderada A | A-vægtet lydeffektniveau | A-vägd ljudeffektsnivå | A-painotettu äänenteho | A-vektet lydeffektnivå | Уровень А-взвешенной звуковой мощности | 99,6 dB(A) |
| Incerteza de medições | Målingsusikkerhed | Osäkerhet för mått | Mittausten epätarkkuus | Usikkerhet ved måling | Погрешность измерения | 2,5 dB |
| Comprimento da correia | Kædelængde | Kedjelängd | Ketjun pituus | Kjedelengde | Длина цепи | 14" |
| Passo da corrente | Kædestigning | Kedjedelning | Ketjun jako | Inndeling av kjede | Зубья пильной цепи | 0,375" |
| Calibre da corrente | Max. tilladeligt kædeslør | Kedjetjocklek | Ketjun paksuus | Kjedestørrelse | Шаг пильной цепи | 0,050" |
| Quantidade de ligações do motor | Antal drivled | Mängden drivlänkar | Vetolenkkien määrä | Drivlinkmengde | Количество звеньев | 52 |


| Polski | Čeština | Magyar | Română | Latviski | Lietuviškai | Eesti |
| Parametry techniczne | Technické údaje produktu | Termék műszaki adatai | Specificațiile produsului | Produkta specifikăcijas | Gaminio techninės savybės | Toote tehnilised andmed |
| Bezprzewodowa pila łańcuchowa | Akumulátorová řetėzová pila | Akkumulátoros láncfūrész | Fierăstrău electric cu lanț, cu accumulator | Bezvadu elektriskais motorzăgis | Akumuliatorinis grandininis pjūklas | Juhtmeta kettsaag |
| Model | Model | Tipus | Model | Modelis | Modelis | Mudel |
| Napięcie znamionowe | Jmenovité napětí | Névleges feszültség | Tensiunea nominală | Nominălais spriegums | Nominali įtampa | Nimipinge |
| Prędkość obrotowa bez obciążenia | Rychlost naprázdno | Üresjáratí fordulatszám | Víteză fără sarcină | Greitis be apkrovimo | Greitis be apkrovimo | Tūhikäigukiirus |
| Długość prowadnicy | Délka vodící lišty | Láncvezető hossza | Lungime a barei de ghidare | Sliedes garums | Kreipiamosios juostos ilgis | Juhtlati pikkus |
| Użyteczna długość cięcia | Vyuzitelná řezací délka | Hasznos vágáshossz | Lungime de tăiere utilizabilă | Izmantojamais griešanas garums | Naudojamas pjovimo ilgis | Kasutatav lõike pikkus |
| Ogranicznik łańcucha | Zastavení řetězu | Láncleállás | Oprire lanț | Kėdes apstăšanās | Grandinės stabdiklis | Keti seiskumine |
| Pojemność zbiornika oleju łańcuchowego | Kapacita olejové nádrže pro řetěz | Láncolaj tartályának térfogata | Capacitate rezervor ulei de lanț | Kėdes eljas tvertnes tilpums | Grandinės alyvos bakelio tūris | Ólipaagi maht |
| Masa (Bez akumulatora, z prowadnicą, łańcuchem i pustym zbiornikiem paliwa) | Hmotnost (Není vložen akumulátor, s vodící lištou, řetězem a prázdnou nádrží) | Tömeg (Akkumulátor nélkúl, láncvezetővel, lánccal és üres tartályal) | Greutate (Fără baterie, cu lamă de ghidare, lanț și rezervor gol) | Svars (Bez akumulatora, ar sledi, kėdi un tukšu tvertni) | Svoris (Be akumuliatorinės baterijos, su kreiptuvu, grandine ir tuščiu baku) | Mass (Ilma aku pakita, juhtlatiga, ketiga ja tühja paagiga) |
| Poziom wibracji (zgodnie z normą EN 60745-1; EN 60745-2-13) | Úroveň vibrací (v souladu s EN 60745-1; EN 60745-2-13) | Vibraciós szint (az EN 60745-1; EN 60745-2-13 szerint) | Nivel de vibrație (în conformitate cu EN 60745-1; EN 60745-2-13) | Vibrácijas līmenis (saskaņa ar EN 60745-1; EN 60745-2-13) | Vibracijos lygis (pagal EN 60745-1; EN 60745-2-13 standarta) | Vibratsioonitase (vastavalt standardile EN 60745-1; EN 60745-2-13) |
| Przedni uchwyt | Přední rukojeť | Elülső fogantyú | Mâner anterior | Priekšējais rokturis | Priekinė rankena | Eesmine käepide |
| Tylny uchwyt | Zadní rukojeť | Hátsó fogantyú | Mânerul principal | Aizmugurējais rokturis | Galinė rankena | Tagumine käepide |
| Niepewność pomiaru | Nejistota měření | Mérés bizonytalansága | Nesiguranța măsurătorii | Měrijuma nenoteiktība | Matavimo paklaida | Mõõtmismääramatus |
| Poziom emisji hałasu (zgodnie z normą EN 60745-1; EN 60745-2-13) | Hladina emise hluku (v souladu s EN 60745-1; EN 60745-2-13) | Hangkibocsátási szint (az EN 60745-1; EN 60745-2-13 szerint) | Nivel emisie zgomot (în conformitate cu EN 60745-1; EN 60745-2-13) | Trokšņu emisijas līmenis (saskaņa ar EN 60745-1; EN 60745-2-13) | Skleidžiamo triukšmo lygis (pagal EN 60745-1; EN 60745-2-13 standarta) | Helivõimsuse tase (vastavalt standardile EN 60745-1; EN 60745-2-13) |
| Poziom ciśnienia akusytcznego (A) w miejsu operatora | Hladina akustického tlaku vážená funkcí A v poloze obsluhy | A-súlyozott hangnyomásszint a kezelő helyén | Nivel presiune sunet greutate A la poziția operatorului | Lietotāja pozicijā ir ar A nověrtěts skaņas spiediena līmenis | A svorinis triukšmo slėgio lygis operatoriaus padětyje | A-kaalutud mūraemissiooni rõhu tase operaatori töökohal |
| Niepewność pomiaru | Nejistota měření | Mérés bizonytalansága | Nesiguranța măsurătorii | Měrijuma nenoteiktība | Matavimo paklaida | Mõõtmismääramatus |
| A-ważony poziom natężenia hałasu | Hladina akustického tlaku vážená funkcí A | A-súlyozott hangteljesítmé-nyszint | Nivel de putere acustică ponderată A | A-līmeņa skaņas jaudas līmenis | A-svertinis akustinis lygis | A-kaalutud helivõimsuse tase |
| Niepewność pomiaru | Nejistota měření | Mérés bizonytalansága | Nesiguranța măsurătorii | Měrijuma nenoteiktība | Matavimo paklaida | Mõõtmismääramatus |
| Długość łańcucha | Délka řetězu | Lánc hossza | Lungimea lanțului | Kėdes garums | Grandinės ilgis | Ketta pikkus |
| Przecinak kształtowy łańcucha | Článek řetězu | Fog osztás | Lamele lanțului | Kėdes asmeniši | Pjovimo grandinės dantukas | Keti samm |
| Skok łańcucha | Rozteč řetězu | Fogak közötti távolság | Pasul lanțului | Kėdes parameters | Pjovimo grandinės žingsnis | Keti rööbe. |
| Liczba ogniw napędu | Počet hnacích článků řetězu | Vágófogak mennyisége | Număr zale de legătură | Piedziņas posmu skaits | Varomujų grandžių kiekis | Veolūlide hulk |


| Hrvatski | Slovensko | Slovenčina | България | Українська | Turce | |
| Specifikacije proizvoda | Specifikacije izdelka | Špecifikácie produktu | Технически характеристики | Технічні характеристики пристрою | Ürün teknik özellikleri | |
| Bežična motorna pila | Brezžična motorna žaga | Akumulátorová reťazová píla | Безжичен верижен трион | Бездротова ланцюгова пила | Kablosuz Motorlu Testere | |
| Model | Model | Modelis | Модел | Модель | Model | RY36CSX35A |
| Nazivni napon | Nazivna napetost | Menovité napätie | Номинален воптаж | Номінальна напруга | Nominal voltaj | 36 V d.c. |
| Brzina bez opterećenja | Hitrost neobremenjenega motorja | Rýchlost' naprázdno | Скорост в ненатоварен режим | Швидкість без навантаження | Yüksüz hiz | 21,0 m/s |
| Duljina vodilice lanca | Dolžina meča | Dĺžka vodiacej lišty | Дължина на водещата шина | Довжина напрямної штанги | Kilavuz çubuğu uzunluğu | 356 mm |
| Korisna duljina vodilice | Dolžina uporabne površine za žaganje | Využiteľná dĺžka rezania | Използваема дължина на рязане | Корисна ріжуча довжина | Kullanılabilen kesme uzunluğu | 300 mm (12") |
| Hvatač lanca | Ustavitev verige | Zastavenie reťaze | Време до спиране на веригата | Зупинка ланцюга | Zincir durdurma | <2 s |
| Kapacitet spremnika ulja za lanac | Kapaciteta posode za olje verige | Kapacita olejovej nádrže reťaze | Вместимост на резервоара за верижно масло | Об'єм масляного бака ланцюга | Zincir yağ tankı kapasitesi | 190 ml |
| Težina (Bez baterije, s vodilicom, lancem i praznim spremnikom) | Teža (Brez baterijskega, z mečem, verigo in praznim rezervoarjem) | Hmotnosť (Bez batérie, s vodiacou lištou, reťazou a prázdnou nádržou) | Тегло (Без батерия, с шина, верига и празен резервоар) | Вага (без акумулятора, з направляючою штангою, ланцюгом і порожнім баком) | Ağırlık (Batarya hariç, kilavuz çubuk, zincir ve boş tank) | 4,2 kg |
| Razina vibracija (u skladu s EN 60745-1; EN 60745-2-13) | Nivo vibracij (v skladu s standardom EN 60745-1; EN 60745-2-13) | Úroveň vibrácií (podľa normy EN 60745-1; EN 60745-2-13) | Ниво на вибрациите (в съответствие с EN 60745-1; EN 60745-2-13) | Рівень вібрації (відповідно до EN 60745-1; EN 60745-2-13) | Titreşim seviyesi (EN 60745-1, EN 60745-2-13 uyarınca) | |
| Prednja ručka | Sprednji ročaj | Predná rukovát' | Предна ръкохватка | Передня ручка | Ön kulp | 4,3 m/s2 |
| Stražnja ručica | Zadnji ročaj | Zadná rukovát' | Задна ръкохватка | Задня ручка | Arka kulp | 3,1 m/s2 |
| Neodređenost mjerenja | Negotovost meritve | Nespoľahlivosť meraní | Несигурност на измерването | Невизначеність вимірювання | Ölçüm bilinmiyor | 1,5 m/s2 |
| Razina emisija buke (u skladu s EN 60745-1; EN 60745-2-13) | Raven emisij hrupa (v skladu s standardom EN 60745-1; EN 60745-2-13) | Úroveň emisií hluku (podľa normy EN 60745-1; EN 60745-2-13) | Ниво на шумовите емисии (в съответствие с EN 60745-1; EN 60745-2-13) | Рівень шуму (відповідно до EN 60745-1; EN 60745-2-13) | Gürültü emisyon seviyesi (EN 60745-1, EN 60745-2-13 uyarınca) | |
| A-ponderirana razina zvučnog tlaka u položaju operatera | A-izmerjena raven zvočnega tlaka pri položaju upravljavca | Vážená A hladina akustického tlaku na pozícii obsluhujúcej osoby | Равнище А на нивото на шумового налягане на мястото на оператора. | Рівень звукового тиску за шкалою А для оператора пристрою | Kullanıcı pozisyonundaki A agirlıklı ses basinci seviyesi | 88,6 dB(A) |
| Neodređenost mjerenja | Negotovost meritve | Nespoľahlivosť meraní | Несигурност на измерването | Невизначеність вимірювання | Ölçüm bilinmiyor | 2,5 dB |
| Ponderirana razina zvučne snage | A-izmerjena raven zvočne moči | Vážená A hladina akustického výkonu | Ниво на силата на шума с равнище А | А-зважений рівень звукової потужності | A agirlıklı ses gücü seviyesi | 99,6 dB(A) |
| Neodređenost mjerenja | Negotovost meritve | Nespoľahlivosť meraní | Несигурност на измерването | Невизначеність вимірювання | Ölçüm bilinmiyor | 2,5 dB |
| Duljina lanca | Dolžina verige | Dĺžka reťaze | Дължина на веригата | Довжина ланцюга | Zincir uzunluğu | 14" |
| Zubac lanca | Korak verige | Rozstup reťaze | Стъпка на веригата | Інтенсивність пили | Zincir hatvesi | 0,375" |
| Korak lanca | Debelina verige | Hrúbka reťaze | Звено на веригата | Кожух ланцюга | Zincir kalibresi | 0,050" |
| Količina pogonskih članaka | Količina pogonskih členov | Počet hnacích článkov | Брой задвижващи връзки | Кількість приводних ланок | Tahrik bağlantısı adedi | 52 |

The declared vibration value has been measured with a standard test method and may be used to compare one tool with another.
The declared vibration value may be used in a preliminary assessment of exposure.
The vibration emission during actual use of power tool can differ from the declared total value depending on the ways in which the tool is used.
Identify safety measures to protect yourself based on an estimation of exposure in the actual conditions of use, taking account of all parts of the operating cycle such as the times when the tool is switched off and when it is running idle in addition to the trigger time.
In addition to any statutory rights resulting from the purchase, this product is covered by a warranty as stated below.
- The warranty period is 24 months for consumers and commences on the date when the product was purchased. This date has to be documented by an invoice or other proof of purchase. The product is designed and dedicated to consumer and private use only. So there is no warranty provided in case of professional or commercial use. This warranty applies only on new products.
- There is a possibility to extend for a part of the range of power tools (AC/DC) the warranty period over the period described above using the registration on the www.ryobitools.eu website. The eligibility of products for extended warranty is clearly displayed in stores and / or on packaging and is contained within the product documentation. The end user is required to register his/her newly-acquired products online within 30 days from the date of purchase. The end user may register for the extended warranty in his/her country of residence if listed on the online registration form where this option is valid. Furthermore, end users must give their consent to the storage of their personal data that is required to be entered online. They must also accept the terms and conditions. The registration confirmation receipt, which is sent out by e-mail, and the original invoice showing the date of purchase will serve as proof of the extended warranty.
- The warranty covers all defects of the product during the warranty period due to faults in workmanship or material at the purchase date. The warranty is limited to repair and/or replacement and does not include any other obligations including but not limited to incidental or consequential damages. The warranty is not valid if the product has been misused, used contrary to the instruction manual, or has been incorrectly connected to a power supply. This warranty does not apply to:
– any damage to the product that is the result of improper or lack of maintenance
– any product that has been altered or modified
– any product where original identification (trade mark, serial number) markings have been defaced, altered or removed
– any damage caused by non-observance of the instruction manual
– any product not displaying the CE approval mark on the rating plate
– any product that has been attempted to be repaired by a non-authorised warranty service centre or without prior authorisation by Techtronic Industries
– any product connected to improper power supply (amps, voltage, frequency)
– any product used with inappropriate fuel mixture (fuel, oil, ratio of oil/ fuel mixture)
– any damage caused by external influences (water, chemical, physical, shocks) or foreign substances
– normal wear and tear spare parts
– inappropriate use, overloading of the tool
– use of non-approved accessories or parts
- Accessories provided with the tool or purchased separately including but not limited to blades, saw chains, cutting lines, etc.
– Any periodic adjustments to or maintenance cleaning of carburettors
- Components (parts and accessories) subject to natural wear and tear, including but not limited to bump knobs, drive belts, clutch, blades of hedge trimmers or lawn mowers, harness, cable throttle, carbon brushes, power cord, tines, felt washers, hitch pins, blower fans, blower and vacuum tubes, vacuum bag and straps, guide bars, saw chains, hoses, connector fittings, spray nozzles, wheels, spray wands, inner reels, outer spools, cutting lines, spark plugs, air filters, gas filters, mulching blades, etc.
-
For servicing, the product must be sent or presented to a RYOBI authorised service station listed for each country in the following list of service station addresses. In some countries your local RYOBI dealer undertakes to send the product to the RYOBI service organisation. When sending a product to a RYOBI service station, the product should be safely packed without any dangerous contents such as petrol, marked with sender's address and accompanied by a short description of the fault.
-
A repair / replacement under this warranty is free of charge. It does not constitute an extension or a new start of the warranty period. Exchanged parts or products become our property. In some countries delivery charges or postage will have to be paid by the sender. Your statutory rights arising from the purchase of the product remain unaffected.
-
This warranty is valid in the European Community, Switzerland, Iceland, Norway, Liechtenstein, Turkey and Russia. Outside these areas, please contact your authorised RYOBI dealer to determine if another warranty applies.
AUTHORISED SERVICE CENTRE
To find an authorised service centre near you, visit http://uk.ryobitools.eu/header/service-and-support/service-agents.
FR RYOBI® CONDITIONS D'APPLICATION DE LA GARANTIE
DECLARATION OF CONFORMITY
Techtronic Industries GmbH
Max-Eyth-Straße 10, 71364 Winnenden, Germany
Herewith we declare that the product
Cordless Chainsaw
Brand: RYOBI
Model number: RY36CSX35A
Serial number range: 47508201000001 - 47508201999999
is in conformity with the following European Directives and harmonised standards
2006/42/EC, 2014/30/EU, 2000/14/EC, 2005/88/EC, 2011/65/EU,
EN 60745-1:2009+A11:2010, EN 60745-2-13:2009+A1:2010,
EN 55014-1:2017, EN 55014-2:2015, EN IEC 63000:2018
Measured sound power level: 99.2 dB(A)
Guaranteed sound power level: 101 dB(A)
Conformity assessment method to Annex V Directive 2000/14/EC amended by 2005/88/EC.
Notified body, 0197 TÜV Rheinland LGA Products GmbH; Tillystraße 2 D - 90431
Nürnberg, Germany has carried out EC type approval, and the certificate No. is. BM 50443754 0001.

C€
Todd Chipner
Sr. Director, CPT Quality and Asia Regulatory & Safety
Authorised to compile the technical file:
Alexander Krug, Managing Director
Techtronic Industries GmbH
Max-Eyth-Straße 10, 71364 Winnenden, Germany

Max-Eyth-Straße 10, 71364 Winnenden, Germany
Max-Eyth-Straße 10, 71364 Winnenden, Germany

DÉCLARATION DE CONFORMITÉ
Techtronic Industries GmbH
Max-Eyth-Straße 10, 71364 Winnenden, Germany
Max-Eyth-Straße 10, 71364 Winnenden, Germany

Max-Eyth-Straße 10, 71364 Winnenden, Germany
Max-Eyth-Straße 10, 71364 Winnenden, Germany
Max-Eyth-Straße 10, 71364 Winnenden, Germany
Max-Eyth-Straße 10, 71364 Winnenden, Germany
Max-Eyth-Straße 10, 71364 Winnenden, Germany
Max-Eyth-Straße 10, 71364 Winnenden, Germany
NL CONFORMITEITSVERKLARING
Techtronic Industries GmbH
Max-Eyth-Straße 10, 71364 Winnenden, Germany
Max-Eyth-Straße 10, 71364 Winnenden, Germany
DA OVERENSSTEMMELSESERKLÆRING
Techtronic Industries GmbH
Max-Eyth-Straße 10, 71364 Winnenden, Germany
Vi erklærer hermed, at produktet
Akku-Motorsav
Brand: RYOBI
Modelnummer: RY36CSX35A
Serienummerområde: 47508201000001 - 47508201999999
Max-Eyth-Straße 10, 71364 Winnenden, Germany

KONFORMITETSDEKLARATION
Techtronic Industries GmbH
Max-Eyth-Straße 10, 71364 Winnenden, Germany
Max-Eyth-Straße 10, 71364 Winnenden, Germany

SAMSVARSERKLÆRING
Techtronic Industries GmbH
Max-Eyth-Straße 10, 71364 Winnenden, Germany
Max-Eyth-Straße 10, 71364 Winnenden, Germany

SÄÄNNÖSTEN NOUDATTAMINEN
Techtronic Industries GmbH
Max-Eyth-Straße 10, 71364 Winnenden, Germany
Max-Eyth-Straße 10, 71364 Winnenden, Germany

Max-Eyth-Straße 10, 71364 Winnenden, Germany
Max-Eyth-Straße 10, 71364 Winnenden, Germany

DEKLARACJA ZGODNOŚCI
Techtronic Industries GmbH
Max-Eyth-Straße 10, 71364 Winnenden, Germany
Max-Eyth-Straße 10, 71364 Winnenden, Germany

MEGFELELŐSÉGI NYILATKOZAT
Techtronic Industries GmbH
Max-Eyth-Straße 10, 71364 Winnenden, Germany
Max-Eyth-Straße 10, 71364 Winnenden, Germany

PROHLÁŠENÍ O SHODĚ
Techtronic Industries GmbH
Max-Eyth-Straße 10, 71364 Winnenden, Germany
Max-Eyth-Straße 10, 71364 Winnenden, Germany

DECLARATIE DE CONFORMITATE
Techtronic Industries GmbH
Max-Eyth-Straße 10, 71364 Winnenden, Germany
Alexander Krug, Director General
Techtronic Industries GmbH
Max-Eyth-Straße 10, 71364 Winnenden, Germany
LV ATBILSTĪBAS DEKLARĀCIJA
Techtronic Industries GmbH
Max-Eyth-Straße 10, 71364 Winnenden, Germany
Max-Eyth-Straße 10, 71364 Winnenden, Germany
ET VASTAVUSDEKLARATSIOON
Techtronic Industries GmbH
Max-Eyth-Straße 10, 71364 Winnenden, Germany
Kinnitame, et see toode
Aku-Kettsaag
Mark: RYOBI
Mudeli number: RY36CSX35A
Seerianumbri vahemik: 47508201000001 - 47508201999999
Max-Eyth-Straße 10, 71364 Winnenden, Germany
LT ATITIKTIES DEKLARACIJA
Techtronic Industries GmbH
Max-Eyth-Straße 10, 71364 Winnenden, Germany
Max-Eyth-Straße 10, 71364 Winnenden, Germany
HR IZJAVA O USKLAĐENOSTI
Techtronic Industries GmbH
Max-Eyth-Straße 10, 71364 Winnenden, Germany
Max-Eyth-Straße 10, 71364 Winnenden, Germany

IZJAVA O SKLADNOSTI
Techtronic Industries GmbH
Max-Eyth-Straße 10, 71364 Winnenden, Germany
Max-Eyth-Straße 10, 71364 Winnenden, Germany

Max-Eyth-Straße 10, 71364 Winnenden, Germany
Max-Eyth-Straße 10, 71364 Winnenden, Germany

PREHLÁSENIE O ZHODE
Techtronic Industries GmbH
Max-Eyth-Straße 10, 71364 Winnenden, Germany
Max-Eyth-Straße 10, 71364 Winnenden, Germany

Max-Eyth-Straße 10, 71364 Winnenden, Germany
Max-Eyth-Straße 10, 71364 Winnenden, Germany

UYGUNLUK BEYANI
Techtronic Industries GmbH
Max-Eyth-Straße 10, 71364 Winnenden, Germany
Max-Eyth-Straße 10, 71364 Winnenden, Germany

EN RYOBI is a trademark of Ryobi Limited, and is used under license. TRILINK is a registered trademark of Trilink Saw Chain, LLC. © 2019 Techtronic Cordless GP. All rights reserved.
71364 Winnenden, Germany