RCS-4450C - Chain saw RYOBI - Free user manual and instructions
Find the device manual for free RCS-4450C RYOBI in PDF.

| Product Type | Petrol Chainsaw |
| Brand | RYOBI |
| Model | RCS-4450C |
| Displacement | 35 cm³ |
| Rated Power | 1.6 kW (2.2 hp) |
| Guide Bar Length | 40 cm |
| Chain Pitch | 9.53 mm |
| Chain Gauge | 1.27 mm |
| Weight (without bar, chain, fuel, oil) | 4.4 kg |
| Fuel Tank Capacity | 310 cm³ |
| Oil Tank Capacity | 210 cm³ |
| Sound Pressure Level (ISO 22868) | 100 dB(A) |
| Sound Power Level (ISO 22868) | 110 dB(A) |
| Front Handle Vibration (ISO 22867) | 4.5 m/s² |
| Rear Handle Vibration (ISO 22867) | 7.3 m/s² |
| Rated Speed | 12,000 rpm |
| Idle Speed | 2,700 - 3,100 rpm |
| Chain Brake | Yes (Front Handguard) |
| Low Kickback Chain | Yes (Low kickback tendency) |
| Applications | Limbing, Felling, Cross-cutting |
| Power Source | 2-stroke engine (gas/oil mix 50:1) |
| Warranty | 24 months |
Frequently Asked Questions - RCS-4450C RYOBI
User questions about RCS-4450C RYOBI
0 question about this device. Answer the ones you know or ask your own.
Ask a new question about this device
Download the instructions for your Chain saw in PDF format for free! Find your manual RCS-4450C - RYOBI and take your electronic device back in hand. On this page are published all the documents necessary for the use of your device. RCS-4450C by RYOBI.
USER MANUAL RCS-4450C RYOBI
RCS-3540C / 4046C / 4450C
F TRONCONNEUSE THERMIQUE MANUEL D'UTILISATION 1
GB PETROL CHAIN SAW USER'S MANUAL 20
D BENZIN-KETTENSÄGE BEDIENUNGSANLEITUNG 37
E MOTOSIERRA TÉRMICA MANUAL DE UTILIZACION 57
I MOTOSEGA A SCOPPIO MANUALE D'USO 76
P SERRA DE CORREnte COM MOTOR A GASOLINA MANUAL DE UTILIZACAO 96
NL MOTORKETTINGZAAG GEBRUIKERSHANDLEIDING 115
S BENSINDRIVEN KEDJESAG INSTRUKTIONSBOK 135
DK BENZINDREVEN MOTORSAV BRUGERVEJLEDNING 152
N MOTORDEVET KJEDESAG BRUKSANVISING 169
(FIN) BENSIINIMOOTTORISAHA KAYTTAJAN KASIKIRJA 186
GRBENZINOKINHTO AAYZOPIIONO OAHIGE XPHSE 203
HU BENZINMOTOROS LANCFURESZ HASZNÁLATI UTMUTATO 224
CZ RETÉZOVÁ PILA S BENZINOVYM MOTOREM NÁVOD K OBSLUZE 241
RU CEIIHAR 6EH30IINJA PYKOBODCTBO IIO 3KCIJYATAIIN 259
RO FERASTRAU TERMIC CU LANT MANUAL DE UTILIZARE 276
PL SPALINOWA PILARKA LANCUCHOWA INSTRUKCJA OBSLUGI 293
SLO MOTORNA VERIZNA ZAGA UPORABNIISKI PRIROČNIK 311
HR BENZINSKA MOTORNA PILA KORISNICKI PRIRUCNIK 327
(TR)TERMIK HALKALI TESTERE KULLANMA KILAVUZU 343
EST BENSIINIGA TÖOTAV KETTSAAG KASUTAJAUHEND 360
(LT) BENZININIS GRANDININIS MEDZIO PJUKLAS NAUDOJIMO VADOVAS 376
LV MOTORZAGIS LIETOTAJAROKASGRAMATA 393
SK BENZINOVA RETAZOVÁ PÍLA NÁVOD NA POUŽITIE 410
BG BEPHKEN TPNOH C BEH3HHOB IBHNTATEJI PbKOBOCTBO 3A YIOTPE6A 427
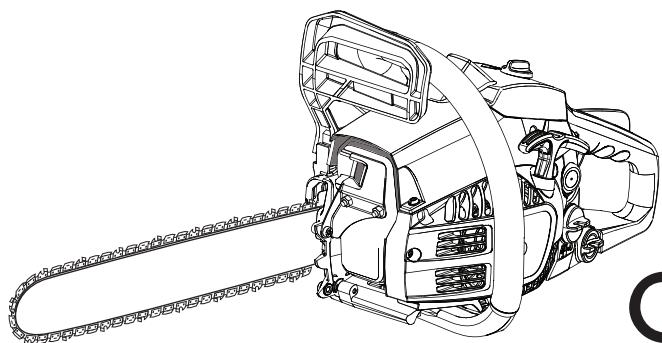
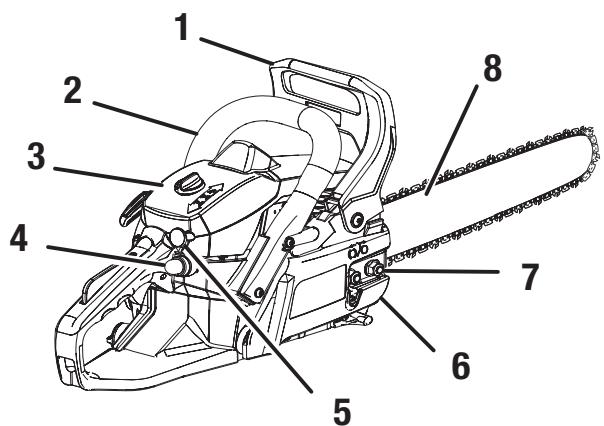
Fig. 1
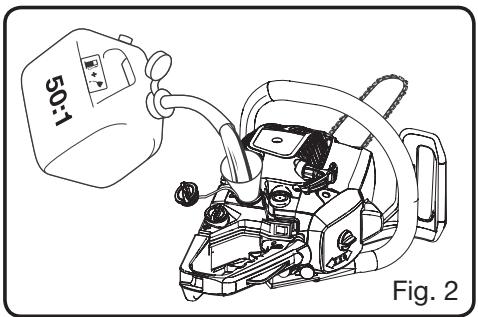
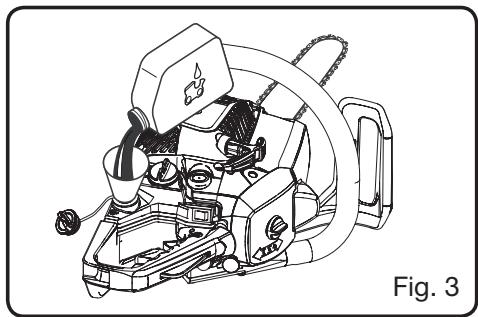
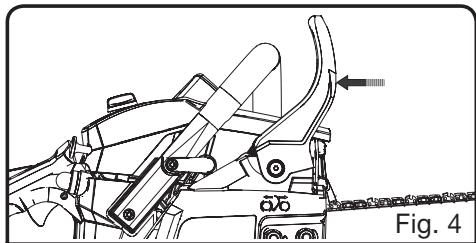
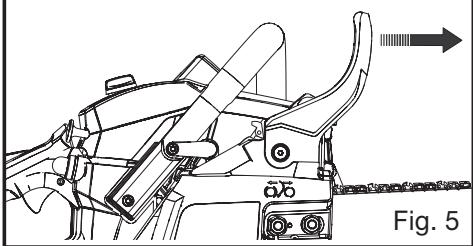
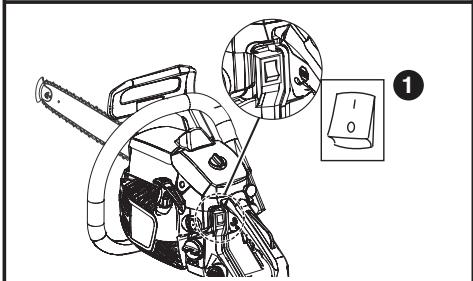
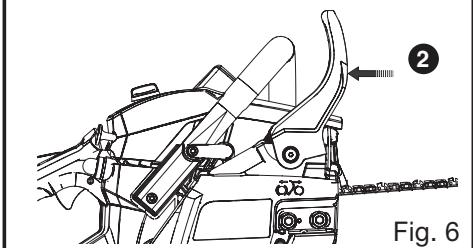
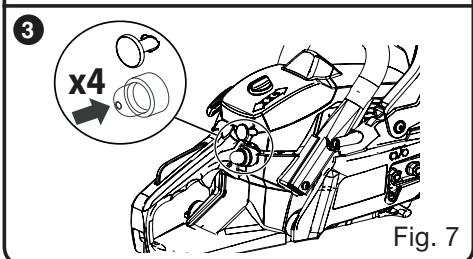
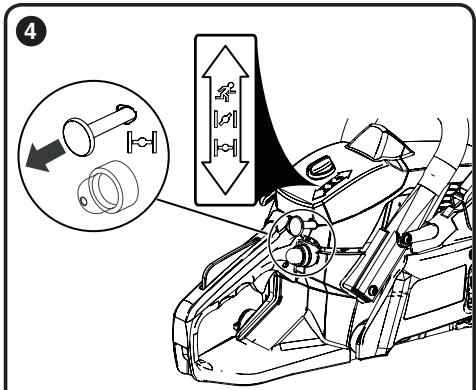
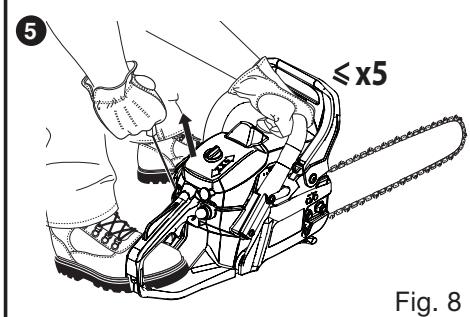
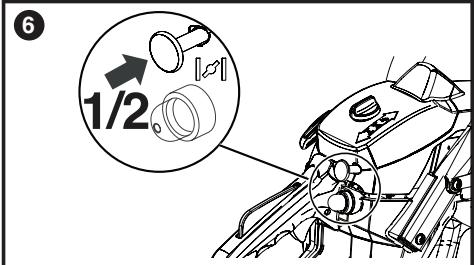
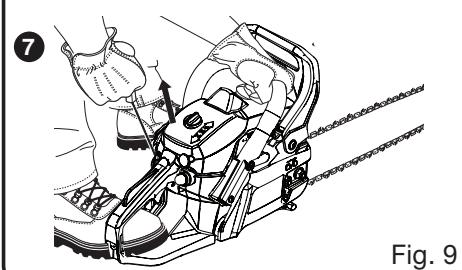
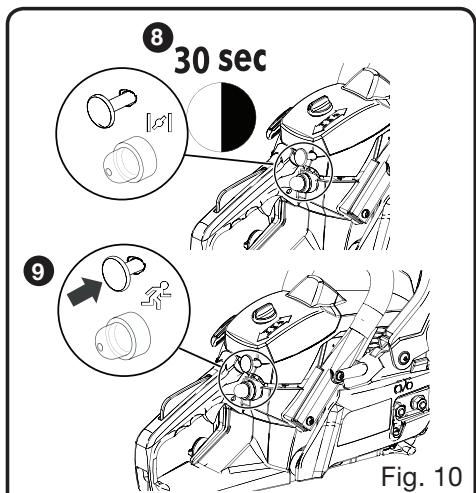
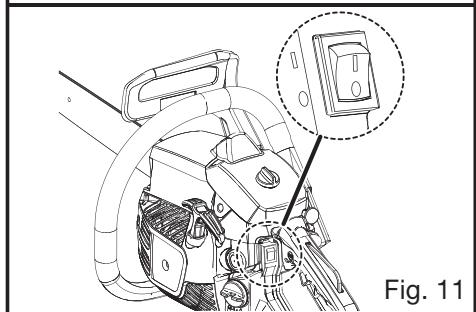


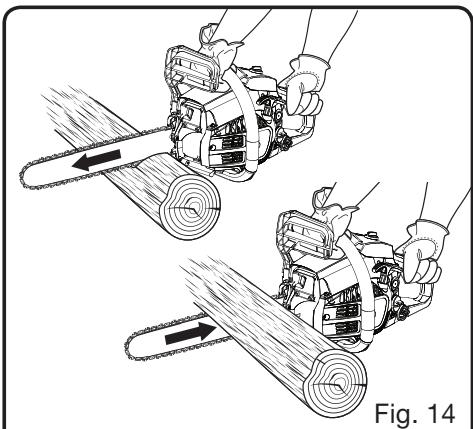
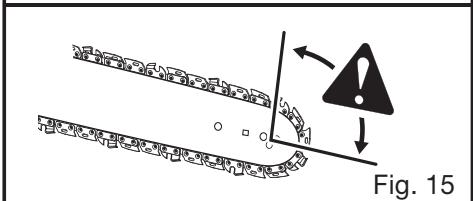
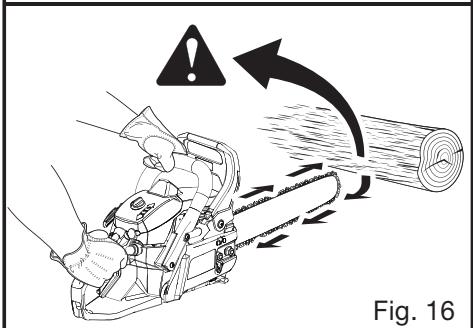
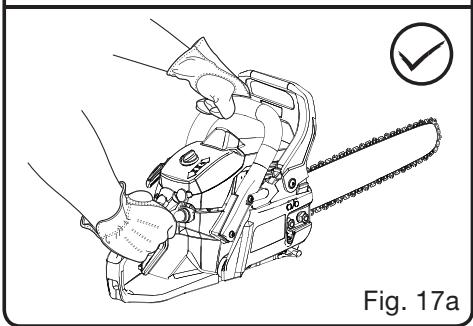
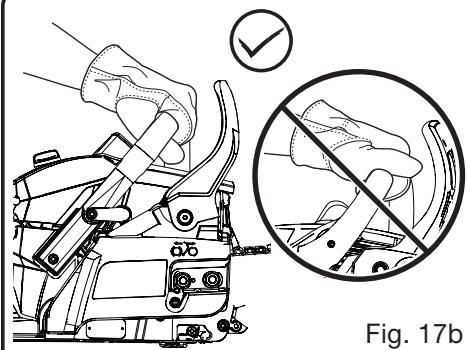
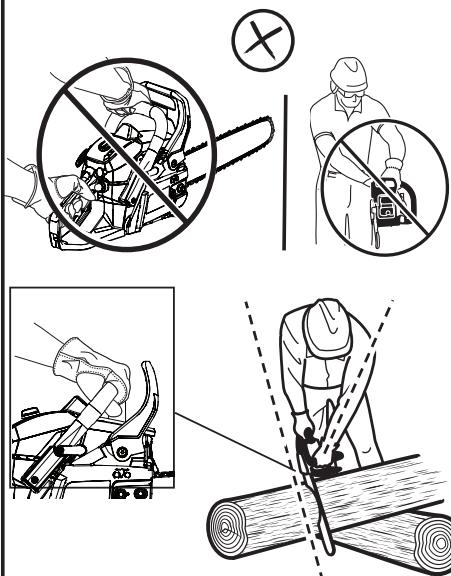
Fig. 18
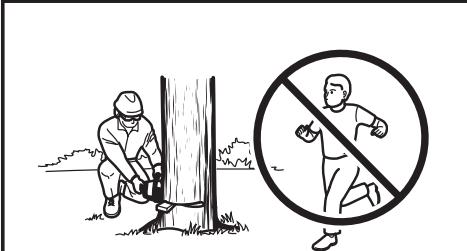
Fig. 19
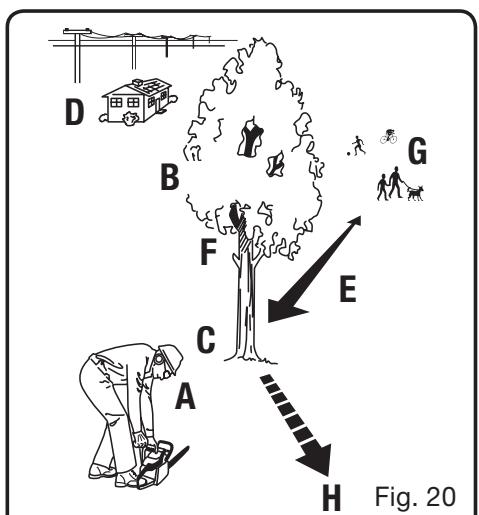
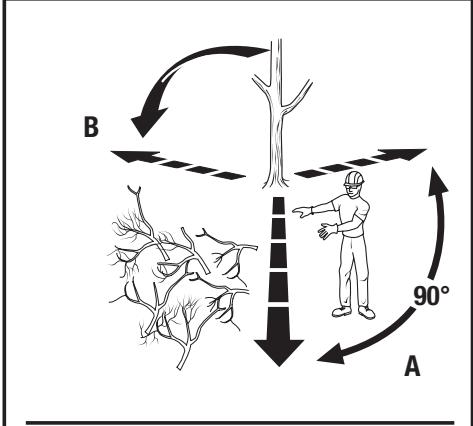
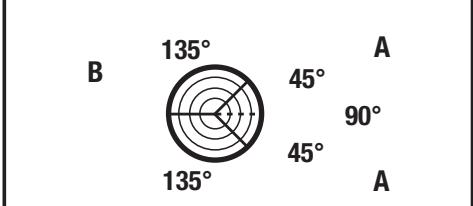
Fig. 21
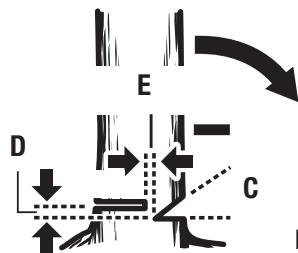
Fig. 22
E
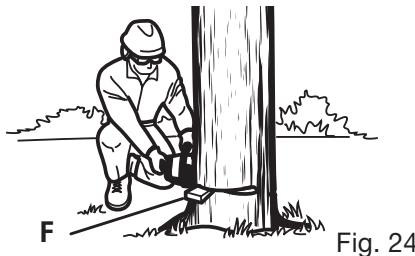
Fig. 23
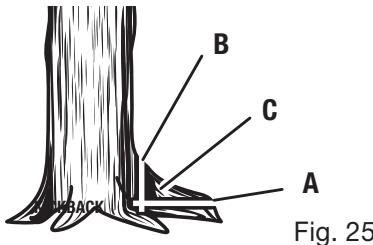
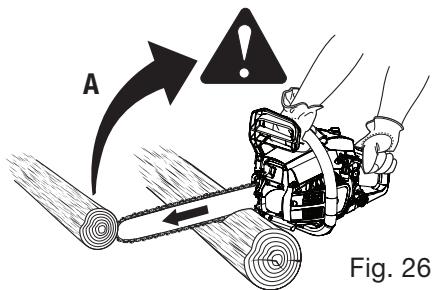
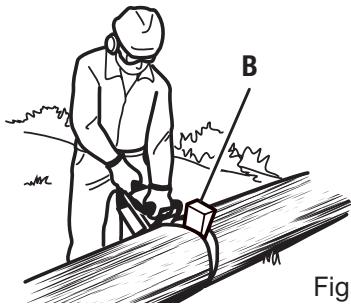
Fig. 27
C
D
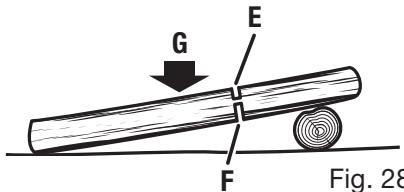
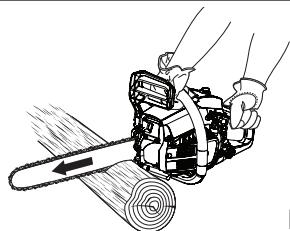
Fig. 29
Fig. 30
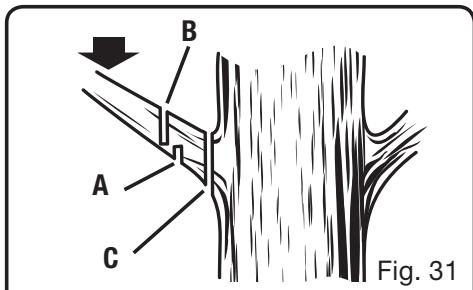
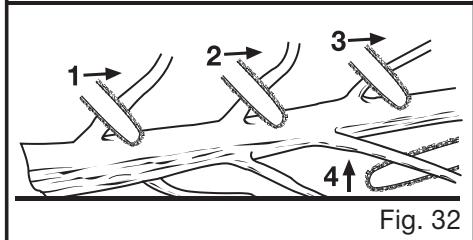
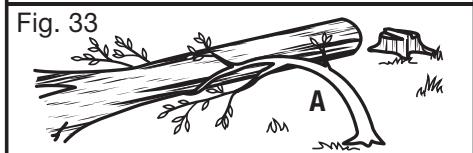
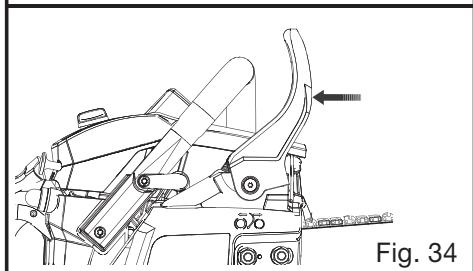
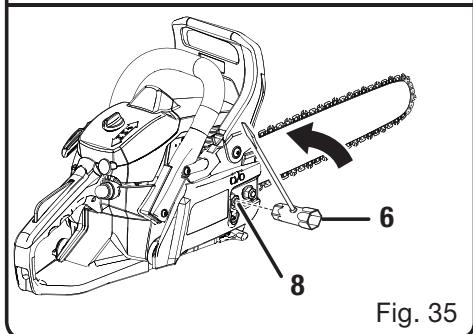

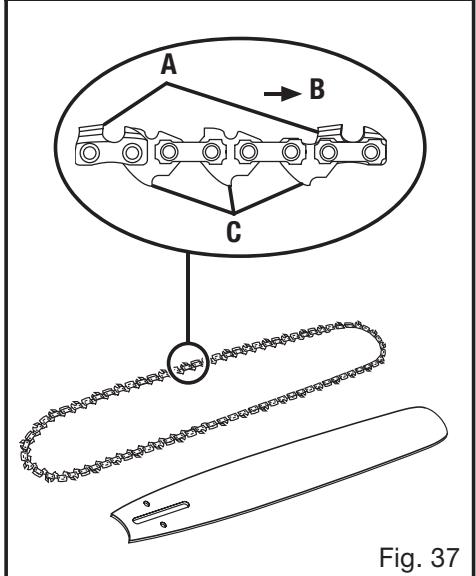
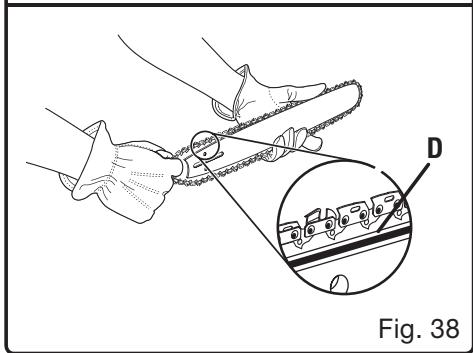
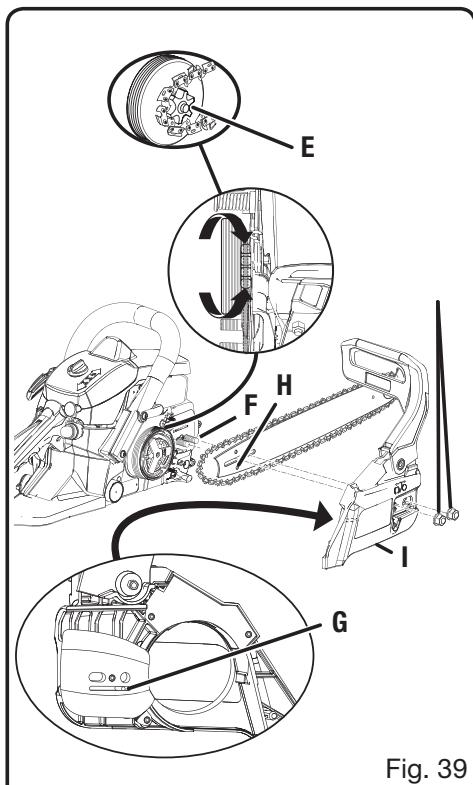
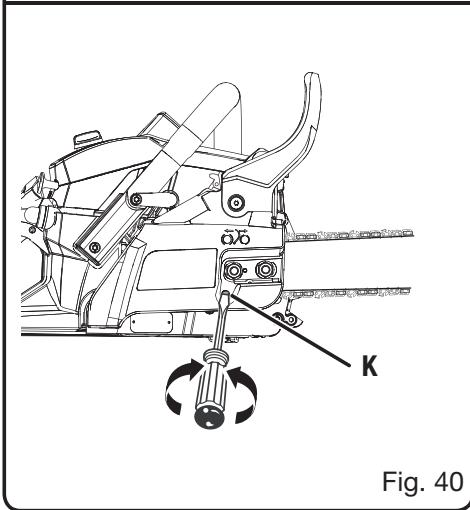
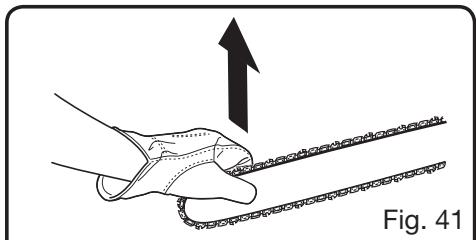

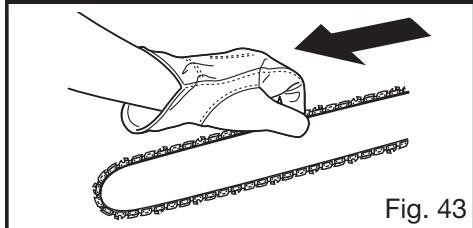
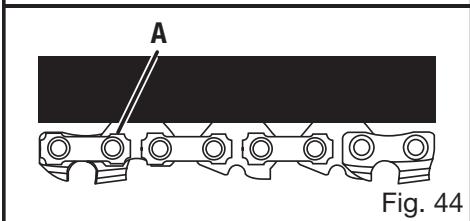
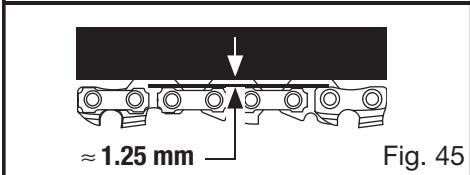
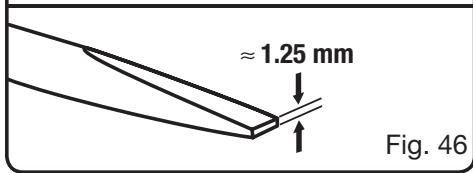
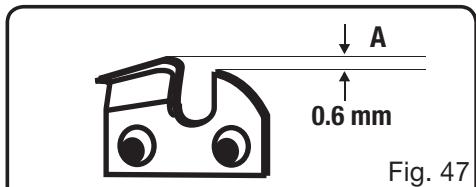
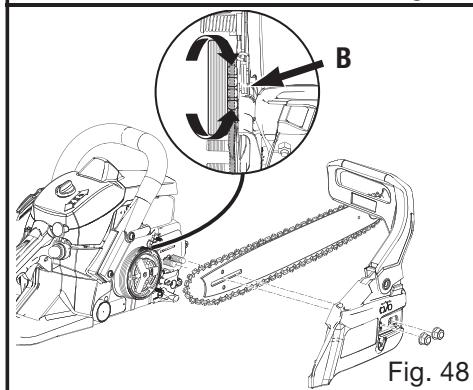
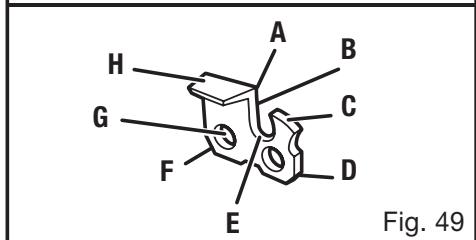
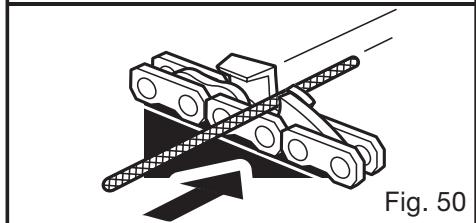
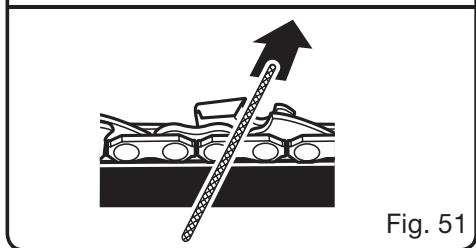
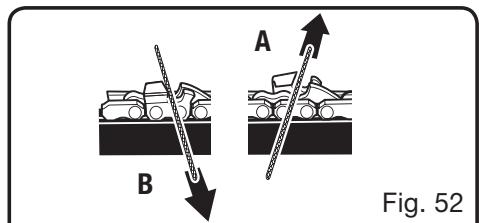
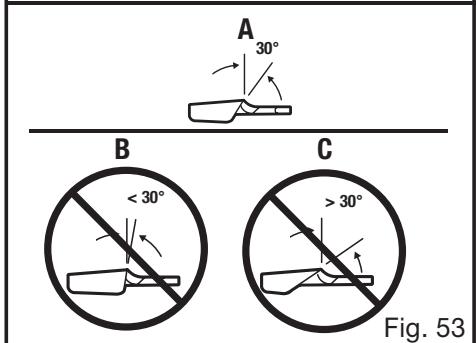
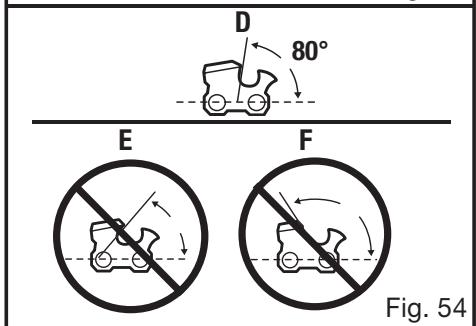
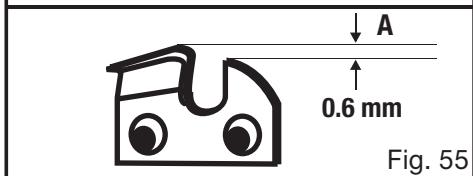
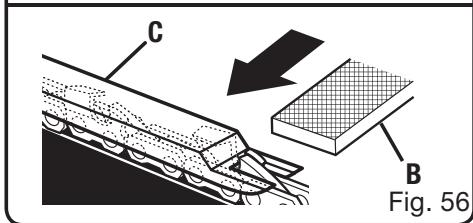
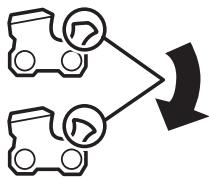
Fig. 57
Fig. 58
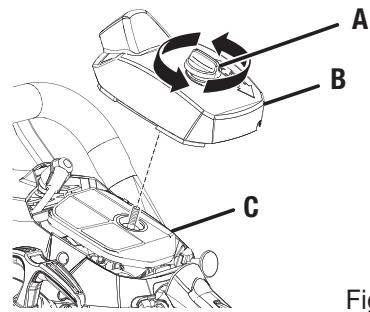
Fig. 59

Fig. 60
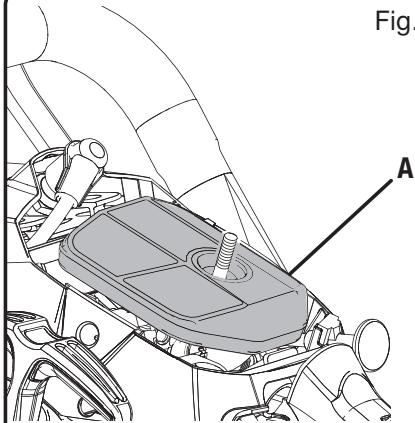
Fig. 61
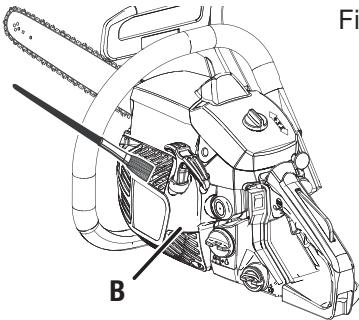
Fig. 62
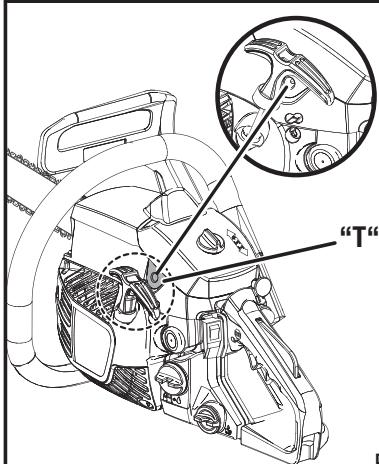
Fig. 63
| Attention ! | Il est indispensable que vous lisiez les instructions contenues dans ce manuel avant le montage et la mise en service de l'appareil. |
| Important! | It is essential that you read the instructions in this manual before mounting and operating this machine. |
| Achtung! | Bitte lessen Sie unbedingt vor Montage und Inbetriebnahme die Hinweise dieser Bedienungsanleitung. |
| ÀTección! | Es imprescindible que lea las instrucciones de este manual antes del montaje y de la puesta en servicios. |
| Attenzione! | Prima di procedere al montaggio e alla messa in funzione, è indispensable leggere attendamente le struzioni del presente manuale. |
| Atençao! | É indispensableaveler as instruçõesdeste manualantesde montargpòr em的服务。 |
| Let op! | Het is absolutoodnoodzakelijkvórormontage en inbedrijfstellingdeaanwijzingenindeaze handleidingtelezen. |
| Observera! | Detä nödvändigt attläsa instruktionerna ienna braupsanvisningföre montering och driftsättning. |
| OBS! | Denne brugsanvisningskallesesigennem indenmontering ogibrugtagning. |
| Advarse!! | Vennligst les instruksjonene ienna braupsanvisingenfor du monterer og tar ibruk maskinen. |
| Huomio! | On ehdtottomanvalttamatontlaukea tassakäyttohjeessa annetut ohejetennen asennusta ja käyttoänottoa. |
| Προσχή! | Eivαιαπαραίτητοναδιβάσετετιςομτάσειςτωνobγιώναυτύνπιριντη συναρμολόγησηκαιŋθέσησελειουργία |
| Figyelem! | Feltétlenul fontos,hogyajelenhasznalatiutmutatóbanfoglaltelöirásokataz összeszerelésésazüzembehelyezésellotelolvassa! |
| Duležitéupozorněni! | Před montáží nañadi a uvedením do provozujne nutné s prićéist nasledujíci pokyny. |
| Bnuhanue! | Περει σcbρκοῦнзãиуckомнсструментанебхдимо почеьннсструкшинн健康的япсюцeroу руковodztba. |
| Atentie! | Este indispensable sā citi instruetjunilecontinuteinacemoddeutilizareincinte de montcj.si de punereañfunctiune. |
| Uwaga! | Przed montowaniemi uruchomieniem,koniecznie musieie Państwo zapoznać z zaleceniami zawartymi w niniejszym sposobie užycia. |
| Pomembno! | Zelo pomembno je,dad prænestitvoj in prvo uporabo te naprave preberete navodila vtem priročniku. |
| Upozorenje! | Važno je da upute u ovom Korisničkom priručniku pročitatePRIpe postavljanja i uporabe ovog alata. |
| Dikkat! | Montajdan ve aletin kullanimina baslamadan bu kilavuzda bulunan talimatlari okumaniz gerekmektedir. |
| Tähtis! | Lugege enne seadme kokkupanekut jasukamistkindlasti labi sesjuhendis sisalduvad eeskirjad ja juhised! |
| Démesio! | Priëš surinkdami ir paleisdami aparatajdarba,reikia,kadjus perskaitytumète šiame vadove esancías instrukcjías. |
| Uzmanibul! | Ir Joti būtiski,laijus izlasitu noradijumus,kasnagti šajā rokasgrāmatā,pirms keraties pieiericesmontēsanas uniedarbināsanas! |
| Pozor! | Je nutné,aby ste pričitaliPokyny,ktore sa nachádzajú v tejto priručke pred montážou a spustenim pristroja. |
| Bnuhanue! | П repdcl crloobvaheиптукaine на мшинатае ваяжнолдраочтугкдипгвBPьковоствоту за улотреба. |
Sous réserve de modifications techniques / Subject to technical modifications / Technische Änderungen vorbehalten / Bajo reserva de modificaciones tecnicas / Con riserva di eventuale modifiche tecniche / Com reserva de Modifications tecnicas / Technische wijzigingen voorbehonden / Med forbehäll for tekniska änderingar / Med forbeshold for tekniske ændringer / Med forbeshold om tekniske endringer / Tekniset muutokset varataan / YTó TnV ᵇιρύλξη τέχνικων ΠροTTOITOUŋεων / A muszaki MODositas jegát fenntartjuk / Změny technickych udajú vyhrazeny / MóγT 6bIbB WHCCB H TECHNIQUEKNE I3MENHIN/ Sub rezerva modificaṭilor tehnice / Z zastrzeżeniem modyfikacijs technicznych / Tehnične spremembe dopusčene Podložno techničim promjenama / Teknik dūzeltmeler hakki saklidir / Tehnilised muudatused voǐimalikud / Pasiliekant teise daryt techninius pakeitimus / Paturam tiesības mainit tehniskos raksturlielumus / Technické zmeny vyhradené / ΠoJIeЖи Na TexNHueCKN MoJɪΦHKaɪŋ
Français
Thank you for buying a Ryobi chainsaw.
Your new chainsaw has been engineered and manufactured to Ryobi's high standard for dependability, ease of operation, and operator safety. Properly cared for, it will give you years of rugged, trouble-free performance.

WARNING
To reduce the risk of injury, the user must read and understand the operator's manual.

IMPORTANT
Servicing requires extreme care and knowledge and should be performed only by a qualified service technician. When servicing use only identical Ryobi replacement parts. For safe operation, read and understand all instructions before using the chainsaw. Follow all safety instructions. Failure to follow all safety instructions listed below may result in serious personal injury.

WARNING
Carefully read through this entire operator's manual before using your new saw. Pay close attention to the Safety Rules and all Safety Alert Symbols including Danger, Warning, and Caution. These safety rules are for your safety and to prevent possible serious injury. If you use your saw properly and only for what it is intended,
you will enjoy years of safe, reliable service.

WARNING
Look for this symbol to point out important safety precautions. It means attention!!! Your safety is involved.

WARNING
The operation of any tool can result in foreign objects being thrown into your eyes which may result in severe eye damage. Before beginning tool operation, always wear safety goggles or safety glasses with side shields and a full face shield when needed. We recommend Wide Vision Safety Mask for use over spectacles or standard safety glasses with side shields.
Always wear eye protection.
READ ALL INSTRUCTIONS.
GENERAL SAFETY RULES

WARNING
The warnings, labels, and instructions found in this section of the operator's manual are for your safety. Failure to follow all instructions may result in serious personal injury. Safe operation of this tool requires that you read and understand this operator's manual and all labels affixed to the tool. Safety is a combination of using common sense, staying alert, and knowing how your saw works.
- KNOW YOUR TOOL. Read the operator's manual carefully. Learn the saw's applications and limitations as well as the specific potential hazards related to this tool.
CHAINSAWS are designed for cutting wood only. -
KICK-BACK MAY OCCUR WHEN THE NOSE OF THE GUIDE BAR touches an object or when the wood closes in and pinches the saw chain in the cut. The nose of guide bar contact in some cases may cause a lightning-fast reverse reaction kicking the guide bar up and back toward the operator. Pinching the saw chain along the top of the guide bar may push the guide bar rapidly back toward the operator. Either of these reactions may cause you to lose control of the saw which could result in serious personal injury. DO NOT rely exclusively upon the safety devices built into your saw. As a chainsaw user, you should take several steps to keep your cutting jobs free from accident or injury.
-
With a basic understanding of kick-back, you can reduce or eliminate the element of surprise. Sudden surprise contributes to accidents.
- Keep a good firm grip on the saw with both hands when the engine is running. Place your right hand on the rear handle and your left hand on the front handle with your thumbs and fingers encircling the chainsaw handles. A firm grip together with a stiff left arm will help you maintain control of the saw if kick-back occurs.
- Make sure that the area in which you are cutting is free from obstructions. DO NOT let the nose of the guide bar contact a log, branch, fence, or any other obstruction that could be hit while you are operating the saw.
- Cut at high engine speeds. Always cut with the engine running at full speed. Fully squeeze the throttle trigger and maintain a steady cutting speed.
- Do not overreach or cut above chest height.
- Follow the manufacturer's sharpening and maintenance instructions for the saw chain.
English
GENERAL SAFETY RULES
- Use only replacement bars and chains specified by the manufacturer or the equivalent.
DO NOT OPERATE A CHAINSAW WITH ONE HAND. Serious injury to the operator, helpers, and/or bystanders may result from one-handed operation. A chainsaw is intended for two-handed use.
DO NOT OPERATE A CHAINSAW WHEN YOU ARE FATIGUED. Never operate a chainsaw when you are tired or under the influence of medication, drugs, or alcohol.
USE SAFETY FOOTWEAR. Wear snug-fitting clothing, protective gloves, and eye, hearing, and head protection devices.
DO NOT STAND ON ANY UNSTABLE SURFACE while using your chainsaw: that includes ladders, scaffolds, trees, etc.
USE CAUTION WHEN HANDLING FUEL. Move the chainsaw at least 50 feet (15 m) from the refuelling point before starting the engine.
DO NOT ALLOW OTHER PERSONS to be near the chainsaw when starting or cutting with the chainsaw. Keep bystanders and animals out of the work area.
DO NOT START CUTTING until you have a clear work area, secure footing, and a planned retreat path from the falling tree.
- KEEP ALL PARTS OF YOUR BODY away from the saw chain when the engine is running.
ALWAYS CARRY THE CHAINSAW WITH THE ENGINE STOPPED AND THE BRAKE ENGAGED, the guide bar and saw chain to the rear, and the silencer away from your body. When transporting the chainsaw, use the appropriate guide bar scabbard.
DO NOT OPERATE A CHAINSAW THAT IS DAMAGED, improperly adjusted, or not completely and securely assembled. Be sure that the saw chain stops moving when the throttle control trigger is released.
- TURNOFF THE ENGINE before putting the chainsaw down. DO NOT leave the engine running unattended. As an additional safety precaution, apply the chain brake before putting down the saw.
USE EXTREME CAUTION when cutting small-size brush and saplings because slender material may catch the saw chain and be whipped toward you or pull you off balance.
- WHEN CUTTING A LIMB under tension, be alert for spring-back so that you will not be struck when the tension in the wood fibres is released.
- KEEP THE HANDLES dry, clean, and free of oil or fuel mixture.
OPERATE THE CHAINSAW ONLY in well-ventilated areas.
DO NOT OPERATE A CHAINSAW IN A TREE unless you have been specifically trained to do so.
ALWAYS HAVE A FIRE EXTINGUISHER AVAILABLE WHEN USING CHAIN SAW.
FOLLOW THE SHARPENING and maintenance instructions for the saw chain.
USE ONLY THE REPLACEMENT GUIDE BARS and low kick-back chains specified for your saw.
DO NOT adapt your powerhead to a bow guide or use it to power any attachments or devices not listed for your saw.
SAVE THESE INSTRUCTIONS. Refer to them frequently and use to instruct other users. If you lend someone this tool, lend them these instructions also.
SPECIFIC SAFETY RULES

WARNING
The warnings, labels, and instructions found in this section of the operator's manual are for your safety. Failure to follow all instructions may result in serious personal injury.
GENERAL PRECAUTIONS
DO NOT CUT VINES and/or small undergrowth (less than 76mm 3 in.) in diameter).
MUFFLER SURFACES ARE VERY HOT during and after operation of the chainsaw; keep all body parts away from the muffler. Serious burns may occur if contact is made with the muffler.
ALWAYS HOLD THE CHAINSAW WITH BOTH HANDS when the engine is running. Use a firm grip with thumbs and fingers encircling the chainsaw handles.
NEVER LET ANYONE USE YOUR CHAINSAW who has not received adequate instructions in its proper use. This applies to rentals as well as privately owned saws.
BEFORE YOU START THE ENGINE, make sure the saw chain is not contacting any object.
OPERATE THE CHAINSAW only in well ventilated areas.
English
SPECIFIC SAFETY RULES
PROPER CLOTHING FOR SAFETY
- Wear close-fitting clothing. Always wear heavy, long trousers, boots, and gloves. Do not wear jewellery, shorts, sandals, or go barefoot. Do not wear loose-fitting clothing, which could be drawn into the engine or catch the chain or undergrowth. Wear overalls, jeans, or leggings made of cut-resistant material or ones that contain cut-resistant inserts. Secure hair so that it is above shoulder level.
Wear non-slip safety footwear and heavy-duty gloves to improve your grip and to protect your hands.
Wear eye, hearing, and head protection when operating this equipment.
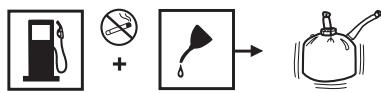
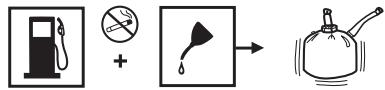
REFUELLING (DO NOT SMOKE!)
To reduce the risk of fire and burn injury, handle fuel with care. It is highly flammable.
- Mix and store fuel in a container approved for petrol.
- Mix fuel outdoors where there are no sparks or flames.
- Select bare ground, stop the engine, and allow it to cool before refuelling.
- Loosen the fuel cap slowly to release pressure and to keep fuel from escaping around the cap.
- Tighten the fuel cap securely after refuelling.
Wipe spilled fuel from the unit. Move 15 m (50 ft.) away from refuelling site before starting engine.
- Never attempt to burn off spilled fuel under any circumstances.
BASIC PRECAUTIONS IN THE CUTTING/WORK AREA
Do not operate a chainsaw in a tree.
- Do not cut from a ladder: this is extremely dangerous.
- Keep bystanders and animals out of the work area. Do not allow other persons to be nearby during starting or cutting with the chainsaw.
NOTE: The size of the work area depends on the job being performed as well as the size tree or workpiece involved. For example, felling a tree requires a larger work area than making other cuts, i.e. bucking cuts etc.
PUSH AND PULL
The reaction force is always opposite to the direction the chain is moving. Thus, the operator must be ready to control the PULL when cutting on the bottom edge of the bar and the PUSH when cutting along the top edge.
NOTE: Your chainsaw has been fully factory tested.
It is normal to find some slight oil residue on the saw.
MAINTENANCE PRECAUTIONS
Never operate a chainsaw that is damaged, improperly adjusted, or is not completely and securely assembled.
Be sure that the saw chain stops moving when the throttle control trigger is released. If the saw chain moves at idling speed, the carburettor may need adjusting. Refer to "Operation-Adjusting Idling Speed" later in this manual.
If the saw chain still moves at idling speed after adjustment has been made, contact a Homelite service dealer for adjustment and discontinue use until the repair is made.

WARNING
All chainsaw service, other than items in the operator's manual maintenance instructions, should be performed by competent chainsaw service personnel. If improper tools are used to remove the flywheel or clutch, or if an improper tool is used to hold the flywheel in order to remove the clutch, structural damage to the flywheel could occur which could subsequently cause the flywheel to burst and serious injury could result.
KICK-BACK
Kick-back is a dangerous reaction that can lead to serious injury. Do not rely only on the safety devices provided with your saw. As a chainsaw user, you must take special safety precautions to help keep your cutting jobs free from accident or injury.
NOTE: Refer to "Operation" later in this manual for added information on kick-back and how to avoid serious personal injury.
SAVE THIS MANUAL FOR FUTURE REFERENCE.
English
SYMBOLS
Some of the following symbols may be used on this tool. Please study them and learn their meaning. Proper interpretation of these symbols will allow you to operate the tool better and safer.
| SYMBOL | NAME | DESIGNATION / EXPLANATION |
| Safety Alert | Precautions that involve your safety. | |
| Read The Operator's Manual | To reduce the risk of injury, user must read and understand operator's manual before using this product. | |
| Wear Eye, Hearing, and Head Protection | Wear eye, hearing and head protection when operating this equipment. | |
| No Smoking | No smoking, sparks, or open flame. | |
| Operate With Two Hands | Hold and operate the saw properly with both hands. | |
| One Handed | Do not operate the saw using only one hand. | |
| Carbon Monoxide | Engines produce carbon monoxide which is an odorless, deadly poison. Do not operate in an enclosed area. | |
| Kickback | DANGER! Beware of kickback. | |
| Bar Nose Contact | Avoid bar nose contact. | |
| Wear Gloves | Wear non-slip, heavy-duty protective gloves when handling the chain saw. | |
| Petrol and Oil | Use unleaded petrol intended for motor vehicle use with an octane rating of 87 [(R + M)/2] or higher. This product is powered by 2-stroke cycle engine and requires pre-mixing petrol and 2-stoke oil. | |
| Keep Bystanders Away | Keep all bystanders and animals at least 15m away. |
English
SPECIFICATIONS
| 35 cc | 40 cc | 44 cc | |
| Weight - No bar, chain, fuel or oil | 4.4 kg | 4.4 kg | 4.4 kg |
| Fuel tank capacity | 310 cm3 | 310 cm3 | 310 cm3 |
| Oil tank capacity | 210 cm3 | 210 cm3 | 210 cm3 |
| Bar lengths | 40 cm | 46 cm | 50 cm |
| Chain pitch | 9.53 mm | 9.53 mm | 8.26 mm |
| Chain gauge | 1.27 mm | 1.27 mm | 1.27 mm |
| Chain type | Low profile, low kickback | Low profile, low kickback | Low profile, low kickback |
| Drive sprocket | 6-tooth | 6-tooth | 7-tooth |
| Engine displacement | 35 cm3 | 40 cm3 | 44 cm3 |
| Rated power | 1.6 kW | 1.8 kW | 2.0 kW |
| Rated speed | 12000 min-1 | 12000 min-1 | 12000 min-1 |
| Idling engine speed | 2700 - 3100 min-1 | 2700 - 3100 min-1 | 2700 - 3100 min-1 |
| Sound pressure level(ISO22868) | 100 dB(A) | 100 dB(A) | 100 dB(A) |
| Sound power level (ISO22868) | 110 dB(A) | 110 dB(A) | 110 dB(A) |
| Vibration (ISO22867) | |||
| - Front Handle | 4.5 m/s2 | 4.5 m/s2 | 4.5 m/s2 |
| - Rear Handle | 7.3 m/s2 | 7.3 m/s2 | 7.3 m/s2 |
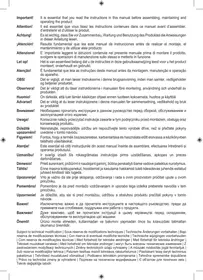
DESCRIPTION (Fig. 1)
- Front hand guard / Chain Brake
- Front handle
- Cylinder cover
- Primer bulb
- Choke knob
- Clutch cover
- Bar mounting nuts
-
Guide bar
-
Low kickback saw chain
- Starter / fan housing
- Starter grip
- Ignition switch
- Trigger release
- Rear handle
- Throttle trigger
- Chain oil cap
- Fuel cap
ASSEMBLY

WARNING
If any parts are damaged or missing do not operate this tool until the parts are replaced. Failure to heed this warning could result in serious personal injury.

WARNING
Do not attempt to modify this tool or create accessories not recommended for use with this tool. Any such alteration or modification is misuse and could result in a hazardous condition leading to possible serious personal injury.
NOTE: The chain saw has been fully factory tested. It is normal to find some slight oil residue on the saw. Read and remove all hang tags and store with the Operator's Manual.
See Figure 34-43.
Read the replacing the guide bar and chain section later in this manual.
English
OPERATION

WARNING
Do not allow familiarity with tools to make you careless. Remember that a careless fraction of a second is sufficient to inflict serious injury.

WARNING
Always wear safety goggles or safety glasses with side shields when operating this tool. Failure to do so could result in objects being thrown into your eyes resulting in possible serious injury.

WARNING
Do not use any attachments or accessories not recommended by the manufacturer of this tool. The use of attachments or accessories not recommended can result in serious personal injury.
APPLICATIONS
You may use this tool for the purposes listed below:
Basic limbing, felling, and woodcutting
Removing buttress roots
FUEL AND REFUELING
HANDLING THE FUEL SAFELY

WARNING
Always shut off engine before fueling. Never add fuel to a machine with a running or hot engine. Move at least 9 m. from refueling site before starting the engine. DO NOT SMOKE! Failure to heed this warning can result in possible personal injury.

WARNING
Check for fuel leaks. If any are found, correct them before using the saw to prevent fire or burn injury.
Always handle fuel with care; it is highly flammable.
Always refuel outdoors where there are no sparks and flames. Do not inhale fuel vapour.
- Do not let petrol or oil come in contact with skin.
- Keep petrol and oil away from the eyes. If petrol or oil comes in contact with the eyes, wash them immediately with clean water. If irritation is still present, see a doctor immediately.
Clean up spilled fuel immediately.
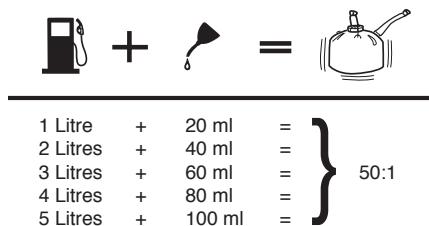
MIXING THE FUEL
This product is powered by a 2-stroke engine and requires pre-mixing petrol and synthetic 2-stroke oil. Pre-mix unleaded petrol and synthetic 2-stroke engine oil in a clean container approved for petrol.
This engine is certified to operate on unleaded petrol intended for motor vehicle use with an octane rating of 87 [(R + M) / 2] or higher.
- Do not use any type of pre-mixed petrol/oil from fuel service stations. This includes the pre-mixed petrol/oil intended for use in mopeds, motorcycles, etc.
Use synthetic 2-stroke oil only.
Mix 2% oil into the petrol. This is a 50:1 ratio.
- Mix the fuel thoroughly and also each time before refueling.
- Mix in small quantities. Do not mix quantities larger than usable in a 30 day period. A synthetic 2-stroke oil containing a fuel stabilizer is recommended.
FILLING THE FUEL TANK (Fig. 2)
Clean surface around fuel cap to prevent contamination.
- Loosen the fuel cap slowly to release pressure and to keep fuel from escaping around the cap.
Carefully pour the fuel mixture into the tank. Avoid spillage.
Prior to replacing the fuel cap, clean and inspect the o-ring.
- Immediately replace the fuel cap and hand tighten. Wipe up any fuel spillage. Move 9 m (30 ft) away from refueling site before starting engine.
NOTE: It is normal for the engine to emit smoke during and after the first use.
English
OPERATION
ADDING BAR AND CHAIN OIL (Fig. 3)
Use Ryobi Bar and Chain Oil. It is designed for chains and chain oilers, and is formulated to perform over a wide temperature range with no dilution required. Chain saw should use approximately one tank of oil per tank of fuel.
NOTE: Do not use dirty, used, or otherwise contaminated oils. Damage may occur to the oil pump, bar, or chain.
Carefully pour the bar and chain oil into the oil tank.
Fill the oil tank every time you fuel the engine.
Check the operating condition of the chain brake prior to each use.
Using the back of your left hand, engage the chain brake by pushing the chain brake lever/hand guard toward the bar while the chain is rotating rapidly.
- Reset the chain brake back into the RUN position by grasping the top of the chain brake lever/hand guard and pulling toward the front handle until you hear a click.

WARNING
If the chain brake does not stop the chain immediately, or if the chain brake will not stay in the run position without assistance, take the saw to an authorized service center for repair prior to use.
STARTING THE ENGINE (Fig. 6 - 10)
The starting method differs depending on whether the engine is cold or warm.

WARNING
Keep your body to the left of the chain line. Never straddle the saw or chain, or lean over past the chain line.
- Place the chain saw on level ground and ensure that no objects or obstructions are in the immediate vicinity that could come in contact with the bar and chain. To prevent rapid dulling of the chain, do not allow the bar and chain to contact dirt on the ground.
Hold the front handle firmly with your left hand and put your right foot onto the base of the rear handle.
To Start a Cold Engine:
Set the ignition switch to the RUN (1) position.
Make sure the chain brake is in the run position by pulling back on the lever/hand guard.
Fully press and release the primer bulb 4 times.
Pull choke knob all the way out to FULL CHEME (| + |) position.
Pull the starter grip until the engine attempts to start, but no more than 5 times.
Push choke knob to HALF CHOKE (1 - 1) position.
Pull starter grip until engine runs.
NOTE: Allow the saw to run in this position 15-30 seconds, depending upon the temperature.
Push the choke knob in to the RUN (^2) position.

CAUTION
Failure to release partial throttle when chain brake lever is in the brake position will result in serious damage to the unit. Never squeeze and hold the throttle trigger while the chain brake is in the brake position.
To Start a Warm Engine:
Set the ignition switch to the RUN (1) position.
Make sure the chain brake is in the run position by pulling back on the lever/hand guard.
Fully press and release the primer bulb 4 times.
Pull starter grip until engine runs.
STOPPING THE ENGINE (FIG. 11-12)
Release the throttle trigger and let the engine return to idle. To stop the engine, move the ignition switch to the STOP (m) position. Do not put the chain saw on the ground when the chain is still moving. For additional safety, set the chain brake when the saw is not in use.
In the event that the ignition switch will not stop the saw, pull the choke knob out to the fully extended position (FULL CHOKE/|+|) and engage chain brake to stop the engine. If the ignition switch will not stop the saw when set to the STOP position, have the ignition switch repaired before using the chain saw again to prevent unsafe conditions or serious injury.
NOTE: When you are finished using the saw, always relieve tank pressure by loosening, then retightening, the chain oil and fuel mix caps. Allow the engine to cool before storing.
English
OPERATION
ADJUSTING IDLE SPEED (Fig. 13)
If the engine starts, runs, and accelerates, but will not idle, turn the idle speed screw "T" clockwise to increase idle speed.
If the chain turns at idle, turn the idle speed screw "T" counterclockwise to reduce the idle RPM and stop the chain movement. If the saw chain still moves at idle speed, contact an authorized service center for adjustment and discontinue use until the repair is made.

WARNING
THE SAW CHAIN SHOULD NEVER TURN AT IDLE. Turn the idle speed screw "T" counterclockwise to reduce the idle RPM and stop the chain, or contact an authorized service center for adjustment and discontinue use until the repair is made. Serious personal injury may result from the saw chain turning at idle.
PULL AND PUSH (Fig. 14)
The reaction force of the saw is always opposite to the direction the chain is moving. Thus, the operator must be ready to control the PULL when cutting on the bottom edge of the bar and the PUSH when cutting along the top edge.
NOTE: The chain saw has been fully factory tested. It is normal to find some slight oil residue on the saw.
KICKBACK PRECAUTIONS (Fig. 15-16)

WARNING
KICKBACK occurs when the moving chain contacts an object at the upper portion of the tip of the guide bar or when the wood closes in and pinches the saw chain in the cut. Contact at the upper portion of the tip of the guide bar can cause the chain to dig into the object and stop the chain for an instant. The result is a lightning-fast reverse reaction which kicks the guide bar up and back toward the operator. If the saw chain is pinched along the top of the guide bar, the guide bar can be driven rapidly back toward the operator. Either of these reactions can cause loss of saw control, which can result in serious injury.
Do not rely exclusively upon the safety devices built into the saw. As a chain saw user, you should take steps to keep your cutting jobs free from accident or injury. See General Safety Rules for more details.
PREPARING FOR CUTTING
PROPER GRIP ON HANDLES (Fig. 17)

WARNING
Never use a left-handed (cross-handed) grip or any stance that would place your body or arm across the chain line.

WARNING
DO NOT operate the throttle trigger with your left hand and hold the front handle with your right hand. Never allow any part of your body to be in the chain line while operating a saw.
PROPER CUTTING STANCE (Fig. 18)
Balance your weight with both feet on solid ground.
- Keep left arm with elbow locked in a "straight arm" position to withstand any kickback force.
- Keep your body to the left of the chain line.
- Keep your thumb on underside of handlebar.
WORK AREA PRECAUTIONS (Fig. 19)
Cut only wood or materials made from wood; no sheet metal, no plastics, no masonry, no non-wood building materials.
- Never allow children to operate the saw. Allow no person to use this chain saw who has not read this operator's manual or received adequate instructions for the safe and proper use of this chain saw.
- Keep everyone - helpers, bystanders, children, and animals, a SAFE DISTANCE from the cutting area. During felling operations, the safe distance should be a least twice the height of the largest trees in the felling area. During bucking operations, keep a minimum distance of 4.5m between workers.
Always cut with both feet on solid ground to prevent being pulled off balance.
- Do not cut above chest height as a saw held higher is difficult to control against kickback forces.
- Do not fell trees near electrical wires or buildings. Leave this operation for professionals.
Cut only when visibility and light are adequate for you to see clearly.
English
OPERATION
BASIC OPERATING/CUTTING PROCEDURES
Practice cutting a few small logs using the following technique to get the "feel" of using the saw before you begin a major sawing operation.
Take the proper stance in front of the wood with the saw idling.
- Accelerate the engine to full throttle just before entering the cut by squeezing the throttle trigger.
Begin cutting with the saw against the log.
- Keep the engine at full throttle the entire time you are cutting.
- Allow the chain to cut for you; exert only light downward pressure. Forcing the cut could result in damage to the bar, chain, or engine.
- Release the throttle trigger as soon as the cut is completed allowing the engine to idle. Running the saw at full throttle without a cutting load can result in unnecessary wear to the chain, bar, and engine.
- Do not put pressure on the saw at the end of the cut.
FELLING TREES - HAZARDOUS CONDITIONS (Fig. 20)

WARNING
Do not fell trees during periods of high wind or heavy precipitation. Wait until the hazardous weather has ended.
When felling a tree, it is important that you heed the following warnings to prevent possible serious injury.
- Wear eye, hearing, and head protection (A) when operating this equipment.
- Do not cut down trees having an extreme lean or large trees with rotten or dead limbs, loose bark, or hollow trunks. Have these trees pushed or dragged down with heavy equipment, then cut them up.
Consider the distribution and weight of heavy limbs (B).
Clear out the undergrowth around the tree to be felled (C).
Do not cut trees near electrical wires or buildings (D).
Consider the direction in which the tree leans (E). - Check the tree for damaged or dead branches which could fall and hit you during felling (F).
Periodically glance at the top of the tree during the back-cut to assure the tree is going to fall in the desired direction.
- Keep all bystanders at a safe distance (G) (at least twice the height of the tree).
Prepare a path of safe retreat (H).
If the tree starts to fall in the wrong direction, or if the saw gets caught or hung up during the fall, leave the saw and save yourself!
Consider the wind direction before felling a tree.
- Do not fell trees near power lines or near buildings which could be struck by falling limbs or the tree itself.
The chainsaw operator should keep on the uphill side of the terrain as the tree is likely to roll or slide downhill after it is felled.
- Remove dirt, stones, loose bark, nails, staples, and wire from the tree where felling cuts are to be made.

WARNING
Do NOT fell trees near power lines or near buildings which could be struck by falling limbs or the tree itself.
PROPER PROCEDURE FOR TREE FELLING (Fig. 21 - 24)
- Pick your escape route (or routes in case the intended route is blocked). Clear the immediate area around the tree and make sure there are no obstructions in your planned path of retreat. Clear the path of safe retreat approximately 135^ from the planned line of fall (A).
- Consider the force and direction of the wind, the lean and balance of the tree, and the location of large limbs. These things influence the direction in which the tree will fall. Do not try to fell a tree along a line different from its natural line of fall (B).
- Cut a notch about 1/3 the diameter of the trunk in the side of the tree (C). Make the notch cuts so they intersect at right angles to the line of fall. This notch should be cleaned out to leave a straight line.
To keep the weight of the wood off the saw, always make the lower cut of the notch before the upper cut.
- Make the back-cut (D) level and horizontal, and at a minimum of 5cm above the horizontal cut of the notch.
English
OPERATION
NOTE: Never cut through to the notch. Always leave a band of wood between the notch and back cut (approximately 5cm or 1/10 the diameter of the tree). This is called a "hinge" or "hingewood" (E).
It controls the fall of the tree and prevents slipping or twisting or shoot-back of the tree off the stump.
On large diameter trees, stop the back cut before it is deep enough for the tree to either fall or settle back on the stump. Then insert soft wooden or plastic wedges (F) into the cut so they do not touch the chain. Drive wedges in, little by little, to help jack the tree over.
- As tree starts to fall, stop the chainsaw and put it down immediately. Retreat along the cleared path, but watch the action in case something falls your way.

WARNING
Never cut through to the notch when making a back cut. The hinge controls the fall of the tree: this is the section of wood between the notch and back-cut.
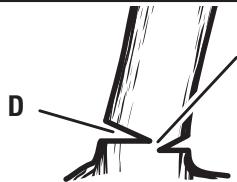
REMOVING BUTTRESS ROOTS (Fig. 25)
A buttress root is a large root extending from the trunk of the tree above the ground. Remove large buttress roots prior to felling. Make the horizontal cut (A) into the buttress first, followed by the vertical cut (B). Remove the resulting loose section (C) from the work area. Follow the correct tree felling procedure after you have removed the large buttress roots. Refer to "Operation - Proper Procedure for Tree Felling" earlier in this manual.
BUCKING (Fig. 26)
Bucking is the term used for cutting a fallen tree to the desired log length.
Cut only one log at a time.
Support small logs on a sawing stand or another log while bucking.
- Keep a clear cutting area. Make sure that no objects can contact the guide bar nose and chain during cutting: this can cause kick-back (A).
During bucking operations, stand on the uphill side so that the cut-off section of the log cannot roll over you.
Sometimes it is impossible to avoid pinching (with just standard cutting techniques) or difficult to predict which way a log will settle when cut.
BUCKING WITH A WEDGE (Fig. 27)
If the wood diameter is large enough for you to insert a soft bucking wedge (B) without touching the chain, you should use the wedge to hold the cut open to prevent pinching.
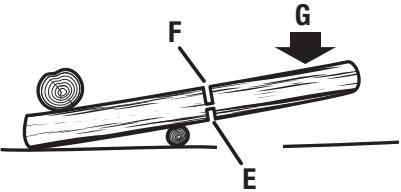
BUCKING LOGS UNDER STRESS (Fig. 28) (C) LOG SUPPORTED AT ONE END.
(D) LOG SUPPORTED AT BOTH ENDS.
Make the first bucking cut (E) 1/3 of the way through the log and finish with a 2/3 cut (F) on the opposite side.
As you cut the log, it will tend to bend. The saw can become pinched or hung in the log if you make the first cut deeper than 1/3 of the diameter of the log.
Give special attention to logs under stress (G) to prevent the bar and chain from pinching.
OVERBUCKING (Fig. 29)
Begin on the top side of the log with the bottom of the saw against the log; exert light pressure downward. Note that the saw will tend to pull away from you.
UNDERBUCKING (Fig. 30)
Begin on the under side of the log with the top of the saw against the log; exert light pressure upward.
During underbucking, the saw will tend to push back at you. Be prepared for this reaction and hold the saw firmly to maintain control.
LIMBING AND PRUNING (Fig. 31 - 32)
Work slowly, keeping both hands on the saw with a firm grip. Maintain secure footing and balance.
- Keep the tree between you and the chain while limbing. Cut from the side of the tree opposite the branch you are cutting.
- Do not cut from a ladder: this is extremely dangerous. Leave this operation for professionals.
- Do not cut above chest height as a saw held higher is difficult to control against kick-back.

WARNING
Never climb into a tree to limb or prune. Do not stand on ladders, platforms, a log, or in any position which may cause you to lose your balance or control of the saw.
English
OPERATION
- When pruning trees it is important not to make the flush cut next to the main limb or trunk until you have cut off the limb further out to reduce the weight.
This prevents stripping the bark from the main member.
- Underbuck the branch 1/3 through for your first cut (A).
- Overbuck the branch to drop it (B).
- Finish by cutting smoothly and neatly against the main member (C) so the bark will grow back to seal the wound.

WARNING
If the limbs to be pruned are above chest height, hire a professional to perform the pruning.
CUTTING SPRING POLES (Fig. 33)
A spring pole (A) is any log, branch, rooted stump, or sapling which is bent under tension by other wood so that it springs back if the wood holding it is cut or removed. On a fallen tree, a rooted stump has a high potential of springing back to the upright position during the bucking cut to separate the log from the stump.
Watch out for spring-poles; they are dangerous.

WARNING
Spring poles are dangerous and could strike the operator causing the operator to lose control of the chainsaw. This could result in severe or fatal injury to the operator.
MAINTENANCE

WARNING
When servicing, use only identical Ryobi replacement parts. Use of any other parts may create a hazard or cause product damage.

WARNING
Always wear safety goggles or safety glasses with side shields during power tool operation or when blowing dust. If operation is dusty, also wear a dust mask.
GENERAL MAINTENANCE
Avoid using solvents when cleaning plastic parts. Most plastics are susceptible to damage from various types of commercial solvents and may be damaged by their use. Use clean cloths to remove dirt, dust, oil, grease, etc.

WARNING
Do not at any time let brake fluids, petrol, petroleum-based products, penetrating oils, etc., come in contact with plastic parts. Chemicals can damage, weaken or destroy plastic which may result in serious personal injury.
LUBRICATION
All of the bearings in this tool are lubricated with a sufficient amount of high grade lubricant for the life of the unit under normal operating conditions. Therefore, no further lubrication is required.
REPLACING THE GUIDE BAR AND CHAIN (Fig. 34 - 43)

DANGER
Never start the engine before installing the guide bar, chain, drivecase cover, and clutch drum. Without all these parts in place, the clutch can fly off or explode, exposing the user to possible serious injury.

WARNING
To avoid serious personal injury, read and understand all the safety instructions in this section.
Always place the switch in the STOP "stop" position before you work on the saw.
Make sure the chain brake is not set by pulling the chain brake lever/hand guard towards the front handle to the run position.
NOTE: When replacing the guide bar and chain, always use the specified bar and chain.
Wear gloves when handling the chain and bar. These components are sharp and may contain burrs.
- Remove the bar mounting nuts using the combination wrench provided.
Remove the clutch cover.
- Remove the bar and chain from the mounting surface.
Remove the old chain from the bar.
- Lay out the new saw chain in a loop and straighten any kinks. The cutters (A) should face in the direction of chain rotation (B). If they face backwards, turn the loop over.
- Place the chain drive links (C) into the bar groove (D) as shown.
English
MAINTENANCE
Position the chain so there is a loop at the back of the bar.
Hold the chain in position on the bar and place the loop around the sprocket (E).
Fit the bar flush against the mounting surface so that the bar studs are in the long slot of the bar.
NOTE: When placing the bar on the bar studs (F), ensure that the adjusting pin (G) is in the chain tension pin hole (H).
- Replace the clutch cover (I) and bar mounting nuts (J).
- Finger-tighten the bar mounting nuts. The bar must be free to move for tension adjustment.
- Remove all slack from the chain by turning the chain tensioning screw (K) clockwise until the chain seats snugly against the bar with the drive links in the bar groove.
Lift the tip of the guide bar up to check for sag. - Release the tip of the guide bar and turn the chain tensioning screw 1/2 turn clockwise. Repeat this process until sag does not exist.
Hold the tip of the guide bar up and tighten the bar mounting nuts securely.
The chain is correctly tensioned when there is no sag on the underside of the guide bar, the chain is snug, but it can be turned by hand without binding. Ensure that the chain brake is not set.
NOTE: If chain is too tight, it will not rotate. Loosen the bar nuts slightly and turn the tension adjuster 1/4 turn counterclockwise. Lift the tip of the guide bar up and retighten the bar nuts securely. Ensure that the chain will rotate without binding.
ADJUSTING THE CHAIN TENSION (Fig. 44 - 46)

WARNING
Never touch or adjust the chain while the motor is running. The saw chain is very sharp. Always wear protective gloves when performing maintenance on the chain.
- Stop the engine before setting the chain tension.
Make sure the bar mounting nuts are loosened to finger tight.
Turn the chain tensioning screw clockwise to tension the chain.
NOTE: A cold chain is correctly tensioned when there
is no slack on the underside of the guide bar, the chain is snug, and it can be turned by hand without binding.
- Retension the chain whenever the flats on the drive links (A) hang out of the bar groove.
NOTE: During normal saw operation, the temperature of the chain increases. The drive links of a correctly tensioned warm chain will hang approximately 1.25 mm. out of the bar groove. The tip of the combination wrench can be used as a guide to help determine the correct warm chain tension.
NOTE: New chains tend to stretch; check the chain tension frequently and tension as required.

CAUTION
A chain tensioned while warm may be too tight upon cooling. Check the "cold tension" before next use.
CHAIN MAINTENANCE (Fig. 47 - 48)

CAUTION
Check that the switch is in the STOP "STOP" position before you work on the saw.
Use only a low-kickback chain on this saw. This fast-cutting chain provides kickback reduction when properly maintained.
For smooth and fast cutting, maintain the chain properly.
The chain requires sharpening when the wood chips are small and powdery, the chain must be forced through the wood during cutting, or the chain cuts to one side. During maintenance of the chain, consider the following:
-
Improper filing angle of the side plate can increase the risk of severe kickback.
Raker (depth gauge) clearance (A). -
Too low increases the potential for kickback.
- Not low enough decreases cutting ability.
If the cutter teeth hit hard objects such as nails and stones, or are abraded by mud or sand on the wood, have an authorized service center sharpen the chain.
NOTE: Inspect the drive sprocket (B) for wear or damage when replacing the chain. If signs of wear or damage are present in the areas indicated, have the drive sprocket replaced by an authorized service center.
NOTE: If you do not fully understand the correct procedure for sharpening the chain after reading the instructions that follow, have the saw chain sharpened by an authorized service center or replace with a recommended low-kickback chain.
English
MAINTENANCE
SHARPENING THE CUTTERS (Fig. 49 - 52)
Parts of a cutter:
(A) Cutting corner
(B) Side plate
(C) Depth gauge
(D) Toe
(E) Gullet
(F) Heel
(G) Rivet hole
(H) Top plate
Be careful to file all cutters to the specified angles and to the same length, as fast cutting can only be obtained when all cutters are uniform.

WARNING
The saw chain is very sharp. Always wear protective gloves when performing maintenance to the chain to prevent serious personal injury.
Tension the chain prior to sharpening. Refer to Adjusting The Chain Tension.
Use a 1.6mm diameter round file and holder (not provided). Do all of your filing at the midpoint of the bar.
- Keep the file level with the top plate of the tooth. Do not let the file dip or rock.
Using light but firm pressure. Stroke towards the front corner of the tooth.
- Lift the file away from the steel on each return stroke.
Put a few firm strokes on every tooth. File all left hand cutters (A) in one direction. Then move to the other side and file the right hand cutters (B) in the opposite direction.
Remove filings from the file with a wire brush.

CAUTION
A dull or improperly sharpened chain can cause excessive engine speed during cutting, which may result in severe engine damage.

WARNING
Improper chain sharpening increases the potential of kickback.

WARNING
Failure to replace or repair a damaged chain can cause serious injury.
TOP PLATE FILING ANGLE (Fig. 53)
(A) CORRECT 30^ - file holders are marked with guide marks to align file properly to produce correct top plate angle.
(B) LESS THAN 30^ - for cross cutting.
(C) MORE THAN 30^ - feathered edge dulls quickly.
SIDE PLATE ANGLE (Fig. 54)
(D) CORRECT 80^ - Produced automatically if you use the correct diameter file in the file holder.
(E) HOOK - "Grabs" and dulls quickly; increases the potential of KICKBACK. Results from using a file with a diameter too small or a file held too low.
(F) BACKWARD SLOPE - Needs too much feed pressure; causes excessive wear to the bar and chain. Results from using a file with a diameter too large or file held too high.
MAINTAINING DEPTH GAUGE CLEARANCE (Fig. 55 - 57)
- Maintain the depth gauge at a clearance of 0.6 mm . Use a depth gauge tool for checking the depth gauge clearances (A).
Every time the chain is filed, check the depth gauge clearance.
Use a flat file (B)(not provided) and a depth gauge jointer (C)(not provided) to lower all gauges uniformly. Use a 0.6mm depth gauge jointer. After lowering each depth gauge, restore original shape by rounding the front. Be careful not to damage adjoining drive links with the edge of the file. - Depth gauges must be adjusted with the flat file in the same direction the adjoining cutter was filed with the round file. Use care not to contact cutter face with flat file when adjusting depth gauges.
MAINTAINING THE GUIDE BAR (Fig. 58)

CAUTION
Make sure the chain has stopped before you do any work on the saw.
Every week of use, reverse the guide bar on the saw to distribute the wear for maximum bar life. The bar should be cleaned every day of use and checked for wear and damage.
Feathering or burring of the bar rails is a normal process of bar wear. Such faults should be smoothed with a file as soon as they occur.
English
MAINTENANCE
A bar with any of the following faults should be replaced:
Wear inside the bar rails which permits the chain to lie over sideways;
Bent guide bar;
- Cracked or broken rails;
Spread rails.
In addition, lubricate guide bars (with a sprocket at their tip) weekly. Using a grease syringe, lubricate weekly in the lubricating hole. Turn the guide bar and check that the lubrication holes (A) and chain groove are free from impurities.
CLEANING THE AIR CLEANER (Fig. 59 - 60)

CAUTION
Make sure the air cleaner is correctly placed in the air filter cover before reassembly. Never run the engine without the air filter, serious damage could result.
ADJUSTING THE CARBURETOR (Fig. 61 - 63) Before adjusting the carburetor:
Use a brush or compressed air to clean the starter cover vents.
Clean the air cleaner (A). Refer to Cleaning the Air Cleaner in the Maintenance section of this manual.
- Allow the engine to warm up prior to adjustment of engine idle speed.

WARNING
Weather conditions and altitude may affect carburetion. Do not allow bystanders close to the chain saw while adjusting the carburetor.
Idle Speed Adjustment
The idle speed adjustment controls how much the throttle valve stays open when the throttle trigger is released. To adjust:
- Turn idle speed screw "T" clockwise to increase idle speed.
Turn idle speed screw "T" counterclockwise to decrease idle speed.
Make a test cut, then adjust the H needle for best cutting power, not for maximum speed. The H needle is restricted to 1/4 turn.

WARNING
THE SAW CHAIN SHOULD NEVER TURN AT IDLE. Serious personal injury may result from the saw chain turning at idle.
CLEANING THE STARTER UNIT (Fig. 62)
Use a brush or compressed air to keep the cooling vents (B) of the starter assembly free and clean of debris.
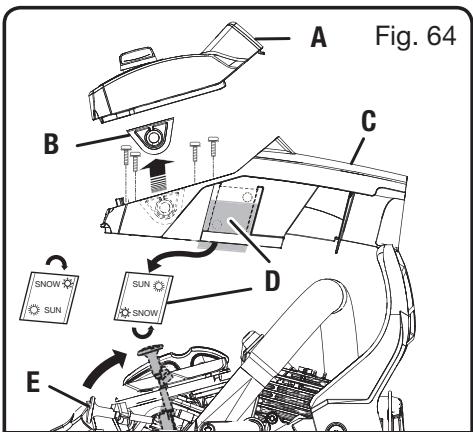
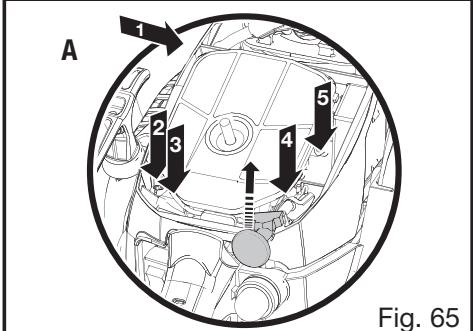
CARBURETOR ANTI-FREEZE MECHANISM (Fig. 64-65)
The chain saw is designed with a ventilation hatch on the right side of the cylinder cover which allows warm air to be supplied from the engine to the carburetor to help prevent icing under colder operating conditions. Operating the chain saw in temperatures from 32^ to 41^ ( 0^ to 5^ ) at times of high humidity may result in ice forming within the carburetor. This can cause the output power of the engine to be reduced and/or the engine to fail to operate smoothly. When operating under these circumstances, the chain saw should be placed in anti-freeze mode before use.
To switch to anti-freeze mode:
Place the ignition switch in the OFF (stop) position.
Remove the air cleaner cover (A).
Remove the air cleaner.
- Lift choke knob (E) up to remove from the cylinder cover (C).
- Loosen the five screws holding the cylinder cover in place. Remove the cylinder cover.
- Remove the icing cap (D) located on the right-hand side of the cylinder cover by pressing down on it with your finger.
- Adjust the icing cap so that the "snow" mark faces upward, then return it to its original position in the cylinder cover.
- Replace the cylinder cover and reinstall screws to secure.
- Replace choke knob, air cleaner, and air cleaner cover.

WARNING
Always return the unit to normal operating mode if there is no danger of icing occurring. Continuing to use the chain saw in anti-freeze mode when temperatures have risen and returned to normal may result in the engine failing to start properly or in the engine failing to operate at its normal speed.
English
MAINTENANCE
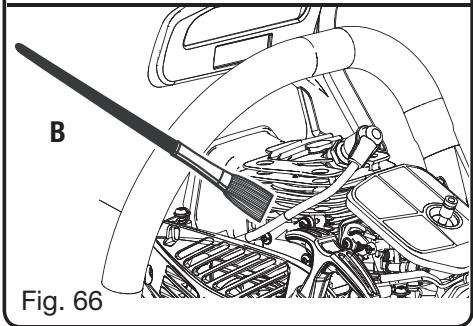
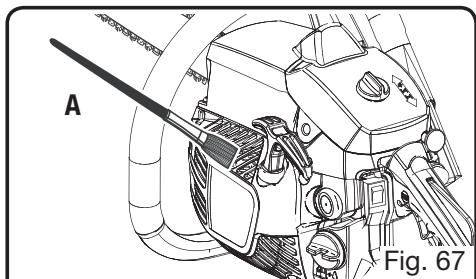
CLEANING THE ENGINE (Fig. 66-67)
Clean the cylinder fins (B) and flywheel fins (A) with compressed air or a brush periodically. Dangerous overheating of the engine may occur due to impurities on the cylinder.

WARNING
Never run the saw without all the parts, including the drivecase cover and starter housing, securely in place.
Because parts can fracture and pose a danger of thrown objects, leave repairs of the flywheel and clutch to factory trained authorized service center personnel.
NOTE: If you notice a power loss with the gas-powered tool, the exhaust port and muffler may be blocked with carbon deposits. These deposits may need to be removed to restore performance.
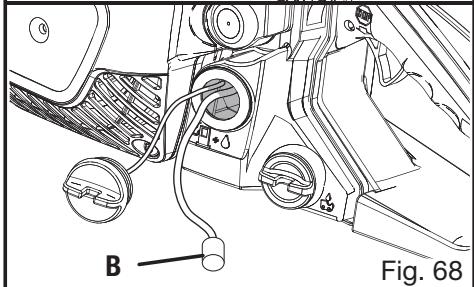
CHECKING THE FUEL FILTER (Fig. 68)
Check the fuel filter (B) periodically. Replace it if contaminated or damaged.
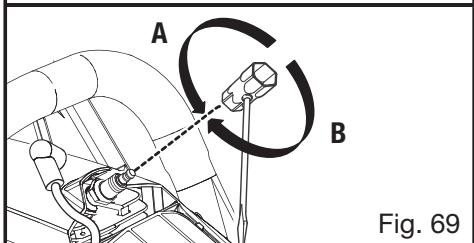
REPLACING THE SPARK PLUG (Fig. 69)
This engine uses a Champion RZ7C or NGK CMR7H spark plug with 0,64 mm electrode gap. Use an exact replacement and replace every 50 hours or more frequently, if necessary.
Loosen the spark plug by turning it counterclockwise with a wrench (A).
Remove the spark plug.
- Hand thread the new spark plug, turning it clockwise. Tighten securely with wrench (B).
NOTE: Be careful not to cross-thread the spark plug. Cross-threading will seriously damage the cylinder.
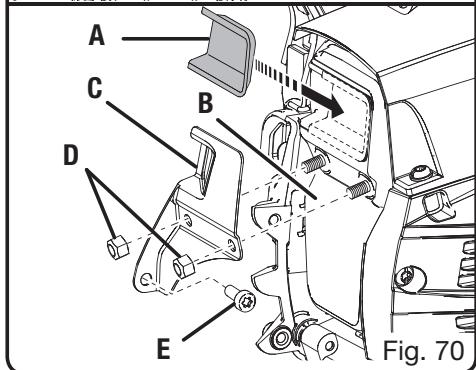
INSPECTING/CLEANING THE SPARK ARRESTOR SCREEN AND MUFFLER EXHAUST PORT (Fig. 70)
The muffler is equipped with a spark arrester screen. Afaulty spark arrester screen can create a fire hazard. Through normal use the screen can become dirty and should be inspected weekly and cleaned as required. Always keep the muffler and spark arrester on the saw in good condition.

WARNING
Muffler surfaces are very hot during and after operation of the chain saw. To avoid serious personal injury, keep all body parts away from the muffler.
- Allow the muffler to cool.
- Remove torx screw (E) and 8 mm. nuts (D) holding the muffler cover in place; remove muffler cover (C) and spark screen (A).
If dirty, clean the spark arrester screen with a small wire brush. Replace the screen if it is cracked or otherwise deteriorated.
Remove the muffler (B).
Insert a flat blade screwdriver into the muffler exhaust vent to remove any carbon deposits.
Wipe away any carbon buildup on the muffler exhaust vent and the cylinder exhaust port at the same time.
Reinstall muffler, spark screen, and muffler cover.
Reinstall torx screw and nuts to secure.
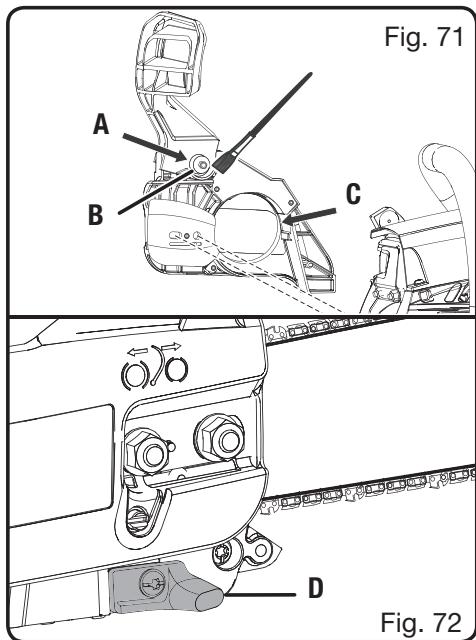
INSPECTING AND CLEANING CHAIN BRAKE (Fig. 71-72)
- Remove the clutch cover and clean the chain brake components (A). Check wear on the brake band (C) and replace if worn or deformed. The band thickness should not be less than 0.6mm , or worn halfway through.
Always keep the chain brake mechanism clean and lightly lubricate the linkage (B).
Always test the chain brake performance after servicing or cleaning. Refer to Operating Chain Brake for additional information.
Check the chain catcher (D) and replace if damaged.

WARNING
Even with daily cleaning of the mechanism, the dependability of a chain brake to perform under field conditions cannot be certified. use proper cutting techniques.
STORING THE CHAIN SAW (1 MONTH OR LONGER)
- Drain all fuel from tank into a container approved for gasoline.
Run the engine until it stops. This will remove all fuel-oil mix that could become stale and leave varnish and gum in the fuel system.
Squeeze primer bulb several times to purge fuel from carburetor.
English
MAINTENANCE
Drain all bar and chain oil from tank into a container approved for oil.
Clean all foreign material from the saw.
Store it in a well-ventilated place that is inaccessible to children.
NOTE: Keep away from corrosive agents such as garden chemicals and de-icing salts.
Abide by local regulations for the safe storage and handling of gasoline. Excess fuel should be used in other 2-cycle engine powered equipment.
TROUBLESHOOTING
| Problem | Possible Cause | Solution |
| Engine will not start. [Make sure ignition switch is in the RUN (1) position.] | No spark. Engine is flooded. | Check spark. Remove air filter cover. Remove spark plug from cylinder. Reattach the spark plug wire and lay spark plug on top of cylinder with the metal part of plug touching the cylinder. Pull the starter grip and watch for spark at spark plug tip. If there is no spark, repeat test with a new spark plug. With the ignition switch OFF, remove spark plug. Move choke knob to RUN position (pushed in completely) and pull starter grip 15 to 20 times. This will clear excess fuel from engine. Clean and reinstall spark plug. Set ignition switch to RUN (1) position. Push and fully release primer bulb 4 times. Pull starter three times with choke knob at RUN. If engine does not start, move choke knob to HALF CHoke and repeat normal starting procedure. If engine still fails to start, repeat procedure with a new spark plug. |
| Engine starts but will not accelerate properly. | Carburetor requires “L” (Low Jet) adjustment. | Contact an authorized service center for carburetor adjustment. |
| Engine starts, then dies. | Carburetor requires “L” (Low Jet) adjustment. | Contact an authorized service center for carburetor adjustment. |
| Engine starts but will not run properly at high speed. | Carburetor requires “H” (High Jet) adjustment. | Contact an authorized service center for carburetor adjustment. |
| Engine does not reach full speed and/or emits excessive smoke. | Oil/fuel mixture incorrect. Air filter is dirty. Spark arrester screen is dirty. Carburetor requires “H” (High Jet) adjustment. | Use fresh fuel and the correct 2-stroke oil mix ratio. Clean air filter. Refer to Cleaning the Air Cleaner in the Maintenance section of this manual. Clean spark arrester screen. Refer to Cleaning the Spark Arresting Screen in the Maintenance section of this manual. Contact an authorized service center for carburetor adjustment. |
English
TROUBLESHOOTING
| Problem | Possible Cause | Solution |
| Engine starts, runs, and accelerates but will not idle. | Carburetor requires adjustment to idle speed. | Turn idle speed screw “T” clockwise to increase idle speed. Refer to Adjusting the Carburetor in the Maintenance section of this manual. |
| Chain turns at idle. | Carburetor requires adjustment to idle speed. | Turn idle speed screw “T” counterclockwise to decrease speed. Refer to Adjusting the Carburetor in the Maintenance section of this manual. |
| Air leak in the intake system. | Contact an authorized service center for a rebuild kit. | |
| Bar and chain running hot and smoking. | Chain oil tank empty. | Oil tank should be filled every time fuel tank is filled. |
| Chain tension is too tight. | Tension chain per instructions in Adjusting the Chain Tension in the Maintenance section of this manual. | |
| Oiler is not functioning. | Run at half throttle 30 to 45 seconds. Stop saw and check for oil dripping from guide bar. If oil is present, the chain may be dull or bar may be damaged. | |
| Clogged oil passages. | Remove the clutch cover and guide bar plate and clean oil passages with a stiff-bristle brush. | |
| Engine starts and runs, but chain is not rotating. | Chain brake is engaged. | Release chain brake. Refer to Operating the Chain Brake in the Operation section of this manual. |
| Chain tension is too tight. | Tension chain per instructions in Adjusting the Chain Tension in the Maintenance section of this manual. | |
| Guide bar and chain assembled incorrectly. | Refer to Replacing the Guide Bar and Chain in the Maintenance section of this manual | |
| Guide bar and/or chain are damaged. | Inspect guide bar and chain for damage. | |
| Drive sprocket teeth damaged | Contact an authorized service center for drive sprocket replacement. |
Deutsch
MEZCLAR EL COMBUSTIBLE
(E) Entalhe (F) Chassis
(G) Orificio do rebite
(H) Placa superior
BASISVOORZORGSGMAATREGELEN VOOR DE PLEK WAAR U WERKT
PLAATSING VAN DE HANDEN (afb.17)

WAARSCHUWING
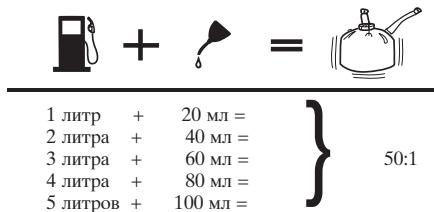
1 liter + 20 ml =
2 liter + 40 ml =
3 liter + 60 ml = 50:1
4 liter + 80 ml =
5 liter + 100 ml =
SMÖRJNING AV KEDJAN OCH SVÄRDET (Fig. 3)
OPTANKING (RYG ALDRIG!)
GEM DENNE INSTRUKTIONSBOG TIL SENERE OPSLAG.
Dansk
SYMBOLER
olje- ellr drivstoff.
■ BRUK KJEDESAGEN KUN I GODT VENTILERTE OMRÄDER.
■ Bruk ikke kjedesagens nár du stár OPPE i et tre, med mindre du er spesielt opplært til den jobben.
HA ALLTID ET BRANNSLUKKINGSSAPARAT I NERHETEN NAR DU BRUKER KJEDESAGEN.
FOLG INSTRUKSENE VEDRORENDE FILING OG VEDLIKEHOLD AV DET SKARPE KJEDET.
■ BRUK KUN SVERD og tilbakeslagshemmende kjeder som anbefales av fabrikanten til deutsche kjedesagen.
- IKKE MONTER et buet sverd på motorenheten og ikke bruk noe tilbehör som ikke er anbefalt for dette kjedesagens.
TA VARE PÁ DISSE FORSKRIFTENE. Se i dem regelmessig og bruk dem for à informere andere brukere. Dersom du läner bort dette verktøyet, bør du ogå läne bort bruksanvisningen som folger med.
SPESIELLE SIKKERHETSFORSKRIFTER FOR KJEDESAGER

ADVARSEL
FORHOLDSREGLER FOR VEDLIKEHOLD
Bruk akdri en kjedesag som er skadet, darylig innstilt aller...,\ ikke welt ellr riktig montert.
KJEDET SKAL ALDRI GÅ RUNDT I TOMGANG.
VEDLIKEHOLD AV KJEDET (Fig. 47-48)

FORSIKTIGHETSREGEL
Sjekk at av/pa bryteren star paa STOP "n" for du foretar noe pa kjedesagen.
Bruk denen kjedesagen kun med et tilbakeslagshemmende kjeede. Hvis det er riktig vedlikeholdt, reduserer dette hurtigskjaerende kjerdet faren for tilbakeslag.
POLTTOAINEEN LISAAMINEN (ALTA TUPAKOII)
IPOAHTIKA METPA SYNTHPHESH
Mn xŋoɪətioeite təte eva aλuσoɪpɪovo tou exi uɪtoeɪ ζημia, éxī puθlətɪe iλθoc n δev exi συαρολoʊynθei πλŋoʊc n ωʊτə.
EKKINHSEH TOY KINHTHPA (x. 6-10)
Hekkivnon Touepyaleiou de yivetαμe tov idio TpOIO AV O KIVNTHPAC EIVAI Kpuoc n ZeoTOS.

IPOEIIOIHsH
PRECTETESNASLEDUJICIPOKNY.
VŠEOBECNÉ BEZPEČNOSTNI POKNY

UPOZORNÉNÍ
PROBLEM A JEJICH RESENI
PROBÉMY A JEJICH RESENI
3AIIPABKA TOIJIINBHOTO BAKA (HE KYPNTb!)
BoI36KAnHeIOXapAIOXOROB6yIteOCTOPOXHbIC TOnIHbOMO OHOeYIEJERKOBOCIIAMEHETcE.
XpaHHTe H CMEIINBAIte TOIJIHBO B CIIeIIHaJIbHbIX KaHHCTpax IJI6EHIHa.
CmeHnBaIte H IpeJIINBaIte TOIIINBO Ha BO3JyXe, BJaIH OT HcKp HOrH.
BbI6epHTe Cbo6oJHoe MeCTO,OCtAHOBHTe MOTOp H JaHTe emy octbIb IpeEz3aIpaBkoI.
MeJIeHNO OTBHNHTNE KpbIHKY TOJIINHBHO 6aKa, YTO6bI BbIyCTHb IapbI IOJ DaJIeHHem HTO6bI TOJIINBO He BblIIOcB HApKyK.
IocJIe 3aIIpaBKN KpeIIKO 3aBHHHTe KpbIIky TOIIIBHORO 6aKa.
EcHnToPbHHaBcMecbpa3JIaIacb,BbITpHTe e c HnCTpyMeHa. IocHe 3anPABKn ToPbHBHO 6aka ydaJIHTeCb He MeHee Ha 15 MeTPOB OT MeCt a3anPABKn, IpexJcJe Yem 3aIyCKaTb MOTOp.
HnKoIgHa He IooJxHraIte pa3JIHBHyIOc TOnJIHBHyIO Cmecb.
3OHA BAJIKN / PA6OTb: 3JIEMEHTAPHbIE IIPDETOCTOPOKHOCTH
He pa6oTaIe 6eH30IIIOJ HaJepeBbIx.
- He pa60taIte 6eH3OIIHIOI HA JIeCTHIIe: 3TO OUYbIaONaHO.
He IOnIyckaIte NocToPOHHNIX HxHBOTbIX K 3OHe pa60tBi.Bo BpeMé 3aIyCkA MOTOPH a60tBi He pa3peIIaIte HIKOMY HAXOJITbcB pIOM.
ПиMHeuaHHe: Pa3MepbI pa6ooye 3OHy 3aBHCET ON BHaJ aP6OT n pa3MepOB IpeBa. HanpHMeP, npi BaJIke Jeca paOchay 3OHa 6yET 6OJIbIIe Yem IIpn paCINHIOBKe IOJIeHBcE.
BO3BPATHO-IOCTYINATEJIbHAR TRA
Pa6o7a cnla BceIgI npOTHBOJIOJXHa HnIpaBJIeHHO JINHKeHHI INJbHOI CEII. PInp pa6ote HNKeH CTOpHOI
6eH30IIbIy TaHHTe ee HA CEBa, a npn pa6ote BepxHei CTOpHOH -OT CEBJ.
ПиMueYaHHe: BeH3OIIJIa 6bIla IIIOJIHOCTbIO IIPOBepHa Ha 3aBOJe. Ha Hei MOyT OCTaTbCJcJIbI cMa3Kn.
MEPbI IPIEIOCTOPOXHOCTH IIPIH OBCJUYKHBHN
HnKoIa He pa6oTaIte cIOMaHNo, He oTpeYIipObaHNo, He IIOJIHO HIN HeIIpaBbHo co6paHHO 6eH30IIIOI.
OTnycTHB Kypok akceIepaTopa, y6eJIHTecb, YTO IIIBhaIe IEBIOHOCTBO OCTAHOBIIaIc. Ecln IIIBhaIe IeNb npOIOJIkaET BVAIATbcI, OTperyIINpyteKap6HopatOp.Cm.pa3JIeP“Pa6oTa- PeryIINpOBKa MabIX o6OpOTob."
EcIINIOscpepyIINPbOKNIIbHaJeIbnIpOJIoJIaaeTbpAaITbc8 HaMaIbIX 6oOpOTax, 6oPaTHTeCB B IeHTprTexHnueckoro 6ocIyKJBAHnRyoi HneIIOJI3yIteCB 6eH30nIHLO, Ioka He 6bIeT pOnI3BeJEN Heo6xOJIHMb peOMHT.

IPEUYIPEKJEHNE
Bce pemOHThbpea60Tb, KpOME OHncaHbIb X HactOHTIe pyKOBOpCTBc, OJIKNbbl BInIOJIHtCbK bAIIHnOuPobAHHH CneIHaJIcTOM. IPr HcNIOIb3OBAHH HeNoJXoDAHINH HnCTpyMeHTOBd YIepKaHHMAOBHKA HIN CcEIIeHH NIN dIyIyepKaHHMAOXBKA MOTOP dIChrTH cIeIIeHHM, MAXOBHK MOKeT IOBPeJITbcA, a MOpT B3OpBaTbCbI NIOJIbe TjKJEJIbIte TaPBMbI.
OTCKOK
OTCKOK 6EH30INHbI MoKeT IOBJIeYb TReJcJIbe TpaBMbl. He HajeITcB ToJIbKO Ha 3aIIHTbHe cpeJCTBa cAMO 6EH30INHbI. Bo I36KaeHnE HeCuaCTbNc ClyuAe B n TpaBM, PInHHMaIte Heo6XoHMblMeBpIpeIOCTOpOxHOCTH.
IIpMueHHe:3a IIOJIINHTeIbHOH INHOpMaIHne 06 OCTcOKaX 6eONIHJIbI H mepax H36eKaHHra TjKeJIbIX TpaBM CM. paJ3eJ "Pa6Ora".
XPAHHTE HACTOIIEE PYKOBIOCTBO IJIYIIOJIYIOIIHX KOHCJIBTAIIH.
Pysckn
UCIOBHBIE O6O3HAUHIN
Ha HnctpymehTe MOryt 6bIbY yka3aHbI cJIeYIOUHHe ycIOBbIe Oo3HaueHHa. 3aIOMHInTe, Ka OHn BbIJIyIaHT N Yo 0o3HauaHOT. IpaBHJIbHOe IOHNMaHHe 3THX YcIOBbIX Oo3HaueHH oecneHIT 6e3OIIaChyIO aJekBaTHyIO paOby HnCTpymehTom.
EXHUNHECKNEXAPAKTEPNUK
| 35 cm³ | 40 cm³ | 44 cm³ | |
| Вес (6e3 thousand, thousand million) | 4,4 Kπ | 4,4 Kπ | 4,4 Kπ |
| ЕмкOSTы толinglyного бака | 310 cm³ | 310 cm³ | 310 cm³ |
| ЕмкOSTы масл窥ого бака | 210 cm³ | 210 cm³ | 210 cm³ |
| Длина пинь | 40 cm | 46 cm | 50 cm |
| Шаг пиньовий сени | 9,53 MM | 9,53 MM | 8,26 MM |
| Кoleя | 1,27 MM | 1,27 MM | 1,27 MM |
| Тири пиньовий сени | TOHКая с малбIM рнскOM | TOHКая с малбIM рнскOM | TOHКая с малбIM рнскOM |
| OTСКОКA | OTСКОКA | OTСКОКA | |
| Велочая 3WEЗДОЧKA | 6 зубьев | 6 зубьев | 7 зубьев |
| Равочий объем пиндра | 35 cm³ | 40 cm³ | 44 cm³ |
| Номинайся мошincстby | 1,6 KBT (2,2 Лc) | 1,8 KBT (2,4 Лc) | 2,0 KBT (2,7 Лc) |
| Номинайся скорocstby | 12000 ob/MMH | 12000 ob/MMH | 12000 ob/MMH |
| Сkopость на мальх оборотх | 2700-3100 ob/MMH | 2700-3100 ob/MMH | 2700-3100 ob/MMH |
| Акystоческе давлие (ISO22868) | 100 nb (A) | 100 nb (A) | 100 nb (A) |
| Акystоческе мошincстby (ISO22868) | 110 nb (A) | 110 nb (A) | 110 nb (A) |
| Уразовь вибраши (ISO22867) | |||
| - Парашия рухочьka | 4,5 m/ceK² | 4,5 m/ceK² | 4,5 m/ceK² |
| - 3адnia рухочьka | 7,3 m/ceK² | 7,3 m/ceK² | 7,3 m/ceK² |
OIIHCAHNE (Pnc.1)
1.3aHTbI ΜHTOK /TOPMO3 ΦJIbHO ΒeΠ
2.Переднaya pykORAka
3. KapTep ⅢJIINIIpa
4. Гушистар_REра
5.Дроссель
6. Kaprep IOJINHNNKOB
7.BHHTyCTaHOBKNIINHBI
8.ⅢInHa
- ToHKa IIJbHaIeIIc MaJIbIM pHcKOM OTCKOKA
- KpbiiIka cTapTepa / BeHTHJIaIIIOHHbIe JKaJIHO3N
- Pukca ctraprep
- BbIKJIIOuATEJIb BKJI/BbIKJI
- KhoIIka pa36IoknpoBKN KypKa
14.3aHnpykoTka - Kypok akceJIepaTopa
- Kpbiiika macJHoro 6aka
- KpbIIka TOJIINBHORO 6aka
CBOPKA

IPEUYIPEXJEHNE
EcnB KOMPiKeTHe Xbataet DeTaHn, He Iohlb3yIteCb HNCTpyMeHTOM, INKa He NOctaHete ee. HecO6IoHeHene 3TOrO npDyIpyKxHenn MOKET NIOJIeBb TIKKJIbe TpaMbM.

IPEyIpyEKDEHNE
He IIbTaIteCb H3MeHЯTb HNCTpymeHT HIN npHcNooca6JIbBaTb K He My akceccyapb, He peKOMeHIOBAAHbIe H3rTOOBHTeM. IIOJbHbIe MoHdHkaaHn H Ipeo6pa3OBAHna HpeIcTaBIAOT co60b HnepaBnJIbHOe HcIIb3OBAHne HNCTpymeHTa HmOrytCo3JaTb OAnChbIe CNTyaHIn, BeYUHKe K TjXeJIbIM TpaBMam.
IpHmEaHHe:BeH30nHla 6bIla POJIHoCTbIO IpoBepHa Ha 3aOJIe. Ha Hei MoryT ocTATcS cIeJIb CIma3Kn. IpOnrHTte HnΦOpMaIHO NO TOPIINBHON CmEcN Ha 3TNKeTc, 3aTeM CHIMITE ee HxAPInTE BmEcTe C pyKOBoCTbOM IO KcIpyATAuIHH.
Cm. phc. 34-43.
Cm. pa3JeJ "CmeHa IIJIbHOH IeIIN H IIINHbI".
PABOTA

IIPEUYIPEKJEHNE
OBJIaIEB INHCTpyMeHTOM,He TepIte 6JIITeJIbHOCTN. POMHIte, YTOIOCTaTOUHO CEkyHbIbe HBNMaHHY, YTO6BIJIOUYHTBTKJEyHO TpAMBY.

IIPEDUYIPEKJEHNE
Ipi pa6oTe C HnCTpyMeHToB CeTgAIOJIb3yHTecB 2aHITHHIMOcAMH C 6KObBIMn POteKTOpAMn. Ipi Hec6bIHOJeHHN ETOrIOpABHtexTHHNK 6e3OJaNaChocHTN IOCTOPHOHeI PneJMeBTMOYrIONaCTB RfIa3a H bIb3BaT TBXKeJIbE fJIA3HbIE TpaMBI.

IIPEJYIIPKJEHNE
IIOJIb3yItebc TOnIbko peKOMeHIOBaHHbIMn H3OTOBHTeMeI DeTAlJMy n AkceccyapamM. IcIOJIbOBAHne IpyTHN DeTAlJNe H akceccyapob BeJET K TjAEJIbIM TpaBMAM.
Pysckn
PABOTA
ПРИМЕHENE
PJIb3yIITecb 6eH3OIIIOJ IJIa:
O6pe3aHHBcTBeH,BAJKNJepeBBeB HpacIIHIOBKn BIeIOM.
06pe3aHHe HecuIINX KopHei.
TOIIJIHBO H 3AIIPABKA BAKA
BE3OIIACHOEOBPAIIEHNECTOJIINBOM

IIPDEUYIPEKXDEHNE
Hepel3aipabKOB BcERIa OcTaHaBJIbBAHTe MoTOp. HIKoIgI He 3aipabJIyIe IHHCTpyMeT C pa6OtaIOHM III npRApYM MoTOpM. IocJle 3aipabKn 6aka ydaJIHTeCb He MeHee Yem Ha 15 MetPOB OT MecTa 3aipabKn, PpeKJe Yem 3aynCkATb MoTOp. HE KVPITb! Heco6IoHeHne ETOr IpEynPpeJednna MoKET IOBJIeYb TKeJIbe TpaMBbl.

IIPDEUYIPEXJEHNE
IpoBepbTe, YTO6bI TOJINHBO He TeKIO H3 HnCTpyMeHTA. OObApxHBYteUyCKy, BO I36eJXaHHe NOKapa H OOKOB OTpeMOHTyPeBeH20HNy, PpEkeH cem IpOJIOKATb EINIOB3OBATbc.
BceTgIa 6paiaaTeCb c TOnJIHBOM ocToPOKHO: OHO JIeKo BOCIIJaMeHReMo.
CmeHnBaIte H npeJIHbAitre TropOuee Ha BO3JyXe, BJaJIH OT HcKp H orHr. He JbIIHITHe HcIapEHnMm ToJIHBA.
H36eRaTe KOHTaKaTa 6eH3nHa HJIM MacJa C KOKeI.
Oc06eHNO ocTepeaHTecb nonaHaHH 6eH3nHa Hm Macla B rIa3a. Ecln 6eH3HH mACJIO nOpAIN B rIa3a, HeMeDJIeHNO IIPOMOITE HX YHCTOIN BOIO. Ecln pa3IpaKeHHe NocJe 3Toro He IpoIIO, HeMeDJIeHNO o6patHTecb K BpaCy.
HeMeJIeHHO BbIHTpaIte pa3JIHBIIEeccToJIHBO.
TOIIINBHA CMECb
MOTOP HNCTpymEHTa - JByXTaKTHbI, OH pa6oTaET Ha CmeCn 6e3HnHa nCHTetUeCKORO MacJa IJI JByXTaKTHbIX JBHrataJIe.I. CMeIHBaJIte He3TJlHPOBaHHbI 6e3HH cMacIOM JByXTaKTHbIX JBHrataJIeB YHcToH CTanIapThOH KaHNCTpe JJI 6e3HnHa.
MOTop pa6oTaet Ha aBTOMO6HbHOM He3TINHPOBaHHOM 6eH3IHe c OKtaHOBBIM YHCJOM 87 [R + M] / 2 HJI BbIIIE.
HeIIOJIb3yIeBcMCEcMH6EHNHaC MaCLOM,KOTOpBHe IpoJIoAHOTcH a3IapBaOHyBxCTaHIIHX, B VacCTHOCH,TIIH MOTOIOJIKOB,MOIEJOB H IIp.
IIOJIb3yI TeCb TOJIbKO cHHTeTHuecKHM MacJOM JIa IByXTaKTbIX JBHrataJIeI.
B TOIIJIHBOI CMECH IOJIJXHO 2% MACla, T.e. IIPOIIOPIIa 1:50.
Xopoio CmeHHBaIe ToJIHBO IpeI KaJIOJ 3aIIpaBkoI.
CMeIINBAA Te TOIIINBO B He6OJIbIINH KOIINcTBAx:He 6OJIee Yem HA MeCNIIOJIb3OBAHnA. TaKae pKOMeHNyTeCA IOJIb3OBAITCB CHTNETHUeCKHM MACJOM IJIA JYBXTAkTHbIX JBHRaTeJIe,CoIEpKaIaHm CTa6NIH3aTOp 6EH3Ha.
3AIIPABKA TOIIJINBHOFO BAKA (Pnc.2)
BoH36eKaHHe 3acopeHHa TOnJIHbA IIpoTpHTe 6ak BOKpyr KpbIiKN.
MeJIeHNO OTHBHTNITKe KpbIHKy TOJIINHBHO 6aKa, YTO6bI BbIYCTHbI NaBbIOJdABJIeHHem HTO6bI TOJIINBO He BblIIOcB HApKyK.
Octopokho 3aJIeTe TOIIINBHyO CMEcb B 6ak. CtapaiTecb He IPOJIIBaTB ee.
IpnexJe Yem 3aBHHuBaTb KpbIiKy,IOUHCTHTe yIIOHTHeJIb H IPOBepbTe erO coCToHHe.
Cpa3y haJeHbTe KpbIHKy Ha rOpJIOBHy H KpeIKO 3aBHHTte ee pyKoB. BByIpaJIte pa3JIINIIeecr TOJIINBO. IocIe 3aIPaBKn 6aka yJaJItec b He MeHee Yem Ha 15 MeTPOB OT MecTa 3aIPaBKn, IpEKeJe Yem 3aIYcKaTb MOTOP.
IpHmeyaHHe:BoBpeMa HIOcJIe IepBOrO HcIOJIb3OBaHHM MOTOP MOKET IbIMHTb.
CMA3KA INJbHOI IENI IN IIHHbI (Puc. 3)
JMa CMA3KNIINbHONIeHHNIIINHb3yITecb MacIOM Ryobi IJIa IeHNi MaCEHeKoIeHN,IOXOJIaIM IJIpa3HbIX Temnepatyp aaboTb. BeHcONIIHa Notpe6JIaTe Ipn6JIHNTeJIbHO OJHb6AK MacJa HA oOH INb 6aIK TOJIINBa.
IIpMaHHe: HeIOJIb3yIeTbc Tpr83HbIM, IcIOJIb3OBAHbHM IIN pa3BeHeHHbM MacJLOM. OHO MOKeTIOBpeJITb MACJIaHbI HaOC, IIHNHy IIN IIINbHYoIeNB.
AkkypaTHO 3aJIeIte MacIO IJIa IIHHbI H IeIIH B MacJIaHbI 6aK.
3aIOJIHnTeMacJHbI6aK OJHOBpeMeHHO C TOJIINHBHbIM.
Pysckn
PABOTA
PABOTA TOPMO3A INJIbHOI CEIIIN (Pnc.4-5)
PEYJINPOBKA CKOPOCTH (Puc.13)
EciH MOTOp 3aBOJHTc,paOToaTn pa3rOHReTc,Ho HeJePKeHtMaJIbX O6OBOPTOB,IOBePHHe BVHT MaJIbX O6OBOPTOB“T”BnAPBo,TO6Bo JDoABnTHbO6OBPTOB.
EcJInIeINbIpoIOJIkaeT BpaaatbTaH MaMaJIbIXobOpOTax, IOBepHNthe BnHT T"BJeBO, YoTObI cOKpaTHbO6OpOTbH N octaHOBHt IeINb. EcJInIOcNe peryIINPOBKn IeINb IpoIOJIkaeT BpaaATbCa H Ma bJIbXOBopOTax, O6pATHeTceB B IeHTpTexHnueckoro 06cIyXHBaHHN, YoTObI BblIOHNbT Heo6xoIMbI HeACToPknI, Hne IIOJI3yIteTceB HHCTpyMeHToM, IOKA OHN He 6yDyT BblIOJIHeHbI.

IPEUYIPEKJEHNE
IeIbHEIOJIKHABPAATbCRAH MAJIbIX OBOPOTAX.IOBopaunBaIte BnHT T" BLBEO, YTO6bl COKpatntb OBOPoTB H OCTaHOBtB IeIb, HINOBpaTNTcEb CIEHTpTexHueCKoro 06cJLYXHBAHNII HeO6xoIMbIXpeYIpboBOK. HeIOJIb3yIeTB INCTpymETOM, IOKA OH He 6yIetOTePMoHTPobAn. IEb, BpaIaHOIaCnA MaJIbIX OOBoPax, MOKeT HaneCTn TKeJIbTe TpaBMbl.
BO3BPATHO-IOCTYIIATEJIbHAA TRA (Pnc.14)
Pa6ooya cHla BcERIa npOTHBONIOJXHa HnPpABLeHHO bHNKHeH NIIbHOeH IIpn pa6oTe HIXKHe CTOPHOH 6EH30IIbIy TAHNIE ee HA CEBA, a npH pa6oTe BepxHei CTOPHOH-OT CEBE.
Pysckn
PABOTA
IIpHMeUaHHe: BeH3OJIHa 6bIJa IIOJIHOCTbIO IIPOBepHa Ha 3aBOJe. Ha HeN MOrYt OcTaTbCJeJIb Cm3KN.
IIPEIYIPIEJKDEHNEOTCKOKOB(Pnc.15-16)

IPIEUYIPEXJEHNE
OTCKK IPOHxCOJHT, KORIa BpaiaoIIaIcR IeIb KACAeTcI PpEIMTaB BepXHeY cAHTN HOCKa IIHHb IIN KOrJa DEpeBO 3aXHMaET eIb BO BpeMra60tBJ. KorJa BepXHa YacTb HocKa IIHHb KAcaeTcI DepeBa, DEpeBO 3aXHMaET eIb N octTahABIIHBeT ee Ha MRHOBEHHe. PnH 3Tom IIIHNHy pe3KO OTo6PacbIbAet BBPx Hn3aI, HA IOJIb3OBATeJI. ToHIO TaKKe, ecII IN IIIBaH Ye 3aXHMaET CBoIJB HOCKa IIHHb, IIHHy pe3KO OTo6PacbIbAet B CTOpOHY IOJIb3OBATeJI. H B TOM H BpyTom CIyue MoxKHO NTopeTpB KOHTpOLBJ NaHnHCtprMeHTOM NIOJIyUHTB TJeKJIbe TpaBMBJ.
He haeHtecb ToIbKO Ha cpeCTBa 6e30nacHocTHc
camoRO HnCTpymHeTA. Bo I36kaHHe NcHcAaTbHX
ClyuAE B TpaBM, HeoXoHMo IprHHMaTb pa3IIHnBHe
Mepb IpeIOctOpXOcHToH. DIOJIHNHeJIbHa
HHΦopMaHg IpiBEdeHa B paaJeIe "O6IIne IpaBILA
TEXHKN6 6e30nacHocTH" HactoJIeTO pyKOBoJCTBA.
IIIOJOXEHHE PYK (Pnc.17)

IPEUYIPEKJEHNE
HnKoTJa He Me HnHaIte OINHcAHoe NIOJoxHeHne pyK (He 6epHrTeCb 3a 3aIIHO pYKOHTKy JIeBOH pyKOi, a 3a IpeHdIeO - PnpAOB) H 36eRaTe BCTaBaTa h TaPaeKToPi IIbHOB eINH.

IPEUYIPEXKDEHNE
He haxhmaite Ha Kypok akcelepaTopa Ieboi pykoi n He Iepxitne IpepeHIOy pykoTky npaboi. IIpn paObre HNKoTdHa BCTabaIte Ha TpaekTopn nnIbHOIeII.
PABOOEEIIOJOXEHHNE(Pnc.18)
KpeIKO cToIte Ha Horax Ha TBepIOH IOBepxHOCTH.
IepxHrTe IeByu pyky B HnpiJxKeHH Ha cIyau otCKoka.
CToIte cJIeBa OT IIINHbI.
BoJIbIIHe IaJIbIbI OIOJIKHbI OXBaTBiBaT pyKOraTK cHn3y.
PABOCHA 3OHA (Pnc.19)
BéH30IIJIa IIeJIbHa3HaYeHea TOnIbKO IJIpa paCInIIOBKn IepeBa H IepeBaHHbIX H3JIeH. He pKbTe JIcHTbI, KaMHn H npOvte CToPoiMaTEpHaJIbX.
HnKoIgHa He nDaBaTHeJeTAMIOJIb3OBaTbC86EH3OIIHIOJ. HnKOMy He nDaBaTHe IOJIb3OBaTbC86EH3OIIHIOJ, He
O3HaKOMHB C HAcTOIIMyKOBOCTBOM H IpaBHJaMH 6e3oIaCHO pa6OtBJ.
-Держhte NOCTOPOHHHX (HOMOIIHKOB, NOCEHTHEJIe, JTei) И ХИВОТьХ Ha E30IINACHOM PACCTOHHN OT paOchoy 3ObH. Пин BAJIke Ieca 6e3OIIaChOE pacCTOHHe ДJOJIKHо 6bITb KaK MHHYM BДBa p3a 6OJIbIe BBICOTb CambIX BbICOKH DepeBbEB B paOchoy 3OHe. Пин paCINIOJIbE配套TcOHHmeJxу paOCHMHДJOJIKHo 6bITb He MeHbIe 4,5M.
- YTO6bI He NoTepeTb paBHOBeCHe BO BpeMra 6o8tbl, KpeIKO cToHrTe Ha Horax Ha yCTOHBOI NOBepxHOCTH.
HeIOIHMaIte6eH3OIIyBbIe yPOBnIgPyuIh:BcIyuaeOTCKOKaee6yIETtpyHOnyUepKaTb.
HeBaJIHTeIecB6JIH3IJIHHN 3JIeKTPoNEpeJauH coOpjuKeHH. IOpyuAaTe TaKHe pa6ObI npOphiCCIOHaJAM.
Pa6oTaIte 6eH3OIIHIOI IIpN IOCTaTOUHOM OCEIeHH, YTObIЯCHO BnIeTb pe3yIbTatCBOeIpa6OTbI.
3JIEMEHTAPHbIE TEXHnKIN PABOTbI
PIIeKJIe HmIPICTYnATb KcpeB3HmIb paOToAM oTpaOBoTaire pAJIHbIte XeTHKnHn Ha He6OJIbIHx NOHeJIbX.
IppHMHTe IpaBnJIbHoe IOJIOKeHHe, BCTaHbTe HAnPOTNB 3aTOrTOBKn HpeBcIHTe 6eH3OIIHy HaMaJIbE O6OpOTbl.
HaKMHTe Ha Kypok IIO KOHua H daIte MoTOpy BpeMHa6paTb MaKcHMaJIbHyU cOPOCTb IIpeJd HauaJIOM pe3KN.
HaHHaHTe pacINIOBky IJIeHbeB.
MotopIOJIKeHpa6OtaTbHaIOJIHOMpeKHMeBceBpeMpe3KN.
CnerkaHaKaHMaMae HnIy,JaIre IInbHoIeIePi3aTb camoi.ΦOpchPoBaHne6eONIOJIbI MoKeT npHBecTH K IOIOMKe IINHbI,IeINI INI MOTOPa.
IIO OKOHuaHH pacINHIOBKN OTNHyCTNe KypOK akceJIepaTOrn I aJITne MOTOpY c6pOHTb 6OBpOTb.IPiHa pa6ote Ha XIoOCTOM XoJy H Na IOJIHOI CKOpocTH IeNb, IIHHa N MOTOp MoryT IpeKJDeBpeMeHHO I3HOcHTbCJ.
He haxHMaTe Ha 6eH3OINJy B KOHJIe paCINJIOBKN.
BAJIKA JIECA-OIIACHBIE YCJIOBHA(Pnc.20)

IPEUYIPEXJEHNE
HeBaJIHTeIecBcHJIbHbIBeTeP HJIH BbIpy. IIOJOKIHTe,IOKA IIOROJa HAJIaIHTcY.
Bo H36eKaHHe TjKeJIbIX TpaBM Bo BpeMa BaJKN DepeBa Heo6XoHMo co6JIHOaTb CJeJyOIOHe IpaBnJa.
- IIpH pa6Ote NOJIb3yIteCb KAcKoA (A) H cpeIcTBamH 3aIHTbI CJIyxa I3peHn.
He BaJIHTe CnJIbHO HAcKIOHeHHbIe JepeBbH 60JIbIIHeJepeBBc FHNJIbIM HJIN BbICOXIHIM BETKaIM,OTBAJIHBAIOUeC KOpO HJIN C NpCTbIM CTBOJIOM. IpeKJDe Yem HX IIINbTcPTOnTeJIbH TReaT JOnJIKeH IOITOLKHytB HJIN NOTAHyTB IH HA 3eMIHO.
Pysckn
PABOTA
CJIeJnte 3a paIIOLOXKeHHeM H BecOM 6OJIbIIHX BeTOK (B).
PacHCTHTe XBOPoCT BOKpyIepeBa (C).
He BaJIHTe IepeBbIa B6JIH3N JInHH 3JIeKTPoIIpePaU H coopyKeHH (D).
YuHTbIaHrTe, B KaKyIO cTOpOHy HaKJIOHeHO JepeBO (E).
IpoBepTe,HTo6bHaJapeBeHe 6bIIO HAJIOMJIeHHbIX HJIN cyHXBETOK,MOryIiHxYIaCTb BO BpeMBAJIKN(F).
BoBpeMaBaJIKNIOcMaTpHbAaIteHaBepxUHKyJepeBa, CJeJnte, YTO6bI OHO yIaIbO B HjKHyO CTOpOHy.
- IepKHTe IIOCTOpOHHH Ha 6e3OIIaHOM paccTOrHHn (G) (KaK MHHHMym B JbA pa3a 60JIbIe BBICOTbI DepeBa).
PaccuHTaIte, B Kakyo cTOpOHy OTxOJIHTb, KOrJa IepeBO 6yIET NaIaTb (H).
EciHJepeBoHaJIoPiAaTbHeBTyCTOpHyIJI6BeH3OIIJIa3cTpJIa BO BPEMaIaENHJaJepeBa,6oPcaIteHJIyHcnaiaIteCeb!
Ipeen BaJkoJ IepeBa yUHTHe HAnpaBJIeHne BETpa.
He BaJIInTe DepeBb B6JIIN3I JINHH 3JIeKtPonepeJaH coOpuyKeHn, YTO6bI HN BETKN Hn cAmO DepeBO Ha HNX He yunaII.
PnBaJIaeHNa KOCOATOCTeBcBAIbIIeJepeBa, T.K. NOJcE NaJEHn OHO MOKET NOKaTHTBc HBN3.
YbnpaIte c MeCTa IIIEHnO TxOJIbI, KaMHN, KOPY, rBO3IN, cKpeIIKH H IPOBOJIOKY.

IPEUYIPEJKDEHNE
HEBAJIHTepeBb B6JIHnIHHIJIeKTPoJIepeaHcoOpyeKeHH,HTObI HN BETKNHcMoI DEpeBOHa HNHe YnAJI.
TEXHUNKA BAJIKN DEPEBBEB (Pnc.21-24)
- PaccuHTaIte, B KaKYIO CTOpOHy OTXoINITb, KOrJa DepeBO 6yIET NaATBaT (HEcKoJIbKO HAnpaJIbeHEn, cSIN HameeHHeO 6yIET 3aHrTO). PaccnCTHtE MeTOB V HeNOCpeCTBeHHOn 6JINIOCTh OT DepeBA H IOBepbTe, YTObI Ha NTH OTXoJa HE bIo IpeINITCTBn. PaccnCTHtE MeTO B 135^ BOKpyr HAmeueHHO JINHH NIAIDHn EpeBA (A).
- YuHTbBAIte cHJIy H HAnpaBJIeHHe BcTa, HaKJIIOH H paBHOBecHe JepBa, a TaKKe pacIoJIOKeHne KpyIIhIX BeTOK. 3TH fakTopb MOrYT IOBJIaHTb Ha HAnpaBJIeHne IaJeHnI DEpeBa. He IItaiTeCb BaJIHT bpeBO b CTOpOHy, B KOTopyIOHO He MoKeT yIaCTb eCTeCTBeHHbIM IITeM (B).
- Bbipejte KJIHH BaJIKN Ha 1/3 IIHaMeTpca CTBOJa co cTOpOHbI, B KOTopy JOpeBO JIOJIKH OYIaCTb (C). Bbipe3JI KJINHa JOJIIXHbI 6bITb JepNEHINKUJIaRbHbI JINHHI IaJEHHN JOpeBa. KJIHH JOJIIXeBbITb H3bIaH3 CTBOJa, YTOb6OBoHTb RopH3OHTaJIbHbI IpOxOJ bE3OIIHJIe. YTOb6JIpeBO He 3aKaJIo 6eH3OIIHJy, NaHHaJIte BcERda C HnKHeRo BbIpe3a.
- Hametbte npmyo rohp30htaJIbHyIO JHHIO BaJIKN (D)
KaK MHHHMy B 5 CM HaI rOpH3OHTaJIbHbIM Bblpe3OM KJIHa.
IIpHMeueaHHe: HIKoIgTa He IIJIInTe Do KJIHa. OctaBbTe Yaactb CTBOJa MEXJy IINHei BAJKn H KJIiHOM (OKOIO 5 CM INI 1/10 IINameTpTa CTBOJa). 3Ta YAcTb Ha3bIbAeTCR "IapHnPOM" (E). OHN KOHTpOJIHpYET NaIeHne DepeBa H IIpeIaTCTByet HAKIoHy, CKOJIbXeHIIIO H CNOI3AHIO CTBOJa CIIHa.
IIpn BaJIke JepeBbE6 0JIbIIOrO dHaMeTpRa OCTaHAbJIbBaIte JINHHo BAJIKN paHbIe, IO IaJIeHNrJepeBa.3aTeM BCtABJnIeT Be JINHHo BAJIKN JepeBcHHbIe INI INlaCTMaCCOBbIe KJIINbIe (F) Tak, YTObI OHn He KacaJIbCb INIbHO Hoi cIIeN.3aOHTBe IH NOTHXOBky, YTObI OHn Cpa6OtaJIH KAc pbYar.
- KorlaJepeBO NaYHHaeT PaIaTb, OcTaHOBHTe 6EHNIIHy I cpa3y IIOJoxHTe ee Ha 3emJIHO. OToJIrTe B HAmEcEHHyo CTOpOHy, IIpoBepHB, YTO6bI JepeBO He PaIaJIo B BAIIHY CTOpOHy.

IPEUYIPEKJEHNE
JIHHNA BaIKn HNKoFJa He DoJNkHa JIOXOINb JDo KJIIna. IIIapHnK KOHTrhoJInpyet NaJEHNHeJepeBa:3rO-uaCTb CTBoJa, OCTabIIaCer He PPOIIHIEHHo MEJxI KJIHHOM IJIHHeB aIKn.
OBPE3AHHE HECYIIHX KOPHEN (Pnc.25)
Hecyuie KoprH - 3to KpyuHbIe KopHn,OTxOJaIIne OTCBOLa K 3emJIe. ObpeaIte KpyuHbIe KopHn IpeEi BaJIKOJIpeBa.CJeIaIe TcnaJala TogpI3OHTaJIbHb pa3pe3 (A) B KopHe, 3aTeM IepPeHJIKUJIphO BePITKaJIbHb (B). YdaJIInTe BByIe3aHHyoTaeMbCT (C) H3 pa6ooye 3Onbl. YdaJIINb HecyuHc KopHn, IIpNCTynaiTe K bAIke IpeBa. CM. pa3JIeI "TexHnka BaJIKN IpeBBeB".
PACINJIOBKA (Pnc.26)
PE3KA XJIbICTOB (Pnc. 33)
XJIbICT (A) -3TO BeTka, BbIKOpueBaHHb KopeH bIHN KcYT, HATnHTbI NIOJ DAJIeHNEM dpyHM JepEBOM. XJIbICT MOKet pe3KO bIbIprMaHITcB, eJIN OTpe3aTb JepKaIeE eTO JepBO. IeHB IOBaJIeHOrO JepBAeYCaTOB0BaPaaETCB VBeTHKAJIbHOe POJOKeHHe, KOJIa CTBOI OTpe3aOT OT Hero DO KOHua. ByIbTe OCEtOPoKhbl! XJIbCTbI ONaCHbl.

IIPDEUYIPEXJEHNE
XJIbCTB MOrYT yIapHTb pa6OeH O bIbEcTH 6eH30IIHJy H3-NIOE Eo KOHTPOJ, YTO BeTeT TJAeJIbIM NJaKe CMePTeLbHbM TpABMM.
OBCJYXHBAHNE

IPEyIPEXJEHNE
B cIyae peMOHTa IIOJIb3yIteC bTOLIbKO MAPoUHbIMN 3aIuaCTMn Ryobi. IcIOJIb3ObaHne IIOb6Ix dpyTHX 3aIyaCTeM MoKet IIpeJCTabIbTb ONaCHOCTb HII NOBpeACTb IHCTpyMeNT.

IPEyIPEXJEHNE
\Pi npa6oTe H pnp ylaeneHHn PbHn cKaTbIM BO3JYXOM BcRgdaIpb3yUe3c 3auiHTbIMcOykAMc C 60KOBbIMn IpoteKTopAm. Pnp IIbHbIX pa60tax nn3yIteC TaKke 3auiHTbIM 3a6paJom HIN pcEtnpAToPOM.
OBIIEE OBCJYKHBAHNE
HnKorIa He nOJIb3yIteCb pactBOpHTeJIaMn IJIa YNCTKN IIaTcMaccCOBbIX JTeJIaI.BoJIbIIHHCTBO IIaCTMAcc MOKeT NOBpeJIbTHcOf O bIbHIbX pactBOpHTeJIaI. IJIa CTnTHrIg3H, MaJcIA, Jkpu, IIbIJN H.T.I. NIOJIb3yITeCb YINCTOn TpIaNKOJ.

IPEyIPEXJEHNE
Пл actMaccobbe TeTaN HNKoTgA He noJXhbl cOpHKacatbC TOpMO3HON JIKIOcTbO, 6eHNHOM, HeqTePPOyKtAMH, eKNHM MacIaMn H np. 3TN XHMKnATb CoepkatBeIeCTBa, cnOCoBHe NOBpeNTb, ocLa6NtB nIu pa3pyIHT bIactMaccy.
CMA3KA
Bce IIOIIHHHKN HNCTpyMeHTa 6bIIN CMA3aHbI Ha 3aBOJIe BbICOKaueCTBeHHOH CMA3KOH Na BeCb cPOK CJyJx6bl HNCTpyMeHT B HopMaJIbHOM peKHe Mpa60Tb. IHCTpyMeHT He HyJXJaTeCBA JIOJIHOHTHE LHOH CMa3Ke.
CMEHA INJIBHOI CEIIH HINHHBI (Pnc.34-43)
Pysckn
O6CJYXHBAHHE

ONACHOCTb
HnKorJa He 3anyckaIte MoTOp, He yctaHOBb IIHHy, HInIbHyO HeN, KapTeP MoTOpa I KapTeP cIeJIeHNHa. EcIn OAna H3THxIeTaJIeH Ye yctaHOBJIeHa, cIeJIeHne MOKeT BbCKoYHTb IIN B3OPBaTbcN I NaHeCTN TKeJIbe TpaMbIb.

IPEUYIPEJKDEHNE
Bo I36eXaHHe TjaKeIbIX TpaBm POnHocTbIO H BHHMaTeJIbHO IIPOuTHHe YcBOHTe BCE npaBHLa TexHHK63oNaCHOCTn, OIIHCaHbIe B HaCtoRIeM pa3Je.
IpeepIIO60B onepaHne cTABtE bIKJIIOUaTeJIb B IIOJIOXeHNE“O”.
IOTaHHTe Ha ce6a pbYar TOPMo3a / 3aIHTHbI IHTOK, YTO6bI pa36JIOKHpOBaTB TOPMO3 cIIH.
I\PnMeaHHe:PiHcMEn HIIbHOIeHN IIINHbI NOJIb3yITecb ToJIbKO 3aIHaCTaMn, peKoMeHIOBaAHbIMN IHTOFOTBITEJEM.
PnMaHnIyJiaIcx cIeIbIO HIN IHHoB BcERda IOJIb3yITecb IepyATkAMH.3TH JETaJIH OYeBH OCTpIe.
KOM6HHHPOBaHHbIM KJIHOUM H3 KOMJIJEKTA cHHMHTe KpeIeXHbIe BINTbI IHHbI.
CHHMMTe KapTeP IOIINIHKNOB.
CHMHTe IHHHy HIeIb.
CHMHTe cTapyIO ueIb C IHHbI.
PacnpabTe HOBYIO INIbHyIO IeNB H CLOKHTe ee NtTne. 3y6aA A) JOJIKNb CMOTpeTB HAnpabJIeHNB BpaIeHnra IIeNn (B).EcIN OHN CMOTpR T BIpTyO CTOpOHy, nepeBepHIte INIbHyIO IeNB.
YcTaHOBHTe BeDyIe H3BeHbIeIeHn (C) Ha peJIbc IIHHbI (D) KaK IokaHa Ha Pnc. 38.
IeBdoJxHaOba3OBbBaTneTIOc3aHINHHbI.
IpnHeJxHbA qIeNb Ha IHHHe, HAnEhBt e ee Ha BeNyUyO 3Be3IOuKy (E).
ПОпразьтЕ XIIIHy,ЧТБИ XIIIыгнДОЛЖНВ BOHTN BДIHHHYIOIIpOe3b YIeHTpe IIIHbI.
IIpMmeaHHe:HaJIeBaIINHnHa IIITbIpy(F),IOpeBepTe, YTO6bI pyERIHPoROBHyI IaIEu(G)BXOHNJ B OTBePCTHe OCN HATJXKENHI NIIH(H).
YcTaHOBHe Ha MeCTO KapTep IOIDHHHKNOB (I) KpeINeXHbIe BnHTbI IHHbI (J).
3aTbHHTe BpyHyIO KpeENXhBe BNHTb. IIHHa IOLJHnHa HmETb BO3MOxHOCTb DBHrAteBc npI peryHpOBKe HATIXEHNIIeIIIN.
HATBHTNEIHOIeNBIOBOPaHBBA BHT 3aTAAKNN (K) BnPABO, NOKAIEINIOJHOCTbO He cJIET BeDyIMM 3BEHBMM HpeJIbC IIIHHJI.
IIOHNHmHTe HOCOK IIHHbI, YTO6bI IPOBepHTb, YTO cIb He
IPOBHCaET.
Повторгийт eу onepaцин, noka He hce3HET cbo6oHbI XOJ.
IIpHJIepKJBaH HOCOK IHHbI, KpeIKo 3aTHe ee KpeIeXHbIe BHTbl.
Ecni HnHJXKHeI IIOCKOCTNIHBI HET IPOBCAHNH IeNJI MOKHO CBO6OIIHO IPOBEPHyTb pyKOH 3NaHTH OHaHTHya TIPABHbHO. TopMOI IIHbONeINI JOILKeH 6bITb OTNUIeH.
IppmeyaHHe:EcIIIN IIeINb IpeTeHYta, OHa He CMOKeT IbnpobauHBatcbc. CJIerka OTNcyCTHTe BnHTb IIHHbI INOBepHHTe peryIINpOBOuHbI BnHT natKHeHHa YteBertb OBopota BJIeBO. IIpIePckHbA HOCOK IIHHbI, KpeIKo 3aTtHHTe e KpeIeXhIbe BnHTb.IeNb DIOJxHc CBO6OJHO IbnpobauHBatcbc.
PERYJIMPOBKA HATXKEHNAEIN (Pnc.44-46)

IPEJYIPEXKJEHNE
HnKOrJa He TporaIte H He peryInHpIe TIIhLyHo IeIb npAboTaOoiM MoTope. IeIb oYeHb ocTpaI. PIIb OcXyKnBHe63OnIOJIb BcEgDa IoJIb3yITeCb 3aIHTbIMH IpueHATKaMm.
IpeKJe Yem peYJIHPOBAbTHaTJKeHHe IeHH, octaHOBHTe MOTop.
KpeIeJHbIe BnHTbI IHHbI OJIJXHbI OTKpyuHBaTbcBpyuHyIO.
ПовернITEВНТ PERУИПОВКН HATЯЖЕНИЗЕИ NВпарBO, YTOБь HA附THyTB ПILьHуO CEIIb.
IpHmeyaHne: Ecln Ha HnKhempe6pe ⅢHHbHET IpOBcaHnH XOLOHyHOeIIb MoKHO CBO6oHIOnpOBeHTy pyKOH, 3NaUHT, OHa HATyHTaPABBILHO.
EclnBeDyIeNe3BeHbA(A)CBHcAOTHaHNKHeIIIOCKOCTH IIHHbI,IEIbHEoEOxOIMHOaTHHyTb.
IIpHmeyaHne:BoBpeMa paboTbIeHnHarpeBaetc. IpaBnIbHO HATaHHTbIe RopUHe BEdyUHe 3y6bIeHN MOryt IPOBcAtehNtHa1,25 MMOTpeBa cIHbI.JIpaIPOBepKINOJIOYCTHMoIPOBcAHHaROpEeIeHN MoKHO HCIOJIb3OBaTB KOHUnKOM6HInPobAHHO KJIHOa.
IpmeaHne: HObIe IeN MOryT pactraNaBtbc. PeryJIaPhO IpOBepeIte HaTeJKeHHe IeN II npH Heo6XoDMocTHn IOITrHbAHTe ee.

IPEIOCTEPEKHENE
EcnH HATnHyra TOpayu, OHa MoKet 3aXaTbCy octbHyB. IpeI paOToI npOBeprrte HataKeHne xoJIOHOeHH
OBCLIYXHBAHNEIENP(Puc.47-48)

ПЕДОCTЕКЕНЕ
IpeIJIIO60I OIIePaIIHc CTaBbTe BbIKIIOuATEJIb B IIOJIOKeHHe "CTOIT".
Pysckn
OBCJYXHBAHHE
Pa60TaiTe TOJIbKO IeINHm C MAJIbIM PHCKOM OTcKOKA. IIPI npABHbHOM O6cIyKhbAHHH 3Ta 6bIcTpOpeKyuJHaI cIIb cOKpaJIaET OAnCHoCTB OTcKOKA.
IJIra POBHOH H 6bICTPO pe3KH Heo6xoHMO IpaBnJIbHO 06cJyKHBaTB IIIBHyU cIIb.
EcIIH OIIIKN BbIXOJr H3MeJIbYeHHbIMn,ecJIH IIph pa6oTe Ha cKaTOp HAnO CnIbHO JABHTb HIN ecJIH OH peJET ToIbKOc OHN CTOPOHbI, CIeIb CJIeIyET 3aTOUHTb.Bo BpeMg O6ClyjKIBAHnI CEIIb OpaIaJIte BHNMaHHe Ha cJIeIyIOJIne MOMETBtI:
HeIIpaBHBbHbIyTOJI 3aTOUKN6OKOBHHeINyBEJIHbBaET OIIaCHOCTbOTCKOKa.
3a3op orpaHHHTeJIe IJIy6HbI (A):
- YEM 60JIbIe JIOΦT OgraHnHTeJIe IJIy6HHbI, TeM 60JIbIe ONaCHoCTb OTcKoka.
- peRyIINPOBKA Ha cJIHIIKOM MaJIeHbKUIO TJyOHHy CHNJaET KaYecTBO pe3KH.
Ecl 3y6bI hNIIb HAcKoUHJI Ha TBePbIe IpeIMTeB (R03Hn HIN KAMHI) HIN H3OCHINb OT r8Hn Hnecka Ha Ipebe,OTdAteIeHb HA 3aToKY bΦHpMeHHb II HeTp texHHueCKoro O6cJyXBaHHa.
IpHmueaHHe: Pn yctahOBKe 1eHH Na MeTo IpoBepaIte H3Hoc N pa6Ooee coctOAnHe BNeUJIe 3Be3IOuKb (B). EcNn 3Be3IOvKa NObPexJHa Nn H3HOIIeA, 3AmHITe ee BΦpMHemOH McHTpe TxHueCeKOrO o6ClykBaHnn.
IphmeaHHe:ecnBbHeIOJIHOCTbIOIOHOJIAHIO6bJcHEHHyIO HNKe IpoJeDpy3aTOUKNiEHN,OTAbaJIte NtB 3aTOOky BΦpHMeHTNEIHTP texHHckeKOrO bcJyKbHaBBHn HIN 3aMeHHTe ee HaIEbc MJIbIM pCKOM OTCKOKA.
3ATOUKA 3YbBEB (Pnc.49-52)
OmmcHne 3y6a:
(A) Pe3eui
(B) Kpai
(C) OgraHnHTeJIb Iy6HbI
(D)ПоJOиBa
(E) BbIeMka
(F) Ka6IyK
(G)OTBepCTHeJIA3aKJIeIKN
(H)BepxHnKpaI
3aatayHbaiTre 3cy6b8IOJ OINHM yIgOM nHa OINHAKOByo JInHy.ToJIbKO OINHOpDHe 3cy6b8 o6ecneuat 6bIcTpyo peKhy.

IPEDUYIPEXJEHENE
IeBbOeBcOtPra. Ipn6cbJyKbAHnI cIeN BcEJIa IIOJIb3yIteB paOoHmN IepuATkAmH. 2TO IOMoKET H36eKATb TpAB.
Ipeep3atoKoHnAHTHHe zenB. JIra 3TOrO cNeJyHe HnCTpykUHm H3 pa3JeLa "PeylnpOBKa HATJxKeHHa nenn"
IIOJIb3yIteCb KpyTJIbIM HAIJIbIbHHKOM JHAmEeTpOM 1,6 MM (BHE KOMIIIEKTA).3aTaUHBAITe 3y6bI IO cepeJHHe IHHbI.
ДержнтЕ habиьнкHa yopOBHe bepxuKn pe3aKa. He NaKIOHЯTe HAIINJIbHK n He BpaIaJIte HM.
CJerKa HaKmHa Ha HnHbHKn, TOHTe B cTOpHy IpeJeHrO yIa 3y6a.
IIOHNMaTe HaHJIbHKn Ha o6paTHOM IPOXOJe.
IpoHITHe HAnHJIbHnKOM KaJbIpe3aK No HeckOJIbKO pa3.ToCHTE cJIeBa(A)IN B OJHy H Ty Je cTOpOHy.3aTeM ToHTe C npYroH cTOpOHb, cnpaba(B), IN b o6paTHyo cTOpOHy.
YdaJIHTe IIbIb c HAnHJIbHnKa MeTaJIINueckOIIeTKoI.

IIPEIOCTEPEXEHNE
IIIOXO 3aTOUeHHaJIH 3aTyINBIIaCJIeNb MOKET NObICHTb O6OpOTb MOtOp paOte N HcNpOTnTb erO.

IPEyIPEXJEHNE
Пи ПLOXОI 3aTOUKe IeIN BbIpaCTaET OIIaCHOCt bOTCKOka.

IPEyIPEKJEHNE
Bo h36eKaHne TjXeJIbIX TpaBM 3aMeHnTe HJIpeMOHTpyIte IOBpeKJDeHHyIO IIJIbHyIO IeIIb.
YTOJI 3ATOUKN OT BEPXHETO KPAJ (Pnc.53)
(A) 30^ IIPABUNJBHAB 3ATOUKA- JdepKABKN HAHINJBJHKOB HMEOT OTMeTK JIJI IPIPABNJBJHOYCTAHOBKN yJIA 3aTOUKH OTHCNTJE.HO BEpXHEOR KpaR.
(B) MEHEE 30^ - Для пошелу пасиювск
(C) BOJIEE 30^ - ToHKaJ peKyuIaI pIOcKocTb 6bIcTpo TuIIITcI.
YTOJI 3ATOUKN OT BOKOBOFO KPAJ (Pnc.54)
(D) 80^ IIPABNJIbHAR-3TOTyTIOJIoJyaeTcE.CIIN BCTaBHTBJePjAkBkyHaIIJIbHIKIpaBNIbHOIHaMeTpTa.
(E) KPIOK - Βeπληετ 3a DepeBO h 6bICtpo TyuHtCγ, yBeIJIuHBAET onaHcOteB oTcKoka. IIOJIyuaTeC np HcIOJIb3OBaHHn HAnIIbHbHKa MaIJO OJHaMeTpα HJIH np CJIINIKOM H3KOJ IOCTaHOBE.
(F) TYIIOH YTOJI - Tpe6yET cJIHHKOM 6OJIbIOI cHIbI npOJBNXeHN, BDeT K IpeXJDEBPEMeHOMY 13HOCY IIHNbI H cIIIN. IOnyaeTcprn HcONJIb3OBAHNHaIIbHNKa 6OJIbIIO dAmEtpa INI pRc cJIHHKOM BbICOKOI NOCTAHOBKe.
OGRAPHHTEJIIN TJLYBHHbI (Puc. 55-57)
3a3op orpaHnHTeJIgIy6bHbI (A):0,6MM. IIOJIb3yITecb IIyIOM IJIPOBepKn orpaHHNTeJIe.
IpoBepnTe 3aOp orpaHnHTeJIe Iy6HbI nocJe kaKaJIO 3aTOOJIeIIe.
IIJIb3yyTeCbIIOCKHM HAIJIbHNIKOM (B) (HEIOCTABJIeH B KOMJIIEKeTHe) INTOJIbHOHIOJIaHIKOCH (C) (HEIOCTABJIeHa B KOMJIIEKeTc), YTO6BJ BYIPOBHHTB CCE ORPAHHTTEJIN.
Pysckn
OBCJYXHBAHHE
IIOJIb3yIteCb HAIINJIbHIKOM Ha 0,6 MM. BbIpOBHHB BCE orpAHIVHTeJIN, pIIaIaTe IM N3HaUaJIbHyUo FOpMy, T.e. 3aKpyIITHe Hx CnepeJH. He NOBpeJITe BeUYIe 3BeHbA KpaEM HAIINJIbHKa.
OrpaHHHTeHrIy6hHbIOJIXHb6bTbBbIPOBHeHb IIOCKHM HAnIIbHbIKOM B TOMKe HAnpABJIeHH, YTO IN CMeXHbIe 3y6bI. PnBbIPaBHbAHHH OrpaHHHTeJIe rIy6HbIb IIIOCKHN HAnIIbHKn He DJIxKHe KacaTbcra 3y6beB.
OBCLYXHBAHNE IIHHbI (Pnc.58)

IPEIOCTEPEXEHNE
Ipejde yem 06cIyKHBaTb 6eH3OIIHy y6eHNTecb, YTO IIIBhaN IeBIOJIHOCTbIO OCTaHOBJEHa.
IpeBopauHbaiTe IHHy KaKJIO HeJIHO, YTO6bI paBHomepHO paIpcJIeJIHTb I3OHc Ha 06e ee CTOpHbI NpoJIHTb cPOK ee CnyKbI. IocJIe KaKJIO HcIOJIb3OBAHnI HAChTHe IHHy, npOBepHTte EiN3OC H eJOLOCTHO.
HepoBocHTN HbEMKn Ha peJIbe cIIHHbI -cJIeCTBnE ee HOPMaJIbHO rHO h3HOCA. 3TH HEPoBocHTCJIeJyET 3aUNIHATb HANJIbIKOM, KAK TOJIbKO OHNIIOBHIHCb.
IIHHy cJIeJyET MeHrTb:
ecJIN H3HOC peJIbca He IIO3BOJIaTeIeII IN DePkaTbcra Ha HEM;
ecJH OHA IORHyJIacb;
ecJIH peJIbc paTpeckaIcH IIIN cJLOMaJIc;
ecJIHpeJIbcbIpa3bexaJIHcB.
Cma3bIaIe IHHy KaJkyU HeJeIHO Upe3 cneuaJIbHO npEduCMOTpeHnOE IINrToO tBepCTHe.IpeBOpauHbIte IHHy INpOBepraTe, YTObI B OTBepCTHX (A) H na peJIbc He 6blIO gr3n.
CHCTKA BO3IyIHHOFO HJIbTPA (Pnc.59-60)

IIPEIOCTEPEXEHNE
Ipejke yem yctaHaBJIbBaTb Ha meCTo BCE JeTaIIH, InpoeBpTe, YTO6bI BO3JUHbIy HnJIbTp 6blI npaBHJbHO yctaHOBJe Ha CBOEm MeCte. HnKOrJa he 3aYncKaJIte MOTop 6e3 BO3JUHHO rHnJIbTp.a OH MOKet IOBpeJIbTcS.
PERYJINPOBKA KAPBIOPATOPA (Pnc. 61-63)
Ipeep uHcTKoN KAp6IoPaTopa:
OuHCTHTe BeHTNHJIAIOHHBJe JAAIO3N KpbIINK CTapTepa IIETKOHNJIN CKAATbIM BO3JYXOM.
IpoHCTHTe BO3JyHHbI H JbTp (A). Cm. pa3JeJI "HcTka BO3JyHHORo H JbTp'a.
IpepepeyInpOBKMOaBIXo6OpOTOBaHTeMOTopy Iopap60TaTBHeCKOJIbKOceKyHJ.

IPIEUYIPEXJEHNE
IoroHbIe H reorpaohueckne ycIOBnMyoT bJIaHTb ha paOby KAP6HopaToPA.Bo Bpemr peryIipOBKn KAp6HopaToPA He IIOIyckaiTe NocTOPOHHX 6JI3Ko K6eH3ONIIIE.
PeryJInPOBka MaJIbIX O6OpOTOB
PeyIHPOBKa Kap6IopaTopa IIO3BOJIaTeH N3MeHHTb yTOI OTKpbITTH 3acJIOHNK pIN OTIIyIeHHOM Kypke akceJIepaTopa.
PeylinpoBka:
TTO6bIyBEJIHHTBCKOPoCTb BpeKHMeMaJIbIXO6OpOTOB, IOBepHNTe BnHT 3aMeJIeHHRA "T" BnPaBO.
TTO6bI cHH3HTbpeKHM MaJIbIX 06OPOTOB,IOBepHHTe BnHT "T"BJcBO.
Пюпьденте побную расиловку,затem оретулneyт eBHT peKHMa 60JIbIINx OOBOTOB "H",ДЯн HANBOJIepe IюпьдnteJIbHOpaOtBI(HO He JДЯ МAKChMaJIbHOcKOPoCTH).BHT peKHMa 60JIbIINx OOBOTOB HeJ3Я NOBepHyTB 60JIbIIe YeM Ha YeTBePTb OOBOTa.

IPEUYIPEXJEHNE
JIIEIbHEIOJIJXHA BPAIIATbCRA HA MAJIbIX OBOPOPTAX.IIeN,BvpaIooaeraHa MaJIbIXOBOPOTAX.MOKeT HAnEHT TKeJIeIbTraPbMbI.
NUCTKA IPOCCEJIa (Pnc.62)
YIcHTHe BEHTJIJIIOHOHbIe JAIIO3N KApTePc StapTePa IeTkoI HJI IN CKaTbIM BO3JyXOM.
MEXAHN3M IIOJIOPEBA KAPBIOPATOPA
(Pnc. 64-65)
BeH3OIIHa HMeET BeHTIJIaIIOHHbI JIOK CIIpaBAo OT 6IOka IIINIIHpA, KOTOpBI rTOApET ROpHHY Bo3JyX OMTopoA K Kap6IoIpatopy, YTO6bI IpeIOBTpArITb 3aMeP3AHne Ipi PA6oTe B xOLOIHbIX yCIOBHX. Ipi PA6oTe pHI TMHePATE BO3JyX oT 0^ IO 5^ N cIIbHO BIAJXHOCTn B KAP6IoIpatope MOKET o6p3AOBtCSIeI. 3To MoKET pINBECTN K 3aMeJIENHO MOTOH N IOLOMke. Ipi PA6oTe B TAKHNIOJbIX yCIOBHX bIbIpaIte peKHM NIOIOrpeBa kAP6IoIpatopa.
Bb6op pexHMa IIOIgPeBa Kap6oPaTopa:
IocTaBbTe BbIKJIIOuAteJIb B IOJIOKeHHe CTOI“O”.
CHHMMTe KpbIHKy OTJeJIeHHa BO3dYIIIHO foJIbTp a(A).
CHHmTe BO3dyHHbH #JIbTp.
IIOHMMTe IpocceJIb (E), YTO6bl CHaTb KpbHk Ky HINHPpa (C).
OTBHHHTteIPTbBHNTOB,JepeKaiHxIJIINHIp.CHMnTe KpbIIHKyIJIINHJpa.
CINMMITE IIOK (D) cnpaba Ha 6IIOke IIJIINHJa,HaJXAB Ha HrO.
IpeBepHHTeJIOK, YTO6bI HaJIINCb "Snow" 6bJIa cBepxHy yCTaHOBHTe erO Ha MeCTO.
YcTaHOBHTe KpbIHKy IINJIHHJaHa MeCTO H 3aBHTHTe IITb JepKaIIHX ee BnHTOB.
Pysckn
06CJYXHBAHHE
YctaHOBHTe Ha MeTo IpoCSeJIb H KpbIuKy BO3yHOrO _H J L Tpa.

IPEUYIPEKJEHNE
EcHn HcNacOCTn 3aMep3aHH, BcEgTaNCTabbTe IIOK B HOPMaJIbHOe IOIOKeHHe ("Sun"). EcIN IOJIb3OBAIbC6eH3OIIHIOB PpeHMHe IOIOrpeBa KAP6oBaTopaB TeIpyIOHOroOy, MOTOp MOKeT paOToTb HEOpMaJIbHO.
NUCTKA MOTOPA (Pnc.66-67)
Peylarpno YIeHTHepe6pa 6IOka IIuHIIpBa (B) I maxOBkna MOTOPA (A) cKaTbIM BO3JXOM HJI INIeKTo. Ipr3b. Na 6IOke IUNIHIOPO MOKET bYb3BaTb ONaCHbI nepeRpeB MoTOpA.

IPIEUYIPEXJEHNE
HnKoRJa He 3aNyckaiTe MToP6eH30nHJIbI,ecJIn Kakaay-Jin6o DeTajB He yctahOBJIeHa. B YactHOCTH, He 3aNyckaiTe erO 6e3 KapTePOB MToPra HcTApTePA. JEtaiN MOyT CJOMaTbCn H BiCKOuHTb N3 MoTOpA. PeMOnTHpyu MaxOBiK H ciEJIeHHe ToJIbKO B fHpMeHHOM IeHTpe TExNHueCKOrO o6cIyXHBAHIN.
IphmeaHHe:ecJH 3aMeeH cnaM MoIOHocTH 6eH30IIJIbI, BO3MOxHO BbXIOJIIOHOTBEpCTHe IINI rIyIHTeJIb 3aBHTbI rpaJIbO UChNTte 6eH30IIJIY OT rApH, YTObI OHa cHOBA paOToJa C ppeKHe MIOHOCtBO.
IIPOBEPKA COCTOHHN TOIJIINBHORO ФИЛБТРА (PnC.68)
PeryIpaHNo IIOBepaIte TOIIINBbIy IIbTp (B).EcJIH OH 3acopeH HIn IOBpeKJHeN,3aMeHnTe erO.
CMEHA CBEH (Puc.69)
Motop pa6oTaet Ha cBeue TnHa Champion RZ7C Hn NgK CMR7H C 3a3Opom 3eKtpdoB 0,64 MM. MeHnIte CbeUy KaJbIe 50 Yacob Pa6OToBn H, IIpH Heo6xOJIMcOTh, YaIe Ha CbeUy TORO JKe TnHa.
BbIbePHTe CBeUy KJIIOUOM, IOBOPaUHBAe ee BJIeBO (A).
CHMMHTe cBeuy.
BcTaBbTe HOByo CByu B OTBepCTHe N 3aBePhHrTe ee BIIpaBO pyKoI. 3aTeM Tyro 3aTnHrTe ee KJIOUOM (B).
IIpMueaHne: cIeJIte 3a TEM, YTO6bI He 3aKOpOTHTb KOHTaKTbI CBeUH: 3TO MOKeT cepbe3HO IOBpeHTb HnCTpyEMT.
IIPOBEPKA/CHCTKA CETKIN HCKPOOTPAKATEJI INIJYHHTEJI (Pnc.70)
TJyHITeJIb HMeET HCKPOYIaJIbIbHaIOJIyO CEtKU. IcIopuHHaIe cTeKa HcKPOOTpaXATEJI MOKeT bIb3BaTb IOxAp. Jdxe IIprn HOpMaJIbHOM IcIIbIb3OBaHH INcHTpyMeNTa cTeKa MoKeT 3a6BtBc. Ee cIeJyTe IpOBePert KajIyU HeJeIHO IIprn Heo6OJIIMOCTH uCHTN.T. IOnIEpKJBaIte TjyHITeJIbIc tCeTy
HCKPOOTpaKaTeJIaBpa6OeMcoCToHHH.

IPEyIPEXJEHNE
IOBepxHOCTbIgHHTeJIaIbHO HArpeBaTeCBO BVpemHnOcIe paObTo.Bo H36eKaHHe TpaBM He IotparHBAITecbI DoIgHHTeJIa.
JaTeTJyHHTeJIIOOCtBtB.
CHNMHTBEHNT CIOLOI ROJBOKOB(E)INRAIKHA8MM (D),德PkaHNE KpbHKyIgUHNTeJIa.CHNMHTeKpBHKy (C) nctky HcKPOOTpKaTeA(A).
Ecn cetKa nckpooTpaKataJI grp3nHg, ouhctHte ee metaJIHHueckO IIeTOchK. Ecn cetKa nckpooTpaKataJI npOBaHa IIN HcNOpHeA, 3ameHHte ee.
CHHMMTeTJYIHTeJIb(B).
IIIOscKoO TBeptKoCHHmHTe rapb uepe3 BeHTnJIaIIOHHbIe XaJIHO3N.
CHMHTe rapb c BEHTHJIIOHOHHbIX JaJIHO3I rJyIHHeJI H3 BbIXIOIHORO OTBepCTHJIINHHJa.
YcTaHOBHTeHaMeToIyHHTeJIb,ceTky HcKpOoTPaKaTeJIH KpbIHKyIyHHTeJIa.
3aBnHTTE BnHT C IOJIOI FOJIOBKOI IraKn.
OCMOTP IN CHCTKA TOPMO3A INHJBHOI IEEIN (Puc. 71-72)
CHMMTe KapTep cueIeHn H npovHCTne Jetah TopMO3a IIHLbHOJ eIN (A). IpoBepte CTeneHb H3HOIIeHHOCTn IOIOcBt TopMO3a (C) H, cEJn OHa CNJIbHO H3HOIIeHa HJ defOpMHPOBaHa, 3aMeHNte ee. ToJIiHa HTopMO3HOIIOCSbI OJIXKa 6bITb He MeHbIe 0,6 MM, T.e. OHa He JOJIKHa 6bITb H3HOIIeHa 6OJIbIe Yem HanoIOBHy.
ПлдерхнваiteчсOTуTOPMO3aIIHbHOIJIeIIHICJIeKCa cMa3bIaIte IIIapHnр TOPMO3a(B).
IIOscIe YHcTKn HJIN pEMOHTA BceJIa IPOBepaIte pa6Oty TOPMO3a.CM. JIOJIOnIHHTeJIbHy IO HΦOpMaIHO Bpa3JeIe “Pa6Ota TOpMO3a INIIbHOIeHH
IpoBepHTe coCTOHHe yIOBHTeJIa CEIIH (D) H 3aMeHnTeero,ecIIH OH IOBpeKJdH.

IPEyIPEXJEHNE
Даже пгн ExeJHeBHoнЧстke МexaHn3Ma HeBO3MOxHOr rapaHTnpoBaTb ФФeKTHBHOCTb TOPmO3a BaPoTe. Co6JIOnaIte HnCtpyKuIIH no paCInIOJBKe.
XPAHEHNE BEH3OIIJIbI (MEcIu IIOJIbIIe)
CneIte BCE TOJIINBO H3 6aKa B KaHcTp yJIA 6eHNHa.
JaTe MOTopy Iopap6oTaTb,IOka OH cAm He ocTaHOBHTc. 3To IO3BOJMeI IOJIHOCTbIO BByHaTb OCTaJIIEeC8 TOINHBO, YTObI OHO He ocTaNHIO JInIKOFO OcaIKA B CnCTEMe.
HaKMHTe HeckoJIbKO pa3 Ha rpyuI cy tApTepa, YTO6bl BbIHATb H3 Kap6HopaTopa OCTaTKH TOJIINBA.
Pysckn
OBCJYXHBAHHE
CneIte Bce macIO IJI IIHHb I IeINB KauHcTpy IJIa MacIA.
TuaTeJbHoOuHCTnTe 6eH30HNJy.
XpaHHTe ee B cyXM, IIPOBEtPbBaEMOM IOMeIeHHN, BHe IIpeJeIOB IOcraeMOCTH JeTei.
IpMueaHne: HeJepKHe 6eH3OHNJIy pJIOM c eJKHMI BeIeCTBaMH, TaKHMN KaK caIObbI y XHMKaTbI HJI pAOMopJXKBauHOA couJIb.
CJIeJyIe CTaJIaPTAM ISO IMcTeHbIM IpraBbIaM XpaHeHHa RTOPOUero.CIIHTOE TOIJIHO MoKHO HcIOJIb3OaBT B JpyTHX HnCTpyMeHTax C IbYXTaKTHbIM MOTOpOM.
Pysckn
CAMOCTOJEIBHOEYCTPAHEHNE
| Helenaika | Bozmochnaya przyчuna. | Yctspanienne |
| MOTOR He 3aIpyckaeTcra. [Поверьт.Чтобы БыклioчateJIb StOЯЛВ Паложеви NBJI. "I" ] | Het Искрь. | Поверьт coSTOЯнHe CBeuN.Спимпte КрblИКу Bo3dUshHOro ФИльТра. БыИberнite СeчУ n3 roIobKи IciLIIHДра.НадьтЕ правОн Ha CbeUy n ПIoLOJKe Tte eHa nToIobKу IciLIIHДра, псисLOнв K为其 HIXKHI N3IeKTPoI cBeuN.ПOTянITE Stapertep И пОмOTRHTe, ectb Л МeЖДу 3IeKTPoIaMn CBeuN HcKpa.Есл Искрь He,ПрodeJaIte Ty je OIePauHIO C HOBO BcEuy. |
| Motop "3axIe6hUlcIe". | Поставы Te BlyIiOuHаTeB bIoiLOJeHNe CTOI "O" I bIiyerbHITe СbeUy.ЗдВиltTe ДО кONцДлPoSSCEь N DePryHITe 15 - 20 pa3 Зa Stapertep.ЭTO ocB6OoiH MTOpOT OT LlIeHero TOIpIbA. ПосточTte CbeUy u yCTaHOBHt eе ha MeCTo.Поставы БыклioчateJIb B IoiLOJeHNe BKI (I).Плдakayte ПОсoc 4 pa3. ДePryHITe TpI pRa3 cStapertc CПОLOHcTbU 3aIBNHyTbIM dIpoCCeJIeM. Есл MTOp He 3aOIOHcTc, Поставы TpOcSeJIe B cpeIHee Паложеви,И 3aIpyckaiTE MTOp KAK OBIuHIO.Есл И ПОсle ЗТOTO MTOp He 3aBeJIcIe,ПОТOPHITe BCErH OIePauHIN C HOBO СbeUy. | |
| MOTOR 3aBOIHTcno He No He par3roHЯETcra. | ВИNT "L" (maIbIe OБорOTb) Т repeуET peYIiPovBKN. | Образнелсь B ФирMuHь N IeHtr TexHNUeCKORO obcIyJXHBAHIN, ЧТобь ТExNK OTRpeYIiPovBaI Kap6HOpATop. |
| MOTOR 3aBOIHTcno I ГлoxHET. | ВИNT "L" (maIbIe OБорOTb) Т repeуET peYIiPovBKN. | Образнелсь B ФирMuHь N IeHtr TexHNUeCKORO obcIyJXHBAHIN, ЧТобь ТExNK OTRpeYIiPovBaI Kap6HOpATop. |
| MOTOR 3aBOIHTcno Ho ПлoxO pa6Otaet Na Полийский | ВИNT "H" (6OJIbIe IoborOTb) Т repeуET peYIiPovBKN. | Образнелсь B ФирMuHь N IeHtr TexHNUeCKORO obcIyJXHBAHIN, ЧТобь ТExNK OTRpeYIiPovBaI Kap6HOpATop. |
| MOTOR He 3aRHOJETcra do ПалоHо SCOKOstri, и Из Hero ИдeТ MHOTo ДыIMA. | Н electablbnaia IIpoIopuIina Macla и БeSHINa B ToIIOHBn CMeCH. ВоЗdIuHbIy PhIbItp 3acopHJIcIe. Сетka ИскроуЛobHITeJIa 3acopHJIaIcIe. ВИNT "H" (6OJIbIe IoborOTb) Т repeуET peYIiPovBKN. | И сюлььуte HOBуO cMeCS b c pravBuHbN oIpoIopuIeH СпнтЕТЧУССКОМ macla Ддя ДуBXТakTHbIx DBHrATEJIe. ПосточTte Bo3dUHbIy PhIbItp. CM. рa3dJe "IcHcTKa ВоЗdIuHBO rФIbItpa". ПосточTte cTeKу HSCpOToPraJxAteJIa. CM рa3dJe "Поверka / обLуЖИВaHIne cTeKу HSCpOToPraJxAteJIa I rIyIuHTeJIa". Орразнелсь B ФирMuHь N IeHtr TexHNUeCKORO obcIyJXHBAHIN, ЧТобь ТExNK OTRpeYIiPovBaI Kap6HOpATop. |
| MOTOR 3aBOIHTcno I par3roHЯETcra, Ho ne Держит рeЖIM maJIbX obopotOB. | СлdeуET otReYIiPovBaTb BИNT maJIbX obopotOB kap6HOpatORA. | ЧТобь уBEIiNHT b CskOporCTb B reJxHme MaJIbX obopOTOB, ПовернITE BИNT 3aMeIeHIne "T" BnIpABO. CM. рa3dJe "PeryIiPovBKa Kap6HOpatORA". |
| СлdeуET otReYIiPovBaTb BИNT maJIbX obopotOB kap6HOpatORA. | ЧТобь сokратпь TckOporCTb B reJxHme MaJIbX obopOTOB, ПовернITE BИNT 3aMeIeHIne "T" BJIeBO. CM. рa3dJe "PeryIiPovBKa Kap6HOpatORA". | |
| Псь вршаETcra ha maJIbX obopotax. | В снctemу похODHT Bo3dUx. | Орразнелсь B ФирMuHь N IeHtr TexHNUeCKORO obcIyJXHBAHIN Для 3amEHbI deΦeKTHO сИстемы. |
Pysckn
CAMOCTOJEJIbHOE YCTPAHEHNE
CITITI TOATE INSTRUCTIUNILE.
MÁSURI DE SIGURANTA GENERALE

AVERTISMENT
- Maner fata
- Maner principal
35cmc
4,4 kg
310~cm^3
210 cm3
40 cm
9,53 mm
1,27 mm
fin si cu tendinta
redusă de recul
6 dinti
35~cm^3
1,6 kW (2,2 ch)
12000 rot/min
2700-3100 rot/min
100 dB(A)
110 dB(A)
4,5 m/s²
4,5 m/s²
40 cmc
4,4 kg
310~cm^3
210 cm3
46 cm
9,53 mm
1,27 mm
fin si cu tendinta
redusă de recul
6 dinti
40~cm^3
1,8 kW (2,4 ch)
12000 rot/min
2700-3100 rot/min
100 dB(A)
110 dB(A)
44cmc
4,4 kg
310~cm^3
210 cm³
50 cm
8,26 mm
1,27 mm
fin sici tendinta
redusă de recul
7 dinti
44 cm3
2,0 kW (2,7 ch)
12000 rot/min
2700-3100 rot/min
100 dB(A)
110 dB(A)
4,5 m/s²
7,3 m/s²
DESCRIERE (Fig. 1)
(B) Krawedz bocznata
KARBURAATORI SEADISTAMINE (Joonised 61-63)
Enne karburaatori seadistamist:
KEDES VADIKLAS APKOPE (58. att.)

BRIDINAJUMS
PRECITAJTE SI VSETKY POKNY.
VSEOBECNE BEZPECNOSTN POKNY

UPOZORNENIE
Upozornenia, štítky a pokyny uvedeni v tejo casti návodu slúžia pre vašu bezpečnost. Nedodržanje věstkychPokynov moze spôsobil vázne zranenia. Pre bezpečné použivanie tohto náradia si pozorne prečitajte tento námov a oboznámte sa so věstkymi Štítkami pripvenými na náradi. Zachovanie zdravého Rozumu, opatrnosti adoğanža náradia su podmienkou bezpečnosti.
OBOZNÁMTE SA DÖKLADNE SO SVOJÍM NARADIM. Prečitajte si pozorne námod na použitie. Oboznámte sa s použivaním pily, jej obmedzeniami a smoznými nebezpečenstvami špecifikými pre toto náradie.
RETAZOVÉ PÍLY su urçéné len na rezanie dreva.
KED SA SPIOCKA VODIACEJ LISty DOTKNE NEJAKEHO PREDMETU ALEBO KED SA RETAZ ZAKLIESNI V REZE, MOze DOJST K SPATNEMU RAZU. Dotyk spicy vodiacej liSty s imyn predmetom mozu v urcich prapadoch sposobit rchyle vymrstenie vodiacej liSty smerom hore a dozadu k pouzivatelovi. Zakliesnenie refazee v hornej casti vodiacej liSty moze sposobit prudky pohyb vodiacej liSty smerom k pouzivatelovi. Obidve tieto reakcie mozu sposobit stratu kontroly nad naradim, co moze viest k vaznemu zraneniu. NESPOLIEHAJTE sa len na bepeznochstne privky refazovej pily. Pri obluhe refazovej pily je potrebne podniknuf urcitek roky na zabranenie vzniku urazov alebo zraneni pri recazich pracach:
- Vdaka základnám znalostiam o spätnom raze możete zniží alebo vylúčí moment prekvapenia. Náhle prekvapenie je�件ou prćin urazov.
- Pri práci držte pilu pavne obidvomi rukami. Pravou rukou uchopte zadnú rukovat a'avou rukou prednú rukovat oboputim palcami a prstami. Pevné držanie náradia spolu s napnutým lavym ramenom pomáhaju zachovat kontrolu nad náradim aj v pripade spatného razu.
- Skontrolujte, cis v pracovnej zone nenachadzaju prekazky. NEDOVOLTE, aby sa spička vodiacej listy dotkla pna, vetvy, plotu alebo inej prekazky.
- Rezte pri vysokych otackach motora. Vzdy rezte s motorom beziacim na plne otacky. Uplne stlacte plynovu packu a udrziavaje rovnomnru rychlost reznania.
- Ruky pri praci nenafahujte priliš daleko a pilu nedržte nad urovnou hrudnika.
- Dodržiavajte poukny vyrobcu na ostrenie a udrzbu refazovej pily.
- Použivajte len nahradné vodiace lišty a refaze odporučné vyrobcom.
Slovencina
VSEOBECNE BEZPECNOSTNENE POKNY
RETAZOV PILU NIKDY NEOBSLUHUIJE JEDNOU RUKOU. Držanim pily Jednou rukou možete spósobit vázne zranenie nielen sebe, ale aj asistujucim alebo okolostojacim osobám. Refazová pía sa musi použivaţ obidvomi rukami.
NEPRACUJE S RETAZOVOU PLOU, KED STE UNAVENI. Nepouzivaje refazovu pilu, ked ste unaveni, chori alebo pod vplyvom alkoholu, drog alebo liekov, ktoré znižuju pozornost.
NOSTE BEZPECNOSTNU OUV. Noste priliehvy odev, ochranné rukavice, ochranné okuliare, chraniče sluchu a ochrannú prilbu.
- NESTOJTE NA NESTABILNOM POVRCHU pri práci s reṭazovou pilou: napr. na rebrikoch, lešeni, stromoch atd.
S PALIVOM MANIPULUJTE OPATRNE. Motor startujte minimalne 15 m od miesta, kde ste plnili nadrz palivom.
- NEDOVOLTÉ OSTATNYM OSOBÁM stav v blízkosti miesta, kdestartujete pilu alebo kde s nou režete. Okolostojace osoby a zvierata sa nesmú zdrziavaf v pracovnej zone.
NEZAÇINALAJTE REZAT, kym nie je pracovná zona yvciistena, kym nebudete moct staf pvne na obidvoch nohach a kym nebudete mat premyslenu unikovu cestu pred padajucim stromom.
VSETKY CASTI TELA MUSIA BYT V DOSTATOČNEJ VZDIALENOSTI od pily, kej je zapnuty motor.
PRI PRENÁŠANI RETAZOVEJ PÍLY VŽDY VYPNITE MOTOR A ZAISTITE BRZDU, vodiaca lista a retaz majú smerovat dozadu a tlmić má byt na strane odvrátnej od tela. Pri preprave refazovej píly použite vchodné puztro na vodiacu listu.
NEPOUZIVAJTE RETAZOVU PILU, AK JE POSKODENA, nespravne stavnava alebo neuplne ci nie pvne zmontovaná. Skontrolujte, ci sa refaz zastavi, ked' uovl'nite plynovu packu.
VYPNITE MOTOR pred poLOzENiM pily na zem. NIKDY nenechavajte reTazovu pilu zapnutu bez dozur. Ako dalsie bezpecnostdne opatrenie pouzite brzdut rezafe predpoZENiM pily na zem.
BUDE MIMORIADNE OPATRNI pri rezani malych krikov a stromcekov, pretoze tenke konarky sa mozu zachytit v refazi a yvmrstif smerom k vam alebo narusif vašu rovnováhu.
KED REZETE KONAR s vynalozenim tlaku, budte pripraveni, aby ste mohl rychle odskočit, ked napatie v drevenych vlaknach zrazu povoli.
■ RUKOVÄTE UDRŽIAVAJTE suché, Čisté a bez zvyškov oleja alebo palivovej zmesi.
RETAZOV PILU POUZIVAJTE LEN v dobre
vetranychpriestoroch.
NEPOUZIVAJTE RETAZOVU PILU NA PRACUV KORUNSTROMU, ak ste na to neboli predtym odborne vyskoleni.
PRI PRACI S RETAZOVOU PILOU MAJTE VZDY PORUKE HASIACI PRISTROJ.
DORZIAVAJTE POKNY NA OSTRENIE a udrzbu refazovej pily.
POUZIVAJTE LEN VODIACE LISTY a refaze znižujuce spatný raz určene pre tento vyrobok.
NEPRISPOSOBJUJE block motora ohnutej vodiacej liiste ani nepipajale prisluensstvo alebo zariadenia, ktore nie su uvedente pre tuto pilu.
USCHOVAJTE SI TIETO POKNY. Pravidelne si ich citajte a informujte o nich pripadnych dalsich pouzivatefov. Ak tento vyrobok niekomu poziiciate, pozičajte aj tietoPokyny.
SPECIFICKE BEZPECNOSTNÉ POKNY

UPOZORNENIE
Upozornenia, štítky a pokyny uvedeni v tejto casti návodu slúzia pre vašu bezpečnost. Nedodopržanie věschkychPokynov moze spósobit važné zranenia.
VŠEOBECNE OPATRENIA
NEODREZÁVAJTE VINÍCE ani malý podrast (s priemerom menśim ako 76 mm).
POVRCH TLMICA JE VE LMI HORUCI poças praça a bezprostredne po nej, preto sa ho nedotykajte casfami tela. Kontakt s timicom moze sposobit vazne popaleniny.
RETAZOV PILU DRZTE VZDY OBIDVOMI RUKAMI, ked je motor zapnuty. Obidve rukovate uchopte pvne oboputim palcami a prstami.
NIKDY NEDOVOLTPE POUZIVAT RETAZOVU PILU osobam, ktoré neboli nalezite poucené o jej spravnom pouzivani. Toto plati ako pre pozičovne, tak aj pre sukromnych vlastnikov naradia.
■ PRED NASTARTOVANIM MOTORA skontrolujte, cis a refaz nedotyka ziadneho predmetu.
RETAZOV PILU POUZIVAJTE len v dobre vetranych priestoroch.
VHODNY BEZPECNOSTNY PROCOVNY ODEV. Noste priliehavy odev. Vzdy nods lhhe a hrubé nohavice, vysoku obuv a rukavice. Nenoste spherky, kräte nohavice, sandále a nikdy nepracujte s bosymi nohami. Nenoste volny odev, ktory by sa mohol zachytif do motora alebo refaze ci podrastu. Noste kombinézu, dzínsy alebo iné priliehavé nohavice z pvěnej látky. Ak mate lhhe vlasy, stiahnite si ich gumickou nd urovnou ramien.
Slovencina
SPECIFICKÉ BEZPECNOSTNÉ POKNY
Casti clanku refaze:
(A) Rezný uhol
(B) Bočná hrana
(C) Obmedzovaci zub
(D) Predný koniec
(E) Zubová drážka
(F) Zadný koniec
(G) Otvor pre nit
(H) Horná hrana
Nebazudnite naostri vsetky clanky refaze na predpisane uhly a rovnak dlzku, pretoze rychly rez je mozné dosiahnut, len ak su vsetky clanky refaze rovnake.

UPOZORNENIE
Refaz je ve'lmi ostra. Pri udzbe refaze v'dy pracujte v rukaviciach, aby ste zabranili vaznemu zranieniu.
Pred ostrenim refaz napnite. Pozrite si cast Nastavenie naputia refaze.
Použite okrúhly pilník s priemerom 1,6 mm a držiak (nie su súcastou dodáky). Vsetky zuby ostrite v strede listy.
Pilnik drzte na urovni hornej hrany rezného clanku. Pilnik nesmie byt skloneny a nesmie sa vychylovat do strán.
Pri ostreni aplikujte mierny, ale pevny tlak. Pilnik tahajte smerom k prednemu hrotu clanku refaze.
Pri spātnom pohybe pilínk nadvihnite.
Kazdy clanok refaze prebruste niekolkymi pevnymi pohybm. Vsetky clanky refaze na favej strane (A) opilujte jednym smerom. Potom prejdite na druhu stranu a opilujte clanky refaze na pravej strane (B) v opacnom smere.
■ Pilnik očistite drōtenu kefou.

VYSTRAHA
He Bn yIapH, KOraTo IbPBeCHHTe HIIIK Ce OTnycHaT.
ДРБЖКITEТРЯБBAДа ca cyxHиЧСТи,6e3 3aMbpcraBaHHOT MacIIO HropHBO.
C TPHOHA CE PABOTN CAMO HA IIPOBETPMB MECTA.
HEPEKETE IbPETA CTPHOA oCbeH aKO He cTe cIeuaJIHO OObuEH Ja H3BbPiBaTe TaKaBa DeHocT.
BHHAHN HOCETE MAJbK IIOXAPOTACHTEJI, KORATO PABOTITE C BEPHXHNA TPHOH.
CIIA3BAIte HNCTPYKUNITE 3A 3ATOUBAHE HIOJIIPbJKA HA PEXEIIATA BEPNTA.
I3NIOJI3BAJTE EDHHCTBEHO IHHH INBepHn C Hncka CKJIOHOCT KbM OTKaT, IIpeOpBtAHN OTIPOIN3BOJDTEJI HA MOTOPHNTHO.
HEIOCTABIHTE IbIgOooBpa3Ha IIHHa HbIBHraTeJIHHa 6JIOK IN H3IOI3BaIte caMO OIOOpeHN pIHNaIeKHOCTh 3a TpHOnA.
3AIIA3ETE TE3H INHCTPYKUHN. PeIOBHO ce KOHCYITnHpaIte C TIN H INIpeIOCTABJIte Ha IpyTH IINHa, KOHTO IIe H3IOI3BaT IPOJyKTa. AIO IIe IpeIOCTABTe MAIHHaTa HA IpyRO IInHe, cIbIO TaKa IaJIte H cIbIbTCTBaIIOTO pKOB0OJCTBO 3a yIOnTp6a.
CIEUΦHINIIPABUNIA3ABE3OIIACHOCT IPII PA6OTA C BEPHXEHTPNOH

IIPDEUYIPKJEHNE
IeJIaHa npEynpeKJEnHnTa n Kya3AHnTa B To3n paeJIeOT pBkoBOJIcTB0To 3a yNtOpeBa e Na oChyrrT BaIIaTa 6e3oIacHocT. PInr HecIa3BaHe Ha Te3n HHCTpyKUn MoKe Ja ce IpnYHnRr TeKKn TeJeCnn NOBpeJi.
OBIII IPEIIA3HNMEPKH
HEPEKETEJIO3OBINPbKHNxpaCTNc HnAmetbpIO76MM.
IIIYMO3AIGIYHINTEJIITCE HAIROPEIIBA MHOTO IO Bpeme Ha n cIeJ pa6Ota c trHOHa. He JOKOCBaHte Ta3n IOBbpxHOCT, 3aIIO TO MOKe TeKko Da ce H3TropHe.
BINHAFINPbJXTETPHOA CIBEPbUE, JOKATO BnHrataJIpaOHT. JpIbJKe 3JpABo TPHOA, Kato pIpbCTHe BN TpIb6AIOpeO IA6bXaIIAT dpJbKIne.
HEIOnyCKAHTECTPHOHA IA PABOTHJIIE, KOeTo He e IOnyJIno Heo6XoJIMHTe HcTpyKIN3a IpaBnIOto FyHKINOHnpAte. TOba ce OTHac KaKTO IOΦHpMn, OTaBaAsPiNdHaem OobopyDbaHe, Taka H 3a YactHN JIIHa.
IIPEINI DA IYCHETE IBNATAEJy, yBepTe ce, Ye BEpHraTa He e B KOHTaKT C HnKaKbB IIpeIMeT.
C T P H O H A C E P A B O T H C A M O H a I p o B e T p H B N M e c t a.
Блтарский
CIEIINHIIPABNJ3ABE3IOACHOCT IPII PA6OTA C BEPHXEHTPNOH
HOCETE IOXODIIO OBJEKIO.He 6JIuHTe IINPOKINpEXn.BHAnr TpOBAJaHOHCOTe JbTbTn HIIbTeH NaHTaIOH,6OTyINnPbKabNtU. He NOcTe 6hKyTa, KChn NaHTaIOHn CnAHJINn HIKORA he pa60TeTe c 6oCN KpKa. He cIarai Te IINPOKINpEXn,KOHToMORat Ja ce3aKaayat B DIBrAteJI INn Da5bDat 3axBaHATn OTBeprata INn B XpaCTn.OsIHuaTe rAiepeH3OH,IKNHcNn INn DJIInn NaHTaIOHn INIITbTHa,yCTOnuHBMaTePn. XbaHeTe KocATA nHaD pameHaTa.
Hocete 06yBKN, KOHTO He CE IIbP3aJIaT, H pa6oTHNI pKabNtI 3a IIO-JIo6bP 3axBAT Ha HHCTpyMeHTa H 3a 3aIHTA ha PbIeTe.
Korato pa6oHTHe cTo3H HnctpyMeHT, HocTe IpeIa3HH cpeIcTb3 aOHTHe nYiHTe, KaKTo H KAcKa.
3APEKIIaHE HA PE3EPBOAPA (IA HE CE IIYIII)!
3a da ce orpaHUn onaCHOCTTA OT NOXAP H 3rApHHN, BHHMaBaJIte npn pa60Ta c ropHbOTo. ToBa e H3KJIOUHTeJIHO 3anaJIIM IPOJYKT.
CmeBaIeHcXpaHbAaIteRopHbOToBcI,IpeBnEHN3a6EHNI.
CmecBaHTe H cHIIBaHTe rOpHBOTo Ha OTKpHTo,JaJIeUOT HCKPH H IIaMbK.
I36epTe YHCT yuaCTbK, CnpeTe IIBHrAteJIA H O OCTaBeTeJa H3CTHHe, IpEJa IA ro 3apeHITe.
BabHOaBaHTne kanaKaHTa, 3a da HnYnche hAraHaeTO nHa de ce paCnHe rOpBHTo OKOJe He.
3aBHTe Io6pe KanaUkata Ha pe3epBoapacneI 3apeXJHe.
IIOHCTETe MaIHINATA, aO cTe p3aCIIaJIr roPHBO. IIpeJHa Ia IyCHETe DnBArTeJIa, oTJIaJIeTeCe he 15 M OT MxCTOTO, KBJETe Cte TbJIHInI pe3eBoaAp c rTOHBO.
Hnkora He TpbIgBaIte Ja rOpIte pa3cnHaHO rOpHBO.
3OHA HA P83AHE/PA6OTEH yUACTbK: OCHOBHN IPEIIIA3HN MEPKH
He pa6oTeTe C bepHxHHa TpHO, KaueHN Ha IbPBO.
Haepa6oTeHcBepHNHHrTpHOHaCTbJI6a:TOba e HKJIOHTeJIOnAO.HC.
BcHKn cTpaHUnHJnHa JxHbOTnTp46BaJa ca H3BbH pa60THy yAcTbk. He No3BOJIaBaTe Ha HNKOrO Ja ce Ipn6JIHXKaBA Do TPhOHa, KOraTo FO BKIOuVBe Ta HIN pexket e Hero.
Be.IeJka: IIIOUHa Ha pa6oTHH yuaCTbK 3aBHCn ot Pa6oTata, KOITo Ie CE hEBbPbIba, KaKTO H OT BVcoOuHATA Ha IbPbOTo IIN OT cTBOLa, KOITo Ie CE o6pa6oTBA. HanpHMeP Iprn IOBaJIaHe Ha IbPbO CE hNcKBa IIO-ROJHM pa6oTeH yuaCTbK, OTkoJIkOTo 3a IpyTN JeHocTH KaTO pa3TPyIBaHe.
HATNCKI TEGJEHE
IpoTHBOEeCTBaIIaTaC Hla BnHaTrc c NocKa, ObaTHa Na HBpTeHTo Ha BePrrata. 3aTOBA Tp8BaJa BnHMABate C TEJIINTEJIHATA CNJIA, KOrato pexete c JoINHpaB6 Ha BePrrata, nC HATNCKA, KOrato pexete c rOpHata Yact Ha IIHHata.
BeJexKa: TpHObT e MHaJI IIbJHn fpa6pHcH H3IITBaHna. B3MOxHo e IIO HeRo Ja HMa ocTaTbUn OT MacIO.
IPEIIIA3HN MEPKN IPIIIOJIIPbJKA
HnKora He pa6oTeTe c TpHoN, KOITe HeH3npaBeH, JIoIO peYJIpaH n YacTHUHO HJIn HeINpABnIHO crIIO6eH.
YBepTe ce, Ye BepHrata cInHp aI ce BbptN, KORATo OTyNHcHTe TpHRepa Ha CkopocTt. Ako pexKeiHa TbePra ce BbptNa HAp3eH xoJ, MoKe Ja ce HAlOxH perJaK Ha Kap6byatopA. BnXte pa3Je "PeJIax Ha Cbo6OHNHxO"OT TOBA PbKOBOCTBO.
Ako cIeI perJaKa BepHrata IpoJIbJXaBA Ja ca BeBPTN IIPI np3aeh XoI, OobpHeTe CE KbM oTOPh3nAPc BepBn3 Ha Ryobi H ne paObTeT e T rnoHa, pIeNi da Ce h3BbP1nn peMOHTbT.

IPEyIPEXJEHNE
BcNcKn IoppaBKn IOp TpHOna, C H3KJIIOUeHHe Na OHcAnHte B Yka3AHAra 3a NODpBxKaHa pBKOoIcTBoto 3a yNoTpe6a, Tpr6Ba 7ae Ce N3bPbWbat OT KBAJIHΦHUnap TexNHK. A KOce H3IOJ3BaT He NOIOXOJMy INHCTpyMeHTH, 3a Da CE H3BaDN MAOXOBKbT INI DpKHy, IOKAto CE CBIA JcEINHHTeJIr, TOBA MOKe Ia IOBpeIN MxAOBHkA H ToH Ja ce OTKbCHE, Ipn KooTeJa ce IpnuYHHT TeKKn TEJeCNH NoPBepi.
OTKAT
OTkaTbT IpeIcTabJIbBa OIIaCHO IpoTbHOBeIcTBHe, KOeTo MoKeJa IpruHHN TeJckn TeJeCnIOBpeJi. He pa3HTaIte EINHCTBeHO Ha IpeIIa3HITMe MEXaHH3Mn HA BePbHKHNr TpHOH. EJHOBpeMeHHo C TOBA Tpr6Ba Ja IpeIIpHemEt KOHKPeTHN IpeIIa3Hm MEPK, 3a Ja H36ErHTe ONaCHOCTTa OT 3JIOIpyKn H npAHBaHHa.
BleJekka: BnKte pazIe "HaunH na pa6oTa" ot pblKOBOCTBOTO 3a IOBEue INHΦOpMaTHa 3a OTkATA n HAUNHHe 3a IpeOJTBPaTbAbe H TeKxN TJeEChN IbNOpeJi.
3AHA3ETE HACTOIIOTO PbKOBOCTBO 3A YIOTPEBA,3A JAMOKETENBbDEIEJCA CE KOHCYJITPATE CHETO.
Блгарский
CIMBOJH
HЯков OT IOOCOeHNITI NO-IOJLY CHMBOJIH MORAT Ja CE BnIaT BbpyMaIIHHaTAt. Pa3yUte Tn H 3aONMHTe O603aueHHeTo HM. KaTO 3aONMHITE IpaBNIHO CHMBOLHTE, IIE MOKeTe Ja H3IOJI3BaTE IPOJyKTa IIO-6e3OJIaceH eIeKETHBEN HaUHH.
| СИМBOЛ | HA3BAHNE | ОБОЗHAUCHЕНИ / OБЯСHECHNE |
| Прешистенье | Овознaya воредиемерки, сбърasts с вишата бezоноанoc't. | |
| Почуторе Вимателю ръковскиеото за улотpeба | За ѳибетене орадостта от телесни по breasti, поеди ekсл Sloanatingaiaяяяяяяяяяяяяяяяяяяяяяяяяяяяяяяяяяяяяяяяяяяяяяяяяяяяяяяяяяяяяяяяяяяяяяяяяяяяяяяяяяяяяяяяяяяяяяяяяяяяяь. Травьда щ_PREюпдзп очига, поеди орадоста и по indstва за уштente и каск. Когато пботite с таши машина, поеде орадastни срedingва за очinate и уштente, касто и каска. | |
| Пушистенье 3абра themselves | Забра themselves e за се пшии и за се пботы в блиизов л do nckри плnot пламьк. | |
| Зават с дve рьце | Дръжte и пботete с труноа с дvete си рьце. | |
| Забраныа ce пбота с сени рьka | He pботete c trpoноа, koTo go nbpЖITE сamo c сени рьka. | |
| ВълегODEн okсци | Двигате自主创新ists Искета вълегODEн okсци - ra3 6e3 миризma, ковто може на e смьртонося. He pботete c verhЖня有很大ун в Затворецnome themselves. | |
| ОTKAT | ОПАСHОCT! Падete ce ot OKat. | |
| Контакт с Шината | Вимавaite крагту на Шината на He Влиза в Контакт с п徴metи. | |
| Винаги посые рьковиц | Пос brame Na рбота с труноа посые пьтын рботони рьковиц, ковто He se Xlbztrat. | |
| Бehинн и масло | Изпл�вайte БеzoLOВен БеHZIN 3a ABTOMOБил, с OKТАНОВЧИСJO87 ([R+M]/2) пи пь-BHCOKO. Малшната в рботи с дувтактов ДУВАТЕЛ, пи ковто ТрбБа лдссмсгБЕHZIN И сИNTETHУNO МASJO3a ДУВТAKТВДУВАТЕЛ (В сы�тошени 2%). | |
| Дръжte пошчнite Лиca надалач | Всчкн стравочни Лиca и ковOTНи ТрбБа лдсStyleн на разстони наи-малко 15 m ot рботони уразьк. |
Блгарский
TEXHNUECKA INHΦOPMAIIHA
CMA3BAHE HA BEPHATA HHA IIIHATA (phr. 3)
H3IOI3BaIte MacIo 3a BepHn H IIHH RYobi, IpeIHa3NaueHo 3a BepHn H MacIbOHKn 3a BepHn H c TaKaBa fOpMyla, KOIto IO3BOJIbA eFeKeTKBHa pa6Ota 6e3 pa3peKJHaHe Ipn ROJAM TemIIpePaTyeh IHaIaIzOH. KoHCyMaIJIraTa Ha TPhOHa e Ipn6JIbIHTeJIHO eIIN Pe3epBoAp macIo Ha eIIN pe3epBoAp roPnBO.
BeJekKa: He 3nIOJI3BAIte octapeJIH, BcE H3nOJI3BAHIN HIN 3aMbpeCHN MaCJa. Toba MOKe Ja IOBopeJe B MAJCHeHATA NOMII, IHHHATA HIN BEPHrATA.
BHHMaTeJIHO cHneTe MacIOTO 3a IIHHaTa H BepHraTa B pe3epBoapa 3a MacIOTO.
IbJIHepe3epBoaapcMacIOIIpHBCaKo3apeXJaHeHa pe3epBoaapcROpHBO.
H3IOJI3BAHE HA CIIHPAUKATA HA BEPHATA (ΦИТ.4-5)
BceknIbT IpeH yIOTpe6a IIPOBepBAHTe H3IIpaBHOCTTa Ha cIInpaKaTaHa BepHgata.
C Trophata Yact Ha JbBATA cPbKa BkJIOUeTe CINHPaKATA Ha BepHrata, KaTo HATNCHEte PpeJIna3IeJIc/CHnpuKATA HAnPeJ, JOKATO BepHrTaCe BbPtn C MaKcMuaJIHa ckOPOCT.
BbPHeTe cInpaKaTaHa BePnIgata, KATO IpIbnHete IpeIaIaIeJIa/cIIpaKATA KbM IpIbXkata,IOkato YyeTe IIpaKaBaHe.

IPEyIPEXJEHNE
Ako cinnpaqukata he cnpe He3a6abHb BepHrata HnH AKO cinnpauqkata He cTOH cMOCTOHTeJHO B IyCHATO IIOLOXKeHne, O6bPHeTe Ce KbM OTOpH3npAH CepBn3 3a IIIOpBaKb, IIpeIN OHBO Da IIpHcTbNtte KbM EKcIIIOaTuaII.
CTAPTHPAHE HA JBHATAEJI (qHr.6-10)
MaIIHHaTa ce Iycka IIO pa3JIHyeH NaHIn B 3aBHCMOCT OT TOBaJaJIbIbHrAteJIaT E CTUDeH NJIH TOnblJ.

IPEUYIPEJKDEHNE
CTOJIe BIABOOTIIHHATA. HIKORA He IIpeKpaUbaIte TPhOHa HINBepHrata; He ce HaIbBeCsBaIte HaI NIIHHa HbIbKeHHe BAeHpRata.
IocTabeTe TPhOHa Ha BbPxy paBHa IIOBbPxHcT Hce yBpeTe,Ye B 6JI3OcT Do MAIIHHaTa HMA HnKakBNIpeJMeTH NII INI PIIeTICTBna, KOHTO Da BJIa3aT B KOHTaKT C IIHHaTn H beprata.3aJa H36erHeTe IpeXJebPemEHOTOn H3TbIIBaHe Ha Beprata, yBpeTe ce, Ye IIHHaTn Beprata He JOKOCBAT 3eMTa.
XbaHete 3npABO IIpeHnata IpbKKa CJIbHaTa CHpKa H cTbIeTe C dcEHnka pKaBbPxy OCHOBaHa Ha 3aIHHaTa IpbKKa.
Ctaptnpahe npn ctyen dBnrgateJ:
IocTaBeTe IpeKbCBAu BIOJIOKeHHe IYCKAHE (I).
YBepTe ce,Ye cInnpaKaTaHa BepnTaTa He e BKIOueHa, KaTO npbHHe Te IpeJna3IeJa/cInnpaKaTa Ha3aJ.
HaTHcHete HOTnycHeTe 4IbTH NyCKOBH6aJIOH.
IocTabete IpoceJIHaTa KJIaHa B 3aTBopeHo IIOJOKeHHe (1+1).
IpyHHepe pHuKaTa Ha cTApTepa,IOkATO IBHrAteJIaT e IOTOB DA TpbHne,HO He IOBuee OT 5 IIbTH.
IocTabeTe IpoceJIHaTa KJIaIIa B cpeJHo,IOJIy3aTBOpEHO IOJOKeHHe (1).
IpbHHeTe pBcKaTa Ha cTapTepa,IOKaTo IBnGaTeJIaT 3apa60TH.
BeJekka: Octabete JIIBATeJIa H a TpHOna Ja ce BbptN, KaTO IPOceJIHATA KJIana e B TOBA IIIOJKeHHe, 3a OKOJO 15-30 cekyHnB a 3ABNCIMoCT OT tEmepatypata.
HaKpa HaTnche Te OkpaI pOceJIHaTa KlaIIa B IIOJIOKeHHe IYCKAHE (2).

BHIMAHHE
Ako He OTnycHeTe TPhRepa, 3a Da MoKe JBHrataJIeT Ma 3apaobOTn Ha Ipa3aEN XOJ pNIR BKJIIOueHa CINpAka HA BepHrata, PnCKyBaTe JBHrataJIeT Na ce IOBpeH. HnKORA He 3aIbPjKaIte TPhRepa IIpN BKJIIOueHa CINpAka HA BepHrata.
Crtnnpane npn ToBJI ABHrataJI:
IocTaBete IpeBkJIIOuBaTeJIa B IIIOJIOKeHHe IYCKAHE (I).
YbepTe ce,Ye cInHpauKaTa Ha BepHrTa He e BKIOueHa KaTO dpBnHeTe IpeJnA3nTeJy/cInHpauKaTa Ha3aJ.
HaTHcHete HOTnycHeTe 4IbTH NyCKOBH6aJIOH.
IpybHHeTe pByKaTa Ha cTapTepa,IOKaTo DBHrAteJIaT 3apa60TH.
CINPAHE HA JBNIGATEJI (qur.11-12)
OTnycheTe TpHepa 3a CkOpocTHa HoctaBeTe DIBrAteJHa Ja paOHTn Ha npa3En XoJ. 3a Ja cnPete TBnIateJHa, NOCTabeTe INeKbCBaUa B NoIOJIeKeHHe CTOII "“ He nOcTaBnIe TPhOHa BbPxY 3eMrtA, IOKaTO BePHrata ce BbptN. 3a No- OJIIMMa 6eOJIaNoCHOT, BKJIIOUeTe cINpaYKaTa Hc BePHrata, KORAto HE H3NOJ3BaTe TPhOHa.
Ako IpeKbcbayt He cnpe TpHOna, IpbHHeTe OOKpaI
IpoceJIHaTc KJana (3aTbapReH/1) IN BKJIIOUe TcNpuKaTAta
Ha BEpHrata, 3a Na cnpTe IBnRATeJI. AKO IpeBKMIOuBaTeJAT
He cIIHpA TpHOa, KOATO rIOCTaBHTe B IOJOKeHHe CTONI
"OIO", Tp6Ba Jda bJe peMOHTpAH, IpeJIN da N3IOJ3BaTe
TPHOa OTHOBO, 3a Ja He paobOTHTe BOaCHH yCIOBnH Ja He
ce HApAHTE TeJXKO.
BeIeKka: Korato npHKJIOOHte paObTa c TPhOHa, n3nHyCHeTe hAnHraTHe, KATO pa3aBHHe t CNEI TOBA 3aBHeTe kanaVKeHte 3a MacIoTO H a rOpBNoTo. OctaBeTe IbHrAteJIa N3CTHHe, pIepDI npN6bepTe TPhOHa.
Бытарский
HAUH HA PABOTA
PEYJIMPAHE HA CKOPOCTTA (Фиг.13)
AkoIbHrataTeTpBfBa,pa6OtnYyckopra,Ho HeIOBtPka Ipa3eH XOJ,3aBpTeTe BHHTa“T”no YacobHHKOBATAcTeJIKA,3aJa YEbcJItepeIa3HHXoJ.
AkoBepHrata ce BbPTN IIpH Ipa3eH XoI, 3aBbptTe BnHTa "T" o6paTHO HA yacOBHHKOBaTA cTpeJIka, 3aJa HamaJIInTE ckOpcTTa Ha cPiPeTe IBHXeHETo HA BepHrata. AKO H cIeJ peJIax BepHrata IpoDbJIkaba Ja ce BbPtN IIpH Ipa3eH XoI, O6bPHeTe C KbM OTOpH3nPAH cepBn3, 3aJa ce HanpaBt Heo6XoIMHITe IoppABKN, H He H3IOJI3BaJIte TPhOHa, IpeIN Da e PemOHTHpaH.

IPEJYIPIEJKDEHNE
BEPHΓATA H3O6IIO HE TPR6BA J4CE BbPTN IPI PABOTA HA IIPA3EH XOJ. 3aBbPTeTe BnHTa 3a Ipa3eH xoJ "T" o6paTHo Ha yacobHHKOBATA cTpeJa, 3a Ja HamaJIte CkOpCTTa Ipn Ipa3eH xoJ n CnPte BepHrata, INH ce O6bPheTe KbM OTOpH3Hp aCepBn3, 3a Ja BN HapPaBrt Heo6XoHNMTe NaCTPOJKN. He I3No13BaITe MaHHHaT, IOKato He 6bJe IoppaBeHa. BepHra, KOHO Ce BbPTN Ipi paa3eH xoJ, MoKeJa IpiuHH TeKKn TNeCEHN NOBpeH.
HATNCKI TEGJIIEHE (pHr.14)
IpoTHBOeHCTBaIIaTc Hla BnHa n c NocKa, O6paTHa Ha bYbTeHoe Na BePheTa.3aTOBA Tp8Ba Jb HnMaBate C TEJIINTEJIHATA CHIIA, KORATO peJezete c DoJIHHa Pb6 Ha BePheTa, n c HATNCKA, KORATO peJezete c RopHata n Yact.
BeJexKa: TpHOHTb eMHHaI IbJIHH fAp6PCHH H3IITBaHnBb3MOxHo e IO HeTo Ja HMa OCTaTbHn OT MacIO.
IIPEIIIA3HNMEPKN CPEIIYOTKAT (fHr.15-16)

IPEJYIPKJEHNE
OTkaTbT ce NOJUyaba, KORATo BbPrtIaTa ce BepHra BII3a B KOHTAKC IIpeIMET B rOpHata qact Ha KpAa HIIHATA HIN KORATO IIpbOTo 3aIIHnBa BepHrata IO bPme HA p3aHe. KORATo rOpHata qact Ha IIHHATA BIE3e B KOHTAKC IIpeIMET, BEPIrata MOJE da CE bpeKe H Hero H Na Ipe 3a MHI. TOBA BOiIO cHIIHO OTXBpbJIHe HA IIHHATA Harope H h3aB IN IBOcOKA KbM ONEpATOPA. CbIo Taka, Ako peKeeIaTate BepHa 6bJe 3aIIHNaHa No Pb6a HA IIHHATA IIHHATA MOJE p3KO KaOtckObN KbM ONEpATOPA. B TakBa CclYau E b3M0XKn Da 3aY6hTe KOHTpOI Na IHCTpyMeHTa H Na NOJUynTe TeKko HapaHBAe.
He pa3uHTaTe eHHCTBeHO Ha IpeIpa3HHTe mexAHn3Mn, c KOIO pao 3aIOnla MaIIHNaTAt. Bne cbIoo Tp8BaJa IpeIpnPHEMePa3JIHyHmepKn, 3a Ja Ia36eHETe PnCKa OTIIOJUKNi HapaaBAHIn.
3a IIoBuey HnΦopMaunu BnKTe "O6nn IpaBnla 3a 6e3onacHocT".
ПОДГOTOBKA 3A РЯЗАС
HIOJOXEHNE HA PbETE (fur.17)

IPIEUYIPEXJEHNE
HnKora He o6pbIaIte NIOJIOKeHHeTo Ha pIbIeTe, OIIcHAno B ToBa pIbKOBOCTBO (He NOCTABJIe TJIbATA pKa BByPx 3aJHaTa IpBxKHa IINCHaTa pKa BByPx IpeJHaTa), H368raBaiTe BCsKaKBO NIOJIOKeHHe, KOeTO NIOCTABr TaIOTO H pBkATo Bn HA IIbTbHa BePrlTa.

IPEUYIPEXJEHNE
He HaTnCKaIte TprHepa 3a ckOpocTt a c JIbBaTa cn pKa H He XbaIaIte PpeIHaTAt PpbXka C IJcHATA. BHIMABaIte Na He IonoIaHe Na PbTb HA BepHrata, KORAto pa6OHTe C TPhoHa.
IIJIOXEHNE IPIH PABOTA (fur.18)
CTbIeTe cTa6HJHO Bbpy TbPja IOBbpxHOCT.
JIaBaTa pKa BnHaHr TpAba Da e OIIbHaT, B rOToBHOCT Ja yIbPxN OTKAT.
CTOITeBJIABOBOTIIHHaTa.
IIaJIiHTe Bn TpIbBA Ia IIpHJbPkAT IOLHaT auct Ha IpbKHTe.
PABOTEH yUACTbK (pHr. 19)
Pejekete eJHHCTBEO hIbPBeCnHa I IbPBeHN MATEpnaJIH. He pexkete IaMapHa, IIaTMcaca, KaMbHH HIN dpyrH cTPOHTJIH MATEpHaJIH.
HnKora He ocTabaIte Dea Ia H3IOJI3BAT TPhOHa. He ocTabaIte Ipyo JIeue Ia H3IOJI3Ba TPhOHa, IpeJI da cTe My JaII Na IpoUe HactOJIIOTO PbKOBIOCTBO 3a YOITp6ea Ia CTe MY OcnryPbIN Heo6XoHNMn HnCTpykTAk 3a HaJIbIHO 6eOJNACha PaOraTc PhOHa.
BcHcKn npytn Iina (NOMOHNH, cTpaHUnH Nla, da) ) HxNBOHTN Tp6Ba Da cTOr Ha OIppeJeHO Be3OJIACHO PA3CTOHRNE ot paoTHN yAcTBk. IIpi nOBaJIHe Ha IbPBo 6eONACHOTo pa3CTOHne E MHHMym Dba IIbTH BHCQUHnATA Ha Hau-BHCOKOTO IbPBo B paoTHN yAcTBk. IIpi p3aHe Ha IbPBEHn TpyIN Tp6Ba Da ce Cna3BA MmHmAlHo pa3CTOHRNE ot 4,5 M MeJx BceKn pa6oTHNK.
3aeme cta6HJHa IO3HJINH cTbIeTe IO6pe Ha 3emrTa, 3a He H3ry6He paBHOBecHe IO BpEm Ha pa6Ota.
He npbXkTe TpHOna HnBnOChHa HnTpBnHnKoII, 3aIto Ie Bn e TpyHn Da rO bJaJeete npH OTKaT.
He ceeheIbpbeta, KOHTeCeHAMnpatB6H3IOCT JO eJIeKTPoPiPoBOIoHcraJH. To3n TNI JeHooCT Tp86BaJa ce H3BbPIbOaT IoPpOecHOHaJIChTH.
Бытарский
HAUHH HA PABOTA
Pa60TeTc TPhOHa cAmo KOraTo HMa JIOCTaTbIHO CBETJIHnA H IObpa BHNMOCT, 3aJa BHNKdTe IObpe KaKBO npABte.
OCHOBHA TEXHUNKA HA PABOTA/PR3AHE
3aJa ca 3a0n03aHee c TpHOHa, 3aOnOyHete Ja pexeHete MaJIKN KIOHN, KaTO H3IOI3BaTe pa3JIiHNuTexHHNK, IpeJN Ja IIprHCTbIInTe KbM IIO-OITOBOPHN 3aJaHN.
3aemeTe IpaBnIHO NOIOJKeHHe CJIHcE KbM IbPBOTo H TPhOH Ha Ipa3eH XoJ.
IpeHJa 3aIOOHete Ja peKTe, BKIOUeTe Ha MaKCHMaJIHaCKOPoCT, KaTO HaTHcHete TPHepa JOKpaJ.
3aioHeTe da pexKeTe, KaTo TpHOHBt cpeIy IbpoBO.To.
Ipe3IJIATO Bpeme,IOkato pekeTe,IBHrAteJIaT Tp6BaJa pa60TH Ha IIbJIHa MOIOCT.
Octabete TpnoHa Ia CbbpHIN “IuaIata pa6oTa” H npocTo Jleko HaTHcHete HaJouIy. IIpn No-roJIHM HaTHCK cbIeCTByBa OAnchOCT Ja NOBpeJITe IHHATA, BepHrata H dBHrataJIa.
OtnycheTe IocTa, KOrato IIpHKIOUHTe C p3aHeTo, H octabete IBnIATEJHa pa6oTH Ha Ipa3eH xOJ. Ako OCTabHTe TPhOHa JAp6oTH IIpH MaKCHMaJIHa cKOpOCT, 6e3 JapeXe, HMA PnCK OT IIpeXJEbPemEH N3HOcBaHa He BepHrata, IIHHATA NIBHrataJIa.
He ynpaJxHbAHTe HaTHcK BbPxy TPhOHa B KpaHa p3aHeTo.
IIOBAJIaHE HA IbPBETA-OIACHN YCIOBnA (ΦHr.20)

IPEDUYIPEXJEHENE
He ceyete Ibpbeta IIH CNIEH BHTpI ROJIMBAJXHOCT. H3uaKaJIte IO-6e3OaHn KJIImaTHUHNYcJOBNI.
IIINIOBAJIINE HaIbPBO MHO eBaJXHO Ja cna3BaTe CJIeJHITHe HNCTpyKUHN, 3aJa H36BerHete PHCKOBETe OT TeKKN TeJeCNI NOBpeHn.
Korato pa6oHTHe c To3H HnCTpyMeHT, Hocete IpeJHa3HH cpeIcTbA 3a OHTHe H yIHTe, KaKT0 H KAcKa (A).
HeceTeHaKIOHEnIbPBeTa HINrOJIeMH IbPBeTa C HTHNI HMI MbPTBn KIOHN, C NaHnAaKopa HIN C KyXh CTBOJIOE. TeN IIbPBeTa Tp6BaJa Ce c b6oprt HIN H3IbPnAT Ha 3eMaTc NMOUHTa Ha TeKxKa TeXHnKa, CJeT KoTo DA ce HapeKaT.
O6bPHeTe BHHMaHHe Ha pa3IpeJeJIeHHeTo H TeJIOTo Ha roJIeMHTe KIOHN (B).
Pa3HCTeTe H3paTbIHTe OKOJIo IbPBoTo, KOeTO IIe ceyeTe (C).
He orchuaTe IbpeTa, KOHTO ce HAmpaT B 6JIH3OCT IO eJIeKToPiPoBOAn H crpaHn (D).
O6bpeHe BHHMaHHe Ha IIOcOKaTa, B KOrTo e HAKJIOHeHO
_b (E).
YBepete ce, Ye IIbPBOTo HMa CcUYeHn NII MbPTBN KIOHN, KOHTo MORaT Ja IaIHaH T Na Bn YJaPrt, DOKaTO CeueTe (F).
IIO BpeMe Ha p3aHe CJIeTe BbPxA Ha IIpbROTO, 3a Ja cte CHpyHN, Ye Ie IaHHe B IIpeBnEHaTaNocKa.
BCHN BtHINI IJIa Tp86Ba JI cTOrT Ha 6e30IIaCHO pa3ctOHHne (G) (Ha-MAJIKO DBA IIbTH BnCOUHHa Ta Ha IpbTOBO).
IpeBnHeTe B KaKaBa Iocoka Ie ce OITpbHHeTe, KOraTo TbpBOrTO TpBΓe Ja IaJa (H).
AkoIbPBOTo 3aIOUHe IaPiJaBIpYraIIOsOKa HINAKoTPhOBt Ce 3aIIHne HJIa3XBaHe Iprn PIAJHeTO, IyChete TPOHaIb3pO Ce OTrdAeETe!
IpeHnJa 3aIOUHeTe Ja peKeTe,ObbPHeTe BHHMaHHe Ha IIOcOKaTa Ha BAITba.
HeceyeThe Ibpbeta B6JIO3OCTI0 eJELKTPOIPOBOHN I crpaH, KOHTO MORAT Ja 6bJAT 3aceHATHOT KIOHH HIN OT camOTO JbPBO pHn IpaAHETO.
Ako pa6oHTHe IIO hakIoHOHe yuactbK, BnHaH cToIte HABBCOKO, 3aIIO TO cIeCTyBA OAnCHOCT npI OTcHuaHETO Ch IIpbOTO Da ce H3TbpKaJIЯ HIN NIIb3He HaJIoY IO HAKJOHa.
IIBaJIeTe OT IIbPBOTO BCHUKN OCTATbIIN, KAMbHI, IAPyeta Kopa, IIHPOHH, cKoBH IN KHIIN OT MICTOTO, KBJTeTO III peXeHTe.

IPEDUYIPEJKDEHNE
HE ceyete JbPbeta B 6JIN3OCT JO eJNEKTPOPNBOJIN I cpaJH, KOHOT MOrat Ja 6bJat 3aceRHaTH OT KJHOH INI OH CTAMOTO JbPBO pni PAIAHETO.
TEXHUKA HA IOBAJIHE HA IbPBETA (Φnrg. 21-24)
- PpeBnIeTe B KaKbA NocKaJa ce H3TeJInTe, KOraTo IbPBOTo 3aOnUHe JaPiAa (HJIH HApKO NocKn, B ClyaH Ye IIaHaPiHaHTIbCe OkaKe 6IoKpHa). Pa3YnCtete YuactbKa B HeNocpeCTBeHa 6H3OcT OKoIO IbPBOTo H ce YbePeTe, Ye HMA IpePiTcTBnA B NocKaTa, B KOrTO cMrrTaJa ce H3TeJInTe. Pa3YnCtete To3H YuacTBKa Ha OKoIO 135^ ot IpeBnIeHaTJIHHa Na Jadahe (A).
- O6bPheTe BHHMaHHe Ha cHJaTa HIOcOKaTa Ha B8Tba, Ha KaKIOHa BepTHKaJIaTa Ha IbPBOTo, KaKTo H a pa3IOJIOKeHHeTo Ha roJeMeTe KIOHO. BcNCH Te3n AKTOH OKa3BaT BInHHe BpyXoKcOHa H naIaHe Ha IbPBO.To He ce OINTBaIIe Ja NOBAAITE IbPBO IO JINHHa, pa3JIYHa oT eCTeBHeata JINHHa NaIaNae (B).
- Hanpabete npope3B nIbPBOto Ha oKoJIo 1/3 ot IaHameTbpa Ha CTBoIA OT cTpaHaTa Ha IaJaHe Ha IbPBOto (C). Hanpabete npope3HTaKa, ye Ja IpecuHt IiHHaTa Ha IaJaHe IOI pAb bTBJI. Ipope3bT Tp6Ba Da 6bJe YCHCT, 3aJa MoKe TPhOHbTa JIpeMHe xOpH3OHTaIIHO. BnHaHn 3aIOUbaIte C JOJIINHpaInpoe3, 3aJa He 6bTpHoHbT da 6bJe 3aTHcHAT IOI TeKecCTTA Ha IbPBOto.
Бытарский
HAUH HA PABOTA
- HainpaBeTe paBEn XOpH3OHTaJIeN OTCnUaIIHT pa3pe3 (D), NaH-MaIko Ha 5cm HaN XOpH3OHTaJIHn Ipope3.
BeJexka: HnKora He peXeTe Ipe3 Ipope3a. BnHaHn octabRHTe qACT OI IbPBOTo MExy pa3pe3a N OTCuHaIIHpa pape3 (OKOJIo 5cm INI 1/10 OT dAmEeTbPa Ha IIpbTO). ToBaCe hApHu "PiHaT" E.C Hee ce KOHTpOJIpa IaIaHETo Na IbPBoTo H Ce IpeIOtBpArTa XIb3TaHe, I3BnBAHe INI JIOHbAbe KbM IIbHa.
IIpnIbpbeta cTOJIaM IHaMaTeBpOTCHuaHnTpa3pe3 He TaPbOBA aE TbBpIe NJaIOBeNe DO NaIaHeTo Ha IIbPBOTo HJIN Do BpBuIaHETo My KbM TbHa.CJeToba B pa3pe3IOCTaBeTe IIpbBeHH NJIIlaCTMacOBN KJIHHObE (F),HO63JaIOKOCBatBepHrata.Ha6HHTe Tn NOJIeKa,3a Da 3AnOpueHe TaIOBaJIte IbPBoTo.
5. Korato TbpbTO 3aIOUHe Ja Ia, BeIHa rCpTe TPhOHa HTo IOCTABe Ha 3emTa. TbTgHETe B IpeIbHJeHata IIOcoka, KaTO BHHMaBaTe TbpbOTO Ja He TpbHRe Ja IaJa KbM Bac.

IPEDUYIPEXJEHNE
OTcHuaHnT a3p3e3 He Tpr6Ba Ja DoocTHHe Do npope3a. "PiHaTara" onpeJeIaHaHeTo Ha IpbTO: TOBa e qactTa O t bPbTO MeJy npope3a N OTcHuaHnPa3pe3.
H3P3BAHE HA Ie6EJIIN KOPEHN (pHr. 25)
ToBa Ca MHO rOJIeMH KOpEHo KOnTO H3JIH3aT O TcBOJI NaIIOBpHXOCCTTA. IIpeJn Ia OTcyeTe JbPBoTO,OTcPaHete Ie6BJNTe KOpEHn. IIbPbHO npabapeTe XOpIH3OHaJIeN Ipope3 (A) B KOpEHa, cJIe IO Ta Hb eRTHKApHe (B) IepNEHKnUyHpRo. MaxHeTe H3P3aHaTa YAcT (C) O pABOTHHaYuactbk.CJIeI Kato H3BaJIte Ie6BJNTe KOpEHn, pINCTbNETe KbM OTRp3BaHe Ha JbPBoT. BIOKe pa3JeI "TexHHKa Ha NObAJIHe Ha JbPBeTa" T BO Ta PbKOBOJCTBO.
PA3TPYIIBAHE (PRAHAHE HA TPYIIH) (pHr.26)
TePMHbT "pa3TpYBaHe" O3Haayaba Ja HapeKeTe NOBaJIeHOTo JbPBO Ha TpyINC JeJaHa JbJIaKHa.
IbpeHHepeKaHnHNO.
IIOCTaBeTe MaJIKNTe KIOHn Bbpy pa6OTHO MaIape HJIN Bbpy Jpyr KIOH,3aJa rH cpeKeTe.
Pa60THnAT Bn yuactbK Tpr6ba Na e pa3HcTeH. YBepeTeCe, che HNKaBKn IpeMeTn HE MOrAT Na BJIa3aT B KOHTAKC KpRa Ha IIHHaTa HIN Ha BePrrata No BpeMe Ha p3aHe: TOBA MoKeJa npeD3BnKa OTkA (A).
IIO Bpeme Ha pa3tpyUbahe cToHte B rohpata YacT ha Tepeha, Taka Ye TpyHte Ja He MOrat Ja ce H3tbpKaJIrT KbM Bac.
IIOHkaKoHa He MoKe Ja Ce 36e9Re 3aunuBaHe Ha BepHrata (PiH cTaNAdPHT NcTexHNKn Ha p3aHe) H e TpyHNo J a ce npedBnHn HakbJe nce PAnDE oTpr3AHOTo Ib.pBO.
PRAHE HA TPyIN C KJIINH (pHr.27)
AkoIbHepBt cIOCTaTbUHO IOniIMIHaMeTbp, KOITo IO3BOJIABaJa ce NOCTABn KLIIN (B), 6e3 Ja ce IOKOcBa BepHata, H3IOJI3BaHTe KLIHH, 3a Ja IbPjHte Ipope3a OTbOpHn Jda H36BerHeTe 3aIIIMNbaHe bepHrtata.
P3AHEIOI OITbH (qur.28)
(C) TPyIIN C IIIOIIOPA OT EIIHHKPAI (D) TPyIIN C IIIOIIOPA OT JBATA KPAJ
Haipabete IIbPBOHauaEN IIpope3 (E) Ha 1/3 ot IIbJIxHHATA, cIeI TOBA BTOPH IIpope3 Ha 2/3 (F) OT Ipyrata CTpHa. IIpi pR3aHE TpyINTE Ie Ce oBHT. TPhOHbT MOnKe Ia ObIe 3aIIHN HIN IIIaTHCNAT B IbPbOTo, AKO IIbPbNt Ipope3 e Ha IOBcEOT EJHa TpeTa OT IIaMEmbpa.
O6bPheTe oO6eHO BHNMaHHe Na TpyII NIOI OIIbH (G), 3a Ja H36BerHeTe 3aIIINBaHe Na IIHHata Na Beprata.
PRAHE HA TPYIN OTTOPE (ФИ.29)
3aOnuHete OT orpHata qact Na IbPbOTo, KaTO peXeTe c OJInHaT aact Ha IIHHa. Pa6oTeTe c JeK haTHCK hAOJy. BHIMABaHTe, 3aIOTo TPhOHbTI ne Ce oTMeCTn HapEnJ.
PRAHE HA TPYIIN OTIOJLY (pHn. 30)
3aOnuHHeTe OTOJIHaTaaCt Ha IbPBoTo, KaTopeXeTe c TropHaTcPaHa HuaHnHaTa. Pa6oTeTe C Jek HaTHcK Harope.
TPhOHbI Ie TErH BIOcOKA KbM Bac. BbJIeTe NOIOITROBEHN 3a TaKOBa DBINKeHne H npBxTe 3JpABo TPhOHa, 3a da 3aIIa3HTe KOHPTOr.
H3P3BAHE HA KJOHN I KACTPEHE (phr. 31-32)
Pa6oTe 6aBHO H npbXte TpHOa c nBe pIe. BnHaHn Tpa6Ba Ia Ia3He TaPBHOBeCHe.
CTOHTHa paactoHHe OT KIOHa, KOIto pekeTe. Korato ro pekeTe, cTOnTe OT IpOTHBONIOJXHa tCpaHa Ha CTBOJa.
He pa60Tete C bepnHnHa CTbJI6a ToBa e H3JIIOHHTeJHO ancho.To3N TnI DeHIOCT Tp86BaJa c H3BtBuBA tO npOceCOnHaJHCTN.
He npbxte TpHOna HnBcOnHa HnTpBnHnKaII, 3aIto Ie Bn e TpyHn Da rO bJaIaeTe pN OTkT.

IIPDEUYIPEKDEHNE
HnKoHa He CKe KaYBaIte Ha IIpbO, 3a Da pEeKTe HII KAcTPhrte KIOHN. He paOteTe c TPhOHa, Korato CTBe BbPxy CtBJI6a, IIaIaTΦopMa, KIOH HII BpyrO HeCTaBnIH OIOJIOKeHne, IIpa KTOeTo pCKyBaTe Da 3aRyOHe TaPBHOBeCHe H/IIH KOHTpOI HAIT PhOHa.
Korato KaCTPHTe IIbPBeTa, e BaXHo IIbPBO Ja OTpeKeTe KpaHa KJIOHa, 3a Ja HAmAJITE TeJIOTO, I cJEI TOBA Ja HAnpABHTe fHnHaJIHHo IOTPe 3I IO pIOJIbJIkeHHe Ha CTBOJa HIN Ha OCHOBHHa KJIOH. TaKa HMaJa ce pa3KbCa KopaTa HA CTBOJa.
Бытарский
HAUH HA PABOTA
1.Пьво habпавete eин поре3 OTДу Ha 1/3 ot Даметы (A).
2.ПослеHaIIpaBteпроe3 OTope,зда CBaJIHTe KJOHa(B).
3. HanpaBete ΦHnHaJIHHN OTepe3 IO npOJIbJIkeHHe Ha CTBoJla (C), KaTO JBnKHTe IIHaHTa 6abHO, Taka ye cpr3BaHEto Da e IaIKO. IO To3H NaHHK KopTa Ie MoKe da Ce Bb3CTaHOBI.

IPEUYIPEXJEHNE
Ako KIohnite, KOHTo Tp6BaJa ce PoJIkaCTPJT, Ce HAMHpAT No-BHcOKO OT rPbJHINBA BN KOJI, KAcTpeHoTe Tp6BaJa ce I3BtPPIHOn tIOPOEChOnHaJIHCT.
H3P3BAHE HA OITbHATN KJOHH (pHr. 33)
OrbHaTHe eIemeHTH (A) MoKeJa ca KaIOHN, YAcTHUHO H3KOpTeHbHOBe HII PhaHKn, KOHO Ca OrBbATn OToIpyTO IbPBO, Taka Ye pRzKO Ie Ce H3PiPaBtA, KOraTO rN OTeJKeTe HIN MaXhe TpBBoTO, KoToE r E 3axBaHOno. CbIeCTByBa cePHO3e HnCK H3KOpHeHnT PbH Ha OTceYeHOTo IbPBO da CeOCb60BDn I Da 3aCtAte B'BB PeTrKaIHO NIOJoxHeHne PnI py3AHe, 3a De cTeJIHN OTcTBOLA. BHIMabaIe - OrbHaTHe KIOHN Ca ONACHI.

IIPDEUYIPEXJEHNE
OrbHaTHe KIOHn ca OAnCHn, 3aIOTO MoRat Ja Bn Ynapr H Na 3a4y6hTe KOHTpOJI HaN TpHOHa, npr KoETo Da IIOJYUHTe TeKKn HIn CmBpTOHOCh TeteChn NOBpeHn.
IIOIDPbJKA

IPEDUYIPEXJEHNE
IpiNIOJMaHaJa ce H3NoJ3BaT eINHCTBeHO opHnJIaHJIepe3ePBHHa CTaH NHa Ryobi. Ako H3NoJ3BaTeApyH NaCTH, TOBA MoKeJa IpiHUnHH onaCHoTH HJIH DaIOBcE Do IOBpeHb INpojKTa.

IIPEUYIPEKDEHNE
BnHaHn HocTe 3aIHTHn OuHJa HIn OuHJa cbc TpaHNUHn IpeJna3Hn EkpAHn, KOrato pa6OHTHe c IeKTrPecO6OpyUBaHe HIn KOrATO IIOnHCTBaTe C b3JbIIHnA CTpyr. Ako pnp a6oTa ce BInra Ipax, HOCTe macka 3a IJIue.
OBIIIIOIDPbXKA
He noHcTBaIte IIacTMacOBHTe qactn c pa3TBopHTe.II. IIOBEeTO IIACTMacOBH qactn MORaT Ja ce IIobpeIr OT pa3TBopHTe.IIte, IIpeJIlaRaHH B TbProbckata MpeXa. I36bPIeTe 3ambpcBaHHra, IIpaxa, MacIoTO, CMA3KaTa n T.H. c HcTc KaBpHa.

IPEUYIPEKJEHENE
HInKora He IOnyckaIte PIIaCTMacOBHTe YacTH Ja BIn3at B KOHTAKT CbC CINpaUHa TeuHOCT, 6EH3HH, PIOyIKTH Na HEΦTeHa OCHOBA, IPOHNHKBaII MAcJIa H Ip. Te3H XHMHeeCKN IPOyIKTH CbJbPkaT BeIEcTBa, KOTIO MORAT Da IOBpeIIT, H3TbHIT NIIp Pa3pyIiAT IIaTcMAcTa.
CMA3BAHE
Jaerephte Ha npodykta ca cma3aHn C H3BecTHO KOJIHNueCTBO BHCOKOKaueCTBeHa cma3ka,DOCTaTbYHO 3aJIENJXJNBO HA MaIIHHaTATA INH HopMaJIHN yCIOBHe HA eKCHIOaTaIIN. 3aTOBA MaIIHHaTARMA HyjKa OT JOITJIHNTEIHO cMa3BaHe.
IIOMHA HA IIIHHATA H HA BEPHATA (Hnr. 34-43)

OIIACHOCT
HnKora He NyckaJIte IbHrataJIe, IIpeJn Ja cTe HNCTaIHaPJIu IINHaTAt, BepHrata, KApTepa Ha IbHrataJIe N CKOpOCTHaTATA KUTH. AKO eJNa OT Te3N YactHe E NOCTaBeHa, 3b6HHaT MExaHn3bM MoKeJa 6bJde INx3BbPJIe HIn JIa Ce OTKbCHe, KOeTo Ja IOBeJe Do TEKKN TeJIecCHN IOBpeJn.

IPEUYIPEKJEHNE
3aJa H36erHHe TE OAnchOCTTA OT TeKKn TEJeCnH NopeHIn, IpOeTete BHNMaTeJIHO INo6pe pa3yHete BCHVN KpAraHbIa 3a 6e30PiacHoCT, ONHcAHN BTo3H pa3dJI.
IpeHJa IpaBHTe KaKBOTo H Ja 6HIO C TPhOHa, BnHaHINocTABHTe IpeKbCBAa B INIOJKeHHe CTOnI“
YBepTe ce, Ye BepHrata Ha cINHpauKaTa He e BKJHOHe, KaTO npbHHe TE IpeIa3HTeJI/cINHpauKaTa H3aJ.
BeJexKa:KoratoIOMeHrTe HINHaTaN BepHra,BINaHn H3IOJI3BaIte IpeOpBuaHHOITPOHN3BOJNTeJIa HINHa N BepHra.
Korato 6opabnre C Bepnrata H C mHHaTa, Hocete pBkABHn. Te3h Yactn ca peXeIHN MoKe Ja HmAt peXeIIN pb6yeta.
CbaJIeTe MOHTaXHHTe BHNTOBe Ha IHHATA C IOMOITa Ha IIpeIOCTaBEHNA KOMbHHpA HKIIOU.
CbaJeTe cKOpocThaTa KyTHA.
CbaJIeTe IHHaTa H BepHrata.
MaxheTe cTapa Ta BepHa ot IHHata.
CbHHe HOBATA BePra Ha IIpHMKa HnIHpABeTe BCHKN 3aJIeTEHN eJEMHTN. 3b6He (A) TpOBA Ja ca O6bphATn BIOcOKaHa BbPtHe Ha BePrrata (B). Ako ca 06bphATn B o6paTHa IIOcOKa, 3abptre HAnpBeHATAOT BAC pHMKa.
IocTabete 3aBnBxKbAIIHTe 3BeHa (C) B KaHaJIHTe Ha IIHHATA (D),KaTTo e IOKa3aHO HaΦHr.38.
Bepnata Tpr6ba da 06pa3yba yxo B 3aHaTata qact Ha IIHHATA.
Бытарский
IIOJIPbXKA
3aIpbjTe BepHrata Bbpxy IHHHaTn H npEkapai Te IppHMkata OKIo 3aBHNKBaIIOTo 3b6HO KoJIeJO (E).
HaIacete IHHaTa Taka, Ye IINΦTOBete Ja BJIa3at B JbJIInr OTBOPOTaJ.
BeJekka:KoratoIOCTABRteIHHHATA BbpyXIIHPTOBETe(F),yBepetece,yepeYIHPaIINHTAJIeI(G)CeHAMnPaBOTOPBa HcTBAIINGBoIT(H)HaBEPHrata.
IIOCTaBete 6oPaTHO KapTepa Ha cBeHNHTeJIa (I) H MOHTaXHHTe BHNTOBe (J) Ha IHHATA.
3aterHETe c pIbKa MOHTaKHNITE BHHOTBE.IHHATA TpOBA da MoKe Ja ce IINJHK, 3a Ja ce pepyIHpA oBtIraHeTo Ha bepHrtata.
- OnbheTe BepHrata, Kato 3abbpTHe BnHTa 3a 3aTHeHa Ha BepHrata (K) No YacobHHKObATA CtpJKA, JOKATO BepHrata JIeH HeJIeALHO BIIHHata, a 3BeHata Ha BepHrata BJIeHTa IpaBNIHO B KaHJaA H IIHHata.
Повнгепpeннkaрй haинота,за ja ce ybeprte, Ye BEpHrata He ce BaJI.
Ako MeJky BepHrata H IIHHATA HMA Xla6bHHa,OTHyCHeTe Kpa Ha IIHHATA N 3aBnHTeTe BnHTA 3a peRyIipaHe Ha 06TgRaHTo HA BePrrata CIOIOBHN O6OpOT No YacOBHKnOBaTa CtpeJIka. IIOBTOpeTe Ta3N IpoUedypa, JOKATO OTcTpaHHTe Xla6bHnata.
XbaHETe KpA Ha IIHHATA H3IpaBO 3aTeRHeTe MOHTaKHHBAHNT HA IIHHATA.
Bephratae npaBHIO 6OerHATA, KORATO HMA xla6HHa IIINHnI p5b HA IHHATA N KORATO e peryIIHPaHa, HO MoKe Ja ce 3aBbPtN CpbKa, 6E3 Ja 3aIIbBA. YBepTe Ce, Ye cIIHpauKkata Ha Beprata He E BKJIOueHa.
BeJexka:AkoBepHrataeIpeKaJIeHO3aTeRHaTAt, HMaMa da ce BbptN.JEko pa3xla6ete BnHTOBete Ha IIHHATA H3aBpTeTE BnHTA 3a peryIHHaHe HA oOtIaHToC cYeTBpT O6OpOT o6paTHo HA cAcOBHNKOBATAcTpeJa. XBaheTe KpaA HIIHHATA H3pabo 3aTeHReTe MOtAKHHa BHTA HIIHHATA YbepTeCe, Ye BepHrataceBbptN, 6e3 Ja 3aIIbBA.
PERJAX HA OBJTIGAHETO HA BEPHATA (HnR. 44-46)

IPEUYIPEJKJEHNE
HnKora He JOKocBaIte H ne peryIpaIte BepHrata npaBoTeIbBHeTaIe. BepHrata e MhOrO octPa. KoroTo I3BbPiBaTe nOpIpbXka NIO TPhOHa, BnHaHn Hocete IpeDnA3HHpKaBauIIi.
Cnpete IBHrataJI,IIpeINJa IIpHcTBHnTe KbM perJax Ha 06TgAHeTO HA BepHrata.
YBepTe Ce, Ye MOKeTe Ja pa3BHHe MOHTaXHHTe BHTOBe Ha BePHrata CpbKa.
3aBbptTe BnHTa 3a peryIipane Ha onIbHaETo Ha BepHrata IIO yacOBHHKOBaTa CtpeJka, 3a Ja 3aTeHrHeTe BepHrata.
BeJExKa:B cTyJeHO cbCToHHe, BepHaTa e npabHIO
obTeHata, KORATO HMa Xla6HnA PPn DIoHHa Pb6 Ha
IIHHaTn H KOrato e peryJIHpHa, HO MoKeJa ca ce 3aBbPTN C
pbKa, 63 Ja 3aJIbBa.
CTraIeBepHrata BceKINbT, KOraTO 3aIBHXBaIHTe 3BeHa(A)PiHaTIOJIOJIHHKaHaJI HaIIHHaTa.
BeJIeJka: TemIepaTpata Na BepHrata ce NOBIIaBa IIO BpeMe Ha pa6Ota. 3aIbNkBaIITne 3Bena IIpi TOnIJa BepHra, KOToE oIpaBUNHO bTeHATA, IaIATc OKIo 1,25 MM IOI KaHaIa HA IIHHATA. 3a Ia ONpeJIITne IIpaBUNIHnO ITbH IIpi TOIIa BepHra, MoKeTe Ja IINIOJI3BaTE KpAЯ H KOM6HINHPaH KJIIOv.
BeJekKa:HOBJNTeBepHnMORATa ce pa3Ipychat. IpoBepBAHTe peOBOHO o6TgAHTo Ha BepHraTaI a 3atraIaTE, KOrTO e He06XoIMIO.

BHIMAHNE
Korato 3aTare ToIJa BepHra, KoraTo ce OxlaJn, Moke Ja ce OkaKe IpeKaJIeHo oOteHata. IIpoBepeTe "oObTaHaeTo Ha CTyEHO" Ppei CJIeIbAaTa yOntpe6a.
IIOPPbKKA HABEPHATA (pHr.47-48)

BHUMAHNE
IpeHnJa npaBHTe KaKBOTo H Ja 6HIO C TPhOHa, IpoBepTe DaJIH NpeKbCBAuT E B IOJIOKeHHe "CTOIN"
H3n013BaBte TPhOHa cMoC bEepHa c HnCKa cKIOHOCT KbM OTkAT. Ipn IIpaBnHaIpoIbPbXkaCe o rpaHuaBa pHKcTbOT OT kTHaT aTa3N bP3o06Opotha peKeiHa BeepHa.
Ochrgpte IIO6pa IIOIINpbXka Ha BepHrata, 3a Ja MoKe Japexe YHCTO H6bP30.
Beprata Tp8bA da ce 3aOtH, KOrato cTbProTHnHTe ca MaJIHK nPxAoo6p3AHN, Ako Tp8bA da pIHOJxHte HATNCK pIpy3aHe nIh aKO peXe camo Ha eDNa CTpaHa. PnH nopIb8kKa ha Beprata OsbPheTe BHIMAHNE ha CnEHDOTO:
I npH IooJI bHa 3aTOUBAHe a CTpaHHNHy Pb6 ce NOBHIABA ONAHOCTA OT OKAT.
Xla6HHaTa Ha orpaHHuTeJIHe Ha JbJIoHHaTa (A):
KJOLKOTO NOI-JOJIMA E XIAI6HATA HA OI PAHNAHHTJE, TOJIKoba IOBUEC eIOBIIHABA OIHAOCCTTA OITOKAT.
HOBpaTHO, aK0 3aJaIeTe HeIOCTaTbUHa IbJIbOuHHa, cHaMaJIbRA KaYeCTBOTO Ha p3aHETo.
Ako 3b6uHTe BIA3AT B KOHTaKT C TBpIIN IpeIMTeKaTO IIHPOHN HIN KAMbHH NII CE H3Nc8T OT KAITra H INCbKaIO IIbPbOTO, 3aOTUbaHeTO Ha BepHrata TprOBA da CE H3BbPbHH b OTOPH3nAPcBepH3.
BeJexka:Korato OTHOBO NOCTaBtE BepHrata, IPOBepeTe JaIIN 3aIBNkBAUOTo 3b6HO KOJIeIO (B) He e H3OHeO HIN NIOBpeJeHO. AKO HMa IIpH3HaII Ha H3OcBaHE HIN HEH3PABHOCT, Tp8Oba Da ce IOJMeHN B OTOpH3npaH cEpBN3.
Блтарский
ПОДРБЖКА
BeIeKka: Ako He cTe pa36paJIHn HAIJIHO ropeONHcAHATA IpOeUHa 3a 3aTOUbaHe, BEHPaHa HTPOHa TpObHa Ja 6bJe 3aTOUHa B OTOPI3Hap CepBn3 HIIIOJMeHec H BePHa C HNCKA CKJOHNCT KbM OTkAT.
3ATOUBAHE HA 3'b6HTE (Fig.49-52)
OncanHe na pexeun3b6:
(A) Pejkei p6
(B) CtrpaHnHa YacT
(C)OrpaHnHTeJIHaIbJI6OuHHaTa
(D)П配电ичсг
(E)MekJy3b6ne
(F) Πeτa
(G) Hrt
(H)TopHa cTpaHa
YBepeTeCe, Ye BcWuKb 3b6n ca 3aTOeHEn IIO eJHaKbB bTbJI Hdo eJHaKaBa BcOChUHa, 3aIIOTo cAmO IIpH paBHH 3b6n Ce noJIyaba 6b3Hna Ha p3aHe.

IPEDUYIPEXJEHNE
Beprratae mHOrO octra. Pnir n3bIpIbAhe Ha npIipJbKa BHNar Hocete pa60THn pIbKaBnIH. Taka Ite I36eHTHe onaHcOTTA OT HapAHBaHHa.
- O6TeHHeBepHrata IIpeIIN 3aToOVAhe. 3aIOBEue HnΦOpMaIIH BnKte pa3Je "PerJaJ HA o6TraHaTeHO Ha bepHrata".
I INIOJI3BaIe KpIgIIa IIIIa C 4 MM B IINAMETbI p IIIOJIbPkaTeI (IpOdaBa ce OTJeHHO). 3aTOUBAIte 3b6Ite No cpeJATA HIIHHATA.
IIOJIpaBHeTe IINJaTa C roPnHra p6b Ha peKeiHaT a Yact. He octaBnTe IIJaTa Ja ce HAKJOHH HIn Bbptn.
CJeK,HOIOCTOReHHaTHCKH3IIHeTeBIOcOKaHa IIpeJHHbIJa3b6a.
Повдгайтплала淘汰Врьшан.
H3HHIeTe BcEKN 3b6 C H8KOJIK O CHIIHN D8HXeHHIA. HIIHeTe BcHUn K3b6nOTJRABO (A)B eHa Nocoka.CJIeT OToBA MHHeTe OTdpyrata CtpaHa H3HHIeTe 3b6HTe OTJcHO (B)B6paTa Hnocoka.
H3yHCTeTe 3aJIeHHaJIHTe 3a IIJIATA OCTaTBIIc C mTaJIHa Yetka.

BHIMAHHE
PeIOBHOIOPOBepaIte roPbHnHnΦHITbP (B).PiOnMeHeTe rO, aKO e 3AmTpcEHnHIOBpeJeH.
IIOIMRAHA HA 3AIIAJHATA CBEII (qur.69)
Дига teянт ha Ta3n MaIIHnHa pa60TH c6c 3aIIaIIHn CBeIe Champion RZ7C nII NgK CMR7H c pa3cTOnHne MeXJy eJIeKToIInTe O 0,64 MM. Tp6Ba JЯЯ IOJIMeHrTe C6c CBeIe OT cbIIHn TII Na BceKn 50 Yaca pa60Ta HII NIO-ueCTO, aKO ce HaJIaHa.
Pa3BnIte CBeIHa 6paTHo Ha YacOBHKnOBaTa CTpeJIka C IIMOHTa Ha KJIIOU (A).
H3BaIeTe cBeIITa.
IIOCTABe HOBATA CBEII B OTBOPA HA BHTA N I 3aBnHte c pKa IIO YACOBHHKOBATA CTpeJIka. -HaKpaI aTeRHeTe IO6pe c KJIou (B).
BeIeJka: BHHMABaIYe Ja He CbByPKeTe Ha KbCo CTapTePHOTO BbKe: MaIIHHaTa MoKe Ja IIIOJIyHc cepHO3Ha IOBeda.
П РОВЕРКА / ПОЧИСТBAHEHA HCKPOГАСHTEJIHATA PEIETKA H HAH3IYCKATEJIHATA TpБBA (par.70)
H3nyckaTeJIHaTa Tpb6a HMa HckporacTeJIHa peIeTka. Ako HckporacTeJIHaTa peIeTka e JepeKTHa, MokeJa bB3HNKHe OAnCHOCT OT NOKap. PeIeTKaTa MOKe Ja ce 3aNyHH I npH HopMaJIHa YIOTpe6a. Tp6BaJa I npOBepBAte BcKa cEIMnua J da J noNUCTBaTe, KORATO e Heo6xOJIMO. IIIyMO3arJyIHNeTI HckporacTeJIa BnHaH Tp6BaJa ca Ba DIObOc bCTOJHHe.

IPEUYIPEXJEHNE
IyMo3arLyuHTeJrCeHaropeiBaNoBpeMe HaNcIePaToaCtpHOHa.3aNaceH36eRHe OAnACHOCTTaOTexKKnHapaHbAHHH,HeJOKOCBaTe IyMo3arLyuHTeJIe.
OctaBeTeIyMo3arLyIHTeJIaCeOxlaJH.
- Maxhete IIeCTOrpAMHHI BuHT (E) H 8-MHIMMEToPbITREaIKN (D), KOnTO IbPKat KAnaka Ha IyMo3arLyIHTeJIa MAXhETe KAnaka (C) HCKporacTeIHaT aPeIeTKA (A).
Ako HcKporacHteJIHaTpeIeTeKa e 3ambpcHea, noHCTete c mKalka MetJIHa YetKa. IOnMeHete HcKporacHTeJIHaTa peIeTeKa, Ako e HanaykaHa II INIOBpeJHa.
CbaIe Te IyMo3aIyIInTeJIa (B).
IpekapaHTe IIOCKa OTBepTKa IIpe3 BeENTHlaIauHOHHTe OTbOPH, 3a Ja IOHCTHTe HATpyNAHTe caKJH.
CbIO TAKA MAXHETE CaJHITRE OT BEHTHLaIHHITE OTBOPH HA IyMo3aRIyHITeJI H OT H3NyCKaTeJIHaTATpB6a HA IINHHtpa.
Ioctabete o6patno ymo3aIyHnteI, hckporactenHaeta peIeTKa H kanaeTo Ha ymo3arIyHnteJI.
3aTeHHeTe BnHTOBeTe H raIKHe.
IIPOBEPKA H IIOUHCTBAHE HA CINHPAUKATA HA BEPHIATA (ФИг.71-72)
I3BaIeTe KyTHa Ha CbeIHINHTe IINOHTe YAcTHe HA CInpauKATA Ha BepHrata (A). IIPOBepTe cTeHEHa HA H3HOcBAHe Ha CnIPauHATA JeHTA (C) I NaIOMeHETe, Ako E MHOrO H3xa6eHa IIN DeOpMHPaHa. Je6eJIHHaTHa HaJeHTa He Tpr8bA Ja e IOJ 0,6 MM.T.e He Tpr8bA Ja e H3HOceHa NOBueY ot 50%
CInhpauHHHT MexaHN3bM BnHaHr Tpr6BaJa e uHCT H Jeko Cma3BaJIte CbeJINHeHHeTO Ha cInhpauKaTa (B).
CneI peMOHT IIN IOHCTBAHe CnCTeMo HIO POBepBaIte yHKIIIOHNIPAHeTo Ha cIIpAkaKaTa Ha BepHaTa. 3a NObeTe HHOpMaIIIB NkTe pa3JIe "Pa6Ora CbC cIInpAkaTa Ha BepHaTa".
ПоверяbaHTe cSTOЯнHeTo Ha orpaHnHTeJHa BePraTa (D) H ro IOJImeHete, aKO e HEN3IpaBeH.

IPEDUYIPEKJEHENE
Dopn H npn EeKJHBeBHO NOUcTBAHe Ha MexaHn3Ma Heb3M0KHO e Na craPahnpa HaJeKdNocCTTa Ha CINPAkata Ha Beprata B yCIOBnHa paObaTc. Cna3BaIte yka3aHnIgTA 3pa3ane.
CbXPAHEHNE HA TPHOHA (3A IIOBEYE OT 1 MECEI)
I3cnHte OctaHaITo Bpe3epBoapa rOpHBo CbI, 0IO6peH 3a cbXpaHeHHe Ha 6eH3HH.
I Nychete BnHrataTeJa paobToH, JOKaTo cnpe. Taka Ie H3ropn BCNUKOTO rOpHBO, KOeTo Hnaue 6nMOrJIO da 3acbXHe H da octABN CMOnHCTaYtaJIb KaBb BepHrta.
Блтарский
ПОДРБЖKA
3aJeCTBaIte HAKOLKO IIbTH IyCkoBn6aJIOH,3aJaI npOuHcTHTe OCTaHaIOTo B KAp6ypaTopa RopHB0.
I3cnHte octaHaJIOTo MACJIO 3a IIHHaTa H BepHra Ta CBJ, OIO6peH 3a CbXpaHeHHe Ha MacJIO.
IIOHCTeOCHOBHO TpHOHa.
IpnhepepeToHa npobetpHBO HnEOCTbHIO 3a DeHaMACTO.
BeIeKka: He octabTRe TPhOHa B 6JIH3OCT Jo KOpO3BHN MaTePraHaN KaTo rpaIHHckN XHMHKaJIn HJIn cOJI N 3a pa3Mpa3BaHe.
BnKTe KaKBn Ca n3NcKbAHnHa HA ISO N MeCTHnTe
pa3nOpeI6h, Cb5p3aHH c8c cbxpaHEHeTo H pTeHpaHETo
Ha roPbHN BHeIeCTBa. MoKeTe Ha n3NoJI3BaTe octaHAnIo
TO ROPbHO 3a IpyTa MaHnHa C bByrAKToB IBnIateJ.
Блгарский
PA3PEIIABAHE HA IPOBJIEMN
GARANTIE - CONDITIONS
All Ryobi products are guaranteed against manufacturing defects and defective parts for a period of twenty four (24) months from the date stated on the original invoice drawn up by the retailer and given to the end user.
Deterioration caused by normal wear and tear, unauthorised or improper use or maintenance, or overload are excluded from this guarantee as are accessories such as battery packs, light bulbs, blades, fittings, bags, etc. In the event of malfunction during the warranty period, please take the NON-DISMANTLED product, along with the proof of purchase, to your retailer or nearest Authorised Ryobi Service Centre.
This warranty in no way affects your legal rights concerning defective products.

CE DECLARATION OF CONFORMITY
We declare in sole responsibility that the product: - to which this certificate applies, conforms to the basic health and safety requirements of the Machinery Directive 98/37/EC and other relevant directives, like EMC Directive 89/336/EEC and Outdoor Directive 2000/14/EC and Gas Emission Directive 97/68/EC, 2002/88/EC and 2004/26/EC.
To effect correct application of the health and safety requirements stated in the EEC directives, the following European and/or national standards and/or technical specifications were consulted: EN 292-1/1991 / EN 292-1/1991+A1/1995 / EN 608-1994 / ISO 6533:2001 / ISO 6534:1992 / ISO 6535:1991 / ISO 7293:1997 / ISO 7914:2002 / ISO 7915:1991 / ISO 6531:1999 / ISO 8334:1985 / ISO 9518:1998 / ISO 10726:1992 / EN ISO 14982:1998 / EN ISO 3744:1995 / EN ISO 4871:1996 / ISO 9207:1995 / ISO 7182:1984 / ISO 7505:1986
We declare this product complies to the requirements of the Out Door Directive. 2000/14/EC.
| Measured Sound Power Level | 35 cc | 40 cc | 44 cc |
| 110 dB (A) | 110 dB (A) | 110 dB (A) | |
| Guaranteed Sound Power Level | 112 dB (A) | 112 dB (A) | 112 dB (A) |
| Date of Issuance | 1 / 2007 |
This product has been assessed to conform to the Outdoor Directive 2000/14/EC by means of unit verification by SLG PRUEF-UND ZERTIFIZIERUNGS GMBH. BURGSTAEDTER STRASSE 20, D-09232, HARTMANNSDORF, GERMANY.
Technical documents are kept by Homelite Far East Co., Ltd. 24/F, 388 Castle Peak Road, Tsuen Wan, N.T., Hong Kong.
Declared in Sep 2006 by Homelite Far East Co., Ltd.

Tekniset asiakirat ovarat Homelite Far East Co., Ltd arkistossa, 24/F, 388 Castle Peak Road, Tsuen Wan, N. T., Hong Kong.
H Teyukn BIAOyoapoi 8aTnpieTau Tn Homelite Far East Co., Ltd. 24/F, 388 Castle Peak Road, Tsuen Wan, N.T., Xovyk Koyvk.
h umoepwomn n oioia katoptirokve Tov SeTtEmuo Tou 2006 aTo tv Homelite Far East Co., Ltd.
Tekhunueckar JOKMETHAUN XHAPIRTCEB KOMAHINHOMelite Far East Co., Ltd. 24/F, 1883 Castle Peak Road, Tsuen Wan, N.T., TOKHOH.
3aBJIHHeC coTbAJIeBO B cHTB6pe 2006 r. KOMIIHn Hometelie Far East Co., Ltd.
DECLARATIE DE CONFORMITATE
Declarantpe proprie raspundere ca ccast produs este in conformitate cu ceritele prind sanaotatea si siguranta prevazute in Direactiva Masini 98/37/CE si in alte Direktive aplicabile cum ar fi Direktive CEM 89/336/CEE,2000/14/CE prind emisile sonore,Directiva 97/68/CE prind emisile de gaz, Direactiva 2002/88/CE si 2004/26/CE.
Normeipe europene si/sau nationale si/sau specificaile tehnice umutaoarefost consultatepentreuaplicaexigentein materie de sanstate s de sigunantofoamulate in directevele comunitare:EN 292-1:1991/EN 292-1:1991+A1:1995/EN608:1994/ISO 6533:2001/ISO6534:1992/ISO6535:1991/ISO7293:1997/ ISO7914:2002/ISO7915:1991/ISO6531:1999/ISO8334:1985/ISO9518:1998/ISO10726:1992/EN ISO14982:1998/EN ISO 3744:1995/EN ISO4871:1996/ISO9207:1995/ISO7182:1984/ISO7505:1986
TerynHexeckata JOKMENHTAUNI CE HAMPA a Homelite Far East Co., Ltd. 24/F, 388 Castle Peak Road, Tsuen Wan, N. T., Hong Kong.
Демарита за с低调е в госте и релега сcenternburg 2006.у Homelite Far East Ltd.,CO.
Machine: PETROL CHAIN SAW
Name of company: Homelite Far East Co., Ltd.
Address: 24/F, CDE Building,
Tsuen Wan Hong Kong.
Type: RCS-3540C / 4046C / 4450C
Name/Title: Andrew Eyre
Engineering Director
Signature:

11-Jan-2007