USER MANUAL HW-Q600C SAMSUNG
Thank you for purchasing this Samsung product.
To receive more complete service, please register
your product at www.samsung.com/register
SAFETYWARNINGS
TO REDUCE THE RISK OF ELECTRIC SHOCK, DO NOT REMOVE THE COVER (OR BACK).
NO USER-SERVICEABLE PARTS ARE INSIDE. REFER SERVICING TO QUALIFIED SERVICE PERSONNEL.
Refer to the table below for an explanation of symbols which may be on your Samsung product.
| CAUTION
RISK OF ELECTRIC SHOCK.
DO NOT OPEN. |
| This symbol indicates that high voltage is present inside. It is dangerous to make any kind of contact with any internal part of this product. |
| This symbol indicates that this product has included important literature concerning operation and maintenance. |
| Class II product: This symbol indicates that it does not require a safety connection to electrical earth (ground). If this symbol is not present on a product with a power cord, the product MUST have a reliable connection to protective earth (ground). |
| AC voltage: This symbol indicates that the rated voltage marked with the symbol is AC voltage. |
| DC voltage: This symbol indicates that the rated voltage marked with the symbol is DC voltage. |
| Caution, Consult instructions for use: This symbol instructs the user to consult the user manual for further safety related information. |
WARNING
- To reduce the risk of fire or electric shock, do not expose this appliance to rain or moisture.
CAUTION
- TO PREVENT ELECTRIC SHOCK, MATCH WIDE BLADE OF PLUG TO WIDE SLOT, FULLY INSERT.
- This apparatus shall always be connected to a AC outlet with a protective grounding connection.
- To disconnect the apparatus from the mains, the plug must be pulled out from the mains socket, therefore the mains plug shall be readily operable.
- Do not expose this apparatus to dripping or splashing. Do not put objects filled with liquids, such as vases on the apparatus.
- To turn this apparatus off completely, you must pull the power plug out of the wall socket. Consequently, the power plug must be easily and readily accessible at all times.
PRECAUTIONS
- Ensure that the AC power supply in your house complies with the power requirements listed on the identification sticker located on the bottom of your product. Install your product horizontally, on a suitable base (furniture), with enough space around it for ventilation (7~10 cm). Make sure the ventilation slots are not covered. Do not place the unit on amplifiers or other equipment which may become hot. This unit is designed for continuous use. To fully turn off the unit, disconnect the AC plug from the wall outlet. Unplug the unit if you intend to leave it unused for a long period of time.
- During thunderstorms, disconnect the AC plug from the wall outlet. Voltage peaks due to lightning could damage the unit.
- Do not expose the unit to direct sunlight or other heat sources. This could lead to overheating and cause the unit to malfunction.
-
Protect the product from moisture (i.e. vases), and excess heat (e.g. a fireplace) or equipment creating strong magnetic or electric fields. Unplug the power cable from the AC wall socket if the unit malfunctions. Your product is not intended for industrial use. It is for personal use only. Condensation may occur if your product has been stored in cold temperatures. If transporting the unit during the winter, wait approximately 2 hours or until the unit has reached room temperature before using.
-
The battery used with this product contains chemicals that are harmful to the environment. Do not dispose of the battery in the general household trash. Do not expose the battery to excess heat, direct sunlight, or fire. Do not short circuit, disassemble, or overheat the battery.
CAUTION: Danger of explosion if the battery is replaced incorrectly. Replace only with the same or equivalent type.
CONTENTS
01 Checking the Components 6
02 Product Overview 7
Front Panel / Top Panel of the Soundbar 7
Bottom Panel of the Soundbar 8
03 Using the Remote Control 9
Inserting Batteries before using the Remote Control (AAA batteries X 2) 9
How to Use the Remote Control 9
Using the Hidden Buttons (Buttons with more than one function) 13
Output specifications for the different sound effect modes 13
Adjusting the Soundbar volume with a TV remote control 14
04 Connecting the Soundbar 15
Connecting Electrical Power 15
Connecting the Samsung Wireless Rear Kit to your Soundbar 18
05 Connecting to a TV 19
Method 1. Connecting with HDMI
Method 2. Connecting using an Optical Cable 21
Method 3. Connecting via Bluetooth 23
06 Connecting an External Device 25
Method 1. Connecting using an HDMI Cable (Capable of Dolby Atmos®/DTS:X decoding and playback) 25
Method 2. Connecting using an Optical Cable 26
07 Connecting a USB drive 27
08 Connecting a Mobile Device 28
Connecting via Bluetooth 28
Using Tap Sound 32
09 Installing the Wall Mount 33
Installation Precautions 33
Wallmount Components 33
10 Installing the Soundbar in front of TV 35
11 Software Update 36
USB Update 36
Reset 37
12 Troubleshooting 38
13 Licence 40
14 Open Source Licence Notice 41
15 Important Notes About Service 41
16 Specifications and Guide 42
Specifications 42
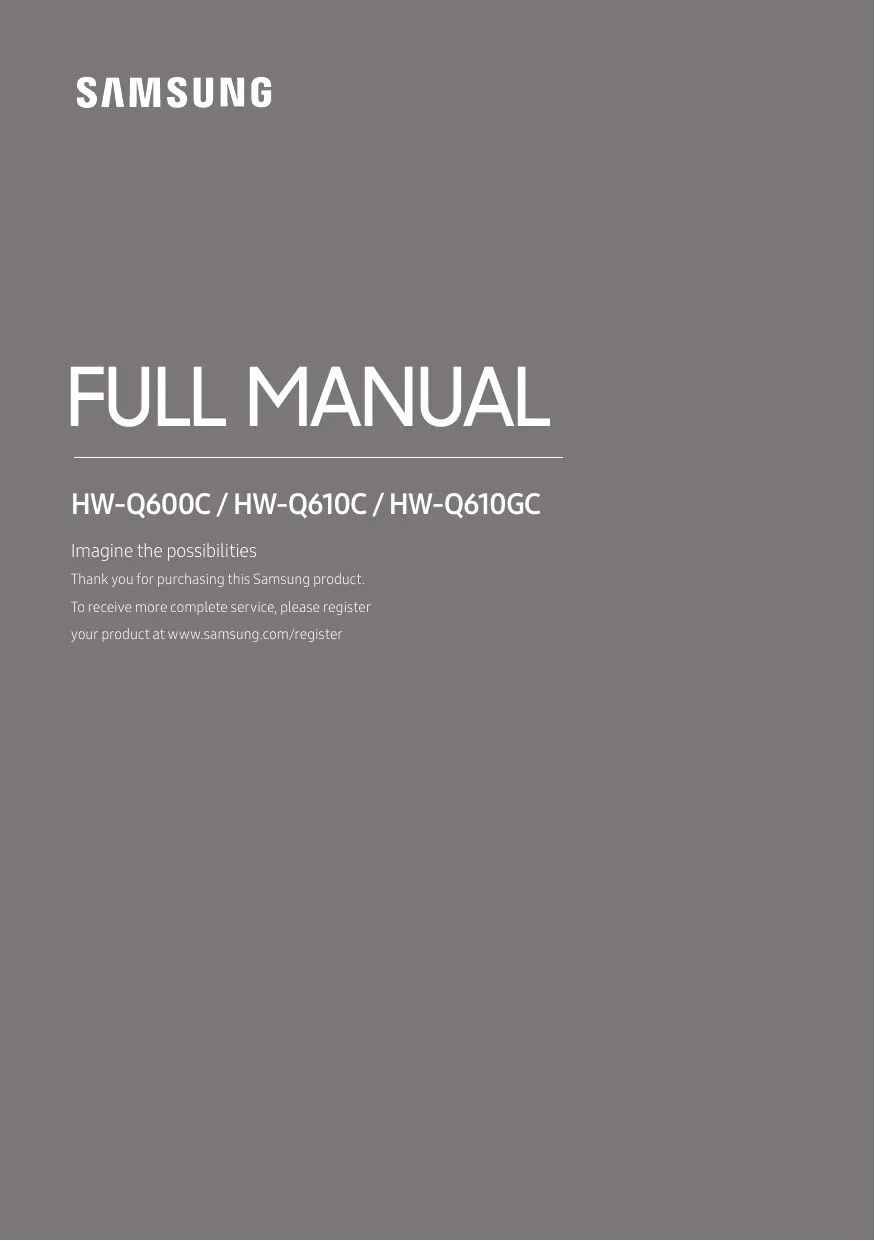
01 CHECKING THE COMPONENTS
Soundbar Main Unit
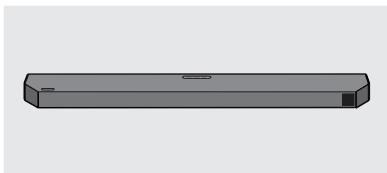
Subwoofer
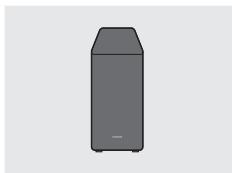
Remote Control / Batteries

Power Cord (Subwoofer, Soundbar)
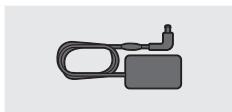
AC/DC Adapter (Soundbar)

HDMI Cable
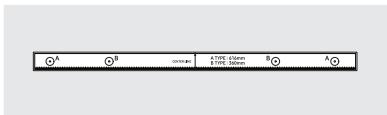
Wall Mount Guide
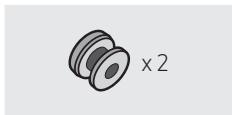
Holder-Screw
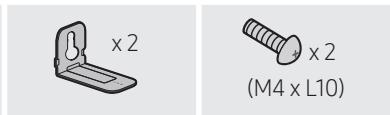
Screw
Bracket-Wall Mount
- For more information about the power supply and power consumption, refer to the label attached to the product. (Label: Bottom of the Soundbar Main Unit)
- To purchase additional components or optional cables, contact a Samsung Service Centre or Samsung Customer Care.
- For more information about the wallmount see page 33.
- Design and specifications are subject to change without prior notice.
- The appearance of the components may differ slightly from the illustrations above.
02 PRODUCT OVERVIEW
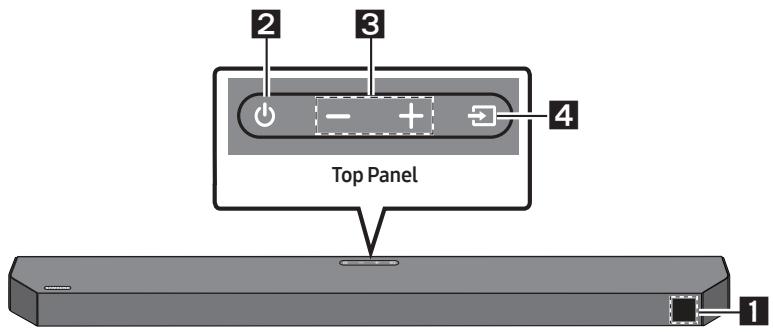
Front Panel / Top Panel of the Soundbar
| 1 | Display
Displays the product's status and current mode. |
| 2 | ● (Power) Button
Turns the power on and off.
• Auto Power Down Function
The unit turns off automatically in the following situations:
- In D.IN / HDMI / BT / USB Mode: If there is no audio signal for 18 minutes. |
| 3 | — + (Volume) Button
Adjusts the volume.
• When adjusted, the volume level appears on the Soundbar's front display. |
| 4 | ● (Source) Button
Selects the source input mode. |
| Input mode | Display |
| Optical | D.IN |
| eARC/ARC (HDMI OUT) | * D.IN → TV eARC (Auto conversion) |
| D.IN → TV ARC (Auto conversion) |
| HDMI | HDMI |
| BLUETOOTH mode | BT |
| USB mode | USB |
| • To turn on “BT PAIRING” mode, change the source to “BT” mode, and then press and hold the (Source) button for more than 5 seconds. |
- “*” mode is supported when the eARC function in the TV setting is On.
-
When you plug in the AC cord, the power button will begin working in 4 to 6 seconds.
-
When you turn on this unit, there will be a 4 to 5 second delay before it produces sound.
- If you hear sounds from both the TV and Soundbar, go to the Settings menu for the TV audio and change the TV speaker to External Speaker.
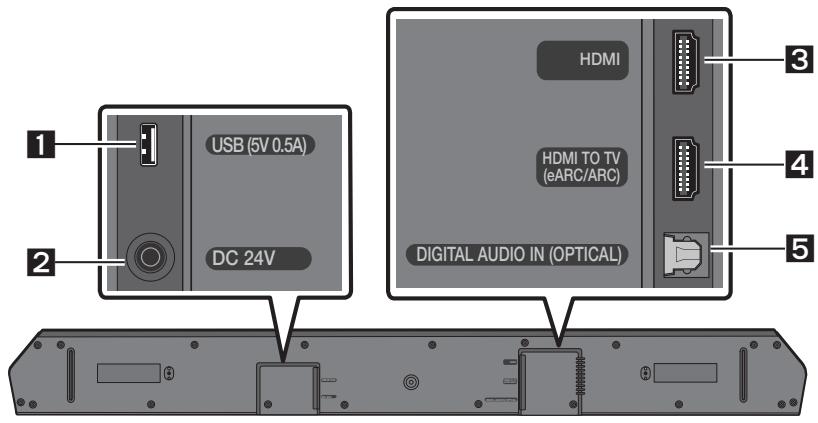
Bottom Panel of the Soundbar
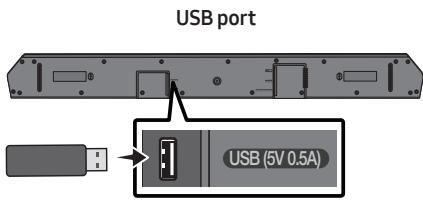
| 1 | USB (5V 0.5A)
Connect a USB drive here to play music files stored on the USB drive through the Soundbar. (See page 27) |
| 2 | DC 24V (Power Supply In)
Connect the AC/DC power adapter. (See page 15) |
| 3 | HDMI
Inputs digital video and audio signals simultaneously using an HDMI cable.
Connect to the HDMI output of an external device. (See page 25) |
| 4 | HDMI TO TV (eARC/ARC)
Connect to the HDMI IN (eARC) port on a TV. (See page 19) |
| 5 | DIGITAL AUDIO IN (OPTICAL)
Connect to the digital (optical) output of an external device. (See page 26) |
- When disconnecting the power cable of the AC/DC power adapter from a wall outlet, pull the plug. Do not pull the cable.
- Do not connect this unit or other components to an AC outlet until all connections between components are complete.
03 USING THE REMOTE CONTROL
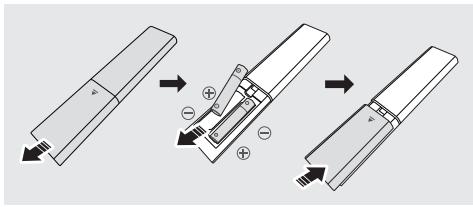
Inserting Batteries before using the Remote Control (AAA batteries X 2)
Slide the back cover in the direction of the arrow until it is completely removed.
Insert 2 AAA batteries (1.5V) so that their orientation is correct. Slide the back cover back into position.
How to Use the Remote Control
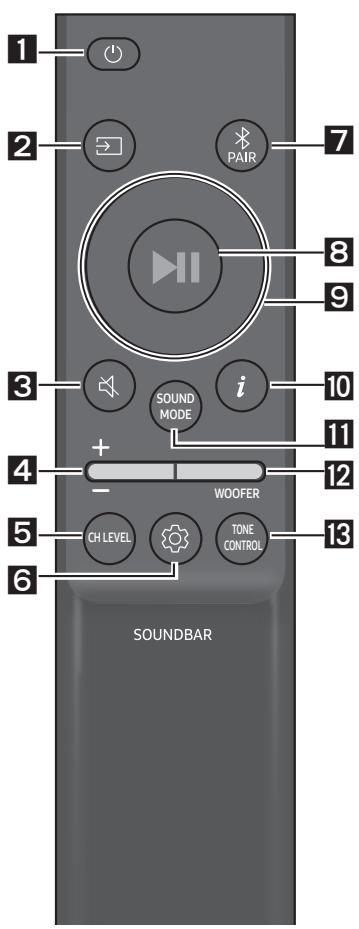
| 1 | Power | Turns the Soundbar on and off. |
| 2 | Source | Press to select a source connected to the Soundbar. |
| 3 | Mute | Press the (Mute) button to mute the sound. Press it again to unmute the sound. |
| 4 | Volume | Push the button up or down to adjust the volume.
• Mute
Press the Volume button in to mute the sound. Press it in again to unmute the sound. |
| 5 | CH LEVEL
CH LEVEL | By pressing the button, you can adjust the volume of the each speaker.
• Press the button to select CENTER LEVEL or TOP LEVEL and then adjust the volume between -6~+6 by using the Up/Down buttons.
• If the Rear Speakers (sold separately) are connected, the setting REAR LEVEL is supported. To adjust the volume of the REAR LEVEL between -6 to +6 by using the Up/Down buttons. |
| 6 | Sound Control | By pressing the button, you can set the audio function. The desired settings can be adjusted using the Up/Down buttons.
VOICE ENHANCE ON/OFF → NIGHT MODE ON/OFF → SYNC → VIRTUAL ON/OFF
- VOICE ENHANCE ON/OFF
This mode is easier to hear spoken dialog in movies and TV.
- NIGHT MODE ON/OFF
This mode is optimized for nighttime viewing with the settings adjusted to bring the volume down but keep the dialog clear.
- SYNC
If the video on the TV and audio from the Soundbar are not synchronized, press the Sound Control button to select SYNC and then set the audio delay between 0~300 milliseconds by using the Up/Down buttons. (Not available in "USB" or "BT" mode.)
- VIRTUAL ON/OFF
Dolby Virtual function can be turned ON/OFF.
• The VOICE ENHANCE, NIGHT MODE, and VIRTUAL audio function can be turned ON/OFF by using the Up/Down buttons. (VIRTUAL function is not available in "USB" or "BT" mode.)
• Press and hold the Sound Control button for about 5 seconds to adjust the sound for each frequency band. 150Hz, 300Hz, 600Hz, 1.2kHz, 2.5kHz, 5kHz, and 10kHz are selectable using the Left/Right buttons and each can be adjusted to a setting between -6 to +6 using the Up/Down buttons. (Make sure the Sound mode is set to "STANDARD".) |
| 7 | PAIR
Bluetooth
PAIR | Switch the Soundbar to Bluetooth pairing mode.
Press the PAIR button and wait for the "BT PAIRING" screen to connect to a new Bluetooth device. |
| 8 | Play / Pause | You can also play or pause music by pressing the button. |
| 9 | Up/Down/Left/Right | Press the indicated areas to select Up/Down/Left/Right. |
| | Press Up/Down/Left/Right on the button to select or set functions.
• Repeat
To use the Repeat function in "USB" mode, press the Up button.
• Music Skip
Press the Right button to select the next music file. Press the Left button to select the previous music file.
• ID SET
Press and hold the Up button for 5 seconds to complete ID SET (when connecting to a wireless subwoofer or wireless rear speakers). |
| 10 | Info | Press to display information about the active function or the codec available. |
| 11 | SOUND MODE | By pressing the button, you can select the desired sound mode.
SURROUND SOUND → GAME PRO → ADAPTIVE SOUND → STANDARD
- SURROUND SOUND
Provides a wider sound field than standard.
- GAME PRO
Provides stereoscopic sound to immerse you in the action while gaming.
- ADAPTIVE SOUND
Analyzes the content in real time and automatically provides an optimal sound field based on the characteristics of the content.
- STANDARD
Outputs the original sound.
• DRC (Dynamic Range Control)
Lets you apply dynamic range control to Dolby Digital tracks. Press and hold the SOUND MODE button for more than 5 seconds while the Soundbar is powered off to turn DRC (Dynamic Range Control) on or off. With the DRC turned on, loud sound is reduced. (The sound may be distorted.)
• Bluetooth Power
This feature automatically turns the Soundbar on when it receives a connection request from a previously connected TV or Bluetooth device. The setting is On by default.
- Press and hold the SOUND MODE button for more than 5 seconds to turn off the Bluetooth Power function. |
| 12 | WOOFER
WOOFER
(BASS) LEVEL | Push the button up or down to adjust the level of the woofer (bass) to -12 or between -6 to +6. To set the woofer (bass) volume level to 0 (Default), press the button. |
| 13 | TONE
CONTROL
TONE
CONTROL | By pressing the button, you can adjust the volume of the treble or bass sound.
• Press the button to select TREBLE or BASS and then adjust the volume between -6~+6 by using the Up/Down buttons. Once the bass level is changed, the woofer level will be also adjusted accordingly. |
| Hidden Button | Reference page |
| Remote Control Button | Function |
| WOOFER (Up) | TV remote control On/Off (Standby) | page 14 |
| Left | TV Auto connect On/Off (BT Ready) | page 24 |
| Up | ID SET | page 11 |
| (Sound Control) | 7 Band EQ | page 10 |
| SOUND MODE | DRC ON/OFF (Standby) | page 11 |
| Bluetooth Power | page 11 |
Output specifications for the different sound effect modes
| Effect | Input | Output |
| With Subwoofer Only | With Subwoofer & Wireless Rear Speaker Kit |
| SOUND MODE | SURROUND SOUND | 2.0 ch | 3.1.2 ch | 5.1.2 ch |
| 5.1 ch | 3.1.2 ch | 5.1.2 ch |
| Dolby Atmos®, DTS:X | 3.1.2 ch | 5.1.2 ch |
| GAME PRO | 2.0 ch | 3.1.2 ch | 5.1.2 ch |
| 5.1 ch | 3.1.2 ch | 5.1.2 ch |
| Dolby Atmos®, DTS:X | 3.1.2 ch | 5.1.2 ch |
| ADAPTIVE SOUND | 2.0 ch | 3.1.2 ch | 5.1.2 ch |
| 5.1 ch | 3.1.2 ch | 5.1.2 ch |
| Dolby Atmos®, DTS:X | 3.1.2 ch | 5.1.2 ch |
| STANDARD | 2.0 ch | 2.1 ch | 2.1 ch |
| 5.1 ch | 3.1 ch | 5.1 ch |
| Dolby Atmos®, DTS:X | 3.1.2 ch | 5.1.2 ch |
- The Samsung Wireless Rear Speaker Kit can be purchased separately. To purchase a Kit, contact the vendor you purchased the Soundbar from.
- When the input source is Dolby Atmos®, DTS:X, the Subwoofer-only setup provides 3.1.2 channel audio, while the Subwoofer & Wireless Rear Speaker Kit setup provides 5.1.2 channel audio.
- The Rear Speakers will not produce sounds for 2 channel output while STANDARD mode is in use. To enable sound for the Rear Speakers, change the effect mode to SURROUND SOUND.
Adjusting the Soundbar volume with a TV remote control
Adjust the Soundbar volume using the TV's remote control.
- This function can be used with IR remote controls only. Bluetooth remote controls (remote controls that require pairing) are not supported.
- Set the TV speaker to External Speaker to use this function.
-
Manufacturers supporting this function: Samsung, VIZIO, LG, Sony, Sharp, PHILIPS, PANASONIC, TOSHIBA, Hisense, RCA
-
Turn Off the Soundbar.
- Push up and hold the WOOFER button for 5 seconds. Each time you push the WOOFER button up and hold it for 5 seconds, the mode switches in the following order: "OFF-TV REMOTE" (Default mode), "SAMSUNG-TV REMOTE", "ALL-TV REMOTE".
| Remote Control Button | Display | Status |
| 5 Sec | (Default mode)
OFF-TV REMOTE | Disable the TV remote control. |
| 5 Sec | SAMSUNG-TV REMOTE | Enable a Samsung TV's IR remote control. |
| 5 Sec | ALL-TV REMOTE | Enable a third-party TV's IR remote control. |
04 CONNECTING THE SOUNDBAR
Connecting Electrical Power
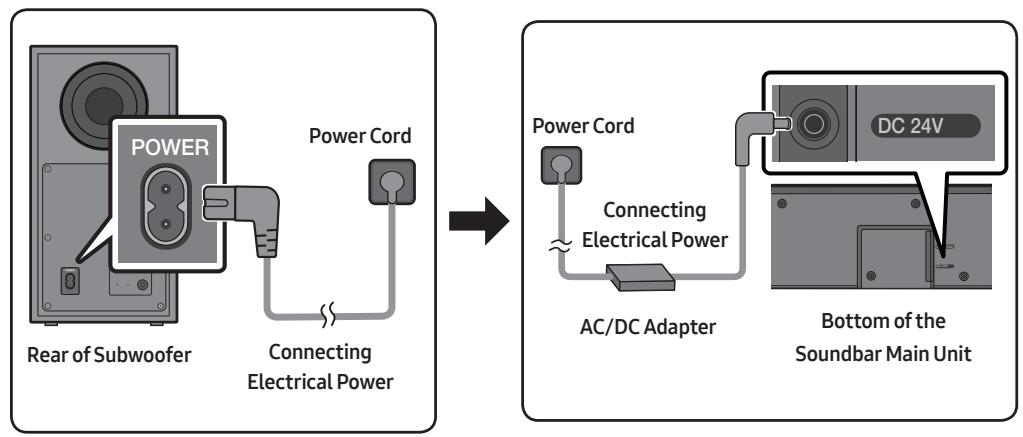
Use the power components to connect the Subwoofer and Soundbar to an electrical outlet in the following order:
-
For more information about the required electrical power and power consumption, refer to the label attached to the product. (Label: Bottom of the Soundbar Main Unit)
-
Connect the power cord to the Subwoofer.
- Connect the power cord to the AC/DC adapter. Connect the AC/DC adapter (with the power cord) to the Soundbar.
-
Connect power to the Soundbar and Subwoofer.
-
Connect power to the Subwoofer first. The Subwoofer will be automatically connected when turning on the Soundbar.
- Make sure to rest the AC/DC Adapter flat on a table or the floor. If you place the AC/DC Adapter so that it is hanging with the AC cord input facing upwards, water or other foreign substances could enter the Adapter and cause the Adapter to malfunction.
- If you unplug and reconnect the power cord when the product is turned on, the Soundbar turns on automatically.
- Check whether the power cables for the Soundbar and subwoofer are connected properly.
-
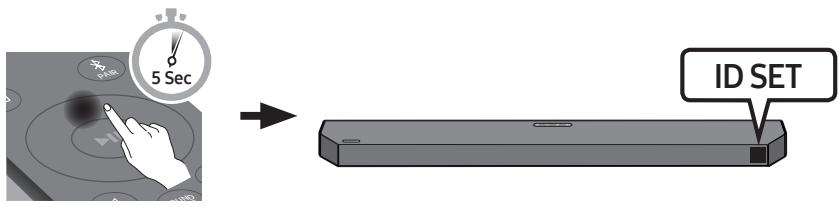
Make sure that the Soundbar is turned on.
-
Press and hold ID SET on the rear of the subwoofer for at least 5 seconds.
-
The red indicator on the rear of the subwoofer turns off and the blue indicator blinks.

-
Press and hold the Up button on the remote control for at least 5 seconds.
-
The ID SET message appears on the display of the Soundbar for a moment, and then it disappears.
- The Soundbar will automatically power on when ID SET is complete.
- Check if the LINK LED is solid blue (connection complete).
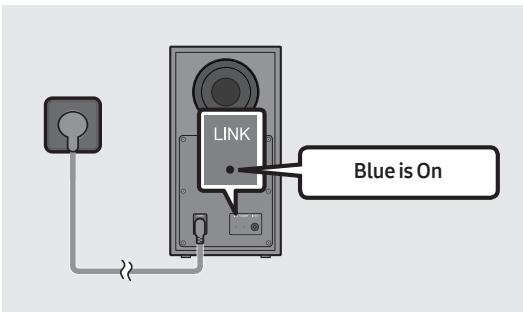
The LINK LED indicator stops blinking and glows a solid blue when a connection is established between the Soundbar and the Wireless Subwoofer.
LED Indicator Lights on the Rear of Subwoofer
| LED | Status | Description | Resolution |
| Blue
LINK STANDBY ID SET | On | Successfully connected (normal operation) | - |
| Blinking | Recovering the connection | Check if the power cable attached to the main Soundbar unit is connected properly or wait about 5 minutes. If blinking persists, try manually connecting the subwoofer. See page 16. |
| Red
LINK STANDBY ID SET | On | Standby (with the Soundbar main unit turned off) | Check if the power cable attached to the main Soundbar unit is connected properly. |
| Connection failed | Connect again. See the instructions for manual connection on page 16. |
| Red and blue
LINK STANDBY ID SET | Blinking | Malfunction | See the contact information for the Samsung Service Centre in this manual. |
NOTES
- Before moving or installing this product, be sure to turn off the power and disconnect the power cord.
- If the main unit is powered off, the wireless subwoofer will go into stand-by mode and the STANDBY LED on the rear of the sub-woofer will turn red after blinking blue several times.
- If you use a device that uses the same frequency as the Soundbar near the Soundbar, interference may cause some sound interruption.
- The maximum transmission distance of the main unit's wireless signal is about 10m , but may vary depending on your operating environment. If a steel-concrete or metallic wall is between the main unit and the wireless subwoofer, the system may not operate at all because the wireless signal cannot penetrate metal.
CAUTION
- Wireless receiving antennas are built into the wireless subwoofer. Keep the unit away from water and moisture.
- For optimal listening performance, make sure that the area around the wireless subwoofer and the Wireless Rear Speakers (sold separately) are clear of any obstructions.
Connecting the Samsung Wireless Rear Kit to your Soundbar
Expand to true wireless surround sound by connecting the Samsung Wireless Rear Speaker Kit (SWA-9200S sold separately) to your Soundbar.
For detailed information on connections, see the Samsung Wireless Rear Speaker Kit manual.
05 CONNECTING TO A TV
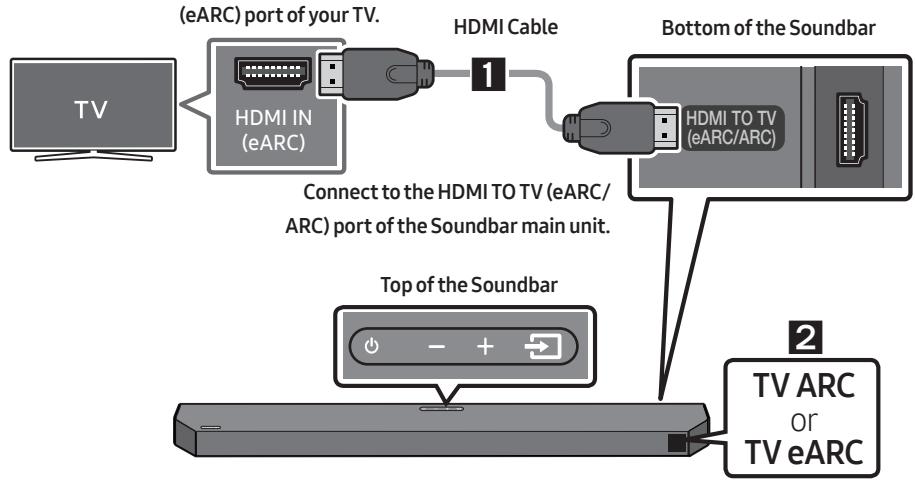
Method 1. Connecting with HDMI
Connecting the TV that supports HDMI ARC/eARC (Audio Return Channel/ Enhanced Audio Return Channel)

CAUTION
- When both the HDMI cable and optical cable are connected, the HDMI signal is received first.
- To connect the HDMI cable between the TV and Soundbar, be sure to connect the terminals marked ARC or eARC. Otherwise, the TV sound output may not work.
- The recommended cable is High Speed HDMI Cable with Ethernet.
- When connecting a TV that supports the eARC function, "TV eARC" appears on the display and the sound is heard.
- Dolby Atmos@/DTS:X is supported in the ARC/eARC function.
Connect to the HDMI IN (ARC) or
- With the Soundbar and TV turned on, connect the HDMI cable as shown in the figure.
-
"TVARC" or "TV eARC" appears in the display window of the Soundbar main unit and the Soundbar plays TV sound.
-
"TV eARC" is displayed when the eARC function in the TV setting is On.
-
To connect with eARC, the eARC function in the TV menu should be set to On. Refer to the TV user manual for details on setting. (e.g. Samsung TV: Home () Menu Settings () All Settings () Sound Expert Settings HDMI-eARC Mode (Auto))
- If TV sound is inaudible, press the (Source) button on the remote control or on the top of the Soundbar to switch to "D.IN" mode. The screen displays "D.IN" and "TV ARC" or "TV eARC" in sequence, and TV sound is played.
- If "TV ARC" or "TV eARC" does not appear in the display window of the Soundbar main unit, confirm that the HDMI cable is connected to the correct port.
- Use the volume buttons on the TV's remote control to change the volume on the Soundbar.
NOTES
- When you connect the TV that supports the HDMI ARC/eARC (Audio Return Channel/Enhanced Audio Return Channel) to the Soundbar with an HDMI cable, you can transmit the digital video and audio data without connecting a separate optical cable.
- We recommend you use a coreless HDMI cable if possible. If you use a cored HDMI cable, use one with a diameter that is less than 14mm .
- This function is not available if the HDMI cable does not support ARC or eARC.
- ARC and eARC differ in bandwidth. eARC that is enhanced version of the audio return channel has significantly higher bandwidth than ARC. Higher bandwidth increases the amount of data that can be transmitted. So, with the eARC channel, you can enjoy the sound through formats such as Dolby Atmos® and DTS:X.
- When the audio in a broadcast is encoded in Dolby Digital and the "Digital Output Audio Format" on your TV is set to PCM, we recommend that you change the setting to Dolby Digital. When the setting on the TV is changed, you will experience better sound quality. (The TV menu may use different words for Dolby Digital and PCM depending on the TV manufacturer.)
Method 2. Connecting using an Optical Cable
Pre-connection Checklist
- When both the HDMI cable and optical cable are connected, the HDMI signal is received first.
- When you use an optical cable and the terminals have covers, be sure to remove the covers.

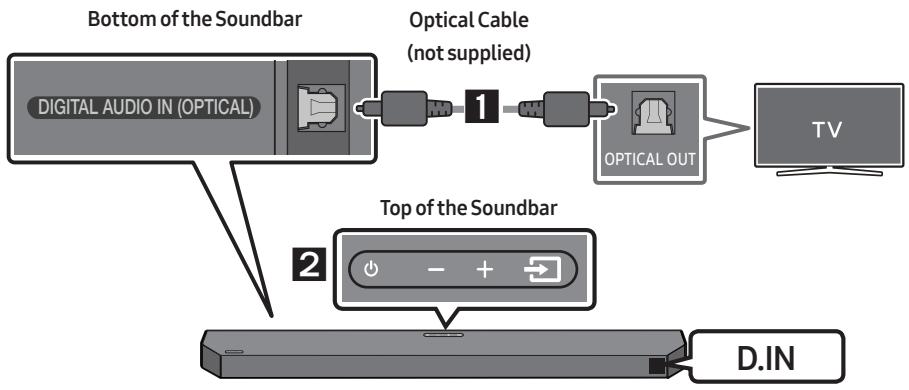
- Connect the DIGITAL AUDIO IN (OPTICAL) port on the Soundbar to the OPTICAL OUT port of the TV with a digital Optical Cable (not supplied).
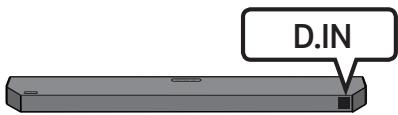
- Press the (Source) button on the top panel or remote control, and then select the "D.IN" mode.
- The TV sound is played from the Soundbar.
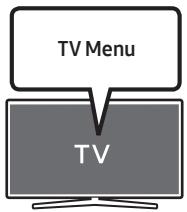
Using the Q-Symphony Function
For Q-Symphony, the Soundbar syncs with a Samsung TV to output sound through two devices for optimum surround effect. When the Soundbar is connected, the menu, "TV+Soundbar" appears under the Sound Output menu of the TV. Select the corresponding menu.

Optical Cable (not supplied)
- TV menu example: TV + [AV] Soundbar series name (HDMI)
NOTES
- It can operate according to the Codec supported by TV.
- This function is supported only when the HDMI Cable or Optical Cable (not supplied) is connected.
- The message displayed may differ with the TV model.
- This function is available in some Samsung TVs and some Soundbar models.
Method 3. Connecting via Bluetooth
When a TV is connected using Bluetooth, you can hear stereo sound without the hassle of cabling.
- Only one TV can be connected at a time.
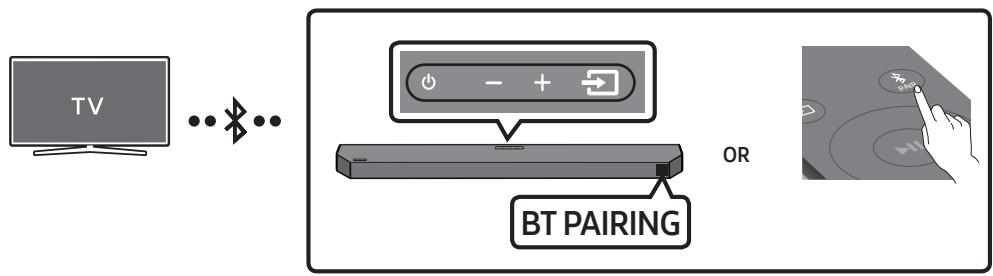
The initial connection
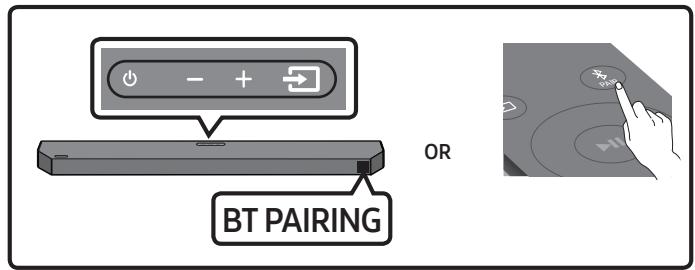
- Press the PAIR button on the remote control to enter the "BT PAIRING" mode.
(OR) a. Press the (Source) button on the top panel and then select "BT".
"BT" changes to "BT PAIRING" in a few seconds automatically or changes to "BT READY" if there is a connect record.
b. When "BT READY" appears, press and hold the (Source) button on the top panel of the Soundbar for more than 5 seconds to display "BT PAIRING".
- Select Bluetooth mode on the TV. (For more information, see the TV's manual.)
- Select "Soundbar Q6C-Series(Bluetooth)" from the list on TV's screen.
An available Soundbar is indicated with "Need Pairing" or "Paired" on the TV's Bluetooth device list. To connect the TV to the Soundbar, select the message, and then establish a connection.
-
When the TV is connected, [TV Name] "BT" appears on the Soundbar's front display.
-
You can now hear TV sound from the Soundbar.
- After you have connected the Soundbar to your TV the first time, use the "BT READY" mode to reconnect.
If the device fails to connect
- If a previously connected Soundbar listing (e.g. "Soundbar Q6C-Series(Bluetooth)") appears in the list, delete it.
- Then repeat steps 1 through 3.
Disconnecting the Soundbar from the TV
Press the (Source) button on the top panel or on the remote control and switch to any mode but "BT".
- Disconnecting takes time because the TV must receive a response from the Soundbar. (The time required may differ, depending on the TV model.)
- To cancel the automatic Bluetooth connection between the Soundbar and TV, press the Left button on the remote control for 5 seconds with the Soundbar in "BT READY" status. (Toggle On Off)
What is the difference between BT READY and BT PAIRING?
- BT READY: In this mode, you can reconnect TV or mobile device that was connected before.
- BT PAIRING: In this mode, you can connect a new device to the Soundbar. (Press the PAIR button on the remote control or press and hold the Source) button on the top of the Soundbar for more than 5 seconds while the Soundbar is in "BT" mode.)
Notes on Bluetooth connection
- Locate a new device within 1m to connect via Bluetooth communication.
- If asked for a PIN code when connecting a Bluetooth device, enter <0000>.
- In Bluetooth connection mode, the Bluetooth connection will be lost if the distance between the Soundbar and the Bluetooth device exceeds 10m .
- The Soundbar automatically turns off after 18 minutes in the Ready state.
- The Soundbar may not perform Bluetooth search or connection correctly under the following circumstances:
If there is a strong electrical field around the Soundbar.
If several Bluetooth devices are simultaneously paired with the Soundbar.
If the Bluetooth device is turned off, not in place, or malfunctions.
- Electronic devices may cause radio interference. Devices that generate electromagnetic waves must be kept away from the Soundbar main unit - e.g., microwaves, wireless LAN devices, etc.
06 CONNECTING AN EXTERNAL DEVICE
Method 1. Connecting using an HDMI Cable (Capable of Dolby Atmos®/DTS:X decoding and playback)
Pre-connection Checklist
- If the Audio Output options include Secondary Audio, make sure Secondary Audio is set to Off.
- Make sure that the content supports Dolby Atmos®/DTS:X.
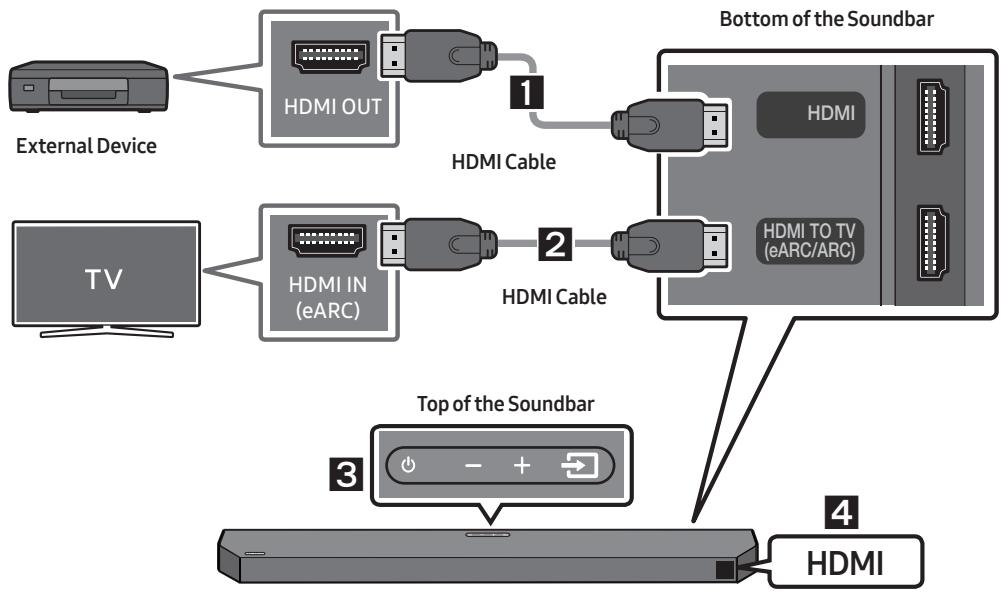
- Connect an HDMI cable from the HDMI port on the bottom of the Soundbar to the HDMI OUT port on your digital device.
- Connect an HDMI cable from the HDMI TO TV (eARC/ARC) port on the bottom of the Soundbar to the HDMI IN (eARC) port on your TV.
- Press the (Source) button on the top panel or on the remote control, and then select "HDMI".
- "HDMI" mode is displayed on the Soundbar display panel and sound plays.
NOTES
- When you use Dolby Atmos®/DTS:X: If the input source is Dolby Atmos®/DTS:X, refer to "Output specifications for the different sound effect modes" on page 13.
- When Dolby Atmos® is activated, "DOLBY ATMOS" appears in the front display.
- When DTS:X is activated, "DTS:X" appears in the front display.
- Configuring Dolby Atmos®/DTS:X on your BD player or other device.
Open the audio output options on the settings menu of your BD player or other device and make sure that "No Encoding" is selected for Bitstream. For example, on a Samsung BD Player, go to Home Menu Sound Digital Output and then select Bitstream (unprocessed).
- HDMI Pass-Through is that the Soundbar plays the audio from the source through its own speakers and sends the unaltered video signal to a TV via the second HDMI cable.
Supported UHD Signals Specification (3840 x 2160p)
| Frame rate (fps) | Colour depth | RGB 4:4:4 | YCbCr 4:4:4 | YCbCr 4:2:2 | YCbCr 4:2:0 |
| <60 | 8 bit | O | O | O | O |
| 10 bit | - | - | O | O |
| 12 bit | - | - | O | O |
| 120 | 8 bit | - | - | - | - |
| 10 bit | - | - | - | - |
- Supported specification may vary depending on the connected external device or usage conditions.
Method 2. Connecting using an Optical Cable
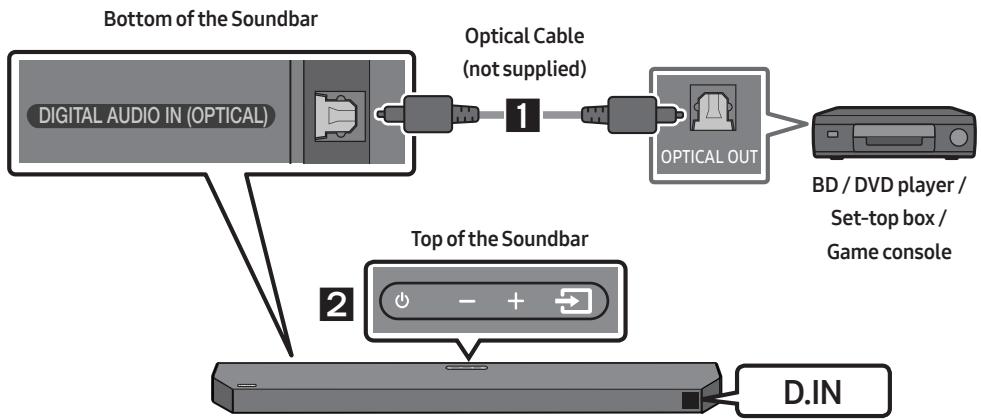
- Connect the DIGITAL AUDIO IN (OPTICAL) port on the Soundbar and the OPTICAL OUT port on the external device with the optical cable (not supplied), as shown in the figure.
- Select "D.IN" mode by pressing the (Source) button on the top panel or on the remote control.
- The external device sound is output from the Soundbar.
07 CONNECTING A USB DRIVE
You can play music files located on USB drive through the Soundbar.
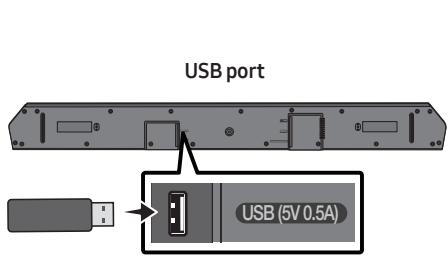
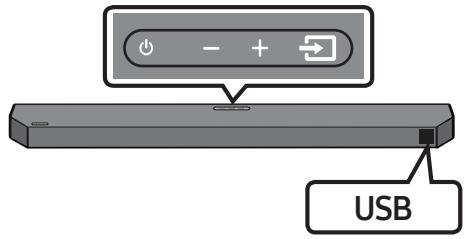
- Connect the USB drive to the USB port on the bottom of the product.
- Press the (Source) button on the top panel or on the remote control, and then select "USB".
- "USB" appears in the display screen.
-
Play music files from the USB drive through the Soundbar.
-
The Soundbar automatically turns off (Auto Power Down) if there is no audio signal from USB drive or no USB drive connection for more than 18 minutes.
| Extension | Codec | Sampling Rate | Bit Rate |
| *.mp3 | MPEG1 Layer2 | 32kHz ~ 48kHz | 32kbps ~ 320kbps |
| MPEG1 Layer3 | 32kHz ~ 48kHz | 32kbps ~ 320kbps |
| MPEG2 Layer3 | 16kHz ~ 24kHz | 8kbps ~ 160kbps |
| MPEG2.5 Layer3 | 8kHz ~ 12kHz | 8kbps ~ 160kbps |
| *.wma | WMA7/8/9 (Audio Only) | 32kHz ~ 48kHz | 32kbps ~ 320kbps |
| *.ogg | Vorbis | 32kHz ~ 48kHz | 45kbps ~ 500kbps |
| *.aac | | | |
| *.m4a | AAC-LC(MPEG2/MPEG4 Audio Only) | 32kHz ~ 48kHz | 32kbps ~ 320kbps |
| *.mp4 | | | |
| *.wav | LPCM | 32kHz ~ 192kHz | 1,024kbps ~ 9,216kbps |
| *.flac | FLAC | 32kHz ~ 192kHz | 162kbps ~ 8,100kbps |
| *.aiff | AIFF | 32kHz ~ 192kHz | 1,024kbps ~ 9,216kbps |
- If there are too many folders (about 200) and files (about 2000) stored on the USB drive, it may take the Soundbar some time to access and play files.
Supported USB file system : FAT16, FAT32, NTFS
08 CONNECTING A MOBILE DEVICE
Connecting via Bluetooth
When a mobile device is connected using Bluetooth, you can hear stereo sound without the hassle of cabling.
- When you connect a paired Bluetooth device with the Soundbar off, the Soundbar automatically turns on.
- The connection is limited to one TV or two Bluetooth devices at the same time.

The initial connection
-
When connecting to a new Bluetooth device, make sure the device is within 1 m distance.
-
Press the PAIR button on the remote control to enter the "BT PAIRING" mode.
(OR) a. Press the (Source) button on the top panel and then select "BT".
"BT" changes to "BT PAIRING" in a few seconds automatically or changes to "BT READY" if there is a connect record.
b. When "BT READY" appears, press and hold the (Source) button on the top panel of the Soundbar for more than 5 seconds to display "BT PAIRING".
-
On your device, select "[AV]Samsung Soundbar Q6C-Series" from the list that appears.
-
When the Soundbar is connected to the Mobile device, [Mobile Device Name] "BT" appears in the front display.
-
Play music files from the device connected via Bluetooth through the Soundbar.
-
After you have connected the Soundbar to your mobile device the first time, use the "BT READY" mode to reconnect.
If the device fails to connect
- If you have an existing Soundbar (e.g., "[AV]Samsung Soundbar Q6C-Series") on the list of speakers on the Mobile device, delete it.
- Then repeat steps 1 and 2.
What is the difference between BT READY and BT PAIRING?
- BT READY: In this mode, you can reconnect TV or mobile device that was connected before.
- BT PAIRING: In this mode, you can connect a new device to the Soundbar. (Press the PAIR button on the remote control or press and hold the Source) button on the top of the Soundbar for more than 5 seconds while the Soundbar is in "BT" mode.)
Notes on Bluetooth connection
- Locate a new device within 1m to connect via Bluetooth communication.
- If asked for a PIN code when connecting a Bluetooth device, enter <0000>.
- In Bluetooth connection mode, the Bluetooth connection will be lost if the distance between the Soundbar and the Bluetooth device exceeds 10m .
- The Soundbar automatically turns off after 18 minutes in the Ready state.
-
The Soundbar may not perform Bluetooth search or connection correctly under the following circumstances:
-
If there is a strong electrical field around the Soundbar.
If several Bluetooth devices are simultaneously paired with the Soundbar.
-
If the Bluetooth device is turned off, not in place, or malfunctions.
-
Electronic devices may cause radio interference. Devices that generate electromagnetic waves must be kept away from the Soundbar main unit - e.g., microwaves, wireless LAN devices, etc.
The Soundbar supports SBC data (44.1kHz, 48kHz).
- Connect only to a Bluetooth device that supports the A2DP (AV) function.
- You cannot connect the Soundbar to a Bluetooth device that supports only the HF (Hands Free) function.
- Once you have paired the Soundbar to a Bluetooth device, selecting "[AV]Samsung Soundbar Q6C-Series" from the device's scanned devices list will automatically change the Soundbar to "BT" mode.
Available only if the Soundbar is listed among the Bluetooth device's paired devices.
(The Bluetooth device and the Soundbar must have been previously paired at least once.)
– When the body is in contact with the signal transceiver on the Bluetooth device or Soundbar
- In corners or when there is an obstacle in proximity, such as a wall or partition, where electrical changes may occur.
- When exposed to radio interferences by other products operating on the same frequency ranges, such as medical equipment, microwave ovens, and wireless LAN devices.
- Obstacles such as doors and walls may still impact the sound quality even when the devices are within the effective range.
- Note that your Soundbar cannot be paired with other Bluetooth devices while using the Bluetooth option.
- This wireless device may cause electrical interference during operation.
Bluetooth Power On (SOUND MODE)
If a previously paired Bluetooth device tries to pair with the Soundbar when the Bluetooth Power On function is on and the Soundbar is turned off, the Soundbar turns on automatically.
- Press and hold the SOUND MODE button for more than 5 seconds on the remote while the Soundbar is turned on.
- "ON-BLUETOOTH POWER" appears on the Soundbar's display.
Disconnecting the Bluetooth device from a Soundbar
You can disconnect a Bluetooth device from the Soundbar. For instructions, see the Bluetooth device's user manual.
- The Soundbar will be disconnected.
- When the Soundbar is disconnected from the Bluetooth device, the Soundbar will display "BT DISCONNECTED" on the front display.
Disconnecting the Soundbar from the Bluetooth device
Press the (Source) button on the top panel or on the remote control, and then change to any mode except "BT".
- Disconnecting takes time because the Bluetooth device must receive a response from the Soundbar. (Disconnection time may differ, depending on the Bluetooth device)
- When the Soundbar is disconnected from the Bluetooth device, the Soundbar will display "BT DISCONNECTED" on the front display.
The Soundbar can be connected to 2 Bluetooth devices at the same time.
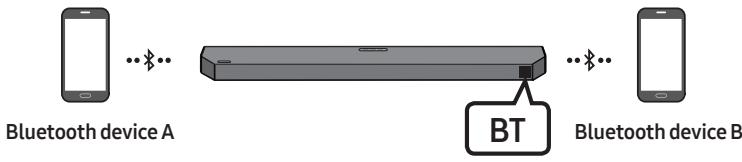
- Connect the Soundbar to up to two Bluetooth devices. (See page 28)
- Play music from one of the connected Bluetooth devices while two devices are connected.
- If music is played from the Bluetooth device "B" while playing from the device "A", the music is started playing on the device "B" and automatically being stopped/paused playback on the device "A".
- In versions prior to AVRCP V1.4, the switching time of the device playing music may be delayed.
NOTES
- The device can be switched by notification or alarm on some devices.
- Some devices do not support Bluetooth multi connection.
- "BT PAIRING" mode stops when no device is paired within 3 minutes.
- Switching devices may take about 7 seconds on some apps.
- If you attempt to connect a 3rd Bluetooth device, the A or B devices will be disconnected. (A device that is not currently playing will be disconnected.)
- Only one Samsung TV, or 2 Bluetooth devices can be connected at the same time.
- The Soundbar will be disconnected from Bluetooth devices when it receives a connection request from a Samsung TV.
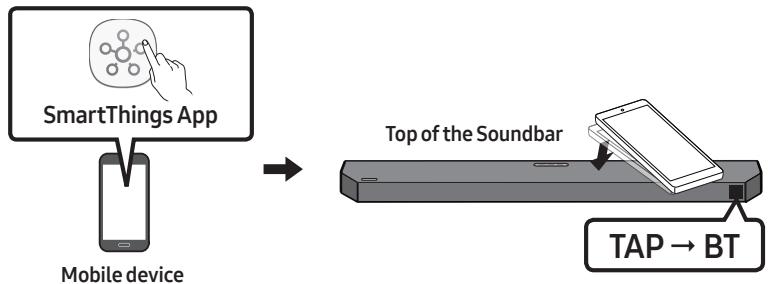
Using Tap Sound
Tap the Soundbar with your mobile device to play audio from the mobile device through the Soundbar.
- This function may not be supported, depending on the mobile device.
- This function is only compatible with Samsung mobile devices with Android 8.1 or later.
-
Turn on the Tap Sound function on your mobile device.
-
For details on how to turn on the function, refer to "Enable the Tap Sound function" below.
-
Tap the Soundbar with the mobile device. Select "Start now" in the displayed message window.
A connection is established between the mobile device and Soundbar via Bluetooth.
-
Play audio from the mobile device through the Soundbar.
-
This function connects a mobile device to the Soundbar via Bluetooth by detecting vibration that occurs when the device touches the Soundbar.
- Make sure the mobile device does not tap a sharp corner of the Soundbar. The Soundbar or mobile device may become scratched or damaged.
- It is recommended that the mobile device be covered with a case. Lightly tap the wide area in the upper portion of the Soundbar, without using excessive force.
- To use this function, update the SmartThings app to the latest version.
The function may not be supported, depending on the app version.
Enable the Tap Sound function
Use the SmartThings app to turn on the Tap View, Tap Sound function.
- On the mobile device, run the SmartThings app.
- Select (→) in the SmartThings app screen displayed on the mobile device.
- Set "Tap View, Tap Sound" to On to allow the function to work when a mobile device moves close to the Soundbar.
NOTES
- When the mobile device is in power-saving mode, the Tap Sound function does not work.
- The Tap Sound function may not work if there are devices near the Soundbar that cause radio interference such as electric devices. Make sure devices that may cause radio interference are placed at a sufficient distance away from the Soundbar.
09 INSTALLING THE WALL MOUNT
Wallmount Components
Installation Precautions
Install on a vertical wall only.
- Do not install in a place with high temperature or humidity.
- Verify whether the wall is strong enough to support the product's weight. If not, reinforce the wall or choose another installation point.
Purchase and use the fixing screws or anchors appropriate for the kind of wall you have (plaster board, iron board, wood, etc.). If possible, fix the support screws into wall studs.
Purchase wall mounting screws according to the type and thickness of the wall you want to mount the Soundbar on.
Diameter: M5
Length: 35mm or longer recommended.
- Connect cables from the unit to external devices before you install the Soundbar on the wall.
- Make sure the unit is turned off and unplugged from the power source before you install it. Otherwise, it may cause an electric shock.

Holder-Screw
Screw

Bracket-Wall Mount
-
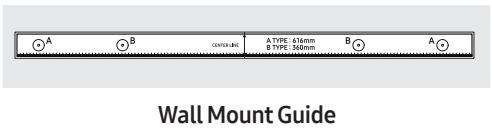
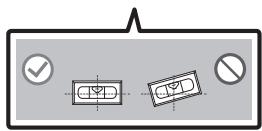
Place the Wall Mount Guide against the wall surface.
-
The Wall Mount Guide must be level.
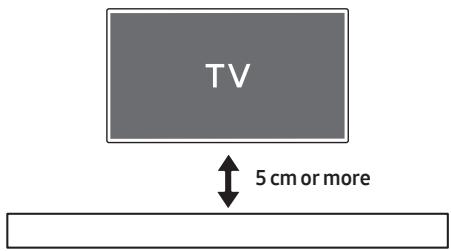
- If your TV is mounted on the wall, install the Soundbar at least 5 cm below the TV.
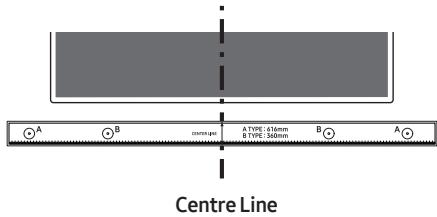
-
Align the Wall Mount Guide's Centre Line with the centre of your TV (if you are mounting the Soundbar below your TV), and then fix the Wall Mount Guide to the wall using tape.
-
If you are not mounting below a TV, place the Centre Line in the centre of the installation area.
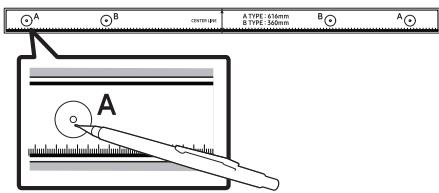
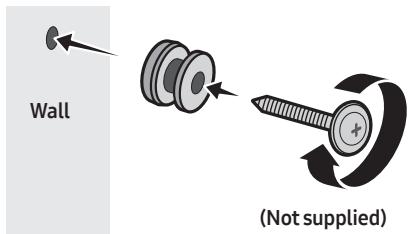
- Push a pen tip or sharpened pencil tip through the centre of the A-TYPE images on each end of the Guide to mark the holes for the supporting screws, and then remove the Wall Mount Guide.
-
Using an appropriately sized drill bit, drill a hole in the wall at each marking.
-
If the markings do not correspond to the positions of studs, make sure you insert appropriate anchors into the holes before you insert the support screws. If you use anchors, make sure the holes you drill are large enough for the anchors you use.
-
Push a screw (not supplied) through each Holder-Screw, and then screw each screw firmly into a support screw hole.
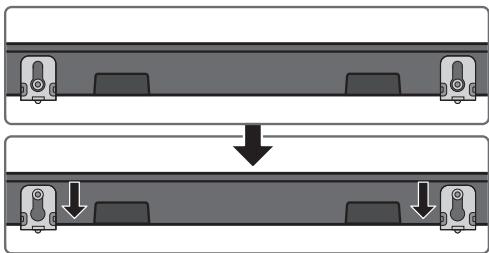
- Install the 2 Bracket-Wall Mounts in the correct orientation on the bottom of the Soundbar using 2 Screws.
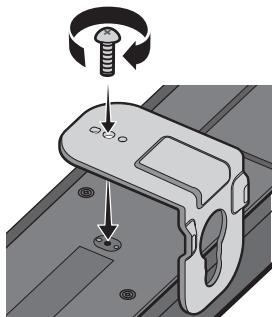
- When assembling, make sure the hanger part of the Bracket-Wall Mounts are located behind the rear of the Soundbar.
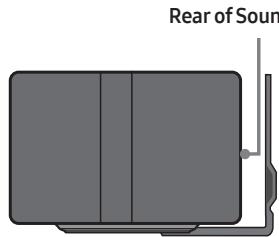
Right end of Soundbar
- Install the Soundbar with the attached Bracket-Wall Mounts by hanging the Bracket-Wall Mounts on the Holder-Screws on the wall.
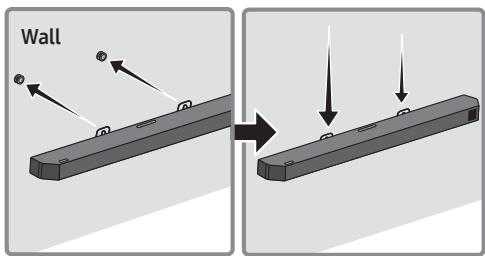
-
Slide the Soundbar down as shown below so that the Bracket-Wall Mounts rest securely on the Holder-Screws.
-
Insert the Holder-Screws into the wide (bottom) part of the Bracket-Wall Mounts, and then slide the Bracket-Wall Mounts down so that the Bracket-Wall Mounts rest securely on the Holder-Screws.
10 INSTALLING THE SOUNDBAR IN FRONT OF TV
Place the Soundbar on a TV stand.
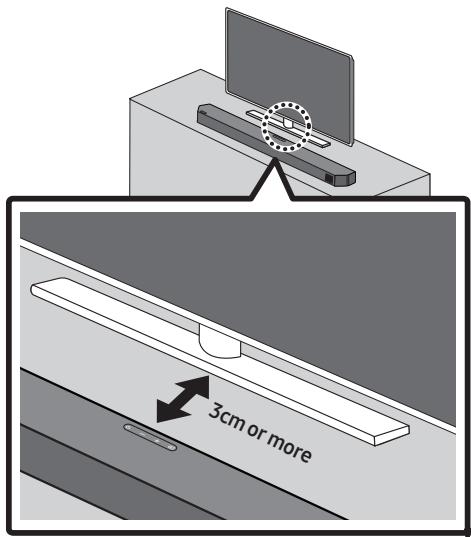
As illustrated in the image, align the centre of the Soundbar with the centre of the TV, carefully place the Soundbar onto the TV stand. For optimal sound quality, position the Soundbar at least 3 cm away from the TV front.
NOTES
- Make sure the Soundbar is placed on a flat and solid surface.
Insufficient gap from the TV may cause acoustic problems.
11 SOFTWARE UPDATE
Samsung may offer updates for the Soundbar's system firmware in the future.
If an update is offered, you can update the firmware by connecting a USB drive with the firmware update stored on it to the USB port on your Soundbar.
USB Update
After the update completes, all your customized user settings are maintained.
- Connect a USB drive to the USB port on your computer.
Important: Make sure there are no music files on the USB drive. This may cause the firmware update to fail.
- Go to (www.samsung.com) search for the model name from the customer support menu option.
- For more information about update, refer to Upgrade Guide.
- Download the upgrade file (USB type).
-
Unzip the downloaded upgrade file and copy the *.bin file to the root directory of the USB drive.
-
Turn off the Soundbar and connect the USB drive containing the firmware update to the USB port on the Soundbar.
- Turn on the Soundbar and press the (Source) button to select USB source. "UPGR" will be displayed, this may take up to 3 minutes.
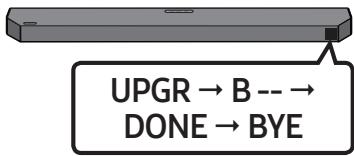
- The process of firmware update is displayed UPGR B--- DONE BYE in sequence, B or H can be displayed according to the firmware that is updated.
NOTES
Soundbar is rebooted automatically when the update is completed.
- This product has a DUAL BOOT function. If the firmware fails to update, you can update the firmware again.
- During update, do not turn it off or remove the USB.
- If update does not proceed, disconnect and reconnect the Soundbar power cord.
- When the latest version is installed, no update is performed.
Depending on the USB type, update may not be supported.
- If the connection to the subwoofer is not re-established automatically after the update, refer to page 16.
- If the software update fails, check if the USB drive is defective.
Mac OS users should use MS-DOS (FAT) as the USB format.
Reset
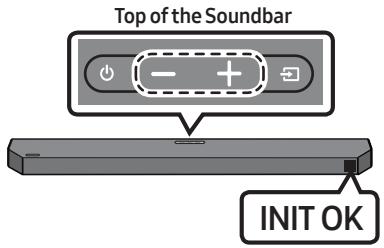
With the Soundbar on, press the - + (Volume) buttons on the top of the Soundbar at the same time for at least 5 seconds. "INIT OK" appears on the display and then the Soundbar is reset.
CAUTION
- All the settings of the Soundbar are reset. Be sure to perform this only when a reset is required.
12 TROUBLESHOOTING
Before seeking assistance, check the following.
Soundbar does not turn on.
Check whether the power cord of the Soundbar is correctly inserted into the outlet.
Soundbar works erratically.
After removing the power cord, insert it again.
Unplug the power cord and plug it back into the external device and try again.
If there is no signal, the Soundbar automatically turns off after a certain period of time. Turn on the power. (See page 7.)
If the remote control does not work.
Point the remote directly at the Soundbar.
Replace the batteries with new ones.
Soundbar does not output any sound.
The volume of the Soundbar is too low or muted. Adjust the volume.
When any external device (STB, Bluetooth device, mobile device, etc.) is connected, adjust the volume of the external device.
For sound output of the TV, select Soundbar. (Samsung TV: Home () Menu Settings () All Settings () Sound Sound Output Select Soundbar)
The cable connection to the Soundbar may be loose. Remove the cable and connect again.
Remove the power cord completely, reconnect, and turn the power on.
Reset the product and try again. (See page 37.)
Subwoofer does not output any sound.
- Check whether the LED indicator on the rear of the Subwoofer is on in blue. Reconnect the Soundbar and Subwoofer if the indicator is blinking in blue or turned red. (See page 16.)
You may experience an issue if there is an obstacle between the Soundbar and Subwoofer. Move devices to an area away from obstacles.
- Other devices sending radio frequency signals in proximity may interrupt the connection. Keep your speaker away from such devices.
Remove and reconnect the power plug.
In case there is sound jitter, delays, or noise from the Subwoofer.
If there are any objects between the Soundbar and Subwoofer speaker, this could cause a problem. Please reposition these to a place without interference from that object.
There may be sound jitter or delays when the Subwoofer is far from the Soundbar. Please place it near the Soundbar.
There may be sound jitter or delays when the Soundbar is near an instrument or electrical device that can cause radio interference. Place the Soundbar far from such devices that can cause radio interference. (E.g., wireless router)
Change the TV network connection status from wireless to wired.
The Subwoofer volume is too low.
The original volume of the content you are playing may be low. Try adjusting the Subwoofer level. (See page 12.)
Bring the Subwoofer speaker closer to you.
If the TV is not connected via HDMI TO TV (eARC/ARC).
Check whether the HDMI cable is correctly connected to the eARC terminal. (See page 19.)
Connection may not be possible due to the connected external device (set-top box, game machine, etc.). Directly connect the Soundbar.
HDMI-CEC may not be activated on the TV. Turn on the CEC on the TV menu. (Samsung TV: Home () Menu Settings () All Settings () Connection External Device Manager Anynet+ (HDMI-CEC) ON)
To connect with eARC, the eARC function in the TV menu should be set to On. (Samsung TV: Home () Menu Settings () All Settings () Sound Expert Settings HDMI-eARC Mode (Auto))
There is no sound in when connecting to the TV in HDMI TO TV (eARC/ARC) mode.
Your device is unable to play the input signal. Change the TV's audio output to PCM or AUTO. (Samsung TV: Home () Menu Settings (念) All Settings (念) Sound Expert Settings Digital Output Audio Format)
Soundbar does not connect via Bluetooth.
When connecting a new device, switch to "BT PAIRING" for connection. (Press the PAIR button on the remote control or press the (Source) button on the body for at least 5 seconds.)
If the Soundbar is connected to another device, disconnect that device first to switch the device.
Reconnect it after removing the Bluetooth speaker list on the device to connect. (Samsung TV: Home () Menu Settings () All Settings () Sound Sound Output Bluetooth Speaker List)
The automatic TV connection may be disabled. While the Soundbar is in "BT READY", press and hold the Left button on the Soundbar remote control for 5 seconds to select ON-TV CONNECT. If you see OFF-TV CONNECT, press and hold Left button again for 5 seconds to switch the selection.
Remove and reconnect the power plug, then try again.
Reset the product and try again. (See page 37.)
Sound drops out when connected via Bluetooth.
- Some devices can cause radio interference if they are located too close to the Soundbar. e.g. microwaves, wireless routers, etc.
If your device that is connected via Bluetooth moves too far away from the Soundbar, it may cause the sound to drop out. Move the device closer to the Soundbar.
If a part of your body is in contact with the Bluetooth transceiver or the product is installed on metal furniture, sound may drop out. Check the installation environment and conditions for use.
Bluetooth multi connection does not work.
When the TV is connected to the soundbar, Bluetooth multi connection may not operate. Disconnect the Soundbar from the TV and try again.
Check whether the Bluetooth Multi connection setting is turned on. (Refer to the "Soundbar does not connect via Bluetooth." section.)
Disconnect the device currently playing, pair with the device that you want to connect, and reconnect the previous device.
If the sound is inaudible even after connecting properly, refer to the "Sound drops out when connected via Bluetooth." section.
Soundbar does not turn on automatically with the TV.
When you turn off the Soundbar while watching TV, power synchronization with the TV is disabled. First turn off the TV.
13 LICENCE
Dolby ATMOS
Dolby, Dolby Atmos, and the double-D symbol are registered trademarks of Dolby Laboratories Licensing Corporation. Manufactured under license from Dolby Laboratories. Confidential unpublished works. Copyright © 2012-2021 Dolby Laboratories. All rights reserved.
dtss
For DTS patents, see http://patents.dts.com. Manufactured under license from DTS, Inc. or DTS Licensing Limited. DTS, DTS:X, and the DTS:X logo are registered trademarks or trademarks of DTS, Inc. in the United States and other countries. © 2021 DTS, Inc. ALL RIGHTS RESERVED.
The terms HDMI, HDMI High-Definition Multimedia Interface, HDMI Trade dress and the HDMI Logos are trademarks or registered trademarks of HDMI Licensing Administrator, Inc.

Bluetooth
The Bluetooth® word mark and logos are registered trademarks owned by Bluetooth SIG, Inc. and any use of such marks by Samsung Electronics Co., Ltd. is under license. Other trademarks and trade names are those of their respective owners.

[ENERGY STAR]
ENERGY STAR qualified model only
- Your Samsung product is ENERGY STAR qualified in its factory default setting. Change to certain features, settings and functionality in this product can change the power consumption, possibly beyond the limits required for ENERGY STAR qualification.
- Environmental Protection Agency and Department of Energy. ENERGY STAR is a joint program of the Government agencies, designed to promote energy efficient products and practices.
Refer to www.energystar.gov for more information of the ENERGY STAR Program.
ENERGY STAR qualified model only (Applicable to Thin Client models only)
As an ENERGY STAR® Partner, SAMSUNG has determined that this product meets the ENERGY STAR® guidelines for energy efficiency.
- The ENERGY STAR Program has been to reduced greenhouse gas emissions and save energy through voluntary labeling.
- Power management setting of this product have been enabled by default, and have various timing settings from 1 minutes to 5 hours.
- The product can wake with a button press on the chassis from sleep mode.
ENERGY STAR qualified model only (The other models)
- As an ENERGY STAR Partner, Samsung has determined that this product or product models meets the ENERGY STAR guideline for energy efficiency.
14 OPEN SOURCE LICENCE NOTICE
To send inquiries and requests for questions regarding open sources, contact Samsung Open Source (http://opensource.samsung.com)
15 IMPORTANT NOTES ABOUT SERVICE
- Figures and illustrations in this User Manual are provided for reference only and may differ from actual product appearance.
- An administration fee may be charged if either
(a) an engineer is called out at your request and there is no defect with the product (i.e. where the user manual has not been read).
(b) you bring the unit to a repair centre and there is no defect with the product (i.e. where the user manual has not been read).
- You will be informed of the administration fee amount before a technician visits.
16 SPECIFICATIONS AND GUIDE
Specifications
| Model Name | HW-Q600C / HW-Q610C / HW-Q610GC |
| USB | 5V/0.5A |
| Weight | 3.8 kg |
| Dimensions (W x H x D) | 1030.0 x 57.0 x 105.0 mm |
| Operating Temperature Range | +5°C to +35°C |
| Operating Humidity Range | 10 % ~ 75 % |
| AMPLIFIER
Rated Output power | 200W (30W x 6 + 10W x 2) |
| Supported play formats | Dolby 5.1ch / Dolby Digital Plus / Dolby TRUE HD / Dolby ATMOS / DTS:X MA / DTS:X / DTS-HD MA / DTS-HD HRA / DTS Express / DTS 96/24 / DTS-ES / DTS Digital Surround / LPCM 8ch |
|
| Subwoofer Name | PS-WC67B |
| Weight | 5.5 kg |
| Dimensions (W x H x D) | 184.0 x 343.0 x 295.0 mm |
| AMPLIFIER
Rated Output power | 160W |
|
| Overall Standby Power Consumption (W) | 2.0W |
| Bluetooth
Port deactivation method | Press and hold the SOUND MODE button for more than 5 seconds to turn off Bluetooth Power function. |
NOTES
Samsung Electronics Co., Ltd reserves the right to change the specifications without notice.
- Weight and dimensions are approximate.
- Hereby, Samsung declares that this radio equipment is in compliance with Directive 2014/53/EU and the relevant UK statutory requirements. The full text of the declaration of conformity is available at the following internet address: http://www.samsung.com go to Support and enter the model name. This equipment may be operated in all EU countries and in the UK.
- WIRELESS DEVICE OUTPUT POWER
RF max transmitter power
100mW at 2.4GHz - 2.4835GHz
25mW at 5.725GHz - 5.825GHz

[Correct disposal of batteries in this product]
(Applicable in countries with separate collection systems)
This marking on the battery, manual or packaging indicates that the batteries in this product should not be disposed of with other household waste at the end of their working life. Where marked, the chemical symbols Hg, Cd or Pb indicate that the battery contains mercury, cadmium or lead above the reference levels in EC Directive 2006/66.
If batteries are not properly disposed of, these substances can cause harm to human health or the environment. To protect natural resources and to promote material reuse, please separate batteries from other types of waste and recycle them through your local, free battery return system.

Correct Disposal of This Product
(Waste Electrical & Electronic Equipment)
(Applicable in countries with separate collection systems)
This marking on the product, accessories or literature indicates that the product and its electronic accessories (e.g. charger, headset, USB cable) should not be disposed of with other household waste at the end of their working life. To prevent possible harm to the environment or human health from uncontrolled waste disposal, please separate these items from other types of waste and recycle them responsibly to promote the sustainable reuse of material resources.
Household users should contact either the retailer where they purchased this product, or their local government office, for details of where and how they can take these items for environmentally safe recycling. Business users should contact their supplier and check the terms and conditions of the purchase contract. This product and its electronic accessories should not be mixed with other commercial wastes for disposal.
For information on Samsung's environmental commitments and product specific regulatory obligations e.g. REACH, WEEE, Batteries, visit:
www.samsung.com/uk/aboutsamsung/sustainability/environment/our-commitment/data/
COMMISSION REGULATION (EU) 2019/1782
Ecodesign requirements for external power supplies :
www.samsung.com/global/ecodesign_component
AVERTISSEMENTS
Dolby, Dolby Atmos, and the double-D symbol are registered trademarks of Dolby Laboratories Licensing Corporation. Manufactured under license from Dolby Laboratories. Confidential unpublished works. Copyright © 2012-2021 Dolby Laboratories. All rights reserved.
dtssx
For DTS patents, see http://patents.dts.com. Manufactured under license from DTS, Inc. or DTS Licensing Limited. DTS, DTS:X, and the DTS:X logo are registered trademarks or trademarks of DTS, Inc. in the United States and other countries. © 2021 DTS, Inc. ALL RIGHTS RESERVED.
HOMI
The terms HDMI, HDMI High-Definition Multimedia Interface, HDMI Trade dress and the HDMI Logos are trademarks or registered trademarks of HDMI Licensing Administrator, Inc.

Bluetooth
The Bluetooth® word mark and logos are registered trademarks owned by Bluetooth SIG, Inc. and any use of such marks by Samsung Electronics Co., Ltd. is under license. Other trademarks and trade names are those of their respective owners.

[ENERGY STAR]
ENERGY STAR qualified model only
- Your Samsung product is ENERGY STAR qualified in its factory default setting. Change to certain features, settings and functionality in this product can change the power consumption, possibly beyond the limits required for ENERGY STAR qualification.
- Environmental Protection Agency and Department of Energy. ENERGY STAR is a joint program of the Government agencies, designed to promote energy efficient products and practices.
Refer to www.energystar.gov for more information of the ENERGY STAR Program.
ENERGY STAR qualified model only (Applicable to Thin Client models only)
As an ENERGY STAR® Partner, SAMSUNG has determined that this product meets the ENERGY STAR® guidelines for energy efficiency.
- The ENERGY STAR Program has been to reduced greenhouse gas emissions and save energy through voluntary labeling.
- Power management setting of this product have been enabled by default, and have various timing settings from 1 minutes to 5 hours.
- The product can wake with a button press on the chassis from sleep mode.
ENERGY STAR qualified model only (The other models)
- As an ENERGY STAR Partner, Samsung has determined that this product or product models meets the ENERGY STAR guideline for energy efficiency.
14 AVIS DE LICENCE LIBRE
Channel/Enhanced Audio Return Channel)

ATTENZIONE
Dolby, Dolby Atmos, and the double-D symbol are registered trademarks of Dolby Laboratories Licensing Corporation. Manufactured under license from Dolby Laboratories. Confidential unpublished works. Copyright © 2012-2021 Dolby Laboratories. All rights reserved.
dtss
For DTS patents, see http://patents.dts.com. Manufactured under license from DTS, Inc. or DTS Licensing Limited. DTS, DTS:X, and the DTS:X logo are registered trademarks or trademarks of DTS, Inc. in the United States and other countries. © 2021 DTS, Inc. ALL RIGHTS RESERVED.
The terms HDMI, HDMI High-Definition Multimedia Interface, HDMI Trade dress and the HDMI Logos are trademarks or registered trademarks of HDMI Licensing Administrator, Inc.

Bluetooth
The Bluetooth® word mark and logos are registered trademarks owned by Bluetooth SIG, Inc. and any use of such marks by Samsung Electronics Co., Ltd. is under license. Other trademarks and trade names are those of their respective owners.

[ENERGY STAR]
ENERGY STAR qualified model only
- Your Samsung product is ENERGY STAR qualified in its factory default setting. Change to certain features, settings and functionality in this product can change the power consumption, possibly beyond the limits required for ENERGY STAR qualification.
- Environmental Protection Agency and Department of Energy. ENERGY STAR is a joint program of the Government agencies, designed to promote energy efficient products and practices.
Refer to www.energystar.gov for more information of the ENERGY STAR Program.
ENERGY STAR qualified model only (Applicable to Thin Client models only)
As an ENERGY STAR® Partner, SAMSUNG has determined that this product meets the ENERGY STAR® guidelines for energy efficiency.
- The ENERGY STAR Program has been to reduced greenhouse gas emissions and save energy through voluntary labeling.
- Power management setting of this product have been enabled by default, and have various timing settings from 1 minutes to 5 hours.
- The product can wake with a button press on the chassis from sleep mode.
ENERGY STAR qualified model only (The other models)
- As an ENERGY STAR Partner, Samsung has determined that this product or product models meets the ENERGY STAR guideline for energy efficiency.
14 AVVISO DI LICENZA OPEN SOURCE
http://www.samsung.com/it/aboutsamsung/sustainability/environment/our-commitment/data/
REGOLAMENTO (UE) 2019/1782 DELLA COMMISSIONE
Dolby, Dolby Atmos, and the double-D symbol are registered trademarks of Dolby Laboratories Licensing Corporation. Manufactured under license from Dolby Laboratories. Confidential unpublished works. Copyright © 2012-2021 Dolby Laboratories. All rights reserved.
dtss
For DTS patents, see http://patents.dts.com. Manufactured under license from DTS, Inc. or DTS Licensing Limited. DTS, DTS:X, and the DTS:X logo are registered trademarks or trademarks of DTS, Inc. in the United States and other countries. © 2021 DTS, Inc. ALL RIGHTS RESERVED.
The terms HDMI, HDMI High-Definition Multimedia Interface, HDMI Trade dress and the HDMI Logos are trademarks or registered trademarks of HDMI Licensing Administrator, Inc.
Bluetooth
The Bluetooth® word mark and logos are registered trademarks owned by Bluetooth SIG, Inc. and any use of such marks by Samsung Electronics Co., Ltd. is under license. Other trademarks and trade names are those of their respective owners.

[ENERGY STAR]
ENERGY STAR qualified model only
- Your Samsung product is ENERGY STAR qualified in its factory default setting. Change to certain features, settings and functionality in this product can change the power consumption, possibly beyond the limits required for ENERGY STAR qualification.
- Environmental Protection Agency and Department of Energy. ENERGY STAR is a joint program of the Government agencies, designed to promote energy efficient products and practices.
Refer to www.energystar.gov for more information of the ENERGY STAR Program.
ENERGY STAR qualified model only (Applicable to Thin Client models only)
As an ENERGY STAR® Partner, SAMSUNG has determined that this product meets the ENERGY STAR® guidelines for energy efficiency.
- The ENERGY STAR Program has been to reduced greenhouse gas emissions and save energy through voluntary labeling.
- Power management setting of this product have been enabled by default, and have various timing settings from 1 minutes to 5 hours.
- The product can wake with a button press on the chassis from sleep mode.
ENERGY STAR qualified model only (The other models)
- As an ENERGY STAR Partner, Samsung has determined that this product or product models meets the ENERGY STAR guideline for energy efficiency.
14 AVISO SOBRE LICENCIA DE CÓDIGO ABIERTO
www.samsung.com/uk/aboutsamsung/sustainability/environment/our-commitment/data/
REGLAMENTO (UE) 2019/1782 DE LA COMISION
Dolby, Dolby Atmos, and the double-D symbol are registered trademarks of Dolby Laboratories Licensing Corporation. Manufactured under license from Dolby Laboratories. Confidential unpublished works. Copyright © 2012-2021 Dolby Laboratories. All rights reserved.
dtss
For DTS patents, see http://patents.dts.com. Manufactured under license from DTS, Inc. or DTS Licensing Limited. DTS, DTS:X, and the DTS:X logo are registered trademarks or trademarks of DTS, Inc. in the United States and other countries. © 2021 DTS, Inc. ALL RIGHTS RESERVED.
The terms HDMI, HDMI High-Definition Multimedia Interface, HDMI Trade dress and the HDMI Logos are trademarks or registered trademarks of HDMI Licensing Administrator, Inc.
Bluetooth
The Bluetooth® word mark and logos are registered trademarks owned by Bluetooth SIG, Inc. and any use of such marks by Samsung Electronics Co., Ltd. is under license. Other trademarks and trade names are those of their respective owners.

[ENERGY STAR]
ENERGY STAR qualified model only
- Your Samsung product is ENERGY STAR qualified in its factory default setting. Change to certain features, settings and functionality in this product can change the power consumption, possibly beyond the limits required for ENERGY STAR qualification.
- Environmental Protection Agency and Department of Energy. ENERGY STAR is a joint program of the Government agencies, designed to promote energy efficient products and practices.
Refer to www.energystar.gov for more information of the ENERGY STAR Program.
ENERGY STAR qualified model only (Applicable to Thin Client models only)
As an ENERGY STAR® Partner, SAMSUNG has determined that this product meets the ENERGY STAR® guidelines for energy efficiency.
- The ENERGY STAR Program has been to reduced greenhouse gas emissions and save energy through voluntary labeling.
- Power management setting of this product have been enabled by default, and have various timing settings from 1 minutes to 5 hours.
- The product can wake with a button press on the chassis from sleep mode.
ENERGY STAR qualified model only (The other models)
- As an ENERGY STAR Partner, Samsung has determined that this product or product models meets the ENERGY STAR guideline for energy efficiency.
14 AVISO DE LICENÇA DE OPEN SOURCE
www.samsung.com/uk/aboutsamsung/sustainability/environment/our-commitment/data/
REGULAMENTO (UE) 2019/1782 DA COMISSAO
Dolby, Dolby Atmos, and the double-D symbol are registered trademarks of Dolby Laboratories Licensing Corporation. Manufactured under license from Dolby Laboratories. Confidential unpublished works. Copyright © 2012-2021 Dolby Laboratories. All rights reserved.
dtss
For DTS patents, see http://patents.dts.com. Manufactured under license from DTS, Inc. or DTS Licensing Limited. DTS, DTS:X, and the DTS:X logo are registered trademarks or trademarks of DTS, Inc. in the United States and other countries. © 2021 DTS, Inc. ALL RIGHTS RESERVED.
The terms HDMI, HDMI High-Definition Multimedia Interface, HDMI Trade dress and the HDMI Logos are trademarks or registered trademarks of HDMI Licensing Administrator, Inc.

Bluetooth
The Bluetooth® word mark and logos are registered trademarks owned by Bluetooth SIG, Inc. and any use of such marks by Samsung Electronics Co., Ltd. is under license. Other trademarks and trade names are those of their respective owners.

[ENERGY STAR]
ENERGY STAR qualified model only
- Your Samsung product is ENERGY STAR qualified in its factory default setting. Change to certain features, settings and functionality in this product can change the power consumption, possibly beyond the limits required for ENERGY STAR qualification.
- Environmental Protection Agency and Department of Energy. ENERGY STAR is a joint program of the Government agencies, designed to promote energy efficient products and practices.
Refer to www.energystar.gov for more information of the ENERGY STAR Program.
ENERGY STAR qualified model only (Applicable to Thin Client models only)
As an ENERGY STAR® Partner, SAMSUNG has determined that this product meets the ENERGY STAR® guidelines for energy efficiency.
- The ENERGY STAR Program has been to reduced greenhouse gas emissions and save energy through voluntary labeling.
- Power management setting of this product have been enabled by default, and have various timing settings from 1 minutes to 5 hours.
- The product can wake with a button press on the chassis from sleep mode.
ENERGY STAR qualified model only (The other models)
- As an ENERGY STAR Partner, Samsung has determined that this product or product models meets the ENERGY STAR guideline for energy efficiency.
14 KENNISGEVING OPEN SOURCE- LICENTIE
- UITGANGSVERMOGEN DRAADLOOS APPARAAT
RF max. zendvermogen
100 mW op 2,4 GHz - 2,4835 GHz
25 mW op 5,725 GHz - 5,825 GHz

www.samsung.com/uk/aboutsamsung/sustainability/environment/our-commitment/data/
VERORDENING (EU) 2019/1782 VAN DE COMMISSIE
Dolby, Dolby Atmos, and the double-D symbol are registered trademarks of Dolby Laboratories Licensing Corporation. Manufactured under license from Dolby Laboratories. Confidential unpublished works. Copyright © 2012-2021 Dolby Laboratories. All rights reserved.
dtsx
For DTS patents, see http://patents.dts.com. Manufactured under license from DTS, Inc. or DTS Licensing Limited. DTS, DTS:X, and the DTS:X logo are registered trademarks or trademarks of DTS, Inc. in the United States and other countries. © 2021 DTS, Inc. ALL RIGHTS RESERVED.
The terms HDMI, HDMI High-Definition Multimedia Interface, HDMI Trade dress and the HDMI Logos are trademarks or registered trademarks of HDMI Licensing Administrator, Inc.

Bluetooth
The Bluetooth® word mark and logos are registered trademarks owned by Bluetooth SIG, Inc. and any use of such marks by Samsung Electronics Co., Ltd. is under license. Other trademarks and trade names are those of their respective owners.

[ENERGY STAR]
ENERGY STAR qualified model only
- Your Samsung product is ENERGY STAR qualified in its factory default setting. Change to certain features, settings and functionality in this product can change the power consumption, possibly beyond the limits required for ENERGY STAR qualification.
- Environmental Protection Agency and Department of Energy. ENERGY STAR is a joint program of the Government agencies, designed to promote energy efficient products and practices.
Refer to www.energystar.gov for more information of the ENERGY STAR Program.
ENERGY STAR qualified model only (Applicable to Thin Client models only)
As an ENERGY STAR® Partner, SAMSUNG has determined that this product meets the ENERGY STAR® guidelines for energy efficiency.
- The ENERGY STAR Program has been to reduced greenhouse gas emissions and save energy through voluntary labeling.
- Power management setting of this product have been enabled by default, and have various timing settings from 1 minutes to 5 hours.
- The product can wake with a button press on the chassis from sleep mode.
ENERGY STAR qualified model only (The other models)
- As an ENERGY STAR Partner, Samsung has determined that this product or product models meets the ENERGY STAR guideline for energy efficiency.
14 BEKANNTMACHUNG ZU OPEN SOURCE LIZENZEN
Bluetooth-multianslutting
Dolby, Dolby Atmos, and the double-D symbol are registered trademarks of Dolby Laboratories Licensing Corporation. Manufactured under license from Dolby Laboratories. Confidential unpublished works. Copyright © 2012-2021 Dolby Laboratories. All rights reserved.
dtss
For DTS patents, see http://patents.dts.com. Manufactured under license from DTS, Inc. or DTS Licensing Limited. DTS, DTS:X, and the DTS:X logo are registered trademarks or trademarks of DTS, Inc. in the United States and other countries. © 2021 DTS, Inc. ALL RIGHTS RESERVED.
The terms HDMI, HDMI High-Definition Multimedia Interface, HDMI Trade dress and the HDMI Logos are trademarks or registered trademarks of HDMI Licensing Administrator, Inc.

Bluetooth
The Bluetooth® word mark and logos are registered trademarks owned by Bluetooth SIG, Inc. and any use of such marks by Samsung Electronics Co., Ltd. is under license. Other trademarks and trade names are those of their respective owners.

[ENERGY STAR]
ENERGY STAR qualified model only
- Your Samsung product is ENERGY STAR qualified in its factory default setting. Change to certain features, settings and functionality in this product can change the power consumption, possibly beyond the limits required for ENERGY STAR qualification.
- Environmental Protection Agency and Department of Energy. ENERGY STAR is a joint program of the Government agencies, designed to promote energy efficient products and practices.
Refer to www.energystar.gov for more information of the ENERGY STAR Program.
ENERGY STAR qualified model only (Applicable to Thin Client models only)
As an ENERGY STAR® Partner, SAMSUNG has determined that this product meets the ENERGY STAR® guidelines for energy efficiency.
- The ENERGY STAR Program has been to reduced greenhouse gas emissions and save energy through voluntary labeling.
- Power management setting of this product have been enabled by default, and have various timing settings from 1 minutes to 5 hours.
- The product can wake with a button press on the chassis from sleep mode.
ENERGY STAR qualified model only (The other models)
- As an ENERGY STAR Partner, Samsung has determined that this product or product models meets the ENERGY STAR guideline for energy efficiency.
14 LICENSMEDDELANDE FÖR OPEN SOURCE
www.samsung.com/uk/aboutsamsung/sustainability/environment/our-commitment/data/
KOMMISSIONENS FÖRORDNING (EU) 2019/1782
USB-oppatering 36
Tilbake still 37
Bluetooth-multitilkobling
Soundbar kan kobles til 2 Bluetooth-enheter smtidig.

Dolby, Dolby Atmos, and the double-D symbol are registered trademarks of Dolby Laboratories Licensing Corporation. Manufactured under license from Dolby Laboratories. Confidential unpublished works. Copyright © 2012-2021 Dolby Laboratories. All rights reserved.
dtss
For DTS patents, see http://patents.dts.com. Manufactured under license from DTS, Inc. or DTS Licensing Limited. DTS, DTS:X, and the DTS:X logo are registered trademarks or trademarks of DTS, Inc. in the United States and other countries. © 2021 DTS, Inc. ALL RIGHTS RESERVED.
The terms HDMI, HDMI High-Definition Multimedia Interface, HDMI Trade dress and the HDMI Logos are trademarks or registered trademarks of HDMI Licensing Administrator, Inc.

Bluetooth
The Bluetooth® word mark and logos are registered trademarks owned by Bluetooth SIG, Inc. and any use of such marks by Samsung Electronics Co., Ltd. is under license. Other trademarks and trade names are those of their respective owners.

[ENERGY STAR]
ENERGY STAR qualified model only
- Your Samsung product is ENERGY STAR qualified in its factory default setting. Change to certain features, settings and functionality in this product can change the power consumption, possibly beyond the limits required for ENERGY STAR qualification.
- Environmental Protection Agency and Department of Energy. ENERGY STAR is a joint program of the Government agencies, designed to promote energy efficient products and practices.
Refer to www.energystar.gov for more information of the ENERGY STAR Program.
ENERGY STAR qualified model only (Applicable to Thin Client models only)
As an ENERGY STAR® Partner, SAMSUNG has determined that this product meets the ENERGY STAR® guidelines for energy efficiency.
- The ENERGY STAR Program has been to reduced greenhouse gas emissions and save energy through voluntary labeling.
- Power management setting of this product have been enabled by default, and have various timing settings from 1 minutes to 5 hours.
- The product can wake with a button press on the chassis from sleep mode.
ENERGY STAR qualified model only (The other models)
- As an ENERGY STAR Partner, Samsung has determined that this product or product models meets the ENERGY STAR guideline for energy efficiency.
14 LISENSMERKNADER OMÄPEN KILDEKODE
For a sendehenvendelser og sporsmal angaende apne kilder,kontakt Samsung Open Source (http://opensource.samsung.com)
15 VIKTIG MERKNAD OM SERVICE
www.samsung.com/uk/aboutsamsung/sustainability/environment/our-commitment/data/
KOMMISJONSFORORDNING (EU) 2019/1782
HDMI ARC/eARC (Audio Return Channel/Enhanced Audio Return Channel)
Dolby, Dolby Atmos, and the double-D symbol are registered trademarks of Dolby Laboratories Licensing Corporation. Manufactured under license from Dolby Laboratories. Confidential unpublished works. Copyright © 2012-2021 Dolby Laboratories. All rights reserved.
dtssx
For DTS patents, see http://patents.dts.com. Manufactured under license from DTS, Inc. or DTS Licensing Limited. DTS, DTS:X, and the DTS:X logo are registered trademarks or trademarks of DTS, Inc. in the United States and other countries. © 2021 DTS, Inc. ALL RIGHTS RESERVED.
HOMI
The terms HDMI, HDMI High-Definition Multimedia Interface, HDMI Trade dress and the HDMI Logos are trademarks or registered trademarks of HDMI Licensing Administrator, Inc.

Bluetooth
The Bluetooth® word mark and logos are registered trademarks owned by Bluetooth SIG, Inc. and any use of such marks by Samsung Electronics Co., Ltd. is under license. Other trademarks and trade names are those of their respective owners.

[ENERGY STAR]
ENERGY STAR qualified model only
- Your Samsung product is ENERGY STAR qualified in its factory default setting. Change to certain features, settings and functionality in this product can change the power consumption, possibly beyond the limits required for ENERGY STAR qualification.
- Environmental Protection Agency and Department of Energy. ENERGY STAR is a joint program of the Government agencies, designed to promote energy efficient products and practices.
Refer to www.energystar.gov for more information of the ENERGY STAR Program.
ENERGY STAR qualified model only (Applicable to Thin Client models only)
As an ENERGY STAR® Partner, SAMSUNG has determined that this product meets the ENERGY STAR® guidelines for energy efficiency.
- The ENERGY STAR Program has been to reduced greenhouse gas emissions and save energy through voluntary labeling.
- Power management setting of this product have been enabled by default, and have various timing settings from 1 minutes to 5 hours.
- The product can wake with a button press on the chassis from sleep mode.
ENERGY STAR qualified model only (The other models)
- As an ENERGY STAR Partner, Samsung has determined that this product or product models meets the ENERGY STAR guideline for energy efficiency.
14 AVOIMEN LÄHDEKIELEN LISENSSI-ILMOITUS
www.samsung.com/uk/aboutsamsung/sustainability/environment/our-commitment/data/
KOMISSION ASETUS (EU) 2019/1782
Dolby, Dolby Atmos, and the double-D symbol are registered trademarks of Dolby Laboratories Licensing Corporation. Manufactured under license from Dolby Laboratories. Confidential unpublished works. Copyright © 2012-2021 Dolby Laboratories. All rights reserved.
dtssx
For DTS patents, see http://patents.dts.com. Manufactured under license from DTS, Inc. or DTS Licensing Limited. DTS, DTS:X, and the DTS:X logo are registered trademarks or trademarks of DTS, Inc. in the United States and other countries. © 2021 DTS, Inc. ALL RIGHTS RESERVED.
The terms HDMI, HDMI High-Definition Multimedia Interface, HDMI Trade dress and the HDMI Logos are trademarks or registered trademarks of HDMI Licensing Administrator, Inc.
Bluetooth
The Bluetooth® word mark and logos are registered trademarks owned by Bluetooth SIG, Inc. and any use of such marks by Samsung Electronics Co., Ltd. is under license. Other trademarks and trade names are those of their respective owners.

[ENERGY STAR]
ENERGY STAR qualified model only
- Your Samsung product is ENERGY STAR qualified in its factory default setting. Change to certain features, settings and functionality in this product can change the power consumption, possibly beyond the limits required for ENERGY STAR qualification.
- Environmental Protection Agency and Department of Energy. ENERGY STAR is a joint program of the Government agencies, designed to promote energy efficient products and practices.
Refer to www.energystar.gov for more information of the ENERGY STAR Program.
ENERGY STAR qualified model only (Applicable to Thin Client models only)
As an ENERGY STAR® Partner, SAMSUNG has determined that this product meets the ENERGY STAR® guidelines for energy efficiency.
- The ENERGY STAR Program has been to reduced greenhouse gas emissions and save energy through voluntary labeling.
- Power management setting of this product have been enabled by default, and have various timing settings from 1 minutes to 5 hours.
- The product can wake with a button press on the chassis from sleep mode.
ENERGY STAR qualified model only (The other models)
- As an ENERGY STAR Partner, Samsung has determined that this product or product models meets the ENERGY STAR guideline for energy efficiency.
14 BEMAERKING VEDR. OPEN SOURCE-LICENS
For at sende forsporgsler og anmodninger om sporgsmål vedrørende Åbne kilder, skal du kontakte Samsung Open Source (http://opensource.samsung.com)
15 VIGTIG NOTE OM SERVICE
www.samsung.com/uk/aboutsamsung/sustainability/environment/our-commitment/data/
KOMMISSIONENS FORORDNING (EU) 2019/1782
Dolby, Dolby Atmos, and the double-D symbol are registered trademarks of Dolby Laboratories Licensing Corporation. Manufactured under license from Dolby Laboratories. Confidential unpublished works. Copyright © 2012-2021 Dolby Laboratories. All rights reserved.
dtss
For DTS patents, see http://patents.dts.com. Manufactured under license from DTS, Inc. or DTS Licensing Limited. DTS, DTS:X, and the DTS:X logo are registered trademarks or trademarks of DTS, Inc. in the United States and other countries. © 2021 DTS, Inc. ALL RIGHTS RESERVED.
HOMI
The terms HDMI, HDMI High-Definition Multimedia Interface, HDMI Trade dress and the HDMI Logos are trademarks or registered trademarks of HDMI Licensing Administrator, Inc.

Bluetooth
The Bluetooth® word mark and logos are registered trademarks owned by Bluetooth SIG, Inc. and any use of such marks by Samsung Electronics Co., Ltd. is under license. Other trademarks and trade names are those of their respective owners.

[ENERGY STAR]
ENERGY STAR qualified model only
- Your Samsung product is ENERGY STAR qualified in its factory default setting. Change to certain features, settings and functionality in this product can change the power consumption, possibly beyond the limits required for ENERGY STAR qualification.
- Environmental Protection Agency and Department of Energy. ENERGY STAR is a joint program of the Government agencies, designed to promote energy efficient products and practices.
Refer to www.energystar.gov for more information of the ENERGY STAR Program.
ENERGY STAR qualified model only (Applicable to Thin Client models only)
As an ENERGY STAR® Partner, SAMSUNG has determined that this product meets the ENERGY STAR® guidelines for energy efficiency.
- The ENERGY STAR Program has been to reduced greenhouse gas emissions and save energy through voluntary labeling.
- Power management setting of this product have been enabled by default, and have various timing settings from 1 minutes to 5 hours.
- The product can wake with a button press on the chassis from sleep mode.
ENERGY STAR qualified model only (The other models)
- As an ENERGY STAR Partner, Samsung has determined that this product or product models meets the ENERGY STAR guideline for energy efficiency.
14 NOTIFICARE DELICENTÁ OPEN SOURCE
06 CBb3BaHe Ha BbHsHo yCTpoiCTBO 25
MeToI 1.CBp3BaHe ue3HDMI ka6eI (C Bb3MoJxOCT 3a
deKoDipaHe n Bb3Pon3BExJaHe Ha Dolby Atmos@/DTS:X) 25
MeToI2.CBbP3BaHeUpe3OPTnueHka6eI 26
07 Cbbp3BaHe Ha USB pnaa namet 27
08 Cbbp3BaHe Ha mo6nIHO yctpoiCTBO 28
Cbpr3BaHe ype3 Bluetooth 28
I3noJ3BaHe Ha Tap Sound 32
09 MoNTipaHe Ha KOH3OJaTa 3a CTeHa 33
PpeIpa3Hm MepKn npMOnTaJ 33
KOMnoHENT3aCTeHEmMOHTaJ 33
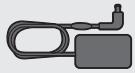
AC/DCaandTep (Soundbar)
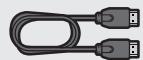
HDMI ka6eI

BodayaMOHTnpaHaHaCTeHa

Дьржач-BИNT

Cko6a 3a mohtax Ha CteHa
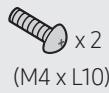
BnHT
3a doJIbIInTeHa HnOpMaun OTHOCHO 3axpaHbAHeTo nNotpe6JIeHneTo Ha eJeKtpoeHepnHa npabaTe cnpaBka c etNKeta, noCTaBeH ha npOyKta. (EtKeT:doJaCt Ha oCHOBHOTyctpoiCTBO Ha Soundbar)
- 3a 3akynbahe HaДопьнnteHn KOMNoHENTилДоьнnteHn Ka6eNi, o6bpeTe ce KbM cepBn3eH ueHtpиИКbM OTdela 3a KIneHTcKO obClykBaHe ha Samsung.
3a noBee uHOpMaZuO ATOHcO CTeHHaT a CTOnKa BVXtE cTpaHnca 33.
-Дизайньт И сецифигаципг Te noДлескат Na помяна 6e3 npeДиЗВecTe.
BbHnHnT BnHa aKceCoapnte MoKe IeKo Da ce pa3Iu7aBa OT NIIocTpauNTe IIO-rope.
02 ПЕГLEДHAПОДУКТА
Yeelen nanei / Topeen nanei Ha Soundbar

MeToI 1. CbByp3BaHe ue3 HDMI
Cbþr3BaHe Ha TeIeBn3Op, KoITo nO,IdbpJxHa HDMI ARC/eARC (kaHaJI 3a o6paTeH
3Byk/Noio6peH KaHaJI 3a 06paTeH 3ByK)

BHIMAHHE
KoratoHDMI ka6eIbT n onTnUHnIa Ka6eI ca CbBp3aHn, nbpBO ce noLyuaba HMI cnHaJIbT.
3a da cBbpxeTe HDMI ka6eJa mexy TeIeBn30pa n Soundbar, yIepTe ce, ye cTe cBbP3aJIn TepmHaJIte, 6o3NaueHc ARC nIe nARC. B npOTuBEn cIyauh 3Bykbt Ha TeIeBn30pa MoKe Da He Ce Bb3pOu3BeDe.
- Пренистелов Кабел e High-Speed HDMI Cable with Ethernet.
Korato CBpb3BaTe TeIeBn3Op, KOITo POnDnBpKa FyHKzIyTa eARC, Ha IincIpe Ce nokaBa ,TV eARC" IN 3ByKbT Ce yBa.
- Dolby Atmos®/DTS:X ce noДьрka BвВ ФункцяТа ARC/eARC.
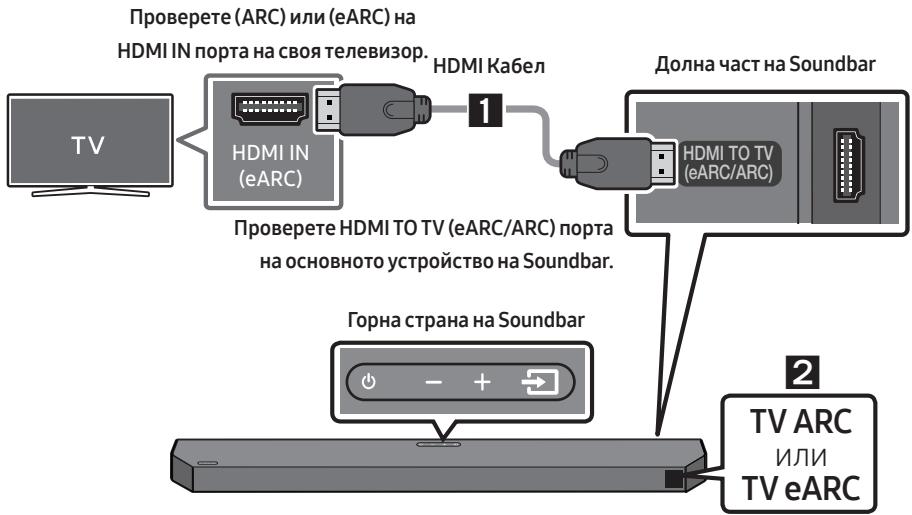
- Пи вклочени Soundbar и телевизор сьвржete HDMI ka6ela, кaktoе пokaано на Фигураза.
- TVARC"ИИN,TVeARC" ce noBBA ha ekpaHa haДиСплян ha ochOBHTo yctpoiCTBO ha Soundbar nSoundbarвзрпоиЗьжда 3Byka ha TeleBu3opa.
"TVeARC" ce noka3Ba, kOraTo fynKcIyraTa eARC B hacTPOIkaTa Ha TeLeBn3opa e BkIIOueHa.
3a da cBbpxkeTe c eARC, yHKnznaTa eARC B MeHIO To Ha TeLeBn3Opa Tp86Ba da e 3daJeHa H bKlnoueHa I03uIy. Haprabete Cnpabka C pBkoBOdCTBTO 3a NOTpe6nteJa Ha TeLeBn3Opa 3a npdo6hoctn OTHOCHO hAcTpoiKaT. (HaNPmep TeLeBn3Op Samsung: Haayano () MeHIO HAcTpoiKn () BCnuKn HAcTpoiKn () 3Byk EKcnepTHn HAcTpoiKn PeKIm HDMI-eARC (AbTo))
- Ako 3Bykbt OT TeleBn3Opa He ce yBa, HATncHete 6yToH (N3ToCHNK) Ha nIcTaHnIOHOTO ynpaBJIeHne IIN ha rOpHaT a CTPaHa Ha Soundbar, 3a da npEbnIOuHTe BpeKIM ,D.IN".Ha ekpHa c e N3BeJckDat PocJeIOBaTeJIHO ,D.IN" IN ,TVARC" IIN ,TVeARC" IN Ce Bb3PpOu3BExJa 3Bykbt Ha TeleBn3Opa.
- Ako в поизорец на дисплия на основно устю на Soundbar не сокоже „TV ARC" улл „TV eARC", поверете дали HDMI kaбельт e сьранк кьm павлини по!.
- I3noI3BaIte 6yToHnIte 3a cIIa Ha 3Byka Ha nIcStaHcUHOHOTo ynpabJIeHne Ha TeIeBn3Opa, 3a da npomEnIte cIIaTAt Ha 3Byka Ha Soundbar.
BEJIEXKNI
- Korato CBbpxKeTe TeIeBn3Op, KoTo IoIbBypKa HDMI ARC/eARC (kaHai 3a o6paTeH 3Byk/ IIOO6peH kaHai 3a o6paTeH 3Byk) KbM Soundbar Upe3 HDMI ka6eJ, MochTe Ja npedabate CuΦpOBu BInDeO u ayDIO daHNH 6e3 CBbP3BaHe Na OIteJeH ONTUeH Ka6eJ.
- Ппөрөчambе Използванeto Ha HDMI ka6e9 6e3 сьрсевиha, ako e Вьзможно. Ako Използва
HDMI ka6e9 CBc CSbPceBnHa, ИзползвайтakbВ, ChИTO duametbp e NO-maMbK OT 14 MM.
- Ta3n ΦyHKZnI He e HAIuHa aKO HDMI ka6eJIbT He noDJIbPka ARC nIeARC.
- ARC n eARC ce pa3lunuabat no cheCTOTnata leNTa. eARC, koTTo e noDo6peHa bercsna Ha kaHala 3a o6paTeH 3ByK, Ima 3NaHTeJIHO no-BvCoKa cheCTOTnA leNTa OT ARC. No-BvCoKaTa cheCTOTnA leNTa yBeIiUaBA KOJIYeCTBOTo daHHN, KOITo MoRt Da 6bDat npedabAHn. TaKa, ype3 eARC KaHala moKeTe Da ce HacJaXdAbate Ha 3ByKa ype3 fOpMaTn, KaTO Dolby Atmos® n DTS:X.
Korato n3JIbUbaHnTe cnHaJInca Dolby Digital, a HacTpoNkata Ha TeLeBn3opa 3a „LcIΦpOB n3XoJedaydno foPmTa" e PCM, npenopbYBa ce da npomEnite hAcTpoNkata, taKa ye da 6bJe Dolby Digital. Korato nactpoNkata ce npomEni, moKeTe da cLyWate 3ByK c No-IO6po KaueCTBO. (MeHIoTO Ha TeLeBn3opa moote da n3NoJ3Ba pa3LIuHn dUmN 3a Dolby Digital n PCM B 3abVCIMocT ot npOn3BODInTeJI ha TeLeBn3opa.)
MeToI2.CBbP3BaHe Upe3 onTnueH ka6eI
KoHTpOlen CnncbK 3a npOBepKa npdeN CBbp3BaHe
KoratoHDMI ka6eBt n oTnTuHnraT ka6eLa cCBpb3aHn, pbpO ce noJyaba HDMICrHaJIbT.
Korato n3noI3BaTe onTnueH Ka6eN i KneMnte mMaT noKpNTHe, yBepTe ce, ye cTe npemaxhannn noKpTuTa.


1.Сьвржeteжа DIGITAL AUDIO IN (OPTICAL)HaSoundbarKbMжа OPTICAL OUT Ha TeilevizopaчретцфpoBОNTИчЕнKa6eI(He eJocTabeH).
2. HataHcHete 6yToHa (M3ToUHnK) Ha rOpHnI paHeI nnI Ha dNCTaHcUHHO To ynpabLeHne, cNeD TOBa n36epeTe pexIM „D.IN".
3. 3Bykbl ot teJeBn3Opa ce Bb3npOn3Bexka ot Soundbar.
I3noJ3BaHe Ha yHKnIyTa Q-Symphony
При Q-Symphony Soundbar ce синхонида с телевизopa Samsung, за за сивжда звк OT дустюства за оптумален съpayнд eфekt. Когато с CBьрке Soundbar, с поka3ba менио „TV+Soundbar" Рд менио 3вковов Изхов на телевизopa. Изберete сьотовETHOTO мени.
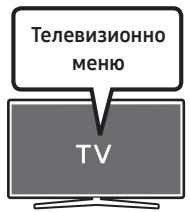
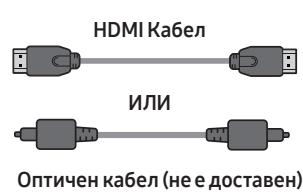
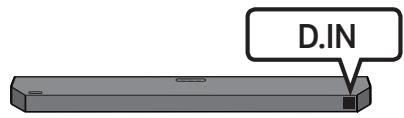
-Пример на телевизионно Meю:TV + [AV]Soundbar пося за(HDMI)
JEJIEXKNI
- Moxke da pa6oTn cnopeK KOdeKa,poDdbpxaH OT TeJeBn3opa.
- Ta3n ΦyHKZIa ce noIdIbPka cAmO KOraTo e Cbbp3aH HDMI ka6e IIN oNtUeH Ka6e (He e JIOCTaBeH).
- Показаното ИЗбразжени може за се рацличава в зависимост о.Tо мдела на Телевизора.
- Ta3n ΦyHKζηe hαJIuHа B nЯко TelenBvI3Opn Samsungng u b nЯко moJeln Soundbar.
MeToI3. CbByp3BaHe npe3 Bluetooth
Korato TeIeBn3OpbTe cBbP3aH ue3 Blueteoth, MoKeTe da cIyuaTe cTepeo 3Byk, 6e3 da Ima xaoc C ka6eInte.
- Camo eünH TeIeBn3Op MOnKe La 6bJe CBbP3aH B DaIeH MOMeHT.
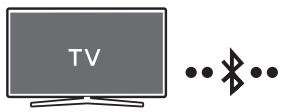
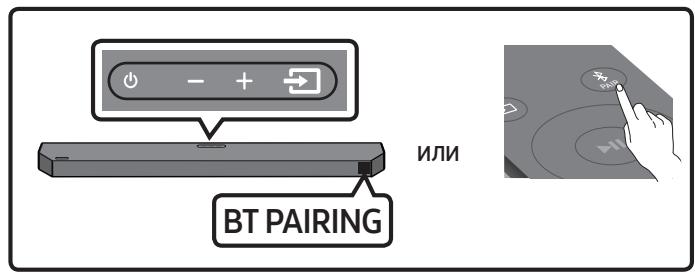
MeToI 1. Cbbp3BaHe ue3 HDMI ka6eI (c Bb3MOxHocT 3a DeKoIpaHe n Bb3PpOu3BvexJaHe Ha Dolby Atmos®/DTS:X)
KoHTpOlenCnncbK3a npOBepKa npEi nCbbp3BaHe
- Ako oniunte 3a Ayidno n3xod BkIIOuBaT BtopueH 3ByK, yBepeTe ce, ye BtopueH 3ByK) e n3KJIIOUeH N3Kn.
- Ybepete ce,Ye cBdpbjxahaneto noDlbpja Dolby Atmos@/DTS:X.
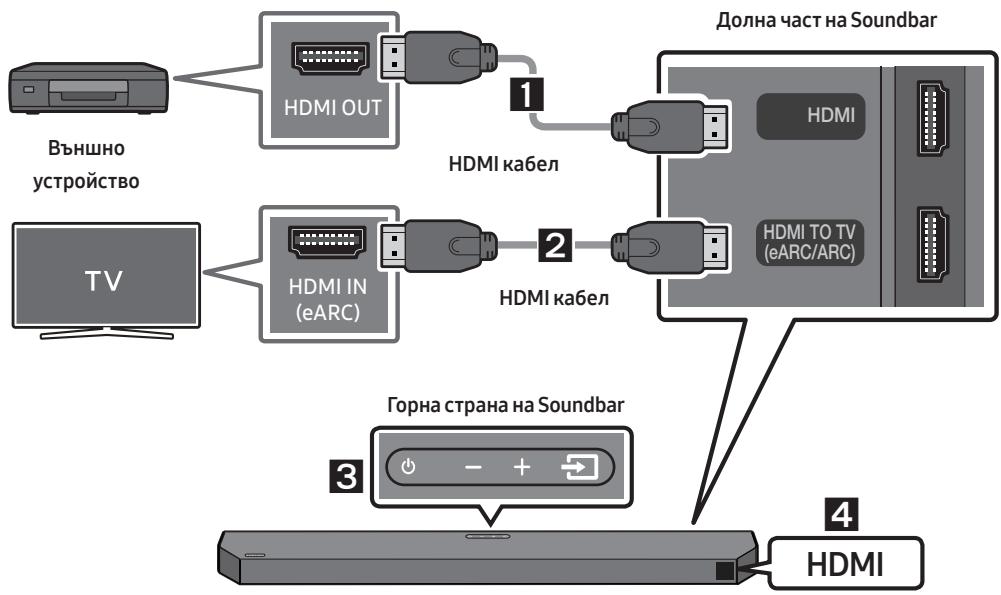
- CbpxkeTe HDMI ka6en ot HDMI nopTa B doJHaT a cact Ha Soundbar KbM HDMI OUT nopTa ha BaWeTo ZnΦpOBo yCTpoiCTBO.
2.СвржeteHDMIka6eIOTHDMI TOTV (eARC/ARC)napTaBdoHaTa YacT HaSoundbarKbM HDMIN (eARC)napTaHaBaShnTeleBu3Op.
- Hatachete 6byoHa (M3toHnK) Ha rohpnaHeI nnHa nIcTaHcIOHHTO ynpabVeHne, I cIeTOBa n36epTe "HDMI".
- PekimbT, HDMi" ce n3BexJa ha nicnpe Ha Soundbar n ce b3npon3BexJa 3Byk
BENEXKNI
- Korato Изпаловату Dolby Atmos®/DTS:X: Ако Вхонит Источник e Dolby Atmos®/DTS:X, вжто „Изхозни с pineцificаши за различн即时 рекима за звкови Ephektу" на чтани 13.
Korato ce aktnbupa Dolby Atmos,Ha npednna dncnne Ce noBBA,DOLBY ATMOS".
Korato DTS:X e aktinbupaHo, Na ppeHnIaIcPiIe ce noka3Ba ,DTS:X".
- Konfumypupahe Ha Dolby Atmos®/DTS:X ha Bausa BD pIeBp Iu npdyo yctpoiCTBO.
OToBope Te OunnTe 3a ayuio n3xOJ B MeHIO To H aNCTPOI KI Na BaIa IBD PJIeIbpr IIN dpyro yctpoiCTBO n ce ybepeTe, Ye 3a Bitstream e n36paHa oIcIIra „Be3 KoInpaHe". HanpImep B BD pIeIbpa Samsung otndete B MeHIO HaJaLo 3ByK LInΦpOB n3xOJ, CneI KOeTO n36epeTe BtOB nOTOK (Heo6pa60TeH).
HDMI Pass-Through 03haaba, ye Soundbar b3npo3Bexka 3Byka ot n3ToHHka ue3 cBoiTe BnCOKOROBOpnten i n3npa7a He npomeHeHnB VInDeo CngHaJ KbM TeLeBn3Op ue3 BTOPIH DMI ka6en.
CneuNkaunHa noDdbpXaHnTe UHD cnHaJI (3840 x 2160 p)
| Кадра чECTOTA (fps) | Дълбочина нацьета | RGB 4:4:4 | YCbCr 4:4:4 | YCbCr 4:2:2 | YCbCr 4:2:0 |
| <60 | 8 сита | O | O | O | O |
| 10 сита | - | - | O | O |
| 12 сиtega | - | - | O | O |
| 120 | 8 сиtega | - | - | - | - |
| 10 сиtega | - | - | - | - |
-Поддьржанату спесифида може да се разлчава в звисимост OT CBьрзанOTВьншюустю CTBO ИИN YСЛБОВЯТа на ИЗПОЛЗВаHe.
MeToI2.CBbP3BaHe ype3 onTnueH ka6eI
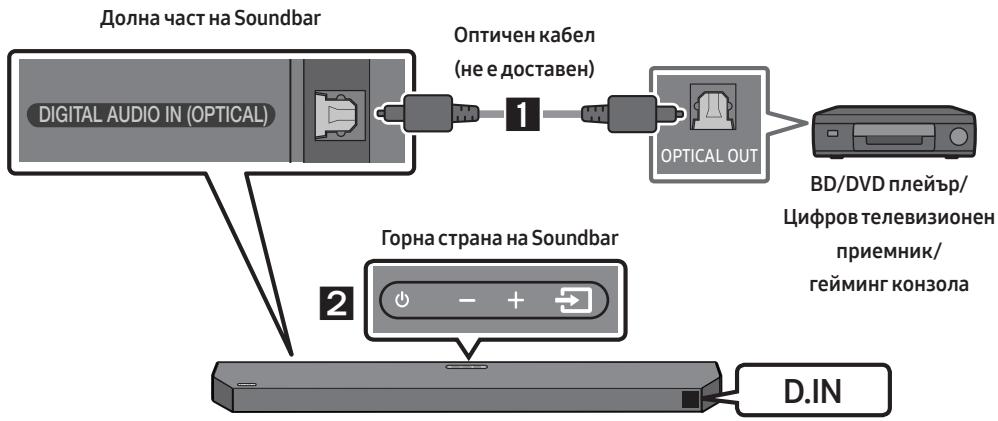
- CbpxkeTe DIGITAL AUDIO IN (OPTICAL) npota Ha Soundbar n OPTICAL OUT npota Ha BbHnHO yctpoiCTBO ue3 onTtunHn Ka6eI (He ce doCTaB), kaKTo e noka3aHo h fniypata.
2.Изберете ржим „D.IN", кato haTис悔te 6уToHa (ИЗTOчнк) Ha roрпя панел плни на дuctацноНOTO упразьени.
- 3BykBT OT BbHshOTo yCTpoiCTBO Ce Bb3pnoi3BexJa ot Soundbar.
07 CBbP3BAHE HA USB ΦДАЛПАМET
PbboHaaJIHo CBbp3BaHe
-
Пис CBьрЗВане Кьм НОВо Bluetooth yctpoiCТВО, увepeTe сe, чу устpoiCТВОTo e Ha pa3ctOЯHne Do 1m.
-
HatncheTe 6ytoH PAIR Ha nIcStaHIOHHTO yCTpoiCtBO,3a da BJe3eTe BpejIM „BT PAIRING".
(NJIN) a. HatncheTe 6yToHa (N3ToUHnK) Ha rOpHnaHe, cIeJ KoETo n36epTe ,BT". "BT" abTomuHc Ce npOMeH na , BT PAIRING" cIeJ HЯKoJIko cekyHn INI CE npOMeH na ,BT READY", aKO Ima 3aIINC 3a Cbþ3BaHe.
b. Korato ce n3BeTe „BT READY", haTncHeTe n 3aIpbKte 6byToHa (N3ToCHNK) Ha roPnIra naHel Soundbar 3a noBcee ot 5 cekyni, 3a da n3BeTe, "BT PAIRING".
2.Избете „[AV]Samsung Soundbar Q6C-Series"OTСПСька.
-
Korato Soundbar e cBbpr3aH KbM Mo6nIHOTO yCTpoiCTBO, [IMeTO Ha Mo6nIHOTO yCTpoiCTBO] "BT" ce n3BexJa ha npEHNIA dncnIe.
-
Вьзэрпозовдайто музигални Фалове о устюг STO, CBьрзано чeЗ Bluetooth, пeэ Soundbar.
CneI kaTo 3a nbpBn nbT cbbpjkeTe Soundbar kblm mo6uHNo yctpoiCTBO, n3noJ3BaIte pejIM "BT READY" 3a noBtOpho CbBp3BaHe.
Ako yctpojCTBOTO He ycnee da ce CBpbxe

CkO6a 3a MoHTaX Ha CteHa
- NocTabete Bɔdau 3a moHTɪpaHé Na CTeHa Bbpxy NOBbpxHOCTTa Ha CTeHaTa.
Bodau 3a moNTnpaHe Ha cTeHa Tp8Ba Da e paBeH.
- AKo TeJebn3OpbT Bn e MOHTnpaH KbM CTehata, MoHTnpaIe Soundbar haMaMKo Ha 5 cm pOd TeJebn3opa.
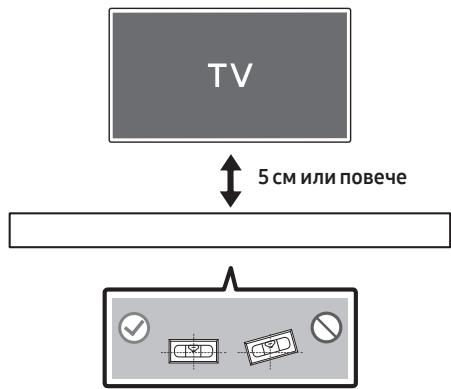
2.Подравнete Lentepralnata liHHa HbOdaча 3a moHTnpaHe Ha cTeHa C ceHTbpaHa Baшия телевиЗор (ako moHTnpaTeSoundbar noTteBvN30pa)И спeДТObaФИКсрайTe BODaЧа moHTnpaHe Ha cTeHaHa cTeHaTc NOMOuTHa HtNKCo.
- Ako He MohtnPaTe PNO TeLeBn3Op, NoCTabete LcHTpaHa nnHbA B cHTbPaHa 30HaTa 3a MOHTpApHe.
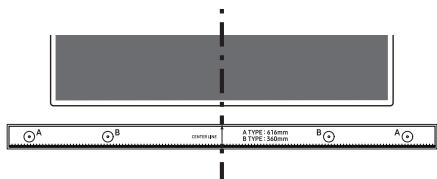
LcHtpaHaIHHn
Dolby, Dolby Atmos, and the double-D symbol are registered trademarks of Dolby Laboratories Licensing Corporation. Manufactured under license from Dolby Laboratories. Confidential unpublished works. Copyright © 2012-2021 Dolby Laboratories. All rights reserved.
dtss
For DTS patents, see http://patents.dts.com. Manufactured under license from DTS, Inc. or DTS Licensing Limited. DTS, DTS:X, and the DTS:X logo are registered trademarks or trademarks of DTS, Inc. in the United States and other countries. © 2021 DTS, Inc. ALL RIGHTS RESERVED.
The terms HDMI, HDMI High-Definition Multimedia Interface, HDMI Trade dress and the HDMI Logos are trademarks or registered trademarks of HDMI Licensing Administrator, Inc.

Bluetooth
The Bluetooth® word mark and logos are registered trademarks owned by Bluetooth SIG, Inc. and any use of such marks by Samsung Electronics Co., Ltd. is under license. Other trademarks and trade names are those of their respective owners.

[ENERGY STAR]
ENERGY STAR qualified model only
- Your Samsung product is ENERGY STAR qualified in its factory default setting. Change to certain features, settings and functionality in this product can change the power consumption, possibly beyond the limits required for ENERGY STAR qualification.
- Environmental Protection Agency and Department of Energy. ENERGY STAR is a joint program of the Government agencies, designed to promote energy efficient products and practices.
Refer to www.energystar.gov for more information of the ENERGY STAR Program.
ENERGY STAR qualified model only (Applicable to Thin Client models only)
As an ENERGY STAR® Partner, SAMSUNG has determined that this product meets the ENERGY STAR® guidelines for energy efficiency.
- The ENERGY STAR Program has been to reduced greenhouse gas emissions and save energy through voluntary labeling.
- Power management setting of this product have been enabled by default, and have various timing settings from 1 minutes to 5 hours.
- The product can wake with a button press on the chassis from sleep mode.
ENERGY STAR qualified model only (The other models)
- As an ENERGY STAR Partner, Samsung has determined that this product or product models meets the ENERGY STAR guideline for energy efficiency.
14 BELEKKA 3A JIINCEH3A 3A OTBOPEH KOД
3a da n3npaTnTE 3aNTBaHnI N 3aBKNI NO BbnpocN, Cbbp3aHn C OTBOpEnTe KoIOBe, CbbpKeTe ce cbc Samsung Open Source (http://opensource.samsung.com)
15 BAXKHN BELEXKKN 3A OBCJUVXBAHETO
LHΦPnte HJIIOCTpaCnITe B TOBa pKOBODCTBO 3a NOTpe6NTeJcA npEIOCTaBEHcMo 3a CnpaBka I MoRaT da ce pa3IuYabAT OT DeIcTBNTeJIHnIy IN3rIeD Ha n3DeJIneTo.
- Ke da ce haucn taKca 3a aDMNHCTpnpaHe, aKO:
(a) e n3BnKaH TexnK IOBaWe HaCTOBAHe IN HЯMaДeФeKTВпpoDyKTA(T.e. He CTe npOyuEN pBkoBOJCTBOTO 3a NOTpe6nteJIa
(b) 3ahece Te ypeDa B cepBn3eH ceHTbpr HЯMa DeΦeK T B npOdyKta (T.e. He cTe npOyei PbKOBOdCTBOTO 3a NOTpe6ntela).
Cymata 3a Ta3n TaKc3a a aDMHHCTpnpaHe 5e Bn 6bJe Cbo6uEHa, Ppei Da Ce n3BbPn KaKbATO n da e 6nlo pa6oTa nn IocseHne BkBn.
16 CNEUΦNKAU IN PbKOBOCTBO
CneuΦnkaun
| Наименование на модали | HW-Q600C |
| USB | 5V/0,5A |
| Терло | 3,8 кг |
| Разmersи (Ш × В × Д) | 1030,0 x 57,0 x 105,0 мм |
| Диапазон на равOTна Temпература | +5 °C до +35 °C |
| Диапазон на равOTна Влajхост | 10 %do 75 % |
| УСИВATEЛ
Изхodяшma моцност | 200W (30W x 6 + 10W x 2) |
| Побдьржану phормати за вьзproизveжданe | Dolby 5.1ch / Dolby Digital Plus / Dolby TRUE HD / Dolby ATMOS / DTS:X MA / DTS:X / DTS-HD
MA / DTS-HD HRA / DTS Express / DTS 96/24 /
DTS-ES / DTS Digital Surround / LPCM 8ch |
| Наименование на субфера | PS-WC67B |
| Терло | 5,5 кг |
| Рazmersи (Ш × В × Д) | 184,0 x 343,0 x 295,0 мм |
| УСИВATEЛ
Изхodяшma моцност | 160W |
| ОвSETSКСUMAZИЕ на[eheprigьВ рекIM на
готовност(W) | 2,0W |
| Bluetooth
Меток за.Deakт観ане на порт | Натисе и задравожte бутона SOUND MODE
За повechе от 5 секунд, за дизлочи-te
функцията Bluetooth Power. |
BENEXKIN
Samsung Electronics Co., Ltd c3a3Ba npabTo da pomEna CpeunKauaTae 6e ne pnd3Becne.
- Terlotoи размерпе са пиблізnteелн.
C hactoToSamsung deeknapura, ye ToBA paAnoo6OpyBaHe e B cbOTBeCTBnE c DnpeKtBa 2014/53/EC n C npiloxkImTe 3aKoHOBu I3NcKBaHnna Ha O6eJInHeHTo KpaIcTBo. TblnraT Tekct Na deeknapaunrTa 3a CbOTBeCTBnE e HAnuHenn Ha CJIeHNHa INTEpHetaA dpec: http://www. samsung.com, kato OTndTe Ha POndpbXka N BbVeDeTe IMeTO Ha MoDena. TOni ypeJ moKeJa da ce n3Pojl3Ba BvB BCnuKn CTpaHn Ha EC n B O6eJInHeHTo KpaIcTBO.
- IN3XOДHA MOUHOCHT HA BE3ЖИHOTO YCTPOICTBO
MaKc. MoUHocT ha npedabateI npR RF b3ka
100mW npu2,4GHz - 2,4835GHz
25mW npn 5,725GHz - 5,825GHz

[ПравлиноиЗХьрляпа 6атэрпг TeToЗ npoДукт]
(HaIInuHO BCTpaHn CbC cnTeMn 3a pa3dElno CMeTOc6bnpaHe)
ToBa 6O3HaueHHe BbpybAtePnTa, pBkoBOdCTB0TO nll ONaKOBKaTa, noka3Ba, ye 6aTePnTe B To3n npOdyKT He 6nBa Da ce N3XbPnTc Dpyrnte 6NtOBu OTnaDbu C kpa Ha TexHn POle3eHN JKBOT. KbDeTo ca MapKnpaHn, XmUnecknTe CmBOLn Hg, Cd nPi Pb noka3BaT, ye 6aTePnTa CbDbpJx KaIBaK, KaDMn nIIn ONoBo NaKDontPoJIHnTe HnBa DInpeKtNb2006/66 Ha EO.
Ako 6atepnite He ce n3xBpIant npaBnHIO, Te3n BeIeIcTbMa MOraT da npeIIN3BnKaT yBpeKdaHe Ha YOBeIeKOTo 3dpaBe NII Na OKoJIHaTa CpeJa.
3a da npednanaite npnpoanhe pecypcn n 3a da cbdejctBaTe 3a MHOROKpaTHaTya NpOte6aHa MaTePnaHnIte pecypcn, moJra OTdJeYte 6aTePnnte O Tpyrnte BnDObe OTpaDbuHNi PNOyKtni rPeunknapae nocpeDCTBOM BaWata loKaHn cncTeMa 3a 6e3PnAto H BpbUaHe Ha 6aTePn.

IpaBnHIO TpeTnpaHe Ha n3dennTo cneI kpaHa eKcnIpoatauOnHHMy JxNBOt (OTnaDbci, npEdctablaBaun eElektpnuEsco n eElektpoHNO6OpyDahe)
(HaIInuHO BCTpaHb CbC ScTEmu 3a pa3deJHo CMeTOc6bMpaHe)
To3n 3nak, noctabenBbpyx n3denneto, herOBn npinnaJaleKHOCTn IIn neaTHN MaTePnAIn, O3NaUba, ye npOyktbI n pinnadJeKHOCTte (HaNPmep 3apJdH0 ycTpoCTBO, cnyuAJIKN, USB ka6e) He 6nBaJa ce n3XbBpIaT 3aeJHO C dpyrnte 6HTOBn OTnAbu, KOrato n3Teue ekCnloataauOnHHnT My JxNBoT. OTdeJnTe Te3n UcTPOCTBA OT dpyrnte BnIOBn OTnAbu, n TnpedABaYte 3a pezuklnpaHe. CnaZBaN ToBA npabnlo He n3laRatHe NaOChOC 3dPaBeTo Ha dpyrns XopAr NpeDnA3BaTe OKoHnTa CpeDaOT 3AmbpcaBaHe, npEIN3BvkaHO OT 6e3kONTpOJNO n3XbBpIaHe Ha OTnAbu. OCBEN TOBn, NOIO6HO OTROBOpNo NOBEJHne Cb3DaBA Vb3MOXHOCT 3a NobTropHO (ekOLOnguHO Cbo6pa3Ho) INoIbnBaHe Ha MaTePnALHnTE pecypscn. DomauHnTe Notpe6bIeTI Tp86Ba Da Ce CBpbKAT C TbprOBeua Ha dpe6Ho, OT KOROTO Ca 3akynlNi n3denneto, INI CSBCbOTBeHTa MeCTHa DpbKABHa aReHcN, 3a Da NoIpyaT NpOBo6Hn IHCTpyKcN KbDe I KORA MoT Da 3aHeCaT Te3n UcTPOCTBA 3a pezuklnpaHe, 6eOAncho 3a OKoHnTa CpeDa. KopnpopatNBHnTe Notpe6bIeTI CneDbA Da Ce CBpbKAT C DoCTabuNc Si N da PpOBepRT YcNoBnTA Ha DOtOBOPa 3a NOKyIkpA. TOBa n3dJIne H erOBnTE eJeKTPoHNi PpHaADLeXHocTN He 6bNA da CE cmecTBaC dpyrnte OTnAbu,Ha TbprOBCKOTO ppeDnPrnTie.
3a inhphiMaIgO TnOcHOn aHraJxMEnHTne Ha Samsung no OTNoIe Hn oKoJIHaTcpeJa n cIeUfNHTe 3a npOyKtpeYpIaNToPn 3aIbJIKeHn, HapnpMeR REACH, WEEE, 6aTePn, nocetete: www.samsung.com/uk/aboutsamsung/sustainability/environment/our-commitment/data/
PEΓΙΑΜΕΝΤ (EC) 2019/1782 HA KOMΥΣΥΑΤΑ
Dolby, Dolby Atmos, and the double-D symbol are registered trademarks of Dolby Laboratories Licensing Corporation. Manufactured under license from Dolby Laboratories. Confidential unpublished works. Copyright © 2012-2021 Dolby Laboratories. All rights reserved.
dtss
For DTS patents, see http://patents.dts.com. Manufactured under license from DTS, Inc. or DTS Licensing Limited. DTS, DTS:X, and the DTS:X logo are registered trademarks or trademarks of DTS, Inc. in the United States and other countries. © 2021 DTS, Inc. ALL RIGHTS RESERVED.
The terms HDMI, HDMI High-Definition Multimedia Interface, HDMI Trade dress and the HDMI Logos are trademarks or registered trademarks of HDMI Licensing Administrator, Inc.

Bluetooth
The Bluetooth® word mark and logos are registered trademarks owned by Bluetooth SIG, Inc. and any use of such marks by Samsung Electronics Co., Ltd. is under license. Other trademarks and trade names are those of their respective owners.

[ENERGY STAR]
ENERGY STAR qualified model only
- Your Samsung product is ENERGY STAR qualified in its factory default setting. Change to certain features, settings and functionality in this product can change the power consumption, possibly beyond the limits required for ENERGY STAR qualification.
- Environmental Protection Agency and Department of Energy. ENERGY STAR is a joint program of the Government agencies, designed to promote energy efficient products and practices.
Refer to www.energystar.gov for more information of the ENERGY STAR Program.
ENERGY STAR qualified model only (Applicable to Thin Client models only)
As an ENERGY STAR® Partner, SAMSUNG has determined that this product meets the ENERGY STAR® guidelines for energy efficiency.
- The ENERGY STAR Program has been to reduced greenhouse gas emissions and save energy through voluntary labeling.
- Power management setting of this product have been enabled by default, and have various timing settings from 1 minutes to 5 hours.
- The product can wake with a button press on the chassis from sleep mode.
ENERGY STAR qualified model only (The other models)
- As an ENERGY STAR Partner, Samsung has determined that this product or product models meets the ENERGY STAR guideline for energy efficiency.
www.samsung.com/uk/aboutsamsung/sustainability/environment/our-commitment/data/
ROZPORZADZENIE KOMISJI (UE) 2019/1782
Dolby, Dolby Atmos, and the double-D symbol are registered trademarks of Dolby Laboratories Licensing Corporation. Manufactured under license from Dolby Laboratories. Confidential unpublished works. Copyright © 2012-2021 Dolby Laboratories. All rights reserved.
dtss
For DTS patents, see http://patents.dts.com. Manufactured under license from DTS, Inc. or DTS Licensing Limited. DTS, DTS:X, and the DTS:X logo are registered trademarks or trademarks of DTS, Inc. in the United States and other countries. © 2021 DTS, Inc. ALL RIGHTS RESERVED.
HOMI
The terms HDMI, HDMI High-Definition Multimedia Interface, HDMI Trade dress and the HDMI Logos are trademarks or registered trademarks of HDMI Licensing Administrator, Inc.

Bluetooth
The Bluetooth® word mark and logos are registered trademarks owned by Bluetooth SIG, Inc. and any use of such marks by Samsung Electronics Co., Ltd. is under license. Other trademarks and trade names are those of their respective owners.

[ENERGY STAR]
ENERGY STAR qualified model only
- Your Samsung product is ENERGY STAR qualified in its factory default setting. Change to certain features, settings and functionality in this product can change the power consumption, possibly beyond the limits required for ENERGY STAR qualification.
- Environmental Protection Agency and Department of Energy. ENERGY STAR is a joint program of the Government agencies, designed to promote energy efficient products and practices.
Refer to www.energystar.gov for more information of the ENERGY STAR Program.
ENERGY STAR qualified model only (Applicable to Thin Client models only)
As an ENERGY STAR® Partner, SAMSUNG has determined that this product meets the ENERGY STAR® guidelines for energy efficiency.
- The ENERGY STAR Program has been to reduced greenhouse gas emissions and save energy through voluntary labeling.
- Power management setting of this product have been enabled by default, and have various timing settings from 1 minutes to 5 hours.
- The product can wake with a button press on the chassis from sleep mode.
ENERGY STAR qualified model only (The other models)
- As an ENERGY STAR Partner, Samsung has determined that this product or product models meets the ENERGY STAR guideline for energy efficiency.
14 POZNÁMKA K LICENCI OTEVRENEHO SOFTWARE
12 RIESENIE PROBLEMOV
Dolby, Dolby Atmos, and the double-D symbol are registered trademarks of Dolby Laboratories Licensing Corporation. Manufactured under license from Dolby Laboratories. Confidential unpublished works. Copyright © 2012-2021 Dolby Laboratories. All rights reserved.
dtssx
For DTS patents, see http://patents.dts.com. Manufactured under license from DTS, Inc. or DTS Licensing Limited. DTS, DTS:X, and the DTS:X logo are registered trademarks or trademarks of DTS, Inc. in the United States and other countries. © 2021 DTS, Inc. ALL RIGHTS RESERVED.
The terms HDMI, HDMI High-Definition Multimedia Interface, HDMI Trade dress and the HDMI Logos are trademarks or registered trademarks of HDMI Licensing Administrator, Inc.

Bluetooth
The Bluetooth® word mark and logos are registered trademarks owned by Bluetooth SIG, Inc. and any use of such marks by Samsung Electronics Co., Ltd. is under license. Other trademarks and trade names are those of their respective owners.

[ENERGY STAR]
ENERGY STAR qualified model only
- Your Samsung product is ENERGY STAR qualified in its factory default setting. Change to certain features, settings and functionality in this product can change the power consumption, possibly beyond the limits required for ENERGY STAR qualification.
- Environmental Protection Agency and Department of Energy. ENERGY STAR is a joint program of the Government agencies, designed to promote energy efficient products and practices.
Refer to www.energystar.gov for more information of the ENERGY STAR Program.
ENERGY STAR qualified model only (Applicable to Thin Client models only)
As an ENERGY STAR® Partner, SAMSUNG has
determined that this product meets the
ENERGY STAR® guidelines for energy efficiency.
- The ENERGY STAR Program has been to reduced greenhouse gas emissions and save energy through voluntary labeling.
- Power management setting of this product have been enabled by default, and have various timing settings from 1 minutes to 5 hours.
- The product can wake with a button press on the chassis from sleep mode.
ENERGY STAR qualified model only (The other models)
- As an ENERGY STAR Partner, Samsung has determined that this product or product models meets the ENERGY STAR guideline for energy efficiency.
14 POZNÁMKA K LICENCI S OTVORENÍM ZDROJOVÍM KÓDOM
Ak chcetezaslat otazky ci poziadavky na otazky o otvorenych zdrojoch, obratte sa na diviziu
Samsung Open Source
(http://opensource.samsung.com).
15 DÖLEZITÁ POZNÁMKA OHL'ADOM SERVISU
www.samsung.com/uk/aboutsamsung/sustainability/environment/our-commitment/data/
NARIADENIE KOMISIE (EU) 2019/1782
Poziadavky na ekodizajn externych zdrojov napajania :
www.samsung.com/global/ecodesign_component
BIZTONSÁGÍ OVINTÉZKEDÉSEK
BIZTONSAGI ELOÍRÁSOK
AZÁRAMÜTÉS VESZÉLYENEK ELKERÜLÉSE ERDEKÉBEN NE VEGY LE A KÉSZÜLEK BURKOLATÁT.
A HDMI ARC/eARC (Audio Return Channel/Enhanced Audio Return Channel)
Dolby, Dolby Atmos, and the double-D symbol are registered trademarks of Dolby Laboratories Licensing Corporation. Manufactured under license from Dolby Laboratories. Confidential unpublished works. Copyright © 2012-2021 Dolby Laboratories. All rights reserved.
dtssx
For DTS patents, see http://patents.dts.com. Manufactured under license from DTS, Inc. or DTS Licensing Limited. DTS, DTS:X, and the DTS:X logo are registered trademarks or trademarks of DTS, Inc. in the United States and other countries. © 2021 DTS, Inc. ALL RIGHTS RESERVED.
HOMI
The terms HDMI, HDMI High-Definition Multimedia Interface, HDMI Trade dress and the HDMI Logos are trademarks or registered trademarks of HDMI Licensing Administrator, Inc.

Bluetooth
The Bluetooth® word mark and logos are registered trademarks owned by Bluetooth SIG, Inc. and any use of such marks by Samsung Electronics Co., Ltd. is under license. Other trademarks and trade names are those of their respective owners.

[ENERGY STAR]
ENERGY STAR qualified model only
- Your Samsung product is ENERGY STAR qualified in its factory default setting. Change to certain features, settings and functionality in this product can change the power consumption, possibly beyond the limits required for ENERGY STAR qualification.
- Environmental Protection Agency and Department of Energy. ENERGY STAR is a joint program of the Government agencies, designed to promote energy efficient products and practices.
Refer to www.energystar.gov for more information of the ENERGY STAR Program.
ENERGY STAR qualified model only (Applicable to Thin Client models only)
As an ENERGY STAR® Partner, SAMSUNG has determined that this product meets the ENERGY STAR® guidelines for energy efficiency.
- The ENERGY STAR Program has been to reduced greenhouse gas emissions and save energy through voluntary labeling.
- Power management setting of this product have been enabled by default, and have various timing settings from 1 minutes to 5 hours.
- The product can wake with a button press on the chassis from sleep mode.
ENERGY STAR qualified model only (The other models)
- As an ENERGY STAR Partner, Samsung has determined that this product or product models meets the ENERGY STAR guideline for energy efficiency.
14 NYIILT FORRÁSKÓDÜ LICENC MEGJEGYZÉS
SIGURNOSNA UPOZORENJA
DA BISTE SMANJILI OPASNOST OD ELEKTRICNOG
UDARA, NE ODSTRANJUJE POKLOPAC (ILI POLEDINU).
U UNUTRASNOSTINEMA DIJELOVA KOJE MOZE
SERVISIRATI KORISNIK. PREPUSTITE
SERVISIRANJE KVALIFICIRANOM SERVISNOM OSOBLJU.
Objašnenje symbola koji se mogu nalaziti na vašem proizvodu Samsung potražite u donjoj tablici.
| 4 | OPREZ
OPASNOSTOD
ELEKTRICNOG UDARA NE
OTVARAJTE |
| 5 | Ovaj simbol znači da je struja u unutrašnjosti visokog napona. Opasno je dolaziti u bilo kakav doticaj's unutarnjim sklopopimaproizvoda. |
| 1 | Ovaj simbol naznačuje da je uz urežaj prilozëna važna dokumentacija o njegovom radu i odžavanju. |
| Proizvod II. razreda: Ovaj simbol označava da.nije potrebna sigurnosna veza s uzemljenjem. Ako se taj simbol ne nalazi na proizvodu s kabelom za napajanje, proizvod MORA imati pouzdan spoj na zašitno uzemljenje. |
| ~ | AC napon: Ovaj simbol označava da nazivni napon označen navenedenim simbolom predstavlja AC napon. |
| == | DC napon: Ovaj simbol označava da nazivni napon označen navenedenim simbolom predstavlja DC napon. |
| 4i | Oprez, pogledajte upute za upotrebu: Ovaj simbol upićuje korisnika da potraži dodatne informacije u pogledu sigurnosti u korisničkom prisćniku. |
UPOZORENJE
- Da biste smanjili opasnost od požara ili elektricnog udara, ne izlažite uredaj kisi ili vlazi.
OPREZ
DA BISTE SPRIJEČILI ELEKTRICNI UDAR, NAMJESTITE ŠIROKE KONTAKTE UTIKAÇA U SIROK UTOR, UMETNUT DO KRAJA.
- Ovaj uredaj treba uvijek biti spojen na uticnicu izmjenicine struje sa zašitnim uzemljenjem.
- Da biste isključili urežaj iz struje, morate izvuci utikač iz strujne uticnice. Stoga strujni utikač treba biti spreman za rad.
- Ne izlažite ovaj uredaj kapanju ili prskanju tekućina. Ne stavljaje predmete pune tekúćine, poput vaza, na uredaj.
- Da biste potpuno isključili ovaj uredaj, morate izvuci utikač za napajanje iz zidne utičnice. Stoga utikač mora uvijek biti lako dostupan.
MJERE OPREZA
Dolby, Dolby Atmos, and the double-D symbol are registered trademarks of Dolby Laboratories Licensing Corporation. Manufactured under license from Dolby Laboratories. Confidential unpublished works. Copyright © 2012-2021 Dolby Laboratories. All rights reserved.
dtssx
For DTS patents, see http://patents.dts.com. Manufactured under license from DTS, Inc. or DTS Licensing Limited. DTS, DTS:X, and the DTS:X logo are registered trademarks or trademarks of DTS, Inc. in the United States and other countries. © 2021 DTS, Inc. ALL RIGHTS RESERVED.
HOMI
The terms HDMI, HDMI High-Definition Multimedia Interface, HDMI Trade dress and the HDMI Logos are trademarks or registered trademarks of HDMI Licensing Administrator, Inc.

Bluetooth
The Bluetooth® word mark and logos are registered trademarks owned by Bluetooth SIG, Inc. and any use of such marks by Samsung Electronics Co., Ltd. is under license. Other trademarks and trade names are those of their respective owners.

[ENERGY STAR]
ENERGY STAR qualified model only
- Your Samsung product is ENERGY STAR qualified in its factory default setting. Change to certain features, settings and functionality in this product can change the power consumption, possibly beyond the limits required for ENERGY STAR qualification.
- Environmental Protection Agency and Department of Energy. ENERGY STAR is a joint program of the Government agencies, designed to promote energy efficient products and practices.
Refer to www.energystar.gov for more information of the ENERGY STAR Program.
ENERGY STAR qualified model only (Applicable to Thin Client models only)
As an ENERGY STAR® Partner, SAMSUNG has determined that this product meets the ENERGY STAR® guidelines for energy efficiency.
- The ENERGY STAR Program has been to reduced greenhouse gas emissions and save energy through voluntary labeling.
- Power management setting of this product have been enabled by default, and have various timing settings from 1 minutes to 5 hours.
- The product can wake with a button press on the chassis from sleep mode.
ENERGY STAR qualified model only (The other models)
- As an ENERGY STAR Partner, Samsung has determined that this product or product models meets the ENERGY STAR guideline for energy efficiency.
14 OBAVIJEST O LICENCI ZA UPORABU SOFTVERA OTVORENOG KODA
Želite li poslati upite i zahtjeve u vezi sa softverom otvorenog koda, obratite se grupi Samsung Open Source (http://opensource.samsung.com)
15 VAŽNA NAPOMENA VEZANA UZ SERVIS
- Slike u ovom korisničkom priručniku služe kao samo kao referencec i mogu se razlikovati od stvarnog izgleda proizvoda.
- Moguca je naplata administrativne pristoje u slučaju
(a) poziva inženjera na vaš zahtjev, a nema oštećenja na proizvodu (tj. ako niste pročitali korisnički prirucnik)
(b) da做一些jedinicu na popravak u servis, a nema ostecenja na proizvodu (tj. akoniste proci talikorisniicki prirucnik)
- S visinom administrativne pristoje bit cete upoznati prije poduzimanja bilo kakvih radnji ili kućnog posjeta.
16 TEHNICKI PODACI I VODIC
Tehnički podaci
| Naziv modela | HW-Q600C |
| USB | 5V/0,5A |
| Težina | 3,8 kg |
| Dimenzije (Š x V x D) | 1030,0 x 57,0 x 105,0 mm |
| Raspon radne temperature | +5°C do +35°C |
| Raspon vlažnosti | 10 % ~ 75 % |
| POJAČALO
Nazivna izlazna snaga | 200W (30W x 6 + 10W x 2) |
| Podržani formati za reprodukciju | Dolby 5.1ch / Dolby Digital Plus / Dolby TRUE HD / Dolby ATMOS / DTS:X MA / DTS:X / DTS-HD MA / DTS-HD HRA / DTS Express / DTS 96/24 / DTS-ES / DTS Digital Surround / LPCM 8ch |
| Naziv subwoofera | PS-WC67B |
| Težina | 5,5 kg |
| Dimenzije (Š x V x D) | 184,0 x 343,0 x 295,0 mm |
| POJAČALO
Nazivna izlazna snaga | 160W |
| Ukupna potrošnja energije u stanju mirovanja (W) | 2,0W |
| Bluetooth
Način isključivanja ulaza | Pritisnite i držite gumb SOUND MODE dulje od 5 sekundi da biste isključili funkcjtu Bluetooth Power. |
NAPOMENE
Samsung Electronics Co., Ltd pridržava pravo promjene specifikacija bez prethodne obavijesti.
- Težina i dimenzije su pribrižni.
- Tvrtka Samsung ovime izjavljuje da je ova radio-oprema sukladna Direktivi 2014/53/EU te relevantnim zakonskim odredbama Ujedinjenog Kraljevstva. Cijeli tekst izjave o sukladnosti dostupan je na sljedećoj internetskoj adresi: http://www.samsung.com. Idite na stavku Podrška i unesite naziv modela. Ova se oprema smije koristiti u svim državama šlanciama EU i Ujedinjenom Kraljevstvu.
- IZLAZNA SNAGA BEZICNOG UREDAJA
Maks. snaga RF odašiljača
100mW pri 2,4GHz - 2,4835GHz
25mW pri 5,725GHz - 5,825GHz

[Ispravo odlaganje baterija iz ovog proizvoda]
www.samsung.com/uk/aboutsamsung/sustainability/environment/our-commitment/data/
UREDBA KOMISIJE (EU) 2019/1782
SIGURNOSNA UPOZORENJA
DA BISTE SMANJILI OPASNOST OD
ELEKTRICNOG UDARA, NE SKIDAJTE POKLOPAC
(ILI ZADNJU PLOČU).
UNUTRA SE NE NALAZE DELOVI KOJI SE MOGU SERVISIRATI. SERVISIRANJE POVERITE KVALIFIKOVANOM OSOBLJU SERVISA.
Pogledajte tabelu u nastavku za objasnjenje simbola koje mozte naci na svom Samsung proizvodu.
| 4 | OPREZ
OPASNOST OD
ELEKTRICNOG UDARA.
NE OTVARATI. | |
| 5 | Ovaj simbol ukazuje na to da je unutar
ureža prisutan visoki napon. Svaka
vrsta kontakta sa unutrašnjim
komponentama ovog uredaja
predstavlja opasnost. |
| 1 | Ovaj simbol ukazuje na to da se uz
proizvod isporučuje važna
dokumentacija koja se odnosi na
rukovanje i održavanje. |
| 2 | Proizvod klase II: Ovaj simbol označava
da povezivanje na zašitno elektricno
uzemljenjeicates nejne neophodno.
Ako ovaj simbol ne postoji na proizvodu
sa kablom za napajanje, proizvod MORA
da ima pouzdanu vezu sa zašitnim
uzemljenjem. |
| ~ | Naizmenična struja: Ovaj simbol
označava da naizmeničnu struju. |
| == | Jednosmerna struja: Ovaj simbol
označava da Jednosmernu struju. |
| 4i | Oprez, videti uputstva za upotrebu: Ovaj
simbol upićuje korisnika da u
korisničkom prisćniku pročita dodatne
informacije u vezi sa bezbednosću. |
UPOZORENJE
- Da biste smanjili opasnost od požara ili elektricnog udara, ne izlažite ovaj proizvod kiši ili vlazi.
OPREZ
Dolby, Dolby Atmos, and the double-D symbol are registered trademarks of Dolby Laboratories Licensing Corporation. Manufactured under license from Dolby Laboratories. Confidential unpublished works. Copyright © 2012-2021 Dolby Laboratories. All rights reserved.
dtssx
For DTS patents, see http://patents.dts.com. Manufactured under license from DTS, Inc. or DTS Licensing Limited. DTS, DTS:X, and the DTS:X logo are registered trademarks or trademarks of DTS, Inc. in the United States and other countries. © 2021 DTS, Inc. ALL RIGHTS RESERVED.
The terms HDMI, HDMI High-Definition Multimedia Interface, HDMI Trade dress and the HDMI Logos are trademarks or registered trademarks of HDMI Licensing Administrator, Inc.

Bluetooth
The Bluetooth® word mark and logos are registered trademarks owned by Bluetooth SIG, Inc. and any use of such marks by Samsung Electronics Co., Ltd. is under license. Other trademarks and trade names are those of their respective owners.

[ENERGY STAR]
ENERGY STAR qualified model only
- Your Samsung product is ENERGY STAR qualified in its factory default setting. Change to certain features, settings and functionality in this product can change the power consumption, possibly beyond the limits required for ENERGY STAR qualification.
- Environmental Protection Agency and Department of Energy. ENERGY STAR is a joint program of the Government agencies, designed to promote energy efficient products and practices.
Refer to www.energystar.gov for more information of the ENERGY STAR Program.
ENERGY STAR qualified model only (Applicable to Thin Client models only)
As an ENERGY STAR® Partner, SAMSUNG has determined that this product meets the ENERGY STAR® guidelines for energy efficiency.
- The ENERGY STAR Program has been to reduced greenhouse gas emissions and save energy through voluntary labeling.
- Power management setting of this product have been enabled by default, and have various timing settings from 1 minutes to 5 hours.
- The product can wake with a button press on the chassis from sleep mode.
ENERGY STAR qualified model only (The other models)
- As an ENERGY STAR Partner, Samsung has determined that this product or product models meets the ENERGY STAR guideline for energy efficiency.
14 OBAVEŠTENJE O LICENCI OTVORENOG IZVORNOG KODA
Da biste poslali pitanja i zahteve u vezi sa softverom otvorenog koda obratite se grupi Samsung Open Source
(http://opensource.samsung.com).
15 VAŽNA NAPOMENA O SERVISIRANJU
- Slike i ilustracije koje su upotrebljene u ovom korisničkom uputstvu date su samo kao reference i mogu se razlikovati od vaseg proizvoda.
- Administrativni troškovi mogu biti naplaceni u sledećim slučajevima:
(a) tehnicar je pozvan u vaš dom na vaš zahtev i ako proizvod nije u kvaru (tj. ako niste pročitali ovo korisničko uputstvo),
(b) vi donesete uredaj u servisni centar, a proizvod nije u kvaru (tj. akniste proci tali ovo korisničko uputstvo).
www.samsung.com/uk/aboutsamsung/sustainability/environment/our-commitment/data/
VARNOSTNI PODATKI
VARNOSTNA OPOZORILA
ZARADI NEVARNOSTI ELEKTRICNEGA UDARA
NE ODPIRAJTE ZADNJEGA (HRBTNEGA)
POKROVA.
NAPRAVA NIMA DELOV, KI BI JIH LAHKO
POPRAVIL UPORABNIK. SERVIS NAJ OPRAVI
USTREZNO USPOSOBLJENA OSEBA.
Dolby, Dolby Atmos, and the double-D symbol are registered trademarks of Dolby Laboratories Licensing Corporation. Manufactured under license from Dolby Laboratories. Confidential unpublished works. Copyright © 2012-2021 Dolby Laboratories. All rights reserved.
dtssx
For DTS patents, see http://patents.dts.com. Manufactured under license from DTS, Inc. or DTS Licensing Limited. DTS, DTS:X, and the DTS:X logo are registered trademarks or trademarks of DTS, Inc. in the United States and other countries. © 2021 DTS, Inc. ALL RIGHTS RESERVED.
The terms HDMI, HDMI High-Definition Multimedia Interface, HDMI Trade dress and the HDMI Logos are trademarks or registered trademarks of HDMI Licensing Administrator, Inc.

Bluetooth
The Bluetooth® word mark and logos are registered trademarks owned by Bluetooth SIG, Inc. and any use of such marks by Samsung Electronics Co., Ltd. is under license. Other trademarks and trade names are those of their respective owners.

[ENERGY STAR]
ENERGY STAR qualified model only
- Your Samsung product is ENERGY STAR qualified in its factory default setting. Change to certain features, settings and functionality in this product can change the power consumption, possibly beyond the limits required for ENERGY STAR qualification.
- Environmental Protection Agency and Department of Energy. ENERGY STAR is a joint program of the Government agencies, designed to promote energy efficient products and practices.
Refer to www.energystar.gov for more information of the ENERGY STAR Program.
ENERGY STAR qualified model only (Applicable to Thin Client models only)
As an ENERGY STAR® Partner, SAMSUNG has determined that this product meets the ENERGY STAR® guidelines for energy efficiency.
- The ENERGY STAR Program has been to reduced greenhouse gas emissions and save energy through voluntary labeling.
Power management setting of this product have been enabled by default, and have various timing setting from 1 minutes to 5 hours.
- The product can wake with a button press on the chassis from sleep mode.
ENERGY STAR qualified model only (The other models)
- As an ENERGY STAR Partner, Samsung has determined that this product or product models meets the ENERGY STAR guideline for energy efficiency.
14 OBVESTILO O ODPRTOKODNIH LICENCAH
www.samsung.com/uk/aboutsamsung/sustainability/environment/our-commitment/data/
UREDBA KOMISJE (EU) 2019/1782
Dolby, Dolby Atmos, and the double-D symbol are registered trademarks of Dolby Laboratories Licensing Corporation. Manufactured under license from Dolby Laboratories. Confidential unpublished works. Copyright © 2012-2021 Dolby Laboratories. All rights reserved.
dtss
For DTS patents, see http://patents.dts.com. Manufactured under license from DTS, Inc. or DTS Licensing Limited. DTS, DTS:X, and the DTS:X logo are registered trademarks or trademarks of DTS, Inc. in the United States and other countries. © 2021 DTS, Inc. ALL RIGHTS RESERVED.
The terms HDMI, HDMI High-Definition Multimedia Interface, HDMI Trade dress and the HDMI Logos are trademarks or registered trademarks of HDMI Licensing Administrator, Inc.

Bluetooth
The Bluetooth® word mark and logos are registered trademarks owned by Bluetooth SIG, Inc. and any use of such marks by Samsung Electronics Co., Ltd. is under license. Other trademarks and trade names are those of their respective owners.

[ENERGY STAR]
ENERGY STAR qualified model only
- Your Samsung product is ENERGY STAR qualified in its factory default setting. Change to certain features, settings and functionality in this product can change the power consumption, possibly beyond the limits required for ENERGY STAR qualification.
- Environmental Protection Agency and Department of Energy. ENERGY STAR is a joint program of the Government agencies, designed to promote energy efficient products and practices.
Refer to www.energystar.gov for more information of the ENERGY STAR Program.
ENERGY STAR qualified model only (Applicable to Thin Client models only)
As an ENERGY STAR® Partner, SAMSUNG has determined that this product meets the ENERGY STAR® guidelines for energy efficiency.
- The ENERGY STAR Program has been to reduced greenhouse gas emissions and save energy through voluntary labeling.
- Power management setting of this product have been enabled by default, and have various timing settings from 1 minutes to 5 hours.
- The product can wake with a button press on the chassis from sleep mode.
ENERGY STAR qualified model only (The other models)
- As an ENERGY STAR Partner, Samsung has determined that this product or product models meets the ENERGY STAR guideline for energy efficiency.
14 EIDONOIHSHIATIAGEIEXPHSEIAOTMIKOV ANOIXTOY KQAIKA
12 PROBLEMU NOVERŠANA
Dolby, Dolby Atmos, and the double-D symbol are registered trademarks of Dolby Laboratories Licensing Corporation. Manufactured under license from Dolby Laboratories. Confidential unpublished works. Copyright © 2012-2021 Dolby Laboratories. All rights reserved.
dtssx
For DTS patents, see http://patents.dts.com. Manufactured under license from DTS, Inc. or DTS Licensing Limited. DTS, DTS:X, and the DTS:X logo are registered trademarks or trademarks of DTS, Inc. in the United States and other countries. © 2021 DTS, Inc. ALL RIGHTS RESERVED.
HOMI
The terms HDMI, HDMI High-Definition Multimedia Interface, HDMI Trade dress and the HDMI Logos are trademarks or registered trademarks of HDMI Licensing Administrator, Inc.

Bluetooth
The Bluetooth® word mark and logos are registered trademarks owned by Bluetooth SIG, Inc. and any use of such marks by Samsung Electronics Co., Ltd. is under license. Other trademarks and trade names are those of their respective owners.

[ENERGY STAR]
ENERGY STAR qualified model only
- Your Samsung product is ENERGY STAR qualified in its factory default setting. Change to certain features, settings and functionality in this product can change the power consumption, possibly beyond the limits required for ENERGY STAR qualification.
- Environmental Protection Agency and Department of Energy. ENERGY STAR is a joint program of the Government agencies, designed to promote energy efficient products and practices.
Refer to www.energystar.gov for more information of the ENERGY STAR Program.
ENERGY STAR qualified model only (Applicable to Thin Client models only)
As an ENERGY STAR® Partner, SAMSUNG has determined that this product meets the ENERGY STAR® guidelines for energy efficiency.
- The ENERGY STAR Program has been to reduced greenhouse gas emissions and save energy through voluntary labeling.
- Power management setting of this product have been enabled by default, and have various timing settings from 1 minutes to 5 hours.
- The product can wake with a button press on the chassis from sleep mode.
ENERGY STAR qualified model only (The other models)
- As an ENERGY STAR Partner, Samsung has determined that this product or product models meets the ENERGY STAR guideline for energy efficiency.
14 PAZINOJUMS PAR ATVERTA PIRMKODA LICENCI
Mis on valikute, "BT READY" ja, "BT PAIRING" erinevus?
Dolby, Dolby Atmos, and the double-D symbol are registered trademarks of Dolby Laboratories Licensing Corporation. Manufactured under license from Dolby Laboratories. Confidential unpublished works. Copyright © 2012-2021 Dolby Laboratories. All rights reserved.
dtssx
For DTS patents, see http://patents.dts.com. Manufactured under license from DTS, Inc. or DTS Licensing Limited. DTS, DTS:X, and the DTS:X logo are registered trademarks or trademarks of DTS, Inc. in the United States and other countries. © 2021 DTS, Inc. ALL RIGHTS RESERVED.
The terms HDMI, HDMI High-Definition Multimedia Interface, HDMI Trade dress and the HDMI Logos are trademarks or registered trademarks of HDMI Licensing Administrator, Inc.

Bluetooth
The Bluetooth® word mark and logos are registered trademarks owned by Bluetooth SIG, Inc. and any use of such marks by Samsung Electronics Co., Ltd. is under license. Other trademarks and trade names are those of their respective owners.

[ENERGY STAR]
ENERGY STAR qualified model only
- Your Samsung product is ENERGY STAR qualified in its factory default setting. Change to certain features, settings and functionality in this product can change the power consumption, possibly beyond the limits required for ENERGY STAR qualification.
- Environmental Protection Agency and Department of Energy. ENERGY STAR is a joint program of the Government agencies, designed to promote energy efficient products and practices.
Refer to www.energystar.gov for more information of the ENERGY STAR Program.
ENERGY STAR qualified model only (Applicable to Thin Client models only)
As an ENERGY STAR® Partner, SAMSUNG has determined that this product meets the ENERGY STAR® guidelines for energy efficiency.
- The ENERGY STAR Program has been to reduced greenhouse gas emissions and save energy through voluntary labeling.
- Power management setting of this product have been enabled by default, and have various timing settings from 1 minutes to 5 hours.
- The product can wake with a button press on the chassis from sleep mode.
ENERGY STAR qualified model only (The other models)
- As an ENERGY STAR Partner, Samsung has determined that this product or product models meets the ENERGY STAR guideline for energy efficiency.
14 AVATUD LÄHTEKOODI LITSENTSI TEATIS
www.samsung.com/ee/aboutsamsung/sustainability/environment/our-commitment/data/
KOMISJONI MÄÄRUS (EL) 2019/1782
Dolby, Dolby Atmos, and the double-D symbol are registered trademarks of Dolby Laboratories Licensing Corporation. Manufactured under license from Dolby Laboratories. Confidential unpublished works. Copyright © 2012-2021 Dolby Laboratories. All rights reserved.
dtssx
For DTS patents, see http://patents.dts.com. Manufactured under license from DTS, Inc. or DTS Licensing Limited. DTS, DTS:X, and the DTS:X logo are registered trademarks or trademarks of DTS, Inc. in the United States and other countries. © 2021 DTS, Inc. ALL RIGHTS RESERVED.
The terms HDMI, HDMI High-Definition Multimedia Interface, HDMI Trade dress and the HDMI Logos are trademarks or registered trademarks of HDMI Licensing Administrator, Inc.

Bluetooth
The Bluetooth® word mark and logos are registered trademarks owned by Bluetooth SIG, Inc. and any use of such marks by Samsung Electronics Co., Ltd. is under license. Other trademarks and trade names are those of their respective owners.

[ENERGY STAR]
ENERGY STAR qualified model only
- Your Samsung product is ENERGY STAR qualified in its factory default setting. Change to certain features, settings and functionality in this product can change the power consumption, possibly beyond the limits required for ENERGY STAR qualification.
- Environmental Protection Agency and Department of Energy. ENERGY STAR is a joint program of the Government agencies, designed to promote energy efficient products and practices.
Refer to www.energystar.gov for more information of the ENERGY STAR Program.
ENERGY STAR qualified model only (Applicable to Thin Client models only)
As an ENERGY STAR® Partner, SAMSUNG has determined that this product meets the ENERGY STAR® guidelines for energy efficiency.
- The ENERGY STAR Program has been to reduced greenhouse gas emissions and save energy through voluntary labeling.
- Power management setting of this product have been enabled by default, and have various timing settings from 1 minutes to 5 hours.
- The product can wake with a button press on the chassis from sleep mode.
ENERGY STAR qualified model only (The other models)
- As an ENERGY STAR Partner, Samsung has determined that this product or product models meets the ENERGY STAR guideline for energy efficiency.
14 ATVIROSIOS PROGRAMINES IRANGOS LICENCIJOS PRANEŠIMAS
www.samsung.com/uk/aboutsamsung/sustainability/environment/our-commitment/data/
KOMISIJOS REGLAMENTAS (ES) 2019/1782
© 2023 Samsung Electronics Co., Ltd. All rights reserved.
If you have any questions or comments relating to Samsung products, please contact the SAMSUNG customer care Centre.
| Country | Samsung Service Centre | Web Site |
| ■ Europe |
| UK | 0333 000 0333 | www.samsung.com/uk/support |
| IRELAND (EIRE) | 0818717100 | www.samsung.com/ie/support |
| GERMANY | 06196 77555 77 | www.samsung.com/de/support |
| FRANCE | 0148 63 00 00 | www.samsung.com/fr/support |
| ITALIA | 800-SAMSUNG (800.7267864) | www.samsung.com/it/support |
| SPAIN | 91175 00 15 | www.samsung.com/es/support |
| PORTUGAL | 210 608 098Chamada para a rede fixa nacionalDias ñteis das 9h às 20h | www.samsung.com/pt/support |
| LUXEMBURG | 26103 710 | www.samsung.com/be_fr/support |
| NETHERLANDS | 088 90 90 100 | www.samsung.com/nl/support |
| BELGIUM | 02-201-24-18 | www.samsung.com/be/support (Dutch)www.samsung.com/be_fr/support (French) |
| NORWAY | 21629099 | www.samsung.com/no/support |
| DENMARK | 707 019 70 | www.samsung.com/dk/support |
| FINLAND | 030-6227 515 | www.samsung.com/fi/support |
| SWEDEN | 0771-400 300 | www.samsung.com/se/support |
| POLAND | 801-172-678* lub +48 22 607-93-33*Specialistyczna infolinia do obstugi zapy tăni dotycznych Telefonówkomórkowych: 801-672-678* * (opleta wedug taryfy operadora) | http://www.samsung.com/pl/support/ |
| HUNGARY | 0680SAMSUNG (0680-726-7864) | www.samsung.com/hu/support |
| AUSTRIA | 0800 72 67 864 (0800-SAMSUNG) | www.samsung.com/at/support |
| SWITZERLAND | 0800 726 786 | www.samsung.com/ch/support (German)www.samsung.com/ch_fr/support (French) |
| Country | Samsung Service Centre | Web Site |
| CZECH | 800 - SAMSUNG (800-726786) | www.samsung.com/cz/support |
| SLOVAKIA | 0800 - SAMSUNG (0800-726786) | www.samsung.com/sk/support |
| CROATIA | 072 726 786 | www.samsung.com/hr/support |
| BOSNIA | 055 233 999 | www.samsung.com/support |
| NORTHMACEDONIA | 023 207 777 | www.samsung.com/mk/support |
| MONTENEGRO | 020 405 888 | www.samsung.com/support |
| SLOVENIA | 080 697 267 (brezplaţă stevița) | www.samsung.com/si/support |
| SERBIA | 011 321 6899 | www.samsung.com/rs/support |
| KOSovo | 038 40 30 90 | www.samsung.com/support |
| ALBANIA | 045 620 202 | www.samsung.com/al/support |
| BULGARIA | 0800 111 31 - Бразларетен за в�инке оретату
*3000 - Сени на伟大复兴范围内
разговорнисторадия на моблисторе
operațopor
09:00 до 18:00 - Рождевник до петък | www.samsung.com/bg/support |
| ROMANIA | 0800872678 - Apel Gratis
*8000 - Apel tarifat in retea Program Call Center
Luni - Vineri: 9 AM - 6 PM | www.samsung.com/ro/support |
| CYPRUS | 8009 4000 only from landline, toll free | www.samsung.com/gr/support |
| GREECE | 80111-SAMSUNG (80111726 7864) only from land line (+30) 210 6897691 from mobile and land line |
| LITHUANIA | 8-800-77777 | www.samsung.com/lt/support |
| LATvia | 8000-7267 | www.samsung.com/lv/support |
| ESTONIA | 800-7267 | www.samsung.com/ee/support |