
SLEEK - Kitchen hood ELICA - Free user manual and instructions
Find the device manual for free SLEEK ELICA in PDF.



| Product Type | Cooker Hood |
| Brand | ELICA |
| Model | SLEEK |
| Use Version | Extracting (external evacuation) or recirculating (internal recycling) |
| Number of Speeds | 4 (speed 1, 2, 3, intensive) |
| Lighting | LED (high efficiency, 90% energy saving) |
| Grease Filter | Metal, washable (by hand or in dishwasher, gentle cycle) |
| Activated Carbon Filter | Optional for recirculation version, non-washable, maximum duration 4 months. |
| Timer | Yes (20 min on speed 1, 15 min on speed 2, 10 min on speed 3, 5 min on intensive) |
| Grease Filter Saturation Signal | Indicator L5 steady on after 40 hours of operation |
| Carbon Filter Saturation Signal | Indicator L5 flashing after 160 hours (requires activation) |
| Temperature Alarm | Yes, automatically activates speed 3 in case of overheating |
| Minimum Installation Distance | ≥50 cm (electric cooking), ≥65 cm (gas or mixed cooking) |
| Grease Filter Maintenance | Clean at least once a month |
| Lamp Replacement | Integrated LED, contact after-sales service |
| Power Supply | See rating plate (electrical connection section) |
| Recycling | Compliant with WEEE (Directive 2012/19/EC), do not dispose of with household waste |
Frequently Asked Questions - SLEEK ELICA
User questions about SLEEK ELICA
0 question about this device. Answer the ones you know or ask your own.
Ask a new question about this device
Download the instructions for your Kitchen hood in PDF format for free! Find your manual SLEEK - ELICA and take your electronic device back in hand. On this page are published all the documents necessary for the use of your device. SLEEK by ELICA.
USER MANUAL SLEEK ELICA
Closely follow the instructions set out in this manual. All responsibility, for any eventual inconveniences, damages or fires caused by not complying with the instructions in this manual, is declined. This appliance is intended to be used in household and similar applications such as: - staff kitchen areas in shops, offices and other working environments; - farm houses; - by clients in hotels, motels and other residential type environments; - bed and breakfast type environments.
The hood can look different to that illustrated in the drawings in this booklet. The instructions for use, maintenance and installation, however, remain the same.
It is important to conserve this booklet for consultation at any moment. In the case of sale, cession or move, make sure it is together with the product. - Read the instructions carefully: there is important information about installation, use and safety. - Do not carry out electrical or mechanical variations on the product or on the discharge conduits. - Before proceeding with the installation of the appliance verify that there are no damaged all components. Otherwise contact your dealer and do not proceed with the installation.
Note: The parts marked with the symbol "(^)" are optional accessories supplied only with some models or otherwise not supplied, but available for purchase.
Caution
- Before any cleaning or maintenance operation, disconnect hood from the mains by removing the plug or disconnecting the mains electrical supply.
- Always wear work gloves for all installation and maintenance operations.
- This appliance can be used by children aged from 8 years and above and persons with reduced physical, sensory or mental capabilities or lack of experience and knowledge if they have been given supervision or instruction concerning use of the appliance in a safe way and understand the hazards involved. Children shall not be allowed to tamper with the controls or play with the appliance.
- Cleaning and user maintenance shall not be made by children without supervision.
- The premises where the appliance is
installed must be sufficiently ventilated, when the kitchen hood is used together with other gas combustion devices or other fuels.
- The hood must be regularly cleaned on both the inside and outside (AT LEAST ONCE A MONTH).
- This must be completed in accordance with the maintenance instructions provided. Failure to follow the instructions provided regarding the cleaning of the hood and filters will lead to the risk of fires.
- Do not flambe under the range hood.
- For lamp replacement use only lamp type indicated in the Maintenance/Replacing lamps section of this manual.
The use of exposed flames is detrimental to the filters and may cause a fire risk, and must therefore be avoided in all circumstances.
Any frying must be done with care in order to make sure that the oil does not overheat and ignite.
CAUTION: Accessible parts of the hood may become hot when used with cooking appliances.
- Do not connect the appliance to the mains until the installation is fully complete.
- With regards to the technical and safety measures to be adopted for fume discharging it is important to closely follow the regulations provided by the local authorities.
- The air must not be discharged into a flue that is used for exhausting fumes from appliance burning gas or other fuels.
- Do not use or leave the hood without the lamp correctly mounted due to the possible risk of electric shocks.
- Never use the hood without effectively mounted grids.
- The hood must NEVER be used as a support surface unless specifically indicated.
- Use only the fixing screws supplied with the product for installation or, if not supplied, purchase the correct screws type.
- Use the correct length for the screws which are identified in the Installation Guide.
- In case of doubt, consult an authorized service assistance center or similar qualified person.
WARNING!
- Failure to install the screws or fixing device in accordance with these instructions may result in electrical hazards.
- Do not use with a programmer, timer, separate remote control system or any other device that switches on automatically.
- This appliance is marked according to the European directive 2012/19/EC on Waste Electrical and Electronic Equipment (WEEE).
- By ensuring this product is disposed of correctly, you will help prevent potential negative consequences for the environment and human health, which could otherwise be caused by inappropriate waste handling of this product.

- The symbol on the product, or on the documents accompanying the product, indicates that this appliance may not be treated as household waste. Instead it should be taken to the appropriate collection point for the recycling of electrical and electronic equipment. Disposal must be carried out in accordance with local environmental regulations for waste disposal.
- For further detailed information regarding the process, collection and recycling of this product, please contact the appropriate department of your local authorities or the local department for household waste or the shop where you purchased this product.
Appliance designed, tested and manufactured according to:
- Safety: EN/IEC 60335-1; EN/IEC 60335-2-31, EN/IEC 62233. Performance: EN/IEC 61591; ISO 5167-1; ISO 5167-3; ISO 5168; EN/IEC 60704-1; EN/IEC 60704-2-13; EN/IEC 60704-3; ISO 3741; EN 50564; IEC 62301.
- EMC: EN 55014-1; CISPR 14-1; EN 55014-2; CISPR 14-2; EN/IEC 61000-3-2; EN/IEC 61000-3-3. Suggestions for a correct use in order to reduce the environmental impact: Switch ON the hood at minimum speed when you start cooking and keep it running for a few minutes after cooking is finished. Increase the speed only in case of large amount of smoke and vapor and use boost speed(s) only in extreme situations. Replace the charcoal filter(s) when necessary to maintain a good odor reduction efficiency. Clean the grease filter(s) when necessary to maintain a good grease filter efficiency. Use the maximum diameter of the ducting system indicated in this manual to optimize efficiency and minimize noise.
Use
The hood is designed to be used either for exhausting or filter version.

Extraction version
In this case the fumes are conveyed outside of the building by means of a special pipe connected with the connection ring located on top of the hood.
CAUTION!
The exhaust pipe is not supplied and must be purchased separately.
The diameter of the exhaust pipe must be equal to that of the connection ring.
CAUTION!
If the hood is supplied with an active charcoal filter, it must be removed.
Connect the hood and the discharge holes on the walls with a diameter equivalent to the air outlet (connection flange).
Using tubes and discharge holes on walls with smaller dimensions will cause a reduction in suction performance and a drastic increase in noise.
Any responsibility in this matter is therefore declined.
Use a duct of the minimum indispensable length. Use a duct with as few elbows as possible (maximum elbow angle: 90°). Avoid drastic changes in the duct cross-section.

Filtration version
The aspirated air will be degreased and deodorised before being fed back into the room.
In order to use the hood in this version, you have to install a system of additional filtering based on activated charcoal.
Installation
The minimum distance between the supporting surface for the cooking equipment on the hob and the lowest part of the range hood must be not less than 50 cm from electric cookers and 65 cm from gas or mixed cookers.
If the instructions for installation for the gas hob specify a greater distance, this must be adhered to.
Electrical connection
The mains power supply must correspond to the rating indicated on the plate situated inside the hood. If provided with a plug, connect the hood to a socket in compliance with current regulations and positioned in an accessible area, after installation. If it is not fitted with a plug (direct mains connection) or if the plug is not located in an accessible area after installation, apply a double pole switch in accordance with standards which assures the complete disconnection of the mains under conditions relating to over-current category III, in accordance with installation instructions.
WARNING!
Before re-connecting the hood circuit to the mains supply and checking the efficient function, always check that the mains cable is correctly assembled.
Warning! If the supply cord is damaged, it must be replaced by the manufacturer, its service agent or similarly qualified persons in order to avoid hazard.
Mounting
Before beginning installation:
- Check that the product purchased is of a suitable size for the chosen installation area.
- Remove the charcoal (*) filter/s if supplied (see also relative paragraph). This/these is/are to be mounted only if you want to use the hood in the filtering version.
- Check (for transport reasons) that there is no other supplied material inside the hood (e.g. packets with screws ( ), guarantees ( ), etc.), eventually removing them and keeping them.
In the case of the presence of panels and/or walls and/or lateral wall units, check that there is sufficient space to install the hood and that access to the command panel is easy.
To remove the hood from the wall unit, perform the mounting steps in reverse order.
Caution! Use suitable cut resistant gloves.
Start detaching the hood from the double-sided adhesive that keeps it adherent to the bottom of the wall unit (see also Fig. 4)
Therefore, use a cutter that can be slipped between the sheet metal of the hood and the bottom of the wall unit on the right and left sides. Fig. A
Caution! Otherwise, if you use force during extraction, the sheet metal of the hood could be irremediably distorted.
Operation



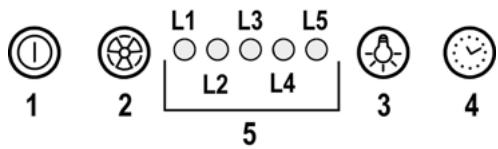
1 ON/OFF motor
Pressing the button, the hood turns on at speed 1.
Pressing the button during functioning, the hood turns OFF.
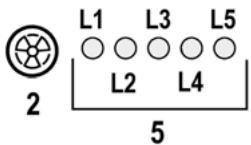
2 Speed Increase
Pressing the button the hood passes from the OFF state to speed 1.
Pressing the button (hood in ON state) the motor speed is increased from speed 1 to intensive.
To each speed corresponds the ignition of the respective led.
Speed 1 led L1
Speed 2 led L2
Speed 3 led L3
Intensive Speed led L4 (flashing)
The intensive speed is timed. The standard timing is 5 at the end of which the hood positions itself to speed 2.
To deactivate the function before the time expires, press key 2; the hood will position itself to speed 1. Pressing key 1 will turn off the hood.
3 ON/OFF lights
4 Speed timing
5 Function state indicator
Speed Timing
The timing of the speed is enabled by pressing key 4. Once the timing expires, the hood turns off.
The timing is subdivided as follows:
Speed 1 - 20 minutes (led L1 flashing)
Speed 2 - 15 minutes (led L2 flashing)
Speed 3 - 10 minutes (led L3 flashing)
Intensive Speed - 5 minutes (led L4 flashing)
During the timed functioning, pressing key 1 turns off the hood. If you press key 2 or key 4, the hood returns to the set speed.
Grease trap Signal
After 40 hours of operation, the led L5 turns on.
When such signal appears, the installed grease trap needs to be washed.
To reset the signal, hold down key 1 for 3 seconds.
Carbon filter signal
After 160 hours of operation, the LED L5 flashes.
When such a signal appears, the installed carbon filter must be substituted.
To reset the signal, hold down key 1 for 3 seconds.
In the case of both filters signaling at the same time, the LED L5 will indicate the alarms alternately, remaining on for 3 seconds and subsequently flashing 3 times.
The reset takes place by carrying out the procedure described above 2 times.
The first time resets the grease trap signal, the second resets the carbon filter signal.
In the standard mode, the carbon filter signal is not active.
In case one uses the hood in filter version, it is necessary to enable the carbon filter signal.
Carbon filter signal activation:
Position the hood in OFF and simultaneously hold down keys 1 and 4 for 3 seconds.
The LEDs L1 and L2 will flash for 5 seconds.
Carbon filter signal deactivation:
Position the hood in OFF and simultaneously hold down keys 1 and 4 for 3 seconds.
The LED L1 will flash for 2n .
Temperature Alarm
The hood is equipped with a temperature sensor that activates the motor to speed 3 in the case that the temperature in the control panel zone becomes too elevated.
The alarm condition is indicated with the sequential flash of the LEDs L1, L2, L3.
This condition remains until the temperature falls below the alarm threshold.
You can get out of this mode by pressing key 1 or 2.
Every 30° the sensor checks the environmental temperature of the control panel zone.
Maintenance
Cleaning
Clean using ONLY a cloth dampened with neutral liquid detergent. DO NOT CLEAN WITH TOOLS OR
INSTRUMENTS. Do not use abrasive products. DO NOT USE ALCOHOL!
Panel
Fig. 12
Attention! Hold the panel with both hands when dismantling and re-mounting in position to avoid it falling and causing damage to people or things.
Dismantling:
-pull the panel (FRONT SIDE) downward with decision,
-push to the left the small lever located on the right side of the panel,
-unhook it from the back hinges.
Cleaning:
Clean the suction panel with the same frequency as the fats filter using a cloth soaked in neutral liquid detergents.
Avoid the use of products containing abrasives. DO NOT USE ALCOHOLS.
Mounting:
The panel must be hooked at the back and fixed in front fitted into the pins for the purpose on the surface of the hood.
Attention! Always check that the panel is well fixed in its place.
Grease filter
Fig. 10-13
Traps cooking grease particles.
The grease filter must be cleaned once a month using non aggressive detergents, either by hand or in the dishwasher, which must be set to a low temperature and a short cycle. When washed in a dishwasher, the grease filter may discolor slightly, but this does not affect its filtering capacity. To remove the grease filter, pull the spring release handle.
Charcoal filter (filter version only)
Fig. 11
It absorbs unpleasant odors caused by cooking.
The saturation of the charcoal filter occurs after more or less prolonged use, depending on the type of cooking and the regularity of cleaning of the grease filter.
In any case it is necessary to replace the cartridge at least every four months.
The charcoal filter may NOT be washed or regenerated.
Circular charcoal filter
Apply one on each side as cover to both the shield grids of the motor impeller, then turn clockwise.
For the disassembly, turn counter-clockwise.
Replacing lamps
The hood is equipped with a lighting system based on LED technology.
The LEDs guarantee an optimum lighting, a duration up to 10 times as long as the traditional lamps and allow to save 90% electrical energy.
For replacement, contact the technical service.
Signal fibre anti-graisses
Activation signal fibre charbon:
Speed 120 minutes (led L1 flashing)
Speed 2 15 minutes (led L2 flashing)
Speed 3 for 10 minutes (LED L3 flashing)
Intensive speed for 5 minutes (LED L4 flashing)
The LED L1 is on for 2".
Grease filter signal
Speed 1 LED L1
Speed 2 LED L2
Speed 3 LED L3
Intensive speed LED L4 (flashing)
The intensive speed is time-limited.
Signal for charcoal filter
Signal for dirty grease filter
Signal for dirty charcoal filter
After 160 hours of use, LED L5 flashes.
When this signal is activated, the installed charcoal filter must be replaced.
Press and hold button 1 for three seconds to reset the signal.
If a signal is given for both filters simultaneously, the LED L5 will show both alarms by alternating between being lit steadily for 3 seconds and then blinking 3 times.
Circular carbon filter
- European Directive 2012/19/EC
- Waste Electrical and Electronic Equipment (WEEE).
Please ensure that this device has been repaired according to the instructions for this product, in order to protect the environment and your health.

The symbol on the product or in the accompanying documentation indicates that this product should not be treated as household waste, but should be handed over to the appropriate collection point for the recycling of electrical and electronic equipment. Please contact your local waste disposal service, the household waste collection service, or the store where you purchased this product for more information on the disposal, recovery, and recycling of this product.
The device has been designed, tested, and manufactured in
compliance with:
- Safety: EN/IEC 60335-1; EN/IEC 60335-2-31, EN/IEC 62233.
- Performance characteristics: EN/IEC 61591; ISO 5167-1; ISO 5167-3; ISO 5168; EN/IEC 60704-1; EN/IEC 60704-2-13; EN/IEC 60704-3; ISO 3741; EN 50564; IEC 62301.
- EMC - Electromagnetic compatibility: EN 55014-1; CISPR 14-1; EN 55014-2; CISPR 14-2; EN/IEC 61000-3-2; EN/IEC 61000-3-3.
Suggestions for correct use to reduce environmental impact: Turn on (ON) the extractor at minimum speed when you start cooking and leave it running for a few minutes after cooking is finished. Increase the speed only in case of large amounts of smoke and steam, and use the boost speed only in extreme situations. Replace the filter/filters with the active carbon filter when necessary to maintain good odor removal efficiency. Clean the grease filter/filters when necessary to maintain good grease filter efficiency. Use the maximum diameter of the air exhaust system, as indicated in this manual, to optimize efficiency and minimize noise.
Use
The extractor has a specific purpose: to suck and expel or filter the air, while at the same time recycling it.

Extractor hood
It is connected to the exhaust pipe by means of an air duct, connected to the flange connector.
ATTENTION!
The air duct is not included in the package and must be purchased separately.
The diameter of the air duct must correspond to the diameter of the connecting flange.
ATTENTION!
If the appliance is equipped with an active carbon filter, the duct must be removed.
Connect the appliance to the air outlet openings in the wall. The diameter of the pipes must correspond to the diameter of the connecting flange for air exhaust.
Connecting to the air duct and openings with a smaller diameter will reduce the performance of the appliance and increase the noise level during operation.
In these cases, the manufacturer accepts no responsibility.
Use the pipe with the necessary length. Use the pipe with the shortest possible length!
Elbows (maximum number of bends: 90°). Do not sharply bend the pipe!

Recirculation with filter
The aspirated air is filtered and returned to the room. To use the appliance in this mode of operation, you must install a complete filter system on the base of the filter with an active carbon filter.
Installation
The minimum distance between the surface on which the cookers are placed and the lowest part of the kitchen hood must be no less than 50 cm in the case of electric cookers and no less than 65 cm in the case of gas or combination cookers.
The connection of the gas burner for heating is made over a longer distance, so it must be taken into account.

Electrical connection
The voltage in the mains must correspond to the voltage indicated on the rating plate with the data for the appliance, supplied by its manufacturer. If it is equipped with a special appliance plug to the socket, the corresponding standards apply, and it must be placed in an easily accessible place for disconnection from the mains. If it is not equipped with a special plug (direct connection to the mains), the installation must be in an easily accessible place for disconnection from the mains, using a two-pole switch that complies with the standards, so that the appliance can be disconnected from the mains under overvoltage category III, in accordance with the installation rules.

WARNING!
Before connecting the appliance to the mains, check that it functions correctly, and check that the cable is installed as it should be.
WARNING! The replacement of the damaged power cable must be carried out by a qualified technician, to avoid any risk.
INSTALLATION
Before proceeding with the installation:
- Make sure that the product you have purchased corresponds in size to the chosen installation location.
- Remove the filter/filters with activated carbon (if your chosen model is equipped with such). To do this, follow the instructions in the relevant paragraph. Mount the filter(s) back only if you wish to use the appliance in the filtering version.
- Make sure that during transport, no foreign objects have entered the inside of the appliance, such as screws, cardboard packaging, etc.; if you find any, remove them and store them.
Plan the installation location, walls, and/or ceiling, and make sure you have enough space to install the appliance, and that you have easy access to the control panel.
To dismantle the appliance and detach it from the cabinet, please follow the installation steps in reverse order.
WARNING! Use suitable work gloves and stable supports.
Separate the two-part duct that connects the appliance to the top of the cabinet (see fig. 4).
Place the appliance in a suitable location, ensuring it can be inserted into the space between the vacuum cleaner's handle and the wall cabinet on the left and right sides (fig. A).
Warning! In the opposite case, in the event of accidental pressure on the vacuum cleaner's handle, it could be irreversibly damaged.
Instructions for use

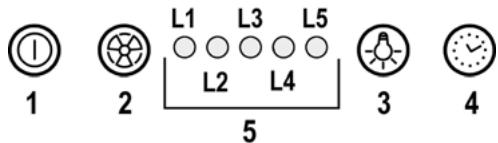
1 ON/OFF of the motor
By pressing the vacuum cleaner button, the 1st speed is activated.
By pressing the button again during operation, the vacuum cleaner turns off (OFF position).
2 Increasing the speed
By pressing the vacuum cleaner button, it switches from OFF position to 1st speed.
By pressing the button when the vacuum cleaner is on (ON position), the motor speed increases and the vacuum cleaner switches from 1st to intensive speed.
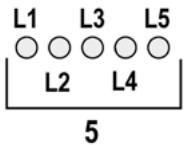
When each speed is activated, different LEDs light up:
1st speed - LED1 2nd speed - LED2 3rd speed - LED3
Intensive speed - LED4 (flashing)
The intensive speed has a set duration.
The standard duration is 5 seconds, after which the vacuum cleaner automatically switches to 2nd speed.
To deactivate the function before the set time, press button N2, the vacuum cleaner switches to 1st speed, and by pressing button N2 again it turns off.
3 ON/OFF
4 Timer for speed
5 Indicator for operating mode
Timer for speed
The timer for speed is set by pressing button 4; after the preset time has elapsed, the aspirator turns off automatically.
The time is divided as follows:
1 - speed - 20 minutes (LED 1 lights up)
2 - speed - 15 minutes (LED 2 lights up)
3 - speed - 10 minutes (LED 3 lights up)
Intensive speed - 5 minutes (LED 4 lights up)
When button 1 is pressed while one of the speeds with a set timer is active, the aspirator turns off, and when button 2 or 4 is pressed, the aspirator switches to the set speed.
Filter replacement indicator
The filter replacement indicator lights up LED 5.
The light of the indicator means that the filter, which is installed, must be replaced.
To reset the indicator, press button 1 and hold it for 3 seconds.
The active carbon filter indicator
After 160 hours of operation, the indicator light L5 will light up to remind you to replace the filter.
When the active carbon filter indicator is activated, the filter must be replaced.
To reset the filter indicator, press buttons 1 and 3 and hold for 3 seconds.
If the filter indicator is not reset in time, the L5 light will not go off after the filter is replaced, and it will remain lit for 3 seconds after the appliance is turned on.
The filter reset procedure is the same as the replacement procedure, repeated twice.
The first filter is for grease, and the second is the active carbon filter.
In standard operation mode, the active carbon filter indicator is not activated.
In case the aspirator is used in the filtering version, it is necessary to activate the active carbon filter indicator.
Activating the active carbon filter indicator:
Turn off the aspirator (position OFF), press buttons 1 and 4 simultaneously and hold for 3 seconds.
The L1 and L2 lights will flash for 5 seconds. Deactivating the active carbon filter indicator:
Turn off the aspirator (position OFF), press buttons 1 and 4 simultaneously and hold for 3 seconds.
The L1 light will flash for 2 seconds.
Temperature alarm
The thermostat sensor is activated when the motor operates at 3rd speed and the temperature in the command supply zone rises significantly.
To activate the alarm, press buttons L1, L2, L3 sequentially.
This continues until the temperature drops below the alarm threshold.
This mode can be reset by pressing button 1 or 2.
At each 30° sensor, the temperature of the environment in the supply zone is measured.
Maintenance
Cleaning
For cleaning, use ONLY a cloth dampened with a neutral detergent. DO NOT use instruments or tools for cleaning!
Avoid products containing abrasives. DO NOT USE ALCOHOL!
Panel
Fig. 12
Warning! When removing or installing the panel, hold it with both hands to prevent it from falling and causing injury to people or pets.
Removal:
- Disconnect the electrical connector from the panel (from its upper side),
- Turn the locking screw counterclockwise, which is located on the rear side of the panel,
The filter is free of preservatives or hazardous substances.
Instructions:
The aspirator must be placed only in the place intended for it, as many times as the filter for the machine is used. For cleaning, use a dry cloth and neutral cleaning agents.
Do not use products containing abrasive particles or spray them!
Installation:
Place the panel in the designated area and secure it by attaching the panel to the specially designed slots on the housing, placing it on the surface of the aspirator.
Attention! Make sure the panel is securely attached.
Filter replacement
Fig. 10-13
The filter retains the particles that are released during operation.
The product is made of materials that are neutral to the environment. It is not harmful to the machine or the surrounding temperature and operating mode.
The use of the filter in the machine is possible, but this does not affect the filtering capacity.
To replace the filter for the machine, press the button with the spring mechanism.
The filter is activated (only for filtering version)
Fig. 11
The filter must be replaced when it is dirty.
The filter with active carbon starts to operate automatically after a certain period of use, depending on the type of cooking and how often the filter is used.
In any case, it is necessary to replace the active carbon filter every four months or when the filter saturation indicator shows that it is necessary.
It cannot be reused.
Cover the active carbon filter
Place the filter on each side so that the two front grids of the motor wheel are covered, then turn it clockwise.
To remove it, turn it counterclockwise.
Remove the cover.
The hood is equipped with a lighting system with LEDs.
The LEDs guarantee optimal lighting, and compared to traditional lamps, they allow 90% energy savings.
For replacement, contact the technical service.
Speed 1 - LED L1
Speed 2 - LED L2
Speed 3 - LED L3
Speed 1 - 20 minutes (LED L1 flashing)
Speed 2 - 15 minutes (LED L2 flashing)
Speed 3 - 10 minutes (LED L3 flashing)
The device has been developed, tested and manufactured in accordance with:
- Safety: EN/IEC 60335-1; EN/IEC 60335-2-31, EN/IEC 62233.
- Operational characteristics: EN/IEC 61591; ISO 5167-1; ISO 5167-3; ISO 5168; EN/IEC 60704-1; EN/IEC 60704-2-13; EN/IEC 60704-3; ISO 3741; EN 50564; IEC 62301. EMC: EN55014-1; CISPR 14-1; EN55014-2; CISPR 14-2; EN/IEC61000-3-2; EN/IEC61000-3-3. Recommendations for correct use to reduce impact on the environment: Turn on the extractor hood at minimum speed when you start cooking and leave it running for a few minutes after you finish cooking. Increase the speed only in case of a large amount of smoke and steam, and use the boosted speeds only in extreme situations. Replace the charcoal filter when necessary to maintain good odor reduction efficiency. Clean the grease filters when necessary to maintain good grease filtration efficiency. Use the maximum diameter of the ducting system indicated in this manual to optimize efficiency and minimize noise levels.
Use
The hood is designed for use in the extraction mode (air exhausted outside) or in the recirculation mode (air recirculated inside).

Using the recirculation mode
In this mode, the vapors are discharged outside through the ducting connected to the connecting ring.
WARNING!
The exhaust duct is not included in the package and must be purchased separately.
The diameter of the exhaust duct must match the diameter of the connecting ring.
WARNING!
If the hood is equipped with a charcoal filter, make sure it is correctly installed.
Connect the hood to the exhaust duct with a diameter corresponding to the air outlet opening (connecting flange).
Using pipes with a smaller diameter will reduce the suction power and sharply increase the noise level.
Use a pipe with the minimum necessary length. Use a pipe with the minimum number of bends (maximum bend angle: 90 degrees) and avoid sharp changes in the pipe section.

Use of the recirculation mode
air
A charcoal filter must be used, which absorbs the odors of the extracted air. The extracted air is filtered and then returned to the room through the upper grille.
Installation
The distance between the lower edge of the exhaust outlet and the hob must be at least 50 cm for electric hobs, and at least 65 cm for gas or combined hobs.
If the installation instructions for the gas hob specify a greater distance, take this into account.

Electrical connection
The mains voltage must match the voltage indicated on the technical data plate located inside the appliance. If the plug is fitted with a plug, connect the plug to a suitable socket. It must comply with current regulations and be located in an easily accessible place. The socket can be switched on after installation. If the plug is not fitted with a plug (direct connection to the mains), or if the socket is not located in an accessible place after installation, use a standard two-pole switch that ensures complete disconnection from the mains in case of overvoltage category 3, in accordance with installation instructions.

WARNING!
Before connecting the electrical system of the hood to the power supply and checking its correct functioning, make sure that the power cable is correctly installed.
Warning! To avoid any risks, the operation of replacing the power cable must be carried out by qualified service personnel.
Installation
Pressing the ON button (extraction on) increases the speed of the extractor from speed 1 to intensive speed.
Each speed corresponds to the activation of the corresponding indicator light.
Speed 1 - indicator light L1
Speed 2 - indicator light L2
Speed 3 - indicator light L3
Intensive speed - indicator light L4 (flashing)
The intensive speed can be programmed by time. Standard programming is 5 minutes, after which the extractor switches to speed 2.
To disable the previously programmed time function, press button 2, the extractor switches to speed 1, then press button 1, the extractor turns off.
3 ON/OFF light
4 Speed programming 5 Operating indicator
Speed programming
Speed programming is activated by pressing button 4. After the programmed time has elapsed, the extractor turns off.
The programming is distributed as follows:
Speed 1 - 20 minutes (indicator light L1 flashing)
Speed 2 - 15 minutes (indicator light L2 flashing)
Speed 3-10 minutes (light indicator)
Intensive speed - 5 minutes (light indicator)
During programmed operation, pressing button 1 turns off the extractor; if you press button 2 or 4, the extractor returns to the programmed speed.
Filter cleaning indicator
After 40 hours of operation, the L5 light indicator turns on.
When the filter cleaning indicator appears, it is necessary to clean it.
The extractor is equipped with a temperature sensor that activates the motor at speed 3 if the temperature near the hob is very high.
The presence of an alarm signal is indicated by the flashing of the light indicators L1, L2, L3.
The alarm condition remains until the temperature drops below the alarm signal activation level. From this mode, you can exit by pressing button 1 or 2.
Every 30 seconds, the sensor reads the temperature of the surrounding environment near the hob.
Maintenance
Cleaning
For cleaning, use only a special cloth moistened with neutral liquid detergent. Do not use any tools for cleaning. Do not use products containing abrasive materials. Do not use alcohol!
Panel
Fig. 12
Attention! Lors de l'installation, tenez le panneau à deux mains pour qu'il ne tombe pas et pour éviter, ainsi, d'endommager les charnières ou les pièces.
Retrait :
- Soulever le panneau (par le haut) vers le bas,
- Tourner vers la gauche la petite manette située sur le côté droit du panneau, - Le retirer des charnières arrière.
Nettoyage :
Le panneau amovible doit être nettoyé avec la même fréquence que le filtre métallique, en utilisant pour cela un chiffon humide avec un détergent doux.
Ne pas utiliser de produits contenant des substances abrasives. NE PAS UTILISER D'ALCOOL !
Installation :
Accrocher le panneau à l'arrière, insérer les pivots dans les fentes situées sur la surface d'extraction.
Attention ! Vérifier toujours que le panneau est bien fixé à sa place.
Filtre à charbon rond
Couvrir les deux côtés du filtre avec les grilles de protection pour les fixer, puis tourner le filtre dans le sens horaire. Pour le retrait - tourner dans le sens antihoraire.
Remplacement des lampes
La hotte est équipée d'un éclairage à LED. Les LED assurent un éclairage optimal, leur durée de vie est 10 fois supérieure à celle des ampoules traditionnelles, et elles permettent d'économiser 90% d'énergie électrique.
Pour le remplacement des LED, contacter le service technique.
The manufacturer is not responsible for any damage or injury caused by improper use or failure to follow the instructions provided in this manual. The appliance is designed for household use and for the purpose for which it is intended, as described in the instructions.
The kitchen hood may have differences from the illustrations in the instructions, but in any case, the instructions for installation, maintenance, and operation remain unchanged.
It is important to keep these instructions so that you can refer to them at any time. In case of sale, before moving, make sure that the instructions are included with the appliance. - Read the instructions carefully: they contain important information on installation, use, and safety. It is forbidden to make any electrical or mechanical modifications to the product in any way. - Before starting the installation of the appliance, check all components for defects and damage. In case of damage, contact the point of sale and stop the installation.
Note: Parts marked with the symbol (*) are optional accessories and are supplied only with certain models, or are parts that are not supplied with the kit and need to be purchased.

Preliminary
Safety
Before starting any cleaning or maintenance operation, disconnect the hood from the electrical supply by unplugging it from the socket or switching off the general switch of the appliance.
- For all installation and maintenance operations, use work gloves. - The appliance can be used by children aged 8 and above and by persons with reduced physical, sensory, or mental capabilities, or with lack of experience and knowledge, if they have been given supervision or instruction concerning use of the appliance in a safe
way and understand the hazards involved.
- Children must be supervised and must not play with the appliance. Cleaning and maintenance must not be performed by children without supervision. - The appliance must have adequate ventilation when the hood is used simultaneously with other appliances that operate on gas or other fuels. - The hood must be cleaned frequently both inside and outside (at least once a month), always following the instructions given in the maintenance instructions. Failure to follow the cleaning and filter replacement rules increases the risk of fire. It is strictly forbidden to cook with an open flame under the hood. - For lighting, use only the lamps specified in the maintenance/replacement section of the lamp.
Using an open flame is harmful to the filters and can cause a fire, so it must be avoided in any case.
The installation must be carried out by qualified personnel according to the instructions.
WARNING: The accessible parts may become hot when used with cooking appliances.
Do not connect the appliance to the electrical supply until the installation is completely finished.
- LTO CTOCYETbC TEXHcHINx MIP Ta MIP 6e3neKu y BIKOpICCTaHHI 0o BiDnOCHtBcN DO BIKuDnB napB, cybopo
DToPmMyTeCeHOPM MlueBnx KOMneTeHTnX OprAhIB.
Повитра сьгубс, He NOBHHNO BUNyCKATNCB Tpy6y Jka BKNOPCTOBYcSДЯ BKNUY DmMIB pNCTPOAMN 0 npaioTb Ha razi Ta iHuxn naibax. He BnKOpNCTOByBatn a6o 3aIIuIaTn BNTAKKy 6e3 npabINbHO BCTaHOBJIeHIX JAMNOYOK 3 pN3IKOM OTPIMATnyap eJekTpUHIM CTpYMOM. HikoJIN He BnKOpNCTOByBatn BnTgKky 6e3 npaBnIbHO BCTAHOBHeIO peuITKn! BHTJkKa HIKOJIH He NOBHHa BKNOpIcTOByBaTcra KOnOPHa NoBepxHRAKUTo TIlbKn HE BKA3yETbCra. BmKOpncTObyBaTu rBnHTn DnI pKcYBaHnB Habopi 3 npOdyKTOM DnI yCTaHObKn, JaKIO HeMaE B Habopi, PpUd6aTu rBnHTn IpabunbHOTo TIny. Bukopnctobvatni npabnilbny doBXinny TBnHTIB kka Bkaytbcra B nocibHky no BctaHOBnEHIO. - Y BnpiKy CymHIBiB, KOHCyIbTyBaTINcR B aBTOpN3OBAHOMy CEHTpi a60 3 KbaniΦiKOBAHIM NepcoHAnOM.

YBAGA!
- He BCTaHOBIIbAHNByIiNbOIBINHX TBnHTB i npncIpoIB dIy fikCyBaHH y BiIOBIDHOCTI 3 cIMM IHCTpyKcIMy M0Ke npNBecTN Do pu3NKiEneKTpUHOro NOxOJKeHN. He cnid BnKOpNCToBvBaTn 3 nporpamatopom, TaMepom, OKpemm NpIbTom KepyBaHHa 6o3 6ykbKaMM iHIMM pNCTPOeM, kNk npNbOBNtcbr B dIO ABTomATUHO.
DanHH Bnpi6 npomapKobAHn BiinobiDiHO Do CbponecBkoI npeKtnbN 2012/19/EC, ytiniaaui eKeKtpnHoro i eneKtponHoro obnaHann (WEEE).3a6e3neuyuOn bipHy ytinaizio cboRBO BnO6y, Bu donoMoxete nonepedTn notehuiH HeRaTHBI HacniDKn DnA OTOUYOHoro cepeDoBua i 3doob'JIOHN, KOTPI MOrn 6 Matn MiCue B npotnoexhOMy BnAky.

Cnmbon ha camomy Bnpo1 a6o Ha cynpoBdoxyuOmy Horo doKoymTe Bk3yc, 10 npn ytniiauii 2b0r O npboy 3 Hm He moXHa NOBODTNCRA k3 i 3BnuahHHMn NO6yTOBHMn BIDxOAMn. BIn Mae 3daBAtncy y BiNIOB1HN pNHT npnOmy EneKTPUHO r ENEKTPOHNO 6bLnADHnA nIra NoaIbWo ytniiaui. 3DaabAHn Ha 3NaI NobINHBO BVKOHyBAHTCA 3rdHO 3 MicueBMn PpabINAMn no ytniiauii BIDxOIB. Dn4 Binwe DeTaNBoHIO IHOpmaui npo npabINA nobOJeHHN 3 TakIMn BnpoABm, ix ytniiaui i nepepo6Kn 3BeptaInTeCb B Mucebi opraHn BnAdn, B Cnyk6y no ytniiauii BIDxOIB, a6o B Maarazn, B KOMy Bn prnd6an daHn Bnpi6.
Пилад спpoeKTOBaHо, ВирpoБуBaHо i ВИROTOВNeHо 3riДно 3:
- Be3neka: EN/IEC 60335-1; EN/IEC 60335-2-31, EN/IEC 62233.
- Eknnyatauihi kocti: EN/IEC 61591; ISO 5167-1; ISO 5167-3; ISO 5168; EN/IEC 60704-1; EN/IEC 60704-2-13; EN/IEC 60704-3; ISO 3741; EN 50564; IEC 62301.
- EMC: EN 55014-1; CISPR 14-1; EN 55014-2; CISPR 14-2;
EN/IEC 61000-3-2; EN/IEC 61000-3-3. Iopadn nnpabunboo ecknyatau ta Dnna 3HnKHeHH BnInBy Ha cepeobune: Bmkaite BnTakky ha MihimalbHy wBnDkiCTb neped noatkom npirotoybanha iki, i zanuwaute II npauobatn Ha deiklbka XbnNn nicra 3aikyuHn npirotoybanha. 36inbuyte wBnDkiCTb tiNbky y paai Benkoi kibkoct dmy i napy Ta BnKOpNCBOyte HndyB tInbky Kpaahix BnAdkax. Dnpi NidtpmaHn BnCOoI eFeKTNBHOCTi BndaHEnh 3anaXib, 3a Heo6xHIOCTi, BnKOHyTe 3amiHy ByrInbHorO(-nx) fipItpy(-IB). Dnpi NidtpmaHn BnCOoI eFeKTNBHOCTi fipItpy KupiB, 3a Heo6xHIOCTi, BnKOHyTe YnctKy fipItpy(-IB) XkpivB. BnKOpNCBOyte MAKcImaHbni diameTp ciStemn nobitpOBoID, 100 BkazAHy y IHcTykuii Idn ONTImiaaui eFeKTNBHOCTi Ta Mihimiaaui uMy.
Installation
The plug is designed for operation in wet mode, with the outlet directed upward or in filtration mode with air recirculation.

Installation option
The outlet pipes are led out through the outlet pipe with the flange closed with a union.

ATTENTION!
The outlet pipe is not supplied, so it must be purchased separately.
The diameter of the outlet pipe must match the diameter of the union ring.

ATTENTION!
If the cap has mounting holes, they must be removed.
Use only outlet pipes and outlets with the same inlet diameter for air (union flange).
Using outlet pipes and outlets with a smaller diameter will reduce the efficiency of the wet mode and significantly increase the noise level.
Therefore, we disclaim any liability for the above.
! Use the shortest possible exhaust duct. ! Use an exhaust duct with the minimum number of bends (maximum bend angle: 90°). Avoid sharp changes in the cross-section of the exhaust duct.

Version with filtration
The extracted air is cleaned and deodorized and then returned to the room. To use the cap in this mode, it is necessary to install a filter system with activated carbon.
The distance from the hood to the gas or electric hob must be at least 50 cm for electric hobs, and 65 cm for gas and combined hobs.
It is necessary to take into account the distances specified in the installation instructions for the gas hob.

The voltage in the electrical network must correspond to the characteristics indicated on the label located inside the hood. If the plug is included in the kit, connect the plug to a socket that meets the existing standards and is in an accessible place so that the plug can be disconnected after installation. If the plug is not included in the kit (without a plug for the electrical network), or the socket is not in an accessible place, then after installation, install a reliable two-pole switch that ensures complete disconnection from the network under conditions of overvoltage category III, in full compliance with installation rules.

ATTENTION!
Before reconnecting the hood to the electrical network, check the correctness of the work, take control so that the network cable is installed correctly.
Attention! Replacement of the electric cable must be carried out by authorized technical service personnel.
Installation
Before starting installation:
- Check that the dimensions of the purchased hood correspond to the chosen installation location. Remove the filter/grease filter from the hood (see also the corresponding section). The filter will be reinstalled later if you want to use the hood in recirculation mode.
- Check that inside the hood there are no objects left during its transportation (for example, packages with screws, warranty cards, etc.), if any, remove them and keep them.
In addition to the side panel and/or the wall, and/or the ceiling, check that there is enough space for installing the hood and that it is possible to reach the control panel without obstacles.
To remove the hood from hanging furniture, perform installation work in the reverse order.
Attention! Use appropriate protective gloves when working.
The hood is equipped with a double-sided adhesive tape, which is applied to the lower part of the hanging furniture. (See also Fig. 4).
Use this adhesive tape to attach the lower part of the hanging furniture to the right and left sides, Fig. A.
Attention! When installing, applying force during removal, the adhesive tape may deform irreversibly.
Operation
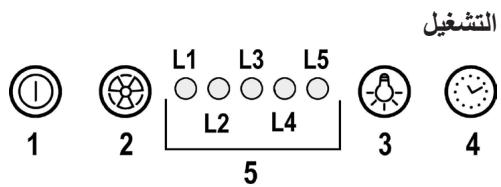
1 ON/OFF button
Press the button once, the hood will start operating at the first speed.
Press the button again during operation, the hood will turn off.
2 Speed increase
Press the button, the hood will switch from OFF mode to speed 1.
Press the button (hood in ON mode), the speed will increase from speed 1 to intensive.
Each speed corresponds to the activation of the corresponding indicator light.
Speed 1 indicator L1
Speed 2 indicator L2
Speed 3 indicator L3
Intensive speed indicator L4 (flashing)
The intensity can be programmed in 5 steps, after which the lamp switches to step 2.
To turn off the lamp, press button 2, the lamp switches to step 1, press button 1 and the lamp turns off.
3 ON/OFF lighting
4 Programming intensity 5 Operating mode indicator
Programming intensity
Programming intensity is activated by pressing button 4, after the programmed time has elapsed the lamp turns off.
Programming is divided as follows:
[ \text{Step 1 - 20 minutes (light L1 mode)} ]
Step 2 - 15 minutes (light L2 mode)
Step 3 - 10 minutes (light L3 mode)
Intensity 5 - 5 minutes (light L4 mode)
During operation with programmed time, pressing button 1 turns off the lamp, if you press button 2 the lamp returns to the previously set intensity.
Signal for filter replacement
After 40 hours of operation, light L5 turns on.
When this signal appears, it is necessary to replace the filter.
To reset the alarm, press button 1 and hold it pressed for 3 seconds.
First, the coal filter alarm
After 160 hours of operation, the L5 LED will light up.
When such an alarm appears, it is necessary to replace the coal filter.
To reset the alarm, press button 1 and hold it pressed for 3 seconds.
If the alarms for both filters are activated, the L5 LED will indicate the alarm - it will light up for 3 seconds and then blink 3 times.
To reset the alarm, it is necessary to perform the above operation 2 times.
The first time we reset the alarm for the grease filter, the second time for the coal filter.
In standard mode, the coal filter alarm is not activated.
If you use the hood in recirculation mode, it is necessary to activate the coal filter alarm.
Activating the coal filter alarm:
Set the hood to OFF and simultaneously press buttons 1 and 4 for 3 seconds.
The L1 and L2 LEDs will light up for 5 seconds.
Deactivating the coal filter alarm:
Set the hood to OFF and simultaneously press buttons 1 and 4 for 3 seconds.
Control L1 Emergency mode 2-x seconds.
Emergency signal temperature
The emergency signal is equipped with a temperature sensor, which activates at 3 high temperatures in the control panel.
The emergency signal indicates the primary phases L1, L2, L3.
This state will be maintained until the temperature drops below the emergency level.
To exit this mode, it is necessary to press button 1 or 2.
Every 30 seconds, the sensor reads the temperature values around the device.
Then
Cleaning
For cleaning, use only a special cloth, slightly dampened with neutral detergent. Do not
USE ABRASIVE AGENTS OR INSTRUMENTS FOR CLEANING!
Do not use agents containing abrasive materials.
DO NOT USE SPRAY!
Damage
Fig. 12
Installation: hold the panel with both hands to avoid damaging the paint and the applied markings.
Removal:
- Pull the panel (bottom edge) downwards.
Do not use abrasive or sharp tools.
Do not use alcohol!
Installation:
The panel is inserted from the front and placed into the opening that is on the surface of the drawer.
Warning: before use, check that the panel is well secured in its place.
Grease filter
Fig. 10-13
The grease filter should be cleaned when it becomes dirty, especially after cooking.
It should be cleaned at least once a month with non-abrasive detergents, by hand or in a dishwasher at low temperature and with a short cycle.
Washing the grease filter in a dishwasher may cause discoloration, but its filtering characteristics will not change.
To remove the filter, pull the spring-loaded handle.
ByrilbHnI φ IbTp (TIbKn B pexnmi peunpkynaii) Man. 11
B6npaε HenpncmHi 3aapanx Kyxhi.
PpeBipKa ByrIbHOro fIpIbTpHa hAcMHeHn npBoMDtcbn iNcIa BInIbMeHd BoTOrO nepIOy BkOPOpCTnHn B 3aJeNHOCTi Bd TmNy KxHy i PeryIyrpHOctO oChtKn fIpIbTp XkpIb. Y6dy-baKOMy BnAmADky Heo6XIdHO 3aMIHTn NaTPOH MaKcIMYM KoxHi QOTPiN MciU.
HE niDjae MHTHQ NHOHBnHHO.
- atrums LED L1
- atrums LED L2
- atrums LED L3
Intensivais atrums LED L4 (mirgulo)
MaHbIH 7aMaHaTbIC Kbl3bIN HeMece XaHbIn KeTneyiH KaMTaMaCbI3 eTy yuH, TaMaKTbI a6aJnAn KybIpyKaKeT.
CAK BOJbIHbI3: CopfbltbiH KOJIKeTImDi 6eJIkTepi TaMaK DaIbIHday Kypblfblnapbl NaJaIaHaBbINFaH Ke3De KbI3bIN KeTyI MymKiH.
- Ophaty Tobilbik aayktaJMaBihwa KpypbIJIbIHbI 3JIeKTp JxeliciHe KocpHaB13.
- BydbH 乌bIyBHa Kapcbl KOndaHbIaTbH texHnKaIbIK KeHe Kayinc3ik WapanapbH eckeOpbI,Keprilikti BuNik opraHdpb6ekITepepekelepi MyKnT opbHday MaHb3bl. OcbI KpyblfHbIH TyIK apKbIbI 6aftTay JyueciH ra3 Hemece 6acka OTbHdb JxaraTbH KpyblfNapdAn hblKcHb 6bnapDb I bIfapy CmKtBb 6bacKa da MaKaTTapDa naJaAnaHbTaNbKe3 KeIreH KOJaHaICTabfJ XeJeTeY JyueciHe JxanFay KaKxt. 3NeKtp TorblhCory KayiHne BaJaHaICTbI WAmbl Dpybc 6ekITINMereH COPfblWbI naJaAnaHbHaB3 KHe KaNDbIpMaHbI3. TopnapbTnictTyprde6eKitImereH copfbltbeuKaWan naDaanHaBb3.
- Apnaы! KepcetIINMeIHnWe, copfblTbELKAAUAH TIpeK 6eTI petiHne naJaIaNbHaI3.
- The product is intended for use in domestic and similar applications, such as staff kitchens in shops, offices, and other working environments, farmhouses, by clients in hotels, motels, and other residential-type environments, and bed and breakfast type environments.
WARNING!
- It is possible to install the hood or the exhaust structure in accordance with these instructions and connect it to electrical appliances. - Do not use it with a programmer, timer, remote control, or any other device that turns on automatically.
Electrical and electronic equipment (EEE) containing waste must be disposed of in accordance with the European Directive 2012/19/EC (WEEE).
Disposal of the product
By not disposing of this product as unsorted municipal waste, you will help to reduce the negative impact on the environment and human health.

The symbol on the product or its packaging indicates that this product must not be treated as household waste. Instead, it should be handed over to an applicable collection point for the recycling of electrical and electronic equipment.
By ensuring this product is disposed of correctly, you will help prevent potential negative consequences for the environment and human health.
For more detailed information about recycling of this product, please contact your local city office, your household waste disposal service, or the shop where you purchased the product.
The following standards have been applied:
Safety: EN/IEC 60335-1; EN/IEC 60335-2-31, EN/IEC 62233. - Performance: EN/IEC 61591; ISO 5167-1; ISO 5167-3; ISO 5168; EN/IEC 60704-1; EN/IEC 60704-2-13; EN/IEC 60704-3; ISO 3741; EN 50564; IEC 62301. EMC: EN 55014-1; CISPR 14-1; EN 55014-2; CISPR 14-2; EN/IEC 61000-3-2; EN/IEC 61000-3-3.
Instructions for correct disposal to reduce environmental impact:
Before cleaning, disconnect the appliance from the power supply and wait a few minutes. Clean only with a damp cloth and mild detergents. Do not use abrasive cleaners or solvents. For proper operation, use the recommended filters. Replace the filters when they are saturated. For cleaning and maintenance, follow the instructions in this manual.
Maintenance
The filters are intended to be cleaned or replaced periodically.

By cbiptka biipiktipuyi pfanaheueke KocblnFAH copfbll Kybip apkblnb wblfapblnaabl.
ECKEPTY!
Copfblu Ky6bipdbH DnAmetpi 6ipiKtpuyui caKHaBHy DnAmetpimTe HeDec 6Oly Kepek.
ECKEPTY!
Copfblk cybipcopfbll KnHaKTamacbIme HKeTkiimmei, OHb 6eK catbn any Kepek. Copfbltkbabapbf copfbll KybipnapbMea ayu IfapatbTH TecikTepei, cOn dAmetpreri TecikTepre Kocblh3 (bipiktipyi pfnahe).
Ka6bIpaTaBc copTbIu Ky6bIpaApbI MeH KeMDey DnAmETpderi TecikTi naDaanany, copy KyaTbIH HaWapNaTbIN, rypinDeYIn KyuweTei.
! KaKeTTI MNHImaJIbI Y3bIHbIKTaFbI TYTikTI KOJaHbIHbI3. !BapbHwaKeiMinimiBapTyrkiKoJaHbIb3(mimHiMakcMaIaIb6pybIb:90°). ! TytikTH KENDEHeH KIMacbHaTa TY6eRnI e3repictepdi 60JbIpMaHb3.

Cy3y Hyckacbl
On yuiship kemip cyrici kaxet, OHbl eDetteri caTyubinapdah anyfa 60ana.
Czy3i 1bIbIaPbIbNA ayAaNbI JxOaPbIb IbIbIc TOpbl apKbIbI b6eMnere KaTata KbiBepy anDbIa OHbI MaH MeH NICTepen TaapaTbIa.
KoHdbipy
CopfbltbnTMeHKnbplmehbDlcactbHaarbltipeiyu Ka3bltbHnapaKaBkTBflb3neKtpnnntacbl yin 50cm, an ra3 hemece bipiktipiren pntanap yin 65cm den Kem 60lmaybi Tnic.
ErepHcyka ra3nnTacbIn opHaTyfa apTbIbpaKapa KaBtBk 6enrineHren 6onca, OHbl eckepiH3.
! 3neKtp Kocynapbl
Before starting repair work, it is necessary to check the technical condition of the device. If a malfunction is detected, do not start repair until the fault is completely eliminated. If the malfunction is not detected (device operates normally), or if the fault cannot be completely eliminated, then contact the manufacturer's service center for further instructions.
WARNING!
Before connecting the device to the electrical network, check that the cable is properly installed.
WARNING! Only authorized technical personnel or qualified specialists should perform the repair.
Repair
Before starting repair:
- Disconnect the device from the power supply.
- Remove the screws (if any) (see also the figures). If the screws are difficult to remove, use appropriate tools. Then remove the covers, nameplates, etc. Be careful not to damage the internal components (to avoid damage to the device). Remove them and set them aside.
If there are capacitors or other components that may be charged, discharge them before repair and check with a multimeter that they are discharged.
For repair of the device, use only original spare parts.
Be careful! Do not touch the hot parts of the device.
(See figure 4) Remove the screws and carefully lift the cover to start repairing the device.
After repair, check the device and, if necessary, replace the protective cover for the metal parts. See figure A.
Be careful! When closing the cover, make sure that the protective cover is not damaged.
Repair
1 Eiinidau KINO/0R DO:
Nyeelit arnkf elcal nidrur 1-cueareaukdI kInueefau.
Cyéun ardunuiar nyéelil amnHuc, ndrur erlal.
2 Cueareauknrdnudó
Nyeelit armki elcal nirdur ,, eyeltili 1-
cueaefaeukf eIal.
Nyeelit arnkf elcal (nifdur KINOEUeyelial aierfiaf) einfc uareau 1-cueauknfdkuiu cueaueukkf rnau.
Ed cueaeafauknf nclnl cfduk acia cifrau.
a aal aal aal aal aal aal aal aal aal aal aal aal aal aal aal aal aal aal aal aal aal aal aal aal aal aal aal aal aal aal aal aal aal aal aal aal aal aal aal aal aal aal aal aal aal aal aal aal aal aal aAL
()
11
a a a a a a a a a a a a a a a a a a a a a a a a a a a a a a a a a a a a a a a a a a a a a a a a a a a a a a a a a a a a a a a a a a a a aaa
L5 11111111111111111111111111111111111111111111
y 3 10000000000000000000000000000000000000000000000000000000000000000000
J 1
ON/OFF
The switch is used to turn the device on and off. When the switch is in the ON position, the device is powered on; when in the OFF position, it is powered off.
The indicator light (j) shows the operating status. When the device is on, the light is lit.
The control knob adjusts the temperature. Turn it clockwise to increase the temperature, counterclockwise to decrease.
ON/OFF 3
4
Jus 5
a. yuul ci ci si
4 Clll al bc bnnall 3-12b c ae nll l j
cagall gail ilie blalil isabiy
yLsLauea
(JL1)20-1
(204 L2 15-2e

Therefore A = 90°
J 15
.
JLJI (e)
()
j 1
111 111 111 111 111 111
- |x,y| = 1; |y,x| = 1
y
(3) Prove: 1/1! + 2! + 3! + 1/2! + 3! + 4! + ... + 1/n! + 1 + n! < 1/1! + 2! + 3!
∴ a + b = 3
a 15 jll a lac c 8 j 15 jll (*) 15 jll lai yill ciisall: b 24 y 24 jll ciisall j 24 jll ciisall
- all 2. all 3. all 4. all 5. all 6. all

A
i 1 i j k l m n o p q r s t u v w x y z
jlll jill l lac jy jil 11 jil jil jil jil jil jil jil jil jil jil jil jil jil jil jil jil jil jil jil jil jil jil jil jil jil jil jil jil jil jil jil jil jil jil jil jil jil jil jil jil jil jil jil jil jil jil jil jil jil jil jil jil
gaiy jiei jie jie jie jie jie jie jie jie jie jie jie jie jie jie jie jie jie jie jie jie jie jie jie jie jie jie jie jie jie jie jie jie jie jie jie jie jie jie jie jie jie jie jie jie jie jie jie jie jie jie jies
aI, all 1j bii y


- CAUTION
- WARNING
- USE
- EXTRACTION VERSION
- FILTRATION VERSION
- INSTALLATION
- ELECTRICAL CONNECTION
- MOUNTING
- BEFORE BEGINNING INSTALLATION
- OPERATION
- ON/OFF MOTOR
- SPEED INCREASE
- ON/OFF LIGHTS
- SPEED TIMING
- FUNCTION STATE INDICATOR
- GREASE TRAP SIGNAL
- CARBON FILTER SIGNAL
- CARBON FILTER SIGNAL ACTIVATION
- TEMPERATURE ALARM
- MAINTENANCE
- CLEANING
- PANEL
- FIG
- DISMANTLING
- GREASE FILTER
- TRAPS COOKING GREASE PARTICLES
- CHARCOAL FILTER (FILTER VERSION ONLY)
- CIRCULAR CHARCOAL FILTER
- REPLACING LAMPS
- SIGNAL FIBRE ANTI-GRAISSES
- ACTIVATION SIGNAL FIBRE CHARBON
- GREASE FILTER SIGNAL
- SIGNAL FOR CHARCOAL FILTER
- SIGNAL FOR DIRTY GREASE FILTER
- SIGNAL FOR DIRTY CHARCOAL FILTER
- CIRCULAR CARBON FILTER
- EXTRACTOR HOOD
- ATTENTION
- RECIRCULATION WITH FILTER
- BEFORE PROCEEDING WITH THE INSTALLATION
- INSTRUCTIONS FOR USE
- ON/OFF OF THE MOTOR
- INCREASING THE SPEED
- ON/OFF
- TIMER FOR SPEED
- INDICATOR FOR OPERATING MODE
- FILTER REPLACEMENT INDICATOR
- THE ACTIVE CARBON FILTER INDICATOR
- ACTIVATING THE ACTIVE CARBON FILTER INDICATOR
- REMOVAL
- INSTRUCTIONS
- FILTER REPLACEMENT
- THE FILTER IS ACTIVATED (ONLY FOR FILTERING VERSION)
- COVER THE ACTIVE CARBON FILTER
- REMOVE THE COVER
- USING THE RECIRCULATION MODE
- USE OF THE RECIRCULATION MODE
- AIR
- ON/OFF LIGHT
- SPEED PROGRAMMING
- FILTER CLEANING INDICATOR
- RETRAIT
- NETTOYAGE
- FILTRE À CHARBON ROND
- REMPLACEMENT DES LAMPES
- PRELIMINARY
- SAFETY
- YBAGA
- INSTALLATION OPTION
- VERSION WITH FILTRATION
- BEFORE STARTING INSTALLATION
- ON/OFF BUTTON
- ON/OFF LIGHTING
- PROGRAMMING INTENSITY
- SIGNAL FOR FILTER REPLACEMENT
- FIRST, THE COAL FILTER ALARM
- ACTIVATING THE COAL FILTER ALARM
- EMERGENCY SIGNAL TEMPERATURE
- THEN
- USE ABRASIVE AGENTS OR INSTRUMENTS FOR CLEANING
- DO NOT USE SPRAY
- DAMAGE
- BYRILBHNI Φ IBTP (TIBKN B PEXNMI PEUNPKYNAII) MAN
- ECKEPTY
- CY3Y HYCKACBL
- KOHDBIPY
- NEKTP KOCYNAPBL
- REPAIR
- BEFORE STARTING REPAIR
- EIINIDAU KINO/0R DO
- CUEAREAUKNRDNUDÓ
- ()
Brand : ELICA
Model : SLEEK
Category : Kitchen hood