RCGCG-36 - Washing machine Royal Catering - Free user manual and instructions
Find the device manual for free RCGCG-36 Royal Catering in PDF.


| Product type | Professional gas plancha for chicken |
| Brand | Royal Catering |
| Model | RCGCG-36 |
| Recommended use | Professional cooking for catering |
| Dimensions (W x D x H) | 117 x 48 x 142.5 cm |
| Net weight | 116 kg |
| Electrical supply | 230 V ~ 50 Hz |
| Electrical power | 110 W |
| Total heat output | 20 kW |
| Number of burners | 4 |
| Power per burner | 5 kW |
| Compatible gas type | Butane (G30), Propane (G31), Methane (G20) |
| Gas supply pressure | 28-30 mbar (G30/G31) or 20 mbar (G20) depending on category |
| Butane gas consumption (G30) | 1.574 kg/h |
| Propane gas consumption (G31) | 1.552 kg/h |
| Methane gas consumption (G20) | 2.116 m³/h |
| Injector diameter | 1.2 mm, 1.04 mm, 1.12 mm, 1.76 mm, 1.89 mm depending on gas |
| Compatible appliance categories | I3B/P(30), I3+(28-30/37), I3B/P(50), I3B/P(37), I2E+, I2EK, I2H(20) |
| Destination countries | France, Germany, Belgium, Switzerland, Austria, Netherlands, etc. |
| Maintenance and cleaning | Clean the cooking plate after each use and regularly check the burners and injectors |
| Safety | Compliant with European safety standards for gas appliances |
| Spare parts and repairability | Replacement injectors suitable for each gas type and replaceable burners |
Frequently Asked Questions - RCGCG-36 Royal Catering
User questions about RCGCG-36 Royal Catering
0 question about this device. Answer the ones you know or ask your own.
Ask a new question about this device
Download the instructions for your Washing machine in PDF format for free! Find your manual RCGCG-36 - Royal Catering and take your electronic device back in hand. On this page are published all the documents necessary for the use of your device. RCGCG-36 by Royal Catering.
USER MANUAL RCGCG-36 Royal Catering
| DE | Produktname | Hähnchengasgrill |
| EN | Product name | Chicken Gas Grill |
| PL | Nazwa produktu | Grill gazowy do kurczaka |
| CZ | Název výrobku | Plynový gril na kuře |
| FR | Nom du produit | Gril à gaz pour poulet |
| IT | Nome del prodotto | Griglia a gas per pollo |
| ES | Nombre del producto | Parrilla de gas para pollo |
| HU | Termék neve | Csirke gázgrill |
| DA | Produktnavn | Kylling Gasgrill |
| FI | Tuotteen nimi | Kana kaasugrilli |
| NL | Productnaam | Kippen gasbarbecue |
| NO | Produktnavn | Kyllinggassgrill |
| SE | Produktnamn | Kycklinggasgrill |
| PT | Nome do produto | Grelhador a Gás para Frango |
| SK | Názov produktu | Plynový gril na kurča |
| BG | Име на продукта | Газов грил за пилета |
| EL | Όνομα προϊόντος | Ψησταριά Αερίου Κοτόπουλου |
| HR | Naziv proizvoda | Plinski roštilj za piletinu |
| LT | Produkto pavadinimas | Vištienos dujinis grilis |
| RO | Numele produsului | Grătar pe gaz pentru pui |
| SL | Ime izdelka | Kurací plynový gril |
| DE Modell | EN Product model | PL Model produktu | CZ Model výrobku | FR Modèle | IT Modello | ES Modelo | HU Modell | DA Model | FI Tuotteen malli | NL Productmodel | NO Produktmodell | SE Produktmodell | PT Modelo do produto | SK Model | BG Модел на продукт | EL Movtéло προϊόντος | HR Model proizvoda | LT: Gaminio modelis | RO: Model de produs | SL: Model izdelka | RCGCG-36 | |
| DE Hersteller | EN Manufacturer | PL Producent | CZ Výrobce | FR Fabricant | IT Produttore | ES Fabricante | HU Termelő | DA Producent | FI Valmistaja | NL Producent | NO Produsent | SE Tillverkare | PT Fabricante | SK Výrobca | BG Производител | EL Κατασκευαστής | HR Proizvođač | LT Gamintojas | RO Producător | SL Proizvajalec | expondo Polska sp. z o.o. sp. k. | |
| DE Anschrift des Herstellers | EN Manufacturer Address | PL Adres producenta | CZ Adresa výrobce | FR Adresse du fabricant | IT Indirizzo del produttore | ES Dirección del fabricante | HU A gyártó címe | DA Producentens adresse | FI Valmistajan osoite | NL Adres producent | NO Produsentens adresse | SE Tillverkarens adress | PT Endereço do fabricante | SK Adresa výrobcu | BG Адрес на производителя | EL: Διεύθυνση κατασκευαστή | HR Adresa proizvođača | LT Gamintojo adresas | RO Adresa producătorului | SL Naslov proizvajalca | ul. Nowy Kisielin – Innowacyjna 7, 66-002 Zielona Góra | Poland, EU | |


VORSICHT


This User Manual has been translated using machine translation. We have made every effort to ensure the translation is accurate, but please note that automated translations are not perfect and are not meant to replace human translators. The official version of the User Manual is in English. Any differences between the translated version and the original English are not legally binding. If you have any questions about the accuracy of the translation, please refer to the English version, which is the official reference. More language versions are available upon request via info@expondo.com.
Technical data
| Parameter description | Parameter value | |||||
| Product name | Chicken gas grill | |||||
| Model | RCGCG-36 | |||||
| Type of appliance | A3 | |||||
| Appliance category | I3B/P(30) | I3+(28-30/37) | I3B/P(50) | I3B/P(37) | I2E+, I2EK | I2H, I2E |
| Type of Gas and Supply Pressure | G30Butane and G31Propane 30mbar | G30 Butane 28~30mbar and G31 Propane 30mbar | G30Butane and G31Propane 50mbar | G30 Butane and G31Propane 30mbar | G20 methane 20mbar and G25 methane 25mbar | G20 methane 20mbar |
| Burner Injector Size [mm] | ∅1.2*4 | ∅1.2*4 | ∅1.04*4 | ∅1.12*4 | ∅1.76*4/∅1.89*4 | ∅1.76*4 |
| Burner Power [kW] | 5*4 | 5*4 | 5*4 | 5*4 | 5*4 | 5*4 |
| Total Heat Input Power [kW] | 20 | |||||
| Voltage [V] / Frequency [Hz] | 230~ / 50 | |||||
| Power [W] | 110 | |||||
| Gas Consumption | G30: 1.574kg/h; G31: 1.552kg/h; G20: 2.116 m3 /h | |||||
| Dimensions (Width x Length x Height) [cm] | 117x48x142.5 | |||||
| Weight [kg] | 116 | |||||
| Appliance category | Destination countries |
| I3B/P(30) | CY, DK, EE, FI, FR, HR, HU, IT, LT, NL, NO, RO, SI, SE, TR |
| I3+(28-30/37) | BE, CH, CY, CZ, ES, FR, GB, GR, IE, IT, LT, PT |
| I3B/P(50) | AT, CH, DE |
| I3B/P(37) | PL |
| I2E+ | BE, FR |
| I2EK | NL |
| I2H(20) | AT, CH, CZ, DK, EE, ES, FI, GB, GR, HR, IE, IT, LT, LV, NO, PT, RO, SE, SI, SK, TR |
| I2E(20) | DE, PL, RO |
Purpose
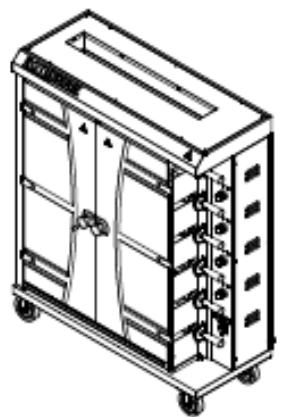
The product is designed to cook chicken efficiently using direct heat from gas flames, ensuring even cooking and enhanced flavors. It is ideal for barbecues and outdoor cooking events where quick heat-up and consistent temperatures are necessary for serving grilled chicken to a crowd.
The user is liable for any damage resulting from unintended use of the product.
Instructions for use

NOTE
- Please clean the machine and get rid of all industrial oil before using. Make sure all the plastic protection and packaging are removed before using.
- Handle all components with care to avoid accidental injury.
- When the machine is not in use, turn the machine off.
• Turn off the gas supply at the gas cylinder after use.
• Never move the machine while in operation or still hot. - Please fill water into the tray before using. Keep the tray always with water (the recommended amount of water is more than half of the water tray) when operating the machine.
• Use long-handled barbecue utensils and oven mitts to avoid burns and splatters. - Clean the machine often, preferably after each cookout.
- If you notice grease or other hot material dripping from the machine onto the valve or regulator, turn off the gas supply at once. Determine the cause, correct it, then clean and inspect the valve, hose, and regulator before continuing. Perform a leak test.
- Keep ventilation openings in the cylinder enclosure free and clear of debris.
- The regulator may make a humming or whistling noise during operation. This will not affect safety or use of the machine.
- If you have a problem with your machine, refer to the Troubleshooting Section; if you can't resolve the problem, please contact your supplier.

WARNING
Accessible parts may be very hot. Keep young children away.
Assembling tips

CAUTION
Ensure the machine is installed in a horizontal position and remains stable after installation. It must not shake during use.
Please read all instructions thoroughly before proceeding. Find a large, clean area in which to assemble your machine. Refer to the assembly diagram as necessary.
- The machine should be installed either alone or with other products according to the prescribed scope.
- Ensure all parts are secure and that the unit is in working order before operation.
- When positioning the machine, ensure the back is at least 50 cm away from the wall, and place it in a well-ventilated area to avoid fire hazards.
- Do not place flammable items such as washcloths on the machine, as this could cause a fire.
- Use the specified gas only; substituting different gases could be dangerous.
- To perform a leak test on your gas connections, mix a 50/50 solution of soap and water and brush it around the regulator and other gas connections. If growing bubbles appear, there is a leak. Re-tighten the connections. If leaks cannot be stopped, do not attempt to repair them yourself. DO NOT TEST FOR LEAKS WITH A FLAME!
- If a gas leak is detected, immediately shut down the valve. Open windows to enhance ventilation, and do not turn on the power switch or ignite any flames. The machine should only be used again after repairs have been made.
• Always shut down the machine valve after use.

CAUTION
If ignition does not occur within 5 seconds, turn the burner controls OFF. Wait a few seconds and then repeat the lighting procedure. If the burner fails to ignite while the valve is open, gas will continue to flow out of the burner, posing a risk of accidental ignition and potential injury.
Valve Check
Important: To check the valve, first push in the knob and release. The knob should spring back. If the knob does not spring back, replace the valve assembly before using the machine.
Turn the knob to the low position and then back to the OFF position. The valve should turn smoothly.
Gas Connection
When connecting the unit to a gas supply pipe or gas cylinder, ensure a gas shut-off valve is installed upstream of the unit within easy reach of the operator for safety and accessibility.
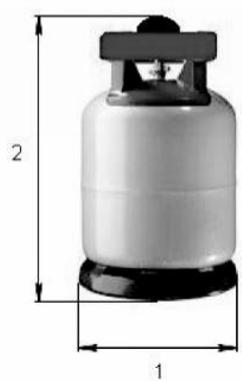
If using a gas cylinder, select one that meets local standards. The maximum diameter should be 40 cm, and the maximum length should be 1.2 meters. Store the cylinder in a dry, cool position.
The type of regulating valve used must comply with the relevant EN (European Norm) standard.


Example of schemes for dimensions of gas cylinders
1- Maximum diameter or breadth
2- Maximum height (regulator included)
- Verify that the local available gas matches the type indicated on the appliance's nameplate.
- Connect the unit to a suitable gas source using an iron pipe. Ensure there are no signs of gas leakage. Use pipe sealant around the joints to secure them.
- After connecting, use a soap water solution to check for gas leakage. If leakage is detected, apply pipe sealant around the leaking point.
- Ensure the position of the flexible pipe is adjusted to be free from torsion.
- Consult the local gas supplier about the local gas pressure. If the gas pressure deviates by more than 10% from the rated gas pressure, install a gas release valve upstream of the unit to stabilize the gas pressure.
- Ensure that the gas pressure conforms to the data indicated on the appliance's plate. The pressure must be measured at the pressure test point, considering the Wobbe index of the gas used.
- When installing the appliance, ensure that the gas flexible hose does not exceed 1.5 meters.
- The used gas supply tube or hose must comply with national requirements. Periodically inspect the gas tube or hose and replace it timely if necessary.
- Keep the appliance away from flammable materials during use.
• Take precautions when replacing gas cylinders: always remove cylinders away from any source of fire.
Operating instructions
Lighting the Machine

NOTE
Do not lean over the machine while lighting. Read all instructions before lighting.
- Press down the knob and rotate it counterclockwise from "OFF" to about 90 degrees. Hold this position for about 5 seconds. This step helps to exhaust the air in the burner. Do not release the pressing knob during this process.
- Then rotate the knob back to "OFF" position, and repeat rotating the knob counterclockwise from "OFF" until you hear the sound "TA", at which point the burners will be ignited. If not working, repeat the above operations. If the machine has been stopped for a long time or it is the first use, it may take longer to light, which is normal.
- When a low flame is working, rotate the knob counterclockwise to increase the flame to a higher setting. If a lower flame is needed, rotate the knob clockwise. Adjust the temperature to your desired level. Please adjust the valve control knob and fan controller according to the gas quality, until the burners are red throughout, with no visible flame.
- After use, rotate the knob from the maximum or minimum setting to the "OFF" position.
- If the machine will not be used for some time, please cut off the gas supply valve.
Operation
- To set up the grilled chicken forks, first turn the screws counterclockwise to loosen them, then place the chickens onto the forks and adjust to the suitable position. Secure the forks by turning the screws clockwise. Reinsert the rods into the machine, adjust their position as necessary, and ensure they are securely locked in place. It is important to keep in mind that the maximum load per rod should not exceed 6-8 kg to prevent any damage.


CAUTION
- Be aware that the forks are sharp. It is advisable to wear protective gloves when handling them to prevent injuries.
- The rod will become heavy once it is loaded with chickens. Always use both hands when inserting or removing the rod from the machine to ensure stability and avoid accidents.
- Ensure that the voltage matches the specifications on the machine's nameplate before connecting to power. Install a power switch, fuse, and breaker for the machine to ensure safety. Once connected, follow the steps mentioned previously to light the machine. The burners will ignite, and the temperature of the machine will begin to increase. Turn on the motor, fan, and light switches to start the operation. The rods will then begin to rotate, and the chickens will start to roast.

1

2

3
1- Motor On-off Switch
2- Fan On-off Switch
3- Light On-off Switch
- The rotating rod is designed for the roasted chickens. It can be raised for cleaning or positioning the chickens. Ensure that the chickens are placed in the middle of the fork to ensure even roasting. As the rod rotates, the chickens will also rotate, providing uniform cooking.
- Fill the oil tray with water and maintain a certain level at all times to prevent drying out. This helps in collecting drippings and minimizes the risk of flare-ups from the oil.
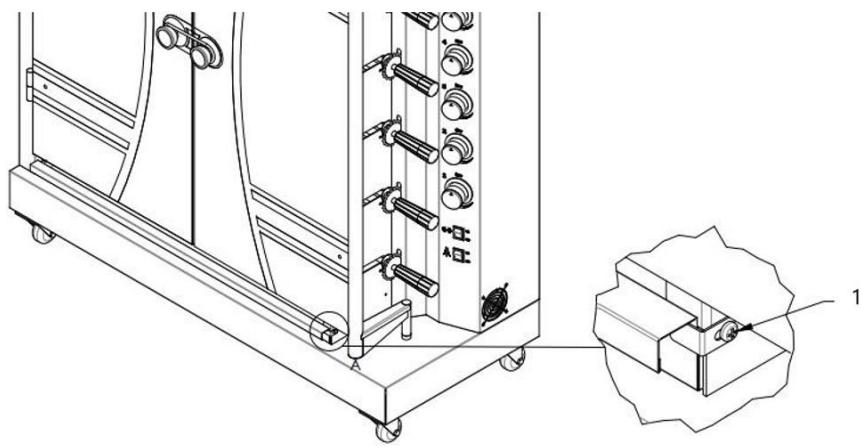
- To remove the water tray, please first loosen the screw on the water tray's fixed plate. Once the screw is loosened, you can then take out the water tray.
Cleaning and Maintenance
- To prevent accidents, always unplug the power supply cord, cut off the power switch, and disconnect any gas supply if the machine has not been used for a long time. All service and maintenance operations should be performed only after power and gas supplies have been cut off. If the machine has issues, do not attempt to disassemble it; instead, send it to your supplier for repair.
- It is recommended to check and tighten metal fittings annually.
- Clean the machine regularly between uses and particularly after extended periods of storage.
- Use a soft fabric for cleaning the machine. If needed, use a neutral cleaning agent. Avoid using sharp metal objects on the surface of the heating plate exterior.
- Frequently clean out oil leftovers under the oil tray.
- Ensure that the machine and its components are sufficiently cool before cleaning. Never handle hot parts with unprotected hands.
- Note that above 90% of the machine is made of metal (stainless steel, iron, aluminum, electroplating metal plate), which can be recycled after processing at a specified treatment plant. Please dispose of these materials responsibly and not indiscriminately.
Transportation and Storage
- Handle the machine with care during transportation to prevent heavy vibrations.
- To extend and maintain the life and condition of your machine, avoid storing the packaged equipment in open-air for long periods. Store it in a facility with good air circulation and non-corrosive, dry conditions. If outdoor storage is necessary, ensure waterproof facilities are used.
- When a gas bottle is connected to the machine, store it outdoors in a well-ventilated space and out of reach of children. If storing the machine indoors, ensure the gas bottle is turned off and disconnected. Always store the gas bottle outside, away from children, and in a dry, well-ventilated area, clear of any heat sources or ignition points.
- Cover the burners with aluminum foil to prevent insects or other debris from collecting in the burner holes.
- Do not store the machine upside-down.
Troubleshooting
| Problem | Possible Cause | Solution |
| Burner will not light but using the piezoelectric ignition system | Faulty regulator.Obstructions in the burner.Obstructions in gas jets or gas hose.Electrode is damaged/faulty igniter.Empty LP bottle. | Have the regulator checked or replaced.Clean burner.Clean jets and gas hose.Change electrode and wire or change igniter.Use a new LP bottle. |
| Burner will not light with a match | Faulty regulator.Obstructions in burner.Obstructions in gas jets or gas hose.Empty LP bottle. | Have the regulator checked or replaced.Clean burner.Clean jets and gas hose.Use a new LP bottle. |
| Fire in burner tube has a low flame or flashback (a hissing or roaring noise may be heard) | Obstructions in burner.Obstructions in gas jets or gas hose.Windy conditions. | Clean burner.Clean jets and gas hose.Use grill in a more sheltered position. |

NOTE
- The above troubleshooting guide is for reference only. If any faults occur, stop using the machine immediately and inform professionals to inspect and maintain it.
- Safety first! Always ensure that both gas and electrical supplies are cut off before carrying out any maintenance.
Parts
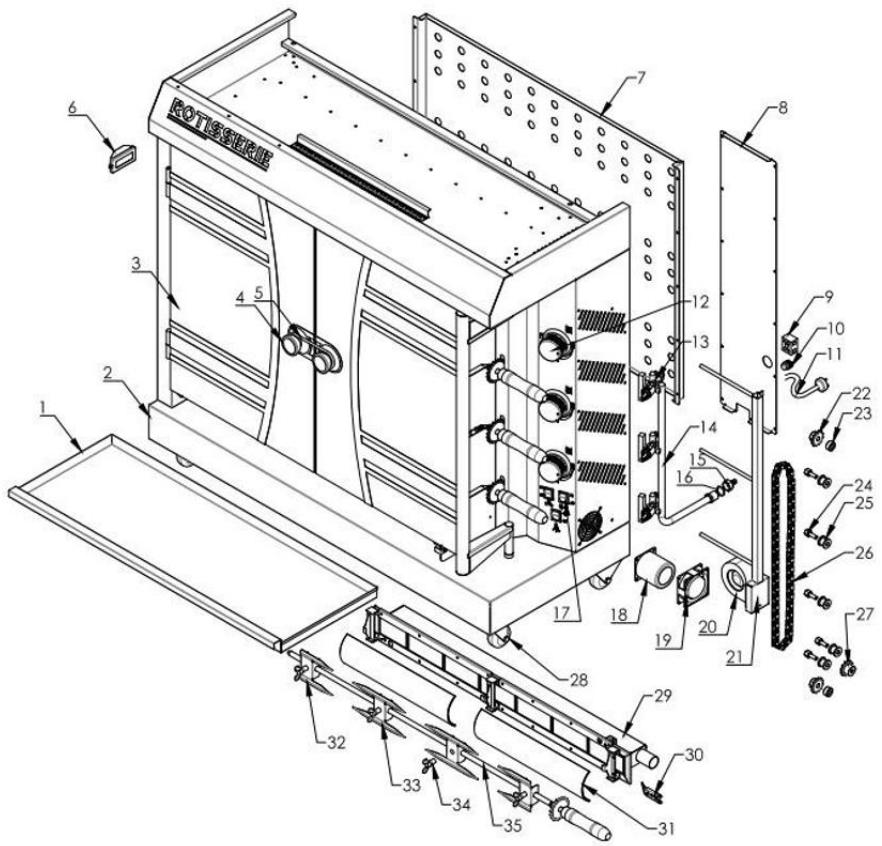
| No. | Name |
| 1 | Water / Oil Tray |
| 2 | Body |
| 3 | Glass Door |
| 4 | Door Handle |
| 5 | Handle Lock |
| 6 | Light |
| 7 | Back Cover Plate of Body |
| 8 | Back Cover Plate of Electrical Control Box |
| 9 | Magnetic terminal |
| 10 | Head of Power Cord |
| 11 | Power Cord |
| 12 | Knob |
| 13 | Valve |
| 14 | Gas Pipe |
| 15 | Copper Connection |
| 16 | Rubber Gasket |
| 17 | On-off Switch |
| 18 | Motor |
| 19 | Fan 1 |
| 20 | Fan 2 |
| 21 | Ventilation Assy |
| 22 | Sprocket 1 |
| 23 | Sprocket Spacer |
| 24 | Center Shaft Sleeve of Transition Wheel |
| 25 | Transition Wheel |
| 26 | Chain |
| 27 | Sprocket 2 |
| 28 | Castor |
| 29 | Burner |
| 30 | Ignition Needle |
| 31 | Glasses of Burner |
| 32 | Fork 1 |
| 33 | Fork 2 |
| 34 | Wing Screw |
| 35 | Rotating Rod |
Electrical schematics

NOTE
- Ensure that the circuit is checked properly. The installer should be responsible for the appliance's installation.
- Always cut the power off and allow the appliance to cool down completely before attempting to dismantle it.

1- XT: Terminal Block
2- QS1: On-off Switch 1
3- QS2: On-off Switch 2
4- QS3: On-off Switch 3
5- WH: Light
6- M1: Air Blower
7- M2: Cooling Fan
8- M3: Motor
Dimension drawings




UWAGA


POZOR



ATTENTION



ATTENZIONE


PRECAUCIÓN


FIGYELMEZTETÉS



FORSIGTIG


VAROITUS


LET OP


FORSIKTIG
| Nr. | Navn |
| 1 | Vann-/oljebrett |
| 2 | Kanne |
| 3 | Glassdør |
| 4 | Dørhåndtak |
| 5 | Håndtakslås |
| 6 | Lys |
| 7 | Bakdekselplate på kroppen |
| 8 | Bakdekselplate på elektrisk kontrollboks |
| 9 | Magnetisk terminal |
| 10 | Strømledningshode |
| 11 | Strømledning |
| 12 | Knott |
| 13 | Ventil |
| 14 | Gassrør |
| 15 | Kobberforbindelse |
| 16 | Gummipakning |
| 17 | Av/på-bryter |
| 18 | Motor |
| 19 | Vifte 1 |
| 20 | Vifte 2 |
| 21 | Ventilasjonsenhet |
| 22 | Tannhjul 1 |
| 23 | Tannhjulavstandsstykke |
| 24 | Senterakselhylse på overgangshjul |
| 25 | Overgangshjul |
| 26 | Kjetting |
| 27 | Tannhjul 2 |
| 28 | Castor |
| 29 | Brenner |
| 30 | Tennnål |
| 31 | Glass med brenner |
| 32 | Gaffel 1 |
| 33 | Gaffel 2 |
| 34 | Vingeskrue |
| 35 | Roterende stang |
Elektriske skjemaer

NOTE


WARNING


CUIDADO



POZOR



ВНИМАНИЕ


ΠΡΟΣΟΧΗ


OPREZ
- Da biste uklonili posudu za vodu, prvo otpustite vijak na fiksnoj ploči posude za vodu. Nakon što se vijak otpusti, možete izvaditi posudu za vodu.


ATSARGIAI


ATENTIE


Primeri shem za dimenzije plinskih jeklenk

POZOR

For the disposal of the device please consider and act according to the national and local rules and regulations.
CONTACT
expondo Polska sp. z o.o. sp. k.





- VORSICHT
- PURPOSE
- INSTRUCTIONS FOR USE
- NOTE
- WARNING
- ASSEMBLING TIPS
- CAUTION
- VALVE CHECK
- GAS CONNECTION
- MAXIMUM DIAMETER OR BREADTH
- MAXIMUM HEIGHT (REGULATOR INCLUDED)
- OPERATING INSTRUCTIONS
- LIGHTING THE MACHINE
- OPERATION
- CLEANING AND MAINTENANCE
- TRANSPORTATION AND STORAGE
- PARTS
- ELECTRICAL SCHEMATICS
- DIMENSION DRAWINGS
- UWAGA
- POZOR
- ATTENTION
- ATTENZIONE
- PRECAUCIÓN
- FIGYELMEZTETÉS
- FORSIGTIG
- VAROITUS
- LET OP
- FORSIKTIG
- ELEKTRISKE SKJEMAER
- CUIDADO
- ВНИМАНИЕ
- ΠΡΟΣΟΧΗ
- OPREZ
- ATSARGIAI
- ATENTIE
- CONTACT
Brand : Royal Catering
Model : RCGCG-36
Category : Washing machine