RCAM-250 - Washing machine Royal Catering - Free user manual and instructions
Find the device manual for free RCAM-250 Royal Catering in PDF.



User questions about RCAM-250 Royal Catering
0 question about this device. Answer the ones you know or ask your own.
Ask a new question about this device
Download the instructions for your Washing machine in PDF format for free! Find your manual RCAM-250 - Royal Catering and take your electronic device back in hand. On this page are published all the documents necessary for the use of your device. RCAM-250 by Royal Catering.
USER MANUAL RCAM-250 Royal Catering
| DE | Produktname | Aufschnittmaschine |
| EN | Product name | Electric meat slicer |
| PL | Nazwa produktu | Krajalnica elektryczna |
| CZ | Název výrobku | Elektrický kráječ masa |
| FR | Nom du produit | Trancheuse électrique |
| IT | Nome del prodotto | Affettatrice elettrica |
| ES | Nombre del producto | Cortadora de fiambre eléctrica |
| HU | Termék neve | Szeletelőgép |
| DA | Produktnavn | Elektrisk skiveskærer |
| FI | Tuotteen nimi | Sähkökone leikkuuri |
| NL | Productnaam | Elektrische snijmachine |
| NO | Produktnavn | Elektrisk skiveskiver |
| SE | Produktnamn | Elektrisk skivskärare |
| PT | Nome do produto | Fatiador elétrico |
| SK | Názov produktu | Elektrický krajací stroj |
| BG | Име на продукта | Електрическа рязачка за месо |
| EL | 'Оvoμα προϊόντος | Нлектрикός κοπτήρας κρέατος |
| HR | Naziv proizvoda | Električni rezač mesa |
| LT | Produkto pavadinimas | Elektroninė mésos pjaustyklé |
| RO | Numele produsului | Felier electric |
| SL | Ime izdelka | Električni rezalnik |
| DE Modell | EN Product model | PL Model produktu | CZ Model výrobku | FR Modèle | IT Modello | ES Modelo | HU Modell | DA Model | FI Tuotteen malli | NL Productmodel | NO Produktmodell | SE Produktmodell | PT Modelo do produto | SK Model | BG Модел на продукт | EL Movtělo προϊόντος | HR Model proizvoda | LT: Gaminio modelis | RO: Model de produs | SL: Model izdelka | RCAM-220PRO RCAM-250PRO RCAM-300PRO RCAM-250EXPERT RCAM-300EXPERT RCAM-250 RCAM-300 | |
| DE Hersteller | EN Manufacturer | PL Producent | CZ Výrobce | FR Fabricant | IT Produttore | ES Fabricante | HU Termelő | DA Producent | FI Valmistaja | NL Producent | NO Produsent | SE Tillverkare | PT Fabricante | SK Výrobca | BG Производител | EL Κατασκευαστής | HR Proizvođač | LT Gamintojas | RO Producător | SL Proizvajalec | expondo Polska sp. z o.o. sp. k. | |
| DE Anschrift des Herstellers | EN Manufacturer Address | PL Adres producenta | CZ Adresa výrobce | FR Adresse du fabricant | IT Indirizzo del produttore | ES Dirección del fabricante | HU A gyártó címe | DA Producentens adresse | FI Valmistajan osoite | NL Adres producent | NO Produsentens adresse | SE Tillverkarens adress | PT Endereço do fabricante | SK Adresa výrobcu | BG Адрес на производителя | EL: Διεύθυνοη κατασκευαστή | HR Adresa proizvođača | LT Gamintojo adresas | RO Adresa producătorului | SL Naslov proizvajalca | ul. Nowy Kisielin – Innowacyjna 7, 66-002 Zielona Góra | Poland, EU | |

1) Anspitzergruppe
2) Klingenschutz
3) Klingenabdeckung
1- Klinge
2- Klingenhülse
4.6.6. Spitzer
AUFMERKSAMKEIT! VERWENDEN SIE ZUM REINIGEN DER ABNEHMBAREN ELEMENTE NIEMALS DIE SPÜLMASCHINE.
This User Manual has been translated using machine translation. We have made every effort to ensure the translation is accurate, but please note that automated translations are not perfect and are not meant to replace human translators. The official version of the User Manual is in English. Any differences between the translated version and the original English are not legally binding. If you have any questions about the accuracy of the translation, please refer to the English version, which is the official reference. More language versions are available upon request via info@expondo.com.
1. Technical data
Table 1: Technical data of the product (4 models)
| Parameter description | Parameter value | |||
| Product name | Electric meat slicer | |||
| Model | RCAM-220PRO | RCAM-250PRO | RCAM-300PRO | RCAM-250EXPERT |
| Rated voltage [V~]/Frequency [Hz] | 230/50 | |||
| Rated power [W] | 120 | 180 | 280 | 180 |
| Diameter of the blade [cm] | 22 | 25 | 30 | 25 |
| Max. slicing width [mm] | 160 | 180 | 200 | 180 |
| Max. slicing height [mm] | 130 | 130 | 180 | 130 |
| Dimensions of the carriage [mm] | 180 | 185 | 205 | 185 |
| Slicing thickness [mm] | 0 – 12 | 0 – 12 | 0 – 15 | 0 – 12 |
| Weight [kg] | 12 | 18 | 23 | 21 |
Table 2: Technical data of the product (3 models)
| Parameter description | Parameter value | ||
| Product name | Electric meat slicer | ||
| Model | RCAM-300EXPERT | RCAM-250 | RCAM-300 |
| Rated voltage [V~]/Frequency [Hz] | 230/50 | ||
| Rated power [W] | 280 | 150 | 250 |
| Diameter of the blade [cm] | 30 | 25 | 30 |
| Max. slicing width [mm] | 200 | 180 | 200 |
| Max. slicing height [mm] | 180 | 130 | 180 |
| Dimensions of the carriage [mm] | 205 | 180 | 200 |
| Slicing thickness [mm] | 0 – 15 | 0 – 12 | 0 – 15 |
| Weight [kg] | 24 | 16 | 21 |
2. General description
The user manual is designed to assist in the safe and trouble-free use of the device. The product is designed and manufactured in accordance with strict technical guidelines, using state-of-the-art technologies and components. Additionally, it is produced in compliance with the most stringent quality standards.
DO NOT USE THE DEVICE UNLESS YOU HAVE THOROUGHLY READ AND UNDERSTOOD THIS USER MANUAL.
To increase the product life of the device and to ensure trouble-free operation, use it in accordance with this user manual and regularly perform maintenance tasks. The technical data and specifications in this user manual are up to date. The manufacturer reserves the right to make changes associated with quality improvement. The device is designed to reduce noise emission risks to a minimum, taking into account technological progress and noise reduction opportunities.
2.1. Legend
| Icon | Description |
 | The product satisfies the relevant safety standards. |
 | Read instructions before use. |
 | The product must be recycled. |
 | WARNING! or CAUTION! or REMEMBER! Applicable to the given situation.(general warning sign) |
 | ATTENTION! Electric shock warning! |
 | ATTENTION! Rotating parts, entanglement hazard! |
 | Class I protection device. |
 | Only use indoors. |

PLEASE NOTE! DRAWINGS IN THIS MANUAL ARE FOR ILLUSTRATION PURPOSES ONLY AND IN SOME DETAILS MAY DIFFER FROM THE ACTUAL PRODUCT.
3. Usage safety

ATTENTION! READ ALL SAFETY WARNINGS AND ALL INSTRUCTIONS. FAILURE TO FOLLOW THE WARNINGS AND INSTRUCTIONS MAY RESULT IN ELECTRIC SHOCK, FIRE AND/OR SERIOUS INJURY OR EVEN DEATH.
The terms "device" or "product" are used in the warnings and instructions to refer to:
Electric meat slicer
Do not use in very humid environments or in the direct vicinity of water tanks. Prevent the device from getting wet. Risk of electric shock!
Do not cover the air inlets/outlets. When in use, do not put your hands or other items inside the device! Do not exceed the maximum permissible operating pressure.
3.1. Electrical safety
a) The plug must fit the socket. Do not modify the plug in any way. Using original plugs and matching sockets reduces the risk of electric shock.
b) Avoid touching earthed elements such as pipes, heaters, boilers and refrigerators. There is an increased risk of electric shock if the earthed device is exposed to rain, comes into direct contact with a wet surface or is operating in a damp environment. Water getting into the device increases the risk of damage to the device and of electric shock.
c) Use the cable only for its designated use. Never use it to carry the device or to pull the plug out of a socket. Keep the cable away from heat sources, oil, sharp edges or moving parts. Damaged or tangled cables increase the risk of electric shock.
d) If using the device in a damp environment cannot be avoided, a residual current device (RCD) should be applied. The use of an RCD reduces the risk of electric shock.
3.2. Safety in the workplace
a) Make sure the workplace is clean and well lit. A messy or poorly lit workplace may lead to accidents. Try to think ahead, observe what is going on and use common sense when working with the device.
b) Do not use the device in a potentially explosive environment, for example in the presence of flammable liquids, gases or dust. The device generates sparks which may ignite dust or fumes.
c) If you discover damage or irregular operation, immediately switch the device off and report it to a supervisor without delay.
d) If you are unsure about whether the device is operating correctly or if you find damage, please contact the manufacturer's service centre.
e) Only the manufacturer's service centre may make repairs to the device. Do not attempt to make repairs yourself!
f) In case of fire, use a powder or carbon dioxide ( CO2 ) fire extinguisher (one intended for use on live electrical devices) to put it out.
g) Children or unauthorised persons are forbidden to enter a work station. A distraction may result in loss of control over the device.
h) Use the device in a well-ventilated space.
i) The device produces dust and debris during operation. It is important to protect bystanders from their harmful effects.
j) Use the “EMERGENCY STOP” if there is a risk of injury or death, accident or damage.

REMEMBER! WHEN USING THE DEVICE, PROTECT CHILDREN AND OTHER BYSTANDERS.
3.3. Personal safety
a) Do not use the device when tired, ill or under the influence of alcohol, narcotics or medication which can significantly impair the ability to operate the device.
b) When working with the device, use common sense and stay alert. Temporary loss of concentration while using the device may lead to serious injuries.
c) Use personal protective equipment as required for working with the device, specified in section 1 “Legend”. The use of correct and approved personal protective equipment reduces the risk of injury.
d) To prevent the device from accidentally switching on, make sure the switch is on the OFF position before connecting to a power source.
e) Do not overestimate your abilities. When using the device, keep your balance and remain stable at all times. This will ensure better control over the device in unexpected situations.
f) Do not wear loose clothing or jewellery. Keep hair, clothes and gloves away from moving parts. Loose clothing, jewellery or long hair may get caught in moving parts.
g) Remove all adjusting tools or spanners before turning the device on. A tool or spanner left in the revolving part of the device may cause injury.
3.4. Safe device use
a) Do not overload the device. Use the appropriate tools for the given task. A correctly-selected device will perform the task for which it was designed better and in a safer manner.
b) Do not use the device if the “ON/OFF” switch does not function properly (does not switch the device on and off). Devices which cannot be switched on and off using the “ON/OFF” switch are hazardous, should not be operated and must be repaired.
c) Make sure the plug is disconnected from the socket before attempting any adjustments, accessory replacements or before putting the device aside. Such precautions will reduce the risk of accidentally activating the device.
d) When not in use, store in a safe place, away from children and people not familiar with the device who have not read the user manual. The device may pose a hazard in the hands of inexperienced users.
e) Keep the device in perfect technical condition. Before each use check for general damage, especially check moving components for cracked parts or elements, and for any other conditions which may impact the safe operation of the device. If damage is discovered, hand over the device for repair before use.
f) Keep the device out of the reach of children.
g) Device repair or maintenance should be carried out by qualified persons, only using original spare parts. This will ensure safe use.
h) To ensure the operational integrity of the device, do not remove factory-fitted guards and do not loosen any screws.
i) When transporting and handling the device between the warehouse and the destination, observe the occupational health and safety principles for manual transport operations which apply in the country where the device will be used.
j) Avoid situations where the device stops working during use due to excessive loading. This may result in overheating of the drive elements and damage to the device.
k) Do not touch articulated parts or accessories unless the device has been disconnected from the power source.
I) When in use, keep your hands away from the blades.
m) WARNING! Danger of loose clothing becoming tangled up in the machine, which might lead to injuries.
n) In order to prevent injuries, always pay due care when carrying out maintenance on the device, and in particular when handling the cutting disks.

ATTENTION! DESPITE THE SAFE DESIGN OF THE DEVICE AND ITS PROTECTIVE FEATURES, AND DESPITE THE USE OF ADDITIONAL ELEMENTS PROTECTING THE OPERATOR, THERE IS STILL A SLIGHT RISK OF ACCIDENT OR INJURY WHEN USING THE DEVICE. STAY ALERT AND USE COMMON SENSE WHEN USING THE DEVICE.
4. Use guidelines
The product is exclusively designed to slice common pieces of meat, cheese and sausage. It is recommended to use Teflon knives in order to slice cheese (only the kinds of cheese is suitable for cutting).
The product is not adapted to:
- Slice food at a temperature under -6°C
- Slice the bony meat
The user is liable for any damage resulting from unintended use of the device.
4.1. Device description
Figure 1: 9 key parts of the product
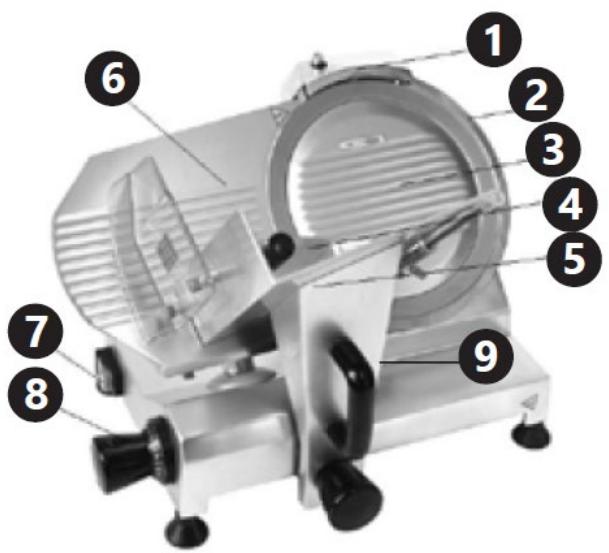
1) Sharpener group
2) Blade protection
3) Blade cover
4) Food pusher handle
5) Carriage / Sliding food tray
6) Movable bulk
7) On/Off switch
8) Slice thickness regulation knob
9) Carriage locking knob
4.2. Preparing for use
4.2.1. Appliance location
The temperature of environment must not be higher than 40° C and the relative humidity should be less than 85%. Ensure good ventilation in the room in which the device is being used. There should be at least 10 cm distance between each side of the device and the wall or other objects. The device should always be used when positioned on an even, stable, clean, fireproof and dry
surface, and be out of the reach of children and persons with limited mental and sensory functions. Position the device such that you always have access to the power plug. The power cord connected to the appliance must be properly grounded and correspond to the technical details on the product label.
4.3. Assembling the device

NOTICE! THE MACHINE SHOULD BE INSTALLED ON A STABLE AND RESISTANT SURFACE. ON/OFF SWITCH (7) SHOULD BE IN FRONT OF THE OPERATOR.
4.3.1. Assembly instructions of the blade
1) Install the blade for the product.
Put the blade in the position for installation, and move the blade to ensure the three holes on the blade align with the three threaded holes.
Figure 2: Assembly step 1 - Install the blade for the product

1- Blade
2- Blade sleeve
2) Fix with screws.
Insert three screws and tighten them.
Figure 3: Assembly step 2 - Fix with screws
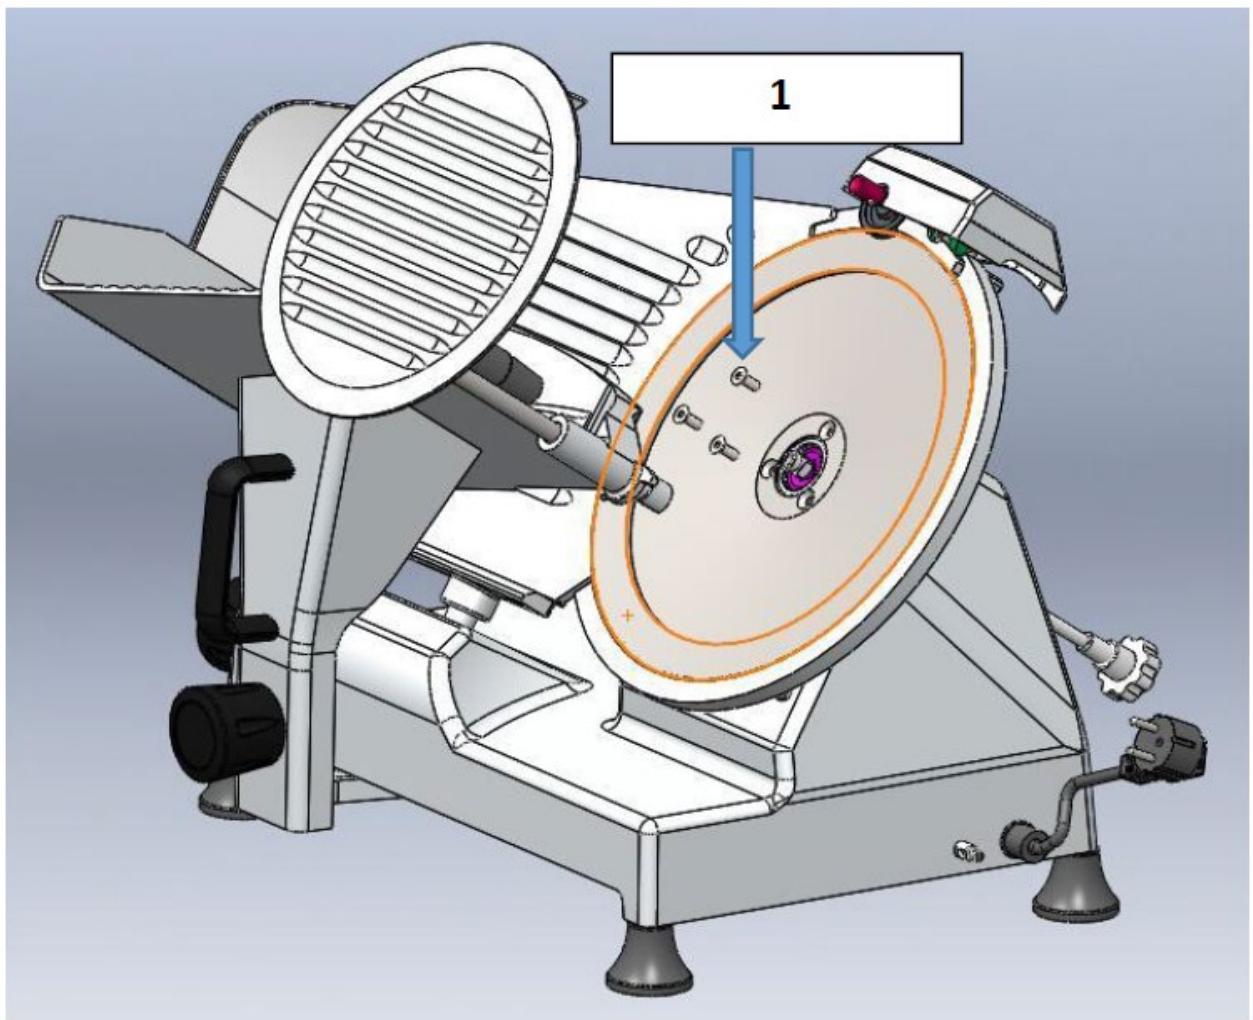
1- Fix with screws
3) Fix the blade plate.
Place the blade plate right in the middle of the blade and press it tightly, making sure to align the lines on the blade plate properly.
Figure 4: Assembly step 3 - Fix the blade plate

1- Fix the blade plate
4) Assemble the clamping rod.
Insert the clamping rod into the blade sleeve and screw the bottom studs into the rear threaded holes of the blade plate at the same time.
Figure 5: Assembly step 4 - Assemble the clamping rod

1- Assemble the clamping rod
2- Blade sleeve
4.4. Device use
4.4.1. Operation instructions
1) Make sure that the power supply corresponds to the requirements of the device (see technical details or technical plate).
2) Turn the device on. The knife starts to rotate counterclockwise. Let it rotate for 2-3 minutes to check if everything works normally.
3) Adjust the slice thickness with the regulator (8). To do so, turn the knob counterclockwise.
4) Fix the carriage with the locking knob (9) so that it touches the movable bulk (6). To fix the carriage, turn the locking knob counterclockwise.
5) Place the food you want to slice on the carriage and hold it with the pusher handle (4). Slide the carriage with the handle from one side to the other in a regular way to slice the food.
6) As soon as you are done with your work, slide the carriage back to its start position on the left. Turn the regulation knob (8) and the locking knob (9) back to zero.
7) Then, you can remove the food from the carriage.

NOTICE!
- Never use the device for more than 15 minutes to avoid overheating the engine. After a short break, the device can be turned on and used again.
- If the engine stops working (jammed) while cutting dry products (i.e., bread), the carriage must be moved back to avoid engine overheating; the cutting operation can be resumed afterwards.
4.4.2. Knife sharpening
If the surface of the sliced product becomes frayed or coarse and the cutting operations become cumbersome, the knife is to be sharpened.
- Pull the plug from the socket and before sharpening clean the knife edges with use of alcohol in order to degrease it.
- Loosen the fixing screw (a) of the sharpener (14) on the back side of the device. (Fig. 6).
Figure 6: The illustration of fixing screw (a) and sharpener (14)
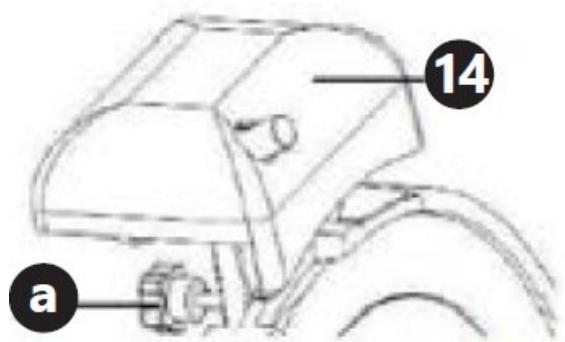
- Remove the sharpener (14) and turn it by 180 ° .
- Put the sharpener (14) into the special rail and tighten the fixing screw (a) again.
- Make sure that the surface of the sharpener is close to the edge of the knife. Correct the positioning if required.
- Connect the device to the grounded single socket and start it with use of white START button.
- Hold the depressed button (b, fig. 7) of the sharpener on the back of the sharpener (14) and leave the device turned on for approx. 30-40 seconds, until the burr appears on the knife.
Figure 7: The illustration of fixing screw (a), button on the back (b), button in the front (c) and sharpener (14)

- Then hold button (c) in the front and button (b) on the back of the sharpener simultaneously for approx. 3-4 seconds to sharpen the knife and remove the burr. Release both buttons simultaneously.

CAUTION!
- Do not exceed the above-mentioned sharpening time of 3-4 seconds so as not to cause the so-called “zero grind”.
- Stop the device and check whether the knife is sharpened enough. Continue until the desired grind is reached.

WARNING! POSSIBLE CUTS DANGER! THE KNIFE IS VERY SHARP, SO WHEN CHECKING THE ID, ONE MUST BE VERY CAUTIOUS. ALWAYS USE PROTECTIVE GLOVES!
- After sharpening, clean the knife and the sharpener elements. In order to ensure it will operate correctly, keep the sharpener in good condition.
- Put the sharpener back to its initial position. Follow the installation instructions in reverse order.

CAUTION!
- Injury danger! Only start the device with the sharpener assembled correctly! The sharpener is used as the knife cover in the upper part of the device.
- In order to keep the knife in the optimum condition and maintain safety it should be replaced, when its height is reduced by approx. 5-7 mm.
4.5. Wiring diagram
Figure 8: Wiring diagram of the product

4.6. Cleaning and maintenance
4.6.1. General instructions
- Clean the device every day or more frequently when required.
- Unplug the device before the cleaning operation (remove the plug!) and check whether the slice thickness adjustment (8) is set to "0".
- Move the carriage (7) towards the slice thickness adjustment (8) (fig. 9).
Figure 9: The illustration of parts 4-8 & 13

- The elements having contact with food products should be cleaned especially thoroughly with use of neutral cleaning agents.
- Clean the device, following the instructions for the individual subassemblies below.
4.6.2. Carriage and pusher handle
- In order to clean it, remove the carriage (7) with the pusher handle (4). To do this, loosen the carriage adjustment (6), rotating it counter-clockwise, and remove the carriage itself (7) (fig. 9).
- Wash the carriage (7) with cover (13), pusher (4) and carriage tray (5) using warm water, soft cloth and a neutral cleaning agent. Rinse with clean water to remove the cleaning agent residuals.
4.6.3. Knife and knife cover
WARNING! POSSIBLE CUTS DANGER! THE KNIFE IS VERY SHARP; UNDER NO CIRCUMSTANCES MAY ONE TOUCH THE KNIFE BLADE WITH BARE HANDS! WEAR METAL GLOVES DURING KNIFE CLEANING TO AVOID POSSIBLE CUTS.
- Remove the sharpener from the device. (Fig. 3)
- In order to remove the knife cover (3) for cleaning loosen the fixing screw (d) on the back side of the device (fig. 10) and push it towards the knife cover. Remove the knife cover.
Figure 10: The illustration of fixing screw (d)
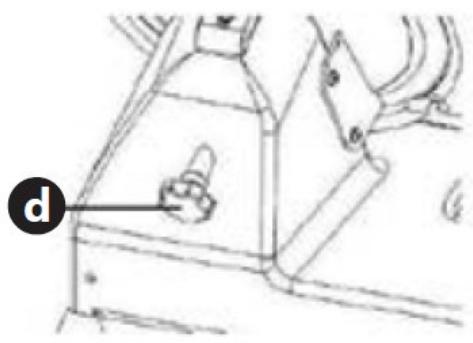
- In order to remove the knife, loosen three adjustment screws (e) with the use of an appropriate screwdriver (fig. 11) and carefully take the knife away.
Figure 11: The illustration of adjustment screws (e), knife (1) and knife protective ring (2)

- Wash the knife cover and knife (1) with warm water and neutral cleaning agents. Use the sponge, supplied cleaning brush or soft cloth. Rinse in clean water.
- Wash the knife protective ring (2) in warm water and a small amount of cleaning agent. Rinse in clean water.
- Leave the washed parts for drying or wipe them with a dry cloth.
- After cleaning, install the knife (1) with the use of three adjustment screws (e), maintaining correct stance, and the knife cover with the use of screw (d).
4.6.4. Knife protecting device
- Loosen the screws (f) of the protective device (g) on the back of the slicer, using an appropriate screwdriver (fig. 12).
Figure 12: The illustration of the screws (f) and the protective device (g)

- Wash the protective device (g) in warm water with neutral cleaning agent. Rinse in clean water. After cleaning, dry it completely.
• Reinstall the protective device (g) on the slicer and the tighten screws.
4.6.5. Slice tray and housing
- Wash the slice tray (11) and housing with a moist, soft cloth and the neutral cleaning agent; dry completely after cleaning (fig. 13).
Figure 13: The illustration of the slice tray (11)

4.6.6. Sharpener
- Remove the sharpener as a whole from the device.
- After sharpening, clean the sharpener elements (h) with the cleaning brush soaked in alcohol (fig. 14).
Figure 14: The illustration of the sharpener elements (h)

ATTENTION! NEVER USE THE DISHWASHING MACHINE FOR CLEANING THE REMOVABLE ELEMENTS.
• Never use chemical or corrosive cleaning agents.
• In order to avoid rust, never clean the device with AkoPads or a similar, or a wire washcloth.
- Always use a soft cloth and never use coarse cleaning agents that could damage or scratch the surface of the device.
• After cleaning operations, wipe and polish the device with a dry cloth.
4.6.7. Maintenance instructions
1) Maintenance of the knife/blade.
a) Please watch up to dry the knife properly after cleaning.
b) Grease regularly the blade with adapted grease.
c) Sharpen the blade regularly.
2) Greasing the movable bulk.
a) Push the carriage on the side and grease the surfaces with a soft cloth. Please watch up to grease the pattern.
b) We recommend you grease the device once a week.
3) Greasing the axle.
a) The carriage is to be greased regularly with a natural technical grease. In order to do so, put the slicer on its side and grease both ends of the carriage axle (i) (fig. 15).
Figure 15: The illustration of the carriage axle (i)

b) Move the carriage forward and backward in order to distribute the grease evenly. Remove the excess grease with a cloth.
4) Greasing the sharpener.
a) Make sure that the sharpener can rotate properly.
b) Grease regularly the axle of the sharpener.
4.6.8. Disposing of used devices
Do not dispose of this device in municipal waste systems. Hand it over to an electric and electrical device recycling and collection point. Check the symbol on the product, instruction manual and packaging. The plastics used to construct the device can be recycled in accordance with their markings. By choosing to recycle you are making a significant contribution to the protection of our environment.
Contact local authorities for information on your local recycling facility.


UWAGA! NIGDY NIE MYJ ELEMENTÓW WYJMOWANYCH W ZMYWARCE.
1- Čepel
2- Pouzdro čepele
2) Upevněte šrouby.
4.6.6. Ořezávátko

POZOR! K ČIŠTĚNÍ VYJÍMATELNÝCH ČÁSTÍ NIKDY NEPOUŽÍVEJTE MYČKU NÁDOBÍ.
1- Lame
2- manchon de lame
1- Assembler la tige de serrage
2- manchon de lame
4.6.6. Aiguisoir
ATTENTION! NE JAMAIS UTILISER LE LAVE-VAISSELLE POUR NETTOYER LES ÉLÉMENTS AMOVIBLES.
4.6.6. Temperamatite
ATTENZIONE! NON UTILIZZARE MAI LA LAVASTOVIGLIE PER PULIRE GLI ELEMENTI RIMOVIBILI.
4.6.6. Sacapuntas
1- Penge
2- Pengehüvely
4.6.6. Élesítő
1) Slibegruppe
1- Klinge
2- Bladhylse
1- Saml klemmestangen
2- Bladhylse
4.4. Brug af enhed
4.6.6. Slibemaskine
! OPMÆRKSOMHED! BRUG ALDRIG OPVASKEMASKINEN TIL RENG∅RING AF DE AFTAGELIGE ELEMENTER.
4.6.6. Teroitin

HUOMIO! ÄLÄ KOSKAAN KÄYTÄ ASTIANPESUKONETTA IRROTETTAVIEN OSIEN ISTAMISEEN.
1) Slijpergroep
1- Blad
2- Meshuls
1- Monteer de klemstang
2- Meshuls
4.6.6. Slijper

AANDACHT! GEBRUIK NOOIT DE VAATWASSER OM DE UITNEEMBARE ELEMENTEN DON TE MAKEN.
1) Slipergruppe
2) Bladbeskyttelse
3) Bladdeksel
4) Håndtak for matskyver
5) Vogn / Skyvebrett for mat
6) Flyttbar masse
7) Av/på-bryter
1- Blad
2- Bladhylse
2) Fest med skruer.
1- Fest bladplaten
4) Monter klemmestangen.
Sett klemmestangen inn i bladhylsen og skru samtidig de nederste tappene inn i de bakre gjengehullene på bladplaten.
Figur 5: Monteringstrinn 4 – Monter klemmestangen

1- Monter klemmestangen
2- Bladhylse
4.4. Enhetsbruk
4.4.1. Bruksanvisning
4.6.6. Sliper
! OPPMERKSOMHET! BRUK ALDRI OPPVASKMASKINEN TIL Å RENGJ∅RE DE AVTAKBARE ELEMENTENE.
1) Slipargrupp
2) Bladskydd
3) Bladskydd
1- Blad
2- Bladhylsa
1- Fixera knivplattan
4.6.6. Pennvässare
! UPPMÄRKSAMHET! ANVÄND ALDRIG DISKMASKINEN FÖR ATT RENGÖRA DE LÖSTAGBARA DELARNA.
4.6.6. Apontador
ATENÇÃO! NUNCA UTILIZE A MÁQUINA DE LAVAR LOUÇA PARA LIMPAR OS ELEMENTOS REMOVÍVEIS.
1- Čepel'
2- Puzdro čepele
2) Upevnite skrutkami.
Vložte tri skrutky a utiahnite ich.
1- Upevnite čepel'ovú dosku
4.6.6. Orezávač
• Vyberte brúsku zo zariadenia ako celok.
- Po naostrení očistite brúsne prvky (h) čistiacou kefkou namočenou v alkohole (obr. 1 4 ).

POZOR! NA ČISTENIE VYBERATEL'NYCH ČASTÍ NIKDY NEPOUŽÍVAJTE UMÝVAČKU RIADU.
b) Pohybujte vozíkom dopredu a dozadu, aby sa mazivo rovnomerne rozložilo. Prebytočné mazivo odstráňte handričkou.
4) Mazanie brúsky.
4.6.6. Острилка
1) Ομάδα ξυστηριού
4.6.6. Ξύστρα
1) Grupa za oštrenje
2) Zaštita oštrice
3) Poklopac oštrice
1- Sječivo
2- Čahura oštrice
2) Pričvrstite vijcima.
Umetnite tri vijka i pritegnite ih.
1- Pričvrstite ploču s oštricama
4) Sastavite steznu šipku.
Umetnite steznu šipku u čahuru oštrice i istovremeno zavrnite donje vijke u stražnje navojne rupe ploče oštrice.
Slika 5: Korak montaže 4 - Montirajte steznu šipku

1- Sastavite steznu šipku
2- Čahura oštrice
4.4. Korištenje uređaja
4.6. Čišćenje i održavanje
4.6.1. Opće upute
- Čistite uređaj svaki dan ili češće po potrebi.
- Prije čišćenja isključite uređaj iz struje (izvucite utikač!) i provjerite je li podešavanje debljine rezanja (8) postavljeno na "0".
- Pomaknite kolica (7) prema podešavanju debljine kriške (8) (slika 9).
- Elemente koji dolaze u kontakt s hranom treba posebno temeljito očistiti neutralnim sredstvima za čišćenje.
- Očistite uređaj slijedeći upute za pojedinačne podsklopove u nastavku.
4.6.2. Kolica i ručka za guranje
- Za čišćenje uklonite kolica (7) pomoću ručke za potiskivanje (4). Da biste to učinili, otpustite podešavanje kolica (6) okrećući ga suprotno od smjera kazaljke na satu i uklonite sama kolica (7) (slika 9).
- Operite kolica (7) s poklopcem (13), potiskivačem (4) i ladicom kolica (5) toplom vodom, mekom krpom i neutralnim sredstvom za čišćenje. Isperite čistom vodom kako biste uklonili ostatke sredstva za čišćenje.
- Za uklanjanje noža, otpustite tri vijka za podešavanje (e) pomoću odgovarajućeg odvijača (slika 11) i pažljivo izvadite nož.
Slika 11: Prikaz vijaka za podešavanje (e), noža (1) i zaštitnog prstena noža (2)

- Operite poklopac noža i nož (1) toplom vodom i neutralnim sredstvima za čišćenje. Koristite spužvu, priloženu četku za čišćenje ili meku krpu. Isperite čistom vodom.
- Operite zaštitni prsten noža (2) u toploj vodi i maloj količini sredstva za čišćenje. Isperite čistom vodom.
• Operite dijelove da se osuše ili ih obrišite suhom krpom. - Nakon čišćenja, postavite nož (1) pomoću tri vijka za podešavanje (e), održavajući ispravan položaj, i poklopac noža pomoću vijka (d).
4.6.6. Šiljilo

PAŽNJA! NIKADA NE KORISTITE PERILICU POSUĐA ZA ČIŠĆENJE UKLONJIVIH ELEMENATA.
- Nikada ne koristite kemijska ili korozivna sredstva za čišćenje.
- Kako biste izbjegli hrđu, nikada ne čistite uređaj AkoPadsom ili sličnim sredstvima, niti žičanom krpom.
- Uvijek koristite meku krpu i nikada ne koristite gruba sredstva za čišćenje koja bi mogla oštetiti ili ogrebati površinu uređaja.
- Nakon čišćenja, obrišite i ispolirajte uređaj suhom krpom.
4.6.6. Galąstuvas

DÈMESIO! NIEKADA NENAUDOKITE INDAPLOVÈS NUIMAMIEMS ELEMENTAMS VALYTI.
4.6.6. Ascuțitoare
ATENȚIE! NU FOLOSIȚI NICIODATĂ MAȘINA DE SPĂLAT VASE PENTRU CURĂȚAREA ELEMENTELOR DETAȘABILE.
1) Skupina za ostrenje
2) Zaščita rezila
3) Pokrov rezila
1- Rezilo
2- Tulec rezila
2) Pritrdite z vijaki.
1- Pritrdite ploščo rezila
4) Sestavite vpenjalno palico.
1- Sestavite vpenjalno palico
2- Tulec rezila
4.4. Uporaba naprave
4.4.1. Navodila za uporabo
4.6.6. Ostrilček
POZOR! ZA ČIŠČENJE SNEMLJIVIH ELEMENTOV NIKOLI NE UPORABLJAJTE POMIVALNEGA STROJA.
For the disposal of the device please consider and act according to the national and local rules and regulations.
CONTACT
expondo Polska sp. z o.o. sp. k.





- SPITZER
- AUFMERKSAMKEIT! VERWENDEN SIE ZUM REINIGEN DER ABNEHMBAREN ELEMENTE NIEMALS DIE SPÜLMASCHINE
- TECHNICAL DATA
- GENERAL DESCRIPTION
- DO NOT USE THE DEVICE UNLESS YOU HAVE THOROUGHLY READ AND UNDERSTOOD THIS USER MANUAL
- LEGEND
- USAGE SAFETY
- ATTENTION! READ ALL SAFETY WARNINGS AND ALL INSTRUCTIONS. FAILURE TO FOLLOW THE WARNINGS AND INSTRUCTIONS MAY RESULT IN ELECTRIC SHOCK, FIRE AND/OR SERIOUS INJURY OR EVEN DEATH
- ELECTRICAL SAFETY
- SAFETY IN THE WORKPLACE
- PERSONAL SAFETY
- SAFE DEVICE USE
- USE GUIDELINES
- DEVICE DESCRIPTION
- PREPARING FOR USE
- APPLIANCE LOCATION
- ASSEMBLING THE DEVICE
- ASSEMBLY INSTRUCTIONS OF THE BLADE
- DEVICE USE
- OPERATION INSTRUCTIONS
- NOTICE
- KNIFE SHARPENING
- CAUTION
- WARNING! POSSIBLE CUTS DANGER! THE KNIFE IS VERY SHARP, SO WHEN CHECKING THE ID, ONE MUST BE VERY CAUTIOUS. ALWAYS USE PROTECTIVE GLOVES
- WIRING DIAGRAM
- CLEANING AND MAINTENANCE
- GENERAL INSTRUCTIONS
- CARRIAGE AND PUSHER HANDLE
- KNIFE AND KNIFE COVER
- KNIFE PROTECTING DEVICE
- SLICE TRAY AND HOUSING
- SHARPENER
- ATTENTION! NEVER USE THE DISHWASHING MACHINE FOR CLEANING THE REMOVABLE ELEMENTS
- MAINTENANCE INSTRUCTIONS
- DISPOSING OF USED DEVICES
- UWAGA! NIGDY NIE MYJ ELEMENTÓW WYJMOWANYCH W ZMYWARCE
- OŘEZÁVÁTKO
- POZOR! K ČIŠTĚNÍ VYJÍMATELNÝCH ČÁSTÍ NIKDY NEPOUŽÍVEJTE MYČKU NÁDOBÍ
- AIGUISOIR
- ATTENTION! NE JAMAIS UTILISER LE LAVE-VAISSELLE POUR NETTOYER LES ÉLÉMENTS AMOVIBLES
- TEMPERAMATITE
- ATTENZIONE! NON UTILIZZARE MAI LA LAVASTOVIGLIE PER PULIRE GLI ELEMENTI RIMOVIBILI
- SACAPUNTAS
- ÉLESÍTŐ
- BRUG AF ENHED
- SLIBEMASKINE
- OPMÆRKSOMHED! BRUG ALDRIG OPVASKEMASKINEN TIL RENG∅RING AF DE AFTAGELIGE ELEMENTER
- TEROITIN
- HUOMIO! ÄLÄ KOSKAAN KÄYTÄ ASTIANPESUKONETTA IRROTETTAVIEN OSIEN ISTAMISEEN
- SLIJPER
- AANDACHT! GEBRUIK NOOIT DE VAATWASSER OM DE UITNEEMBARE ELEMENTEN DON TE MAKEN
- ENHETSBRUK
- BRUKSANVISNING
- SLIPER
- OPPMERKSOMHET! BRUK ALDRI OPPVASKMASKINEN TIL Å RENGJ∅RE DE AVTAKBARE ELEMENTENE
- PENNVÄSSARE
- UPPMÄRKSAMHET! ANVÄND ALDRIG DISKMASKINEN FÖR ATT RENGÖRA DE LÖSTAGBARA DELARNA
- APONTADOR
- ATENÇÃO! NUNCA UTILIZE A MÁQUINA DE LAVAR LOUÇA PARA LIMPAR OS ELEMENTOS REMOVÍVEIS
- OREZÁVAČ
- POZOR! NA ČISTENIE VYBERATEL'NYCH ČASTÍ NIKDY NEPOUŽÍVAJTE UMÝVAČKU RIADU
- ОСТРИЛКА
- ΞΎΣΤΡΑ
- SJEČIVO
- ČAHURA OŠTRICE
- KORIŠTENJE UREĐAJA
- ČIŠĆENJE I ODRŽAVANJE
- OPĆE UPUTE
- KOLICA I RUČKA ZA GURANJE
- ŠILJILO
- PAŽNJA! NIKADA NE KORISTITE PERILICU POSUĐA ZA ČIŠĆENJE UKLONJIVIH ELEMENATA
- GALĄSTUVAS
- DÈMESIO! NIEKADA NENAUDOKITE INDAPLOVÈS NUIMAMIEMS ELEMENTAMS VALYTI
- ASCUȚITOARE
- ATENȚIE! NU FOLOSIȚI NICIODATĂ MAȘINA DE SPĂLAT VASE PENTRU CURĂȚAREA ELEMENTELOR DETAȘABILE
- UPORABA NAPRAVE
- NAVODILA ZA UPORABO
- OSTRILČEK
- POZOR! ZA ČIŠČENJE SNEMLJIVIH ELEMENTOV NIKOLI NE UPORABLJAJTE POMIVALNEGA STROJA
- CONTACT
Brand : Royal Catering
Model : RCAM-250
Category : Washing machine