
ME339 - Lawn mower VIKING - Free user manual and instructions
Find the device manual for free ME339 VIKING in PDF.
User questions about ME339 VIKING
0 question about this device. Answer the ones you know or ask your own.
Ask a new question about this device
Download the instructions for your Lawn mower in PDF format for free! Find your manual ME339 - VIKING and take your electronic device back in hand. On this page are published all the documents necessary for the use of your device. ME339 by VIKING.
USER MANUAL ME339 VIKING
Thank you for choosing a VIKING quality product.
This product has been produced using state-of-the-art production methods and extensive quality assurance procedures, because our goal is only achieved if you, the customer, are satisfied with your machine.
If you have any questions concerning your machine, please contact your dealer or our sales agency directly.
I hope that your VIKING machine will give you great enjoyment.

Dr. Peter Pretzsch
Management
1. Table of contents
Notes on the instruction manual 30
General 30
Country-specific versions 30
Instructions for reading the instruction manual 30
Machine overview 31
For your safety 31
General 31
Transport 32
Preparations 32
Mowing procedure 32
Maintenance, cleaning, repairs and storage 34
Warning - dangers caused by electrical current 34
Disposal 35
Description of symbols 35
Standard equipment 36
Preparing the machine for operation 36
General 36
Installing mono handlebar (ME 339 C) 36
Installing dual handlebar (ME 339) 37
Assembling grass catcher box 37
Controls 37
Mono handlebar (ME 339 C) 37
Dual handlebar (ME 339) 38
Grass catcher box 38
Central cutting height adjustment 38
Notes on working with the machine 39
General 39
Mowing on slopes 39
Correct motor load 39
If the mowing blade blocks 39
Thermal motor overload protection 39
Safety devices 39
Two-hand operation 39
Motor run-down brake 39
Initial operation of the machine 40
Electrical connection 40
Strain relief 40
Switching on lawn mower 40
Switching off lawn mower 40
Level indicator 40
Emptying grass catcher box 40
Maintenance 41
General 41
Cleaning the machine 41
Electric motor and wheels 41
Upper handlebar ME 339 41
Mowing blade maintenance 41
Removing and installing mowing blade 42
Sharpening mowing blade 42
Storage (winter break) 42
Transport 43
Carrying and securing lawn mower 43
Environmental protection 43
Minimising wear and preventing damage 43
Standard spare parts 44
Circuit diagram 44
CE - Manufacturer's declaration of conformity 44
Technical specifications 45
Troubleshooting 46
Service schedule 47
Handover confirmation 47
Service confirmation 47
2. Notes on the instruction manual
2.1 General
This instruction manual constitutes original manufacturer's instructions in the sense of EC Directive 2006/42/EC.
VIKING is continually striving to further develop its range of products; we therefore reserve the right to make alterations to the form, technical specifications and equipment level of our standard equipment.
For this reason, the information and illustrations in this manual are subject to alterations.
2.2 Country-specific versions
VIKING supplies machines with different plugs and switches, depending on the country of sale.
Machines with European plugs are shown in the illustrations. Machines with other types of plug are connected to the mains in a similar way.
2.3 Instructions for reading the instruction manual
Illustrations and texts describe specific operating steps.
All symbols which are affixed to the machine are explained in this instruction manual.
Viewing direction:
Viewing direction when "left" and "right" are used in the instruction manual: the user is standing behind the machine and is looking forwards in the direction of travel.
Section reference:
References to relevant sections and subsections for further descriptions are made using arrows. The following example shows a reference to a section: ( 2.1)
Designation of text passages:
The instructions described can be identified as in the following examples.
Operating steps which require intervention on the part of the user:
- Release bolt (1) using a screwdriver, operate lever (2)...
General lists:
Use of the product for sporting or competitive events
Texts with added significance:
Text passages with added significance are identified using the symbols described below in order to especially emphasise them in the instruction manual:

Danger
Risk of accident and severe injury to persons. A certain type of behaviour is necessary or must be avoided.

Warning
Risk of injury to persons. A certain type of behaviour prevents possible or probable injuries.

Minor injuries or material damage can be prevented by a certain type of behaviour.

Information for better use of the machine and in order to avoid possible operating errors.
Texts relating to illustrations:
Illustrations relating to use of the machine can be found in the front of this instruction manual.
The camera symbol serves to link the figures on the illustration pages with the corresponding text passages in the instruction manual.

3. Machine overview

1 Upper handlebar
2 Lower handlebar
3 Housing
4 Motor hood
5 Rear wheel
6 Front wheel
7 Grass catcher box
8 Upper transport handle
9 Lower transport handle
10 Discharge flap
11 Rotary handle
12 Quick-clamping device
13 Motorstop lever
14 Height adjustment lever
15 Strain relief
16 Mains connection
17 Start button
18 Identification plate
4. For your safety
4.1 General

These safety regulations must be observed when working with the lawn mower.

Read the entire instruction manual before using the machine for the first time and keep it in a safe place for future reference.
Ensure that you are familiar with the controls and use of the machine.
Before initial use, advice should be obtained from the specialist dealer or other technician.
The lawn mower should not be operated after the consumption of alcohol, medications which impair reactions, or drugs.
Never allow children under the age of 16 or other persons who are unfamiliar with the instruction manual to use the lawn mower. Local regulations may specify a minimum age for users.
Never mow in the vicinity of other persons, particularly children, or animals.
Be aware that the user of the machine is responsible for accidents involving other persons or their property.
Only give (or lend) the machine to persons who are familiar with this model and how to operate it. Always provide them with the instruction manual.
This machine is not suitable for use by persons (in particular children) with impaired physical, sensory or mental faculties or those lacking the appropriate
experience and/or knowledge, unless supervised by a person responsible for their safety or having received instructions on use of the machine from such person. Children must be supervised, in order to ensure that they do not play with the machine.
Caution - risk of accident:
The lawn mower is intended for private use and only for mowing lawns; its use for other purposes is not permitted and may be dangerous or result in damage to the machine.
Due to the physical danger to the user, the lawn mower must not be used, for example, for the following applications (incomplete list):
- for trimming bushes, hedges and shrubs,
- for cutting creepers,
- for the care of lawn roofs and balcony boxes,
- for clearing paths (vacuuming, blowing, clearing snow),
- for shredding or chopping tree or hedge cuttings,
- for levelling earth mounds, e.g. mole hills,
- for transporting clippings (except in the grass catcher box provided).
Caution - risk of accident:
Only use accessories which VIKING has supplied or authorised for use on this machine. Furthermore, modifications to the machine are not permitted.
Particular care is required during use in public green spaces, parks, sports fields, along roads and in agricultural and forestry businesses.

Caution: Danger to health due to vibrations.
Excessive exposure to vibrations can result in damage to the
cardiovascular or nervous system, particularly in persons with cardiovascular problems. Please consult a physician if you experience symptoms that may have been caused by vibrational loads.
Symptoms of this kind principally affect the fingers, hands or wrists and include (incomplete list):
- numbness,
- pain,
- muscular weakness,
- skin discolouration,
- unpleasant tingling sensation.
4.2 Transport

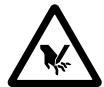
Always wear gloves to prevent injuries from sharp-edged components.
Switch off the machine prior to transport, disconnect the power cable and allow the blade to come to a standstill.
Note the information in the "Transport" section ( 13.) when lifting the machine.
Take the weight of the machine into account and use suitable loading aids (loading ramps, lifters) if necessary.
Avoid contact with the blade when lifting and carrying the machine.
Only transport the machine once the motor has cooled down.
Secure the machine and any machine components being transported (e.g. grass catcher box) on the load floor using adequately-dimensioned fastening material (belts, ropes etc.).
When transporting the machine, always observe regional legislation, especially regarding load security and the transport of objects on load floors.
4.3 Preparations
Persons who are not familiar with the instruction manual are not permitted to use the machine.
Observe the local regulations regarding permitted operating times for gardening power tools.

Always wear robust shoes and long trousers when mowing.
Never mow barefoot or in
sandals.
Carefully inspect the complete area on which the machine is to be used and remove any large stones, sticks, wires, bones or other foreign objects which could be thrown up by the machine.
Before use, perform a visual check to ensure that the cutting tool, fastening screws and entire cutting unit are in good condition, check particularly for secure seating, damage and wear ( 12.5) .
Replace all worn or damaged parts before using the machine. Replace any illegible or damaged danger signs and warnings on the machine. Your VIKING dealer has a stock of replacement stickers.
Never switch the motor on without a correctly installed blade. Risk of motor overheating.
Never use the mower with damaged safety devices, without functioning motor brake or attached safety devices, e.g. without the discharge flap or the grass-catching unit.
For safety reasons, always use an undamaged grass catcher box.
The switch mechanisms installed in the machine must not be removed or bypassed (e.g. by tying the motorstop lever to the handlebar).
Observe the instructions in section "Warning - dangers caused by electrical current" (⇒ 4.6).
4.4 Mowing procedure
Keep others, particularly children, and animals out of the danger area. Make sure that others are not endangered.
Do not mow at ambient temperatures below +5^ (41^)
Never mow wet grass or mow in the rain. The risk of accidents is higher if the grass is wet (increased danger of slipping for operator).
Only mow during the day or when there is enough light.
Place the machine on an even surface for start-up. The machine must not be tilted when starting the engine.
Exercise care when starting the motor. Observe the instructions in section "Initial operation of the machine" ( 11.) .Keep your feet a safe distance from the cutting tool.
Only operate the machine at walking speed – never run when working with the machine. Working quickly with the machine increases the risk of injury due to stumbling, slipping etc.
Switch off the motor,
- if tilting of the mower is necessary when transporting over surfaces other than grass,
- when pushing the mower to and from mowing areas,
- before removing the grass catcher box.
Always ensure good stability on slopes. Avoid mowing on excessively steep slopes in order to prevent loss of control of the machine.
Be particularly careful when changing direction on a slope in order to prevent loss of control of the machine.
Only mow at right-angles to the slope and never up or down the slope, in order to avoid being run over by the running lawn mower in the case of loss of control of the machine or of falling.
Caution - Risk of stumbling!
Be particularly careful when moving backwards and when pulling the lawn mower.
Be particularly careful when turning the machine around or pulling it towards you.
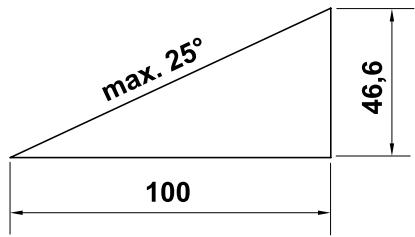
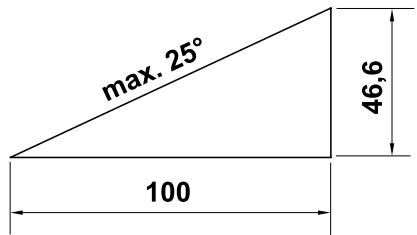
For safety reasons, the machine must not be used on slopes with an incline of more than 25^ (46.6%) .
Risk of injury:
A slope inclination of 25^ corresponds to a vertical height increase of 46.6cm for a 100 cm horizontal distance.

Beware of the work tools running on for several seconds before coming to a standstill.
STOP

Do not try to examine the blades while the lawn mower is operating. Never open the flap and/or remove the grass box when the mowing blade is Rotating blades can cause injury.
Never attach any objects to the handlebar (e.g. work clothing). Extension cables must never be wrapped around the handlebar.
Regularly check that the blade is securely fastened and is not damaged or worn in any way ( 12.5) .
Caution - risk of injury!
Never put hands or feet on or underneath rotating parts. Never use rotating blade. Always keep arm the discharge opening. Always use the safety distance provided by a blebar.
Avoid switching on the machine repeatedly within a short period of time; in particular avoid "playing" with the start button. Risk of motor overheating.
Owing to the voltage fluctuations caused by this machine during the run-up period, other devices connected to the same circuit may be subject to interference in the case of unfavourable power supply conditions. In this case, appropriate steps should be taken (e.g. connection to a different circuit than the one used by the affected device, or operation of the machine using a circuit with a lower impedance).

Switch off the motor, disconnect the mains plug and ensure that the cutting tool has come to a standstill
- before remedying blockages, including those in the discharge chute,
- if the cutting tool has hit a foreign object. The cutting tool needs to be checked for possible damage. The lawn mower must not be operated with a damaged or bent blade shaft or motor shaft. Risk of injury through defective parts!
Before you check, clean or carry out work on the mower, e.g. adjusting the cutting height, opening or closing the discharge flap; - If the mower begins to vibrate excessively. In this case, the complete machine, in particular the cutting tool must be checked for possible damage and loose parts. Damaged parts must be replaced prior to further use, loose parts must be fastened/tightened.
Before leaving the machine unattended; - Before lifting, or carrying the machine;
- Before transporting the machine.
Never lift or carry a mower with the motor running or the mains lead connected.
It is not permitted to transport anything or anyone, particularly children, on the machine.
4.5 Maintenance, cleaning, repairs and storage
Before performing any work on the machine, before adjusting or cleaning the mower, or before
checking whether the electric cable is entwined or damaged, switch off the mower and disconnect the plug.

Always wear thick gloves when carrying out any work on the cutting tool.
Allow the machine to fully cool down before storing it in an enclosed space, performing maintenance on it or cleaning it.
Perform only those maintenance operations that are described in this instruction manual. Have all other operations carried out by a specialist dealer.
VIKING recommends that you have maintenance operations and repairs performed exclusively by a VKING specialist dealer.
VIKING specialist dealers regularly attend training courses and are provided with technical information.
If you do not have the necessary expertise or auxiliary equipment, please always contact a specialist dealer. (VIKING recommends VKING specialist dealers).
Only use high quality tools, accessories and spare parts. Otherwise, there may be a risk of accidents resulting in personal injury or damage to the machine.
VIKING recommends the use of genuine VKING tools, genuine accessories and genuine spare parts. Their properties are optimally adapted to the machine and the user's requirements.
Genuine VIKING spare parts can be recognised by the VIKING spare parts number, by the VIKING lettering and, if present, by the VIKING spare parts symbol. On smaller parts, only the symbol may be present.
Ensure that all nuts, pins and bolts are securely tightened, so that the machine is in a safe operating condition.
Check the grass-catching unit regularly for wear, damage or for loss of functionality.
If the cutting tool or the lawn mower hits an obstacle or a foreign object, the motor must be switched off, the plug disconnected, and an inspection performed by a specialist.
Replace danger signs and warnings on the machine which have become illegible. Your VIKING dealer has a stock of replacement stickers.
The power cable should only be repaired or replaced by authorised electricians.
In order to prevent fire hazards, keep the area around the air vents between the motor cover and housing free from e.g. grass, straw, moss, leaves or emerging grease.
Components or guards that are removed for maintenance operations must be properly reinstalled immediately.
Carefully clean the lawn mower following use. Never use high-pressure cleaners and do not clean the lawn mower under running water (e.g. using a garden hose). Do not use aggressive cleaning agents.
These cleaners can damage plastics and metals, impairing the safe operation of your VIKING machine.
Check the entire machine for wear damage on a regular basis, particular before extended periods when the machine is not in use (over winter).
Replace worn or damaged parts to ensure that the machine is always in a safe operating condition.
Store the cooled lawn mower safely in a dry, locked place that is inaccessible to children.
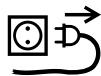
4.6 Warning - dangers caused by electrical current
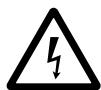
Caution: Danger of electric
shock! Particularly important for electrical safety are the mains cable, plug, on/off switch and
electric cable. Damaged cables, connectors and plugs, or electric cables that do not conform to regulations must not be used, to prevent any risk of electric shocks. Therefore, check the electric cable regularly for signs of damage or ageing (brittleness).
- Never use a damaged extension cable.
- Replace defective cables with new ones and never repair extension cables.
Never use the machine if the cables are damaged or worn.
Danger of electric shock!
Do not connect a damaged cable to the mains and do not touch a damaged cable before disconnecting it from the mains.
Danger of electric shock!
Damaged cables, connectors and plugs, or electric cables which do not conform with regulations may not be used.
Keep the electric cable away from the blade when mowing.
Only use extension cables that are insulated against moisture for outdoor use which are suitable for use with the machine ( 11.1) .

Although the drive motor is splashproof, do not use the lawn mower when it is raining or in wet environments.
Do not leave the machine unprotected in the rain.
Detach electric cables at the plug and socket and not by pulling on the electric cable.
Only connect the machine to a power supply that is protected by means of a residual current-operated protective device with a release current of a maximum of 30mA . Your electrician can provide further information.
It must be noted that current fluctuations can damage the lawn mower when the machine is connected to a power generator.
Always ensure that the power cables used are adequately protected by a fuse.
For reasons of electrical safety, the electric cable must always be correctly installed on the handlebar ( 7.2) .
4.7 Disposal
Ensure that old machines are properly disposed of. Render the machine unusable prior to disposal. In order to prevent accidents, ensure that you remove the power supply cable or the electric cable from the on/off switch to the motor.
Risk of injury due to the mowing blade!
Always store an old lawn mower in a safe place prior to scrapping. Ensure that the machine and the mowing blade are kept out of the reach of children.
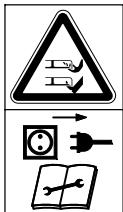
5. Description of symbols
Caution!
Read the instruction manual before initial use.

Risk of injury!
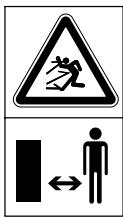
Keep other persons out of the danger area.
Risk of injury!
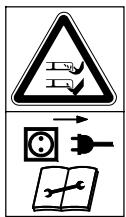
Beware of the sharp mowing blade. The mowing blade runs on for several seconds after switching off (motor/blade brake). Before performing any work on the cutting tool, before carrying out maintenance and cleaning work, before checking whether the electric cable is entwined or damaged, or before leaving the machine unattended, switch off the motor and disconnect the plug.
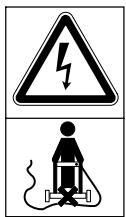
Danger of electric shock!
Keep the electric cable away from the cutting tool.
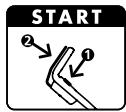
ME 339:
Start motor.
ME 339 C:
Start motor.

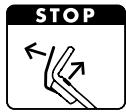
ME 339 C:
Stop motor.
6. Standard equipment

Qty.
Item Designation
A Basic unit

B Upper part of grass catcher box

C Lower part of grass catcher box

D Pin

Instruction manual

ME 339 C:
E Washer

F Screw

G Pin

H Clamping piece

Quick-clamping device

ME 339:
J Flat head bolt

K Cable guide

L Rotary handle

M Cable clip

7. Preparing the machine for operation
7.1 General

Risk of injury!
Observe the safety instructions in the section "For your safety" (⇒ 4.).
- Place the machine on level and firm ground when performing all the operations described.
7.2 Installing mono handlebar (ME 339 C)
- Locate mono handlebar (1) in working position in handlebar console (2) and hold.
- Insert left and right clamping pieces (H) into handlebar console (2) as illustrated. Fit washer (E) onto screw (F) and guide screw (F) through clamping pieces and lower handlebar from the inside to the outside.
- Fit washer (E).
- Insert pin (G) in quick-clamping device (I) and screw both together onto screw (F).
- Close quick-clamping device (3).
- Quick-clamping device (3) must be sufficiently tightened so that it closes completely and the handlebar is firmly attached to the handlebar console. If necessary, release quick-clamping device again and tighten or loosen screw (F).

Installing electric cable:
- Insert electric cable (1) in strain relief moulding (2) of handlebar console as illustrated. Make sure the cable tie (3) is correctly positioned in the strain relief moulding.
- Press electric cable (1) into holder (4) on quick-release clamp body. The electrical cable must lie taught against the handlebar tube in the area of the lower handlebar.
7.3 Installing dual handlebar (ME 339)

Installing upper handlebar:
- Insert flat head bolt (J) through cable guide (K) and attach electric cable (1).
- Fit dual handlebar (2) onto both lower handlebar sections (3). Insert flat head bolts (J) – on right with cable guide (K), on left without – through bores from the inside to the outside and tighten with rotary handles (L).
Installing cable clip:

Danger of electric shock!
In order to prevent damage to the insulating layer on the handlebar, only press on the cable clips by hand. Do not use any tools (e.g. hammer or screwdriver).
- Fasten electric cable (1) to upper handlebar with cable clip (M). Ensure a distance of 25 - 27 cm between cable clip and switch on upper handlebar.
7.4 Assembling grass catcher box

- Fit upper part of grass catcher box (B) onto lower part of grass catcher box (C). Ensure correct position in guides (1).
- Push pin (D) through bores provided from inside.
- Allow upper part of grass catcher box (B) to engage in lower part of grass catcher box using slight pressure.
- Attach grass catcher box (⇒ 8.3).
8. Controls
8.1 Mono handlebar (ME 339 C)
The ME 339 C lawn mower is equipped with an adjustable telescopic handlebar.


Danger of electric shock!
The electric cable must always be attached to the quick-release clamp body and the handlebar console. Some slack must be retained at the adjustment area of the telescopic handlebar at maximum handlebar length ( 7.2) .

Danger of pinching!
The handlebar can fold down or retract when the quick-clamping device is released. For this reason, always hold the handlebar (1) with one hand at its highest point when you open the quick clamping device.
1 Folding down handlebar:
Transport position (for cleaning, for space-saving transport and for storage of the machine):
- Set handlebar to minimum height.
- Hold handlebar (1) with one hand and open quick-clamping device (2).
- Fold down handlebar (1) forwards.
- If necessary, quick-clamping device (2) can be closed and the handlebar set to the transport position.
Working position (to push machine):
- Fold up handlebar (1) rearwards and hold with one hand.
- Close quick-clamping device (2).
- Quick-clamping device (2) must be sufficiently tightened so that it closes completely and upper handlebar is firmly attached to handlebar console. If necessary, release quick-clamping device again and tighten or loosen screw (3).
- Adjust handlebar height.
2 Height adjustment:
The height of the telescopic handlebar is infinitely adjustable:
- Hold upper handlebar (4) with one hand and open quick-clamping device (5).
- Pull or push upper handlebar (4) out of/into lower handlebar to the desired handlebar height.
- Hold upper handlebar (4) with one hand and close quick-clamping device (5).
- Quick-clamping device (5) must be sufficiently tightened so that it closes completely and handlebar is firmly locked in lower handlebar. If necessary, release quick-clamping device again and turn knurled nut (6).
8.2 Dual handlebar (ME 339)


Danger of pinching! The upper handlebar can be fold down when the rotary handles are released. For this reason, always hold the upper handlebar (2) with one hand at its highest point when you unscrew the rotary handles.
Folding down handlebar:
Transport position (for cleaning, for space-saving transport and for storage of the machine):
- Loosen rotary handles (1) until they can be moved easily backwards and forwards in machined grooves, then fold down upper handlebar (2) forwards.
Working position (to push machine):
- Fold up upper handlebar (2) rearwards and hold with one hand.
- Tighten rotary handles (1). Ensure correct position of cable guide (3).
8.3 Grass catcher box
Attaching:
- Open discharge flap (1) and hold it open.
- Attach grass catcher box (2) to mountings (4) on rear of machine by means of locating lugs (3).
- Close discharge flap (1).
Detaching:
- Open discharge flap (1) and hold it open.
- Lift grass catcher box (2) and remove rearwards.
- Close discharge flap (1).
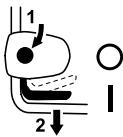
8.4 Central cutting height adjustment

Five different cutting heights between 30 mm and 70 mm can be set.
Level 1 = lowest cutting height
Level 5 = highest cutting height
Lawn mowers for Great Britain:
Six different cutting heights between 20 mm and 70 mm can be set.
Level S = lowest cutting height
Level 5 = highest cutting height
In order to prevent damage, the lowest cutting height must only be used on even lawns (without bumps).
Setting cutting height:
- Push height adjustment lever (1) away from lawn mower slightly until lever is released from locating lugs (2).
- Increasing cutting height: Raise lawn mower using height adjustment lever (1) (push lever forwards).
Decreasing cutting height: Lower lawn mower using height adjustment lever (1) (push lever rearwards).
- Push height adjustment lever (1) towards lawn mower slightly until locating lugs (2) engage in lever. The selected cutting height can be read off at the front locating lug (3).
9. Notes on working with the machine
9.1 General

Risk of injury!
Untangle any knots in the cable immediately.
Guide the electric cable behind you when mowing. Electric cables can be inadvertently cut when mowing and present a tripping hazard. They therefore involve a high accident risk. For this reason, mow so that the electric cable is always visible in the area of grass that has already been cut.
To ensure a perfect, thick lawn, mow regularly and keep the grass short.
Do not cut the lawn too short in hot, dry conditions as it will dry out or burn in the sun and become unsightly.
The cutting pattern will be better with a sharp blade than with a blunt one; the blade should therefore be sharpened regularly (VIKING specialist dealer).
9.2 Mowing on slopes
For safety reasons, the lawn mower must not be used on inclines of more than 25^ . A slope inclination of 25^ (46.6%) corresponds to a vertical height increase of 46.6 cm for a 100 cm horizontal distance.
9.3 Correct motor load
Do not switch on the lawn mower in tall grass or at the lowest cutting height.
The lawn mower load must never cause the motor speed to drop significantly.
If the speed drops, select a higher cutting height setting and/or reduce the rate of feed.
9.4 If the mowing blade blocks
Switch off the motor immediately and disconnect the plug. Then eliminate the cause of the fault.
9.5 Thermal motor overload protection
If an overload of the motor occurs during operation, the built-in thermal overload protection device automatically deactivates the motor.
Causes for an overload:
- mowing excessively high grass or cutting height adjusted too low,
excessive rate of feed, - inadequate cleaning of the cooling air guide (inlet slots),
- mowing blade is blunt or worn,
- unsuitable or excessively long electric cable - voltage loss (⇒ 11.1).
Recommencing operation
Resume normal operation of the machine following a cooling period of up to 10min (depending on the ambient temperature) ( 11) .
10. Safety devices
10.1 Two-hand operation
The motor can only be switched on by pressing and holding the start button with the right hand and then pulling the motorstop lever to the handlebar with the left hand.
10.2 Motor run-down brake
When the motorstop lever is released, the mowing blade comes to a complete standstill in less than three seconds.
An integrated motor run-down brake shortens the run-down time until the blade stops.
11. Initial operation of the machine
11.1 Electrical connection

Danger of electric shock!
Observe the safety instructions in the section "For your safety" ( 4.)
If using a cable drum, the connection cord must be unwound completely, otherwise electrical resistance may cause loss of power and overheating.
Only electric cables which are no lighter than rubber sheathed cables H07 RN-F DIN/VDE 0282 may be used as electric cables.
Recommended minimum cross-section:
up to 25 m Length: 3 × 1.5 mm^2 up to 50 m Length: 3 × 2.5 mm^2
The connectors of the electric cable must be made of rubber or have a rubber cover and conform to the standard DIN/VDE 0620.
The mains voltage and mains frequency must correspond to the information on the identification plate and the information contained in the section "Technical specifications" ( 19.)
The power cable must be adequately protected by fuse ( 19) .
This machine is intended for operation with a power supply having a system impedance of Z_max at the transfer point (house connection) of maximum 0.49 ohms (at 50 Hz).
The user must ensure that the machine is only operated with a power supply which meets this requirement. If necessary, this information can be obtained from the local electric power company.
11.2 Strain relief
During work, the strain relief prevents any unintentional disconnection of the electric cable and any resulting damage to the mains connection on the machine.
For this reason, the electric cable must be fed through the strain relief.
- Form a loop in the electric cable (1) and guide it through the opening (2).
- Then push the loop over the hook (3) and pull it tight.
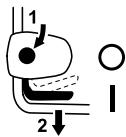
11.3 Switching on lawn mower

i Do not start the motor in high grass or when the mower is set to the lowest cutting height, as this makes starting difficult.
- Press and hold down start button (1). Pull motorstop lever (2) to handlebar and hold.
- Start button (1) can be released once motorstop lever (2) is pressed.
11.4 Switching off lawn mower
- Release motorstop lever (1).
Motor and mowing blade come to a stop after a short run-down time.
11.5 Level indicator
The grass catcher box features a level indicator (1) on the upper part of the catcher box.
The flow of air that is created by the rotary movement of the mowing blade and is responsible for filling the grass catcher box raises the level indicator (2): The grass catcher box is filled with clippings.
When the grass catcher box is full, this flow of air is reduced and the level indicator drops (3):
- Empty filled grass catcher box ( 11.6) .
11.6 Emptying grass catcher box
- Switch off motor ( 11.4) and detach grass catcher box ( 8.3) .
- Open grass catcher box at tab (1) and open upper part of the grass catcher box (2) upwards.
- Hold grass catcher box by handles in upper part of grass catcher box (3) and in lower part of grass catcher box (4) and empty it.

12. Maintenance
12.1 General

Risk of injury!
Observe the safety instructions in the section "For your safety" (⇒ 4.).
Annual service by the specialist dealer:
The lawn mower should be inspected once annually by a specialist dealer. VIKING recommends VIKING specialist dealers.
12.2 Cleaning the machine
Maintenance interval: After each use

- Detach grass catcher box (⇒ 8.3).

Risk of injury:
Before tipping up the mower, place it on firm, level and flat ground. The machine may tip over when working on it in the cleaning position. Always stand to the side of the machine. Never work in front of or behind the mower.
Cleaning position ME 339 C:
- Fold down mono handlebar ( 8.1) .
- Lift discharge flap (1), tilt mower upwards and set down on handlebar console (2).
- Leave handlebar (3) resting on the ground and fasten in this position with quick-clamping device (4).
Cleaning position ME 339:
- Fold down the dual handlebar ( 8.2) .
- Tilt lawn mower upwards and set down on lower handlebars (5).
Notes on cleaning:
Clean the machine thoroughly each time it has been used. Care of the machine will protect it against damage and extend its service life.
Remove dirt from the cooling air guide (inlet slots) between the motor cover and the lower housing to ensure that the motor is adequately cooled.
Clean the mowing blade.
Clean the underside of the mower with water and a brush. Detach accumulated cutting deposits in the housing and in the ejection chute beforehand using a stick.
Never spray water onto motor components, seals, bearing points or electrical parts such as switches. This would result in expensive repairs.
If you are unable to remove the dirt with water using a brush or a cloth, VIKING recommends the use of a special cleaner (e.g. STIHL special cleaner).
12.3 Electric motor and wheels
The electric motor is maintenance-free.
The wheel bearings are maintenance-free.
12.4 Upper handlebar ME 339
Maintenance interval: Before each use
The upper handlebar is coated with a insulating layer. Should this layer become damaged, the upper handlebar must be replaced.
12.5 Mowing blade maintenance
Maintenance interval:
Before each use

- Tilt mower upwards into cleaning position ( 12.2) .
- Clean mowing blade (1) and check it for damage (notches or cracks) and wear; replace if necessary.
- Use a slide calliper (2) to measure blade thickness at 5 points at least. In particular, minimum thickness must also be ensured in the area of the blade wings.
- Place a ruler (3) against the front blade edge and measure permissible grinding.
Wear limits:
The blade thickness must be at least 1.6 mm at any point.
The cutting edges may not be ground back by more than 5 mm during sharpening.
If the supplied standard blade is not installed in the lawn mower, but e.g. the mulching blade, which is available as a special accessory, different wear limits apply (see instruction manual Kit 339).

Risk of injury:
A worn or damaged blade may break off and cause serious injuries. The instructions for blade maintenance must therefore always be observed.
In particular, the lawn mower must not be operated if parts of the cutting unit (comprising the mowing blade, blade fastening screw and blade mounting) are damaged or worn.
Blades are subjected to differing degrees of wear depending on the location and duration of use. If you use the mower on sandy ground or use it frequently under dry conditions, the blade will be subjected to greater loads and will wear more quickly than the average.
Always replace the blade fastening screw (4) when replacing the mowing blade.
12.6 Removing and installing mowing blade

In order to prevent damage to the blade fastening screw, use a suitable hexagon socket (22 mm) for loosening and tightening.
1 Removing:
- Use a suitable wooden block (1) to counterchold mowing blade (2).
- Unscrew blade fastening screw (3) and remove mowing blade (2).
2 Installing:
Risk of injury: The mowing blade (2) must only be installed as shown. The tabs (6) must face downwards and the curved wings must point upwards.
Observe the specified torque of 10 - 15 Nm when tightening the blade fastening screws, as the secure attachment of the cutting tool depends on this. Additionally secure the blade fastening screw (3) with Loctite 243.
- Clean blade contact surface and blade bushing.
- Install mowing blade (2) with curved wings pointing upwards. Locating lugs (4) must be located in bores (5) of mowing blade.
- Use a suitable wooden block (1) to counterchold mowing blade (2).
- Tighten blade fastening screw (3) to a torque of 10 - 15 Nm .
12.7 Sharpening mowing blade
Risk of injury: Check blade for damage before installing. The blade must be replaced if notches or cracks are identified, if the blade is worn back by 5mm or if the blade is thinner than 1.6mm at any point ( 12.5) .
VIKING recommends having the mowing blade sharpened by a technician. Operation of the machine is impaired in the case of an incorrectly sharpened blade (incorrect sharpening angle, imbalance etc.).
Sharpening instructions:
- Remove mowing blade ( 12.6) .
Cool the mowing blade when sharpening, e.g. with water. The blade must not be allowed to display blue colouring, as this would reduce its cutting quality. - Sharpen the blade evenly to prevent vibrations due to imbalance.
- Observe sharpening angle of 30^ .
- After sharpening, remove any sharpening burr at the cutting edge using fine sandpaper if necessary.
12.8 Storage (winter break)
Store the machine in a dry and locked place that is generally free of dust. Make sure that it is kept out of the reach of children.
Only store the lawn mower in good operating condition, fold down the handlebar if necessary.
Keep all nuts, pins and bolts tightly fastened, replace danger signs and warnings on the machine that have become illegible, check the entire machine for wear and damage. Replace all worn or damaged parts.
Any machine faults must be completely remedied prior to storage.
Note the following points when storing the lawn mower for long periods (winter break):
- Clean all external parts of the machine with care.
- Thoroughly lubricate/grease all moving parts.
13. Transport
13.1 Carrying and securing lawn mower


Risk of injury:
Observe the safety instructions in the section "For your safety" (⇒ 4.).
Carrying the machine:
- Only lift the lawn mower by the transport handles (1, 2). Always ensure sufficient distance between the mowing blade and your body, particularly your feet and legs.
- Carry the lawn mower using both hands, with one hand at the upper transport handle (2) and the other hand at the lower transport handle (1),
or
- carry the lawn mower with one hand at the upper transport handle (2).
Securing the machine (lashing):
- Secure the lawn mower on the load floor using suitable fastening materials.
- Attach ropes or straps at the handles (1, 2).
14. Environmental protection
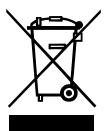
Lawn clippings should be composted and not disposed of in household waste.
The machine, its packaging and accessories are all produced
from recyclable materials and must be disposed of accordingly.
By disposing of materials separately, and in an environmentally friendly manner, valuable resources can be re-used. For this reason, the machine should be disposed of for recycling at the end of its useful life. Pay particular attention to the information in the "Disposal" section during disposal (4.7).
Consult your recycling centre or your specialist dealer for information on the proper disposal of waste products.
15. Minimising wear and preventing damage
Please always observe the following important information for the prevention of damage or excessive wear to your VIKING machine:
1. Wearing parts
Some parts of the VIKING machine are subject to normal wear even when used properly and must be replaced in due time depending on type and duration of use.
These include:
- Blade
- Grass catcher box
2. Compliance with the information in this instruction manual
The VKING machine must be used, maintained and stored with the care described in this instruction manual. Any damage caused by non-compliance with the safety, operating and maintenance instructions is the sole responsibility of the user.
This applies in particular to:
- inadequately dimensioned power cables (cross section),
- incorrect electrical connection (voltage),
- product modifications not approved by VIKING,
- the use of tools or accessories which are not approved or suitable for the machine, or are of inferior quality,
-
improper use of the product,
-
use of the product for sporting or competitive events,
resultant damage due to continued use of the product with defective components.
3. Maintenance operations
All operations listed in the section "Maintenance" must be performed regularly.
If these maintenance operations cannot be carried out by the user, a specialist dealer must be commissioned to perform them.
VIKING recommends that you have maintenance operations and repairs performed exclusively by a VKING specialist dealer.
VIKING specialist dealers regularly attend training courses and are provided with technical information.
If these operations are neglected, faults may arise which are the responsibility of the user.
These include:
- damage to the drive motor as a result of inadequate cleaning of the cooling air guide (inlet slots),
corrosive and other resultant damage caused by incorrect storage,
damage to the machine through the use of inferior-quality spare parts, - damage due to untimely or inadequate maintenance or damage due to maintenance or repair work not performed in the workshops of specialist dealers.
16. Standard spare parts
Mowing blade
63207020100
Blade fastening screw
63107102800
The fastening elements for the mowing blade (e.g. blade fastening screw) must be replaced when replacing the blade, i.e. when installing the blade. Spare parts are available from a VIKING specialist dealer.
17. Circuit diagram

1 Mains connection
2 On/off switch
3 connector
4 Capacitor
5 Engine
BL blue
BR brown
18. CE - Manufacturer's declaration of conformity
We,
VIKING GmbH
Hans Peter Stihl-Strasse 5
declare that the machine,
Lawn mower, manually-operated and mains-powered (ME)
manufacturer's VIKING
brand:
Type: ME 339.0
ME 339.0 C
Serial number 6320
conforms to the following EU guidelines: 2000/14/EC, 2002/95/EC, 2002/96/EC, 2004/108/EC, 2006/95/EC, 2006/42/EC
The product has been developed in conformance with the following standards: EN 60335-1, EN 60335-2-77
Applicable conformity assessment procedure:
Appendix VIII (2000/14/EC)
Name and address of relevant, named location:
Compilation and storage of technical documentation:
Johann Weiglhofer
VIKING GmbH
The year of manufacture and serial number appear on the identification plate of the machine.
Measured sound power level: 92.5 dB(A)
Guaranteed sound power level: 93 dB(A)
Langkampfen, 2013-01-02 (YYYY-MM-DD)
VIKING GmbH

Research and Product Development Manager

19. Technical specifications
ME 339.0 / ME 339.0 C:
Serial number 6320
Motor, design: Electric motor
Manufacturer Cleva
Universal AC
Type: motor
Voltage: 230 V~
Power input: 1200 W
Frequency: 50 Hz
Fuse: 5 A
Protection class: II
Type of protection: IPX 4
Cutting utilities: Cutter bar
Cutting width: 37 cm
Speed of cutting utilities: 3200 rpm
In accordance with Directive 2000/14/EC:
Guaranteed sound power level L_WAd 93 dB(A)
In accordance with Directive 2006/42/EC:
Sound pressure level 79 dB(A)
at workplace L_pA
Uncertainty K_pA 1 dB(A)
Cutter bar drive: permanent
Tightening torque for blade fastening
screw: 10 - 15 Nm
Wheel diameter
(front): 150 mm
Wheel diameter
(rear): 180 mm
Grass catcher box: 401
Cutting height 30 - 70 mm
Cutting height (Great
Britain only) 20 - 70 mm
ME 339.0:
Specified vibration characteristic in accordance with EN 12096:
measured value a_hw 0.82 m/sec²
Uncertainty K_hw 0.41 m/sec2
Measurement in accordance with EN 20643
L/W/H 122/42/107 cm
Weight 14 kg
Weight
(Great Britain only) 15 kg
ME 339.0 C:
Specified vibration characteristic in accordance with EN 12096:
measured value a_hw 0.55 m/sec²
Uncertainty K_hw 0.28 m/sec2
Measurement in accordance with EN 20643
L/W/H 128/42/107 cm
Weight 14 kg
20. Troubleshooting
If necessary, contact a specialist dealer; VIKING recommends VIKING specialist dealers.
Fault:
Motor will not start
Possible cause:
- No mains voltage
- Connection cable, plug, plug connector or switch defective
- Start button not pressed
- Motor is overloaded because the grass is too tall or too wet
- Motor overload protection activated
- Mower housing is blocked
- Fuse in plug faulty (GB version)
Remedy:
- Check fuse (⇒ 11.1)
- Check cable/plug/switch and replace if necessary (⇒ 11.1)
- Press start button (⇒ 11.3)
- Do not start motor in high grass, adapt cutting height (⇒ 8.4)
- Allow machine to cool (⇒ 9.5)
- Clean mower housing ( 12.2)
- Replace fuse in plug (x)
Fault:
Frequently tripped mains fuse
Possible cause:
- Unsuitable electric cable
- Power overload
Machine is overloaded due to mowing grass which is too long or too wet
Remedy:
- Use suitable electric cable (⇒ 11.1)
- Connect machine to another circuit
- Adapt cutting height and mowing speed to mowing conditions (⇒ 8.4)
Fault:
Excessive vibration during operation
Possible cause:
- Blade fastening screw is loose
- Blade is not balanced
Remedy:
- Tighten blade fastening screw (⇒ 12.6)
- Re-sharpen (balance) or replace blade ( 12.7)
Fault:
Poor cut, lawn turning yellow
Possible cause:
- mowing blade is blunt or worn,
rate of feed is too high in relation to the cutting height
Remedy:
- Re-sharpen or replace mowing blade ( 12.7)
- Reduce rate of feed and/or select correct cutting height ( 8.4)
Fault:
Starting problems or deteriorating motor power
Possible cause:
- Mowing grass which is too long or too wet
- Mower housing is blocked
Remedy:
- Adapt cutting height and mowing speed to mowing conditions (⇒ 8.4)
Clean mower housing (disconnect mains plug before cleaning) ( 12.2)
Fault:
Ejection chute blocked
Possible cause:
- Mowing blade is worn
- Mowing grass which is too long or too wet
Remedy:
- Replace mowing blade (⇒ 12.7)
- Adapt cutting height and mowing speed to mowing conditions (⇒ 8.4)
21. Service schedule
21.1 Handover confirmation
Model:

Date:
Next service
Date:
21.2 Service confirmation
Please hand this instruction manual to your VKING specialist dealer in the case of maintenance work.
He will confirm the service operations performed in the pre-printed boxes.


Service performed on

Next service date
Chere cliente, cher client,
Motor, type: electromotor
Fabrikant Cleva
universele
wisselstroommo
Type: tor
Spanning: 230 V~
Meting conform EN 20643
I/b/h 122/42/107 cm
Gewicht 14 kg
Meting conform EN 20643
I/b/h 128/42/107 cm
Gewicht 14 kg
20. Defectopsoring
Lu./La./A. 128/42/107 cm
Peso 14 kg
2000/14/CE, 2002/95/CE, 2002/96/CE, 2004/108/CE, 2006/95/CE, 2006/42/CE
2000/14/CE, 2002/95/CE, 2002/96/CE, 2004/108/CE, 2006/95/CE, 2006/42/CE
8.1 Mono-style (ME 339 C)
2004/108/EC, 2006/95/EC, 2006/42/EC
Varning - risk for olycksfall!
Varning - risk for olycksfall!
Varning! Hälsorisk pga vibration!
2004/108/EC, 2006/95/EC, 2006/42/EC
Driving knivbalk: permanent
Atdragningsmoment
knivskruv: 10-15 Nm
Hjul- fram: 150 mm
Hjul- bak: 180 mm
Gräsuppsamlare: 401
Klipphofd 30-70 mm
Klipphofd (endast for
2000/14/EF, 2002/95/EF, 2002/96/EF, 2004/108/EF, 2006/95/EF, 2006/42/EF
Anvendt procedure for
overensstemmelsesvurdering:
Tillag VIII (2000/14/EF)
Motor, type: Elmotor
Produce Cleva
Vekselstrøms- universalmotor
Spending: 230 V~
Forbrugseffekt: 1200 W
Frekvens: 50 Hz
Sikring: 5 A
2004/108/EC, 2006/95/EC, 2006/42/EC
2004/108/EC, 2006/95/EC, 2006/42/EC
2004/108/EB, 2006/95/EB, 2006/42/EB
2013-01-02 (MtMtMtMt-MnMn-DD)
VIKING GmbH

Weiglhofer
Stimata clienta, stimate client,
Conducerea executiva
1. Cuprins
corespunde cu urmatoarele directive CE: 2000/14/EC, 2002/95/EC, 2002/96/EC, 2004/108/EC, 2006/95/EC, 2006/42/EC
Conform directivei 2000/14/EC:
Nivel maxim de putere acustica LwAd 93 dB(A)
Conform directivei 2006/42/EC:
Eaipéia kααkeuic; VIKING
Túrroç: ME 339.0
ME 339.0 C
Avaywupion oepac 6320
Eivai evapovioevo e Tc npakatw Eupwnaikc Osnyic:
2000/14/EK, 2002/95/EK, 2002/96/EK, 2004/108/EK, 2006/95/EK, 2006/42/EK
To npoiov exe oεδiaoté kα
Kataokeuaotei ouwva e ta akoloutheta npotut:
EN 60335-1, EN 60335-2-77
2. O noJIb3OBAHnДaHHoI nHCTpyKcneI NO 3KcnpnyatauN
2.1 Ośzań Hópopaźna
He cIeNyET 3a6bIBaTb, yTO nOJIb3OBaTeJIb HeCet OTBeTCTBEHHOCTb 3a HeCuaCTHbIE CJIyauN C dpyuMn JIuCaMn IJIN 3a IN Co6CTBeHHOCTb.
UcTpoIcTBoMOxHOpeEaBaTb (OdaJIxNtBaTb)TOJbKO TeM IOnb3OBaTeJIaM,KOTOpBIE3HaKOMbl C DaHHoMoJeJIbIOuMeIoT O6paUaTbC Hm.IpeEaBaTb yCTpoIcTBo CJIeDyET BCerDa BMeCTe CINHCTpyKUnei PO 3KcNJIyatauIN.
3To yCTpoiCTBO He npEHa3NaueHo dIy IONb3OBAHnI LIuAMn (B OCO6eHHocTn DeTbMn) C fN3NuueCKIMN, NCNXUeCKIMN IINu YMCTBeHHbIMN HeDOCTaTKaMn, a TaKke C HeIOCTaTOUHbIM ONbITOM N/INI HeIOCTaTOUHbIMN 3HaHnIaMn, 3a NCKJIIOUeHNEm, ECJN OHN HAXOJaTcR PoI Na6JIIODeHNEM LIua, OTBeTCTBeHHORo 3a INx 6e3OpaCHOCTb, INI NOnyuaOT OT HeRo Yka3AHnI NO pPImHeENIO UCTPOiCTBa. DInr TOrO yTO6bl NCKJIIOUCHtB BepoarTHOCtB INrP c UCTPOiCTBOM, DETr NocTOJHO DOnjXhbl 6blTb NpICSMOTpOM.
BHMaHne - onachoctb hecuaCThbIX cnyuaeB!
CneNyET TuaTeJIbHO OCMOTpeTb yUaCTOK, Ha KOTOpOM 6yJeT pa6oTaTb yCTpoiCTBO, nY6paTb BCE KaMHN, NaKN, PPOBOJOKy, KOCTN IN DpyrHe NOCTOPOHnE PpeDMeTbl, KOTOpBIE MOyT 6bITb OTbOpeHbI yCTpOiCTBOM.
IpeeI nCnoJIb3ObaHnem Heo6xoJIMOBn3yaJIbHO npOBepaTb coCTOAHnepeKyuIero IHCTpyMeHTa, KpeNExKhbIXBnHTOB INBCero pexyIeTo MexaHn3Ma,OCo6oe BnImaHne o6paTntbHaHaJeXHOCTbΦIKCaUIM,KOHpOJInpoBaTbOTCyTCTBnE IOBpeKdEHHn IN3HOCA ( 12.5)
Ipeed nCnoJb3ObaHnem ycTpoiCTBa CneJeYe 3aMeHNt bN3HOWeHHbIe NIN NOBpeKdEHHbIe DeTaJI. NOBpeKdEHHbIe NIN HeueTKHe NaKeIeKN Ha ycTpoiCTBe C ppeDynpEckDeHnAMn Uka3aHnAMn O6 IMHeoUxxCnOaCHOCTX Heo6xOIMO
BOBpEmoHOBJIb. HakneiKnIJIA3aMeHbIMeIOTCB HaNnUINBCNEuaJIn3uPoBaHHOM cHTpe VIKING.
3anpezaetc BkHouatb Dnuratelb 6e3 npaBnJbHO yCTaHOBJeHHORo HOxa.
Onachoctb neperpeBa dBurataJIa!
3anpeaaetcnaonlb30BaTbKocnky c
noBpeJdeHHbIMN 3aunTHbIMN
npncnocobJeHnAMy,6e3
fynkUHOHpyuOeTO TpMO3aDbIrTaTeJIa a TaKke 6e3 3aunTHbIX npncnocobJeHn,
HaNPmep,6e3 OTKnIDHO KnblKn nIIn
yctpoiCTBa dIra c6oPa TpaBl.
IIO COO6paJxHnIaM 6e30NaChOCTu HeJIb3a IcNoJIb3OBAuTb NOBpeKdEHHbI TpaBOc6OpHnK.
UcTaHOBJIeHHbIe Ha yCtpoiCTBe nepeKJIuOaIOUIne npncnOCoJIeHn 3aIpeJaaETcYdaJIaTb INJI uHTnpOBaTb (HaIpIMep, CBa3bIBaRpbIyar OCTaHOBKn DInrataTeJIHa BeDuIe pyUke).
CneJeT co6IIOaTb Tpe6oBaHnraIaBbl "IpeDynpexKdHne - onaChOcTn 13-3a 3JIeKtpuYeCKOrToKa" ( 4.6)
4.4 DeiCTBn npu Kocb6e
B onacHoi 30He 3anpeueHo
InpncyTCTBVE NocToPOHHnx JnU,
B OcObeHNOCTn DeTeu
JXBOThbIX. BblIOJIHrTa pa6oTbI
OCMOTpNTeJIbHO, YTO N03BOJIHT
NCKIIIOHTb BO3MOxHHyO ONaCHOCTb InIa DpyrNX JnU.
He cIeJeT Kocntb npi TempePaTypax OkpykaIoSei cpebl Hnke 5^
HeKoCIneMOKpyu TpaBy,aTaKKe HNkoTda He KocTe BO BpeMdoXdJa. KoSeHne MOKpoTpaBbMoKet npNBecTn KHeCuaCTHomy CnyaHO(HeycTouHBOe NOJooKeHneNoJIb3ObaTeIa).
Kocnte ToIbKO npn DHeBHom CBTe nn npn XopoWem OCBWeHEn.
Для nуcka yctpoiCTBa ero cneIyet пocтавит ha pOBHyIO nobepxHocTb. ПрИ Зауcke ДВиraTeЯ 3aIpeuaeTcA ОпрКидыВaТь yctpoiCTBO.
3anyck DnBraTeJ npOn3BoDInTe C octopoxKHOCTbIO, co6JIIOaYka3AHn rIaBb I BBeJeHne yctpoiCTBa B pa6OToy ( 11.) . HOrn DoJnxHbI haxoINtbcr Ha doCTaTOUHOM pacCTOaHmOT pexJuero INHCTpyMeHTa.
IpeeBnraTecb c yctpoiCTBOM TOlbKO B TeMne 7ara - npu pa6oTe 6bICTpoe nepeBnXKeHne 3anpeSeHo. BcNeDCTBne 6bICTPOrO nepemeUeHnBa 03paCTaet OnaCHOCTb HeCCHaCTHbIX CnyuaeB N3-3a CNOTbKaHn, CKOBXeHn I T. n.
BbIKHouTe DnurTaTeJIb,
- ecn Kocnilky HxKHO cIeRka HaKnloHITb npu TpaHCnpTupOBKe nO yuaCTky, IINSeHHOMy TpaBbl,
-припегемшени КocилкіК СkaшиBaemomy yuaCTky И орразно, - nepeid cHrTnem TpaBoc6opHnka.
Bcerda cIeDInTe 3a npabunbHbIM
noJoxeHnem yCTpoINCTBa Ha cKnOHa. He
Kocnte Ha cnNtKom KpytbIX cKnOHaX,
YTO6bl He nOTepaTb KOHTPOJIb HaI
yCTpoINCTBOM.
ПюяВЯп Te OCO6уO OCTOPOKHOCb Iprn ИЗМЕн ИН HAnpaBNeHЯ ДВИЖЕнЯ Ha СКЛоHe C Tem, YTOБы He NotepaTb КОHTpoЛb HAd yCTpoIcTBOM.
Дигагьс седует пораз ecлona,нкогда He KOCITE BHN3 nIN BBepx NOCKHONY,чTOбI пri BO3MOXHOn NOTepeKOHToPЯ NaI yCTpoIcTBOM He nonaCtBPOД DBNkUyUOcR KOCUNKy.
BhImaHne - onachOcTb CNOTKHyTbC!
Co6IIOdaIte oO6bYIOCTOpOXHOCtB npi DBIXeHN Ha3aI N pRn POITrNBaHN KOCNJIKN.
Будьт ecobocotopoknbl,ecn Bbl nobopaunbaete yctpoiCTBO nnn noDburaete erK ce6e.
I3 coo6paXeHn 6eONaChocTn 3aIpeSeHO nCNoJIb3OBaTb yCTpoIcTBO Ha ckIoHaX c NOpJbeMOM 6Oone 25^ (46,6%).
Onachoctb noJyueHn TpaBm!
YroJHaKIOHa 25° COOTBeTCTByET
noDbemy 46,6 CM Ha KaXDbIe 100 CM no
rOpn3OHTaJI.

O6paTnTe BHNMaHne Ha To, YTO IO NOHOr OCTaHOBKn pa6oynI INCTpyMeHT eUe HeCKoJIbKOceKyHd DnBxKeTcN PO INHePzMn.

He nbTaIteCb OcMaTpNBaTb HOK BO BpEm pa6Otbl KocNJKn. 3anpeuaetcra OKpbBaTb
OTKnHyO KpbIuKy I/INn CHImMaTb TpaBOc6OpHnK Do NOnHOJ OCTaHOBKn HOJa KocNIKn. BpaUaUoNciSry HOX MOKeT CtA Tb npUHnToTeJIeCHbIX NOBpeKdEHi.
Hnkorga He 3akpenIyTe npedMeTbHa
BedeUe pyuke (Hanprimep,pa6ouyo
Odekny).He donyckaTb HaMaTbIBaHnra
yDInHHTeJbHOro Ka6eJI BOKpy BeDuSei
pykN.
PeryIpaHNO npOBepaTe qnkcauHO HOka, OTCyTCTBVe NOBpeKdEHN I N3HOCA ( 12.5)
BhImaHne - onachoctb noJyehnTpaBM!
HnkOrda HnIb3a KnaCTb pyKn Ha BpaAuaOuNeCra DeTaJI Nn 3aIpeSeHO npKacatBcR K uemcy Hoxy. Heo6xoJMo axoDHTbcr Ha HeKOTOpOM HnO T OTBepCTnI dNbBbPocaleo6xoJMo BcerDa coXpaHrTb Hoe paCCToAHne O t yCTpOiCTBa, EHHoe BeDuUeI pyKoI.
Heo6xOJIMo n36eraTb yactbIX BkIIOUeHnB TeueHne KOpOTKOrO nepNoDa BpeMeHN, B OOCeHNOCTn He IOnyckaJIte «Irpyi》C NpCKOBONKONKo. OnaCHOCTb neperpeBa DBrarateJI!
Bpe3yIbTaTe KOle6aHn HnapJxHeNIA, Bbl3BaHHbIX 3TtM UcToPcOBCTBOM pIn PyCKe, B Cnyuae He6JIaROpnraTHbIX npaMeTpOBe cTe MOnKHO NOBpeDNTb Dpyroe
06OpUdoBAnHe, PNOkJIIOUeHNoe K Toi JxE
3JeKTPnuCeCKo Zen. DnA
PpeODTbPaUeHNr NOIO6HOu CNTuAuzm
Heo6XoIMo IprnHbTcoOTBeTCTByUOzne
Mepbl (HaNPmEp, NOkJIIOUeHNe DaHHOrO
06OpUdoBAnNr K DpyRoY 3JeKTPnuCeCKo
ZePi, pa6Ota YcToPoIcTBa B
3JeKTPnuCeCKo ZeNi C 6OJIee Hn3KMn
PONHbIM COpOToBVeHnEM).

BbIKHouTe DBrTaTeB, BbIHbTe ceTeBOI wTeKeP n y6eDnTeCb B noJIHO OCTaHOBKe peKyuJero
UHCTpyMeHTa,
Ipeed Tem KaBbInOpHnTb pa36JIOKIpOBaHne nnuYcTpaHnTb 3a6bBaHnB K aHaJIe Bbl6pOca;
- Ecni pexyuynn HnctpymeHT 3aJeI kakoi-lno6o noctopoHnn npedMeT, Heo6xOIMO npOBepuTB ero Ha BO3MOXHbIe NOBpeKdEHHy. 3aPpeuaetc npBODntb B deiCTBne ra30HOKOCUNky C NOBpeJdeHHbIM IINI TORHyTbIM HOKeBbIM BaJIOM IINI BAJOM DBNrTaTeJI. OnachOCTb TpaBMnPOBaHnN u3-3a DeΦeKTbIx Detanel!
- nepei npOBepKoKocnKn, OunchKoHnn nepei BbIOnHeHneM pa6OuXn Oepaun Ha KocnKe, (HaNPmep, nepei HacTpoKoB BbICOTbl Cpe3aHnA, OTKnDbIBaHnEM/yCTaHOBKO BeDyuee pyuKn B 3aDaHHoe nIoJoxHne);
B CNYaae NOBJIeHn y KOCJIKn HEnPnIBbIHyNO CINbHbIX Bn6paqni. BCE yCTpoiCTBO, B OcObeHHocTn pexuui INHCTpymeHT Heo6XODmO BCerda npOBepaTb Ha OTCyTCTBne NOBpeXdEHN I HeIOCTaTOUHO 3aKpeJIeHNbIX DeTaJIe.IpePeI DaJIbHeNWe EKcIIpyaTaUeI CneDyET 3aMeHNTb NOBpeXdEHbIe DeTaJIIn, HeIOCTaTOUHO 3akpeJIeHNbIe DeTaJIIn COOTBeTCTBeHHO 3akpeINbI INI 3aTAYTb.
ecnBbOCTaBJIeTe yCTpoIcTBO nI ne ccn OHO haoOnITc63 NaD30pa;
-пегд подемом Или пеонocom устюйства;
-пегдтрансортуково.
3aIpeuaeTcnoHMaTb nI nepeHoCnTb KocNlKy c pa6oTaHouIm DnIraTeJeM nI C NOkJIIOueHHbIM K 3JIeKTPocEtncTeBbIM Ka6eJeM.
Ha yctpoiCTBe 3aIpeuaaTc8 napeBO3ntb IIOdeB uactHOCTn dTee NII npedMeTbl.
4.5 TexHnueckoe 6cbnyKbHaHne, ouHCTka, peMOHT uXpaHeHne
Ipeed Bcemn pa6oTaMn Ha yctpoiCTBe,peep erO yCTaHOBkoN uIN OuNCTKOJ,UNI
peepnpOBepKoCoeINHtBHO npOBoJa Ha OTCyTCTBne nepenIeTeHn IINIOBpexKeHn, Heo6xOIMO BbIKIQUHTb KOCUKNy IN BblHyTb BNkky N3 CETN.

PpN BCex pa6oTaX c pexyIIMMEXaHn3MOM Heo6xOJIMHOaDeBaTb npouHbIe nepuATKn.
Ipeed yctaHOBkoHa xpaHeHne B 3aKpbITOM NOMEseHn, nepei pa6oTaMn IIO TexHnueckOMy O6cLyJKNBaHNIO UOCHTE daTe yCTpOINCTBy OCTbITb.
BbIOpHnIe ToIbKo Te pa60TbI nToTexO6cnykINBaHHO, KOTOpbIe OINCaHbIBDaHHo INCTpyKuIN IO 3KcPlyaTuIN. Bce IpyrIe pa60TbIOJIKHbI npOn3BOAnITbcra CneUaIN3InpOBaHHbIM ceHTpOM.
KOMnHaNVIKING peKomeHnyet BbIOnHrTb pa60tbl no TEXO6cIyJxuBaHIO npeMOHTy ToJIbKO B cneuaJIn3nupoBaHHom ueHTpe VIKING. CneuaJIn3npoBaHHbe cepBvCHbIE ueHTpbI VIKING peryJIrpHO npeJnaraIo T Kycbl n ppeIoCTabJIaOT TexHnueckyo HOpMaUIO.
PnHexBaTKe Heo6xOuMbIX 3HaHnI nn BCNOMORAteIbHbIX CpeICTB BCErda o6paauTeCtcb CneuaJIn3uPoBaHHbI ueHTp (KoMaHnY VIKING peKomeHnyET cNeuaJIn3uPoBaHHbI cepBnCHbI ceHTp VIKING).
Применяп TeToJbKOOpuHnHaJIbHbIe INHCTpymeHTbl, KOMJIneKToUOuIe N 3aunactn.В npOTNBHom clyuaye
BO3MOXHbI HeCuaCTHbIe CnyuHaN, IINBODJxUe K TpaBMam NJIIN NOBpeKdEHHo yCTpOiCTBa.
KoMaHnY VIKING peKOMeHnyeT npMHeHtB opuHaJIbHbIe INCTpyMeHTbl, opuHaJIbHbIe npHaIJIeXHOCTN 3aNaChIbe qAcTNI VIKING. OHI no CBOIM KaueCTBaM ONTImaJIbHO COOTBeTCTBYIOT yCTpOJCTBy n Tpe6oBaHnA m NOJIb3OBaTeJI.
OpunHaJIbHbIe 3anaChIbe qactNI VIKING ONo3HaIOTcno Homepy 3aNaCHO uactNI VIKING, no HaJnncu VIKING n npn Heo6xoImOCTn no 3NaKy 3anaChbIX qactei VIKING. Ha MaJIeHbKIN DeTaJIAX 3HaK MoKeT cToRb TaKKe OTDeJIbHO.
ДяТOrO yTo6bI yCtpoiCTBO pa6oTaNo HaJeXHo, CNeIeYeT 3aTЯrNbaTb BCE raiKn, 6oNTbI N BnHTbI Do ynopa.
Pergnno npovepa Te npncnocobne Hnna c6opa TpaBbHa oTCyTCTBn e 3Hocaa, nobpejdeHn Ha pa60tocnoc6hoctb.
Ecn npexyunn HNCTpymEn Tnn ra30HOKOcnilka 3aJeI N KaKoe-Jn6o npenTCTBne IIN NOCTOPOHn INpeDMET, TO Heo6XoIMIO OCTAHOBNTb DVBraTeJIb, BbHyTb BNkU n3 CeTN n PPOUN3BecTn OCMOTp.
HaKneiHa yctpoiCTBe C npdeynpexkJeHnMaN uYka3aHnMaN o6 NMeOuNXc ONaCHOCTx, CTaBwne Hepa36OpUHBIM, Heo6xoJIMo 0bHOBJTb. HaKeiKn dJa 3aMeHbI NMeOTcB HaNUnB CneuaJIn3npOBaHHom ceHTpe VIKING.
Cetebo coeHnHtIbHbKabEJIb pa3pe7aeTc3aMeHrT ToIbKO aBTopu3OBaHHbIMn CneuaJIncTaMn cepBnCHOrO ueHTpa.
Bo n36eXaHHe BO3rOpAHnI oBlaactb BeHTnJIaLIOHbIX OTBepCTn MExdy KOKyXOM DvIraTeI N KOPnyCOM DOJXHa
6bITb YNCTO, HAnpIMep, OT TpaBbl, COJIOMbI, Mxa, JINCTbeB ININ BbITEKUeM CMA3KN.
B cnyuae cnaTnKaKnx-Im6 DeTanei nn 3aunTHbIX npncnocO6JeHn BO Bpem npoBeHeNpa60 Texo6cLyKuBaHnIO nx Heo6xOdIMo HemeJleHHO CHOba yCTaHOBnTB Ha MeCTO B COOTBETCTBn C npeDnucHnMn.
Iocne pa60TbIra3OHOKOcNlky
TuataTeBbHO OuNCTnTb. 3aPeeuaeTcR
NCNoJIb3OBaTB aannapat BbICOKO
DaBHeHnA DnA OUHCTKn, a TAKKe
IpOMbIBaTB r3OHOKOCNlky CTPyAMN BObl
(Hanpimep, pni NOMoUs CaIOBOrO
ShaHa). 3aPeeuaeTcN cNoJIb3OBaTB
arpeCCNBhBue YnCTaUne CpeDCTBa. TaKHe
CpeDCTBA MOrTy NOBPeDnTb PNaCTMaCCy N
MeTaII, YTO MOxET BbI3BaTb HApUSeHne
6e3OpacHoi kCpIpyaTuIN yCTpoiCTBa
VIKING.
PeryIpaHNO npOBepaTe BCE yCTpoiCTBO -OCo6eHNO nepeJ yCTaHOBkoI erOHa
XpaHeHne nepeJ dInIteJIbHbIM
nepepbIbOM B 3KcIIpyaTaUIN (B 3IMHNI
pePiOn) - Ha OTCyTCTBnE n3HOca N
NoBPexJeHNI. Jnra TOrO YTO6bl
yCTpOoiCTBO Bcerda pa6oTaIIO HaJeXHO,
CNeJeYET HeMeIeHNO 3aMeHrTb
n3HOWeHHbIe INI IOBpeXDeHHbIe
dTeaII.
OCTbIBWJyIra3OHOKOINKy Heo6XODIMHOaEXHoxpaHNtB CUXOM 3aKpbITOMNOMEeHNN,HeoCTynHom dIJI dTeI.
IpeedepBbIM npMHeHnEM pOChTaTb INCTpyKuIO NO 3KcnpyatauIN.
Onachoctb noyuychen TpaBM!
3anpeueho npucytBne noctoPOHHX LIUC B pa6oey 3OHe.
Onachoctb noJyuHn TpaBM!
O6paatabca octopoxho c OCTpbIM HOKOM KOCINK. HOX KOCINK INPOJONkae BpaaTbCS NO INHEPUNB TEUHNI HeCKONbKIX CekyND NOCNE BvIKIQUHeHNA (TOPMO3 DvIRatela/ HOXA). DBVIRATENB CLeDeYe BBIKIOUHTb IN BByHUYTB BUNKY n3 CEtn: nepeD paobotamn C pexyuIm INCHTPymENTOM, a TAKKe nepeD paobotamn ITOxHNUeCKOMy 0CJIyXuBAHIno IN ONUCTKe, nepeD npOBepKOI COeHNITbHOrO KaBeJHa OTCyUTCTBVE 3aNyTbVAHnJnI IOBpeJdEHnI IN pepeD TEM, KAK OCTaBtB yCTPOINCTBO.

Onachoctb nopaxeHn3JleKtpueecknM TOKOM!
CoeHINHTeNbHbI Ka6eJIb DOJIKeH HxOJITbCn Ha 6e3oNaChOM paCtOHNOT peKyuJero MExaHIn3Ma.
ME 339:
3aynctntb DnBraTeJIb.
ME 339 C:
3aynctntb DnBraTeJIb.
ME 339 C:
OctaHOBITb DBNrAteJIb.
6. Komnjekt noctabkn
ПОЗ.ΗΝΜΕΝΟΒΑΝΙη
A Ba3OBoe yCTpoiCTBO 1
B BepxHЯ qacTb 1 TpaBoc6OpHnKa
C HxHnJa YacTb 1 TpaBoc6OpHnKa
D Paine 2
IHNCTpyKcNnno 1 3KcPnyatau
ME 339 C:
E 2
F BnHT 1
G BoNT 1
H 3axim 2
I BbICTpoJeIcTByUoIuI 1
ME 339:
J BnHT c noIynoTaHNo 2 roJIOBkoI
K ČeρЖaTeJIb Ka6eJIa 1
L Поворотая руcka 2
M 3axim ka6eJ 1
i TTo6bI He DoOnyCTnTb IOBpeKdEHN, MNHIMaJIbHyO BbICOTy Cpe3aHINcJeDyET IcNoJIb30BaTb JInuB Ha rA30HbIX yUacTkax C pOBHOJ NOBepxHOCTbIO.
YctaHOBka BbICOTbI Cpe3aHnA:
Clerka otXkabpykoarky perynilnpOBKn BbICOTbl (1) OT ra3oHOKOCnIKn TaK, YTO6bl OCBO6OuNTb pykoarTy O T nnKcnpuyuux N BbICTynOB (2).
- MakcimalbHaj BbICota Cpe3aHnja: PpInnoDnHtB rA3OHOKocNky 3a pyKoTky peyInpOBKn BbICOTbl (1) (pyKoTka nepeMeaetcBnepeJ). MinImalbHaj BbICota Cpe3aHnja: HdaBnTB BnI3 Ha rA3OHOKocNky, nCNoJIb3yra pyKoTky peyInpOBKn BbICOTbl (1), (pyKoTka nepeMeaetcHa3aJ).
HaxaTb pyKoTky peRyIuPobKn BbICOTbl (1) K ra3OHOKOCnJIke, YTO6bl 0NKcnpUOUIne BbICTynbl (2) BOJIN BpyKoTky. BbIbpaHHb I yPoBeHb BbICOTbl Cpe3aHnM MoXHo BnDeTb Ha cAmOM npeEHNem 0NKcnpUOUIe M BbICTyne (3).
9. Pekomehdaци no pa6oTe
He BKNHouaTbra3OHOKOcNJIkyB BbICOKOITpabe INPi npn cAmo HN3KO BbICOTcpe3aHnI.
Tg30HOKOcNlky pa3peuaaetcHa rpykaTb TOJbKO TaKIM O6pa3OM, YTO6bl YaCTOTa BpaueHnna 3JeKToDvBraTeIeI npn 3TOM CHNXKaNaCb He3HaunTeJIbHO.
11.5 INHdNkaTOp 3aNoJIHeHnA

HaBepxHeJuaCTn TpaBOc6OpHnka yCTaHOBJIeH INdIKaTOP 3aNoJIHeHnI (1).
Bo3nyuHbI NOTOK, Bo3HnKaHOUcN 3a Cuet BpaueHn H0Xa KocuKIN cnOCo6CTByUcN 3aOpJHeHIO TpaBoc6OpHnka TpaBOi, npINOdHmMaet INDnKaTOp 3aOpJHEnHn (2): TpaBoc6OpHnK 3aOpJHReTc spe3aHHoT PabOi.
EcnTpaBoc6OpHnK 3aOpHHeN TpaBOi,TO BO3dUshbI NtOk UMeHbuaeTcN INHdNkaTOp 3aOpHHeHnOnyckaAeTcN (3):
OnyctoWntb 3aNoJIHeHHbI TpaBoc6OpHnK ( 11.6)
11.6 OnyctoWeHne TpaBoc6OpHnka

- BbIKHouHTb DbVraTeIb (⇒ 11.4)
и ChrTb TpaBoc6OpHNK (⇒ 8.3). - OTkpbltpaboc6opnK 3a
- pKcnpyuoyu npnaHky (1), nOTknHyTb
- Habepx BepxHIO uactb
- TpaBoc6opnKa (2).
- YdepxkBaTb TpaBoc6OpHnK 3a pyuKn B BepxHeuactn (3) nB HnXHeuactn TpaBoc6OpHnKa (4), KaK n3o6paxKeHo Ha pncyHke, nOnycTooHtB.
12. TexHnueckoe 06cIyXnBaHne
12.1 Ośbań Hópopmaṇia
Onacnoctb noJyueHn TpaBM! CJeNyET c6bnOaTb npEnncAHn no Texnke 6e3oNaChocTN B rnaBe "Texnka 6e3oNaChocTN" ( 4.)
ExeroHoe Texnueckoe o6cnykubHne B cneunaIIN3npOBaHHOM ueHTpe:
HnkOrda He HappaBnTb Ctpyn BObbl Ha y3JIb I DBnIaTeJra, yNIOThHeHn I ONOpHbI MeCTa, a TaKKe Ha KOMNoHEHTbl 3JeKtpoo6OpyOboHn, KaK, HApnpMep,
BbIKIIOUaTeJI.N. PnHecO6JIIODeHIN BblIeYka3aHHOrO CJIeICTBnEM MOKET CTaTb DOpOROCToAun peMOHT.
Ecnn 3aqrpa3HeHn He ydaeTcYdAJIntb C nOMOuB OBObl, UeTKN INI TpAINK, TO VIKING peKoMeHdyET npImeHrTb cneuaJbHbI ONUCTInTeNb (HaNPmep, cpeuaJbHbI ONUCTInTeNb STIHL).
12.3 3JIeKtpoDbVaTeJbI KOneca
3NeKtpoDbBnRaTeIb He Tpe6byETexHnueckoro 06cnykBaHnIy.
Пошиннки КОЕС He Tpe6уOT texhnueCKOrO o6cnykBaHnA.
12.4 BépxhЯ qacTh b VeDuyei pyuKIME 339
Ebponeckoro Co06eCTBa (EC):
2000/14/EC, 2002/95/EC, 2002/96/EC,
2004/108/EC, 2006/95/EC, 2006/42/EC
I3dennne 6bIIO pa3pa6oTaHO B
COOTBETCTBNN CO CNeIyUOuIMN HOpMaMn:
EN 60335-1, EN 60335-2-77
PpIMeHnBmMeToD OceHKn
COOTBETCTBNAI INpeKTHiBaM:
- BnHT Hoxa ocna6JeH
-HoH He OToBaJHaNcIpuObaH
YcTpaHeHne:
- 3aTЯнHyTB BnHT Hoxa (⇒ 12.6)
- HoX 3aToUHTb (OT6aIaHcnpoBaTb) nII 3aMeHHTb ( 12.7)
Hapyuelsen:
HeuTcTe cpe3aHne, ra3OH cTaHOBNTcJ KeTTbIM
Bo3MOxHa npuynHa:
-HoK KocnKn 3aTyPJIeH nIIN I3HOuHeN
- CkopoocTb DnBxKeHnCnIuKOM 60JIbUaI NO OTHOWeHnIO K BbICOTcpe3aHnI
YcTpaHeHne:
HOK KOCINIKI 3aTOUYTB INN 3aMEHNTb ( 12.7)
- YmehbintbCKOpocTbBnXeHnN/INBbI6paTb npaBnIbHyO BbICOTy cpe3aHn ( 8.4)
HapyeHne:
3aTpydHeHHbI pyCK nJIM MOUHOCTb DBrVaTeJIa CHNkaeTCa
Bo3MOxHa npuyna:
Kocb6a CnNtKOM BvICOKO ININ CnNtKOM MOKpOITpaBbl
Kopnyc ra3oHokocuNKn 3a6nt TpaBoi
YcTpaHeHne:
- YCTaHOBtB BbICOTy Cpe3aHnI NCKOPoCTb KOCb6bl B COOTBeTCTBnI CycIOBnIM KOCb6bl ( 8.4)
OuHCTnTb KOpnyc KocnIKn (pepeouchKoB BblHyTb BNkky n3 CeTu) ( 12.2)
Hapyuelsen:
3a6nt KaHaJ BbIbOca TpaBbl
Bo3MOxHa npuHnHa:
HoxkocnilnN3HOweH
Kocb6a CnIuKOM BbICOKO INN CnIuKOM MOKpOINpaBbl
YcTpaHeHne:
- 3aMeHHTb HOX KOCNIK (⇒ 12.7)
- YctaHOBtB BbICOTy Cpe3aHnI N CKOpOCTb KOCb0bl B COOTBeTCTBnI C ycIOBnM N KOCb6bl ( 8.4)
Pa60THN CTbIKN, KONTO N3NCKBaT DeiCTBnE OT CtpaHa Ha nOTpe6nteJIa:
Pa3BnIe 6oTtA (1) c OTBePtKa, 3aJeCTBaIte IocTa (2)...
Obu n36po8BaHnA:
I3no3BaHe Ha npOdyKa Ta npi CnpOTn IIN CbCTe3aTeHm MeponpnaTn
TeKCTOBe C dONbJIHNTeJIHO 3HaueHHe:
Te3n nacaxn ca o6o3naueHn c eDINH OT OINCAHNTE NO-DOJy CnMBOJI, 3a Da 6bDaT Te no-dO6pe OTKpoEHN B INHCTpyKUInraTa 3a EKCNIOatauia.
Onachoct!
OnachocOT 3nnonolyka n Tekko HapaHbAHe Ha xopa.
U3BbPbBaHeto Ha onpeJeIeHn DeiCTBna e Heo6xoJIMO NJI
Tp6Ba da ce n36rBa onpeJeIeHo NOBeJEnHe.
A PpeDynpexdEneHie!
Onachoct OT HapaHraBaHe Ha xopa.
N3BbPbBaHeTo Ha onpeJeHn
IeJCTBnI ppeIpa3Ba O T Bb3MOXHINJI IN BepoTHN HapaHbAHNA.

BHHMaHHe!
Jekn HapaHbAHn nI MaTePnaJIHn uEtN MoRat da 6bDat npedOTBpATEHc N3BbPbBaHe Ha onpeJeHn DeiCTBn.

Yka3aHne
HOpMaun 3a no-do6po
nIOn3BaHe Ha ypeJa n 3a
n36raBe Ha eBeHTyaJHOTo My
He npabNJHo o6cnyXbaHe.
Tekctobe, OTHacraun Ce KbM fHpynp:
Фигупе,HaКоИTO e ПOKAZHЯчIHbT Ha yNOTpe6aHa ypeda,ce HAMIpaT B NaHauJIIoTO Ha INHCTpyKcIyra 3a ekCnIIOaTaця.
To3n CnMBOJ NOKa3Ba Bp3kata Mekdy fHpynte B HauaIOTOn CbOTBeTHNr TEKCT B INHCTpyKuYra 3a ekCnIIOaTaun.

3.Описанце на урEDA

1 Togna yacnt Ha locta 3a ynpablenne
2Долна чаг На locta 3a управленье
3 Kopnyc
4 Kanak Ha DnBraTeTna
5 3aHNO kOJIeNo
6 IpeDn KoIeNo
7 Kow 3a c6bpaHe Ha TpeBa
8 Topha pBkoXBaTKa 3a HocHe
9Долна ръкoxВаТka 3a HOceHe
10 DeΦneKTop
11 Bbptyca ce loct
12БьрзэateraTeHnO npucno6JIeHne
13 JIoCT 3a cnipane Ha DnBiratela
14 JIoCT 3a peRyIinpaH e H bVcOuHHaTa
15ПпспособленьезИЗТeглЯн e npибиран e Na Ka6ena
16 BkIIOUcbAe BMpexKaTa
17 BytoH 3a cTapTnpaHe
18Фирмeha Ta6eJka
4. 3a Baωata 6e30napCHOCT
4.1 O6uyn yka3aHnna

Ppi pa6oTa c KocauKaTa 3aIbJIxNtEJIH0 CnA3BaIte Te3N yKa3aHn8 3a IpeIoTbPaTЯBaHe Ha 3NoIOnyKn.

Ipei nIbPBoTo npcKaHe HaypeaB DeIeCTBnE BHIMaTeHNO npOueTe Te IJNaTa INHCTpyKzna 3a ekCIIoAtaqnI n J 3ana3ete,
3aДаЯпОЗВATEИВБыдeш.
3aio3HaIte Ce c KOMaHdHnTe eJeMeHTn I C NaHHa Ha yNoTpe6a Ha ypeDa.
Ipei Da n3noJI3BaTe ypeJa 3a nbpBn
IbTe Heo6xoJIMO da 6bJeTe
IHCTpykTIpaHOn OT npOdaBaUa nnDpyro
KOMnTeHTHO JInCe.
Hcpepaeeba pa6ota c kocaukata
Cnei KOHCymaunHa aIkoXoJ, pniem Ha
MeNKaMeHTN, KOnTO BNoBaBAT
cnoc6HoCTTa 3a pearupaHe, nIi
HapKOTn.
He no3BoJBaIte HnKOrHa Ha Deca, MnaJedexn PoD 16 roDInH nIe TpeT IuCa, KOINTo He Ca 3aNo3HaTn C Ta3n INHCTpyKcIy 3a EKcNlOaTaCnA, Da n3POn3BaT KocayKaTa.
MecTHn pa3npoe6moraT da onpeTeIa pa3JIuHa MNHMaJHaTa Bb3paCT Ha IInCeTo Notpe6nteI.
He kocete HnKora B 6IIN3OCT Do xopa, OOC6eHO DaCa, INN JXNBOTHN.
O6bprHeTe BnImaHne Ha qKaTа,Ye IOTpeBnteJIr T HOCN OTROBOPHOCT 3a 3JIOJOLyKc C npTu NIIu NA JIN MaTePnaHNI UETn HA TExHa CO6CTBeHOCT.
UpeIbT MoKe Ia Ce IpeIOCTaBra (OTdaba IOI Haem) cAmo Ha IInuca, 3aNo3HaTIN npHUnnHO C To3n MoJeN pa6OtaTa C Hero. 3aeJHo C ypeDa BnHarn IpeIOCTaBraIte N IHcTpkyKunraTa 3a EKcJIIOaTaunr.
To3n ypei He e npdeHa3NaueH 3a n3noJI3BaHe ot Xopa (ocObeHo OT deca) C orpaHnueHnФn3NueCKn, CeTbHNnIy mCTBeHn cNoOC6HOCTn IyIOT NlIcA C HeIOCTaTbueH ONIT N/IIIN PO3HaHn, OCBeH aKO He ca PoId HaN3Opa Ha JIuCe, OTROBOPHO 3a TExHaTa 6e3OpacHOCT, INIe He ca NOJUynI INHCTpyKuIN OTHOCHO PON3BaHETo Ha ypeDa OT TaKOBa IuCe. Deuata Tp8Ba Da bJaT noD HaN3Op, 3a da ce rapaHTnpa, ye HЯMa Da INrpaT C ypeDa.
BhImaHne - onacnoct OT 3lonoJyka! Kocaukata e npoeKtnpaHa camo 3a kOceHe n e npedHa3NaYeHa 3a liuHa ynoTpe6a. He e no3BoJeHo da ce n3POn3Ba 3a dpyrN ueJi, TbJ KaTO TOBa MOxe Da 6bDe onacHO JIa DOBeJe IOBpeDa Ha ypeJa.
Iopadn pucka ot fni3nuecko hapaHraBaHe Ha pa6oTeu n C He, KocauKaTa He 6BaDa ce n3noJ3Ba HapnPmep 3a (CnncbKbT He e nbLeH):
- pOdpra3BaHe Ha xpaCTn, KINB PJIeT IN xpaTaJaCuN,
- p3aHe Ha IIbI3aIu paCTeHn,
IpoIbpxaHe Ha TpeBa B NOKpNBn rpaIHHN 6aJIkoHcKn CaKcMn, -
NOUNCTbaHe Ha aIaEN (N3CMyKBaHe, N3dYXBaHe, NOUNCTbaHe Ha cHra),
pa3dp06BaHe nHaDp06BaHe Ha OTp3aHn KIOHNOTDbPBeTa N XNB PNeT, -
3apaBHaBaHe Ha NOpBeHn HepaBHOCTN, HApN. KbPTuHnI,
- TpaHcnpTnpaHe Ha OKOceHa Maca, OCBEN B PpeBnDEHn 3a TOBa K0w 3a Cb6npaHe Ha TpeBa.
BHMaHne - onachocT OT 3JonoJyka!
I3noJI3BaIte cAmO npHaIdNexKHOCTNe,
IOCTaBeHn OT VIKING nInn I3pNuHo
pa3peSeHn 3a MoNTaXk Ha To3n ypei. He
IN3BbPbWbAte pIpOMeHn no ypeJa.
Pn n3noJI3BaHe Ha ypeJa 3a noIdpbJkKa
Ha TpeBHN IIOUIN B O6uEcTBeHn
CboPbXeHn, NapKOBe, INpUa, OT
NtBTHO-CTPOITEnH, CenCKOCTOnaHcKn I
rOpCKn PpeIppraTna Ce n3NCBa
NoBNIseHO BVImaHne.

BHMaHne! OnacNoct 3a 3dpaBeTo nopadn B6paqun!
Ipekomepnoto n3laqaneHa Bn6paun MoKe da yBpeu
KpbBoo6paueHHeTo n HepBbHaTa CnCTeMa, Ooc6eNo npxopa c HapuyseHo KpbBoo6paueHne.ObbpheTe ce KbM Jekap npn NoBaTa Ha CmMTOMn, KOITO 6nxma MoIa Da ca pe3yJrTa OT n3naReHa Bn6paun. TaKNa CBMTOMn, KOITo Ce IOBRABaT OCHOBHO n PpCTHTe, PbCeTe IIN KNTKITE, Ca HAp. (CnncbKbT He e nbLeH):
- IINCa Ha ChyBCTBnTeJHOCt,
-6oJkn, - Myckylnha cna6oct,
-ДиСхрOMЯн KaKoKaTa, - HenpnraTeH cbp6ek.
4.2 TpaHcnpTupaHe

Pa6oTe BnHaTc pBkAunz,3a da n36eHete HapaHbAnr OTo yactn Ha ypeDa c ocTpnpbObe.
Ipei Da ro TpaHcnpTnpaTe N3KIOUoTe Upeia, IN3BaJeTe MPeXOBn Ka6eJ OT KOHTa I IN3uKaaiTe HOxBT da cnpe HanbJIHO.
Пи NOBДИгАне Ha ypeДа оБьрHTe BHHMaHHe Na INФОрмuaцЯТаВ ГlaBa „ТраHCNoptIupaNe" ( 13.)
O6bPhe TBHmAHne Ha TerIIOTo Ha ypeDa n npn Huxda n3NoI3BaIte IoXoIaun NOMOuHN CbOpBXeHn 3a TOBapeHe (TOBAPHn paMn, NOeMHn MEXaHn3Mn).
ИЗбаяиTe KOHTaKT C HOxa 3a KOCHe npi NOBdIraH e N HOCHe.
TpaHcnpOpTnpaIte ypea caMo c n3CTnHaI DnBraTeJ.
Obe3oNaCeTe UpeDa n TpaHcnpOpTnpaHnte C Hero npi6opu n npHaJdLeXHoCTN (HaNP. KoW 3a TpeBa) Bbpxy ToBapHaTa PnPaTOpMa C KpeJeKHi CpeIcTBA C PoJxOJaU p a3Mepr (peMbU, BbKeTa n dp.).
Pn TpaHcnpTnpaHe Ha ypeDa cna3BaIte MeCTHIne 3aKoHOBn pa3npoeIbN I NO-cneuHaNHO OTHacrIHTe Ce Do 6e3OpaChOCCTTa PnTOBapHe N TpaHCnOPT Ha npeDMETN Bbpxy TOBAPHNlaTFOpmN.
4.3 PoiDrToBtTeJHm MepKn
JIuata, KOITo He ca 3aNo3HaTn C INHCTpyKUraTa 3a ekCnIIOaTaCuY, He 6bVa da pa60Tc ypeDa.
CnazBaIte nocoueHnte B MeCTHnte pa3npoei6b uacOBe 3a pa60Ta C MOTOPHN rpaDINHCN ypeiN.

Поваме на косец Виharи нocete заюpen obyвки Дылг nahtajohn. He kocete
6ocn nn no caHaJn.
Проверецелятуг,在ьрух коюто сьбыди n3ползван уредът,и отстранete BCИЧКи kamьн,пьчки,ЖИЦи,КОCTи BCЯКВи дугс STранчHynpedMeTи, KОТTO MOrat Да sbДaT n3XbPJIeHи OT HeRo.
IpeiBcKa ynoTpe6a npOBepBaIte Bn3yaJHo DaJI npEkeuIy INHCTpyMeHT, KpeENeKHe 6oNTOBe u CEJIyT pKeEu 6JOK ce HAMpAT B n3npABHO cBCTOHaNe, KaTO o6bPHeTe NO-CneUaHBO BHIMaHHe Ha CNrpyHocTTa Ha 3akpeINBaHe i HAJInuHTo Ha NOBpei nn IINn I3HOCBaHe ( 12.5)
Ipeiynynotpe6aHa ypeiaNoDMHeTe
n3HOCeHNTEINIOBpeEnuactn.
CTaHaJInte HeueTInBn INI NOBpeEni
npEdupeiTeHN HaIINcN no ypeJa
Tp6Ba Da ce NIOHOBaT.Baunr
CneuaJIn3nap TaPROBeU HaVIKING
noIbtpKaHaJIInuHOCT OT pe3epBHN
ctnkepi.
Hnkora He BknoyBaIte DnIraTeIa, ako He cTe MOHTnpaII NHOka CbIpaCHO yKa3aHnIa. OnaCHOt OT nperepRbAHe Ha DnIraTeIa!
Hnkora He n3noJI3BaIte KocauKaTa C HeyHKUOHNpaAa CnnpaKa Ha DnRaTeJI N Hen3npaBHi IIN JInNCBaUz 3aUnTHn Pnucnoc6JIeHn, Hapr.6e3 DePKeTOp IIN 6e3 npncnoc6JIeHne 3a CbUpaHe Ha TpeBa.
OT cbo6paXeHn3a cnHypHOCT BnHaIu 13noJI3BaIte n3npaBeH K0w 3a TpeBa.
MOnTnpaHInTe Ha ypeJa npeKbCBAu He 6nBa Da ce OTCpAraBAt Nm 3aO6nKaJAT (HaNP. Ype3 pnpBbP3BaHe Ha loCTa 3a CnPaHc Ha DnRaTeJI KbM loCTa 3a ynpabJeHne).
OsbpHeTe BHMaHne Ha INHΦopMaunrTaB rIaBa, BHMaHne - onaCHOCT OTeJIeKtpnueckn ToK" ( 4.6)
4.4 Pa6ota c kocaukaTa
He donyckaTe cTpaHnUHnIuca, Oco6eHo Deua, KaKTo u JxNBOTHN, B paOna, KbDeTo Ue pa6oTnte Cypeda. BbDeTe npdna3JIuBn u He donyckaAte Da Bb3HnKHe OnaCHOCT 3a OKOJHNTe.
He kocete npu TeMnpaTpyn NO-HnCKn OT +5^
He Kocete MOKpa TpeBa N BДБЖДOBHOBpeMe,Ты KaTo HapactBa OnaCHOCTTa OT3ЛОЛуka (HamajeneHa Cta6nHOCt Ha pa6oTeuia -OnaCHOCTOT NOxNb3BaHe).
Kocete camo Ha DHeBHa CBeTInHa INI npn Do6po N3KyCTBeHO OCBetIeHne.
Ipei Da cTapTnpaTe ype, ro nocTaBeTe Bbpxy paBHa nobbpxHocT. Pn cTapTnpaHe Ha DnRaTeJypeJbT He 6nBa Da e HAKNoHeN.
CTapTnpaIte BHNMaTeJIHO DBNrTaTeJIa, KaTO cna3BaTe INHCTpyKUInTe, ONuCaHI B rIaBA „NyckaHe Ha ypeJa B ekCnIloatauia" ( 11.) .OcnrypRaBaiTe DocTaBtuHO pa3cToHne MeJdy KpaKaTa Bn n peKeuHa INHCTpymEnT.
BnHa n ynpablaBaIte ypea c neXeOHa cKOpocT N B HnKaKbB cLyuai He TnuaTe,doKaTo pa60nte C Hero. YnpabLeHneTo Ha ypea C no-rolMa
CKOPOCT yBelenucaBa ONaCHOCTTa OT HapaHЯBaHe B pe3yI TaT Ha IpeIbBaHe, IOnxJIb3BaHe I T.H.
U3KnIoueTe DnBraTeJna,
- KOraTo Ipn TpaHcnpTupaHe CbIeCTByBa OAnaCHOcOT O6pbUaHe Ha KocauKaTa BbPxY PINOUs, KOITo He Ca TpeBn;
KOrTaToI npuBnKBaTe KbM N O6paTHO OT pIoUcTa 3a KOceHe;
-пренида CBалитЕ Коша 3a TpeBa.
BnHa n ocInpyraBaiTe Do6pa Cta6nHocT Ha ypea npi pa60Ta no cKnHObe. N36yraBaiTe Da Kocnte no npekaJeHo CTpbMHN cKnHOBe, 3a Da npEDoTbPaTnte 3ary6a Ha KOHTpO Bbpxu ypeDa.
БьдeTe MHOrO BHNMaTeJIHn Пи ПрмЯHa NOCOKaTa Ha DBIXeHne NO CkNoHa, 3a Da IpeDoTbpaTIne 3aY6a Na KOHTpOJ Bbpxy ypeda.
Pa6oTeHnpeuHo Ha cKIOHa, HNKOra
Harope nIi HaJOny IIO Hero, 3a Ja He
6bJeTe npera3eHi OT dVIXKeUaTa Ce
KocauKa npi eBentTuajHa 3aY6a Ha
KoHTpOJI Bbpxy ypeJa.
BHMaHHe - onaCHOCT OT npenbBaHe! BHMaBaIte MHOrO, KOrATo ce IDbXkUTe Ha3aI NJI TErJIIne KocayKaTAta.
Быдente oc6eHo npedna3IbN, KOraTo 3aBbATE cypeda nI rO npIbPbBaTe KbM ce6e cn.
OTcbo6paXeHn3a cnIpyHocT ypeIbT He 6nBa da ce n3no3Ba no cKIOHOBe C NaKIOH Hd 25^ (46,6%)
Onachoct OT HapaHyaBe!
25^ NaKIOH HaCKIOHa OTROBaprT Ha BepTKaJIHo HapacTaBaHe OTe 46,6 cm Ha 100 cm Xopn3OHTaJIHa DbJxNHa.
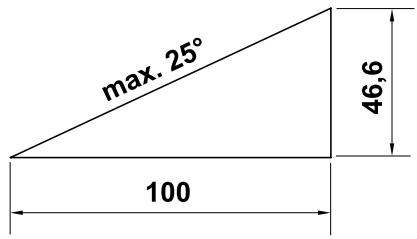

STOP
BnMaBaIte 3a DvXKeHneTo nO
nHepZna Ha pa6oTHnTe
nHCTpyMeHTn, KOeTO MoKe Da
npOdbJnxn HkONKO cekyHdn,
DOKaTO cnpaT HanbNo.

He ce onitbaIte da npOBeRbATE HOka, DOKaTO Kocaykata pa60tN. HnKora He
OTBaprTe DeΦnEeKTopa N/Unn He CBAJIrTe KOwa 3a TpeBa, DOKaTO HOXbT 3a KocHe paBoTn. BbptraunrCe HOx MOKe Da npuHn HapaHbaHe.
Hnkora He okayBaIte npedMeTn no locta 3a ynpabIeHne (hanp. pa6oTHo o6NeKNo). YdbJXHTeHNHe Ka6eHn He 6uBa da ce ycKbAT OKOLO NOCTa 3a ynpabIeHne.
Поберяваite peядовно HOxa 3a ctaбилно 3axBaшанe,пobpeДа ИИИ n3HOCBAнe ( 12.5).
BHMaHne - onachocT OT HapaHyaBe!
Hnkora He noctabraTe pbuete
NII KpakaTa Cn Do NII NOD BbPTraUc Ce
caCTn. Hnkora He nIpaNTe BbPTraUc Ce
HOK. BnHaR cToIte Ha pa3ctoHne ot
OTBopa 3a n3XbPJIHe. BnHaR
Cna3BaIte onpeJeIeHata ot loCTa 3a
ynpabIeHne 6e3OacHa dIcTahzra.
I36raBaiTeYeCTOTo BKNIOUbaHe Ha ypeDa BpaMKITEHa KpaTbK nepNoID OT BpeMe HcN ,IrpaaiTe" C 6yToHa 3a CTapTnpaHe. OnachocT ot nperepaBaHe Ha DnurataTe!
При Нетостянно Hanpsexhene прдиЗвканITE OT TO3и уред колебань На HanpsexheneTO NO BpeMe Ha pa60Ta Ha Високи obopOTи MOrAT DA Hapuyat pa60TaHaДPyrgn CBbP3aHn KbM CbUaTAt TOKOBA BepURA CBOpBXeHn. B To3N cIpya Tp86Ba Da ce B3emAT NOxOJusNi МерКИ (HApP. CBbP3BaHne KbM Dpyra TOKOBA BepURA, p3JIuHn OT Ta3N Ha 3acERHaTOTO CBOpBXeHn, CBbP3BaHe Ha урда Кьм TOKOBA BepURA C NO-HNCKO ПьЛHо CBnPOTINBLeHnE).

I3KJIouhe Te DVBraTeJIA, I3BaJeTe UeNceJa OT KOHTaTaN Ce yBepTe, Ye pexeunrT
INCTpyMeHT e cnpraHnBbNo da ce DBNXN,
- ppei Da ot6lOknpaTe nIu OTnyuHnte KaHaJa 3a u3XbPJIHe;
aKo pexeIyIHT INHCTpyMeHT e cpeIHaJI yJxIO TJIIO.PexeIyIHT INHCTpyMeHT TpIbBa Da ce npOBepn 3a eBEHTyaJIHN noBpeN. KocaykaTa He 6uBa Da ce Iycka B EKcIINoaTaIaC NOBpeDen IIN OrBuHaT HOKOB BaJ NII BaN Ha DBIrataJI. OnachOCT OT HapaHЯBaHe nopAIDI Hen3npABHn qactn!
-праздра поверпгte, почstпге ИИ N3BbprnTe Други DeHOCTN NO Kocaykata (Нар. Habстpoяka BncoUnHaTа на Косян, CBBaHe/perylnipaHe на loCTa 3a ynpabJIeHne);
aKo KocauKaTa 3aNoUHe Da Bn6pnpa HeoBuaHNO cInHo. B TaKbB Cnyaun Tpr6Ba Da npOBepuTe ueNna ypei, Oco6eHO pexeueN INCTpyMeHT, 3a eBeHTyaJIHN NOBpeDN uXna6abu YactN. IobpeDeHNTe UacTn Tpr6Ba da ce CmEnrA, a Xna6abuTe UacTn Da Ce 3akpenr/TaTe rHaT, PpeDN da npOdbJxKeIte pa6ota.
- ppei Da ocTaBnTe ypeia 6e3 HaI3Op;
- ppei Da nOBnIraTe IJIu npenacrTe ypeia;
-праздд Транспортуаруuropeа.
Hnkora He BndraIte IIN He HocTe Kocaukata c pa6oTeu DnBraTeJ INC BKJIIOUeH BeJ. Mpeka 3axpaHbAa Ka6eJ.
C ypeHa He 6nBa Da ce TpaHcnpTnpaT xopa, oO6eHo Deca, nIi npEmdTeN.
4.5Подрьжka,почистванe,peMOHTи cbyханенe

Ppei Da ppeIppneMeTe KaBnTo I Da 6NIO DeHocTn No ypea, ppei NaCTpoiKa nn
NoCTBaHe Ha KocauKaTa NIn PpeN Da npOBepnTe, daN 3axpaHbAunr Ka6eJ e npenIeTEN IN HeIN3npaBeH, INKIOUcTe KocauKaTa N IN3BaJeTe UeNceJa O T KOHTaTa.

Ppi DeHocTn nO pexeun HNCTpymeHT BnHaRn HocTe NtBTHn PpeDna3Hn pbKaBnCn.
OcTabe Te ypeHa HnblnHO Da n3ctnHe, npdeI da ro npnbepete 3a cbxpanehne B 3aTBopeHo NOMEUeHne I npdeI da n3BbPUnTe DeHOCTHn PO NOpdpbKkTa INouchTbaHeto My.
I3BbPbBaIte cAmo Te3n DeHocTn P0 IOnDpBxKkata, KOITc Ca ONNcaH N Ta3N INCTpyKcIa 3a EKcnIIOaTaIe. 3a BCNUKn OCTaHaJI N DeHOCtN Ce O6pbJauTe KbM CneUaJIIN3IpaH TbproBeu.
VIKING npenopbvy DeHocntte no nOndpbkata n peMOHTa da ce n3BbprBaT cAmO OT CpeuHaN3npan TbproBeu Ha VIKING.
CneunnaIIm3npaHnTe TbproBun Ha VIKING peoBHO npemuHaBaT oOyuHne Nm ce npdeocTabra TexHnuecka INΦopMaun.
B cnyaayce cy hjckdaeTe OT HOpMauny nIIN NOMOuHn CpeDCTBa, BInHaN Ce o6pbuaIte KbM CneuaJIn3npar TbproBeU (VIKING npenopbYBa CBOITe CneuaJIn3npaHn TbproBu).
ИзлгьпсамOBICOKOKaYeCTBeHINHCTpyMeHTN,ПинадлжнOCTNиpe3eрВичacterN.ВпotивенСCityamMOKeДа Вb3HnKHeОпАСHOCТOT3ILOJyKa,KoЯTOДаДobeDEdoФИЗUECKO habaHЯBaHeHaXopaИЛДоПОВрдаHaуpeDA.
VIKING npenopbUba Da ce n3noJ3BaT opnHaJIHn INCTpymeHTn,
npHaJnEJXHOCTn N pe3epBHN Yactn Ha VIKING. IIO CBOITe KaueCTBa Te ca ONtImaJIHNO CbIaCyBaHc C ypeDa n
n3uCKBaHnraTa Ha Notpe6nteJr.
OpnHaJIHnTe pe3epBHN Yactn Ha VIKING ce No3HaBAt NO kataLoxHn Homep Ha pe3epBHaTa YaCT, NO HaJnCa VIKING n eBeHTyAlHo NO OTJNUHTeJIHn 3HaK Ha pe3epBHaTa YaCT. Bbpxu MaIKInTe Yactn MoKe Da Ima CaMo 3HaK.
BnIMaBaIe BCNUKr raiKN, nALUN 6oJIToBe Da ca Do6pe 3aTeHnatu, TakaYe ypeIbT Da ce HAMnpa B 6e3OpaCHO pa60THO CbCTOAHHe.
PpOBePraBaItepeIOBHO npCnOc6JIeHHeTo3aCb6IpaHe Ha TpeBa 3a n3HOCBaHe,poBpeDa nIi 3aIy6a HaΦyHKcUHaJIHoCT.
B clyuaye pexeunrT nHctpyment nn Kocaukata CpeuHaT HkaKBO npenTCTBne nn YuXdo TAYO, N3KIOUyTe DBrarTeIa, n3BaJeTe UcenCeJa OT KOHTaTa IINBbPseTe KOMNeTeHTHa npOBepka.
CtaHaJInte HeueTINBn IpeDyIpeDInTeJHn HaIINCS NO ypeDa Tpr6Ba Da ce PoINHOBT. BaWnT CneuaJIn3npaH TbProBeu Ha VIKING noIbPka HaJIynchOCT OT pe3epBN CTKeepN.
3axpaHbauT Ka6eJ Tp86Ba da ce npBExJa B n3npaBHOCT, pecn. NOdMeHa caMo OTOTOpu3UnPAHN eNeKTPoTexHnU.
3a n368rBaHe Ha onaChocTtA OT noXap B 30HaTa Ha oxJaXdaUnte OTBOpn MexJy KaNaka Ha DBrIaTeJI N KOpNyca He 6NuBa Da nOpaTapeBa, CnaMa, MbX, JInCTa, n3TEKJIra rpec i np.
B cnyaaye 3a n3BbpyBaHe Ha deiHocTn
IIO NOIDpBxKkA Ta Ca 6uINoOTcTaPAnEH
KOMPOHEHTN INI 3aUHTHNI
npncnoCo6JIeHnI, Te Tpr6Ba Da ce
IOCTaBAY OTHOBO CNeD TOBa CbflaCHO
yKa3aHnIra.
Cney npotpe6a nooNCTe terjknbo kocaukata. Hnkora He noI3BaIte npoJnB OBOOCTpyka I He noUcTBAIte Kocaukata noT Teuaa BOJa (HaNP.c rpaDnHKn Mapky).He n3noI3BaIte arpecnBHN nooNCTBaU npenapatn. Te MOraT da NOBpeJr PIACTMacOBIne IMetAJIHnTe Yactn, KOeTo Da BLOuN 6e3onacHaTa pa6ota Ha Baun ypei VKING.
PpOBepaBaiTepeIOBHO ueIypeI3a Iu3HOCBaHeI IOBpeI,OCoBeHO ppeIa Iro np6epeTe 3a cbxpaHeHne, HapPImep
IopaIINo-IPoIbJIxNtENHO pKeBcBaHe Ha pa60TaTa (Ppe3 3IMMaT).PiOnMeHnTe I3HOceHnTe INI NOBpeDeHNuAcTn,3a Da 6bJe ypeJbT BInHaRn B 6e3ONaCHO pa60THO CbCTOJHHe.
CbXpaHraBaIte N3CTnHaIaTa Kocayka B cyxo I 3aTbOpeHo NOMEueHne, HeIOcTbIHO 3a Deua.
4.6 BhimmaHne - onaCHOCT OT eJektpnueckn TOK

BhimaHne!OnaCHOCTOT TOKOByap!MHOROBaxHN3a eJeKtpnueckaTa6e3oNaCHOCT Ha ypeDa ca MPexKobNt Ka6en, bT, npeKbCBAuyT N aunrKa6eN.3a n36BaHe Ha TTAOTTOKOByapHe 6uBa Da Ce t HEn3npaBn Ka6eN, KynnyHn nn nn HeOTROBApUHa Hnra 3axpaHbaan Ka6eN. OeDobHO npOBepraTe aunya Ka6eN 3a nobpeDi nn Ha CTapeene (yynlBOCT).
Hnkora He n3noJ3BaIte noBpeDeH ydbJxnteJe Ka6eJI. 3aMeHeTe Hn3npaBnTe Ka6eJIc HOBu I He peMOHpaTe ydbJxnteJIHnTe Ka6eJI.
UpeT He 6nBa Da ce n3noJ3Ba, aKo npBOODHnTe Ca nobpeDeHN nn H3HOceHn.
Onachoct OT TOKOB yap!
He BkIIOUcBaIte KbM eJIeKTpNueCkaT aMpexa Heu3npaBeH IPOBOIDnK I He roDOKOCBaIte, PpeDN da CTe Ro N3BaAnIN OT KOHTaTa.
Onachoct OT Tokob yap!
He 6nBa Da ce n3NoJ3BaT Heu3npaBn Ka6eJIn, KynJyH3n In ZeIceJIn NInn HeOTROBapAun Ha IN3NCKBaHnra Ta 3axpaHbAun Ka6eJIn.
При Косе He ДрьжTe Kaбета Далач ot HOжа.
I3no3BaTe camo n3oJnpaHn CpeuY Bnara yNbJnxTeHn Ka6eJIn, noDxOJaU 3a yNoTpe6a cypeda ( 11.1)

BbnpeknYeDbngatelaTHa 3aDnBkBaunMexaHn3bMe 3aUnTeH cpeuY BoHN npbckn, Kocaykata He 6nBa da ce
I3NOJI3Ba, KOraTO BaII IbXd N B YcNoBnHa BnCOKa BJIaXHOCT.
He n3naraaye ypea Ha oTKpnto, KOrato BAln DbXd.
I3BaKaJaTe ⅢeNcEla OT KOHTa KaTo ro XbaHeTe, a He Ype3 TerIeHe Ha 3axpaHbAunrKa6eJ.
BkHouBaIte ypeDa cAmo KbM
eJIeKtpO3aXpaHbAHe, KOeTo e 3aUHTeHO
IOcpeIcTBOM IpeKbCBaY 3a 3aUHTa
cPeUy TYeUeH TOK C MaKcIMaJIeH TOK Ha
3aJeIcTBAHe 30 mA. DOnbJIHITeJIHa
INHOpMauJN Ie NOLyUHrTeOT
eJIeKtpoTexHnKa.
Ako ypeIbT e BkIIOueH KbM eJIeKTporeHepaTOpeH arperaT, BHIMaBaIte Da He Ce IOBpeN Iopadn KOJIe6aHn Ha Toka.
BnHaBn BnHmBaBaiTe n3NoJ3BaHInTeMpexOBn IpoBOdHIuI da Ca IOCTaTbUHO 0e3OpacEn.
OT cbo6paKeHna 3a 6e3oNaCNoCT eNeKtpnuecknT Ka6eT Tpr6Ba BnHaRn Da ce MOHTnpa KbM loCTa 3a ynpabLeHne cbfIacHO INCHpyKuNHe ( 7.2)
4.7 N3XbBpIaHe
YBepTe ce, ye n3JIe3JIyT OT yNoTpe6a ypeI ue 6bJe npeJaen 3a cbO6pa3eHo c n3NCKBaHnTa n3XbPnIHe. Ppei Da
6bIe n3XbBpIeH, ypeIbT trpaBa da ce npBBeE B HeroIDHO 3a ynoTppe6a cbCToRHe. 3a npDeIOtBpaTaBAHe Ha 3JIoNoLyka MaxHete Hai-Beue MpeKOBnKa6eJI cBoTB. eJeKtpnueckn Ka6eJI KbM DBrurataTeJI.
Onachoct OT HapaHyaHe c HOxa 3a KOceHe!
Hnkora He octabaye n3jra3na ot ynoTpe6a kocauka 6e3 na3op. Ybepete ce, ye ypeBt N HOXbT 3a KOceHe ce cbxpaHbAt Ha MeCTa, HeIOCTbPHN 3a deca.
5. Onncahne Ha cIMBOJNTe

BHHMaHne!
IpooyTeTe INHCTpyKuYTa 3a ekCnloataun, npEn Da n3non3BaTe ypeia.
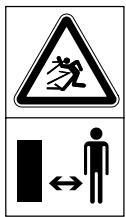
Onachoct ot HapaHbAhe! He donyckaIte cTpaHnUHn IInca B onaChata 30Ha.

Onachoct ot hapaHraBahe!
PanaTe ce ot octpna HOX 3a KOceHe. CLei n3KIOUcbHe HOXbT 3a KOceHe pa6oTu HnKOJIco CeKYHdI NO uHepuia (Cnnpauchka Ha DBVaTeJr/ Ha HOxa).
N3KIOUcTe DVBraTeJr N3BaJeTe UepeCela OT KOtAKTa, PpeNi Da
N3BbPShte pa6oTu No
peKeJns INCTpyMeHT N
DeHOCTo N ONDpbjXkata
In OOnCTBaHeTo, PpeNi da
npOBepnte, DaII
3axpaHbAunr Ka6eI e
npenIeTeH IIN NobpeDeH N
npeNi Da OCTabNeYpeDa
6e3 Na3Op.

Onachoct OT TOKOB yap!ДръжтесхранвашиякабелдалачOT ржецнинсгчмп.
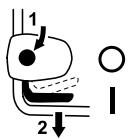
ME 339: CtaptnpaHe NaDburataJeI.
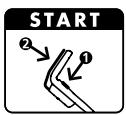
CTapTupaHe Ha DnBraTeIa.
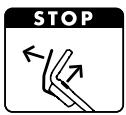
CTeneh S = Hai-Majika Ta BncouHa Ha KOceHe
Ctenen5=Ha-ΓoJMaTa BnCOuHnHa KaOceHe
3a npedeTbpaTbaHe noBpeDa Ha ypeDa Hau-MaJIkata CTeENHa Kocene Tp86Ba Da ce I3IOn3Ba cAmO Bbpx TyebHn PlouN 6e3 HepaBHOCTN.
HactpoiKa Ha BnCOuMHaTa Ha KocHe:
-Дрьн overhe Лескstoа Perулпане Na Виcoунна (1) HabtpaHn,doKaTo ФИКсИрацяТ MexaHn3bM (2) ce OCBO6OOn.
- По-гляма Висунна на Косе:
- Повдигнete Косакata с помоцта на лоста за р发电机.
- Висунота (1) (Юстът ce 6ута напеш).
- По-mалka Висунна на Косе:
- СваNETe Косакata на дolyс с помоцта на лostа за р发电机.
- Висунота (1) (Юстът ce 6ута назад).
- HatncheTe loCTa 3a peryInpaHe ha BncoUHnata (1) KbM KOcaKaTa,doKaTo fNkCupaunT MExAHn3bM (2) 3aueB NloCTa. IV36paHATA BncoUHa Ha KocHe MoKe Da ce OnPeDeJI No HauNpEHDHOf NkCupaTO 3b6ye (3).
9. Yukazannha 3a pa60Ta
9.1 O6zynyka3aHnA
Onachoct ot HapaHyaBe!
Béndara onpaBeTe Ka6eNa, B cnyuai Ye Ce npenIeTe.
Pn Kocene 3axpaHbAaNt Ka6e Tp8Ba Da e 3aI Tb8Ba Bn. Pn Kocene 3axpaHbAaNtKe Ka6eMn MoarT NO HeBHMaHne Da 6bDaT pKeKcbHaTN IJN Da Ce CnBHeTe B T8X. ETo 3aUO Te KpNr TOrJa m PnCK OT 3NoOnJyka. 3aTOBa Kocete Taka, Ye 3axpaHbAaNt Ka6eBn BInHar N da OCTaBA Ha Beue OkOceHaTa nlou.
Xy6aba N TbCTa TpeBHa PLOUc Ce noCTnra Upe3 YecTo KocHe N POnDbPxKaHe Ha HnCKa TpeBa.
Pn ropeu n cyx kImMaT He KocTe TpeBaTa npkeaIeHO HsCKO, B npOTnBeH Cnyau T Ta ue N3rOpN OT CbHcTo N ige npDObne HeyrIeDeH Bn!
При Косец с оctьр HOж ce noctURA no-KpacINBиД Ha OKOceHATA nNoU,OTKOKOTO C TBn HOж. ETo 3aIoTOI Tp6Ba peDobHO Da ce 3aToUBa (cneuaJIIn3npan TbproBeuHa VIKING).
9.2 KocHe no CKJIOHOBe
OT cbo6paXeHnna 3a 6e3onacnoCT 11 KocaukaTata Tpr6Ba da ce n3noJ3Ba camo Ha CKIOHOBe C hAKIoH Do 25^ 25^ (46,6%) HAKIOH Ha CKIOHa OTROBAPr HA BepTKaJIHo HapactBaHe ot 46,6 CM Ha 100 cm Xopu3OHTaJIHa DblKInHa.
9.3ПразвиноHaToBapBaHeHa eJeKtpoDBratela
He BkHouBaIte KocauKaTa BbB BnCoka TpeBa, CbOTB. Ha Hn-HnCKaTa BnCOuHa Ha KOCeHe.
HaTOBaBaiTe KocayKaTa CaMo IToJIKoBA, Ye YecToTaHa BbPTeHe Ha eNEKtpOdBnIgTeJa Da He CnaIHe dpaCTnUHO.
Пи спадане на чecToTана Вьртэн иЗберTe ПО-голЯмВИСочинаHaКосеH и/ин HaMaJIte CКОpoCТТa,C KОЯTO ВОДиTe KOCaЧКаТa.
9.4 B cnyuaye HoxbT 3a KocHe 6nokupa
Bednaga n3knjuoyete dBvraTeIa n 13BaJeTe IeIeIeIa OT KOHTakTa. CneT TOBaOTCTpaHHeIe npuHHaTa 3a nobpeIaT.
9.5 3aunTa OT TOnJIHHo npTeOBapBaHe Ha DBrVaTeJa
Ako no BpeMe Ha pa60Ta ce noJyU npTeOBapBaHe Ha DnBraTeJIa, BrpaJeHaTa 3aIHTa CpeUToPInHHo npTeOBapBaHe ro N3KJIIOuBA aBTOMaTNo.
PnpuHn 3a npetOBapBahe:
KoCeHe Ha MHOrO BnCOKa TpeBa NJI NaCTpOnKa Ha MHOrO HnCKa BnCOuHa Ha KoCeHe,
MHOROBUCOKACKOPOCTHaBOJeHeHa KocauKaTa,
- HeIOCTaTbUHO NOUcTBAHe Ha I npOBoJa 3a OXnJaAa, Bb3dYx (CMyKaTeJIHnTe OTBOpN),
HOKbT 3a KOceHe e TbN ININ N3HOceH,
- HeNoDxOJaIu NII TbBpIe Dblb3axpaHbAaKabE-NcnaHa HanpeXeHHeTo ( 11.1)
Onachoct OT TOKOB yap!
Cna3BaIte yka3aHnIra 3a 6e30NaacNoCT B rInaba „3a BaIaTa 6e30NaacNoCT" ( 4.)
Pn n3no13BaHe Ha Ka6eIeH
6apaban 3axpaHbauT Ka6eI
Tp6Ba Da e pa3BNT N3aJIO, B
npOTnbEN CnyaeyektpueckOTO
CbnpOTnbJeHne MoKe Da DOBeJe
do 3ary6Ha HAnpexeHne n
npERpaBaHe.
KaTo 3axpaHbAsn Ka6eI N Tpr6Ba Da ce
H3noJ3BaT CaMo IPOBOdHIuN, KOIO Ta
No-TeKKn OT rMUnpaH N PPOBOdHIuN
H07 RN-F DIN/VDE 0282.
MnHmJaHNo HappeHo ceeHne:do 25 M dIbJxHa: 3 x 1,5 MM²do 50 M dIbJxHa: 3 x 2,5 MM²
Kynnyh3nTe Ha Ka6ela Tp86Ba Da ca OT rMa nIe C rMaMeHO NOKPITne I da OTROBAPrT Ha cTaHdapTa DIN/VDE 0620.
HanpexeHneto NyeCToTaHa MpeXkata Tpr6Ba Da CbOTBeTCTBaT Ha daHHnTe BbyxΦnpMeHaTa Ta6eKn, pecn. rnaBa „TexHnueckn daHHn" ( 19)
3axpaHbauT Ka6e Tpr6Ba da e doCTaTbUHO 06e3oNaceH ( 19.)
To3n ypeI e npEbnueH da ce 3axpaHbA OT eIeKtpuYecka Mpeka C nbHo CNCTeMHO CbIpOtnBLeHne ZMaKc. Ha CbeIINHTeNHa TOkA (CrpaJHa INCTaIaU)OT MaKcIMyM 0,49 Ohm (npi 50 Hz).
Iotppe6nteJrTp8Ba da ce yBepn, yeypeNbTce 3axpaHbA OT eJeKtpuYeckaMpexka,KoTo OTROBapra Ha Te3n
n3nCKBaHnA.Ako e Heo6xOIMo, MoKeTe Da nonNTaTe MeCTHOTe
eNeKTPopa3npeJedJIteNHO ppeJnpnTne
3a IIbJHOTo CnCTeMHo CbIpOTNBHeHne.
11.2Ппсncopo6ленезИЗтгЯн И пибиране наКабela

Pnncnooc6JeHneTo 3a n3TeTJHe n npinbpaHe Ha Ka6eIa PpeIoTBpTaTBA HeBOJHOTo I3BaJdaHe Ha 3axpaHbAunKa6eI IO BpeMe Ha pa6Ota, KoETo MoKe Da npuHHIOBpeDa Ha rHe3DoTO 3a BKJIQUcbHe Ha ypeJa KbM MPekKaTa.
3aToba 3axpaHbAaMHT Ka6eJ Tpr6Ba Da 6bJe BODe H NocpeIcTBOM TOBa npucnocO6JIeHne.
- HanpaBeTe npIMka c6c 3axpaHbau nja Ka6eJ (1) nЯ npekapaTe npes OTbopa (2).
Haxny3eTe npIMkata Ha kykaTa (3) nЯ 3aTeHete.
11.3 BkIIOUBaHe Ha KocauKaTa

He cTapTnpaIte DvIraTeJI BvB BvICOKa TpeBa IJIN Ha HaN-HNCKaTa CTeEN Ha KOCHe, TbN KaTO TOBa 3aTpUdHbA CTApTnpaHTo Ha ypeJa.
- Hatnche 6yToHa 3a cTapTnpaHe (1) n ro 3aDpBxTe. N3dIbpnaIte loCTa 3a cnipaHe Ha DnIraTeJIa (2) KbM IocTa 3a ynpabLeHne n ro 3aDpBxTe.
-Бутоньтзасторанe(1) може дa бдe пс chat следдадемостванe на юста засторанe на двигаеля (2).
11.4 I3KJIouBaHe Ha KocaKaTa

Onachoct OT HapaHЯBaHe!
Cna3BaIte yka3aHnIra 3a
6e3oNaacHOCT B rIaBa „3a BaWata
6e3oNaacHOCT" ( 4.)
TodnHa nOdpbXka OT cneuaHn3npaH TbproBeu:
KocaykaTata Tp86Ba Da ce npOBepBa BeHNbX RoINuHNo OT CneuJIn3npaH TbproBeU. VIKING npenOpBvBa cBoNTe CneuaJIn3npaHn TbproBuN.
12.2 Почистван Ha урда
InTepBaI 3a noIpaX
CneBvcayynotpe6a

- OTkaye Te Ko7a 3a Cb6npaHe Ha TpeBa ( 8.3)

Onachoct OT HapaHbahe!
Ppei Da y oobpHeTe Harope, NOCTaBeTe KocauKaTa Bbpxy TBbpda, Xopn3oHTaJIHa n paBHa OCHOBa. Ppi pa60Ta no ypeDa B IO3uIg 3a NoHcTBAhe ToJ MOKe da ce ppeo6bPhe. BuHar n cToIte OTCTpaHn Ha ypeDa. Hnkora He pa60Te ne pei nn 3aKocauKaTa.
POnu3a nouchTbahe ME 339 C:
- CbrhTe MOHOJIOCTa (⇒ 8.1).
- Повдигнеле Deфлестopa (1), На Кюнеле Кocа Ка ТЯ Роста Вьрху конзола Т ha locta 3a упразвileни (2).
- Octabete locta 3a ynpabIeHne (3) da IerHe Ha 3emrTa n ro fIKcpaIte B TOBa IonoJKeHne C 6bp3o3aTeRaTeJIHOTO npncnoc6JIeHne (4).
Ponuzia 3a nouchTahe ME 339:
- CbHeTe locta 3a ynpabLeHne ( 8.2).
- Haknohe Te Kocauka T a I noctaBeTe Bbpxy DoHnIte Yactn Ha NoCTa 3a ynpabJIeHne (5).
Yka3aHnHa 3a nOuNCTBaHe:
CneB BCya ynoTpe6a noocntBaTe OCHOBHO ypeA. BnMaTeJHOTO 6opabeHe C ypeA ro npEJa3Ba OT NOBpeA N yIbIkaBA Cpoka My Ha EKcNlloTaun.
3aДаocnrypnteДocTaTbUH0oxJaXdaHe HaDbNtAteJna,poUcTBaIteOT 3aMbpCraBaHnI npOBoJa 3a oxJaXdaU Bb3dyx (CMyKaTeJIHnTe OTBOp) MeKdY KaNaKaHaDbNtAteJnDOnHaTa YacT Ha Kopnyca.
Kocayeh MexaHn3bM: HOKOdbpKaay
山nHa Ha KocHe: 37cm
YeCTota Ha BbPteHe
Ha KocauHnY
MexaHn3bM: 3200 06/MnH
CbrlacHo DnapeKtNbA 2000/14/EC:
-BoNTbT Ha Hoxa e Xna6ab
HoxbT He e 6aIaHcnpaH
OTCTpaHbAbe:
- 3aTeRHeTe 6oTtHa HoXa (⇒ 12.6)
- 3aToUeTe (6aHaHcnpaIte) nII nOdMeHete Hoxka ( 12.7)
HEn3npaBnOCT:
HekayecTBHeo KocHe, TpeBaTa NOXbTBA
Bb3MOxHa npuHHa:
- HoKbT 3a KoCeHe e TbI nn N3HOceH
- CkopocTtHa HbOJeHHa ypeHa e MHOrO rOJMa 3a N36paHaTa BnCOnHa Ha KOCHe
OTCTpaHbAhe:
- 3aToUcTe Hoxka 3a KocHe nIINrO npDMeHete ( 12.7)
- HamaJIeTe cKOpocTTa Ha BOJeHe Ha ypeJa n/nnn 136epe Te npabunHaTa BnCOUHa Ha KocHe ( 8.4)
HEn3npaBHOCT:
3aTpydHEno C7apTnpaHe NnO Tcna6BaHe MOuHOCTTa Ha DnIraTeJIa
Bb3MOxHa npuHnHa:
KoceneHa npekalneHo BnCoka NIN BnaXHa TpeBa
KopnycbT ha kocaykaTa e3anyuen
OTCTpaHbAhe:
Cb06pa3eTe BncoUHHaTa NCKOpocTTHa KOCHe C ycNoBnraTa 3a KOCHe ( 8.4)
-Почисте Корпуна на Косачкata (празд почесвашивадешенида OT контакta) ( 12.2)
HEn3npaBnOCT:
KaHaJIbT 3a n3XbPnIe e 3anyuEh
Bb3MOxHa npuHnHa:
Hokhte n3HOceH
KoceneHa npekaJIeHO BnCoka IINBnaJHa TpeBa
OTCTpaHbAbe:
-ПодмеHTe HOka 3a KocHe ( 12.7)
Cb06pa3eTe BncoUHHa Tn CKOpocTTHa KOCHe C ycNoBnTa 3a KOCHe ( 8.4)
21. CepBn3eH nlaH
21.1 NpOrBbPjxDeHne 3a nppeJaBaHe
MoeI:
CepneH Homep:

daTa:

CneBbau cepBn3
data:
21.2 NtBpKdEHe 3a n3BbPseHa cepBn3Ha noDpBkKa

ДаиTeТaЗИнСТуКцЯЗаEkCплоаТаця НаВашяспeциАлзИранТьproBEцHa VIKINGПриИЗБРшВаеHaДeйHOCтиПО ПОДдрБЖКATA.
ToI 1e IOTBpDn IN3INbHHeHneTO Ha cepBn3HnTe DeiHOCTN B NOJEtata Na fOpmyjra.

CepBn3HaTaNpDpBxKka e n3BbPseHa Ha

IaTaHa cIeIbAua cepBn3Ha IoIpBxKa
Lugupeatud klien,
Tāname Teid, et valisite VIKINGi kvaliteettoote.