MFR-15 - Deep fryer MPM - Free user manual and instructions
Find the device manual for free MFR-15 MPM in PDF.

| Product Type | Air fryer |
| Brand | MPM |
| Model | MFR-15 |
| Power Supply | 220-240 V ~ 50/60 Hz |
| Power | 1900 W |
| Display | LED |
| Default Programs | 12 programs: fries, kebab, toast, baking, pizza, shrimp, grill, wings, reheat, fermentation, defrost, dehydrate |
| Temperature Range | 30 °C to 220 °C depending on program |
| Timer | 1 minute to 8 hours depending on program |
| Basket Type | 360° rotating cooking basket |
| Included Accessories | Baking tray, grill, rotating basket, removal handle |
| Functions | Oil-free frying, grilling, baking, rotisserie, reheating, fermentation, defrosting, dehydrating |
| Safety | Automatic shutdown after 3 minutes of inactivity, hot surface warning, overheat protection |
| Maintenance and Cleaning | Clean surfaces with a damp cloth; accessories wash by hand (not dishwasher) |
| Spare Parts | Rotating basket, grill, tray, handles, bulb (15 W, 220-240 V) |
| Repairability | Replaceable bulb; other repairs at authorized center |
| Use | Household use only |
| Cord Length | 0.9 m |
Frequently Asked Questions - MFR-15 MPM
User questions about MFR-15 MPM
0 question about this device. Answer the ones you know or ask your own.
Ask a new question about this device
Download the instructions for your Deep fryer in PDF format for free! Find your manual MFR-15 - MPM and take your electronic device back in hand. On this page are published all the documents necessary for the use of your device. MFR-15 by MPM.
USER MANUAL MFR-15 MPM
EN We wish you satisfaction from using the product and invite you to check a wide range of other MPM appliances
HORKOVZIJSNAFRIFFA BFI ZO EJF
A. B. C. D. E. F. G. H. I. J. K. L. M. N. O. P. Q. R. S. T. U. V. W. X. Y. Z. A. B. C. D. E. F. G. H. I. J. K. L. M. N. O. P. Q. R. S. T. U. V. W. X. Y. Z. A. B. C. D. E. F. G. H. I. J. K. L. M. N. O. P. Q. R. S. T. U. V. W. X. Z. A. B. C. D. E. F. G. H. I. J. K. L. M. N. O. P. Q. R. S. T. U. V. W. X. Y. Z. A. B. C. D. E. F. G. H. I. J. K. L. M. N. O. P. Q. R. S. T. U. V. X. Y. Z
中FETAXOR5
A E F1 R
FREDORA SIN GRASA
FRIUS SANSHLI
- MUN-19 5:30 PCD
KARSTO CRO GRUZDINTUVE
KARSTA CASA FR TERS
VEYRUL FRIE USE
FRYTKOWNICA RF7TI US7CZOWA
BILUZATARA ULL
ФРИТОРНИЯ АГЕЗ МАСПА
ILPLOVZDJSNATRI LZA BILZ OLLIA
АГ РСКРИПОФНИЯ
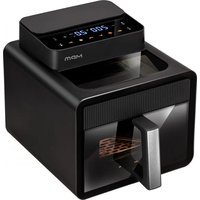
natural_image
Black and white photo of a modern kitchen oven with control panel and display screen (no visible text or symbols)cz NAVOD K OBSLUZE 3
BEZPEČNOSTNÍ POKYNY PŘI POUŽÍVÁNÍ
Read the instructions carefully before use.
Take special care when children are near the device!
Do not use the appliance for purposes other than those for which it was intended.
The device is used for heating / roasting food with the use of accessories adapted for this purpose, such as dedicated trays, heatproof dishes, etc.
Plastic products, cardboard and other flammable and fusible items must not be placed in the device.
When setting up the device, it is necessary to maintain at least 10 cm clearance on the sides and 30 cm clearance above the device.
Do not move the device during operation.
Do not place any objects on or cover the device.
Do not put a load on the open machine door.
Prolonged use of the device may require increased ventilation levels – set the ventilation to a higher level, tilt the window if necessary.
During use, the device components become very hot.
Please be careful during and after use.
Direct contact with the heating elements of the device is particularly dangerous.
When using a working appliance, touch only the parts of the appliance intended for this purpose, such as the handle in the door, buttons, knobs, etc.
When heating, accessories and food (especially fats) get hot – be careful when removing them, use oven gloves, etc.
Risk of burns, avoid direct contact – beware of hot steam that can be ejected when the device is opened, covered containers, etc.
Do not immerse the device, cable or plug in water or other liquids!
Do not leave the appliance unattended during operation.
Always unplug the device when not in use.
Never use a damaged appliance, including one with a damaged cord or plug, in which case have it repaired at an authorised service centre.
Use of accessories not recommended by the manufacturer may cause damage to the device, fire or personal injury.
Do not use the appliance outdoors.
Do not hang the cable on sharp edges or allow it to come into contact with hot surfaces.
Do not place the device near electric or gas cookers, burners, ovens, etc.
Do not touch the device's hot surface while it is working. When opening, use only the handle intended for this purpose.
Before cleaning, first unplug the device from the mains socket and wait until it has cooled down completely.
Maintain the highest carefulness when opening the device during toasting, as hot fumes can escape from the sides of the heating plates!
Use the device on a smooth and stable surface.
The device should be connected to a mains socket outlet with a grounding pin.
This equipment may be used by children of at least 8 years of age and by persons of diminished physical, mental capacity and lack of experience and knowledge of the equipment if supervision or instruction is provided regarding the safe use of the equipment so that the hazards involved are understood. Cleaning and maintenance must not be performed by children, unless they are over 8 years old and supervised by an adult. Unsupervised children are not allowed to perform cleaning/maintenance.
Keep the device and its cord out of reach of children under 8 years of age.
The device is not a toy and should not be used as such by children.
The equipment is not designed to operate using external timers or a separate control.
The appliance is intended for domestic use only.
Clean the appliance, in particular parts being in direct contact with food, before first use, imme-
diately after finishing work and if the appliance has not been used for a long time. The procedure is described in details in the “CLEANING AND MAINTENANCE” section.
Do not use aggressive cleaners or sharp metal scrapers to clean the glass of the appliance door, as they can scratch the surface, which in turn can contribute to cracking of the glass.
You must not use steam washers to clean the appliance.
CAUTION! Hot surface! The symbol placed on the appliance indicates that its components may become hot during operation.
The temperature of the appliance's surfaces may be higher during operation.
Do not place the appliance near flammable materials such as curtains, tablecloths etc., because this may lead to a fire.
Do not pull the plug out of the power socket by pulling the cord.
Do not connect the plug to the power socket with wet hands.
For the safety of children, please do not leave freely accessible parts of the packaging (plastic bags, cardboard boxes, polystyrene, etc.).
WARNING! Do not allow children to play with the film. Danger of suffocation!
WARNING! Overheated fat can ignite. Be especially careful!
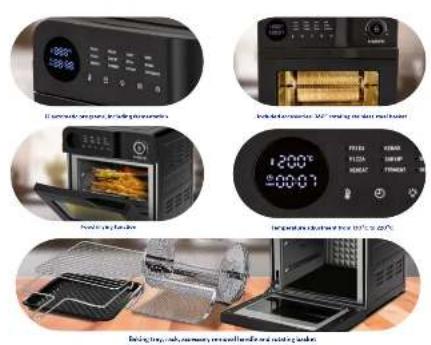
DESCRIPTION OF THE APPLIANCE
ELEMENTS DESCRIPTION
- Door
- Chamber
- Display
- Default program LEDs
- Control panel:
A. ON/OFF button
B. menu button
C. light button
D. time adjustment button
E. temperature control button - Housing
- Knob
- Holder
- roasting tray
- Handle for accessories
- 360° rotating roasting basket
- Oven rack
Established connection with the network and launch of the device is signalled with a sound.
A multifunctional appliance for oil-less frying, grilling, stewing and roasting thanks to its unique design. The greaseless fryer prepares dishes using hot air circulation, making food crispy on the outside and tender on the inside. No need to add oil to most ingredients.
BEFORE FIRST USE
- Unpack the appliance from the packaging. Remove any bags, shipping locks, fillers and labels.
- Make sure the appliance has not been damaged during its transportation. In case of suspected damage, do not start the appliance and consult the seller
- Make sure the electrical mains parameters match the data on the appliance's name plate.
- Wash the appliance following the instructions in the "CLEANING AND MAINTENANCE" section
- Place the appliance on a hard, dry, stable, flat and horizontal surface.
DESCRIPTION OF CONTROL PANEL FUNCTIONS
ON/OFF BUTTON (5A)
With the ON/OFF button (5A) you will turn the device on and off, additionally pause the operation of the fryer and reset the previously selected operation settings of the device.
MENU BUTTON (5B)
Use the menu button (5B) to select one of the 12 preset programs. The 12 defaults include:
WINGS
REHEATING
▶ FERMENTING
▶ DEFROSTING
▶ DEHYDRATING
When the menu button (5B) is pressed, all the LEDs of the default programs (4) will light up, the FRIES LED will blink, and the displays (3) will show the settings assigned to that program. To change the program, press the menu button (5B) until the desired program is selected. Each time the menu button (5B) is pressed, there will be a beep, a change in the flashing LED and a change in the time and temperature settings on the display (3).
LIGHT BUTTON (5C)
With the light button (5C), you can turn the light on or off when the device is in standby mode and during operation. Each press of the button (5C) is indicated by a beep.
TIME ADJUSTMENT BUTTON (5D)
After selecting the desired automatic program, thanks to the time adjustment button (5D), you can change the set roasting time. Press the time button (5D), then turn the knob clockwise or counterclockwise to increase or decrease the set time.
TEMPERATURE ADJUSTMENT BUTTON (5E)
With the temperature control button (5E), you can set the unit's cooking temperature to your preference. After selecting the appropriate automatic program, press the temperature control button (5E), and then turn the knob to the right or left to increase or decrease the set temperature.
KNOB (7)
Use the knob (7) to select one of twelve default programs by turning the knob clockwise or counterclockwise. The knob (7) can also be used to change the time and temperature by turning it clockwise or counterclockwise after pressing the time adjustment button (5D)/temperature adjustment button (5E). By pressing the knob (7) you will activate the set program and stop the device during operation.
USING THE APPLIANCE
CAUTION! A small amount of smoke may come out of the appliance during the first use. This is normal.
- Connect the fryer to a grounded power source.
- Place the food on the tray (9) or grid (12) and insert it into the device. When opening and closing the door (1), use the handle (8).
CAUTION! Do not place any plastic or paper packaging, containers, etc. in the device.
-
When roasting in the 360° rotating roasting basket (11), install the basket with the applied food in the device. Place the tray (9) inside the device and close the door (1).
-
Use the tray (9) to roast products from which fat and juice are likely to run off during roasting and when using the rotating roasting basket (11).
-
Press the ON/OFF button (5A) and use the menu button (5B) to select one of the twelve preset programs. If necessary, use the time adjustment buttons (5D), temperature (5E) and the knob (7) to change the set time and temperature of cooking
-
Press the knob to start the device. The LEDs next to the list of default programs (4) are off and the LED next to the selected program will come on, and the display (3) will count down the time until the end of the program.
- When the device is finished, it will beep three times and the display (3) will show END message.
- After 3 minutes of inactivity, the device will beep 5 times and turn off.
- Disconnect the deep fryer from the power supply.
CAUTION! Use the accessory handles (10) and use oven gloves to remove the product, this will avoid burns.
- Once the unit has cooled down, clean it immediately following the directions in the "CLEANING AND MAINTENANCE" section
COOKING - TIPS
Due to differences in the shape, size, texture of foodstuffs, among others, thermal processing may vary in terms of roasting time and temperature. Many dishes can be cooked with the device, the table below is intended to inform the user of the temperature and time ranges for each of the twelve default programs.
Over time, the user will probably work out their preferable time and temperature settings in individual programs for the dishes of their choice.
Preheating of the device should take from 5 to 10 minutes as long as the nature of the food requires it.
| Default program Temperature range Time range | ||
| FRIES 130°C-220°C 1 – 35 min. | ||
| KEBAB 130°C-220°C 1 min. – 1 h | ||
| TOAST 130°C-220°C 1 – 15 min. | ||
| ROASTING 130°C-220°C 1 min. – 1 h | ||
| PIZZA 130°C-220°C | 1 – 20 min. | |
| SHRIMP | 130°C-220°C | 1 – 30 min. |
| GRILL 130°C-220°C | 1 – 20 min. | |
| WINGS | 130°C-220°C | 1 – 30 min. |
| REHEATING | 130°C-220°C | 1 min. – 1 h |
| FERMENTING | 30°C- 45°C | 30 min. -1:30 h |
| DEFROST | 40°C–90°C | 10 min. – 1:40 h |
| DEHYDRATE | 50°C–90°C | 10 min. – 8 h |
If the device is not preheated, 5 minutes should be added to the roasting time given in the table.
CLEANING AND MAINTENANCE
CAUTION! Unplug the device from the mains power supply and wait until it has cooled completely before starting cleaning and maintenance. Do not immerse the fryer in water or other liquids.
CAUTION! Do not use abrasive substances or sharp tools to clean the device, do not use aggressive detergents and solvents.
- Clean the exterior and interior surfaces of the device with a damp cloth, then wipe dry.
-
Wash the tray (9), grate (12), rotating roasting basket (11) and removal handles (10) in warm water with mild detergent, rinse and dry. Do not wash any accessories in a dishwasher.
-
If you need to exchange the light bulb follow the instructions below:
-
disconnect the device from the mains and wait for it to cool down.
- unscrew the heat-resistant bulb shade counterclockwise,
- remove the defective bulb from the device by unscrewing it counterclockwise
- don't throw a defective light bulb in the trash, dispose of it at an e-waste collection point,
- install a new bulb (220-240V,15W),
- screw on the heat-resistant bulb shade.
CAUTION! Do not run the device without a heat-resistant bulb shade.
TECHNICAL DATA
| Model MFR-15 | |
| Power supply 220 – 240V | ~ 50-60 Hz |
| Power 1900 W | |
| Off and standby mode available available | |
| Power consumption in standby mode - | |
| Power consumption in off mode - | |
| Power consumption in network standby mode | - |
| It automatically goes into standby mode after | - |
| Automatically goes into shutdown mode after | - |
| Network standby mode, if the device has a connection function with the appli cation | - |
| Length of mains cable 0.9 m |
CE
CAUTION! MPM agd S.A. reserves the right to technical changes.
Proper disposal of the product (waste electrical and electronic equipment)

Marking on the product indicates that after the service-life of the product expires, it should not be disposed with other type of municipal waste. Used equipment may have a negative impact on the environment and health of people due to potentially containing hazardous substances, mixtures and components. Mixing electric waste with other types of waste or disassembling those in an unprofessional manner may cause a release of substances that are hazardous to the environment and health.
Used equipment should be handed-over to a point for collection of electric waste. In order to obtain detailed information regarding the electric waste collection points, the user should contact the municipal point of electric waste collection or used equipment processing department.
BESCHRIJVING VAN HET APPARAAT
BESCHRIJVING VAN DE ELEMENTEN
▶ FRIES – frytki
KEBAB – kebab
▶ TOAST – tosty
▶ BAKE – pieczenie
▶ PIZZA – pizza
▶ SHRIMP – krewetki
▶ GRILL – grill
WINGS – skrzydełka
▶ REHEAT – podgrzewania