MFR-16 - Deep fryer MPM - Free user manual and instructions
Find the device manual for free MFR-16 MPM in PDF.

| Product type | Multifunction hot air fryer |
| Model | MPM MFR-16 |
| Power supply | 220-240 V ~ 50/60 Hz |
| Power | 1600 W |
| Temperature range | 60-200 °C |
| Timer | 1-60 minutes |
| Automatic programs | 6 preset programs |
| Delayed start function | Yes, adjustable from 1 to 24 hours |
| Basket capacity | Approximately 3 litres (recommended max 700 g of fries) |
| Interior lighting | Yes, on/off control |
| Display | LED |
| Material | Plastic housing, non-stick coating |
| Cable length | 1.10 m |
| Safety | Automatic shut-off, overheat protection, hot surface indicator |
| Cleaning | Basket and bowl hand-washable with a soft sponge; do not put in dishwasher |
| Maintenance | Clean the heating element with a brush |
| Approximate dimensions | 30 x 30 x 35 cm |
| Approximate weight | 4 kg |
| Standby consumption | 0.44 W |
| Spare parts | Available from the manufacturer or an authorized service center |
| Warranty | Consult the manual or the retailer |
| Usage | Household use only |
Frequently Asked Questions - MFR-16 MPM
User questions about MFR-16 MPM
0 question about this device. Answer the ones you know or ask your own.
Ask a new question about this device
Download the instructions for your Deep fryer in PDF format for free! Find your manual MFR-16 - MPM and take your electronic device back in hand. On this page are published all the documents necessary for the use of your device. MFR-16 by MPM.
USER MANUAL MFR-16 MPM
EN We wish you satisfaction from using the product and invite you to check a wide range of other MPM appliances
natural_image
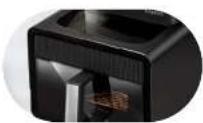
Black square electronic device with a digital display and a metallic handle, no visible text or symbols on the device itself.cz NAVOD K OBSLUZE 3
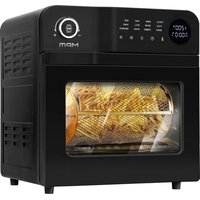
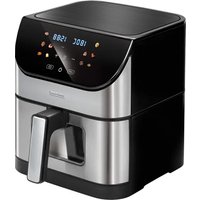
Electronic control panel with LED display
Two double-glazed viewing windows
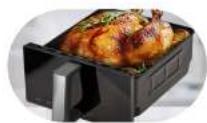
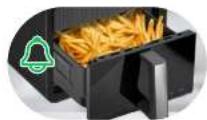
7 L basket and tray with a non-stick coating
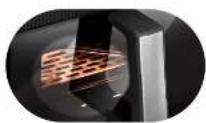
luminated interior during operation
Sound signaling for mains connection and operation and selection of functions
Temperature adjustment from 50°C to 200°C
BEZPEČNOSTNÍ POKYNY PŘI POUŽÍVÁNÍ
Read the instructions carefully before use.
Take special care when children are near the device.
Do not leave the device unattended during operation!
Do not use the device for purposes other than those for which it was intended.
Do not immerse the device, cable or charger in water or other liquids.
Always remove the plug from the mains socket when the device is not in use or before cleaning.
Use of accessories not recommended by the manufacturer may cause damage to the device or personal injury.
If the device starts producing abnormal sounds or odour, or if smoke comes out of it, switch it off immediately and contact an authorized service to have it repaired.
Do not use the device outdoors.
Do not hang the mains cable on sharp edges or allow it to come into contact with hot surfaces.
Make sure the mains cable is not extending over the edge of the device's support surface. This will prevent the device from being accidentally pulled down.
Do not touch any hot surfaces. Use holders when moving this product.
- Store the device in cool, dark and dry place.
Avoid deformation of plastic parts, do not wash the device and accessories with hot water or in a washing machine.
Do not put hands or any items inside the € container during operation.
Before cleaning, disconnect the unit from the power supply first.
Clean the device, in particular parts being in direct contact with food, before first use, immediately after finishing work and if the device has not been used for a long time. The procedure is described in details in the “CLEANING AND MAINTENANCE” section.
Do not place the device near other electric cookers, burners, ovens, etc.
Always ensure that all parts of the device are correctly fitted before starting work.
Wait for the device to cool down completely after frying before attaching or removing its elements, as well as cleaning the device.
During hot air frying, hot steam escapes through the air vents.
Keep your hands and face away from the escaping steam or air outlets. Pay attention to the steam and air when removing the bowl with the basket from the device.
Do not cover the air inlets and outlets when the device is operating.
Do not place the device near flammable materials such as curtains, tablecloths etc., because this may lead to a fire.
Food intended for frying should always be placed into the basket.
Do not fill the bowl with oil as this may cause a fire.
Device is suitable for home use solely. To-prevent deformation of the housing and lid, never use the device continuously for a long period of time.
Damaged plug or power cord must be replaced by the manufacturer, its service centre or another suitably qualified person in order to avoid any risk.
The surface temperature may increase during use.
The device should be connected to a mains socket outlet with a grounding pin! Before switching the device on, make sure the mains parameters match the values on the device's identification plate.
It is recommended to use protective gloves intended for handling this type of equipment.
This equipment may be used by children of at least 8 years of age and by persons of diminished physical, mental capacity and lack of experience and knowledge of the equipment if supervision or instruction is provided regarding the safe use
of the equipment so that the hazards involved are understood. Cleaning and maintenance must not be performed by children, unless they are over 8 years old and supervised by an adult. Unsupervised children can not perform cleaning and maintenance of the product.
The device is not a toy and should not be used as such by children.
The device has not been designed to operate with an external timer switch or a separate remote control system.
Keep the device and its cord out of reach of children under 8 years of age.
Do not connect the plug to the power socket with wet hands.
Do not pull the plug out of the power socket by pulling the cord.
Use the device on a smooth and stable surface.
Do not place the device directly against a wall or other devices. Leave at least 10 cm of free space at the back and upper parts of the device, as well as on its both sides. Do not place any objects on the device.
For the safety of children, please do not leave freely accessible parts of the packaging (plastic bags, cardboard boxes, polystyrene, etc.).
WARNING! Do not allow children to play with the film. Danger of suffocation!
WARNING! Overheated fat may ignite. Be especially careful!
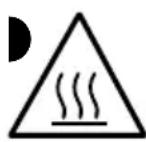
CAUTION! Hot surface! The symbol indicates that the surface of the device may reach very high temperatures dur-se.
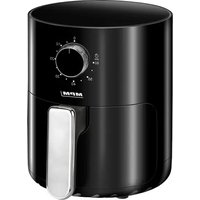
DESCRIPTION OF THE APPLIANCE
ELEMENTS DESCRIPTION
- Frying basket with handle
- Window
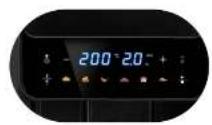
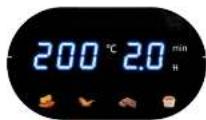
- Control panel with LED display:
A. on/off button for the interior light
B. temperature/time reduction button “-”
C. temperature/time increase button “+”
D. delayed start button
E. temperature/time selection button
F. automatic programs
G. Start/Pause button
-
Grate grill
-
Vent
-
Power cable
A multifunctional appliance for oil-less frying, grilling, stewing and roasting thanks to its unique design. Air fryer can prepare dishes using hot air circulation, thanks to which the dishes are crispy on the outside and delicate on the inside. No need to add oil to most ingredients.
BEFORE FIRST USE
- Unpack the appliance from the packaging. Remove any bags, shipping locks, fillers and labels.
- Make sure the appliance has not been damaged during its transportation. In case of suspected damage, do not start the appliance and consult the seller
- Make sure the electrical mains parameters match the data on the appliance's name plate.
- Wash the appliance following the instructions in the "CLEANING AND MAINTENANCE" section
- Place the appliance on a hard, dry, stable, flat and horizontal surface.
USING THE APPLIANCE
CAUTION! A small amount of smoke may come out of the appliance during the first use. This is normal.
CAUTION! After finishing work, in order to remove hot fumes from the device, the fan will continue to work for approx. 30 seconds.
- Connect the appliance to the grounded mains. When connected to the network, the device will signal this with a single beep. Then the entire control panel (3) will briefly illuminate, and after it goes out, the Start/Pause button (3G) will light up and the on/off button for the interior light (3A) will flash, while illuminating the inside of the fryer. If no action is taken, the on/off button of the interior light (3A) will turn off after about 30 seconds, along with the illumination of the interior of the fryer. After about 1 minute, only the Start/Pause (3G) button will flash. The device is in standby mode.
- Slide out the frying basket by pulling the handle (1). The control panel will display the message "OPEN".
- Place food products to be roasted in the frying basket (1).
- Push the basket back into the air fryer by holding the handle.
- Wake the device from standby mode by pressing the Start/Pause (3G) button once – this will illuminate the entire control panel and activate all functions of the device.
- Set the time and temperature:
a. automatic programs – the device supports six automatic programs. The currently selected program is indicated by flashing one of the six automatic program icons located on the control panel (3). Select one of the automatic programs (3F). The default temperature and duration of the automatic program will appear on the panel.
b. custom settings – (range 60-200°C / 1-60 min.) function has the ability to adjust the time and temperature of roasting to individual needs. The temperature / time can be selected using the button (3E) by adjusting the parameters using the adjustment buttons (3B) and (3C) located on the control panel (3).
Caution! To speed up the temperature / time change, hold down one of the temperature (3 B) / time (3C) buttons.
- Start the device – once the cooking parameters have been set, press the Start/Pause button (3G). When the program is completed, the unit will beep and the control panel will display END and the unit will enter standby mode.
CAUTION! The temperature (3B) and time (3C) control buttons are also active when the automatic program is activated – you can still change the operating parameters of the device.
- Press the Start/Pause button (3G) to start roasting. When the program is completed, the unit will beep and the control panel will display "END" and the unit will enter standby mode.
CAUTION! Do not fill the frying basket (1) or exceed the maximum amount of ingredients listed in the table (see the "FOOD PREPARATION - TIPS" section).
-
Ending the operation - the device will turn off automatically when the set time comes to an end. Completion of operation will be signalled by the "END" message on the control panel (3) and beeps. After approx. 1 minute, the device will switch to standby mode. You can end operation at any time by pressing and holding the Stop/Pause (3G) button for about 2 seconds – the device will go into standby mode after about 1 minute. The fan will continue to run for about 30 seconds after the operation finishes. Once the fan has stopped, the device must be disconnected from the power supply.
-
Operation of the interior light – during roasting, the interior light can be turned on or off by pressing the (3A) button.
SETTING THE DELAYED START FUNCTION
After starting the device, we can also set a delayed start function. To activate it:
- Press the Start/Pause (3G) button.
- Choose one of the automatic programs, or make temperature and time adjustments according to your preferences.
- Press the delayed start button (3D) – the default time of 1 hour will appear on the control panel.
- Use (3B) or (3C) buttons to adjust the time after which the device should start (range: 1-24 hours).
- Confirm the settings by pressing the Start/Pause (3G) button again.
- To cancel the delayed start function, press and hold the (3D) button for about 2 seconds.
COOKING - TIPS
The range of dishes one can prepare with the appliance is vast; for choosing the correct weight of food and the optimal roasting time, please refer to the table below.
However, due to differences in shape, size, structure of food products, the data provided in the table should be treated as indicative information that will facilitate starting work with the device. Over time, the user will probably work out their preferable time and temperature settings in individual programs for the dishes of their choice.
Some dishes require shaking (mixing) halfway through the cooking time. To do this, slide out the frying basket (1), this will extinguish the control panel (3) and pause the set cooking program. The roasting program will resume when the frying basket (1) is reinserted.
CAUTION! Risk of burns from fumes, hot fat and hot parts of the appliance. Be especially careful when removing the frying basket (1) from the device while it is still running.
Exceeding the recommended amount of food products may prevent proper air circulation in the device and significantly affect the final result - the top layer will be too roasted, while the centre will remain raw.
| Groceries | Weight (g) | Temperature in C^ | Time (min.) |
| Thin-cut frozen fries | 300-700 200 12-16 | ||
| Thick-cut frozen fries | 300-700 200 12-20 | ||
| Home fries 300-700 180 18-25 | |||
| Steak | 100-500 | 200 | 8-10 |
| Pork chops on the bone | 100-500 200 | 10-14 | |
| Hamburger | 100-500 | 180 | 7-14 |
| Chicken leg | 100-500 | 180 | 18-22 |
| Chicken breast | 100-500 | 180 | 10-15 |
| Spring rolls | 100-400 | 200 | 8-10 |
| Frozen chicken nuggets | 100-500 200 6-10 | ||
If the device is not preheated, add 3 minutes to the roasting time indicated in the table.
For best results, use pre-cooked (e.g. frozen) French fries. To fry homemade fries, follow the steps below.
- Peel the potatoes and cut them into sticks.
- Soak the fries in a bowl for at least 30 minutes, remove and dry on a paper towel.
- Pour 1/2 tablespoon of olive oil into a bowl, then put the fries in it and mix until they are coated with it.
- Remove the fries with your fingers or a suitable kitchen utensil so that the excess oil remains in the bowl. Put them in the frying basket (1).
CAUTION! Do not pour all the fries from the bowl into the basket at once, so that the oil does not drip to the bottom of the pot.
- Fry according to the instructions.
CLEANING AND MAINTENANCE
- Before cleaning, remove the plug from the power socket and wait until the appliance cools down completely.
- Pull out the basket with the handle (1) to cool the device faster.
CAUTION! The basket and the interior of the device are covered with an anti-stick coating. Do not clean them with metal kitchen utensils or abrasive cleaners as this may damage the coating.
- Wipe the housing of the appliance with a damp cloth. The housing should never neither be immersed in water or any other liquid nor washed in the dishwasher.
- Wash the basket with warm water and mild detergent. Rinse and dry thoroughly. Do not use wire cloths or abrasive cleaners to clean the case.
- Clean the inside of the appliance with hot water and a delicate, non-abrasive sponge.
- Clean the heating element with a cleaning brush to remove any dirt.
- After cleaning and drying, the appliance should be folded and stored in a safe place.
CAUTION! If dirt has stuck to the basket, fill it with hot water with a small amount of dishwashing liquid. Leave it soaked for about 10 minutes.
TECHNICAL DATA
| Model | MFR-16 |
| Power supply 220-240V | ~ 50/60Hz |
| Power 1600W | |
| Off and standby mode available available | |
| Power consumption in standby mode 0,44W | |
| Power consumption in off mode - | |
| Power consumption in network standby mode | - |
| It automatically goes into standby mode after - | |
| Automatically goes into shutdown mode after - | |
| Network standby mode, if the device has a connection function with the application | - |
| Length of mains cable 1.10m |
CE
CAUTION! MPM agd S.A. reserves the right to technical changes.
Proper disposal of the product (waste electrical and electronic equipment)

Marking on the product indicates that after the service-life of the product expires, it should not be disposed with other type of municipal waste. Used equipment may have a negative impact on the environment and health of people due to potentially containing hazardous substances, mixtures and components. Mixing electric waste with other types of waste or disassembling those in an unprofessional manner may cause a release of substances that are hazardous to the environment and health.
Used equipment should be handed-over to a point for collection of electric waste. In order to obtain detailed information regarding the electric waste collection points, the user should contact the municipal point of electric waste collection or used equipment processing department.