XS 4B0M3SB-84 - Dishwasher HAIER - Free user manual and instructions
Find the device manual for free XS 4B0M3SB-84 HAIER in PDF.

| Product type | Built-in dishwasher |
| Brand | Haier |
| Model | XS 4B0M3SB-84 |
| Adjustable height | 818 to 898 mm |
| Width | 600 mm (estimation) |
| Depth | 550 mm (estimation) |
| Weight | Approximately 45 kg |
| Power supply | 220-240 V, 50 Hz |
| Required water pressure | 0.08 to 1 Mpa |
| Wash programs | Multiple programs (eco, intensive, etc.) |
| Capacity | 12 standard place settings |
| Noise level | Approximately 44 dB (estimation) |
| Safety | Anti-overflow device |
| Installation | Built-in with kitchen panel (max weight 9 kg) |
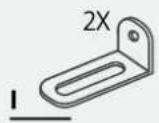
| Supplied accessories | Anti-vapor strip, brackets, screws, drilling template |
| Minimum recess dimensions | Height 818 mm, width 600 mm, depth 550 mm |
| Handover to user | Information on functions and safety provided |
Frequently Asked Questions - XS 4B0M3SB-84 HAIER
User questions about XS 4B0M3SB-84 HAIER
0 question about this device. Answer the ones you know or ask your own.
Ask a new question about this device
Download the instructions for your Dishwasher in PDF format for free! Find your manual XS 4B0M3SB-84 - HAIER and take your electronic device back in hand. On this page are published all the documents necessary for the use of your device. XS 4B0M3SB-84 by HAIER.
USER MANUAL XS 4B0M3SB-84 HAIER
sliding movement hinges
FROM CLEAN
TO SHINE
EN|IT|FR|DE|ES|GR|NL|PT|SK|PL|CZ|RO|HU
SL|SR|LT|EE|LV|BG|HR|DA|FI|NO|SV|UA|TR

WELCOME
This installation manual is intended for kitchen manufacturers who will accommodate these products. To ensure safety and achieve the best results, carefully read this manual, including the safety instructions, and keep it for future reference. Before proceeding with installation, note the serial number, as it may be needed in case of repairs. Check for any damage during transport and consult a technician if in doubt before use. Always keep all packaging material away from children children.
NOTE: The features and images contained in this document are for reference only and may change without notice.
Index
1 Safety notices for installation p.2-3
2 Where to install the dishwasher p.3
3 Dishwasher dimensions p.4-5
4 Step-by-step installation video p.6
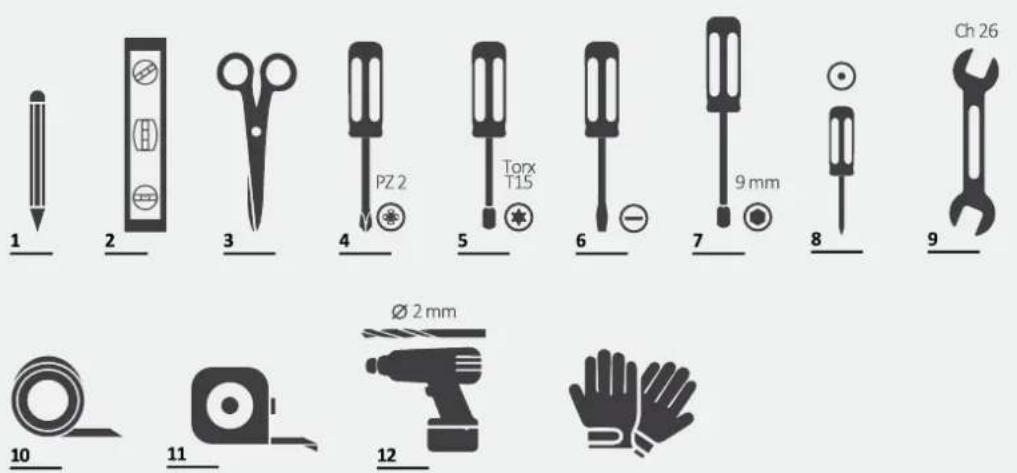
5 Installation tools p.6
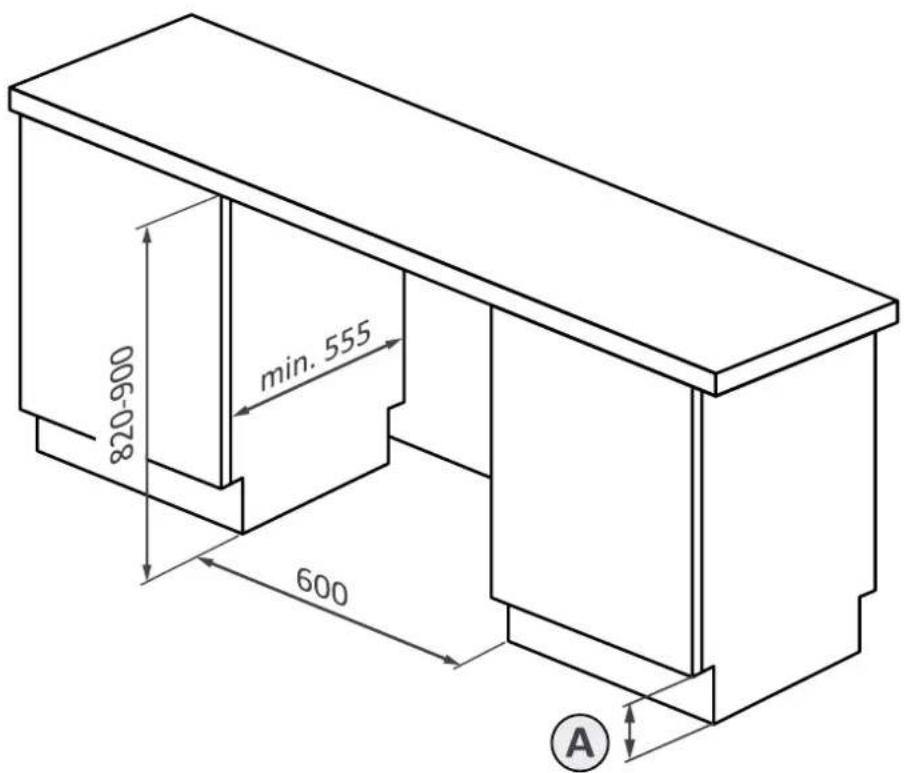
6 Built-in dimensions p.7
7 Instructions for dishwasher installation p.8 - 15
7.1 Steam band installation
7.2 Height adjustment
7.3 Adjustment of the rear foot
7.4 Adjustment of the front feet height
7.5 Tilt adjustment
7.6 Insertion into the built-in compartment
7.7 Fixing the front feet
7.8 Preparation of the panel
7.9 Installation of the panel
7.10 Fixing the machine to the kitchen
8 Connection to water and electrical network p.16-17
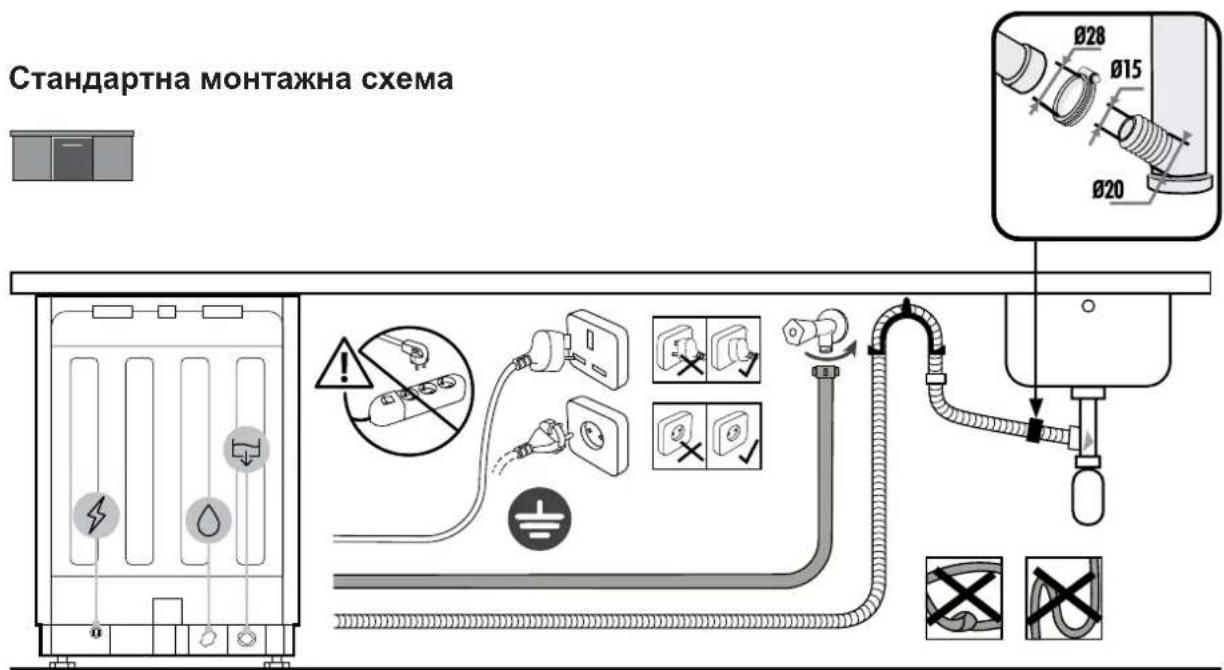
8.1 Connection diagram
8.2 Safety devices
9 Delivery to the user p.17
10 Dishwasher disassembly p.17
Observe these directions before beginning the installation of the product. Your safety is very important to us. Please read this information carefully before using the product.
- The installation must be carried out by a qualified technician who must be aware of and comply with the laws in force in the country of installation and the manufacturer's instructions;
- If manufacturer service is required to eliminate faults resulting from improper installation, such service is not covered by the fix;
- Remove the packaging material before operating the appliance;
- After unpacking the product, check that it is not damaged and, in case of problems, contact the service center before proceeding with installation and do not connect it to the power supply;
- A damaged product can cause a short circuit, electric shock, fire hazard, and other dangers;
- Check the packaging for accessories or accompanying materials (envelopes with screws, documents, brochures, etc.) and, if so, remove and store them;
- Incorrect installation may cause harm or injury to people, animals or belongin-gs. The manufacturer cannot be held responsible for such harm or injury;
- Safe use is only guaranteed if installation has been carried out properly according to these instructions. In case of damage due to improper installation, the responsibility lies with the person who installed the product;
- During installation, the appliance must not be connected to the power supply;
- It is recommended to wear protective gloves during installation to avoid cut injuries;
- In case of incorrect installation, tampering with the device and improper connection, the validity of the product warranty will expire;
- Make sure that when the product's power supply cable is completed, it is not accessible;
- After assembly, the power cord must not come into contact with moving parts of kitchen components (such as a drawer) and must not be exposed to mechanical stresses;
- When delivering the product to the end user, the technician must ensure that it has been installed correctly;
- Do not connect the product to the electrical network until the front panel has been fully installed. Otherwise, there may be an electrical hazard;
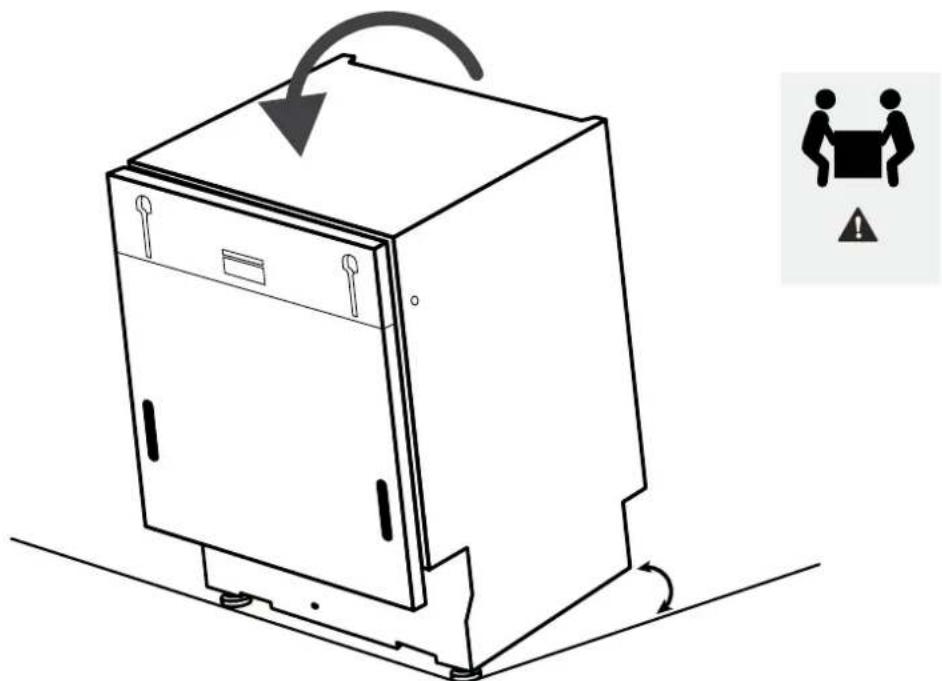
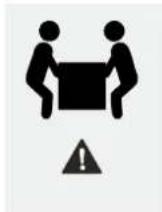
Take care during transport, the product is heavy; -
Before starting the installation, check all the dimensions of the built-in compartment by comparing them with the instructions contained in this manual. Note that it is possible to align the door with the doors of other furniture, even if it exceeds the control panel in height;
-
Make sure the installation area is stable and solid;
- Apply the protective film, supplied in the installation kit, under the worktop and on surrounding furniture. This film protects the furniture from humidity;
- Be careful when opening and closing the product;
- Incorrect installation can cause the product to tip over;
- The product must be level to function correctly, otherwise the door will not close properly, leading to the escape of hot steam.
Where to install the dishwasher
2
- Install and use this product in a closed, covered, dry, and well-ventilated environment;
- Do not install the product in open environments exposed to atmospheric agents;
- Install the product near an electrical outlet;
- Use the product only when placed in a recessed compartment, otherwise you risk injury and burns;
- Do not install the dishwasher under a cooktop;
- Do not install the product near heat sources (radiators, stoves, etc.);
- Do not place the product on carpets or similar surfaces;
- Place the product on a clean, level, and stable surface.
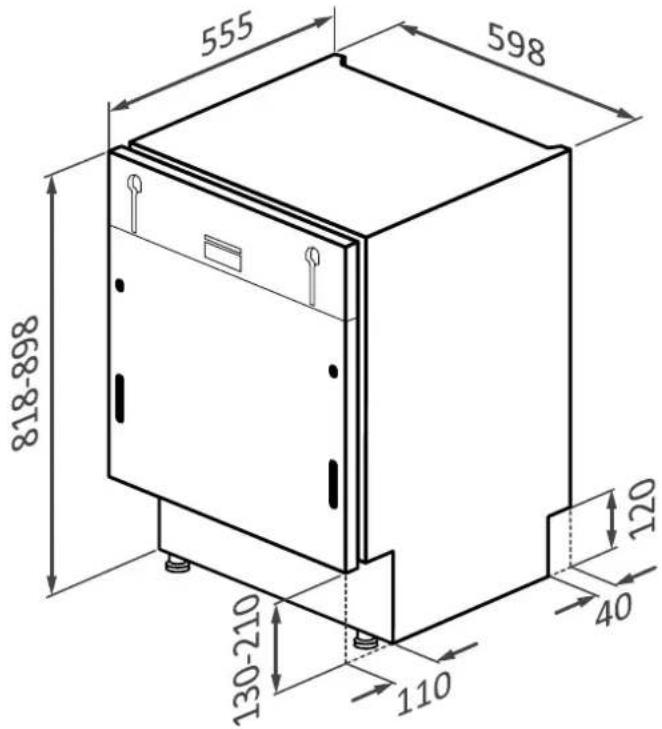
Dimensions in mm
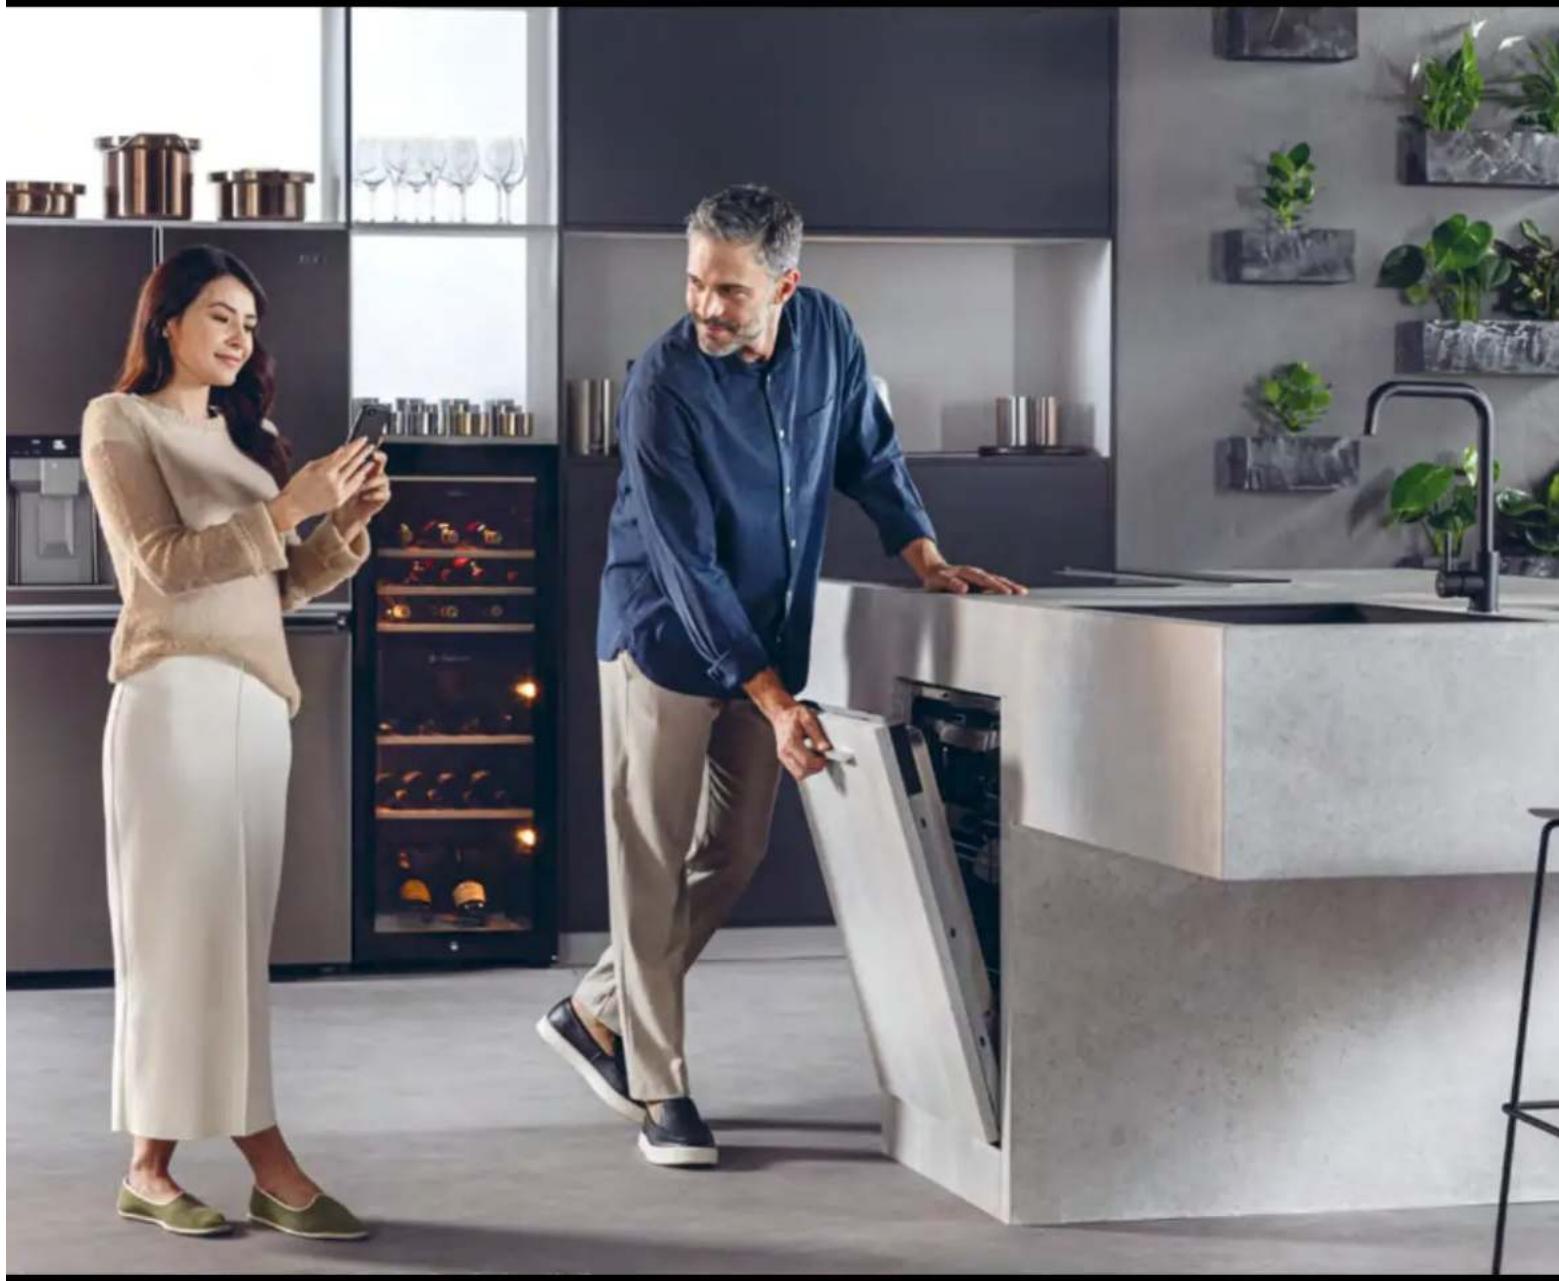
Front axonometric view of the product
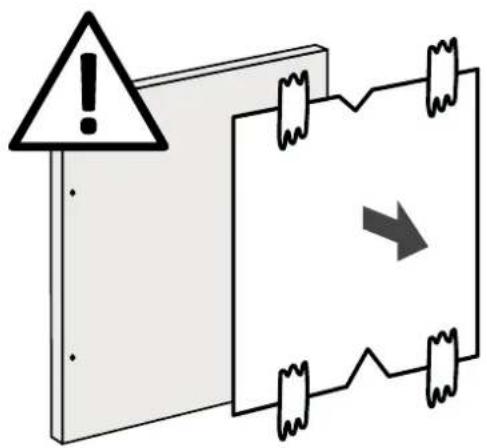
Front axonometric view with kitchen door


WARNING: if the kitchen panel weighs more than 9kg contact customer service.
Dimensions in mm
Back view
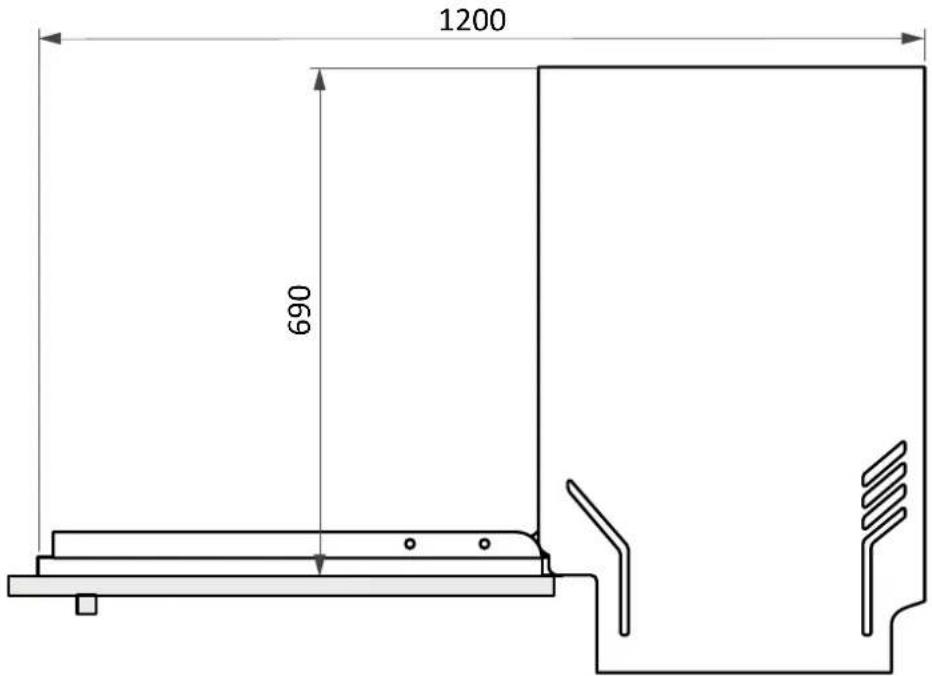
Side view
4 Step-by-step installation video
You can watch the product installation video by scanning the QR Code:

or by clicking this link
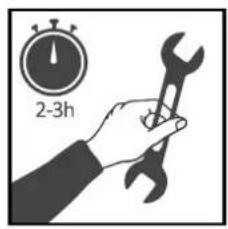
5 Installation tools

Required tools
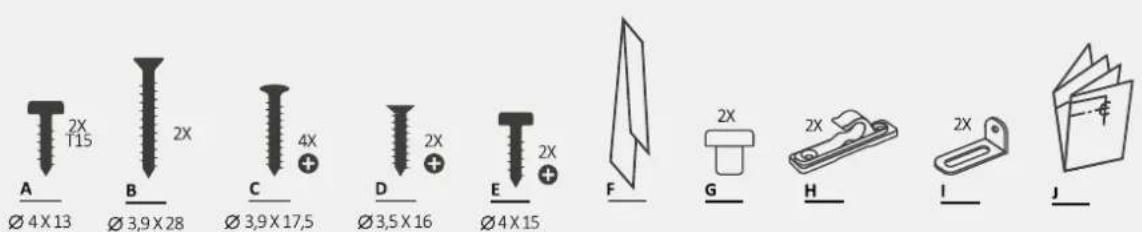
Tools provided with the product
Dimensions in mm
Axonometric view
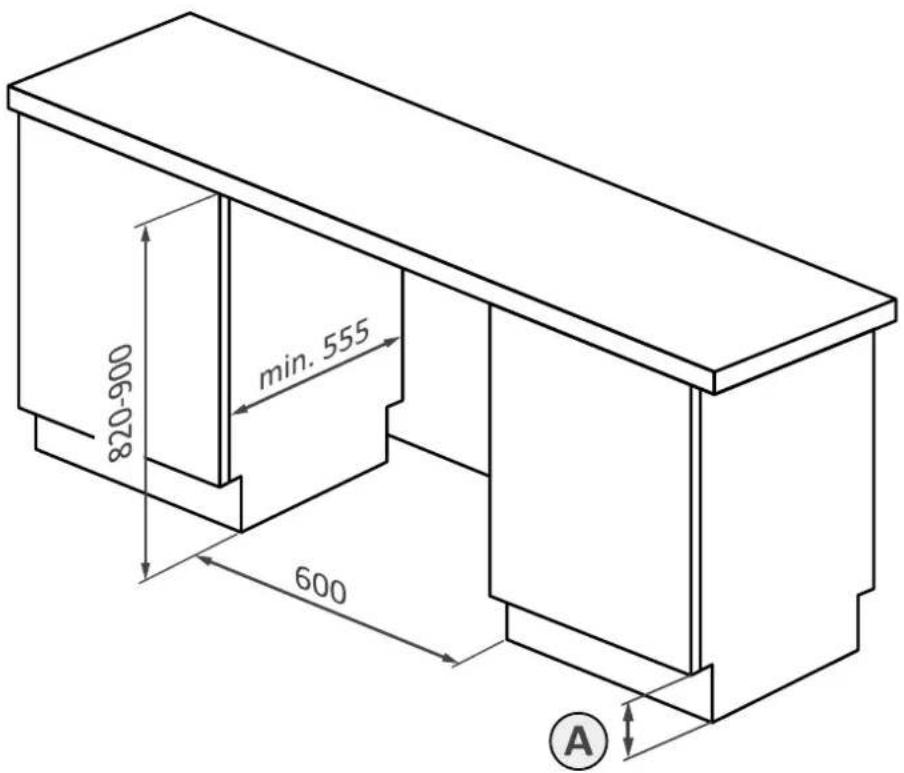
A
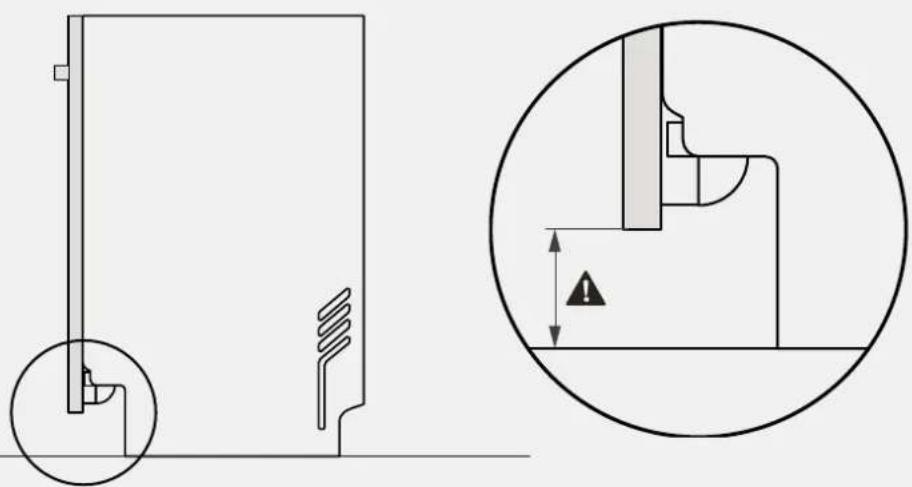
WARNING: The minimum recess height is 818~mm ; in this case, the distance between the door and the floor must be between 10 and 130~mm . If the dishwasher is raised (max. 898~mm ), the door-to-floor distance must also increase proportionally, up to a maximum between 90 and 210~mm .
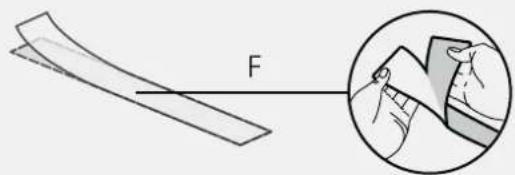
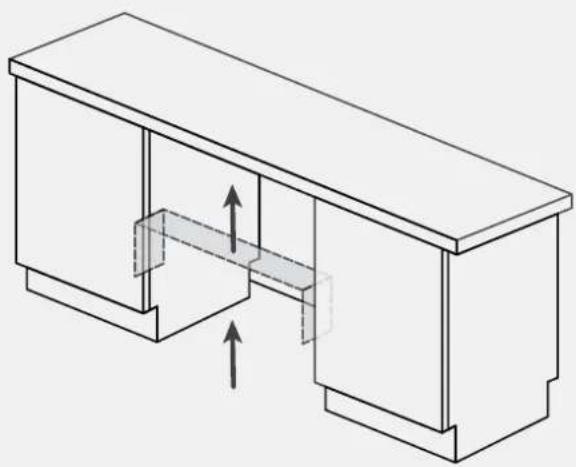
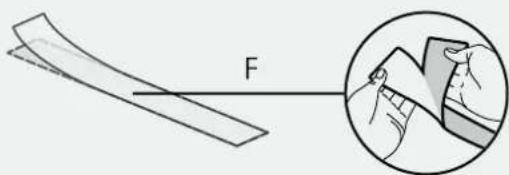
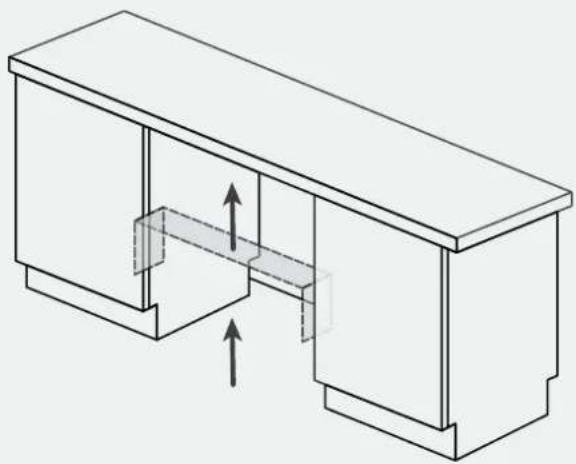
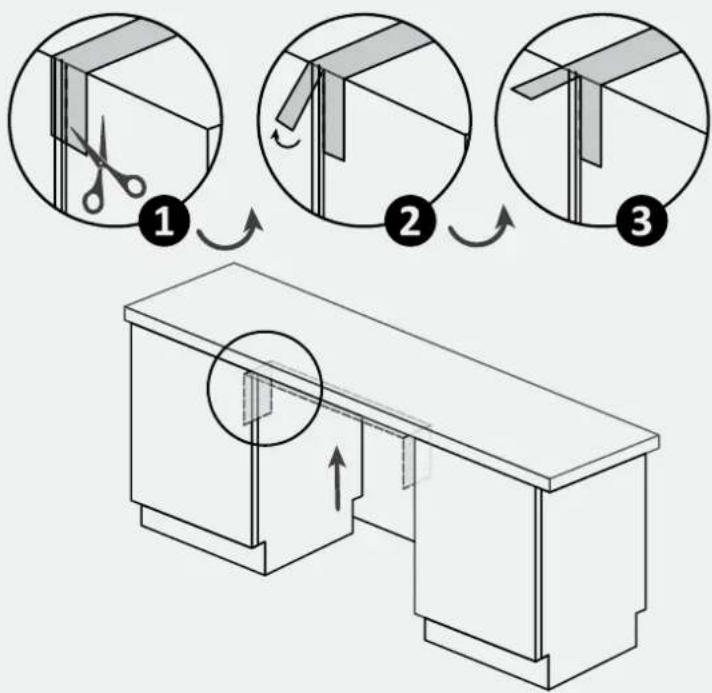
Steam band installation7.1
Apply the sticker band under the worktop and to the sides of the adjacent furniture;
1.
2.
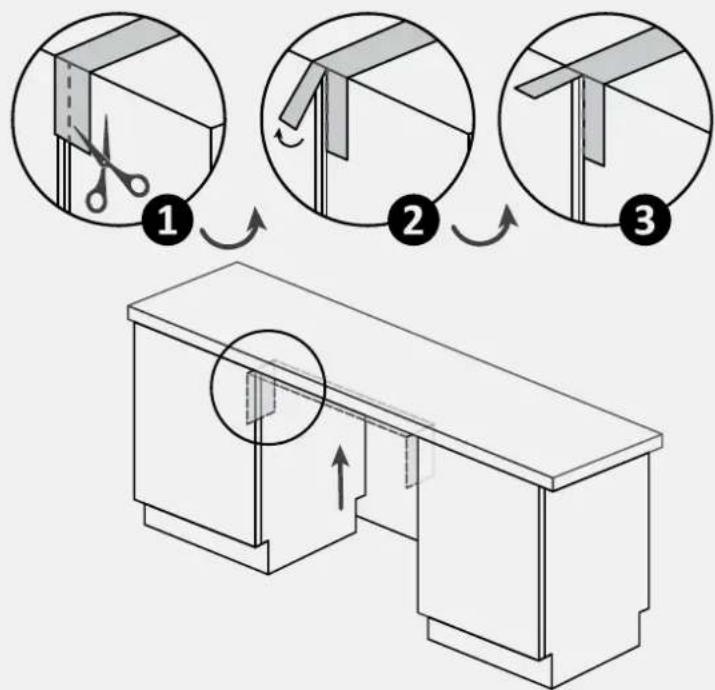
3.
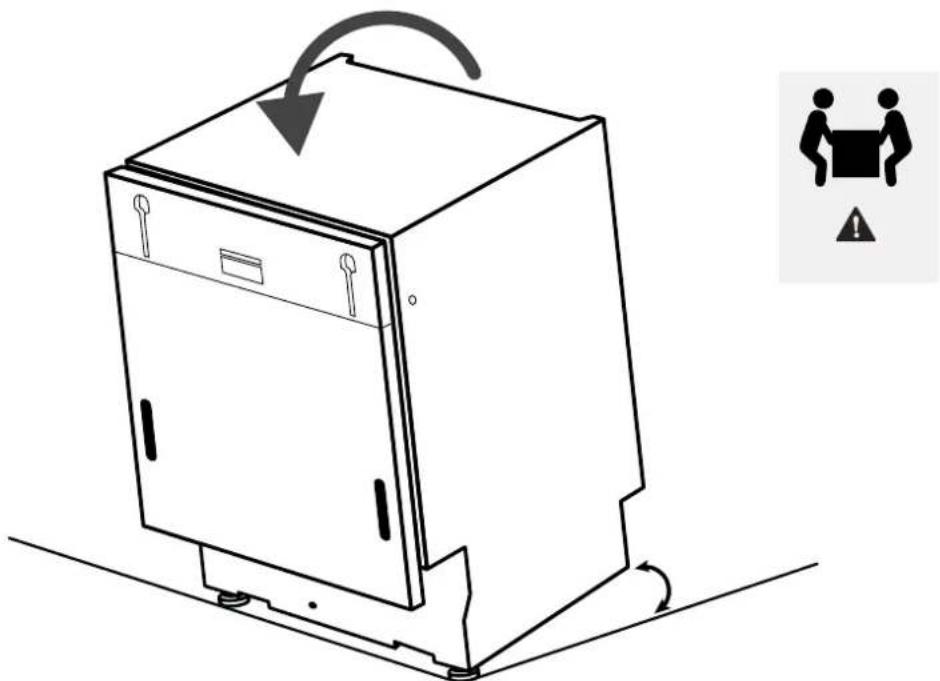
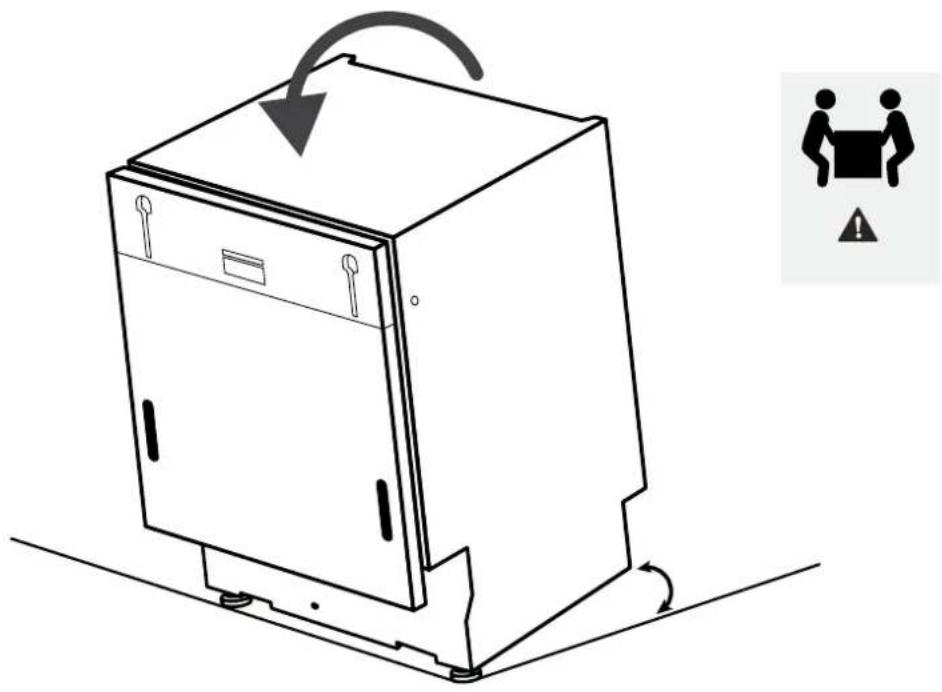
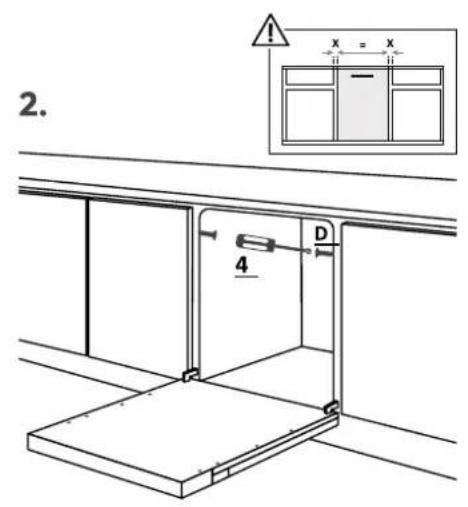
7.2 Height adjustment
Incline the dishwasher by raising the back about 10 cm.
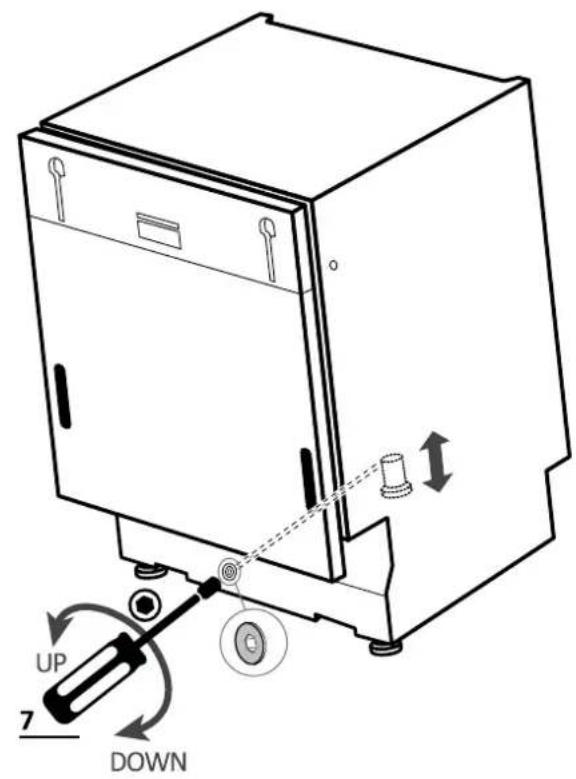
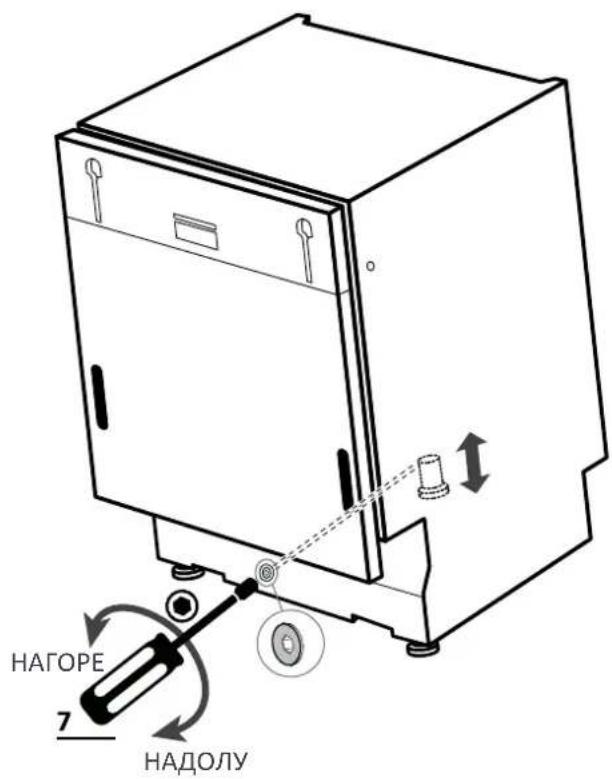
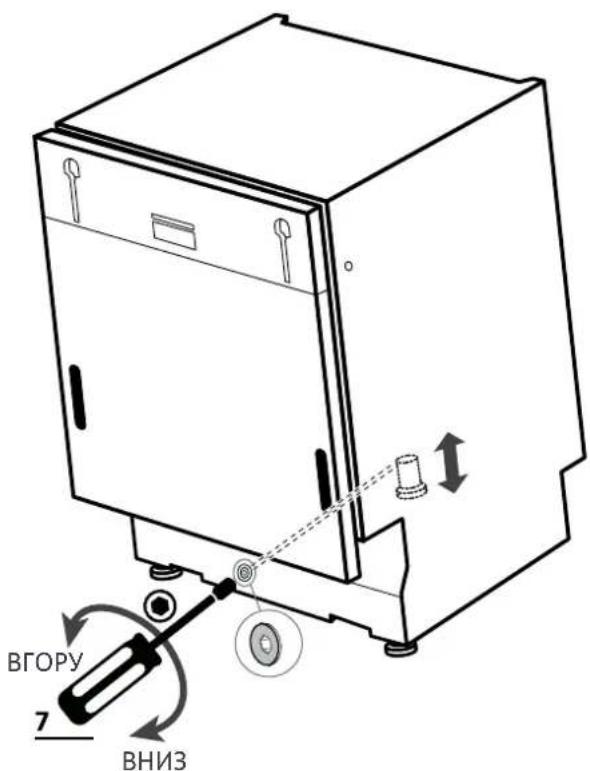
7.3 Rear foot adjustment
Adjust the rear foot height by operating from the front of the machine as indicated below.

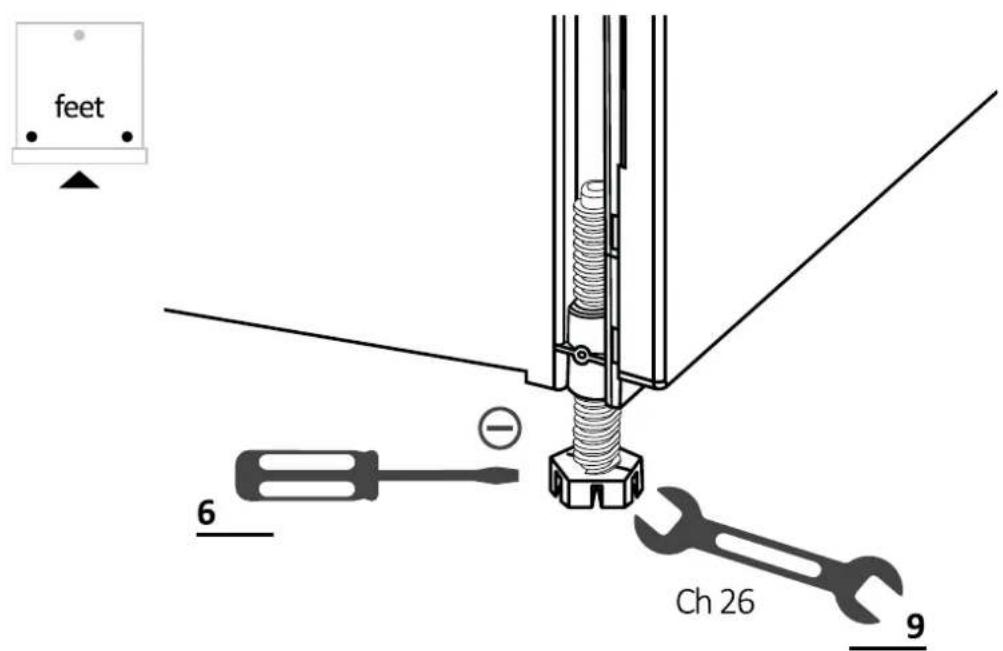
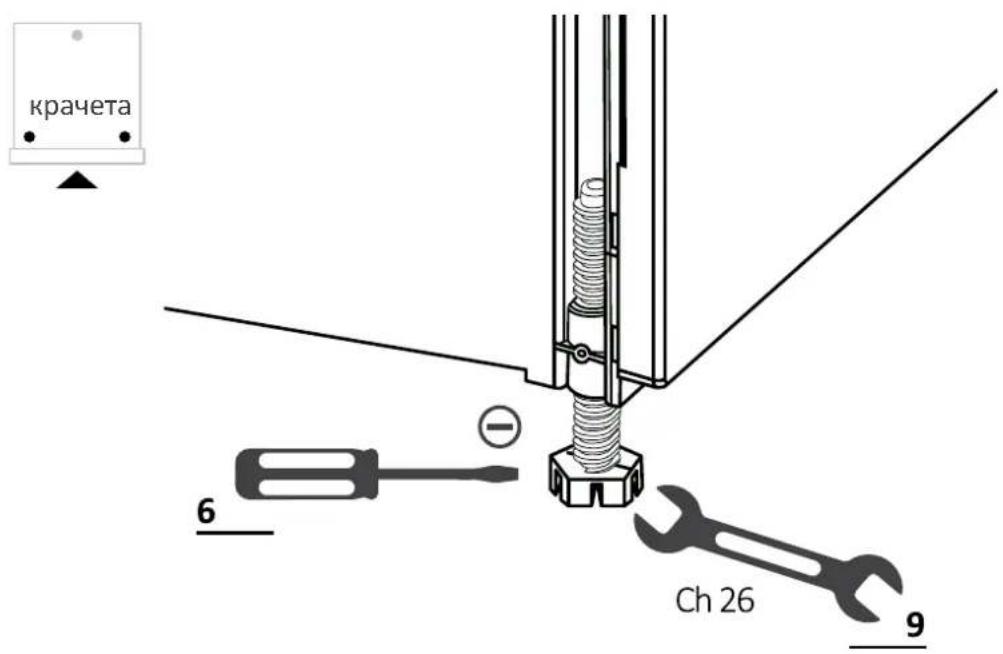
7.4 Front feet adjustment
Adjust the front feet directly. If necessary, lift the dishwasher slightly.
7.5 Tilt adjustment
Level the dishwasher by the vertical and horizontal planes.

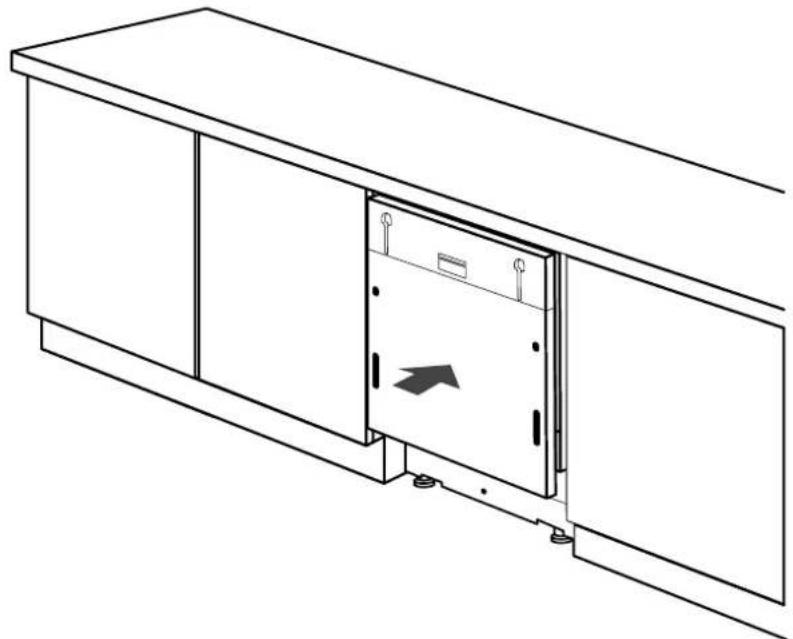
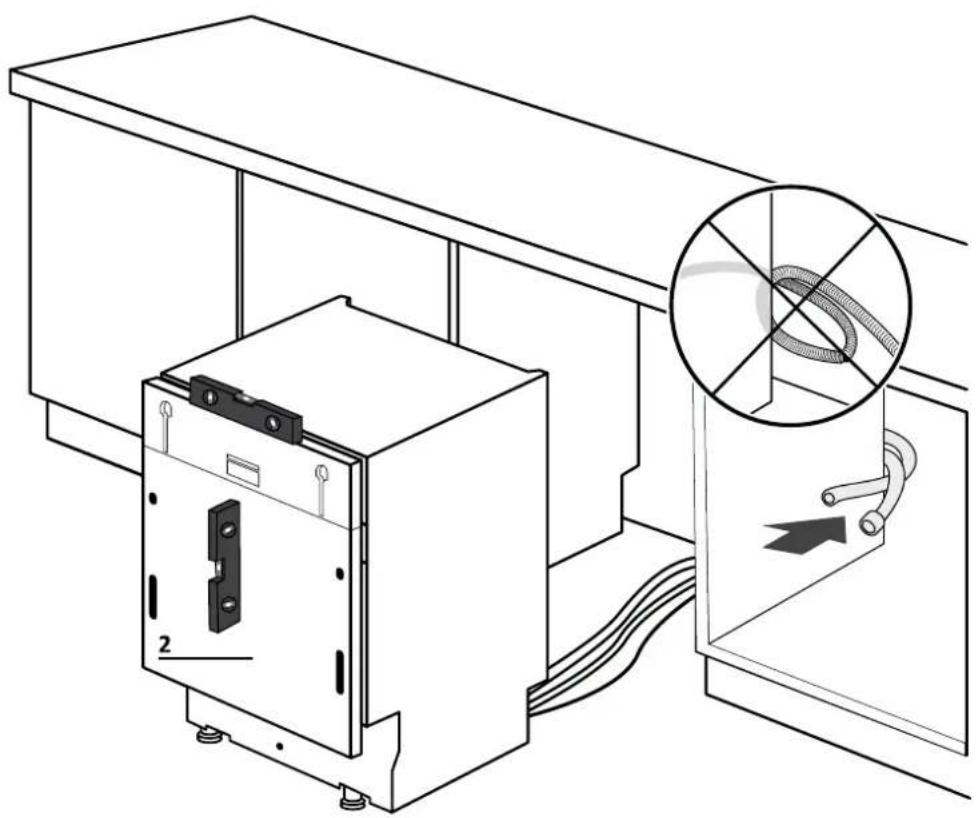
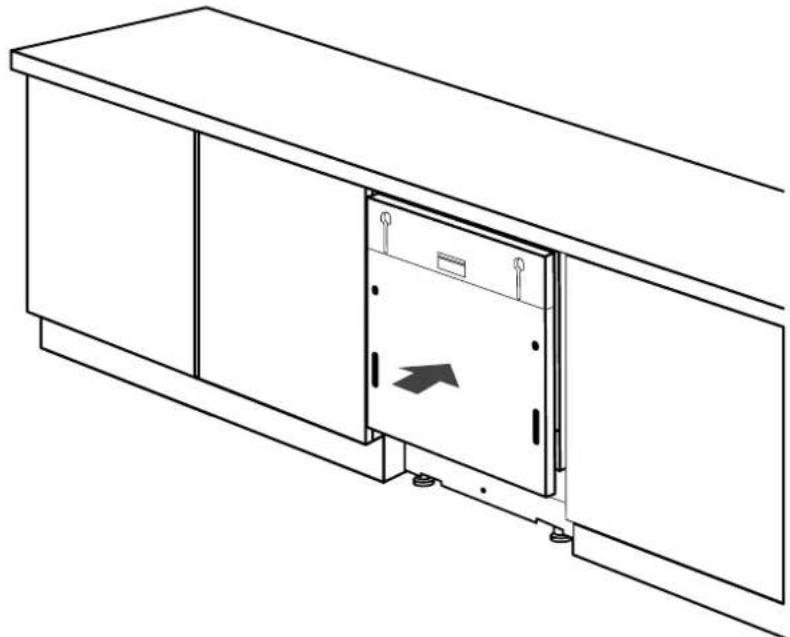
7.6 Insertion into the built-in compartment
Insert the dishwasher into the built-in compartment and check measurements and tolerances.
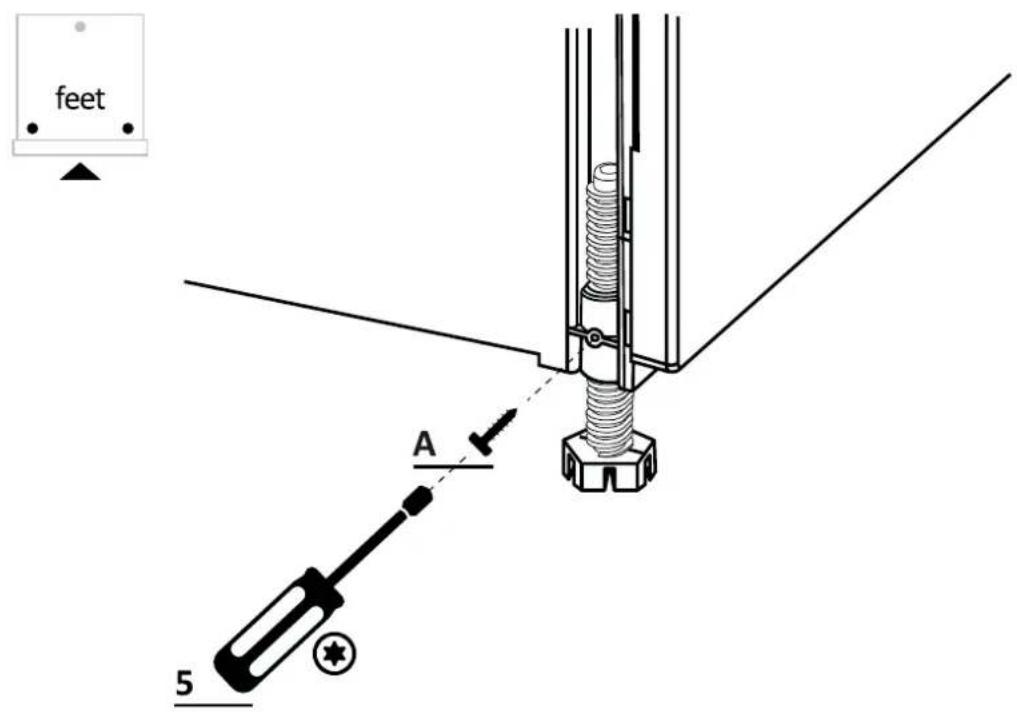
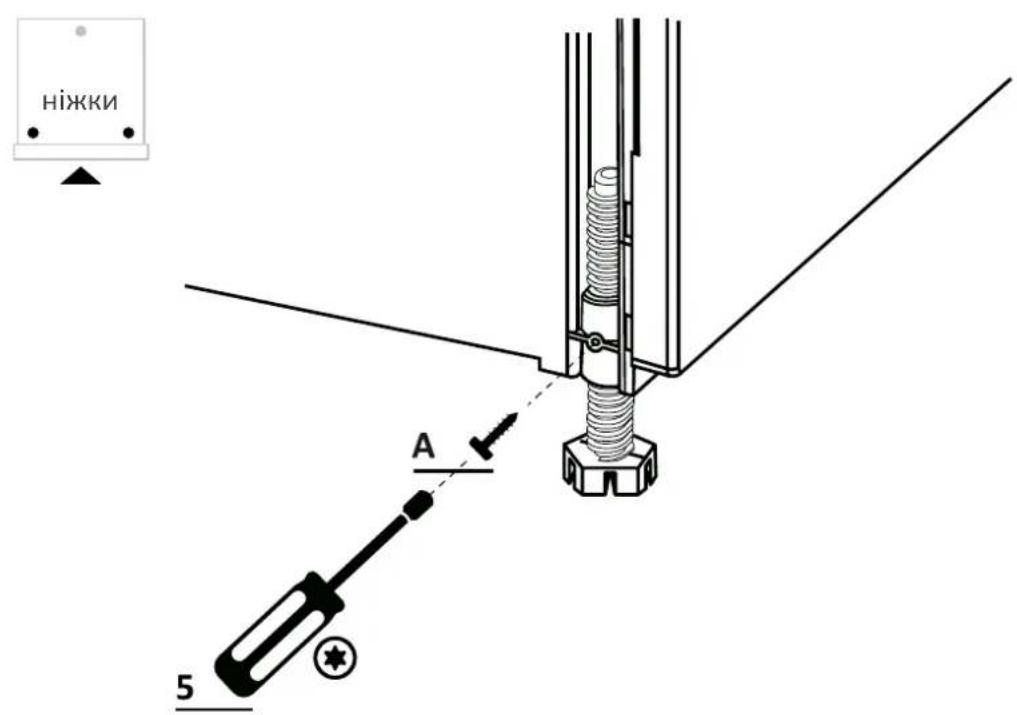
Fixing the front feet7.7
After checking all measurements, permanently fix the front feet to prevent them from loosening over time. This operation can also be done after installing the kitchen panel.
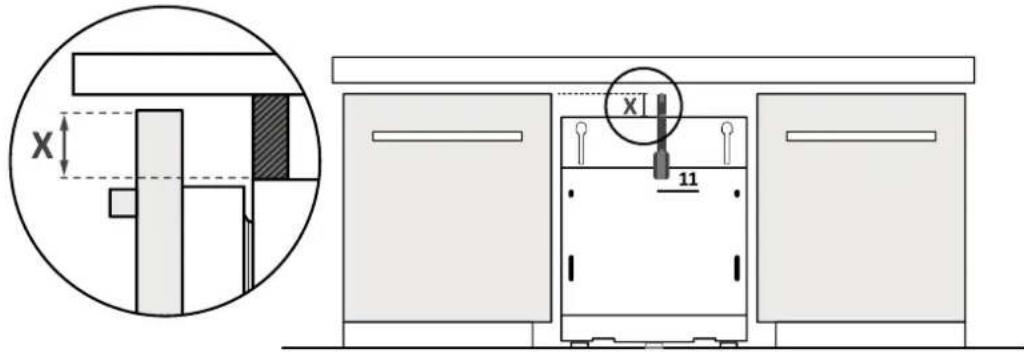
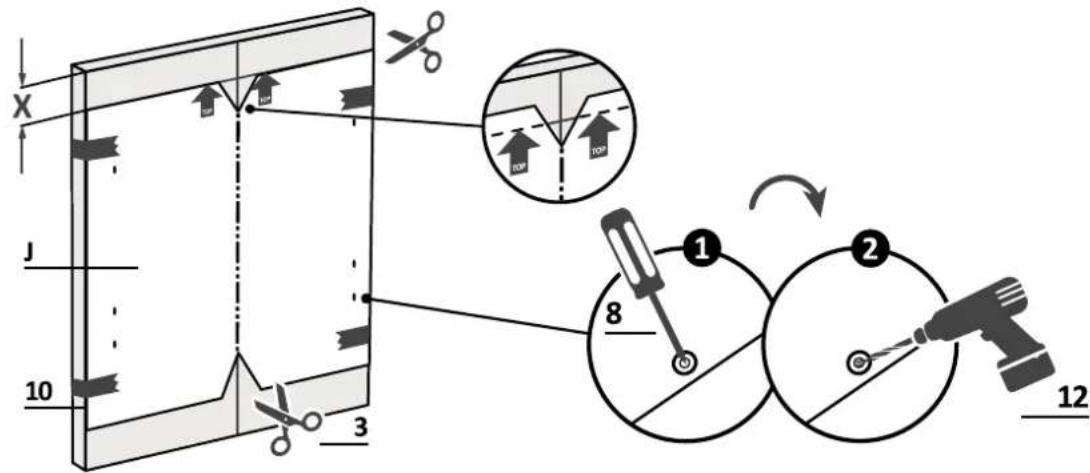
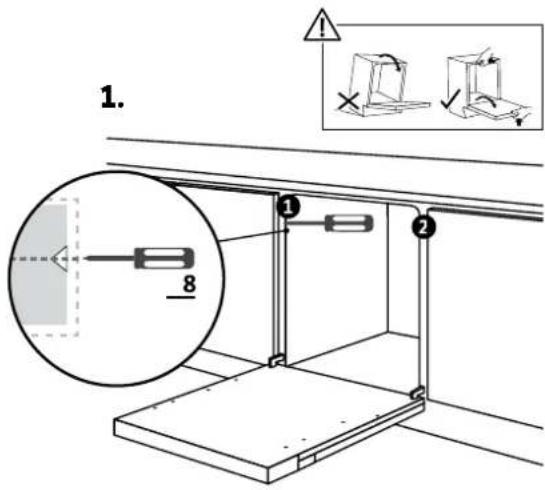
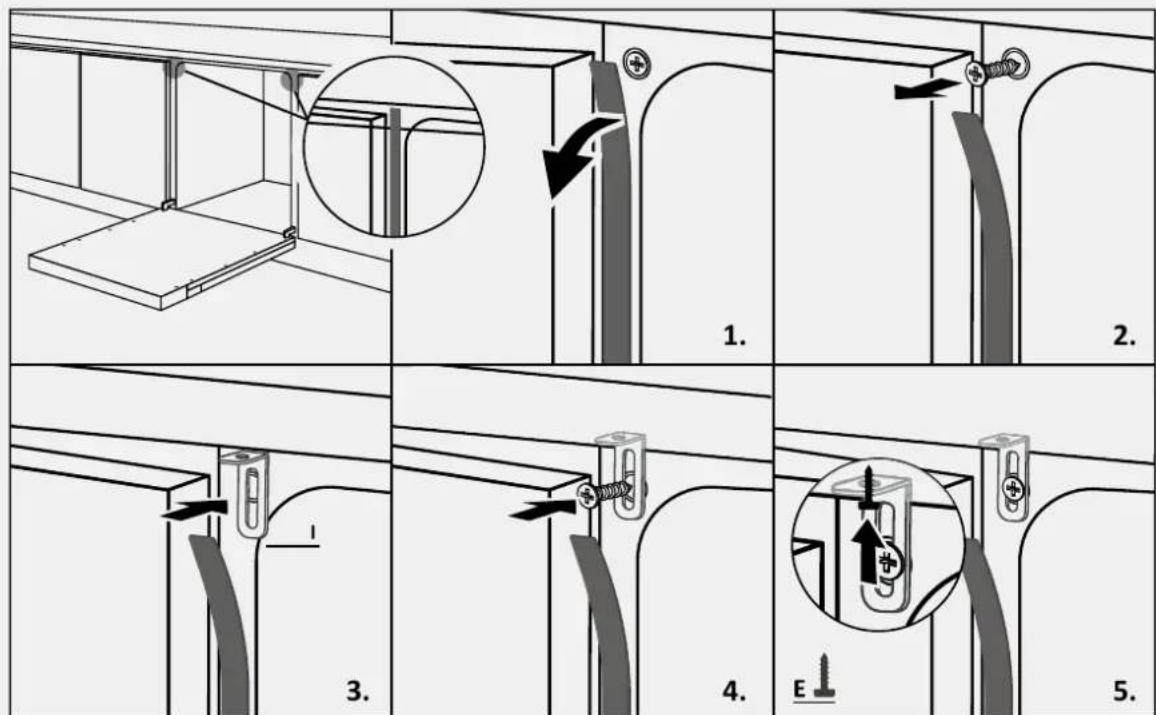
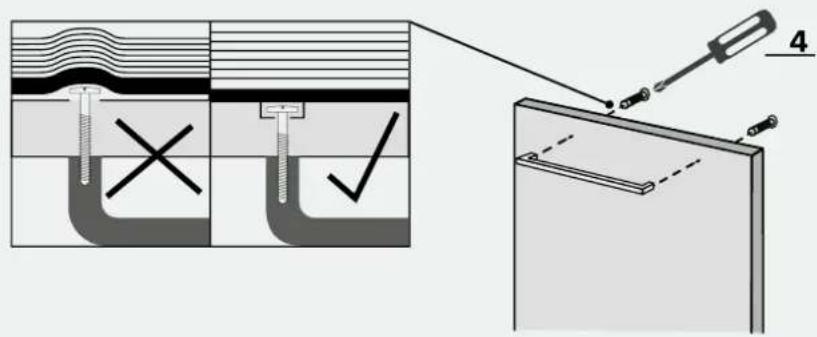
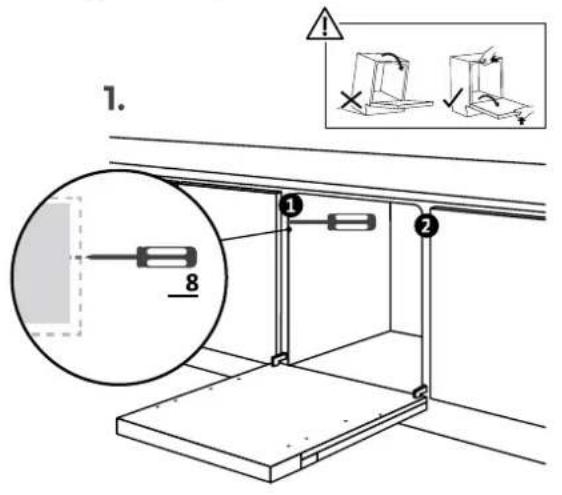
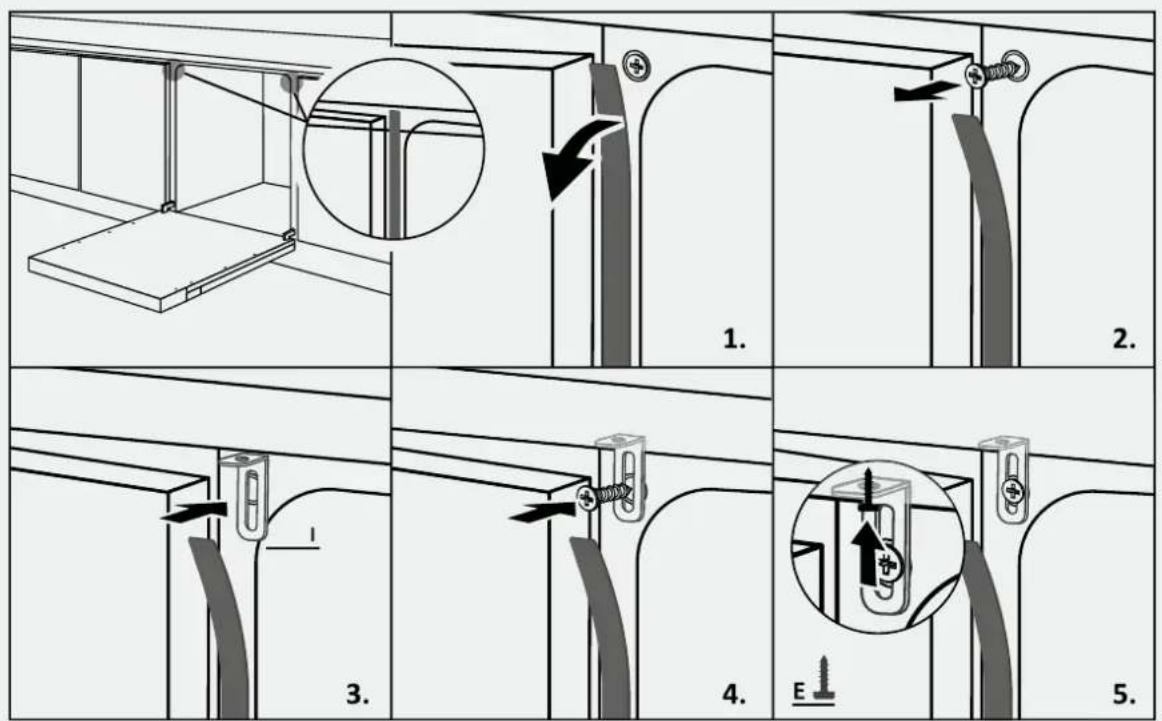
7.8 Panel preparation
1.
Measure the distance between the top edge of the adjacent doors and the dishwasher;
2.
Transfer the measurement onto the kitchen panel and locate the center;
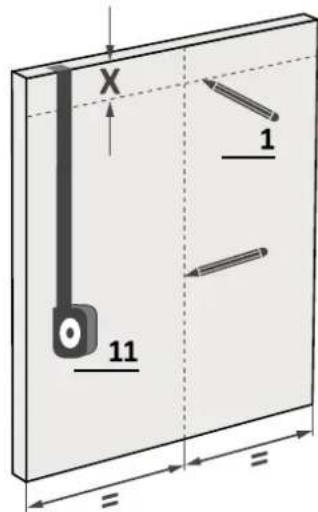
3.
Apply the drilling template anfd follow the strucions provided.
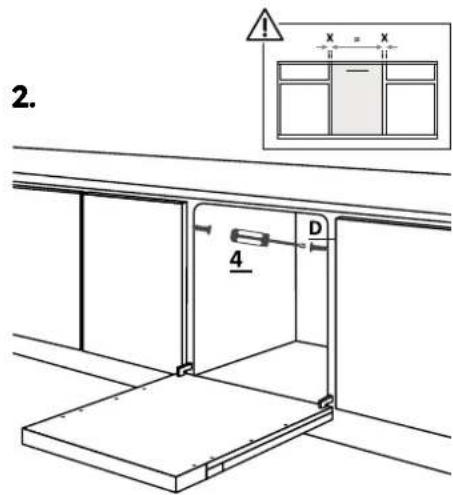
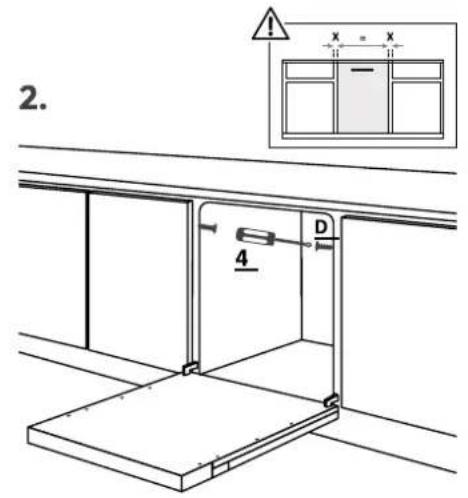
7.8 Panel preparation
4.
Remove the drilling template and apply the accessories.
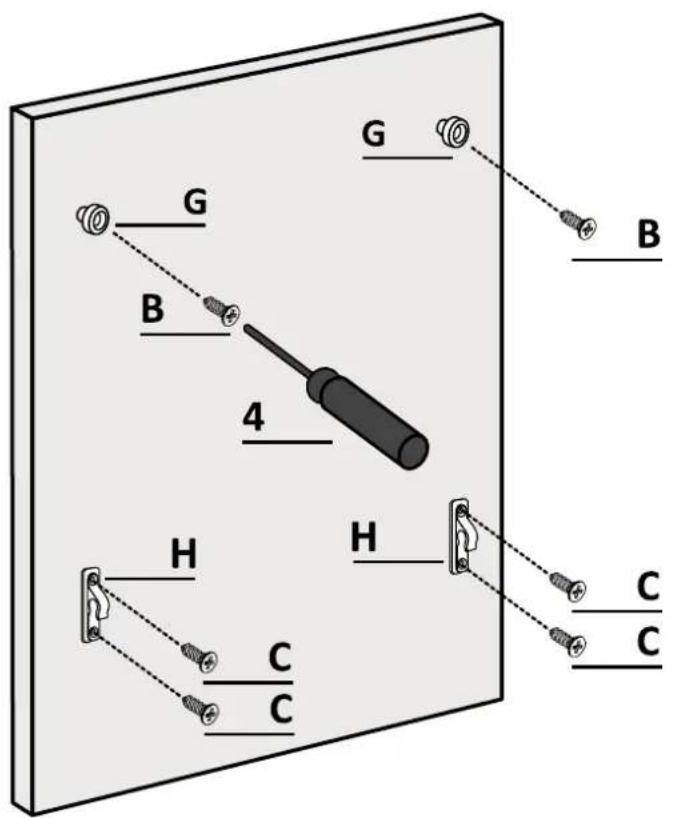
WARNING: Ensure screw heads don't protrude from the panel's rear surface, especially if you install the handle.
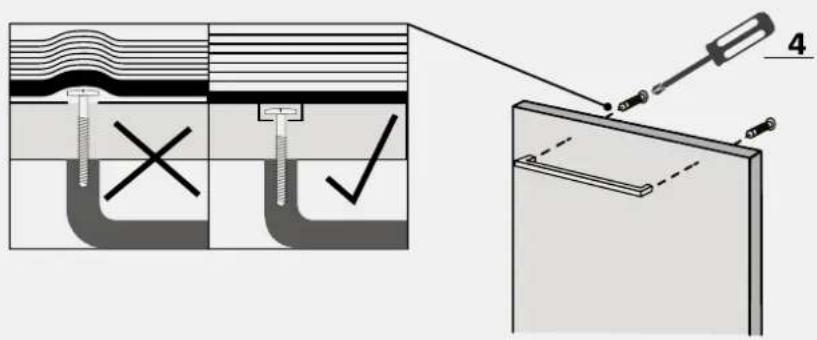
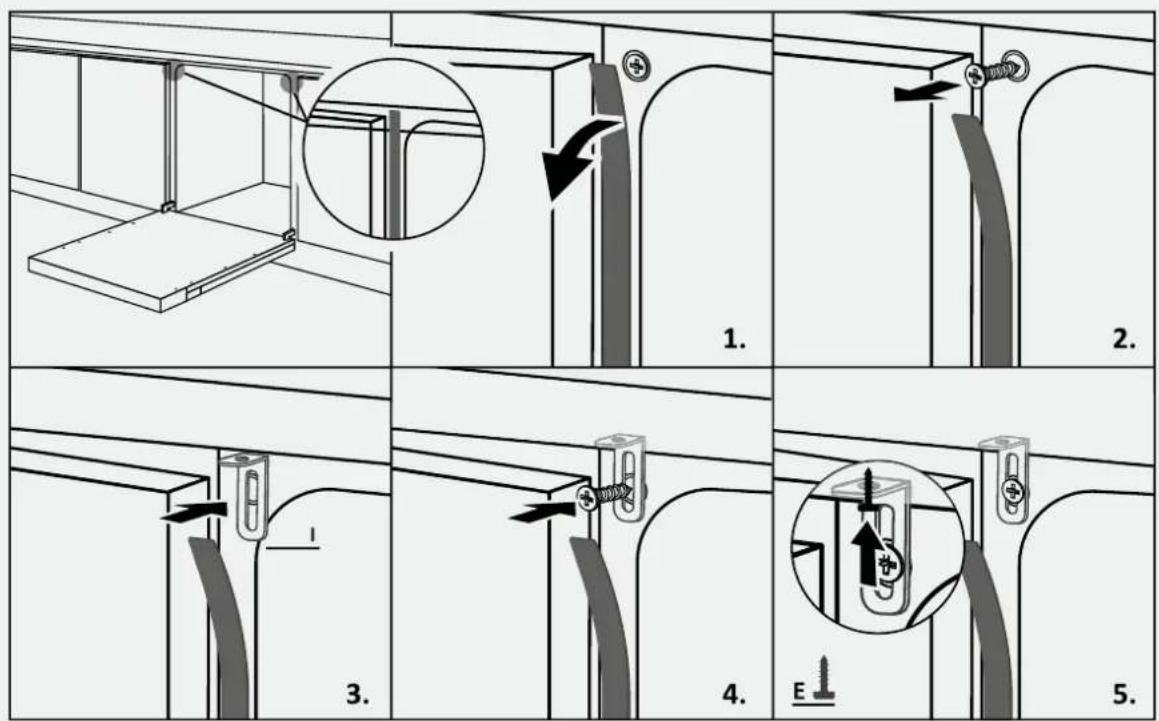
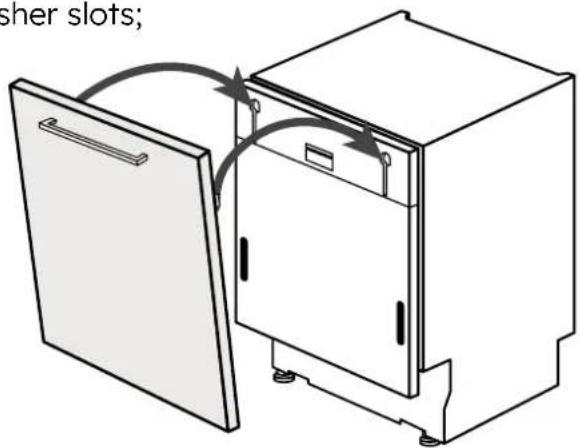
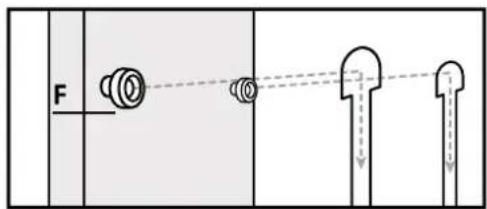
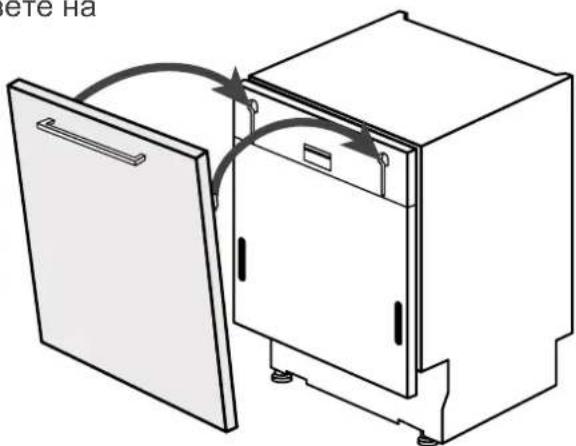
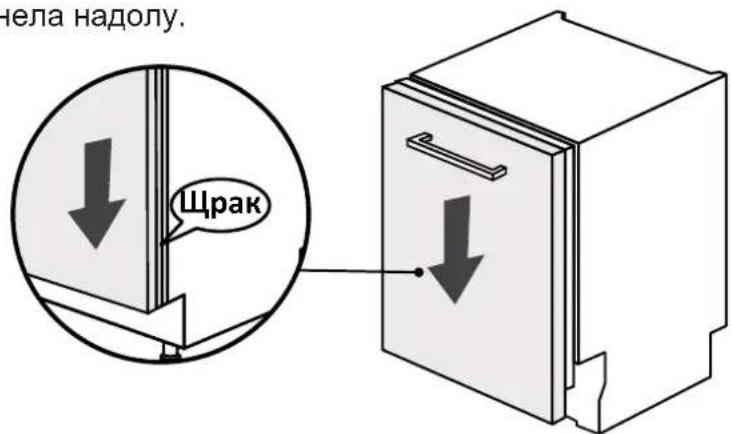
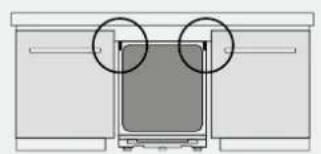
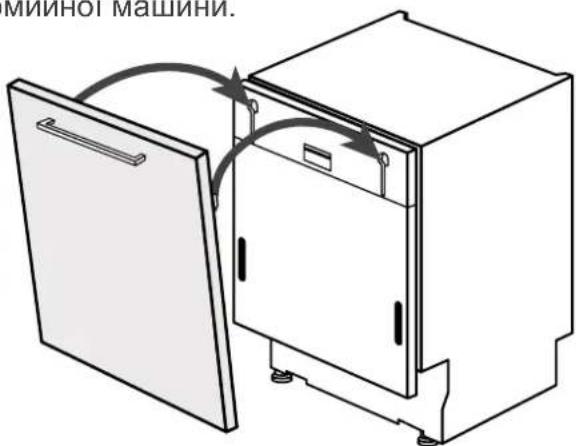
7.9 Panel installation
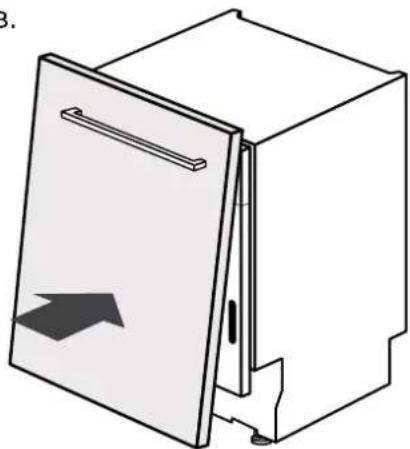
1.
Insert the upper pins into the dishwasher slots;
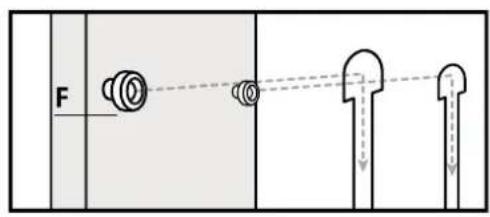
2.
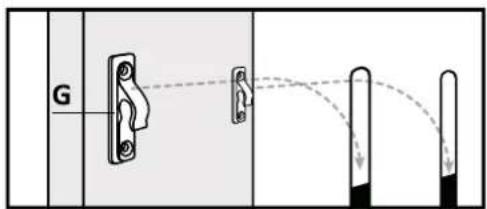
Fix the panel using the lower hooks;
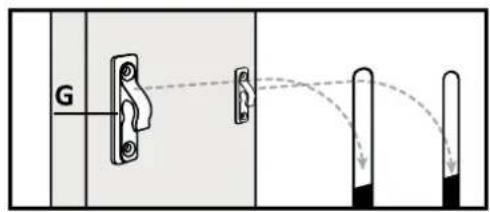
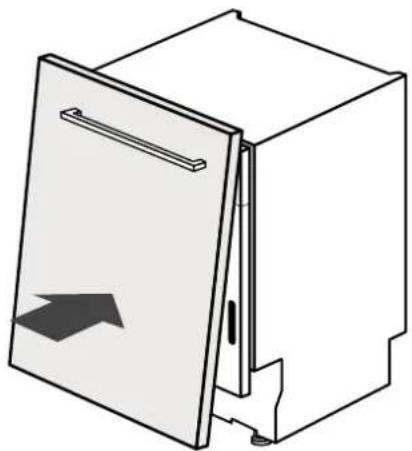
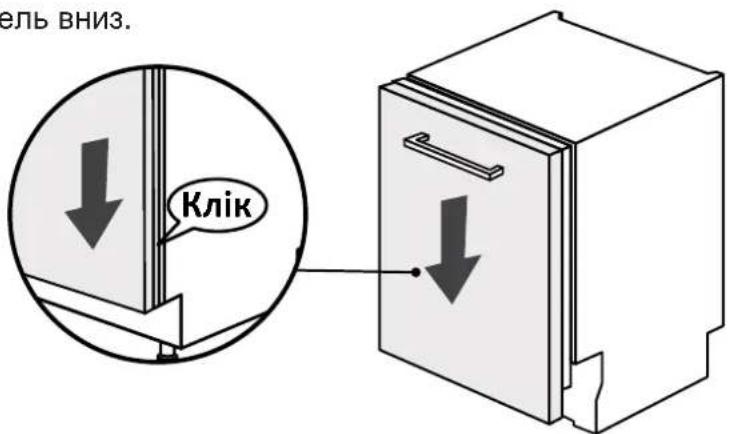
3.
Push the panel downwards.
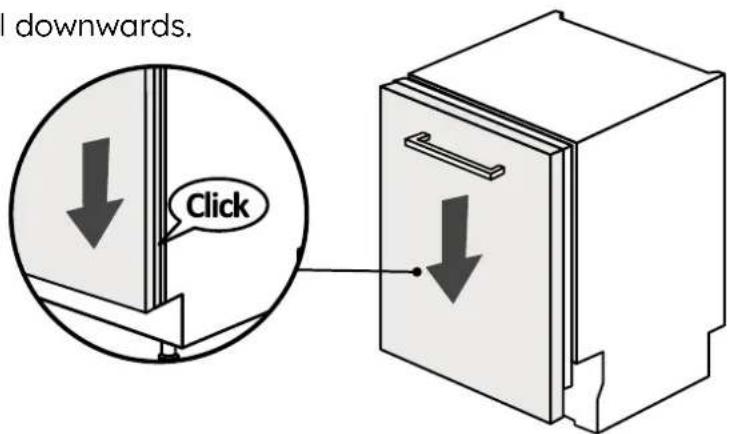

WARNING: Connect the dishwasher to the water and electrical mains at this time, observing the instructions provided in chapter 8.
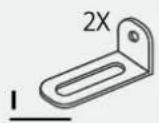
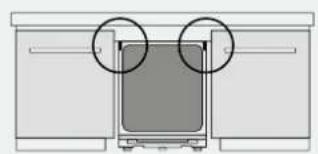
7.10 Fixing the machine to the kitchen
Instructions for fixing the dishwasher to the side of adjacent cabinets.
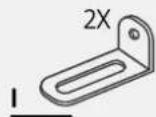
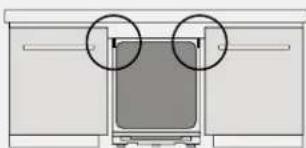
WARNING: If you can't fix the dishwasher laterally, use the brackets provided and secure it to the worktop; be careful if the worktop material is not wood.
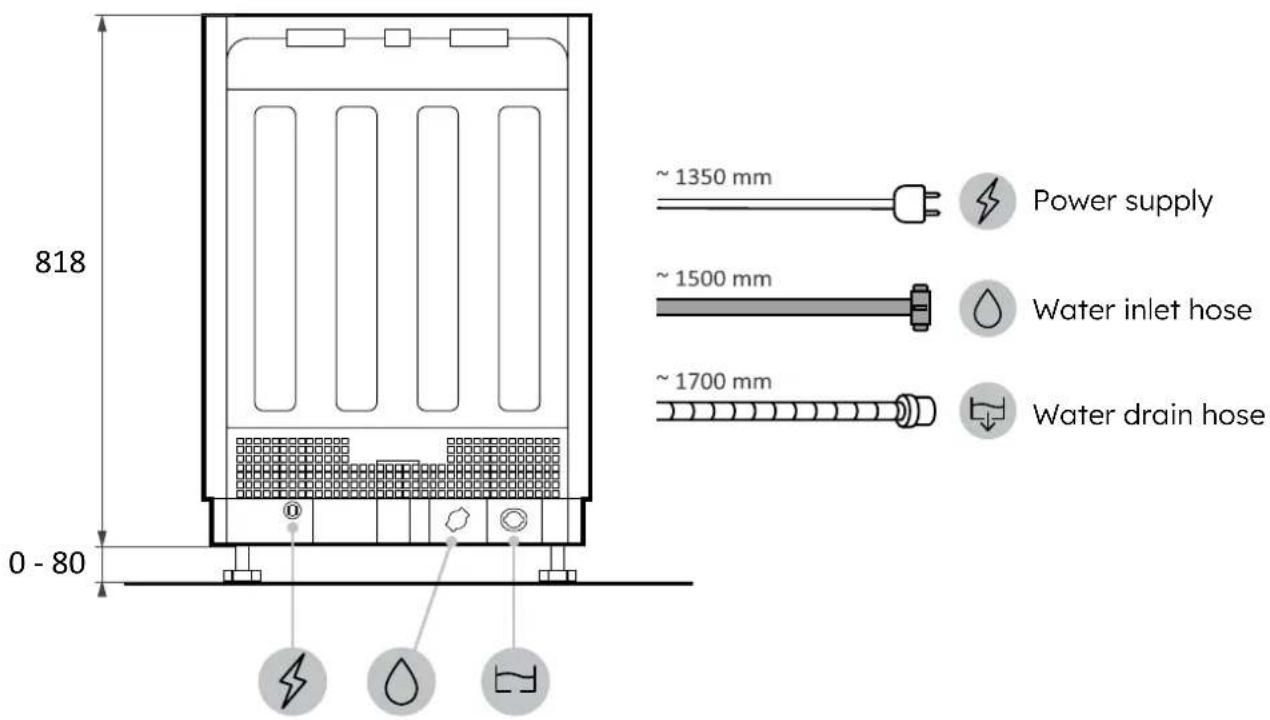
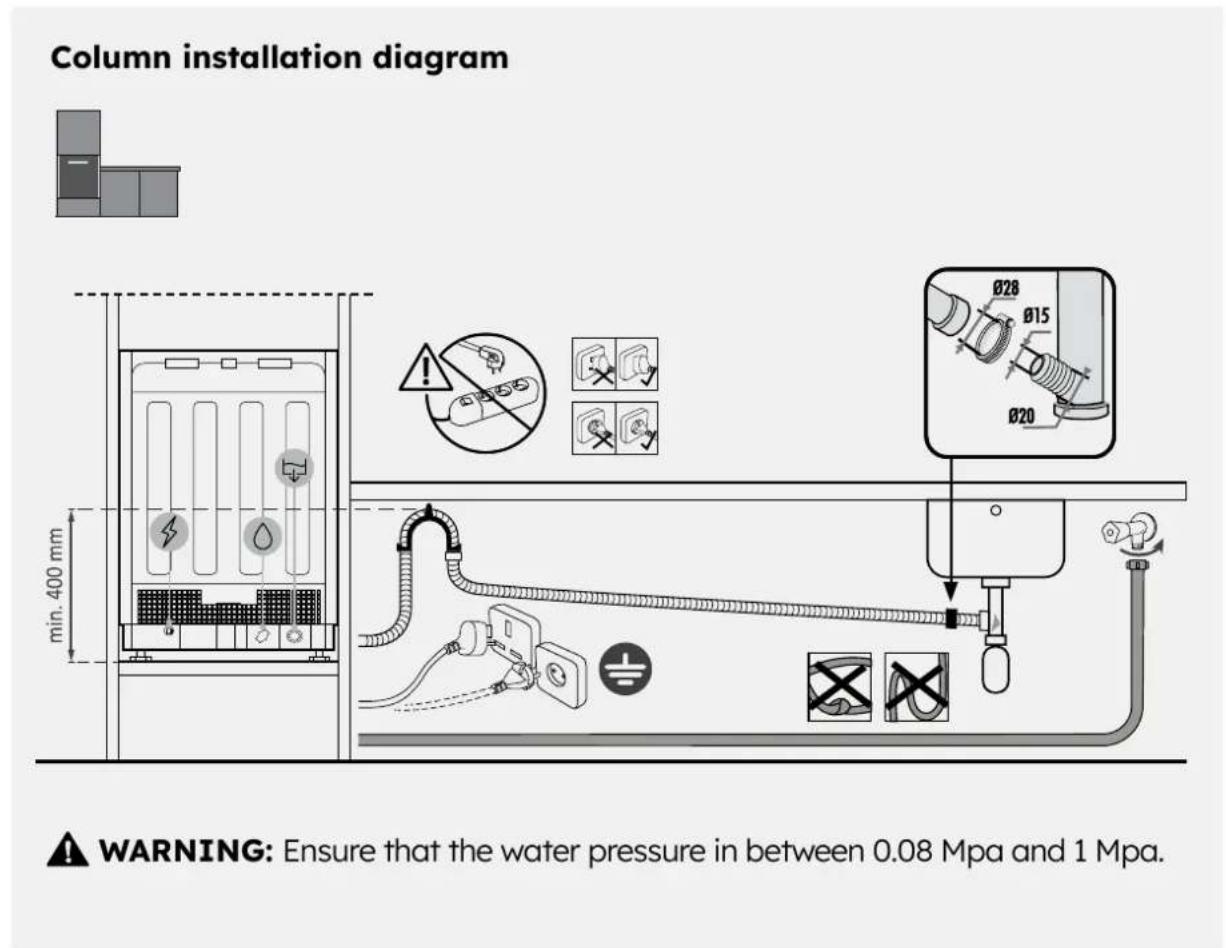
8.1 Connection diagram

8.2 Safety devices
All dishwashers are equipped with an anti-overflow safety device which, in the event that the water exceeds the normal level due to a malfunction, automatically blocks the water flow and/or drains the excess water.
See the User Manual for more details.
Delivery to the user 9
At the end of installation:
- Inform the user about essential functions;
- Inform the user about all aspects relevant to safe use and handling;
- Deliver accessories and instructions for use and assembly to the user to be kept with care.
After installation is complete, remove the protective film, tape, and all other packing materials and remove the supplied accessories from inside the product.
NOTE: The actual appearance of the product depends on the model chosen.
Dishwasher disassembly
10
- Disconnect the product from the electrical and water supply;
- Unscrew the fastening screws;
- Slightly lift the product and pull it out completely;
- This product does not damage the furniture, which can also be used with a new appliance.

Haier
BENVENUTI
8.1 Diaypauma ouvdoons

Lugege need juhised enne toote paigaldamist hoolikalt libi. Teie ohutus on meile vaga oluline. Palun lugege enne toote kasutamist hoolikalt libi need juhised.
7.2 Peruipane Ha BncounHaTa
HaknoheTe cBDOMnHaTa MaunHa, KaTo nobnHHeTe 3aHaTa nacT cOKoNo 10 cm.
7.3 Peruipane Ha 3aHnTe Kpaeta
PerynpaTe BncoHnHaTa Ha 3aHOTo Kpaue, KaTo DeiCTBaTe OT npedHaTa Yact Ha MaunHata, KaKTo e NocOueHo NO-DOJy.

7.4 Perylnaphe Ha npedHnte kpayeTa
PerynpaTe DnpeKTHo npedHnte KpaeTa. Ako e Heo6xOdmo, NOBdHHeTe Jeko cbDOMNHaT MaunHa.
7.5 Perynipane Ha NaKloHa
HnBepaTe cIOMnHaTa MaunHa No BepTnKaHaTa I XOpn3oHTaJIHaTa paBnHa.
7.6 NocTaBЯHe B OTdEJIeHNeTo 3a BrpaJdaHe
IocTaBete CbDOMnAHaTa MaHnHa B OTDeJeHHeTo 3a BrpaXdaHe n npOBepTe pa3Mepnte N DONyCTUmTe OTKNoHEnH.

BHIMAHHE: YBepeTe Ce, Ye rnaBnTe Ha BnHTOBeTe He CTbpyaT n3BbH OT HeIaOT 3aHaT aNOBbpxHOCT, OcObeHo aKO MOHTnPate dpBXkata.
7.9 MoHTaX Ha naHeJ
1.
IocTabete rohpnte uioptobe BCLOTOBete Ha CbDOMnHaTa MaunHa;
2.
HaTnchHeTe nHaHela HaDoJIy.

A BHIMAHNE: CbbpkeTe cIOMnHaTa KbM BOOpnoBa n eIeKtpnueckaT a Mpeka Ha To3n eTan, cna3BaIKu HNCTpykUnTe, npedocTabeH N Brna 8.
7.10 MoNTaJHa MaunHaTa B KyxHЯTa
HCTpyKuIN 3a 3akpenBaHe Ha CbdomnHaHaTa MaunHa OTCTpaH N KbM CbceHN WkafoBe.
BHUMAHNE: Ako He MoKeTe da fHKcnpate CbDOMnHaTa MaUNHa cTpaHNUHO, N3N0J3BaHTe IpeOCTaBeHNTe cKo6n I 3aKpeIe T KbM pa6OTnI nnOT; 6bDeTe BHMaTeHNH, aKO MaTePnaNbT Ha pa6OTnI nnOT He e DbpBO.
8.1 Cxema Ha CBbp3BaHe
Cxema 3a MOHTaK Ha KOJIOHa
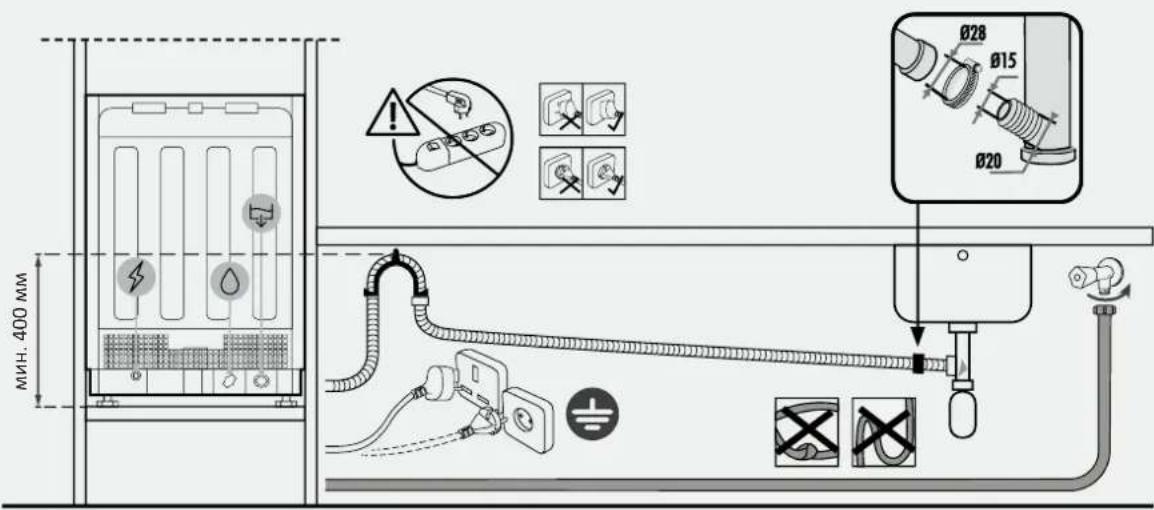
BHIMAHHE: YBepeTe ce,ue BoHOTo HaJIraHe e mExy 0,08 Mpa n 1 Mpa.
8.2 Празаи устpoиства
BcnuKn CbdomnHm MaunHn ca obopydBaHn c yctpoiCTBO 3a 3auNTa cpeu npelnaHe, KOeTO B cnuya HbDAta HaDbuHn HopMaJIHOTo HNBO NopaHn Hen3npabHOCT, ABTomatuH0 6nOKpA BoHNr nOTOK n/nnn n3ToyBa n3nUHaTa BOda.
Bnxte pbooDcTbTo 3a noTppe6nty 3a nobueye npdo6noctn.
Doctabka do notpe6nteJia
9
B Kapa Ha MoHTaJa:
- INΦopMpaIe nOtpe6nte 3a OCHOBHnTe ΦyHKUIN;
- HΦopMpaIe IOTpe6bTeIa BCnUcN acNeKTn, Cbbp3aHn c 6e3oNaHaTa ynoTpe6a n 6opabeHe;
- OoctaBeTe Ha notpe6nteI npHaIeXHocHTe n HcTpyKuNTe 3a ynoTpe6a mOHTaK, KOnTO cIeDbA da ce cbxpaHraBb BnMaTeJHO.
Cne3aBbPbBaHe Ha MOHTaJa OTCTpaHete 3aUHTHO TO FOJIO, NeHTaTaN BCNUKn DpyrN ONAKObYH N MaTePnaI N n3BaTe IpeOCTaBeHtE PpHaJNeXHOCTN OT BbTpewHOCCTTa Ha npOdykTA.
BENEXKA: DeiCTBNTeHnT BbHWeH BnHa npOyKta 3aBnCn OT n36paHnMoJeI.
Pa3rno6yBaHe Ha cBdomnHa MaunHa
10
- I3kIIOyTe npOdyKta OT eJneKtpo3axpaHbaHETo n BDOCha6dJaBaHeTo;
Pa3BnIte 3aKpenBaIuTe BnHTOBe; - Jeko NOBdHHeTe npOdyKTa n Iro N3BaJeTe HAnbJHo;
To3n npOdyKT He yBpeJda Me6eJIHTe, KOITOMoRat Da 6bDaT n3PON3BaHN iC HOB ypeI.

Haier

DOBRODOŠLI
7.8 Forberedelse of panelet
1.
7.8 Forberedelse of panelet
4.
7.9 Installation of panelet
1.
Bn mokeTe neperJnyTu BiJeO
Ipo BCTaHOBJIeHHBnpo6y,
npockaHyBaBwn QR-KoD:

a6oHaTnchyBwnIe

nocunahn

5 HcTpymeHTnДЯBCTaHOBJIeHHA
Heo6xidihi iHcTpymeHTn

IhctpymEnTn, 1o nocTaauToBc8 3 BInpo60m
Po3Mipn (MM)
AkoHometpnuHn BnIyD
A
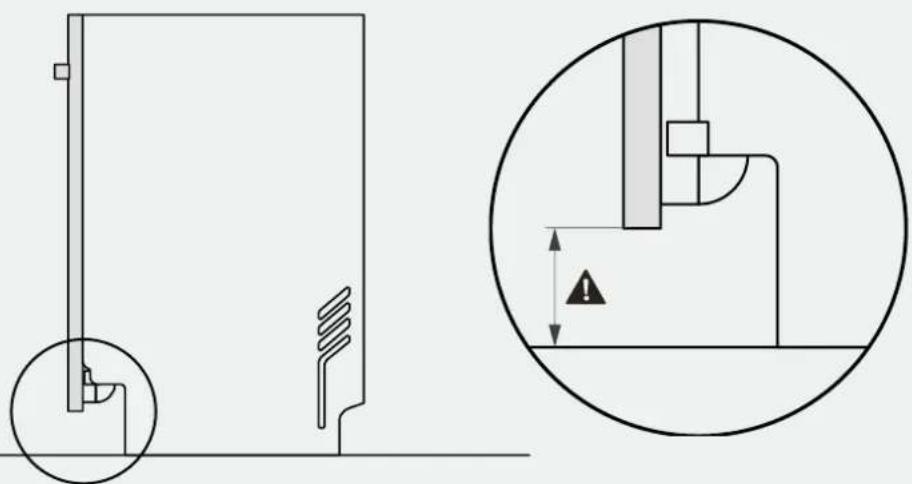
ANONEPEKHEH. Minimabha Bucota Hiwi ctaHOBTb 818 MM; ycbomy BnnaKy BiDcTaHb mixdBepaTAMn NiIIOROo Mae 6yTN BiD 10 do 130 MM. RaIIO nocydomHy maunHy nIDHrTO (MaKC. 898 MM), BiDcTaHb BiD nbEPaTdo niIDnOrn TakoX Mae nponopuiHo 36ilbSyBaTncra, MaKcIMMy Do 90-210 MM.
7 Hctpyku 3i BCTaHOBJIeHHa NocydOMnHOI MaunHn
7.1 HaheceHn npo3axnchoi cTpiuKn
Hakne Te hainky i nd cTbHueo i no 6okax Ha cycidnix Me6jx.
1.
2.
3.
7.2 PerylIOBaHHno BnCOTi
Haxnilitb nocydomnHy mawHy, niDnBwN 3aDnO yactHy np6n3HO ha 10 cm.
7.3 PerylIOBaHHaHix HIXOK
BidperyIIOte BncoTy 3aHbOi HIXKN, BnKoHaBUn dii 3 nepeHbOi YacTHN MaunHH, JIK NOKa3aHO HIXKHe.

7.4 PeryllobaHn nepeHix HIXOK
BidperyIIOte nepeDiH iIXKn 6e3nocepEnbO. 3a notpe6n 3JIerKa nIDHIMITb nocydomnHy MaunHy.

7.5 PeryilobaHHaHxNny
BupibHraTe nocydomHy MaunHy y BepTKaJIbHi i rOpN3OHTaJIbHi nloHHax.

7.6 BcTaHOBJIeHHaY BiDcIK dJa B6yDoBaHOro BCTaHOBJIeHHa
BcTaBte nocydomnHy maunHy y BiDcik dny B6ydoBaHoro BcTaHOBneHHi nepeBipTe po3mipn i donyckn.
7.7 Φíkcaúí nepeDHíx HIXOK
PicnnepeBipKn Bcix Bmipib octatouHo 3aqiKcyIe nepedhi HIXKN, 06 3anobirx po3xntyBaHHIO 3 YacOM. LIO onepauio TAKOX MOXHa BIKOHaTN PICnBCTAHOBHeHH KxyOHHO i naHeni.
7 Hctpyku 3i BCTaHOBJIeHHa NocydOMnHOI MaunHn
7.9 BctaHOBJIeHHnaHeJI
1.
BcTaBTe BepxHi TnTn B n3n nocyDmHoi MaHHN.

2.
3aKpinitb naHeJb 3a donomoroHnXhIX raYKiB.
3.
HaTnChiTb nAHeNb BHN3.
ANONEPEDXEHNA.ⅡKIOHITb NOcYOMnHy MaunHy Do BOOnpoBOy N eJekTpOmepekHa cIbomy etani, DOTpIMyOuNCb IHCTpyKci, HabeJeHx y po3di 8.
7.10 KpinJIeHHaMaunHnHa KyxHi
Ihctpykuii 0do KpinnneHn noCydomnHO mAsHH 36ky do cycidHix wa.

NONEPEDXEHRA. RaKo Bn He MoKeTe 3aKpInNTn NocydomnHy MaunHy 360ky, CKOpNCtaTecra HaDaHmN KPOHtEiHAMi i 3aKpiiTb ii do poobooi nobepxhi; 6ydTe oBepexHi, KaO MaTePiaI pObooyi nobepxHi He DepeBO.