LVS 1/2 Bp - Vacuum Cleaner Kärcher - Free user manual and instructions
Find the device manual for free LVS 1/2 Bp Kärcher in PDF.

| Product type | Cordless vacuum cleaner |
| Brand | Kärcher |
| Model | LVS 1/2 Bp |
| Power supply | 36 V DC battery, nominal power 350 W |
| Tank capacity | 0.35 L |
| Air flow (max.) | 15 L/s |
| Vacuum (max.) | 20 kPa |
| Runtime (36 V 2.5 Ah battery) - Eco mode | ≤ 40 min |
| Runtime (36 V 2.5 Ah battery) - Standard mode | ≤ 24 min |
| Runtime (36 V 2.5 Ah battery) - Power mode | ≤ 14 min |
| Filtration | HEPA 13 filter, sponge filter, cyclone |
| Sound level | 72 dB(A) |
| Weight (without accessories and battery) | 2.0 kg |
| Dimensions (L x W x H) | 186 x 250 x 1150 mm |
| Operating ambient temperature | 0 °C to +40 °C |
| Power modes | Eco, Standard, Power (button selection) |
| Included accessories | Floor nozzle, crevice tool, suction tube, wall mount |
| Filter cleaning | Cyclone cleaning by trigger button, sponge filter washable with water |
| Maintenance | Empty tank when the 'Max' mark is reached |
| Safety | Protection class III, emergency stop by removing battery |
Frequently Asked Questions - LVS 1/2 Bp Kärcher
User questions about LVS 1/2 Bp Kärcher
0 question about this device. Answer the ones you know or ask your own.
Ask a new question about this device
Download the instructions for your Vacuum Cleaner in PDF format for free! Find your manual LVS 1/2 Bp - Kärcher and take your electronic device back in hand. On this page are published all the documents necessary for the use of your device. LVS 1/2 Bp by Kärcher.
USER MANUAL LVS 1/2 Bp Kärcher
natural_image
Line drawing of two different vacuum cleaner designs (no text or symbols present)Deutsch 8
English 12
Français 17
Italiano 22
Español 26
Português 31
Nederlands 36
Türkçe 40
Svenska 45
Suomi 49
Norsk 54
Dansk 58
Eesti 62
Latviešu 67
Lietuviškai 71
Polski 76
Magyar 80
Čeština 85
Slovenčina 89
Slovenščina 94
Română 98
Hrvatski 103
Srpski 108
Ελληνικά 112
Русский 117
Українська 122
Български 127
中文 132
日本語 136
한국어 140
Indonesia 145
Bahasa Melayu 149
English (UK) 154
العربيya 159

EAC
Read Online


97747600 (04/25)

Register your product
www.kaercher.com/welcome
natural_image
Illustration of an open book with a black arrow indicating rotation (no text or symbols)A
LVS 1/2 Bp
natural_image
Line drawing of a mechanical device with a cylindrical component inserted into a base, showing directional arrows (no text or symbols)
natural_image
Diagram of a mechanical device with a lever and handle, showing sequential assembly from left to right (no text or symbols)
flowchart
graph LR
    A["Tool"] --> B["Bar"]
    B --> C["Device"]
natural_image
Diagram showing two mechanical device configurations with directional arrows indicating movement (no text or symbols)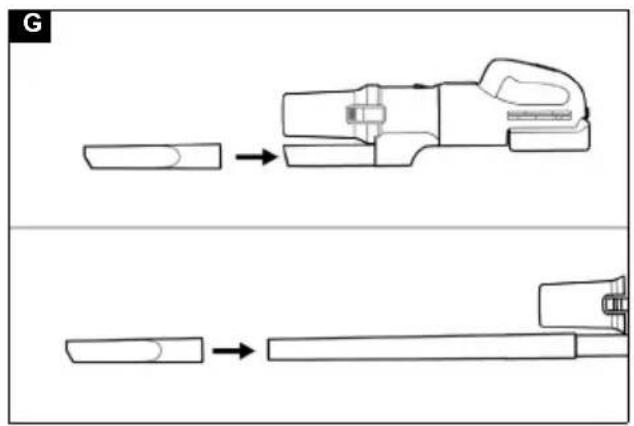
natural_image
Technical line drawing showing a mechanical assembly process with two views (top and bottom) of a tool or component, no text or symbols present.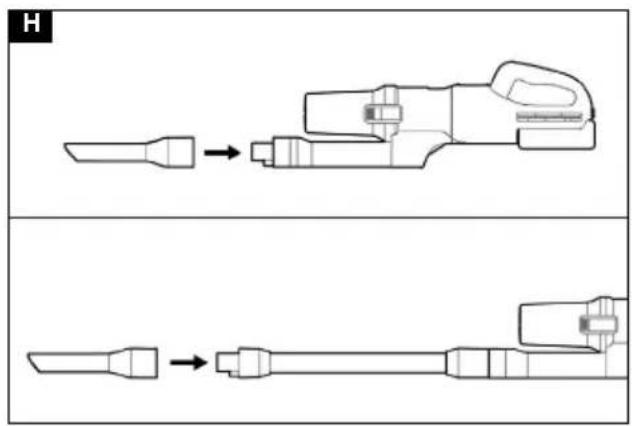
natural_image
Technical line drawing of a mechanical tool or device with two sequential steps, showing internal components and assembly (no text or symbols)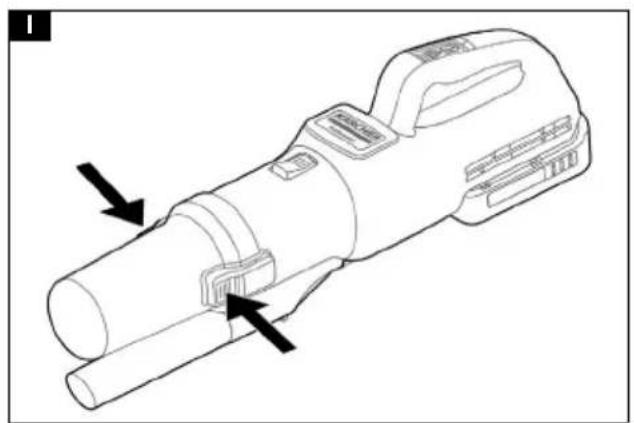
natural_image
Technical line drawing of a handheld device with two black arrows indicating directional components (no text or symbols present)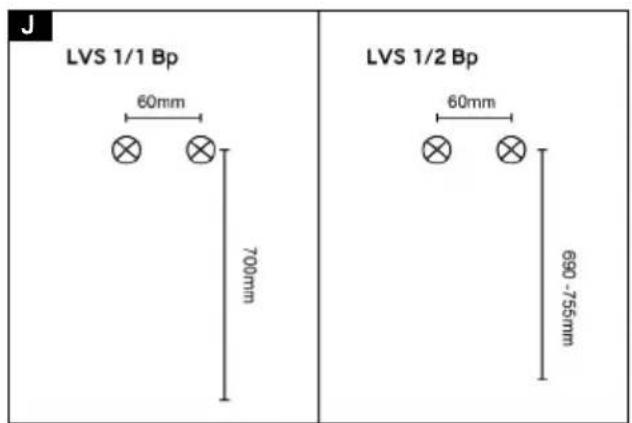
natural_image
Simple line drawing of a hand holding a tool with two circular symbols, positioned above a diagonal line (no text or labels)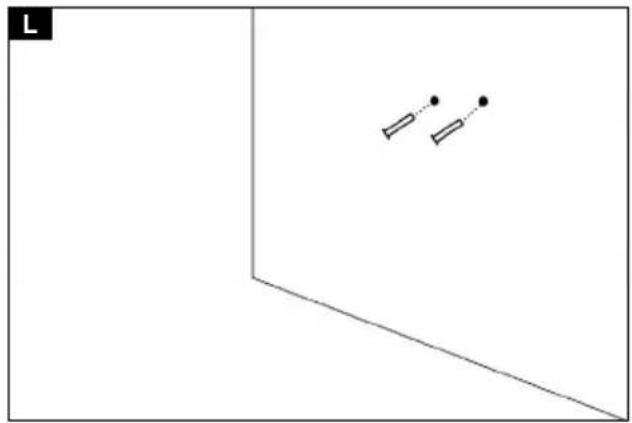
natural_image
Simple geometric diagram showing two parallel lines with dots and a right-angle marker, no text or symbols present.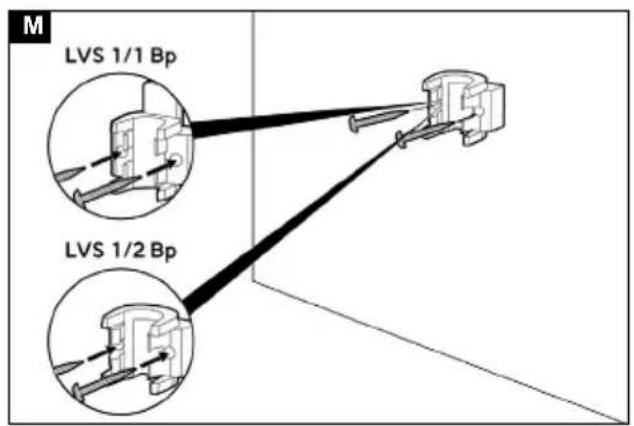
natural_image
Line drawing of a vacuum cleaner with a directional arrow indicating motion (no text or symbols)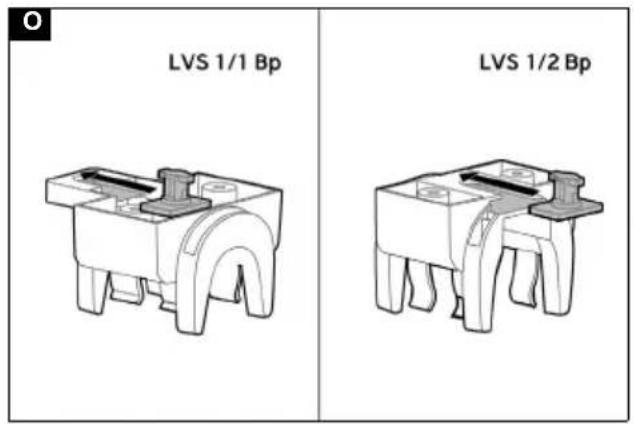
natural_image
Line drawing of a cleaning or cleaning cart with a hand operating it, no text or symbols present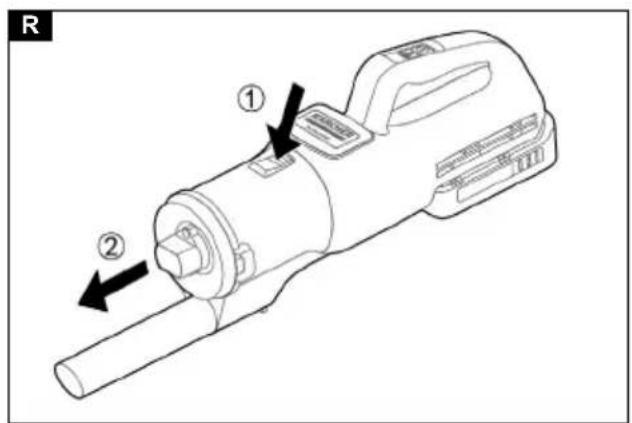
natural_image
Technical illustration of a mechanical component with two views showing internal structure and directional arrows (no text or symbols)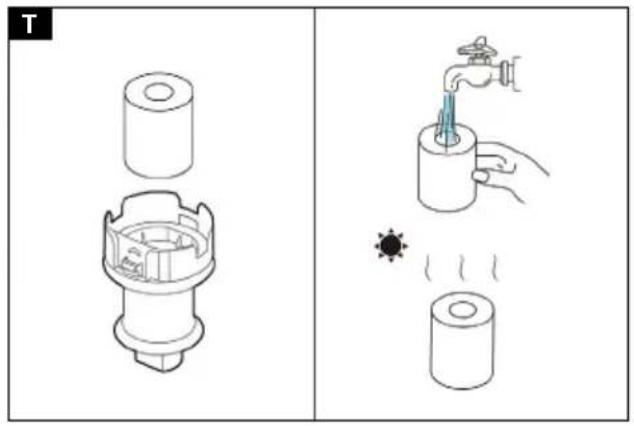

natural_image
Technical line drawing of a mechanical device with an arrow indicating direction (no text or symbols present)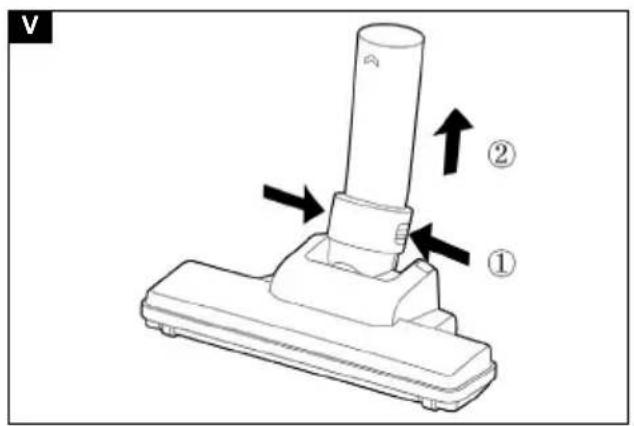
Inhalt
Chairman of the Board of Management
S. Reiser
Director Regulatory Affairs & Certification
71364 Winnenden (Germany)
Tel.: +49 7195 14-0
Fax: +49 7195 14-2212
Winnenden, /06/01
Contents
General notes.... 12
Environmental protection 12
Intended use 13
Safety information 13
Description of the unit 13
Initial startup.... 13
Operation 14
Transport.... 14
Storage.... 14
Care and service.... 15
Troubleshooting guide.... 15
Warranty.... 15
Accessories and spare parts.... 16
Technical data.... 16
EU Declaration of Conformity.... 16
General notes
Read these original instructions and the enclosed safety instructions before using the device for the first time. Act in ac-
cordance with them.
Keep both books for future reference or for future owners.
- If the operating instructions and safety instructions are not observed, the device can be damaged and dangers could arise for users and other persons.
- Notify the dealer immediately in the case of shipping damage.
- Check the package contents when unpacking for missing accessories or for damage.
- The scope of delivery for your equipment version is shown on the packaging.
Environmental protection

The packing materials can be recycled. Please dispose of packaging in accordance with the environmental regulations.

Electrical and electronic devices contain valuable, recyclable materials and often components such as batteries, rechargeable batteries or oil, which - if handled or disposed of incorrectly - can
pose a potential danger to human health and the environment. However, these components are required for the correct operation of the device. Devices marked by
this symbol are not allowed to be disposed of together with the household rubbish.
Notes on the content materials (REACH)
Current information on content materials can be found at: www.kaercher.de/REACH
Intended use
⚠ WARNING
Health risk
Inhalation of dusts that are harmful to health Do not use the device for vacuuming up dusts that are harmful to health.
ATTENTION
Damage to the device
Short-circuit due to high levels of humidity Only use and store the device indoors.
- This universal vacuum cleaner for carpets is intended for dry cleaning floor and wall surfaces.
- This device is suitable for commercial use, e.g. in hotels, schools, hospitals, factories, shops, offices, and rental companies.
Safety information
Battery pack and charger
In addition, read the operating instructions and safety instructions that come with the battery pack and the charger.
This device can be operated with all 18 V / 36 Kärcher Battery Power and Battery Power+ battery packs.
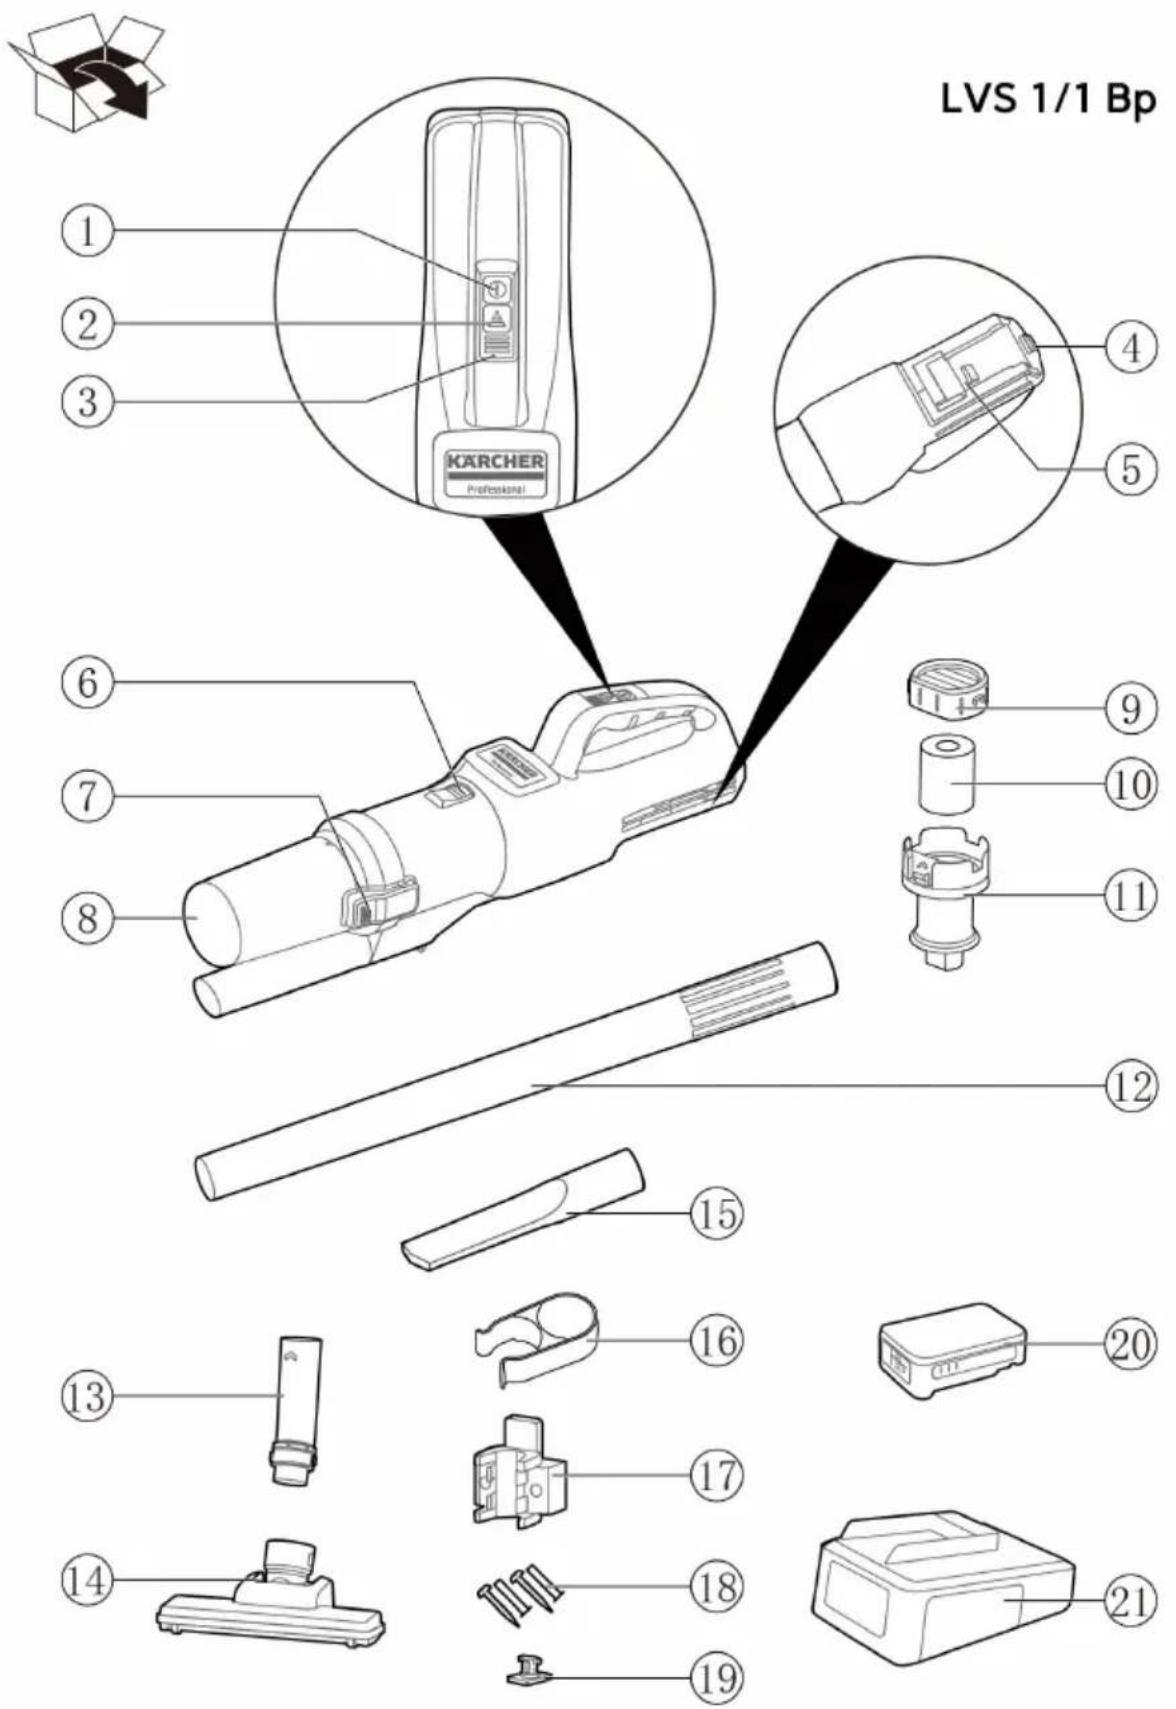
Description of the unit
Overview of LVS 1/1 Bp
Illustration A
① On/OFF Button
② Mode button
③ Mode/error indication display
④ Battery release button
⑤ Battery holder
⑥ Filtration system release button
⑦ Dust cup release button
⑧ Dust cup
⑨HEPA 13 Filter
⑩ Sponge filter
⑪ Cyclone
⑫ Suction tube
⑬ Floor nozzle tube
⑭ Floor nozzle head
⑮ Crevice nozzle
⑯ Crevice nozzle holder
⑰ Wall mount / Flexomate adapter
⑱ Screws and dowels
19*FlexoLink connection
⑳*Rechargeable battery pack
②1*Battery charger
* optional accessory, depending on the configuration
Overview of LVS 1/2 Bp
Illustration B
① On/OFF Button
② Mode button
③ Mode/error indication display
④ Battery release button
⑤ Battery holder
⑥ Filtration system release button
⑦ Dust cup release button
⑧ Dust cup
⑨ HEPA 13 Filter
⑩ Sponge filter
⑪ Cyclone
⑫ Suction tube
⑬ Floor nozzle
⑭ Wall mount / Flexomate adapter
⑮ Screws and dowels
16 *FlexoLink connection
⑰ *Crevice nozzle
18 *Rechargeable battery pack
⑲ *Battery charger
* optional accessory, depending on the configuration
Colour coding
- Control elements for the cleaning process are yellow.
- Control elements for maintenance and servicing are light grey.
Initial startup
Installing accessories
LVS 1/1 Bp
- Install the floor nozzle tube and floor nozzle head together in the direction shown in the illustration.
- Push the floor nozzle onto the end of the suction tube until it is tight, and push another end of the suction tube onto the main body.
- Remove the floor nozzle or the suction tube in the opposite direction of installation.
Illustration C
Illustration D
- Install the crevice nozzle holder on the suction tube in the direction shown in the illustration. the crevice nozzle can be stored in the holder.
Illustration F
- Push the accessory, such as the crevice nozzle, onto the suction fitting of the dust container or suction pipe until it is tight.
Illustration G
LVS 1/2 Bp
- Push the suction pipe onto the suction fitting of the main body until it audibly clicks into place. Push the floor nozzle onto the suction pipe until it audibly clicks into place.
- Press the unlocking button and remove the suction pipe from the suction fitting. Press the unlocking button and remove the floor nozzle from the suction tube.
Illustration E
- Push the crevice nozzle onto the suction fitting of the dust container or suction pipe until it audibly clicks into place.
Illustration H
Floor nozzle: ideal for hard floors and carpet.
Crevice nozzle: For edges, joint, heaters and areas that are difficult to reach.
Inserting the battery pack
- Slide the battery pack into the battery holder and lock it in place.
Charging the battery pack
Note
Please read the operating instructions of the charger manufacturer, especially the chapters on safety instructions!
Note
Please read the operating instructions of the battery pack manufacturer, especially the chapters on safety instructions!
Note
The battery pack is partially charged on delivery. Charge before use and when necessary.
Note
The battery pack can only be charged when it is removed.
-
Press the unlocking button and remove the battery pack.
-
Charge the battery pack according to the operating instructions of the charger manufacturer and the battery pack manufacturer.
Operation
LED Display
The LED on the device shows information on the power level and error messages.
Power Level
| Indicators LED status Mode | ||
| 1st LED light up blue | ECO Mode*: Mini-mum suction power | |
| 1st LED light up blue2nd LED light up green | Standard Mode: Standard suction power | |
| 1st LED light up blue2nd and 3rd LED light up green | Power Mode: Maxi-mum suction power | |
*Eco mode: The device works with reduced suction performance. The battery run time is extended.
Error message
| Indicators LED status Information | ||
 | 1st LED flashes orange | Blockage / filtration missing |
Switching the device on/off
- Press the on/off button, the device starts up.
- Press the on / off button again, the device stops.
Illustration A Illustration B
Mode adjustment
3-mode options for power and run time management. You can change the suction power in three steps by pressing the mode button. Each press on this button repeats the Eco / Standard / Power mode in a cycle.
Illustration A Illustration B
Mode memory
The selected mode before the last shutdown remains stored, which is reactivated when the device is switched on again.
Emptying dust cup
Note
To ensure an optimum suction performance, empty the dust container before it exceeds the dust "Max" line.
1 Switch off the device. Press the On/Off switch again to turn the device off,
2 Pointing the floor nozzle downwards, pull the dust container apart from the main body by holding the dust container firmly and pressing the release buttons on the both sides.
Illustration I
3 Empty the dust container.
4 Reinsert the dust container.
Transport
△CAUTION
Failure to observe the weight
Risk of injury and damage
Be aware of the weight of the device during transportation.
- When transporting the device in vehicles, secure it to prevent it from slipping or overturning in accordance with the respective valid guidelines.
Storage
△CAUTION
Failure to observe the weight
Risk of injury and damage
Be aware of the weight of the device during storage. The device may only be stored indoors.
On the wall
ATTENTION
Secure installation!
Install the wall mount on a sturdy wall, beam, or column, ensuring a secure attachment.
Before hanging the device, always double-check that the wall mount is firmly and securely attached.
1 Choose the desired location on the wall and mark the positions for the two mounting holes. Ensure the distance between the holes is 60 mm. For LVS 1/1, the suggested height for the mounting holes is 700 mm. For LVS 1/2, the suggested height for the mounting holes is 690–755 mm.
2 Place the wall mount at the desired position and mark the positions for the two mounting holes. Illustration J
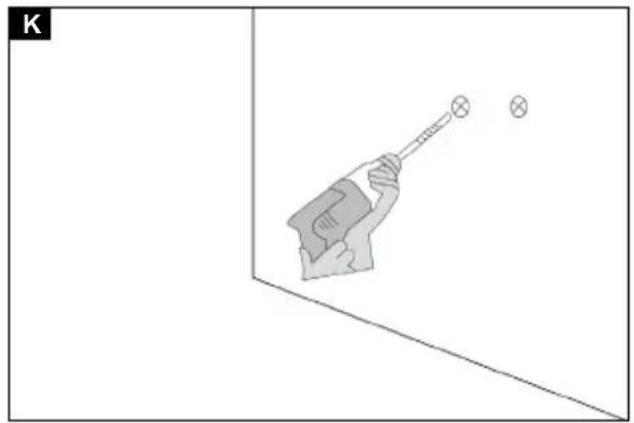
3 Drill two holes at the marked positions. Illustration K
4 Insert the dowels into the drilled holes. Illustration L
5 Position the wall mount onto the installation location and securely fasten it using screws. Illustration M
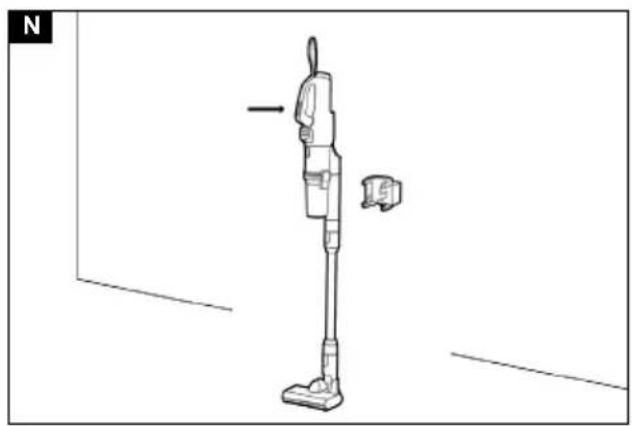
6 Press the unlocking button and remove the battery pack to prevent discharge.
7 Push the device into the bracket and secure it against unauthorised use.. Illustration N
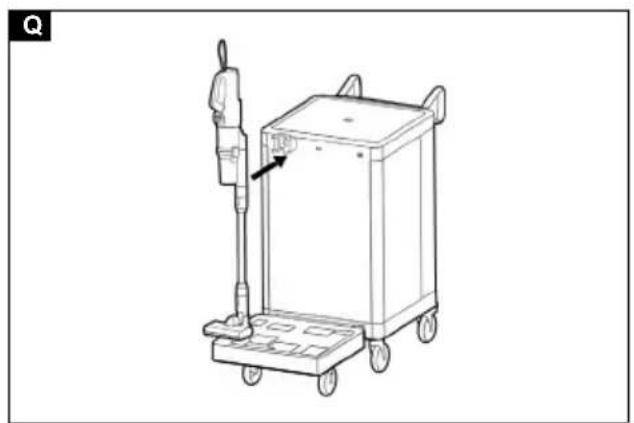
On the Flexomate trolley
Note
The LVS vacuum cleaners can be stored on the Flexomate trolley, enabling easy transportation. The vacuum cleaner can be quickly detached and is ready for use whenever needed.
1 Insert the FlexoLink connection into the Flexomate adapter. Illustration O
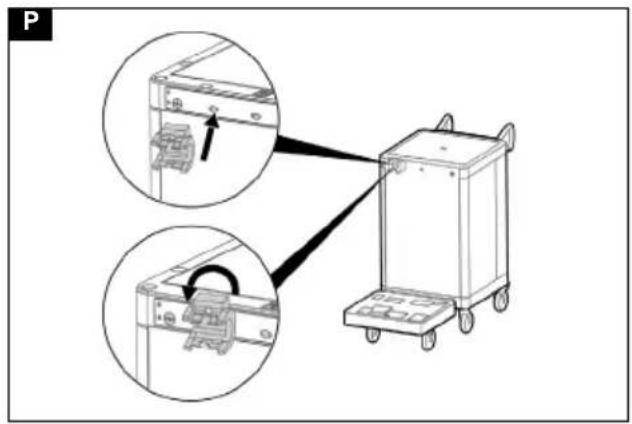
2 Securely rotate the Flexomate adapter to lock it onto the Flexomate trolley. After rotating, ensure the surface marked with "UP" is facing upward. Illustration P
3 Push the device into the Flexomate adapter. Illustration Q
Care and service
⚠️DANGER
Risk of injury!
Injuries due to touching moving parts.
Switch off the device.
Remove the battery pack.
Cleaning the filtration system
Cleaning the cyclone
1 Press the filtration release button by one hand, and pull the filtration system out by another hand. Clean the adhered dust off the mesh metal filter. Illustration R
Cleaning / Replacing the filter
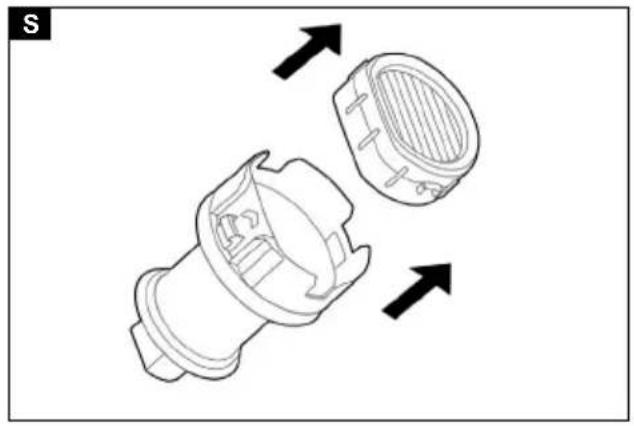
1 Pull out the filtration system.
2 Take the HEPA out. Illustration S
3 Clean the filter element with gently knocking or replace if necessary.
4 Take the sponge filter out.
5 Rinse the sponge filter by running water and dry it completely, or replace the sponge filter. Illustration T
6 Install the sponge filter and HEPA in to the filtration system.
7 With the arrow facing upward, following the direction of the arrow, push the filtration system into the main body until it audibly clicks into place. Illustration U
ATTENTION
Risk of damage!
Damage to the filter elements during mechanical cleaning.
Carefully clean the filters by gently knocking the dirt out. Do not expose the filter area to any mechanical loads and replace the filters if damaged.
Do not operate the device without the complete filter elements.
Troubleshooting guide
⚠️DANGER
Danger of electric shock
Injuries due to touching live parts
Switch off the device.
Remove the battery pack.
The device is not working
Battery is empty
Charge the rechargeable battery.
Battery is not inserted correctly
Push the battery into the mount until it locks into place.
Battery is defective
Replace the battery.
Error detected
Errors
The LED strip flashes orange, the device does not start up.
Filtration system is not install properly.
1 Check whether HEPA and filtration is in right position.
2 Install the HEPA into the filtration system.
3 With the arrow facing upward, following the direction of the arrow, push the filtration system into the main body until it audibly clicks into place. Illustration U
Blockage
1 Floor nozzle blockage
- LVS 1/1: Disassemble the floor nozzle, and clean the blockage.
Illustration V
- LVS 1/2: Disassemble the roller by sliding the unlock button. Clean the roller and remove any blockage in the floor nozzle with suitable aid.
Illustration W
2 Suction tube blockage.
Disassemble the suction tube and remove the blockage.
3 The dust container is full.
Empty the dust container.
4 The filters are soiled.
Clean the cyclone, HEPA and sponge filter, referring to the section of Cleaning the filtration system.
Unsatisfactory vacuuming result
1 Remove blockages from the brush head, and suction tube.
2 Clean the cyclone or replace motor protection filter or HEPA filter.
Customer Service department
If the malfunction cannot be corrected, the device must be checked by the Customer Service department.
Warranty
The warranty conditions issued by our relevant sales company apply in all countries. We shall remedy possible malfunctions on your appliance within the warranty
period free of cost, provided that a material or manufacturing flaw is the cause. In a warranty case, please contact your dealer (with the purchase receipt) or the next authorised customer service site.
(See overleaf for the address)
Further warranty information (if available) can be found in the service area of your local Kärcher website under "Downloads".
Accessories and spare parts
Only use original accessories and original spare parts. They ensure that the appliance will run fault-free and safely.
Information on accessories and spare parts can be found at www.kaercher.com.
Technical data
| LVS 1/1 Bp LVS 1/2 Bp | |||
| Electrical connection | |||
| Battery pack nominal voltage V 18 DC 36 DC | |||
| Rated power W 230 350 | |||
| Protection class III III | III | ||
| Device performance data | |||
| Operation duration with fully charged battery (without floor nozzle)- ECO mode | min ≤30 (18V 2.5Ah)≤35 (18V 3.0Ah)≤60 (18V 5.0Ah) | ≤40 (36V 2.5Ah)≤80 (36V 5.0Ah) | |
| Operation duration with fully charged battery (without floor nozzle)- standard mode | min ≤17 (18V 2.5Ah)≤20 (18V 3.0Ah)≤34 (18V 5.0Ah) | ≤24 (36V 2.5Ah)≤48 (36V 5.0Ah) | |
| Operation duration with fully charged battery (without floor nozzle)- power mode | min ≤10 (18V 2.5Ah)≤12 (18V 3.0Ah)≤20 (18V 5.0Ah) | ≤14 (36V 2.5Ah)≤28 (36V 5.0Ah) | |
| Tank content I 0.35 0.35 | |||
| Air quantity (max.) | l/s | 12 15 | |
| Vacuum (max.) | kPa | 14 20 | |
| Dimensions and weights | |||
| Weight without accessories and battery pack | kg | 1.6 | 2.0 |
| Length mm 179 186 | |||
| Width | mm | 220 | 250 |
| Height | mm | 1100 1150 | |
| Ambient conditions | |||
| Ambient temperature | °C | 0/+40 | 0/+40 |
| Determined values in acc. with EN 60335-2-69 | |||
| Sound pressure level L_pA | dB(A) | 70 72 | |
| KpA uncertainty | dB(A) | 1 | 1 |
| Hand-arm vibration value | m/s ^2 | < 2.5 | < 2.5 |
| K uncertainty | dB(A) | 1 | 1 |
Subject to technical changes without notice.
EU Declaration of Conformity
We hereby declare that the machine described below complies with the relevant basic safety and health requirements in the EU Directives, both in its basic design and construction as well as in the version placed in circulation by us. This declaration is invalidated by any changes made to the machine that are not approved by us.
Product: Dry vacuum cleaner Bp
Type: 1.394-xxx
Currently applicable EU Directives
2006/42/EC (+2009/127/EC)
2011/65/EU
2014/30/EU
Harmonised standards used
EN 60335-1
EN 60335-2-69
EN IEC 63000: 2018
EN 55014-1: 2017 + A11: 2020
EN 55014-2: 2015
EN 62233: 2008
National standards used
The signatories act on behalf of and with the authority of the company management.
H. Jenner
Chairman of the Board of Management

S. Reiser
Director Regulatory Affairs & Certification
Documentation supervisor:
S. Reiser
Alfred Kärcher SE & Co. KG
Alfred-Kärcher-Str. 28 - 40
71364 Winnenden (Germany)
Ph.: +49 7195 14-0
Fax: +49 7195 14-2212
Winnenden, /06/01
Contenu
⑭ Support mural / adaptateur Flexomate
⑮ Vis et goujons inclus
⑯ *Connexion FlexoLink
⑰ *Suceur fentes
⑱ *Bloc-batterie rechargeable
2006/42/CE (+2009/127/CE)
2011/65/UE
2014/30/UE
H. Jenner
Chairman of the Board of Management

S. Reiser
Director Regulatory Affairs & Certification
71364 Winnenden (Germany)
H. Jenner
Chairman of the Board of Management
S. Reiser
Director Regulatory Affairs & Certification
71364 Winnenden (Germany)
Tel.: +49 7195 14-0
Fax: +49 7195 14-2212
Winnenden, 01/06/
2006/42/CE (+2009/127/CE)
2011/65/UE
2014/30/UE
H. Jenner
Chairman of the Board of Management
S. Reiser
Director Regulatory Affairs & Certification
71364 Winnenden (Germany)
Tel.: +49 7195 14-0
Fax: +49 7195 14-2212
Winnenden, 01/06/
Índice
No carrinho Flexomate
Aviso
2006/42/CE (+2009/127/CE)
2011/65/UE
2014/30/UE
H. Jenner
Chairman of the Board of Management
S. Reiser
Director Regulatory Affairs & Certification
De battery is defect
Chairman of the Board of Management

S. Reiser
Director Regulatory Affairs & Certification
71364 Winnenden (Germany)
Tel.: +49 7195 14-0
Fax: +49 7195 14-2212
Winnenden, /06/01
İçindekiler
2006/42/AT (+2009/127/AT)
2011/65/AB
2014/30/AB
H. Jenner
Chairman of the Board of Management

S. Reiser
Director Regulatory Affairs & Certification
Chairman of the Board of Management
S. Reiser
Director Regulatory Affairs & Certification
D-71364 Winnenden (Germany)
Tfn: +49 7195 14-0
Fax: +49 7195 14-2212
Winnenden, 01.06.
Sisältö
Yleisiä ohjeita 49

H. Jenner
Chairman of the Board of Management

S. Reiser
Director Regulatory Affairs & Certification
71364 Winnenden (Germany)
Puh.: +49 7195 14-0
2006/42/EF (+2009/127/EF)
2011/65/EU
2014/30/EU
Anvendte harmoniserte standarder
EN 60335-1
EN 60335-2-69
EN IEC 63000: 2018
EN 55014-1: 2017 + A11: 2020
EN 55014-2: 2015
EN 62233: 2008
H. Jenner
Chairman of the Board of Management
S. Reiser
Director Regulatory Affairs & Certification
71364 Winnenden (Germany)
Tlf.: +49 7195 14-0
2006/42/EF (+2009/127/EF)
2011/65/EU
2014/30/EU
Chairman of the Board of Management

S. Reiser
Director Regulatory Affairs & Certification
71364 Winnenden (Germany)
Tlf.: +49 7195 14-0
Fax: +49 7195 14-2212
Winnenden, /06/01
Sisukord
Üldised juhised 62
Keskkonnakaitse 62
2006/42/EÜ (+2009/127/EÜ)
2011/65/EL
2014/30/EL
Chairman of the Board of Management

S. Reiser
Director Regulatory Affairs & Certification
71364 Winnenden (Germany)
Tel: +49 7195 14-0
Chairman of the Board of Management

S. Reiser
Director Regulatory Affairs & Certification
Chairman of the Board of Management
S. Reiser
Director Regulatory Affairs & Certification
2006/42/WE (+2009/127/WE)
2011/65/UE
2014/30/UE
H. Jenner
Chairman of the Board of Management
S. Reiser
Director Regulatory Affairs & Certification
71364 Winnenden (Germany)
Tel.: +49 7195 14-0
Chairman of the Board of Management

S. Reiser
Director Regulatory Affairs & Certification
2006/42/ES (+2009/127/ES)
2011/65/EU
2014/30/EU
Chairman of the Board of Management

S. Reiser
Director Regulatory Affairs & Certification

H. Jenner
Chairman of the Board of Management
S. Reiser
Director Regulatory Affairs & Certification
71364 Winnenden (Germany)
Tel.: +49 7195 14-0
Fax: +49 7195 14-2212
Winnenden, 01.06.
Kazalo
Splošni napotki 94
Zaščita okolja 94
Namenska uporaba 94
Varnostna navodila....94
Opis enote 94
Zagon 95
Upravljanje 95
Transport 96
Shranjevanje 96
2006/42/ES (+2009/127/ES)
2011/65/EU
2014/30/EU

H. Jenner
Chairman of the Board of Management
S. Reiser
Director Regulatory Affairs & Certification
Directive UE relevante
2006/42/UE (+2009/127/UE)
2011/65/UE
2014/30/UE
Norme armonizate aplicate
EN 60335-1
EN 60335-2-69
EN IEC 63000: 2018
EN 55014-1: 2017 + A11: 2020
EN 55014-2: 2015
EN 62233: 2008
Standarde nationale aplicate
Chairman of the Board of Management
S. Reiser
Director Regulatory Affairs & Certification
71364 Winnenden (Germania)
Tel.: +49 7195 14-0
Fax: +49 7195 14-2212
Winnenden, /06/01
Sadržaj
Opće napomene.... 103
Zaštita okoliša 103
2006/42/EZ (+2009/127/EZ)
2011/65/EU
2014/30/EU
Primijenjene uskladene norme
EN 60335-1
EN 60335-2-69
EN IEC 63000: 2018
EN 55014-1: 2017 + A11: 2020
EN 55014-2: 2015
EN 62233: 2008
Primijenjene nacionalne norme
Chairman of the Board of Management
S. Reiser
Director Regulatory Affairs & Certification
Opšte napomene


Pre prve upotrebe, pročitajte originalna uputstva za upotrebu i priložene bezbednosne instrukcije. Postupajte u
skladu sa tim.
Sačuvajte obe knjižice za buduću upotrebu ili sledeće vlasnike.
- Ukoliko se ne pridržavate uputstva za rad i sigurnosnih napomena, mogu nastati oštećenja na uređaju i opasnosti za korisnika i druge osobe.
- U slučaju štete nastale prilikom transporta odmah obavestite trgovca.
- Prilikom otpakivanja proverite da li paket sadrži svu opremu i da li ima oštećenja.
- Obim isporuke za vašu varijantu opreme prikazan je na pakovanju.
2006/42/EZ (+2009/127/EZ)
2011/65/EU
2014/30/EU
Primenjene harmonizovane norme
EN 60335-1
EN 60335-2-69
EN IEC 63000: 2018
EN 55014-1: 2017 + A11: 2020
EN 55014-2: 2015
EN 62233: 2008
Primenjene nacionalne norme
Potpisnici deluju po nalogu i uz punomoć upravnog odbora.
H. Jenner
Chairman of the Board of Management

S. Reiser
Director Regulatory Affairs & Certification
Lice ovlašćeno za dokumentaciju:
S. Reiser
Alfred Kärcher SE & Co. KG
Alfred-Kärcher-Str. 28 - 40
71364 Winnenden (Germany)
Tel.: +49 7195 14-0
H. Jenner
Chairman of the Board of Management
S. Reiser
Director Regulatory Affairs & Certification
71364 Winnenden (Germany)
Tηλ.: +49 7195 14-0
Φαξ: +49 7195 14-2212
Winnenden, /06/01
Содержание
Chairman of the Board of Management

S. Reiser
Director Regulatory Affairs & Certification
71364 Winnenden (Germany)
Тел.: +49 7195 14-0
Факс: +49 7195 14-2212
Chairman of the Board of Management
S. Reiser
Director Regulatory Affairs & Certification
71364 Winnenden (Germany)
Тел.: +49 7195 14-0
Факс: +49 7195 14-2212

H. Jenner
Chairman of the Board of Management

S. Reiser
Director Regulatory Affairs & Certification
71364 Winnenden (Germany)
Тел.: +49 7195 14-0
Факс: +49 7195 14-2212
Виненден, /06/01
目录
www.kaercher.com/REACH
按规定使用
警告
健康危害
吸入有害粉尘
请勿使用本设备抽吸有害粉尘。
注意
设备损坏
高湿度会导致短路
仅在室内使用和存放设备。

H. Jenner
Chairman of the Board of Management

S. Reiser
Director Regulatory Affairs & Certification
文档全权代表:
S. Reiser
Alfred Kärcher SE & Co. KG
Alfred-Kärcher-Str. 28 - 40
71364 Winnenden (德国)
电话:+49 7195 14-0
传真:+49 7195 14-2212
Winnenden, /06/01
目次
一般的な注意事項.... 136
環境保護.... 136
規定に沿った使用.... 136
安全注意事項.... 136
ユニットの説明.... 136
セットアップ.... 137
操作.... 137
Chairman of the Board of Management

S. Reiser
Director Regulatory Affairs & Certification
文書の全権委員:
S. Reiser
Alfred Kärcher SE & Co. KG
Alfred-Kärcher-Str. 28 - 40
71364 Winnenden (Germany)
電話番号:+49 7195 14-0
H. Jenner
Chairman of the Board of Management
S. Reiser
Director Regulatory Affairs & Certification
문서 작성 책임자:
S. Reiser
Alfred Kärcher SE & Co. KG
Alfred-Kärcher-Str. 28 - 40
71364 Winnenden (Germany)
전화: +49 7195 14-0
팩스: +49 7195 14-2212
Winnenden, /06/01
Daftar Isi

H. Jenner
Chairman of the Board of Management

S. Reiser
Director Regulatory Affairs & Certification
Penyusun dokumen yang berwenang:
S. Reiser
Alfred Kärcher SE & Co. KG
Alfred-Kärcher-Str. 28 - 40
71364 Winnenden (Jerman)
Tel.: +49 7195 14-0
General notes.... 154
Environmental protection.... 154
Intended use.... 154
Safety instructions 154
Description of the unit.... 154
Initial startup 155
Operation.... 155
Transport 156
Storage.... 156
Care and service 156
Troubleshooting guide.... 157
Warranty.... 157
Accessories and spare parts 157
Technical data 157
Declaration of Conformity.... 158
General notes


Read these original instructions and the enclosed safety instructions before using the device for the first time. Act in accordance with them.
Keep both books for future reference or for future owners.
- If the operating instructions and safety instructions are not observed, the device can be damaged and dangers could arise for users and other persons.
- Notify the dealer immediately in the case of shipping damage.
- Check the package contents when unpacking for missing accessories or for damage.
- The scope of delivery for your equipment version is shown on the packaging.
Environmental protection

The packing materials can be recycled. Please dispose of packaging in accordance with the environmental regulations.

Electrical and electronic devices contain valuable, recyclable materials and often components such as batteries, rechargeable batteries or oil, which - if handled or disposed of incorrectly - can pose a potential danger to human health and the environment. However, these components are required for the correct operation of the device. Devices marked by
this symbol are not allowed to be disposed of together with the household rubbish.
Notes on the content materials (REACH)
Current information on content materials can be found at: www.kaercher.de/REACH
Intended use
⚠ WARNING
Health risk
Inhalation of dusts that are harmful to health Do not use the device for vacuuming up dusts that are harmful to health.
ATTENTION
Damage to the device
Short-circuit due to high levels of humidity
Only use and store the device indoors.
- This universal vacuum cleaner for carpets is intended for dry cleaning floor and wall surfaces.
- This device is suitable for commercial use, e.g. in hotels, schools, hospitals, factories, shops, offices, and rental companies.
Safety instructions
Battery pack and charger
In addition, read the operating instructions and safety instructions that come with the battery pack and the charger.
This device can be operated with all 18 V / 36 Kärcher Battery Power and Battery Power+ battery packs.
Description of the unit
Overview of LVS 1/1 Bp
Illustration A
① On/OFF Button
② Mode button
③ Mode/error indication display
④ Battery release button
⑤ Battery holder
⑥ Filtration system release button
⑦ Dust cup release button
⑧ Dust cup
⑨ HEPA 13 Filter
⑩ Sponge filter
⑪Cyclone
⑫Suction tube
⑬ Floor nozzle tube
⑭ Floor nozzle head
⑮ Crevice nozzle
16 Crevice nozzle holder
⑰ Wall mount / Flexomate adapter
⑱ Screws and dowels
19*FlexoLink connection
20*Rechargeable battery pack
21*Battery charger
* optional accessory, depending on the configuration
Overview of LVS 1/2 Bp
Illustration B
① On/OFF Button
② Mode button
③ Mode/error indication display
④ Battery release button
⑤ Battery holder
⑥ Filtration system release button
⑦ Dust cup release button
⑧ Dust cup
⑨HEPA 13 Filter
⑩ Sponge filter
⑪ Cyclone
⑫ Suction tube
⑬ Floor nozzle
⑭ Wall mount / Flexomate adapter
⑮ Screws and dowels
16 *FlexoLink connection
⑰ *Crevice nozzle
⑱ *Rechargeable battery pack
⑲ *Battery charger
* optional accessory, depending on the configuration
Colour coding
- Control elements for the cleaning process are yellow.
- Control elements for maintenance and servicing are light grey.
Initial startup
Installing accessories
LVS 1/1 Bp
- Install the floor nozzle tube and floor nozzle head together in the direction shown in the illustration.
Illustration C
- Push the floor nozzle onto the end of the suction tube until it is tight, and push another end of the suction tube onto the main body.
- Remove the floor nozzle or the suction tube in the opposite direction of installation.
Illustration D
- Install the crevice nozzle holder on the suction tube in the direction shown in the illustration. the crevice nozzle can be stored in the holder.
Illustration F
- Push the accessory, such as the crevice nozzle, onto the suction fitting of the dust container or suction pipe until it is tight.
Illustration G
LVS 1/2 Bp
- Push the suction pipe onto the suction fitting of the main body until it audibly clicks into place. Push the floor nozzle onto the suction pipe until it audibly clicks into place.
- Press the unlocking button and remove the suction pipe from the suction fitting. Press the unlocking button and remove the floor nozzle from the suction tube.
Illustration E
- Push the crevice nozzle onto the suction fitting of the dust container or suction pipe until it audibly clicks into place.
Illustration H
Floor nozzle: ideal for hard floors and carpet.
Crevice nozzle: For edges, joint, heaters and areas that are difficult to reach.
Inserting the battery pack
- Slide the battery pack into the battery holder and lock it in place.
Charging the battery pack
Note
Please read the operating instructions of the charger manufacturer, especially the chapters on safety instructions!
Note
Please read the operating instructions of the battery pack manufacturer, especially the chapters on safety instructions!
Note
The battery pack is partially charged on delivery. Charge before use and when necessary.
Note
The battery pack can only be charged when it is removed.
-
Press the unlocking button and remove the battery pack.
-
Charge the battery pack according to the operating instructions of the charger manufacturer and the battery pack manufacturer.
Operation
LED Display
The LED on the device shows information on the power level and error messages.
Power Level
| Indicators LED status Mode | ||
 | 1st LED light up blue | ECO Mode*: Minimum suction power |
 | 1st LED light up blue2nd LED light up green | Standard Mode: Standard suction power |
 | 1st LED light up blue2nd and 3rd LED light up green | Power Mode: Maximum suction power |
*Eco mode: The device works with reduced suction performance. The battery run time is extended.
Error message
| Indicators LED status Information | ||
| 1st LED flashes orange | Blockage / filtration missing | |
Switching the device on/off
- Press the on/off button, the device starts up.
- Press the on / off button again, the device stops.
Illustration A Illustration B
Mode adjustment
3-mode options for power and run time management. You can change the suction power in three steps by pressing the mode button. Each press on this button repeats the Eco / Standard / Power mode in a cycle.
Illustration A Illustration B
Mode memory
The selected mode before the last shutdown remains stored, which is reactivated when the device is switched on again.
Emptying dust cup
Note
To ensure an optimum suction performance, empty the dust container before it exceeds the dust "Max" line.
1 Switch off the device. Press the On/Off switch again to turn the device off,
2 Pointing the floor nozzle downwards, pull the dust container apart from the main body by holding the dust container firmly and pressing the release buttons on the both sides.
3 Empty the dust container.
4 Reinsert the dust container.
Illustration I
Transport
△CAUTION
Failure to observe the weight
Risk of injury and damage
Be aware of the weight of the device during transportation.
- When transporting the device in vehicles, secure it to prevent it from slipping or overturning in accordance with the respective valid guidelines.
Storage
⚠CAUTION
Failure to observe the weight
Risk of injury and damage
Be aware of the weight of the device during storage. The device may only be stored indoors.
On the wall
ATTENTION
Secure installation!
Install the wall mount on a sturdy wall, beam, or column, ensuring a secure attachment.
Before hanging the device, always double-check that the wall mount is firmly and securely attached.
1 Choose the desired location on the wall and mark the positions for the two mounting holes. Ensure the distance between the holes is 60 mm. For LVS 1/1, the suggested height for the mounting holes is 700 mm. For LVS 1/2, the suggested height for the mounting holes is 690–755 mm.
2 Place the wall mount at the desired position and mark the positions for the two mounting holes. Illustration J
3 Drill two holes at the marked positions. Illustration K
4 Insert the dowels into the drilled holes. Illustration L
5 Position the wall mount onto the installation location and securely fasten it using screws. Illustration M
6 Press the unlocking button and remove the battery pack to prevent discharge.
7 Push the device into the bracket and secure it against unauthorised use.. Illustration N
On the Flexomate trolley
Note
The LVS vacuum cleaners can be stored on the Flexomate trolley, enabling easy transportation. The vacuum cleaner can be quickly detached and is ready for use whenever needed.
1 Insert the FlexoLink connection into the Flexomate adapter. Illustration O
2 Securely rotate the Flexomate adapter to lock it onto the Flexomate trolley. After rotating, ensure the surface marked with "UP" is facing upward. Illustration P
3 Push the device into the Flexomate adapter. Illustration Q
Care and service
⚠️DANGER
Risk of injury!
Injuries due to touching moving parts.
Switch off the device.
Remove the battery pack.
Cleaning the filtration system
Cleaning the cyclone
1 Press the filtration release button by one hand, and pull the filtration system out by another hand. Clean the adhered dust off the mesh metal filter. Illustration R
Cleaning / Replacing the filter
1 Pull out the filtration system.
2 Take the HEPA out. Illustration S
3 Clean the filter element with gently knocking or replace if necessary.
4 Take the sponge filter out.
5 Rinse the sponge filter by running water and dry it completely, or replace the sponge filter. Illustration T
6 Install the sponge filter and HEPA in to the filtration system.
7 With the arrow facing upward, following the direction of the arrow, push the filtration system into the main body until it audibly clicks into place.
Illustration U
ATTENTION
Risk of damage!
Damage to the filter elements during mechanical cleaning.
Carefully clean the filters by gently knocking the dirt out. Do not expose the filter area to any mechanical loads and replace the filters if damaged.
Do not operate the device without the complete filter elements.
Troubleshooting guide
⚠️DANGER
Danger of electric shock
Injuries due to touching live parts
Switch off the device.
Remove the battery pack.
The device is not working
Battery is empty
Charge the rechargeable battery.
Battery is not inserted correctly
Push the battery into the mount until it locks into place.
Battery is defective
Replace the battery.
Error detected
Errors
The LED strip flashes orange, the device does not start up.
Filtration system is not install properly.
1 Check whether HEPA and filtration is in right position.
2 Install the HEPA into the filtration system.
3 With the arrow facing upward, following the direction of the arrow, push the filtration system into the main body until it audibly clicks into place.
Illustration U
Blockage
1 Floor nozzle blockage
- LVS 1/1: Disassemble the floor nozzle, and clean the blockage.
Illustration V
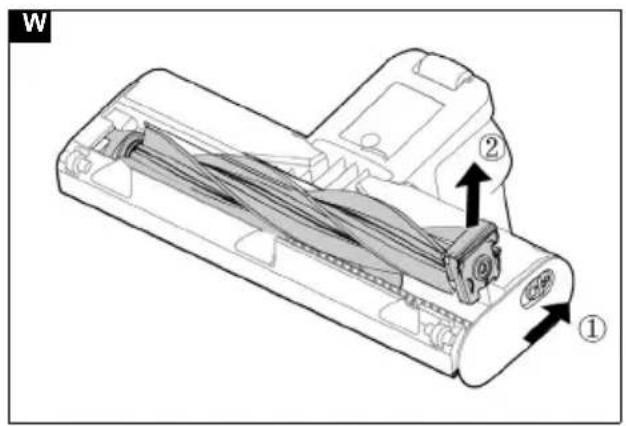
- LVS 1/2: Disassemble the roller by sliding the unlock button. Clean the roller and remove any blockage in the floor nozzle with suitable aid.
Illustration W
2 Suction tube blockage.
Disassemble the suction tube and remove the blockage.
3 The dust container is full.
Empty the dust container.
4 The filters are soiled.
Clean the cyclone, HEPA and sponge filter, referring to the section of Cleaning the filtration system.
Unsatisfactory vacuuming result
1 Remove blockages from the brush head, and suction tube.
2 Clean the cyclone or replace motor protection filter or HEPA filter.
Customer Service department
If the malfunction cannot be corrected, the device must be checked by the Customer Service department.
Warranty
The warranty conditions issued by our relevant sales company apply in all countries. We shall remedy possible malfunctions on your appliance within the warranty period free of cost, provided that a material or manufacturing flaw is the cause. In a warranty case, please contact your dealer (with the purchase receipt) or the next authorised customer service site.
(See overleaf for the address)
Further warranty information (if available) can be found in the service area of your local Kärcher website under "Downloads".
Accessories and spare parts
Only use original accessories and original spare parts. They ensure that the appliance will run fault-free and safely.
Information on accessories and spare parts can be found at www.kaercher.com.
Technical data
| LVS 1/1 Bp LVS 1/2 Bp | ||
| Electrical connection | ||
| Battery pack nominal voltage V 18 DC 36 DC | ||
| Rated power W 230 350 | ||
| Protection class III III | III | |
| Device performance data | ||
| Operation duration with fully charged battery (without floor nozzle)- ECO mode | min ≤30 (18V 2.5Ah)≤35 (18V 3.0Ah)≤60 (18V 5.0Ah) | ≤40 (36V 2.5Ah)≤80 (36V 5.0Ah) |
| Operation duration with fully charged battery (without floor nozzle)- standard mode | min ≤17 (18V 2.5Ah)≤20 (18V 3.0Ah)≤34 (18V 5.0Ah) | ≤24 (36V 2.5Ah)≤48 (36V 5.0Ah) |
| Operation duration with fully charged battery (without floor nozzle)- power mode | min ≤10 (18V 2.5Ah)≤12 (18V 3.0Ah)≤20 (18V 5.0Ah) | ≤14 (36V 2.5Ah)≤28 (36V 5.0Ah) |
| Tank content | I 0.35 | 0.35 |
| LVS 1/1 Bp | LVS 1/2 Bp | ||
| Air quantity (max.) l/s 12 15 | |||
| Vacuum (max.) kPa 14 20 | |||
| Dimensions and weights | |||
| Weight without accessories and battery pack kg 1.6 2.0 | |||
| Length mm 179 186 | |||
| Width mm 220 250 | |||
| Height mm 1100 1150 | |||
| Ambient conditions | |||
| Ambient temperature | °C | 0/+40 | 0/+40 |
| Determined values in acc. with EN 60335-2-69 | |||
| Sound pressure level L_pA | dB(A) | 70 72 | |
| KpA uncertainty | dB(A) | 1 | 1 |
| Hand-arm vibration value | m/s^2 | < 2.5 < 2.5 | |
| K uncertainty | dB(A) | 1 | 1 |
Subject to technical changes without notice.
Declaration of Conformity
We hereby declare that the product described below complies with the relevant provisions of the following UK Regulations, both in its basic design and construction as well as in the version put into circulation by us. This declaration shall cease to be valid if the product is modified without our prior approval.
Product: Dry vacuum cleaner Bp
Type: 1.394-xxx
Currently applicable UK Regulations
S.I. 2008/1597 (as amended)
S.I. 2012/3032 (as amended)
S.I. 2016/1091 (as amended)
Designated standards used
EN 60335-1
EN 60335-2-69
EN IEC 63000: 2018
EN 55014-1: 2017 + A11: 2020
EN 55014-2: 2015
EN 62233: 2008
National standards used
The signatories act on behalf of and with the authority of the company management.

Chairman of the Board of Management
S. Reiser
Director Regulatory Affairs & Certification
Documentation supervisor:
S. Reiser
Alfred Kärcher SE & Co. KG
Alfred-Kärcher-Str. 28 - 40
71364 Winnenden (Germany)
Ph.: +49 7195 14-0
Fax: +49 7195 14-2212
Winnenden, /06/01
Chairman of the Board of Management
S. Reiser
Director Regulatory Affairs & Certification
وكيل التوثيق:
إس رايزر
Alfred Kärcher SE & Co. KG
Alfred-Kärcher-Str. 28 - 40
71364 Winnende
0-14 7195 49+ : تليfoon
2212-14 7195 49+ : فاكس
10/06/وبئيندن
natural_image
Symbol of a trash bin crossed with no visible text or labelsnatural_image
Black and white line drawing of a hand giving a thumbs-up gesture (no text or symbols)THANK YOU!
MERCI! DANKE! iGRACIAS!

Register your product and benefit from many advantages.
www.kaercher.com/welcome


Rate your product and tell us your opinion.
natural_image
Icon showing a gear and wrench inside a square frame (no text or symbols)www.kaercher.com/dealersearch
Alfred Kärcher SE & Co. KG
Alfred-Kärcher-Str. 28-40
71364 Winnenden (Germany)