
RCBM-11 - Professional cooking equipment Royal Catering - Free user manual and instructions
Find the device manual for free RCBM-11 Royal Catering in PDF.

| Product type | Professional bain-marie |
| Brand | Royal Catering |
| Model | RCBM-11 |
| Rated voltage | 230 V~ / 50 Hz |
| Rated power | 2000 W |
| Total capacity | 21 L |
| GN container type | GN 1/3 |
| GN container dimensions (L x W x H) | 30 x 15 x 10 cm |
| Device dimensions (L x W x H) | 122,5 x 41 x 33 cm |
| Weight | 22,6 kg |
| Lid material | Glass |
| Drain tap | Yes, with Teflon gasket |
| Temperature control | Rotary thermostat |
| Intended use | Keeping prepared food warm |
| Safety | Automatic temperature regulation, overheat protection |
| Maintenance and cleaning | Mild detergent, soft cloth, do not use water jet |
| Repairability | Manufacturer-approved service only, original parts |
| Recycling | Do not dispose of with household waste, take to collection point |
Frequently Asked Questions - RCBM-11 Royal Catering
User questions about RCBM-11 Royal Catering
0 question about this device. Answer the ones you know or ask your own.
Ask a new question about this device
Download the instructions for your Professional cooking equipment in PDF format for free! Find your manual RCBM-11 - Royal Catering and take your electronic device back in hand. On this page are published all the documents necessary for the use of your device. RCBM-11 by Royal Catering.
USER MANUAL RCBM-11 Royal Catering
natural_image
Abstract white line drawing of a stylized creature or mythical creature on a dark blue background (no text or symbols)| DE | Produktname | BAIN MARIE |
| EN | Product name | BAIN MARIE |
| PL | Nazwa produktu | BAIN MARIE |
| CZ | Název výrobku | BAIN MARIE |
| FR | Nom du produit | BAIN MARIE |
| IT | Nome del prodotto | BAGNOMARIA |
| ES | Nombre del producto | BAÑO MARÍA |
| HU | Termék neve | BAIN MARIE |
| DA | Produktnavn | BAIN MARIE |
| FI | Tuotteen nimi | LÄMPÖHAUDE |
| NL | Productnaam | BAIN MARIE |
| NO | Produktnavn | BAIN MARIE |
| SE | Produktnamn | BAIN MARIE |
| PT | Nome do produto | BEMAR |
| SK | Názov produktu | BAIN MARIE |
| BG | Име на продукта | БЕН МАРИ |
| EL | Όνομα προϊόντος | МПЕН-МАРІ |
| HR | Naziv proizvoda | BAIN MARIE |
| LT | Produkto pavadinimas | BAIN MARIE |
| RO | Numele produsului | VITRINĂ CALDĂ |
| SL | Ime izdelka | BAIN MARIE |
| DE Modell | EN Product model | PL Model produktu | CZ Model výrobku | FR Modèle | IT Modello | ES Modelo | HU Modell | DA Model | FI Tuotteen malli | NL Productmodel | NO Produktmodell | SE Produktmodell | PT Modelo do produto | SK Model | BG Модел на продукт | EL Movtėlo προϊόντος | HR Model proizvoda | LT: Gaminio modelis | RO: Model de produs | SL: Model izdelka | RCBM-11 | |
| DE Hersteller | EN Manufacturer | PL Producent | CZ Výrobce | FR Fabricant | IT Produttore | ES Fabricante | HU Termelő | DA Producent | FI Valmistaja | NL Producent | NO Produsent | SE Tillverkare | PT Fabricante | SK Výrobca | BG Производител | EL Κατασκευαστής | HR Proizvođač | LT Gamintojas | RO Producător | SL Proizvajalec | expondo Polska sp. z o.o. sp. k. | |
| DE Anschrift des Herstellers | EN Manufacturer Address | PL Adres producenta | CZ Adresa výrobce | FR Adresse du fabricant | IT Indirizzo del produttore | ES Dirección del fabricante | HU A gyártó címe | DA Producentens adresse | FI Valmistajan osoite | NL Adres producent | NO Produsentens adresse | SE Tillverkarens adress | PT Endereço do fabricante | SK Adresa výrobcu | BG Адрес на производителя | EL: Διεύθυνση κατασκευαστή | HR Adresa proizvođača | LT Gamintojo adresas | RO Adresa producătorului | SL Naslov proizvajalca | ul. Nowy Kisielin – Innowacyjna 7, 66-002 Zielona Góra | Poland, EU | |

natural_image
Close-up of a metallic pipe fitting with a hexagonal bolt inserted, mounted on a wall (no text or symbols visible)This User Manual has been translated using machine translation. We have made every effort to ensure the translation is accurate, but please note that automated translations are not perfect and are not meant to replace human translators. The official version of the User Manual is in English. Any differences between the translated version and the original English are not legally binding. If you have any questions about the accuracy of the translation, please refer to the English version, which is the official reference. More language versions are available upon request via info@expondo.com.
I. Technical data
| Parameter description | Parameter value |
| Product name | Bain Marie |
| Model | RCBM-11 |
| Rated voltage [V~] / frequency [Hz] | 230 / 50 |
| Rated power [W] | 2000 |
| Total capacity [l] | 21 |
| Container type | GN 1/3 |
| GN container dimensions [cm] | 30x15x10 |
| Dimensions (width x depth x height) [cm] | 122.5x41x33 |
| Weight [kg] | 22.6 |
II. General description
The user manual is designed to assist in the safe and trouble-free use of the device. The product is designed and manufactured in accordance with strict technical guidelines, using state-of-the-art technologies and components. Additionally, it is produced in compliance with the most stringent quality standards.
DO NOT USE THE DEVICE UNLESS YOU HAVE THOROUGHLY READ AND UNDERSTOOD THIS USER MANUAL.
To increase the product life of the device and to ensure trouble-free operation, use it in accordance with this user manual and regularly perform maintenance tasks. The technical data and specifications in this user manual are up to date. The manufacturer reserves the right to make changes associated with quality improvement. The device is designed to reduce noise emission risks to a minimum, taking into account technological progress and noise reduction opportunities.

PLEASE NOTE! Drawings in this manual are for illustration purposes only and in some details may differ from the actual product.
Legend

The product satisfies the relevant safety standards.

Read instructions before use.
The product must be recycled.

WARNING! or CAUTION! or REMEMBER! Applicable to the given situation.
(general warning sign)

ATTENTION! Electric shock warning!
ATTENTION! Hot surface, risk of burns!

Only use indoors.
III. Usage safety

ATTENTION! Read all safety warnings and all instructions. Failure to follow the warnings and instructions may result in electric shock, fire and/or serious injury or even death.
The terms "device" or "product" are used in the warnings and instructions to refer to: Bain Marie
Electrical safety
a) The plug has to fit the socket. Do not modify the plug in any way. Using original plugs and matching sockets reduces the risk of electric shock.
b) Avoid touching earthed elements such as pipes, heaters, boilers and fridges. There is an increased risk of electric shock if the earthed device is exposed to rain, in direct contact with a wet surface or operating in a humid environment. Water ingression into the device increases the risk of damage to the device and of electric shock.
c) Do not touch the device with wet or damp hands.
d) Use the cable only in accordance with its designated use. Never use it to carry the device or to pull the plug out of a socket. Keep the cable away from heat sources, oil, sharp edges or moving parts. Damaged or tangled cables increase the risk of electric shock.
e) If using the device in a humid environment cannot be avoided, a residual current device (RCD) should be applied. The use of an RCD reduces the risk of electric shock.
Safety in the workplace
a) Make sure the workplace is orderly and well lit. A messy or poorly lit workplace may lead to accidents. Try to anticipate what may happen, observe what is going on and use common sense when working with the device.
b) Do not use the device in an explosion hazard zone, for example in the presence of flammable liquids, gasses or dust. The device generates sparks which may ignite dust or fumes.
c) Upon discovering damage or irregular operation, immediately switch the device off and report it to a supervisor without delay.
d) If there are any doubts as to the correct operation of the device, contact the manufacturer's support service.
e) Only the manufacturer's service point may repair the device. Do not attempt any repairs independently!
f) If a fire starts, use solely powder or carbon dioxide (CO2) fire extinguishers suitable for use on live devices to put it out.
g) Children or unauthorized persons are forbidden from entering a work station. (A distraction may result in a loss of control over the device). h) Use the device in a well-ventilated space.
h) Regularly inspect the condition of the safety labels. If the labels are illegible, they must be replaced.
i) Please keep this manual available for future reference. If this device is passed on to third parties, the manual must be passed on with it.

Remember! When using the device, protect children and other bystanders.
Personal safety
a) Do not use the device when tired, ill or under the influence of alcohol, narcotics or medication which can significantly impair the ability to operate the device..
b) The device is not designed to be handled by persons (including children) with limited mental and sensory functions or persons lacking relevant experience and/or knowledge unless they are supervised by a person responsible for their safety or they have received instructions on how to operate the device.
c) When working with the device, use common sense and stay alert. Temporary loss of concentration whilst using the device may lead to serious injuries.
d) To prevent the device from accidentally switching on, make sure the switch is on the OFF position before connecting to a power source.
e) The device is not a toy. Children should be supervised so that they will not play with the device.
f) Note: The metal parts of the lid and the housing may be hot and may cause skin burns.
Safe device use
a) Do not use the device if the ON/OFF switch does not function properly (does not switch the device on and off). Devices which cannot be switched on and off using the ON/OFF switch are hazardous, should not be operated and have to be repaired.
b) When not in use, store in a safe place, away from children and people not familiar with the device, who have not read the user manual. The device may pose a hazard in the hands of inexperienced users.
c) Maintain the device in a good technical state. Before each use check for general damage and especially check for cracked parts or elements and for any other conditions which may impact the safe operation of the device. If damage is discovered, hand over the device for repair before use.
d) Keep the device out of the reach of children.
e) Device repair or maintenance should be carried out by qualified persons, only using original spare parts. This will ensure safe use.
f) To ensure the operational integrity of the device, do not remove factory fitted guards and do not loosen any screws.
g) It is forbidden to move, adjusting and rotating the device in the course of work.
h) Clean the device regularly to avoid a durable encrustation of dirt.
i) Attention: The metal parts of the lid and housing may be hot and cause burns.
j) Do not turn on the appliance if the container is not filled with water.
k) It is forbidden to move the appliance while it is filled with hot water!
I) Use of the machine without water is forbidden
m) The water level should be between the indicated minimum and maximum.
n) Important: The water level in the container should be kept over the heating element. Failure to comply with this recommendation is hazardous and will cause burnout of the heating element.
o) Do not fill the tank above the maximum level. Failure to comply with the recommendation will cause water overflow when the containers are placed in the bain-marie and in consequence water leakage into the electrical components of the appliance.

ATTENTION! Despite the safe design of the device and its protective features, and despite the use of additional elements protecting the operator, there is still a slight risk of accident or injury when using the device. Stay alert and use common sense when using the device.
IV. Scope of application of the device
The Bain Marie is an appliance intended to maintain the temperature of food previously prepared and placed in GN containers. The device keeps food warm by heating up the water and transferring its heat to the GN containers. It is forbidden to use this appliance to prepare dishes, heat liquids and flammable materials, heat or boil water, soups, sauces or to defrost frozen products.
The user is liable for any damage resulting from unintended use of the device.
V. Device description
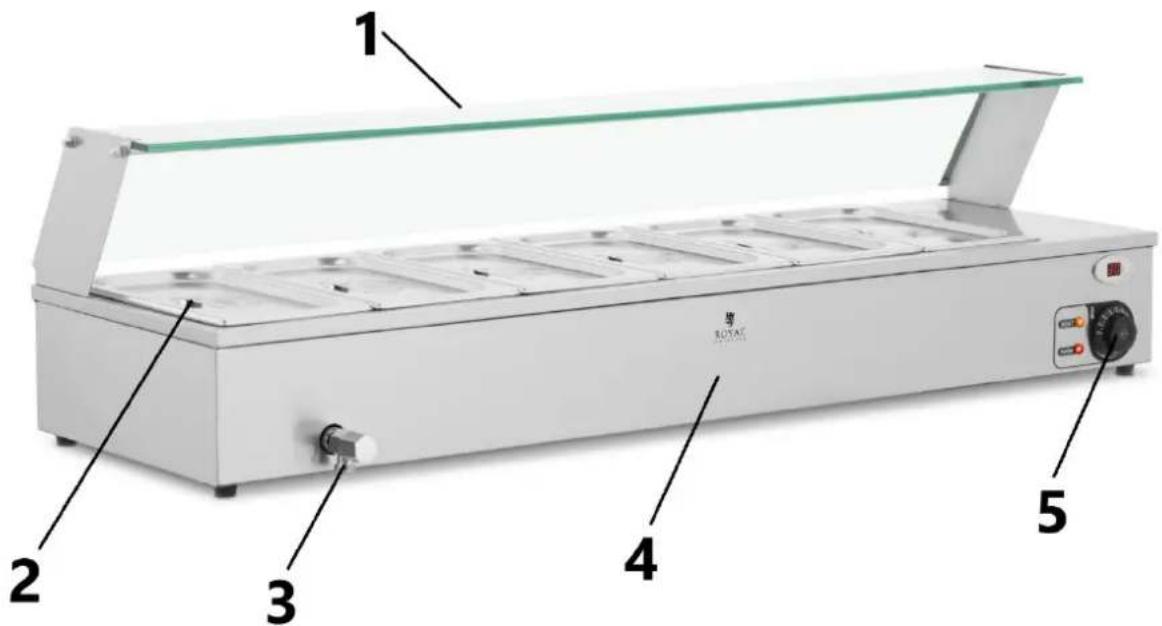
1 - Glass cover
2 - Food containers
3 - Faucet
4 - Device body
5 - Temperature Controller
6 - Power cord (on the back of the device, not visible in the image)
VI. Appliance location
The temperature of environment must not be higher than 40^ C and the relative humidity should be less than 85%. Ensure good ventilation in the room in which the device is used.
The distance between each side of the device and the wall or other objects should be at least 10 cm. Keep the device away from hot surfaces.
Operate the device on flat, stable, clean, refractory and dry surfaces out of the reach of children and people with mental disabilities. Install the device making sure that constant access to the main plug is ensured.
The power cord connected to the appliance must be properly grounded and correspond to the technical details. Before first use, remove all elements and clean them along with the entire device.
VII. Assembling the device
Before using the appliance, it is necessary to install the glass cover. To do this, follow the steps described below.
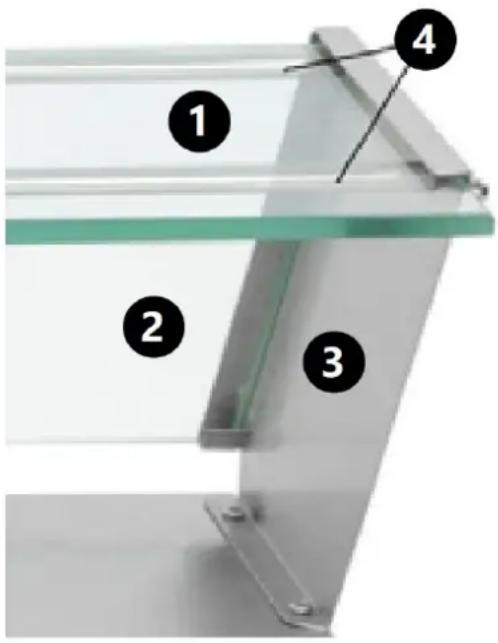
1) Screw the support (3) to the appliance housing using two screws.
2) Install the two longitudinal rods supporting the upper section of the glass cover. Remove the nut and insert the threaded ends of the rods (4) through the holes in the support. Finger tighten the rods to the support.
3) Slide the rear glass cover (2) into the side support (3).
4) Install the second side support (3) to the appliance using bolts, fitting it to the rear glass cover (2) and longitudinal support rods (4).
5) Slide the upper part of the glass cover (1) onto the side supports (3) and the support rods (4).
6) Secure the longitudinal bars connected to the side supports by tightening the nuts on the rods.
IMPORTANT: Do not over-tighten the screws, as it may damage the glass.
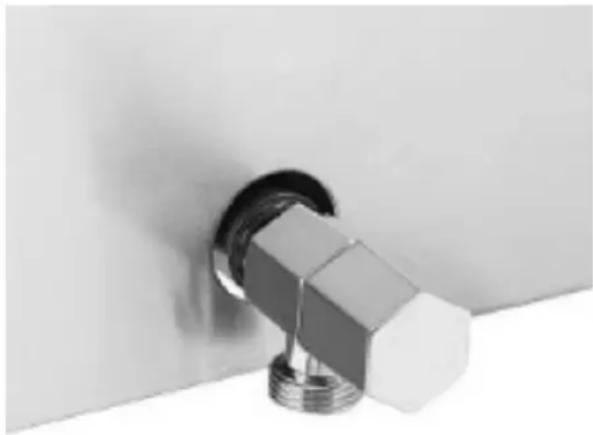
Drain tap
Install the drain tap before use.
CAUTION! Before installing the drain tap, it should be sealed by winding some teflon tape around the tap thread.
natural_image
Close-up of a metallic bolt and nut assembly (no text or symbols visible)VIII. Device use
1) Make sure that the device is disconnected from the power supply. Remove the GN containers and fill the device tank with water so that the heating elements are submerged under its surface.
2) Set the temperature control knob (thermostat) to the „0“ position and insert the plug into an electrical outlet.
3) Set the desired temperature using the knob.
4) After the device has reached the desired temperature, the GN containers can be filled with warm food. Close the GN containers with lids. Lids are designed to keep the food warm and clean.
NOTE: It is recommended to set the lowest possible temperature, one which keeps the food ready to be served immediately.
NOTE: The unit will automatically regulate the water temperature in the tank. If the temperature drops below the desired value, the heater will turn on again and turn off when the set water temperature is reached.
5) Always after finishing work with the device, remember to set the thermostat to „0“ and disconnect the device from the power supply.
6) After cooling down to room temperature, drain the water from the device using the drain tap. Place a suitable vessel under the tap.
7) Regularly clean the water tank and the heater.
IX. Cleaning and maintenance
a) Before each cleaning, adjustment, replacement of accessories and if the device is not used, it is necessary to pull out the mains plug and cool the device completely
b) Use only mild detergents suitable for washing surfaces which come into contact with food to wash the device.
c) Food residue must be removed from all external surfaces.
d) Clean the appliance after each use.
e) Do not use water to wash the electric control panel as this might cause damage and invalidate the warranty.
f) After cleaning the device, all parts should be dried before reusing it.
g) Store the unit in a dry, cool place, free from moisture and direct exposure to sunlight.
h) Never spray the device with water jets.
i) Regular inspections of the device must be carried out in terms of its technical efficiency and any damages
j) Use a soft cloth for cleaning.
X. Disposing of used devices:
Do not dispose of this device in municipal waste systems. Hand it over to an electric and electrical device recycling and collection point. Check the symbol on the product, instruction manual and packaging. The plastics used to construct the device can be recycled in accordance with their markings. By choosing to recycle you are making a significant contribution to the protection of our environment.
Contact local authorities for information on your local recycling facility.

natural_image
Close-up of a metallic bolt and nut assembly (no text or symbols visible)natural_image
Close-up of a metallic pipe fitting with hexagonal bolt securing a corner (no text or symbols visible)natural_image
Close-up of a metallic pipe fitting with hexagonal bolt securing a corner (no text or symbols visible)natural_image
Close-up of a metallic hexagonal bolt securing a small cylindrical component (no text or symbols visible)natural_image
Close-up of a metallic pipe fitting with hexagonal bolt securing a corner (no text or symbols visible)natural_image
Close-up of a metallic hexagonal bolt securing a small cylindrical component (no text or symbols visible)natural_image
Close-up of a metallic pipe fitting with a hexagonal bolt inserted, mounted on a wall (no text or symbols visible)VIII. Brug af enhed
natural_image
Close-up of a metallic pipe fitting with a hexagonal bolt inserted, mounted on a wall (no text or symbols visible)natural_image
Close-up of a metallic pipe fitting with a hexagonal bolt inserted, mounted on a wall (no text or symbols visible)OBS! Varm overflate, fare for forbrenning!
natural_image
Close-up of a metallic pipe fitting with a hexagonal bolt inserted, mounted on a wall (no text or symbols visible)natural_image
Close-up of a metallic pipe fitting with a hexagonal bolt inserted, mounted on a wall (no text or symbols visible)natural_image
Close-up of a metallic bolt and nut assembly (no text or symbols visible)natural_image
Close-up of a metallic hexagonal bolt securing a small cylindrical component (no text or symbols visible)natural_image
Close-up of a metallic hexagonal bolt securing a small cylindrical component (no text or symbols visible)natural_image
Close-up of a metallic pipe fitting with a hexagonal bolt inserted, mounted on a wall (no text or symbols visible)1) Pričvrstite nosač (3) na kućište uređaja pomoću dva vijka.
2) Postavite dvije uzdužne šipke koje podupiru gornji dio staklenog poklopca. Uklonite maticu i umetnite navojne krajeve šipki (4) kroz rupe u nosaču. Prstom zategnite šipke na oslonac.
3) Gurnite stražnji stakleni poklopac (2) u bočni nosač (3).
4) Ugradite drugi bočni nosač (3) na uređaj pomoću vijaka, montirajući ga na stražnji stakleni poklopac (2) i uzdužne potporne šipke (4).
5) Gurnite gornji dio staklenog poklopca (1) na bočne nosače (3) i potporne šipke (4).
6) Pričvrstite uzdužne šipke spojene na bočne nosače zatezanjem matica na šipkama.
natural_image
Close-up of a metallic pipe fitting with a hexagonal bolt inserted, mounted on a wall (no text or symbols visible)natural_image
Close-up of a metallic pipe fitting with a hexagonal bolt inserted, mounted on a wall (no text or symbols visible)natural_image
Close-up of a metallic pipe fitting with hexagonal bolt securing a corner (no text or symbols visible)1) Nosilec (3) z dvema vijakoma privijte na ohišje aparata.
2) Namestite dve vzdolžni palici, ki podpirata zgornji del steklenega pokrova. Odstranite matico in vstavite navojne konce palic (4) skozi luknje v nosilcu. S prsti privijte palice na oporo.
3) Potisnite zadnji stekleni pokrov (2) v stranski nosilec (3).
4) Namestite drugi stranski nosilec (3) na aparat z vijaki, tako da ga pritrdite na zadnji stekleni pokrov (2) in vzdolžne nosilne palice (4).
5) Zgornji del steklenega pokrova (1) potisnite na stranske nosilce (3) in nosilne palice (4).
6) Pritrdite vzdolžne palice, povezane s stranskimi nosilci, tako da zategnete matice na palicah.
natural_image
Close-up of a metallic hexagonal bolt securing a wall-mounted screw (no text or symbols visible)VIII. Uporaba naprave
1) Prepričajte se, da je naprava izključena iz napajanja. Odstranite GN posode in rezervoar naprave napolnite z vodo, tako da so grelni elementi potopljeni pod njegovo površino.
2) Gumb za regulacijo temperature (termostat) nastavite na položaj „0“ in vtaknite vtič v električno vtičnico.
3) Z gumbom nastavite želeno temperaturo.
4) Ko naprava doseže želeno temperaturo, lahko GN posode napolnimo s toplo hrano. Posode GN zapremo s pokrovi. Pokrovi so zasnovani tako, da ohranjajo hrano toplo in čisto.
For the disposal of the device please consider and act according to the national and local rules and regulations.
CONTACT
expondo Polska sp. z o.o. sp. k.
- Technical data
- General description
- DO NOT USE THE DEVICE UNLESS YOU HAVE THOROUGHLY READ AND UNDERSTOOD THIS USER MANUAL.
- Legend
- Usage safety
- Electrical safety
- Safety in the workplace
- Personal safety
- Safe device use
- Scope of application of the device
- Device description
- Appliance location
- Assembling the device
- Drain tap
- Device use
- Cleaning and maintenance
- Disposing of used devices:
- Brug af enhed
- Uporaba naprave
- CONTACT
Brand : Royal Catering
Model : RCBM-11
Category : Professional cooking equipment