USER MANUAL Next2Me Forever CHICCO
natural_image
Line drawing of a portable air conditioner unit with mesh grille and wheels (no text or symbols)
• ISTRUZIONI D'USO
• MODE D'EMPLOI
• GEBRAUCHSANLEITUNG
• INSTRUCTIONS FOR USE
• INSTRUCCIONES DE USO
• INSTRUÇÕES PARA A UTILIZAÇÃO
• GEBRUIKSAANWIJZINGEN
• ANVÄNDNINGSINSTRUKTIONER
• BRUGSANVISNING
• NÁVOD K POUŽITÍ
• INSTRUKCJE SPOSOBU UŻYCIA
• ΟΔΗΓΙΕΣ ΧΡΗΣΗΣ
• KULLANIM BİLGİLERİ
• ИНСТРУКЦИЯ ПО ЭКСПЛУАТАЦИИ
• ІНСТРУКЦІЯ З ВИКОРИСТАННЯ
- INSTRUÇÕES DE USO
تعليمات الاستعمال.


natural_image
Simple line drawing of a curved horizontal bar with a red circular label labeled 'B' in the top-left corner (no other text or symbols)
PRIMO MONTAGGIO - FIRST ASSEMBLY - PREMIER MONTAGE - ERSTE MONTAGE - PRIMER MONTAJE - PRIMEIRA MONTAGEM - PRVNÍ MONTÁŽ - PIERWSZY MONTAŽ - EERSTE MONTAGE - ΠΡΩΤΗ ΣΥΝΑΡΜΟΛΟΓΗΣΗ - İLK MONTAJ - ПЕРШИЙ МОНТАЖ - ПЕРВОНАЧАЛЬНАЯ СБОРКА - FÖRSTA MONTERINGEN - PRIMA MONTARE - FÖRSTE GANGS MONTERING - FÖRSTEGANGSMONTERING - ПЪРВИ МОНТАЖ - PRIMEIRA MONTAGEM - (خط النوم المشترك للمهد (ال intertwined بسرير cardboardين)
natural_image
Technical line drawing of a mechanical assembly with no visible text or symbols
natural_image
Technical line drawing of a vehicle chassis frame with directional arrows indicating movement (no text or symbols present)
natural_image
Diagram of two vertical support structures with a red arrow indicating movement, no text or symbols present
natural_image
Technical diagram of a mechanical assembly with red arrows indicating motion or force direction (no text or symbols present)
natural_image
Technical diagram of a mechanical assembly with two vertical supports and red arrows indicating motion or force directions (no text or symbols present)
natural_image
Technical line drawing of a mechanical assembly with no visible text or symbols
natural_image
Technical line drawing of a mechanical device with a hand operating the frame (no text or symbols)
natural_image
Illustration of a hand adjusting a seatbelt using a tool, with no visible text or symbols
natural_image
Line drawing of a hand holding a wall-mounted device with a mesh grille, no text or symbols present
natural_image
Technical line drawing of a mechanical assembly with hands operating a component (no text or symbols visible)
natural_image
Line drawing of a baby car seat with a red ball on top (no text or symbols)

natural_image
Line drawing of a container with internal compartments and a handle, no text or symbols present
natural_image
Illustration of hands adjusting a seatbelt with a numbered label (16) in the corner, no text or symbols present.
natural_image
Illustration of a hand holding a tool near a textured surface, with no visible text or symbols
natural_image
Line drawing of a car interior showing hand positioning and a red arrow indicating direction (no text or symbols)
natural_image
Line drawing of a cleaning machine with handle and frame (no text or symbols)
natural_image
Line drawing of a baby in a baby crib with a red measurement arrow indicating width (no text or symbols)
USO LETTINO CO-SLEEPING - COT CO-SLEEPING CONFIGURATION - UTILISATION DU LIT CODODO -VERWENDUNG ALS „CO-SLEEPING BETTCHEN“- USO DE LA CUNA EN MODALIDAD COLECHO - UTILIZAÇÃO DO BERÇO CO-SLEEPING - POUŽITÍ POSTÝLKY PRO SPOLEČNÉ SPANÍ S RODIČI (CO-SLEEPING) - UŽYTKOWANIE LÓŻECZKA JAKO LÓŻKA RODZINNEGO - GEBRUIK ALS CO-SLEEPING BEDJE - XPHŞH KPEBATIOY CO-SLEEPING - KARYOLA YAKIN UYUMA KULLANIM ŞEKLİ - ВИКОРИСТАННЯ ЛІЖЕЧКА У КОНФІГУРАЦІЇ «СОН РАЗОМ З БАТЬКАМИ» - ИСПОЛЬЗОВАНИЕ В ВАРИАНТЕ КРОВАТКИ CO-SLEEPING - ANVÄNDNING AV BARNSÄNGEN SOM SIDOSÄNG - UTILIZAREA PÂTÜTULUI CO-SLEEPING - BRUK AV BARNESENGEN FOR CO-SLEEPING - BRUG AF CO-SLEEPING BARNESENGEN - РЕЖИМ CO-SLEEPING - USO DO BERÇO CO-SLEEPING - استخدام Majority
natural_image
Line drawing of a hospital bed with a monitor and armrest, no text or symbols present
natural_image
Hand-drawn sketch of a striped bathtub placed on a tiled floor with a red checkmark at the bottom (no text or symbols)
natural_image
Line drawing of a chair with legs and arm, showing structural details (no text or symbols)
natural_image
Line drawing of a hand holding a small mechanical component, no text or symbols present
USO LETTINO - COT USE - UTILISATION DU LIT - VERWENDUNG ALS BETTCHEN - USO EN MODALIDAD CUNA - UTILIZAÇÃO DO BERÇO - POUŽITÍ POSTÝLKY - UŽYTKOWANIE JAKO ЛОŽECZKO - GEBRUIK ALS WIEGJE - XPHŞH KPEBATIOY - KARYOLA KULLANIMI - ВИКОРИСТАННЯ ЛІЖЕЧКА - ИСПОЛЬЗОВАНИЕ В КАЧЕСТВЕ КРОВАТКИ - ANVÄNDNING AV BARNSÄNGEN - UTILIZAREA PÂTUȚULUI - TIL BRUK SOM BARNESENG - BRUG AF BARNESENGEN - ИЗПОЛЗВАНЕ ЛЕГЛО - USO DO BERÇO - الاستخدام المستقل للمهد
USO LETTINO A TERRA - FLOOR BED FOR TODDLERS USE - UTILISATION DU LIT AU SOL- VERWENDUNG ALS AM BODEN STEHENDES BETTCHEN - USO EN MODALIDAD CUNA EN EL SUELO - UTILIZAÇÃO DO BERÇO NO CHÃO - POUŽITÍ JAKO POSTÝLKA NA ZEMI - UŽYTKOWANIE JAKO LÓŽECZKO STOJACE - GEBRUIK VAN HET STAANDE BEDJE - XPHŞH KPEBATIOY ΣΤΟ ΠΑΤΩΜΑ - KARYOLA BAĞIMSIZ KULLANIMI - ВИКОРИСТАННЯ В ЯКОСТИ МАНЕЖУ - ИСПОЛЬЗОВАНИЕ В КАЧЕСТВЕ НАПОЛЬНОЙ КРОВАТКИ - ANVÄNDNING AV BARNSÄNGEN PÅ GOLVET - UTILIZAREA PÄTUȚULUI LA SOL - TIL BRUK SOM BARNESENG PLASSERT PÅ GULVET - BRUG AF BARNESENGEN PÅ GULVET - ИЗПОЛЗВАНЕ ЛЕГЛО НА ПОДА - USO DO BERÇO NO CHÃO
الجميع الأولي
natural_image
Illustration of hands using a tool to adjust or install a mechanical component, no text or symbols present
natural_image
Line drawing of a baby seat with a bandage and mesh pattern (no text or symbols)
natural_image
Line drawing of a hand using a tool to adjust or install a device inside a rectangular container (no text or symbols)
natural_image
Illustration of hands adjusting a mechanical component with a red arrow indicating direction (no text or symbols present)
natural_image
Line drawing of a person using a handheld device on a small table (no text or symbols)
SFODERABILITÀ MATERASSO - REMOVING THE MATTRESS COVER - DÉHOUSSAGE DU MATELAS - ABNEHMBARER BEZUG DER MATRATZE - COLCHÓN DESENFUNDABLE - REMOÇÃO DO FORRO DO COLCHÃO - SNÍMÁNÍ POTAHU Z MATRACE - ZDEJMOWANIE POKRYCIA MATERACA - DE BEKLEDING VAN DE MATRAS VERWIJDEREN - ΔYNATOTHTA ΑΦΑΙΡΕΣΗΣ ΕΠΕΝΔΥΣΗΣ ΑΠΟ ΤΟ ΣΤΡΩΜΑ - ΣİLTE KILIFININ ÇIKARILMASI - ЯК ЗНЯТИ ЧОХОЛ МАТРАЦА - СНЯТИЕ ЧЕХЛА С МАТРАСА - BORTTAGNING AV MADRASSENS TYGÖVERDRAG - İNDEPÄRTAREA HUSEI SALTELEI - HVORDAN TA AV MADRASSENS STOFFTREKK - AFTAGNING AF MADRASSENS STOF - OTCTPAHЯВАНЕ НА ТЕКСТИЛНАТА ЧАСТ НА МАТРАКА - REMOÇÃO DO FORRO DO COLCHÃO - ازالة غطاءjalشية
natural_image
Illustration of hands placing a plastic container with a red arrow indicating force (no text or symbols)
natural_image
Illustration of a hand holding a folded garment with a red arrow indicating direction (no text or symbols)


ISTRUZIONI D'USO
IMPORTANTE! TENERE PER RIFERI- MENTI FUTURI.
ATTENZIONE: PER EVITARE RISCHI DI SOFFOCAMENTO, RIMUOVERE LA COPERTURA PLASTICA PRIMA DELL'USO DEL PRODOTTO. QUESTA COPERTURA PLASTICA DEVE ESSE-RE DISTRUTTA O TENUTA LONTANA DALLA PORTATA DEI NEONATI E BAMBINI.
AVVERTENZE
USO LETTINO CO-SLEEPING (FIS- SAGGIO AL LETTO DEI GENITORI)
IMPORTANTE - LEGGERE ATTENTAMENTE E CONSERVARE PER FUTURO RIFERIMENTO.
AVVERTENZE
IMPORTANT! KEEP FOR FUTURE REFERENCE.
WARNING: TO AVOID DANGER OF SUFFOCATION REMOVE THE PLASTIC COVER BEFORE USING THE PRODUCT. THIS COVER MUST BE DESTROYED OR KEPT AWAY FROM BABIES AND CHILDREN.
WARNINGS
- Only for domestic use.
- WARNING: Do not use this product without reading the instruction booklet first.
- WARNING: Do not use more than one mattress in the product.
- WARNING: Only use the mattress sold or any replacement mattresses approved by Artsana with the product. Do not add a second mattress, choking hazard.
- Unattended children must not be left to play near the product.
- All assembly couplings must ALWAYS be fastened correctly. Be sure there are no loose screws, as a child's body or clothing (e.g., laces, necklaces, cords from pacifiers) may get trapped and cause a strangulation hazard.
-
Consult the user manual for the list of components. Examine the product regularly to make sure that there are no loose, damaged or missing parts.
-
Before assembling, ensure that the product and all its components do not show any signs of damage or deformation. In this case, do not use and keep out of reach of children.
• Always use all parts needed for each configuration of use.
• Make sure that the adult using the product knows exactly how it works.
- The product is ready for use only when all locking mechanisms are engaged. Make sure they are securely engaged before use.
• Always LOCK the wheels when the product is being used.
- All operations for opening, adjusting, fastening and positioning the product must be carried out by an adult.
- Do not make adjustments to the product when the child is in it.
- Do not move the product when the child is inside.
- Do not use the product with more than one child at a time.
- Prolonged exposure to direct sunlight may cause the products colour to fade. After prolonged exposure of the product to high temperatures, wait a few minutes prior to putting your child in it.
- WARNING: To prevent it becoming trapped, do not place the cot close to walls or obstacles.
- Keep the product out of reach of children when it is not in use.
- WARNING: If the baby is able to climb over the sides, the cot should no longer be used.
COT CO-SLEEPING CONFIGURATION (FASTENED TO THE PARENTS' BED)
IMPORTANT - READ CAREFULLY AND KEEP FOR FUTURE REFERENCE.
WARNINGS
- WARNING: Do not use this product without reading the instruction booklet first.
- WARNING: The product is intended for use by children of 0 to 4 years.
- WARNING: When used in co-sleeping configuration, fasten the straps to the parents' bed and do not use the Next2me Forever in floor-standing cot configuration.
- WARNING: Never use the product in co-sleeping configuration if the legs are not inserted.
- WARNING: Never use the product in co-sleeping configuration if the side barrier has been removed or if the safety straps of the folding side barrier have been attached to the rear buckles of the cot base without being secured to the bed.
- WARNING: Placing additional items in the product may cause suffocation.
- WARNING: Do not place the product close to another product, which could present a danger of suffocation or strangulation, e.g. strings, blind/curtain cords, etc. To
avoid all risks of strangulation, never give children objects with cords or strings attached, or leave them within their reach.
- DANGER! The folding side must always be raised and locked when the product is not attached to the parents' bed.
- WARNING: To avoid hazards from the child's neck being caught on the top rail on the side that is next to the adult bed, the top rail must not be higher than the adult bed mattress.
- WARNING: To avoid a strangulation hazard, the systems for fastening the crib to the parents' bed must always be kept outside of and away from the product.
- WARNING: During use, make sure that the bedsheets, blankets, etc. do not interfere with the product's space.
- WARNING: Use the product with beds and/or mattresses with straight sides only. Do not use the product with round beds and/or mattresses or water mattresses.
- The product must always be placed on a horizontal surface. Never leave the product on a sloping surface with your child inside.
- When your child is unattended in the product, always make sure that the side is raised and locked in closed position, and aligned with the upper perimeter of the product.
- Be aware of the risk of burns from cigarettes, naked flames and other heat sources, like electric or gas heaters, that are near the product.
- DO NOT USE the product if any part is missing, damaged or broken. Contact Artsana SPA for spare parts and user instructions if needed. DO NOT REPLACE missing, damaged or broken parts with non-OEM components or components not approved by Artsana SpA.
- Use only the fastening straps included in the package.
- When used in "Co-sleeping Configuration" (fastened to the bed), the product must be used only in horizontal position.
- To prevent danger of choking due to the child's head being trapped, when the product is in the "Co-Sleeping Configuration" (fastened to the bed) it should be properly fastened to the parents' bed with the fixing straps as explained in the instruction booklet.
- There must NEVER be free space between the lower part of the product in "Co-Sleeping Configuration" and the adult bed mattress.
- Before using in "Co-sleeping configuration (fastened to bed)," make sure the product is fastened and positioned correctly. Check the fastening system hold before each use by attempting to push the product away from the parents' bed.
- Do NOT fill any spaces or gaps between the parents' mattress and the product with pillows, blankets, bedsheets or any other
material that may cause a choking hazard.
- Infants can suffocate on soft bedding. Avoid placing pillows or similar items inside the product for additional comfort during sleep.
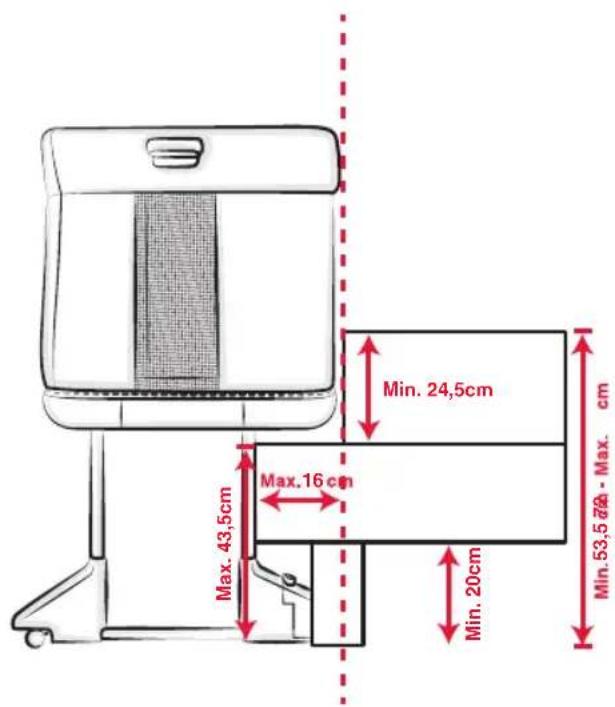
- Use the product in the "Co-Sleeping Configuration" (fastened to the bed) only with beds of the size indicated in the reference figure at the beginning of the manual.
- Do not leave anything inside the product that might reduce its depth.
COT USE
IMPORTANT – READ CAREFULLY AND KEEP FOR FUTURE REFERENCE.
WARNINGS
- WARNING: The product is intended for use by children of 0 to 4 years.
- WARNING: To prevent the risk of fire, do not place the cot near fans, electric bar fires, gas fires or other sources of heat.
- WARNING: Do not use the cot if any parts are broken, ripped or missing, and only use spare parts approved by the manufacturer.
- WARNING: Do not leave anything in the cot or place it close to another product that can be leant on or that could represent a choking or strangling hazard, such as ropes, cables, curtain cords etc.
• WARNING: The cot must be kept
away from electrical cables and cords: do not position close to windows where cords, curtains or similar could pose a suffocation or choking hazard. To avoid all risks of strangulation, never give children objects with cords or strings attached, or leave them within their reach.
- When your child is unattended in the product, always make sure that the side is raised and locked in closed position, and aligned with the upper perimeter of the product.
- All connectors must be correctly secured at all times. Check them regularly and tighten if necessary.
- Newborn babies can suffocate on soft beds. Avoid placing cushions or similar objects underneath newborn babies when they sleep.
FLOOR BED FOR TODDLERS USE
IMPORTANT – READ CAREFULLY AND KEEP FOR FUTURE REFERENCE.
WARNINGS
- WARNING: The product is intended for use by children over 18 months of age.
- WARNING: To prevent the risk of fire, do not place the cot near fans, electric bar fires, gas fires or other sources of heat.
- Do not leave any small objects inside the product that might cause choking or strangulation.
COMPONENTS
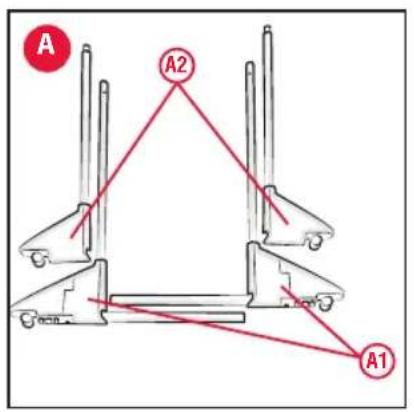
A) Leqs
A1) Leg with folding foot (x2)
A2) Leg with fixed foot (x2)
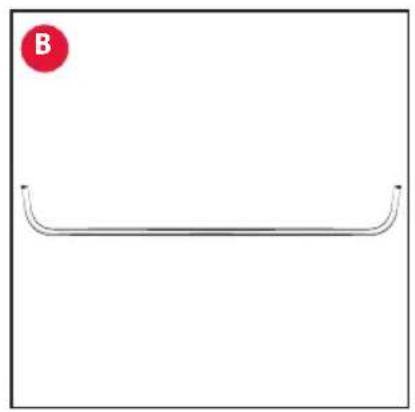
B) Upper frame
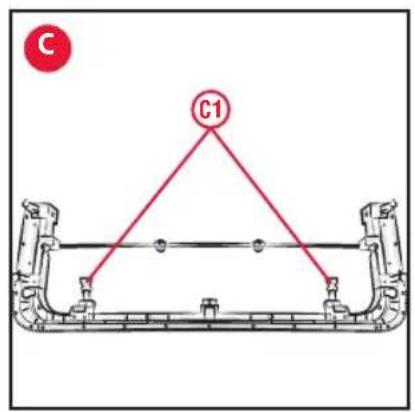
C) Base
C1) Rear strap fastening buckle (x2)
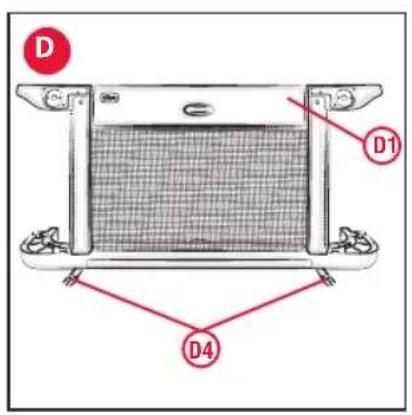
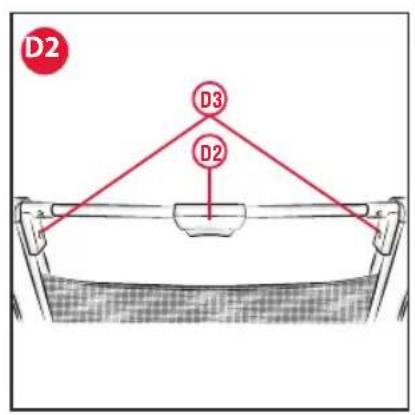
D) Folding side barrier
D1) Side
D2) Side tilting button
D3) Side removal button (x2)
D4) Safety strap (x2)
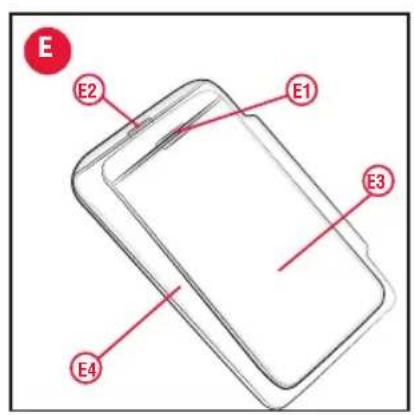
E) Mattress
E1) Lower Velcro strap
E2) Upper Velcro strap
E3) Lower mattress
E4) Upper mattress
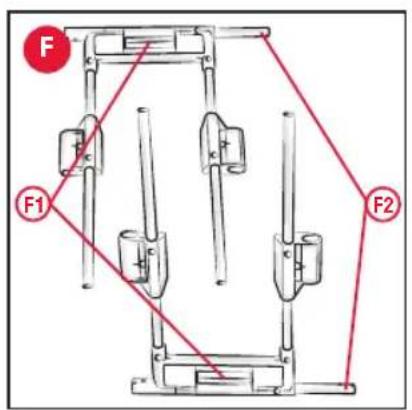
F) Frame for height adjustment (x2)
F1) Adjustment button
F2) Tubular elements
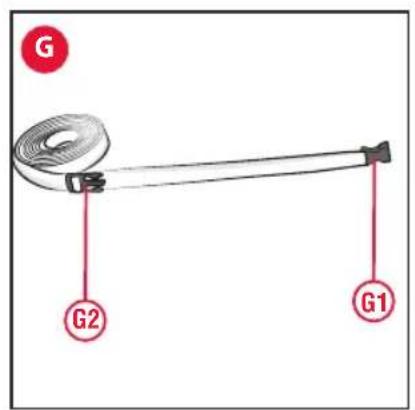
G) Fastening strap (x2)
G1) Grey cot safety strap fastening buckle
G2) Grey bed fastening and height adjustment prong
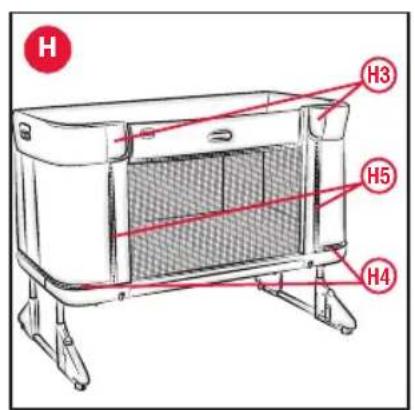
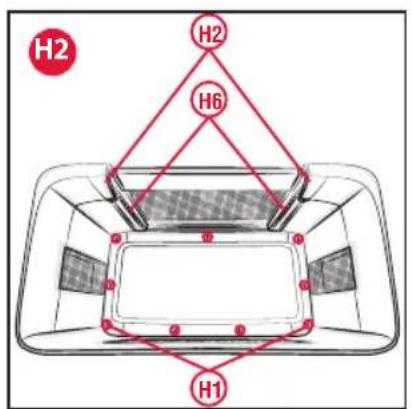
H) Fabric
H1) Bed base snap button (x9)
H2) Internal snap button (x2)
H3) External snap button (x2)
H4) Base zipper (x3)
H5) External vertical zipper (x2)
H6) Internal vertical zipper (x2)
FIRST ASSEMBLY
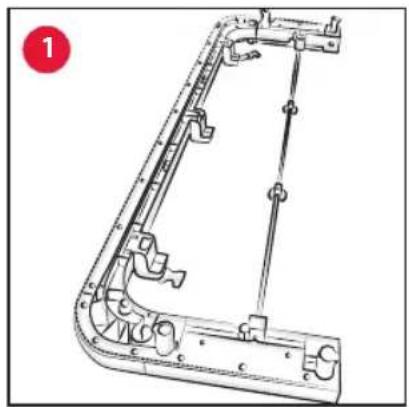
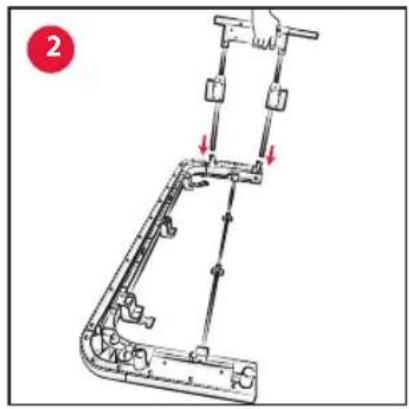
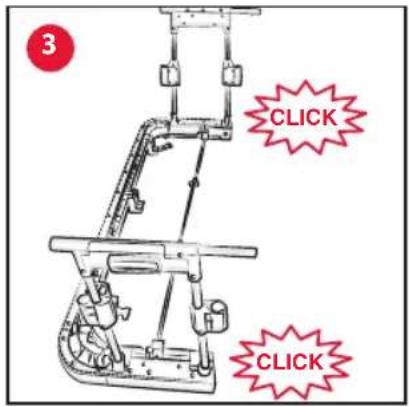
- Lay the base "C" on the floor (Fig. 1), insert the frame for height adjustment "F" (Fig. 2) taking care to hold the adjustment buttons "F1" outwards. Push the tubular elements "F2" all the way down until you hear a click. Repeat this step on the other side (Fig. 3).
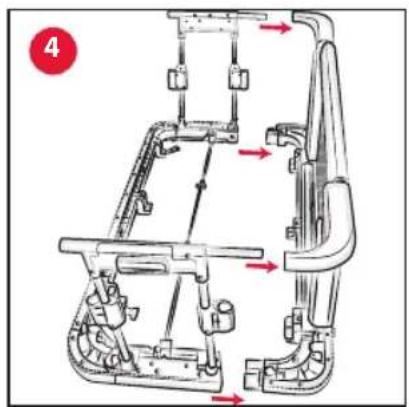
- Bring the assembled block to point 1 on the folding side barrier "D", engage the tubular elements "F2" at the top and the rectangular hooks at the bottom of the barrier "D" (Fig. 4). Insert all four fastening devices until you hear the click that are correctly fastened.
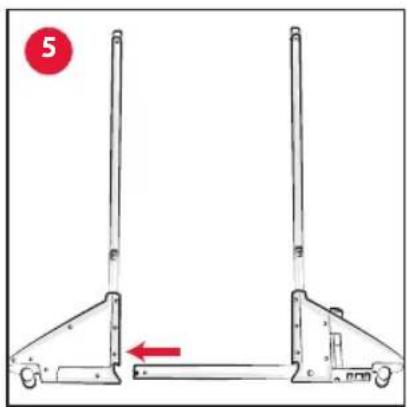
- Assemble the lower tubular element of leg "A1" by inserting it into the hole at the base of the leg "A2" (Fig. 5), taking care to keep the smooth part (without screws) on the same side. You will hear a click if correctly assembled. Repeat the same step for the other leg.
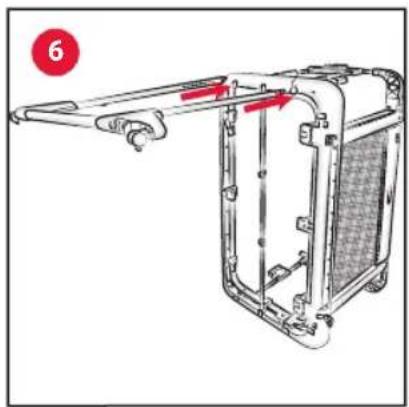
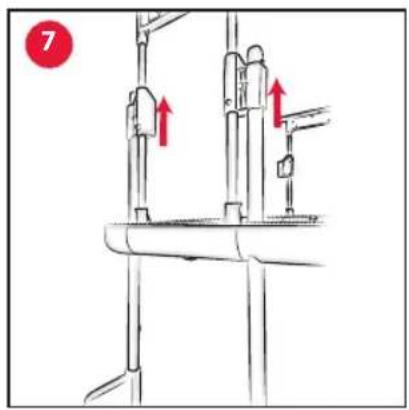
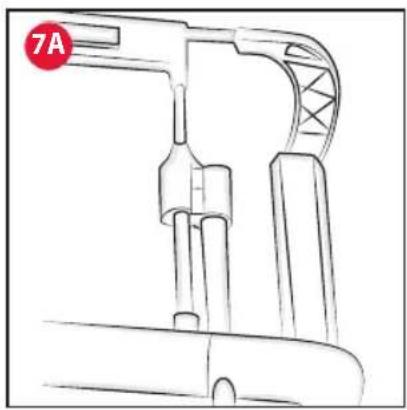
- To make it easier to assemble the legs, fold the structure assembled so far on the short side. Making sure that the smooth part of the legs (without screws) faces outwards, slide the leg tubes "A" into the lower holes under the base "C" (Fig. 6) and slide them into the holes of the height adjustment frame "F" (Fig. 7-7A) until completely locked. Repeat this step with the other leg.
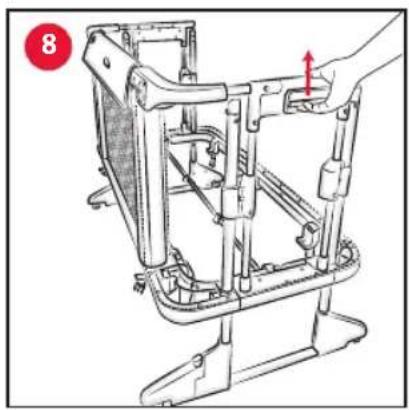
- Press the adjustment buttons "F1" (Fig. 8) to lower the cot completely.
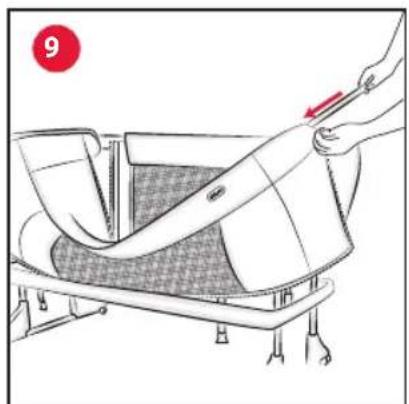
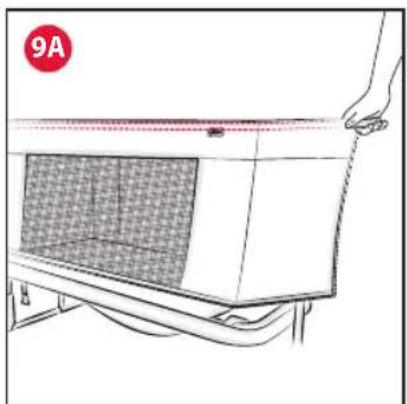
- Insert and slide the upper frame "B" (making sure that the fastening pins are facing down) into the through-hole of the fabric "H" (Fig. 9-9A).
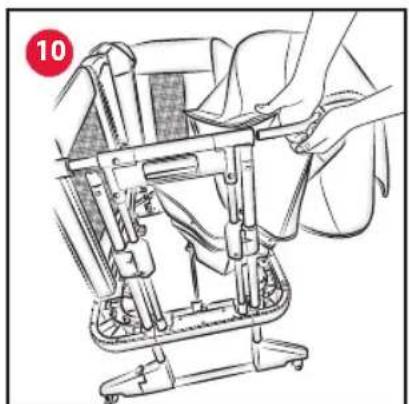
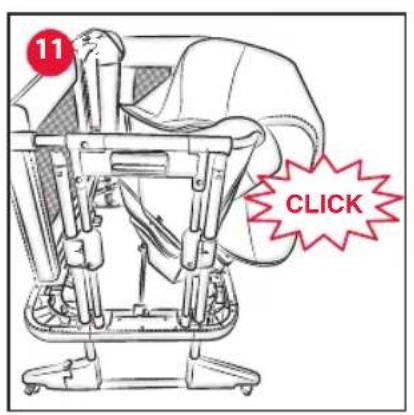
- Assemble the upper frame "B" with fabric in the holes of the height adjustment frame "F" (Fig. 10) until you hear a locking click (Fig. 11).
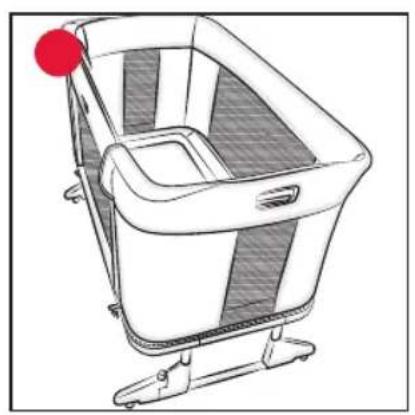
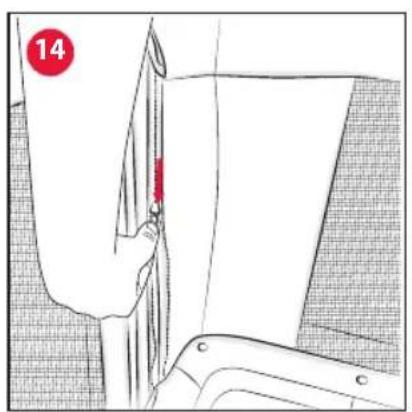
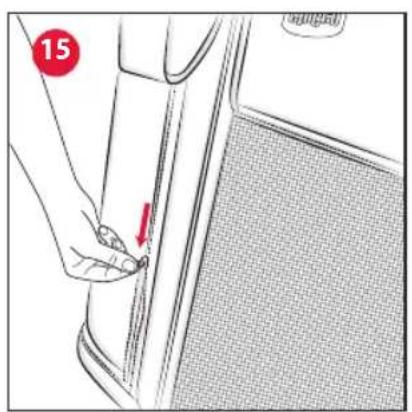
- Place the fabric on the upper perimeter of the cot (Fig. 12), fasten all the snap buttons in the bed base "H1" (Fig. 13), close the two internal vertical zippers "H6" (Fig. 14), and repeat the operation with the two external vertical zippers "H5" (Fig. 15).
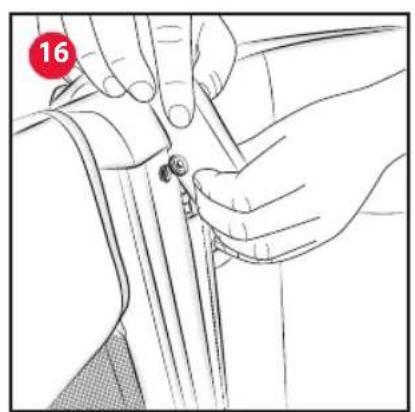
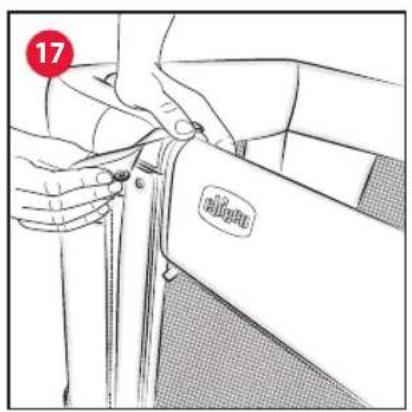
- Fasten the internal snap buttons "H2" (Fig. 16) and the external snap buttons "H3" (Fig. 17) to the folding side barrier "D".
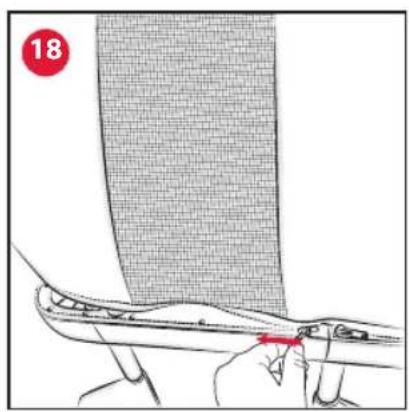
- Close the zippers of the base "H4" (Fig. 18).
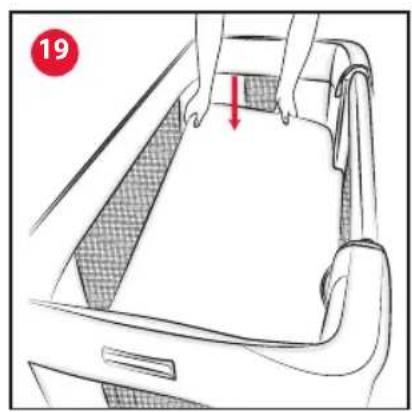
- Place the mattress "E" (Fig. 19).
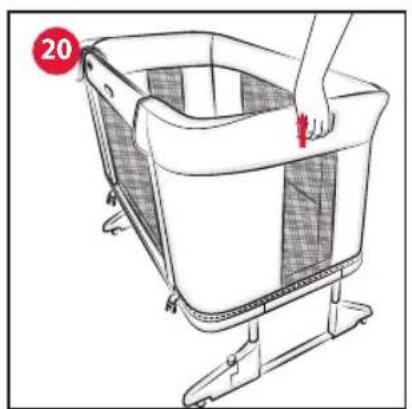
HEIGHT ADJUSTMENT
- The product can be adjusted in 11 different heights. To adjust
the height, press the buttons "F1" on the upper short side, and lift or lower the structure to the desired position (Fig.20). Releas the button to lock the position.
- The base of the product can be inclined by adjusting the 2 feet at different heights.
WARNING: The product can be inclined by a maximum of 4 positions between one leg support and the other (e.g., right leg in position 1 and left leg in position 5).
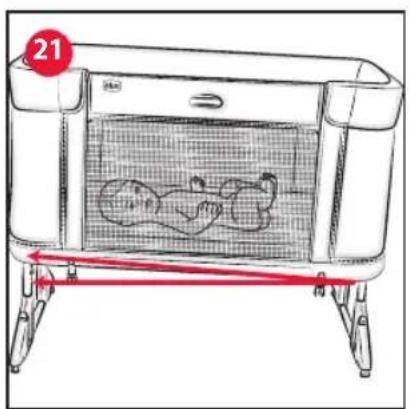
WARNING: The child's head must always be positioned near the raised end (fig.21).
COT CO-SLEEPING CONFIGURATION (FASTENED TO BED)
It is possible to fasten the product to the parents' bed (co-sleeping configuration).
WARNING - IMPORTANT FOR YOUR CHILD'S SAFETY: This configuration is allowed only with beds that allow compliancy with all the conditions described in this paragraph.
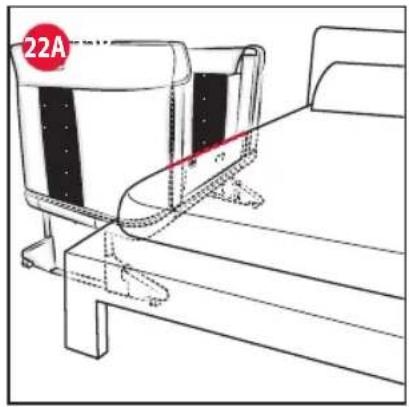
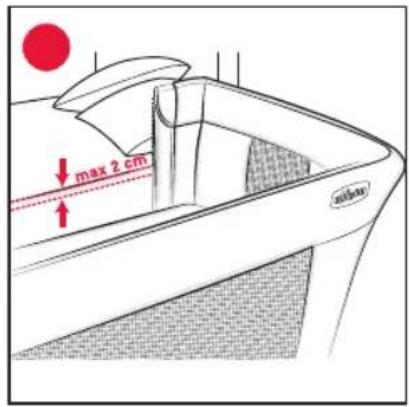
In particular, the folding side of the cot must always be positioned against the mattress of the parents' bed and the parents' mattress must be aligned with (or at most higher than) the height of the cot's side (Fig.22A-22B). Moreover, the product must be fastened to the structure of the parents' bed or to the mattress support (mesh or slat sprung base).
WARNING: Check that the structure of the product in co-sleeping configuration does not interfere with the parents' bed.
WARNING: Use the product with the side lowered only in co-sleeping configuration.
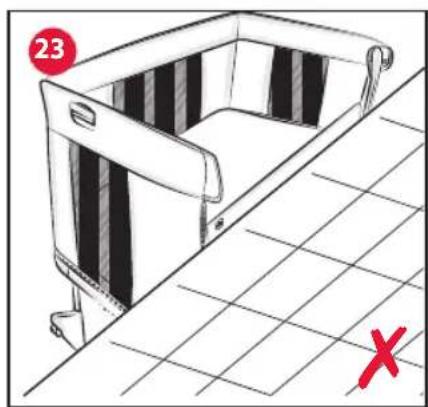
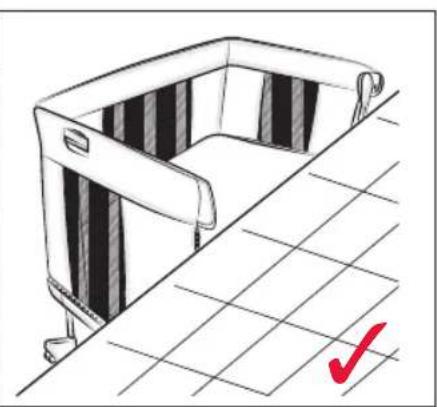
- Put the product against the parents' bed and check its height compared to the parents' mattress (Fig. 23).
WARNING: The height of the parents' mattress must be higher than or the same as that of the side of the product. If this is not the case, use the adjustment system to achieve this condition on both sides.
WARNING: In co-sleeping configuration, the 2 feet of the product must be set at the same height.
-
To fasten the product to the parents' bed (co-sleeping configuration), use the pair of supplied straps "G".
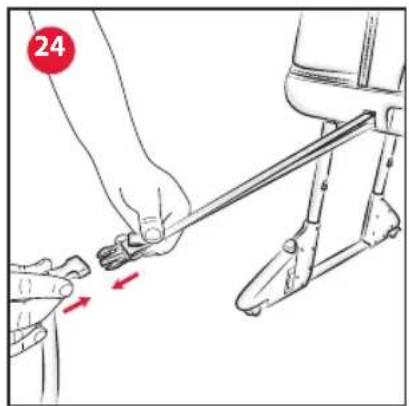
-
Now fasten the grey buckles "G1" to the safety straps "D4" and pull them as tightly as possible (Fig. 24).
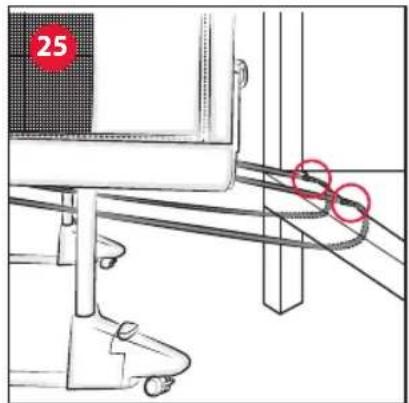
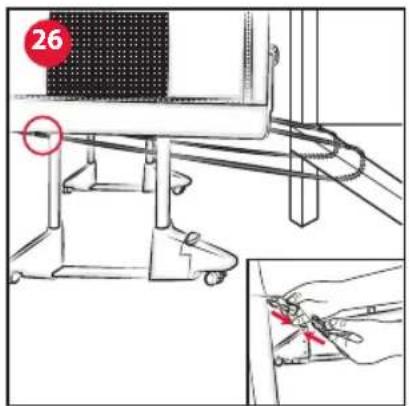
-
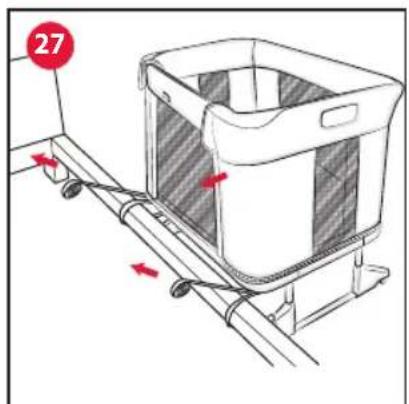
Then pass the straps "G" around the parent's bed frame/slats from top to bottom. Complete the bed fastening operation by hooking the and length adjustment prongs "G2" to the grey bed fastening buckles "C1", located under the base of the product (Fig. 25) until a loop is formed (Fig. 26). Make sure to repeat the step on both sides. To make installation easy, when fastening the buckles, always keep the product slightly away from the parents' bed.
-
Now pull the product completely to the parents' bed, tighten the loop by pulling the straps "G" (Fig. 27) and make sure that the safety straps "D4" of the folding side barrier are fully tensioned. Carry out this step first on one side and then on the other, adjusting the straps until the product is in contact with the parents' mattress.
WARNING: If the straps "D4" are not fully tensioned, it is not possible to maintain the safety height of the side.
-
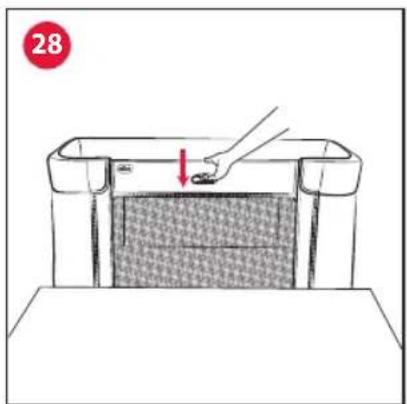
Lower the side of the product by pushing button "D1" (Fig. 28) and accompanying the side until it reaches the end of its travel.
-
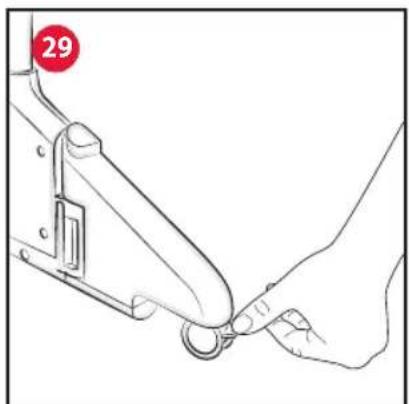
Lock all wheels with brake "A5" (Fig. 29).
-
To close the side "D1", simply lift it upwards, holding it from the centre. Always make sure that it is engaged correctly.
WARNING: Before use, always make sure that there is no space between the parents' mattress and product's side. Otherwise adjust the straps "G" pulling them until the required condition is restored. Make sure that the side is always free to be lowered and raised completely.
WARNING: If when fastening the product to the parents' bed it is not possible to fit the product's feet under the parents' bed, the bed can be fastened anyway by the following the instructions above folding the feet "A3" with the release button "A4" when putting the product against the bed.
WARNING: Whenever the side is lowered, make sure that the position compared to the parents' mattress has not changed from that illustrated in the paragraphs above.
WARNING: When the product is used in "Co-sleeping configuration (fastened to the bed)," it must always be mounted on the long side of the bed. DO NOT install the product at the head or feet of the bed.
MAKING THE PARENTS' BED
When in "Co-sleeping configuration (Fastening to the bed)" to facilitate the daily making of the parents' bed, you can unfasten the product from the bed. Just list the folding side barrier "D" completely and unfasten the grey buckles underneath the base of the product. When fastening the product again to the parents' bed, pull the straps back to the maximum tension to ensure that the product is correctly and securely fastened to the parents' bed. Make sure that all the steps illustrated above in "Co-sleeping configuration (fastened to the bed)" have been completed.
HOW TO USE THE COT
-
If previously used in co-sleeping configuration, remove the product from the bed by unfastening the buckles of the straps "G", taking care to accompany the safety straps "D4" of the folding side barrier "D".
-
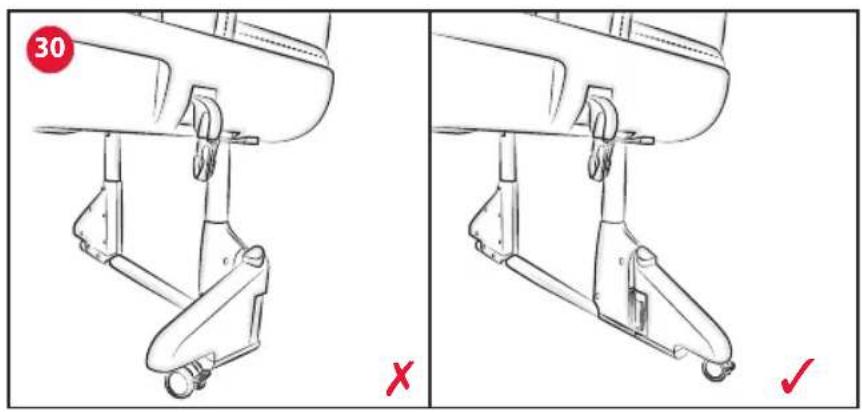
WARNING: If the feet "A3" were folded, straighten them again until you hear the fastening click. Repeat the step on the other leg as well (Fig. 30).
-
Check the fastening of the folding side barrier to the structure, after its automatic ascent.
WARNING: Remove the straps from the parents' bed and keep them in a place out of the child's reach.
HOW TO USE THE FLOOR BED FOR TODDLERS
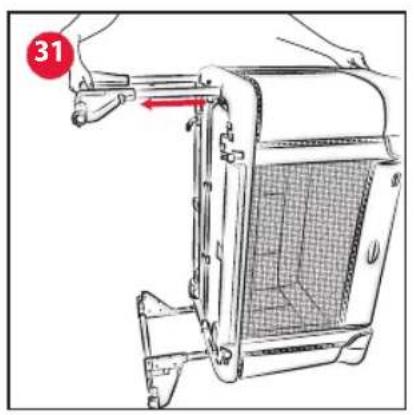
- To use the product in this configuration, remove the legs "A" as shown below:
- Tilt the product on the short side, taking care to place a protective sheet on the floor.
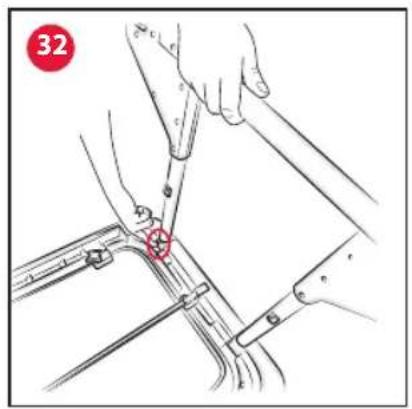
- Pull leg "A" to the maximum extension until it reaches the safety lock (Fig. 31), act on the safety pin, positioned on the rear leg (Fig. 32) and pull the leg completely out of the product. Repeat this operation on the other side as well.
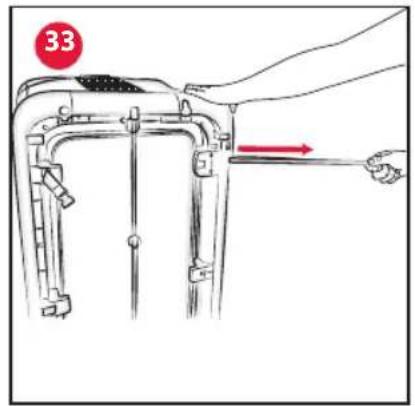
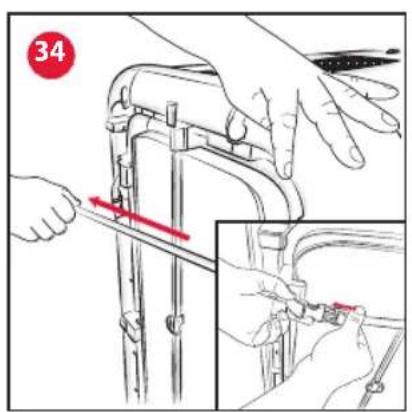
- Keeping the product in an upright position, proceed as indicated below to fold and remove the side:
- Pull the safety strap "D4" of the folding side barrier "D" until it is fully extended and attach it to the buckle "C1" at the rear of the base "C" as shown in Figures 33 and 34. Repeat the step for the other side.
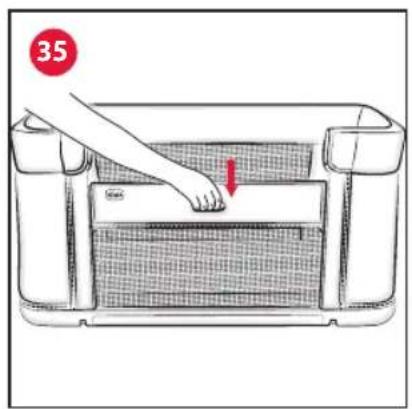
- Position the product again on base "C" and press button "D1" to lower the side (Fig. 35).
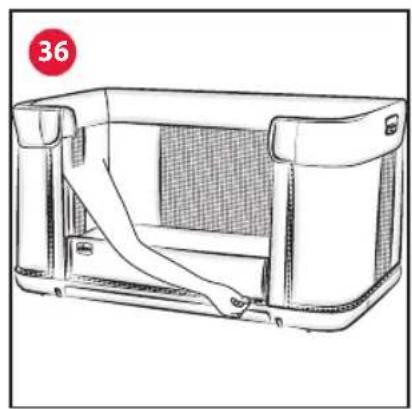
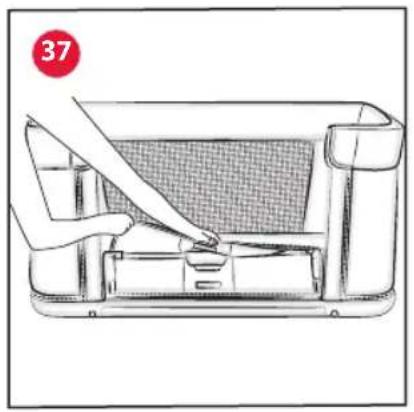
- Open the zipper on the fabric on the side (Fig. 36) with the help of a paper clip and fold the fabric over so that the horizontal tubular element is uncovered (Fig. 37).
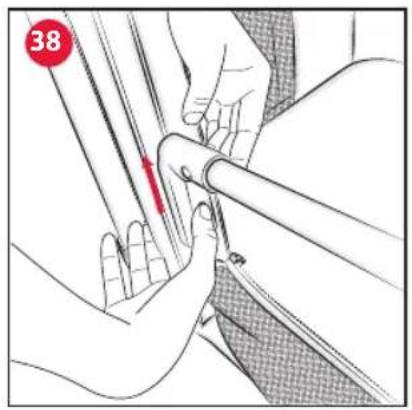
- Press button "D3" on the side cart and simultaneously lift the bar upwards to release it from the product (Fig. 38). Repeat this step on the other side.
WARNING: Once removed, keep the bar out of the child's reach.
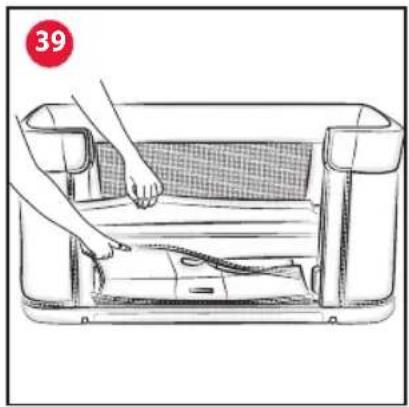
- Fit the fabric of the side under the mattress again (Fig. 39).
CARE AND MAINTENANCE
The product crib and mattress have a fabric lining that can be removed completely and washed except for folding side barrier "D". To remove the fabric, follow the instructions in the paragraph "REMOVING THE FABRIC."
WARNING: Covering or removing the fabric may take a few minutes and must be carried out by an adult.
Regularly inspect the product for signs of wear and damage. In the case of damage, do not use and keep out of reach of children.
Do not use solvents, abrasive or overly aggressive products.
When washing the fabrics pay close attention to the instructions on the label.

Maximum washing temperature 30°C

Do not bleach

Do not tumble dry

Do not iron

Do not dry clean

Line drying
Check that the fabric and the stitching are in good condition after
each wash.
WARNING: When covering or removing the cover of the product, take care when handling the fabric parts so as to avoid accidental tears or damage.
WARNING: The fabric part of the foldable side can be removed partially to allow the side to be removed when the product is used in cot configuration (see point 26).
REMOVING THE FABRIC FROM THE PRODUCT
- Open the zippers along the perimeter of the base "H4" and then the vertical external zipper "H5" and internal vertical zipper "H6".
- Release the internal upper snap buttons "H2" and external snap buttons "H3".
- Remove the mattress.
- Release the nine snap buttons "H1" on the bottom.
- Release the upper frame "B" from the frame for height adjustment "F", operating on the pins of the upper frame "B".
- Remove the upper frame "B" from the fabric "H".
- You can now remove the lining.
REMOVING THE MATTRESS COVER
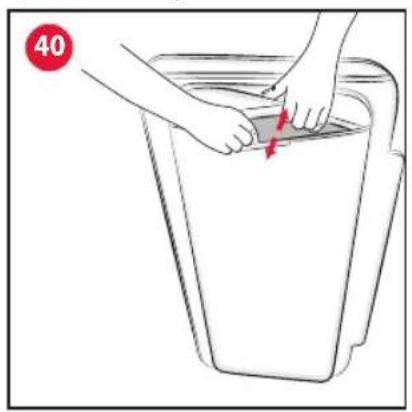
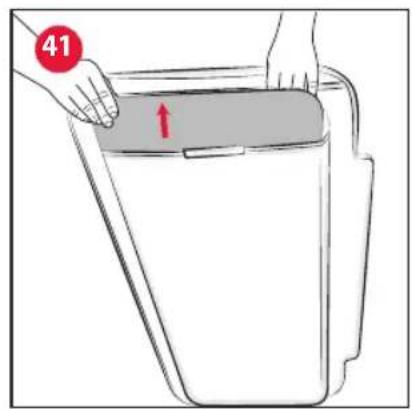
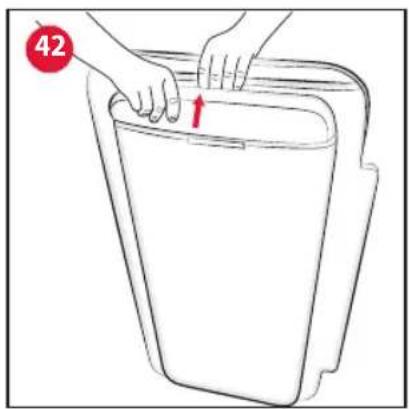
- Open the lower Velcro strap "E1" (Fig. 40), remove the panel (Fig. 41) and the lower mattress "E3" (Fig. 42).
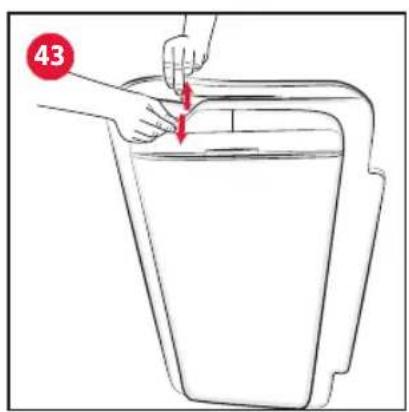
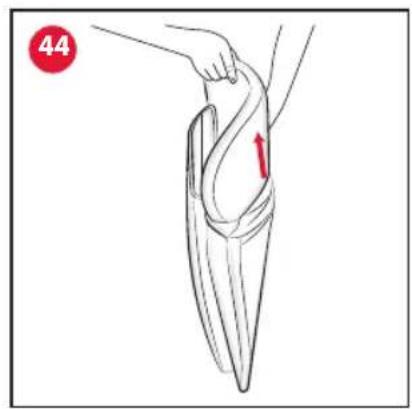
- Open the upper Velcro strap "E2" (Fig. 43) and remove the upper mattress "E4" (Fig. 44).
Follow the steps above in reverse order to cover the mattress again.
DISASSEMBLING THE PRODUCT
Once the fabric covers and legs have been removed from product, the product can be completely disassembled by following steps 1 to 6 in reverse order.
WARRANTY
The product is guaranteed against any conformity defect in normal conditions of use as described in the instructions. The warranty shall not therefore apply in the case of damage caused by improper use, wear or accidental events. For the duration of the warranty on conformity defects please refer to the specific provisions of applicable national laws in the country of pur chase, where appropriate.
FR NOTICE D'UTILISATION
IMPORTANT! À CONSERVER POUR CONSULTATION UL- TÉRIEURE.
AVERTISSEMENT : AFIN D'ÉVITER TOUT RISQUE D'ÉTOUFFEMENT, ENLEVER LA PROTECTION EN PLASTIQUE AVANT D'UTILISER CE PRODUIT. LA PROTECTION EN PLASTIQUE DOIT ÊTRE DÉTRUITE OU TENUE HORS DE PORTÉE DES BÉBÉS ET DES ENFANTS.
AVERTISSEMENTS
MODE LIT CODODO (FIXATION AU LIT)
ABNEHMBARER BEZUG DES PRODUKTES
MODUL PĂTUT CO-SLEEPING (FIXARE PE PAT)
MODALITETEN BARNESENG FOR CO-SLEEPING (FESTET TIL SENGEN)
risikoen for fastklemning.
ال,’م,”م,”م,”م,”م,”م,”م,”م,”م,”م,”م,”م,”م,”م,”م,”م,”م,”م,”م,”م,”م,”م,”م,”م,”م,”م,”م,”م,”م,”م,”م,”م,”م,”م,”م,”م,”م,”م,”م,”م,”م,”م,”م,”م,”م,”م,”م,”م,”م,”م,”م”
مائية.
ARTSANA GERMANY GMBH
Borsigstrasse 1-3
28923 Alcorcon (Madrid)-Spain
902 117 093
www.CHICCO.es

ARTSANA PORTUGAL S.A.
ARTSANA POLAND Sp.z o.o.
Ul. Połczyńska 31 A
01-377 Warszawa
+48 22 290 59 90
www.CHICCO.pl


ООО "Артсана Рус"
ARTSANA BRASIL LTDA.
Dec V. Ruben Dario 1015
Colonia Lomas De Providencia 44647
Guadalajara, Jalisco-Mexico
01800 702 8983
www.CHICCO.com.mx

ARTSANA ARGENTINA S.A.
Av. Santa Rita 2731 Piso 1 Of 5,
1609 Boulogne, Buenos Aires.
Argentina.
Phone: (011) 5254-3030
www.CHICCO.com.ar

ARTSANA INDIA PRIVATE LIMITED,
7Th Floor, Tower B, Paras Twin Towers,
Golf Course Road, Sector 54
Gurgaon - 122002 - Haryana, India
(+91)(124)(4964500)
www.CHICCO.in

ARTSANA S.p.A.
22070 Grandate (CO) - Italy
Tel. (+39) 031 382 111
Fax (+39) 031 382 400
www.CHICCO.com


NOTE


NOTE


NOTE


EN 16890:2017+A1:2021
ARTSANA S.p.A. - Via Saldarini Catelli, 1 - 22070 Grandate (CO) - Italy
Tel. (+39) 800 188 898 - Fax (+39) 031 382 400 - www.chicco.com