Next2Me Magic Evo - Baby bed CHICCO - Free user manual and instructions
Find the device manual for free Next2Me Magic Evo CHICCO in PDF.

| Product Type | Baby bedside sleeper / crib |
| Brand | Chicco |
| Model | Next2Me Magic Evo |
| Category | Baby crib |
| Maximum weight capacity | 9 kg |
| Recommended age | From birth to approximately 5/6 months (until the child can sit, kneel, or stand up) |
| Dimensions (L x W x H) | Approximately 92 x 70 x 80 cm (estimate) |
| Adjustable height | Yes, 11 positions |
| Adjustable tilt | Yes, up to 4 positions difference between the feet |
| Rocking function | Yes, can be activated/deactivated |
| Co-sleeping mode (attachment to parent bed) | Yes, with included attachment straps |
| Mattress included | Yes, removable cover mattress included |
| Fabric cover | Removable and hand washable |
| Care and cleaning | Hand wash in cold water, do not bleach, do not tumble dry, do not iron, do not dry clean |
| Safety | Wheel brakes, attachment straps, raised bumper, locking mechanisms |
| Spare parts and repairability | Replacement parts approved by the manufacturer only |
| Warranty | Guarantee against conformity defects according to national standards |
| Domestic use | Yes, for indoor use only |
Frequently Asked Questions - Next2Me Magic Evo CHICCO
User questions about Next2Me Magic Evo CHICCO
0 question about this device. Answer the ones you know or ask your own.
Ask a new question about this device
Download the instructions for your Baby bed in PDF format for free! Find your manual Next2Me Magic Evo - CHICCO and take your electronic device back in hand. On this page are published all the documents necessary for the use of your device. Next2Me Magic Evo by CHICCO.
USER MANUAL Next2Me Magic Evo CHICCO
chicco Next2me Magic EVO
natural_image
Line drawing of a baby crib with adjustable legs and a backrest (no text or symbols)


natural_image
Technical line drawing of two mechanical components with circular features, labeled B (no text or symbols on the parts themselves)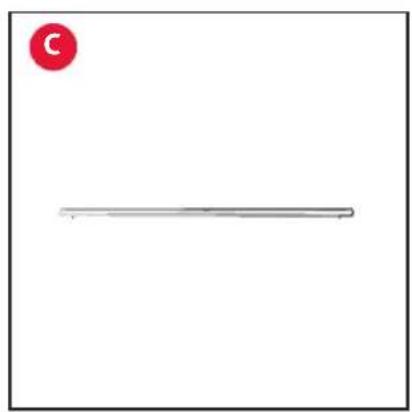
natural_image
Simple horizontal line with a red circular icon labeled 'C' in the top-left corner (no text or symbols on the line itself)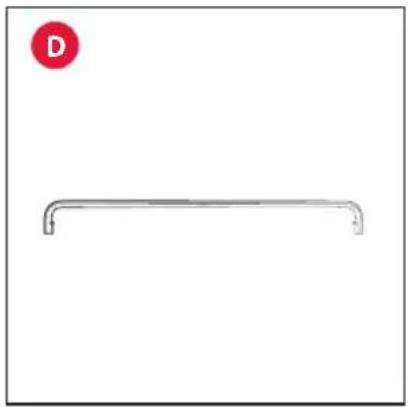
natural_image
Simple line drawing of a horizontal support bar with a red circular marker labeled 'D' in the top-left corner (no text or symbols on the bar itself)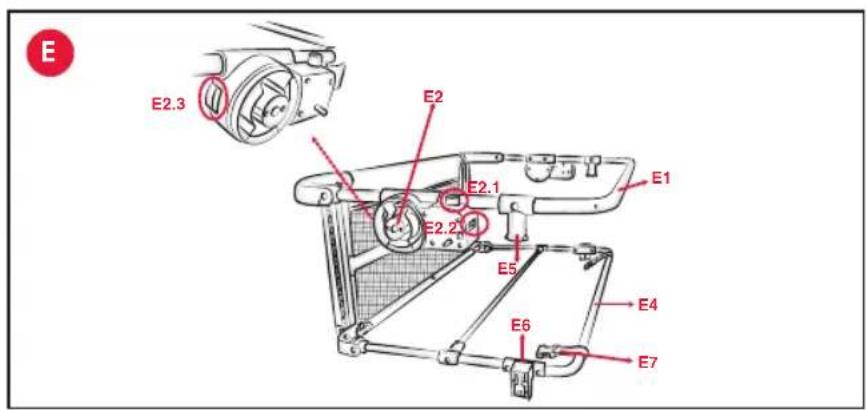
natural_image
Two vertical metal tools with circular markers and a red letter 'F' in the top-left corner (no text or symbols on the tools themselves)
natural_image
Simple hand-drawn rectangle with a red circular icon labeled 'H' in the top-left corner (no text or symbols within the shape)
natural_image
Simple line drawing of a rectangular pouch with a handle, no text or symbols present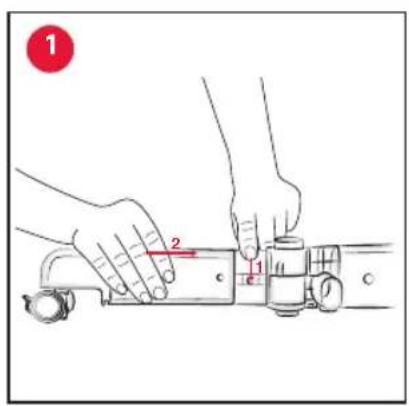

natural_image
Simple line drawing of a mechanical frame with two arms and a central horizontal bar, no text or symbols present.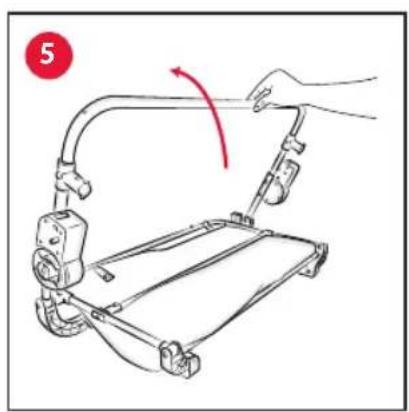
natural_image
Line drawing of a hand operating a mechanical device with a curved handle and lever mechanism (no text or symbols)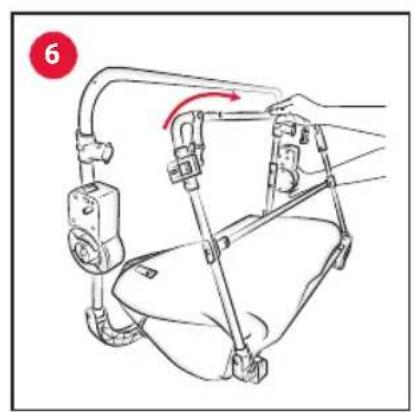
natural_image
Illustration of a person using a mechanical device to lift a cushion, with no visible text or symbols.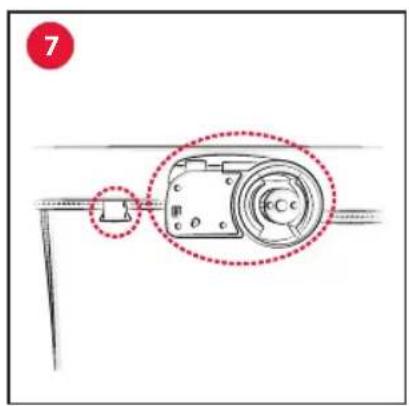
natural_image
Line drawing of a hand holding a hairdryer with a red circular marker labeled '9' (no text or symbols on the diagram itself)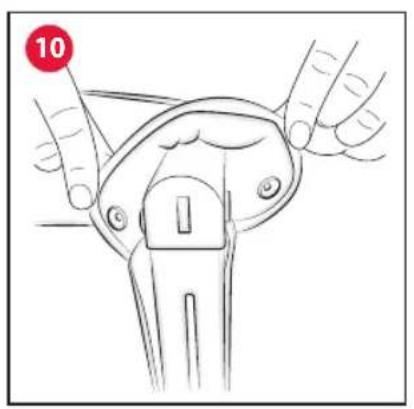
natural_image
Line drawing of a rectangular device with handles and a red circular marker (no text or symbols)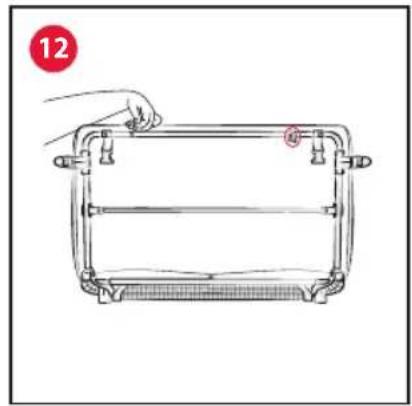
natural_image
Line drawing of a mechanical device with a hand adjusting its top component (no text or symbols)
natural_image
Line drawing of a baby crib with mesh backrest and adjustable legs (no text or symbols)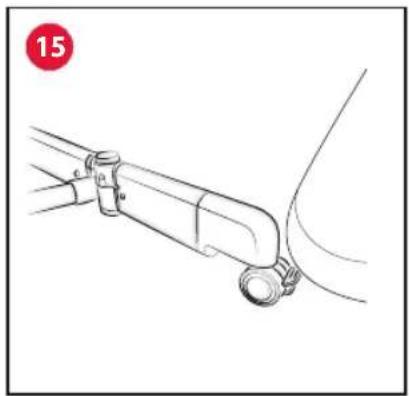
natural_image
Technical line drawing of a mechanical linkage or lever assembly (no text or symbols)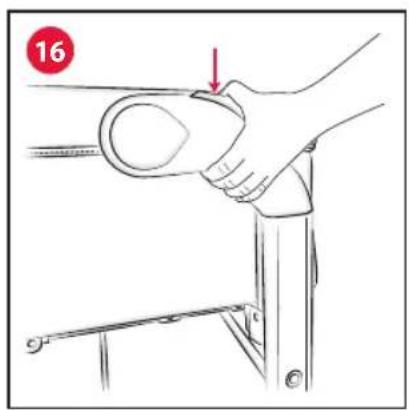
natural_image
Illustration of a hand holding a tool or grip, with a red arrow pointing to a specific area (no text or symbols present)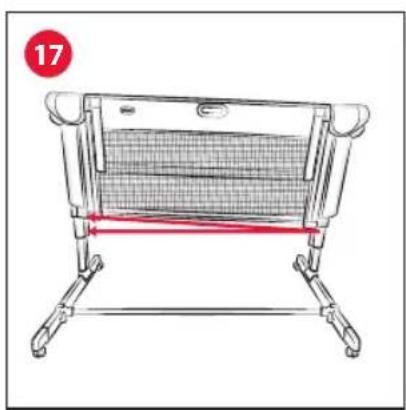
natural_image
Line drawing of a portable air conditioner unit with a red band indicating resistance, no text or symbols present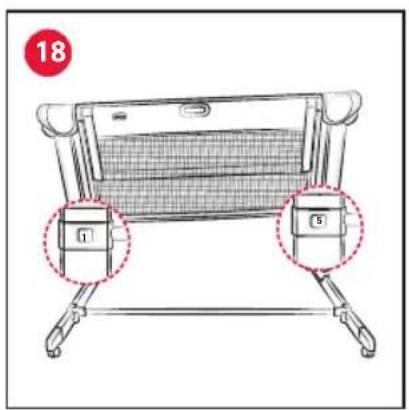
natural_image
Line drawing of a portable air conditioner unit with labeled parts (no text or symbols on the device itself)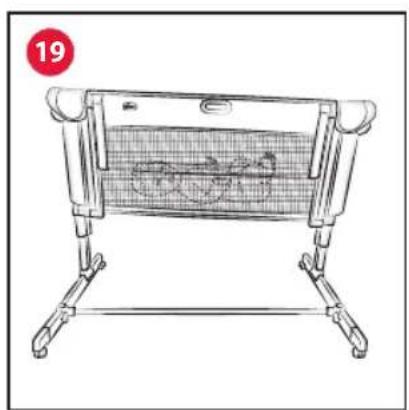
natural_image
Line drawing of a portable electric stove with mesh insulation and a small bird inside (no text or symbols)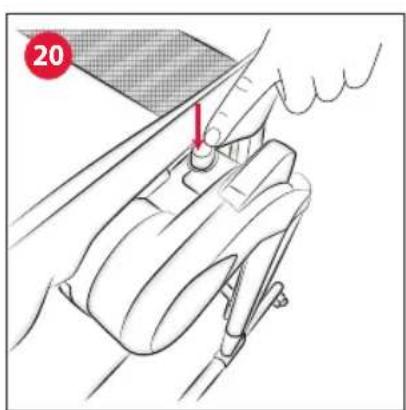
natural_image
Line drawing of a mechanical device with a hand operating a lever, showing motion and assembly (no text or symbols)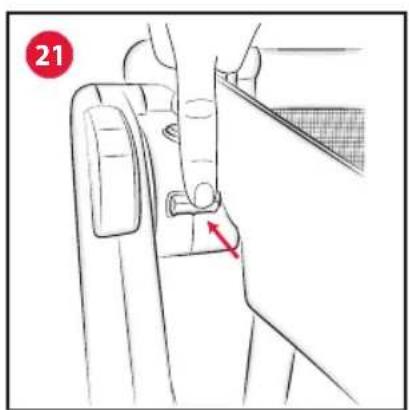
natural_image
Line drawing of a stainless steel sink with handle and base, no text or symbols present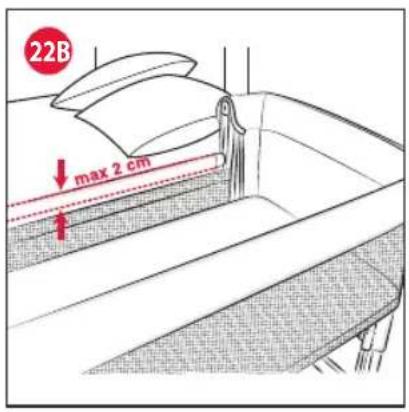
natural_image
Line drawing of a baby crib with a hand adjusting the seat (no text or symbols)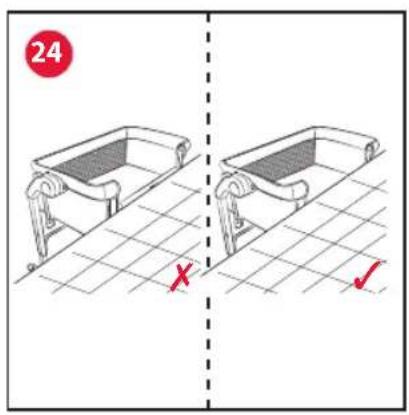
natural_image
Illustration of hands connecting a cable to a bracket, no text or symbols present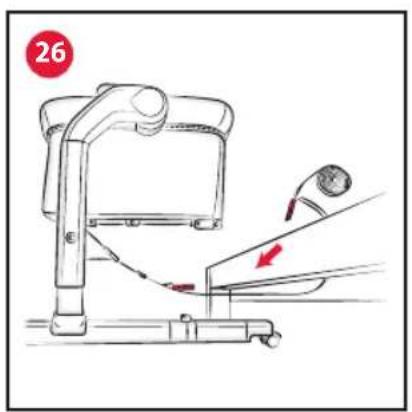

natural_image
Line drawing of a baby crib with red arrows indicating movement, no text or symbols present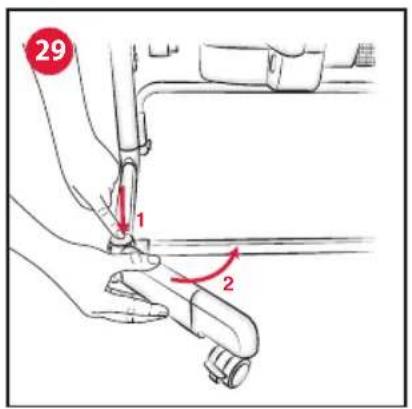
natural_image
Line drawing of a portable exercise tray with a handle and seat, no text or symbols present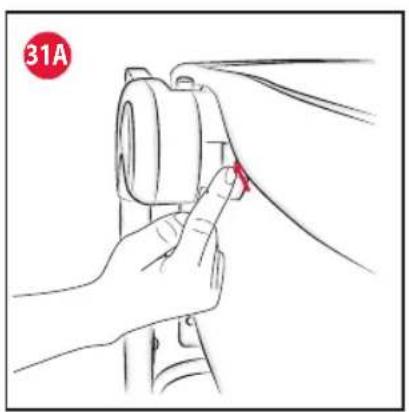
natural_image
Hand holding a camera component with a red arrow pointing to the tip (no text or symbols)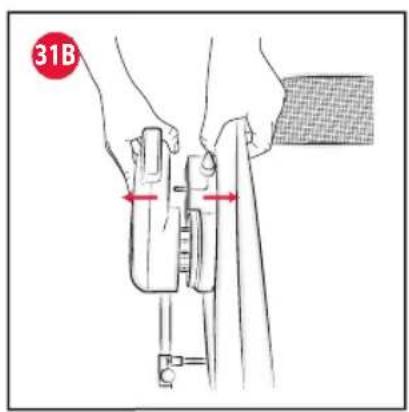
natural_image
Illustration of hands connecting a cable to a bracket with a red arrow indicating the adjustment point (no text or symbols present)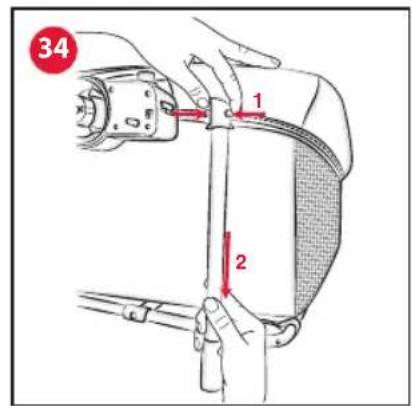
natural_image
Line drawing of hands using a tool to cut or adjust a piece of material, no text or symbols present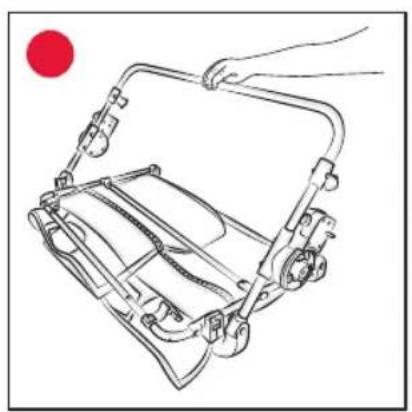
natural_image
Line drawing of a mechanical device with a red circular indicator (no text or symbols)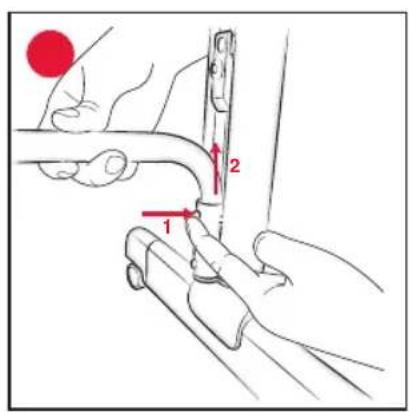

IT CULLA CHICCO NEXT2ME MAGIC EVO
IMPORTANTE - LEGGERE ATTENTAMENTE E CONSERVARE PER FUTURO RIFERIMENTO.
ATTENZIONE: PER EVITARE RISCHI DI SOFFOCAMENTO, RIMUOVERE QUESTA COPERTURA PLASTICA PRIMA DELL'USO DEL PRODOTTO. QUESTA COPERTURA PLASTICA DOVREBBE ESSERE DISTRUTTA O TENUTA LONTANA DALLA PORTATA DEI NEONATI E BAMBINI.
AVVERTENZE
MODALITÀ CO-SLEEPING (FISSAGGIO AL LETTO)
IMPORTANT! - READ CAREFULLY AND KEEP FOR FUTURE REFERENCE.
WARNING: TO AVOID DANGER OF SUFFOCATION REMOVE THIS PLASTIC COVER BEFORE USING THE PRODUCT. THIS COVER SHOULD BE DESTROYED OR KEPT AWAY FROM BABIES AND CHILDREN.
WARNINGS
• Domestic use only.
- WARNING: Do not use this product without reading the instructions for use first.
- WARNING: The product is intended for use by babies aged 0 to 5/6 months, weighing a maximum of 9 kg.
- WARNING: Stop using the product as soon as the child can sit or kneel or pull itself up.
- WARNING: Placing additional items in the product may cause suffocation.
- WARNING: Do not place the product close to another product, which could present a danger of suffocation or strangulation, e.g. strings, blind/curtain cords, etc.
- To avoid all strangulation hazards, never give children objects with cords or strings attached, or leave them close to such objects.
- WARNING: Do not use more than one mattress in the product. Only use the mattress that comes with the product.
- The product must always be placed on a horizontal surface. Never leave the product on a sloping surface with your child inside.
- Unattended children must not be left to play near the product.
- WARNING: When your child is unattended in the product in "crib configuration", always make sure that the side is raised and locked in closed position, and aligned with the upper perimeter of the crib.
- All assembly couplings must be fastened correctly. Be sure there are no loose screws, as a child's body or clothing (e.g., lace, necklaces, pacifier cords) may snag and pose a strangulation hazard.
- Only use the mattress provided with the product or replacement mattresses approved by Artsana.
- WARNING: Only use the mattress sold with this crib, do not add a second mattress on this one, suffocation hazards.
- WARNING: Be aware of the risk of burns from cigarettes, naked flames and other heat sources, like electric or gas heaters, that are near the crib.
- WARNING: When not attached to the bed, the crib can be inclined by a maximum of 4 positions between one leg support and the other.
- WARNING: •Do not use if any part is broken, torn or missing.
- WARNING: DO NOT USE the product in "Crib Configuration" and/or "Co-Sleeping Configuration" if any part is missing, damaged or broken. Contact Artsana SPA for spare parts and user instructions if needed. Do not replace missing, damaged or broken parts with non-OEM components or components not approved by Artsana SPA.
- WARNING: Read the instructions for use for the list of components. Examine the product regularly to make sure that there are no loose, damaged or missing parts.
- WARNING: Always use all parts needed for each configuration of use.
- Make sure that the adult using the product knows how it works, in accordance with manufacturer's instructions.
•WARNING: The product is ready for use
only when the locking mechanisms are engaged. Make sure they are securely fixed before use.
- When the product is being used, especially in "crib configuration", the wheels must always be locked.
- All operations for opening, adjusting, fastening and positioning the product must be carried out by an adult.
- WARNING: Use the product with beds and/or mattresses with straight sides only. Do not use the product with round beds and/or mattresses or water mattresses.
- The fixing straps are included in the packaging. Other fastening systems must NOT be used.
- When used in the "Co-Sleeping Configuration" (fastened to the bed), the crib must never be inclined.
- To prevent danger of choking due to the child's head being trapped, when the crib is in the "Co-Sleeping Configuration" (fastened to the bed) it should be properly fastened to the parents' bed with the fixing straps as explained in the instruction booklet.
- In "Co-Sleeping Configuration (fastened to the bed)" there must never be an empty space between the lower side of the crib and the parents' mattress.
- Before using in "Co-sleeping configuration (fastened to bed)," make sure the product is fastened and positioned correctly.
- To avoid choking hazards, check the fastening system hold before each use by attempting to push the crib away from the parents' bed.
- If there are gaps between the lowest part of the co-sleeping crib and the parents' mattress, DO NOT use the product.
- WARNING: Before placing the child inside the crib when the product is in the "Co-Sleeping Configuration" (fastened to the bed), be sure that the fixing straps are fastened and tightened correctly. The product must be attached to the parents'
bedframe and there should be no gaps between the lowest part of the co-sleeping crib and the parents' mattress
- Do not fill any spaces or gaps between the parents' mattress and the crib with pillows, blankets, bedsheets or any other material that may cause the risk of suffocation.
- DANGER! Always completely raise the drop side when not attached to the adult's bed.
- WARNING: To avoid hazards from the child's neck being caught on the top rail on the side that is next to the adult bed, the top rail must not be higher than the adult bed mattress.
- WARNING: To avoid the risk of your child being strangled the attachment system to the adult's bed shall always be kept away from and out of the crib.
- Do not use the product without the frame.
- Keep the fastening straps out of reach of children.
- Infants can suffocate on soft bedding. Avoid placing pillows or similar items under newborn babies for additional comfort during sleep.
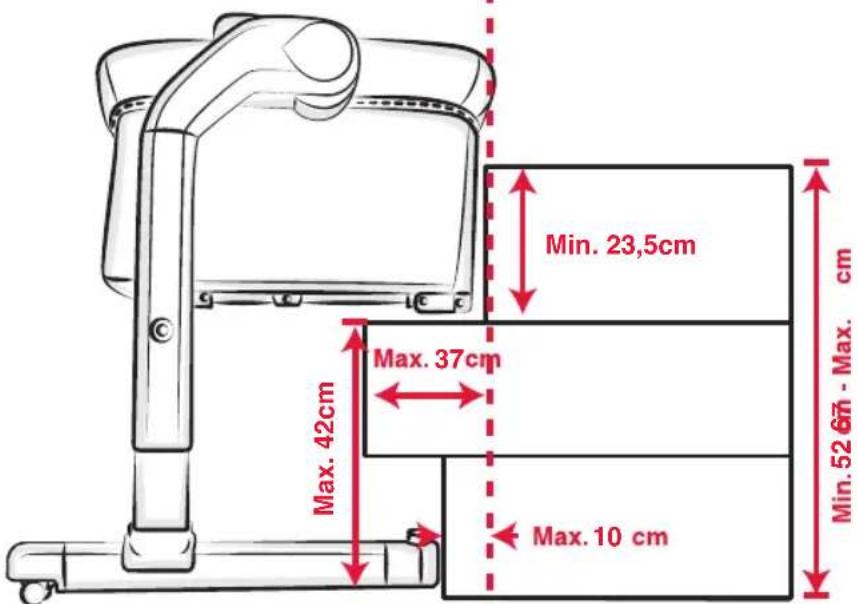
- Use the crib in "Side sleeping configuration (fastened to the bed)" only with beds of the size indicted in the reference figure at the beginning of the manual.
- Do not leave anything inside the product that might reduce its depth.
• To prevent the child being trapped, do not place the crib close to walls of obstacles.
- Do not leave any small objects inside the product that might be swallowed.
- Only use spare parts approved by the manufacturer. Do not attach any accessories to the product that have not been supplied by the manufacturer.
- Do not make adjustments to the product when the child is in it.
- Do not move the product when the child is inside.
- Do not use the product with more than one child at a time.
- Prolonged exposure to sunlight may cause the colour of the product to vary in tone. After prolonged exposure of the product to high temperatures, wait a few minutes prior to putting your child in it.
- WARNING: During use, make sure that bedsheets, blankets, etc. do not invade the crib space.
- Keep the product out of reach of children when it is not in use.
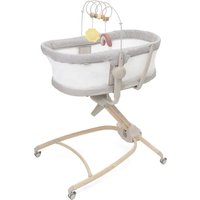
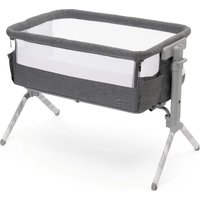
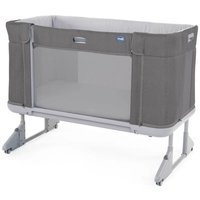
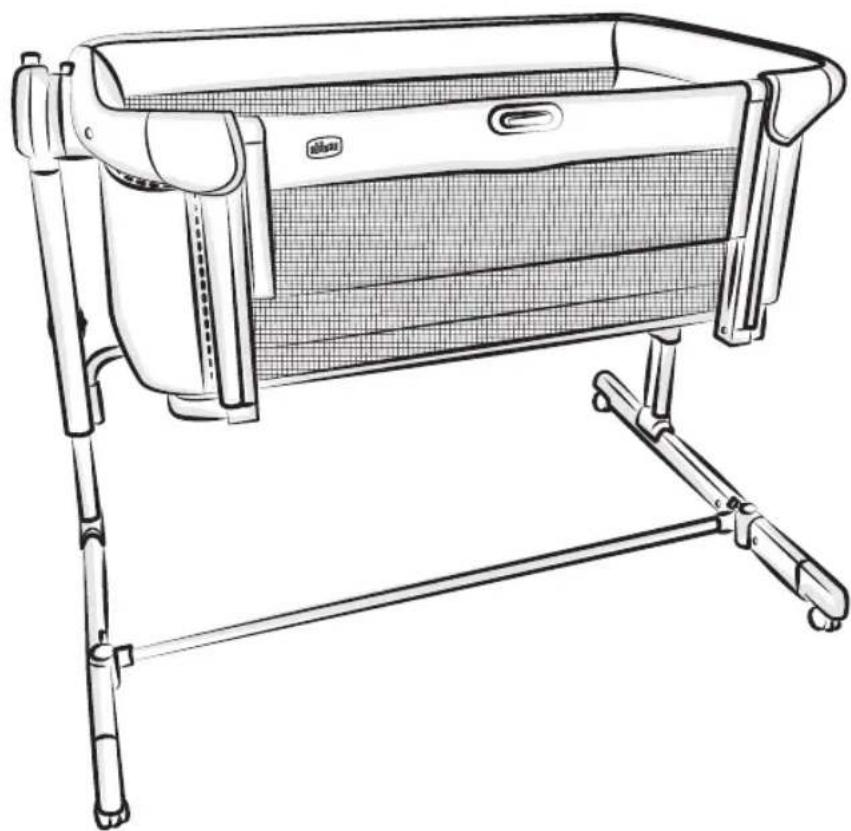
COMPONENTS
WARNING: Before assembly, check that the product and all of its components have not been damaged during transportation. Should any part be damaged do not use and keep out of reach of children.
A. Leg support with wheel (x2)
A1. Height adjustment button
A2. Height indicator
A3. Attachment support for crib frame
A4. Fitting for central support
A5. Fitting for bottom bar
A6. Wheels with brakes
A7. Foldable foot release button
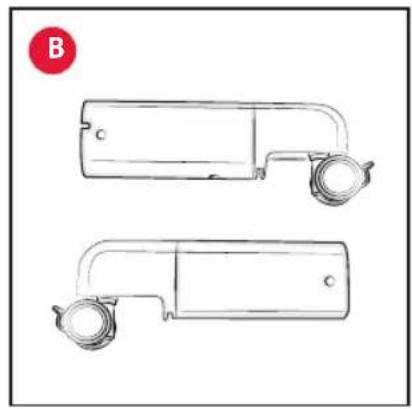
B. Foot with wheel (x2)
C. Bottom bar
D. Central support
E. Crib structure
E1. Upper frame
E2. Leg support inserts
E2.1 Rocking activation button
E2.2 Rocking deactivation button
E2.3 Button for releasing crib frame from leg supports
E3. Button for lowering drop side
E4. Crib bottom
E5. Attachment for upper frame strut
E6. Attachment for crib base strut
E7. Grey buckle
E8. Fabric
E8.1 Front vertical zippers
E8.2 Upper zipper
E8.3 Upper fabric attachment buttons
E8.4 Lower fabric attachment buttons
E8.5 Strap with snap buttons
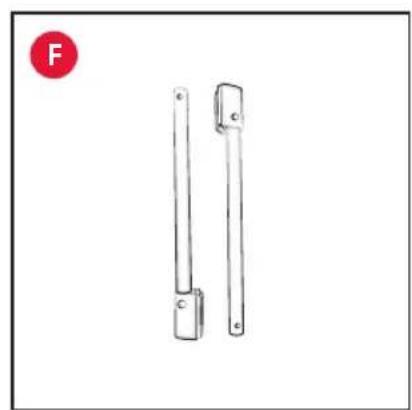
F. Crib structure side uprights (x2)
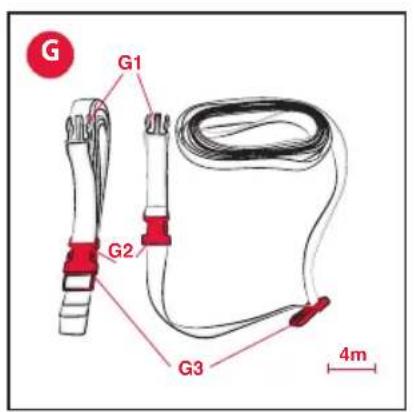
G. Fastening straps (x2)
G1. Grey prong
G2. Red buckle
G3. Red prong
H. Mattress with removable lining
I. Bag
ASSEMBLY OF THE CRIB
- Insert the feet "B" on the leg supports "A", making sure that the hole present on each foot points inwards. To insert the feet, push on the foot while also pressing on the metal pin present on the frame (Fig. 1).
- Insert the bottom bar "C" in its fitting "A5", pressing on the metal pin until you hear the connecting click (Fig. 2). Repeat the same step for the other leg as well.
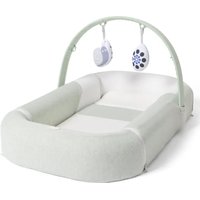
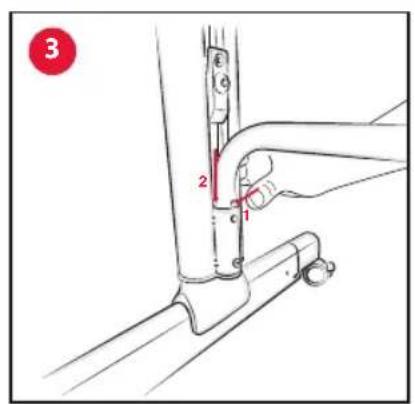
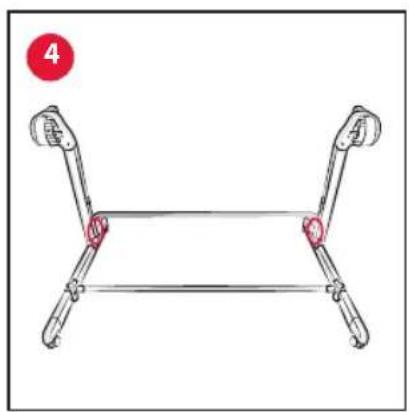
- Insert the central support "D" in the fittings "A4" present on both of the legs, pressing on the metal pin until the connecting click is heard (Fig. 3-4).
- Hold the crib frame "E" and turn the upper part of the frame "E1" by 90° (Fig.5). Repeat the same operation for the bottom of the crib "E4" (Fig. 6).
- Cover the upper part of the frame "E1" with the fabric "E8", making sure to insert the leg support fittings "E2" and the upper attachments "E5" in the appropriate slots on the sides of the fabric (Fig. 7).
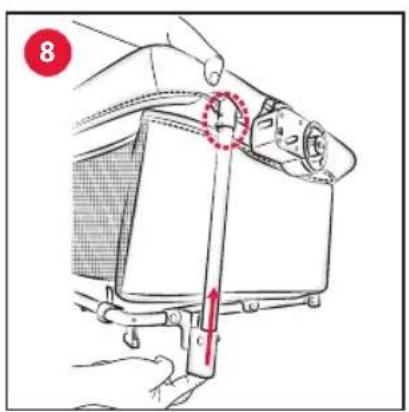
- Insert the strut "F" in the attachment at the bottom of the crib "E6" making sure to also insert it in the upper attachment "E5" at the same time, until the connecting click is heard (Fig. 8). Repeat this operation on the other side.
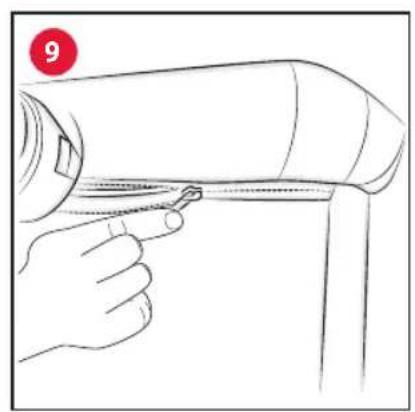
- Close the upper zipper "E8.2" (Fig. 9).
- Close the upper fabric attachment buttons "E8.3" (Fig. 10).
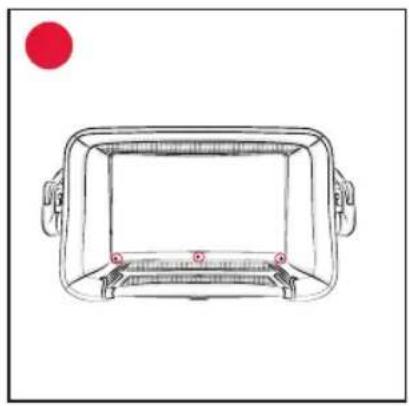
- Close the lower fabric attachment buttons "E8.4" (Fig. 11).
- Fasten the straps with the snap buttons "E8.5" as shown in figure 12.
- Insert the leg support inserts "E2" in the attachments "A3" found on each leg (Fig. 13). Be careful to position the structure "E" so that the front drop panel faces in the same direction as the foldable feet.
- Insert the mattress "H" inside the crib structure, making sure to orient the breathable net surface upwards.
- Block the 4 wheels "A6" of the crib by lowering the levers that activate the brakes (fig.15).
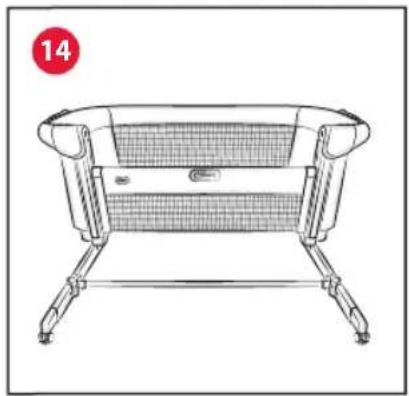
The crib is now ready to be used.
ADJUSTING THE CRIB HEIGHT
The height of the crib can be adjusted in 11 different positions.
- To adjust the height, press the buttons "A1" on the leg support and lift or lower the crib structure "E" to the desired position (Fig.16). Release after hearing the click.
The base of the crib can be slightly inclined by adjusting the 2 leg supports to different heights (Fig. 17).
WARNING: The crib can be inclined by a maximum of 4 positions between one leg support and the other (e.g., right leg support in position 5 and left leg support in position 1) (Fig. 18).
WARNING: The child's head must always be positioned near the raised end (fig.19).
WARNING: Selecting different heights on the two sides of the crib is not permitted when it is used in the co-sleeping configuration.
ROCKING FUNCTION ACTIVATION
- The rocking function can be activated by pressing the activation buttons "E2.1" (Fig. 20). To disable the function, simply press the deactivation buttons "E2.2" (Fig. 21) and, subsequently, gently move the crib upwards or downwards until a click is heard on both sides.
WARNING: If the crib has been used previously in "Side sleeping configuration (fastened to the bed)", make sure that the drop side is in the closed position and check that it has engaged correctly.
WARNING: Always remember to deactivate rocking configuration when using the product in "Side sleeping (fastened to the bed)" or when the child is unattended.
WARNING: It is not possible to select different heights on the two sides of the crib when in rocking function.
SIDE SLEEPING CONFIGURATION (FASTENING THE CRIB TO THE BED)
The crib can be fastened to the parents' bed (side sleeping configuration).
WARNING - IMPORTANT FOR YOUR CHILD'S SAFETY: This configuration is allowed only with beds that allow compliance with all the conditions described in this paragraph.
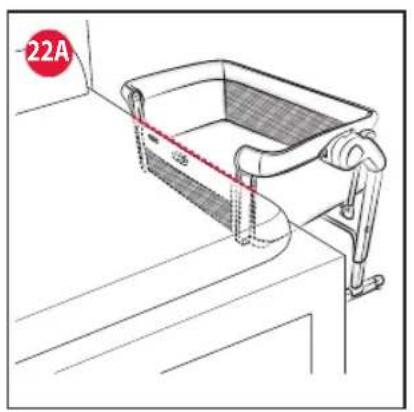
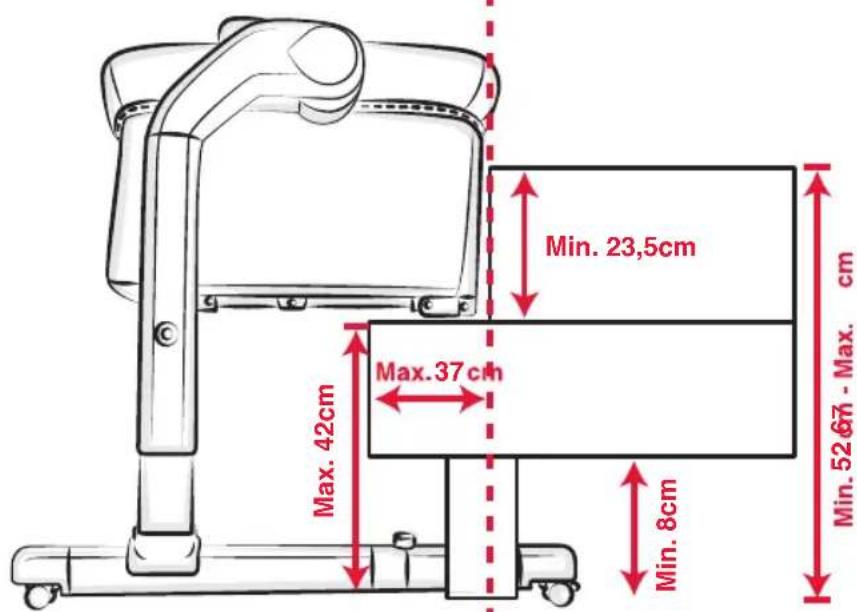
- Specifically, the lowered side of the crib must always be positioned against the adult bed mattress, and, the adult bed mattress must be aligned with (or at most slightly higher than) the side of the crib. (Fig. 22A-22B). Moreover, the crib must be fastened to the structure of the adult bed or to the mattress support (mesh or slat sprung base).
WARNING: Check that the structure of the crib in side sleeping configuration does not interfere with the parents' bed.
WARNING: During use, make sure that the bedsheets, blankets, etc. do not interfere with the crib's space.
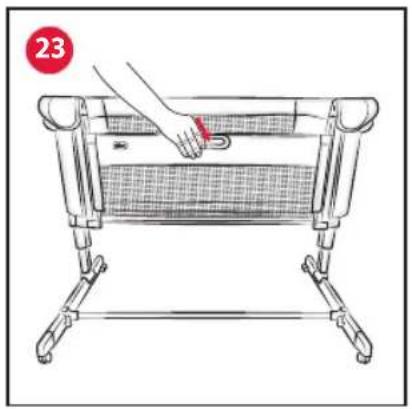
- Lower the drop side of the crib by pushing button "E3" and accompanying the side until it reaches the end of its travel (Fig. 23).
WARNING: Use the crib with the drop side lowered only in side sleeping mode.
- Put the crib against the parents' bed and check its height compared to the parents' mattress (Fig. 24).
WARNING: The top of the adult bed mattress must be higher than or the same as that of the side of the crib. If this is not the case, use the adjustment system to achieve this condition on both sides.
WARNING: In side sleeping configuration, the 2 leg supports of the crib must be set at the same height
-
To fasten the crib to the adult bed (side sleeping configuration), use the pair of supplied straps "G".
-
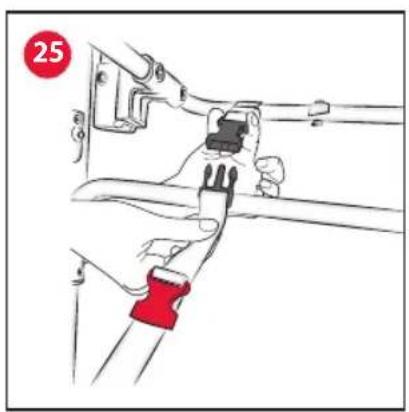
Fasten the grey prongs "G1" to the grey buckles "E7" under the fabric cover on either side. Make sure that the red buckles "G2" are positioned above the belt strap (Fig. 25).
-
Then run the strap around the structure of the adult bed from the bottom up (Fig. 26) and fasten the red buckle "G3" to the red prong "G2" forming a noose (Fig. 27). Repeat this operation on the other side as well. To make installation easy, when fastening the buckles, always keep the crib slightly away from the parents' bed.
-
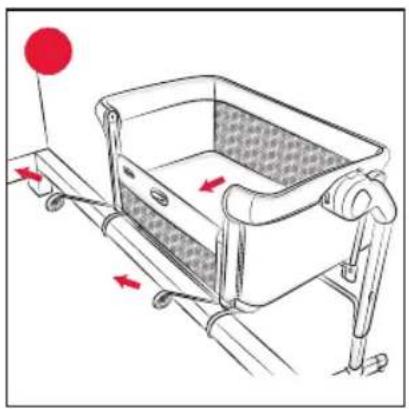
Put the crib up against the parents' bed and tighten the loop by pulling firmly on the straps (Fig. 28). Carry out this step first on one side and then on the other, adjusting the straps until the crib is in firm contact with the parents' mattress.
WARNING: Before each use, make sure that there is no space between the adult bed mattress and side of the crib. Otherwise adjust the straps pulling them until the required condition is restored. Make sure that the side is always free to be lowered and raised completely.
- If the wheels are unlocked, lock the crib wheels as described in point 13.
If when fastening the crib to the adult bed it is not possible to fit the crib's feet under the adult bed, the bed can be fastened anyway by the following the instructions above, with the added step of rotating the feet "B" when putting the crib against the bed.
To rotate the feet press the release button "A7" and use one hand to rotate the feet of the crib inward (Fig. 29).
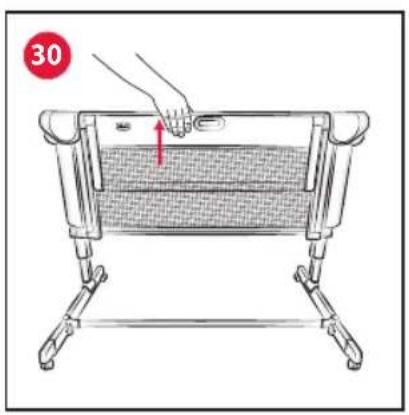
- To close the drop side simply lift it upwards, holding it from the centre (Fig.30). Always make sure that it is engaged correctly.
WARNING: Whenever the drop side is lowered, make sure that the position compared to the adult bed mattress has not changed from that illustrated in the paragraphs above.
WARNING: NEVER USE the rocking function when the crib is in "Side sleeping configuration (fastened to the bed)."
WARNING: When the product is used in "Co-sleeping configuration (fastened to the bed)," it must always be mounted on the long side of the bed. DO NOT install the product at the head or foot of the bed.
CARE AND MAINTENANCE
The crib and mattress have a fabric lining that can be removed and washed.
To remove the fabric, follow the instructions in the paragraph "REMOVING THE FABRIC."
WARNING: Covering or removing the fabric may take a few minutes and must be carried out by an adult.
Regularly inspect the product for signs of wear and damage. In the case of damage, do not use and keep out of reach of children.
When washing the fabrics pay close attention to the instructions on the label.
Do not use solvents, abrasive or overly aggressive products.

Hand wash

Do not bleach

Do not tumble dry

Do not iron

Do not dry clean
Check that the fabric and the stitching are in good condition after each wash.
WARNING: When covering or removing the cover, take care when handling the fabric parts to avoid accidental tears or damage.
WARNING: The fabric part of the drop side cannot be removed.
MAKING THE BED
The crib can be unfastened from the parents' bed when making the bed.
- Just unfasten the grey buckles under the fabric lining.
When fastening the crib again to the parents' bed, pull the straps again to make sure that the crib is correctly and securely fastened to the parents' bed. Make sure that all the steps illustrated above in "Co-sleeping configuration (fastened to the bed)" have been completed.
REMOVING THE COVER
-
Remove the mattress from the crib.
-
Disconnect the crib frame "E" from the leg supports "A" by pressing the buttons "E2.3" and gently moving the legs outwards (Fig. 31A-31B). Complete one side first then the other.
-
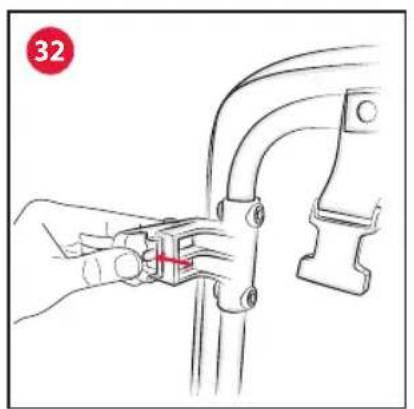
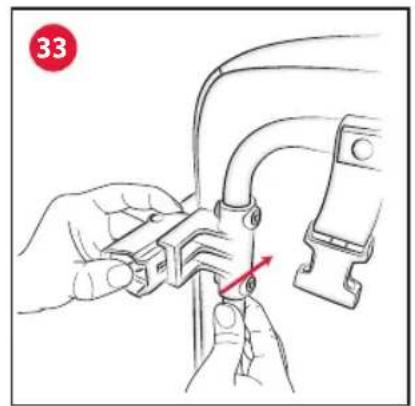
Remove the lateral support struts "F" by pressing the tabs (Fig. 32) and pushing the base of the crib "E4" upwards (Fig. 33). Subsequently, press the pins placed in the upper attachments "E5" and remove the struts completely (Fig. 34).
-
Release the upper attachment buttons "E8.3", the lower attachment buttons "E8.4" and the two straps with the snap buttons "E8.5".
-
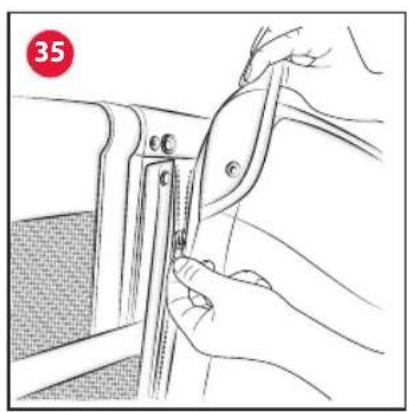
Open the upper zipper "E8.2" and the two vertical zippers "E8.1" (Fig. 35).
-
The fabric can now be removed completely, carefully pulling it off the leg support inserts "E2" and the attachments for the upper struts "E5".
DISASSEMBLING THE CRIB
WARNING: This operation must be carried out when no children are present nearby.
The crib can be disassembled completely to put it away in the supplied bag. To continue disassembling the crib, repeat the
steps described in the paragraph about "REMOVING THE COVER". Subsequently:
- Take hold of the crib frame "E" and rotate the crib base "E4" inwards by 90°. Repeat the same operation for the upper frame "E1" (Fig. 36).
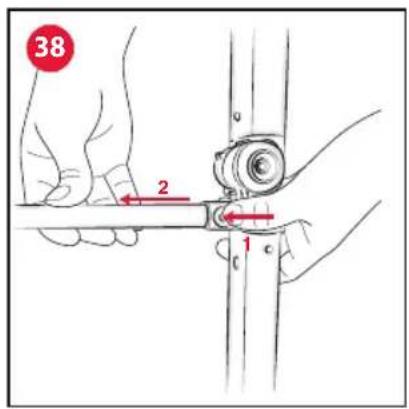
- Remove the central support "D" from the fittings "A4" found on both legs by pushing on the metal pins and pulling upwards (Fig. 37).
- Remove the bottom bar "C" from its fitting "A5", pressing on the metal pin (Fig. 38). Repeat the same step for the other leg as well.
- Remove the feet "B" by pressing on the metal pins and pulling them free from the leg supports (Fig. 39).
- Place all the disassembled components in the bag "1".
WARRANTY
The product is guaranteed against any lack of conformity under normal use as specified in the instructions. The warranty shall not therefore apply in the case of damage caused by improper use, wear or accidental events. For the duration of the warranty on conformity defects please refer to the specific provisions of applicable national laws in the country of purchase, where appropriate.
FR BERCEAU CHICCO NEXT2ME MAGIC EVO
IMPORTANT - LIRE ATTENTIVEMENT LA NOTICE ET LA CONSERVER POUR CONSULTATION UL- TÉRIEURE.
AVERTISSEMENT : AFIN D'ÉVITER TOUT RISQUE D'ÉTOUFFEMENT, ENLEVER LA PROTECTION EN PLASTIQUE AVANT D'UTILISER CE PRODUIT. LA PROTECTION EN PLASTIQUE DOIT ÊTRE DÉTRUITE OU TENUE HORS DE PORTÉE DES BÉBÉS ET DES ENFANTS.
AVERTISSEMENTS
MODE CODODO (FIXATION AU LIT)
MODUS CO-SLEEPING (BEVESTIGING AAN HET BED)
(modus Co-Sleeping).
Handwas in koud water

Niet bleken

Niet in de droogtrommel drogen

Niet strijken

MODUL CO-SLEEPING (FIXARE PE PAT)
MODALITETEN CO-SLEEPING (FESTET TIL SENGEN)
ARTSANA GERMANY GMBH
Borsigstrasse 1-3
28923 Alcorcon (Madrid)-Spain
902 117 093
www.CHICCO.es

ARTSANA PORTUGAL S.A.
ARTSANA POLAND Sp.zo.o.
Aquarius, Ul. Połczyńska 31 A
01-377 Warszawa
+48 22 290 59 90
www.CHICCO.com

ООО "Артсана Рус"
ARTSANA BRASIL LTDA.
Dec V. Ruben Dario 1015
Colonia Lomas De Providencia 44647
Guadalajara, Jalisco-Mexico
01800 702 8983
www.CHICCO.com.mx

ARTSANA ARGENTINA S.A.
Av. Santa Rita 2731 Piso 1 Of 5,
1609 Boulogne, Buenos Aires.
Argentina.
Phone: (011) 5254-3030
www.CHICCO.com.ar

ARTSANA INDIA PRIVATE LIMITED,
7Th Floor, Tower B, Paras Twin Towers,
Golf Course Road, Sector 54
Gurgaon - 122002 - Haryana, India
(+91)(124)(4964500)
www.CHICCO.in

ARTSANA S.p.A.
22070 Grandate (CO) - Italy
Tel. (+39) 031 382 111
Fax (+39) 031 382 400
www.CHICCO.com
NOTE


NOTE


EN 16890:2017+A1:2021
ARTSANA S.p.A. - Via Saldarini Catelli, 1 - 22070 Grandate (CO) - Italy Tel. (+39) 031 382 111 - Fax (+39) 031 382 400 - www.chicco.com