ROG Thor Platinum II - PC Power Supply ASUS - Free user manual and instructions
Find the device manual for free ROG Thor Platinum II ASUS in PDF.

| Product Type | Modular PC Power Supply |
| Brand | ASUS |
| Model | ROG Thor Platinum II |
| Form Factor | ATX |
| Energy Efficiency | 80 PLUS Platinum Certified |
| Design | Fully Modular |
| Cooling | 135 mm fan with 0 dB mode and dedicated switch |
| Display | OLED to view real-time power consumption and voltage |
| Motherboard Main Connector | 24-pin (20+4) |
| CPU Connectors | 2 x 4+4-pin (8-pin) |
| PCIe Connectors | 6+2-pin (quantity varies by model) |
| SATA Connectors | Variable quantity |
| Peripheral Connectors (Molex) | 4-pin (variable quantity) |
| RGB Connector | AURA Addressable RGB |
| Protections | OVP, OCP, OPP, SCP, OTP |
| Safety | Never open the unit; use only provided cables |
| Maintenance | Clean with a dry cloth; avoid dust and moisture |
| Warranty | 10 years (subject to manufacturer's conditions) |
Frequently Asked Questions - ROG Thor Platinum II ASUS
User questions about ROG Thor Platinum II ASUS
0 question about this device. Answer the ones you know or ask your own.
Ask a new question about this device
Download the instructions for your PC Power Supply in PDF format for free! Find your manual ROG Thor Platinum II - ASUS and take your electronic device back in hand. On this page are published all the documents necessary for the use of your device. ROG Thor Platinum II by ASUS.
USER MANUAL ROG Thor Platinum II ASUS
Quick Start Guide (English)
快速使用指南(繁體中文)
快速使用指南(简体中文)
クイックスタートガイド(日本語)
Conventions used in this guide
To ensure that you perform certain tasks properly, take note of the following symbols used throughout this manual.

DANGER/WARNING: Information to prevent injury to yourself when trying to complete a task.

NOTE: Tips and additional information to help you complete a task.
Product Overview

The illustrations in this section are for reference only and may vary between models.
Front view
Left view
Right view
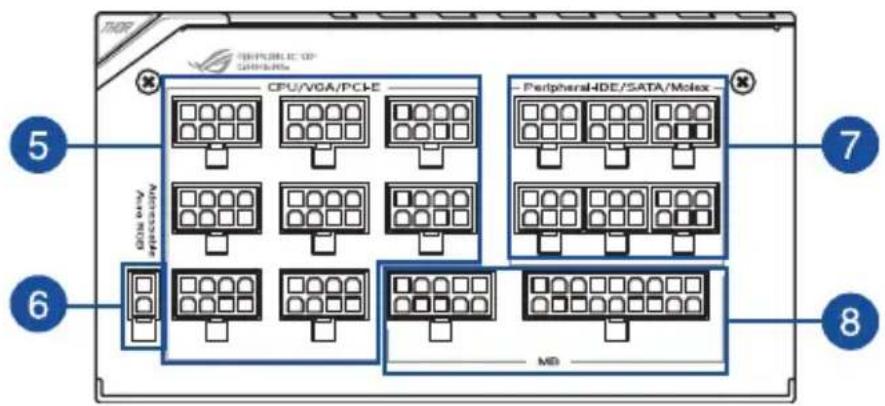
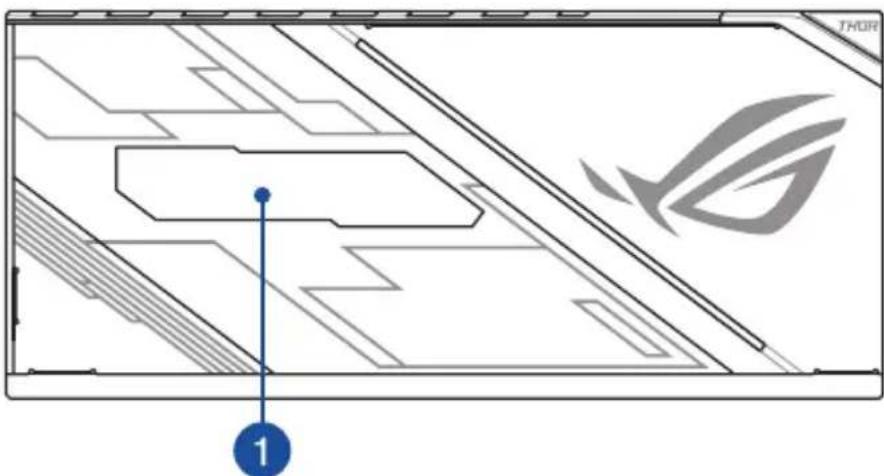
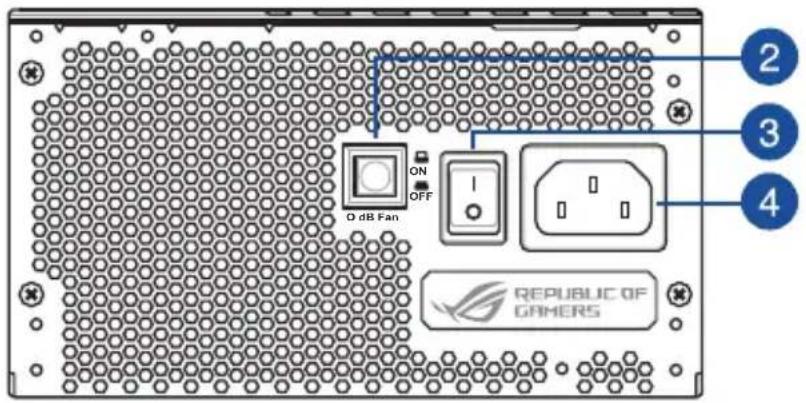
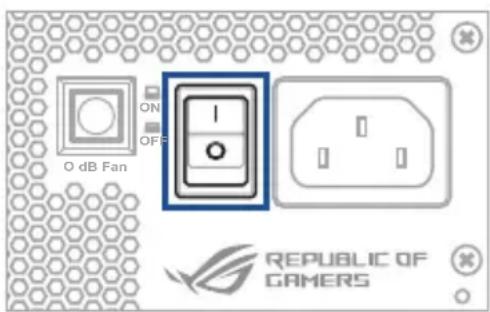
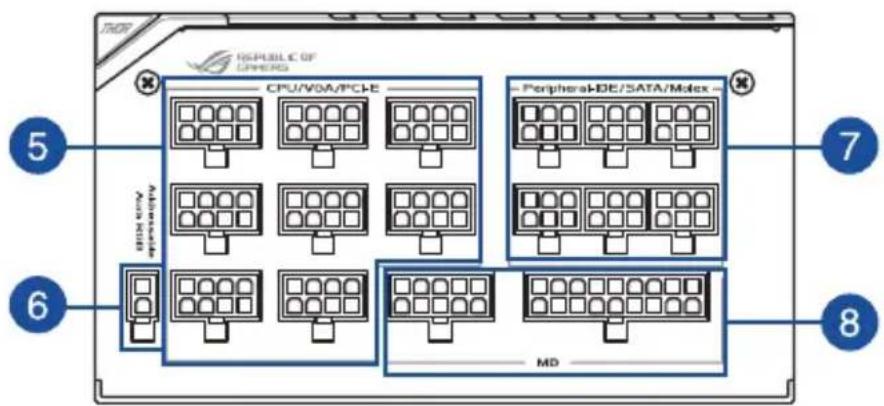
1 OLED power display 8-pin CPU / VGA / PCI-E connectors
2 0 dB Fan button* Addressable AURA RGB connector
3 Power switch 6-pin Peripheral-IDE / SATA / Molex connectors
4 Power connector 10-pin and 18-pin MB connectors
Installing your ROG THOR Power Supply Unit

Before installing or removing cables, ensure that the system is turned off, and all power cables for the system and all attached devices are unplugged.
- Follow the directions of your chassis manual and secure your ROG THOR power supply unit into your chassis using the mounting screws.
- Connect the bundled cables to your ROG THOR power supply unit.
- Connect the power connectors to your motherboard and peripheral devices according to your preference. You may refer to the list below to check which devices each power connector can be connected to.

- The power connectors may vary between different models of ROG THOR Power Supply Units.
- Refer to your motherboard's user manual for more information on the location and connecting the power connectors mentioned below.
- Connect the 24-pin or 20-pin Main Power Connector to the motherboard's 24-pin or 20-pin power connector.
- Connect the 4+4 pin CPU +12V Power Connector to the CPU power socket on the motherboard.
- Connect the 4-pin Peripheral Power Connector to peripheral devices if needed.
- Connect the 6+2 pin PCI-E +12V Power Connector to the PCI-E graphics card.
- Connect the SATA Power Connector to devices with a Serial ATA interface.
- Connect your ROG THOR Power Supply Unit to a power source using the bundled power cord.
- Flip the Power Switch to the "I" position to turn on your power supply unit
Safety information
- NEVER, under any circumstances, open the power supply unit. This is extremely dangerous due to the high voltage inside.
- DO NOT insert any objects into the fan grill or the ventilation area of the power supply unit.
- DO NOT place any objects in front of the fan or the ventilation area of the power supply unit that may obstruct or restrict the airflow.
- USE ONLY the modular cables bundled with the power supply unit.
- Avoid dust, humidity, and temperature extremes. Do not place the power supply unit in any area where it may become wet.
- The power supply unit is for integration into a computer, and not intended for external or outdoor usage.
- DO NOT use any third party cables or extension cables with this unit.
Notice labels


提示符號
安全性須知

提示符号
右视图
安全性须知

このマニュアルの表記について
安全上のご注意


natural_image
Abstract white line drawing on black background with no text or symbolsمعلومات السلام


Korištene konvencije u ovom vodiču
Da biste određene postupke ispravno proveli, pripazite na sljedeće simbole u priručniku.


이 설명서에서 사용되는 표기 규칙
안전 정보


Konvencije, uporabljene v tem priročniku
Da bi zagotovili ustrezno opravljanje določenih nalog, upoštevajte simbole, uporabljene v tem priročniku.

Informacije o varnosti

Säkerhetsinformation

Güvenlik bilgileri


VGA / PCI-E / 8 OLED
1
תְרָה בְּרָה בְּרָה
•