800 Series EAF12B - Deep fryer ELECTROLUX - Free user manual and instructions
Find the device manual for free 800 Series EAF12B ELECTROLUX in PDF.

| Product Type | Air Fryer |
| Brand | Electrolux |
| Model | 800 Series EAF12B |
| Cooking Functions | Air Fry, Bake, Reheat, Dehydrate, Rotisserie |
| Temperature Range (Air Fry/Bake/Reheat/Rotisserie) | 60 to 200 °C |
| Temperature Range (Dehydrate) | 30 to 80 °C |
| Timer (Air Fry/Bake/Reheat/Rotisserie) | 1 to 99 minutes |
| Timer (Dehydrate) | 5 to 300 minutes |
| Preset Recipes | 7 (Fries, Muffin, Meat, Chicken, Bread, Fish, Vegetables) |
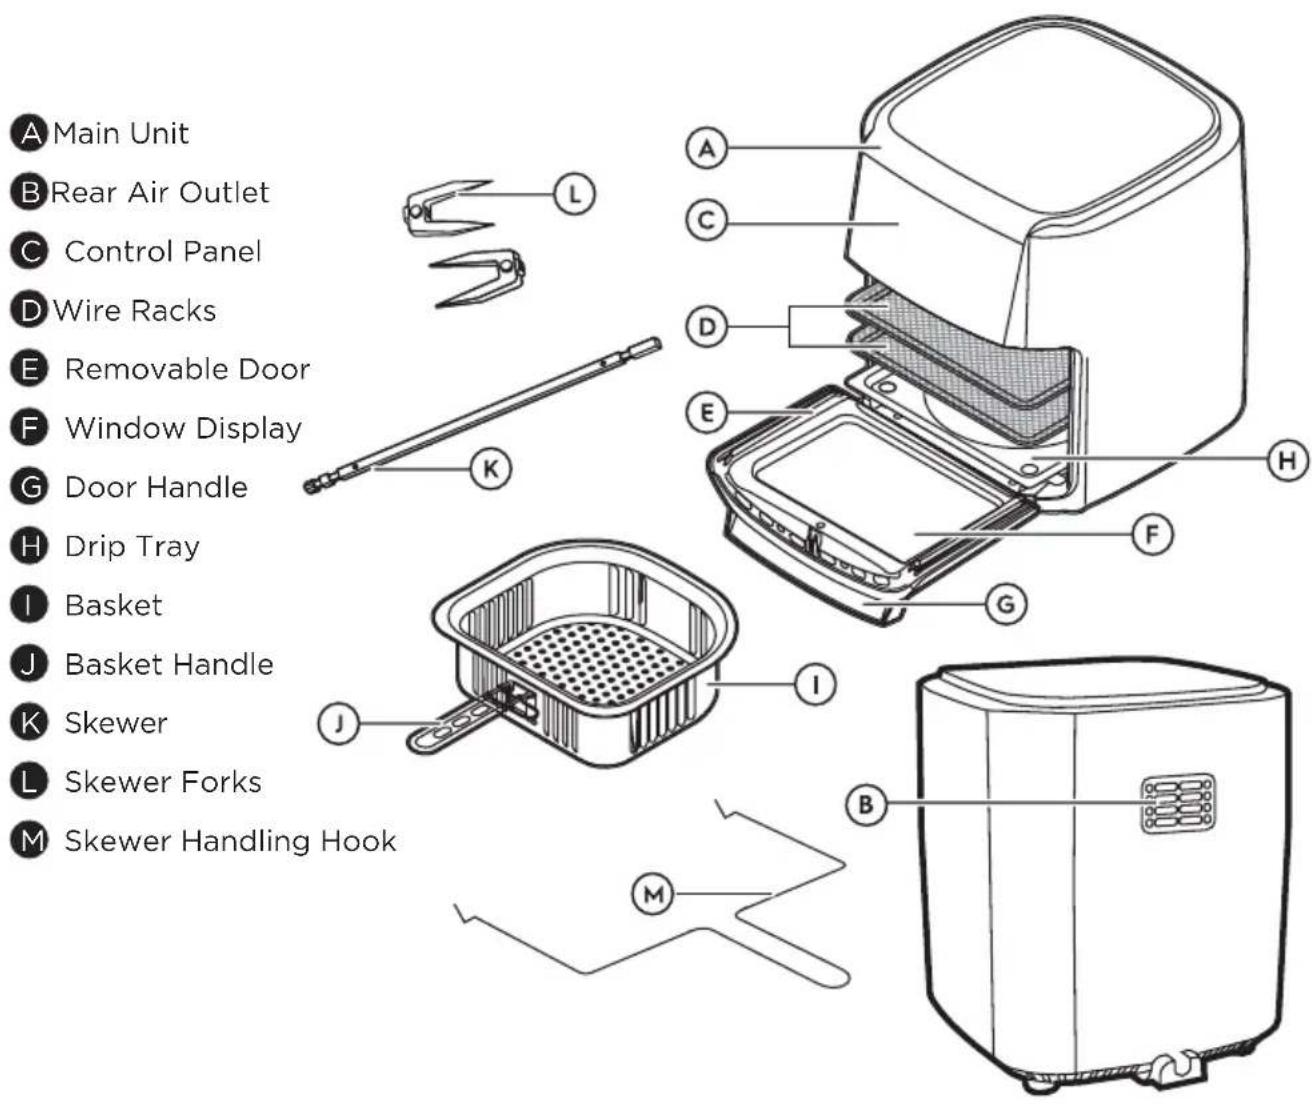
| Included Accessories | Wire racks (2), Basket with handle, Spit with forks, Drip tray, Handling hook |
| Removable Door | Yes, for manual cleaning |
| Display | Digital screen with temperature and time |
| Interior Light | Yes, light button |
| Accessory Cleaning | Drip tray, basket, basket handle, spit, forks, hook: dishwasher safe |
| Cleaning the Removable Door | By hand, hot water and mild detergent (not dishwasher safe) |
| Safety | Automatic shut-off when door is opened, preheat max 5 min, hot surfaces, burn protection |
| Repairability | Use original parts, do not repair yourself, contact authorized after-sales service |
| Environmental Information | Recycle the appliance and packaging according to local regulations |
Frequently Asked Questions - 800 Series EAF12B ELECTROLUX
User questions about 800 Series EAF12B ELECTROLUX
0 question about this device. Answer the ones you know or ask your own.
Ask a new question about this device
Download the instructions for your Deep fryer in PDF format for free! Find your manual 800 Series EAF12B - ELECTROLUX and take your electronic device back in hand. On this page are published all the documents necessary for the use of your device. 800 Series EAF12B by ELECTROLUX.
USER MANUAL 800 Series EAF12B ELECTROLUX
WE'RE THINKING OF YOU
Thank you for purchasing an Electrolux appliance. You've chosen a product that brings with it decades of professional experience and innovation. Ingenious and stylish, it has been designed with you in mind. So whenever you use it, you can be safe in the knowledge that you'll get great results every time.
Welcome to Electrolux.
Visit our website to:

Get usage advice, brochures, trouble-shooting, service information: www.electrolux.com

Register your product for better service: www.registerelectrolux.com

Buy Accessories, Consumables and Original spare parts for your appliance: www.electrolux.com/shop
CUSTOMER CARE AND SERVICE
Always use original spare parts.
When contacting our Authorised Service Centre, ensure that you have the following data available: Model, PNC, Serial Number.
The information can be found on the rating plate.
Symbols in the instruction:

Warning / Caution-Safety information.

General information and tips.

Environmental information.
Subject to change without notice.
1. SAFETY INFORMATION
- This appliance can be used by children aged from 8 years and above and persons with reduced physical, sensory or mental capabilities or lack of experience and knowledge if they are supervised or have received instruction concerning how to safely use the appliance and understand the hazards involved. Children shall not play with the appliance. Cleaning and user maintenance shall not be made by children unless they are older than 8 and supervised.
- This appliance is not intended for use by persons (including children) with reduced physical, sensory or mental capabilities or lack of experience and knowledge, unless they have been given supervision or instruction concerning use of the appliance in a safe way and understand the hazards involved by a person responsible for their safety. Children should be supervised to ensure that they don't not play with the appliance.
- Please keep the air fryer and the power cord out of the reach of children less than 8 years.
- This appliance is intended for normal household use only.
- If the power cord is damaged or broken, it must be replaced by a service agent or similarly qualified persons to avoid safety hazards.
- The accessible surfaces may become hot during use.
- Do not cover the air inlet and the air outlet openings while the appliance is operating.
- Always return the appliance to an authorized service center for examination or repair.
- Do not attempt to repair the appliance yourself.
- Do not place the appliance on or near a hot gas stove, any kind of electric stove, electric cooking plates or in a heated oven.
- Always make sure that the plug is inserted into the socket properly.
- Keep the mains cord away from hot surfaces or sharp objects to avoid damage.
- Never put anything flammable, explosive or corrosive in the basket.
- Do not excessively pinch, bend, twist or place heavy objects on the power cord to prevent from exposing or breaking its core.
- Do not use the appliance if the plug, the main cord or the appliance itself is damaged.
- Never start cooking without the basket being in place.
- Do not fill up the basket above the “MAX” line in order to prevent food contact with the heating element.
- Do not touch the basket directly with your hands during or right after use to avoid getting scalded.
- Do not use any plastic utensils or normal paper wrapping materials to wrap food for cooking.
- Do not insert pins, wires or other objects into any of the openings of the air fryer to avoid an electrical shock or injury.
- Please be sure to unplug the air fryer before cleaning or repairing it.
- Do not move or shake the air fryer during use.
- Do not insert any foreign objects into the safety switch to avoid any danger.
- Not suitable for contact with high acidic and/or high salty ingredients.
- Avoid using metal tools when manipulating the food in the basket.
- Appliances are not intended to be operated by means of an external timer or separate remote-control system.
- This appliance is intended to be used in household and similar applications such as:
- staff kitchen areas in shops, offices and other working environments;
- farm houses;
- by clients in hotels, motels and other residential type environments;
- bed and breakfast type environments.

CAUTION: Hot Surface

2. PRODUCT DESCRIPTION
2.1 General Overview
3. BEFORE FIRST USE
- Remove all packaging materials and promotional labels from the inside and outside of the appliance.
- Place the appliance on a stable, level and heat-resistant surface, leaving enough space to open the door.
-
Clean the appliance and accessories (see CARE & CLEANING).
-
Heat the appliance for 10 min using the Air Fry function.
NOTE: During the first heating operation you may notice a small amount of smoke and/or an odor of oil.
4. OPERATING INSTRUCTIONS
4.1 Usage of the Control Panel
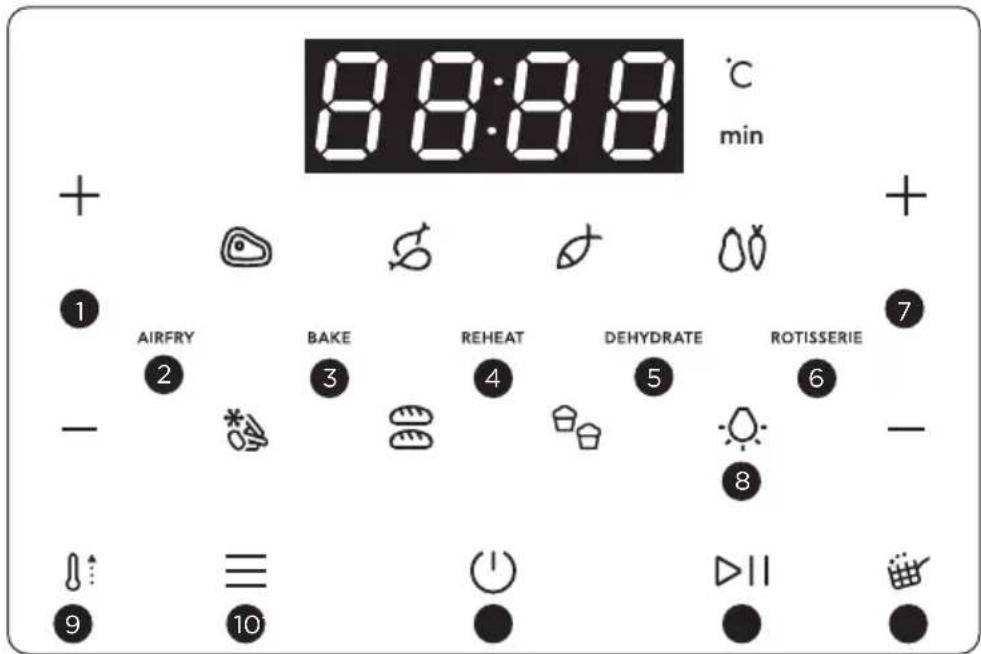
1 Temperature Adjustment:
Press the + or - temperature buttons to set the preparation temperature. For a quick adjustment, Hold down the button.
NOTE: The operating temperature varies between 60°C and 200°C (Dehydrate function operates between 30°C and 80°C)
2 AIR FRY
With Air Fry mode selected, you can choose one of the 7 preset recipes or manually adjust the preparation.
3 BAKE
With bake mode selected, cook your favorite foods such as cookies, cakes, cinnamon rolls and more.
4 REHEAT
Quickly warm up your favorite foods.
5 DEHYDRATE
Dehydrate fruits and vegetables at low temperatures for healthy snacks.
6 ROTISSERIE
With the skewer inserted into the appliance, use this function to rotate your meats for even cooking.
NOTE: The preset temperature and time in the cooking modes can also be manually adjusted according to your preference.
7 Time Adjustment
Tap the + or - time buttons to set the cooking time. For a quick adjustment, hold down the button.
NOTE: The operating time varies between 1 minute and 99 minutes (except for the “dehydrate” function: which is between 5 minutes and 300 minutes).
8 Light
Press the Light button to turn the light on or off.
9 Preheat Indicator Light
The indicator light will turn on informing you that the appliance is preheating. The preheating lasts for a maximum of 5 minutes.
10 Preparation Mode Button
Press the Preparation Modes menu to select one of the 5 preparation modes.
11 On / Off
This button has three functions: Tap the button to activate the control panel. If the appliance is not in use, touch the button for the panel to enter rest mode. The panel will show a countdown of 20 seconds for the appliance to cool down.
12 Start/Pause
Tap the button to start preparing your food or to pause the process during cooking. When paused, it is possible to adjust the temperature/time of the cycle if necessary.
NOTE: If the Air Fryer is paused at any time for more than 10 minutes, the appliance will return to the home screen.
13 Turn Food Indicator Light
This indication will appear halfway through the cooking time for some of the preset recipes and for manual adjustment.
4.2 Preset Recipes
Select one of the 7 predefined preparation recipes:
NOTE: It is necessary to turn certain foods at halfway though the cooking time for uniform texture. Use gloves or tongs to handle to ensure your safety and avoid accidents. The cooking process pauses if the door is opened. Operation resumes once the door is closed.
NOTE: Big Bread: 500g, 180°C 30 minutes; Frozen Cheese bread: 50gx18pcs, 160°C, 24 minutes
| Food | Temp. (°C) | Prep time (minutes) | Portion (kg) | Turn food at halfway point? | |
| French Fries |  | 180 20 0.4 Yes | |||
| Muffin |  | 165 15 | 0.45 (50g x 9pcs) | No | |
| Meat |  | 180 30 0.9 Yes | |||
| Chicken |  | 200 40 1 Yes | |||
| Bread 180 | 30  | ||||
| Fish |  | 180 15 | 0.2(40x120x100mm) | No | |
| Vegetable |  | 180 30 0.8 Yes | |||
IMPORTANT
The temperature and preparation times listed in the table are guidelines and vary depending on the recipes and the amount of ingredients, shape and texture of the foods. You can adjust the cooking temperature and time as desired.
4.3 Using Your Air Fryer
- Place the appliance on a stable, level and heat-resistant surface leaving enough room to open the door.
IMPORTANT
Do not obstruct the air outlets of the product.
-
Plug in the appliance.
-
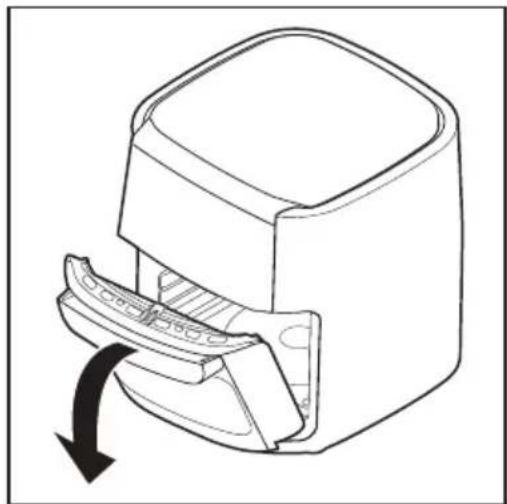
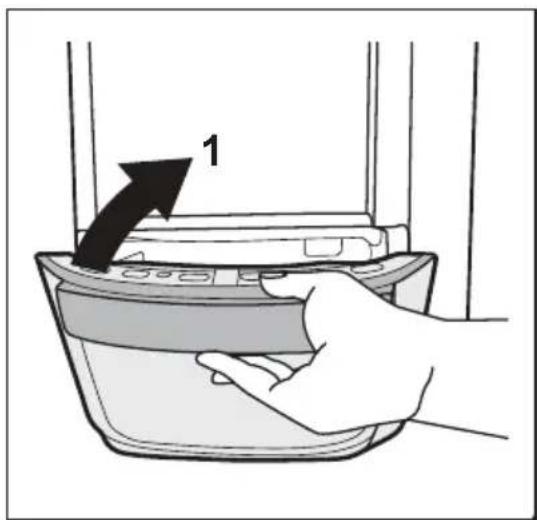
Pull on the handle to open Door.
natural_image
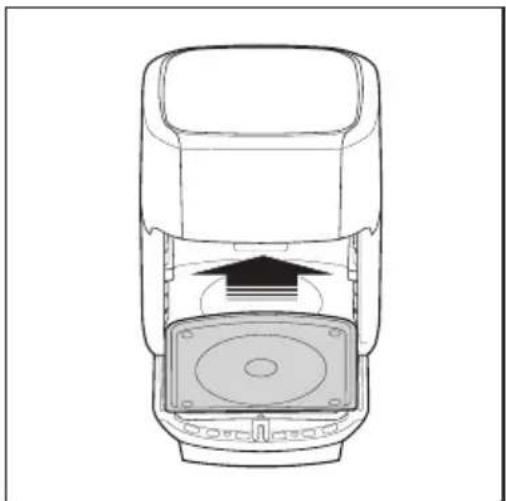
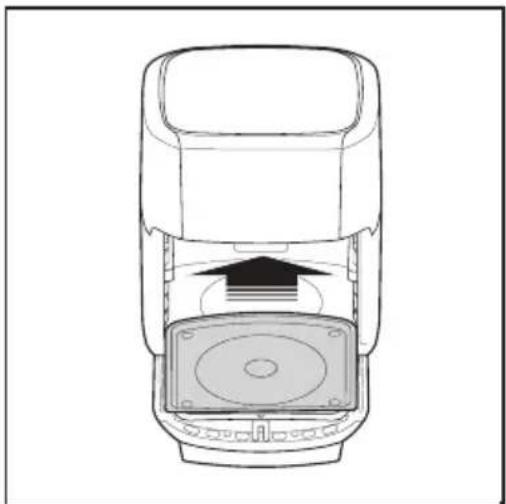
Technical line drawing of a mechanical component with a curved arrow indicating rotation or movement (no text or symbols)- Insert the Drip Tray into the bottom of the appliance so that grease and debris do not fall into the appliance.
natural_image
Technical line drawing of a mechanical device with an arrow indicating direction (no text or symbols)-
Your appliance has 3 accessories for the preparation of various foods (See General Overview).
-
Place food in the chosen accessory and close the door of your appliance.
-
Press the On/Off button once to turn on the appliance.
-
Select a preset recipe, staging mode, or manually adjust the temperature and time as desired.
-
Press the Start/Pause button to begin food preparation.
NOTE:
- The control panel buttons beep to confirm selection.
- The appliance automatically preheats when the start/pause button is pressed. The preheat light stays on for up to 5 min. The time countdown begins once the cooking temperature is reached.
- At the end of the programmed time, the panel shows "END", together with 3 "Beeps" signal.
- Pull the handle to open the door.
- Use a heat resistant utensil to remove food and deposit it in a container.

WARNING
Keep your face, arms and hands away from steam released when opening the door.
13. Unplug the appliance when finished or, return to step 8 if you wish to prepare more food.
4.4 Wire Racks
- Place the appliance on a stable, level and heat-resistant surface leaving enough room to open the door.
natural_image
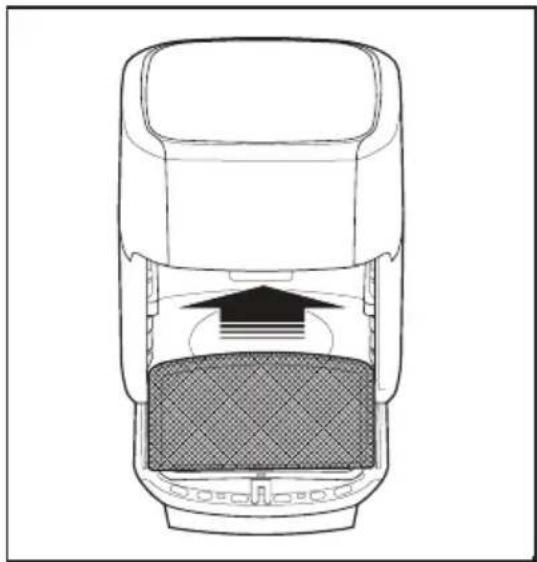
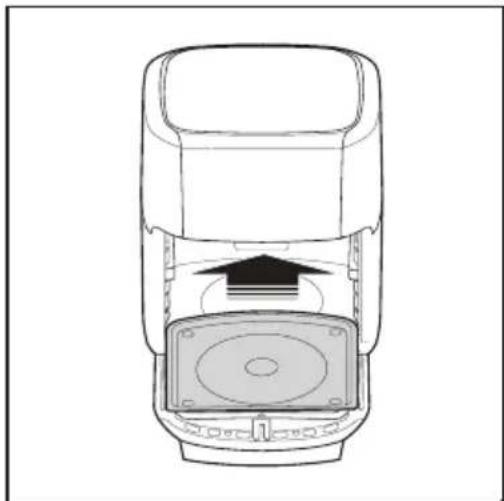
Cross-sectional diagram of a car showing internal components and airflow direction (no text or labels)- Use the wire racks when dehydrating fruits/vegetables.
NOTE: If both wire racks are used at the same time it is recommended to switch the rack positions halfway through the cooking time for more even cooking.
4.5 Basket
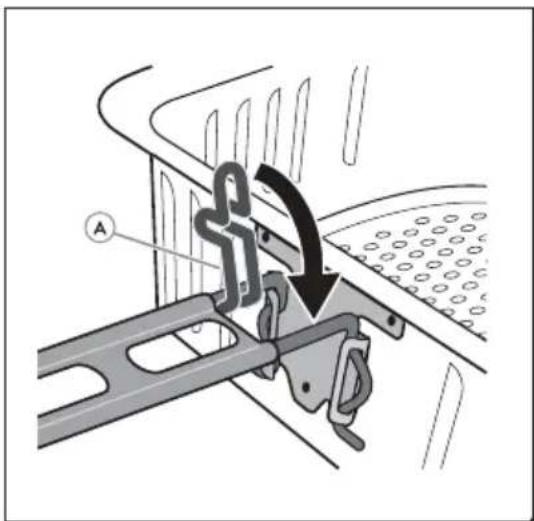
The basket handle must be attached when inserting or removing food.
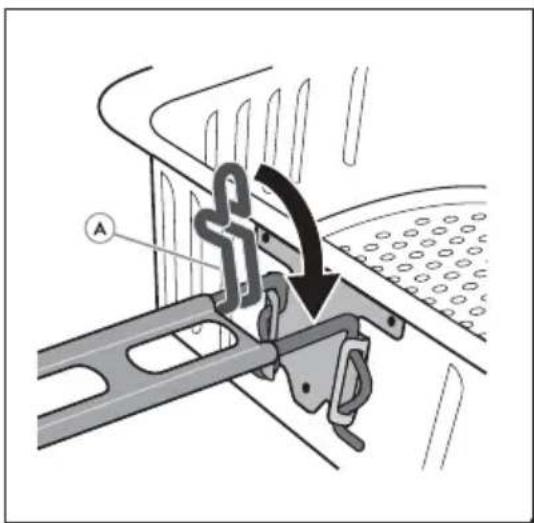
- Press the sides of the handle (A) and fit the handle into the slots on the basket.
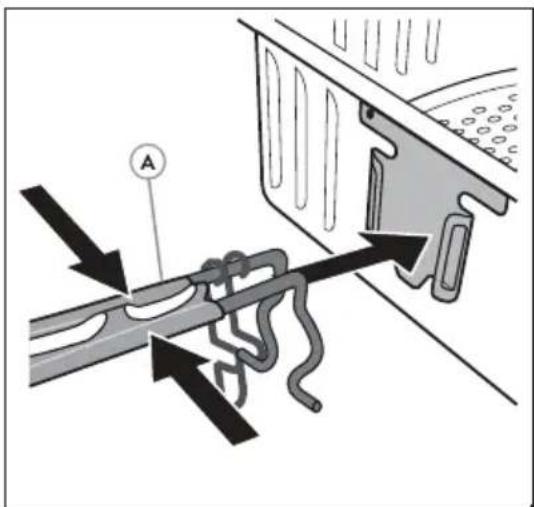
- Release the handle then close the clip to lock the handle in place.
- Place the Basket on the desired shelf and remove the basket handle.

IMPORTANT
Be sure handles are assembled and fastened properly.
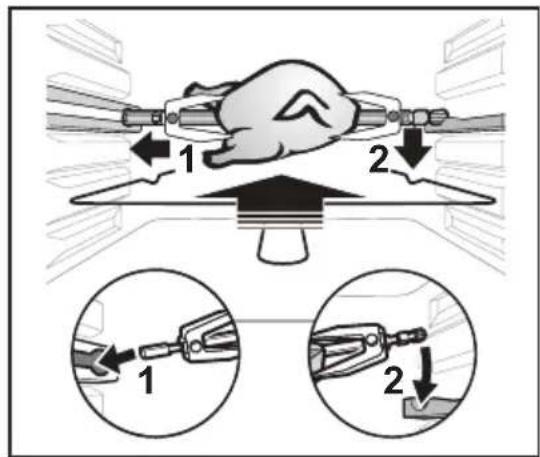
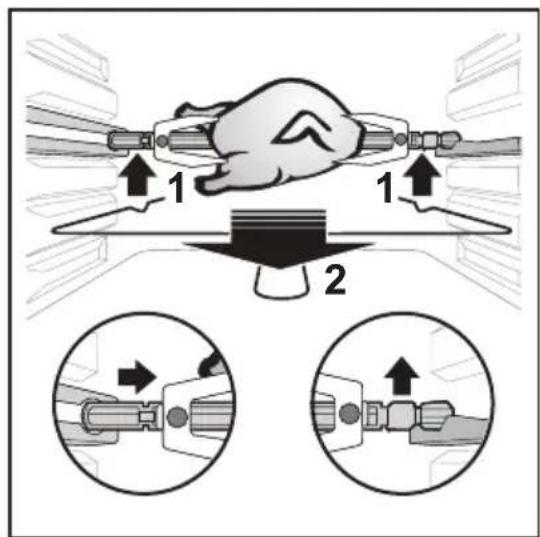
4.6 Spinning Skewer
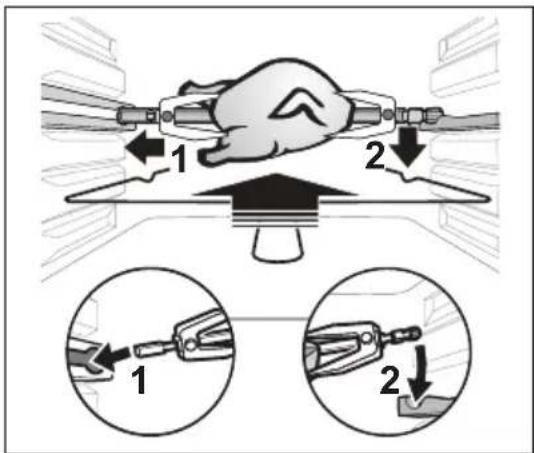
Insert the Skewer into the meat of your choice. Make sure the meat can freely rotate within the cavity. If meats are too large they may not cook correctly, and they may hit the side of the cavity and damage the appliance.
- Position the forks and attach them with the screws so that the food is securely fastened.
NOTE: Use the forks to help secure the food.
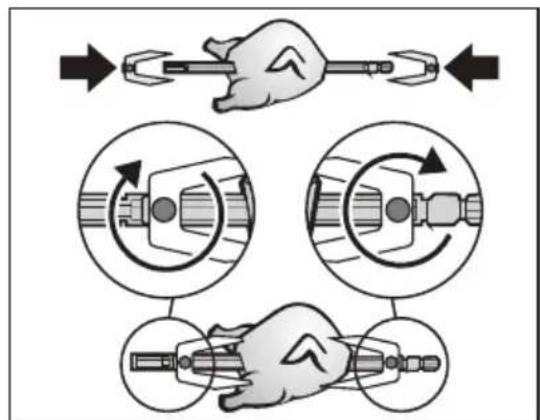
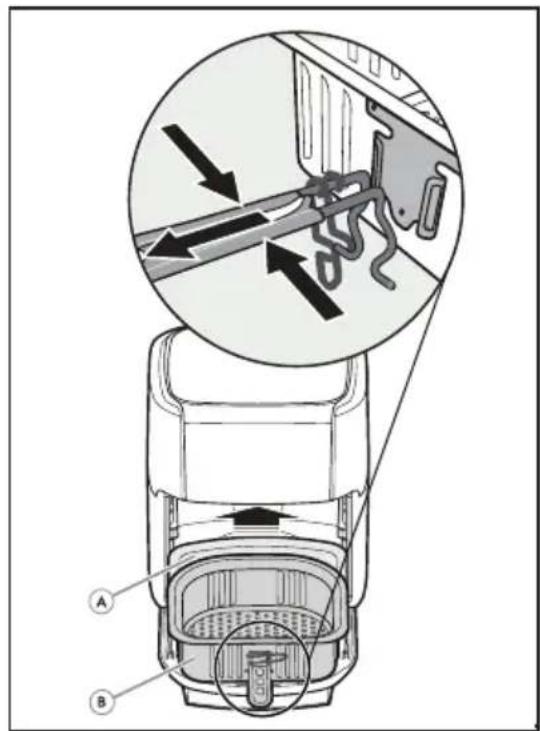
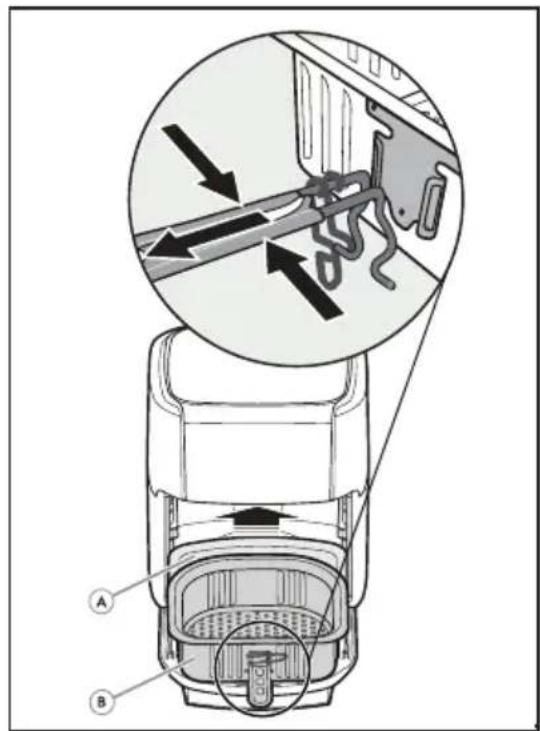
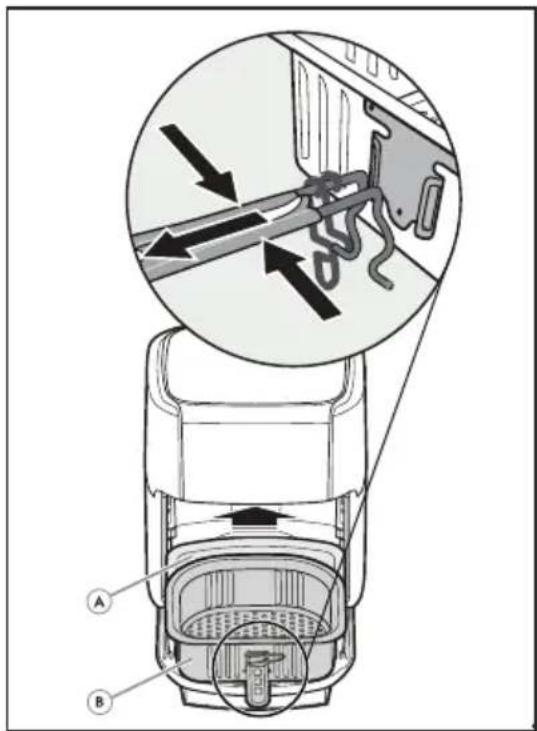
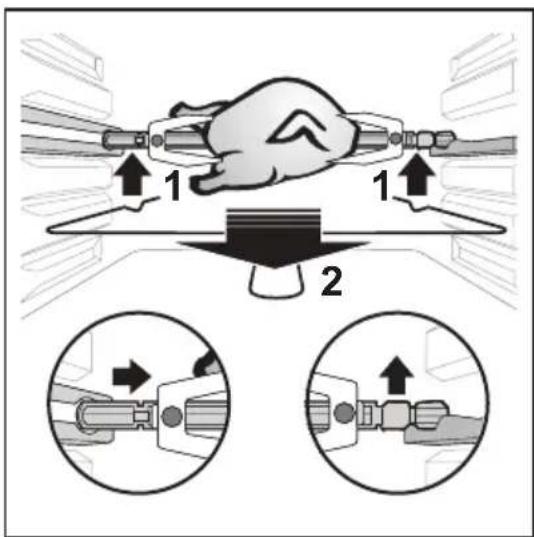
- Use the Handling Hook to position the Skewer on the rails and slide it to the docking points. Make sure the Skewer is properly seated in the turning hole on the left side of the appliance.
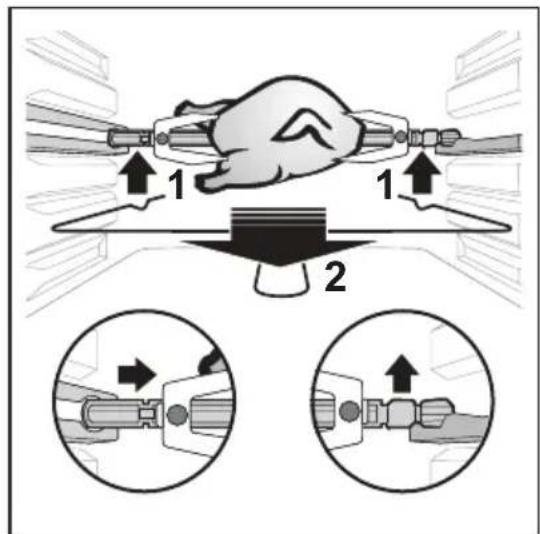
- To remove the Skewer, use the Handling Hook by snapping into the skewer and pushing it slightly to the right to disengage it from the fixing brackets. Then slide the Skewer down the rails out of the appliance.
5. CARE & CLEANING
5.1 Cleaning
To avoid electric shock, remove the plug from the outlet before performing any cleaning or maintenance. Cleaning should be done with a cold appliance.
Use only a damp cloth to clean the outside of the appliance and its electrical cable.
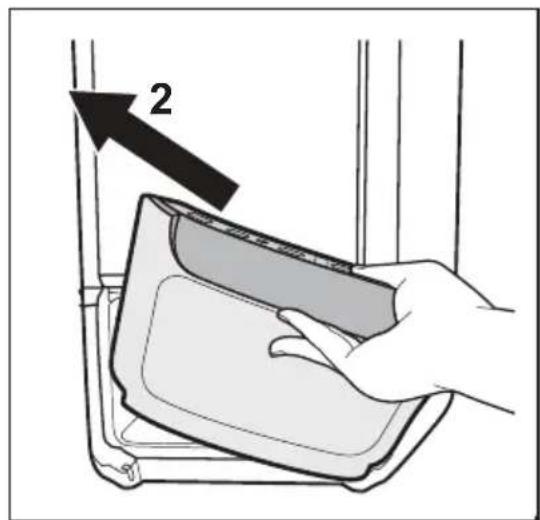
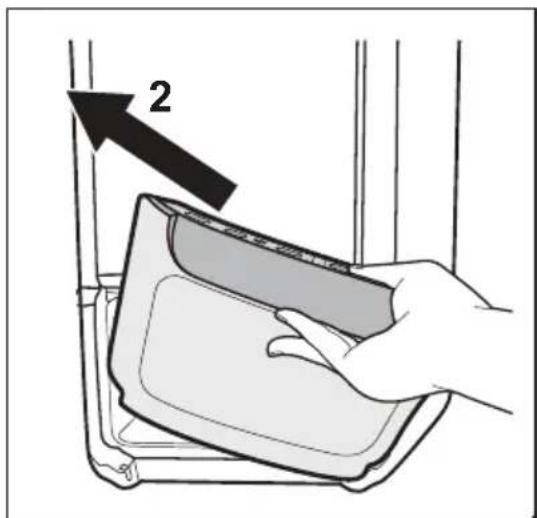
- Open the door at 45^ and remove the Removable Door by first pulling the left side up and then pull the door to the left. Clean both sides with warm water and mild detergent.

CAUTION
Do not place the removable door in the dishwasher. Handwash only.
- Use a soft sponge and mild detergent and rinse thoroughly to clean the accessories.
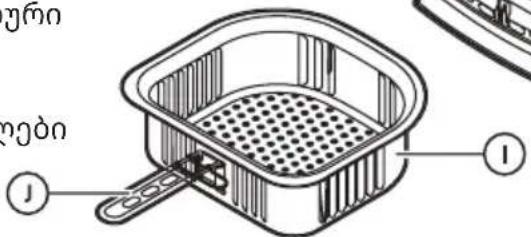
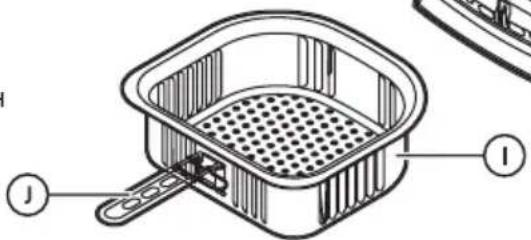
NOTE: The Drip Tray (H), Basket (I), Basket Handle (J), Skewer (K), Skewer Forks (L), and Skewer Handling Hooks (M) are dishwasher safe. (See General Overview)
- Use a dry, soft cloth to clean the outside of the appliance.

CAUTION
Never immerse the appliance, plug or power cord in water or any other liquid. Never clean your appliance with flammable fluids such as alcohol, kerosene, gasoline, thinner, solvents, removers or with chemicals such as detergents with ammonia, acids, vinegars, soda or abrasives such as soaps.
Do not use steam equipment to clean the appliance.
- It is important to clean your appliance after each use as the buildup of oil, grease or food can cause unpleasant odors, malfunctions and decrease performance.
5.2 Storage
- Turn off the appliance and allow it to cool down completely.
- Ensure that all components and accessories are clean and dry.
- Store your appliance in a flat, dry, safe place away from children.
6. WHAT TO DO IF ...
Use this guide to help with common issues that may interfere with the performance of the product. If this does not help improve the issue, please contact Customer Service.
| PROBLEM POSSIBLE CAUSE SOLUTION | ||
| Appliance does not turn on or heat up | The appliance is not plugged into the outlet | Place the power plug into the socket |
| The door is not closed properly | Check that the door is closed | |
| Food preparation takes longer than expected | The basket is over filled with food | Prepare a smaller amount of ingredients |
| The set temperature is too low | Increase the temperature using the temperature control keys | |
| Food was not turned or shaken | Turn round or shake the food after some minutes cooking | |
| The food is raw on the inside and/or burned on the outside. | The set temperature is too high | Reduce the temperature by using the temperature control keys |
| The Wire Racks are not set at a suitable height | Set wire racks at a suitable height | |
| Food was not turned or shaken | Turn round or shake the food after some minutes cooking | |
| White smoke coming from appliance. | Preparation of fatty foods | The oil released when cooking some foods may splash on the heating element and produce white smoke. This is normal and does not affect the food |
| Residue from previous use | Be sure to clean the appliance after each use | |
7. ENVIRONMENT CONCERNS
Recycle materials with the symbol 📊 Put the packaging in relevant containers to recycle it. Help protect the environment and human health by recycling waste of electrical and electronic appliances. Do not dispose appliances marked with the symbol 📊 with the household waste. Return the product to your local recycling facility or contact your municipal office.
TABLE DES MATIÈRES
- INFORMATIONS DE SÉCURITÉ ....14
- DESCRIPTION DU PRODUIT ....16
- AVANT LA PREMIÈRE UTILISATION ....16
- NOTICE D'UTILISATION ...... 17
- ENTRETIEN ET NETTOYAGE 22
- EN CAS D'ANOMALIE DE FONCTIONNEMENT... 23
- EN MATIÈRE DE PROTECTION DE L'ENVIRONNEMENT .... 23
NOUS PENSONS À VOUS
natural_image
Line drawing of a mechanical device with a curved arrow indicating rotation or movement (no text or symbols)natural_image
Technical line drawing of a mechanical device with internal components and an arrow indicating direction (no text or symbols)natural_image
Diagram of a car interior showing a seat and dashboard with an upward arrow indicating motion (no text or symbols)IMPORTANT
5. ENTRETIEN ET NETTOYAGE
5.1 Nettoyage
natural_image
Technical line drawing of a mechanical device with a curved arrow indicating rotation or movement (no text or symbols)natural_image
Technical line drawing of a mechanical device with an arrow indicating direction (no text or symbols)natural_image
Top-down schematic of a car interior showing internal components and airflow direction (no text or symbols)ME RËNDËSI
5. MIRËMBAJTJA DHE PASTRIMI
5.1 Pastrimi
natural_image
Illustration of a hand placing a component into a container with an arrow labeled '1' (no text or symbols on the diagram itself)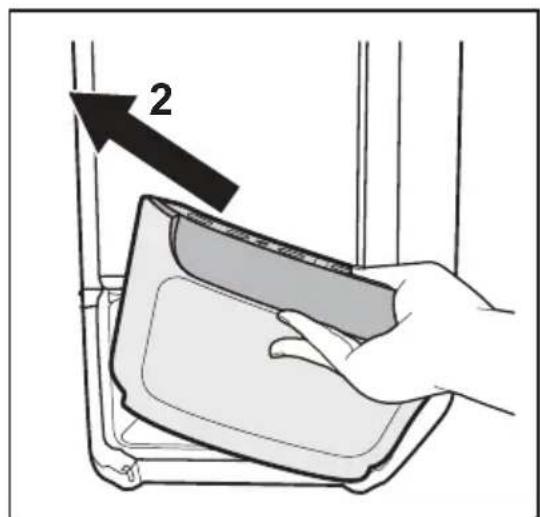
3. PŘED PRVNÍM POUŽITÍM
natural_image
Technical line drawing of a mechanical device with a curved arrow indicating rotation or movement (no text or symbols)natural_image
Technical line drawing of a mechanical device with an internal component and mounting base (no text or symbols)natural_image
Cross-sectional diagram of a car door or seat assembly (no text or symbols)- Pro dehydrataci ovoce/zeleniny použijte rošty.
DŮLEŽITÉ
5. ČIŠTĚNÍ A ÚDRŽBA
5.1 Čištění
natural_image
Technical line drawing of a mechanical device with a curved arrow indicating rotation or movement (no text or symbols)natural_image
Technical line drawing of a mechanical device with an arrow indicating direction (no text or symbols)natural_image
Top-down schematic of a car showing internal components with no text or symbolsVIGTIGT
5. PLEJE & RENG∅RING
5.1 Rengøring
6. HVAD SKAL MAN G∅RE, HVIS ...
natural_image
Technical line drawing of a mechanical component with a curved arrow indicating rotation or movement (no text or symbols)natural_image
Technical line drawing of a mechanical device with internal components and an upward arrow indicating motion (no text or symbols)natural_image
Cross-sectional diagram of a car showing internal components with no text or symbolsTÄHTIS
5. HOOLDUS JA PUHASTAMINE
5.1 Puhastamine
natural_image
Technical line drawing of a mechanical component with a curved arrow indicating rotation or movement (no text or symbols)natural_image
Technical line drawing of a mechanical device with internal components and an arrow indicating direction (no text or symbols)natural_image
Top-down schematic of a car showing internal components with no text or symbolsTÄRKEÄÄ
5. HOITO JA PUHDISTUS
5.1 Puhdistus
natural_image
Line drawing of a rectangular appliance with a label pointing to its side (no text or symbols on the device itself)3. 307307307307307307307307307307307307307307307307307307307307307307307307307307307307307307307307307307
sā dān mān sā bān gāng jīns sā bān: qūu gān mān mān sā bān dān mān sā 3sāg mān bān uāng fāng jīng dān sā mān 3n dāmbu mān mān sā dāng dān sā gādmnyg bās, qūu gān mān 3sāg mān mān sā bān uāng fāng dān māng dān gāo uās uāz māg mān sā. 3sāg mān gān uāh bāng dās dāmbu mān mān sā bān uāg mān māng dān 20 6sān sāb n hun dāg mān.
natural_image
Technical line drawing of a mechanical component with a curved arrow indicating rotation or assembly (no text or symbols)- Uzbeknls ωs bsqgónl dmbymònmmònl zmśzylún dmbzqfmn lusmghzbgnmp, lusbʒmyrn mssbgsmn dmbymònmmònl dʒqos bsbnmdn dmsonszlgm.
natural_image
Technical line drawing of a mechanical device with internal components and an arrow indicating motion (no text or symbols)natural_image
Technical line drawing of a car rearview assembly showing internal components (no text or symbols)∂6n∂36gμm3s6n
natural_image
Technical line drawing of a mechanical device with a curved arrow indicating rotation or movement (no text or symbols)natural_image
Technical line drawing of a mechanical device with internal components and an upward arrow indicating motion (no text or symbols)-
Uređaj ima 3 pribora za pripremu raznih namirnica (pogledajte Opći pregled).
-
Stavite hranu u odabrani pribor i zatvorite vrata uređaja.
-
Uređaj uključite pritiskom na gumb za uključivanje/isključivanje.
-
Odaberite unaprijed podešeni recept, način pripreme ili ručno podesite temperaturu i vrijeme po želji.
-
Pritisnite gumb pokretanje/pauza radi pokretanja pripreme hrane.
NAPOMENA:
- Gumbi na kontrolnoj ploči emitiraju zvučni signal za potvrdu odabira.
- Uređaj se automatski zagrijava kada se pritisne gumb pokretanje/pauza. Signalno svjetlo zagrijavanja ostaje uključeno do 5 minuta. Odbrojavanje vremena započinje kada se postigne temperatura kuhanja.
- Na kraju programiranog vremena, na ploči se prikazuje "END" (kraj), i oglasavaju se 3 zvučna signala.
- Povucite dršku kako biste otvorili vrata.
- Koristite pribor otporan na toplinu za vađenje hrane i njezino odlaganje u posudu.

UPOZORENJE
natural_image
Cross-sectional diagram of a car door or seat assembly (no text or symbols)- Koristite žičane police za dehidriranje voća/povrća.
- Otpustite dršku i zatim zatvorite kopču kako biste zabravili dršku na mjestu.
- Postavite košaru na željenu policu i uklonite dršku košare.
VAŽNO
Pazite da drške budu pravilno sastavljene i pričvršćene.
4.6 Rotirajući ražanj
Zabodite ražanj u meso po izboru. Provjerite može li se meso slobodno okretati unutar prostora. Ako je meso preveliko, možda se neće dobro ispeći i može udariti u stijenku otvora i oštetiti uređaj.
- Postavite vilice i pričvrstite ih vijcima tako da hrana bude dobro pričvršćena.
5. ODRŽAVANJE I ČIŠĆENJE
5.1 Čišćenje
Kako biste izbjegli električni udar, iskopčajte utikač iz utičnice prije čišćenja ili održavanja. Čišćenje treba obaviti na hladnom uređaju.
natural_image
Line drawing of a mechanical device with a curved arrow indicating rotation or movement (no text or symbols)natural_image
Technical line drawing of a mechanical device with an internal component and directional arrow (no text or symbols)natural_image
Diagram of a car interior showing a piston and seat with an upward arrow indicating motion (no text or symbols)FONTOS
STIAMO PENSANDO A TE
natural_image
Technical line drawing of a mechanical component with a curved arrow indicating rotation or movement (no text or symbols)natural_image
Technical line drawing of a mechanical device with an internal component and an upward arrow (no text or symbols)natural_image
Cross-sectional diagram of a car showing internal components and airflow direction (no text or labels)IMPORTANTE
natural_image
Technical line drawing of a mechanical component with a curved arrow indicating rotation or movement (no text or symbols)natural_image
Technical line drawing of a mechanical device with an upward arrow indicating motion or force (no text or symbols)natural_image
Cross-sectional diagram of a car showing internal components with an upward arrow (no text or symbols)- Džiovindami vaisius ir daržoves naudokite metalines groteles.
SVARBU
5. PRIEŽIŪRA IR VALYMAS
5.1 Valymas
natural_image
Line drawing of a mechanical device with a curved arrow indicating rotation or movement (no text or symbols)natural_image
Technical line drawing of a mechanical device with an arrow indicating direction (no text or symbols)natural_image
Diagram of a car interior showing a piston and cushion with an upward arrow indicating motion (no text or symbols)SVARİGI
5. APKOPE UN TİRİŞANA
5.1 Tīrīšana

natural_image
Line drawing of a portable refrigerator with labeled component B (no text or symbols on the device itself)natural_image
Technical line drawing of a mechanical device with a curved arrow indicating rotation or movement (no text or symbols)natural_image
Technical line drawing of a mechanical device with internal components and an upward arrow indicating motion (no text or symbols)natural_image
Top-down schematic of a car showing internal components with no text or symbolsВАЖНО
- I typen bed-and-breakfast-omgivelser.

FORSIKTIG: Varm overflate

2. PRODUKTBESKRIVELSE
3. F∅R F∅RSTEGANGS BRUK
natural_image
Technical line drawing of a mechanical device with a curved arrow indicating rotation or movement (no text or symbols)natural_image
Technical line drawing of a mechanical device with internal components and an upward arrow indicating motion (no text or symbols)natural_image
Cross-sectional diagram of a car's internal components, showing no text or symbolsVIKTIG
5. VEDLIKEHOLD OG RENGJ∅RING
5.1 Rengjøring
natural_image
Technical line drawing of a mechanical component with a curved arrow indicating rotation or assembly (no text or symbols)natural_image
Technical line drawing of a mechanical device with internal components and an arrow indicating direction (no text or symbols)natural_image
Cross-sectional diagram of a car showing internal components and airflow direction (no text or labels)WAŻNE
5. PIELEGNACJA I CZYSZCZENIE
5.1 Czyszczenie
natural_image
Hand placing a device into a container with an arrow indicating direction (no text or symbols)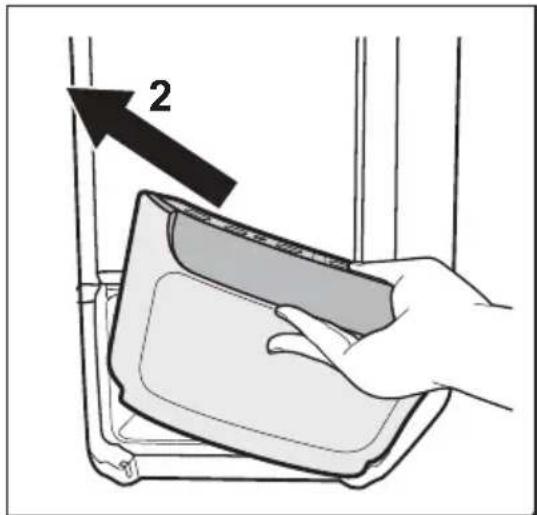
natural_image
Technical line drawing of a mechanical device with a curved arrow indicating rotation or movement (no text or symbols)natural_image
Technical line drawing of a mechanical device with internal components and an upward arrow indicating motion (no text or symbols)natural_image
Cross-sectional diagram of a car interior showing internal seating and airflow direction (no text or labels)IMPORTANT
5. ÎNTRETINERE ŞI CURĂTARE
5.1 Curățare
natural_image
Technical line drawing of a mechanical device with a curved arrow indicating rotation or movement (no text or symbols)natural_image
Technical line drawing of a mechanical device with internal components and an upward arrow indicating motion (no text or symbols)natural_image
Top-down schematic of a car interior showing internal seating and airflow direction (no text or labels)ВАЖНО!
5. УХОД И ЧИСТКА
5.1 Чистка
natural_image
Technical line drawing of a mechanical component with a curved arrow indicating rotation or assembly (no text or symbols)natural_image
Technical line drawing of a mechanical device with internal components and an arrow indicating direction (no text or symbols)natural_image
Cross-sectional diagram of a car showing internal components and airflow direction (no text or labels)VIKTIGT
5. VÅRD & RENGÖRING
5.1 Rengöring
natural_image
Line drawing of a mechanical device with a curved arrow indicating rotation or movement (no text or symbols)natural_image
Technical line drawing of a mechanical device with internal components and an upward arrow indicating motion (no text or symbols)-
Vaš aparat ima 3 dele pribora za pripravo različnih jedi (glejte razdelek Splošni pregled).
-
Vstavite sestavine v košaro ali pladenj ali nataknite na raženj in zaprite vratca aparata.
-
Za vklop aparata enkrat pritisnite tipko za Vklop/Izklop.
-
Izberite prednastavljeni recept in potrebo po obračanju jedi ali po želji ročno nastavite temperaturo in čas.
-
Za začetek priprave jedi pritisnite tipko Start/Premor.
OPOMBA:
natural_image
Cross-sectional diagram of a car showing internal components with no text or symbols- Žične police uporabite za sušenje sadja ali zelenjave.
- Postavite košaro na želeno polico in nato odstranite ročaj košare.
POMEMBNO
- Da odstranite raženj, znova uporabite nosilni kavelj ražnja. Zataknite ga za raženj in ga potisnite malce v desno, da se sprosti iz pritrdilnih spon. Nato povlecite raženj po vodilih iz aparata.
5. NEGA IN ČIŠČENJE
5.1 Čiščenje
natural_image
Line drawing of a mechanical device with a curved arrow indicating rotation or movement (no text or symbols)- Vložte misku na odkvapkávanie do spodnej časti spotrebiča tak, aby sa do spotrebiča nedostal tuk a nečistoty.
natural_image
Technical line drawing of a mechanical device with an arrow indicating direction (no text or symbols)natural_image
Cross-sectional diagram of a car showing internal components and airflow direction (no text or labels)- Umiestnite kôš na požadovaný rošt a odstráňte rúčku koša.
DÔLEŽITÉ
- Pomocou manipulačného háku umiestnite ihlu na pečenie na kolajničky a posuňte k dokovacím bodom. Uistite sa, že je ihla na pečenie správne zasunutá v otvore na otáčanie na l'avej strane spotrebiča.
- Ak chcete vybrať ihlu na pečenie, použite manipulačný hák tak, že ho zacvaknete do ihly na pečenie a mierne ho zatlačíte doprava, aby sa odpojila od upevňovacích držiakov. Potom vysuňte ihlu na pečenie po kolajničkách zo spotrebiča.
5. STAROSTLIVOST A ČISTENIE
5.1 Čistenie
natural_image
Technical line drawing of a mechanical device with a curved arrow indicating rotation or movement (no text or symbols)natural_image
Technical line drawing of a mechanical device with internal components and an upward arrow indicating motion (no text or symbols)natural_image
Cross-sectional diagram of a car showing internal components and airflow direction (no text or labels)ВАЖНО
5. НЕГА И ЧИШТЕЊЕ
5.1 Чишћење
natural_image
Technical line drawing of a mechanical device with a curved arrow indicating rotation or movement (no text or symbols)natural_image
Technical line drawing of a mechanical device with an arrow indicating direction (no text or symbols)natural_image
Top-down schematic of a car interior showing internal seating and airflow direction (no text or labels)ВАЖЛИВО!
natural_image
Illustration of a hand placing a component into a container with an arrow labeled '1' (no text or symbols on the diagram itself)