
TE-COL 18/27 Li - Refrigerator EINHELL - Free user manual and instructions
Find the device manual for free TE-COL 18/27 Li EINHELL in PDF.

User questions about TE-COL 18/27 Li EINHELL
0 question about this device. Answer the ones you know or ask your own.
Ask a new question about this device
Download the instructions for your Refrigerator in PDF format for free! Find your manual TE-COL 18/27 Li - EINHELL and take your electronic device back in hand. On this page are published all the documents necessary for the use of your device. TE-COL 18/27 Li by EINHELL.
USER MANUAL TE-COL 18/27 Li EINHELL
GB Original operating instructions Battery-Powered Cool Box
natural_image
Close-up of a black electronic device with labeled component D, showing internal structure and handle (no text or symbols beyond label)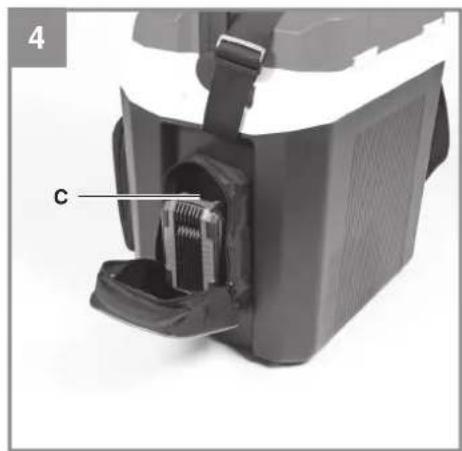
natural_image
Close-up of a device's internal component with labeled part 'c' (no text or symbols beyond label)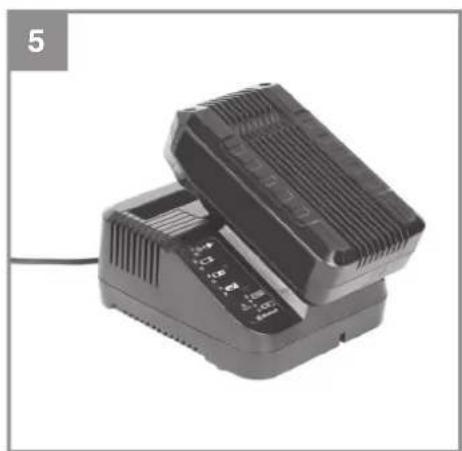
natural_image
Close-up of a black cylindrical power supply unit with ventilation slots and a labeled terminal (no visible text or symbols on the device body)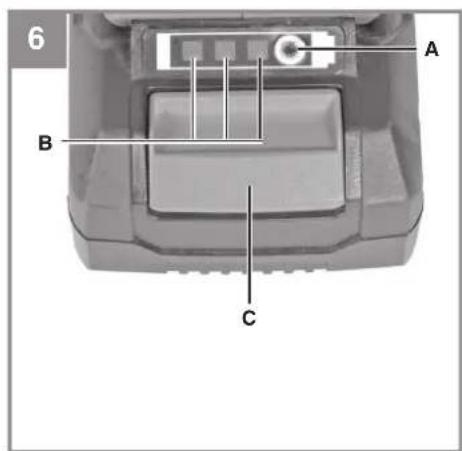
natural_image
Interior view of a white appliance drawer with open lid and internal compartments (no visible text or symbols)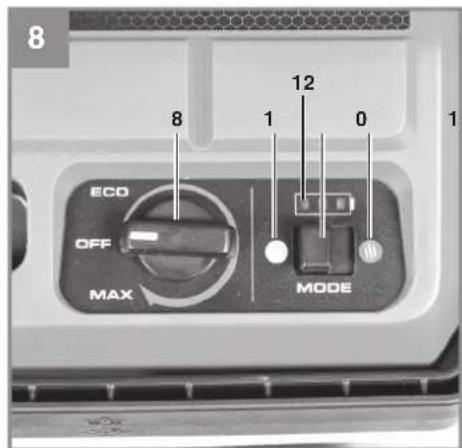
natural_image
Close-up of a mechanical component with a cylindrical shaft and multiple connectors (no visible text or symbols)
natural_image
Two simple line drawings: an open book and a square with nested squares, both without any text or symbols.D
Gefahr!
When using the equipment, a few safety precautions must be observed to avoid injuries and damage. Please read the complete operating instructions and safety regulations with due care. Keep this manual in a safe place, so that the information is available at all times. If you give the equipment to any other person, hand over these operating instructions and safety regulations as well. We cannot accept any liability for damage or accidents which arise due to a failure to follow these instructions and the safety instructions.
Explanation of the symbols used (see Fig. 10)
- Danger! – Read the operating instructions to reduce the risk of injury.
- Used to indicate electrical devices which have a double insulated housing and are therefore protection class II compliant.
1. Safety regulations
The corresponding safety information can be found in the enclosed booklet.
Warning!
Read all the safety information, instructions, illustrations and technical data provided on or with this power tool. Failure to adhere to the following instructions may result in electric shock, fi re and/or serious injury.
Keep all the safety information and instructions in a safe place for future use.
This device can be used by children of 8 years and older and by people with limited physical, sensory or mental capacities or those with no experience and knowledge if they are supervised or have received instruction in how to use the device safely and understand the dangers which result from such use. Children are not allowed to play with the device. Unless supervised, children are not allowed to clean the device or carry out user-level
maintenance work.
Children between the ages of 3 and 8 years old may fill and empty the cooler.
2. Layout and items supplied
2.1 Layout (Fig. 1/2)
- Shoulder strap
- Pocket with battery mount
- Front pocket for accessories
- Bottle opener
- Carry-handle
- Cover
- Recessed handle
- Power controller
- Function switch
- Cooling function
- Warming function
- Battery capacity indicator
- Fan ventilation grille
- Cooling component ventilation grille
- Power supply socket
- 12-V connector
- Power cable
- 12-V power cable
2.2 Items supplied
Please check that the article is complete as specified in the scope of delivery. If parts are missing, please contact our service center or the sales outlet where you made your purchase at the latest within 5 working days after purchasing the product and upon presentation of a valid bill of purchase. Also, refer to the warranty table in the service information at the end of the operating instructions.
- Open the packaging and take out the equipment with care.
- Remove the packaging material and any packaging and/or transportation braces (if available).
- Check to see if all items are supplied.
- Inspect the equipment and accessories for transport damage.
- If possible, please keep the packaging until the end of the guarantee period.
GB
Danger!
The equipment and packaging material are not toys. Do not let children play with plastic bags, foils or small parts. There is a danger of swallowing or suff ocating!
• Cool box with shoulder strap
• Power cable (in the front pocket)
• 12-V power cable (in the front pocket)
• Original operating instructions
• Safetyinstructions
3. Proper use
The cool box is designed to keep packaged food and drinks cool or warm. It is intended for private use when camping, in a vehicle or in similar applications at ambient temperatures of 16 °C to 32 °C.
The cool box can be operated by connecting it to a 220-240 V (henceforth 230V) \~ 50 Hz socket outlet, a 12-V car outlet (e.g. cigarette lighter) or an Einhell 18-V Power X-Change battery.
This cool box is not designed for use as a built-in device. Do not expose the device to rain. This device is not suitable for use as seating or storage.
Please follow the specific regulations and laws in each country.
The equipment is to be used only for its prescribed purpose. Any other use is deemed to be a case of misuse. The user / operator and not the manufacturer will be liable for any damage or injuries of any kind caused as a result of this.
Please note that our equipment has not been designed for use in commercial, trade or industrial applications. Our warranty will be voided if the machine is used in commercial, trade or industrial businesses or for equivalent purposes.
4. Technical data
Voltage: 220-240 V \~ 50 Hz
Cooling/warming energy consumption: .... 55 W / 50 W
Voltage: 18 V DC
Cooling/warming energy consumption: .... 55 W / 50 W
Voltage: 12 V DC
Cooling/warming energy consumption: .... 48 W / 42 W
Miniature fuse: 6.3 A
Protection class: ....II /回
Gross container capacity: 27 L
Energy consumption: 0.164 kWh/24h
Design temperature: 17 °C
Climate class: ....N
Ambient temperature range: 16 °C – 32 °C
Airborne acoustical noise: ....26 dB(A) re 1 pW Insulation / Insulating gas: .... EPS / cyclopentane Dimensions (HxWxD): ....466x430x316 mm Weight: ....6.0 kg
Further information about your model is available online in the EPREL EU product database found at https://eprel.ec.europa.eu. You will find the model identifi er required to search for your model on the rating plate or in the first line of the EU energy label.
Important!
The equipment is supplied without batteries and without a charger and is allowed to be used only with the lithium-ion batteries of the Power X-Change series!
The lithium-ion batteries of the Power X-Change series are allowed to be charged only with the Power X charger.
5. Before starting the equipment
- Check the cool box for damage. A damaged cool box must not be used.
- For hygiene reasons, clean the cool box before using it for the first time. In this regard, please refer to Chapter "8.1 Cleaning".
5.1 Fitting the battery (Fig. 3-4)
Pull the "Power Supply" pocket (Fig. 1 / Item 2) forward, unzip it and push the battery into the mount (Item D) provided. Make sure that the pushlock button (Item C) engages properly! Close the zipper on the pocket.
To remove the battery, proceed in reverse order!
GB
5.2 Charging the lithium-ion battery pack (Fig. 4/5)
- Remove the battery pack from the mount by pressing the pushlock button (c) downwards.
- Check that your mains voltage is the same as that marked on the rating plate. Insert the power plug of the charger into the power socket. The green LED will begin to blink.
- Push the battery pack onto the battery charger.
In the section entitled „Charger indicator“ you will find a table with an explanation of the LED display on the charger.
5.3 Battery capacity indicator (Fig. 6)
Press the button for the battery capacity indicator (A). The battery capacity indicator (B) shows the charge status of the battery using 3 LEDs.
All 3 LEDs are lit:
The battery is fully charged.
2 or 1 LED(s) are lit:
The battery has an adequate remaining charge.
1 LED fl ashes:
The battery is empty, recharge the battery.
All LEDs blink:
The battery temperature is too low. Remove the battery from the equipment, keep it at room temperature for one day. If the fault reoccurs, this means that the rechargeable battery has undergone exhaustive discharge and is defective. Remove the battery from the equipment. Never use or charge a defective battery.
If the battery pack fails to charge, check for the following:
• Is there voltage at the power socket?
- Is there good contact at the charger's charging contacts?
If the battery pack still fails to charge, please send the charger
• and the battery pack to our customer service center.
To ensure that items are properly packaged and delivered when you send them to us, please contact our customer service or the point of sale at which the equipment was purchased.
When shipping or disposing of batteries and cordless tools, always ensure that they are packed individually in plastic bags to prevent short circuits and fi res.
To ensure that the battery pack provides long service, you should take care to recharge it promptly. You must recharge the battery pack when you notice that the performance of the device drops. Never allow the battery pack to become fully discharged. This will cause it to develop a defect.
5.4 Filling the cool box
CAUTION – Risk of damage to health!
To prevent food contamination, follow the instructions below:
• Leaving the lid open for prolonged periods can lead the temperature in the compartments of the device to rise considerably.
• Regularly clean any surfaces that may come into contact with food.
- Store raw meat and fish in suitable containers so that they do not come into contact with or drip on other food items.
- If the refrigerator/freezer is to remain empty for a long time, switch off the device, defrost, clean and dry it, and leave the lid open to prevent mold from growing.
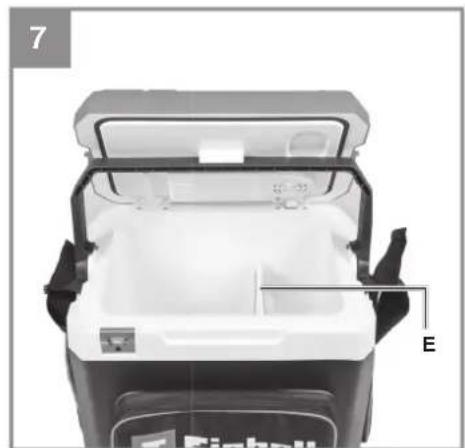
Place the cool box on a sturdy surface (e.g. the floor). Move the carry-handle (Fig. 1 / Item 5) forward and open the lid (Fig. 1 / Item 6). To keep the lid open while fl lling the cool box with food/drinks, the carry-handle can be used to brace the lid (Fig. 7). The mesh divider (Fig. 7 / Item E) can be used to keep different food items separated. Close the lid and move the carry-handle backward. The lid can only be opened if the carry-handle is in the forward position.
5.5 Transporting the cool box
You can use the shoulder strap (Fig. 1 / Item 1) or the carry-handle (Fig. 1 / Item 5) to transport the cool box.
5.6 Bottle opener
On the front side of the cool box there is a bottle opener (Fig. 1 / Item 4) for opening bottles with bottle caps.
5.7 Outside pockets
The pockets on the front and left sides provide additional storage space, used to hold batteries, for example.
GB
6. Operation
6.1 "Mode" Switch (Fig. 8)
Cooling
Slide the "Mode" function switch (Item 9) to the left (Item 10) to keep the contents cool.
Warming
Slide the "Mode" function switch (Item 9) to the right (Item 11) to keep the contents warm.
Important! Switch the device off 30 minutes before you change the function.
6.2 Operation
Place the cool box on a sturdy surface (like the ground). Do not cover the ventilation grille.
The cool box power supply order of priority is 230 V -> 12 V -> 18 V Power X-Change battery. Therefore, you can run the device on 230 V with an 18-V battery also inserted. If you disconnect the device from the 230-V socket outlet, it will automatically switch over to battery power after about 10 seconds. When you plug the device back into the 230-V power supply, it switches over to mains power again. This also works with 12-V power.
6.2.1 Mains power supply (230 V \~ 50 Hz)
Remove the power cable (Fig. 2 / Item 17) from the front pocket and connect it to the AC 220 - 240 V socket (Fig. 2 / Item 15) at the rear of the cool box. Turn the power controller (Fig. 8 / Item 8) to the desired position.
6.2.2 12-V power supply
Note:
• The cool box has integrated excess discharge protection for the car battery.
- On some vehicles, the ignition must be switched on in order to supply power to the cool box.
- When the engine is switched off, the connected cool box draws power from the vehicle battery, discharging it. If the battery voltage drops too low, you will no longer be able to start the engine.
Remove the 12-V power cable (Fig. 2 / Item 18) from the front pocket and connect it to the 12-V DC socket (Fig. 2 / Item 16) at the rear of the cool box. Turn the power controller (Fig. 8 / Item 8) to the desired position.
6.2.3 18-V power supply
Push the Power X-Change battery into the battery mount as described in "Fitting the battery". Turn the power controller (Fig. 8 / Item 8) to the desired position.
Battery capacity indicator on the cool box
The battery capacity indicator (Fig. 8 /Item 12) shows the charge status of the battery using 3 LEDs.
All 3 LEDs are lit
The battery is fully charged.
2 or 1 LED(s) are lit:
The battery has an adequate remaining charge.
1 LED fl ashes
The battery is empty, recharge the battery.
6.3 Power controller (Fig. 8 / Item 8)
Note: The power controller clicks audibly as soon as the cool box is switched on or off.
a) "OFF" position: the cool box is switched off.
b) "ECO" position: the cool box consumes low amounts of energy (minimum cooling or heating capacity).
c) "MAX" position: the cool box consumes the most energy (maximum cooling or heating capacity).
Turn the power controller knob toward the "MAX" position to increase the cooling or heating capacity.
Turn the power controller knob toward the "ECO" position to decrease the cooling or heating capacity.
In cooling mode, the interior temperature may be up to 20 °C lower than ambient temperature (25 °C).
In heating mode, a maximum interior temperature of 55^ C +/- 5^ C can be achieved (at 25^ C ambient temperature).
6.4 Tips for saving energy
- Do not leave the cool box in the sun in cooling mode.
- Use commercially available frozen cooling elements for additional cooling or to speed up the process.
- Only place previously refrigerated food and drinks into the cool box in cooling mode.
GB
• Leaving the lid open for prolonged periods can lead the temperature inside the box to rise considerably.
- Let warm food and drinks cool down before placing them in the cool box to keep them cool.
• After a long period in operation, the cooling capacity can usually be reduced.
7. Replacing the power cable
Danger!
If the power cable for this device becomes damaged, it must be replaced in order to prevent hazards.
8. Cleaning, maintenance and ordering spare parts
Danger!
Always disconnect the power cable from the socket outlet, the 12-V cable from the plug and remove the battery before starting any cleaning work.
8.1 Cleaning
- Clean the inside of the cool box with washing up liquid and clean water. Dry the inside of the cool box thoroughly.
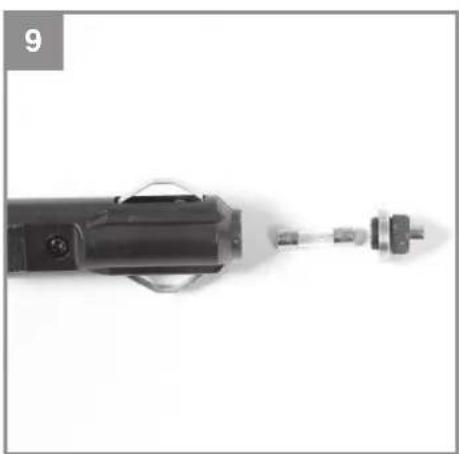
8.2 Replacing the fuse in the 12-V plug (Fig. 9) Replace the fuse (T 6.3A) inside the 12-V power plug if it becomes defective. Unscrew and remove the top end of the plug and replace the defective fuse with one of the same type. Screw the top end of the plug back in place.
8.3 Maintenance
There are no parts inside the equipment which require additional maintenance.
8.4 Ordering replacement parts:
Please quote the following data when ordering replacement parts:
• Type of machine
• Article number of the machine
• Identification number of the machine
- Replacement part number of the part required For our latest prices and information please go to www.Einhell-Service.com
Spare parts are available for this device for at least 10 years after the production date.
9. Disposal and recycling
The equipment is supplied in packaging to prevent it from being damaged in transit. The raw materials in this packaging can be reused or recycled. The equipment and its accessories are made of various types of material, such as metal and plastic. Never place defective equipment in your household refuse. The equipment should be taken to a suitable collection center for proper disposal. If you do not know the whereabouts of such a collection point, you should ask in your local council offices.
10. Storage
Empty the cool box and remove the power cable, 12-V power cable and battery. Store the power cables in the front pocket. Clean and dry the device as described above, and leave the lid open to prevent mold from growing. Use the carry-handle as a brace to keep the lid open.
Take out the battery/batteries. Store the device and its accessories out of the reach of children in a dark and dry place at above freezing temperature. The ideal storage temperature is between 5 and 30 °C. Store the electric tool in its original packaging. Remove the battery from the device if stored for a prolonged period.
11. Faults
The cool box does not work
A) Mains power supply (220-240 V \~ 50 Hz) Check whether the plug is properly inserted in the socket outlet and that the socket outlet is energized.
B) 12-V power supply
- Check whether the 12-V power plug is properly inserted in the 12-V socket and that the 12-V socket is energized.
- Check whether the fuse in the 12-V power plug is defective. Refer to Chapter "8.2 Replacing the fuse in the 12-V plug" to change the fuse.
C) Battery power
- Check whether the battery is empty. Recharge the battery.
- Charger indicator
| Indicator status Explanations and actions | ||
| Red LED Green LED | ||
| Off | Flashing | Ready for useThe charger is connected to the mains and is ready for use; there is no battery pack in the charger |
| On Off Charging | The charger is charging the battery pack in quick charge mode. The charging times are shown directly on the charger.Important! The actual charging times may vary slightly from the stated charging times depending on the existing battery charge. | |
| Off | On | The battery is charged and ready for use. (READY TO GO)The unit then changes over to gentle charging mode until the battery is fully charged.To do this, leave the rechargeable battery on the charger for approx. 15 minutes longer.Action:Take the battery pack out of the charger. Disconnect the charger from the mains supply. |
| Flashing Off | Adapted charging | The charger is in gentle charging mode.For safety reasons the charging is performed less quickly and takes more time. The reasons can be:- The rechargeable battery has not been used for a very long time.- The battery temperature is outside the ideal range.Action:Wait for the charging to be completed; you can still continue to charge the battery pack. |
| Flashing Flashing Fault | Charging is no longer possible. The battery pack is defective.Action:Never charge a defective battery pack.Take the battery pack out of the charger. | |
| On On Temperature fault | The battery pack is too hot (e.g. due to direct sunshine) or too cold (below 0^ ).Action:Remove the battery pack and keep it at room temperature (approx. 20^ ) for one day . | |
GB
Disposal

Power tools, rechargeable batteries, accessories and packaging should be sorted for environmental-friendly recycling.
Do not dispose of power tools and batteries/rechargeable batteries into household waste!
Only for EU countries:
According to the Directive 2012/19/EU on waste electrical and electronic equipment and its transposition into national law, power tools that are no longer usable, and, according to the Directive 2006/66/EC, defective or drained batteries must be collected separately and disposed of in an environmentally correct manner.
If disposed incorrectly, waste electrical and electronic equipment may have harmful effects on the environment and human health, due to the potential presence of hazardous substances.
Only for United Kingdom:
According to The Waste Electrical and Electronic Equipment Regulations 2013 (SI 2013/3113) (as amended) and the Waste Batteries and Accumulators Regulations 2009 (SI 2009/890) (as amended), products that are no longer usable must be collected separately and disposed of in an environmentally friendly manner.
The reprinting or reproduction by any other means, in whole or in part, of documentation and papers accompanying products is permitted only with the express consent of the Einhell Germany AG.
Subject to technical changes.
GB
Service information
We have competent service partners in all countries named on the guarantee certificate whose contact details can also be found on the guarantee certificate. These partners will help you with all service requests such as repairs, spare and wearing part orders or the purchase of consumables.
Please note that the following parts of this product are subject to normal or natural wear and that the following parts are therefore also required for use as consumables.
| Category Example | |
| Wear parts* Battery | |
| Consumables* | |
| Missing parts |
* Not necessarily included in the scope of delivery!
In the effect of defects or faults, please register the problem on the internet at www.Einhell-Service.com. Please ensure that you provide a precise description of the problem and answer the following questions in all cases:
• Did the equipment work at all or was it defective from the beginning?
• Did you notice anything (symptom or defect) prior to the failure?
• What malfunction does the equipment have in your opinion (main symptom)?
Describe this malfunction.
F
Danger!
5.5 Transport hladnjaka
Hladnjak se može transportirati pojasom za nošenje (slika 1 / pol. 1) ili drškom za nošenje (slika 1 / pol. 5).
5.6 Otvarač za boce
Na prednjoj strani hladnjaka nalazi se otvarač za boce (slika 1 / pol. 4) za boce s krunastim čepom.
5.7 Džepovi na vanjskoj strani
Lijevi i prednji džep služe kao dodatni prtljažni prostor i mogu držati npr. baterije.
HR/BIH
6. Rukovanje
6.1 Sklopka „Mode“ (slika 8) Hlađenje
Funkcijsku sklopku „Mode“ (pol. 9) prebacite prema lijevo (pol. 10) da bi hladili sadržinu.
Držanje toplim
Funkcijsku sklopku „Mode“ (pol. 9) prebacite prema desno (pol. 11) da bi sadržinu držali toplom.
Pažnja! Prije prebacivanje funkcije isključite uređaj na 30 minuta.
6.2 Rad
Postavite hladnjak na čvrstu podlogu (pod). Ne prekrivajte rešetku zračenja.
Hladnjak ima prioritetni sklopni krug 230 V -> 12 V -> 18 V Power X-Change baterija. Uređaj možete pogoniti npr. s 230 V i istodobno imate utaknutu bateriju od 18 V. Ako uređaj odvojite od mrežne utičnice s 230 V, uređaj će se nakon cca. 10 sekundi automatski prebaciti na baterijski rad. Ako uređaj ponovno priključite na 230 V, onda će se uređaj ponovno prebaciti na mrežni način rada. To funkcionira i u načinu rada na 12 V.
6.2 Mrežni način rada (230 V \~ 50 Hz)
Izvadite mrežni priključni vod (slika 2 / pol. 17) iz prednjeg džepa i priključite ga na AC 220-240 V utičnicu (slika 2 / pol. 15) na stražnjoj strani hladnjaka. Okrenite regulator snage (slika 8 / pol. 8) na željeni položaj.
5.5 Transport hladnjaka
Hladnjak može da se transportuje kaišem za nošenje (slika 1 / poz. 1) ili ručkom za nošenje (slika 1 / poz. 5).
5.6 Otvarač za boce
Na prednjoj strani hladnjaka nalazi se otvarač za boce (slika 1 / poz. 4) za boce sa čepovima.
GB Full operating instructions are available to you for downloading at www.Einhell-Service.com.