VANDER PRO - Sewing machine Uniprodo - Free user manual and instructions
Find the device manual for free VANDER PRO Uniprodo in PDF.

| Product type | Overlock sewing machine |
| Brand | Uniprodo |
| Model | VANDER PRO |
| Rated voltage | 230 V / 50 Hz |
| Rated power | 90 W |
| Dimensions (W x D x H) | 32.5 x 38.5 x 31 cm |
| Weight | 8.5 kg |
| Number of threads | 2, 3 or 4 threads |
| Stitch length | 2 to 4 mm |
| Seam width | 3 to 6.7 mm (adjustable) |
| Differential feed | Yes, ratio 1:0.7 to 1:2 |
| Rolled hem | Yes |
| Stitch types | Standard overlock, flatlock, rolled hem, safety stitch, etc. |
| Built-in lighting | Yes (combined switch) |
| Free arm | Yes (removable fabric plate) |
| Movable upper knife | Disengageable for sewing without cutting |
| Included accessories | Needles, screwdriver, tweezers, spreader |
| Maintenance | Regular oiling with sewing machine oil; cleaning with soft cloth |
| Safety | Grounding, protection against electric shock, emergency stop not specified |
| Certification | CE |
Frequently Asked Questions - VANDER PRO Uniprodo
User questions about VANDER PRO Uniprodo
0 question about this device. Answer the ones you know or ask your own.
Ask a new question about this device
Download the instructions for your Sewing machine in PDF format for free! Find your manual VANDER PRO - Uniprodo and take your electronic device back in hand. On this page are published all the documents necessary for the use of your device. VANDER PRO by Uniprodo.
USER MANUAL VANDER PRO Uniprodo
OVERLOCK SEWING MACHINE
| DE | Produktname | Multifunktionale overlock-nähmaschine |
| EN | Product name | Multifunctional overlock sewing machine |
| PL | Nazwa produktu | Wielofunkcyjna owerlokowa maszyna do szycia |
| CZ | Název výrobku | Šicí stroj overlock |
| FR | Nom du produit | Surjeteuse |
| IT | Nome del prodotto | Tagliacuci overlock |
| ES | Nombre del producto | Remalladora |
| HU | Termék neve | Overlock varrógép |
| DA | Produktnavn | Overlock-Nähmaschine |
| FI | Tuotteen nimi | Saumuri |
| NL | Productnaam | Overlocknaaimachine |
| NO | Produktnavn | Overlocker symaskin |
| SE | Produktnamn | Overlock-symaskin |
| PT | Nome do produto | Máquina de costura overlock |
| SK | Názov produktu | Overlockový šijací stroj |
| DE | Modell | VANDER PRO |
| EN | Product model | |
| PL | Model produktu | |
| CZ | Model výrobku | |
| FR | Modèle | |
| IT | Modello | |
| ES | Modelo | |
| HU | Modell | |
| DA | Model | |
| FI | Tuotteen malli | |
| NL | Productmodel | |
| NO | Produktmodell | |
| SE | Produktmodell | |
| PT | Modelo do produto | |
| SK | Model | |
| DE | Hersteller | expondo Polska sp. z o.o. sp. k. |
| EN | Manufacturer | |
| PL | Producent | |
| CZ | Výrobce | |
| FR | Fabricant | |
| IT | Produttore | |
| ES | Fabricante | |
| HU | Termelő | |
| DA | Producent | |
| FI | Valmistaja | |
| NL | Producent | |
| NO | Produsent | |
| SE | Tillverkare | |
| PT | Fabricante | |
| SK | Výrobca | |
| DE | Anschrift des Herstellers | ul. Nowy Kisielin – Innowacyjna 7, 66-002 Zielona Góra | Poland, EU |
| EN | Manufacturer Address | |
| PL | Adres producenta | |
| CZ | Adresa výrobce | |
| FR | Adresse du fabricant | |
| IT | Indirizzo del produttore | |
| ES | Dirección del fabricante | |
| HU | A gyártó címe | |
| DA | Producentens adresse | |
| FI | Valmistajan osoite | |
| NL | Adres producent | |
| NO | Produsentens adresse | |
| SE | Tillverkarens adress | |
| PT | Endereço do fabricante | |
| SK | Adresa výrobcu |

natural_image
3D rendering of a sewing machine with metal clamps and a numbered component (16), no visible text or symbols on the device itself.natural_image
Close-up of a sewing machine with metal frame and attached wiring (no visible text or symbols)natural_image
Close-up of a white mechanical device with a metal bracket and multiple cylindrical components (no visible text or symbols)natural_image
Close-up of a sewing machine with visible mechanical components and a black circular arrow indicating rotation (no text or symbols)natural_image
Close-up of hands operating a mechanical device with multiple ports and a tool (no visible text or symbols)


natural_image
Technical line drawing of a mechanical assembly with no visible text or symbolsB

natural_image
Technical line drawing of a mechanical assembly with no visible text or symbolsnatural_image
Line drawing of a mechanical device with scissors and hanging weights, no text or symbols presentnatural_image
Diagram of a mechanical lifting scale with three vertical supports and connecting rods (no text or labels)
natural_image
Technical illustration showing a hand holding a pen and a cylindrical device with internal components (no text or symbols)
natural_image
Technical line drawing of a mechanical component with no visible text or symbols
natural_image
Close-up of a mechanical component with a dial and numbered parts (no readable text or symbols)flowchart
graph TD
    A["Rectangular Node"] --> B["B"]
Differentialeinspeisung
natural_image
Line drawing of a women's dress with patterned skirt, side view, and fabric detail (no text or symbols)natural_image
Line drawings of three different fashion outfits with fabric and accessories (no text or symbols)natural_image
Illustration of two hands using a tool to tie a small object on a surface (no text or symbols present)
natural_image
Technical line drawing of a sewing machine with no visible text or symbols
natural_image
Technical line drawing of a mechanical device with rotating shaft and mounting base (no text or symbols)
natural_image
Line drawing of a mechanical device with an arrow indicating direction (no text or symbols)Freiarmnähen
natural_image
Black-and-white illustration of hands operating a sewing machine with a hand pointing to the mechanism (no text or symbols visible)natural_image
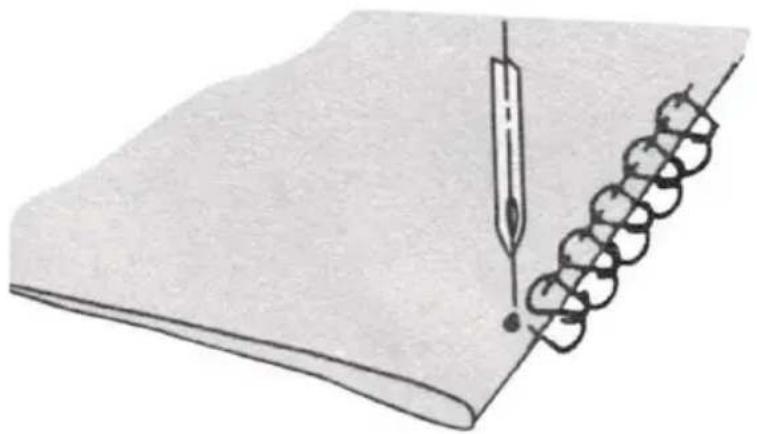
Technical line drawing of a sewing machine needle stitching fabric (no text or symbols)natural_image
Illustration of hands operating a sewing machine needle (no text or symbols visible)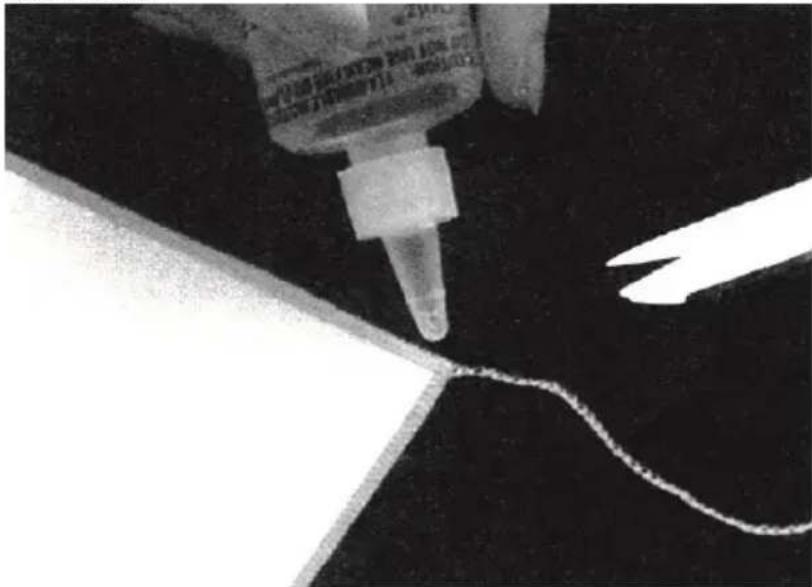
natural_image
Close-up of a pipette tip dispensing liquid onto a surface with a wavy line nearby (no visible text or symbols)natural_image
Close-up of a human face with visible skin texture and a vertical dark line (no text or symbols)
natural_image
Technical line drawing of a mechanical device with no visible text or symbolsnatural_image
Illustration of a pen writing on a notepad with a coiled spring (no text or symbols)natural_image
Close-up of a coiled, coiled wire against a textured background (no text or symbols visible)natural_image
Diagram of a coiled spring attached to a flat surface with an arrow labeled 'A' pointing to it (no text or symbols beyond label)natural_image
Technical line drawing of a sewing machine component (no text or symbols)natural_image
Close-up of a sewing machine needle stitching fabric (no visible text or symbols)
natural_image
Close-up of a metallic object with parallel grooves on a textured surface (no visible text or symbols)Eckige Ecken drehen
Äußere Ecke
natural_image
Technical line drawing of a sewing machine needle stitching and fastening a thread (no text or symbols)Innere Ecke
natural_image
Technical illustration of a sewing machine stitching fabric (no text or symbols)natural_image
Technical line drawing of a sewing machine with a coiled cord, showing mechanical components and assembly (no text or symbols)natural_image
Mechanical assembly diagram showing a lever mechanism with no text or symbolsThis User Manual has been translated for your convenience using machine translation. Reasonable efforts have been made to provide an accurate translation; however, no automated translation is perfect nor is it intended to replace human translators. The official User Manual is the English version. Any discrepancies or differences created in the translation are not binding and have no legal effect for compliance or enforcement purposes. If any questions arise related to the accuracy of the information contained in the User Manual, please refer to the English version of those contents which is the official version.
Technical data
| Parameter description | Parameter value |
| Product name | Multifunctional overlock sewing machine |
| Model | Vander PRO |
| Rated voltage [V~] / Frequency [Hz] | 230 / 50 |
| Rated power [W] | 90 |
| Dimensions [Width x Depth x Height; mm] | 32.5 x 38.5 x 31 |
| Weight [kg] | 8.5 |
1. General description
The user manual is designed to assist in the safe and trouble-free use of the device. The product is designed and manufactured in accordance with strict technical guidelines, using state-of-the-art technologies and components. Additionally, it is produced in compliance with the most stringent quality standards.
DO NOT USE THE DEVICE UNLESS YOU HAVE THOROUGHLY READ AND UNDERSTOOD THIS USER MANUAL.
To increase the product life of the device and to ensure trouble-free operation, use it in accordance with this user manual and regularly perform maintenance tasks. The technical data and specifications in this user manual are up to date. The manufacturer reserves the right to make changes associated with quality improvement. The device is
designed to reduce noise emission risks to a minimum, taking into account technological progress and noise reduction opportunities.
Legend
 | The product satisfies the relevant safety standards. |
 | Read instructions before use. |
 | The product must be recycled. |
 | WARNING! or CAUTION! or REMEMBER! Applicable to the given situation.(general warning sign) |
 | Wear protective goggles. |
 | Use guard. |
 | ATTENTION! Electric shock warning! |
 | ATTENTION! Rotating parts, entanglement hazard! |
 | ATTENTION! Sharp, moving machine parts!Danger of cutting or amputating fingers/limbs. |
 | Only use indoors. |
EN
only and in some details may differ from the actual product.
2. Usage safety
Electrical equipment:
ATTENTION! Read all safety warnings and all instructions. Failure to follow the warnings and instructions may result in electric shock, fire and/or serious injury or even death.
Non-electrical equipment:
ATTENTION! Read all safety warnings and all instructions. Failure to follow the warnings and instructions may result in serious injury or even death.
The terms "device" or "product" are used in the warnings and instructions to refer to the:
MULTIFUNCTIONAL OVERLOCK SEWING MACHINE.
2.1. Electrical safety
a) The plug must fit the socket. Do not modify the plug in any way. Using original plugs and matching sockets reduces the risk of electric shock.
b) Do not touch the device with wet or damp hands.
c) Use the cable only for its designated use. Never use it to carry the device or to pull the plug out of a socket. Keep the cable away from heat sources, oil, sharp edges or moving parts. Damaged or tangled cables increase the risk of electric shock.
d) Do not use the device if the power cord is damaged or shows obvious signs of wear. A damaged power cord should be replaced by a qualified electrician or the manufacturer's service centre.
e) To avoid electric shock, do not immerse the cord, plug or device in water or other liquids. Do not use the device on wet surfaces.
f) Do not use in very humid environments or in the direct vicinity of water tanks.
g) Prevent the device from getting wet. Risk of electric shock!
h) Before the first use, please check whether the main voltage type and current comply with the indicated data on the type plate.
2.2. Safety in the workplace
a) Make sure the workplace is clean and well lit. A messy or poorly lit workplace may lead to accidents. Try to think ahead, observe what is going on and use common sense when working with the device.
b) If there are any doubts as to the correct operation of the device, contact the manufacturer's support service.
c) Only the manufacturer's service point may repair the device. Do not attempt any repairs independently!
d) In case of fire, use a powder or carbon dioxide (CO2) fire extinguisher (one intended for use on live electrical devices) to put it out.
e) Use the device in a well-ventilated space.
f) Regularly inspect the condition of the safety labels. If the labels are illegible, they must be replaced.
g) Please keep this manual available for future reference. If this device is passed on to a third party, the manual must be passed on with it.
h) Keep packaging elements and small assembly parts in a place not available to children.
i) Keep the device away from children and animals.
j) If this device is used together with another equipment, the remaining instructions for use shall also be followed.

Remember! When using the device, protect children and other bystanders.
2.3. Personal safety
a) Do not use the device when tired, ill or under the influence of alcohol, narcotics or medication which can significantly impair the ability to operate the device.
b) The machine may be operated by physically fit persons who are able to handle the machine, are properly trained, who have reviewed this operating manual and have received training in occupational health and safety.
c) When working with the device, use common sense and stay alert. Temporary loss of concentration while using the device may lead to serious injuries.
d) To prevent the device from accidentally switching on, make sure the switch is on the OFF position before connecting to a power source.
e) Do not overestimate your abilities. When using the device, keep your balance and remain stable at all times. This will ensure better control over the device in unexpected situations.
f) Do not wear loose clothing or jewellery. Keep hair, clothes and gloves away from moving parts. Loose clothing, jewellery or long hair may get caught in moving parts.
g) Remove all adjusting tools or spanners before turning the device on. A tool or spanner left in the revolving part of the device may cause injury.
h) The device is not a toy. Children must be supervised to ensure that they do not play with the device.
i) Do not put your hands or other items inside the device while it is in use!
2.4. Safe device use
a) Do not use the device if the "ON/OFF" switch does not function properly (does not switch the device on and off). Devices which cannot be switched on and off using the ON/OFF switch are hazardous, should not be operated and must be repaired.
b) Make sure the plug is disconnected from the socket before attempting any adjustments, accessory replacements or before putting the device aside. Such precautions will reduce the risk of accidentally activating the device.
c) When not in use, store in a safe place, away from children and people not familiar with the device who have not read the user manual. The device may pose a hazard in the hands of inexperienced users.
d) Keep the device in perfect technical condition. Before each use check for general damage, especially check moving components for cracked parts or elements, and for any other conditions which may impact the safe operation of the device. If damage is discovered, hand over the device for repair before use.
e) Keep the device out of the reach of children.
f) Device repair or maintenance should be carried out by qualified persons, only using original spare parts. This will ensure safe use.
g) To ensure the operational integrity of the device, do not remove factory-fitted guards and do not loosen any screws.
h) Avoid situations where the device stops working during use due to excessive loading. This may result in overheating of the drive elements and damage to the device.
i) Do not touch articulated parts or accessories unless the device has been disconnected from the power source.
j) Do not move, adjust or rotate the device in the course of work.
k) Do not leave this appliance unattended while it is in use.
I) The device is not a toy. Cleaning and maintenance may not be carried out by children without supervision by an adult person.
m) It is forbidden to interfere with the structure of the device in order to change its parameters or construction.
n) Keep the device away from sources of fire and heat.
o) Do not overload the device.
p) Do not cover the ventilation openings!
q) Use the device on a hard, stable surface, protected from moisture, frost and direct sunlight.

ATTENTION! Despite the safe design of the device and its protective features, and despite the use of additional elements protecting the operator, there is still a slight risk of accident or injury when using the device. Stay alert and use common sense when using the device.
3. Use guidelines
This device is used for finishing the edges of fabrics to prevent fraying and create a professional look. An overlock sewing machine trims the edges and sews over them with an overcasting stitch in one step. It's commonly used for sewing stretchy fabrics and creating durable seams. Overlock machines can also create decorative edges and hems.
The user is liable for any damage resulting from unintended use of the device.
3.1. Device description
EN
natural_image
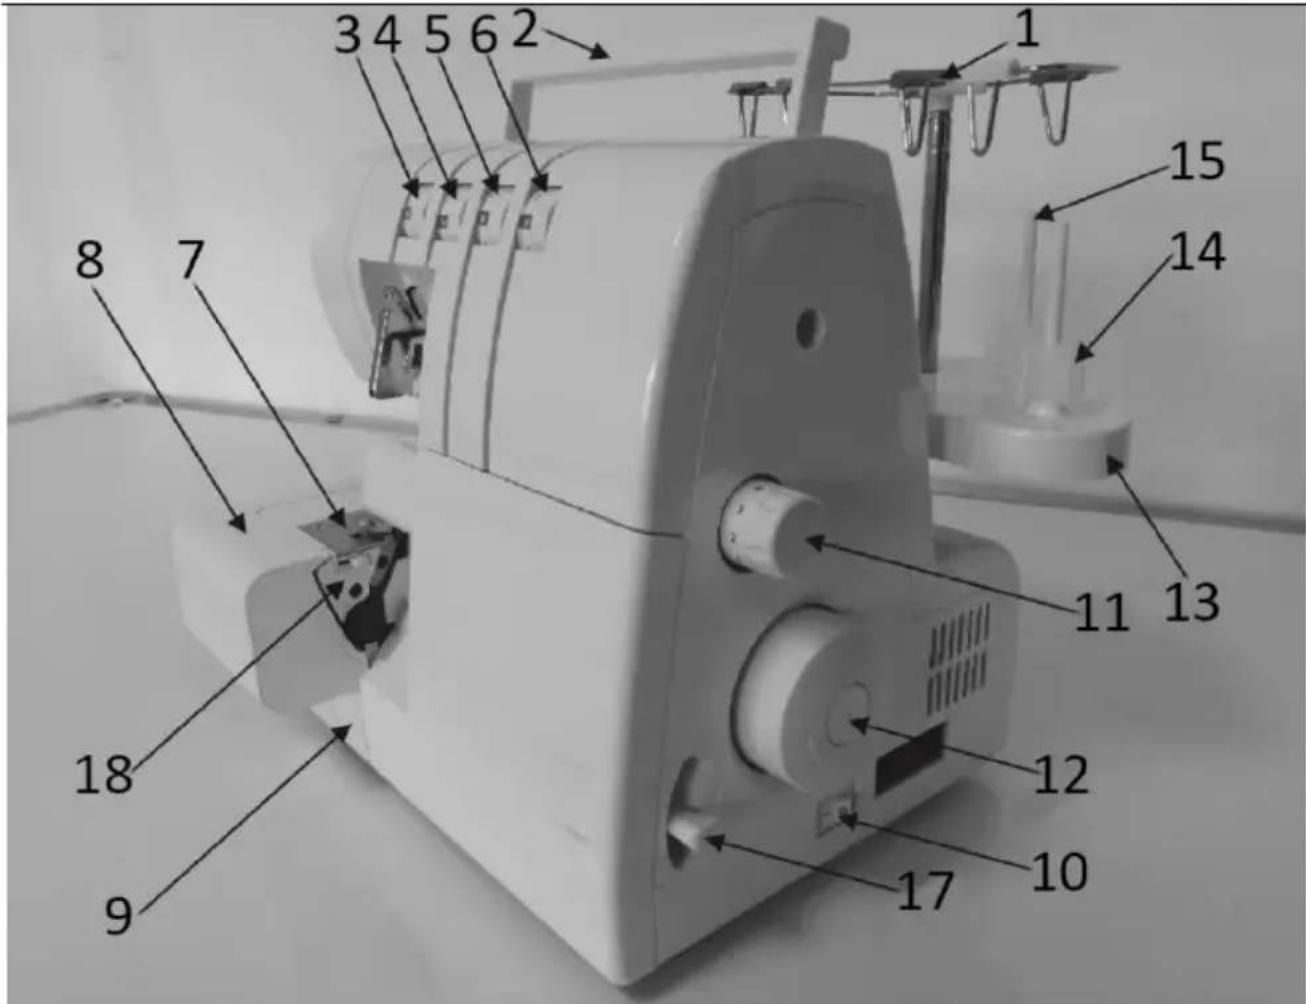
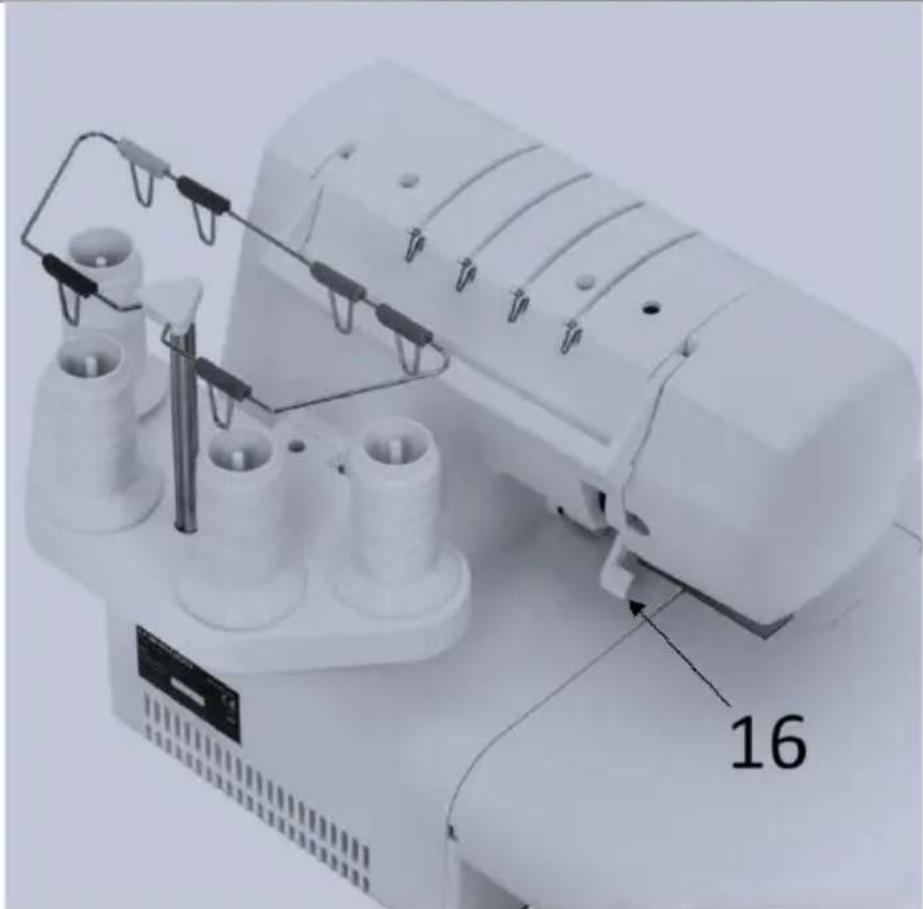
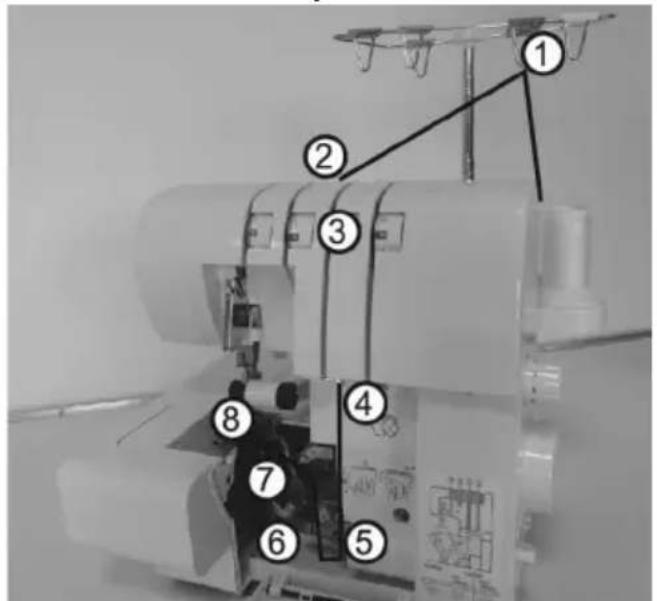
Close-up of a sewing machine with metal clamps and a numbered component (16), no visible text or symbols on the device itself.| 1 | Thread guides and holder |
| 2 | Handle |
| 3 | Left needle thread tension dial (blue) |
| 4 | Right needle thread tension dial (green) |
| 5 | Upper lopper thread tension dial (orange) |
| 6 | Lower looper thread tension dial (yellow) |
| 7 | Throat plate |
| 8 | Cloth plate |
| 9 | Looper cover |
| 10 | Power and light switch |
| 11 | Stitch length dial |
| 12 | Hand wheel |
| 13 | Spool stand |
| 14 | Spool holder |
| 15 | Presser bar lifter |
| 16 | Presser bar lifter |
| 17 | Differential feed adjusting lever knob |
| 18 | Seam width finger support plate |
Accessories
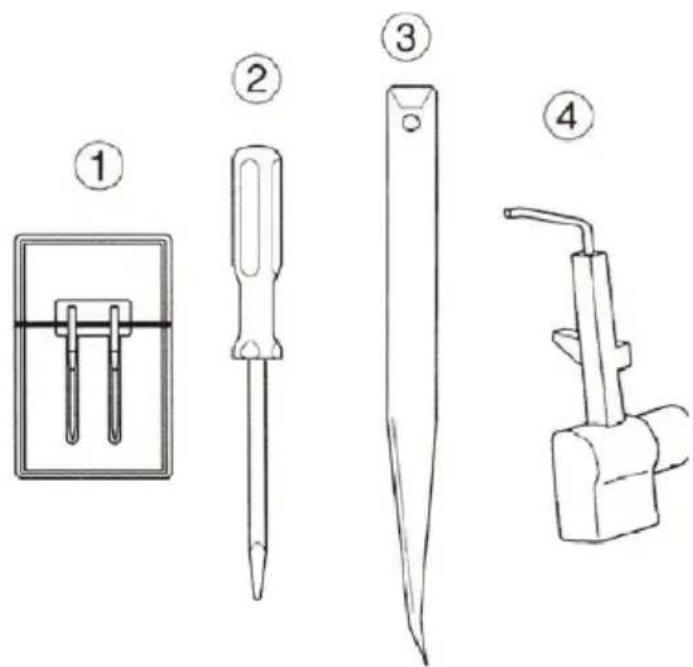
1 Needles
2 Screwdriver
3 Tweezers
4 Spreader
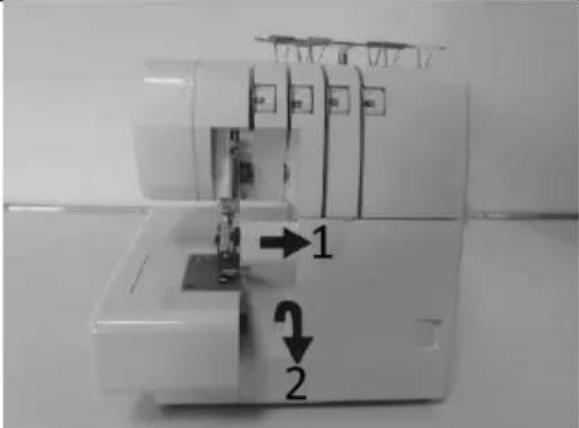 | How to open looper cover1 Push the cover to the right as far as it will go2 Pull cover down toward you |
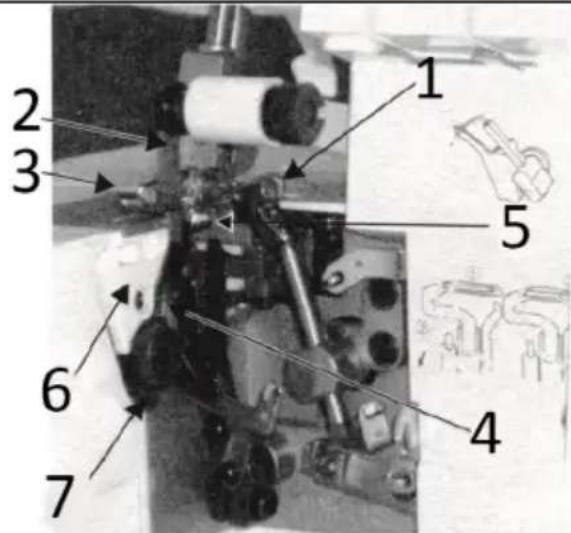 | Principal parts behind looper cover1 upper looper2 movable upper knife3 presser foot4 stationary lower knife5 lower looper6 Seam width finger knob7 seam width adjustment knob |
Please note: The illustrations of this product can be found on the last page of the instruction manual (pp. xxx).
3.2. Preparing for use
APPLIANCE LOCATION
The temperature of environment must not be higher than 40^ C and the relative humidity should be less than 85%. Ensure good ventilation in the room in which the device is being used. There should be at least 10 cm distance between each side of the device and the wall or other objects. The device should always be used when positioned on an even, stable, clean, fireproof and dry surface, and be out of the reach of children and persons with limited mental and sensory functions. Position the device such that you always have access to the power plug. The power cord connected to the appliance must be properly grounded and correspond to the technical details on the product label.
Disassemble the device and all its components and clean them before the first use.
3.3. Device use
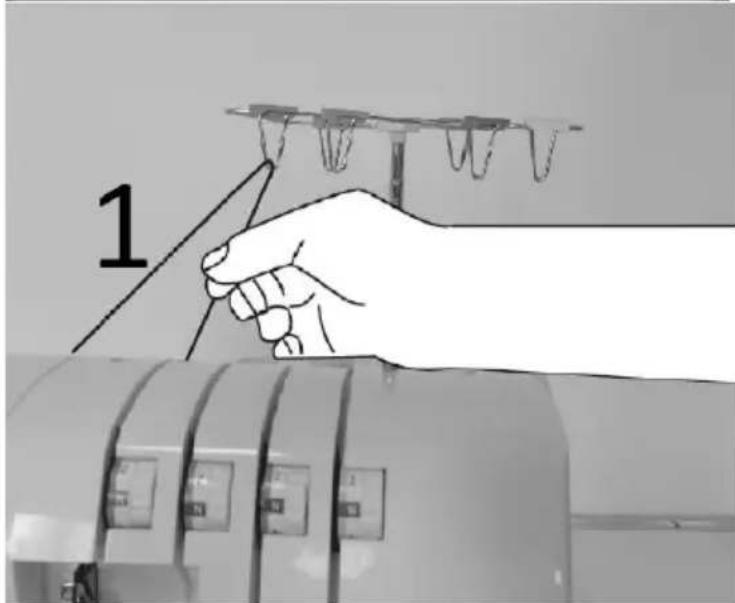
Preparation for threading
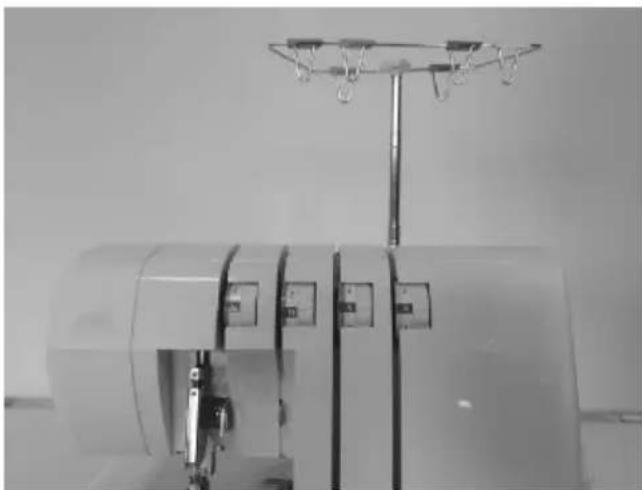
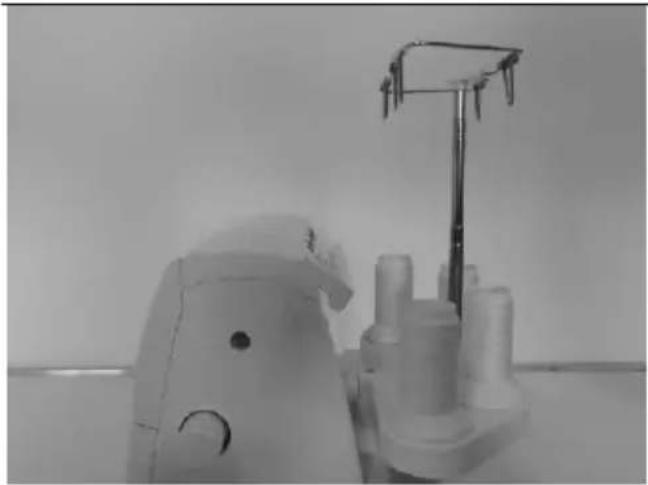
natural_image
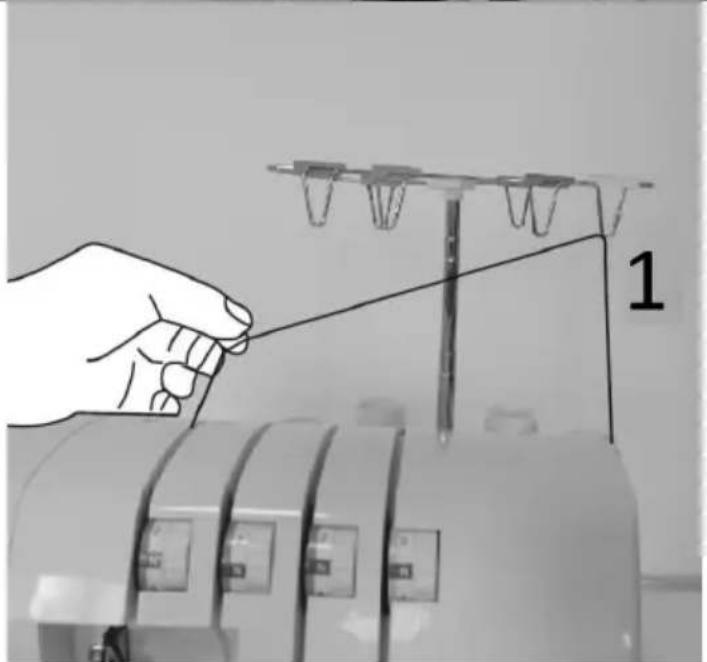
Close-up of a laboratory instrument with metal frame and hanging weights (no visible text or symbols)This machine is shipped with the thread guide holder in the lowered position.
Fully extend the thread guide holder.
The two joints on the telescoping guide will click into place when they are correctly positioned.
EN
natural_image
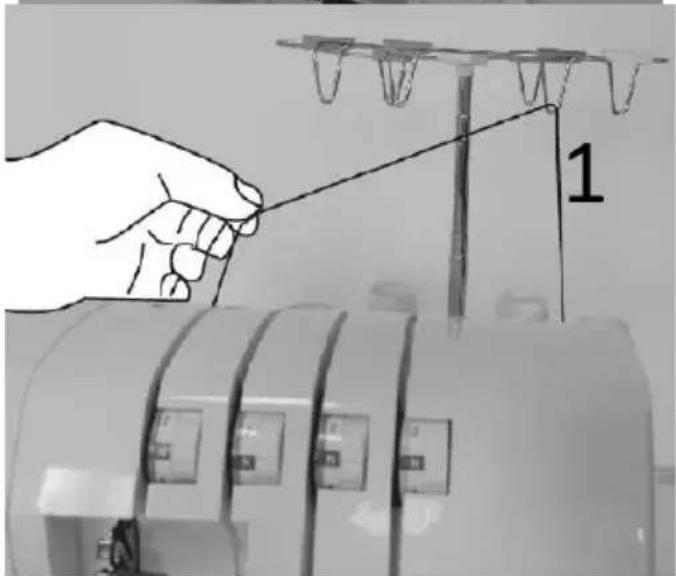
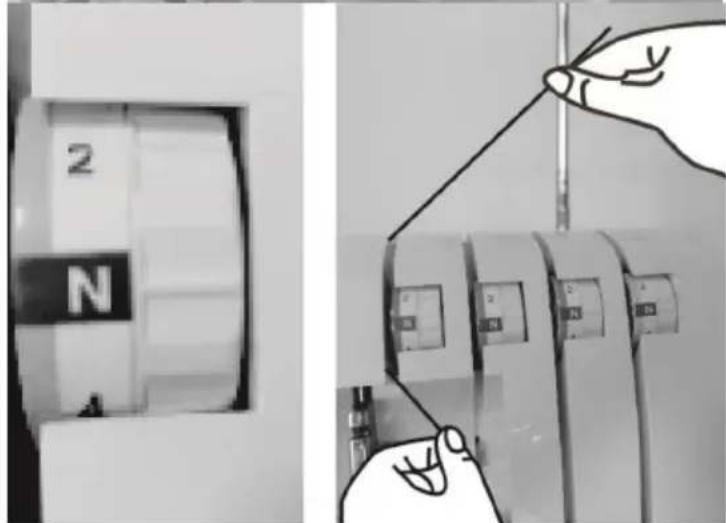
Close-up of a white mechanical device with a metal bracket and multiple cylindrical components (no visible text or symbols)Center the thread guides above the spool pins.
Place the thread over the cone adapters on the spool pins.
Note: If the machine is threaded, straighten the threads to prevent tangling.
How to remove and insert needles
To Remove Needles
natural_image
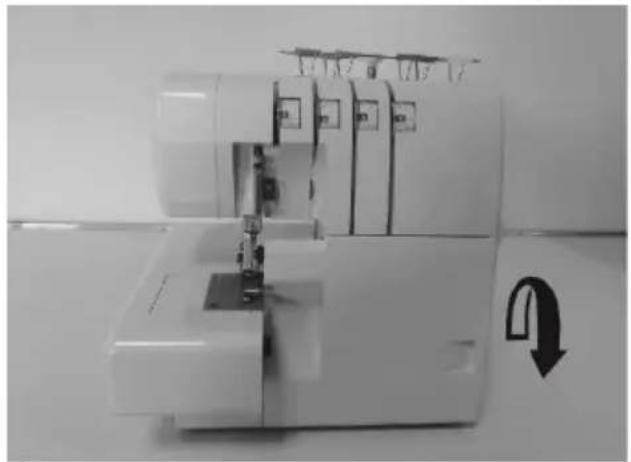
Close-up of a sewing machine with visible mechanical components and a black circular arrow indicating rotation (no text or symbols)Be sure to disconnect the machine from the electric outlet before removing needles
Turn the handle wheel toward you until the needle is at its highest position
Loosen, but do not remove, the needle set screw with the small screwdriver.
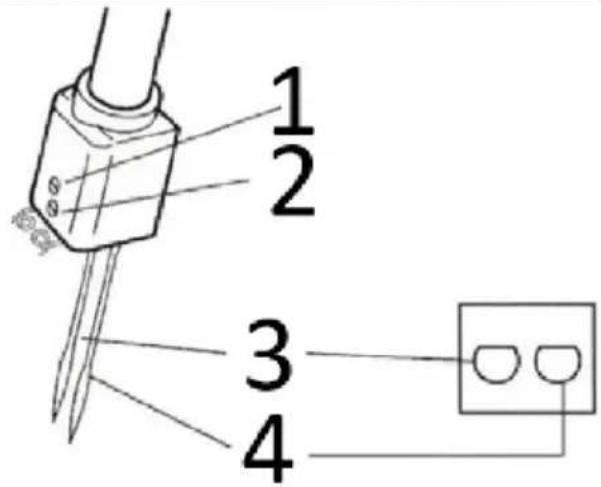
Remove needles
1 Left needle set screw
2 Right needle set screw
3 Left needle
4 Right needle
To Insert Needles
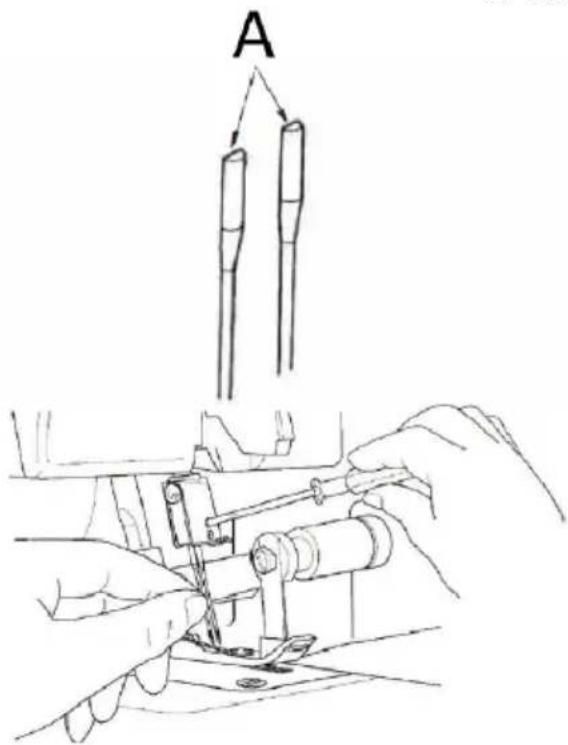
Hold the needle with the flat surface to the back
Insert the needle into the needle clamp as far as it will go.
Securely tighten the needle set screw
A flat surface to the rear
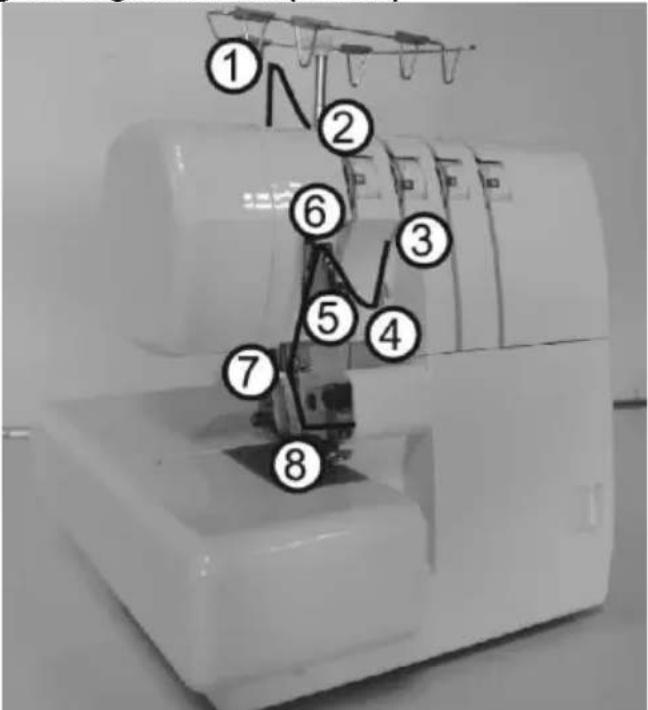
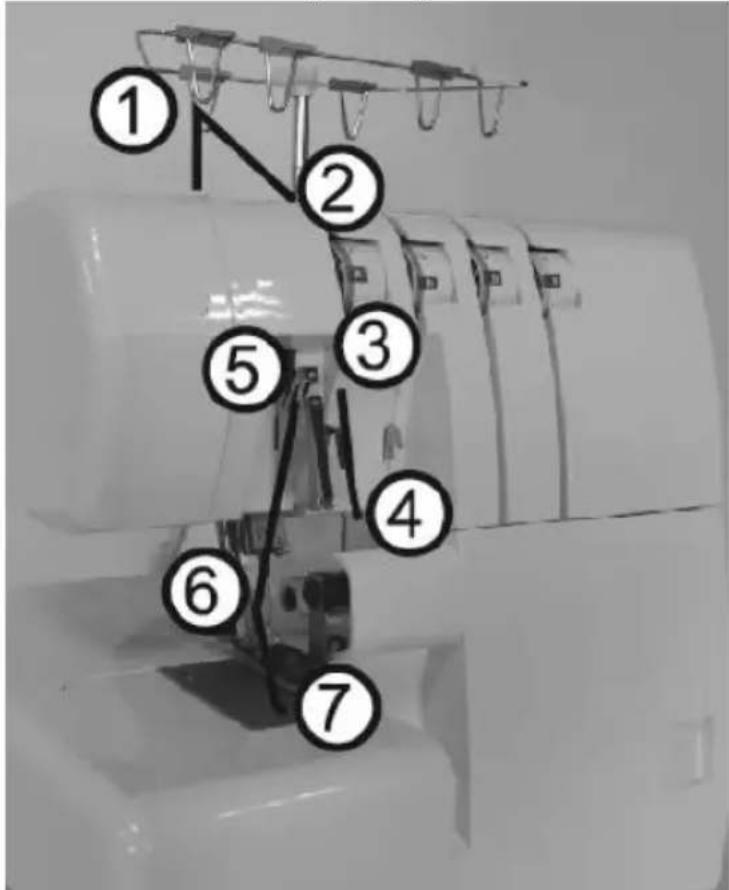
Threading the machine
Threading Diagram
A color-coded threading
diagram is located inside the
looper cover for quick
reference
Thread the machine in order 1
to 4 as shown.
Understanding the color
- Orange – Upper looper thread
- Yellow – Lower looper thread
- Green – Right needle thread
- Blue – Left needle thread
To Thread the Machine Correctly
! Be sure to turn off power switch!
To Thread the Machine Correctly
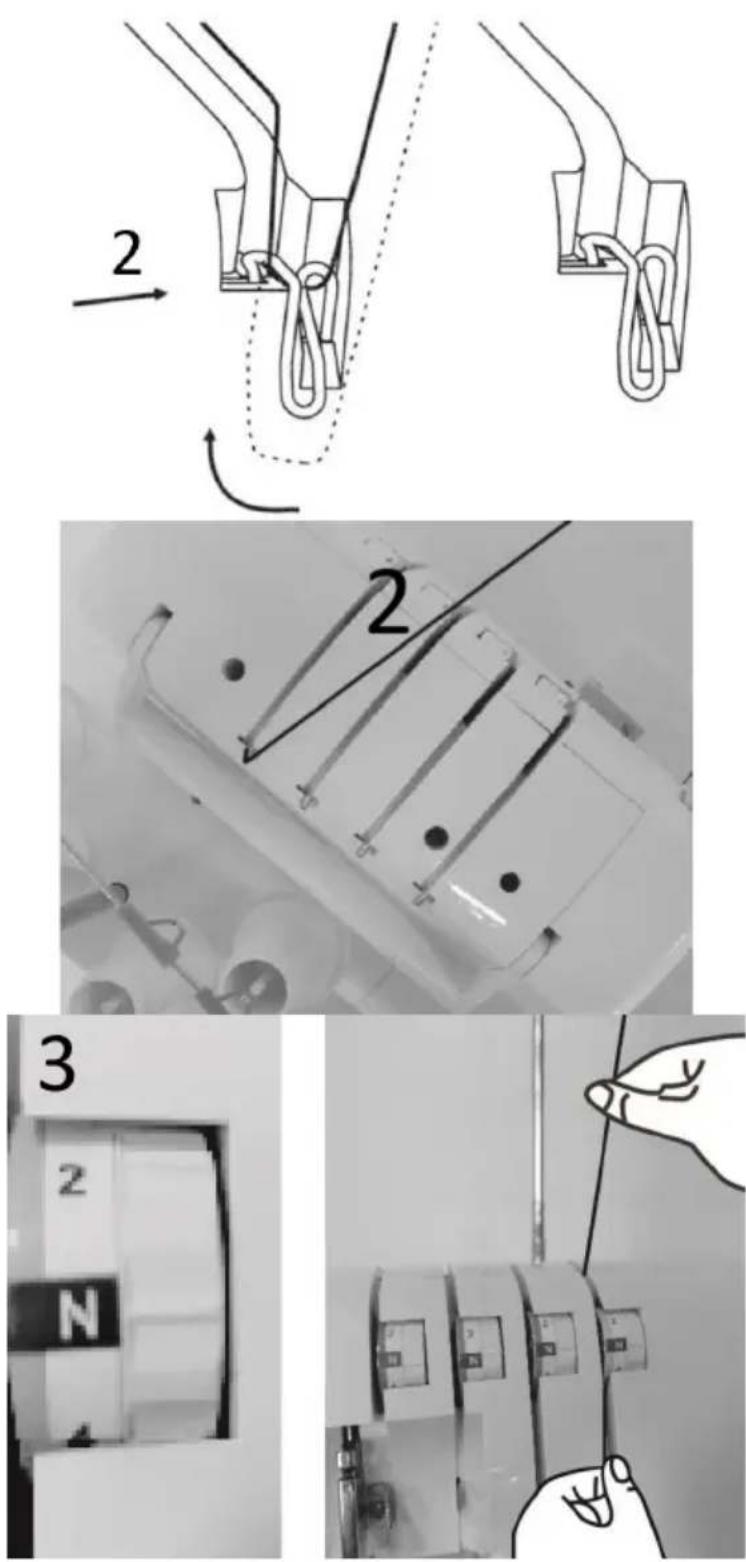
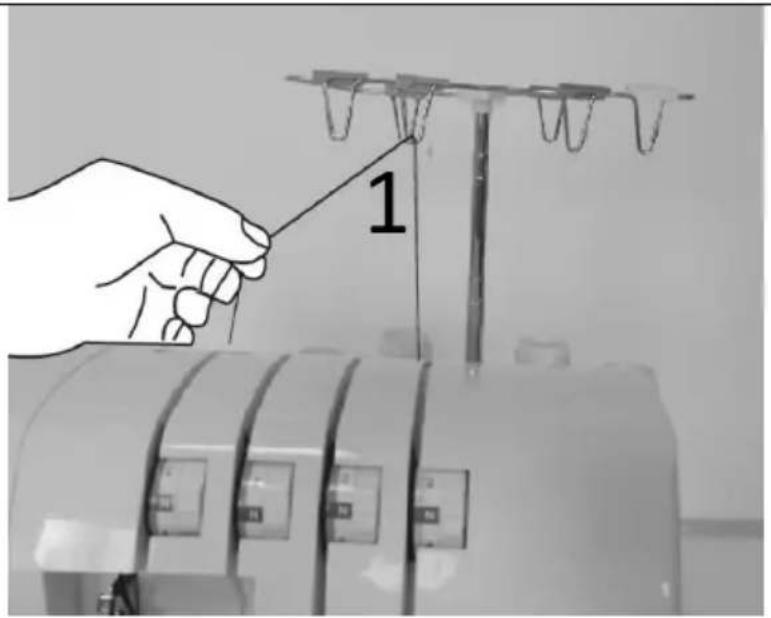
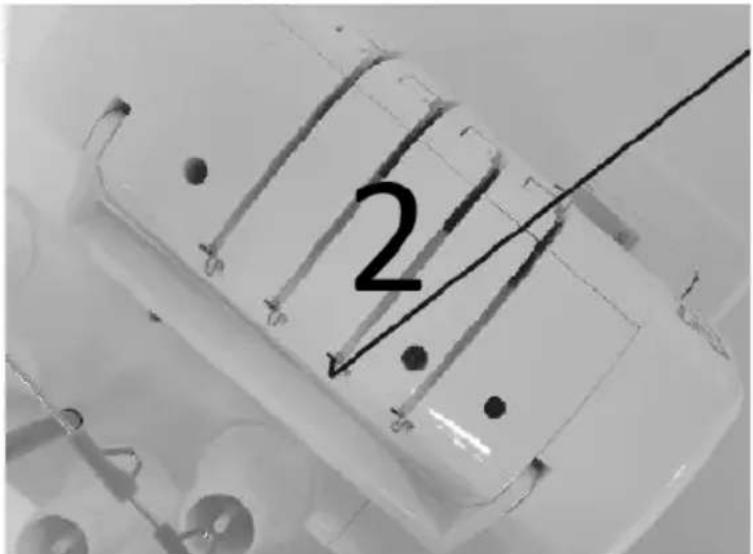
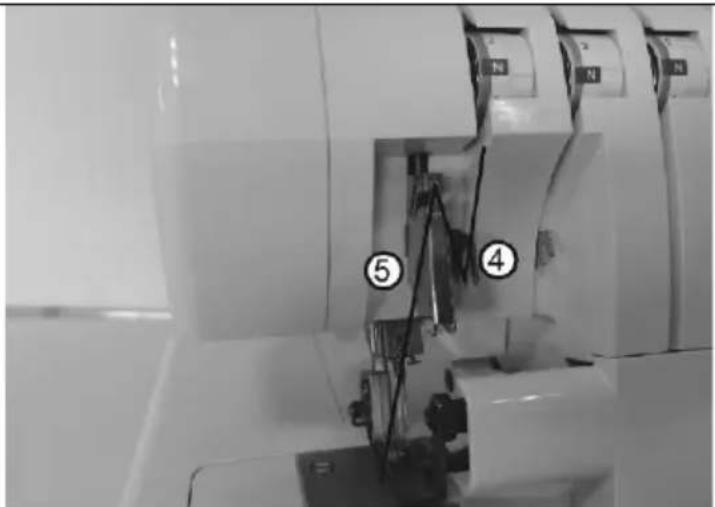
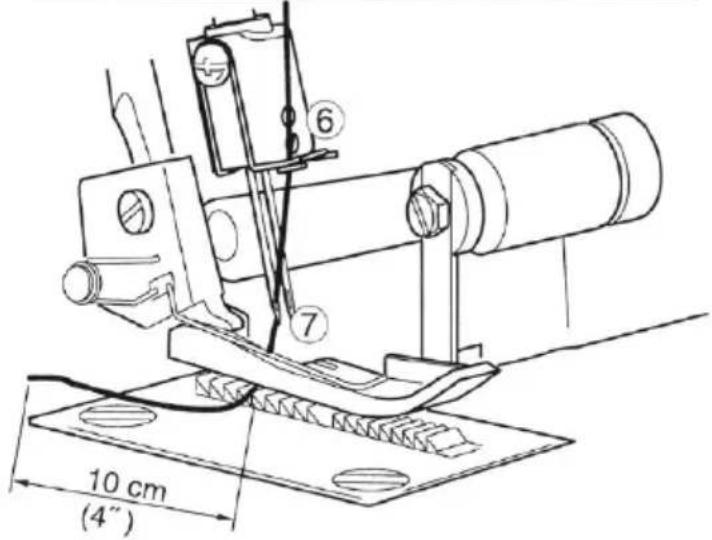
1 Threading the Upper Looper (Orange)
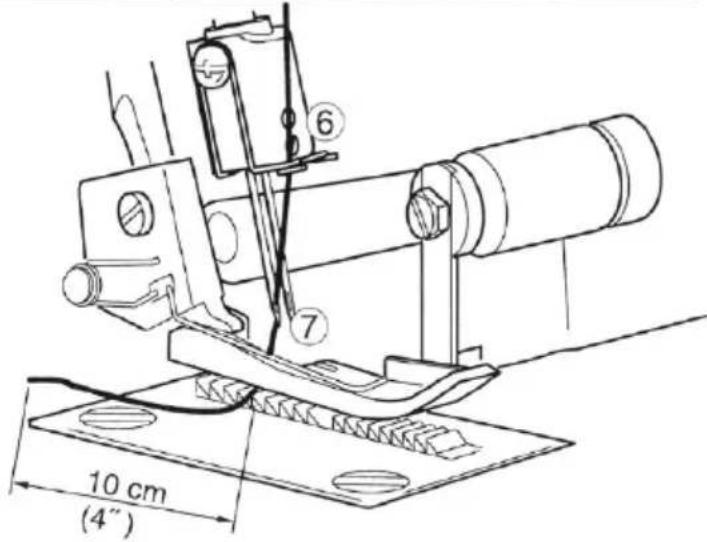
Thread the upper looper as indicated 1 \~ 8
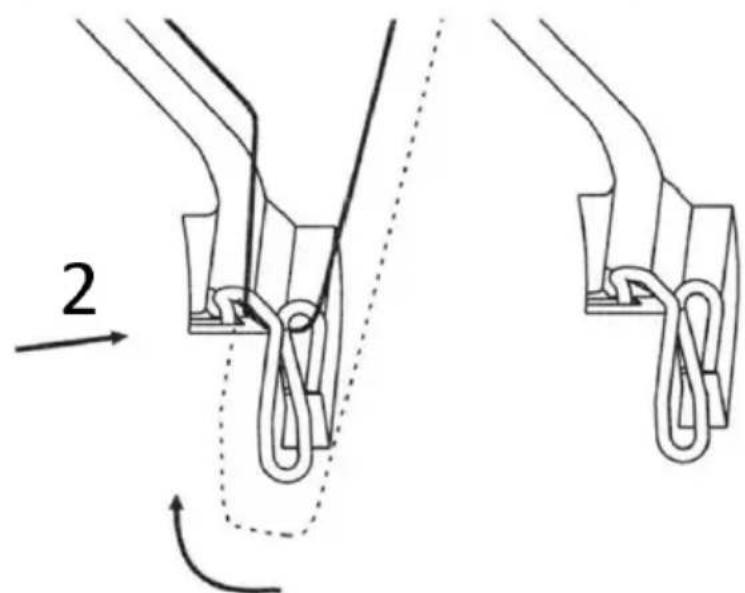
Pass thread from back to the front through the thread guide 1
Thread the top cover thread guide by pulling the thread downward until it slips under thread guide 2.
While holding the thread with your finger, pass it between the tension discs and pull the thread down to ensure it is properly positioned between tension discs 3.

natural_image
Close-up of hands adjusting a mechanical component with a tool (no visible text or symbols)
Thread the looper area of the machine following the orange color coded thread guides (4 \~ 7)
Thread the hole in the upper looper from front to back (8)
Note: Use the tweezers provided in the accessory set to aid in threading the looper
Pull about 10cm (4 inches) of thread through the looper and place to the back of the throat plate
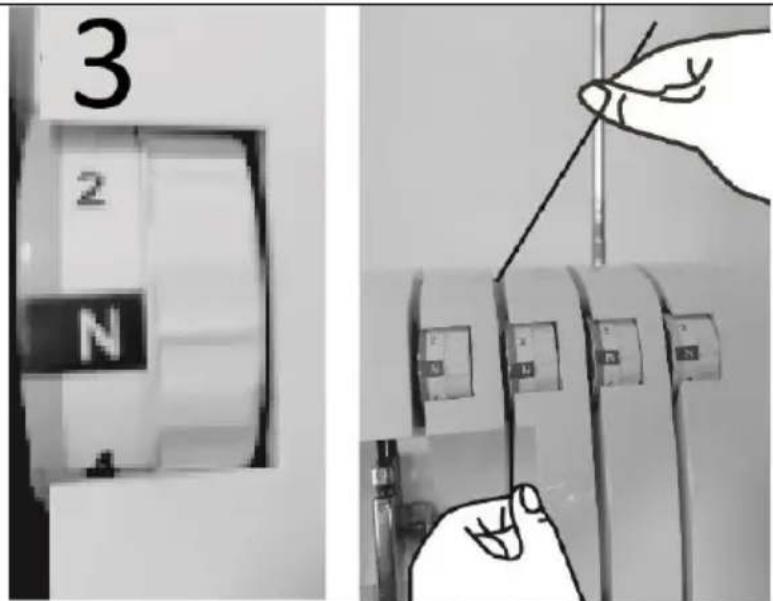
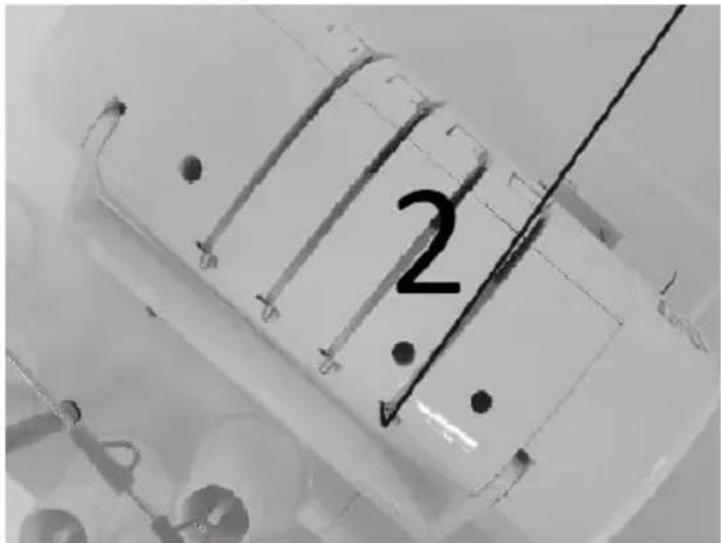
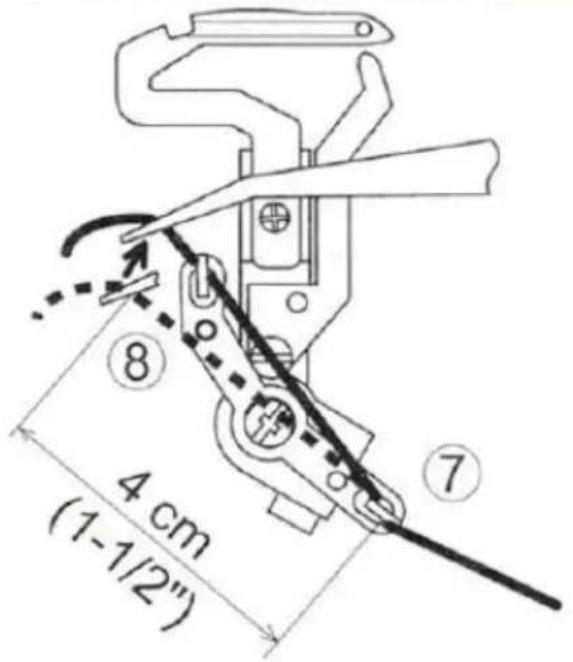
Threading the lower looper (Yellow)
Thread the lower looper as indicated 1\~9

Pass thread from back to the front through the thread guide 1
Thread the top cover thread guide by pulling the thread downward until it slips under thread guide 2.
While holding the thread with your finger, pass it between the tension discs and pull the thread down to ensure it is properly positioned between tension discs 3.
Turn the handle wheel toward you until the lower lopper is at the far right
Thread the looper area of the following yellow color-coded thread guides 4\~7.
Note: Use the tweezers provided in the accessory set to aid in threading the looper
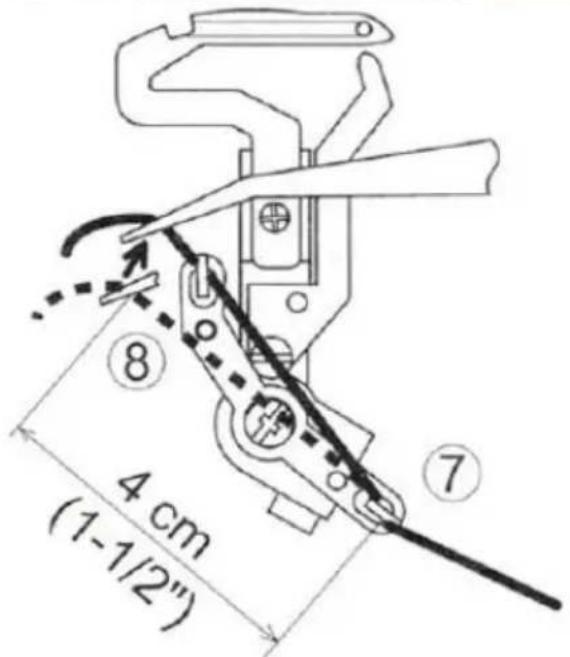
Grasp the thread with the tweezers 4cm (1-1/2 in) from thread guide 7
Place the thread with the point of the tweezers slightly under and to the left of threading guide 8.
Pull the thread up and into thread guide 8.

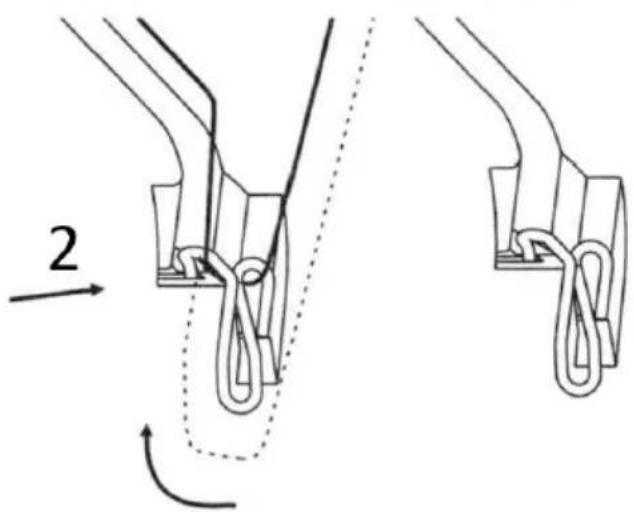
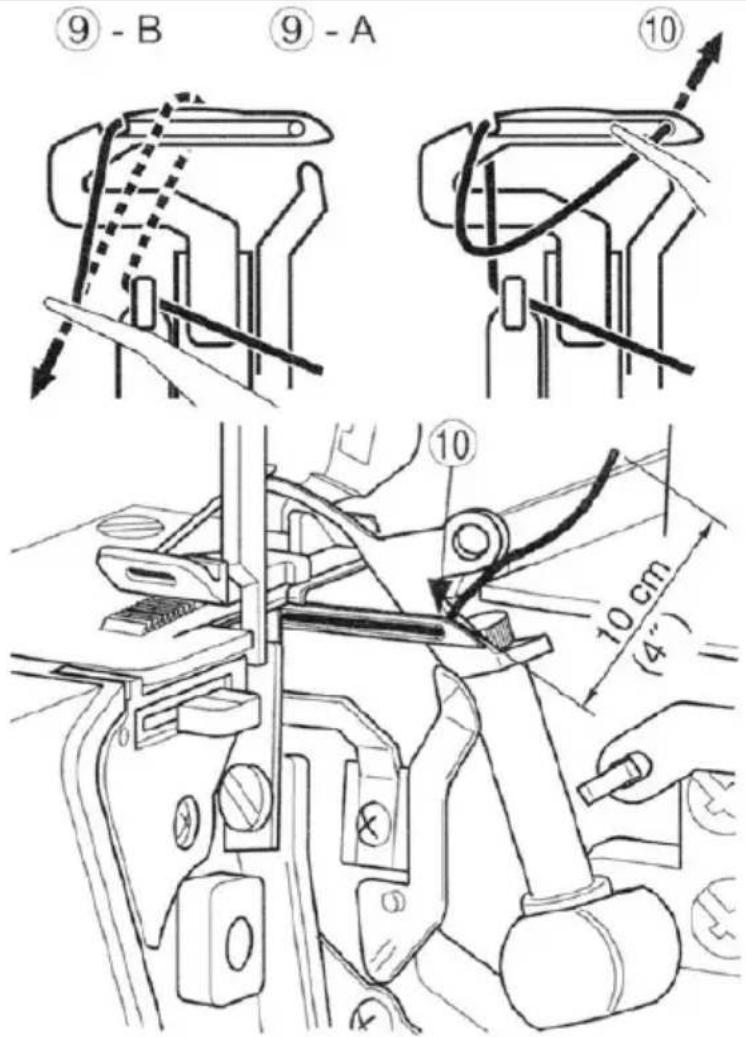
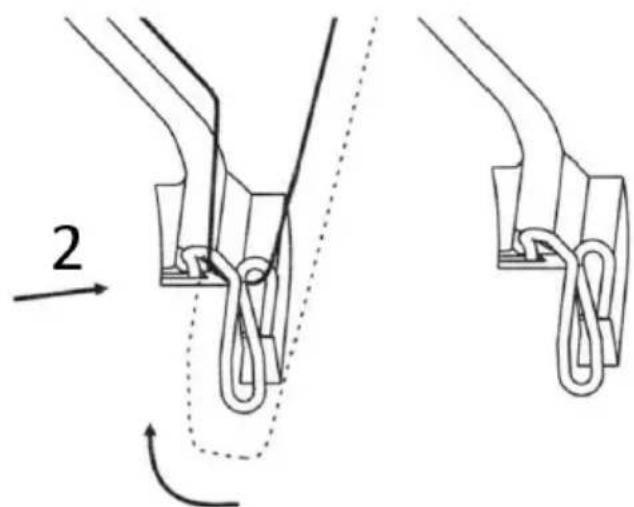
Pass the thread behind and over the top end of the left looper (9-A)
Then pull it downward gently so that it will slip into the slot in the looper (9-B)
Pick up the thread and pass it through the hole in the end of the looper 10.
Note: Use the tweezers provided in the accessory set to aid in threading the looper
The thread should be positioned in the groove of the lower looper.
Pull about 10cm (4in) of thread through the looper and place it over the top of the upper looper and to the back of the throat plate.
Threading the Right Needle (Green)
Thread the right needle as indicated 1\~8
Pass thread from back to the front through the thread guide 1
natural_image
Diagram showing two mechanical components with a dotted line indicating a connection or motion path (no text or symbols present)Thread the top cover thread guide by pulling the thread downward until it slips under thread guide 2.
While holding the thread with your finger, pass it between the tension discs and pull the thread down to ensure it is properly positioned between tension discs 3.
Continue to thread points 4\~6
Note: be sure to pass the thread through upper thread patch of the thread guide 6
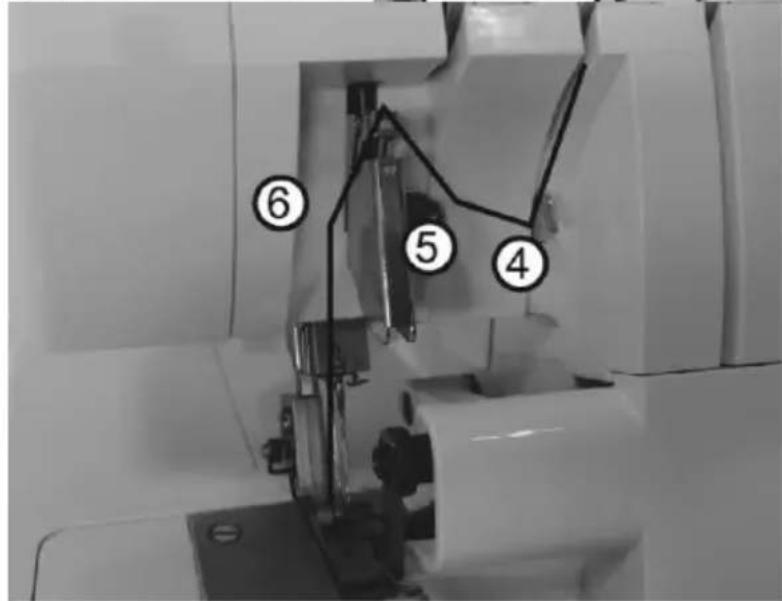
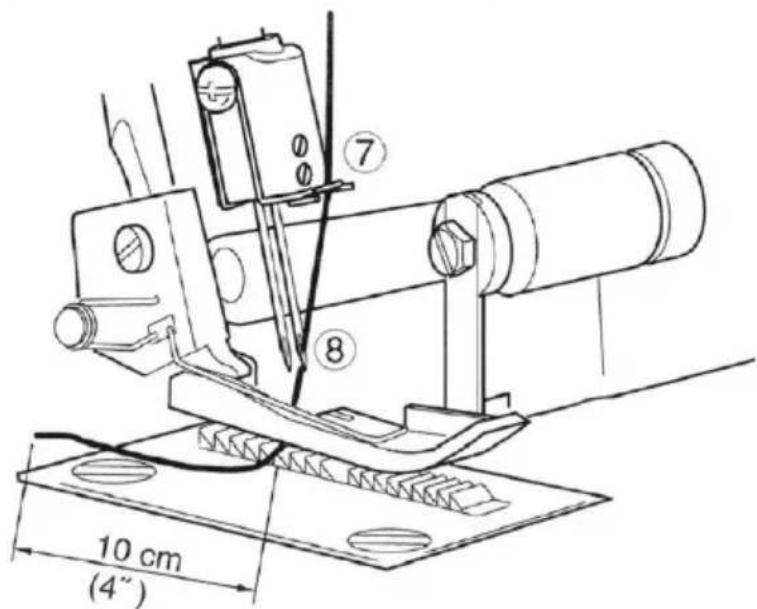
Thread the eye of the right needle (8)
Note: Use of tweezers in the accessory set will make needle eye threading easy.
Draw about 10cm (4in) of thread through needle eye to hang free.
Place the thread to the back, under the presser foot.
Threading the left Needle (Blue)
Thread the left needle as indicated 1\~7
Pass thread from back to the front through the thread guide 1
Thread the top cover thread guide by pulling the thread downward until it slips under thread guide 2.
While holding the thread with your finger, pass it between the tension discs and pull the thread down to ensure it is properly positioned between tension discs 3.
Continue to thread points 4\~6
Note: Be sure to pass the thread through lower thread path of the thread guide 5
Thread the eye of the left needle 7.
Note: Use of the tweezers in the accessory set will make needle eye threading easy.
Draw about 10cm (4 in) of thread through needle eye to hang free.
Place the thread to the back, under the presser foot.

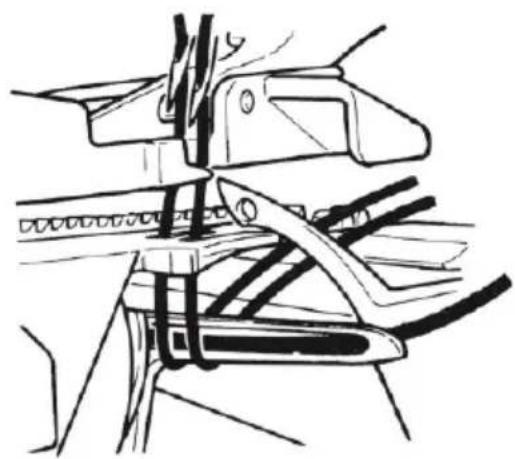
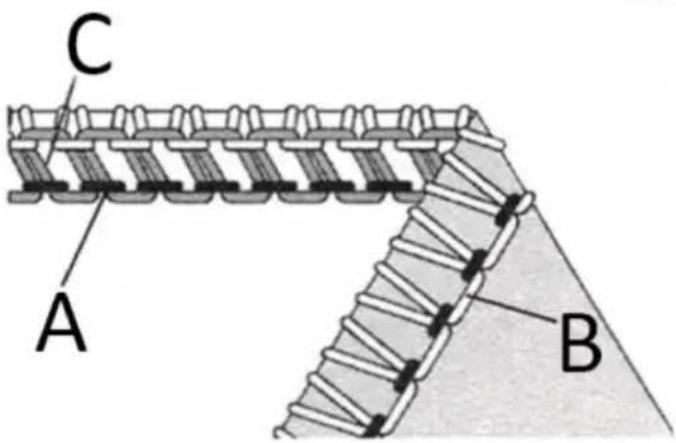
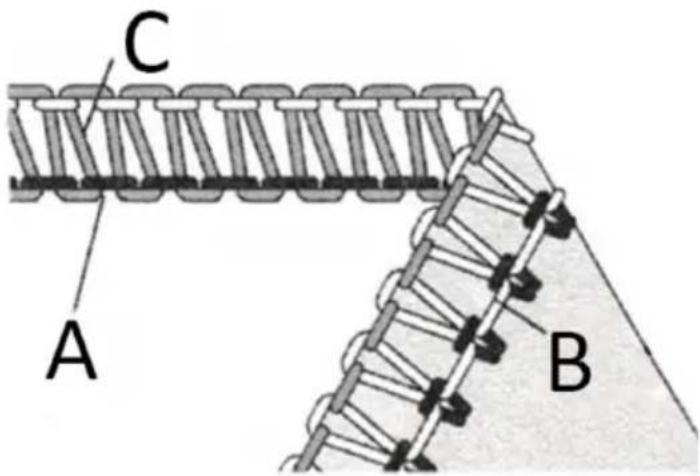
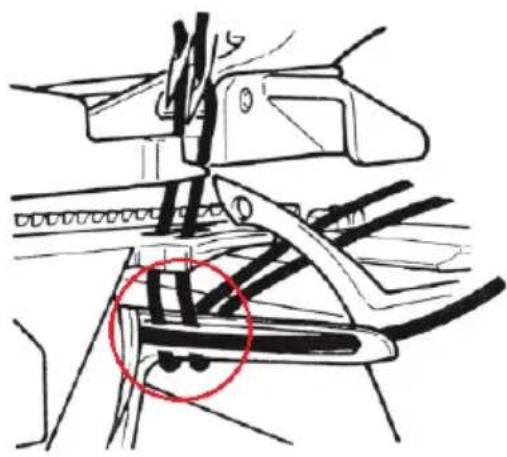
Important Threading Instructions
Always thread the needles last to prevent misthreading the lower looper
If the lower looper should come unthreaded
1 Unthreaded the needles
2 Thread the lower looper
3 Thread the needles
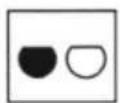
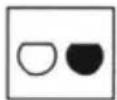
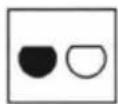
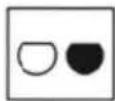
A - Correct View
B - Wrong View
A
natural_image
Technical line drawing of a mechanical assembly with no visible text or symbolsB

natural_image
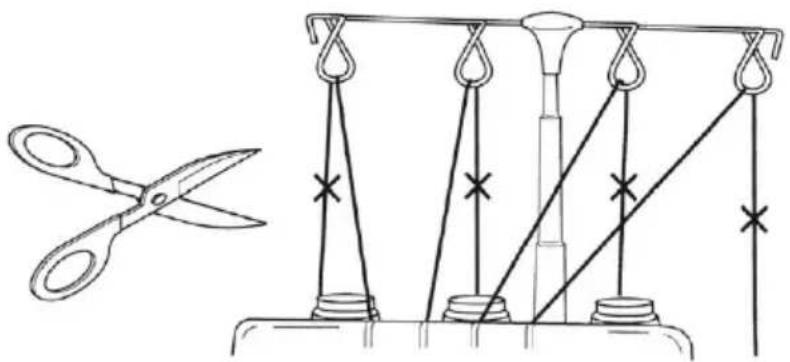
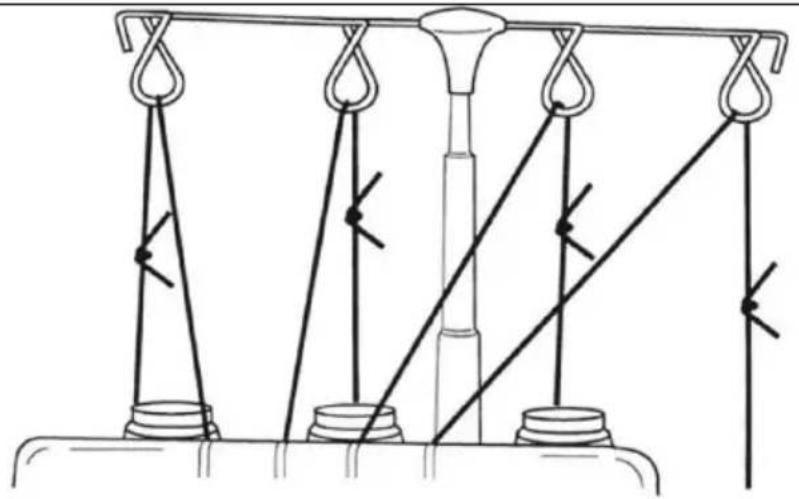
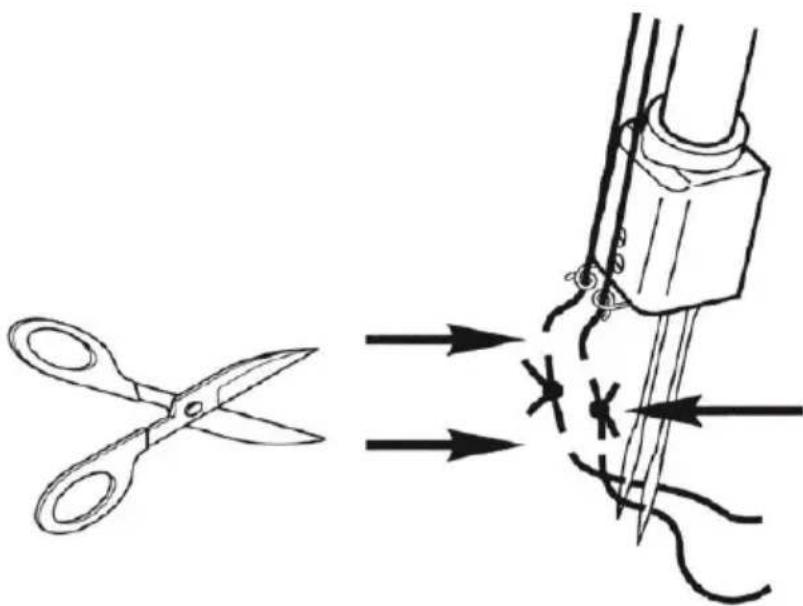
Technical line drawing of a mechanical assembly with a red circle highlighting a specific component (no text or symbols present)How to change threads/tie on method
To change thread type or color, clip thread near the spool
natural_image
Line drawing of scissors cutting through a mechanical structure with ropes and supports (no text or symbols)Place new thread on stand Tie new thread and old thread ends together Clip thread tails to 2\~3cm (1in) length If lipped too short, threads may come untied.
Firmly pull both threads to test knot security
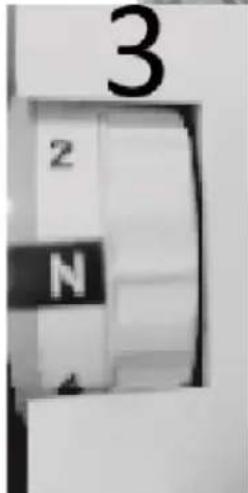
Note tension dial settings
Turn the tension dials down until the dial stops
natural_image
Diagram of a mechanical lifting scale with three vertical supports and connecting rods (no text or labels)
natural_image
Technical illustration showing a hand holding a pencil and a close-up of a mechanical device with a spring scale (no text or symbols)
natural_image
Technical line drawing of a mechanical component with no visible text or symbolsPull the threads through the machine one at a time.
If threads do not pull easily, check for tangles on thread guides or looping under thread stand.
When pulling thread through the needle, STOP when the know is in front of the needle Cut the thread, and insert it through the needle
Return tension dials to previous settings

BEFORE MAKING ADJUSTMENTS, BE SURE TO TURN OFF POWER SWITCH
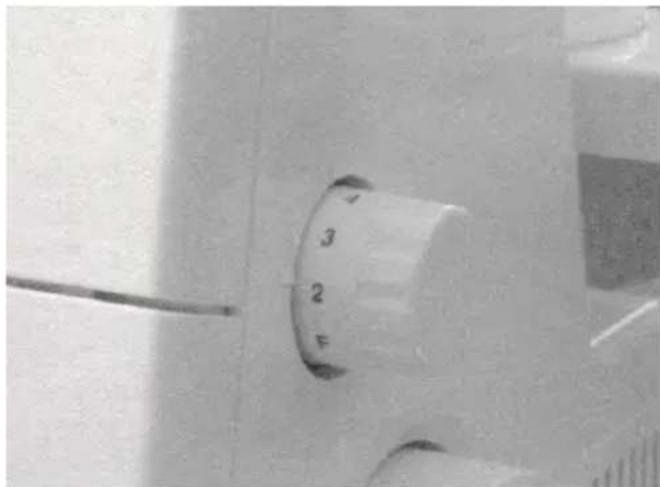
How to adjust the stitch length
The stitch length dial should be set on the 3mm (1/8 in) setting for most sewing conditions.
Adjust the stitch length to 4mm (5/32in) when sewing heavy weight fabrics.
Adjust the stitch length to 2mm (5/64in) when sewing light weight fabrics to obtain excellent seams without puckering.
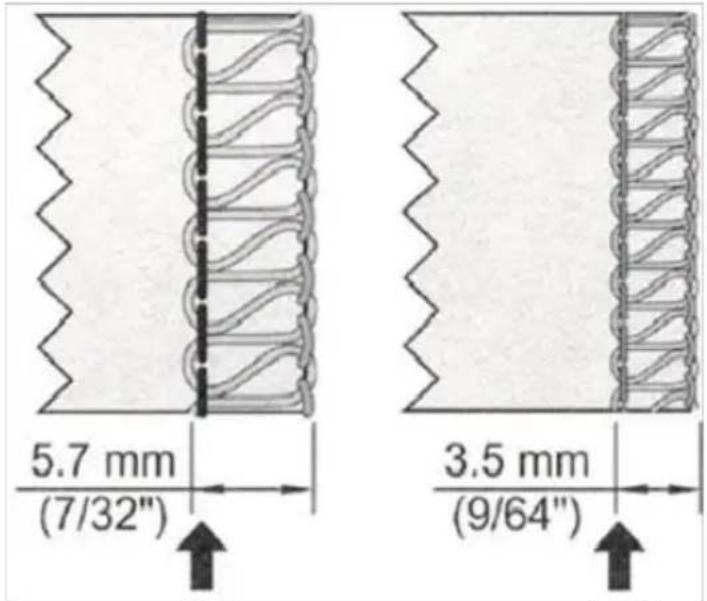
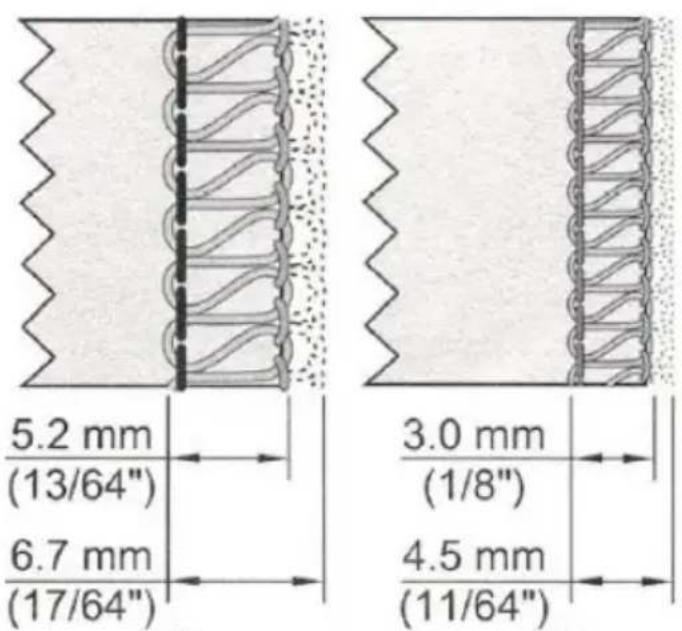
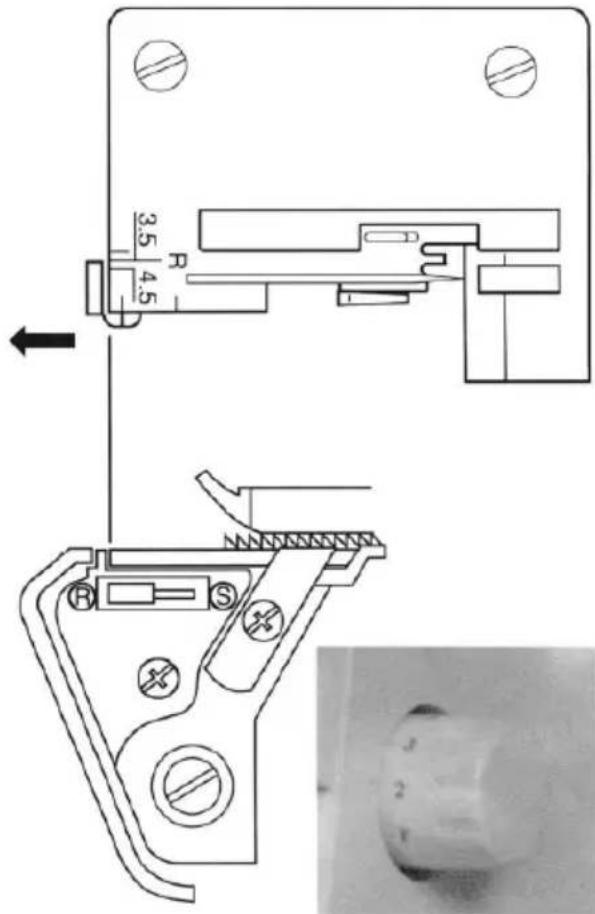
How to adjust the seam width
Overedge seam width can be achieved by repositioning the needle position and also with the width adjustment knob.
Width Adjustment by Changing Needle Position
Overedge seam width can be adjusted by changing the needle position
A When only left needle is used 5.7mm
B When only right needle is use 3.5mm
Width Adjustment with Adjustment Knob
Use of width adjustment knob will permit further adjustment within the width range shown below
* When only left needle is used 5.2\~6.7mm
* When only right needle is used 3\~4.5mm
A
B
A
B
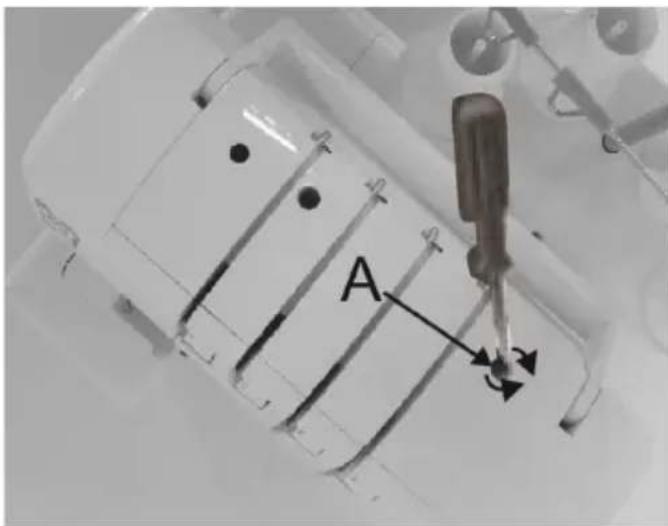
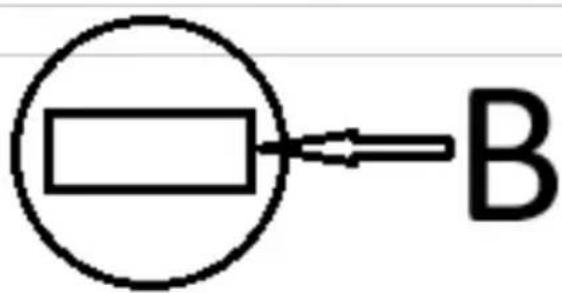
How to adjust the presser foot pressure
The presser foot pressure of this machine is pre-adjusted at the factory to suit the sewing of medium weight fabrics.
Most materials do not require adjustment of the presser foot pressure. However, there are some instances where adjustment is necessary when sewing lightweight or heavyweight fabrics
In such cases, insert a screwdriver through access hole (A) in the top cover and into slot (B) in the pressure regulating screw, then turn the regulating screw as required.
Note: Turn regulating screw counterclockwise until it stops against the top cover. Then turn screw clockwise 6 turns which will be the standard presser bar pressure.
For lightweight fabric – decrease the pressure For heavyweight fabric Increase the pressure
flowchart
graph TD
    A["Rectangular Node"] --> B["B"]
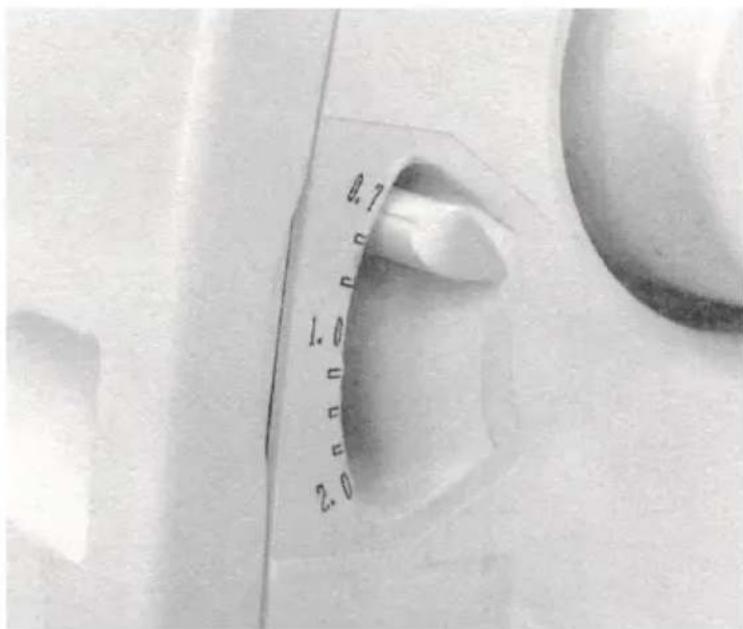
Differential feed
Differential feed is a system that stretches or gathers the fabric by changing the amount of feed of the front feed dog relative to the rear feed dog.
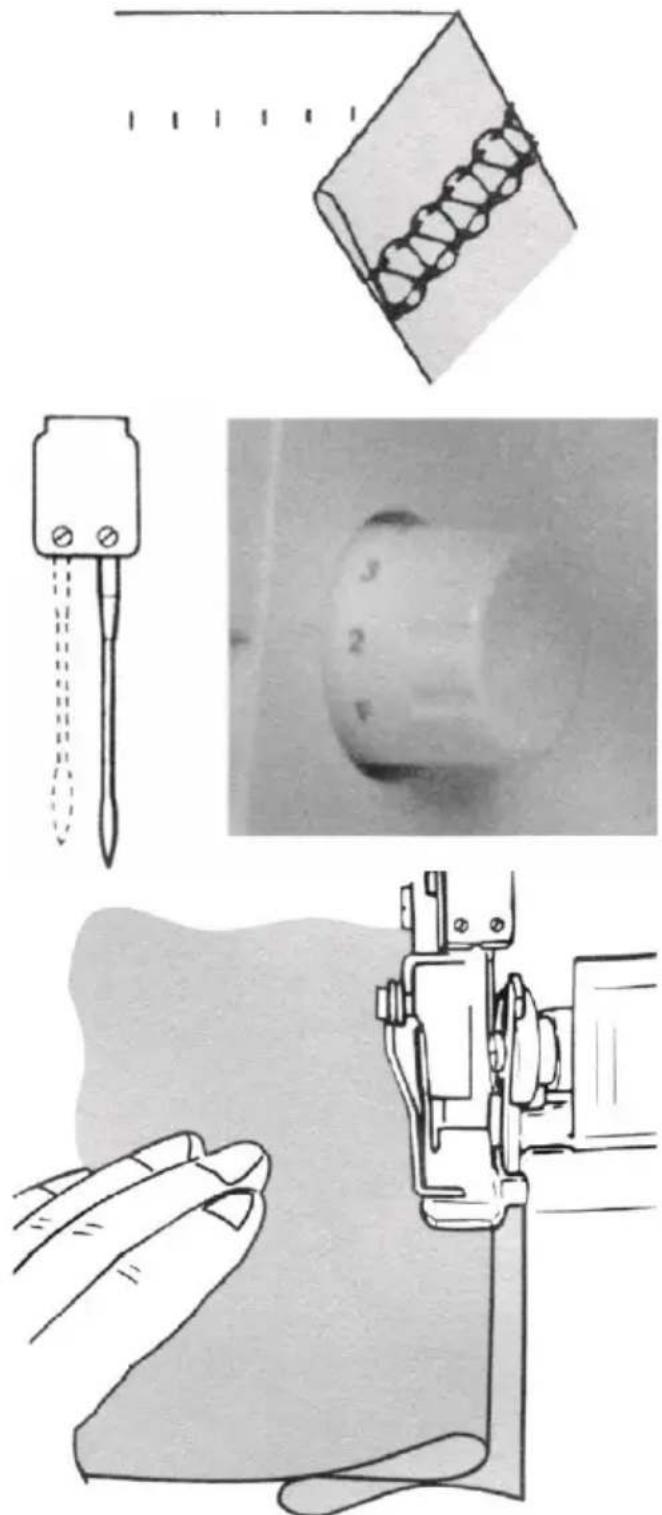
The differential feed ratio ranges from 1:0.7 to 1:2. Adjustment is made by using the differential feed adjusting lever pictured.
Using differential feed is very effective for overedging stretch fabrics and fabrics cut on the bias.
The graduation "1.0" is the setting for a 1:1 ratio on the differential feed adjusting lever.

Gathered overedge
Gathered overedge is most suited for shirring sleeves, yokes, front and back bodices, skirt hems, and other parts in stretch fabrics such as knits and jersey before assembling them into garments.
To set the differential feed adjusting lever
Set differential feed adjusting lever knob below graduation “1.0”. Setting of adjusting lever knob depends on material being sewn as well as the amount of gather therefore set knob to suit the fabric and test sew before sewing your garment.
When feed regulating dial is set at 3 or over, the amount of feed of the main feed dog will change to "3" automatically when adjusting lever knob is set to 2.0

natural_image
Line drawing of a women's dress, skirt, and fabric item (no text or symbols)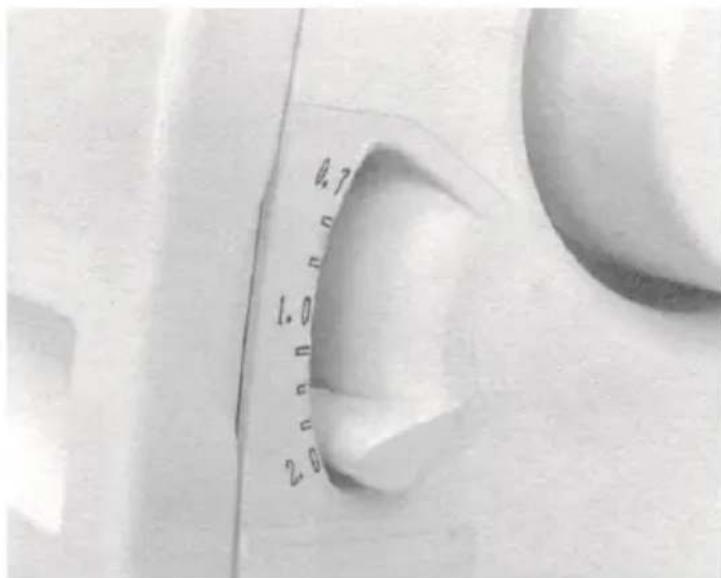
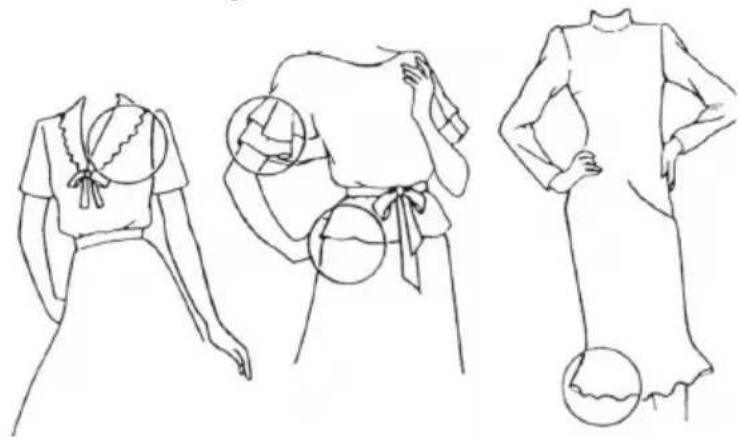
Stretch overedge is ideal for sewing decorative collars, sleeves, skirt hems, etc.
Stretch Overedge
natural_image
Line drawings of three different fashion outfits: a pleated blouse, a turtleneck, and a high-shoulder dress (no text or symbols present)Set differential feed adjusting lever knob above graduation "1.0"
To sew a seam, apply gentle tension to the fabric by holding the seam lightly in front and back of the presser foot
Note: If amount of stretch is not correctly set in relation to the fabric being sewn, the fabric is apt to shift away from the needle resulting in improperly sewn overedge seam. IN such case, reset differential feed adjusting lever closer to the centre mark.
natural_image
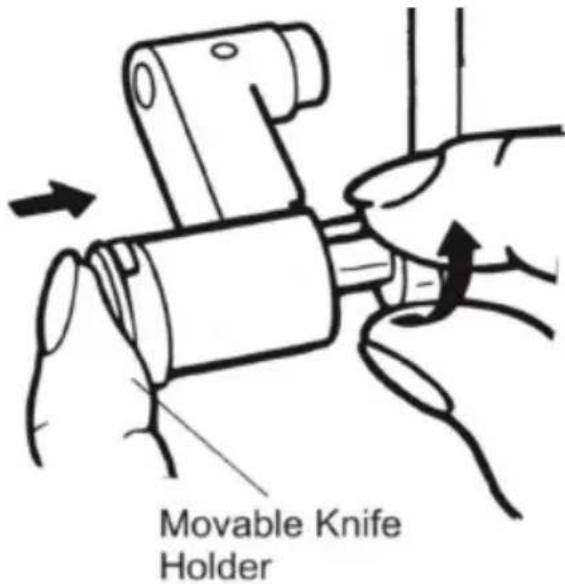
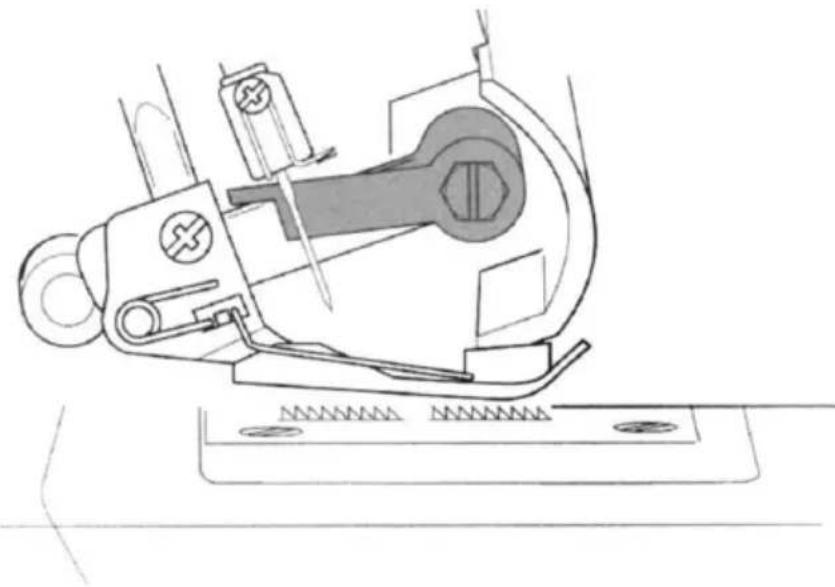
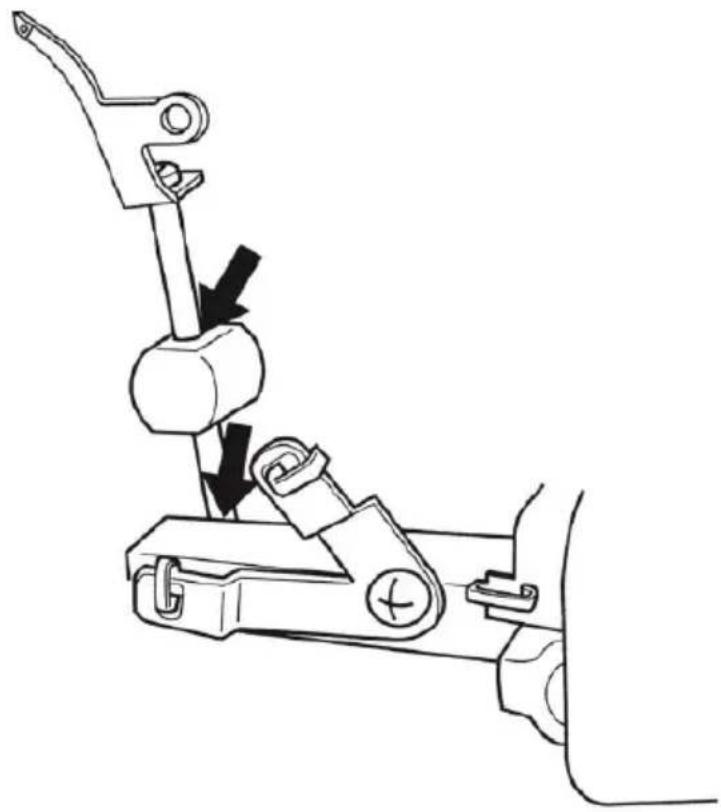
Illustration of hands using a tool to adjust or install a mechanical component (no text or symbols visible)How to disengage movable upper knife
To place movable knife in nonworking position
1 Turn handwheel over toward you and rise upper knife to its highest position
2 Open looper over
3 Push the movable knife holder to the right as far as it will go
4 turn the knob away from you until the knife clicks into horizontal position
Note: If the knife stops in the up position.
Turn the hand wheel toward you until the knife clears the top of the machine.
Continue to rotate the knife to the horizontal position.

natural_image
Technical line drawing of a mechanical assembly with no visible text or symbolsTo place movable knife in working position
Open looper cover and push the movable knife holder to the right as far as it will go.
Turn the knob up and toward you until the knife clicks into the working position.

natural_image
Technical line drawing of a sewing machine with a rotating shaft and base plate (no text or symbols)
BEFORE MAKING ADJUSTMENTS, BE SURE TO TURN OFF POWER SWITCH
Converting the upper looper into spreader
Installing the spreader
1 Insert the pin (A) of the spreader in the hole (B) of the upper looper.
2 Put the positioning rib (C) in contact with the upper surface of the looper.
3 Insert the point (D) in the hole (E) of the upper looper
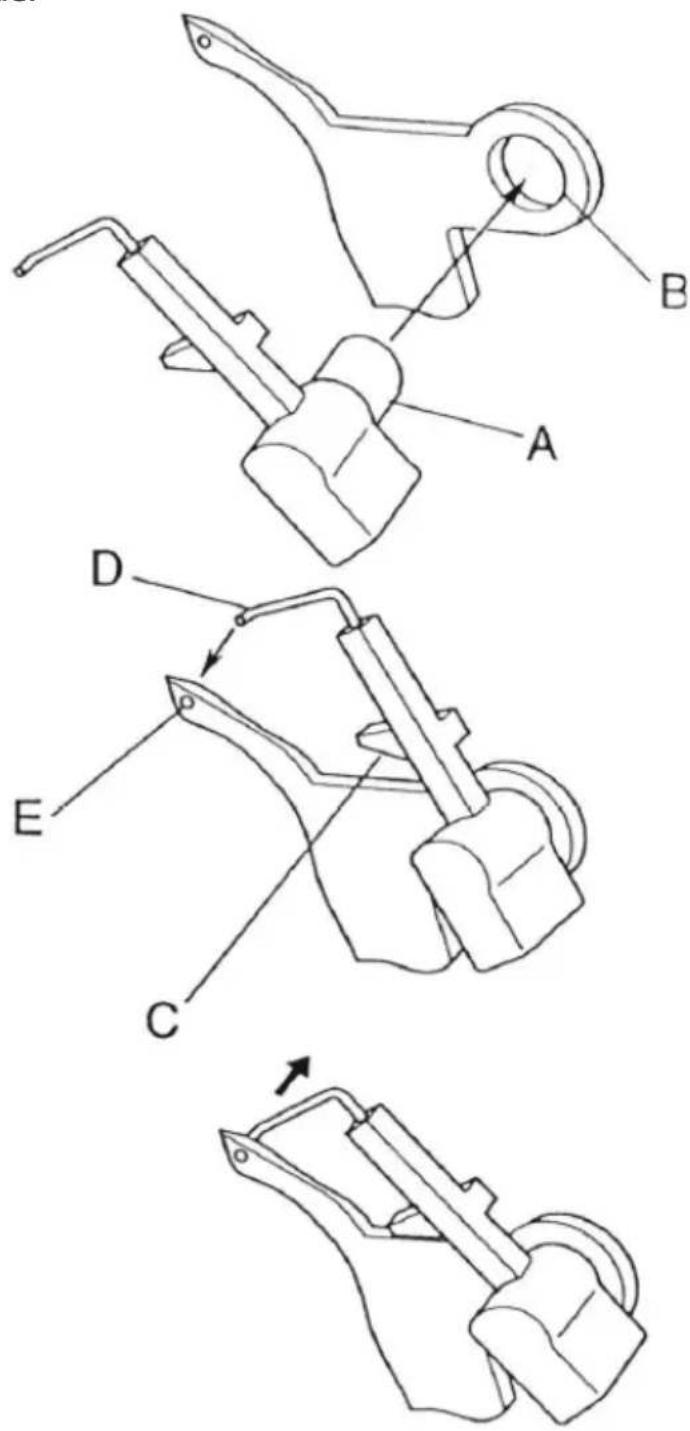
Removing the spreader
1 Remove the point (D) of the hole (E) of the upper looper and take the spreader off the looper.
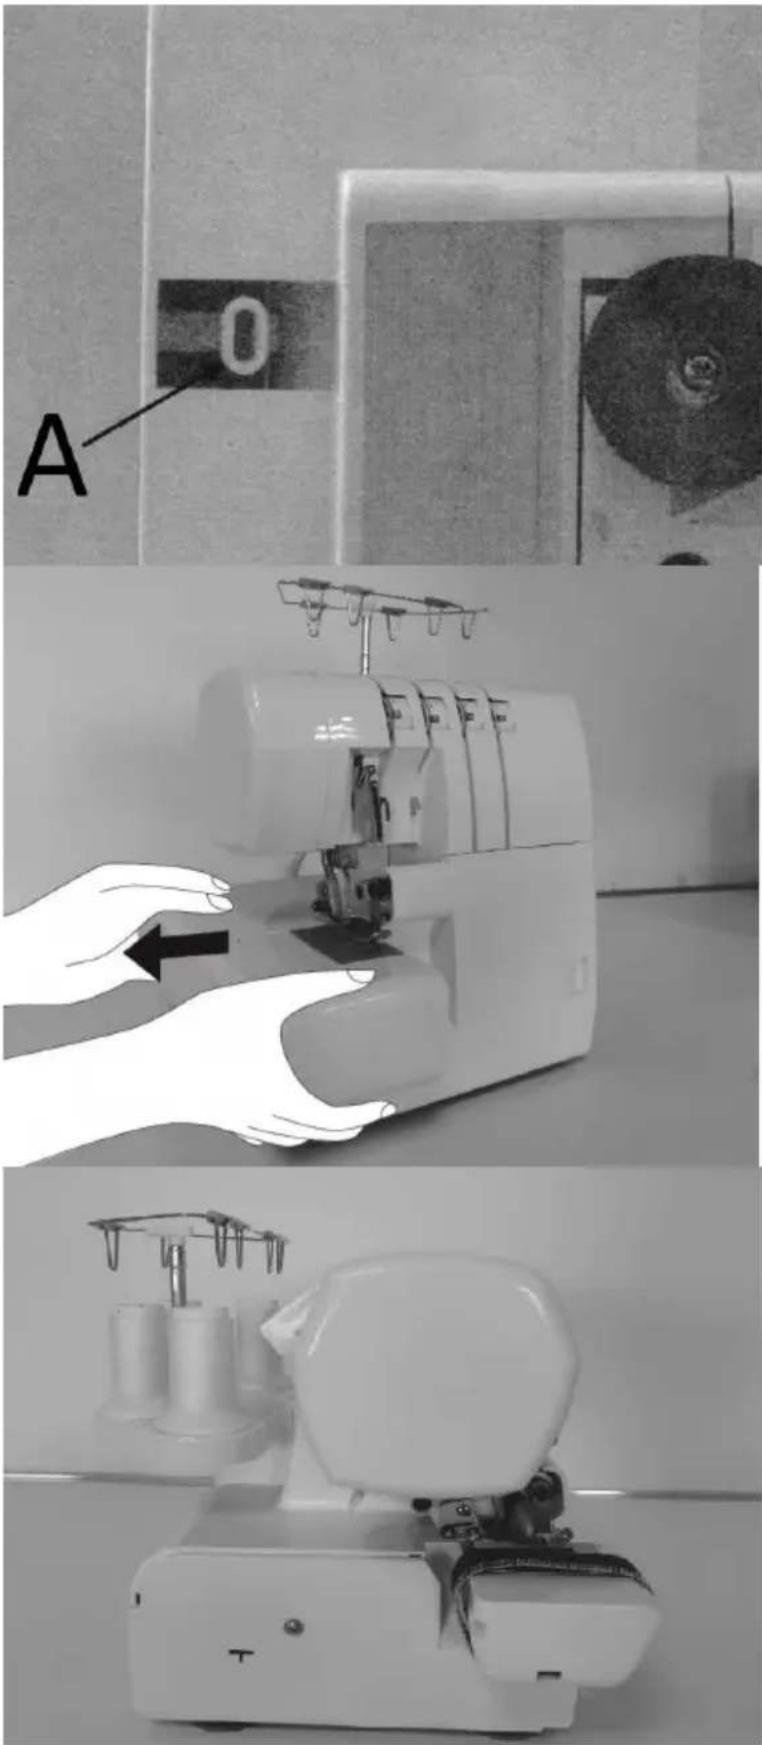
Free arm sewing
This machine become a free arm machine simply be removing the cloth plate.
To remove the cloth plate
Slide cloth plate to the left and remove from machine while pressing button (A) located on the underside.
This is especially suited for sewing hard to reach garment areas such as armholes and overcasting trouser cuffs Place garment over the free arm and sew
To replace the cloth plate:
1 Align the projection on the cloth plate with the groove in the cylinder cover.
2 Slide the cloth plate to the right until the tab on the front of the cloth plate snaps into the slot in the cylinder cover.

natural_image
Black-and-white illustration of hands operating a sewing machine with a hand pointing to the blade (no text or symbols visible)Standard overedge and rolled hem stitching
To Sew Standard Overedge Set seam width finger knob to S to move seam width finger to projected position
Note: be sure to push seam width finger knob as far as it will go in the direction of setting S
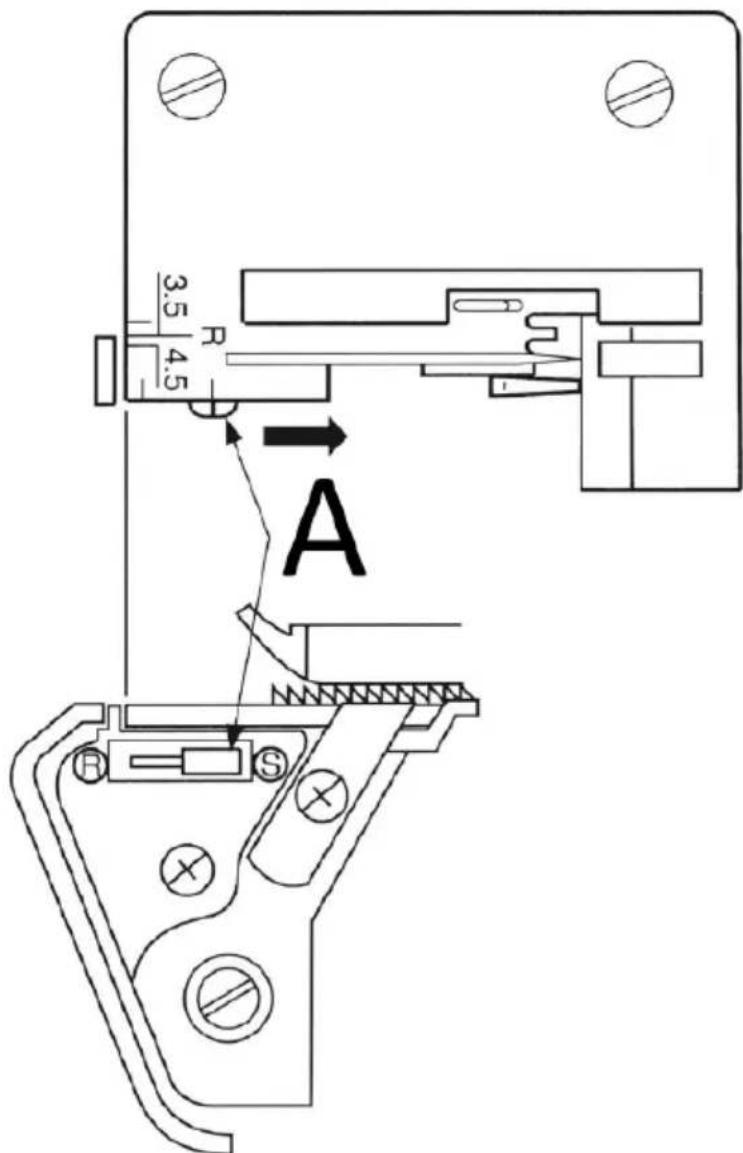
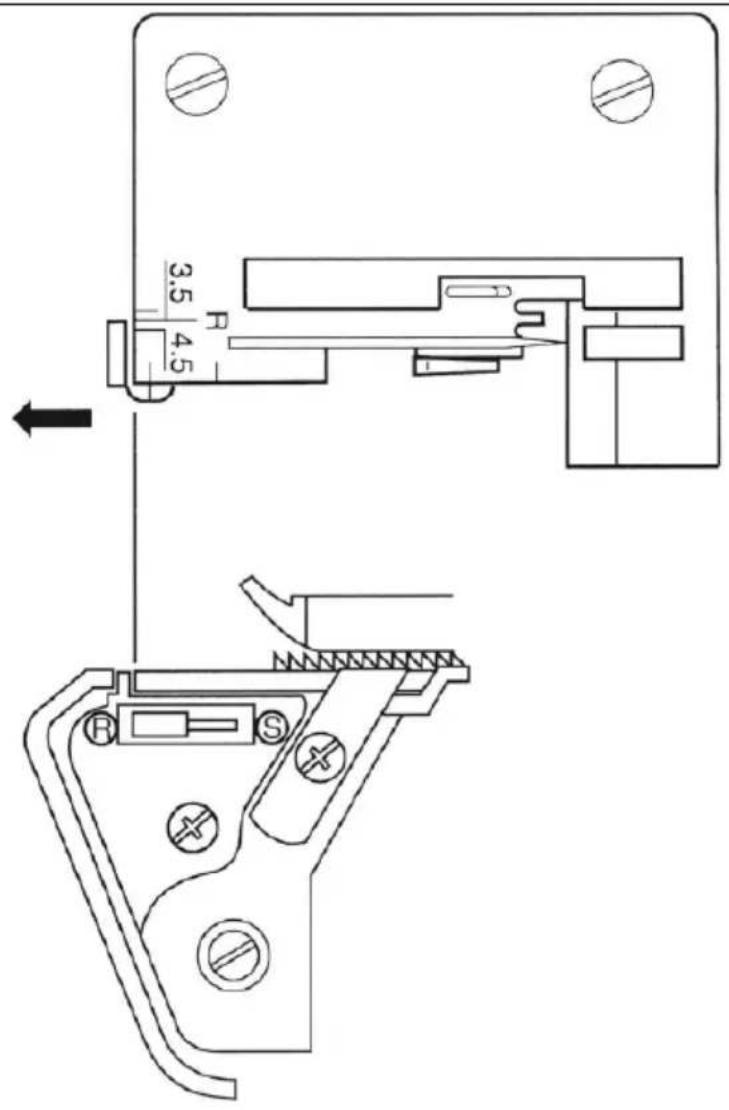
To Sew Rolled Hem
Set seam width finger knob to R to retract the seam width finger
Note: be sure to push seam width finger knob as far as it will go in the direction of setting R
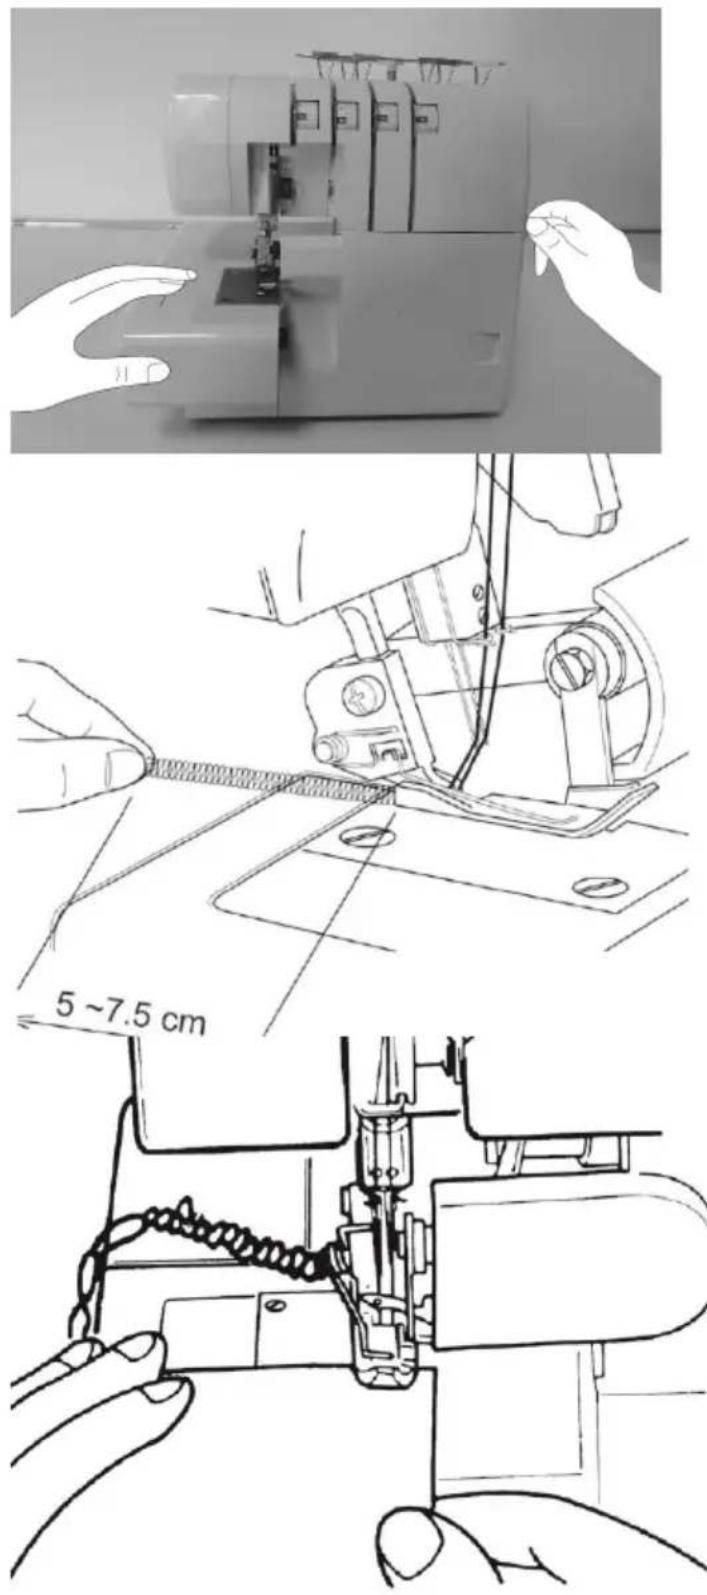
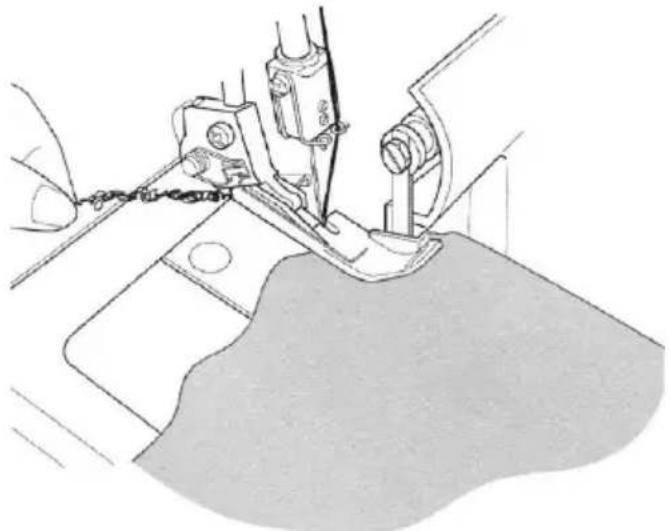
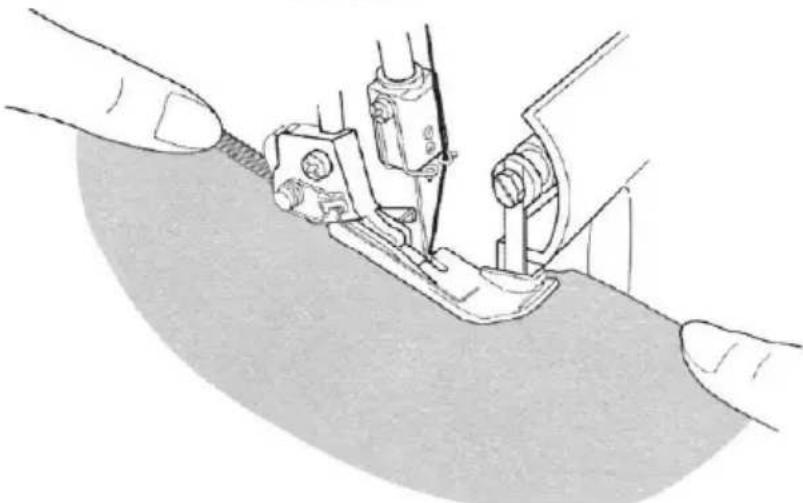
Chaining off and test sewing
When the machine is completely threaded, bring all the threads over the throat plate and slightly to the left under the presser foot Hold the threads and apply slight tension
Place fabric under the front of the presser foot and sew a test sample
Note: Do not pull on the fabric while sewing as this may deflect the needle, causing it to break.
Suggested tension setting
Note:
• these are suggested tension settings only
• Tension settings are affected by:
* Type and thickness of fabric
* Needle size
* Size, type and fibre content of thread
* Type and thickness of fabric
* Needle size
* Size, type and fibre content of thread
2-Thread wrapped edge overlock
A Needle thread
B Lower looper thread
Needle position
Seam width finger knob
Stitch length
Spreader
S
2\~4
USE
Correct Balance
Set each tension dial to settings shown below and test sew on sample of your fabric
| Fabric | Tension Dial | |||
| Blue | Green | Orange | Yellow | |
| Light | 2.5 | Spreader | 1.0 | |
| Medium | 3.5 | Spreader | 1.0 | |
| Heavy | 4.0 | Spreader | 1.0 | |
| Fabric | Tension Dial | |||
| Blue | Green | Orange | Yellow | |
| Light | 2.5 | Spreader | 2.0 | |
| Medium | 4.0 | Spreader | 2.0 | |
| Heavy | 5.0 | Spreader | 2.0 | |
How to balance
When the lower looper thread tension is too tight, or the needle thread tension is too loose:
- Turn the lower looper thread tension dial (yellow) toward a lower number
- Turn the needle thread tension dial (blue or green) toward higher number
When the lower looper thread tension is too loose.
- Turn the looper thread tension dial (yellow) toward a higher number.
2-Thread standard rolled hem stitching
A Lower looper thread
B Needle thread
Correct balance
- Set each tension dial to settings shown at right and test sew on samples of your fabric
| Fabric | Tension Dial | |||
| Blue | Green | Orange | Yellow | |
| Light | 0 | Spreader | 5.0 | |
| Medium | 0.5 | Spreader | 5.0 | |
| Heavy | 1.0 | Spreader | 5.0 | |
EN
| Fabric | Tension Dial | |||
| Blue | Green | Orange | Yellow | |
| Light | 0 | Spreader | 5.0 | |
| Medium | 0.5 | Spreader | 6.0 | |
| Heavy | 1.0 | Spreader | 6.5 | |
How to balance
A Lower looper thread
B Needle thread
When the lower looper thread is bottom side of the fabric
- Turn the lower looper thread tension dial (yellow) toward higher number.
- Turn the needle thread tension dial (blue or green) toward lower number.
A Lower looper thread
B Needle thread
When the needle thread tension is too loose
- Turn the needle thread tension dial (blue or green) toward a lower number
- Turn the lower looper thread tension dial (yellow) toward a lower number.

3-thread Overlock
A Needle thread
B Lower looper thread
C Upper looper thread
Needle position
| Seam width | S |
| finger knob | |
| Stitch length | 2~4 |
Correct balance
- Set each tension dial to settings shown below and test sew on sample of your fabric
| Fabric | Tension Dial | |||
| Blue | Green | Orange | Yellow | |
| Light | 2.5 | 3.0 | 3.0 | |
| Medium | 3.0 | 3.0 | 3.0 | |
| Heavy | 3.5 | 3.0 | 3.0 | |
| Fabric | Tension Dial | |||
| Blue | Green | Orange | Yellow | |
| Light | 2.5 | 3.0 | 3.0 | |
| Medium | 3.0 | 3.0 | 3.0 | |
| Heavy | 3.5 | 3.0 | 3.0 | |
How to balance
A Needle thread
B Lower looper thread
C Upper looper thread
When the upper looper thread lies on the underside of the fabric:
- Turn the upper looper thread tension dial (orange) to higher number
- Turn the lower looper thread tension dial (yellow) to lower number
A Needle thread
B Lower looper thread
C Upper looper thread
When the lower looper thread appears on the top fabric
- Turn the lower looper thread tension dial (yellow) toward a higher number
- Turn the upper looper thread tension dial (orange) to a lower number.
A Needle thread
B Lower looper thread
C Upper looper thread
- When the needle thread is too loose, turn the needle tension dial (blue or green) to a higher number.
3-Thread Flatlock
Needle position
Seam width
finger knob
Stitch length
S
2\~4
A Needle thread
B Lower looper thread
C Upper looper thread
Correct Balance
- Set each tension dial to settings shown below and test sew on a sample of your fabric
| Fabric | Tension Dial | |||
| Blue | Green | Orange | Yellow | |
| Light | 0.5 | 5.0 | 7.0 | |
| Medium | 0.5 | 5.0 | 7.0 | |
| Heavy | 0.5 | 5.0 | 7.0 | |
| Fabric | Tension Dial | |||
| Blue | Green | Orange | Yellow | |
| Light | 0.5 | 5.0 | 7.0 | |
| Medium | 0.5 | 5.0 | 7.0 | |
| Heavy | 0.5 | 5.0 | 7.0 | |
How to balance
A Needle thread
B Lower looper thread
C Upper looper thread
When the lower looper thread tension is too loose
- Turn the lower looper thread tension dial (yellow) toward a higher number
- Turn the needle thread tension dial (blue or green) toward a lower number.
A Needle thread
B Lower looper thread
C Upper looper thread
When the upper looper thread tension is too loose:
- Turn the upper looper thread tension dial (orange) toward a higher number.
- Turn the needle thread tension dial (blue or green) toward a lower number.
A Needle thread
B Lower looper thread
C Upper looper thread
When the needle thread tension is too loose:
- Turn the needle thread tension dial (blue or green) toward a higher number
- Turn the upper looper thread tension dial (orange) toward a lower number.
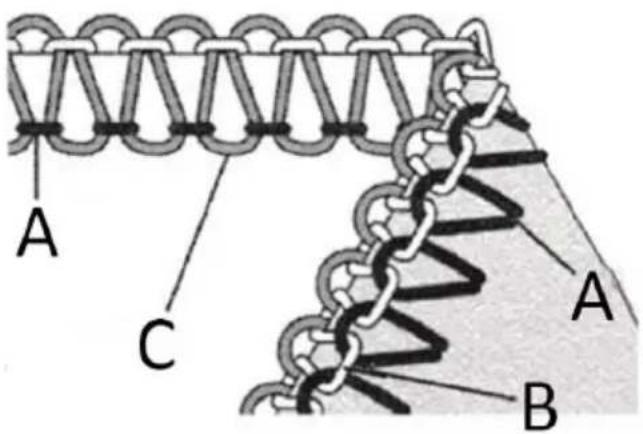
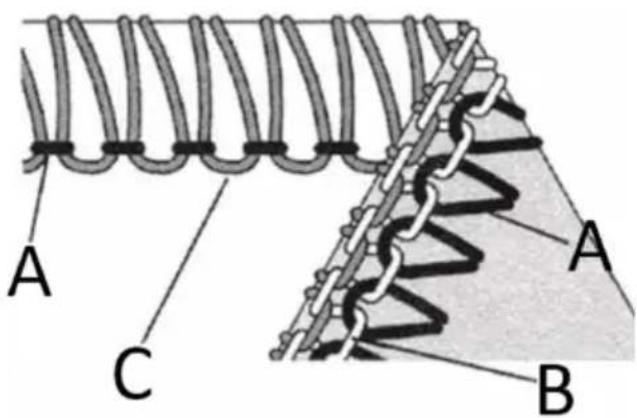
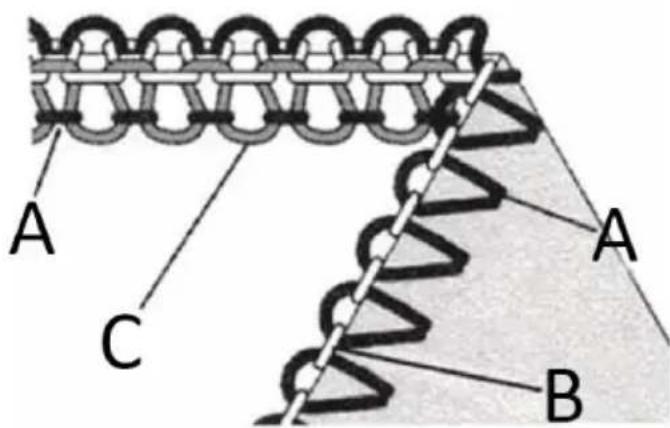
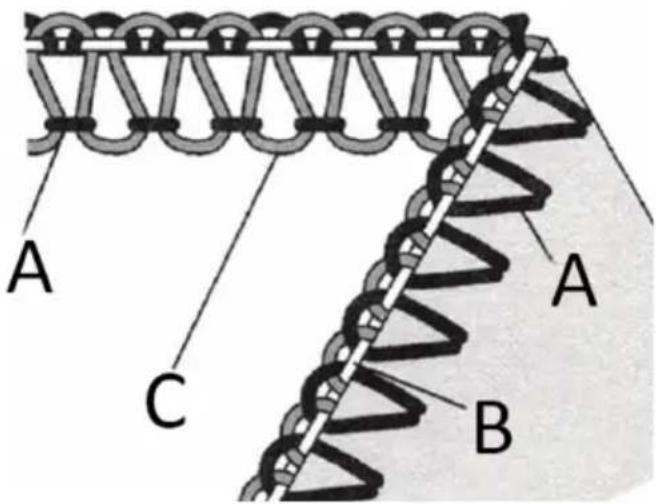
3-thread wrapped edge overlock
A Needle thread
B Lower looper thread
C Upper looper thread
Correct balance
- Set each tension dial to settings shown below and test sew on a sample of your fabric
| Fabric | Tension Dial | |||
| Blue | Green | Orange | Yellow | |
| Light | 4.0 | 0 | 8.0 | |
| Medium | 5.0 | 0 | 8.5 | |
| Heavy | 5.0 | 0 | 8.5 | |
| Fabric | Tension Dial | |||
| Blue | Green | Orange | Yellow | |
| Light | 2.5 | 1.0 | 7.0 | |
| Medium | 3.0 | 1.0 | 7.0 | |
| Heavy | 3.5 | 1.0 | 7.0 | |
How to balance
A Needle thread
B Lower looper thread
C Upper looper thread
When the upper looper thread tension is too loose:
- Turn the upper looper thread tension dial (orange) toward a higher number
A Needle thread
B Lower looper thread
C Upper looper thread
When the lower looper thread tension is too loose:
- Turn the lower looper thread tension dial (yellow) toward a higher number.
- Turn the upper looper thread tension dial (orange) toward a lower number.
A Needle thread
B Lower looper thread
C Upper looper thread
When the needle thread tension is too loose:
- Turn the needle thread tension dial (blue or green) toward a higher number
- Turn the upper looper thread tension dial (orange) toward a lower number.
4-thread ultra stretch mock safety stitch
A Right needle thread
B Left needle thread
C Upper looper thread
D Lower looper thread
Correct Balance
- Set each tension dial to settings shown below and test sew on a sample of your fabric

| Fabric | Tension Dial | |||
| Blue | Green | Orange | Yellow | |
| Light | 2.5 | 2.5 | 3.0 | 3.0 |
| Medium | 3.0 | 3.0 | 3.0 | 3.0 |
| Heavy | 3.5 | 3.5 | 3.0 | 3.0 |
Hot to balance
When the upper looper thread lies on the underside of the fabric:
- Turn the upper looper tension dial (orange) to a higher number
- Turn lower looper thread tension dial (yellow) to a lower number
When the lower looper thread appears on the top of the fabric:
- Turn lower looper thread tension dial (yellow) toward a higher number
- Turn the upper looper thread tension dial (orange) toward a lower number
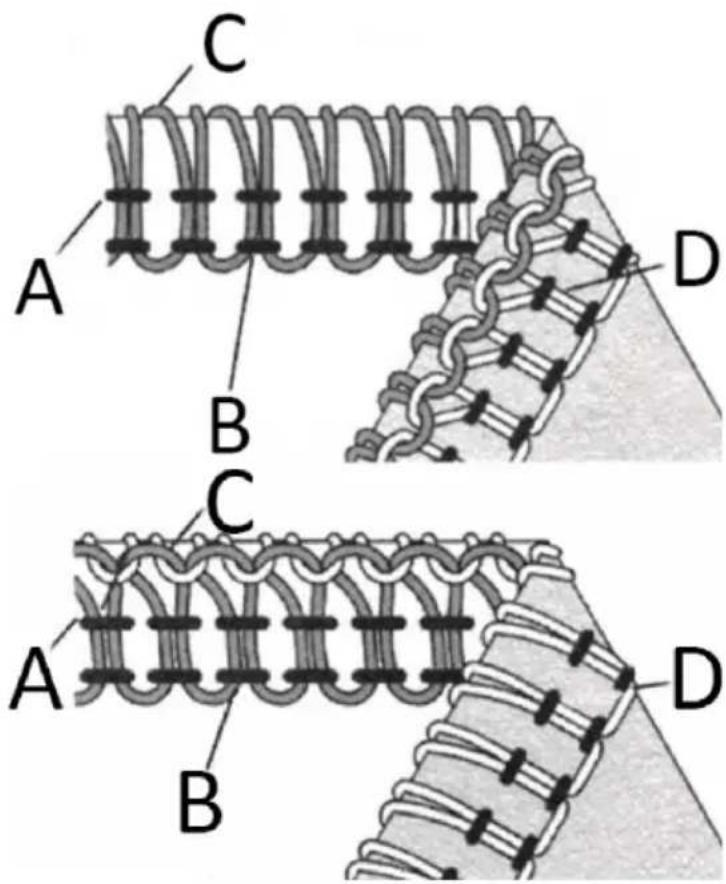
When the left needle thread tension is too loose:
- Turn the left needle thread tension dial (blue) toward a higher number
When the right needle thread tension is too loose:
- Turn the right needle thread tension dial (green) toward a higher number
3.4. Tips
How to sew a rolled hem

natural_image
Close-up of fabric with layered folds and a textured surface (no visible text or symbols)
natural_image
Black-and-white photo of a person's lower legs wearing high-heeled shoes, standing on the ground with brick wall background (no text or symbols)This machine can sew four types of rolled hems
Rolled hemming is done by rolling and overedging the fabric edge
Light weight fabrics such as lawn, voil, organdie, crepe, etc. perform the best Rolled hemming is not suited for heavy or stiff fabrics.
Machine set up
Remove the left needle.
Move the seam width finger knob to the "R" setting.
Align the left face of the seam width finger support plate with the "R" mark on the throat plate by turning the seam width finger knob as needed.
Set the stitch length dial to F \~ 2 for fine seams.
Needle size: 80/11 or 90/14
Thread: A variety of thread combinations can be used for rolled hemming.
Additional information about rolled hemming
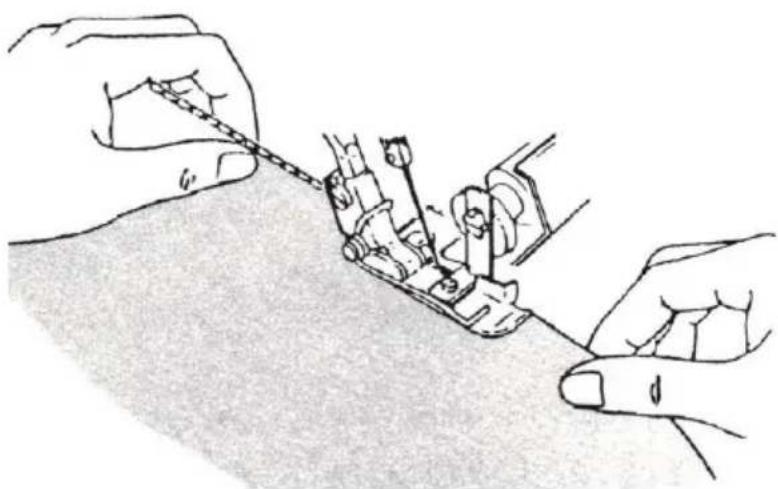
Hold the thread chain when you begin sewing to keep it from furling into the seam
natural_image
Technical line drawing of a sewing machine needle stitching fabric (no text or symbols)Place a slight tension on the material in the sewing direction and a finer seam finish can be obtained The minimum overedge stitch width that can be obtained for rolled hemming is approximately 1.5mm (1/16in) since the cutting width cannot be set bellow 3.5mm(9/64in)
natural_image
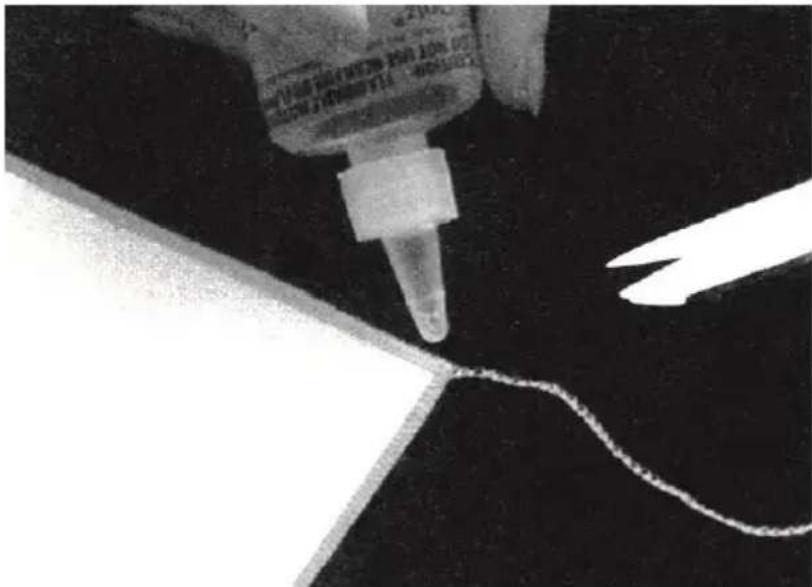
Illustration of hands operating a sewing machine needle (no text or symbols visible)How to secure the rolled hem thread chain
Apply a small drop of liquid seam sealant to the end of the seam. Allow to dry, then cut the chain close to the stitches.
Note: Test the liquid seam sealant for color fastness before use
natural_image
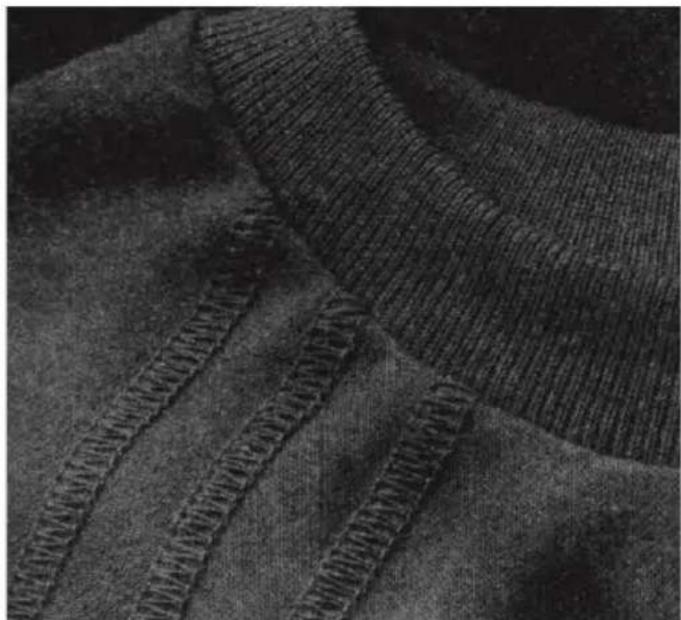
Close-up of a pipette tip dispensing liquid onto a surface with a white wavy line nearby (no text or symbols visible)Stitch variations and sewing techniques How to sew a flatlock decorative seam
A flatlock stitch is achieved by adjusting the tension of the 3-thread overlock stitch, sewing the seam and pulling the fabric aprat to flatten the seam
The flatlock stitch can be used as a construction and decorative stitch or for ornamentation only
Machine set up
- Remove the left or right needle
- Begin with the machine threaded and tension balanced for 3-thread overlock stitch
- Lose the needle thread tension (green or blue) generously
- Loosen the upper looper thread tension (orange) slightly
- Tighten the lower looper thread tension (yellow) generously
Flatlocking a seam
- Place the fabric wrong sides together to sew a decorative stitch on the right side of the garment
- Sew the seam, trimming the excess fabric
natural_image
Close-up of textured fabric with diagonal striped patterns (no visible text or symbols)
natural_image
Close-up of a sewing machine with visible needle and base mechanism (no text or symbols)
natural_image
Illustration of a sewing machine needle stitching fabric, with no visible text or symbols
A Needle thread
B Upper looper thread
C Lower looper thread
- Pull on opposite sides of the seam to pull the stitches flat
natural_image
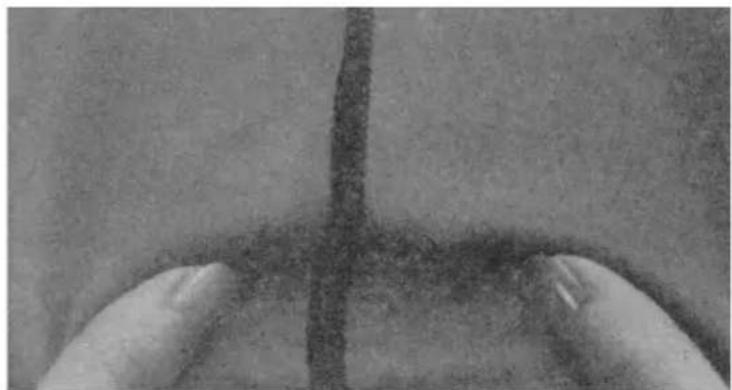
Close-up of a human face with a vertical dark line and faint markings, no visible text or symbolsDecorative flatlocking
- Place the movable upper knife in the nonworking position. The fabric is not trimmed for this stitch

natural_image
Technical line drawing of a mechanical device with no visible text or symbols- Fold fabric wrong side together
- Position the fabric so the seam is sewn with par of the stitch extending off the fabric
natural_image
Illustration of a pen writing on a notepad with a coiled spring (no text or symbols)- Pull on opposite sides of the stitch to flatten

natural_image
Close-up of a coiled spring against a textured background (no text or symbols visible)Additional information about flatlocking
- The tensions must be correctly adjusted for the fabric to pull flat
- The upper looper thread is the prominent thread in the flatlock stitch. Place a decorative thread in the upper looper and inconspicuous threads in the lower looper and needle.
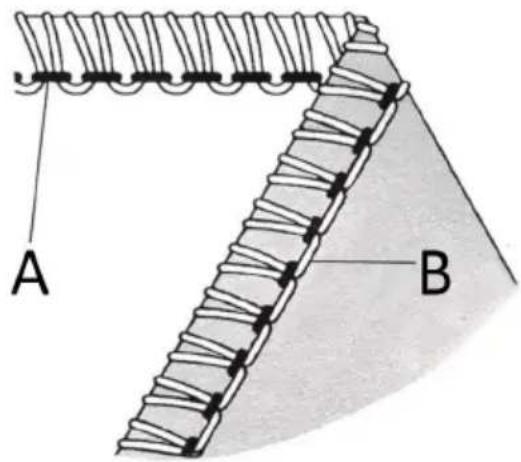
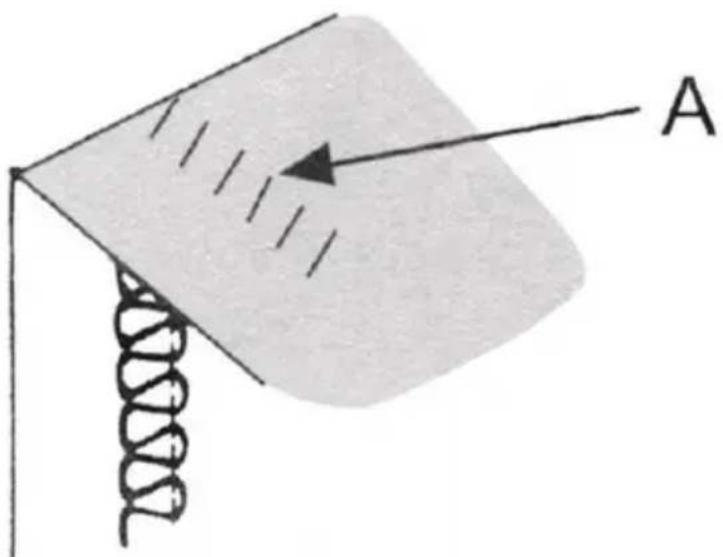
- For a ladder stitch, sew seam with right sides together. The needle thread will be the prominent thread that creates the ladder (A)
natural_image
Diagram of a mechanical or electrical component with a spring and shaded surface, labeled 'A' (no text or symbols beyond label)How to sew an overlock blind hem
- The excess fabric is trimmed, and the hem is sewn, and the raw edges are overlocked in one operation.
- The overlock blind hem is best suited for sewing knit wear. It provides a durable finish that is almost invisible.
- Remove the left needle and adjust machine for a narrow 3-thread overlock stitch.
Note: The 3-thread flatlock stitch can also be used.
• 4 Set the stitch length dial at 4
- Fold the hem to the wrong side of the fabric, then back to the right side with 6mm (1/4in) beyond the fold.
- Stitch on the extended hem edge, allowing the machine needle to barely catch the edge of the fold
natural_image
Illustration of sewing machine stitching process with tool, magnified views, and fabric (no text or symbols)How to sew pin tucks
- Sew decorative pin tucks on the fabric before cutting out garment.
- Remove the left needle and adjust machine for a narrow 3-thread overlock stitch
Note: The rolled hem stitch can also be used for this technique
- Place the movable upper knife in the nonworking position
-
Mark the fabric with the desired number of pin tucks using a water-soluble fabric marker
-
Fold the fabric with the wrong sides together and sew
- Press the pin tucks in the same direction
natural_image
Technical line drawing of a sewing machine component (no text or symbols)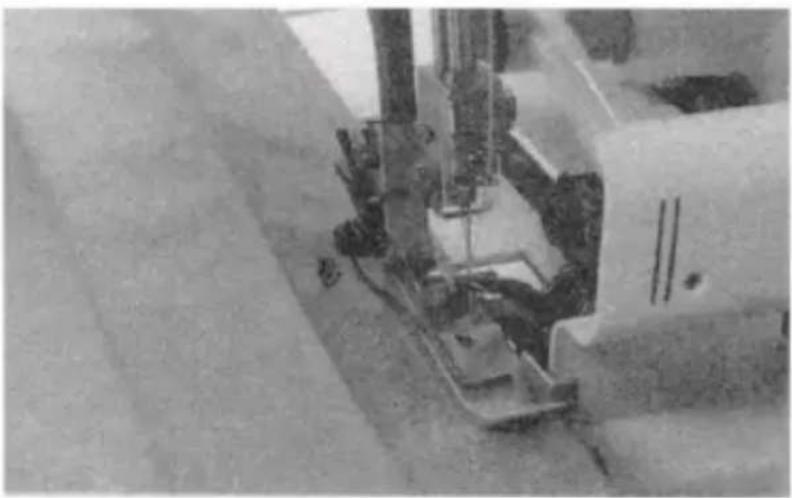
natural_image
Close-up of a sewing machine needle stitching fabric (no visible text or symbols)
natural_image
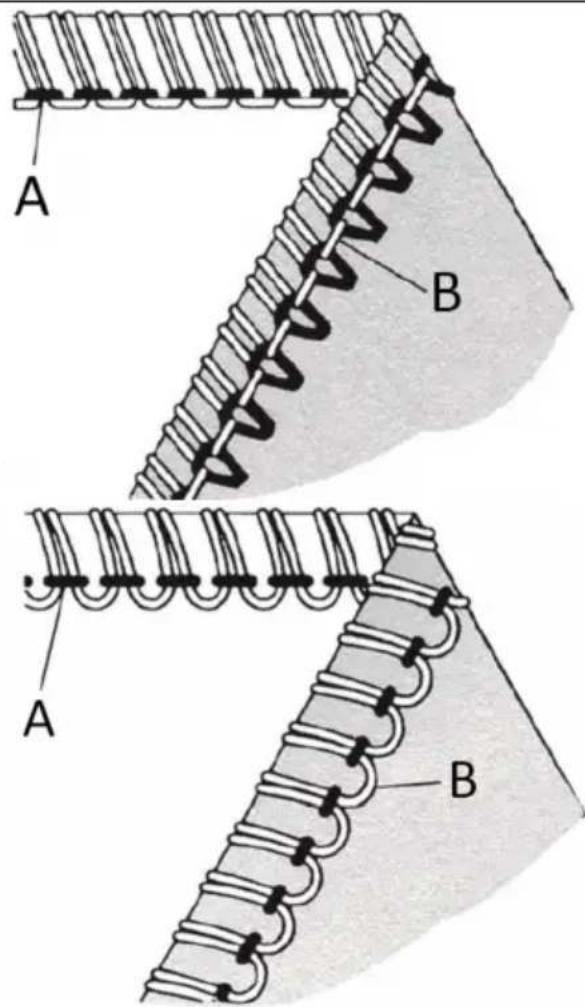
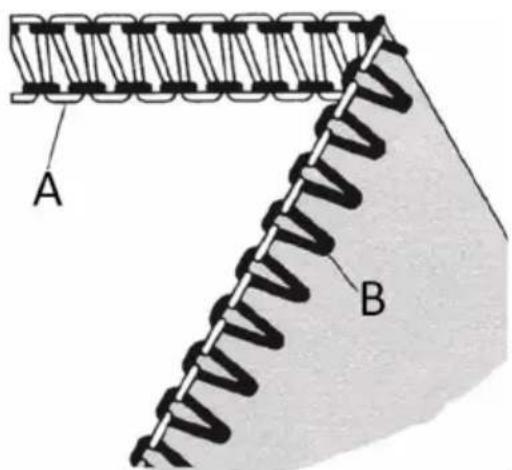
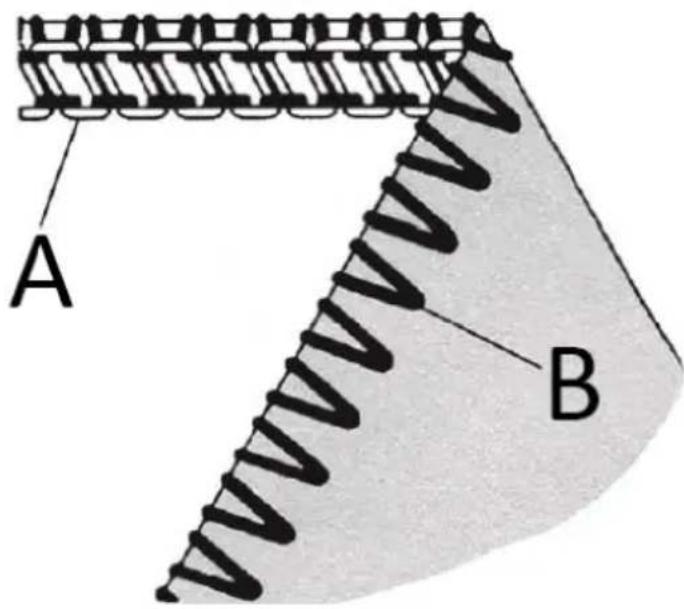
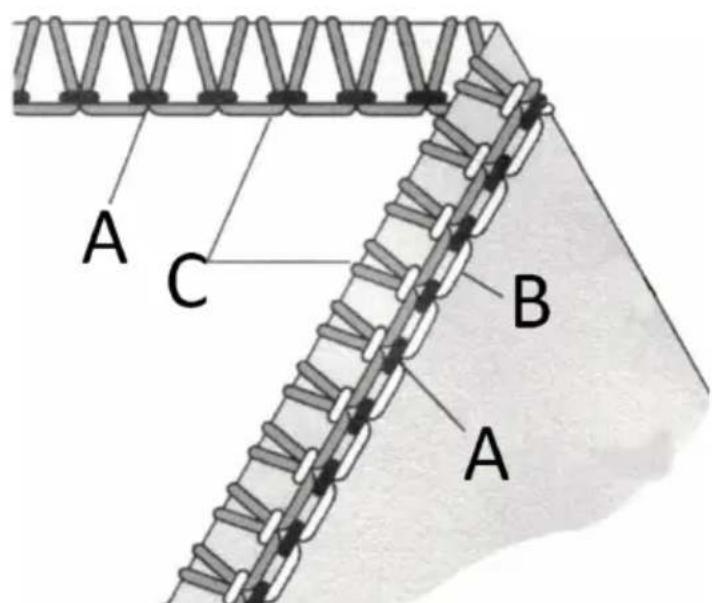
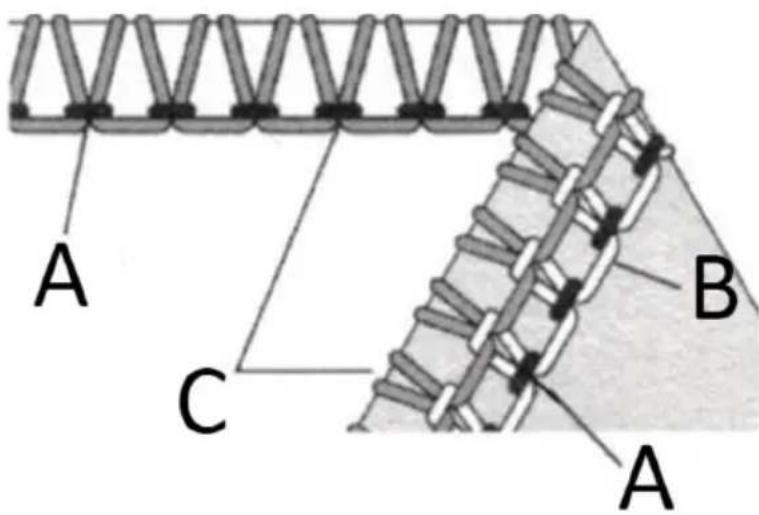
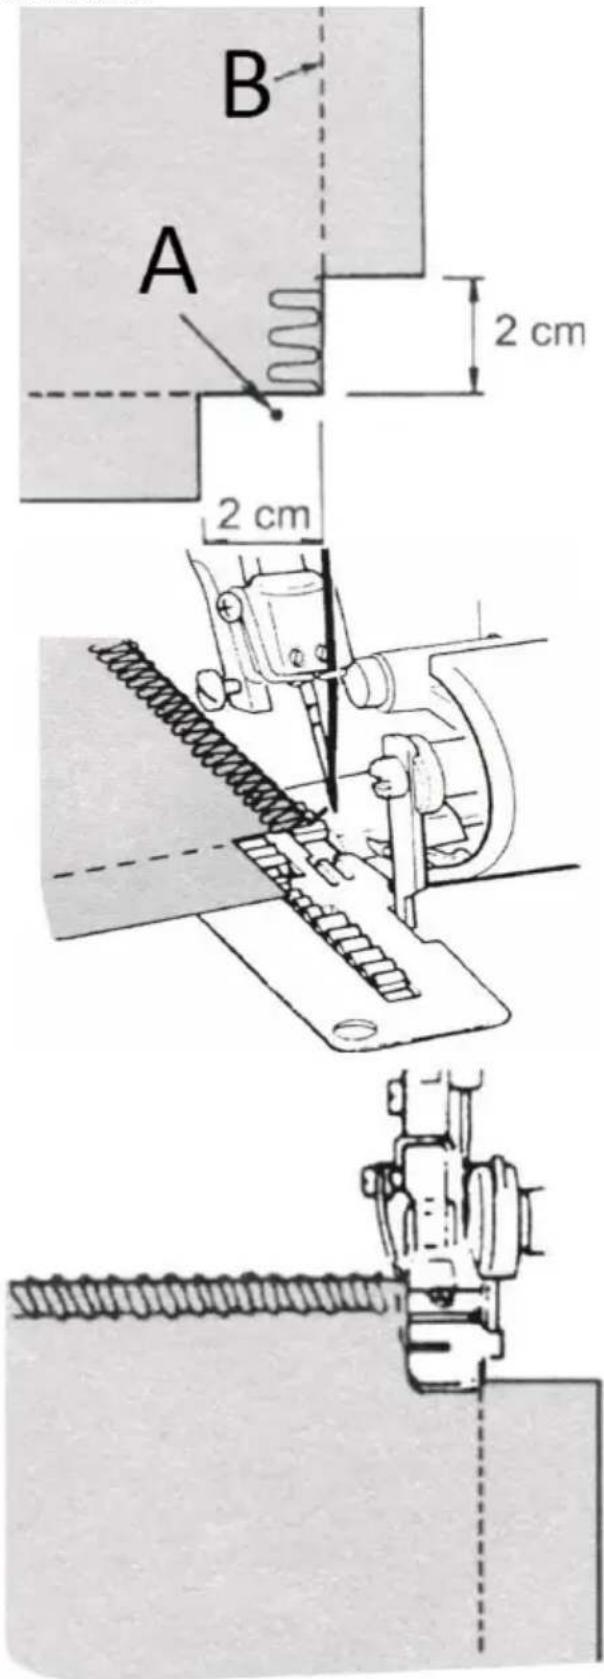
Close-up of a metallic object with parallel lines on a textured surface (no visible text or symbols)Turning square corners
Outside corner
- Cut out approximately 2cm form from the corner in line with the overedged seam edge.
- Sew one stitch beyond point (A) and stop.
- Raise needle and press foot.
- Pull the fabric to the rear of the machine just enough to release the thread caught on the finger of the throat plate
Note: Presser foot has been removed to show detail.
- Turn the fabric and lower the presser foot so that the knife is positioned in line with the cut edge
- Pull slack threads up, then start to sew
B- cutting line
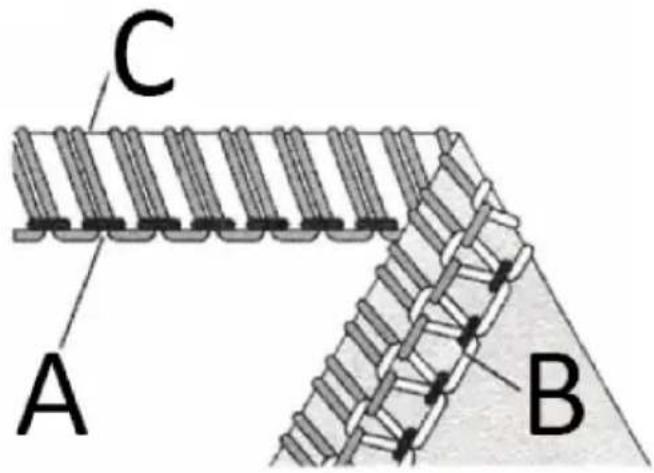
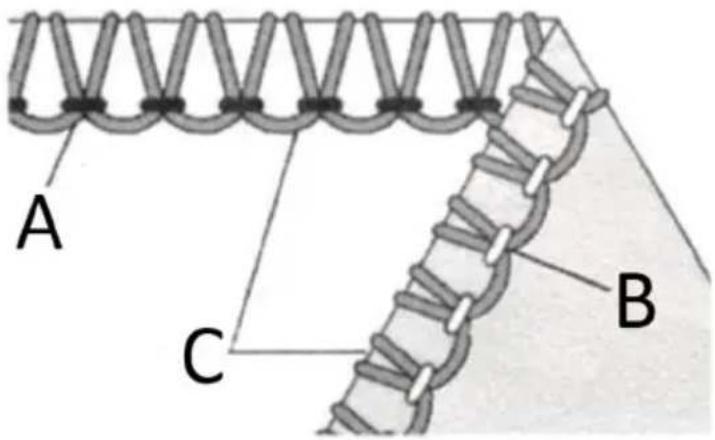
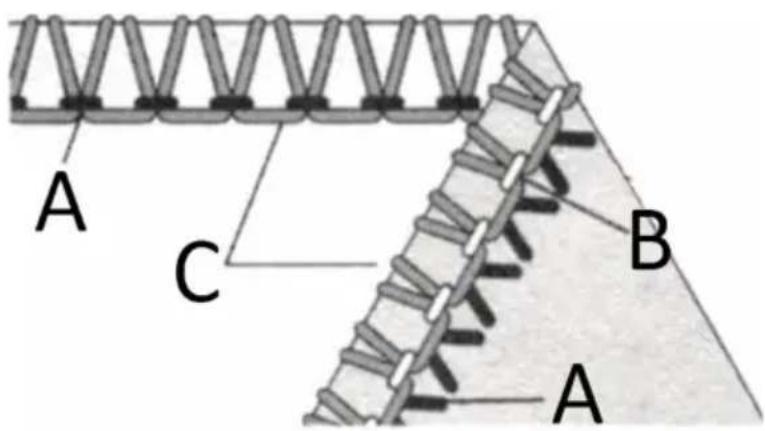
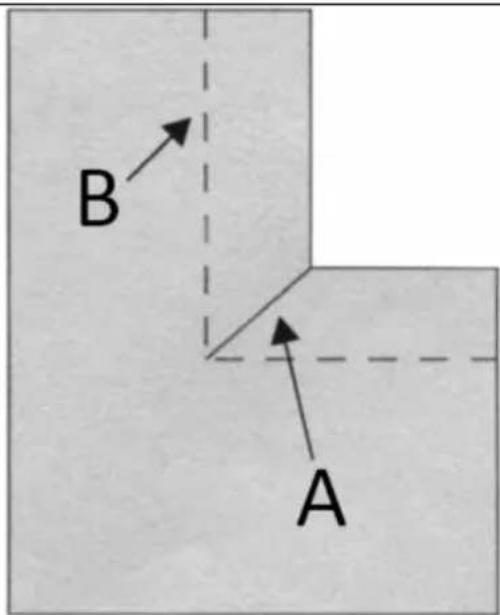
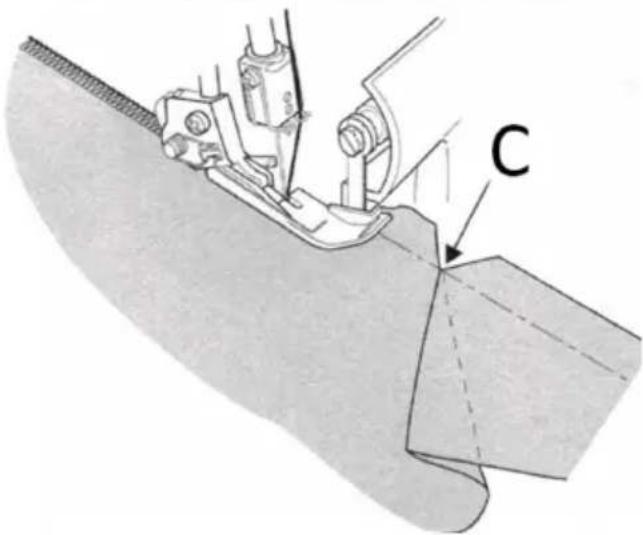
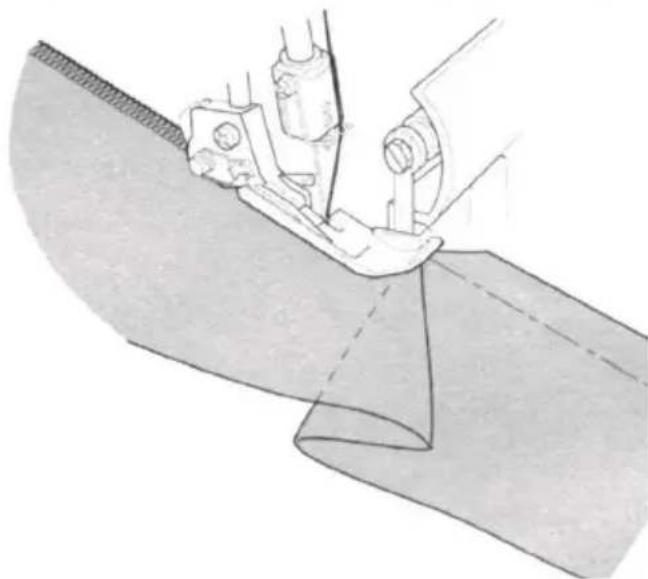
Inside corner
A - Cut slit
B - Cutting line
C - needle position
- Cut fabric at seam edge
- Place the movable upper knife in nonworking position
- Stitch on cut edge of fabric
- Stop sewing before you reach the corner and fold the fabric to the left to straighten the corner
- Continue to sew slowly holding the fabric edge in a straight line moving the fold as you sew
natural_image
Technical illustration of a sewing machine stitching fabric (no text or symbols)Pin placement
Insert pins to the left of the presser foot. The pins will be easy to remove and are away from the cutting action of the knives
CAUTION!
Sewing over pins will damage and/or destroy the cutting edge of the knives.
Securing the thread chain
- Thread a large eye, hand sewing needle (such as a tapestry needle) with the thread chain
- Insert the needle into the end of the seam to secure thread
Braiding by chaining off
- Place the movable knife in nonworking position
- Insert filler cord such as yarn or twill tape through the hole in the front of the foot.
- Position the filler cord under the foot and chain off the desired length
- Chained off braids can be used individually or woven into 3 or 4 ply braids
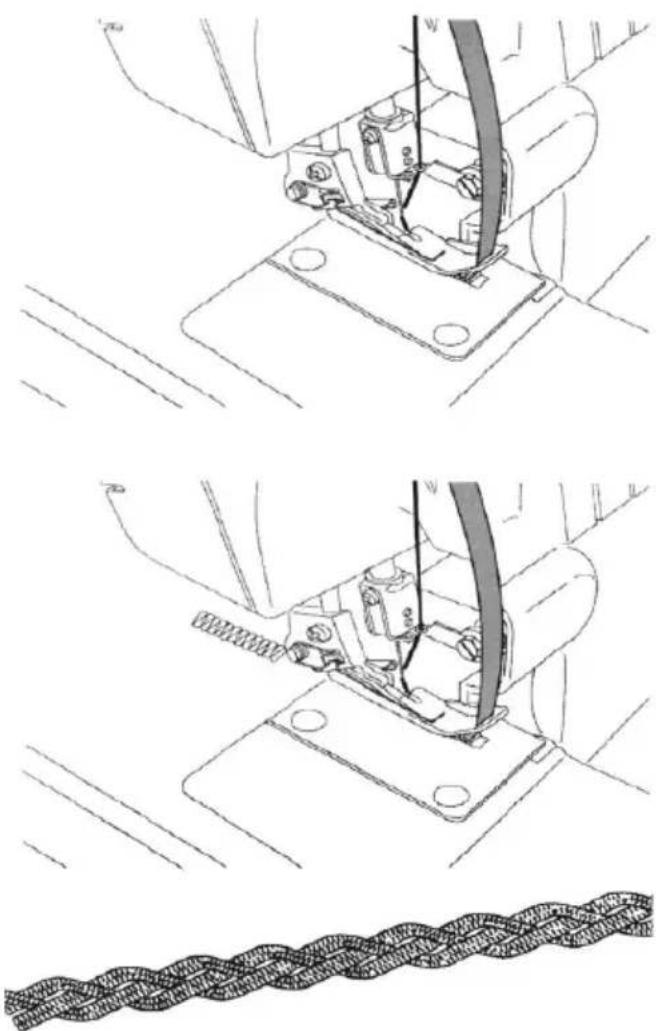
natural_image
Technical line drawing of a sewing machine with a coiled cord, showing mechanical components and assembly (no text or symbols)3.5. Cleaning and maintenance
a) Always unplug the device before cleaning it or lubricating.
b) Use only non-corrosive cleaners to clean the surface.
c) Store the unit in a dry, cool place, free from moisture and direct exposure to sunlight.
d) Do not spray the device with a water jet or submerge it in water.
e) Do not allow water to get inside the device through vents in the housing of the device.
f) Clean the vents with a brush and compressed air.
g) The device must be regularly inspected to check its technical efficiency and spot any damage.
h) Use a soft cloth for cleaning.
i) Do not clean the device with an acidic substance, agents of medical purposes, thinners, fuel, oils or other chemical substances because it may damage the device.
This device requires more maintenance than a conventional machine mainly due to two reasons:
• A lot of lint is produced due to the cutting action of the knives
- The device runs at a very high sped and needs to be oiled frequently to lubricate the internal working parts
Oiling the machine
The oiling points shown in the diagram, should be oiled periodically.
Note: Use sewing machine oil. Do not use any other oil or damage could result.
natural_image
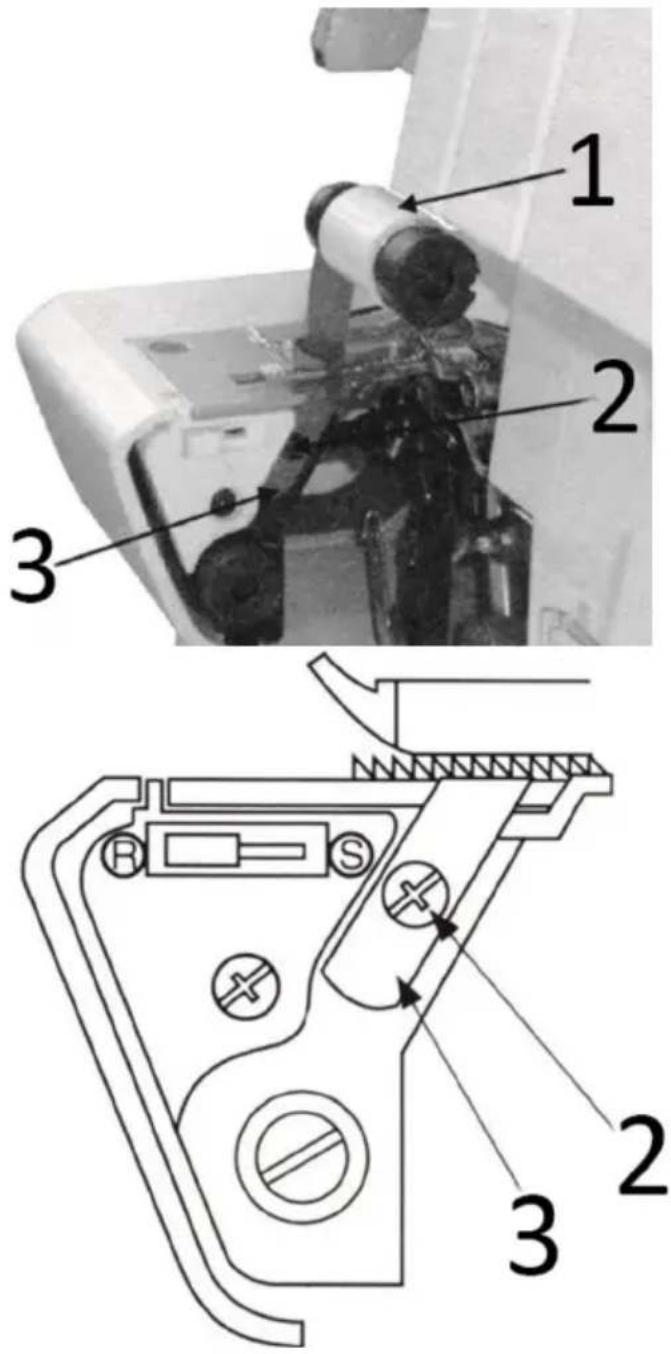
Mechanical assembly diagram showing a lever mechanism with no text or symbolsHow to replace the stationary knife
- Be sure that the power line plug is disconnected from electric source
- The stationary knife should be change when it becomes dull
- The stationary knife can be replaced according to the directions provided, however if there are any difficulties experienced, consult your representative to make the adjustment.
- Open the looper cover and set the movable upper knife 1 in the nonworking position
- Loosen the stationary knife set screw 2 and remove the stationary knife 3
- Place a new stationary knife in the groove of the stationary knife holder
- Place a new stationary knife in the groove of the stationary holder
- Tighten stationary knife set screw 2
- Return the movable upper knife 1 to its working position
DISPOSING OF USED DEVICES
Do not dispose of this device in municipal waste systems. Hand it over to an electric and electrical device recycling and collection point. Check the symbol on the product, instruction manual and packaging. The plastics used to construct the device can be recycled in accordance with their markings. By choosing to recycle you are making a significant contribution to the protection of our environment.
Contact local authorities for information on your local recycling facility.
TROUBLESHOOTING
| Problem | Solution |
| Fabric does not feed well | Lengthen stitch lengthIncrease presser foot pressure for heavy weight fabricDecrease presser foot pressure fir light fabric |
| Needle breaks | Insert needle correctlyDo not pull fabric while sewingTighten needle set screwUse a larger needle on heavy fabrics |
| Thread breaks | Check threadingCheck for tangled or caught threadInsert needle correctlyInsert new needle, current needle may be bent or have blunt pointUse a high-quality threadLoosen thread tension |
| Stitches skip | Insert new needle, current needle may be bent or have a blunt pointTighten needle set screwInsert needle correctlyChange type or size of needleCheck threadingIncrease presser foot pressureUse a high-quality thread |
| Irregular stitches | Balance thread tensionCheck for tangled or caught threadCheck threading |
| Fabric puckers | Loosen thread tensionCheck for tangled or caught threadUse high quality light weight threadShorten stitch lengthDecrease presser foot pressure for light weight fabrics |
| Irregular trimming | Check alignment of knivesReplace on or both knives |
| Fabric jams | Close looper cover before sewingCheck for tangled or caught threadCompress thick layers of fabric with conventional machine before seeing with overlock |
| Machine does not | Connect machine to power source |
EN
| operate |
natural_image
Close-up of a sewing machine with metal clamps and a numbered component (16), no visible text or symbols on the device itself.natural_image
Close-up of a sewing machine with a black circular arrow indicating clockwise motion (no visible text or symbols)natural_image
Close-up of hands operating a mechanical device with multiple ports and a tool (no visible text or symbols)


natural_image
Technical line drawing of a mechanical assembly with no visible text or symbolsB

natural_image
Technical line drawing of a mechanical assembly with no visible text or symbolsnatural_image
Line drawing of a mechanical device with scissors and hanging weights, no text or symbols presentnatural_image
Diagram of a mechanical lifting scale with three vertical supports and connecting rods (no text or labels)
natural_image
Technical illustration showing a hand holding a pencil and a close-up of a mechanical device with a spring scale (no text or symbols)
natural_image
Technical line drawing of a mechanical component with no visible text or symbols
PŘED PROVÁDĚNÍM ÚPRAV SE UJISTĚTE, ŽE VYPNĚTE VYPÍNAČ NAPÁJENÍ
flowchart
graph TD
    A["Rectangle"] --> B["B"]
natural_image
Line drawing of a women's dress and skirt with fabric detail, no text or symbols present
natural_image
Line drawings of three different fashion outfits with no text or symbolsnatural_image
Illustration of hands using a needle to apply or apply a medical procedure on a patient's arm (no text or symbols present)Movable Knife Holder

natural_image
Technical line drawing of a mechanical assembly with no visible text or symbolsnatural_image
Black-and-white illustration of hands operating a sewing machine with a hand pointing to the blade (no text or symbols visible)natural_image
Close-up of fabric with layered folds and a textured surface (no visible text or symbols)
natural_image
Black-and-white photo of a person's lower legs wearing white high-heeled shoes, standing on pavement (no text or symbols visible)natural_image
Technical line drawing of a sewing machine needle stitching fabric (no text or symbols)natural_image
Illustration of hands operating a sewing machine needle (no text or symbols visible)natural_image
Close-up of a pipette tip dispensing liquid onto a surface with a white curved line nearby (no text or symbols visible)natural_image
Close-up of textured fabric with diagonal striped patterns (no visible text or symbols)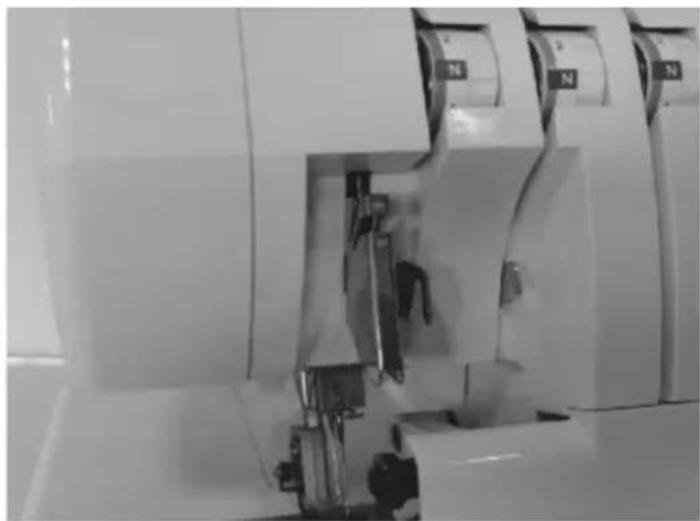
natural_image
Close-up of a sewing machine with visible mechanical components and no text or symbols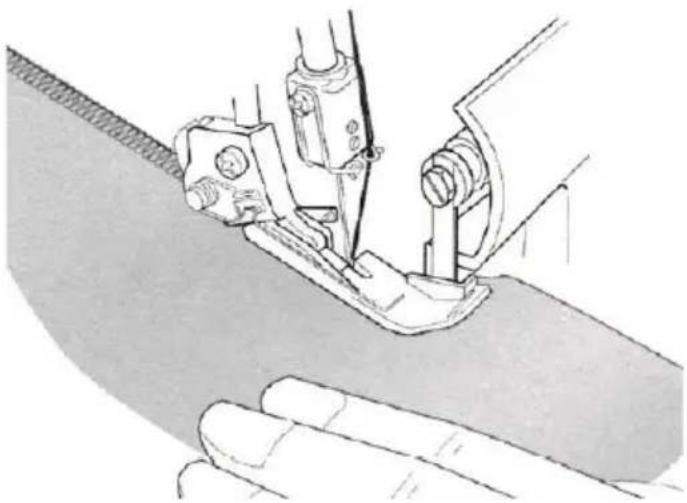
natural_image
Illustration of a sewing machine needle stitching fabric, with a hand operating the seam (no text or symbols visible)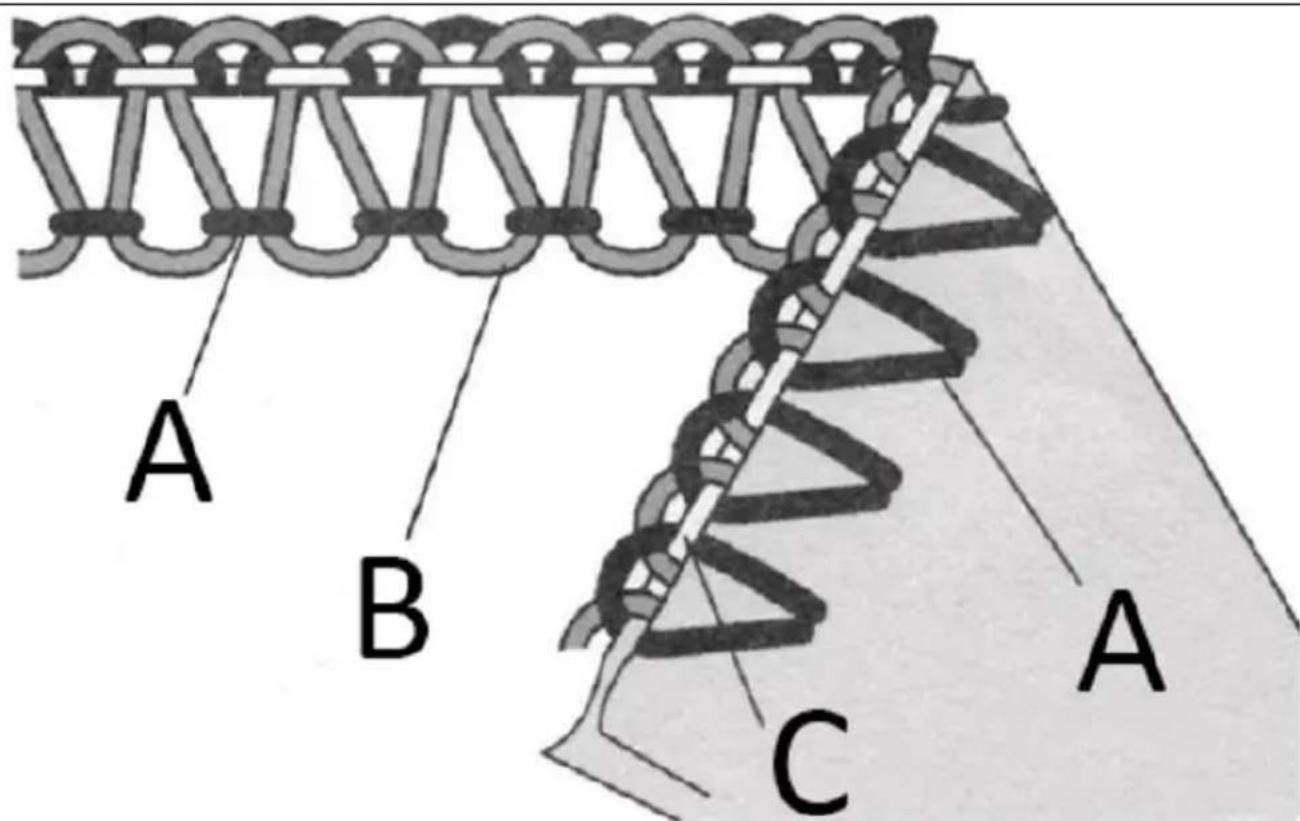
natural_image
Close-up of a hand holding a thin, dark object against a textured gray background (no visible text or symbols)natural_image
Technical line drawing of a mechanical assembly with no visible text or symbolsnatural_image
Illustration of a pen writing on a spiral-bound notebook (no text or symbols present)natural_image
Close-up of a coiled spring against a textured background (no text or symbols visible)natural_image
Diagram of a mechanical or electrical component with a coil and labeled point A, showing internal features and directional arrows (no text or symbols beyond label)
natural_image
Technical illustration showing a pen tip, a mechanical component with coiled spring, and a close-up of a cylindrical object with labeled parts (no text or symbols present)natural_image
Illustration of a sewing machine needle stitching fabric, with a hand adjusting the fabric (no text or symbols)Jak šít špendlíky
natural_image
Technical line drawing of a sewing machine component (no text or symbols)natural_image
Close-up of a sewing machine needle stitching fabric (no visible text or symbols)
natural_image
Close-up of a metallic object with parallel grooves on a textured surface (no visible text or symbols)natural_image
Technical line drawing of a sewing machine with a coiled cord, showing mechanical components and assembly (no text or symbols)3.5. ČISTĚNÍ A ÚDRŽBA
natural_image
Mechanical assembly diagram showing a lever mechanism with no text or symbolsnatural_image
3D rendering of a sewing machine with metal clamps and a numbered component (16), no visible text or symbols on the device itself.natural_image
Close-up of a medical or laboratory equipment setup with metallic tubing and control panels (no visible text or symbols)natural_image
Close-up of a white mechanical device with metal bracket and multiple cylindrical components (no visible text or symbols)natural_image
Close-up of a sewing machine with a black circular arrow indicating clockwise motion (no visible text or symbols)natural_image
Close-up of hands adjusting a mechanical component with a tool (no visible text or symbols)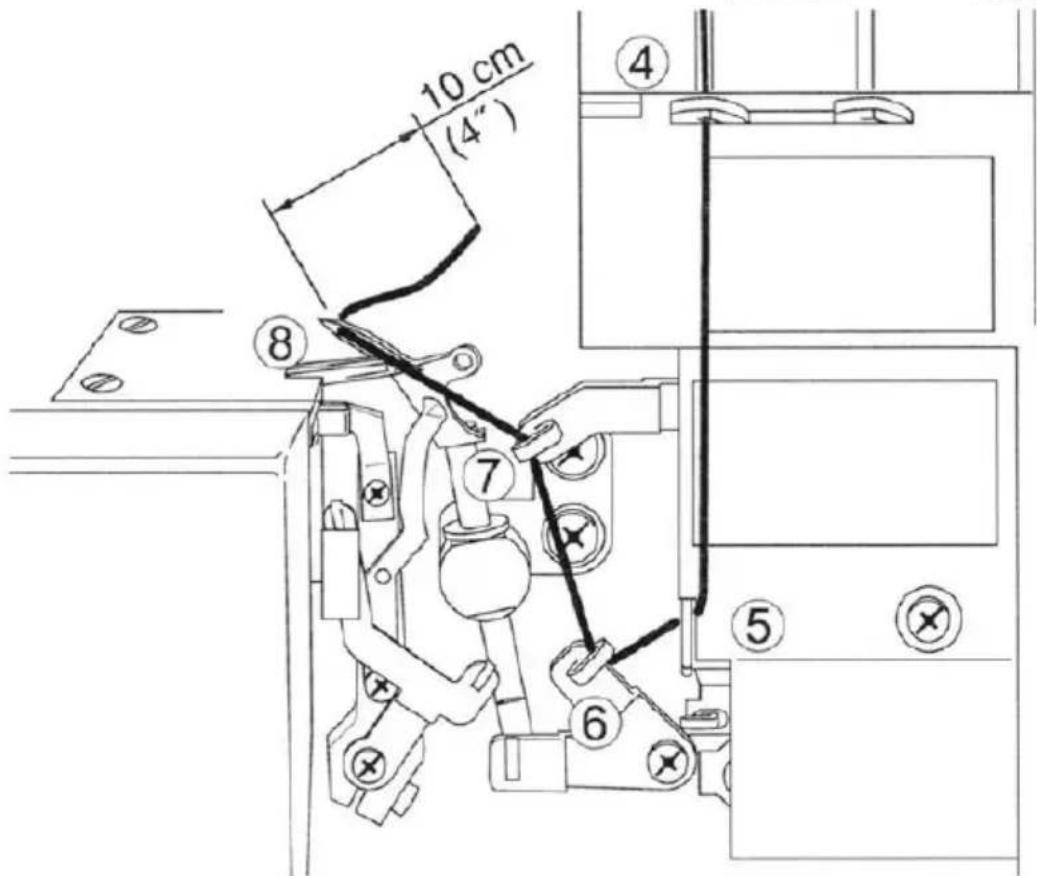

natural_image
Technical line drawing of a mechanical assembly with no visible text or symbolsB
natural_image
Technical line drawing of a mechanical assembly with no visible text or symbolsnatural_image
Line drawing of a mechanical device with scissors and hanging weights, no text or symbols presentnatural_image
Diagram of a mechanical lifting scale with three vertical supports and connecting rods (no text or labels)
natural_image
Technical illustration showing a hand holding a pen and a cylindrical device with internal components (no text or symbols)
natural_image
Technical line drawing of a mechanical component with no visible text or symbols
AVANT DE PROCÉDER AUX RÉGLAGES, ASSUREZ-VOUS D'ÉTEINDRE L'INTERRUPTEUR D'ALIMENTATION
natural_image
Close-up of a mechanical component with a circular dial and numbered parts (no readable text or symbols)flowchart
graph TD
    A["Rectangular Node"] --> B["B"]
natural_image
Line drawing of a women's dress and skirt with decorative trim, shown in two different styles (no text or symbols)natural_image
Line drawings of three different women's dresses with different garment types and designs (no text or symbols)natural_image
Illustration of hands using a tool to adjust or install a mechanical component (no text or symbols visible)
natural_image
Technical line drawing of a sewing machine with rotating shaft and base plate (no text or symbols)
natural_image
Technical line drawing of a mechanical device with rotating shaft and mounting base (no text or symbols)
AVANT DE PROCÉDER AUX RÉGLAGES, ASSUREZ-VOUS D'ÉTEINDRE L'INTERRUPTEUR D'ALIMENTATION
natural_image
Line drawing of a mechanical device with an arrow indicating direction (no text or symbols)natural_image
Black-and-white photo of hands operating a sewing machine with a hand pointing to the fabric (no visible text or symbols)
natural_image
Close-up of a white sewing machine with mechanical components, no visible text or symbolsnatural_image
Black-and-white illustration of hands operating a sewing machine with a hook attachment (no text or symbols visible)natural_image
Close-up of fabric or textile with layered, curved bands and textured surface (no visible text or symbols)
natural_image
Black-and-white photo of a person's legs wearing high-heeled shoes, standing on wet ground with brick wall background (no text or symbols)natural_image
Technical line drawing of a sewing machine needle stitching fabric (no text or symbols)natural_image
Illustration of hands using a sewing machine to cut fabric (no text or symbols visible)natural_image
Close-up of a pipette tip dispensing liquid onto a surface with a white curved line nearby (no visible text or symbols)natural_image
Close-up of textured fabric with diagonal striped patterns and no visible text or symbolsConfiguration de la machine
natural_image
Close-up of a sewing machine with visible mechanical components and no readable text or symbolsnatural_image
Illustration of a sewing machine needle stitching fabric, with no visible text or symbols
natural_image
Close-up of a textured surface with a vertical dark line intersecting it, no visible text or symbolsFlatlock décoratif
natural_image
Technical line drawing of a mechanical device with no visible text or symbolsnatural_image
Illustration of a pencil writing on a notepad with a spiral-bound notebook beside it (no text or symbols present)natural_image
Close-up of a coiled spring against a textured background (no text or symbols visible)natural_image
Diagram of a coiled spring attached to a flat surface with an arrow labeled 'A' pointing to it (no text or symbols beyond label)natural_image
Three-panel image showing a dropper tip, a mechanical component with coiled spring, and a close-up of a spherical object (no text or symbols)natural_image
Illustration of a sewing machine needle stitching fabric, with a hand operating the seam (no text or symbols)
natural_image
Technical line drawing of a sewing machine component (no text or symbols)natural_image
Close-up of a sewing machine needle stitching fabric (no visible text or symbols)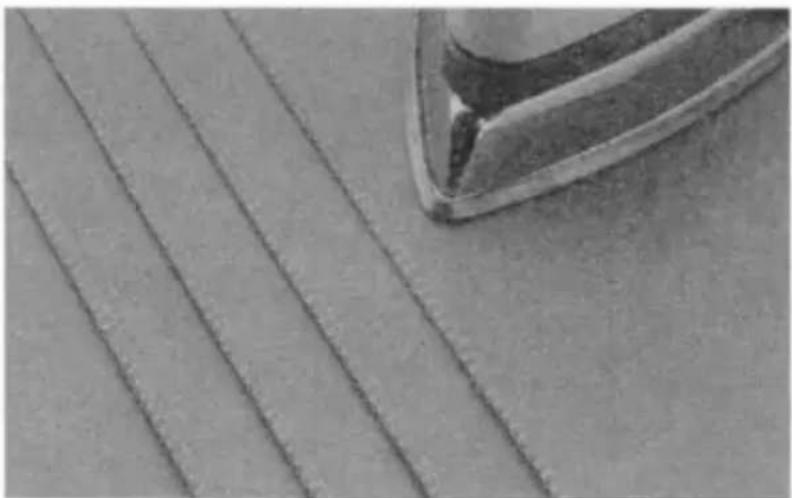
natural_image
Close-up of a metallic object with parallel grooves on a textured surface (no visible text or symbols)natural_image
Technical line drawing of a sewing machine needle stitching, showing thread and fastener assembly (no text or symbols)Coin intérieur
natural_image
Technical illustration of a sewing machine stitching fabric (no text or symbols)natural_image
Technical line drawing of a sewing machine with a coiled cord, showing mechanical components and assembly (no text or symbols)natural_image
Mechanical assembly diagram showing a lever mechanism with no text or symbolsÉLIMINATION DES APPAREILS USAGÉS
natural_image
Close-up of a sewing machine with metal clamps and a numbered component (16), no visible text or symbols on the device itself.1 Aghi
2 Cacciavite
3 Pinzette
4 Spandiconcime manuale
natural_image
Close-up of a medical or laboratory equipment setup with metallic tubing and control panels (no visible text or symbols)natural_image
Close-up of a white mechanical device with metal bracket and multiple cylindrical components (no visible text or symbols)natural_image
Close-up of a sewing machine with visible mechanical components and a black arrow indicating rotation (no text or symbols)natural_image
Close-up of hands operating a mechanical device with multiple ports and a tool (no visible text or symbols)


natural_image
Technical line drawing of a mechanical assembly with no visible text or symbolsB

natural_image
Technical line drawing of a mechanical assembly with no visible text or symbolsnatural_image
Line drawing of a mechanical device with scissors and hanging weights, no text or symbols presentnatural_image
Diagram of a mechanical lifting scale with three vertical supports and connecting rods (no text or labels)
natural_image
Technical illustration showing a hand holding a pencil and a close-up of a mechanical device with a spring scale (no text or symbols)
natural_image
Technical line drawing of a mechanical component with no visible text or symbols
flowchart
graph TD
    A["Rectangular Node"] --> B["B"]
Overed raccolto
natural_image
Line drawing of a women's dress and skirt with fabric, showing front and back views (no text or symbols)natural_image
Line drawings of three different women's dresses with different garment designs (shoulders, tights, and skirts) shown in line art style, no text or symbols present.natural_image
Illustration of hands using a tool to adjust or install a mechanical component (no text or symbols visible)
natural_image
Technical line drawing of a sewing machine with no visible text or symbolsnatural_image
Technical line drawing of a mechanical device with rotating shaft and mounting base (no text or symbols)
natural_image
Line drawing of a mechanical device with an arrow indicating direction (no text or symbols)natural_image
Illustration of hands operating a sewing machine with a hand moving a black arrow (no text or symbols visible)| Tessuto | Quadrante di tensione | |||
| Blu | Verde | Arancione | Giallo | |
| Leggero | 2,5 | 3,0 | 3,0 | |
| Medio | 3,0 | 3,0 | 3,0 | |
| Pesante | 3,5 | 3,0 | 3,0 | |
| Tessuto | Quadrante di tensione | |||
| Blu | Verde | Arancione | Giallo | |
| Leggero | 2,5 | 1,0 | 7,0 | |
| Medio | 3,0 | 1,0 | 7,0 | |
| Pesante | 3,5 | 1,0 | 7,0 | |
Come bilanciare
UN Ago filo
natural_image
Close-up of fabric or textile with layered, curved bands and textured surface (no visible text or symbols)
natural_image
Black-and-white photo of a person's lower legs wearing high-heeled shoes, standing near a brick wall (no text or symbols visible)natural_image
Technical line drawing of a sewing machine needle stitching fabric (no text or symbols)natural_image
Illustration of hands using a sewing machine to adjust fabric (no text or symbols visible)natural_image
Close-up of a pipette dispensing liquid onto a surface with a white curved line nearby (no visible text or symbols)natural_image
Close-up of textured fabric with diagonal striped patterns and no visible text or symbolsnatural_image
Close-up of a sewing machine with visible mechanical components and no readable text or symbolsCucitura piatta
natural_image
Line drawing of a sewing machine needle stitching fabric, with no visible text or symbols
natural_image
Close-up of a textured surface with a vertical dark line intersecting it, no visible text or symbolsPiastre decorative
natural_image
Technical line drawing of a mechanical device with no visible text or symbolsnatural_image
Illustration of a pencil writing on a notepad with a spiral-bound notebook beside it (no text or symbols present)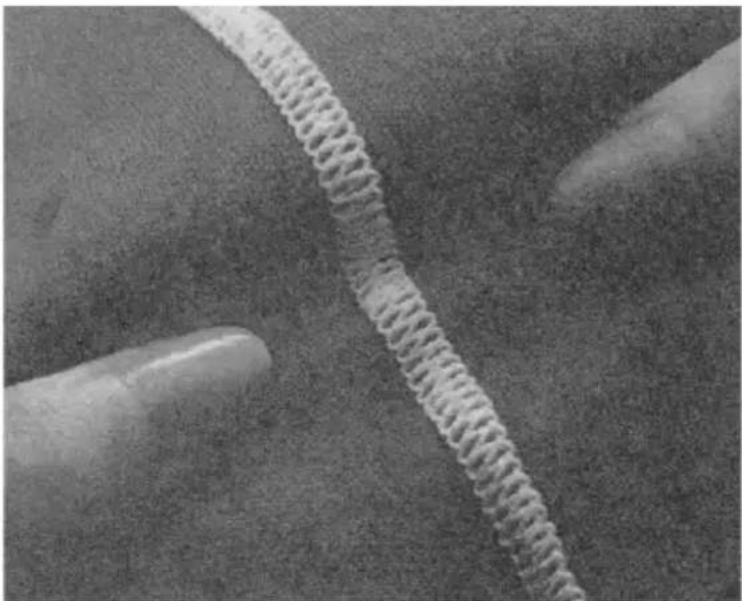
natural_image
Close-up of a coiled spring against a textured background (no text or symbols visible)natural_image
Diagram of a spring attached to a curved surface with an arrow and label 'A' (no text or symbols on the diagram itself)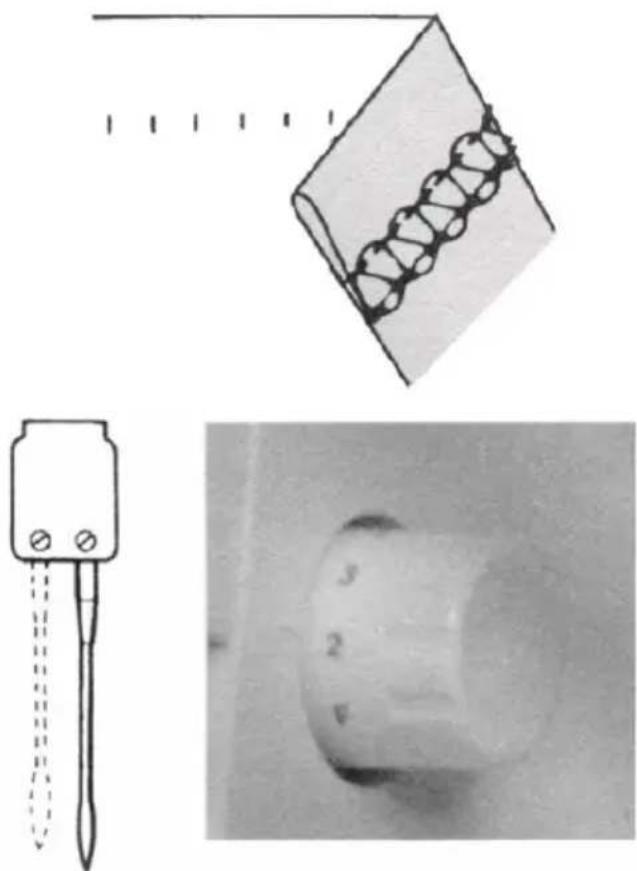
natural_image
Technical illustration showing a tool, a mechanical component with coiled spring, and a close-up of a cylindrical component (no text or symbols)fili.
natural_image
Illustration of a sewing machine needle stitching fabric, with a hand adjusting the seam (no text or symbols)
natural_image
Technical line drawing of a sewing machine component (no text or symbols)natural_image
Close-up of a sewing machine needle stitching fabric (no visible text or symbols)
natural_image
Close-up of a metallic object with parallel grooves on a textured surface (no visible text or symbols)natural_image
Technical illustration of a sewing machine needle stitching and fastening a thread (no text or symbols present)Angolo interno
natural_image
Technical line drawing of a sewing machine with a coiled cord, showing mechanical components and assembly (no text or symbols)natural_image
Mechanical assembly diagram showing a lever mechanism with no text or symbolsSMALTIMENTO DEI DISPOSITIVI USATI
natural_image
Close-up of a sewing machine with metal clamps and a numbered component (16), no visible text or symbols on the device itself.natural_image
Close-up of a medical or laboratory equipment setup with metallic components and a metal frame (no visible text or symbols)natural_image
Close-up of a white mechanical device with metal bracket and multiple ports (no visible text or symbols)natural_image
Close-up of a sewing machine with a black circular arrow indicating clockwise motion (no visible text or symbols)natural_image
Close-up of hands adjusting a mechanical component with a tool (no visible text or symbols)


natural_image
Technical line drawing of a mechanical assembly with no visible text or symbols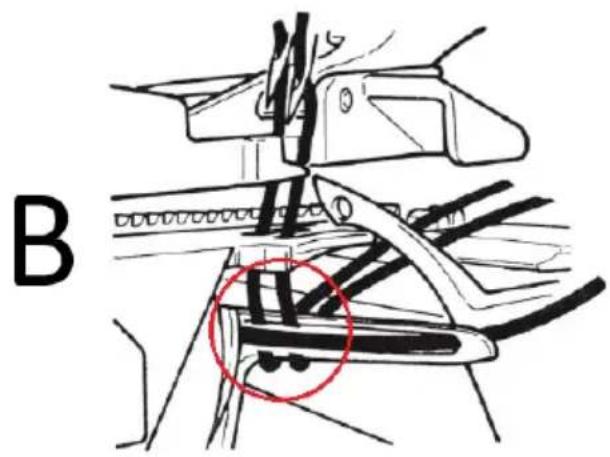
natural_image
Technical line drawing of a mechanical assembly with a red circle highlighting a specific component (no text or symbols present)natural_image
Line drawing of a mechanical device with scissors and hanging weights, no text or symbols presentnatural_image
Diagram of a mechanical lifting scale with three vertical supports and connecting rods (no text or labels)
natural_image
Technical illustration showing a hand holding a pencil and a close-up of a mechanical device with a spring scale (no text or symbols)
natural_image
Technical line drawing of a mechanical component with no visible text or symbols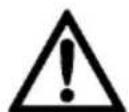
ANTES DE HACER AJUSTES, ASEGÚRESE DE APAGAR EL INTERRUPTOR DE ENCENDIDO
flowchart
graph TD
    A["Rectangle"] --> B["B"]
natural_image
Line drawing of a women's dress showing front, back, and side views (no text or symbols)natural_image
Line drawings of three different outfits: a dress with pleated collar, a t-shirt with bow tie, and a high-sleeve dress (no text or symbols)natural_image
Illustration of hands using a needle to draw or wire around a mechanical component (no text or symbols visible)
natural_image
Technical line drawing of a sewing machine with rotating shaft and base plate (no text or symbols)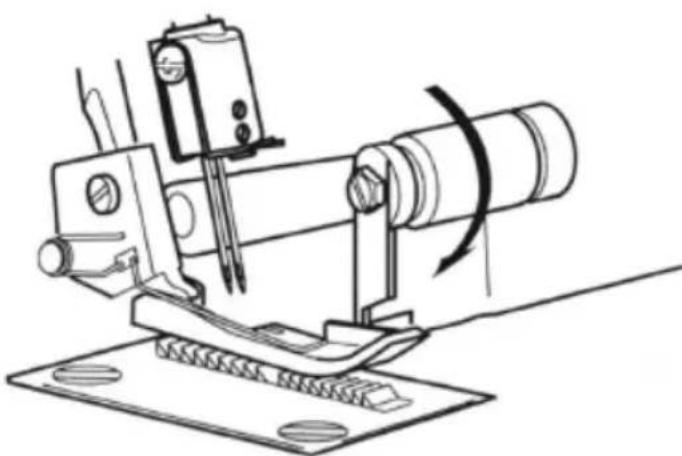
natural_image
Technical line drawing of a sewing machine with no visible text or symbols
ANTES DE HACER AJUSTES, ASEGÚRESE DE APAGAR EL INTERRUPTOR ENCENDIDO
natural_image
Close-up of fabric or textile with layered, curved bands and a textured circular pattern (no visible text or symbols)
natural_image
Black-and-white photo of a person's lower legs wearing white high-heeled shoes, standing on a paved surface (no text or symbols visible)natural_image
Technical line drawing of a sewing machine needle stitching fabric (no text or symbols)natural_image
Illustration of hands using a sewing machine to cut fabric (no text or symbols visible)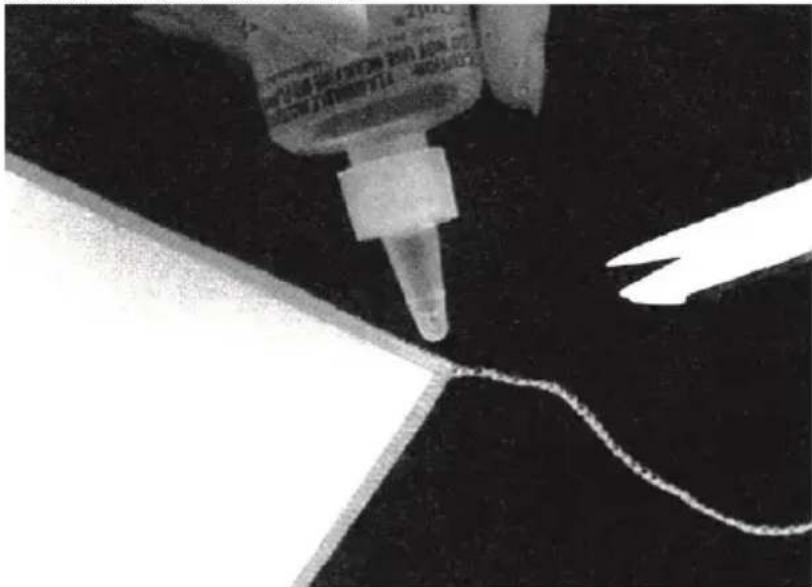
natural_image
Close-up of a syringe tip dispensing liquid onto a surface with a white curved line nearby (no visible text or symbols)natural_image
Close-up of textured fabric with diagonal striped patterns (no visible text or symbols)natural_image
Close-up of a sewing machine with visible needle and clasp mechanism (no text or symbols)natural_image
Illustration of a sewing machine needle stitching fabric, with no visible text or symbols
A Hilo de aguja
natural_image
Close-up of a textured surface with a vertical dark line and faint circular features (no text or symbols)Costuras planas decorativas
natural_image
Technical line drawing of a mechanical device with no visible text or symbolsnatural_image
Illustration of a pen writing on a notepad with beads (no text or symbols)natural_image
Close-up of a coiled spring against a textured background (no text or symbols visible)natural_image
Diagram of a coiled spring attached to a flat surface with an arrow labeled 'A' pointing to it (no text or symbols beyond label)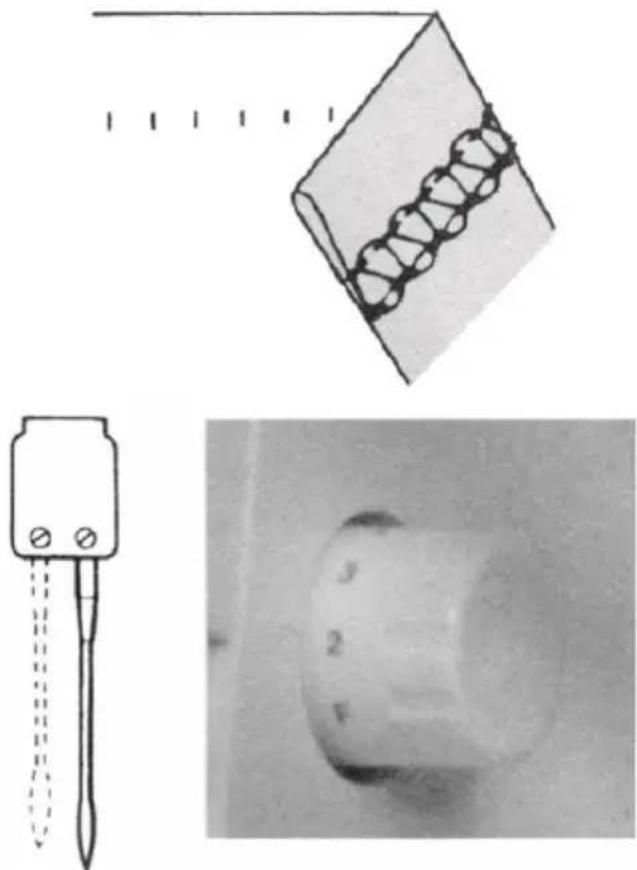
natural_image
Three-panel image showing a tool, a mechanical component with coiled spring, and a close-up of a spherical object (no text or symbols)natural_image
Illustration of a sewing machine needle stitching fabric, with a hand operating the seam (no text or symbols)
natural_image
Technical line drawing of a sewing machine component (no text or symbols)natural_image
Close-up of a sewing machine needle stitching fabric (no visible text or symbols)
natural_image
Close-up of a metallic object with parallel grooves on a textured surface (no visible text or symbols)natural_image
Technical illustration of a sewing machine needle stitching on fabric, showing thread and fastener assembly (no text or symbols)Esquina interior
natural_image
Technical illustration of a sewing machine stitching fabric (no text or symbols)Colocación de pines
natural_image
Technical line drawing of a sewing machine with a coiled cord, showing mechanical components and assembly (no text or symbols)natural_image
Mechanical assembly diagram showing a lever mechanism with no text or symbolsnatural_image
Close-up of a sewing machine with metal clamps and a numbered component (16), no visible text or symbols on the device itself.natural_image
Close-up of a medical imaging machine with metallic components and a metal frame (no visible text or symbols)natural_image
Close-up of a white mechanical device with metal bracket and multiple cylindrical components (no visible text or symbols)natural_image
Close-up of a sewing machine with visible mechanical components and a black circular arrow indicating rotation (no text or symbols on the device itself)

natural_image
Close-up of hands operating a mechanical device with multiple ports and a tool (no visible text or symbols)
natural_image
Technical line drawing of a mechanical assembly with clamps and brackets (no text or symbols)B

natural_image
Technical line drawing of a mechanical assembly with a red circle highlighting a specific component (no text or symbols present)natural_image
Line drawing of a mechanical device with scissors and hanging weights, no text or symbols present
A BEÁLLÍTÁSOK ELVÉGZÉSE ELŐTT FELTÉTLENÜL KAPCSOLJA KI A HÁLÓZATI KAPCSOLÓT
flowchart
graph TD
    A["Rectangle"] --> B["B"]
natural_image
Line drawing of a women's dress and skirt with fabric pattern, showing garment design and assembly (no text or symbols)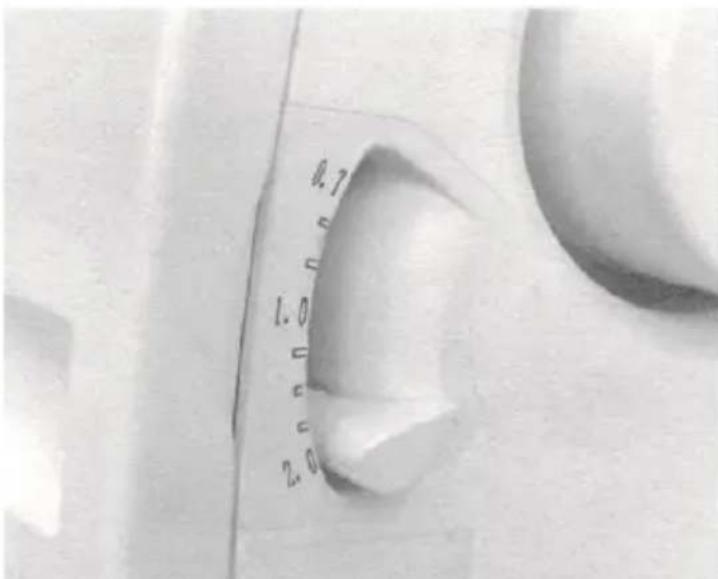
natural_image
Line drawings of three different garment designs, showing front, back, and side views with no text or symbols.natural_image
Illustration of hands using a tool to adjust or install a mechanical component (no text or symbols visible)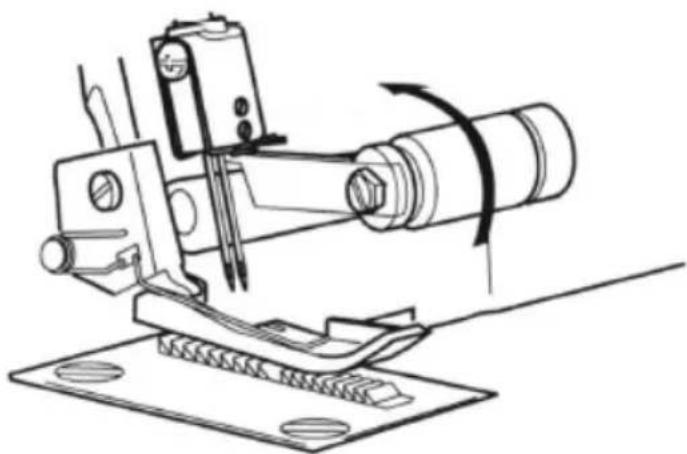
natural_image
Technical line drawing of a mechanical assembly with no visible text or symbolsnatural_image
Black-and-white illustration of hands operating a sewing machine with a hook attachment (no text or symbols visible)natural_image
Technical line drawing of a sewing machine needle stitching fabric (no text or symbols)natural_image
Illustration of hands operating a sewing machine needle (no text or symbols visible)natural_image
Close-up of a pipette tip dispensing liquid onto a surface with a white curved line nearby (no text or symbols visible)natural_image
Close-up of textured fabric with diagonal striped patterns and no visible text or symbolsA gép beállítása
natural_image
Close-up of a sewing machine with visible needle and base mechanism (no text or symbols)natural_image
Illustration of a sewing machine needle stitching fabric, with a hand operating the seam (no text or symbols visible)
A Tüszál
B Felső hurokszál
C Alsó hurokszál
natural_image
Close-up of a human face with visible skin texture and a vertical dark line (no text or symbols)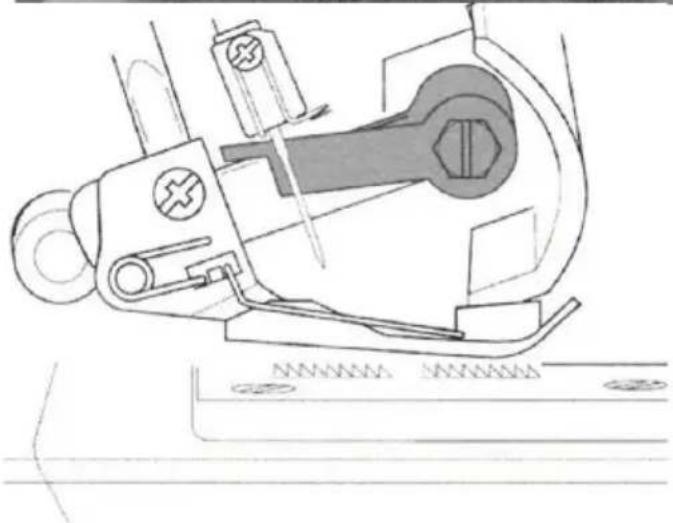
natural_image
Technical line drawing of a mechanical device with no visible text or symbolsnatural_image
Illustration of a pen writing on a notepad with a coiled spring (no text or symbols)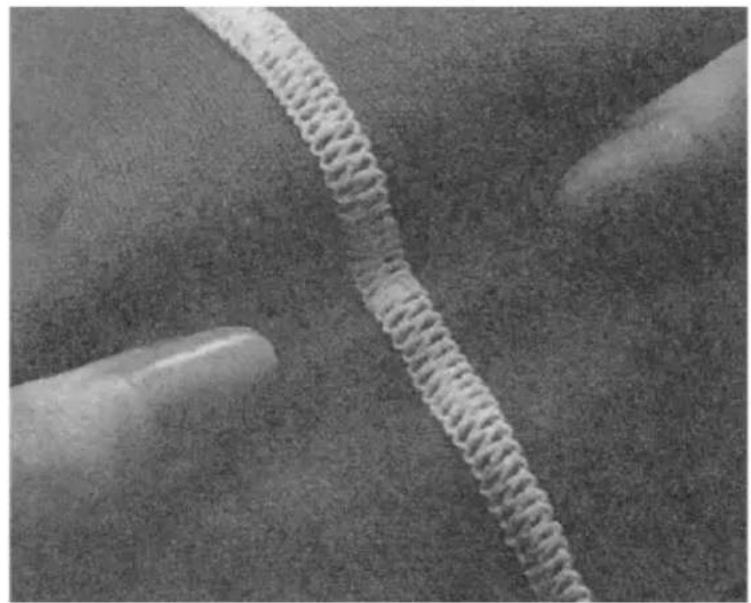
natural_image
Close-up of a coiled, coiled wire against a textured background (no text or symbols visible)natural_image
Diagram of a spring attached to a tilted rectangular plate with an arrow labeled 'A' pointing to it (no text or symbols beyond label)natural_image
Illustration of sewing machine tools including a needle, spring, and base (no text or symbols)natural_image
Technical line drawing of a sewing machine component (no text or symbols)natural_image
Close-up of a sewing machine needle stitching fabric (no visible text or symbols)
natural_image
Close-up of a metallic object with parallel grooves on a textured surface (no visible text or symbols)natural_image
Technical line drawing of a sewing machine needle stitching and fastening a thread (no text or symbols)Belső sarok
A - Vágott rés
B - Vágási vonal
C - tú pozíciója
natural_image
Technical line drawing of a sewing machine and a braided chain, showing mechanical components and assembly (no text or symbols)natural_image
Mechanical assembly diagram showing a lever mechanism with no text or symbolsHASZNÁLT ESZKÖZÖK ÁRTALMATLANÍTÁSA
natural_image
Close-up of a sewing machine with metal clamps and a numbered component (16), no visible text or symbols on the device itself.APPARATETS PLACERING
natural_image
Two industrial sewing machines in a cleanroom setting, one with metal hooks and the other with plastic components (no visible text or symbols)natural_image
Close-up of a sewing machine with visible stitching and mounting holes, no text or symbols present.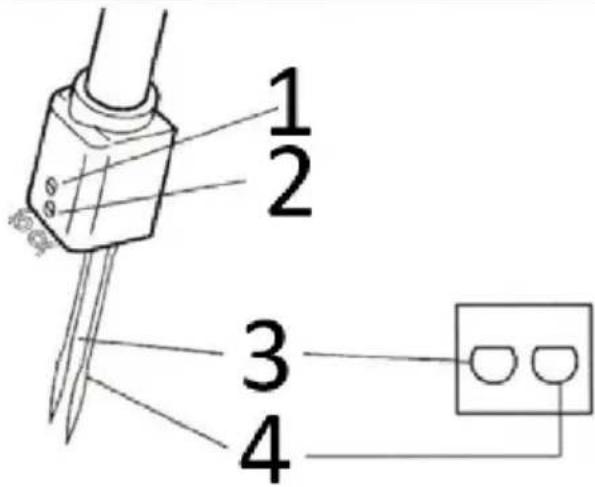
Sørg for at tage maskinen ud af stikkontakten, før du fjerner nålene.
natural_image
Close-up of hands adjusting a mechanical component with a tool (no visible text or symbols)
Tråd maskinens griberområde ved at følge de orange farvekodede trådføringer (4 \~ 7)


natural_image
Technical line drawing of a mechanical assembly with no visible text or symbolsB

natural_image
Technical line drawing of a mechanical assembly with a red circle highlighting a specific component (no text or symbols present)natural_image
Line drawing of a mechanical device with scissors and hanging weights, no text or symbols presentnatural_image
Diagram of a mechanical lifting scale with three vertical supports and connecting rods (no text or labels)
natural_image
Technical illustration showing a hand holding a pencil and a close-up of a mechanical device with a spring scale (no text or symbols)
natural_image
Technical line drawing of a mechanical component with no visible text or symbols
S∅RG FOR AT SLUKKE FOR KONTAKTEN, F∅R DU FORETAGER JUSTERINGER.
flowchart
graph TD
    A["Rectangle"] --> B["B"]
Differentielt foder
natural_image
Line drawing of a women's dress with front, side, and back views (no text or symbols)natural_image
Line drawings of three different fashion outfits: a pleated blouse, a t-shirt, and a high-collared dress (no text or symbols present)Indstil knappen til justering af differentialindføring over gradueringen "1.0"
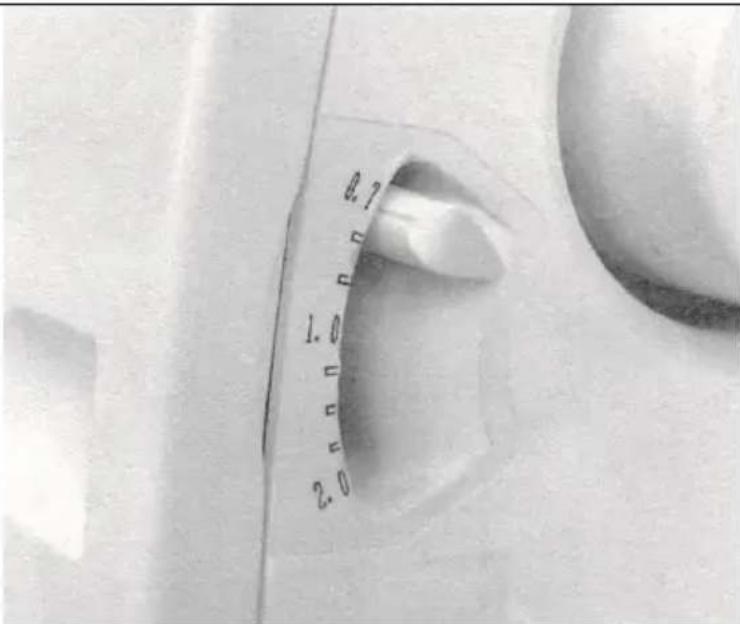
natural_image
Illustration of hands using a tool to adjust or install a mechanical component (no text or symbols visible)
natural_image
Technical line drawing of a sewing machine with no visible text or symbols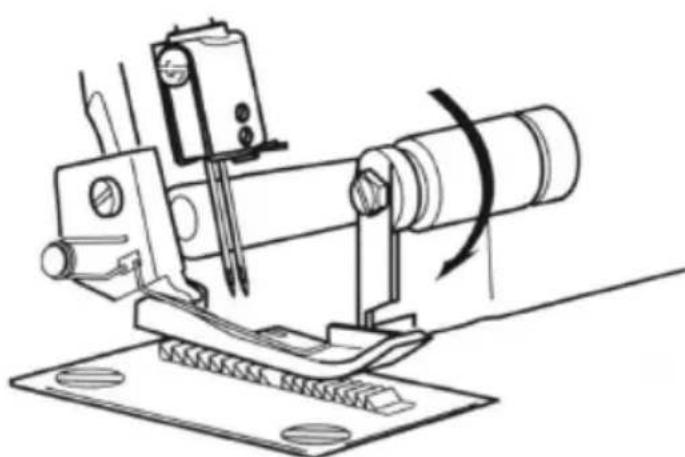
natural_image
Technical line drawing of a mechanical device with rotating shaft and mounting base (no text or symbols)
S∅RG FOR AT SLUKKE FOR KONTAKTEN, F∅R DU FORETAGER JUSTERINGER.
natural_image
Line drawing of a mechanical device with an arrow indicating direction (no text or symbols)Syning med fri arm
natural_image
Black-and-white illustration of hands operating a sewing machine with a hook attachment (no text or symbols visible)Sådan syr du en rullet kant
natural_image
Close-up of fabric with layered folds and a textured surface (no visible text or symbols)
natural_image
Black-and-white photo of a person's lower legs wearing high-heeled shoes, standing on the ground with brick wall background (no text or symbols)natural_image
Technical line drawing of a sewing machine needle stitching fabric (no text or symbols)natural_image
Illustration of hands operating a sewing machine needle (no text or symbols visible)natural_image
Close-up of a pipette tip dispensing liquid onto a surface with a white curved line nearby (no text or symbols visible)Stingvariationer og syteknikker
Sådan syr du en dekorativ flatlock- søm
natural_image
Close-up of textured fabric with diagonal striped patterns and a dark rectangular band (no text or symbols)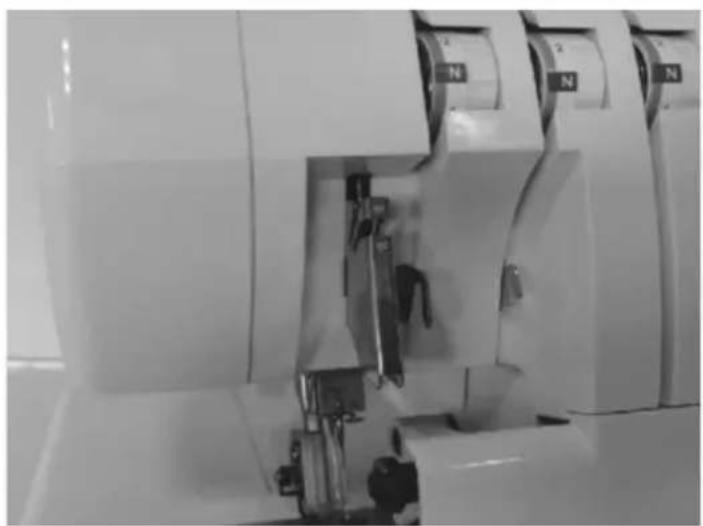
natural_image
Close-up of a sewing machine with visible mechanical components and no text or symbols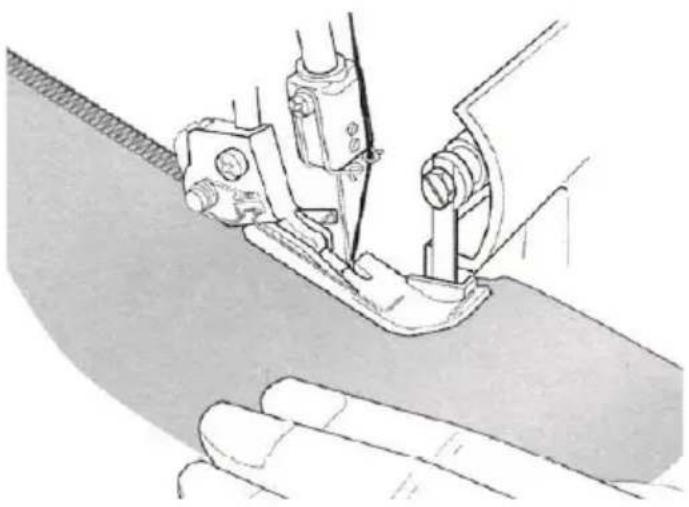
natural_image
Illustration of a sewing machine needle stitching fabric, with a hand operating the seam (no text or symbols visible)DA
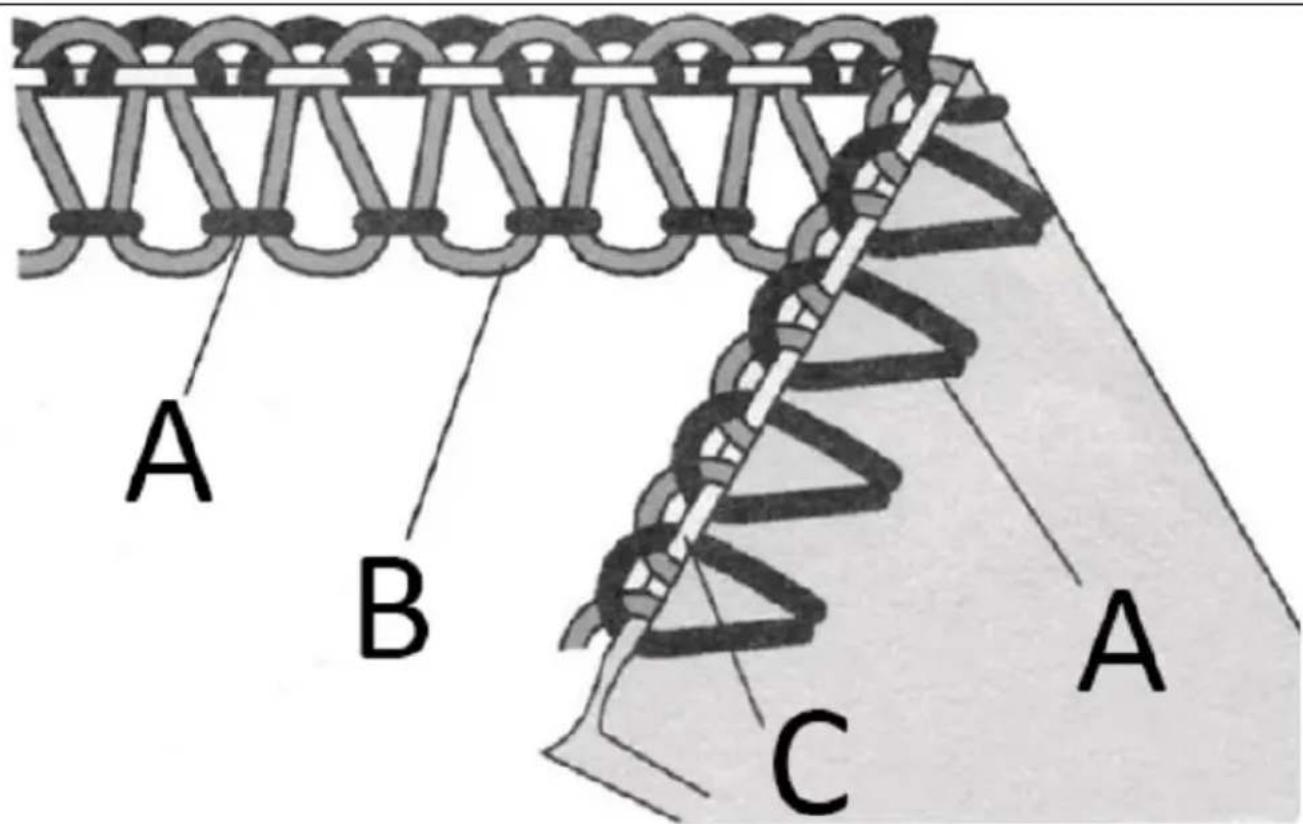
A Nåletråd
B ∅vre løftegarn
C Nedre løftegarn
natural_image
Close-up of a human face with visible skin texture and a vertical dark line (no text or symbols)
natural_image
Technical line drawing of a mechanical device with no visible text or symbolsnatural_image
Illustration of a pen writing on a notepad with a coiled spring (no text or symbols)natural_image
Close-up of a coiled, coiled wire against a textured background (no text or symbols visible)natural_image
Diagram of a coiled spring attached to a flat surface with an arrow labeled 'A' pointing to it (no text or symbols beyond label)natural_image
Illustration of sewing machine tools including a needle, fabric, and a ball (no text or symbols)natural_image
Technical line drawing of a sewing machine component (no text or symbols)- Fold stoffet med de forkerte sider mod hinanden, og sy.
- Tryk pindene i samme retning
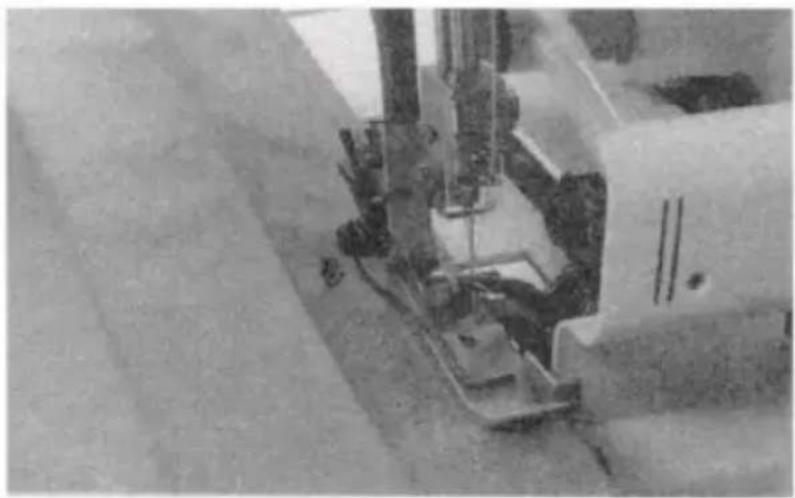
natural_image
Close-up of a sewing machine needle stitching fabric, showing mechanical components and stitching details (no visible text or symbols)
natural_image
Close-up of a metallic object with parallel lines on a textured surface (no visible text or symbols)DA
natural_image
Technical illustration of a sewing machine stitching fabric (no text or symbols)natural_image
Technical line drawing of a sewing machine with a coiled cord, showing mechanical components and assembly (no text or symbols)natural_image
Mechanical assembly diagram showing a lever mechanism with no text or symbolsBORTSKAFFELSE AF BRUGTE ENHEDER
natural_image
Close-up of a sewing machine with metal clamps and a numbered component (16), no visible text or symbols on the device itself.1 Neuloja
2 Ruuvimeisseli
3 Pinsetit
4 Levitin
natural_image
Black-and-white photo of a sewing machine with metal frame and two white sewing machines (no visible text or labels)natural_image
Close-up of a sewing machine with a black circular arrow indicating clockwise motion (no visible text or symbols)natural_image
Close-up of hands operating a mechanical device with multiple ports and a tool (no visible text or symbols)


natural_image
Technical line drawing of a mechanical assembly with no visible text or symbols
natural_image
Technical line drawing of a mechanical assembly with a red circle highlighting a specific component (no text or symbols present)natural_image
Line drawing of a mechanical device with scissors and hanging weights, no text or symbols presentnatural_image
Diagram of a mechanical lifting scale with three vertical supports and connecting rods (no text or labels)
natural_image
Technical illustration showing a hand holding a pencil and a close-up of a mechanical device with a spring scale (no text or symbols)
natural_image
Technical line drawing of a mechanical component with no visible text or symbols
ENNEN SÄÄTÖJEN TEKEMÄ, MUISTA KÄYTTÄÄ VIRTA POIS PÄÄLTÄ
natural_image
Line drawing of a women's dress and skirt with fabric, showing front and back views (no text or symbols)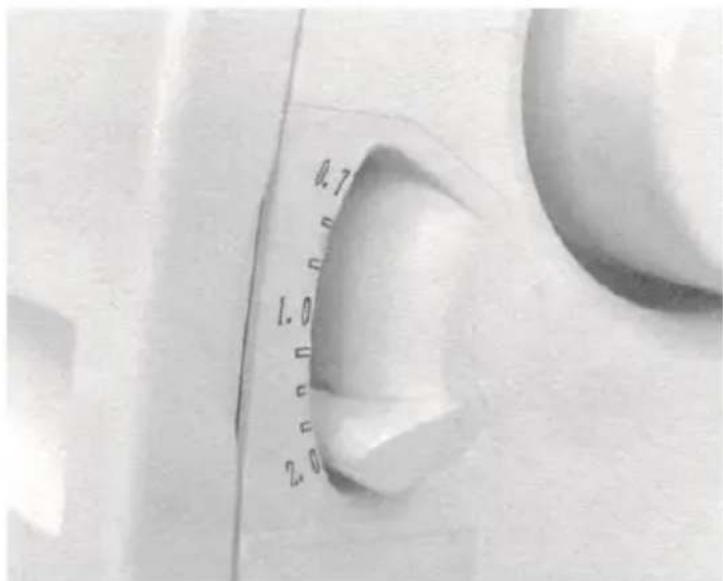
natural_image
Line drawings of three different fashion outfits with no text or symbolsnatural_image
Illustration of hands using a needle to apply or install a medical device on skin (no text or symbols present)keskimerkkiä.

natural_image
Technical line drawing of a sewing machine with rotating shaft and base plate (no text or symbols)natural_image
Black-and-white illustration of hands operating a sewing machine with a hook attachment (no text or symbols visible)Ompele rullahelma
natural_image
Close-up of fabric with layered folds and a textured surface (no visible text or symbols)
natural_image
Black-and-white photo of a person's lower legs wearing white high-heeled shoes, standing on pavement (no text or symbols visible)natural_image
Two-step line drawing showing a sewing machine stitching fabric, with no text or symbols present.natural_image
Close-up of a pipette tip dispensing liquid onto a surface with a white curved line nearby (no text or symbols visible)natural_image
Close-up of textured fabric with diagonal striped patterns (no visible text or symbols)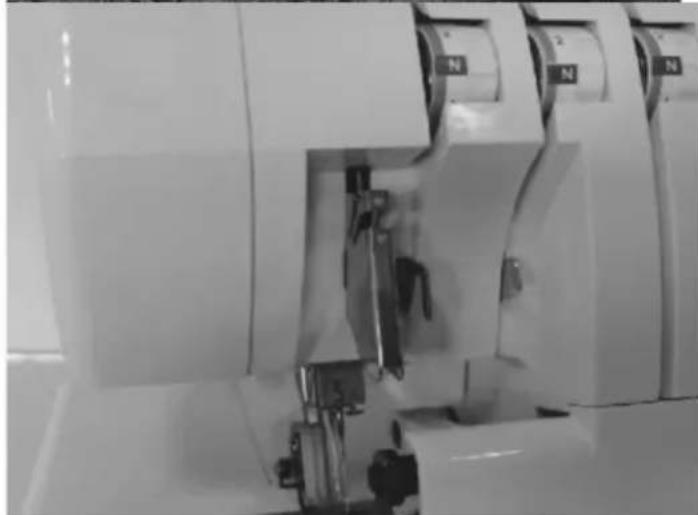
natural_image
Close-up of a sewing machine with visible needle and base mechanism (no text or symbols)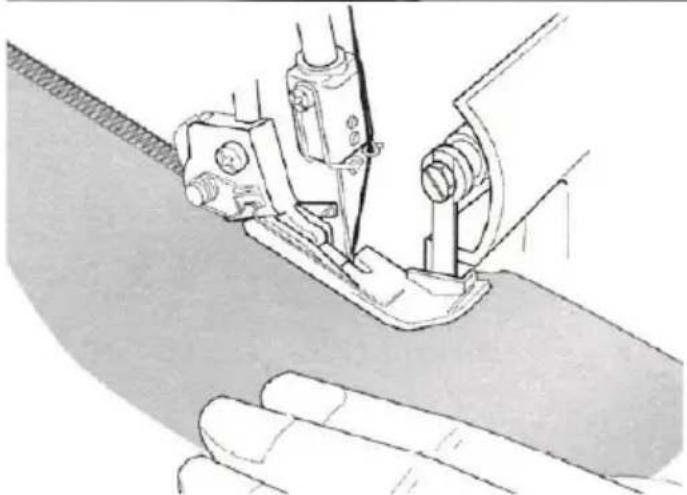
natural_image
Illustration of a sewing machine needle stitching fabric, with no visible text or symbols
A Neulalanka
B Yläsiepparilanka
C Alasiepparilanka
natural_image
Close-up of a human face with visible skin texture and a vertical dark line (no text or symbols)
natural_image
Technical line drawing of a mechanical device with no visible text or symbolsnatural_image
Illustration of a pen writing on a notepad with a coiled spring (no text or symbols)
natural_image
Close-up of a coiled, coiled wire against a textured background (no text or symbols visible)natural_image
Diagram of a coil spring attached to a triangular plate with an arrow labeled 'A' pointing to it (no text or symbols beyond label)natural_image
Illustration of sewing machine stitching process with tool, magnified views, and fabric (no text or symbols)natural_image
Technical line drawing of a sewing machine component (no text or symbols)natural_image
Close-up of a sewing machine needle stitching fabric (no visible text or symbols)
natural_image
Close-up of a metallic object with parallel grooves on a textured surface (no visible text or symbols)natural_image
Technical line drawing of a sewing machine needle stitching and fastening a thread (no text or symbols)Sisäkulma
natural_image
Technical illustration of a sewing machine stitching fabric (no text or symbols)Pin sijoittelu
natural_image
Technical line drawing of a sewing machine with a coiled cord, showing mechanical components and wiring (no text or symbols)natural_image
Mechanical assembly diagram showing a lever mechanism with no text or symbolsKÄYTETTYJEN LAITTEIDEN HÄVITTÄMINEN
natural_image
3D rendering of a sewing machine with attached metal components and a numbered label '16' (no readable text or symbols beyond the number)PLAATS VAN HET APPARAAT
natural_image
Two industrial sewing machines in a cleanroom setting, one with metal hooks and the other with plastic components (no visible text or symbols)natural_image
Close-up of a sewing machine with visible stitching and mounting holes (no text or symbols)natural_image
Close-up of a mechanical component with parallel rods and holes, no visible text or symbols
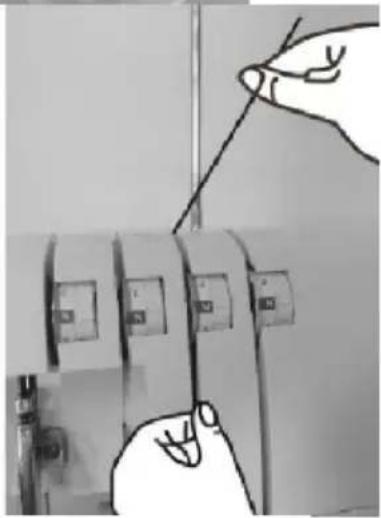
natural_image
Close-up of hands adjusting a mechanical component with a tool (no visible text or symbols)
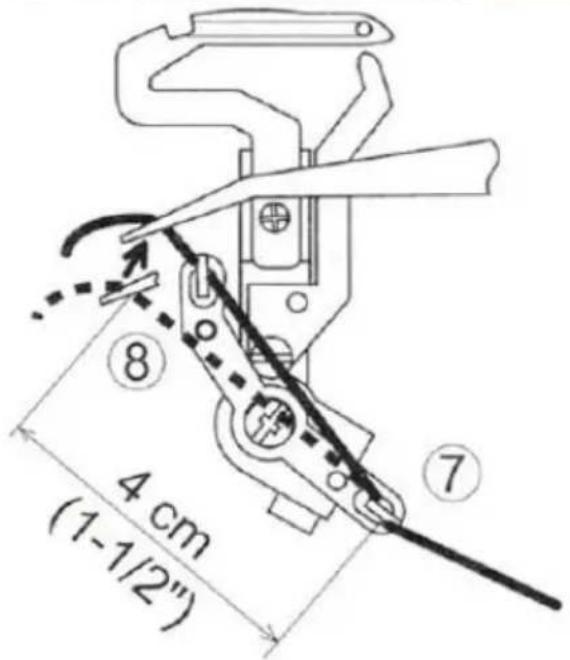

natural_image
Technical line drawing of a mechanical assembly with no visible text or symbolsB

natural_image
Technical line drawing of a mechanical assembly with no visible text or symbolsHoe je draden kunt veranderen/vastbinden
natural_image
Line drawing of a mechanical device with scissors and hanging weights, no text or symbols presentnatural_image
Diagram of a mechanical lifting scale with three vertical supports and connecting rods (no text or labels)
natural_image
Technical illustration showing a hand holding a pencil and a close-up of a mechanical device with a spring scale (no text or symbols)
natural_image
Technical line drawing of a mechanical component with no visible text or symbols
ZORG ERVOOR DAT U DE AAN/UIT-SCHAKELAAR UITZET VOORDAT U AANPASSINGEN AANBRENGT
flowchart
graph TD
    A["Rectangle"] --> B["B"]
natural_image
Line drawing of a women's dress and skirt with accessories, no text or symbols presentnatural_image
Line drawings of three different garment designs, showing front, back, and side views with no text or symbols.natural_image
Illustration of hands using a tool to adjust or install a mechanical component (no text or symbols visible)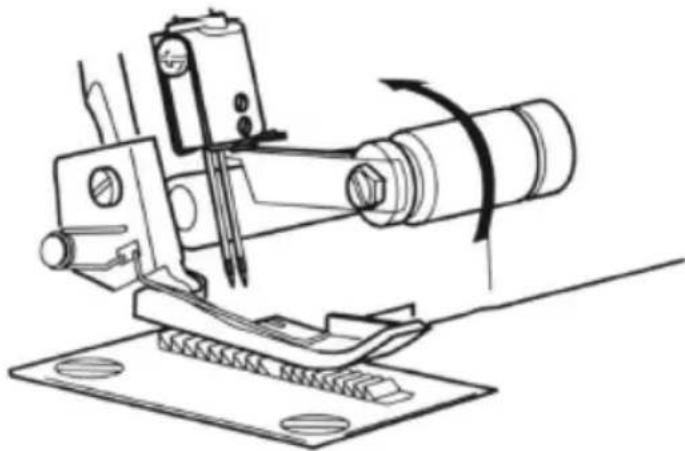
natural_image
Technical line drawing of a sewing machine with rotating shaft and base plate (no text or symbols)
natural_image
Technical line drawing of a mechanical device with rotating shaft and mounting base (no text or symbols)
ZORG ERVOOR DAT U DE AAN/UIT-SCHAKELAAR UITZET VOORDAT U AANPASSINGEN AANBRENGT
natural_image
Line drawing of a mechanical device with an arrow indicating direction (no text or symbols)natural_image
Black-and-white illustration of hands operating a sewing machine with a black arrow indicating the process (no text or symbols visible)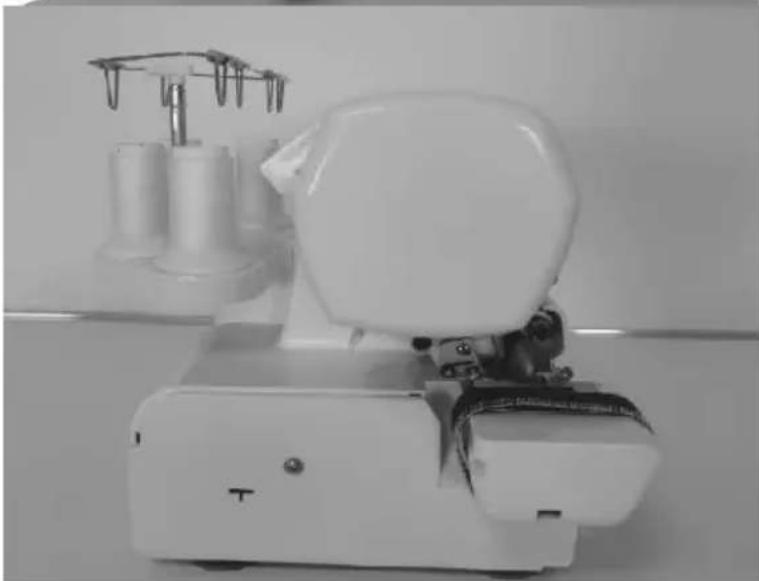
natural_image
Black-and-white photo of a white sewing machine with a coiled cable and mechanical components, no visible text or symbols.natural_image
Black-and-white illustration of hands operating a sewing machine with a hook attachment (no text or symbols visible)natural_image
Close-up of fabric or textile with layered, curved bands and a textured circular background (no visible text or symbols)
natural_image
Black-and-white photo of a person's lower legs wearing white high-heeled shoes, standing on pavement (no text or symbols visible)natural_image
Technical line drawing of a sewing machine needle stitching fabric (no text or symbols)natural_image
Illustration of hands operating a sewing machine needle (no text or symbols visible)natural_image
Close-up of a pipette tip dispensing liquid onto a surface with a white curved line nearby (no text or symbols visible)natural_image
Close-up of textured fabric with diagonal striped patterns (no visible text or symbols)Machine-instelling
natural_image
Close-up of a sewing machine with visible needle and base (no text or symbols)Een naad platmaken
natural_image
Illustration of a sewing machine needle stitching fabric, with no visible text or symbols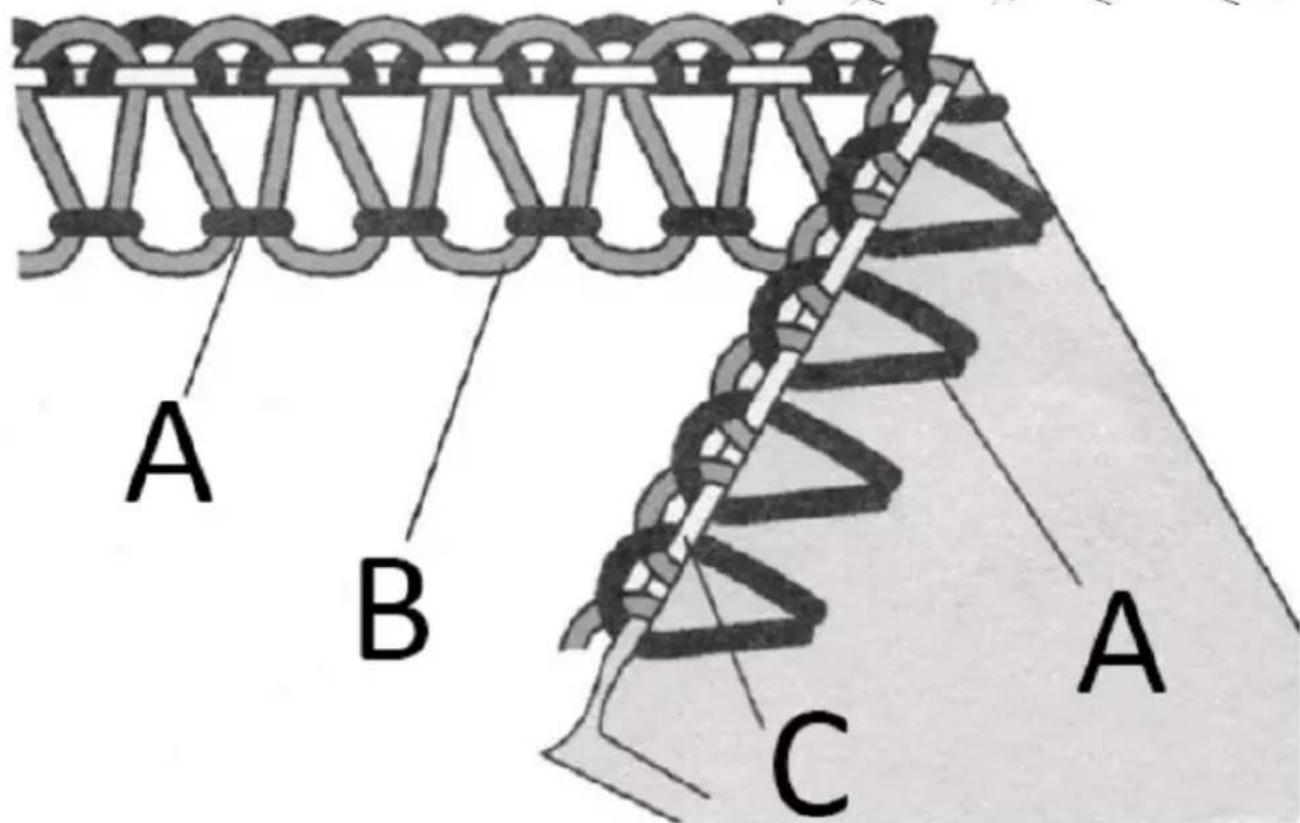
A Naald draad
B Bovenste lusdraad
C Onderste lusdraad
- Trek aan de
natural_image
Close-up of a human face with visible skin texture and a vertical dark line (no text or symbols)natural_image
Technical line drawing of a mechanical device with no visible text or symbolsnatural_image
Illustration of a pencil writing on a notepad with a coiled notebook beside it (no text or symbols present)natural_image
Close-up of a coiled spring against a textured background (no text or symbols visible)natural_image
Diagram of a mechanical or electrical component with a spring and shaded surface, labeled 'A' (no text or symbols beyond label)natural_image
Technical illustration showing a probe tip, a mechanical component with coiled spring, and a close-up of a cylindrical object (no text or symbols)natural_image
Illustration of a sewing machine needle stitching fabric, with a hand operating the seam (no text or symbols)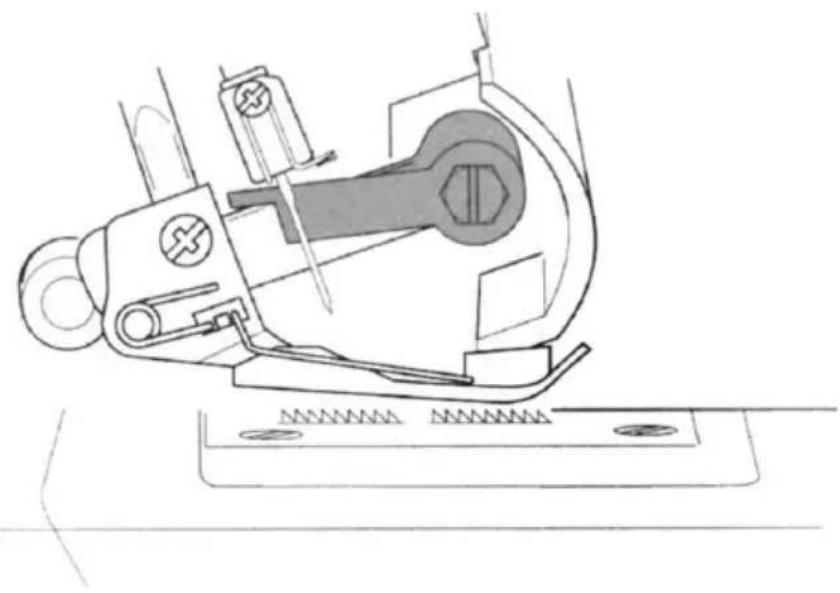
natural_image
Technical line drawing of a sewing machine component (no text or symbols)natural_image
Close-up of a sewing machine needle stitching fabric (no visible text or symbols)
natural_image
Close-up of a metallic object with parallel grooves on a textured surface (no visible text or symbols)Rechte hoeken maken
Buitenhoek
natural_image
Technical illustration of a sewing machine needle stitching and fastening a thread (no text or symbols present)Binnenhoek
natural_image
Technical illustration of a sewing machine stitching fabric (no text or symbols)natural_image
Technical line drawing of a sewing machine with a coiled cord, showing mechanical components and wiring (no text or symbols)natural_image
Mechanical assembly diagram showing a lever mechanism with no text or symbolsAFVOEREN VAN GEBRUIKTE APPARATEN
natural_image
Close-up of a sewing machine with metal clamps and a numbered component (16), no visible text or symbols on the device itself.1 Nåler
2 Skrujern
3 Pinsett
4 Frøspreder
natural_image
Two industrial sewing machines in a cleanroom setting, one with metal hooks and the other with plastic components (no visible text or symbols)Denne maskinen leveres med trådlederholderen i senket posisjon.
Trekk trådlederholderen helt ut.
De to leddene på teleskopføringen klikker på plass när de er riktig plassert.
natural_image
Close-up of a sewing machine with visible stitching and a black arrow indicating rotation (no text or symbols on the machine itself)natural_image
Close-up of hands adjusting a mechanical component with a tool (no visible text or symbols)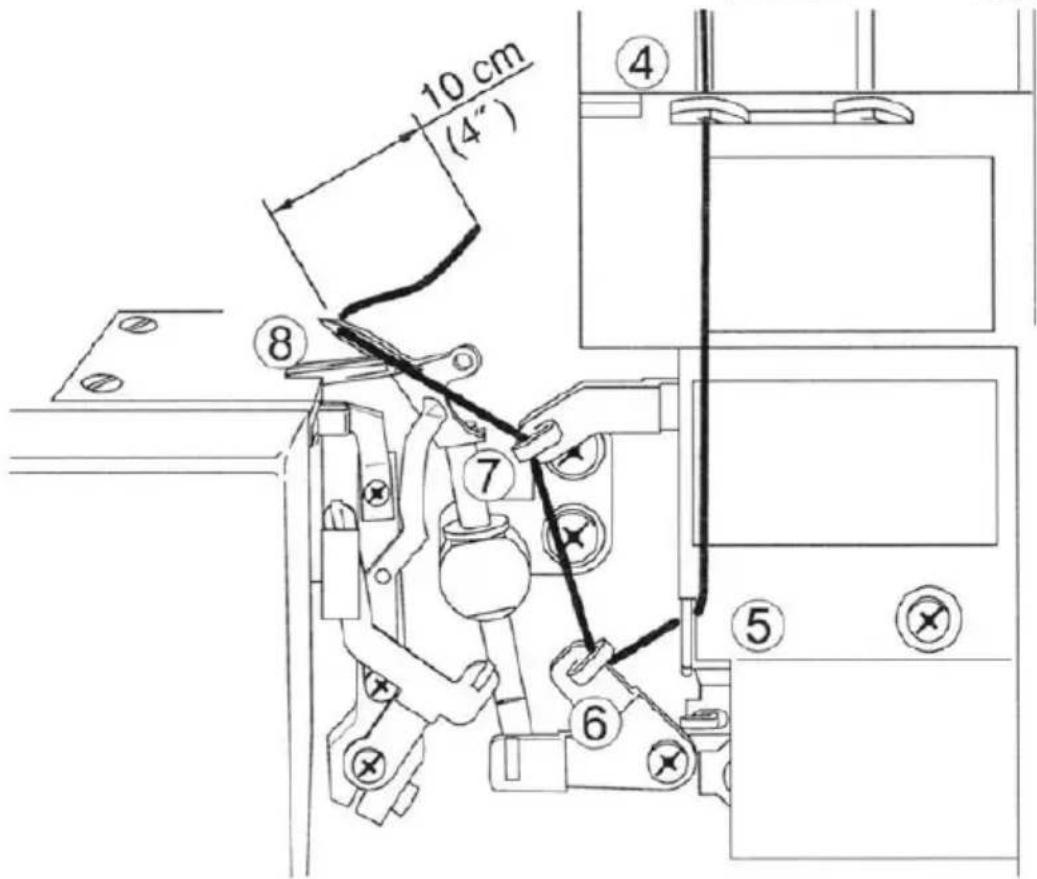


natural_image
Technical line drawing of a mechanical assembly with no visible text or symbolsB
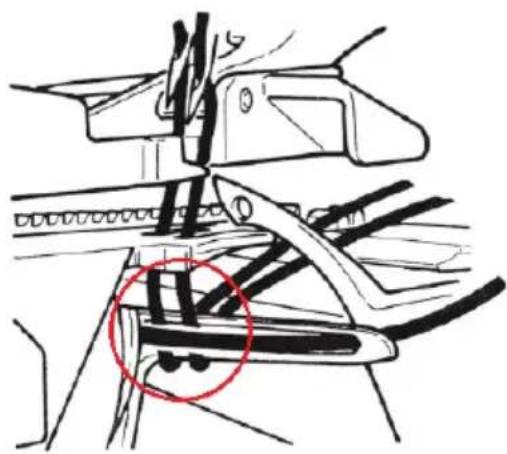
natural_image
Technical line drawing of a mechanical assembly with a red circle highlighting a specific component (no text or symbols present)natural_image
Line drawing of a mechanical device with scissors and hanging weights, no text or symbols presentnatural_image
Diagram of a mechanical lifting scale with three vertical supports and connecting rods (no text or labels)
natural_image
Technical illustration showing a hand holding a pencil and a close-up of a mechanical device with a spring scale (no text or symbols)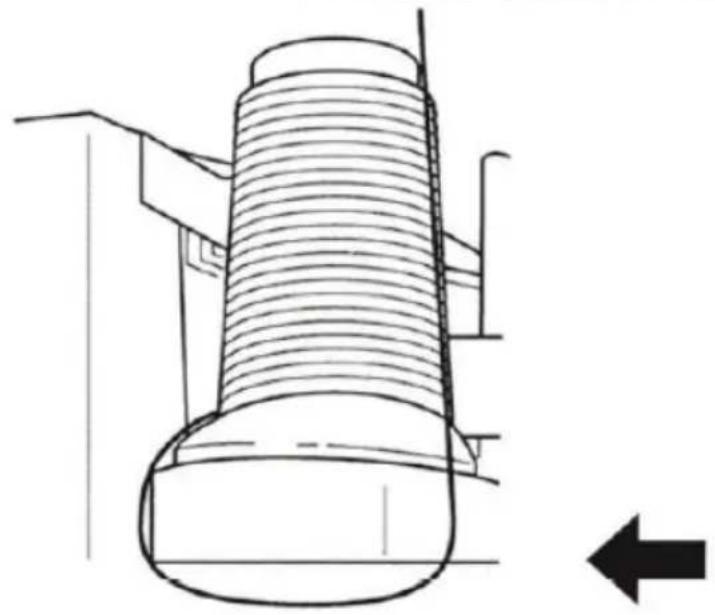
natural_image
Technical line drawing of a mechanical component with no visible text or symbols
F∅R DU GJ∅R JUSTERINGER, S∅RG FOR Å SLÅ AV STR∅MBRYTEREN
flowchart
graph TD
    A["Rectangle"] --> B["B"]
Differensial feed
Samlet overkant
For å stille inn justeringsspaken for differensialmating
natural_image
Line drawing of a women's dress showing front, back, and side views (no text or symbols)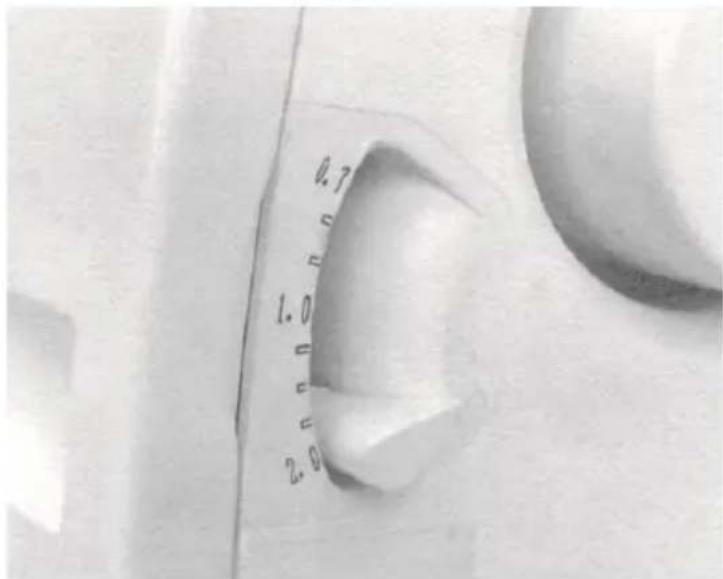
hovedmateren automatisk endres til "3" när justeringsspaken er satt til 2.0
Strekk overkant
Stretch overkant er ideell for å sy dekorative krager, ermer, skjørtkanter, etc.

natural_image
Line drawings of three different fashion outfits: a pleated blouse, a t-shirt, and a high-collared dress (no text or symbols present)Still inn justeringsspaken for differentsialmating over gradering "1.0"
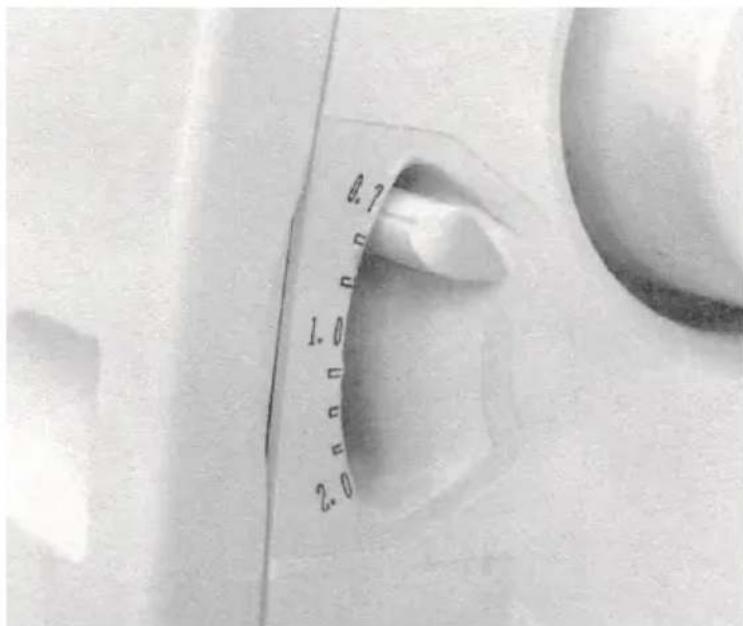
natural_image
Illustration of hands using a tool to adjust or install a mechanical component (no text or symbols visible)Movable Knife Holder

natural_image
Technical line drawing of a mechanical assembly with no visible text or symbolsnatural_image
Black-and-white illustration of hands operating a sewing machine with a hook attachment (no text or symbols visible)Standard overkant og rullesøm
Å sy rullesøm
natural_image
Close-up of fabric with layered folds and a textured surface (no visible text or symbols)
natural_image
Black-and-white photo of a person's lower legs wearing white high-heeled shoes, standing on pavement (no text or symbols visible)natural_image
Technical line drawing of a sewing machine needle stitching fabric (no text or symbols)Plasser en liten spenning på materialet i syretningen og en finere sømfinish kan oppnås
natural_image
Illustration of hands operating a sewing machine needle (no text or symbols visible)natural_image
Close-up of a pipette tip dispensing liquid onto a surface with a white curved line nearby (no text or symbols visible)Stingvarianter og syteknikker
natural_image
Close-up of textured fabric with diagonal seam patterns (no text or symbols)
natural_image
Close-up of a sewing machine with visible needle and clasp mechanism (no text or symbols)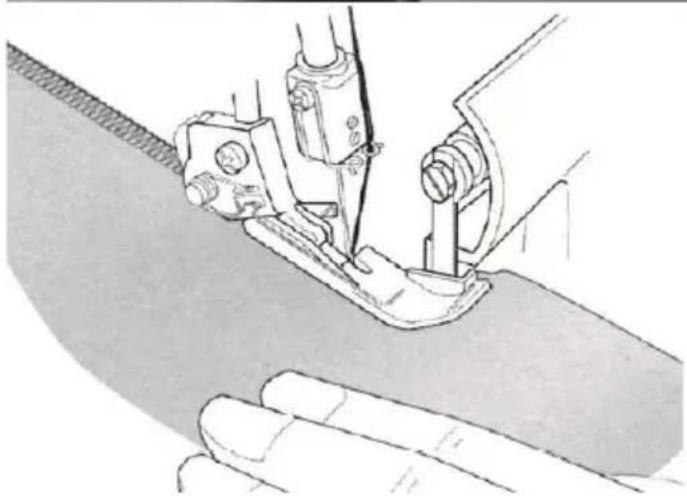
natural_image
Illustration of a sewing machine needle stitching fabric, with no visible text or symbols
A Nåletråd
B Oversløyfetråd
C Nedre sløyfetråd
natural_image
Close-up of a human face with visible skin texture and a vertical dark line (no text or symbols)
natural_image
Technical line drawing of a mechanical device with no visible text or symbolsnatural_image
Illustration of a pencil writing on a notepad with a coiled spring (no text or symbols)natural_image
Close-up of a coiled, coiled wire against a textured background (no text or symbols visible)natural_image
Diagram of a spring attached to a curved surface with an arrow and label 'A' (no text or symbols on the diagram itself)natural_image
Technical illustration showing three different sewing or sewing techniques: a needle, a ring with beads, and a sewing machine (no text or symbols present)natural_image
Technical line drawing of a sewing machine component (no text or symbols)natural_image
Close-up of a sewing machine needle stitching fabric, showing mechanical components and stitching details (no visible text or symbols)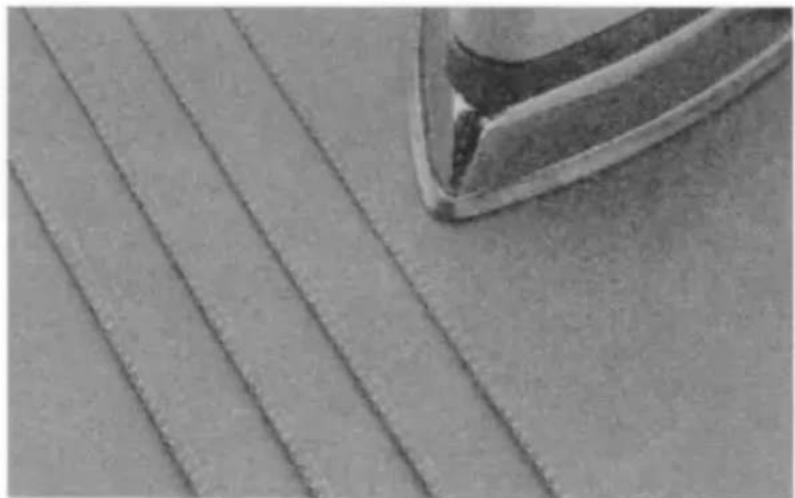
natural_image
Close-up of a metallic object with parallel lines on a textured surface (no visible text or symbols)natural_image
Technical illustration of a sewing machine stitching fabric (no text or symbols)Pinneplassering
natural_image
Technical line drawing of a sewing machine with a coiled cord, showing mechanical components and assembly (no text or symbols)natural_image
Mechanical assembly diagram showing a lever mechanism with no text or symbolsHvordan skifte ut den stasjonære kniven
KASSERING AV BRUKTE ENHETER
natural_image
Close-up of a sewing machine with metal clamps and a numbered component (16), no visible text or symbols on the device itself.1 Nålar
2 Skruvmejsel
3 Pincett
4 Spridarvagn
APPARATENS PLACERING
natural_image
Two industrial sewing machines in a cleanroom setting, one with metal frame and the other with white base (no visible text or symbols)natural_image
Close-up of a sewing machine with visible stitching and mounting holes, no text or symbols present.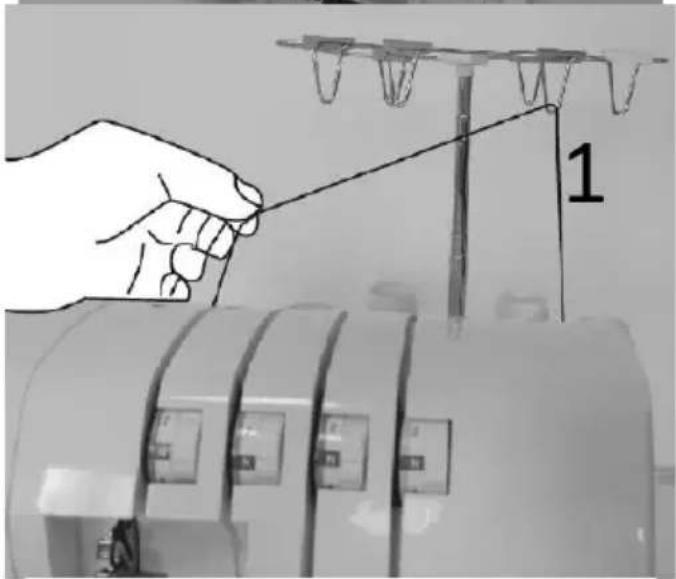

natural_image
Close-up of hands operating a mechanical device with multiple ports and a tool (no visible text or symbols)

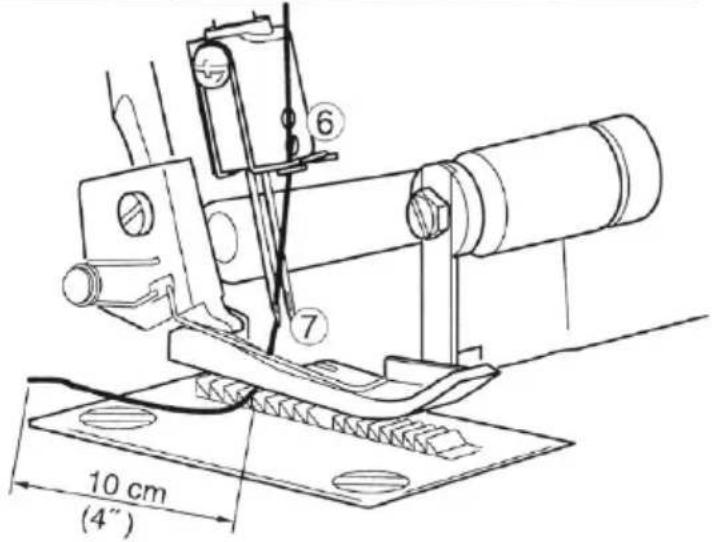
natural_image
Technical line drawing of a mechanical assembly with no visible text or symbolsB

natural_image
Technical line drawing of a mechanical assembly with a red circle highlighting a specific component (no text or symbols present)natural_image
Line drawing of a mechanical device with scissors and hanging weights, no text or symbols presentnatural_image
Diagram of a mechanical lifting scale with three vertical supports and connecting rods (no text or labels)
natural_image
Technical illustration showing a hand holding a pencil and a close-up of a mechanical device with a spring scale (no text or symbols)
natural_image
Technical line drawing of a mechanical component with no visible text or symbols
INNAN DU GÖR JUSTERINGAR, SE TILL ATT STÄNGA AV STRÖMBRYTARE
flowchart
graph TD
    A["Rectangle"] --> B["B"]
Differentialmatning
natural_image
Line drawing of a women's dress and skirt with fabric pieces, showing garment assembly (no text or symbols)natural_image
Line drawings of three different garment designs, showing front, back, and side views with no text or symbols.natural_image
Illustration of hands using a tool to adjust or install a mechanical component (no text or symbols visible)
natural_image
Technical line drawing of a sewing machine with no visible text or symbolsnatural_image
Technical line drawing of a mechanical device with rotating shaft and mounting base (no text or symbols)
INNAN DU GÖR JUSTERINGAR, SE TILL ATT STÄNGA AV STRÖMBRYTARE
Ta bort spridaren
natural_image
Black-and-white illustration of hands operating a sewing machine with a hook attachment (no text or symbols visible)Att sy rullfäll
natural_image
Close-up of fabric with layered folds and a textured surface (no visible text or symbols)
natural_image
Black-and-white photo of a person's lower legs wearing high-heeled shoes, standing on the ground with brick wall background (no text or symbols)natural_image
Two-step line drawing showing a sewing machine stitching fabric, with no text or symbols present.natural_image
Close-up of a pipette tip dispensing liquid onto a surface with a white curved line nearby (no text or symbols visible)natural_image
Close-up of textured fabric with diagonal seam patterns (no text or symbols)
natural_image
Close-up of a sewing machine with visible needle and clasp mechanism (no text or symbols)
natural_image
Illustration of a sewing machine needle stitching fabric, with no visible text or symbols
natural_image
Close-up of a human hand holding a thin, dark vertical line against a textured background (no text or symbols visible)Dekorativ flatlocking
natural_image
Technical line drawing of a mechanical device with no visible text or symbolsnatural_image
Illustration of a notepad with a pen and a coiled spring, no text or symbols presentnatural_image
Close-up of a coiled spring against a textured background (no text or symbols visible)Ytterligare information om flatlocking
natural_image
Diagram of a mechanical or electrical component with a coil and labeled point A, no readable text or symbols present.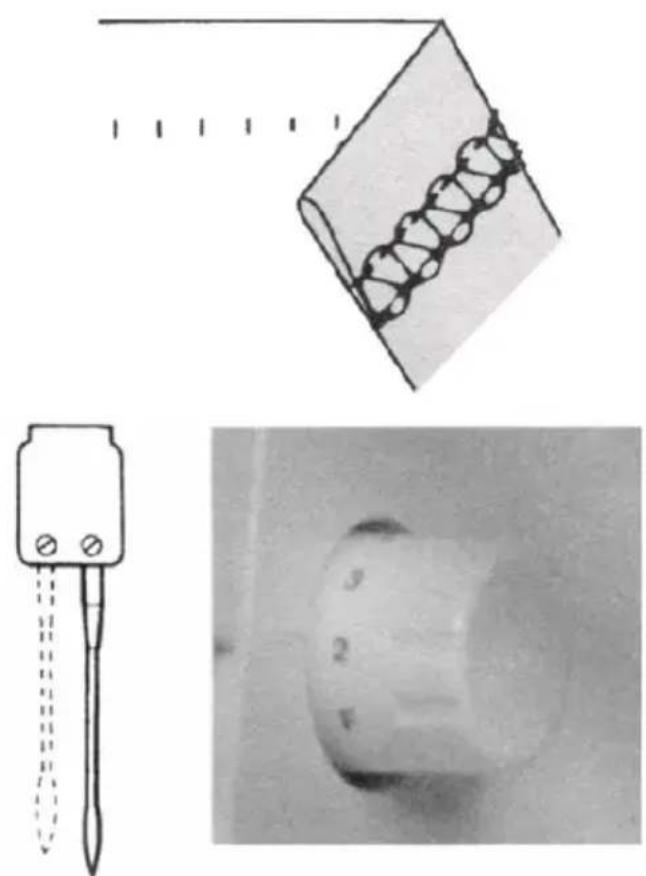
natural_image
Three-panel image showing a pen tip, a mechanical component with coiled spring, and a close-up of a cylindrical object (no text or symbols)natural_image
Illustration of a sewing machine needle stitching fabric, with a hand adjusting the fabric (no text or symbols)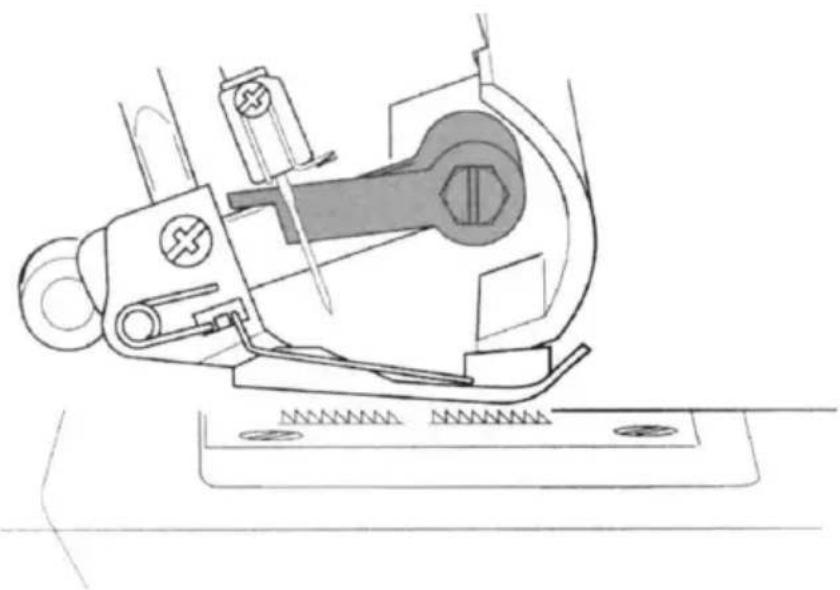
natural_image
Technical line drawing of a sewing machine component (no text or symbols)natural_image
Close-up of a sewing machine needle stitching fabric (no visible text or symbols)
natural_image
Close-up of a metallic object with parallel grooves on a textured surface (no visible text or symbols)natural_image
Technical illustration of a sewing machine needle stitching and fastening a thread (no text or symbols present)Innerhörn
natural_image
Technical line drawing of a sewing machine with a coiled cord, showing mechanical components and assembly (no text or symbols)natural_image
Mechanical assembly diagram showing a lever mechanism with no text or symbolsKASSERING AV ANVÄNDA ENHETER
natural_image
Close-up of a sewing machine with metal clamps and a numbered component (16), no visible text or symbols on the device itself.natural_image
Medical imaging machine with metallic stand and vertical connectors (no visible text or symbols)natural_image
Close-up of a white mechanical device with metal bracket and multiple cylindrical components (no visible text or symbols)natural_image
Close-up of a sewing machine with a black circular arrow indicating clockwise motion (no visible text or symbols)natural_image
Close-up of hands using a tool to adjust or install a mechanical component (no visible text or symbols)


1 Desenfiou as agulhas
2 Passe o passador inferior
3 Passe as agulhas
natural_image
Technical line drawing of a mechanical clamp or bracket assembly (no text or symbols)B
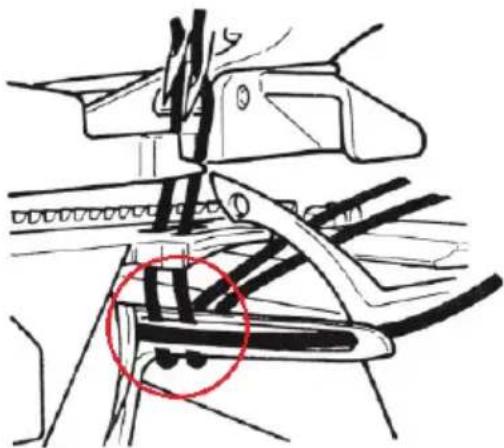
natural_image
Technical line drawing of a mechanical assembly with a red circle highlighting a specific component (no text or symbols present)natural_image
Diagram showing a pair of scissors cutting through a mechanical setup with ropes and supports (no text or symbols)natural_image
Diagram of a mechanical lifting scale with three vertical supports and connecting rods (no text or labels)
natural_image
Technical illustration showing a hand holding a pen and a cylindrical device with internal components (no text or symbols)
natural_image
Technical line drawing of a mechanical component with no visible text or symbols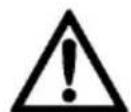
ANTES DE FAZER AJUSTES, CERTIFIQUE-SE DE DESLIGAR O INTERRUPTOR DE ENERGIA
flowchart
graph TD
    A["Rectangular Node"] --> B["B"]
natural_image
Line drawing of a women's dress and skirt with fabric pattern, showing front and back views (no text or symbols)
natural_image
Line drawings of three different women's dresses with different garment designs (tights, shorts, and hem), no text or symbols present.
natural_image
Technical line drawing of a sewing machine with no visible text or symbols
natural_image
Technical line drawing of a mechanical device with rotating shaft and mounting base (no text or symbols)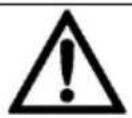
ANTES DE FAZER AJUSTES, CERTIFIQUE-SE DE DESLIGAR O INTERRUPTOR DE ENERGIA
natural_image
Line drawing of a mechanical device with an arrow indicating direction (no text or symbols)natural_image
Black-and-white illustration of hands operating a sewing machine with a hook attachment (no text or symbols visible)Para costurar bainha enrolada
| Tecido | Mostrador de tensão | |||
| Azul | Verde | Laranja | Amarelo | |
| Luz | 2,5 | 3,0 | 3,0 | |
| Médio | 3,0 | 3,0 | 3,0 | |
| Pesado | 3,5 | 3,0 | 3,0 | |
| Luz | 2,5 | 3,0 | 3,0 | |
| Médio | 3,0 | 3,0 | 3,0 | |
| Pesado | 3,5 | 3,0 | 3,0 |
Como equilibrar
| Tecido | Mostrador de tensão | |||
| Azul | Verde | Laranja | Amarelo | |
| Luz | 0,5 | 5,0 | 7,0 | |
| Médio | 0,5 | 5,0 | 7,0 | |
| Pesado | 0,5 | 5,0 | 7,0 | |
| Tecido | Mostrador de tensão | |||
| Azul | Verde | Laranja | Amarelo | |
| Luz | 0,5 | 5,0 | 7,0 | |
| Médio | 0,5 | 5,0 | 7,0 | |
| Pesado | 0,5 | 5,0 | 7,0 | |
Como equilibrar
| Tecido | Mostrador de tensão | |||
| Azul | Verde | Laranja | Amarelo | |
| Luz | 4,0 | 0 | 8,0 | |
| Médio | 5,0 | 0 | 8,5 | |
| Pesado | 5,0 | 0 | 8,5 | |
| Tecido | Mostrador de tensão | |||
| Azul | Verde | Laranja | Amarelo | |
| Luz | 2,5 | 1,0 | 7,0 | |
| Médio | 3,0 | 1,0 | 7,0 | |
| Pesado | 3,5 | 1,0 | 7,0 | |
Como equilibrar
| Tecido | Mostrador de tensão | |||
| Azul | Verde | Laranja | Amarelo | |
| Luz | 2,5 | 2,5 | 3,0 | 3,0 |
| Médio | 3,0 | 3,0 | 3,0 | 3,0 |
| Pesado | 3,5 | 3,5 | 3,0 | 3,0 |
Quente para equilibrar
natural_image
Close-up of fabric with layered folds and a textured surface (no visible text or symbols)
natural_image
Black-and-white photo of a person's lower legs wearing high-heeled shoes, standing on the ground with brick wall background (no text or symbols)natural_image
Technical line drawing of a sewing machine needle stitching fabric (no text or symbols)natural_image
Illustration of hands operating a sewing machine needle (no text or symbols visible)natural_image
Close-up of a pipette tip dispensing liquid onto a surface with a wavy line nearby (no visible text or symbols)natural_image
Close-up of textured fabric with diagonal striped patterns and no visible text or symbolsnatural_image
Close-up of a sewing machine with visible mechanical components and no readable text or symbolsnatural_image
Illustration of a sewing machine needle stitching fabric, with no visible text or symbols
natural_image
Close-up of a textured surface with a vertical dark line intersecting it, no visible text or symbolsFlatlocking decorativo
natural_image
Technical line drawing of a mechanical assembly with no visible text or symbolsnatural_image
Illustration of a pencil writing on a notepad with a spiral-bound notebook beside it (no text or symbols present)natural_image
Close-up of a coiled spring against a textured background (no text or symbols visible)natural_image
Diagram of a coiled spring attached to a flat surface with an arrow labeled 'A' pointing to it (no text or symbols beyond label)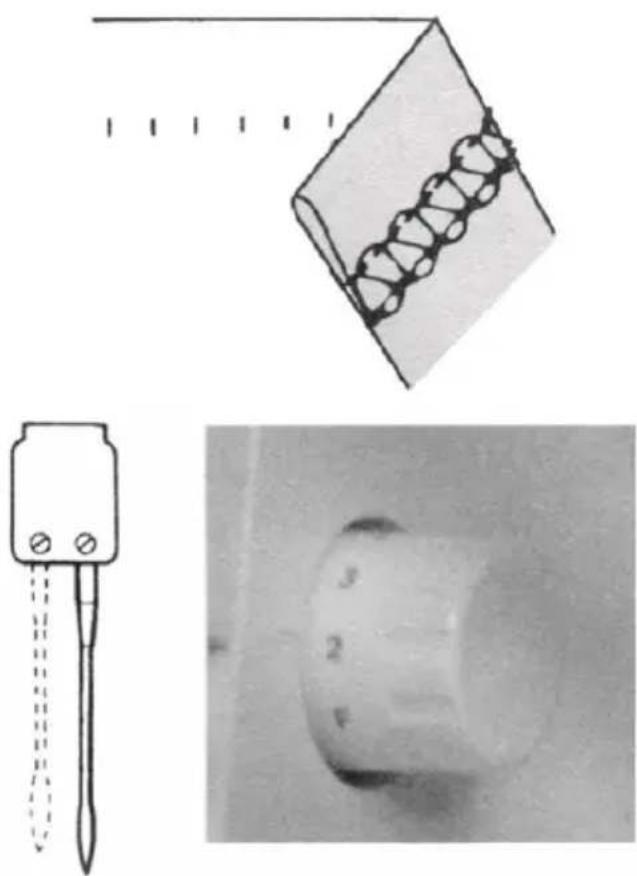
natural_image
Technical illustration showing a probe tip, a mechanical component with coiled spring, and a close-up of a cylindrical component (no text or symbols)natural_image
Illustration of a sewing machine needle stitching fabric, with a hand operating it (no text or symbols present)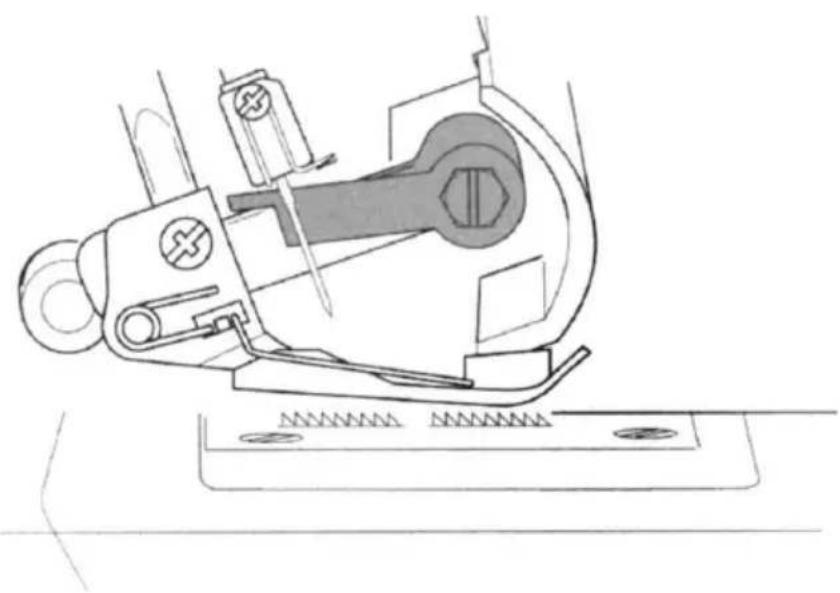
natural_image
Technical line drawing of a sewing machine component (no text or symbols)natural_image
Close-up of a sewing machine needle stitching fabric (no visible text or symbols)
natural_image
Close-up of a metallic object with parallel lines on a textured surface (no visible text or symbols)natural_image
Technical line drawing of a sewing machine needle stitching and fastening a thread (no text or symbols)Canto interno
A - Corte a fenda
B - Linha de corte
natural_image
Technical illustration of a sewing machine stitching fabric (no text or symbols)Posicionamento do pino
natural_image
Technical line drawing of a sewing machine with a coiled cord, showing mechanical components and assembly (no text or symbols)natural_image
Mechanical assembly diagram showing a lever mechanism with no text or symbolsnatural_image
Close-up of a sewing machine with metal clamps and a numbered component (16), no visible text or symbols on the device itself.1 Ihly
2 Skrutkovač
3 Pinzeta
4 Rozmetadlo
natural_image
Two industrial sewing machines in a cleanroom setting, one with metal hooks and the other with plastic components (no visible text or symbols)natural_image
Close-up of a sewing machine with visible stitching and mounting holes (no text or symbols)

Prevlečte niť za a cez horný koniec l'avého slučkovača (9-A) Potom ho jemne potiahnite nadol, aby zapadol do otvoru v slučke (9-B)

Dôležité pokyny na navliekanie
natural_image
Technical line drawing of a mechanical assembly with no visible text or symbolsB

natural_image
Technical line drawing of a mechanical assembly with no visible text or symbolsAko zmenit' nite / spôsob viazania
natural_image
Line drawing of a mechanical setup with scissors and hanging weights (no text or symbols)natural_image
Diagram of a mechanical lifting scale with three vertical supports and connecting rods (no text or labels)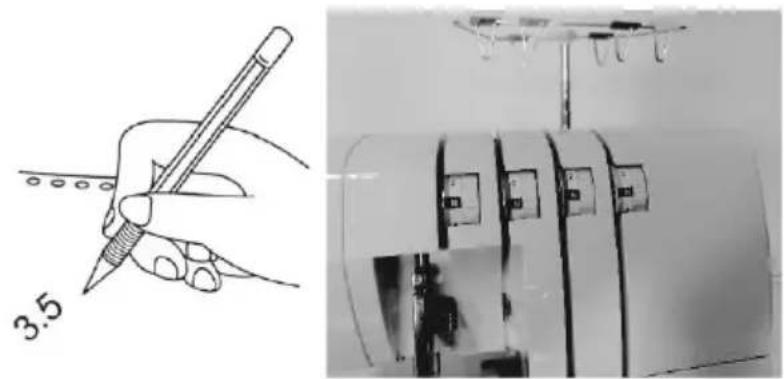
natural_image
Technical illustration showing a hand holding a pencil and a close-up of a mechanical device with a spring scale (no text or symbols)
natural_image
Technical line drawing of a mechanical component with no visible text or symbolsPretiahnite nite cez stroj jednu po druhej.
PRED VYKONÁVANÍM ÚPRAV SA UISTITE VYPNUTÝ VYPÍNAČ NAPÁJANIA
flowchart
graph TD
    A["Rectangle"] --> B["B"]
Diferenciálny posuv
natural_image
Line drawing of a women's dress showing front, back, and side views (no text or symbols)
natural_image
Line drawings of three different garments with different designs and accessories (no text or symbols)natural_image
Illustration of hands using a tool to interact with a mechanical device (no text or symbols visible)Movable Knife Holder

natural_image
Technical line drawing of a mechanical assembly with no visible text or symbolsnatural_image
Illustration of hands operating a sewing machine with a black arrow indicating the process (no text or symbols present)
natural_image
Close-up of a white sewing machine with mechanical components, no visible text or symbolsnatural_image
Black-and-white illustration of hands operating a sewing machine with a hook attachment (no text or symbols visible)natural_image
Close-up of fabric with layered folds and a textured surface (no visible text or symbols)
natural_image
Black-and-white photo of a person's lower legs wearing white high-heeled shoes, standing on pavement (no text or symbols visible)natural_image
Technical line drawing of a sewing machine needle stitching fabric (no text or symbols)natural_image
Illustration of hands operating a sewing machine needle (no text or symbols visible)Naneste malú kvapku tekutého tmelu na švy na koniec švu. Nechajte zaschnút a potom retiazku odstrihnite tesne pri stehoch.
natural_image
Close-up of a pipette tip dispensing liquid onto a surface with a white curved line nearby (no text or symbols visible)natural_image
Close-up of textured fabric with diagonal seam patterns (no text or symbols)
natural_image
Close-up of a sewing machine with visible needle and clasp mechanism (no text or symbols)
natural_image
Illustration of a sewing machine needle stitching fabric, with no visible text or symbols
A Ihlová nit B Horná slučková nit C Spodná slučková nit
- Potiahnite na opačných stranách švu, aby ste stehy stiahli naplocho
natural_image
Close-up of a human face with visible skin texture and a vertical dark line (no text or symbols)
natural_image
Technical line drawing of a mechanical device with no visible text or symbolsnatural_image
Illustration of a pen writing on a notepad with a coiled spring (no text or symbols)natural_image
Close-up of a coiled, coiled wire against a textured background (no text or symbols visible)natural_image
Diagram of a coiled spring attached to a flat surface with an arrow labeled 'A' pointing to it (no text or symbols beyond label)natural_image
Illustration of sewing machine stitching process with tool, magnified view, and fabric (no text or symbols)Ako šit' špendlíky
natural_image
Technical line drawing of a sewing machine component (no text or symbols)
natural_image
Close-up of a sewing machine needle stitching fabric (no visible text or symbols)
natural_image
Close-up of a metallic object with parallel grooves on a textured surface (no visible text or symbols)natural_image
Technical illustration of a sewing machine stitching fabric (no text or symbols)SK
natural_image
Mechanical assembly diagram showing a lever mechanism with no text or symbolsLIKVIDÁCIA POUŽITÝCH ZARIADENÍ
natural_image
3D rendering of a sewing machine with metal clamps and a numbered component (16), no visible text or symbols on the device itself.natural_image
Close-up of a medical or laboratory equipment setup with metallic components and a metal frame (no visible text or symbols)natural_image
Close-up of a white mechanical device with a metal bracket and multiple cylindrical components (no visible text or symbols)natural_image
Close-up of a sewing machine with a black arrow indicating clockwise motion (no visible text or symbols)
natural_image
Close-up of hands operating a mechanical device with multiple ports and a tool (no visible text or symbols)

natural_image
Diagram showing two mechanical components with a dotted line indicating a connection or motion path (no text or symbols present)
natural_image
Technical line drawing of a mechanical assembly with no visible text or symbolsB

natural_image
Technical line drawing of a mechanical assembly with no visible text or symbolsnatural_image
Line drawing of a mechanical device with scissors and hanging weights, no text or symbols presentnatural_image
Diagram of a mechanical lifting scale with three vertical supports and connecting rods (no text or labels)
natural_image
Technical illustration showing a hand holding a pen and a cylindrical device with internal components (no text or symbols)
natural_image
Technical line drawing of a mechanical component with no visible text or symbols
PRZED PRZYSTĄPIENIEM DO REGULACJI NALEŻY UPEWNIĆ SIĘ, ŻE WYŁĄCZONO PRZEŁĄCZNIK ZASILANIA
flowchart
graph TD
    A["Rectangle"] --> B["B"]
Różnicowy posuw
natural_image
Line drawing of a women's dress and skirt with fabric, showing front view and side view (no text or symbols)natural_image
Line drawings of three different fashion outfits: a pleated blouse, a t-shirt, and a high-collared dress (no text or symbols present)natural_image
Illustration of hands using a sewing machine to connect or adjust a piece of hair (no text or symbols present)
natural_image
Technical line drawing of a sewing machine with no visible text or symbolsnatural_image
Technical line drawing of a sewing machine with no visible text or symbols
PRZED PRZYSTĄPIENIEM DO REGULACJI NALEŻY UPEWNIĆ SIĘ, ŻE WYŁĄCZONO PRZEŁĄCZNIK ZASILANIA
natural_image
Black-and-white photo of hands operating a sewing machine with a hand pointing to the fabric (no visible text or symbols)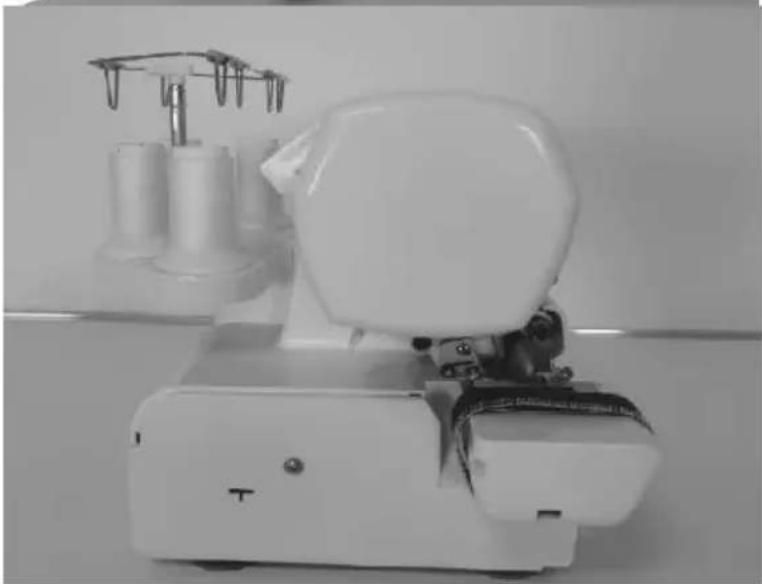
natural_image
Close-up of a white sewing machine with mechanical components, no visible text or symbolsnatural_image
Black-and-white illustration of hands operating a sewing machine with a hook attachment (no text or symbols visible)natural_image
Close-up of fabric with layered folds and a textured surface (no visible text or symbols)
natural_image
Black-and-white photo of a person's lower legs wearing white high-heeled shoes, standing on pavement (no text or symbols visible)natural_image
Technical line drawing of a sewing machine needle stitching fabric (no text or symbols)natural_image
Illustration of hands operating a sewing machine needle on fabric (no text or symbols)natural_image
Close-up of a pipette tip dispensing liquid onto a surface with a white wavy line nearby (no text or symbols visible)natural_image
Close-up of textured fabric with visible stitching and folds (no text or symbols)natural_image
Close-up of a sewing machine with visible needle and base (no text or symbols)natural_image
Illustration of a sewing machine needle stitching fabric, with a hand operating the seam (no text or symbols)
natural_image
Close-up of a textured surface with a vertical dark line intersecting it, no visible text or symbolsnatural_image
Diagram of a mechanical or electrical component with a coil and labeled point A, no readable text or symbols present.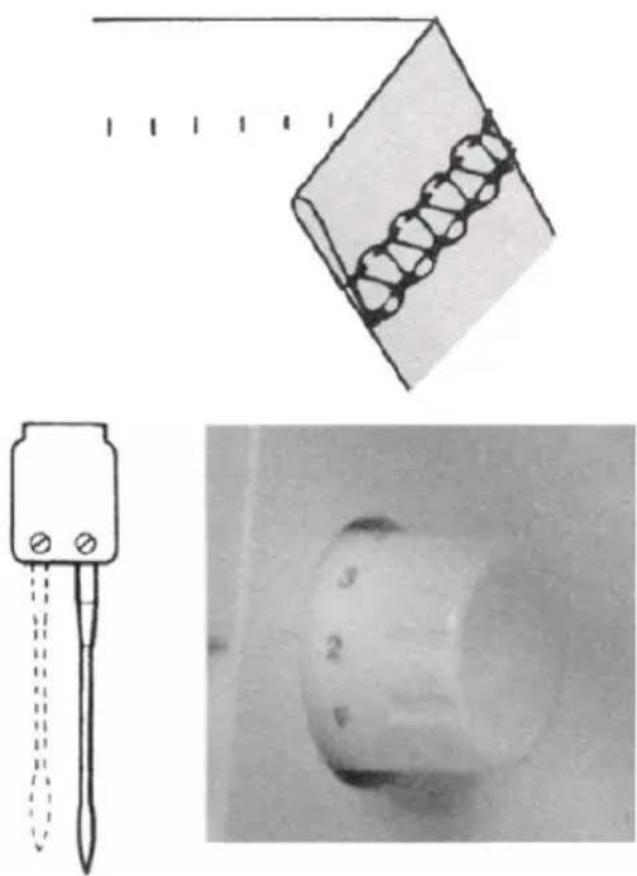
natural_image
Technical illustration showing a probe tip, a mechanical component with coiled spring, and a close-up of a cylindrical object (no text or symbols)natural_image
Illustration of a sewing machine needle stitching fabric, with a hand adjusting the fabric (no text or symbols)
natural_image
Technical line drawing of a sewing machine component (no text or symbols)natural_image
Close-up of a sewing machine needle stitching fabric (no visible text or symbols)
natural_image
Close-up of a metallic object with parallel grooves on a textured surface (no visible text or symbols)natural_image
Technical line drawing of a sewing machine needle stitching, showing thread and stitching details (no text or symbols)Wewnętrzny róg
natural_image
Technical line drawing of a sewing machine needle and base mount (no text or symbols)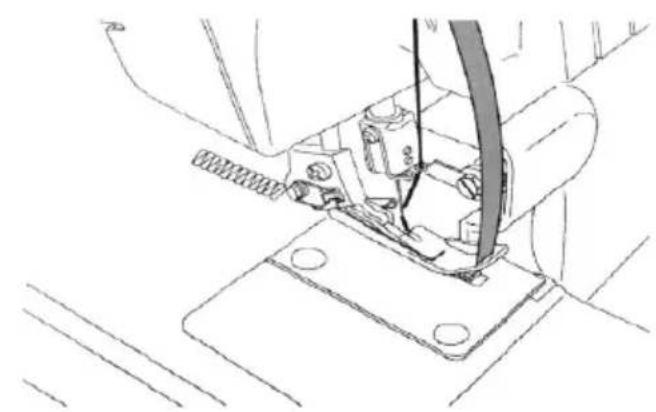
natural_image
Technical line drawing of a sewing machine component (no text or symbols)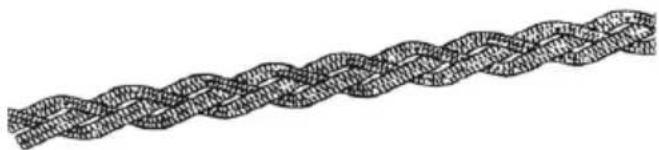
natural_image
Illustration of a braided rope or cord with no text or symbolsnatural_image
Mechanical assembly diagram showing a lever mechanism with no text or symbolsUTYLIZACJA URZĄDZEŃ ZUŻYTYCH
For the disposal of the device please consider and act according to the national and local rules and regulations.
CONTACT
expondo Polska sp. z o.o. sp. k.