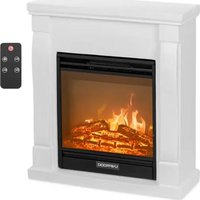
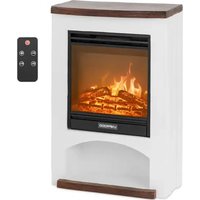
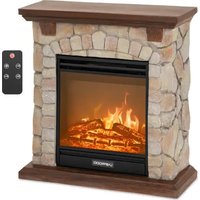
UNI_EFP_03 - Electric fireplace Uniprodo - Free user manual and instructions
Find the device manual for free UNI_EFP_03 Uniprodo in PDF.

| Product type | Electric fireplace |
| Brand | Uniprodo |
| Model | UNI_EFP_03 |
| Dimensions (W × D × H) | 620 × 210 × 805 mm |
| Weight | 20.3 kg |
| Power supply | 230 V ~ 50 Hz |
| Rated power | 1800 W |
| Protection class | I |
| IP rating | IPX0 |
| Maximum room area | 18 m² |
| Temperature range | 10 °C - 30 °C |
| Power levels | 2 (900 / 1800 W) |
| Airflow rate | 0.2 m/s |
| Remote control battery type | CR2025 3 V (×1) |
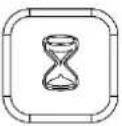
| Timer | 30 min - 9 h |
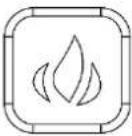
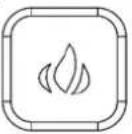
| Flame effect | Yes, with 5 brightness levels |
| Adjustable thermostat | Yes |
| Child lock | Yes, via control panel |
| Open window detection | Yes, automatic heating shutdown |
| Weekly programming | Yes, up to 8 periods |
| Maintenance | Clean exterior with soft cloth; glass with glass cleaner |
| Safety | Overheat protection (automatic shutdown) |
| Use | Indoor only, on a flat, fireproof surface |
| Included accessories | Remote control, CR2025 battery |
Frequently Asked Questions - UNI_EFP_03 Uniprodo
User questions about UNI_EFP_03 Uniprodo
0 question about this device. Answer the ones you know or ask your own.
Ask a new question about this device
Download the instructions for your Electric fireplace in PDF format for free! Find your manual UNI_EFP_03 - Uniprodo and take your electronic device back in hand. On this page are published all the documents necessary for the use of your device. UNI_EFP_03 by Uniprodo.
USER MANUAL UNI_EFP_03 Uniprodo
natural_image
White portable electric heater with black display screen showing a twilight sky (no text or symbols visible)
natural_image
Exterior view of a stone-walled heating unit with arched top and base (no signage or text visible)
natural_image
Exterior view of a modern office building (no signage)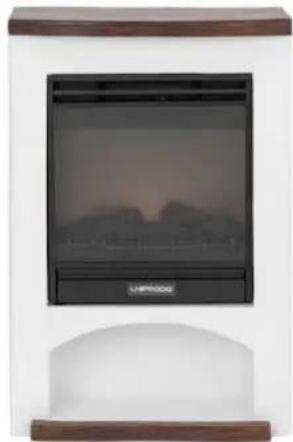
natural_image
Exterior view of a portable electric heater with a digital display showing a twilight sky (no text or symbols visible)natural_image
Pure electrical circuit lines without any symbolsThis User Manual has been translated using machine translation. We have made every effort to ensure the translation is accurate, but please note that automated translations are not perfect and are not meant to replace human translators. The official version of the User Manual is in English. Any differences between the translated version and the original English are not legally binding. If you have any questions about the accuracy of the translation, please refer to the English version, which is the official reference.
Technical data
| Parameter description Parameter value | ||||
| Product name | Electric fireplace | |||
| Model | UNI_EFP_01 | UNI_EFP_02 | UNI_EFP_03 | UNI_EFP_04 |
| Rated voltage [V~] / frequency [Hz] | 230 / 50 | |||
| Rated power [W] | 1800 | |||
| Protection class | I | |||
| IP protection rating | IPX0 | |||
| Dimensions [width x depth x height; mm] | 610 x 235 x 680 | 655 x 245 x 685 | 620 x 210 x 805 | 535 x 260 x 810 |
| Weight [kg] | 19 | 19.95 | 20.3 | 22.3 |
| Max room size [m2] | 18 | |||
| Temperature range [°C] | 10-30 | |||
| Power levels | 2 (900 / 1800 W) | |||
| Air flow [m/s] | 0.2 | |||
| Remote control battery | CR2025 3V (x1) | |||
| Timer [min] | 30-540 (9 h) | |||

natural_image
White portable electric heater with a black display screen and 'UNPROD' branding (no visible text or symbols on the device itself)
natural_image
Exterior view of a stone archway with a black heating unit mounted on a wooden base (no text or symbols visible)
natural_image
Exterior view of a modern office building (no signage)
natural_image
Exterior view of a portable electric heater with a digital display and control panel (no visible text or symbols)This product is a heating device that mimics the look of a traditional fireplace, but uses electricity to create heat and atmosphere for greater convenience, safety and ease of use.
Installation
The temperature of environment must not be higher than 40^ C and the relative humidity should be less than 85%. Indoor use only - ensure good ventilation in the room in which the device is being used. There should be at least 50 cm distance between each side of the device and the wall or other objects (except back and bottom side). The device should always be used when positioned on an even, stable, clean, fireproof and dry surface, away from any curtains, drapes, furniture, hight traffic area. Position the device such that you always have access to the power plug. The power cord connected to the appliance must be properly grounded and correspond to the technical details on the product label.
Using the remote for the first time, please remove the protective plastic tab in the battery tray (see remote battery replacement chapter).
Installation
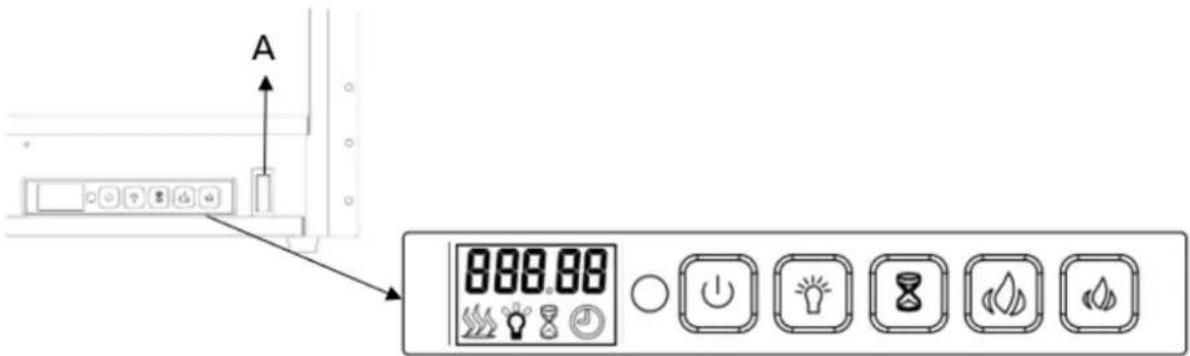
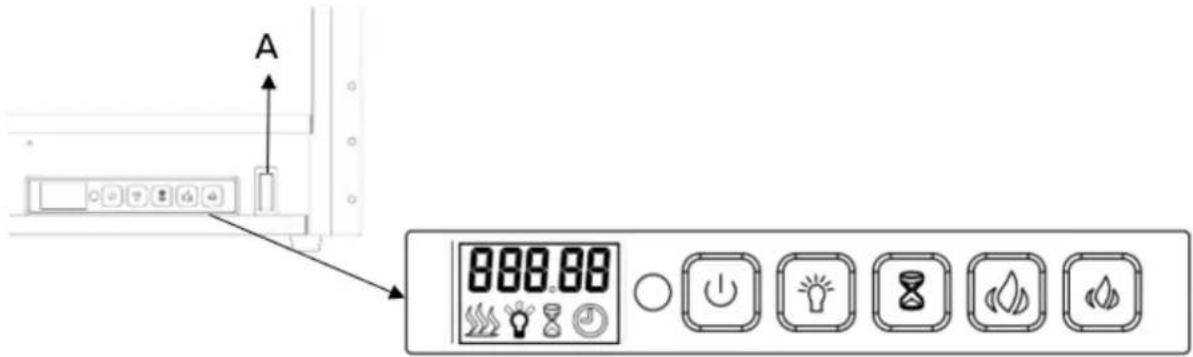
A. Master power switch (behind a cover)
B. Control panel:
| BUTTON | FUNCTION | ACTION & INDICATION |
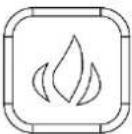
 PowerON/OFF PowerON/OFF | ON: enables control panel functions. Turn on flame effect.OFF: disables control panel functionsTurn off flame effect. | 1. Press once. Indicator light turns on. Power turns on. All functions enabled.2. Press again, it will turn off. |
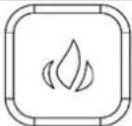
 (Flame)Brightness adjustment (Flame)Brightness adjustment | Brightness control: flame brightness level. | Press button to select the brightness level. 5 brightness levels can be selected. |
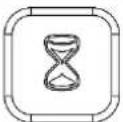 Timer Timer | Timer button: control timer settings to turn off fireplace at selected time.Setting range from 30 min to 9 hours. | 1. Press once. Indicator light turns on.Temperature is set to 00.2. Press again until desired setting is reached.LED display shows setting and displays range:00-30 min-1h...9 h. |
 Temperature increase Temperature increase | Temperature adjustment button:Temperature increase adjustment. | 1. When the set temperature exceeds the detection temperature, the appliance begins heating.2. When the detection temperature reaches the set temperature, the appliance stops heating. |
 Temperature decrease Temperature decrease | Temperature adjustment button:Temperature decrease adjustment. | 1. When the set temperature exceeds the detection temperature, the appliance begins to heating.2. When the detection temperature reaches the set temperature, the machine will stop. |
CHILD LOCK
LOC
Press and hold brightness adjustment button for more than 6 seconds to lock or unlock the buttons. "LOC" is displayed and indicated that the buttons are locked. Once it's locked "LOC" will be flashing for 6 seconds then disappear, press any button LOC will flash again. Long press brightness adjustment button for 6 seconds to unlock the buttons.
NOTE: this function can only be operated on the devise.
SELSIUS/FAHRENHEIT UNIT SETTING
The default temperature readout is Celsius. Long press timer button for 3 seconds to change the temperature readout from Celsius to Fahrenheit.
REMOTE CONTROL

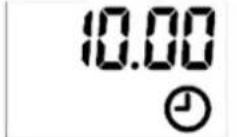
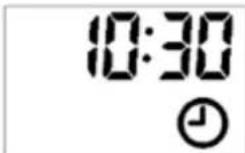
Press the ON/OFF button (red) on remote control to begin the flame effect. Default interface displays as following:
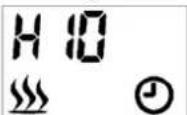
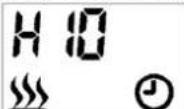
The heating icon will be displayed and appliance starts heating when the room temperature is less than the default setting (10°C), on the contrary it will not display and heat.
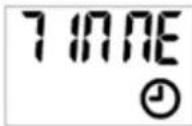
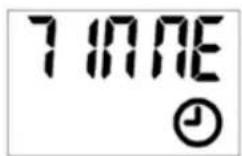
The clock icon will be flashing because the time is not set yet. Please follow the steps in "Timer setting" to set the time.
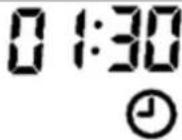
The "H10" shown on the display indicates set high power heating to 10 degrees. "L10" displayed indicates setting low power heating to 10 degrees.
The 26C shown above the machine indicates 26 degrees at room temperature.
HEATING ON/OFF
Press button + or - on remote control to quick start heat setting (Even though it's under weekly program) as following:
- Press either button + or - to see the current temperature on screen.
- Press button + or - to adjust the temperature as desired. If the set temperature is higher than the room temperature detected by appliance, the heating starts. The heating will not start if the set temperature is lower than the room temperature.
The temperature range including OFF (heating off), from 10°C to 30°C.
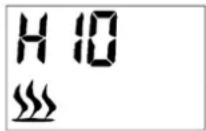
HIGH POWER HEATING
At default interface, press the MENU button on remote control to display H and flashing heating icon as following:

Press OK button to set the temperature. The default temperature is 10^ (50°F). It's displayed as following:
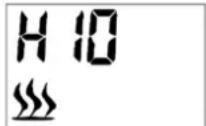
Press + or – button to adjust temperature. If the set temperature is higher than the room temperature detected by appliance, the heating starts. The heating will not start if the set temperature is lower than the room temperature.
LOW POWER HEATING
At default interface, press MENU button to display L and flashing icon as following:

Press OK button to set the temperature. The default temperature is 10^ (50°F). It's displayed as following:
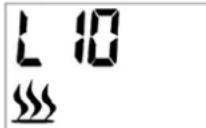
Press + or – button to adjust temperature. If the set temperature is higher than the room temperature detected by appliance, the heating starts. The heating will not start if the set temperature is lower than the room temperature.
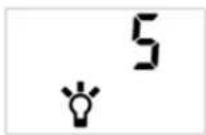
BRIGHTNESS (FLAME) ADJUSTMENT
Brightness adjustment means the flame brightness level selection.
At default interface, keep pressing MENU button on the remote control to select the brightness control, until it's displayed "bri" and an icon flashes, as following:
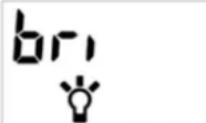
5 brightness levels are selectable. Default setting is 3.5 is the highest level as shown following:
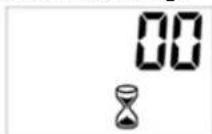
REGULAR TIMER
At default interface, keep pressing MENU button in remote control to select the regular timer, the displayed "Hour" icon as following:
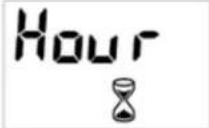
Press OK button to start the regular timer setting. Press button + or - to select the desired time.
The time sequence will read 00-30 min, 1H, 2H, 3H, 4H, 5H, 6H, 7H, 8H and 9H. The default setting is "00" as shown following:
MODE SELECTION (SECONDARY MENU)
At default interface, keep pressing the MENU button on the remote control to select mode selection, it's displayed "Mode" as following:

Press "OK" button to access the secondary menu. The secondary menu has following functions:
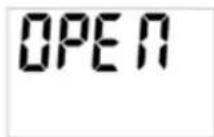
MODE presses OK to display OPEN by default. Press button + or - to select the desired mode.
a) Open
Keep pressing the "MENU" button on the remote control to select mode menu. Press OK to validate, then + or - to access open window detection function. The screen shows "OPEN" as following:
OPEN
Press OK button to validate, then button + or - to select ON or OFF. Press OK button to turn on or turn off the open window detection function.
After activation of the open window detection, the appliance will automatically turn off heating when it detects the room temperature decreased more than 4^ C in 10 minutes and maintain the decreased temperature not less than 20 minutes long.
To restart the heating, adjust the set temperature then press OK button to validate the setting. The open window detection function will be OFF after resetting the temperature.
b) Time setting
On the secondary menu press button + or - to access time setting. It's displayed "TIME" as following:
Press OK to validate, then + or - button to select a day, that is "D1" for Monday, "D2" for Tuesday, "D3" for Wednesday, and so on - up to D7 (Sunday).
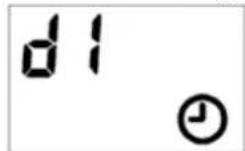
Press OK to validate the day, then button + or - to set the time (hour).
Press OK to validate the hour, then button + or - to further time setting (minute).

Press OK to validate the time setting.
To exit the setting during operation, press the MENU button on the remote control.
If a clock icon permanently flashes, this indicates that the time is offset following a power cut. It's flashing as a time has not been set.
c) C.RROG (Weekly programming)
NOTE: the time must be set before any programming.
4 pre-set programs are available. Each program includes a time period or several time periods during which the electric fireplace is heating. Outside of the time periods, the electric fireplace is off.
The time period of one program may overlap the time period of another one.
Program definition:
• P1 as Program 1:
- Monday to Friday from 05:15 for 4 hours high power heating, and Saturday to Sunday from 06:20 for 4 hours low power heating.
• P2 as Program 2:
- Monday to Friday from 17:45 for 4 hours high power heating, and Saturday to Sunday from 16:30 for 4 hours low power heating.
• P3 as Program 3:
• Saturday to Sunday from 08:15 for 4 hours high power heating.
• P4 as Program 4:
• Saturday to Sunday from 16:30: for 4 hours high power heating.
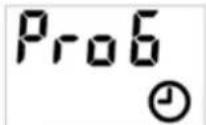
On the secondary menu press + or – button to access weekly programming, it's displayed "ProG" as following:
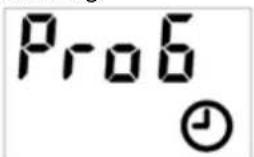
Press + or – button to select "ON" or "OFF" that means to turn on or turn off the weekly program.
| ON | OFF |
Press OK to validate.
To exit the setting during operation, press the MENU.
To cancel an existing weekly program, select OFF to turn off the weekly program.
d) D. manual mode (Settings for weekly programming)
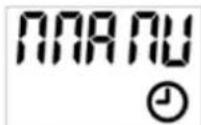
On the secondary menu press the + or - button to access manual setting, it's displayed "MANU" as following (for modifying the content of PROG):
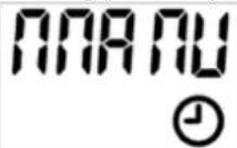
Press OK to validate, then press + or - button to select the day(s) of program activation or deactivation.
Press + or – to select the activation day first, press OK to validate;
Then press + or - to select the inactivation day, press OK to validate.
Following example for selecting Monday as activation day and Sunday as inactivation day:
Press + or - button to select the heating level. "H" for high power heating and "L" for low power heating. Press OK to validate.
Press + or - buttons to set desired temperature. Press OK to validate.
Press button + or - to set the hour of the activation time. Press OK to validate.

Press + or - button to set minutes of the activation time. Press OK to validate. Please note the minute setting is accumulated by 5 minutes each time.
Press button + or - to set the duration of the time period. Press OK to validate. Please note the duration time setting is accumulated by 30 minutes each time.
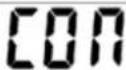
Till now first time period of program is completed. It's displayed "CON PX" (confirm).
NOTE: The program cannot run into the next day. The maximum duration can therefore not exceed midnight (for example, if the start time is 20:30, the maximum duration displayed is 4 hours and the real maximum duration is 3 hours 30 minutes).
To continue the setting for 2nd time period, press OK to continue. After pressing OK, the screen will return to the interface of day selection for second time period.
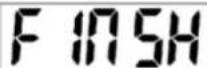
To finish the setting, press + or - button to find "FINSH", then press OK to finish the setting.
Multi time periods could be used for one day. Same time period could be used for multiple days.
NOTE: For settings under mode selection (secondary menu) always remember to press OK button to validate the setting. Maximum 8 time periods could be used for one program.
After manual setting for weekly program, the relevant program has done the manual setting will update the default program setting accordingly.
RESTORE FACTORY DEFAULTS
In the state of connecting the power plug, but not turning on the appliance (main power switch in "O" position – do not turn on the power), press and hold the temperature decrease button for 3-6 seconds, and you will hear a beep-tone. Then unplug the power plug, after 10 seconds, power on again to restore the factory settings.
TEMPERATURE LIMIT CONTROL
This heater is equipped with a temperature limit control. Should the heater reach an unsafe temperature, the heater will automatically turn it OFF. To reset the limit control:
• Unplug the power cord from the outlet.
- Turn the ON/OFF switch on the control panel to OFF. Wait 5 minutes.
- Inspect the fireplace to make sure no vents been blocked or clogged with dust or lint. If they are, use a vacuum to clean the vent areas.
- With the power switch in the OFF ("O") position, plug the power cord back into the outlet.
• If the problem continues, have your power outlet and wiring inspected by a professional.
Maintenance and care
a) Unplug the mains plug and allow the device to cool completely before each cleaning, adjustment or replacement of accessories, or if the device is not being used.
• Wait for the rotating elements to stop.
b) Use only non-corrosive cleaners to clean the surface.
c) Store the unit in a dry, cool place, free from moisture and direct exposure to sunlight.
d) Do not spray the device with a water jet or submerge it in water.
e) Do not allow water to get inside the device through vents in the housing of the device.
f) Use a soft cloth for cleaning.
g) Do not leave the battery in the device if it will not be used for a longer period of time.
h) Do not use sharp and/or metal objects for cleaning (e.g. a wire brush or a metal spatula) because they may damage the surface material of the appliance.
i) Do not clean the device with an acidic substance, agents of medical purposes, thinners, fuel, oils or other chemical substances because it may damage the device.
j) Metal cleaning
• Buff using a soft cloth, slightly dampened with a citrus oil-based product.
• DO NOT use brass polish or household cleaners as these products will damage the metal trim.
k) Glass cleaning
- Use a good quality glass cleaner and dry thoroughly with a paper towel or lint-free cloth.
- NEVER use abrasive cleansers, liquid sprays, or any cleaner that could scratch the surface.
I) Vents
- Use a vacuum or duster to remove dust and dirt from the heater and vent areas.
- Clean the exterior of the fireplace with a slightly damp cloth or duster.
m) Electrical and moving parts
• The fan motors are lubricated at the factory and will not require lubrication.
• Electrical components are integrated in the fireplace and are not serviceable by the consumer.
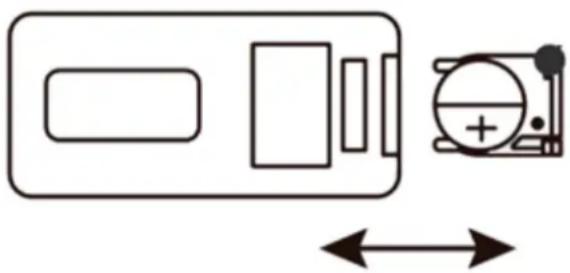
n) Remote battery replacement
- Pull the tab on the battery tray in the remote and slide the tray out.
- Replace an used battery with a new one – watch for proper polarisation.
- Slide the tray with a new battery in the remote and it is ready to continue using.
natural_image
Pure electrical circuit lines without any symbolsDisposing of used devices
Do not dispose of this device in municipal waste systems. Hand it over to an electric and electrical device recycling and collection point. Check the symbol on the product, instruction manual and packaging. The plastics used to construct the device can be recycled in accordance with their markings. By choosing to recycle you are making a significant contribution to the protection of our environment.
Contact local authorities for information on your local recycling facility.
Troubleshooting
| Problem | Possible Cause | Solution |
| 1.Fireplace turns off and will not turn on. | 1. Fireplace has overheated and safety devise has caused thermal switch to disconnect or home circuit breaker has opened. | 1.Reset switch by turning main power off and waiting turning it back on or breaker circuit breaker. |
| 2.Flame is not moving. | 1.Loose wiring.2.Flame motor defective.3.Flame rod out of place | 1.Inspect wiring for loose connections.2.Call a qualified service technician to replace flame motor.3.“Flame Rod” out of place due to rough transit/handing of the product. This issue can be corrected as simple as removing the glass, flipping the fireplace upside anddown, removing a set of screws that are holding the bottom frame plate and placing the flame rod back into place. |
| 3 Flame is not visible. | 1.Wiring is loose. | 1.Disconnect from power source and inspect wiring for loose connections and repair or replace if necessary.2.Push the flame button to high. |
| 4 Log set and /or is not glowing. | 1.Wiring is loose. | 1.Disconnect from power source and inspect wiring for loose connections and repair or replace if necessary. |
| 5 Remote control does not work. | 1.Low battery power.2.Not aiming control correctly.3.Defective remote control and /or sensor. | 1.Replace batteries in remote control.2.Aim control at sensor located directly behind glass screen in center of unit just above logs.3.Replace remote control and/or sensor. |

natural_image
White portable electric heater with a black display screen and 'UNIPROOO' branding (no visible text or symbols on the device itself)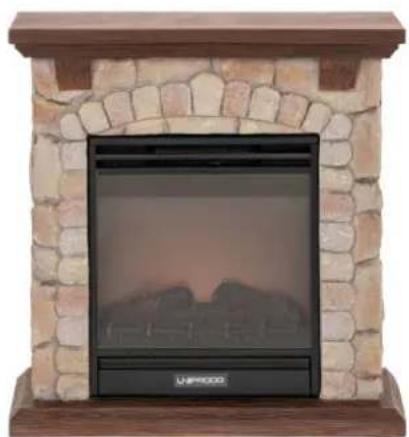
natural_image
Exterior view of a stone archway with a black heating unit mounted on a wooden base (no text or symbols visible)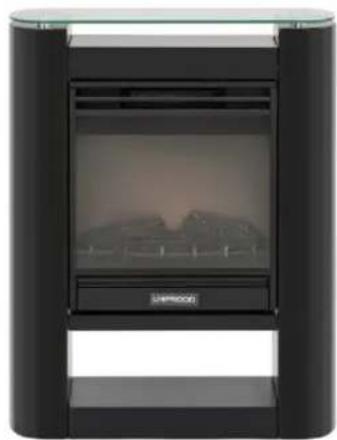
natural_image
Exterior view of a black cylindrical device with a display screen showing a landscape image (no visible text or symbols)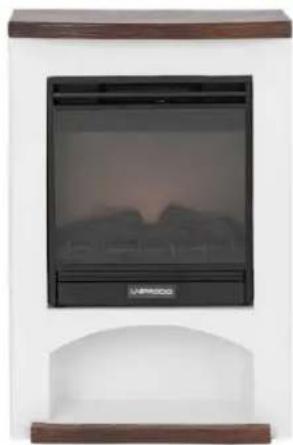
natural_image
Exterior view of a portable electric heater with a digital display and arched base (no visible text or symbols)natural_image
Simple line drawing of a battery and its circuit symbol (no text or labels)
natural_image
White portable electric heater with a black display screen and 'UNPROD' branding (no visible text or symbols on the device itself)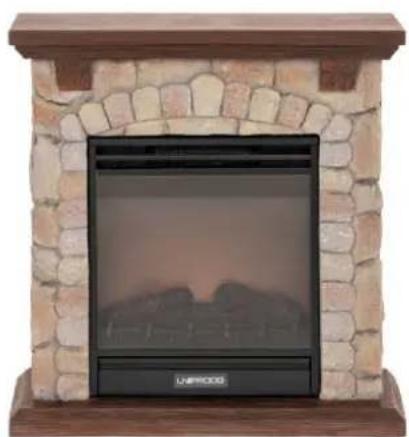
natural_image
Exterior view of a stone archway with a black heating unit mounted on a wooden base (no text or symbols visible)
natural_image
Exterior view of a black cylindrical device with a display screen showing mountainous terrain (no text or symbols visible)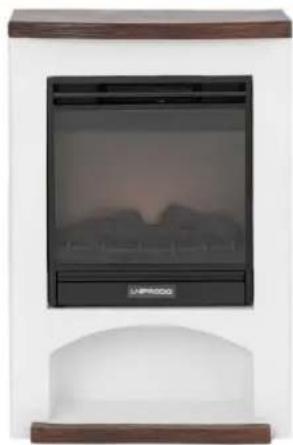
natural_image
Exterior view of a portable electric heater with a digital display and control panel (no visible text or symbols)NASTAVENÍ JASU (PLAMENE).
natural_image
Pure electrical circuit lines without any symbolsnatural_image
White portable electric heater with black display screen showing a twilight sky (no text or symbols visible)
natural_image
Exterior view of a stone-walled heating unit with arched top and base (no signage or text visible)
natural_image
Exterior view of a black cylindrical device with a display screen showing a landscape image (no visible text or symbols)
natural_image
Exterior view of a portable electric heater with a digital display showing a twilight sky (no text or symbols visible)natural_image
Pure electrical circuit lines without any symbolsnatural_image
White portable electric heater with a black display screen showing a scenic sunset background (no text or symbols visible)
natural_image
Exterior view of a stone-walled heating unit with a black display panel and 'UNESCO' branding (no other text or symbols visible)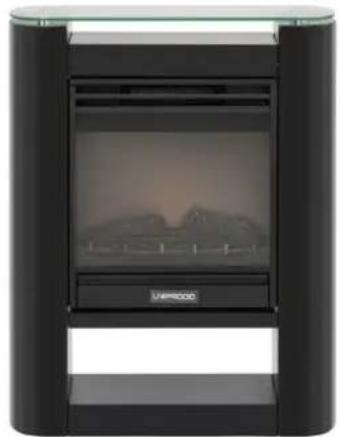
natural_image
Exterior view of a black cylindrical device with a display screen showing a landscape image (no visible text or symbols)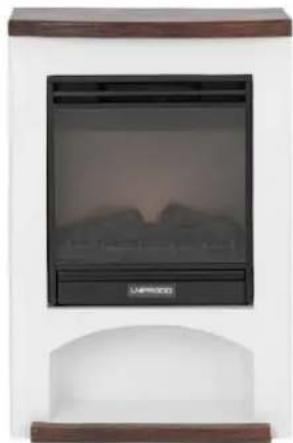
natural_image
Exterior view of a portable electric heater with a black display screen and control buttons (no visible text or symbols)natural_image
Pure electrical circuit lines without any symbolsnatural_image
White portable electric heater with a black display screen and 'UNPROD' branding (no visible text or symbols on the device itself)
natural_image
Exterior view of a stone archway with a black heating unit mounted on a wooden base (no text or symbols visible)
natural_image
Exterior view of a modern office building (no signage)
natural_image
Exterior view of a portable electric heater with a digital display and control panel (no visible text or symbols)natural_image
Pure electrical circuit lines without any symbols
natural_image
White portable electric heater with black display screen showing a twilight sky (no text or symbols visible)
natural_image
Exterior view of a stone-walled heating unit with arched top and base (no signage or text visible)
natural_image
Exterior view of a black cylindrical device with a display screen showing a landscape image (no visible text or symbols)
natural_image
Exterior view of a portable electric heater with a digital display showing a twilight sky (no text or symbols visible)natural_image
Simple line drawing of a battery and a circular component with a plus sign (no text or symbols)
natural_image
White portable electric heater with a black display screen and 'UNPROD' branding (no visible text or symbols on the device itself)
natural_image
Exterior view of a stone archway with a black heating unit mounted on a wooden base (no text or symbols visible)
natural_image
Exterior view of a modern office building (no signage)
natural_image
Exterior view of a portable electric heater with a digital display and control panel (no visible text or symbols)natural_image
Pure electrical circuit lines without any symbolsnatural_image
White portable electric heater with a black display screen, no visible text or symbols on the device itself.
natural_image
Exterior view of a stone archway with a black heating unit mounted on a wooden base (no text or symbols visible)
natural_image
Exterior view of a black cylindrical device with a display screen showing mountainous terrain (no text or symbols visible)
natural_image
Exterior view of a portable electric heater with a digital display and control panel (no visible text or symbols)natural_image
Pure electrical circuit lines without any symbolsnatural_image
White portable electric heater with black display screen and 'UNPROOD' branding (no visible text or symbols on device body)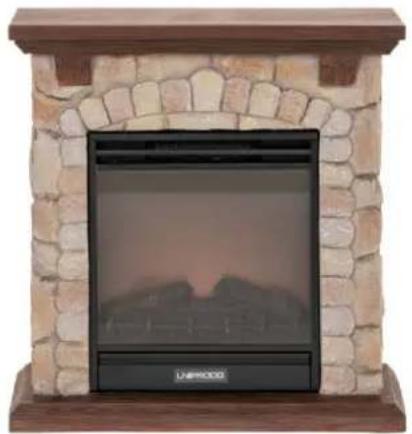
natural_image
Exterior view of a stone archway with a black heating screen and 'LAWPOCKE' logo (no text or symbols on the main structure)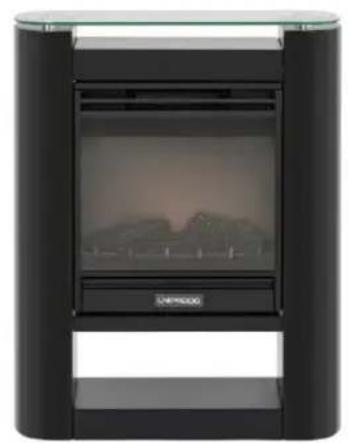
natural_image
Exterior view of a modern office building (no signage)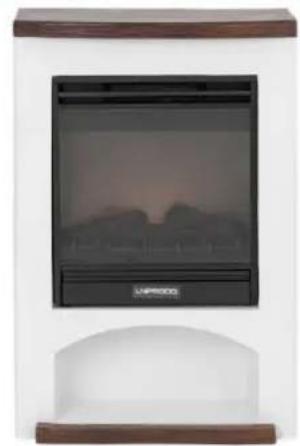
natural_image
Exterior view of a portable electric heater with a black panel and wooden frame (no visible text or symbols)HOOG VERMOGEN VERWARMING
LAAG VERMOGEN VERWARMING
natural_image
Pure electrical circuit lines without any symbolsnatural_image
White portable electric heater with a black display screen and 'UNPROD' branding (no visible text or symbols on the device itself)
natural_image
Exterior view of a stone archway with a black heating unit mounted on a wooden base (no text or symbols visible)
natural_image
Exterior view of a black cylindrical device with a display screen showing mountainous terrain (no text or symbols visible)
natural_image
Exterior view of a portable electric heater with a digital display and control panel (no visible text or symbols)natural_image
Pure electrical circuit lines without any symbolsnatural_image
White portable electric heater with a black display screen and 'UNPROD' branding (no visible text or symbols on the device itself)
natural_image
Exterior view of a stone archway with a black heating unit mounted on a wooden base (no text or symbols visible)
natural_image
Exterior view of a black cylindrical device with a display screen showing mountainous terrain (no text or symbols visible)
natural_image
Exterior view of a portable electric heater with a digital display and control panel (no visible text or symbols)natural_image
Pure electrical circuit lines without any symbols
natural_image
White portable electric heater with a black display screen, no visible text or symbols on the device itself.
natural_image
Exterior view of a stone archway with a black heating unit mounted on a wooden base (no text or symbols visible)
natural_image
Exterior view of a black cylindrical device with a display screen showing mountainous terrain (no text or symbols visible)
natural_image
Exterior view of a portable electric heater with a digital display and control panel (no visible text or symbols)natural_image
Pure electrical circuit lines without any symbols
natural_image
White portable electric stove with black display screen and 'UNIPROOO' branding (no visible text or symbols on main body)
natural_image
Exterior view of a stone archway with a black TV unit and 'LAWPOCKE' logo (no other text or symbols)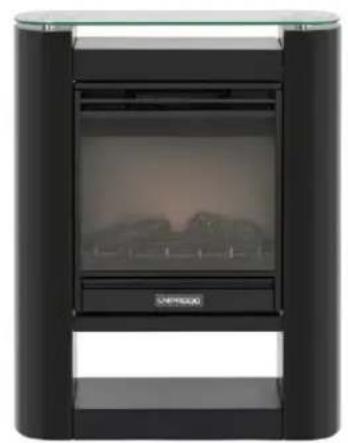
natural_image
Exterior view of a modern office building (no signage)
natural_image
Exterior view of a portable electric heater with a black panel and wooden frame (no visible text or symbols)natural_image
Pure electrical circuit lines without any symbolsnatural_image
White portable electric heater with black display screen showing a twilight sky (no text or symbols visible)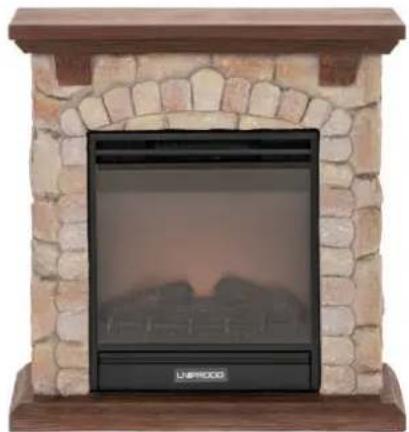
natural_image
Exterior view of a stone-walled heating unit with arched top and base (no signage or text visible)
natural_image
Exterior view of a black cylindrical device with a display screen showing a landscape image (no visible text or symbols)
natural_image
Exterior view of a portable electric heater with a digital display showing a twilight sky (no text or symbols visible)natural_image
Pure electrical circuit lines without any symbolsnatural_image
White portable electric heater with black display screen showing a twilight sky (no text or symbols visible)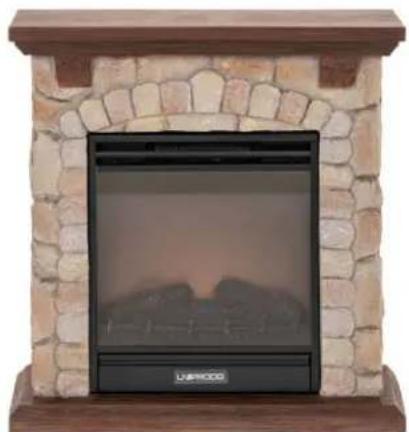
natural_image
Exterior view of a stone-walled fire extinguisher with arched top and base (no text or symbols visible)
natural_image
Exterior view of a modern black industrial device with a display screen and control buttons (no visible text or symbols)
natural_image
Exterior view of a portable electric heater with a black display screen and wooden base (no visible text or symbols)Ovaj proizvod je uređaj za grijanje koji oponaša izgled tradicionalnog kamina, ali koristi električnu energiju za stvaranje topline i atmosfere za veću udobnost, sigurnost i jednostavnost korištenja.
Montaža
Temperatura okoline ne smije biti viša od 40°C, a relativna vlažnost zraka manja od 85%. Samo za unutarnju upotrebu - osigurajte dobru ventilaciju u prostoriji u kojoj se uređaj koristi. Razmak između svake strane uređaja i zida ili drugih predmeta (osim stražnje i donje strane) mora biti najmanje 50 cm. Uređaj uvijek treba koristiti kada je postavljen na ravnu, stabilnu, čistu, vatrootpornu i suhu površinu, daleko od bilo kakvih zavjesa, draperija, namještaja, područja s velikim prometom. Postavite uređaj tako da uvijek imate pristup utikaču. Kabel za napajanje spojen na uređaj mora biti pravilno uzemljen i odgovarati tehničkim podacima na etiketi proizvoda. Kada koristite daljinski upravljač po prvi put, uklonite zaštitni plastični jezičak u pretincu za baterije (pogledajte poglavlje o zamjeni baterije daljinskog upravljača).
Montaža
A. Glavni prekidač napajanja (iza poklopca)
B. Upravljačka ploča:
| GUMB | FUNKCIJA | DJELOVANJE & INDIKACIJA | |
 Uključivanje/isključivanje Uključivanje/isključivanje | ON: Omogućuje funkcije upravljačke ploče.Uključite efekt plamena.ISKLJUČENO:onemogućuje funkcije upravljačke ploče. Isključi efekt plamena. | 1. Pritisnite jednom. Indikatorska lampica se uključuje. Napajanje se uključuje. Sve funkcije omogućene.2. Pritisnite ponovno, isključit će se. | |
 (Plamen) Podešavanje svjetline (Plamen) Podešavanje svjetline | Kontrola svjetline:razina svjetline plamena. | Pritisnite gumb za odabir razine svjetline. Moguće je odabrati 5 razina svjetline. | |
 Timer Timer | Tipka za mjerenje vremena:kontrolira postavke mjerača vremena za gašenje kamina u odabrano vrijeme. Raspon podešavanja od 30 min do 9 sati. | 1. Pritisnite jednom. Indikatorska lampica se uključuje. Temperatura je postavljena na 00.2. Ponovno pritisnite dok se ne postigne željena postavka. LED zaslon prikazuje postavku i prikazuje raspon: 00-30 min-1h...9 h. | |
 Povećanje temperature Povećanje temperature | Tipka za podešavanje temperature:Podešavanje povećanja temperature. | 1. Kada postavljena temperatura prijeđe temperaturu detekcije, uređaj počinje grijati.2. Kada detektirana temperatura dosegne zadanu temperaturu, uređaj prestaje grijati. | |
 Smanjenje temperature Smanjenje temperature | Tipka za podešavanje temperature:Podešavanje smanjenja temperature. | 1. Kada postavljena temperatura prijeđe temperaturu detekcije, uređaj počinje grijati.2. Kada temperatura detekcije dosegne zadanu temperaturu, stroj će se zaustaviti. | |
DJEČJA BRAVA
LOC
Pritisnite tipku ON/OFF (crvenu) na daljinskom upravljaču za početak efekta plamena. Zadano sučelje prikazuje se na sljedeći način:
Ikona grijanja će se prikazati i uređaj počinje grijati kada je sobna temperatura niža od zadane postavke (10°C), naprotiv, neće se prikazati i grijati.
Ikona sata će treperiti jer vrijeme još nije postavljeno. Slijedite korake u "Postavka tajmera" za postavljanje vremena.
natural_image
Pure electrical circuit lines without any symbolsnatural_image
White portable electric heater with a black display screen showing a twilight sky (no text or symbols visible)
natural_image
Exterior view of a stone-walled fire extinguisher with arched top and base (no text or symbols visible)
natural_image
Exterior view of a modern black industrial device with a display screen and control buttons (no visible text or symbols)
natural_image
Exterior view of a portable electric heater with a black display screen and wooden frame (no visible text or symbols)natural_image
Pure electrical circuit lines without any symbolsnatural_image
White portable electric heater with black display screen showing a twilight sky (no text or symbols visible)
natural_image
Exterior view of a stone-walled heating unit with arched top and base (no signage or text visible)
natural_image
Exterior view of a modern office building (no signage)
natural_image
Exterior view of a portable electric heater with a digital display showing a twilight sky (no text or symbols visible)natural_image
Pure electrical circuit lines without any symbolsnatural_image
White portable electric heater with a black display screen and 'UNPROD' branding (no visible text or symbols on the device itself)
natural_image
Exterior view of a stone archway with a black heating unit mounted on a wooden base (no text or symbols visible)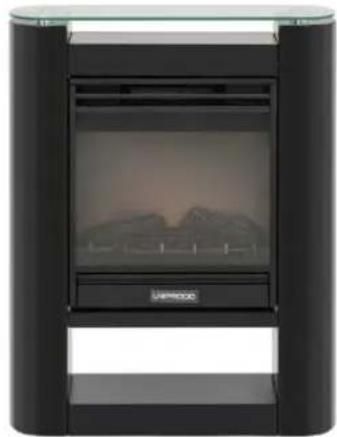
natural_image
Exterior view of a black cylindrical device with a display screen showing mountainous terrain (no text or symbols visible)
natural_image
Exterior view of a portable electric heater with a digital display and control panel (no visible text or symbols)natural_image
Pure electrical circuit lines without any symbolsOdlaganje rabljenih naprav
For the disposal of the device please consider and act according to the national and local rules and regulations.
CONTACT
expondo Polska sp. z o.o. sp. k.