ACENDER 2.0 - Embroidery machine Uniprodo - Free user manual and instructions
Find the device manual for free ACENDER 2.0 Uniprodo in PDF.

| Brand | Uniprodo |
| Model | ACENDER 2.0 |
| Product type | Sewing and embroidery machine |
| Rated voltage | 230 V ~, 50 Hz |
| Rated power | 45 W |
| Dimensions (Length x Depth x Height) | 385 x 460 x 420 mm |
| Weight | 8.4 kg |
| Main functions | Sewing (162 stitches), built-in embroidery, USB import (format *.DST), automatic thread cutter, double needle, quick threading |
| Care and cleaning | Unplug before cleaning; use a soft slightly damp cloth; clean the feed dogs and bobbin area regularly; do not use abrasive products |
| Safety | Automatic shutdown in case of overload; protection against moving parts; indoor use only |
| Spare parts and repairability | Use only original parts; repairs by an authorized service only |
| General information | Domestic use; reduced noise level; maximum operating temperature 40 °C; relative humidity < 85 % |
Frequently Asked Questions - ACENDER 2.0 Uniprodo
User questions about ACENDER 2.0 Uniprodo
0 question about this device. Answer the ones you know or ask your own.
Ask a new question about this device
Download the instructions for your Embroidery machine in PDF format for free! Find your manual ACENDER 2.0 - Uniprodo and take your electronic device back in hand. On this page are published all the documents necessary for the use of your device. ACENDER 2.0 by Uniprodo.
USER MANUAL ACENDER 2.0 Uniprodo

A - Anzeige
B - Handrad
C - Spulmaschine
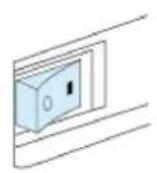
A - Start/Stop-Taste
natural_image
Simple line drawing of a wall-mounted electrical outlet with a blue arrow pointing to the outlet (no text or symbols)
natural_image
Diagram showing a hand pressing down on a curved pipe with circular components and an arrow indicating force direction (no text or symbols)

natural_image
Diagram of a mechanical device with rotating components and directional arrows (no text or symbols)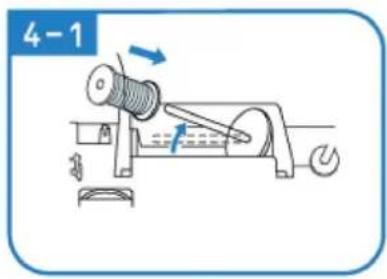

natural_image
Illustration of hands using a tool to adjust or install a mechanical component (no text or symbols visible)
natural_image
Line drawing of hands using a tool to adjust or install a mechanical component (no text or symbols)

natural_image
Illustration of hands holding a medical instrument with blue tubing, no text or symbols present


natural_image
Technical line drawing of a mechanical assembly with no visible text or symbols

natural_image
Simple line drawing of a light blue electrical outlet with a label '1' (no text or symbols on the outlet itself)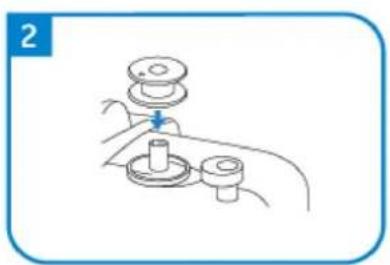
natural_image
Line drawing of a hand holding a mechanical component with a lever and base (no text or symbols)
natural_image
Diagram of a mechanical clamp or bracket assembly with a blue arrow indicating direction (no text or symbols)
natural_image
Diagram of a mechanical device with rotating components and directional arrows (no text or symbols)


natural_image
Line drawing of a mechanical assembly with a blue arrow indicating a downward motion (no text or symbols)
natural_image
Illustration of hands performing a mechanical operation with arrows indicating motion (no text or symbols)

natural_image
Line drawing of a mechanical assembly with a spring and base mount (no text or symbols)
natural_image
Diagram of a mechanical assembly with a rotating component and fluid flow, no text or symbols present

natural_image
Diagram of a cable or wire connection with a spring and rope, no text or symbols present

natural_image
Illustration of a mechanical tool or device with a blue arrow pointing to it, no text or symbols present.
natural_image
Line drawing of a hand holding a small mechanical component, no text or symbols present
natural_image
Illustration of a hand using a tool to adjust a mechanical component, labeled '11-1' (no text or symbols on the diagram itself)
natural_image
Mechanical assembly diagram showing a rotating component with directional arrows (no text or symbols)
NÄHEN
natural_image
Pure mechanical diagram showing a tool or component with red and green curved lines indicating motion or force, no text or symbols present.natural_image
Simple diagram of a switch with a blue arrow pointing to the left side (no text or symbols)
natural_image
Pure diagram of a mechanical or fluidic component with no text, numbers, or symbols
natural_image
Diagram showing mechanical assembly with arrows indicating motion (no text or symbols)
natural_image
Line drawing of a mechanical device with a handle and lever mechanism (no text or symbols)
natural_image
Illustration of a robotic arm with motion arrows indicating movement (no text or symbols)
natural_image
Illustration of a robotic arm with a blue arrow indicating rotation (no text or symbols)
natural_image
Line drawing of a sewing machine needle with a hand operating it (no text or symbols)
natural_image
Illustration of a hand using a tool to press or install a mechanical component, with an arrow indicating motion (no text or symbols present)
natural_image
Simple line drawing of a two-tiered plastic container with a blue arrow indicating rotation (no text or symbols)
natural_image
Simple diagram of a square plate with a dashed oval and a small arrow at the bottom (no text or symbols)

natural_image
Simple line drawing of a square mechanical component with a blue arrow indicating rotation (no text or symbols)
natural_image
Line drawing of a sewing machine needle stitching fabric, showing no text or symbols

This User Manual has been translated for your convenience using machine translation. Reasonable efforts have been made to provide an accurate translation; however, no automated translation is perfect nor is it intended to replace human translators. The official User Manual is the English version. Any discrepancies or differences created in the translation are not binding and have no legal effect for compliance or enforcement purposes. If any questions arise related to the accuracy of the information contained in the User Manual, please refer to the English version of those contents which is the official version.
Technical data
| Parameter description Parameter value | |
| Product name | Multifunctional embroidery and sewing machine |
| Model | ACENDER 2.0 |
| Rated voltage [V~] / frequency [Hz] | 230/50 |
| Rated power [W] | 45 |
| Dimensions [width x depth x height; mm] | 385 x 460 x 420 |
| Weight [kg] | 8.4 |
1. General description
The user manual is designed to assist in the safe and trouble-free use of the device. The product is designed and manufactured in accordance with strict technical guidelines, using state-of-the-art technologies and components. Additionally, it is produced in compliance with the most stringent quality standards.
DO NOT USE THE DEVICE UNLESS YOU HAVE THOROUGHLY READ AND UNDERSTOOD THIS USER MANUAL.
To increase the product life of the device and to ensure trouble-free operation, use it in accordance with this user manual and regularly perform maintenance tasks. The technical data and specifications in this user manual are up to date. The manufacturer reserves the right to make changes associated with quality improvement. The device is designed to reduce noise emission risks to a minimum, taking into account technological progress and noise reduction opportunities.
Legend

The product satisfies the relevant safety standards.
Read instructions before use.
The product must be recycled.
WARNING! or CAUTION! or REMEMBER! Applicable to the given situation.
(general warning sign)
ATTENTION! Electric shock warning!
ATTENTION! Rotating parts, entanglement hazard!
Only use indoors.
Use guard.
ATTENTION! Sharp, moving machine parts! Danger of cutting or amputating fingers/ limbs.

PLEASE NOTE! Drawings in this manual are for illustration purposes only and in some details may differ from the actual product.
2. Usage safety

ATTENTION!
Read all safety warnings and all instructions. Failure to follow the warnings and instructions may result in electric shock, fire and/or serious injury or even death.
The terms "device" or "product" are used in the warnings and instructions to refer to:
Multifunctional embroidery and sewing machine
2.1. Electrical safety
a) The plug must fit the socket. Do not modify the plug in any way. Using original plugs and matching sockets reduces the risk of electric shock.
b) Do not touch the device with wet or damp hands.
c) Use the cable only for its designated use. Never use it to carry the device or to pull the plug out of a socket. Keep the cable away from heat sources, oil, sharp edges or moving parts. Damaged or tangled cables increase the risk of electric shock.
d) Do not use the device if the power cord is damaged or shows obvious signs of wear. A damaged power cord should be replaced by a qualified electrician or the manufacturer's service centre.
e) To avoid electric shock, do not immerse the cord, plug or device in water or other liquids. Do not use the device on wet surfaces.
f) Do not use in very humid environments or in the direct vicinity of water tanks.
g) Prevent the device from getting wet. Risk of electric shock!
h) Before the first use, please check whether the main voltage type and current comply with the indicated data on the type plate.
2.2. Safety in the workplace
a) Make sure the workplace is clean and well lit. A messy or poorly lit workplace may lead to accidents. Try to think ahead, observe what is going on and use common sense when working with the device.
b) If there are any doubts as to the correct operation of the device, contact the manufacturer's support service.
c) Only the manufacturer's service point may repair the device. Do not attempt any repairs independently!
d) In case of fire, use a powder or carbon dioxide (CO2) fire extinguisher (one intended for use on live electrical devices) to put it out.
e) Use the device in a well-ventilated space.
f) Regularly inspect the condition of the safety labels. If the labels are illegible, they must be replaced.
g) Please keep this manual available for future reference. If this device is passed on to a third party, the manual must be passed on with it.
h) Keep packaging elements and small assembly parts in a place not available to children.
i) Keep the device away from children and animals.
j) If this device is used together with another equipment, the remaining instructions for use shall also be followed.

Remember! When using the device, protect children and other bystanders.
2.3. Personal safety
a) Do not use the device when tired, ill or under the influence of alcohol, narcotics or medication which can significantly impair the ability to operate the device.
b) The machine may be operated by physically fit persons who are able to handle the machine, are properly trained, who have reviewed this operating manual and have received training in occupational health and safety.
c) The machine is not designed to be handled by persons (including children) with limited mental and sensory functions or persons lacking relevant experience and/or knowledge unless they are supervised
by a person responsible for their safety or they have received instruction on how to operate the machine.
d) When working with the device, use common sense and stay alert. Temporary loss of concentration while using the device may lead to serious injuries.
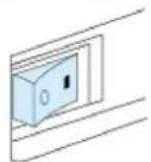
e) To prevent the device from accidentally switching on, make sure the switch is on the OFF position before connecting to a power source.
f) Do not overestimate your abilities. When using the device, keep your balance and remain stable at all times. This will ensure better control over the device in unexpected situations.
g) Do not wear loose clothing or jewellery. Keep hair, clothes and gloves away from moving parts. Loose clothing, jewellery or long hair may get caught in moving parts.
h) Remove all adjusting tools or spanners before turning the device on. A tool or spanner left in the revolving part of the device may cause injury.
i) The device is not a toy. Children must be supervised to ensure that they do not play with the device.
j) Do not put your hands or other items inside the device while it is in use!
2.4. Safe device use
a) Do not use the device if the "ON/OFF" switch does not function properly (does not switch the device on and off). Devices which cannot be switched on and off using the ON/OFF switch are hazardous, should not be operated and must be repaired.
b) Make sure the plug is disconnected from the socket before attempting any adjustments, accessory replacements or before putting the device aside. Such precautions will reduce the risk of accidentally activating the device.
c) When not in use, store in a safe place, away from children and people not familiar with the device who have not read the user manual. The device may pose a hazard in the hands of inexperienced users.
d) Keep the device in perfect technical condition. Before each use check for general damage, especially check moving components for cracked parts or elements, and for any other conditions which may impact the safe operation of the device. If damage is discovered, hand over the device for repair before use.
e) Keep the device out of the reach of children.
f) Device repair or maintenance should be carried out by qualified persons, only using original spare parts. This will ensure safe use.
g) To ensure the operational integrity of the device, do not remove factory-fitted guards and do not loosen any screws.
h) Avoid situations where the device stops working during use due to excessive loading. This may result in overheating of the drive elements and damage to the device.
i) Do not touch articulated parts or accessories unless the device has been disconnected from the power source.
j) Do not move, adjust or rotate the device in the course of work.
k) Do not leave this appliance unattended while it is in use.
I) The device is not a toy. Cleaning and maintenance may not be carried out by children without supervision by an adult person.
m) It is forbidden to interfere with the structure of the device in order to change its parameters or construction.
n) Keep the device away from sources of fire and heat.
o) Do not overload the device.
p) Do not cover the ventilation openings!
q) Use the device on a hard, stable surface, protected from moisture, frost and direct sunlight.

ATTENTION! Despite the safe design of the device and its protective features, and despite the use of additional elements protecting the operator, there is still a slight risk of accident or injury when using the device. Stay alert and use common sense when using the device.
3. Use guidelines
The product is a machine for sewing and embroidering logos, initials, personalised lettering or designs.
The product is intended for home use only.
The user is liable for any damage resulting from unintended use of the device.
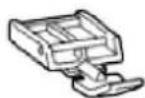
3.1. Device description
A - Display
B - Handwheel
C - Bobbin winder
D – Upper line tension adjustment button; Embroidery unit
E-Wire hook
F – Winding tension guide plate
G-Cutter
H - Lock rod
I - Embroidery unit
J – Quick threading device
K - Presser foot
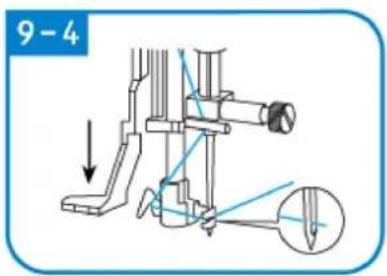
L-Foot lifting lever
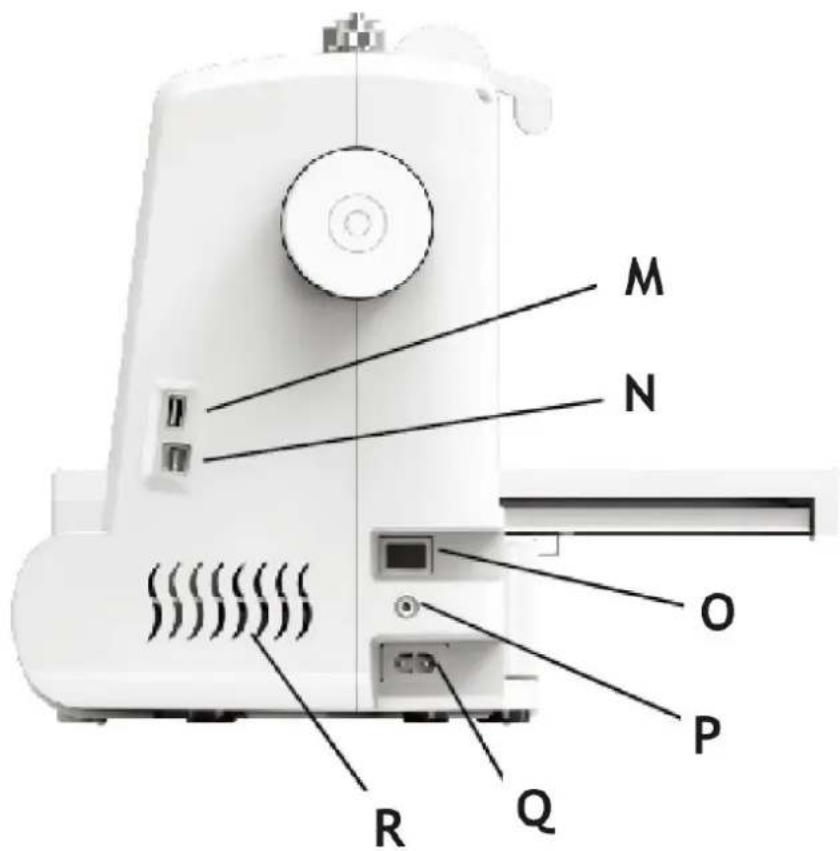
M - USB interface
N - Debug interface (do not use)
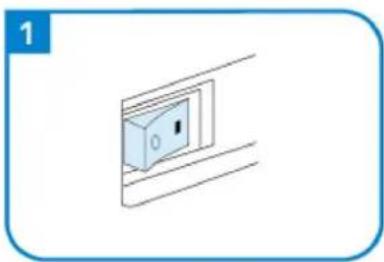
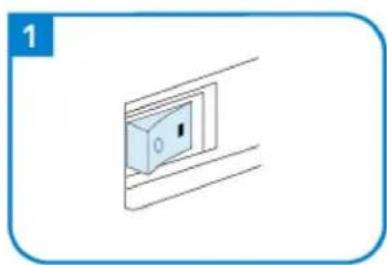
O - Power switch
P - Foot controller socket
Q - Power line socket
R - Vents
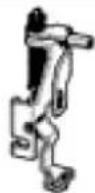
Embroidery unit
A – The embroidery unit release handle
B - Guide rail
C - Embroidered frame connecting groove
D - The embroidery unit connection socket
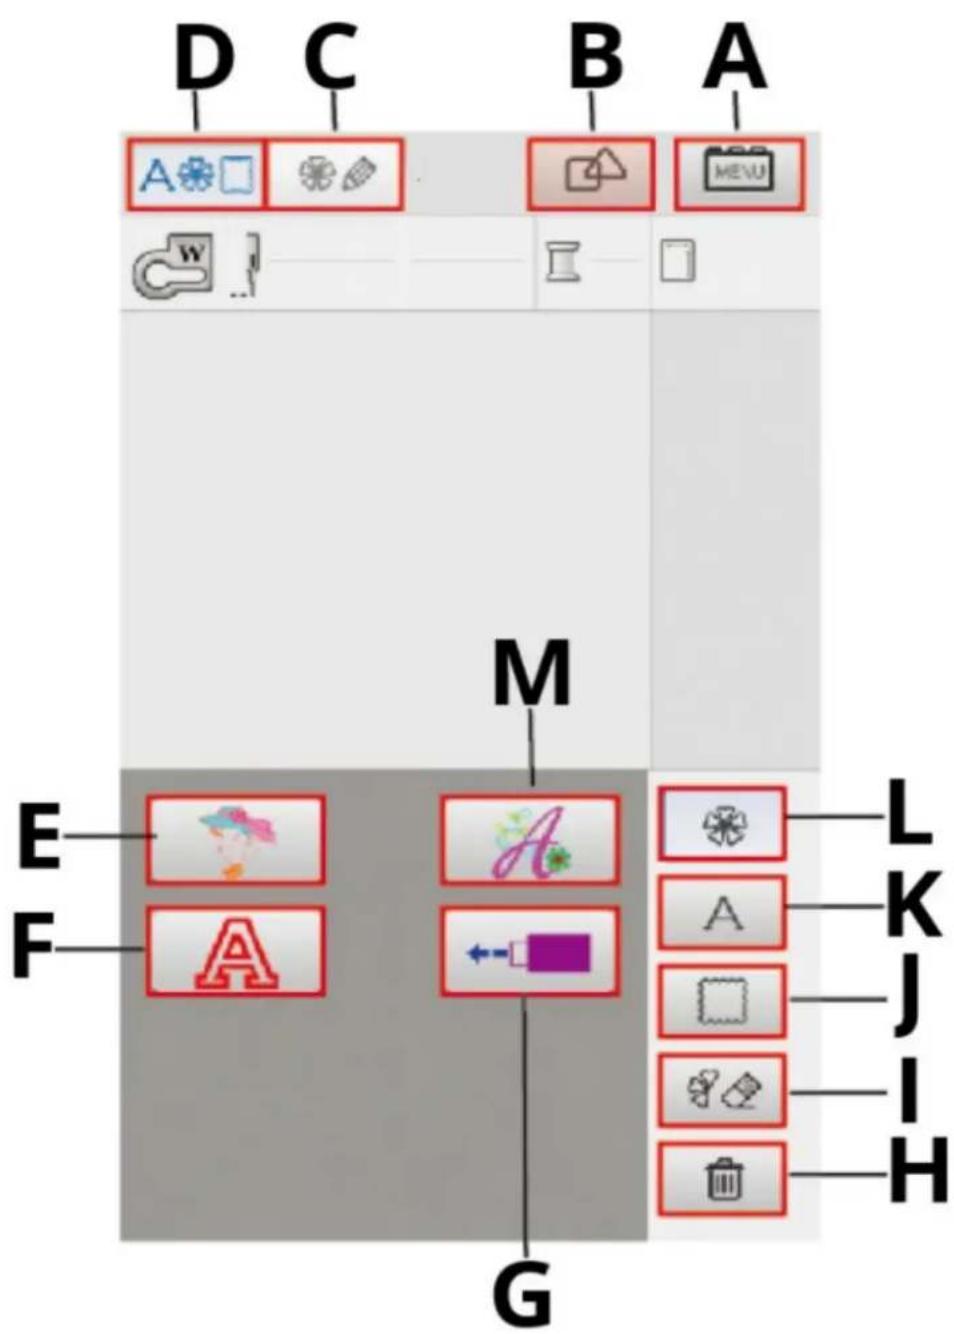
Operation buttons
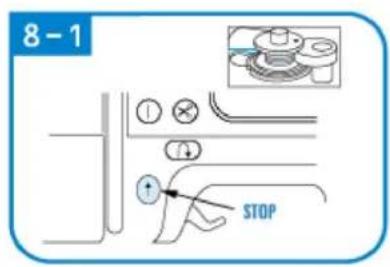
A - Start/Stop button
B - Back seam button
C - Cutting button
D - Pointing button (needle up and down)
Accessories
Locking
intraocular
pressure foot
Zigzag seam
presser foot
Zipper presser foot


Line cap big, medium small
Embroidery
presser foot
Cutting
knife/brush

Screwdriver
Needle
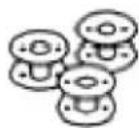
The bobbin
Wrench

Tweezers Stylus Scissors
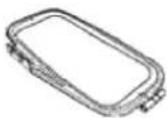
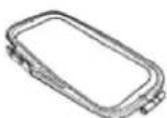
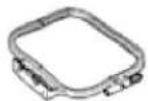
Embroidered frame
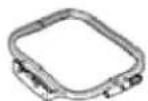
Embroidered frame

Roll line
3.2. Preparing for use
APPLIANCE LOCATION
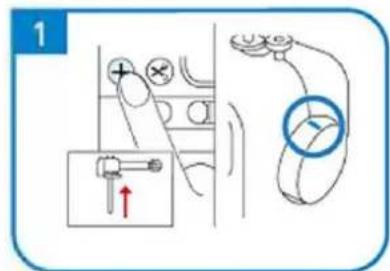
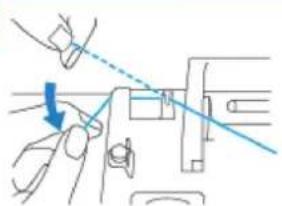
The temperature of environment must not be higher than 40^ C and the relative humidity should be less than 85%. Ensure good ventilation in the room in which the device is being used. There should be at least 10 cm distance between each side of the device and the wall or other objects. The device should always be used when positioned on an even, stable, clean, fireproof and dry surface, and be out of the reach of children and persons with limited mental and sensory functions. Position the device such that you always have access to the power plug. The power cord connected to the appliance must be properly grounded and correspond to the technical details on the product label.
3.3. Device use
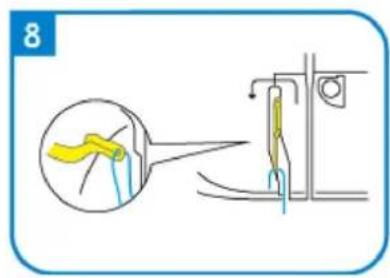
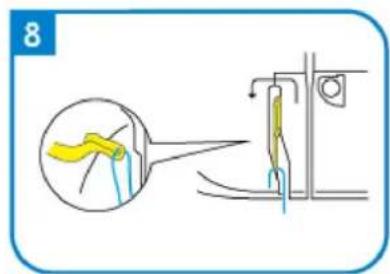
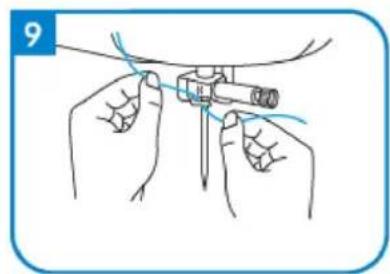
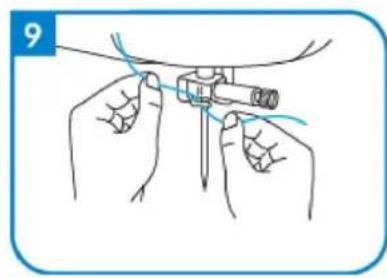
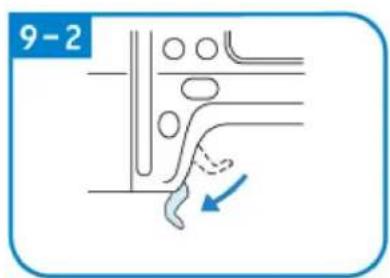
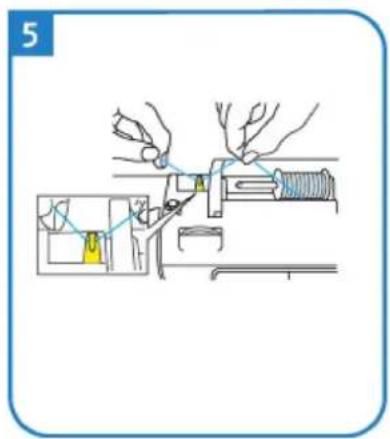
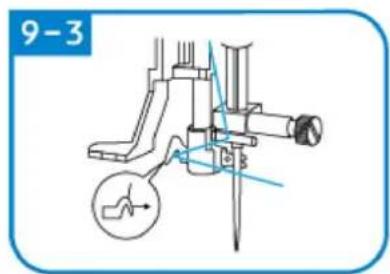
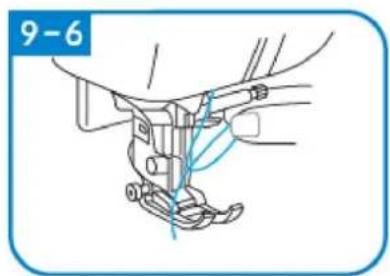
Upper line threading
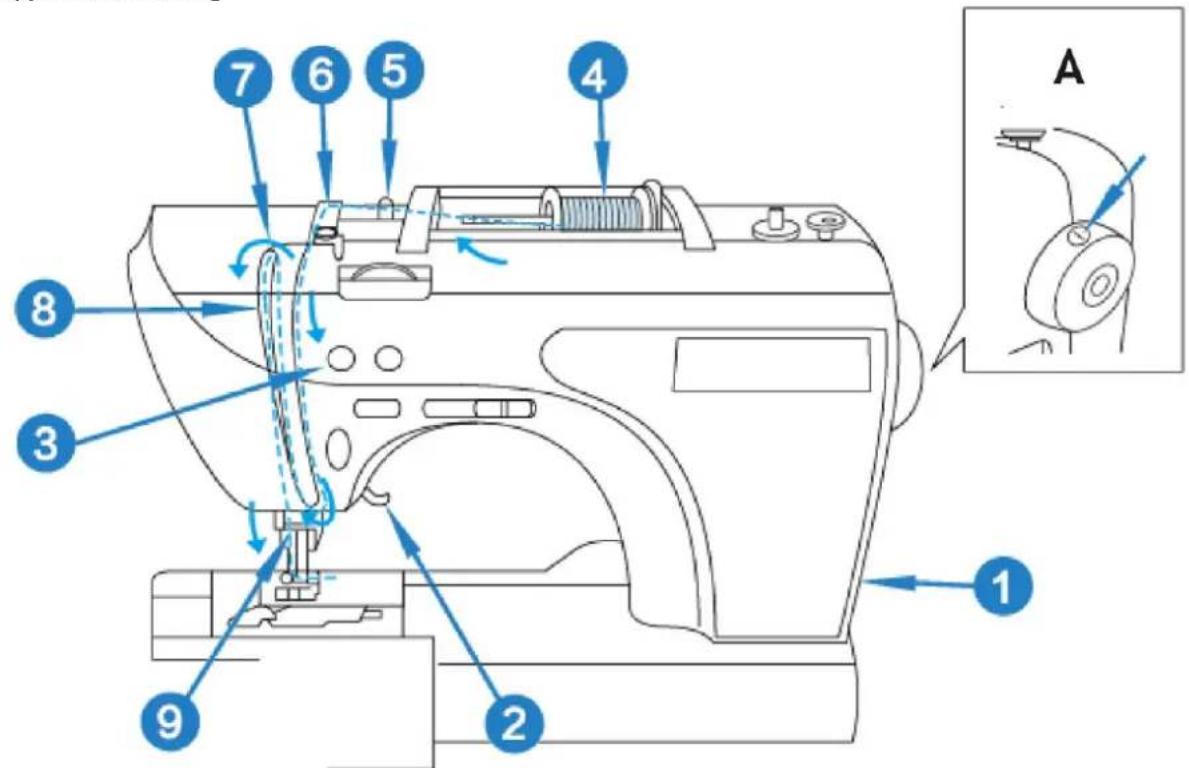
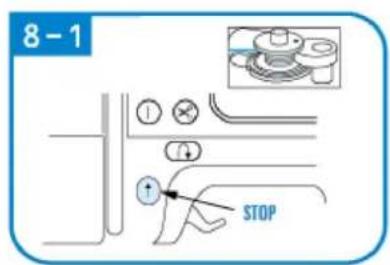
A - Stop needle position mark
natural_image
Simple line drawing of a wall-mounted electrical outlet with a blue arrow pointing to the outlet (no text or symbols)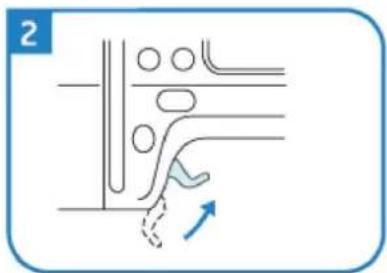
natural_image
Pure diagram of a pipe or duct system with no text, numbers, or symbols
natural_image
Simple line drawing of a mechanical device with a rotating wheel and lever, no text or symbols present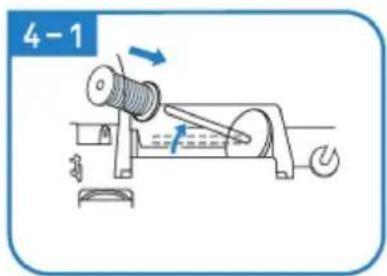
natural_image
Diagram of a mechanical component with a rotating shaft and spiral shaft, labeled '4-2' (no text or symbols on the diagram itself)

natural_image
Illustration of hands using a tool to adjust or install a mechanical component (no text or symbols present)


natural_image
Illustration of hands performing a medical procedure with a tool (no text or symbols present)


natural_image
Technical line drawing of a mechanical assembly with no visible text or symbols
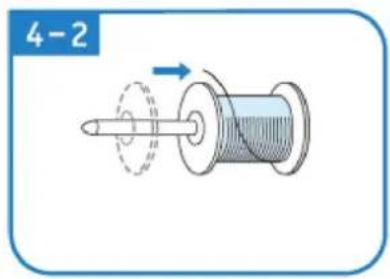
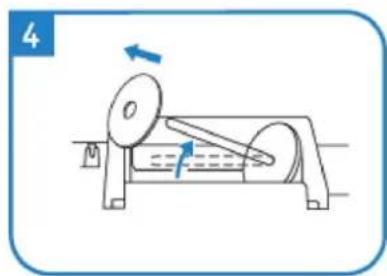
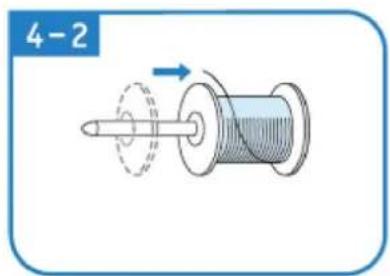
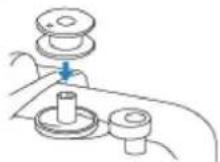
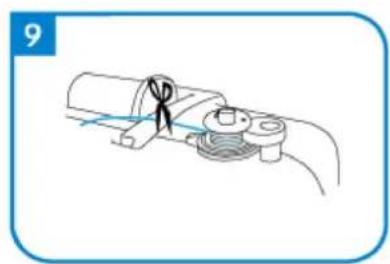
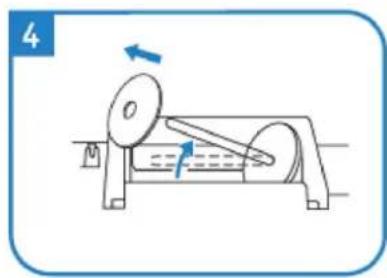
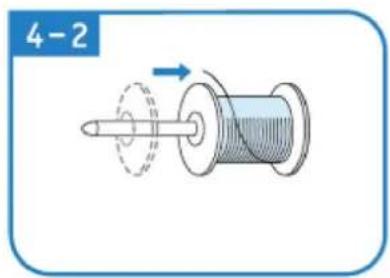
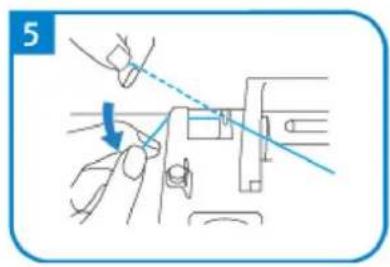
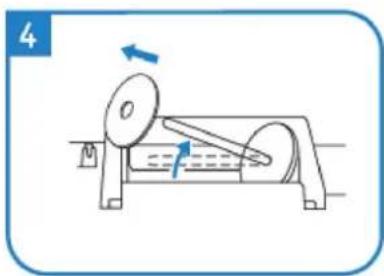
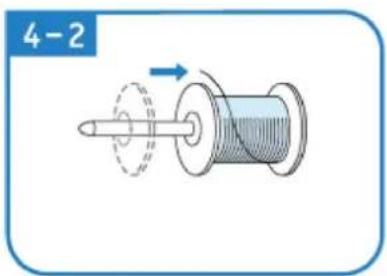
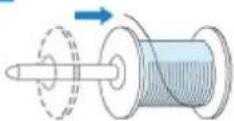
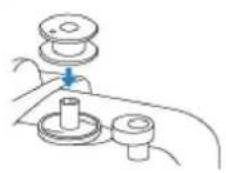
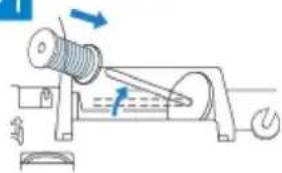
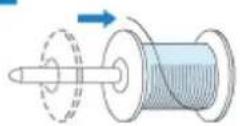
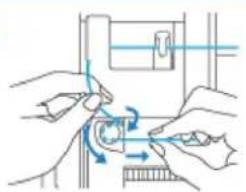
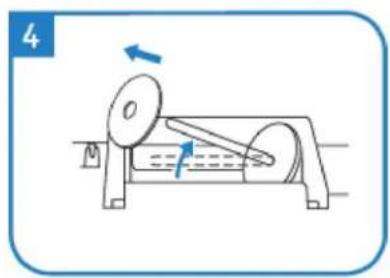
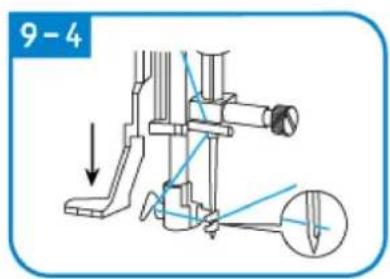
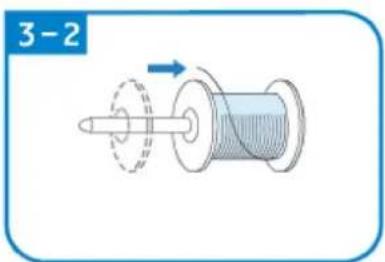
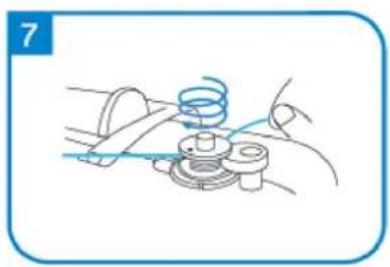
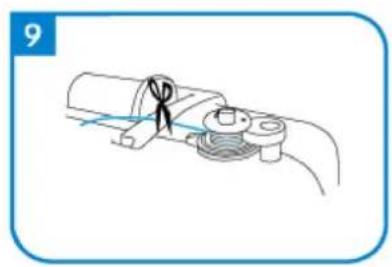
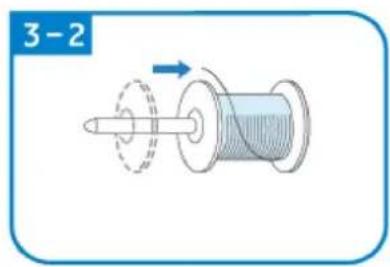
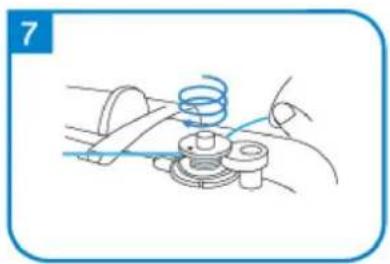
Bobbin Winding and Installation

Use only enclosed bobbin or bobbins of the same type.
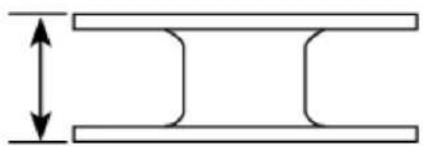
11.5 mm (7/16in)
natural_image
Pure technical diagram of two parallel plates with a vertical double-headed arrow indicating width (no text or symbols)1

2

2-1
natural_image
Mechanical assembly diagram showing a lever mechanism with a blue arrow indicating motion (no text or symbols present)3
natural_image
Mechanical diagram of a rotating device with directional arrows indicating motion (no text or symbols)3-1

natural_image
Mechanical diagram showing a rotating shaft and connecting rod with directional arrows indicating motion (no text or labels)3-2
4

5

natural_image
Diagram of a mechanical assembly with a blue arrow indicating direction (no text or symbols present)6
natural_image
Illustration of hands performing a mechanical operation with blue arrows indicating motion (no text or symbols)

natural_image
Line drawing of a mechanical assembly with a spring and base mount (no text or symbols)
natural_image
Mechanical diagram showing a rotating component with motion arrows, no text or symbols present


natural_image
Diagram of a cable or connector being inserted into a pipe, showing no text or symbols
natural_image
Mechanical diagram showing a valve assembly with a pump and directional arrows (no text or symbols)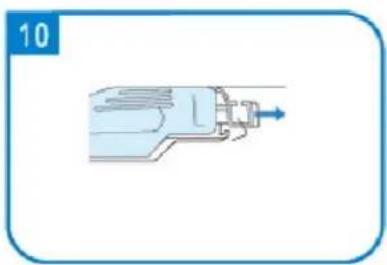
natural_image
Illustration of a mechanical device with a blue arrow pointing to the shaft (no text or symbols)
natural_image
Line drawing of a hand holding a small object with fingers, no text or symbols present
natural_image
Illustration of hands using a mechanical tool to adjust a component, no text or symbols present
natural_image
Mechanical assembly diagram showing a motor with rotating arm and housing (no text or symbols)
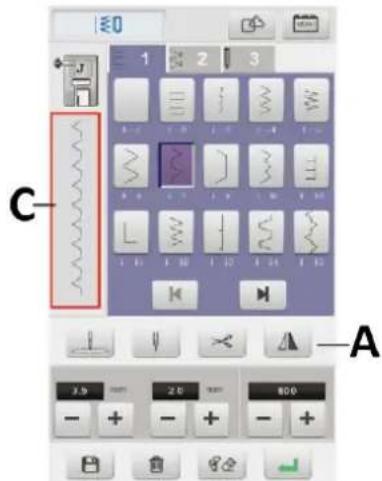
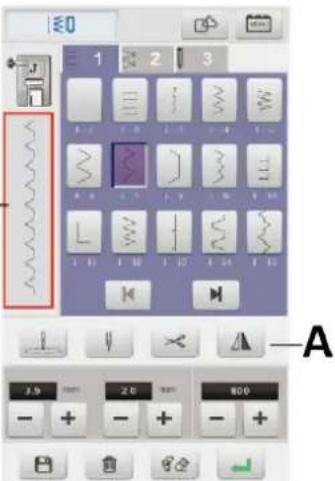
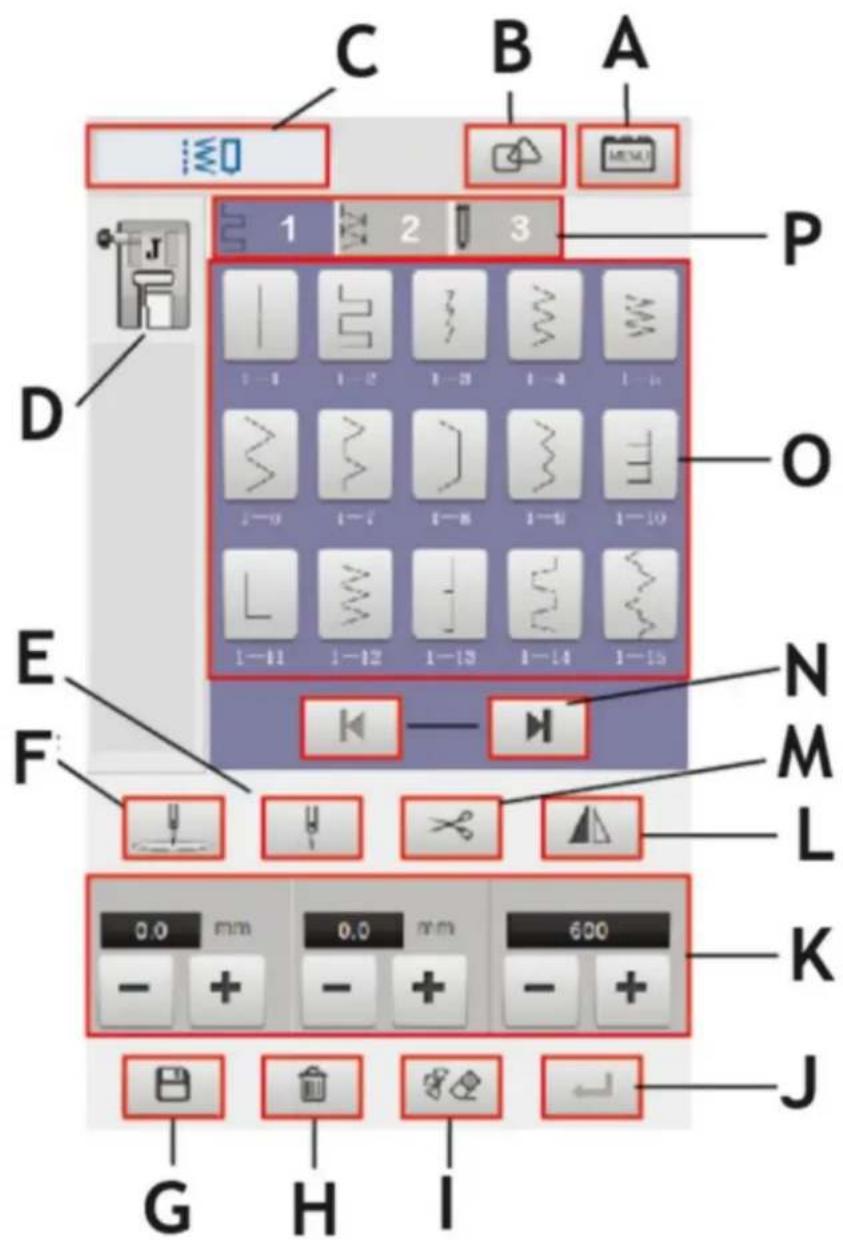
SEWING
Sewing functional interface

| A | Setting button |
| B | Combination button |
| C | Sewing function icon |
| D | Presser foot type display |
| E | Single or double needle switch |
| F | Needle position setting button |
| G | Save button |
| H | Delete button |
| I | Erase button |
| J | Confirm button |
| K | Stitch width, length and speed settings |
| L | Left and right mirror button |
| M | Trimming button |
| N | Top, bottom turn button |
| O | Stitch selection button |
| P | Stitch type selection button |
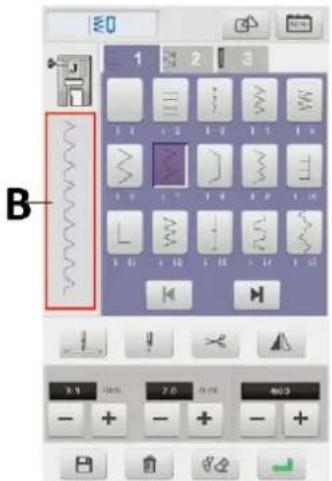
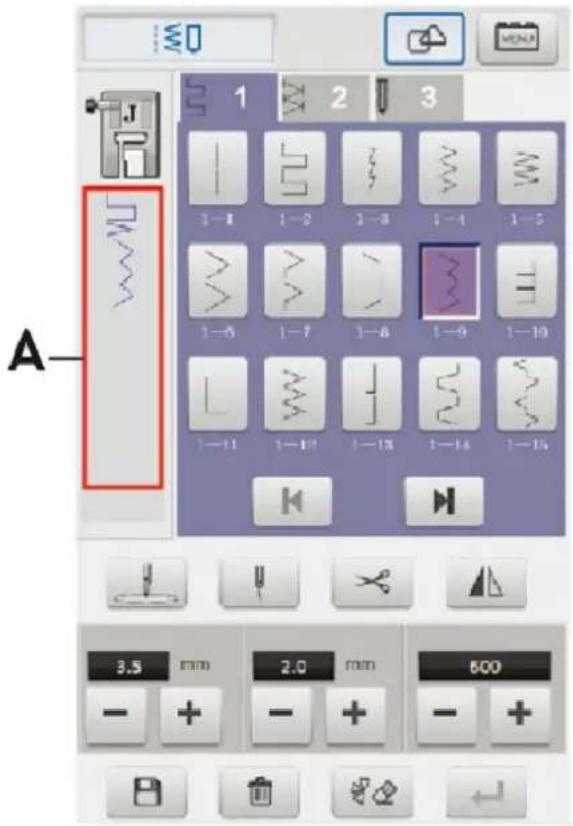
Stitch categories

1 - Straight seam stitches, Reverse seam stitches (42 stitches)
2 - Straight seam stitches (111 stitches)
3 - Button hole stitches (9 stitches)
Select stitch
A

1 – Open the power to the sewing interface.
2 - Click the stitch type to select the required stitch.
A – Click 1/2/3 to select the type of stitch required.
3 – Click the stitch after selecting the stitch category
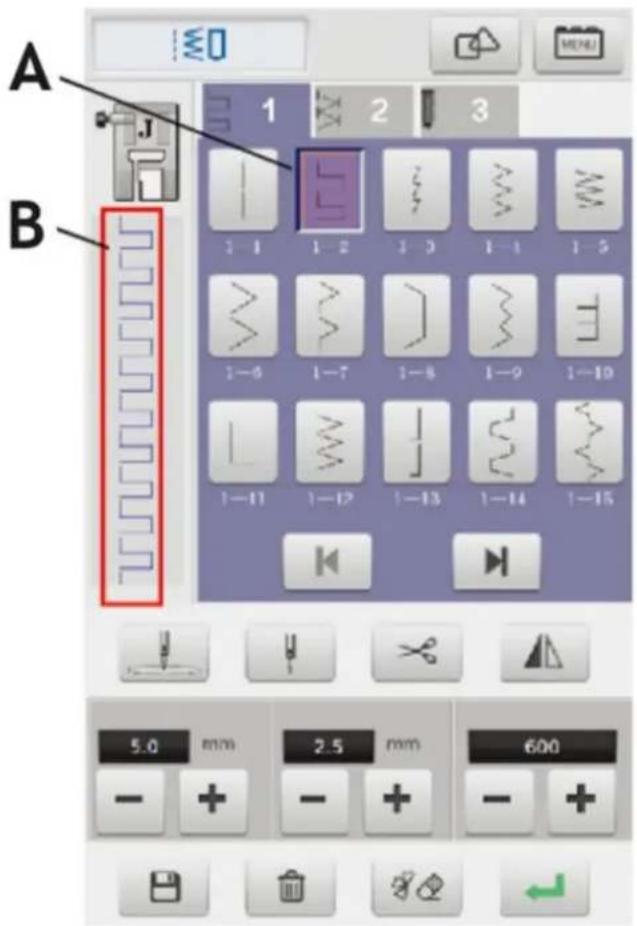
A – Click select stitches that need to be sewn
B - Shows the selected stitch
Stitch mirror
1 – After the user selects the needle trace, click the mirror button on the screen and automatically flip the left and right direction of the needle.
A - Mirror button
B - Left mirror stitch

2 – In the “combination” mode, click to choose a variety of sewing needle tracks for combination.
A – Showing the effects of several stitch combinations
3 – When combining the titch, click the erase button for erasing the selected stitch pattern and redo the selection.
4 – After the stitch combination is completed, click the storage button for saving the combined stitch.
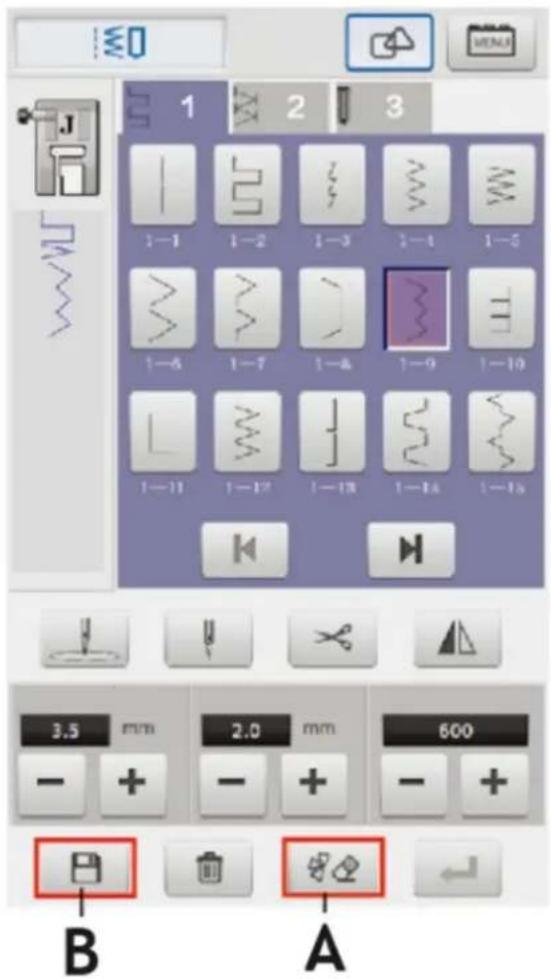
A – Erase button B – Storage button
5 – The location of the saved stitch is inside the stitch custom category 4.
6 – A stitch trace stored in a custom category can be deleted by the user, selecting the needle to be deleted and clicking the delete button to delete.
The user has no permission to delete the embedded stitch.
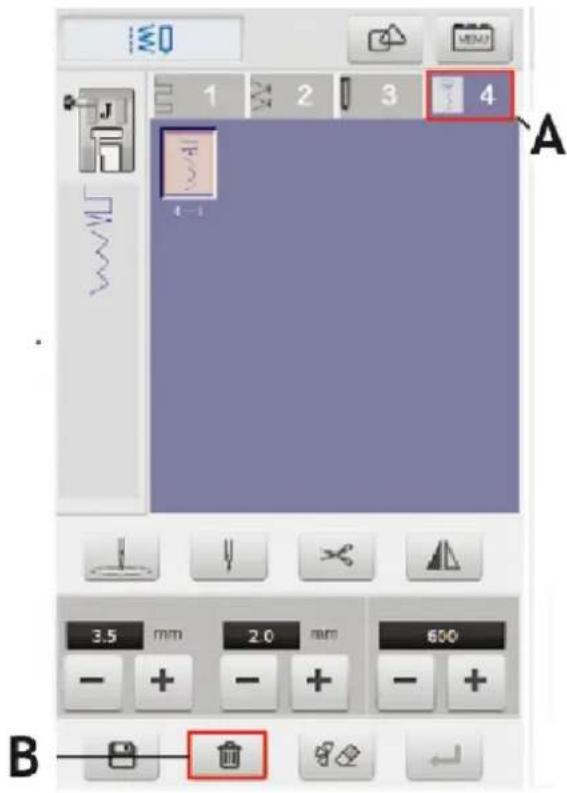
A – Custom stitch category
B - Delete button
Stitch width, length, speed settings.
1 – After selecting the needle, user can set the stitch width, length and sewing speed.
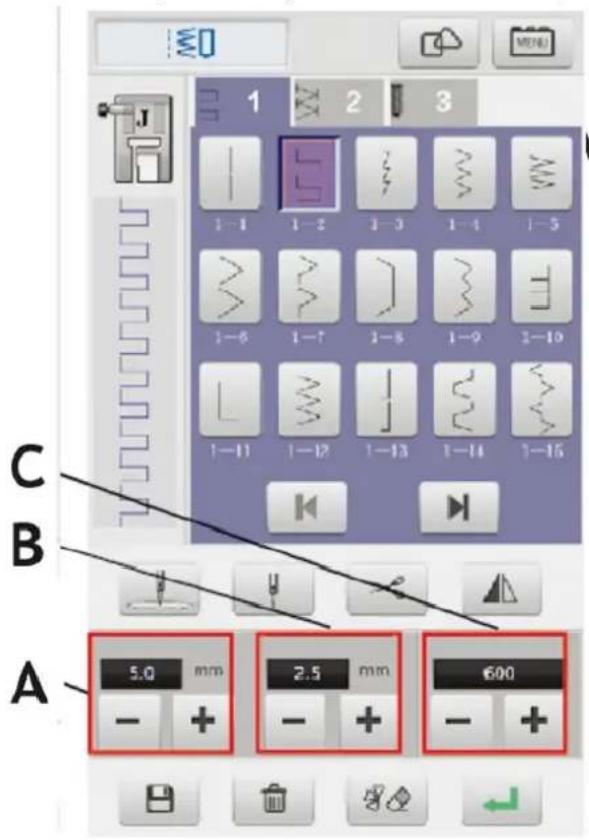
A - Stitch width setting
B - Stitch length setting
C – Sewing speed setting
EN
Double needle sewing.
The user must use qualified machine when making double stitching the needle, otherwise may result in unstitching.
1 – Install two needles correctly.
2 - Manually thread the two sewing threads into the eyelets.
The double needle can not be threaded through a fast thread, otherwise it will damage the threading device.
3 – Select the stitches that needs to be sewn, click on the single, double needle switch; switch to double stitching and then click "OK" to enter the slot.
1 – Single needle
2 - Double needle
A – Single / double needle button
B - Confirmation button
Sewing stitch.
1 - Click the confirmation key after the stitch selection is completed and the machine will enter into the work mode.
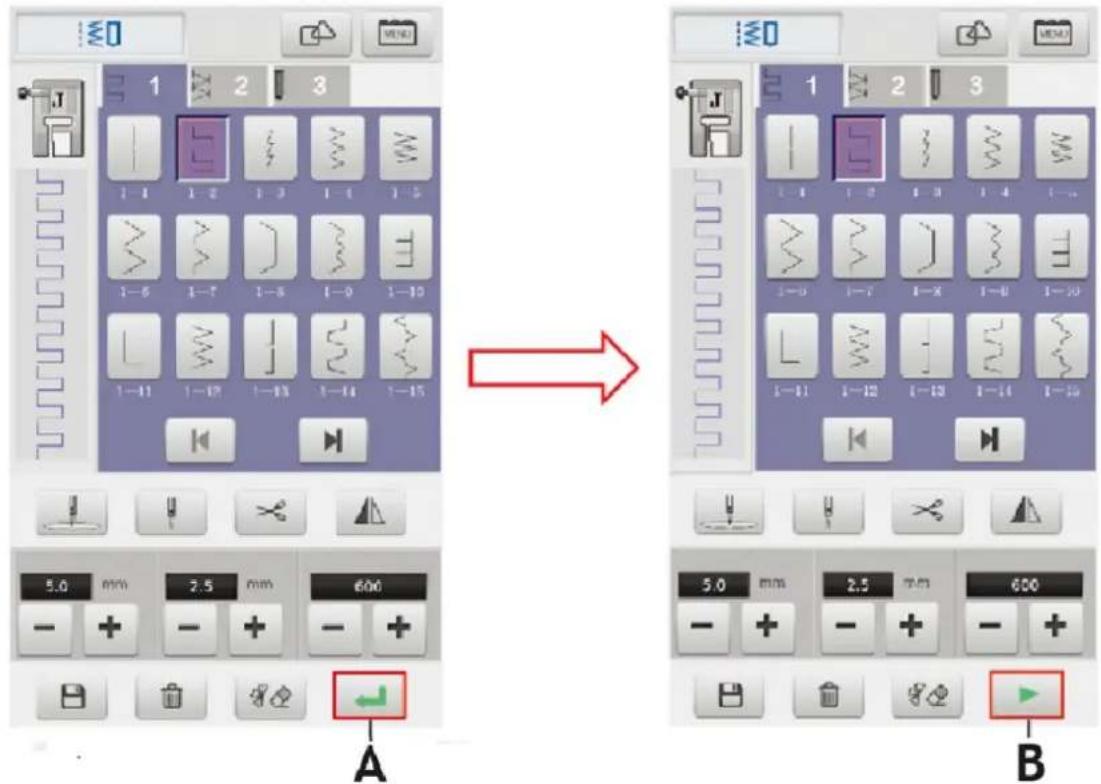
A - Confirmation button
B - Start button
2 - Put the thread and the bottom line; put the fabric in place; put down the foot.
3 - Click the start button to start sewing.
4 - Click the cut line after sewing and the automatic section line and bottom line of machine.
5 – Ensure that the needle is lifted at highest position and the cloth is removed to complete the sewing operation.
The user must correctly use the corresponding function to press the foot, otherwise it may result in unstitching or breakage of the needle causing injury.
Embroidery preparation
The user must use embroidery to press the foot for embroidery operation, otherwise it will not be embroidered.
The user should choose the use of embroidery with different embroidery patterns and embroidery patterns. Suitable embroidery thread, the embroidery thread of different specifications and sizes is not the same effect, it is suggested that the user should use qualified embroidery thread
natural_image
Simple diagram of a switch with a blue arrow pointing to the left side (no text or symbols)
natural_image
Pure diagram of a mechanical or fluidic component with no text, numbers, or symbols
natural_image
Diagram showing mechanical assembly with arrows indicating motion (no text or symbols)
natural_image
Line drawing of a mechanical device with a handle and lever mechanism (no text or symbols)
natural_image
Illustration of a robotic arm with motion arrows indicating movement (no text or symbols)
natural_image
Illustration of a robotic arm with a blue arrow indicating rotation (no text or symbols)
natural_image
Line drawing of a sewing machine needle with a hand operating it (no text or symbols)
natural_image
Illustration of a hand using a tool to press or install a mechanical component, with an arrow indicating motion (no text or symbols present)
natural_image
Simple line drawing of a two-tiered plastic container with a blue arrow indicating rotation (no text or symbols)
natural_image
Simple diagram of a square plate with a dashed oval and a small arrow at the bottom (no text or symbols)

natural_image
Simple line drawing of a square mechanical component with a blue arrow indicating rotation (no text or symbols)
natural_image
Line drawing of a sewing machine needle stitching fabric, showing no text or symbols

| A | Setting Key |
| B | Combination Key |
| C | Pattern Edit |
| D | Embroidery function icon |
| E | Build-in embroidery pattern |
| F | Hollow Letters, Numbers |
| G | The type of USB input |
| H | Delete key |
| I | Erase Key |
| J | Border pattern |
| K | Letters, Numbers, symbols |
| L | Return to the main interface |
| M | Fancy letters |
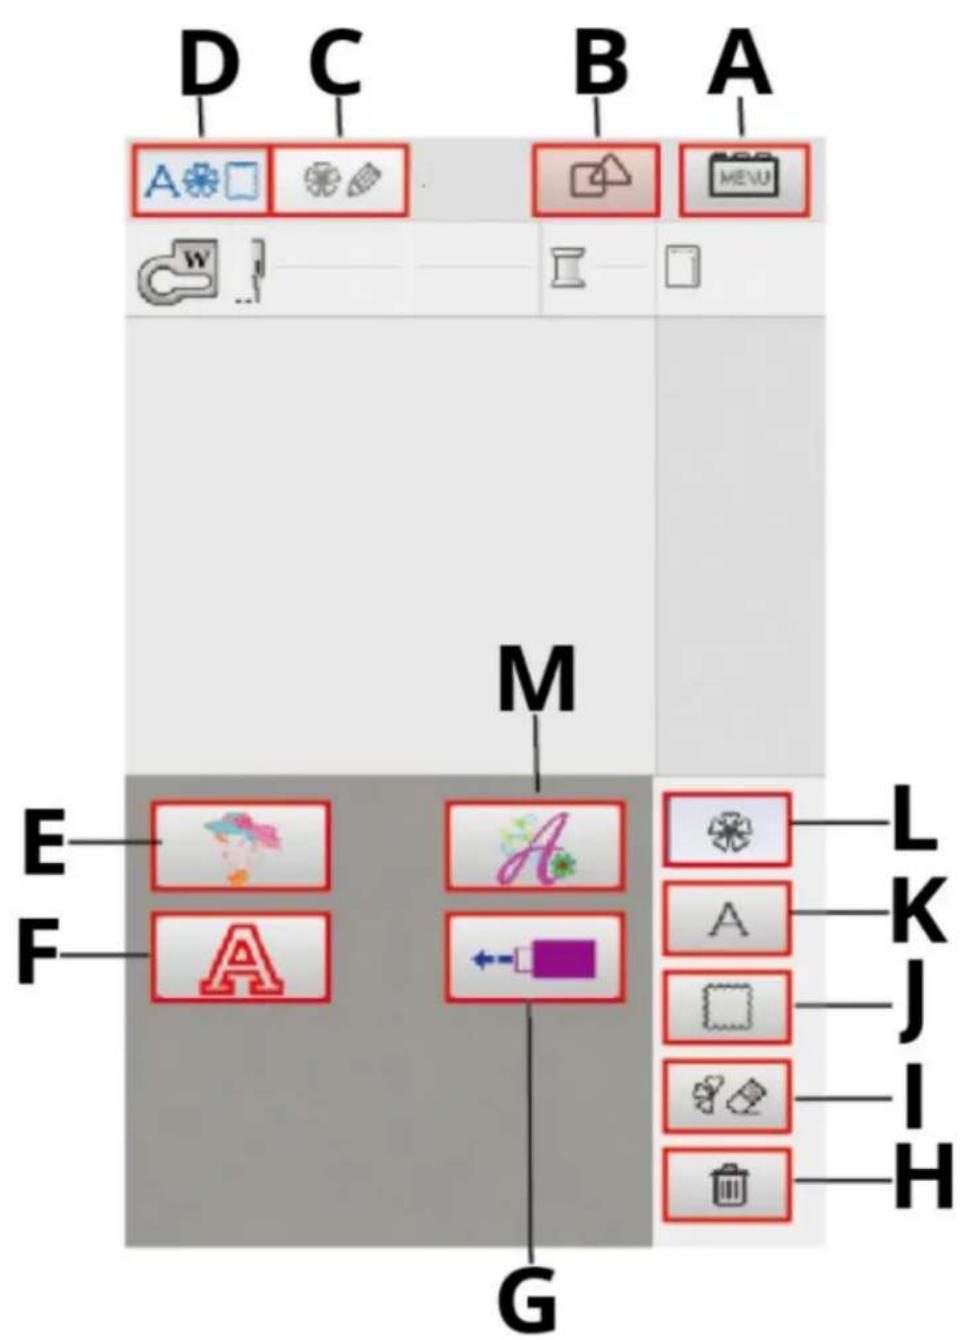
Choice embroidery pattern
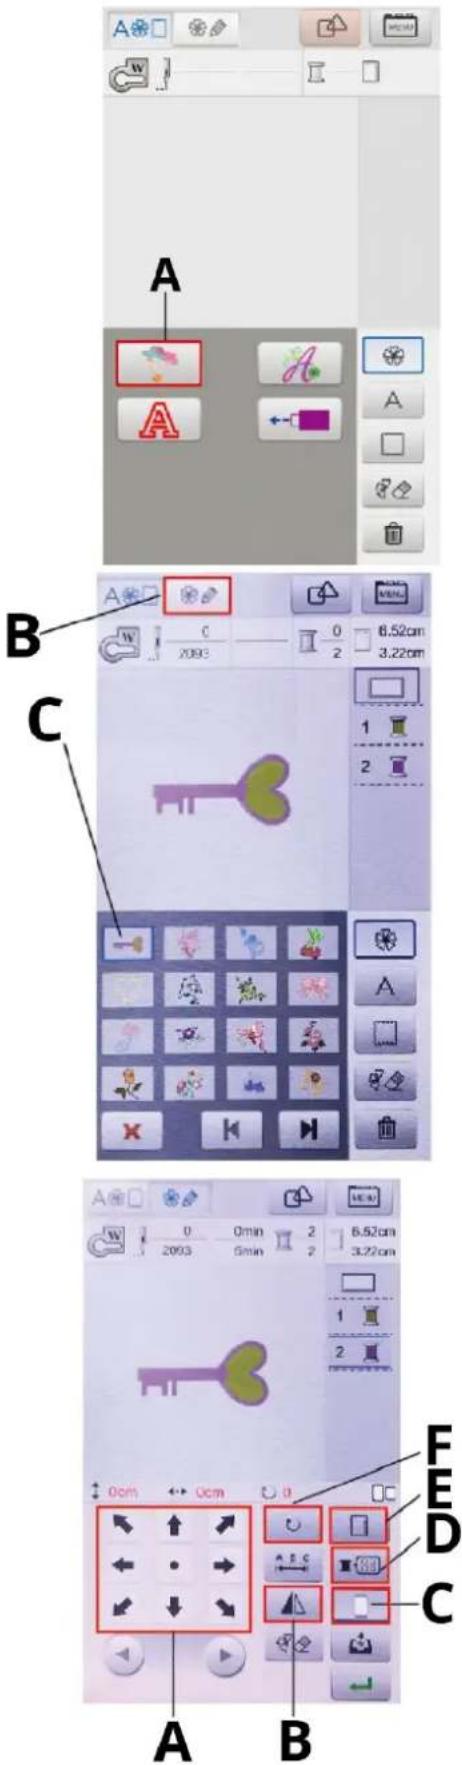
1 Turn on the power and enter the main interface of embroidery
2 Click A (the build-in embroidery pattern button) to enter the pattern selection interface
3 Embroidery pattern selection interface, the user can find the choice There needs to be embroidery. 4 Select a pattern C that requires embroidery and click on the screen Top B (the pattern edit key), enter pattern edit interface.
C- example of embroidery pattern
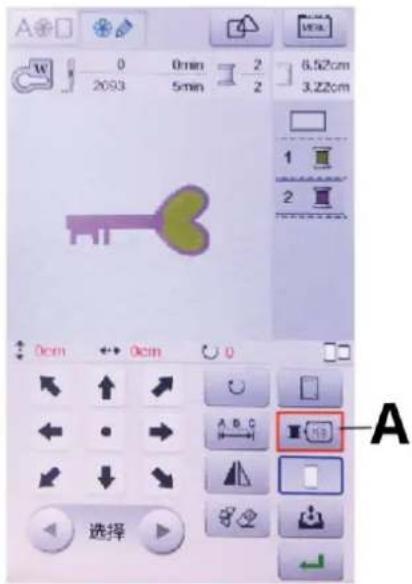
5 The pattern editing interface allows the user to select and edit patterns based on their needs. Functions include repositioning (A), mirroring (B), embroidery frame size adjustment (C), color matching simulation (D), zooming (E) and rotation (F).
Simulation match colors
1 To enter the pattern color matching simulation interface, click the "Simulate Color" button (A) on the pattern editing interface.
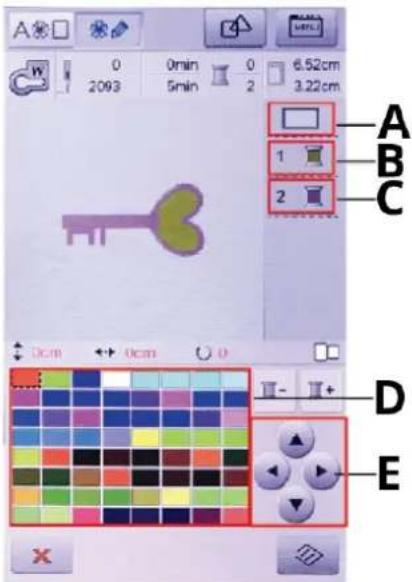
2 In the color matching simulation interface, the user can simulate the pattern's background and embroidery thread colors according to their needs. This allows users to accurately understand the embroidery effect with different background colors and thread choices.
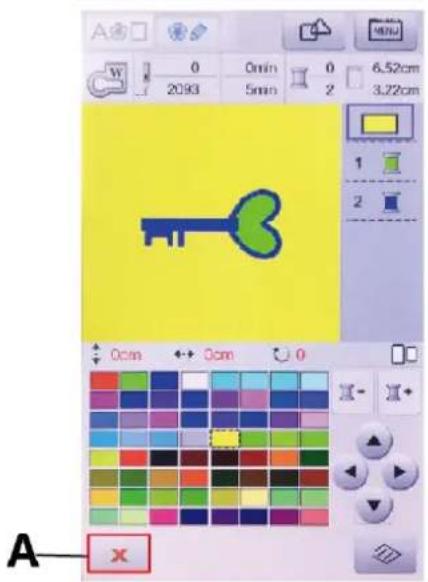
3 Click on the background color (A) and then click on the color selection button (E). Choose the background color you need from palette (D).
4 Click the embroidery thread color 1 (B) or 2 (C) and then click the color selection button (E) to select the desired stitch color from palette (D)
5 After color matching, click the Return button (A) below the screen to go back to the pattern editing interface.
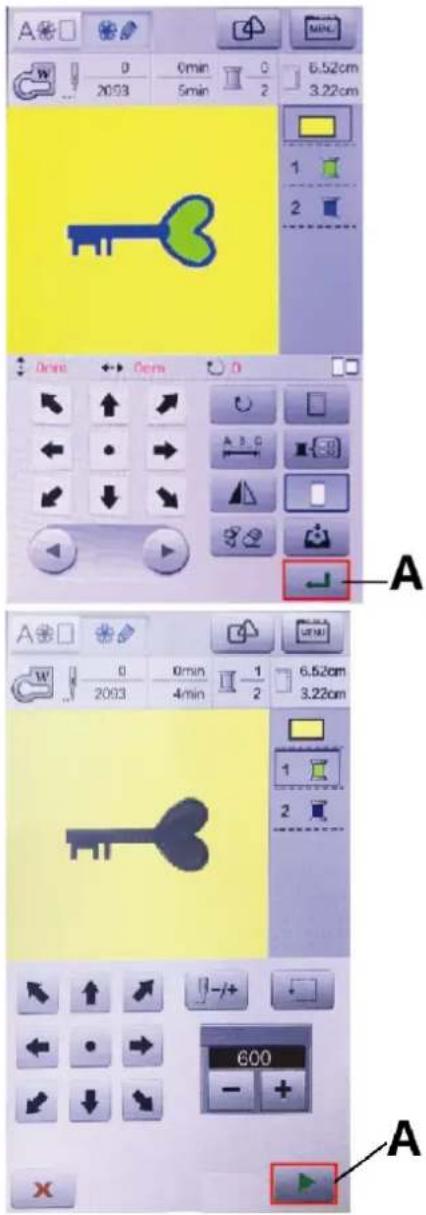
6 Once you have chosen or edited the patterns, click the Confirm button (A) at the bottom right of the screen to enter the embroidery flow execution interface.
7 In the embroidery interface, after users have confirmed that the upper thread, bobbin thread, presser foot, and embroidery frame are correctly installed, they can start the embroidery by clicking the Start button (A) at the bottom right of the screen or by pressing the start/stop button on the machine cover.
When the machine is embroidering with multiple colors, it will stop after each color to wait for a thread change.
8 After embroidery, cut the upper and bottom threads, lift the presser foot, and remove the embroidery frame to complete the embroidery operation.
USB Input
The machine only supports custom designs in the input *.DST format
The user should ensure that the input pattern size does not exceed the machine's maximum sewing size when entering a custom pattern.
Please use only letters of numbers for the name of custom pattern file.
natural_image
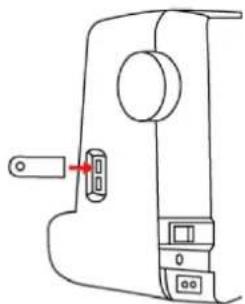
Line drawing of a sewing machine handle with a key inserted (no text or symbols)1 Insert USB flash drive with *.DST embroidery file into the USB port of the machine.
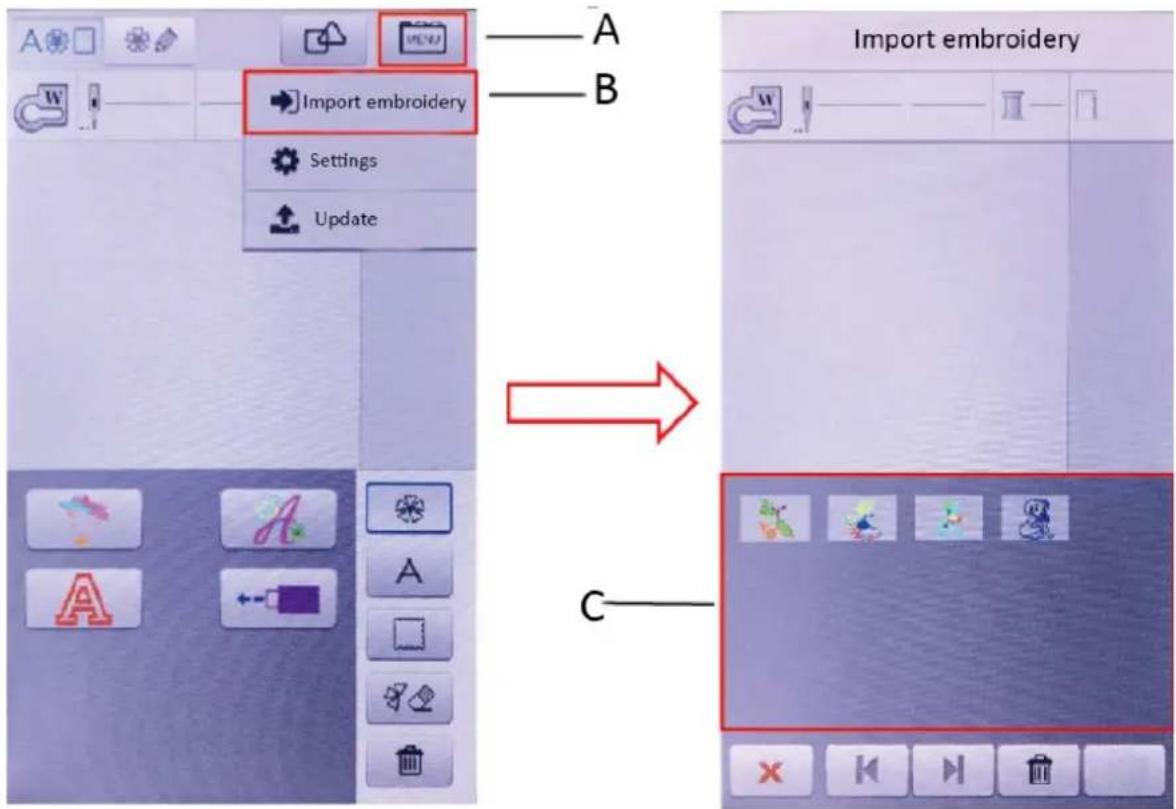
2 Enter the main embroidery interface, click the MENU key (A) in the top right corner of the screen, then select Import embroider (B) Enter the USB storage section, and the machine screen will display the pattern files stored (C) on the USB drive.
After inserting the USB flash drive, the user will need to wait for the machine to recognize it. If there is no pattern import option or if it takes a long time to display patterns, the USB flash drive might be damaged. Please replace the USB flash drive and try again. If the screen displays an empty USB disk file list, it is possible that there are no files on the USB drive or that the file format is incorrect and cannot be recognized by the machine. Please check the USB drive and re-enter the operation after confirming the files and format.
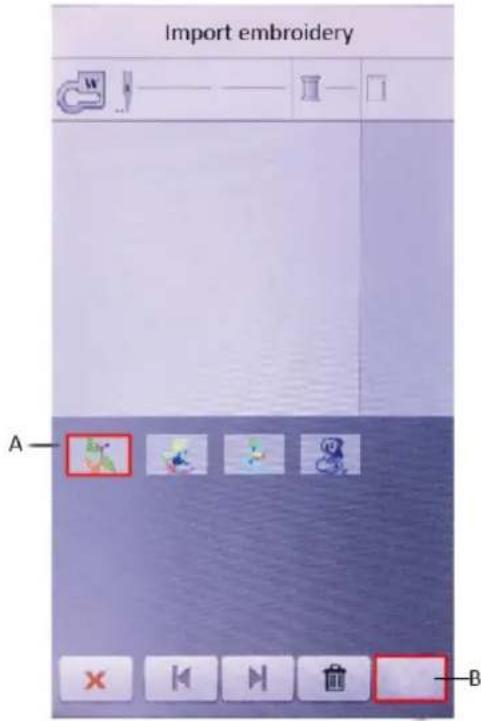
3 Click on the embroidery pattern file that needs to be imported (A), then click the Import button (B) at the bottom right of the screen to import the pattern into the machine.
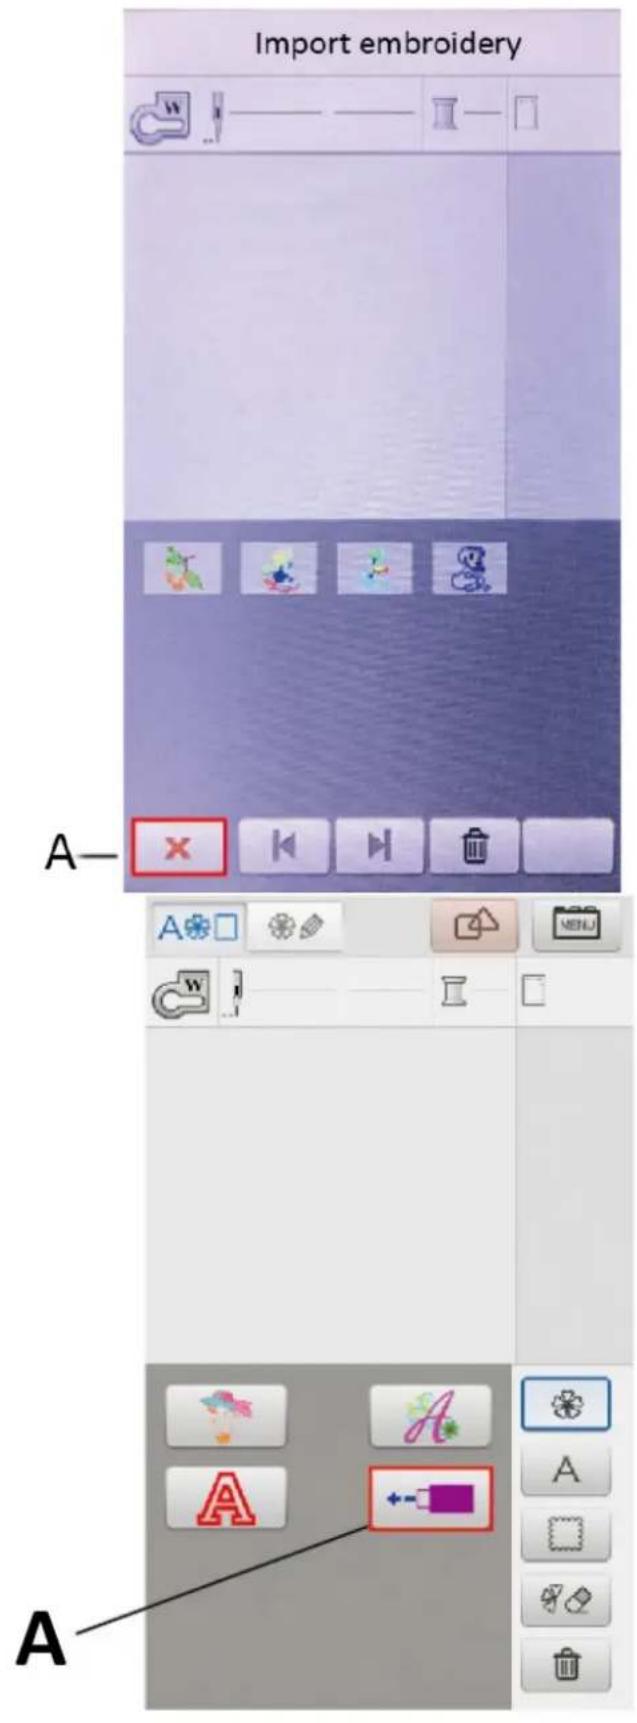
4 After the import is complete, click the return button (A) to return to the main embroidery interface.
5 In the main embroidery interface, click on the USB icon (A) on the screen to view the imported embroidery files.
Pattern deletion
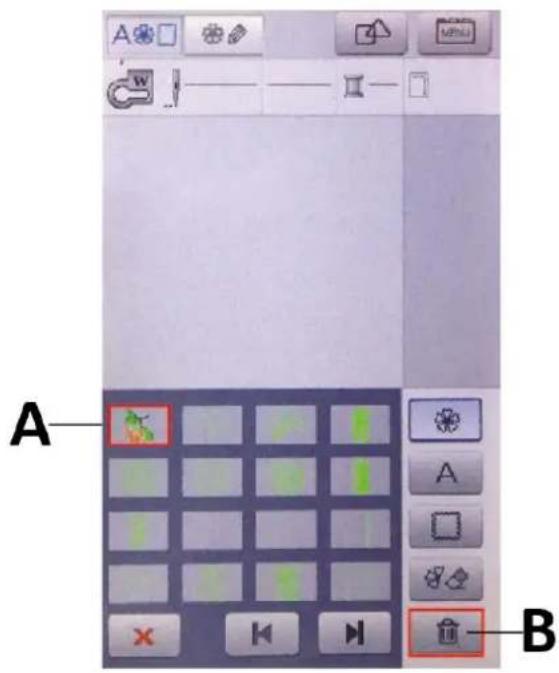
1 Click the USB flash drive icon in the main embroidery interface
2 Select the pattern (A) that needs to be deleted
3 Press the delete key (B)
3.4. Cleaning and maintenance
a) Unplug the mains plug and allow the device to cool completely before each cleaning, adjustment or replacement of accessories, or if the device is not being used.
• Wait for the rotating elements to stop.
b) Always unplug the device before cleaning or putting it away.
c) Use only non-corrosive cleaners to clean the surface.
d) Use only mild, food-safe detergents to wash the device.
e) After cleaning the device, all parts should be dried completely before using it again.
f) Store the unit in a dry, cool place, free from moisture and direct exposure to sunlight.
g) Do not spray the device with a water jet or submerge it in water.
h) Do not allow water to get inside the device through vents in the housing of the device.
i) Clean the vents with a brush and compressed air.
j) The device must be regularly inspected to check its technical efficiency and spot any damage.
k) Use a soft cloth for cleaning.
I) Use a soft, damp cloth for cleaning.
m) Do not use sharp and/or metal objects for cleaning (e.g. a wire brush or a metal spatula) because they may damage the surface material of the appliance.
n) Do not clean the device with an acidic substance, agents of medical purposes, thinners, fuel, oils or other chemical substances because it may damage the device.
DISPOSING OF USED DEVICES:
Do not dispose of this device in municipal waste systems. Hand it over to an electric and electrical device recycling and collection point. Check the symbol on the product, instruction manual and packaging. The plastics used to construct the device can be recycled in accordance with their markings. By choosing to recycle you are making a significant contribution to the protection of our environment.
Contact local authorities for information on your local recycling facility.
TROUBLESHOOTING:
| Problem | Possible cause | Solution |
| Broken Thread | The threads are not properly threaded | Thread properly |
| Excessive surface tension | Adjust the tension | |
| The thread has a knot | Remove knotted parts or replace threads | |
| Excessive surface tension | Install the needle correctly | |
| The inner bobbin case scratched the thread | Change or adjust the bobbin case | |
| The machine needle is not installed correctly | Install the needle correctly | |
| Stranded Thread | The thread path is incorrect | Thread properly |
| Surface tension is too small | Adjust the tension | |
| Jump Stitch | The machine pin model does not match | Use the right needle |
| Needle bending | Replace the needle | |
| The machine needle is not installed correctly | Install the needle correctly | |
| The needle is not properly installed | Install the needle correctly | |
| The thread is not properly threaded | Thread properly | |
| The tension is too high | Adjust the tension | |
| Not Feeding | The sewing length is set to 0 | Set the appropriate length of the needle |
| The feed tooth height is too low | Raise the feed tooth height | |
| Fabric knotted at the bottom | Clean the machine | |
| Embroidery Misalignment | The frame was not clamped correctly | Clamp the fabric correctly |
| There is no liner under the cloth | Add lining when embroidering | |
| The fabric is too heavy or pulled, causing the arms to move | Use appropriate cushions to maintain the height of the embroidery arm | |
| The thread wraps around the foot | Don't let threads wrap around the foot during embroidery | |
| Thread slack | Pay attention to cutting excess threads during embroidery |

A - Przycisk Start/Stop
natural_image
Simple line drawing of a wall-mounted electrical outlet with a blue arrow pointing to the outlet (no text or symbols)
natural_image
Pure diagram of a mechanical or fluidic component with no text, numbers, or symbols
natural_image
Simple line drawing of a mechanical device with a rotating wheel and lever (no text or symbols)


natural_image
Illustration of hands using a tool to adjust or install a mechanical component (no text or symbols visible)


natural_image
Illustration of hands performing a medical procedure on a needle inserted into a tube (no text or symbols present)


natural_image
Technical line drawing of a mechanical assembly with no visible text or symbols
natural_image
Pure technical diagram of two parallel plates with a vertical double-headed arrow indicating width (no text or symbols)1
2
2-1

natural_image
Mechanical assembly diagram showing a lever and mounting bracket with a blue arrow indicating direction (no text or symbols)3
natural_image
Simple line drawing of a mechanical device with rotating components and directional arrows (no text or symbols)3-1

natural_image
Mechanical diagram showing a rotating shaft and motor assembly with directional arrows (no text or labels)3-2

4

5

natural_image
Diagram of a mechanical assembly with a blue arrow indicating direction (no text or symbols present)6

natural_image
Illustration of hands performing a mechanical operation with blue arrows indicating motion (no text or symbols)

natural_image
Line drawing of a mechanical assembly with a spring and base mount (no text or symbols)
natural_image
Mechanical diagram showing a rotating component with motion arrows, no text or symbols present

natural_image
Diagram of a cable or connector being inserted into a pipe, showing no text or symbols
natural_image
Mechanical diagram showing a valve assembly with a pump and directional arrows (no text or symbols)
natural_image
Illustration of a mechanical device with a blue arrow pointing to the shaft (no text or symbols)
natural_image
Line drawing of a hand holding a small object with fingers, no text or symbols present
natural_image
Illustration of a hand holding a device with a blue circular component and a blue arrow indicating rotation (no text or symbols)
natural_image
Mechanical assembly diagram showing a motor with rotating arm and housing (no text or symbols)
SZYCIE
C

natural_image
Line drawing of a sewing machine handle with a knob and control buttons (no text or symbols)ROZWIĄZYWANIE PROBLEMÓW:
A – Tlačitko Start/Stop
natural_image
Simple line drawing of a wall-mounted electrical outlet with a blue arrow pointing to the outlet (no text or symbols)
natural_image
Pure diagram of a mechanical or fluidic component with no text, numbers, or symbols
natural_image
Simple line drawing of a mechanical device with a rotating wheel and lever, no text or symbols present.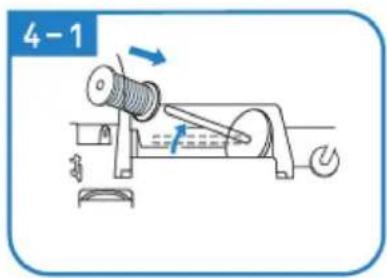

natural_image
Illustration of hands using a tool to adjust or install a mechanical component (no text or symbols present)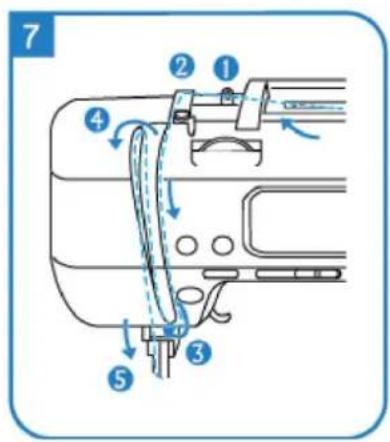
natural_image
Illustration of hands performing a medical procedure with a tool (no text or symbols present)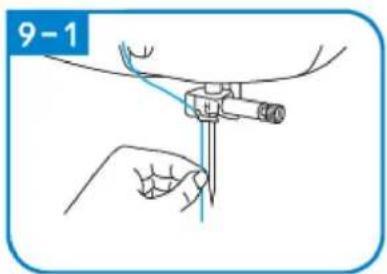


natural_image
Technical line drawing of a mechanical assembly with no visible text or symbols
natural_image
Pure technical diagram of two parallel plates with a vertical double-headed arrow indicating width (no text or symbols)1

2

2-1

natural_image
Mechanical assembly diagram showing a lever mechanism with a blue arrow indicating motion (no text or symbols present)3

natural_image
Mechanical diagram showing a rotating device with a blue arrow indicating rotational direction (no text or symbols)3-1
natural_image
Mechanical diagram showing a rotating shaft and gear mechanism with directional arrows (no text or labels)3-2

4

5
natural_image
Diagram of a mechanical assembly with a blue arrow indicating direction (no text or symbols present)6
natural_image
Illustration of hands performing a mechanical operation with blue arrows indicating motion (no text or symbols)
natural_image
Line drawing of a mechanical assembly with a spring and base mount (no text or symbols)
natural_image
Mechanical diagram showing a rotating component with motion arrows, no text or symbols present


natural_image
Diagram of a cable or connector being inserted into a pipe, showing no text or symbols
natural_image
Mechanical diagram showing a valve assembly with a pump and directional arrows (no text or symbols)
natural_image
Illustration of a mechanical device with a blue arrow pointing to the shaft (no text or symbols)
natural_image
Line drawing of a hand holding a small object with fingers, no text or symbols present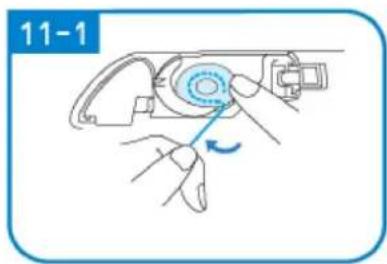
natural_image
Illustration of hands using a mechanical device to adjust a circular component, with no visible text or symbols.
natural_image
Mechanical assembly diagram showing a motor with rotating arm and housing (no text or symbols)
ŠITÍ
natural_image
Diagram of a sewing machine needle with red and green thread paths (no text or labels)
natural_image
Simple line drawing of a wall-mounted electrical outlet with a blue arrow pointing to the outlet (no text or symbols)
natural_image
Pure diagram of a mechanical or fluidic component with no text, numbers, or symbols
natural_image
Diagram of a mechanical device with rotating components and directional arrows (no text or symbols)


natural_image
Line drawing of hands using a tool to adjust or install a mechanical component (no text or symbols)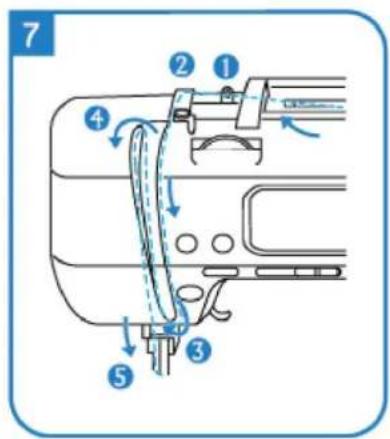


natural_image
Illustration of hands holding a medical instrument with blue tubing, no text or symbols present


natural_image
Technical line drawing of a mechanical assembly with no visible text or symbols

natural_image
Simple line drawing of a light blue electrical outlet with a black square inside, enclosed in a rounded rectangular frame (no text or symbols)
natural_image
Line drawing of a hand holding a mechanical component with a lever (no text or symbols)
natural_image
Mechanical diagram showing a lever mechanism with a rotating component and a blue arrow indicating direction (no text or symbols)
natural_image
Diagram of a mechanical device with rotating components and directional arrows (no text or symbols)


natural_image
Diagram showing a hand operating a mechanical device with a blue arrow indicating direction (no text or symbols present)
natural_image
Illustration of hands using a tool to adjust a mechanical component (no text or symbols visible)

natural_image
Line drawing of a mechanical assembly with a spring and base mount (no text or symbols)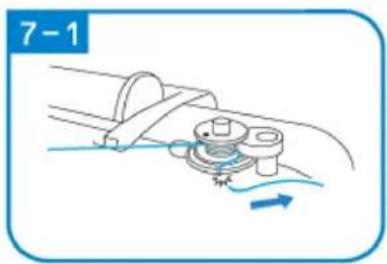
natural_image
Diagram of a mechanical assembly with a rotating component and fluid flow, no text or symbols present


natural_image
Diagram of a cable or wire connection with a spring and rope, no text or symbols present

natural_image
Illustration of a mechanical tool or device with a blue arrow pointing to it, no text or symbols present.
natural_image
Line drawing of a hand holding a small mechanical component, no text or symbols present
natural_image
Illustration of hands using a tool to adjust a mechanical component (no text or symbols visible)
natural_image
Mechanical assembly diagram showing a motor with rotating arm and housing (no text or symbols)
COUTURE
C

natural_image
Pure mechanical diagram showing a tool or component with red and green lines indicating motion paths (no text or symbols)natural_image
Simple diagram of a switch with a blue arrow pointing to the left side (no text or symbols)
natural_image
Pure diagram of a mechanical or fluidic component with no text, numbers, or symbols
natural_image
Diagram showing mechanical assembly with arrows indicating motion (no text or symbols)
natural_image
Line drawing of a mechanical device with a handle and lever mechanism (no text or symbols)
natural_image
Illustration of a robotic arm with motion arrows indicating movement (no text or symbols)
natural_image
Illustration of a robotic arm with a blue arrow indicating rotation (no text or symbols)
natural_image
Line drawing of a sewing machine needle with a hand operating it (no text or symbols)
natural_image
Illustration of a hand using a tool to press or install a mechanical component, with an arrow indicating motion (no text or symbols present)
natural_image
Simple line drawing of a two-tiered plastic container with a blue arrow indicating rotation (no text or symbols)
natural_image
Simple diagram of a square plate with a dashed oval and a small arrow at the bottom (no text or symbols)

natural_image
Simple line drawing of a square mechanical component with a blue arrow indicating rotation (no text or symbols)
natural_image
Line drawing of a sewing machine needle stitching fabric, showing no text or symbols


UN - Schermo
B - Volantino
natural_image
Simple line drawing of a wall-mounted electrical outlet with a blue arrow pointing to the outlet (no text or symbols)
natural_image
Pure diagram of a mechanical or fluidic component with no text, numbers, or symbols

natural_image
Diagram of a mechanical device with rotating components and directional arrows (no text or symbols)


natural_image
Illustration of hands using a tool to adjust or install a mechanical component (no text or symbols visible)
natural_image
Line drawing of hands using a tool to adjust or install a mechanical component (no text or symbols)

natural_image
Illustration of hands holding a medical instrument with blue tubing, no text or symbols present


natural_image
Mechanical assembly diagram showing a foot and arm mechanism (no text or symbols)

natural_image
Simple line drawing of a box mounted on a wall, no text or symbols present
natural_image
Line drawing of a hand holding a mechanical component with a lever and base (no text or symbols)
natural_image
Diagram of a mechanical clamp or bracket assembly with a blue arrow indicating direction (no text or symbols)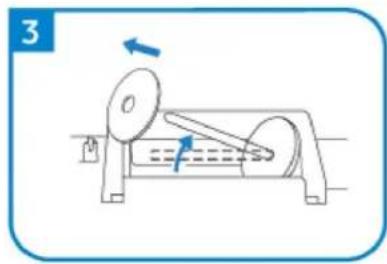
natural_image
Diagram of a mechanical device with rotating components and directional arrows (no text or symbols)


natural_image
Line drawing of a mechanical assembly with a blue arrow indicating a downward motion (no text or symbols)
natural_image
Illustration of hands performing a mechanical operation with arrows indicating motion (no text or symbols)

natural_image
Line drawing of a mechanical assembly with a spring and base mount (no text or symbols)
natural_image
Diagram of a mechanical assembly with a rotating component and fluid flow, no text or symbols present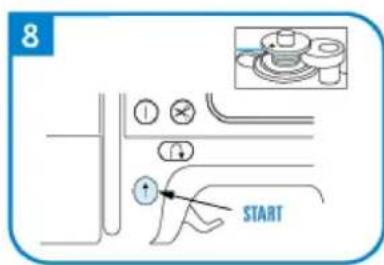


natural_image
Diagram of a cable or wire connection with a spring and rope, no text or symbols present

natural_image
Illustration of a mechanical tool or device with a blue arrow pointing to it, no text or symbols present.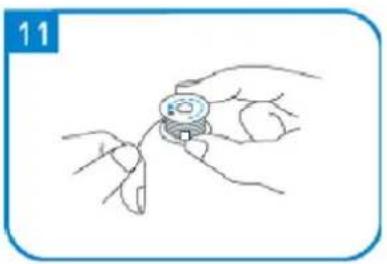
natural_image
Line drawing of a hand holding a small mechanical component, no text or symbols present
natural_image
Illustration of hands using a tool to adjust a mechanical component (no text or symbols visible)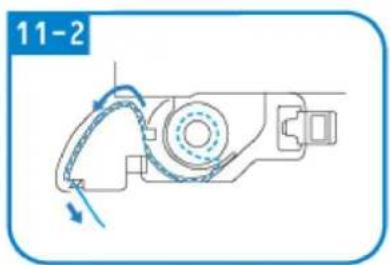
natural_image
Mechanical assembly diagram showing a motor with rotating arm and housing (no text or symbols)
CUCIRE
natural_image
Pure mechanical diagram showing a tool or component with red and green lines indicating motion paths (no text or symbols)natural_image
Simple diagram of a switch with an arrow pointing to the left side (no text or symbols)
natural_image
Pure diagram of a mechanical or fluidic component with no text, numbers, or symbols
natural_image
Diagram showing mechanical assembly with arrows indicating motion (no text or symbols)
natural_image
Line drawing of a mechanical device with a handle and lever mechanism (no text or symbols)
natural_image
Illustration of a robotic arm with motion arrows indicating movement (no text or symbols)
natural_image
Illustration of a robotic arm with a blue arrow indicating rotation (no text or symbols)
natural_image
Line drawing of a sewing machine needle with a hand operating it (no text or symbols)
natural_image
Illustration of a hand using a tool to press or install a mechanical component, with no visible text or symbols.
natural_image
Simple line drawing of a two-tiered plastic container with a blue arrow indicating rotation (no text or symbols)
natural_image
Simple diagram of a square plate with a dashed oval and a small arrow at the bottom (no text or symbols)

natural_image
Simple line drawing of a square mechanical component with a blue arrow indicating rotation (no text or symbols)
natural_image
Line drawing of a sewing machine needle stitching fabric, showing no text or symbols
A - Mostrar
B - Volante
C - Devanador
natural_image
Simple line drawing of a wall-mounted electrical outlet with a blue arrow pointing to the outlet (no text or symbols)
natural_image
Diagram of a mechanical or fluidic component with no visible text, numbers, or symbols

natural_image
Diagram of a mechanical device with rotating components and directional arrows (no text or symbols)


natural_image
Line drawing of hands using a tool to adjust or install a mechanical component (no text or symbols)


natural_image
Illustration of hands holding a medical instrument with blue tubing, no text or symbols present


natural_image
Mechanical assembly diagram showing a foot and arm mechanism (no text or symbols)
natural_image
Simple line drawing of a light blue electrical outlet with a black square inside, enclosed in a rounded rectangular frame (no text or symbols)
natural_image
Line drawing of a hand holding a mechanical component with a lever (no text or symbols)
natural_image
Mechanical diagram showing a lever mechanism with a rotating component and a blue arrow indicating direction (no text or symbols)
natural_image
Diagram of a mechanical device with rotating components and directional arrows (no text or symbols)


natural_image
Line drawing of a mechanical assembly with a blue arrow indicating a downward motion (no text or symbols)
natural_image
Illustration of hands performing a mechanical operation with arrows indicating motion (no text or symbols)

natural_image
Line drawing of a mechanical assembly with a spring and base mount (no text or symbols)
natural_image
Diagram of a mechanical assembly with a rotating component and fluid flow, no text or symbols present


natural_image
Diagram of a cable or wire connection with a spring and rope, no text or symbols present

natural_image
Illustration of a mechanical tool or device with a blue arrow pointing to it, enclosed in a rounded square frame (no text or symbols)
natural_image
Line drawing of a hand holding a small mechanical component, no text or symbols present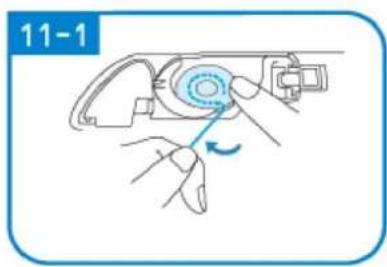
natural_image
Illustration of a hand using a tool to adjust a device (no text or symbols visible)
natural_image
Mechanical assembly diagram showing a rotating component with directional arrows (no text or symbols)
DE COSER
natural_image
Simple diagram of a switch with an arrow pointing to the left side (no text or symbols)
natural_image
Pure diagram of a mechanical or fluidic component with no text, numbers, or symbols
natural_image
Diagram showing mechanical assembly with arrows indicating motion (no text or symbols)
natural_image
Line drawing of a mechanical device with a handle and lever mechanism (no text or symbols)
natural_image
Illustration of a robotic arm with directional arrows indicating movement (no text or symbols)
natural_image
Illustration of a robotic arm with a blue arrow indicating rotation (no text or symbols)
natural_image
Line drawing of a sewing machine needle with a hand operating it (no text or symbols)
natural_image
Illustration of a hand using a tool to press or install a mechanical component, with no visible text or symbols.
natural_image
Simple line drawing of a two-tiered plastic container with a blue arrow indicating rotation (no text or symbols)
natural_image
Simple diagram of a square plate with a dashed oval and a small arrow at the bottom (no text or symbols)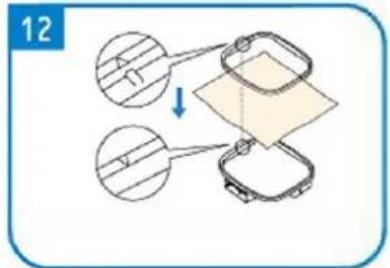

natural_image
Simple line drawing of a square component with a curved arrow indicating rotation (no text or symbols)
natural_image
Line drawing of a sewing machine needle stitching fabric, showing no text or symbols

A - kijelző
B - kézikerék
C - Orsótekercselő
A - Start/Stop gomb
natural_image
Simple line drawing of a wall-mounted electrical outlet with a blue arrow pointing to the outlet (no text or symbols)
natural_image
Pure diagram of a mechanical or fluidic component with no text, numbers, or symbols

natural_image
Diagram of a mechanical device with rotating components and directional arrows (no text or symbols)


natural_image
Line drawing of hands using a tool to adjust or install a mechanical component (no text or symbols)


natural_image
Illustration of hands holding a medical instrument with blue tubing, no text or symbols present


natural_image
Technical line drawing of a mechanical assembly with no visible text or symbols

natural_image
Simple line drawing of a light blue electrical outlet with a black square inside, enclosed in a rounded rectangular frame (no text or symbols)
natural_image
Line drawing of a hand holding a mechanical component with a lever (no text or symbols)
natural_image
Mechanical diagram showing a lever mechanism with a rotating component and a blue arrow indicating direction (no text or symbols)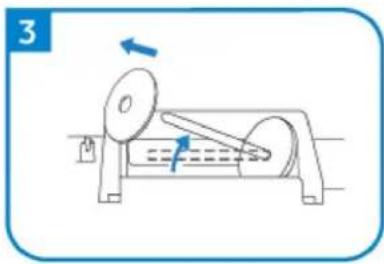
natural_image
Diagram of a mechanical device with rotating components and directional arrows (no text or symbols)

VARRÁS
C

natural_image
Pure mechanical diagram showing a tool or component with red and green lines indicating motion paths (no text or symbols)natural_image
Simple diagram of a switch with an arrow pointing to the left side (no text or symbols)
natural_image
Pure diagram of a mechanical or fluidic component with no text, numbers, or symbols
natural_image
Diagram showing mechanical assembly with arrows indicating motion (no text or symbols)
natural_image
Line drawing of a mechanical device with a handle and lever mechanism (no text or symbols)
natural_image
Illustration of a robotic arm with motion arrows indicating movement (no text or symbols)
natural_image
Illustration of a robotic arm with a blue arrow indicating rotation (no text or symbols)
natural_image
Line drawing of a sewing machine needle with a hand operating it (no text or symbols)
natural_image
Illustration of a hand using a tool to press or install a mechanical component, with no visible text or symbols.
natural_image
Simple line drawing of a two-tiered plastic container with a blue arrow indicating rotation (no text or symbols)
natural_image
Simple diagram of a square plate with a dashed oval and a small arrow at the bottom (no text or symbols)

natural_image
Simple line drawing of a square mechanical component with a blue arrow indicating rotation (no text or symbols)
natural_image
Line drawing of a sewing machine needle stitching fabric, showing no text or symbols
natural_image
Line drawing of a sewing machine handle with a circular knob and a red arrow pointing to the handle (no text or symbols)A - Display
B - Håndhjul
C - Spolemaskine
A - Start/stop-knap
B - Knap i bagsømmen
C - Skæreknap

Line cap stor, medium lille
Trykfod til broderi

Skærekniv/børs
te

Skruetrækker
Nål
Spolen
Skruenøgle

Pincet Stylus Saks
Broderet ramme
Broderet ramme
Rullelinje
APPARATETS PLACERING
natural_image
Simple line drawing of a wall-mounted electrical socket with a blue arrow pointing to the socket (no text or symbols)
natural_image
Pure diagram of a mechanical or fluidic component with no text, numbers, or symbols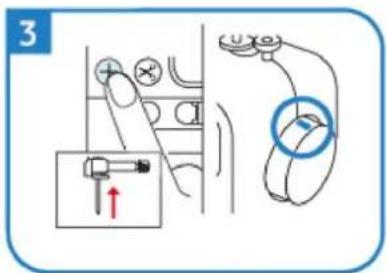
natural_image
Simple line drawing of a mechanical device with rotating components and directional arrows (no text or symbols)


natural_image
Illustration of hands using a tool to adjust or install a mechanical component (no text or symbols visible)


natural_image
Illustration of hands performing a medical procedure with a tool (no text or symbols present)


natural_image
Technical line drawing of a mechanical assembly with no visible text or symbols
natural_image
Pure technical diagram of two parallel plates with a vertical double-headed arrow indicating width (no text or symbols)1
2

2-1

natural_image
Mechanical assembly diagram showing a lever mechanism with a blue arrow indicating motion (no text or symbols present)3

natural_image
Mechanical device diagram showing a rotating shaft and housing with directional arrows indicating motion (no text or symbols)3-1

natural_image
Mechanical diagram showing a rotating shaft and gear mechanism with directional arrows (no text or labels)3-2
4
5

natural_image
Diagram of a mechanical assembly with a blue arrow indicating direction (no text or symbols present)6

natural_image
Illustration of hands performing a mechanical operation with blue arrows indicating motion (no text or symbols)

natural_image
Line drawing of a mechanical assembly with a spring and base mount (no text or symbols)
natural_image
Mechanical diagram showing a rotating component with motion arrows, no text or symbols present


natural_image
Diagram of a cable or connector being inserted into a pipe, showing no text or symbols
natural_image
Mechanical diagram showing a valve assembly with a pump and directional arrows (no text or symbols)
natural_image
Illustration of a mechanical device with a blue arrow pointing to the shaft (no text or symbols)
natural_image
Line drawing of a hand holding a small object with fingers, no text or symbols present
natural_image
Illustration of hands using a mechanical tool to adjust a component, no text or symbols present
natural_image
Mechanical assembly diagram showing a motor with rotating arm and housing (no text or symbols)
SYNING
3 - Knaphulssting (9 sting)
Vælg sting
natural_image
Pure mechanical diagram showing a tool or component with red and green lines indicating motion paths (no text or symbols)natural_image
Simple diagram of a switch with a blue arrow pointing to the left side (no text or symbols)
natural_image
Pure diagram of a mechanical or fluidic component with no text, numbers, or symbols
natural_image
Diagram showing mechanical assembly with arrows indicating motion (no text or symbols)
natural_image
Line drawing of a mechanical device with a handle and lever mechanism (no text or symbols)
natural_image
Illustration of a robotic arm with motion arrows indicating movement (no text or symbols)
natural_image
Illustration of a robotic arm with a blue arrow indicating rotation (no text or symbols)
natural_image
Line drawing of a sewing machine needle with a hand operating it (no text or symbols)
natural_image
Illustration of a hand using a tool to press or install a mechanical component, with no visible text or symbols.
natural_image
Simple line drawing of a two-tiered plastic container with a blue arrow indicating rotation (no text or symbols)
natural_image
Simple diagram of a square plate with a dashed oval and a small arrow at the bottom (no text or symbols)

natural_image
Simple line drawing of a square mechanical component with a blue arrow indicating rotation (no text or symbols)
natural_image
Line drawing of a sewing machine needle stitching fabric, showing no text or symbols

natural_image
Line drawing of a sewing machine handle with a circular knob and adjustment knob (no text or symbols)A – Näyttö
A - Start/Stop-painike
B - Takasauman nappi
C – Leikkauspainike
natural_image
Simple line drawing of a wall-mounted electrical outlet with a blue arrow pointing to the outlet (no text or symbols)
natural_image
Pure diagram of a mechanical or fluidic component with no text, numbers, or symbols

natural_image
Simple line drawing of a mechanical device with a rotating wheel and lever (no text or symbols)


natural_image
Illustration of hands using a tool to adjust or install a mechanical component (no text or symbols visible)


natural_image
Illustration of hands performing a medical procedure on a tool, no text or symbols present


natural_image
Technical line drawing of a mechanical assembly with no visible text or symbols
Puolaus ja asennus

natural_image
Pure technical diagram of two parallel plates with a vertical double-headed arrow indicating width (no text or symbols)1
2
2-1

natural_image
Mechanical assembly diagram showing a rotating component with a blue arrow indicating direction (no text or symbols)3

natural_image
Simple line drawing of a mechanical device with rotating components and directional arrows (no text or symbols)3-1
natural_image
Mechanical diagram showing a rotating shaft and motor assembly with directional arrows (no text or labels)3-2
4

5
natural_image
Diagram of a mechanical assembly with a blue arrow indicating direction (no text or symbols present)6
natural_image
Illustration of hands performing a mechanical operation with blue arrows indicating motion (no text or symbols)

natural_image
Line drawing of a mechanical assembly with a spring and base mount (no text or symbols)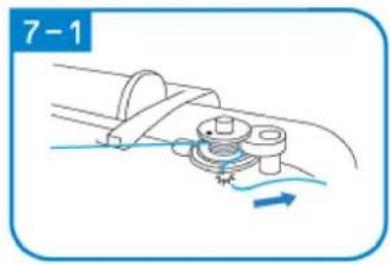
natural_image
Mechanical diagram showing a rotating component with fluid flow direction indicated (no text or symbols)


natural_image
Diagram of a cable or connector being inserted into a pipe, showing no text or symbols

natural_image
Illustration of a mechanical device with a blue arrow pointing to the shaft (no text or symbols)
natural_image
Line drawing of a hand holding a small object with fingers, no text or symbols present

natural_image
Mechanical assembly diagram showing a motor with rotating arm and housing (no text or symbols)
OMPELU
natural_image
Pure mechanical diagram showing a clamping tool with red and green lines indicating motion paths (no text or symbols)natural_image
Line drawing of a sewing machine handle with a red arrow pointing to the keyhole (no text or symbols present)
A - Weergave
B - Handwiel
C - Spoelopwinder
PLAATS VAN HET APPARAAT
natural_image
Simple line drawing of a wall-mounted electrical outlet with a blue arrow pointing to the outlet (no text or symbols)
natural_image
Pure diagram of a mechanical or fluidic component with no text, numbers, or symbols
natural_image
Diagram of a mechanical device with rotating components and directional arrows (no text or symbols)


natural_image
Illustration of hands using a tool to adjust or install a mechanical component (no text or symbols visible)
natural_image
Illustration of hands using a tool to adjust or install a mechanical component (no text or symbols visible)


natural_image
Illustration of two hands holding a medical instrument with blue lines indicating force or procedure (no text or symbols)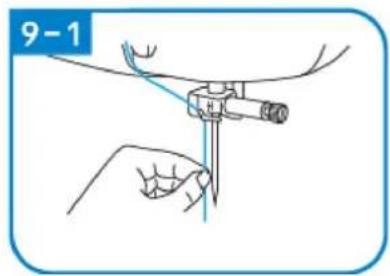


natural_image
Mechanical assembly diagram showing a foot and arm mechanism (no text or symbols)
natural_image
Simple line drawing of a light blue electrical outlet with a label '1' (no text or symbols on the outlet itself)
natural_image
Line drawing of a hand holding a mechanical component with a lever and base (no text or symbols)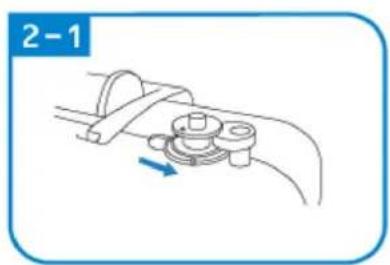
natural_image
Diagram of a mechanical clamp or bracket assembly with a blue arrow indicating direction (no text or symbols)
natural_image
Diagram of a mechanical device with rotating components and directional arrows (no text or symbols)


natural_image
Line drawing of a mechanical assembly with a blue arrow indicating a downward motion (no text or symbols)
natural_image
Illustration of hands performing a mechanical operation with arrows indicating motion (no text or symbols)

natural_image
Line drawing of a mechanical assembly with a spring and base mount (no text or symbols)
natural_image
Diagram of a mechanical assembly with a rotating component and fluid flow, no text or symbols present

natural_image
Diagram of a cable or wire connection with a spring and rope, no text or symbols present
natural_image
Illustration of a mechanical tool or device with a blue arrow pointing to it, no text or symbols present.
natural_image
Line drawing of a hand holding a small mechanical component, no text or symbols present
natural_image
Illustration of a hand using a tool to adjust a device (no text or symbols visible)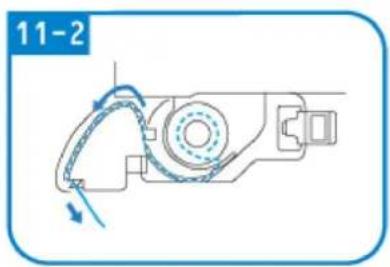
natural_image
Mechanical assembly diagram showing a rotating component with directional arrows (no text or symbols)
NAAIEN
Functionele interface naaien

C
natural_image
Pure mechanical diagram showing a tool or component with red and green curved lines indicating motion or force, no text or symbols present.natural_image
Simple diagram of a switch with a blue arrow pointing to the left side (no text or symbols)
natural_image
Pure diagram of a mechanical or fluidic component with no text, numbers, or symbols
natural_image
Diagram showing mechanical assembly with arrows indicating motion (no text or symbols)
natural_image
Line drawing of a mechanical device with a handle and lever mechanism (no text or symbols)
natural_image
Illustration of a robotic arm with motion arrows indicating movement (no text or symbols)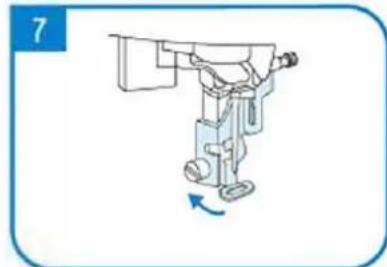
natural_image
Illustration of a robotic arm with a blue arrow indicating rotation (no text or symbols)
natural_image
Line drawing of a sewing machine needle with a hand adjusting the base (no text or symbols)
natural_image
Illustration of a hand using a tool to press or install a mechanical component, with no visible text or symbols.
natural_image
Simple line drawing of a two-tiered plastic container with a blue arrow indicating rotation (no text or symbols)
natural_image
Simple diagram of a square plate with a dashed oval and a small arrow at the bottom (no text or symbols)

natural_image
Simple line drawing of a square mechanical component with a blue arrow indicating rotation (no text or symbols)
natural_image
Line drawing of a sewing machine needle stitching fabric, showing no text or symbols
natural_image
Line drawing of a sewing machine handle with a red arrow pointing to the keyhole (no text or symbols present)A - Start/stopp-knapp
B – Baksømknapp
C - Klippeknapp
natural_image
Simple line drawing of a wall-mounted electrical outlet with a blue arrow pointing to the outlet (no text or symbols)
natural_image
Pure diagram of a mechanical or fluidic component with no text, numbers, or symbols

natural_image
Simple line drawing of a mechanical device with a rotating wheel and lever (no text or symbols)


natural_image
Line drawing of hands using a tool to adjust or install a mechanical component (no text or symbols)


natural_image
Illustration of hands holding a medical or surgical tool with blue lines indicating force or procedure (no text or symbols present)


natural_image
Technical line drawing of a mechanical assembly with no visible text or symbols
natural_image
Simple line drawing of a wall-mounted electrical outlet with a switch (no text or symbols)
natural_image
Line drawing of a hand holding a mechanical component with a cylindrical part inserted (no text or symbols)
natural_image
Mechanical assembly diagram showing a lever mechanism with a blue arrow indicating direction (no text or symbols)
natural_image
Diagram of a mechanical device with rotating components and directional arrows (no text or symbols)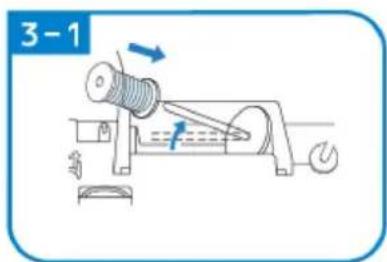
natural_image
Diagram of a mechanical component with a rotating shaft and spiral shaft, labeled '3-2' (no text or symbols on the diagram itself)
natural_image
Line drawing of a mechanical assembly with a blue arrow indicating a step, no text or symbols present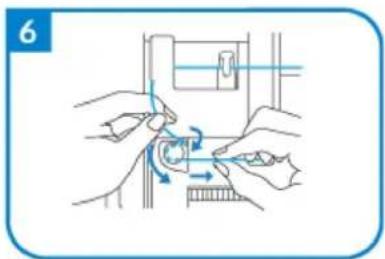
natural_image
Illustration of hands performing a mechanical operation with rotating components (no text or symbols)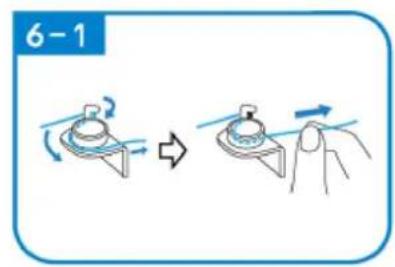
natural_image
Line drawing of a mechanical assembly with a spring and base mount (no text or symbols)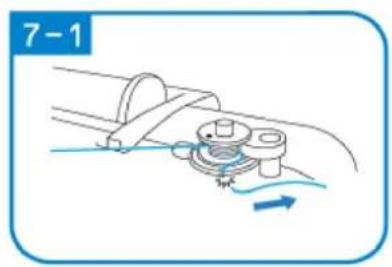
natural_image
Mechanical diagram showing a gear mechanism with motion arrows (no text or symbols)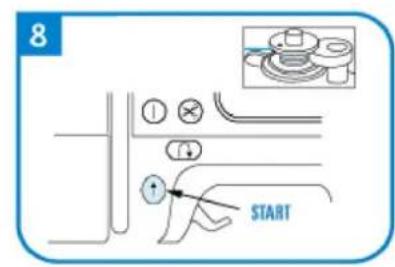
natural_image
Simple line drawing of a mechanical clamp or connector with a spring and connecting rod (no text or symbols)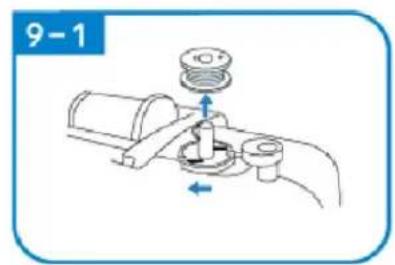

natural_image
Illustration of a mechanical device with a blue arrow pointing to the shaft (no text or symbols)
natural_image
Line drawing of a hand holding a small object with fingers, no text or symbols present
natural_image
Illustration of a hand operating a mechanical device with a blue circular component and a blue arrow indicating rotation (no text or symbols)
natural_image
Mechanical assembly diagram showing a motor with rotating arm and housing (no text or symbols)
SYING
Sy funksjonelt grensesnitt

3 - Knapphullssting (9 sting)
Velg søm
A

A – Stingbreddeinnstilling
natural_image
Diagram of a sewing machine needle with red and green thread paths (no text or labels)Dobbeltnålen kan ikke tres gjennom en rask tråd, ellers vil den skade trådanordningen.
natural_image
Simple diagram of a switch with a blue arrow pointing to the left side (no text or symbols)
natural_image
Pure diagram of a mechanical or fluidic component with no text, numbers, or symbols
natural_image
Diagram showing mechanical assembly with arrows indicating motion (no text or symbols)
natural_image
Line drawing of a mechanical device with a handle and lever mechanism (no text or symbols)
natural_image
Illustration of a robotic arm with motion arrows indicating movement (no text or symbols)
natural_image
Illustration of a robotic arm with a blue arrow indicating rotation (no text or symbols)
natural_image
Line drawing of a sewing machine needle with a hand adjusting the base (no text or symbols)
natural_image
Illustration of a hand using a tool to press or install a mechanical component, with an arrow indicating motion (no text or symbols present)
natural_image
Simple line drawing of a two-tiered plastic container with a blue arrow indicating rotation (no text or symbols)
natural_image
Simple diagram of a square plate with a dashed oval and a small arrow at the bottom (no text or symbols)
natural_image
Simple line drawing of a square mechanical component with a blue arrow indicating rotation (no text or symbols)
natural_image
Line drawing of a sewing machine needle stitching fabric, showing no text or symbols

natural_image
Line drawing of a sewing machine handle with a circular knob and a red indicator button (no text or symbols)A - Visa
B - Handratt
C – Spolarupprullare

Line cap stor, medium small
APPARATENS PLACERING
natural_image
Simple line drawing of a wall-mounted electrical outlet with a blue arrow pointing to the outlet (no text or symbols)
natural_image
Pure diagram of a mechanical or fluidic component with no text, numbers, or symbols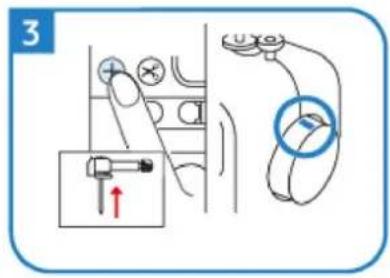

natural_image
Diagram of a mechanical device with rotating components and directional arrows (no text or symbols)


natural_image
Illustration of hands using a tool to adjust or install a mechanical component (no text or symbols visible)
natural_image
Illustration of hands using a tool to adjust or install a mechanical component (no text or symbols visible)


natural_image
Illustration of two hands holding a medical or surgical instrument with blue lines indicating force or procedure (no text or symbols)


natural_image
Technical line drawing of a mechanical assembly with no visible text or symbols

natural_image
Simple line drawing of a light blue electrical outlet with a label '1' (no text or symbols on the outlet itself)
natural_image
Line drawing of a hand holding a mechanical component with a lever and base (no text or symbols)
natural_image
Diagram of a mechanical clamp or bracket assembly with a blue arrow indicating direction (no text or symbols)
natural_image
Diagram of a mechanical device with rotating components and directional arrows (no text or symbols)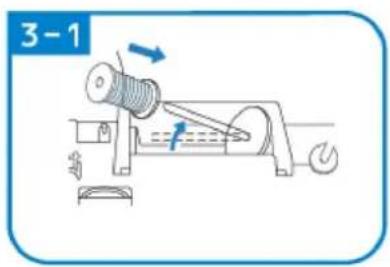


natural_image
Line drawing of a mechanical assembly with a blue arrow indicating direction (no text or symbols)
natural_image
Illustration of hands performing a mechanical operation with rotating components (no text or symbols)

natural_image
Line drawing of a mechanical assembly with a spring and base mount (no text or symbols)
natural_image
Diagram of a mechanical assembly with a rotating component and fluid flow, no text or symbols present


natural_image
Diagram of a cable or wire connection with a spring and rope, no text or symbols present

natural_image
Illustration of a mechanical tool or device with a blue arrow pointing to it, no text or symbols present.
natural_image
Line drawing of a hand holding a small mechanical component, no text or symbols present
natural_image
Illustration of hands using a tool to adjust a mechanical component (no text or symbols visible)
natural_image
Mechanical assembly diagram showing a motor with rotating arm and housing (no text or symbols)
SÖMNAD
natural_image
Pure mechanical diagram showing a tool or component with red and green lines indicating motion paths (no text or symbols)natural_image
Simple diagram of a switch with a blue arrow pointing to the left side (no text or symbols)
natural_image
Pure diagram of a mechanical or fluidic component with no text, numbers, or symbols
natural_image
Diagram showing mechanical assembly with arrows indicating motion (no text or symbols)
natural_image
Line drawing of a mechanical device with a handle and lever mechanism (no text or symbols)
natural_image
Illustration of a robotic arm with motion arrows indicating movement (no text or symbols)
natural_image
Illustration of a robotic arm with a blue arrow indicating rotation (no text or symbols)
natural_image
Line drawing of a sewing machine needle with a hand adjusting the base (no text or symbols)
natural_image
Illustration of a hand using a tool to press or install a mechanical component, with an arrow indicating motion (no text or symbols present)
natural_image
Simple line drawing of two overlapping rectangular containers with a blue arrow indicating rotation (no text or symbols)
natural_image
Simple diagram of a square plate with a dashed oval and a small arrow at the bottom (no text or symbols)

natural_image
Simple line drawing of a square mechanical component with a blue arrow indicating rotation (no text or symbols)
natural_image
Line drawing of a sewing machine needle stitching fabric, showing no text or symbols

natural_image
Line drawing of a sewing machine handle with a circular knob and adjustment knob (no text or symbols)
A - Mostrar
B - Volante
C- Enchedor de bobina
natural_image
Simple line drawing of a wall-mounted electrical outlet with a blue arrow pointing to the outlet (no text or symbols)
natural_image
Pure diagram of a mechanical or fluidic component with no text, numbers, or symbols

natural_image
Diagram of a mechanical device with rotating components and directional arrows (no text or symbols)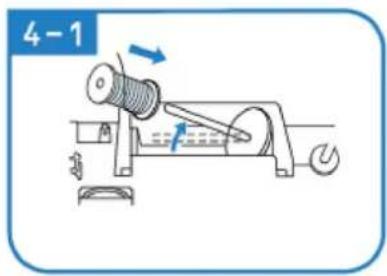

natural_image
Illustration of hands using a tool to adjust or install a mechanical component (no text or symbols visible)
natural_image
Illustration of hands using a tool to adjust or install a mechanical component (no text or symbols visible)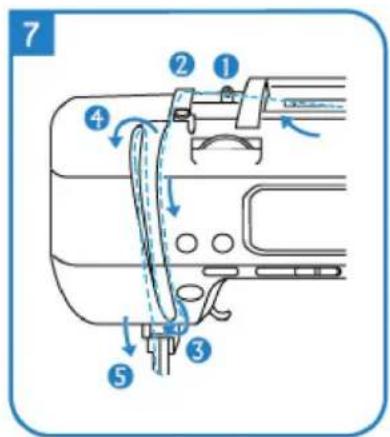

natural_image
Illustration of two hands holding a medical or surgical instrument with blue lines indicating force or procedure (no text or symbols)


natural_image
Mechanical assembly diagram showing a foot and arm mechanism (no text or symbols)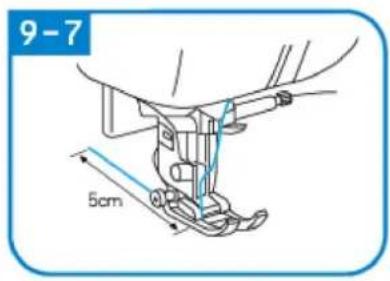

natural_image
Simple line drawing of a light blue electrical outlet with a black square inside, enclosed in a rounded rectangular frame (no text or symbols)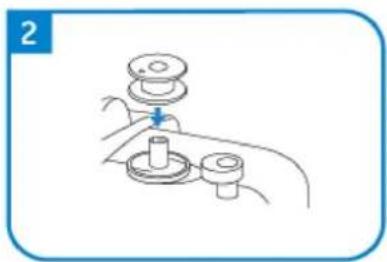
natural_image
Line drawing of a hand holding a mechanical component with a valve (no text or symbols)
natural_image
Mechanical diagram showing a lever mechanism with a rotating component and a blue arrow indicating direction (no text or symbols)
natural_image
Diagram of a mechanical device with rotating components and directional arrows (no text or symbols)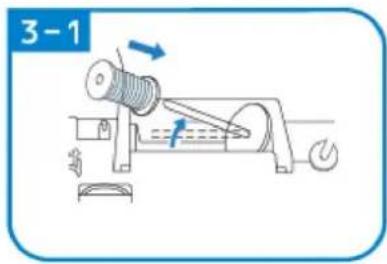


natural_image
Line drawing of a mechanical assembly with a blue arrow indicating direction (no text or symbols)
natural_image
Illustration of hands using a tool to adjust a mechanical component (no text or symbols present)
natural_image
Line drawing of a mechanical assembly with a spring and base mount (no text or symbols)
natural_image
Diagram of a mechanical assembly with a rotating component and fluid flow, no text or symbols present


natural_image
Diagram of a cable or wire connection with a spring and rope, no text or symbols present

natural_image
Illustration of a mechanical tool or device with a blue arrow pointing to it, no text or symbols present.
natural_image
Line drawing of a hand holding a small mechanical component, no text or symbols present
natural_image
Illustration of a hand using a tool to adjust a device (no text or symbols visible)
natural_image
Mechanical assembly diagram showing a motor with rotating arm and housing (no text or symbols)
DE COSTURA
Interface funcional de costura
natural_image
Pure mechanical diagram showing a tool or component with red and green curved lines indicating motion or force, no text or symbols present.natural_image
Line drawing of a sewing machine handle with a circular head and adjustment knob (no text or symbols)A - Displej
B – Ručné koleso
C – Navíjač cievok
A – Tlačidlo Štart/Stop
natural_image
Simple line drawing of a wall-mounted electrical outlet with a blue arrow pointing to the outlet (no text or symbols)
natural_image
Pure diagram of a mechanical or fluidic component with no text, numbers, or symbols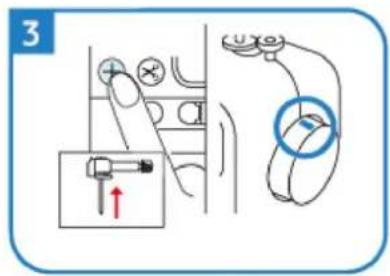

natural_image
Simple line drawing of a mechanical device with a rotating wheel and lever (no text or symbols)

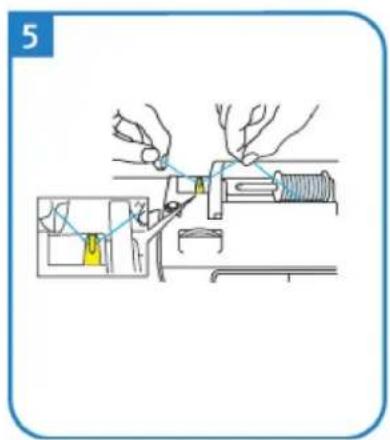

natural_image
Line drawing of hands using a tool to adjust or install a mechanical component (no text or symbols)


natural_image
Illustration of hands performing a medical procedure with a tool (no text or symbols present)


natural_image
Technical line drawing of a mechanical assembly with no visible text or symbols
natural_image
Simple line drawing of a wall-mounted electrical outlet with a switch (no text or symbols)
natural_image
Line drawing of a hand holding a mechanical component with a lever and base (no text or symbols)
natural_image
Mechanical assembly diagram showing a lever mechanism with a blue arrow indicating direction (no text or symbols)
natural_image
Diagram of a mechanical device with rotating components and directional arrows (no text or symbols)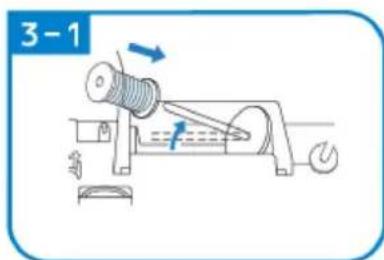
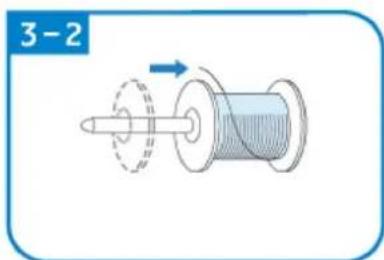
natural_image
Diagram of a mechanical component with a rotating shaft and circular motion arrow, labeled '3-2' (no text or symbols on the diagram itself)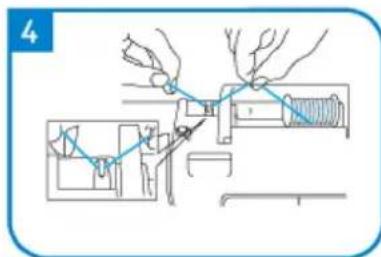
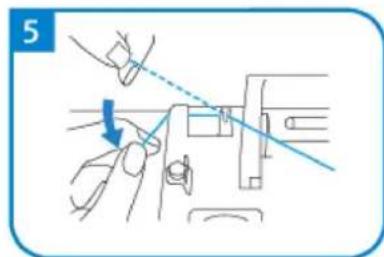
natural_image
Diagram showing a hand operating a mechanical device with a blue arrow indicating direction (no text or symbols present)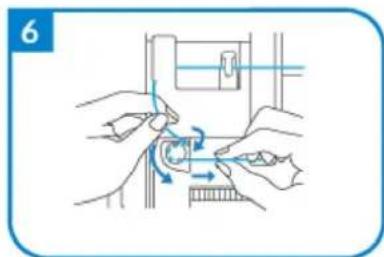
natural_image
Illustration of hands performing a mechanical operation with rotating components (no text or symbols)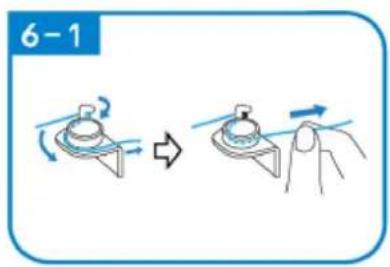

natural_image
Line drawing of a mechanical assembly with a spring and base mount (no text or symbols)
natural_image
Mechanical diagram showing a rotating component with motion arrows, no text or symbols present


natural_image
Diagram of a cable or connector being inserted into a pipe, showing no text or symbols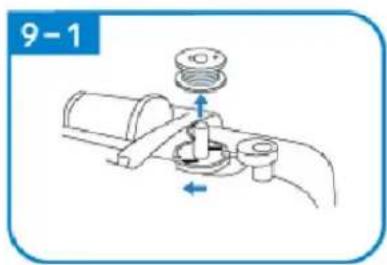
natural_image
Mechanical diagram showing a valve assembly with a pump and directional arrows (no text or symbols)
natural_image
Illustration of a mechanical device with a blue arrow pointing to the shaft (no text or symbols)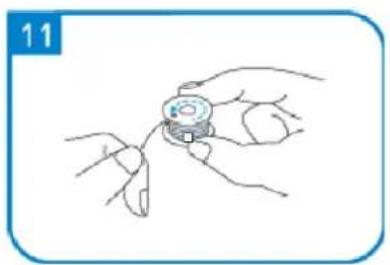
natural_image
Line drawing of a hand holding a small object with fingers, no text or symbols present
natural_image
Illustration of hands using a mechanical tool to adjust a component, no text or symbols present
natural_image
Mechanical assembly diagram showing a motor with rotating arm and housing (no text or symbols)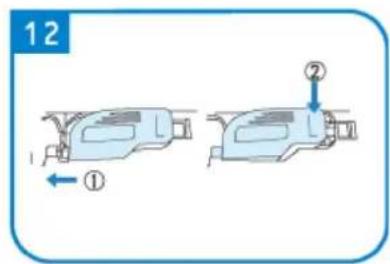
ŠITIE
natural_image
Diagram of a sewing machine needle with red and green thread paths (no text or labels)natural_image
Simple diagram of a switch with a blue arrow pointing to the left side (no text or symbols)
natural_image
Pure diagram of a mechanical or fluidic component with no text, numbers, or symbols
natural_image
Diagram showing mechanical assembly with arrows indicating motion (no text or symbols)
natural_image
Line drawing of a mechanical device with a handle and lever mechanism (no text or symbols)
natural_image
Illustration of a robotic arm with motion arrows indicating movement (no text or symbols)
natural_image
Illustration of a robotic arm with a blue arrow indicating rotation (no text or symbols)
natural_image
Line drawing of a sewing machine needle with a hand adjusting the base (no text or symbols)
natural_image
Illustration of a hand using a tool to press or install a mechanical component, with an arrow indicating motion (no text or symbols present)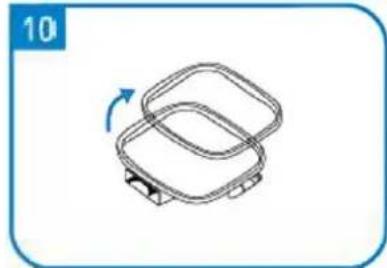
natural_image
Simple line drawing of a two-tiered plastic container with a blue arrow indicating rotation (no text or symbols)
natural_image
Simple diagram of a square plate with a dashed oval and a small arrow at the bottom (no text or symbols)

natural_image
Simple line drawing of a square mechanical component with a blue arrow indicating rotation (no text or symbols)
natural_image
Line drawing of a sewing machine needle stitching fabric, showing no text or symbols

natural_image
Line drawing of a sewing machine handle with a circular knob and a red indicator button (no text or symbols)For the disposal of the device please consider and act according to the national and local rules and regulations.
CONTACT
expondo Polska sp. z o.o. sp. k.