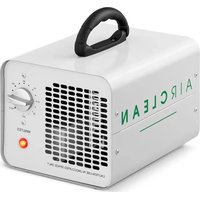
AIRCLEAN 15000-H20 - Air purifier Ulsonix - Free user manual and instructions
Find the device manual for free AIRCLEAN 15000-H20 Ulsonix in PDF.

User questions about AIRCLEAN 15000-H20 Ulsonix
0 question about this device. Answer the ones you know or ask your own.
Ask a new question about this device
Download the instructions for your Air purifier in PDF format for free! Find your manual AIRCLEAN 15000-H20 - Ulsonix and take your electronic device back in hand. On this page are published all the documents necessary for the use of your device. AIRCLEAN 15000-H20 by Ulsonix.
USER MANUAL AIRCLEAN 15000-H20 Ulsonix
OPERATION MODE SWITCH:
natural_image
Diagram of a hexagonal grid structure with directional arrows, no text or symbols presentThis User Manual has been translated using machine translation. We have made every effort to ensure the translation is accurate, but please note that automated translations are not perfect and are not meant to replace human translators. The official version of the User Manual is in English. Any differences between the translated version and the original English are not legally binding. If you have any questions about the accuracy of the translation, please refer to the English version, which is the official reference. More language versions are available upon request via info@expondo.com.
Technical Data
| Description of the parameter Value of the parameter | |
| Product name OZONE GENERATOR | |
| Model | AIRCLEAN 15000-H20 |
| Supply voltage [V~] / Frequency [Hz] 230/50 | |
| Rated power [W]. 140 | |
| Dimensions (Width x Depth x Height) [mm] 180x233x176 | |
| Weight [kg] 3.5 | |
| ozoning capacity [mg/h] 15.000 | |
1. General Description
The instruction manual is intended to assist in safe and reliable use. The product is designed and manufactured strictly according to technical specifications using the latest technology and components and maintaining the highest quality standards.
PLEASE CAREFULLY READ AND UNDERSTAND THIS INSTRUCTION MANUAL BEFORE OPERATION,
To ensure long and reliable operation of the unit, make sure to operate and maintain it properly in accordance with the guidelines in this instruction manual. The technical data and specifications contained in this instruction manual are up to date. The manufacturer reserves the right to make changes in order to improve the quality. Taking the technical progress and the possibility of reducing noise into account, the unit is designed and built in such a way so that risks resulting from noise emissions are reduced to the lowest possible level.
Explanation of symbols
| CE | The product complies with applicable safety standards. |
 | Please read the instructions before use. |
 | Recyclable product. |
 | CAUTION! or WARNING! or REMINDER! describing a situation.(general warning sign). |
 | Warning against poisoning by toxic substances! |
 | For indoor use only. |

CAUTION! The illustrations in this instruction manual are for reference only and may differ from the actual product in some details.
The original instruction manual is in the German language version. Other language versions are translations from German.
- Safety of use
CAUTION! Read all safety warnings and all instructions. Failure to follow the warnings and instructions may result in electric shock, fire and/or severe personal injury or death.
The term "unit" or "product" in the warnings and in the description of the instructions refers to the OZONE GENERATOR.
2.1. Electrical safety
a) The plug of this unit must fit into the outlet. Do not modify the plug in any way. Original plugs and matching outlets reduce the risk of electric shock.
b) Avoid touching grounded parts, such as pipes, heaters, ovens, and refrigerators. There is an increased risk of electric shock if your body is grounded and touches the unit exposed to direct rain, wet pavement, and operation in a humid environment. If water enters the unit, there is an increased risk of damage to the unit and electric shock.
c) Do not touch the unit with wet or damp hands.
d) Do not use the cord in an unintended manner. Never use it to carry the unit or to pull the plug out of the socket. Keep the cord away from heat sources, oil, sharp edges or moving parts. Damaged or tangled cords increase the risk of electric shock.
e) If you cannot avoid using the unit in a wet environment, use a residual current unit (RCD). Using an RCD reduces the risk of electric shock.
f) Do not use the unit if the power cord is damaged or shows signs of wear. A damaged power cord should be replaced by a qualified electrician or the manufacturer's service department.
g) To avoid electric shock, do not immerse the cable, plug, or unit itself in water or other liquid. Do not use the unit on wet surfaces.
h) CAUTION - THREAT TO LIFE! When cleaning or using the unit, never immerse it in water or other liquids.
2.2. Safety in the workplace
a) Keep the work area tidy and well lit. Disorder or poor lighting can lead to accidents. Be foresighted, watch what you are doing and use common sense when using the unit.
b) If you find any damage or irregularities in the operation of the unit, immediately turn it off and report it to an authorized person.
c) If you have any doubts as to whether the unit is working properly or if it is damaged, contact the manufacturer's service department.
d) Only the manufacturer's service department can repair the unit. Do not carry out repairs yourself!
e) In case of open flames or fire, use only dry powder or snow (CO2) fire extinguishers to extinguish the live equipment.
f) No children or unauthorized persons are allowed in the work area. (Inattention may result in loss of control of the unit.)
g) Check the condition of the safety stickers regularly. Replace them if they are illegible.
h) Keep these instructions for use for future reference. If the unit is to be passed on to a third party, the operating instructions must also be handed over together with the unit.
i) Keep the packaging and small assembly parts out of the reach of children.
j) Keep the unit away from children and animals.
k) The room to be ozonized should be sealed (close the external doors, eliminate leaks in windows, doors, etc.), turn off mechanical ventilation and cover ventilation grilles.
If possible, switching on the internal ventilation circuit to facilitate air circulation in the ozonized room is advisable.
Open the inner doors (e.g. bathroom, closet, etc.) of the room being ozonized.
I) It is forbidden for people or animals to be in the room where the ozone treatment is being carried out.
If it is necessary to enter the room, keep the time spent in the room to a minimum and use protective clothing and masks with an appropriate insert.
m) Smoking in a room where ozone is used, working with an open fire, working with tools that produce a flame or spark, working with oils and greases or leaving objects contaminated with oil or grease is prohibited.
n) Leave the room immediately after turning on the ozone treatment
o) Place a sign in front of the door(s) of the room being ozonized:
TRWA DEZODORYZACJA (OZONOWANIE) WSTĘP WZBRONIONY
2.3. Personal safety
a) Do not operate this unit if you are tired, ill or under the influence of alcohol, drugs or medication that could impair your ability to operate the unit.
b) The unit is not intended to be used by people (including children) with reduced mental, sensory or intellectual functions or persons who lack experience and/or knowledge unless they are supervised or have been instructed by a person responsible for their safety on how to operate the unit.
c) The unit may be operated by people who are physically fit, capable of operating it and appropriately trained, and who have read this instruction manual and have been trained in occupational safety and health.
d) Use caution and common sense when operating this unit. A moment's inattention during operation may result in serious personal injury.
e) To prevent accidental start-up, make sure the switch is in the off position before connecting to a power source.
f) The unit is not a toy. Children should be watched to ensure that they do not play with the unit.
2.4. Safe use of the unit
a) Do not use the unit if the ON/OFF switch does not function properly (does not turn on and off). Units that cannot be controlled by the switch are unsafe, cannot operate, and must be repaired.
b) Unplug the unit before making adjustments, changing accessories, or putting it away. This precaution reduces the risk of accidental start-up.
c) Keep unused equipment out of the reach of children and out of the reach of anyone unfamiliar with the unit or this instruction manual. These units is dangerous in the hands of inexperienced users.
d) Keep the unit in good working conditions. Check before each use for general damage or damage to moving parts (cracks in parts and components or any other condition that may affect the safe operation of the unit). If damaged, have the unit repaired before use.
e) Keep the unit out of the reach of children.
f) Repairs and maintenance should be carried out by qualified personnel using only original spare parts. This will ensure the safety of use.
g) To ensure the designed operational integrity of the unit, do not remove factory-installed covers or loosen screws.
h) When transporting or moving the unit from storage to the place of use, observe the health and safety rules for manual handling applicable in the country where the unit is used.
i) Do not move, shift, or rotate the machine while in operation.
j) Clean the unit regularly to prevent permanent dirt build-up.
k) Do not obstruct the air inlet or outlet.
I) The unit is not a toy. Cleaning and maintenance must not be performed by children without adult supervision.
m) Do not tamper with the unit to alter its performance or design.
n) Keep the unit away from sources of fire and heat.
o) Do not overload the unit.
p) Do not allow people with impaired sense of smell to operate the unit.
q) Ensure there is adequate space around the machine before it is switched on.
r) Directly inhaling the ozone discharged from the unit's outlets is STRICTLY FORBIDDEN.
s) Short-term inhalation of high ozone concentrations and long-term inhalation of low ozone concentrations can be dangerous to health and even life!
t) When the unit is used to sterilize water, place it above a container of water to avoid flooding the unit.
u) Do not use the unit near strong magnetic or electric fields.
v) Note that rubber, iron and plastic items should be subjected to shorter ozone treatment to avoid damaging the items.
w) Do not apply mechanical pressure to the product. Be sure not to expose the unit to shocks, falls.

CAUTION! Although the product has been designed to be safe, with adequate safeguards, and despite the additional safety features provided to the other, there is still a slight risk of accident or injury when handling the unit. You advised to use caution and common sense when using this product.
3. Rules of use
The unit is used to generate ozone.
The ozone generator is used to purify and disinfect air, water and fruits, vegetables, meat and clothing placed in water.
The product is intended for home use only!
The user is responsible for any damage resulting from misuse.
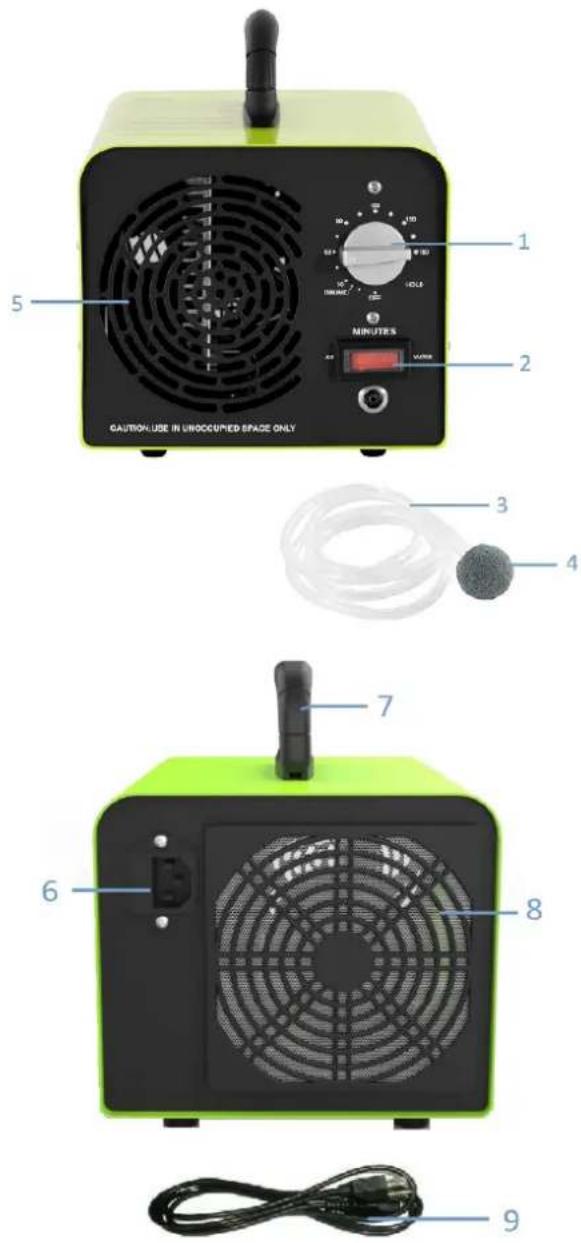
3.1. Description
-
Operating time adjustment knob - Timer
-
Mode switch
- Tube
- Pumice diffuser
- Ozone outlet
- Power socket, fuse socket
- Handle
- Air filter, air inlet
- Power cord
3.2. Preparation for operation
POSITIONING OF THE UNIT
The ambient temperature must not exceed 40^ C and ambient humidity should not exceed 85%. The unit should not be used in an environment with a high content of oily substances in the air. Place the unit in a way that ensures good air circulation. Maintain a minimum clearance of 10 cm from any wall of the unit. Keep the unit away from any hot surfaces. Always operate the unit on a level, stable, clean, fireproof and dry surface and out of the reach of children and persons of impaired mental, sensory and intellectual functions. Place the unit in such a way that the mains plug can be reached at any time. Ensure that the power supply to the unit corresponds to that specified on the identification plate!
3.3. Working with the unit
OPERATION MODE SWITCH:
1) AIR mode - high ozone efficiency: for ozone treatment of rooms above 50m3. Recommended operating time for different sizes of rooms in AIR mode:
| Room area [m3] | 50 | 100 | 200 | 300 | 500 | 1000 | |
| Ozoning time [min] | 5 10 | 20 | 30 50 | 100 |

CAUTION! In AIR mode the room to be ozonized should be sealed, i.e. doors and windows closed, mechanical ventilation closed or ventilation grilles covered.
2) WATER mode - low ozone output: for ozoning small rooms up to 50m3 and water or fruits, vegetables, meat and clothes placed in water.
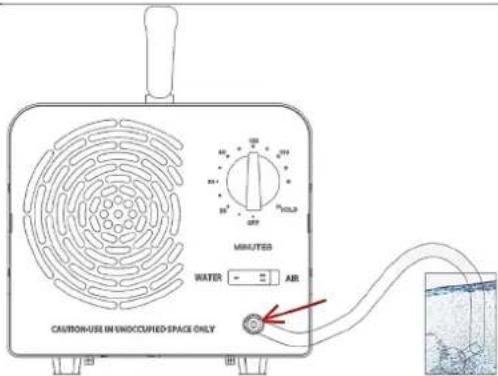
Before ozoning in WATER mode, connect the tube to the ozone outlet connector. When ozoning water, additionally connect the pumice diffuser to the other end of the tube. Place the pumice diffuser in the container with the water to be ozonized. For ozoning rooms up to 50m3, the pumice diffuser should be removed. The room will be ozonized through the tube.

CAUTION! When the unit is used to sterilize water, place it above aainer of water to avoid flooding the unit.
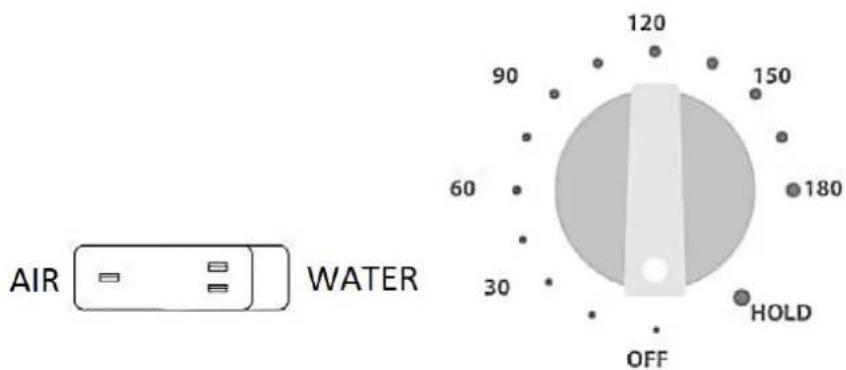
TIME CONTROL KNOB - TIMER
1) To activate the timer, turn the knob clockwise and set it to the desired time (0-180 minutes).
2) To activate the timer, turn the knob past 20 minutes.
If the user needs to set the timer for less than 20 minutes, turn the knob more than 20 minutes and then turn it back to the specified time.

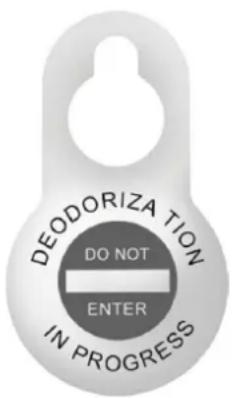
CAUTION! Place a sign in front of the door(s) of the room being ozonized:
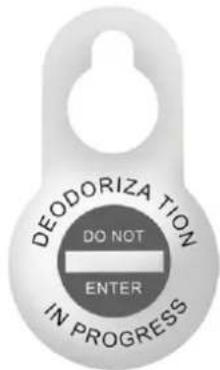
DEODORIZATION IN
PROGRESS
(OZONING)
ENTRY FORBIDDEN
STARTING THE UNIT:
-
Set the unit in the desired location.
-
Plug the power cord [9] into the power receptacle on the back of the unit [6] and then plug it into an electrical outlet.
-
Set the desired operating mode AIR or WATER [2]. For WATER mode, connect the tube [3] to the ozone outlet connector and/or pumice diffuser [4].
-
Set the timer control knob to the desired position. After turning the knob, the unit starts working, i.e. generates ozone!
-
Leave the room as soon as possible!
-
After the ozone treatment has finished, enter the room, switch the unit off (set the timer control knob to OFF) and open the windows, ventilation grilles and the mechanical ventilation in the ozonized room, then leave again. You can safely return to the room after about 15-30 minutes. Not ventilating the room is permitted. In this case, you should not enter the room until at least 2 hours after completing the ozone treatment.
-
Disconnect the unit from the power supply.

CAUTION! After switching on the unit, all people and pets should leave the n!
CAUTION! In AIR mode the room to be ozonized should be sealed, i.e. doors and windows closed, mechanical ventilation closed, or ventilation grilles covered.
CAUTION! After completing the ozone treatment, ventilate the room for 15 to 30 minutes or do not enter the room earlier than 2 hours after completing the ozone treatment.
CAUTION! Use the unit only in empty rooms! Ozone is an irritant gas and damages biological membranes by radical reactions with their components. If you still smell the ozone after you have entered the room, first make sure that the unit is switched off and then leave the room and/or ventilate it.
3.4. Cleaning and maintenance
a) Pull out the mains plug before each cleaning and when the unit is not in use.
b) Use only non-corrosive cleaning agents for cleaning the surfaces.
c) Store the unit in a dry and cool place protected from moisture and direct sunlight.
d) Do not spray the unit with a stream of water or immerse it in water.
e) Make sure that no water enters through the ventilation openings in the casing.
f) Perform regular inspections of the unit checking technical fitness and any damage.
g) Use soft, damp cloth for cleaning.
h) The ozone plates should be cleaned once a month.
i) To ensure effective use of the equipment, replacing the ozone plates every 6 months is recommended.
REPLACING THE OZONE PLATE
-
Loosen the handle and pull out the ozone plate.
-
Clean the ozone plate with water or replace it with a new one.
-
Before installing, make sure the plate is dry, and the metal ends make good contact.
natural_image
Diagram of a hexagonal grid structure with directional arrows, no text or symbols presentREPLACING THE FUSE
CAUTION! The fuse must be replaced by a specialist!
- Disconnect the unit from the power supply.
- Disconnect the power cord and remove the fuse holder.
- To remove the fuse, turn the fuse handle counterclockwise.
- Replace the fuse with a new one of the same rating.
- Reinstall the fuse holder.
CAUTION! To avoid damaging the fuse holder, do not use excessive force when removing and installing the fuse holder.
DISPOSAL OF USED UNITS
At the end of its useful life, this product should not be disposed of with normal household waste but should be taken to a collection point for the recycling of electrical and electronic equipment. This is indicated by the symbol on the product, operating instructions or packaging. The materials used in this unit are recyclable according to their marking. You will be making an important contribution to protecting our environment by reusing, recycling or otherwise disposing of used units.
Your local administration will provide you with information about the appropriate disposal point for used units.
TROUBLESHOOTING
| Problem | Possible | cause |
| The unit does not work. | Improper connection of the cable to the power outlet. | Check that the cord is properly plugged into the power outlet. |
| The plug is not properly connected to the electrical outlet. | Check that the plug is properly connected to the electrical outlet. | |
| The electrical outlet does not work. | Check that the electrical outlet is working properly. | |
| The unit is not working properly. | The ozone plate is dirty/cracked. | Check that the ozone plate is clean and dry with no cracks.Any cracks on the ozone plate can cause visible lightning and lack of ozone output. |
| Blown/incorrectly installed fuse. | Check that the fuse is properly installed and in good condition. |
Action

PRZEŁĄCZNIK TRYBU PRACY:
natural_image
Diagram of a hexagonal grid structure with directional arrows, no text or symbols presentWYMIANA BEZPIECZNIKA:
PŘEPÍNAČ PROVOZNÍHO REŽIMU:
natural_image
Diagram of a hexagonal grid device with directional arrows indicating movement or force (no text or symbols)VÝMĚNA POJISTKY:
LIKVIDACE POUŽITÉ JEDNOTKY
COMMUTATEUR DE MODE DE FONCTIONNEMENT :
natural_image
Diagram of a hexagonal grid structure with directional arrows, no text or symbols presentREEMPLACEMENT DU FUSIBLE :
natural_image
Diagram of a hexagonal grid structure with directional arrows, no text or symbols presentSOSTITUZIONE DEL FUSIBILE:
natural_image
Diagram of a hexagonal grid device with directional arrows indicating movement or force (no text or symbols)REEMPLAZO DEL FUSIBLE:
MÜKÖDÉSI MÓD KIKAPCSOLÓ:
natural_image
Diagram of a hexagonal grid structure with directional arrows, no text or symbols presentA BIZTOSÍTÉK CSERÉJE:
APPARATETS PLACERING
OPERATION MODE SWITCH:
OPSTART AF APPARATET:
natural_image
Diagram of a hexagonal grid structure with directional arrows, no text or symbols presentUDSKIFTNING AF SIKRINGEN:
KÄYTTÖTILAN KYTKIN:
natural_image
Diagram of a hexagonal grid structure with directional arrows, no text or symbols presentSULAKKEEN VAIHTAMINEN
SCHAKELAAR VOOR DE BEDIENINGSMODUS:
natural_image
Diagram of a hexagonal grid structure with directional arrows, no text or symbols presentDE ZEKERING VERVANGEN
DRIFTSMODUSBRYTER:
natural_image
Diagram of a hexagonal grid structure with directional arrows, no text or symbols presentSKIFTE SIKRING
PLACERING AV APPARATEN
DRIFTSLÄGESVÄTTA:
natural_image
Diagram of a hexagonal grid device with directional arrows indicating movement or force (no text or symbols)BYTE AV SÄKRING
INTERRUPTOR DO MODO DE OPERAÇÃO:
natural_image
Diagram of a hexagonal grid structure with directional arrows, no text or symbols presentPREPÍNAČ PREVÁDZKOVÉHO REŽIMU:
natural_image
Diagram of a hexagonal grid device with directional arrows indicating movement or force (no text or symbols)VÝMENA POISTKY
UPOZORNENIE! Poistku musí vymení odborník!
ПРЕВКЛЮЧВАТЕЛ ЗА РЕЖИМ НА РАБОТА:
1) Режим AIR - висока озонова ефективност: за озониране на помещения над 50m3.
natural_image
Diagram of a hexagonal grid device with directional arrows indicating movement or force (no text or symbols)СМЯНА НА ПРЕДПАЗИТЕЛЯ
natural_image
Diagram of a hexagonal grid structure with directional arrows, no text or symbols presentPREKIDAČ NAČINA RADA:
1) AIR način rada - visoka učinkovitost ozona: za ozoniranje prostorija iznad 50 m3. Preporučeno vrijeme rada za različite veličine prostorija u načinu rada AIR:
| Površina prostorije [m3]. | 50 | 100 | 200 | 300 | 500 | 1000 | |
| Vrijeme ozoniranja [min] | 5 10 | 20 | 30 | 50 | 100 | ||

OPREZ! U načinu rada ZRAK prostoriju koju treba ozonizirati treba zatvoriti,
natural_image
Diagram of a hexagonal grid structure with directional arrows, no text or symbols presentZAMJENA OSIGURAČA
natural_image
Diagram of a hexagonal grid device with directional arrows indicating movement or force (no text or symbols)SAUGIKLIO KEITIMAS
ATSARGIAI! Saugiklj turi pakeisti specialistas!
COMUTATOR MOD DE OPERARE:
natural_image
Diagram of a hexagonal grid structure with directional arrows, no text or symbols presentÎNLOCUIRE SIGURANTĂ
STIKALO NAČINA DELOVANJA:
1) Način AIR - visoka učinkovitost ozona: za ozonsko obdelavo prostorov nad 50 m3.
natural_image
Diagram of a hexagonal grid structure with directional arrows, no text or symbols presentZAMENJAVA VAROVALKE
POZOR! Varovalko mora zamenjati strokovnjak!
For the disposal of the device please consider and act according to the national and local rules and regulations.
CONTACT
expondo Polska sp. z o.o. sp. k.