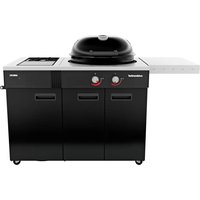
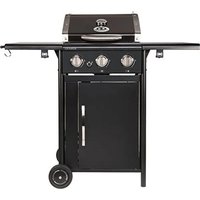
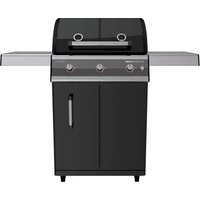
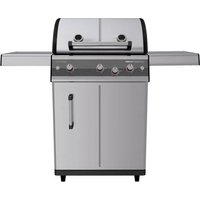
Blazing Zone Dualchef - Barbecue Outdoorchef - Free user manual and instructions
Find the device manual for free Blazing Zone Dualchef Outdoorchef in PDF.

User questions about Blazing Zone Dualchef Outdoorchef
0 question about this device. Answer the ones you know or ask your own.
Ask a new question about this device
Download the instructions for your Barbecue in PDF format for free! Find your manual Blazing Zone Dualchef - Outdoorchef and take your electronic device back in hand. On this page are published all the documents necessary for the use of your device. Blazing Zone Dualchef by Outdoorchef.
USER MANUAL Blazing Zone Dualchef Outdoorchef
natural_image
Metallic heating element grid mounted on a black base plate (no text or symbols visible)BLAZING ZONE MANUAL INFRAROT SEITENBRENNER
KOMPATIBEL MIT FOLGENDEN OUTDOORCHEF GRILL-MODELLEN: \ COMPATIBLE WITH THE FOLLOWING OUTDOORCHEF BARBECUE MODELS: \ COMPATIBLE AVEC LES MODÈLES DE BARBECUE OUTDOORCHEF SUIVANTS : \ COMPATIBILE CON I SEGUENTI MODELLO DI BARBECUE OUTDOORCHEF: \ COMPATIBEL MET DE VOLGENDE OUTDOORCHEF BARBECUEMODELLEN: \ PASSER TIL F∅LGENDE OUTDOORCHEF GRILLMODELLER: \ KOMPATIBEL MED FÖLJANDE OUTDOORCHEF GRILL-MODELLER: \ KOMPATIBEL MED F∅LGENDE OUTDOORCHEF GRILLMODELLER: \ YHTEENSOPIVA SEURAAVIEN OUTDOORCHEF-GRILLIMALLIEN KANSSA: \ PASSAR Á EFTIRFARANDI GERDIR GRILLA FRÁ OUTDOORCHEF: \ SYMBATH ME TA ΠΑΡΑΚΑΤΩ MONTELA ΨΗΣΤΑΡΙΑΣ OUTDOORCHEF: \ KOMPATIBILNÍ S NÁSLEDUJÍCÍMI MODELY GRILÚ OUTDOORCHEF: \ AZ ALÁBBI OUTDOORCHEF GRILL MODELLEKKEL KOMPATIBILIS: \ KOMPATYBILNY Z NASTĘPUJĄCYMI MODELAMI GRILLA OUTDOORCHEF: \ COMPATÍVEL COM OS SEGUINTES MODELOS DE GRELHADORES OUTDOORCHEF: \ COMPATIBIL CU URMĂTOARELE MODELE DE GRĂTAR OUTDOORCHEF: \ KOMPATIBILAN SA SLJEDECÍM MODELIMA OUTDOORCHEF ROŠTILJA: \ ZDRUŽLJIV Z NASLEDNJIMI MODELI ŽARA OUTDOORCHEF: AŞAĞIDAKÍ OUTDOORCHEF MANGAL MODELLERÍ İLE UYUMLUDUR:
DUALCHEF 325 G | DUALCHEF S 325 G | DUALCHEF 425 G | DUALCHEF S 425 G
natural_image
Grid of identical grayscale icons representing various kitchen utensils and appliances (no text or symbols)| 10 | BEDIERUNGSANLEITUNG 4 | |
| Lower line dose A##ing ##ghing band, bench be free OUTOCHEF ELCING ZONE in the case remains. | ||
| 31 | USER GUIDE 13 | |
| Inser need these instructions correctly remain using your OUTOCHEF ELCING ZONE. | ||
| 11 | MODE D EMPLOY 22 | |
| Use for an advertisement can offer things to use for an app or a file IN OUTOCHEF ELCING ZONE. | ||
| 12 | ISTRUZIONI PER L USO 31 | |
| Long time between the process and the method of making the software for ELIZING ZONE OUTOCHEF | ||
| 13 | BEDIERUNGSHAMDLEDING 40 | |
| Less than bed, ingesting the working agent, one must be an OUTOCHEF SLAZING ZONE in the case remains. | ||
| 16 | BRUGSANVISNING 49 | |
| Less not yet been being performed with the equipment given them in order to age in UUI OUTOCHEF SLAZING ZONE in the case remains. | ||
| 17 | BRUKSAVVISNIOC 58 | |
| Less derivate, not otherwise regent in some of the UUI OUTOCHEF SLAZING ZONE in the case remains. | ||
| 18 | BRUKSAVVISNIOC 67 | |
| Less derivate, not otherwise regent in some of the UUI OUTOCHEF SLAZING ZONE in the case remains. | ||
| 19 | KAYTTODHJE 78 | |
| Less in my home, in my home, up to more than and OUTOCHEF SLAZING ZONE in the case remains. | ||
| 19 | NOTKUWARLIEGENNICAR 85 | |
| Local person to be able to go and go over the UUI OUTOCHEF ELIZING ZONE | ||
| 20 | QANTICE XPHIZNE 94 | |
| 21 | NAYOD K OBSLUZE 103 | |
| 22 | HASZNALATI ÚTMUTATÓ 112 | |
| 23 | INSTRUKCJA OBSLUGI 121 | |
| Perin response to the process and the case in UUI OUTOCHEF SLAZING ZONE in the case remains. | ||
| 24 | MANUAL DE INSTRUÇÕES DE UTILIZAÇÃO 130 | |
| Less in minutes later, restructo a set of instructions on the case remains out of OUTOCHEF SLAZING ZONE | ||
| 25 | INSTRUCTUNI DE UTILIZARE 139 | |
| Less in abelde, contá a set of instructions on a pre- to fund base produced as OUTOCHEF SLAZING ZONE | ||
| 26 | UPITA ZA UPORABU 148 | |
| Perin response to a pre-a pre-a pre-a pre-a pre-a pre-a pre-a pre-a pre-a pre-a pre-a pre-a pre-a pre-a pre-a pre-a pre-a pre-a pre-a pre-a pre-a pre-a pre-a pre-a pre-a pre-a pre-a pre-a pre-a pre-a pre-a pre-a pre-a pre-a pre-a pre-a pre-a pre-a pre-a pre-a pre-a pre-a pre-a pre-a pre-a pre-a pre-a pre-a pre-a pre-a prea pre-a pre-a pre-a pre-a pre-a pre-a pre-a pre-a pre-a pre-a pre-a pre-a pre-a pre-a pre-a pre-a pre-a pre-a pre-a pre-a pre-a pre-a pre-a pre-a pre-a pre-a pre-a pre-a pre-a pre-a pre-a pre-a pre-a pre-a pre-a pre-a pre-a pre-a pre-a pre-a pre-a pre-a pre-a pre-a pre-a pre-a pre-a pre-a pre-a pre-e pre-a pre-a pre-a pre-a pre-a pre-a pre-a pre-a pre-a pre-a pre-a pre-a pre-a pre-a pre-a pre-a pre-a pre-a pre-a pre-a pre-a pre-a pre-a pre-a pre-a pre-a pre-a pre-a pre-a pre-a pre-a pre-a pre-a pre-a pre-a pre-a pre-a pre-a pre-a pre-a pre-a pre-a pre-a pre-a pre-a pre-a pre-a pre-a pre-a pre-c pre-a pre-a pre-a pre-a pre-a pre-a pre-a pre-a pre-a pre-a pre-a pre-a pre-a pre-a pre-a pre-a pre-a pre-a pre-a pre-a pre-a pre-a pre-a pre-a pre-a pre-a pre-a pre-a pre-a pre-a pre-a pre-a pre-a pre-a pre-a pre-a pre-a pre-a pre-a pre-a pre-a pre-a pre-a pre-a pre-a pre-a pre-a pre-a pre-a pre-A pre-a pre-a pre-a pre-a pre-a pre-a pre-a pre-a pre-a pre-a pre-a pre-a pre-a pre-a pre-a pre-a pre-a pre-a pre-a pre-a pre-a pre-a pre-a pre-a pre-a pre-a pre-a pre-a pre-a pre-a pre-a pre-a pre-a pre-a pre-a pre-a pre-a pre-a pre-a pre-a pre-a pre-a pre-a pre-a pre-a pre-a pre-a pre-a pre-a pre-u pre-a pre-a pre-a pre-a pre-a pre-a pre-a pre-a pre-a pre-a pre-a pre-a pre-a pre-a pre-a pre-a pre-a pre-a pre-a pre-a pre-a pre-a pre-a pre-a pre-a pre-a pre-a pre-a pre-a pre-a pre-a pre-a pre-a pre-a pre-a pre-a pre-a pre-a pre-a pre-a pre-a pre-a pre-a pre-a pre-a pre-a pre-a pre-a pre-a pre-b pre-a pre-a pre-a pre-a pre-a pre-a pre-a pre-a pre-a pre-a pre-a pre-a pre-a pre-a pre-a pre-a pre-a pre-a pre-a pre-a pre-a pre-a pre-a pre-a pre-a pre-a pre-a pre-a pre-a pre-a pre-a pre-a pre-a pre-a pre-a pre-a pre-a pre-a pre-a pre-a pre-a pre-a pre-a pre-a pre-a pre-a pre-a pre-a pre-a pre-o pre-a pre-a pre-a pre-a pre-a pre-a pre-a pre-a pre-a pre-a pre-a pre-a pre-a pre-a pre-a pre-a pre-a pre-a pre-a pre-a pre-a pre-a pre-a pre-a pre-a pre-a pre-a pre-a pre-a pre-a pre-a pre-a pre-a pre-a pre-a pre-a pre-a pre-a pre-a pre-a pre-a pre-a pre-a pre-a pre-a pre-a pre-a pre-a pre-a pre- a pre-a pre-a pre-a pre-a pre-a pre-a pre-a pre-a pre-a pre-a pre-a pre-a pre-a pre-a pre-a pre-a pre-a pre-a pre-a pre-a pre-a pre-a pre-a pre-a pre-a pre-a pre-a pre-a pre-a pre-a pre-a pre-a pre-a pre-a pre-a pre-a pre-a pre-a pre-a pre-a pre-a pre-a pre-a pre-a pre-a pre-a pre-a pre-a pre-a post-a pre-a pre-a pre-a pre-a pre-a pre-a pre-a pre-a pre-a pre-a pre-a pre-a pre-a pre-a pre-a pre-a pre-a pre-a pre-a pre-a pre-a pre-a pre-a pre-a pre-a pre-a pre-a pre-a pre-a pre-a pre-a pre-a pre-a pre-a pre-a pre-a pre-a pre-a pre-a pre-a pre-a pre-a pre-a pre-a pre-a pre-a pre-a pre-a pre-a post a pre-a pre-a pre-a pre-a pre-a pre-a pre-a pre-a pre-a pre-a pre-a pre-a pre-a pre-a pre-a pre-a pre-a pre-a pre-a pre-a pre-a pre-a pre-a pre-a pre-a pre-a pre-a pre-a pre-a pre-a pre-a pre-a pre-a pre-a pre-a pre-a pre-a pre-a pre-a pre-a pre-a pre-a pre-a pre-a pre-a pre-a pre-a pre-a pre-a priora a pre-a pre-a pre-a pre-a pre-a pre-a pre-a pre-a pre-a pre-a pre-a pre-a pre-a pre-a pre-a pre-a pre-a pre-a pre-a pre-a pre-a pre-a pre-a pre-a pre-a pre-a pre-a pre-a pre-a pre-a pre-a pre-a pre-a pre-a pre-a pre-a pre-a pre-a pre-a pre-a pre-a pre-a pre-a pre-a pre-a pre-a pre-a pre-a pre-a monate a pre-a pre-a pre-a pre-a pre-a pre-a pre-a pre-a pre-a pre-a pre-a pre-a pre-a pre-a pre-a pre-a pre-a pre-a pre-a pre-a pre-a pre-a pre-a pre-a pre-a pre-a pre-a pre-a pre-a pre-a pre-a pre-a pre-a pre-a pre-a pre-a pre-a pre-a pre-a pre-a pre-a pre-a pre-a pre-a pre-a pre-a pre-a pre-a pre-a unprea a pre-a pre-a pre-a pre-a pre-a pre-a pre-a pre-a pre-a pre-a pre-a pre-a pre-a pre-a pre-a pre-a pre-a pre-a pre-a pre-a pre-a pre-a pre-a pre-a pre-a pre-a pre-a pre-a pre-a pre-a pre-a pre-a pre-a pre-a pre-a pre-a pre-a pre-a pre-a pre-a pre-a pre-a pre-a pre-a pre-a pre-a pre-a pre-a pre-A pre-A pre-A pre-A pre-A pre-A pre-A pre-A pre-A pre-A pre-A pre-A pre-A pre-A pre-A pre-A pre-A pre-A pre-A pre-A pre-A pre-A pre-A pre-A pre-A pre-A pre-A pre-A pre-A pre-A pre-A pre-A pre-A pre-A pre-A pre-A pre-A pre-A pre-A pre-A pre-A pre-A pre-A pre-A pre-A pre-A pre-A pre-A pre-A pre-A pre-U pre-A pre-A pre-A pre-A pre-A pre-A pre-A pre-A pre-A pre-A pre-A pre-A pre-A pre-A pre-A pre-A pre-A pre-A pre-A pre-A pre-A pre-A pre-A pre-A pre-A pre-A pre-A pre-A pre-A pre-A pre-A pre-A pre-A pre-A pre-A pre-A pre-A pre-A pre-A pre-A pre-A pre-A pre-A pre-A pre-A pre-A pre-A pre-A pre-A pre -A pre-A pre-A pre-A pre-A pre-A pre-A pre-A pre-A pre-A pre-A pre-A pre-A pre-A pre-A pre-A pre-A pre-A pre-A pre-A pre-A pre-A pre-A pre-A pre-A pre-A pre-A pre-A pre-A pre-A pre-A pre-A pre-A pre-A pre-A pre-A pre-A pre-A pre-A pre-A pre-A pre-A pre-A pre-A pre-A pre-A pre-A pre-A pre-A pre-A pre A pre-A pre-A pre-A pre-A pre-A pre-A pre-A pre-A pre-A pre-A pre-A pre-A pre-A pre-A pre-A pre-A pre-A pre-A pre-A pre-A pre-A pre-A pre-A pre-A pre-A pre-A pre-A pre-A pre-A pre-A pre-A pre-A pre-A pre-A pre-A pre-A pre-A pre-A pre-A pre-A pre-A pre-A pre-A pre-A pre-A pre-A pre-A pre-A pre-A preA pre-A pre-A pre-A pre-A pre-A pre-A pre-A pre-A pre-A pre-A pre-A pre-A pre-A pre-A pre-A pre-A pre-A pre-A pre-A pre-A pre-A pre-A pre-A pre-A pre-A pre-A pre-A pre-A pre-A pre-A pre-A pre-A pre-A pre-A pre-A pre-A pre-A pre-A pre-A pre-A pre-A pre-A pre-A pre-A pre-A pre-A pre-A pre-A pre-Apre-A pre-A pre-A pre-A pre-A pre-A pre-A pre-A pre-A pre-A pre-A pre-A pre-A pre-A pre-A pre-A pre-A pre-A pre-A pre-A pre-A pre-A pre-A pre-A pre-A pre-A pre-A pre-A pre-A pre-A pre-A pre-A pre-A pre-A pre-A pre-A pre-A pre-A pre-A pre-A pre-A pre-A pre-A pre-A pre-A pre-A pre-A pre-A pre-A pre-Apre-C pre-A pre-A pre-A pre-A pre-A pre-A pre-A pre-A pre-A pre-A pre-A pre-A pre-A pre-A pre-A pre-A pre-A pre-A pre-A pre-A pre-A pre-A pre-A pre-A pre-A pre-A pre-A pre-A pre-A pre-A pre-A pre-A pre-A pre-A pre-A pre-A pre-A pre-A pre-A pre-A pre-A pre-A pre-A pre-A pre-A pre-A pre-A pre-A pre-A pre- A pre-A pre-A pre-A pre-A pre-A pre-A pre-A pre-A pre-A pre-A pre-A pre-A pre-A pre-A pre-A pre-A pre-A pre-A pre-A pre-A pre-A pre-A pre-A pre-A pre-A pre-A pre-A pre-A pre-A pre-A pre-A pre-A pre-A pre-A pre-A pre-A pre-A pre-A pre-A pre-A pre-A pre-A pre-A pre-A pre-A pre-A pre-A pre-A pre-Apre-B upre-B upre-B upre-B upre-B upre-B upre-B upre-B upre-B upre-B upre-B upre-B upre-B upre-B upre-B upre-B upre-B upre-B upre-B upre-B upre-B upre-B upre-B upre-B upre-B upre-B upre-B upre-B upre-B upre-B upre-B upre-B upre-B upre-B upro-B upre-B upre-B upre-B upre-B upre-B upre-B upre-B upre-B upre-B upre-B upre-B upre-B upre-B upre-B upre-B upre-B upre-B upre-B upre-B upre-B upre-B upre-B upre-B upre-B upre-B upre-B upre-B upre-B upre-B upre-B upre-B upre-B upre- B upre-B upre-B upre-B upre-B upre-B upre-B upre-B upre-B upre-B upre-B upre-B upre-B upre-B upre-B upre-B upre-B upre-B upre-B upre-B upre-B upre-B upre-B upre-B upre-B upre-B upre-B upre-B upre-B upre-B upre-B upre-B upre-B upre-Bupre-B upre-B upre-B upre-B upre-B upre-B upre-B upre-B upre-B upre-B upre-B upre-B upre-B upre-B upre-B upre-B upre-B upre-B upre-B upre-B upre-B upre-B upre-B upre-B upre-B upre-B upre-B upre-B upre-B upre-B upre-B upre-B upre-B upr-B upre-B upre-B upre-B upre-B upre-B upre-B upre-B upre-B upre-B upre-B upre-B upre-B upre-B upre-B upre-B upre-B upre-B upre-B upre-B upre-B upre-B upre-B upre-B upre-B upre-B upre-B upre-B upre-B upre-B upre-B upre-B upre-B upreB upre-B upre-B upre-B upre-B upre-B upre-B upre-B upre-B upre-B upre-B upre-B upre-B upre-B upre-B upre-B upre-B upre-B upre-B upre-B upre-B upre-B upre-B upre-B upre-B upre-B upre-B upre-B upre-B upre-B upre-B upre-B upre-B upre-B vunre B upre-B upre-B upre-B upre-B upre-B upre-B upre-B upre-B upre-B upre-B upre-B upre-B upre-B upre-B upre-B upre-B upre-B upre-B upre-B upre-B upre-B upre-B upre-B upre-B upre-B upre-B upre-B upre-B upre-B upre-B upre-B upre-B upre-BA upre-B upre-B upre-B upre-B upre-B upre-B upre-B upre-B upre-B upre-B upre-B upre-B upre-B upre-B upre-B upre-B upre-B upre-B upre-B upre-B upre-B upre-B upre-B upre-B upre-B upre-B upre-B upre-B upre-B upre-B upre-B upre-B upre-B unre B upre-B upre-B upre-B upre-B upre-B upre-B upre-B upre-B upre-B upre-B upre-B upre-B upre-B upre-B upre-B upre-B upre-B upre-B upre-B upre-B upre-B upre-B upre-B upre-B upre-B upre-B upre-B upre-B upre-B upre-B upre-B upre-B upro-B unre B upre-B unre B upre-B unre B upre-B unre B upre-B unre B upre-B unre B upre-B unre B upre-B unre B upre-B unre B upre-B unre B upre-B unre B upre-B unre B upre-B unre B upre-B unre B upre-B unre B upre-B unre B upre-B unre B upre-B unreB upre-B unre B upre-B unre B upre-B unre B upre-B unre B upre-B unre B upre-B unre B upre-B unre B upre-B unre B upre-B unre B upre-B unre B upre-B unre B upre-B unre B upre-B unre B upre-B unre B upre-B unre B upre-B unre B upre-B upre-B unre B upre-B unre B upre-B unre B upre-B unre B upre-B unre B upre-B unre B upre-B unre B upre-B unre B upre-B unre B upre-B unre B upre-B unre B upre-B unre B upre-B unre B upre-B unre B upre-B unre B upre-B unre B upre-B umre B upre-B umre B upre-B umre B upre-B umre B upre-B umre B upre-B umre B upre-B umre B upre-B umre B upre-B umre B upre-B umre B upre-B umre B upre-B umre B upre-B umre B upre-B umre B upre-B umre B upre-B umre B upre-B umre B upro-B umre B upre-B umre B upre-B umre B upre-B umre B upre-B umre B upre-B umre B upre-B umre B upre-B umre B upre-B umre B upre-B umre B upre-B umre B upre-B umre B upre-B umre B upre-B umre B upre-B umre B upre-B umre B upre-B umreB upre-B umre B upre-B umre B upre-B umre B upre-B umre B upre-B umre B upre-B umre B upre-B umre B upre-B umre B upre-B umre B upre-B umre B upre-B umre B upre-B umre B upre-B umre B upre-B umre B upre-B umre B upre-B umre B upre-B unre B upre-B umre B upre-B umre B upre-B umre B upre-B umre B upre-B umre B upre-B umre B upre-B umre B upre-B umre B upre-B umre B upre-B umre B upre-B umre B upre-B umre B upre-B umre B upre-B umre B upre-B umre B upro-B umre B upro-B umre B upro-B umre B upro-B umre B upro-B umre B upro-B umre B upro-B umre B upro-B umre B upro-B umre B upro-B umre B upro-B umre B upro-B umre B upro-B umre B upro-B umre B upro-B umre B upro-B umre B upro-B umre | ||

BEDIENUNGSANLEITUNG
natural_image
Simple line drawing of a gas cylinder with a pipe and valve, no text or symbols present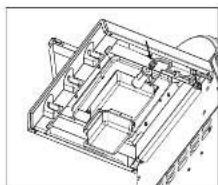
natural_image
Technical line drawing of a mechanical assembly with no visible text or symbols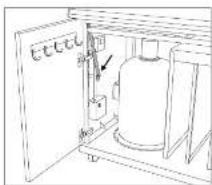
natural_image
Line drawing of a gas cylinder inside a storage unit with an open door and outlet (no text or symbols)natural_image
Technical line drawing of a mechanical assembly with pipes and blocks (no text or symbols)
flowchart
graph TD
    A["Step 1"] --> B["Step 2"]
    B --> C["Step 3"]
    C --> A
text_image
Technical diagram showing four steps of a mechanical assembly with labeled components x2 and x3, including directional arrows and circular indicators.IMPORTANT: Read the user guide before using the spolance. Keep the User Guide in a safe place. It contains important information about safety, operation and maintenance.
IMPORTANT FOR YOUR SAFETY
Anyone who operates the barbecue and the BLAZING ZONE must know and follow the ignition process precisely. Children must not be allowed to use the appliance.
Follow the separate assembly instructions exactly. Incorrect essentially can have dangerous consequences. Do not addition any flammable liquids, materials or coarse gas bottles in the vicinity of the barbecue. Never set up the barbecue or the gas bottle(s) in enclosed rooms without ventilation. Please read these instructions carefully before using your gas barbecue and the BLAZING ZONE. Also refer to the separate instructions for your barbecue. The barbecue including the BLAZING ZONE is for outdoor use only and a safety clearance of at least 1.5 m from flammable objects must be ensured.
GAS BOTTLES
Observe the safety instructions in the separate user guide for your Dualchef barbecue.
SAFETY NOTES
This user guide must be kept by the owner and be close at hand at all times.
Light the BLAZING ZONE in accordance with the INSTRUCTIONS FOR LIGHTING section of this guide.
- Use outdoors only.
- Read the instructions before using the appliance.
- CAUTION: Accessible parts may be very hot. Keep children away.
• This appliance must be kept away from flammable materials during use. - Do not move the appliance during use.
• Turn off the gas supply at the gas cylinder after use.
- Never use the barbecue under a canopy.
- Appliances equipped with castor wheels must no be pushed across uneven ground or steps.
• Make sure that the drip pan is always fully closed and engaged during operation.
- Wear protective gloves when touching hot parts.
- After grilling, always turn the gas regulating knot to the Oposition and close the gas supply at the gas bottle.
- When charging the gas bottle, make sure that, the gas regulating knob is in the ○ position and the gas supply is closed at, the gas bottle. IMPORTANT: Ensure that there are no ignition sources in the vicinity of the barbecue.
• After connecting a new gas bottle, check the connection parts in accordance with the instructions in the LEAK TEST section.
- If you suspect that parts are leaking, turn the gas regulating knob to the ○ position and close the gas supply at the gas bottle. Have the parts that carry gas checked at a specialist gas equipment retailer.
- Replace the gas hose immediately if it is damaged or displays signs of wear. The hose must be free from kinks and must not have any cracks. Do not forget to switch off the gas regulating knob and the gas supply before you remove the hose.
- Review the hose and the gas pressure regulator after it has been in use for 3 years from the date of purchase. Make sure that the gas pressure regulator and the hose comply with the corresponding EN standards (gas pressure regulator EN 10129 / gas hose EN 10485).
- The ventilation openings in the gas bottle compartment must never be closed or covered.
- Do not modify the appliance. Contact a specialist if you suspect there is a malfunction.
- It is essential to keep the gas hose away from the hot outside surfaces of the barbecue and the BLAZING ZONE. The hose must not be twisted. On barbecue models that have a hose guide, it is essential for the hose to be secured in this guide.
- The hose and regulator correspond to the respective national regulations and EN standards (gas pressure regulator EN 16129 / gas hose EN 10486).
- Contact a specialist gas equipment retailer if full power is not achieved and you suspect there may be a blockage in the gas supply.
- The BLAZING ZONE remains hot for quite some time after being switched off. Make sure you do not burn yourself or place any objects close to the BLAZING ZONE due to the danger of burns.
- Only use the BLAZING ZONE if I had been fully associated on a compatible Duachef' barbecue model according to the separate assembly instructions.
- CAUTION: Never use the BLAZING ZONE on its own/individually!
- Never cover the surface of the BLAZING ZONE; this can lead to an accumulation, on of heat.
- Never place the barbecue on wooden floors or other tannmable surfaces while it is in use. Keep the barbecue away from tannmable materials.
- Do not store the barbecue in the vicinity of highly inflammatory liquids or materials.
- If you store the barbecue indoors over winter, it is essential for the gas bottle to be removed. It should always be stored outdoors in a well ventilated location on which is inaccessible to children.
- Select a location that is as sheltered as possible from the wind before lighting the paracoustic
- When the barbecue is not in use, and once it has cooled down fully, protect it again, weather damage by using a cover. Covers can be purchased from your barbecue retailer.
- Remove the cover after heavy rain in order to avoid condensation build-up.
- Never leave the barbecue and the BLAZING ZONE unsupervised during operation.
- Do not move the barbecue while it is opening.
- CAUTION: Do not place any cocking parts on the BLAZING ZONE
LEAK TEST
WARNING: Ensure that no ignition sources are in the victory during the leak test. This also includes smoking. Never check for leaks with a burning match or a naked flame, and always to this task outdoors.
- The gas regulating knob must be in the ○position
- Down the gas supply on the bottle and brush a soap solution comprising 50% liquid soap and 50% water onto all parts that carry gas (connection of the gas bottle / gas pressure regulator / gas hose / gas inlet / connection on the valve). You can also use a leak spray.
- Bubalas forming in the soap solution inclosta that there are lacks.
IMPORTANT: do not use the barbecue and the BLAZING ZONE until at leaks have been eliminated. Turn all the gas supply at the gas bottle. - Eliminate the leaks by re-lightening the connections if possible, or else renew the defective parts.
- Repeat steps 1 and 2.
- Contact your specialist gas equipment retailer in the sales cannot be eliminated.
natural_image
Simple line drawing of a gas storage tank with a pipe and valve (no text or symbols)
natural_image
Technical line drawing of a mechanical assembly with no visible text or symbols
natural_image
Technical line drawing of a mechanical device with a cylindrical component and mounting bracket (no text or symbols)NOTE: Carry out the LEAK TEST each, one the gas bolte is connected or changed, and also at the start of the barbecue season.
INFORMATION ABOUT THE LEFT SIDE TABLE
After filling the BLAZING ZONE on your Duschef, for safety reasons it will no longer be accessible to fold down the left side shelf. Ho, fat could chip down when it is folded.
First, make sure that you have lifted the control dial supplied with the HAZING ZONE correctly according to the separate assembly instructions.
text_image
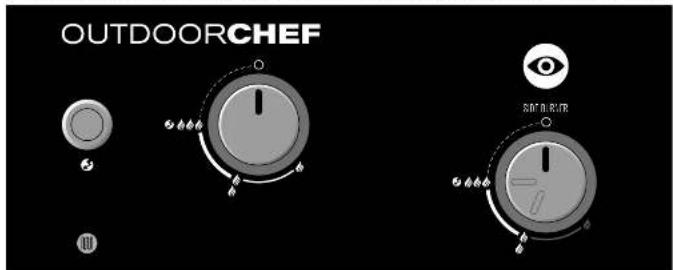
OUTDOORCHEF S 6666 S 6666 S 6666 S 6666 S 6666○: DFT position
◆ ◆ : Medium power
▲▲▲ high power
◇◇◇◇◇◇◇◇◇◇◇◇◇◇◇◇◇◇◇◇◇◇◇◇◇◇◇◇◇◇◇◇◇◇◇◇◇◇◇◇◇◇◇◇◇◇◇◇◇◇◇◇◇◇◇◇◇◇◇◇◇◇◇◇◇◇◇◇◇◇◇◇◇◇◇◇◇◇◇◇◇◇◇◇◇◇◇◇◇◇◇◇◇◇◇◇◇◇◇◇
6:lgm
NOTE: The HL AZING ZONE must only be operated using the new control dial supplied.
CAUTION: The control dist supplied has an internal inner which prevents the BLAZING ZONE from being operated at the lowest selling
This limitation is required as the BLAZING ZONE must only be operated at the settings. ◆ and ◆◆◆ use the BLAZING ZONE at the lowest setting.
BEFORE FIRST USE
- Clean all parts that come into contact with food.
- Check all parts that carry gas, as described in the CHECKING FOR LEAKS chapter
Also do this if your DUA_CHEF barbecue was delivered already assembled by the retailer. - Let the BLAZING ZONE bum for about 10 minutes at the 🔊️ 🔊️ setting.
- Make sure that the drip pan has been pushed in fully. This also applies to normal use of the barbecue.
INSTRUCTIONS FOR LIGHTING THE BLAZING ZONE
- Make sure that all connections between the gas base, the gas pressure regulator and the gas bottle are firmly tightened (as described in the LEAK TEST section).
- Open the metal cover of the BLAZING ZONE on the side table of your Dualcrite barbecue, CAUTION: Never ignite the BLAZING ZONE when the cover is closed.
- Open the gas supply at the gas bottle.
- Press the gas regulating knot and turn it anticlockwise to the ⏻️️️️️ setting. Press the ignition button 📋 and hold it until the spark catches and the gas is burning.
- If the gas does not ignite within 3 seconds, set the gas regulating knob to ☐ Wait 2 minutes to allow the uncombusted gas to dissipate. Then repeat points 4 to 5. Note: If you can see an even blue carpet of frame on the upper side of the burrier, this means the burrier has been grilled correctly.
- If it is not possible to light the barbecue after 3 attempts, check the causes (as described in the TROUBLESHOOTING section).
STAINLESS STEEL BARBECUE GRIDS
USAGE
Always cost the surface of the barbecue grid with a light film of oil to stop food from burning. Use a vegetable oil with a high smoke point (e.g. sucunda oil or rapeseed oil).
BEFORE FIRST USE
Clean the stainless steel barbecue grids with water or a mild soapy water solution before using them for the first time. Always put on barbecue gloves before touching the grids during use on the barbecue. Never place the hot stainless steel barbecue grids on flammable or heat-sensitive surfaces.
CLEANING
The grid filter supplied with the DUALCHCF barbecue can be used for easier removal of the stainless steel barbecue grids.
Observe the following points for cleaning:
- Allow the stainless steel barbecue grids to turn off on the barbecue at full power for around 10 minutes
- Use a brush with brass bristles (no. sleep bristles)
- Let them cool down afterwards
• In case of persistent dirt, use the OUTDOORCHEF CHEF CLEANER for effective cleaning
NOTE:
After cleaning, grease lighty with an edible oil with high heat stability (e.g. avocado oil or rapeseed oil).
TIPS AND TRICKS
INFRARED BARBECUEING
How does an intratered buffer work?
The gas flame created when the BLAZING ZONE is ignited to distributed economy in the ceramic plate through hundreds of very small openings and generates infrared radiation on the surface. This emits concentrated direct heat in excess of 900 degrees Celsius onto the food to be grilled. This makes it possible to work with for higher temperatures in comparison with a traditional gas stove.
Preparing steaks and other foods with the BLAZING ZONE
The OUTDOORCHEF BLAZING ZONE allows you to rapidly tear shocks and other types of more at temperatures in excess of 900 degrees Celsius, clearing a perfect crust through a process known as the "Mallard reaction".
We recommend that you avoid very fatty-costs and use only a very small quantity of a host-resistant edible oil to avoid flare-ups.
For thicker cuts of meal, we recommend that you heat these to the desired core temperature after barbecuing using indirect heat and a low temperature. Another option is to cook the meat indirectly at a low temperature or using a sous vide appliance first to bring it to the required core temperature and then finish it off with a delicious crust on the BLAZING ZONE.
If the stand device is used to increase the clearance, it is also possible to prepare other foods, such as vegetables or fish with the ELAZING ZONE. When barbocuing other foods and using other cooking utensils, it is important to make sure that the complete barbaceous surface is NOT covered (accumulation of heart) and to use only highly heat-resistant cooking utensils (e.g. cast iron).
Barbecuing with the BLAZING ZONE for the first time
When barsecuing for the first time, we recommend using the tap level of the stand device with the greatest clearance (see position 1) to check whether the heat is sufficient. If you would like more heat, you can regulate this using the stand device.
Cook your meal for a maximum of just 60 seconds on each side first to check whether this is sufficient. The line required to create an even crust will vary depending on the type of meat and fat content.
natural_image
Technical line drawing of a mechanical assembly with pipes and blocks (no text or symbols)
flowchart
graph TD
    A["Step 1"] --> B["Step 2"]
    B --> C["Step 3"]
    C --> A
Use of marinades and sauces
For steaks and other meat products, we recommend that you avoid marinsodes and sauces to allow you to fully appreciate the true flavour of the meat. A good steak needs nothing more than a little salt.
However, if you do wish to add mannades, make sure that you do not use too much oil to prevent flare-ups.
When using sauces (in particular, containing sugar) and spices, we recommend that you add these towards the end of the barbecuing line to make sure the food does not burn.
WE HOPE YOU HAVE LOTS OF FUN AND PLEASURE WITH YOUR OUTDOORCHEF BLAZING ZONE!
The following Blazing Zone components should be checked and cleaned at regular intervals (at least once a year) or after a long period of non-use.
Burner
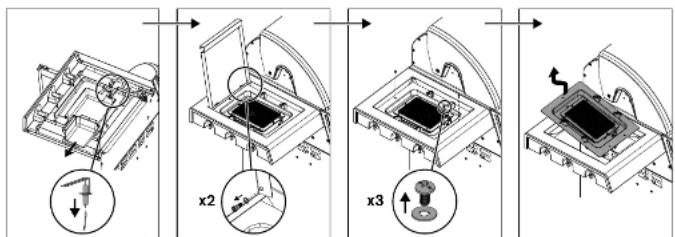
Please perform the following steps to inspect and clean the bumer regularly: Remove the complete BLAZING ZONE unit from the side table, as illustrated below.

text_image
Technical diagram showing four sequential steps of a mechanical assembly with labeled components x2 and x3, including directional arrows and circular indicators.After removing the BLAZING ZONE, carry out the following steps:
- Check the burner for any deformations or cracks.
- The Venturi pipes (pipe section on the burner) can be cleaned/crushed using a thin bottle brush.
- Clean the inside of the supporting frame of the Blazing Zone. Do not use any harsh or flammable cleaning agents for this.
- Replace the entire Blazing Zone unit in the side table, as described in the separate assembly instructions.
IMPORTANT: If you use a cleaning agent when cleaning, you must allow the barbecue to dry cut correctly alter clearing. To accelerate the drying procedure, you can switch the BLAZING ZONE on and lot it burn off for a few minutes at the highest setting with the lid open.
Gas hose
Check the gas hose. If it is brittle or cracks are apparent, replace it immediately.
MAINTENANCE
Regular maintenance of your BLAZING ZONE will ensure it functions correctly.
* At least twice a year, check all parts that carry gas; also check them after extended periods of storage. Spiders and other insects can cause blockages that must be cleared before use.
- If the barbecue is regularly pushed across uneven ground, check from lime to lime whether all screws are still light.
- If you have not used the barbecue for an extended period, you should carry out a LEAK TEST before using it again. If you have any doubts, please contact your gas supplier or the retailer.
• To prevent damage due to corrosion, oil all metal parts before long storage periods.
- Following long storage periods, and at least once a year during the barbecue season, you should check the gas hose for cracks, kinks and other damage. A damaged gas hose must be renewed immediately, as described in the SAFETY NOTES chapter.
- To allow you to enjoy using your barbecue and the Blazing Zone for as long as possible, protect it from the effects of the weather using a suitable OUTDOORCHEF cover once it has cooled down completely. Remove the cover after any rain in order to prevent condensation build up. Covers can be purchased from your barbecue retailer.
TROUBLESHOOTING
The burner does not ignite:
- Check if the gas supply is open at the gas bottle.
• Make sure there is enough gas in the bottle. - Check if sparks are passing between the electrode and the burner.
CAUTION: This inspection may only be performed with the gas supply fully closed!
No spark:
Make sure that the batteries have been inserted correctly and are charged.
- The distance between the burner and electrode is only allowed to be 4–5 mm.
- Check whether the cables of the electric ignition and the electrode are plugged in and firmly connected.
- Insert 2 new batteries (type AAA, 1.5 V) in the electric ignition.
Please contact the retailer if you are still unable to operate the barbecue after carrying out the actions listed above.
CONSUMER WARRANTY
1. Warranty and relation to other rights of the purchaser
As a private end user (consumer) purchasing this OUTDOORCHEF product from an authorised dealer, you are eligible to receive a manufacturer's warranty from OUTDOORCHEF AS ("OUTDOORCHEF").
The manufacturer's warranty entitles you to assert warranty claims against the warranty provider in accordance with this agreement. The warranty claims exist in addition to your other contractual or statutory rights. These other rights are not excluded or restricted by this warranty. Therefore, you can also assert other contractual or statutory claims against the respective obligated parties. Thus for example, claims asserted under the Product Liability Act are not affected by this warranty.
As the purchaser, you may in particular also assert contractual warranty claims against the seller. The reversal of the purchase contract, for example, can only be pursued against the seller, but not against OUTDOORCHEFunder this warranty.
2. Participants and warranty conditions
The warranty provider is OUTDOORCHEF. All end customers who purchase a new product from an authorised dealer for private purposes are eligible for the warranty. Proof of purchase shall be the purchase receipt. A purchase for private use means the product is purchased by a person for purposes which are, for the most part, not associated with either their commercial or their independent professional activities.
If it becomes recognised that a warranty claim must be made, said warranty claim must be asserted against the warranty provider within two months. Otherwise, the warranty claim will be excluded. For obvious defects, this limitation period begins upon receipt of the product. OUTDOORCHEF therefore recommends that you inspect the product for detects immediately upon receipt.
3. Scope
The warranty is valid from the date of purchase and is granted in the following cases, provided that no exclusion of facts exists pursuant to Paragraph 4:
| CERAMIC INFRARED BURNER 5 years Against prod. or defects or turn-throughSTAINLESS STEEL BARSECUE GRID 5 years Against remun in per load unit or turn-throughOTHER PARTS 2 years For all remaining manufacturing/molecular defects |
Inperfections which are not considered to be defects include functionally insignificant and reasonable irregularities, colour differences and minor defects such as production-related support points.
In a warranty case, OUTDOORCHEF will exchange and replace, at the purchaser's request, either the damages/detective parts or the online product. As far as is reasonable, an exchange can be made for a similar mode of a newer design, e.g. for a successor model. Insofar as the functionality of the product is not affected by a defect and to an extent reasonable for you as the customer, appropriate financial compensation can be offered to you in lieu of repair.
During the processing of a warranty claim (verification and possibly exchange), the purchaser shall not be entitled to assert a claim for a replacement, product or other compensation against OUTDOORCHEF. Underlaking warranty services does not mean that the warranty period is extended or restarted. Exchanged parts become the property at OUTDOORCHEF. The warranty period will only start again if the product is exchanged.
Any further claims against the warranty provider are not covered by this warranty. However, this does not restrict or exclude your claims on other legal grounds (see also Section 1 above).
4. Exclusion
The warranty shall not apply in the following cases:
- Normal wear and tear resulting from normal intended use, especially to general wearing parts such as ignition and battery, electrode, ignition cable, gas hose, gas pressure regulation, drip collector tray and drip pan.
- Defects and/or damage due to misuse, improper use, in particular due to not following the user guide, safety instructions or operating/maintenance instructions (for example, use of outdoor equipment indoors, damage resulting from income; installation, improper cleaning of the cancelled surface of the funnel or barbecue grid, failure to perform a leakage test to the extent recommended in the user guide, use of harmful chemicals, unintended use, etc.).
- Defects and/or damage caused by intervention or repair by persons other than those authorised by OUTDOORCHEF.
- Defects and/or damage caused by destructive weather influences (e.g. hail or lightning).
- Defects and/or damage due to vandalism or due to intentional or negligent damage to the extent that this was not caused by OUTDOORCHEF.
- Defects and/or damages incurred during transport to the buyer, unless the transport was arranged by the warranty provider.
- Defects and/or damage due to force majeure.
- Defects and/or damages due to wear caused by professional use for commercial purposes (e.g. use in a hotel or restaurant).
5. Processing of warranty claims
In the event of a warranty claim, please contact us or one of our authorised dealers (a dealer directory is available at www.outstorech.com) as soon as possible and tell us your address and if possible, the product/product part, sales reseller information, serial number and item number (bath can be found on the data slicker on your barbecue; see the first action of the Lise Guide). Please describe the defect and if possible, also send us a photo off. In order to verify your warranty claim, you will need to return the product as us or your local dealer (bring-in warranty). In the case of justified warranty claims, we will announce the necessary and required transport and shipping costs. Otherwise we will send the product back to you all your expense.
The registered brand OUTDOORCHEF is represented by the following enterprise:
Outdoanchef AG | Eggbühlstrasse 28 | Postfisch | BOSC Zurich, Switzerland | www.outdoarchef.com
* A dealer directory can be found on our website at OLIDSORCHE-COM.
** The serial number and item number can be found on the data sticker on your barbecue (see the first section of this USER GUIDE).

MODE D'EMPLOI
natural_image
Simple line drawing of a gas storage tank with a pipe and valve (no text or symbols)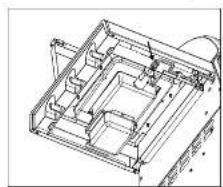
natural_image
Technical line drawing of a mechanical assembly with no visible text or symbols
natural_image
Line drawing of a mechanical device with a cylindrical component and an arrow pointing to a component (no text or symbols present)natural_image
Technical line drawing of a mechanical assembly with pipes and structural components (no text or symbols)
flowchart
graph TD
    A["Component 3"] --> B["Component 2"]
    B --> C["Component 1"]
    C --> D["End"]
Marinades et sauces
text_image
Technical diagram showing four steps of a mechanical assembly with labeled components x2 and x3, including directional arrows and circular indicators.natural_image
Simple line drawing of a cylindrical container with a mechanical component and directional arrows (no text or symbols)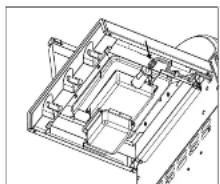
natural_image
Technical line drawing of a mechanical assembly with no visible text or symbols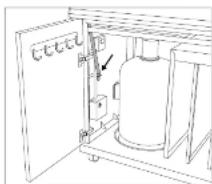
natural_image
Line drawing of a mechanical device with a cylindrical component and an open door (no text or symbols)natural_image
Technical line drawing of a mechanical assembly with pipes and blocks (no text or symbols)
flowchart
graph TD
    A["Component 1"] --> B["Component 2"]
    B --> C["Component 3"]
    C --> A
    style A fill:#99ccff,stroke:#333
    style B fill:#99ccff,stroke:#333
    style C fill:#99ccff,stroke:#333
text_image
Technical diagram showing four sequential steps of a mechanical assembly with labeled components x2 and x3, including directional arrows and circular indicators.natural_image
Simple line drawing of a gas storage tank with a pipe and valve (no text or symbols)
natural_image
Technical line drawing of a mechanical assembly with no visible text or symbols
natural_image
Line drawing of a mechanical or industrial device with a cylindrical component and an open door (no text or symbols)natural_image
Technical line drawing of a mechanical assembly with pipes and blocks (no text or symbols)
flowchart
graph TD
    A["Step 1"] --> B["Step 2"]
    B --> C["Step 3"]
    C --> A
text_image
Technical diagram showing four steps of a mechanical assembly with labeled components x2 and x3, including directional arrows and circular indicators.natural_image
Technical line drawing of a mechanical assembly with no visible text or symbols
natural_image
Technical line drawing of a mechanical assembly with pipes and blocks (no text or symbols)
flowchart
graph TD
    A["Step 1"] --> B["Step 2"]
    B --> C["Step 3"]
    C --> A
text_image
Technical diagram showing four sequential steps of a mechanical assembly with labeled components x2 and x3, including directional arrows and circular indicators.Når du har laget BLAZING ZONE erbeden ud gst logende
-
Kontroller, am expandable or deformally after onset
-
Venlun-rønnte (rarsly-ck på brænden) kan renses/bøsles med en lyne flaskerenset.
- Rens BLAZING ZONEs bereramme på indenziden; drug, kne agressive eller brand stige vergaringsmdet.
- Sæt de retter hele BLAZING /ONE-entreden tilbage i s.dahylden; teg den separate manteringsejörning.
natural_image
Simple line drawing of a gas cylinder with a pipe and valve, no text or symbols present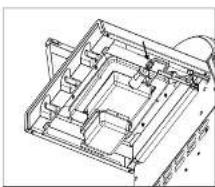
natural_image
Technical line drawing of a mechanical assembly with no visible text or symbols
text_image
tttti wnatural_image
Technical line drawing of a mechanical assembly with pipes and blocks (no text or symbols)
flowchart
graph TD
    A["Step 1"] --> B["Step 2"]
    B --> C["Step 3"]
    C --> A
text_image
Technical diagram showing four steps of a mechanical assembly with labeled components x2 and x3, including directional arrows and circular indicators.natural_image
Technical line drawing of a mechanical assembly with internal components (no text or symbols)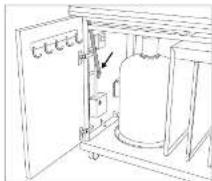
MERKNAD: Utter TETTHETSKONTROLL, avengang du kobier till efter skifter gassflaske og har grillesongen starter.
INFO OM VENSTRE SIDEBORD
Ved en opprosning av din Duachel med BLAZING ZONE kan av sikker elsgromer ikke lengen versre sidebord klappes red. Når den folds, kan det renne ned kannt tett:
68 59
OUTDOORCHEF.COM/OUTDOORCHEF.COM
FORKLARING AV SYMBOLENE PÅ BETJENINGSKONTROLLEN FOR BLAZING ZONE
○ : AV
: models affected
[Non-Text]
Terning
: Tenner
natural_image
Technical line drawing of a mechanical assembly with pipes and blocks (no text or symbols)
flowchart
graph TD
    A["Component 1"] --> B["Component 2"]
    B --> C["Component 3"]
    C --> A
    style A fill:#99ccff,stroke:#333
    style B fill:#99ccff,stroke:#333
    style C fill:#99ccff,stroke:#333
VEDLIKEHOLD AV BLAZING ZONE
Følgende komponenter til Blazing Zona bar kontrolleres og rangjeres med jovne melomrom (mind en gang i året) eller efter en lang periode uten bruk.
Brenner
text_image
Technical diagram showing four sequential steps of a mechanical assembly with labeled components x2 and x3, including directional arrows and circular indicators.natural_image
Simple line drawing of a gas cylinder with a pipe and valve, no text or symbols present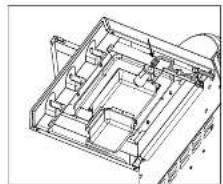
natural_image
Technical line drawing of a mechanical assembly with no visible text or symbols
natural_image
Line drawing of a mechanical device with labeled components and an arrow indicating direction (no text or symbols present)Kaikka of napuregion in arm?
natural_image
Technical line drawing of a mechanical assembly with pipes and blocks (no text or symbols)
flowchart
graph TD
    A["Step 3"] --> B["Step 2"]
    B --> C["Step 1"]
    C --> D["End"]
text_image
Technical diagram showing four steps of a mechanical assembly with labeled components x2 and x3, including directional arrows and circular indicators.natural_image
Simple line drawing of a gas storage tank with a pipe and valve (no text or symbols)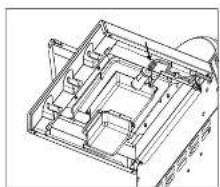
natural_image
Technical line drawing of a mechanical assembly with internal components (no text or symbols)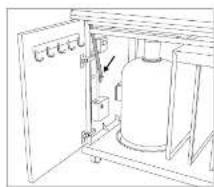
natural_image
Line drawing of an industrial equipment cabinet with a cylindrical tank and internal components (no text or symbols)ATHUGID: Frankverrö LEKAPRÖFUN eller lvejra lengingu eda skipii à gaskåbruir, sem og i appralf grillimabizins.
UPPLÍSINGAR UM HLIBARBORD VINSTRA MEGIN
Pegar BLAZING ZONE er sell upp á Dualchei-grilnu er af önyggisálebetum ekci lengar megzi az fela vinlara Hildarboróð niúur. Heltu er á ad hel tula leki úr potluurum.
86 87
OUTDOORCHEF.COM/OUTDOORCHEF.COM
SKYRINGAR TÁKNA Á STJÓRNBORDINU FYRIR BLAZING ZONE
natural_image
Technical line drawing of a mechanical assembly with pipes and blocks (no text or symbols)
flowchart
graph TD
    A["Component 1"] --> B["Component 2"]
    B --> C["Component 3"]
    C --> A
    style A fill:#99ccff,stroke:#333
    style B fill:#99ccff,stroke:#333
    style C fill:#99ccff,stroke:#333
text_image
Technical diagram showing four sequential steps of a mechanical assembly with labeled components x2 and x3, including directional arrows and circular indicators.Outdoorchet AG | Eggbühlstrasse 25 | Foettsch | BOC Zurich, Swiss | www.outdoorchet.com
* List yfir soluab la et é vels dunn ckkar à OUTDOORCHEF.COM
- Radnúmer og vöranúmer eru å upplýsingalmidanum å gríru. (sjå fysta katta i pessum NOTKUNARLEIDBEININGUM)

ΟΔΗΓΙΕΣ ΧΡΗΣΗΣ
natural_image
Simple line drawing of a mechanical device with arrows indicating motion or force (no text or symbols)
natural_image
Technical line drawing of a mechanical assembly with no visible text or symbols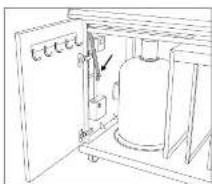
natural_image
Technical line drawing of a mechanical assembly with pipes and structural components (no text or symbols)
flowchart
graph TD
    A["Component 3"] --> B["Component 2"]
    B --> C["Component 1"]
    C --> D["End"]
text_image
Technical diagram showing four sequential steps of a mechanical assembly with labeled components x2 and x3, including directional arrows and circular indicators.Note the afoles on the poobas BLAZING ZONE ovejots we slhe
-
Ελέγετε την κατία υπ παροισφάσες ή σχοίματε.
-
Crusăței, Răței (Rothsliuk am Bremn) prinopău va căbăpăunav/boațunavun pe kenciu 30ăransu kădăpăunav șkala.
- Kăbăpăe to coenorpiu teu unctorpracou măndiu Blasting Zone, olda muy phepnostede acyepd i cuțivata usta, coenorpiu
- Im atyanu crevamutulamjana oksljan in juzidă Rising Zone ma nicaupă sporăi, oikolaculvarna ne fipayamly afingyi, cucapalvengg.
natural_image
Simple line drawing of a tank with a curved pipe and two arrows indicating flow or movement (no text or symbols)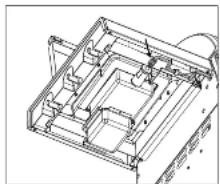
natural_image
Technical line drawing of a mechanical assembly with no visible text or symbols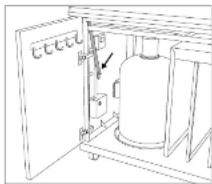
natural_image
Technical line drawing of a mechanical device with a cylindrical component and labeled ports (no text or symbols present)natural_image
Technical line drawing of a mechanical assembly with pipes and blocks (no text or symbols)
flowchart
graph TD
    A["Step 1"] --> B["Step 2"]
    B --> C["Step 3"]
    C --> A
text_image
Technical diagram showing four sequential steps of a mechanical assembly with labeled components and directional arrows indicating motion.Po wytnet jednotky BLAZING ZONE postupuje následovrě
natural_image
Simple line drawing of a gas cylinder with a pipe and valve, no text or symbols present
natural_image
Technical line drawing of a mechanical assembly with no visible text or symbols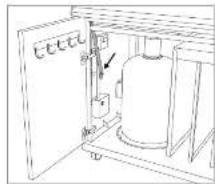
text_image
cttct B A Dnatural_image
Technical line drawing of a mechanical assembly with pipes and blocks (no text or symbols)
flowchart
graph TD
    A["Component 1"] --> B["Component 2"]
    B --> C["Component 3"]
    C --> A
    style A fill:#99ccff,stroke:#333
    style B fill:#99ccff,stroke:#333
    style C fill:#99ccff,stroke:#333
natural_image
Technical line drawing of a mechanical assembly with no visible text or symbols
natural_image
Pure technical line drawing of a mechanical assembly without any text, numbers, or symbols
flowchart
graph TD
    A["Component 1"] --> B["Component 2"]
    B --> C["Component 3"]
    C --> A
    style A fill:#99ccff,stroke:#333
    style B fill:#99ccff,stroke:#333
    style C fill:#99ccff,stroke:#333
text_image
Technical diagram showing four sequential steps of a mechanical assembly with labeled components x2 and x3, including directional arrows and circular indicators.natural_image
Simple line drawing of a gas storage tank with a pipe and valve (no text or symbols)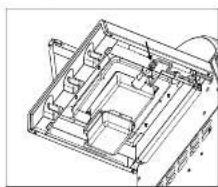
natural_image
Technical line drawing of a mechanical assembly with no visible text or symbols
natural_image
Line drawing of a mechanical device inside a cabinet (no text or symbols)natural_image
Technical line drawing of a mechanical assembly with pipes and blocks (no text or symbols)
flowchart
graph TD
    A["Component 1"] --> B["Component 2"]
    B --> C["Component 3"]
    C --> A
    style A fill:#99ccff,stroke:#333
    style B fill:#99ccff,stroke:#333
    style C fill:#99ccff,stroke:#333
text_image
Technical diagram showing four sequential steps of a mechanical assembly with labeled components x2 and x3, including directional arrows and circular indicators.natural_image
Technical line drawing of a mechanical assembly with no visible text or symbols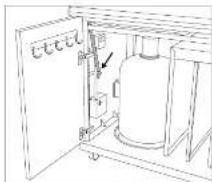
natural_image
Technical line drawing of a mechanical assembly with pipes and blocks (no text or symbols)
flowchart
graph TD
    A["Stage 1"] --> B["Stage 2"]
    B --> C["Stage 3"]
    C --> D["End"]
text_image
Technical diagram showing four sequential steps of a mechanical assembly with labeled components x2 and x3, including directional arrows and circular indicators.natural_image
Simple line drawing of a gas cylinder with a pipe and valve, no text or symbols present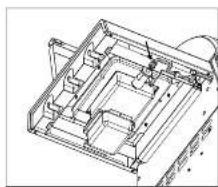
natural_image
Technical line drawing of a mechanical assembly or enclosure (no visible text or symbols)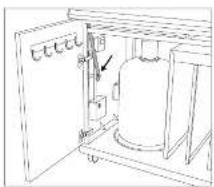
natural_image
Line drawing of a mechanical or electrical enclosure with a cylindrical component and labeled components (no text or symbols present)NAPOMENA: Provacite ISPITIVANJE NEPROPUSNOSTI nakon svakog prikjučivanja li zamjene plinske boci te na početku sezone roštijanje.
INFORMACIJE O LIJEVOM BOČNOM STOLU
Nakori šlo se vaš Duschel opremi s uređajeni BLAZING ZONE. Ijeva očnja povlina za udlaganje docy sigurnosnih se radoga vše ne miože preklapali prema do je.
Frikom skapsnja moglo bi dodi do curanja vno o mas.
TUMAČENJE ZNAKOVA NA UPRAVLJAČKOJ PLOČI ZA UREĐAJ BLAZING ZONE
Prva se avjorte da ste okretni regulator koy se isporušuje zajedno a uredajem BLAZING ZONE pravina montreal i skadi, a posbairn uautama da gvelavljaje.

text_image
OUTDOORCHEF 5000 5000 5000 5000natural_image
Technical line drawing of a mechanical assembly with pipes and blocks (no text or symbols)
flowchart
graph TD
    A["Step 1"] --> B["Step 2"]
    B --> C["Step 3"]
    C --> A
Upotreba marinada i umaka
Preporučajemo da kod pripreme stejkova i ostalog ne upotrebjavate marinsde i irnake kako baste u porpunosti ostavili neizmijenjeni okus messa. Za počar stek sobrebné e samo malu soli.
Aka unatoć tomé trichato radići s marnadama, parte da ne upotrabljevate provilo uje da biste objegli garancja masroža.
Alva upolrealjavale unlake (posevice one koji sadže šeter) i začine, preporučajenju da in stavle negosredno piec kraj ročljanja kako krana koja se ročilija ne ti lajorjeva.
ŽELIWO VAM MNOGO ZABAVE TUŽIKA S VASIM OUTDOORCHEF BLAZING ZONE LREDAJEMI
ODRŽAVANJE UREĐAJA BLAZING ZONE
Slednče komponente určaja. Baving Zona potrebna je provoetih i ožistiti u redovitim vremanskro nizmacins (najmenja jednom godštje) ili u slučaju duleg nekorštenja.
Plamenik
Da biste preveni pionniko i čistili in a redoviti surnacima, morato: prabti slodoće korace: tvadita cijelu odinizu BLAZING ZONE ir hočnag stola postupajući pri lorne u skladu sa sjedećom iustracjorn:
text_image
Technical diagram showing four steps of a mechanical assembly with labeled components x2 and x3, including directional arrows and circular indicators.natural_image
Simple line drawing of a mechanical device with arrows indicating motion or force (no text or symbols)
natural_image
Technical line drawing of a mechanical assembly with no visible text or symbols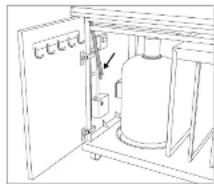
natural_image
Technical line drawing of a mechanical device with no visible text or symbolsNAPOTEK: PREIZKUS TESNJENJA zvedile po vsidi prikjučilvi ali zarenjavi plinske jeklenke let na začetku sezone peke na žara.
INFORMACIJE O STRANSKI MIZI NA LEVI
natural_image
Technical line drawing of a mechanical assembly with pipes and blocks (no text or symbols)
flowchart
graph TD
    A["Component 1"] --> B["Component 2"]
    B --> C["Component 3"]
    C --> A
    style A fill:#99ccff,stroke:#333
    style B fill:#99ccff,stroke:#333
    style C fill:#99ccff,stroke:#333
Uporaba marinad in omak
text_image
Technical diagram showing four sequential steps of a mechanical assembly with labeled components x2 and x3, including directional arrows and circular indicators.natural_image
Simple line drawing of a gas cylinder with a pipe and valve, no text or symbols present
natural_image
Technical line drawing of a mechanical assembly with no visible text or symbols
natural_image
Line drawing of an industrial equipment cabinet with a cylindrical tank and control panel (no text or symbols)natural_image
Technical line drawing of a mechanical assembly with pipes and blocks (no text or symbols)
flowchart
graph TD
    A["Step 1"] --> B["Step 2"]
    B --> C["Step 3"]
    C --> A