MKW-11M - Coffee machine MPM - Free user manual and instructions
Find the device manual for free MKW-11M MPM in PDF.

| Product type | Automatic espresso machine |
| Brand | MPM |
| Model | MKW-11M |
| Water tank capacity | 1.8 L |
| Bean hopper capacity | Approx. 200 g |
| Pump pressure | 15 bar |
| Power | 1350 W |
| Power supply | 220-240 V, 50/60 Hz |
| Cord length | 1.05 m |
| Main functions | Espresso, Double Espresso, Americano, Cappuccino, Latte, Hot water, Milk froth, Cleaning |
| Grind adjustment | 15 levels (from 1 = fine to 15 = coarse) |
| Milk frother system | Automatic with milk carafe and hose |
| Control panel | Touch with icons and LED indicators |
| Maintenance | Manual cleaning, automatic descaling, cleaning of the brew unit and grinder |
| Safety | Automatic shut-off, standby after 28 min, overheat protection |
| Color | Black |
| Dimensions (W x D x H) | 24 x 34 x 40 cm (approx) |
| Weight | 9.5 kg (approx) |
| Material | ABS plastic and stainless steel |
Frequently Asked Questions - MKW-11M MPM
User questions about MKW-11M MPM
0 question about this device. Answer the ones you know or ask your own.
Ask a new question about this device
Download the instructions for your Coffee machine in PDF format for free! Find your manual MKW-11M - MPM and take your electronic device back in hand. On this page are published all the documents necessary for the use of your device. MKW-11M by MPM.
USER MANUAL MKW-11M MPM
EN We wish you satisfaction from using the product and invite you to check a wide range of other MPM/ appliances.
natural_image
Modern silver coffee maker with glass cup, no visible text or symbolsNÁVOD K OBELLZE 3

BEZPEČNOSTNÍ POKYNY PŘI POUŽÍVÁNÍ
natural_image
Close-up of a transparent plastic container with a black lid and internal compartments (no visible text or symbols)Nádrž na vodu:
natural_image
Close-up of a black plastic fan or vent with a circular button, no visible text or symbolsnatural_image
Close-up of a metallic appliance with a black cable inserted, showing internal components (no visible text or symbols)
PŘÍPRAVA JEDNOHO ŠÁLKU ESPRESSA
natural_image
Close-up of a stainless steel coffee maker with a glass cup and black lid (no visible text or symbols)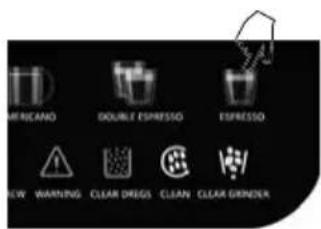
natural_image
Close-up of a stainless steel coffee maker with a black lid and three cups on the side (no visible text or symbols)
VAŘENÍ AMERICANA
natural_image
Close-up of a modern stainless steel coffee maker with a glass cup and black lid (no visible text or symbols)
VAŘENÍ CAPPUCCINA
natural_image
Close-up of a modern stainless steel water dispenser with clear glass and black lid (no visible text or symbols)
natural_image
Close-up of a modern glass water dispenser with a black lid, no visible text or symbols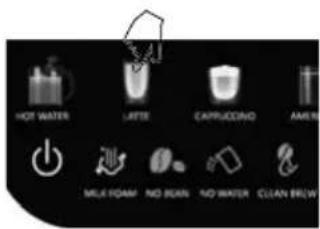
PŘÍPRAVA HORKÉ VODY
natural_image
Close-up of a modern stainless steel water dispenser with clear glass volume (no text or symbols visible)
RUČNÍ NAPĚŇOVÁNÍ MLÉKA
natural_image
Close-up of a stainless steel water dispenser with a black handle, no visible text or symbolsnatural_image
Close-up of a modern stainless steel coffee maker with a glass cup and side grilles (no visible text or symbols)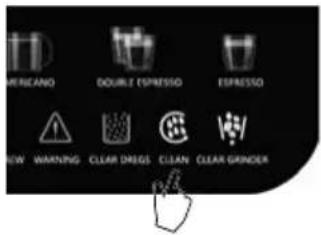
VYPRÁZDNĚNÍ KOMORY NA FAZOLE
NASTAVENÍ DÁVKOVÁNÍ KÁVY A MLÉKA
natural_image
Mechanical component with black and white sections, no visible text or symbolsnatural_image
Close-up of a transparent plastic container with a lid and internal structure (no visible text or symbols)Wasserbehälter
natural_image
Close-up of a modern stainless steel coffee maker with a black lid and ventilation grilles (no visible text or symbols)Tropfschale:
natural_image
Close-up of a stainless steel kitchen appliance with a small electronic device attached (no visible text or symbols)
natural_image
Close-up of a modern stainless steel coffee maker with glass cup and side sink (no visible text or symbols)
natural_image
Close-up of a modern stainless steel coffee maker with a glass pitcher inside (no visible text or symbols)
CAPPUCCINO BRAUEN
natural_image
Close-up of a stainless steel water dispenser with a glass cup and black handle (no visible text or symbols)
natural_image
Close-up of a modern stainless steel water dispenser with a glass cup (no visible text or symbols)
natural_image
Close-up of a stainless steel water dispenser with clear glass and black lid (no visible text or symbols)
natural_image
Close-up of a stainless steel appliance with a black handle and glass container (no visible text or symbols)natural_image
Close-up of a modern stainless steel coffee maker with a glass cup and side grater (no visible text or symbols)
ENTLEEREN DES FACHS FÜR KAFFEEBOHNEN
natural_image
Pure mechanical component diagram without any text, numbers, or symbolsREINIGEN DER TROPFSCHALE
natural_image
Close-up of a transparent plastic container with a black lid and internal compartments (no visible text or symbols)Veepaak:
natural_image
Close-up of a mechanical component with a circular knob and central hub (no visible text or symbols)natural_image
Close-up of a stainless steel kitchen appliance with a power cord and attached electronic device (no visible text or symbols)
ÜHE TASSI ESPRESSO KEETMINE
natural_image
Modern stainless steel water leveler with glass cup and side arm (no visible text or symbols)
KAHEKORDSE TASSI ESPRESSOT KEETMINE
natural_image
Close-up of a stainless steel industrial water dispenser with three white cups at the base (no visible text or symbols)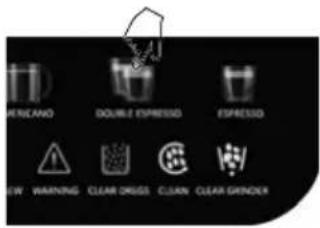
AMERICANO ÖLLETEHAS
natural_image
Close-up of a stainless steel coffee maker with a glass mug, no visible text or symbols
CAPPUCCINO PRUULIMINE
natural_image
Close-up of a modern stainless steel water dispenser with a glass cup (no visible text or symbols)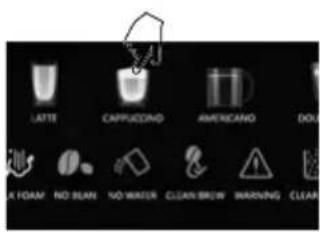
MÄRKUSED:
natural_image
Close-up of a modern glass water dispenser with a black lid, mounted on a metal base (no visible text or symbols)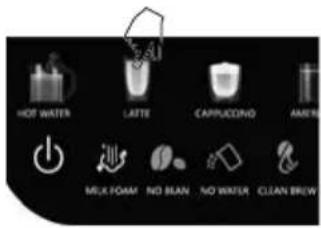
MÄRKUSED:
natural_image
Close-up of a modern stainless steel water dispenser with a glass cup (no visible text or symbols)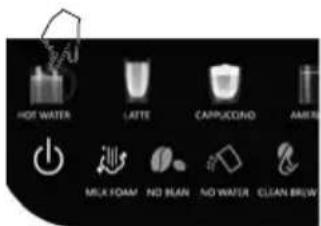
natural_image
Close-up of a stainless steel water dispenser with a black handle, mounted on a cylindrical stand (no visible text or symbols)natural_image
Close-up of a stainless steel water dispenser with a clear glass bulb and ventilation grilles (no visible text or symbols)
KOHVIUBADE SEKTSIOONI TÜHJENDAMINE
KOHVIMAHUTI PUHASTAMINE
natural_image
Pure mechanical component diagram without any text, numbers, or symbolsTILGUTI ALUSE PUHASTAMINE
-Read the instructions carefully before use.
- Do not immerse the device, cable or plug in water or other liquids!
-Take special care when children are near the device!
-Fill the tank only with cold water.
- Never use a damaged device, including one with a damaged cord or plug, in which case have it repaired at an authorised service centre.
-Use of accessories not recommended by the manufacturer may cause damage to the device, fire or personal injury.
- Do not hang the cable on sharp edges or allow it to come into contact with hot surfaces.
-You must not place the working device in a cabinet.
-Do not use the device outdoors.
-Before cleaning, first unplug the device from the mains socket and wait until it has cooled down completely.
-Never leave the device connected to a power source unattended.
-Do not start the device without water.
- Do not place the device near electric or gas cookers, burners, ovens, etc.
- After the device is switched on, do not pour water into the tank.
- Disconnect the device from the power supply each time when the device is left unattended and before any assembling, disassembling, or cleaning works.
-The device should be switched off when finished working!
- Do not use the device for purposes other than those for which it was intended.
-The device is intended for domestic use only.
- The device should be connected to a mains socket outlet with a grounding pin.
- The device may be used by people with reduced physical, sensory or mental abilities, as well as those without prior knowledge or experience in using such types of device, provided that they either are supervised or have been instructed and fully understood the training content.
- The device must be kept away from children. Keep the device and cable out of the reach of children.
-Children are forbidden to perform cleaning and maintenance activities.
-Children should be supervised to ensure that they do not play with the equipment/device.
- The temperature of the device's surfaces may be higher during operation.
-Use the device on a smooth and stable surface.
- Do not pull the plug out of the power socket by pulling the cord.
-Do not connect the plug to the power socket with wet hands.
-For the safety of children, please do not leave freely accessible parts of the packaging (plastic bags, cardboard boxes, polystyrene, etc.).
- WARNING! Do not allow children to play with the film. Danger of suffocation!
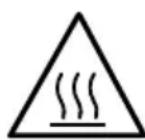
Caution! Risk of burning – be careful. Hot vapours may be released during operation
of the device, the working parts of the device become hot, the prepared drinks are hot.
- Caution! Risk of injury. Do not go near components of the device that move during operation, e.g. put your hands into the grinder.
- Caution! In order to avoid the danger caused by unintentional resetting of the thermal switch, the device should not be used together with external timers or connected to electrical circuits whose on/off switching is controlled automatically.
-Caution! In order to maintain the efficiency of the device and to prevent food contamination, clean the device regularly according to the instructions contained in the “CLEANING AND MAINTENANCE” section.
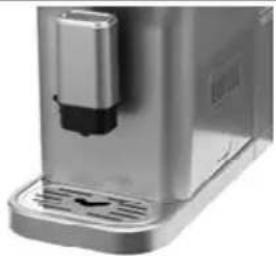
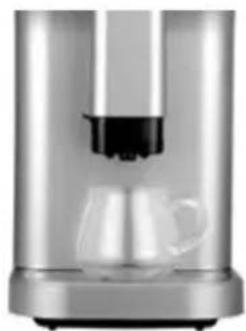
DEVICE DESCRIPTION
- Drip tray
- Drip tray cover
- Internal drip tray
- Grounds container
- Brewer
- Service doors
- Adjustable coffee dispenser
- Control panel
- Grinding level adjustment knob
- Upper grinder burr
-
Bottom grinder burr
-
Coffee bean compartment
- Coffee bean compartment lid
- Water tank
- Milk container - 1 set (lid, hose and tube)
- Milk frother
- Coffee outlet lid
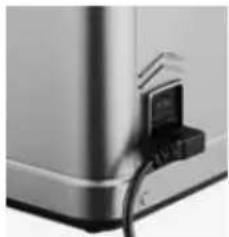
- Power on / off switch
- Cleaning brush
- Dead corner of the brewer
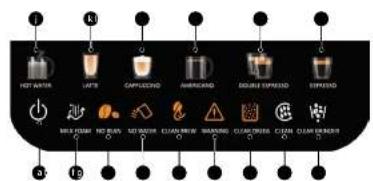
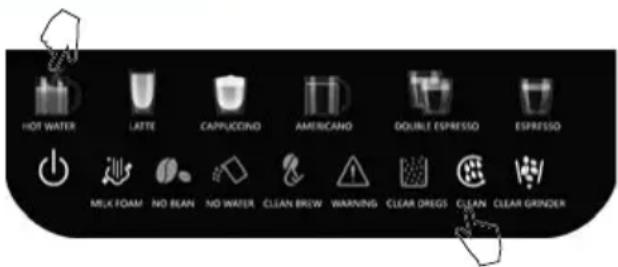
CONTROL PANEL DESCRIPTION
a. Power switch
b. Milk frothing
c. No coffee beans
d. Low water level / No water tank
e. Brewer cleaning indicator
f. Warning indicator
g. Grounds container is full
h. Cleaning
i. Grinder emptying
j. Hot water
k. Latte
I. Cappuccino
m. Americano
n. Double Espresso
o. Espresso
BEFORE FIRST USE
Remove the coffee maker from the box; remove all stickers, transport protectors, bags and fillers. Check whether all accessories are complete and the device is not damaged. Check all accessories and their functions. It is recommended to keep the original packaging for use in the future. Then, carry out the following activities.
- Before first use, remove the water tank, milk container, brewer and milk frother, then rinse them with clean water and wipe them dry.
- Check and make sure that all removable parts are securely fitted:
natural_image
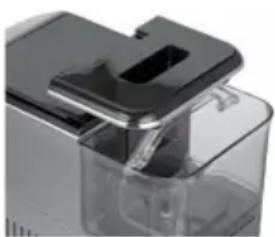
Close-up of a transparent plastic container with a black lid and internal compartments (no visible text or symbols)Water tank:
- Fill the water tank with fresh water up to the Max mark, then refit the tank into the device and make sure it is fitted correctly. Close the cover of the water tank
natural_image
Close-up of a black plastic fan or vent with a circular button, no visible text or symbols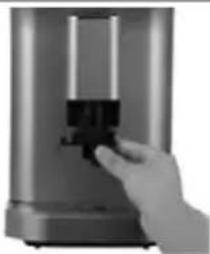
natural_image
Hand inserting a black component into a metallic cylindrical device (no visible text or symbols)
natural_image
Close-up of a stainless steel kitchen appliance with black lid and side arm (no visible text or symbols)
natural_image
Close-up of a metallic cylindrical device with a black handle and a small rectangular component, no visible text or symbols.
natural_image
Close-up of a metallic industrial machine with visible internal components and mounting base (no text or symbols)
natural_image
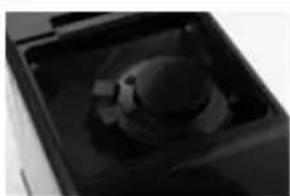
Close-up of a modern stainless steel water dispenser with a black handle and ventilation grilles (no visible text or symbols)Grinding level adjustment knob:
The coffee grinding level can be adjusted in the grinder by turning the control knob in the coffee container:
- when the grinder is grinding coffee beans, turn the adjustment knob,
CAUTION! Never make grinding level adjustments when the coffee is in the compartment and the grinder is not running. This can damage the grinder.
- The grinding adjustment range on the knob indicates the grinding level from 1 (finest) to 15 (coarsest). The digit on the grinding control knob indicated by the arrow is the currently selected grinding setting.
Milk frother:
- open the coffee outlet lid and make sure the milk frother is properly fitted. - if the milk frother is fitted correctly, close the coffee outlet lid.
Milk container:
- put the milk hose into the milk frother opening on the side of the coffee outlet - then put the hose into the milk frother lid - fit the tube in the container lid - close the milk container with the lid
Coffee dispenser height adjustment:
- adjustable coffee dispenser height ranges between 85-115 mm.
Brewer:
Open the service door and check whether the brewer is fitted correctly - check whether the brewer arrow is aligned with the arrow on the device - an audible click indicates that the brewer is fitted correctly - the warning indicator ⚠️ will light up permanently if the brewer is not fitted in its place.
Closing the service door:
- the service door and brewer are on the same horizontal plane.
Internal drip tray and grounds container:
- open the service door and check whether the drip tray and the grounds container are fitted in their places. - The warning indicator ⚠️ will light up permanently and the device will not operate if the internal drip tray is not assembled correctly or if there is a foreign object in front of the grounds container.
natural_image
Close-up of a metallic industrial water dispenser with a black handle and ventilation grilles (no visible text or symbols)Drip tray:
- place the drip tray plate on the drip tray. The drip tray must be fitted properly in order to place a cup for coffee, milk or hot water on it - place the drip tray in the device.
Caution! The drip tray collects water from the dispenser's spout during each rinsing or self-cleaning, as well as coffee, which may be spilled during brewing. Clean the drip tray and empty it ideally after each use!
Coffee bean compartment:
- fill the coffee been compartment with a suitable amount of fresh coffee beans, maximum 200 g, then close the coffee bean compartment lid.
Caution! if the upper burr is removed, before filling the coffee bean compartment, make sure that the burr is fitted properly!
USING THE DEVICE
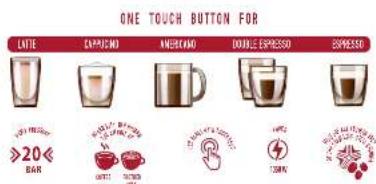
This device is a multi-purpose coffee maker and features 'One cup espresso', 'Two cup espresso', 'Americano', 'Cappuccino', 'Latte', 'Hot water', 'Manual frothing', 'Manual cleaning' and 'Grinder emptying'.
CAUTION! The device will automatically carry out the cleaning procedure to prepare for operation after each start and stop.
CAUTION! The coffee will flow out drop by drop at the beginning of the brewing process, (2-3 seconds after the start of brewing) and at the end (6-8 seconds before the end of brewing); this is a natural phenomenon.
CAUTION! The device will enter the sleep mode if no operation is performed within 28 minutes in the standby mode. In the sleep mode, all indicators are off and all functions are inactive. To wake up the power button ⏻, slide the top of the control panel. If you do not start the device, the power button ⏻ will turn off after 10 seconds.
POWER ON AND HEATING
- Connect the device to the power outlet and press the on/off button on the back of the device.
- Place the container under the coffee outlet and then in the lower left corner of the control panel press and hold the power button ⏻ for at least 2 seconds.
-
The manual cleaning button will light permanently, and the power button will start to flash, after which the device will go to the heating and automatic cleaning phase.
-
After heating the coffee water, the Espresso 📋, Double Espresso 📋, Americano 📋 and Clear Grinder 📋 buttons will light permanently, meaning they are ready to work.
-
When the device is preheated, the buttons Cappuccino 🎨, Latte 🎨, Hot Water 🎨, Milk Foam 🎨 and Clean 🎨 flash, which means that these functions cannot be operated.
-
All functional buttons will light permanently after completion of all the stages of preheating, and then the device will go into readiness.
natural_image
Close-up of a stainless steel kitchen appliance with a small electronic device attached (no visible text or symbols)
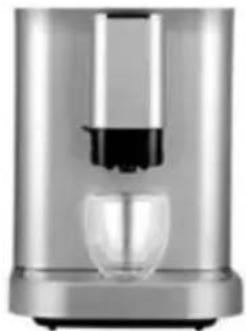
BREWING OF A SINGLE ESPRESSO CUP
- Place and appropriate cup for coffee under the coffee outlet.
- Check whether the milk frother is fitted well.
-
Press and hold the Espresso button 📁 for at least 2 seconds, and the device will start brewing a single espresso cup. The Espres - so button 📁 will illuminate with a continuous light during the process of brewing a single es - presso cup.
-
After brewing the Espresso cup, the device will automatically switch to the standby mode.
-
Press and hold the Espresso button 📋 for 1 second if you wish to cancel the current function.
natural_image
Close-up of a stainless steel coffee maker with a glass cup (no visible text or symbols)
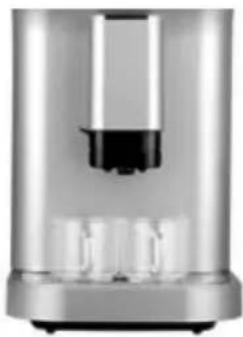
BREWING OF A DOUBLE ESPRESSO CUP
- Place one or two suitable cups for coffee under the coffee outlet.
- Check whether the milk frother is fitted well.
- Press and hold the Double Espresso button 📋 for at least 2 seconds, and the device will start brewing a double espresso cup.
CAUTION! A double cup of espresso is obtained by brewing two cycles of a single cup of espresso continuously, so the cups should not be taken away during the brewing process.
natural_image
Exterior view of a modern stainless steel coffee maker with glass cups (no visible text or symbols)
BREWING AMERICANO
- Place and appropriate cup for coffee under the coffee outlet.
- Check whether the milk frother is fitted well.
- Press and hold the Americano button for at least 2 seconds and the device will start brewing Americano coffee.
- After brewing the Americano cup, the device will automatically switch to the standby mode.
- Press and hold the Americano button for at least 1 second if you wish to cancel the current function.
natural_image
Close-up of a stainless steel coffee maker with glass mug and black lid (no visible text or symbols)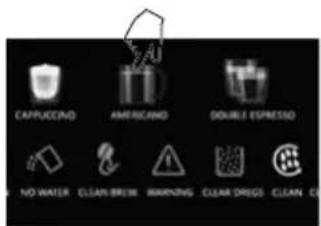
BREWING CAPPUCCINO
-
Place and appropriate cup under the coffee outlet.
-
Fill the milk container with an appropriate amount of cold milk.
CAUTION! It is recommended that the temperature of the milk is 5-10°C and that the fat con-

natural_image
Close-up of a stainless steel water dispenser with a glass cup and black lid (no visible text or symbols)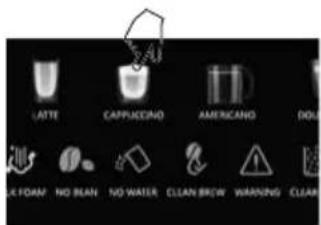
tent of the milk is at least 3%. The amount of milk in the container should not exceed the MAX mark on the container.
- Insert the milk tube into the container lid.
- Fit the hose in the container lid and then connect its other end with the milk frother.
- Press and hold the Cappucino button ▼ for at least 2 seconds and the device will start brewing Cappucino.
- After brewing the Cappuccino cup, the device will automatically switch to the standby mode.
- Press and hold the Cappuccino button ▼ for at least 1 second if you wish to cancel the current function.
NOTES!
After each use, if there is still milk in the milk container it should be kept in the fridge and the milk hose and milk frother should be cleaned immediately after use.
It is recommended to use a high cup to prevent the splashing of the foamed milk.
After the device is no longer used, carry out the cleaning process (see section: Cleaning and maintenance).
BREWING LATTE
- Place and appropriate cup for coffee under the coffee outlet.
- Fill the milk container with an appropriate amount of cold milk.
NOTES! It is recommended that the temperature of the milk is 5-10°C and that the fat content of the milk is at least 3%. The amount of milk in the container should not exceed the MAX mark on the container.
natural_image
Close-up of a modern glass water dispenser with a black lid, no visible text or symbols
- Insert the milk tube into the container lid.
- Fit the hose in the container lid and then connect its other end with the milk frother.
- Press and hold the Latte button ▼ for at least 2 seconds and the device will start brewing Latte.
- After brewing the Latte cup, the device will automatically switch to the standby mode.
- Press and hold the Latte button ▼ for at least 1 second if you wish to cancel the current function.
NOTES!
After each use, if there is still milk in the milk container it should be kept in the fridge and the milk hose and milk frother should be cleaned immediately after use.
It is recommended to use a high cup to prevent the splashing of the foamed milk.
After the device is no longer used, carry out the cleaning process (see section: Cleaning and maintenance)
HOT WATER PREPARATION
- Place and appropriate cup for coffee under the coffee outlet.
CAUTION! The cup volume should exceed 120ml.
- Disconnect the milk container hose and close the plug in the milk frother.
natural_image
Close-up of a modern stainless steel water dispenser with a glass cup (no visible text or symbols)
- Press and hold the Hot Water button 📋 for at least 2 seconds and the device will start producing hot water.
- After the preparation of hot water is finished, the device will automatically switch to the standby mode.
- Press and hold the Hot Water 📋 button for at least 1 second if you wish to cancel the current function.
CAUTION! When preparing hot water, take care not to scald yourself with the water or the escaping steam.
MANUAL MILK FROTHING
CAUTION! When the Milk Foam function is performed, the overheating protection mechanism of the device is activated. If it is necessary to activate the Hot Water function, wait about 3-5 minutes until the indicator lights up solid. After this time, the Hot Water function may be activated.
natural_image
Close-up of a stainless steel water dispenser with black handle and blue liquid, no visible text or symbols-
Place and appropriate cup under the coffee outlet.
CAUTION! The milk cup volume should exceed 200ml. -
Fill the milk container with an appropriate amount of cold milk.
CAUTION! It is recommended that the temperature of the milk is 5-10°C and that the fat content of the milk is at least 3%. The amount of milk in the container should not exceed the MAX mark on the container.
-
Press and hold the Milk Foam 📋 button for at least 2 seconds and the machine will start the manual frothing function.
-
After the milk frothing process is over, the device will automatically switch to the standby mode.
-
Press and hold the Milk Foam button 📋 for at least 1 second if you wish to cancel the current function.
NOTES!
After each use, if there is still milk in the milk container it should be kept in the fridge and the milk hose and milk frother should be cleaned immediately after use.
It is recommended to use a high cup to prevent the splashing of the foamed milk.
After the device is no longer used, carry out the cleaning process (see section: Cleaning and maintenance)
MANUAL CLEANING
-
Place the water container under the coffee outlet.
-
Press and hold the Clean ⚙ button for at least 2 seconds and the machine will start the manual cleaning function.
-
After the cleaning process is finished, the device will automatically switch to the standby mode.
-
Press and hold the Clean button Ⓔ for at least 1 second if you wish to cancel the current function.
natural_image
Close-up of a modern stainless steel coffee maker with a glass bowl and side grates (no visible text or symbols)
COFFEE BEAN COMPARTMENT LID EMPTYING
- Press and hold the Clear grinder 🎨 button for at least 1 second and the device will start the compartment emptying function. At the same time the coffee bean compartment emptying button 🎨 will light up on a permanent basis and other function indicators will go off.
- Open the door and remove the grounds container, pour out the ground coffee from it into another container.
- After the work is finished, fit the elements properly and the device will automatically switch to the standby mode.
- Press and hold the coffee bean compartment emptying 🎨 button for at least 3 seconds, if you wish to cancel the current function.
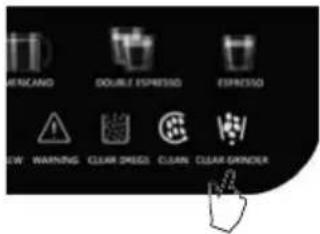
CAUTION! The coffee bean compartment emptying function will only be active for 15 seconds. The above-mentioned operation must be repeated each time when there is not much coffee beans left in the compartment.
SETTING UP THE DEVICE
SETTING THE AMOUNT OF DISPENSED COFFEE AND MILK
- Dispensed coffee amount setting operation:
While dispensing coffee, press and hold the selected function button (Espresso, Double Espresso, Americano); the device gives sound signals and the relevant function button icon will begin to flash. At this time, the device will switch to the mode responsible for setting the amount of dispensed coffee. When the coffee in the cup reaches the required level, release the selected function button - the newly set amount of dosed coffee will be saved.
The scope of amount of the dispensed coffee is as follows:
-single Espresso cup approximately 30-100 ml
-double Espresso approximately 30-100ml * 2
- Americano approximately 110-180ml
- Operation of setting the amount of dispensed milk and coffee:
CAUTION! For Cappuccino and Latte, set the amount of dispensed coffee and the amount of dosed milk separately.
While dispensing milk/coffee, press and hold the selected function button (Latte and Cappuccino); the device gives sound signals and the relevant function button icon will begin to flash. At this time, the device will switch to the mode responsible for setting the amount of dispensed milk/coffee. When the milk/coffee in the cup reaches the required level, release the selected function button - the newly set amount of dosed milk/coffee will be saved. The operation of setting the amount of dispensed milk/coffee applies only to the "Cappuccino" and "Latte" function.
The scope of amount of the dispensed milk/coffee is as follows:
- Cappuccino approximately 30-100ml coffee + milk -10-40 seconds
- Latte: milk 10-40 seconds + coffee approximately 30-100ml
ATTENTION! The quantities given are dependent on the type of coffee and grinding thickness.
DEFAULT SETTING RESTORATION
Presse and hold the Espresso and Double buttons at the same time for 2 seconds, all parameters will be restored to default settings.
CLEANING AND MAINTENANCE
CAUTION! Before proceeding with the cleaning of the device, disconnect it from power supply and wait until it cools down completely. In order to provide protection against electric shock, do not submerge the cord, plug or device in water or liquid.
- Wipe the external surface of the device with a soft and damp cloth in order to remove dirt, but avoid using abrasive cleaning tools, as they can scratch the device. Do not use alcohol or solvents.
- When brewing coffee, drops of water may accumulate in the area of the drip tray or on table top. In order to control the dripping, wipe this area with clean and dry cloth after each use of the device.
- You must not wash the brewer, water tank, milk container, drip tray, internal drip tray, grounds container and service door in the dishwasher.
- Empty the water from the drip tray, internal drip tray and the grounds from the grounds container must be emptied and washed thoroughly in water with a mild detergent. Wipe dry.
- Clean the accessories of the device, acting in accordance with the description given below:
CLEANING THE GROUNDS CONTAINER
After each 8 coffee brewing cycles, an indicator of full grounds container will appear on the control panel ☐, remove it and empty it. Then wash it under running water with mild detergent, wipe it dry and fit it properly in place. If the coffee maker is not used for a longer period of time, it is recommended to clean it on the same day.
CLEANING THE BREWER
After 8 cycles of brewing Espresso, Latte and Cappuccino or after 4 double Espresso brewing cycles, the brewer cleaning indicator will appear on the control panel ; remove the brewer from the coffee maker and rinse it under running water. Wipe it dry and fit it properly in place.
CLEANING THE WATER TANK
Once a week, wash the water tank under running water with mild detergent, wipe it dry and fit it properly in place. if the coffee maker is not used for a longer period of time, it is recommended to empty the tank.
CLEANING THE MILK CONTAINER
After the brewing process comes to an end, disconnect the milk container from the device. Remove the cover, hose and tube and clean all the elements under running water with mild detergent, wipe it dry and fit it properly in place.
CLEANING THE MILK FROTHER
After the coffee brewing process comes to an end or if the frother does not foam the milk properly, then remove the coffee outlet cover and dismantle the frother. Disassemble the frother into three parts and wash thoroughly under running water with a mild detergent. Wipe it dry and fit it properly in place.
natural_image
Pure mechanical component diagram without any text, numbers, or symbolsCLEANING THE DRIP TRAY
Empty the drip tray every day. Remove the drip tray and wash it under running water with a mild detergent. Wipe it dry and fit it properly in place.
CLEANING THE COFFEE GRINDER
It is recommended to clean the coffee grinder once in two weeks. If there i coffee in the coffee bean compartment, empty it (see section: Use of the device - Coffee bean compartment emptying
- Remove the coffee bean compartment lid
- Turn the grinding level adjustment knob counterclockwise.
- Using the handle, unscrew the upper burr counterclockwise.
- Clean the grinding compartment and the grinder using the cleaning brush.
-
Do not insert the upper burr, replace the coffee grinding level adjustment knob again in order to empty the grinder from the rest of the coffee.
-
Then press and hold the Clear grinder 🎨 button for at least 1 second and the device will start the compartment emptying function. If there still coffee in the compartment, repeat the operation.
-
Open the service door and remove the ground coffee from the dispenser channel using the cleaning brush and grounds container, and then close the service door.
-
After grinder cleaning process comes to an end, turn the grinding level adjustment knob counter - clockwise.
-
Close the upper burr by turning it counterclockwise.
-
Close the grinding level adjustment knob clockwise and set the preferred coffee grinding coarseness.
CAUTION! Never make grinding level adjustments when the coffee is in the compartment and the grinder is not running. This can damage the grinder.
CLEANING THE DEAD CORNER OF THE BREWER
It is recommended to clean the dead corner of the brewer once a week.
- When the device is on, press and hold the Clean ⚙ and Double Espresso buttons 📋 for 1 second in order to switch to the mode responsible for the cleaning of the dead corner of the brewer.
- After switching to the brewer cleaning function, the brewer will move to the left side of the device.
- After the service door is opened (the device remains in the state of safe protection), you can clean the dead corner of the brewer with a brush.
- When the cleaning is over, close the service door.
- Press and hold the Clean ⚙️ and Double Espresso buttons 📋 for 1 second, in order to exit the cleaning function.
CLEANING THE COFFEE BREWING AND MILK FROTHING SYSTEM
It is recommended to clean the coffee brewing and milk frothing system after you finish working on the device
- Fill the water tank with a suitable amount of water with a room temperature, which should not exceed the maximum water level, and then close the tank lid. Place the right container under the coffee dispenser.
- Start the function using the Clean button Ⓔ, in order to clean the coffee brewing and milk foaming system, the device will start the cleaning process.
- If milk frothing channel is necessary, fit the milk container and fill it with clean water instead of milk, and then start the milk frothing function using the Milk Foam button 📋 until the cleaning process comes to an end.
- After the cleaning process is finished, the device will automatically switch to the standby mode.
- Open the service door and pour out water from the grounds container.
CLEANING THE COFFEE MAKER FROM MINERAL DEPOSITS
The necessity to descale the coffee maker from mineral deposits will be signalled with the Hot water 🔊 and Clean buttons flashing at the same time, when the device brews 500 coffee cycles in total. The number of coffee brewing cycles will be cleared and counted again after the coffee maker cleaning comes to and end.
- To the empty water tank add decayer for coffee machines. Fill the tank with water to the mark 1000ml. Follow the recommendations of the manufacturer of the decayer.
CAUTION! Use the commercially available descaling agents for coffee makers. Other agents may damage the materials from which parts of the coffee maker are made and/or have the zero descaling effect.
- Place the appropriate container on the drain tray.
- Press and hold simultaneously the Hot water 🔒 and Clean ⏻ buttons for 1 second and the device will start the decay process.
- The whole process of stoning takes about 10 minutes. Eight functional indicators flash slowly from left to right.
- After cleaning, the Hot water 🏠 and Clean ⚙ indicators stop flashing. Pour the remaining solution and rinse the tank under running water.
- Then fill it with clean water to the MAX level and perform the Clean ☑ cleaning process several times.
- After cleaning, open the service doors and empty the fuse container from the remaining water after cleaning.
GUIDELINES FOR COFFEE WITH PERFECT TASTE.
- A clean coffee maker is indispensable for the preparation of tasty coffee. It is necessary to clean the coffee maker regularly in accordance with the description in the "CLEANING AND MAINTE - NANCE" section. Always use fresh water with room temperature for brewing coffee.
- Store the unused ground coffee in a cool, dark and dry place. After a new coffee packaging is un-packed, close tightly and keep it in the fridge to maintain its freshness.
TROUBLESHOOTING
PROBLEM CAUSE METHOD OF REMOVAL
| Warning indicator is flashing | The grinding level adjustment knob and internal drip tray are not fitted correctly. | Fit the grinding coarseness adjustment knob and internal drip tray. |
| If you cannot remove the problem, contact the service centre. | ||
| Warning indicator is illuminated continuously | The brewer or the internal drip tray are not fitted correctly. | Fit the brewer or internal drip tray properly. |
| If you cannot remove the problem, contact the service centre. | ||
| Espresso and warning indicators are flashing at the same time | The grinder is not working correctly | Switch off the device and start it again. |
| If you cannot remove the problem, contact the service centre. | ||
| No coffee bean and warning indicators are flashing at the same time. | The device completed 16 cycles of continuous coffee bean grinding without a 5-minute break between the cycles, all the functions of the device will become inactive. | Leave the device for 5 min. to cool off. |
| Switch off the device and start it again. | ||
| If you cannot remove the problem, contact the service centre. | ||
| The brewer cannot be removed. | The device was not switched off correctly - the brewer is locked. | Switch off the device and then switch it one again to reset the brewer. |
| If you cannot remove the problem, contact the service centre. | ||
| The device foams milk poorly/does not foam the milk. | The milk is not sufficiently cold or is not fit for foaming. | It is recommended that the temperature of the milk is 5-10°C and that the fat content of the milk is at least 3%. |
| The milk frother is clogged/dirty. | Clean the milk frother and the milk foaming system. |
TECHNICAL DATA
Technical specifications are given on the product nameplate.
Length of mains cable: 1.05 m
CE
CAUTION! MPM agd S.A. reserves the right to technical changes!
Proper disposal of the product (waste electrical and electronic equipment)
Marking on the product indicates that after the service-life of the product expires, it should not be disposed with other type of municipal waste. Used equipment may have a negative impact on the environment and health of people due to potentially containing hazardous substances, mixtures and components.
Mixing electric waste with other types of waste or disassembling those in an unprofessional manner may cause a release of substances that are hazardous to the environment and health. Used equipment should
be handed-over to a point for collection of electric waste. In order to obtain detailed information regarding the electric waste collection points, the user should contact the municipal point of electric waste collection or used equipment processing department.
natural_image
Close-up of a transparent plastic container with a lid and internal compartments (no visible text or symbols)tanque de agua
natural_image
Close-up of a modern stainless steel coffee maker with a black lid and control panel (no visible text or symbols)Bandeja de goteo:
natural_image
Close-up of a stainless steel kitchen appliance with a digital display and cable (no visible text or symbols)
natural_image
Modern stainless steel water dispenser with glass cup and black handle (no visible text or symbols)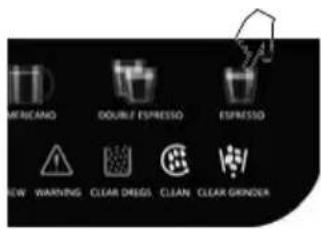
PREPARAR UNA TAZA DOBLE DE ESPRESSO
natural_image
Close-up of a modern stainless steel coffee maker with a glass pitcher inside (no visible text or symbols)
PREPARAR UN CAPUCHINO
natural_image
Close-up of a stainless steel water dispenser with a glass cup and black handle (no visible text or symbols)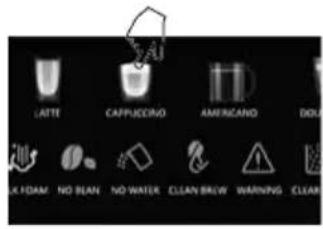
natural_image
Close-up of a stainless steel water dispenser with a glass inside, no visible text or symbols.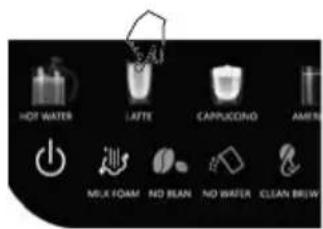
natural_image
Close-up of a modern glass water dispenser with a black lid, no visible text or symbols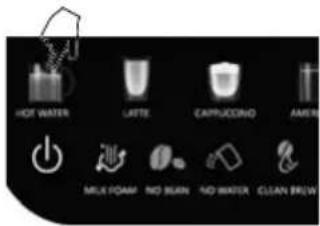
ESPUMADO MANUAL DE LECHE
natural_image
Close-up of a stainless steel appliance with a black handle and blue lid (no visible text or symbols)natural_image
Close-up of a modern stainless steel water dispenser with a glass bottle and control panel (no visible text or symbols)
VACIADO DEL COMPARTIMENTO DE GRANOS
natural_image
Pure mechanical component diagram without any text, numbers, or symbolsLIMPIEZA DE LA BANDEJA DE GOTEO
natural_image
Close-up of a stainless steel kitchen appliance with a black plastic clip attached to its side (no visible text or symbols)
natural_image
Modern stainless steel water leveler with glass cup and black lid (no visible text or symbols)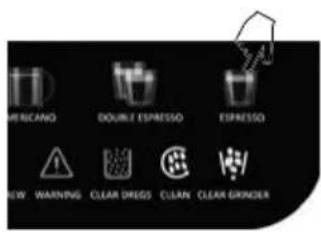
PRÉPARER UNE DOUBLE TASSE D'ESPRESSO
natural_image
Exterior view of a modern stainless steel coffee maker with a black lid and three cups at the base (no visible text or symbols)
BRASSAGE DE L'AMERICANO
natural_image
Close-up of a modern stainless steel coffee maker with a glass pitcher and black lid (no visible text or symbols)
natural_image
Close-up of a modern stainless steel water dispenser with a glass cup and black lid (no visible text or symbols)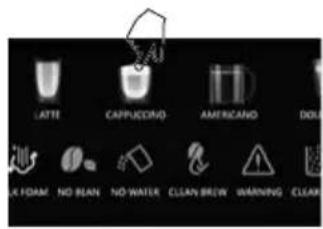
natural_image
Close-up of a modern glass water dispenser with a black lid, no visible text or symbols
natural_image
Close-up of a stainless steel water dispenser with clear glass and black lid (no text or symbols visible)
MOUSSE DE LAIT MANUELLE
natural_image
Close-up of a stainless steel water dispenser with black lid and control lever (no visible text or symbols)natural_image
Close-up of a stainless steel coffee maker with a glass bowl and side grater (no visible text or symbols)
VIDER LE COMPARTIMENT À GRAINS
natural_image
Mechanical component with black and white sections, no visible text or symbolsNETTOYAGE DU BAC D'ÉGOUTTAGE
natural_image
Close-up of a transparent plastic container with a black lid and internal compartments (no visible text or symbols)Víztartály:
natural_image
Close-up of a mechanical component with a circular top and central hub (no visible text or symbols)natural_image
Close-up of a metallic appliance with a small electronic component inserted (no visible text or symbols)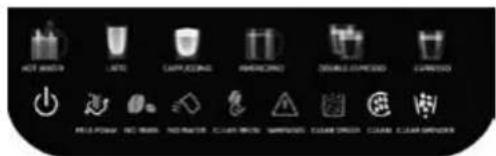
natural_image
Modern stainless steel coffee maker with glass cup and black lid (no visible text or symbols)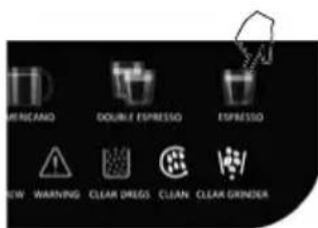
natural_image
Exterior view of a modern stainless steel coffee maker with glass cups (no text or symbols visible)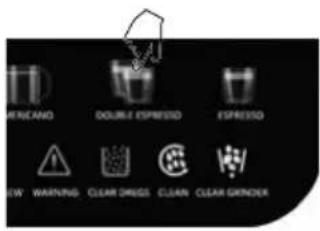
AMERICANO SÖRFÖZÉS
natural_image
Close-up of a stainless steel coffee maker with a glass pitcher inside (no visible text or symbols)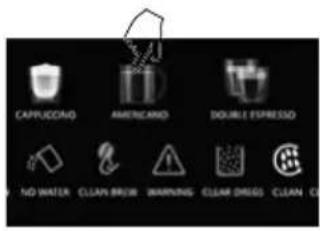
CAPPUCCINO FÓZÉS
natural_image
Close-up of a modern glass water dispenser with a black lid, no visible text or symbols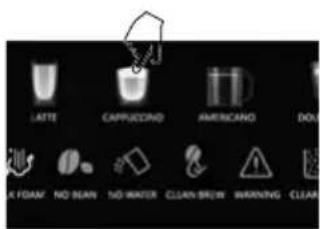
natural_image
Close-up of a modern glass water dispenser with a black lid, no visible text or symbols
natural_image
Close-up of a stainless steel water dispenser with clear glass and black lid (no visible text or symbols)
natural_image
Close-up of a stainless steel water dispenser with a black handle, mounted on a metal shelf (no visible text or symbols)natural_image
Close-up of a modern stainless steel water dispenser with a glass bottle and side grater (no visible text or symbols)
natural_image
Pure mechanical component diagram without any text, numbers, or symbolsnatural_image
Close-up of a transparent plastic container with a lid and internal structure (no visible text or symbols)Serbatoio d'acqua:
natural_image
Close-up of a black plastic fan or vent with a circular button, no visible text or symbols
natural_image
Hand placing a black component into a metallic cylindrical device (no visible text or symbols)
natural_image
Close-up of a stainless steel milk dispenser with a black lid and white tank (no visible text or symbols)
natural_image
Close-up of a metallic cylindrical container with a black lid (no visible text or symbols)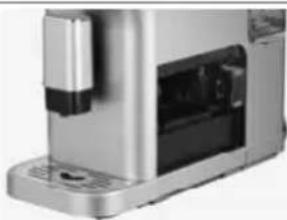
natural_image
Close-up of a metallic industrial machine with visible internal components and mounting base (no text or symbols)
natural_image
Close-up of a modern stainless steel water dispenser with a black handle and ventilation grilles (no visible text or symbols)natural_image
Close-up of a stainless steel coffee maker with a black lid and ventilation grilles (no visible text or symbols)natural_image
Close-up of a stainless steel kitchen appliance with a digital display and cable (no visible text or symbols)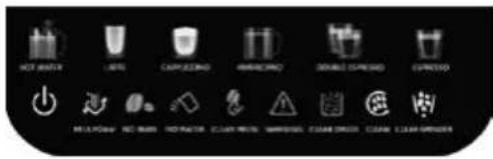
EROGAZIONE DI UNA SINGOLA TAZZINA DI ESPRESSO
natural_image
Close-up of a stainless steel coffee maker with a glass cup (no visible text or symbols)
natural_image
Close-up of a stainless steel industrial water heater with a vertical cylindrical component (no visible text or symbols)
natural_image
Close-up of a stainless steel water dispenser with a glass mug and black lid (no visible text or symbols)
natural_image
Close-up of a modern stainless steel water dispenser with a clear glass volume (no visible text or symbols)
natural_image
Close-up of a modern stainless steel water dispenser with a glass cup and black lid (no visible text or symbols)
TE NEL CONTENITORE NON DEVE SUPERARE LA TACCA MAX SUL CONTENITORE.
natural_image
Close-up of a modern glass water dispenser with a black lid, no visible text or symbols
MONTATURA MANUALE DEL LATTE
natural_image
Close-up of a stainless steel appliance with a black handle and black lid (no visible text or symbols)natural_image
Close-up of a modern stainless steel water dispenser with a glass bottle and control panel (no visible text or symbols)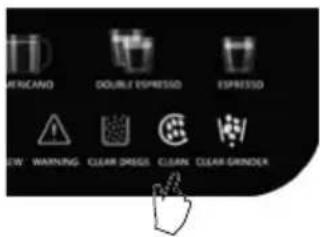
natural_image
Pure mechanical component diagram without any text, numbers, or symbolsPULIRE LA VASCHETTA RACCOGLIGOCCE
natural_image
Close-up of a transparent plastic container with a lid and internal compartments (no visible text or symbols)Vandens rezervuaras:
natural_image
Close-up of a stainless steel coffee maker with a black lid and ventilation grilles (no visible text or symbols)Padėklas vandeniiui
natural_image
Close-up of a stainless steel kitchen appliance with a small electronic device attached (no visible text or symbols)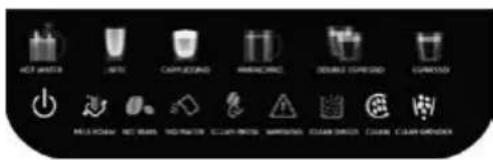
IŠVIRKITE VIENA PUODELI ESPRESO
natural_image
Close-up of a modern stainless steel coffee maker with a glass cup (no visible text or symbols)
IŠVIRKITE DVIGUBA PUODELJ ESPRESO
natural_image
Exterior view of a modern stainless steel water dispenser with three cups (no text or symbols visible)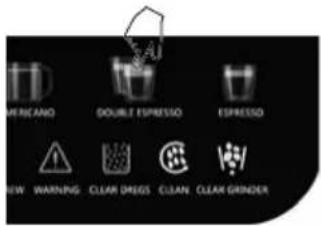
DÉMESIO! Dvigubas espreso puodelis pasiekiamas nuolat verdant du vieno puodelio espreso ciklus, todèl virimo metu neturétumète atimti puodelių.
ALAUS GAMYBA AMERICANO
natural_image
Close-up of a modern stainless steel water dispenser with a glass pitcher (no visible text or symbols)
KAPUČINO GAMINIMAS
natural_image
Close-up of a modern stainless steel water dispenser with a clear glass and black lid (no visible text or symbols)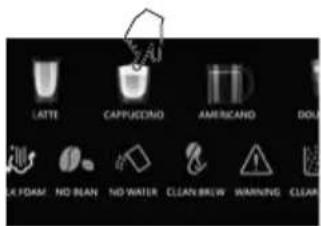
natural_image
Close-up of a modern stainless steel water dispenser with clear glass and black lid (no visible text or symbols)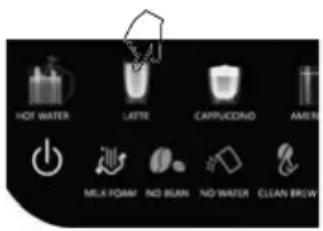
natural_image
Close-up of a modern stainless steel water dispenser with a glass cup and black lid (no visible text or symbols)
natural_image
Close-up of a stainless steel appliance with a black handle and blue lid, mounted on a silver surface (no visible text or symbols)natural_image
Close-up of a modern stainless steel water dispenser with a glass bulb and control panel (no visible text or symbols)
PUPELIŲ SKYRIAUS IŠTUŠTINIMAS
natural_image
Pure mechanical component diagram without any text, numbers, or symbolsLAŠINIMO DĚKLO VALYMAS
natural_image
Close-up of a transparent plastic container with a black lid (no visible text or symbols)Üdens tvertne:
natural_image
Close-up of a mechanical component with a circular top and central hub (no visible text or symbols)natural_image
Close-up of a stainless steel kitchen appliance with a power outlet and cable (no visible text or symbols)
natural_image
Modern stainless steel water leveler with glass cup and black lid (no visible text or symbols)
natural_image
Close-up of a stainless steel industrial water dispenser with a black vertical tube and three white containers (no visible text or symbols)
AMERICANO PAGATAVOŠANA
natural_image
Modern stainless steel water dispenser with glass pitcher and black lid (no visible text or symbols)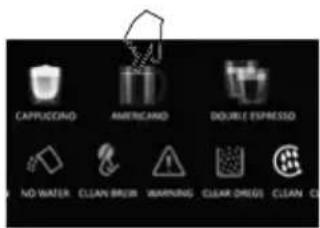
KAPUČINO PAGATAVOŠANA
natural_image
Close-up of a modern stainless steel water dispenser with clear glass and black lid (no text or symbols visible)
natural_image
Close-up of a modern stainless steel water dispenser with clear glass volume (no text or symbols visible)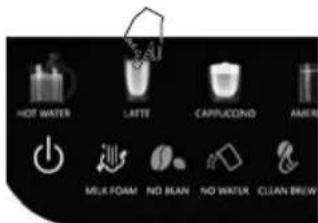
natural_image
Close-up of a modern stainless steel water dispenser with glass volume (no visible text or symbols)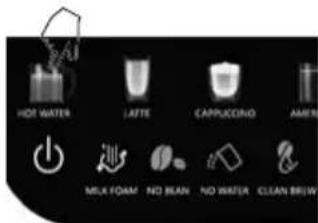
MANUĀLA PIENA PUTU IEPUTOŠANA
natural_image
Close-up of a stainless steel water dispenser with black handle, mounted on a silver shelf (no visible text or symbols)natural_image
Close-up of a stainless steel water dispenser with a clear glass bottle and control panel (no visible text or symbols)
PUPINU KAMERAS IZTUKŠOŠANA
natural_image
Pure mechanical component diagram without any text, numbers, or symbolsPILIENU PAPLĀTES TĪRĪŠANA
BESCHRIJVING VAN HET APPARAAT
natural_image
Close-up of a transparent plastic container with a black lid and internal compartments (no visible text or symbols)Waterreservoir
natural_image
Close-up of a stainless steel coffee maker with a black lid and ventilation grilles (no visible text or symbols)Afdruiprek:
natural_image
Close-up of a stainless steel kitchen appliance with a small electronic device attached (no visible text or symbols)
EÉN KOPJE ESPRESSO ZETTEN
natural_image
Modern stainless steel water dispenser with glass cup and black lid (no visible text or symbols)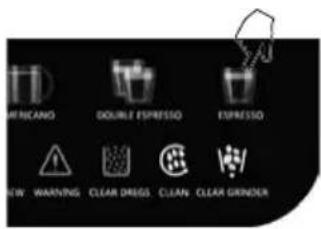
EEN DUBBELE KOP ESPRESSO ZETTEN
natural_image
Exterior view of a modern stainless steel coffee maker with glass cups (no text or symbols visible)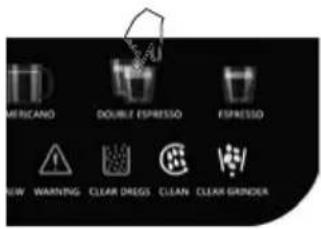
AMERICANO-BROUWEN
natural_image
Close-up of a modern stainless steel water dispenser with a glass pitcher inside (no visible text or symbols)
natural_image
Close-up of a modern stainless steel water dispenser with clear glass and black lid (no text or symbols visible)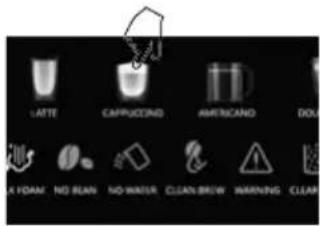
natural_image
Close-up of a modern stainless steel water dispenser with a glass cup and black lid (no visible text or symbols)
natural_image
Close-up of a modern glass water dispenser with a black lid, no visible text or symbols
natural_image
Close-up of a stainless steel water dispenser with black handle and blue lid (no visible text or symbols)natural_image
Close-up of a stainless steel coffee maker with a glass bowl and side grater (no visible text or symbols)
HET KOFFIEBONENVAK LEEGMAKEN
natural_image
Pure mechanical component diagram without any text, numbers, or symbolsHET SCHOONMAKEN VAN DE LEKBAK
PROBLEEM OORZAAK OPLOSSING
natural_image
Close-up of a transparent plastic container with a lid and internal compartments (no visible text or symbols)Zbiornik na wodę:
natural_image
Close-up of a black plastic fan or vent with a circular button, no visible text or symbols
natural_image
Hand inserting a black component into a metallic cylindrical device (no visible text or symbols)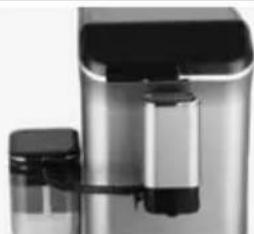
natural_image
Close-up of a stainless steel milk dispenser with black lid and side arm (no visible text or symbols)
natural_image
Close-up of a metallic cylindrical device with a black handle and a small rectangular component, no visible text or symbols.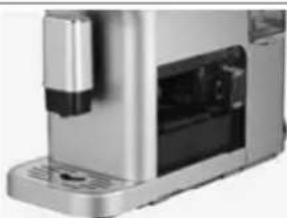
natural_image
Close-up of a metallic industrial machine with visible internal components and mounting base (no text or symbols)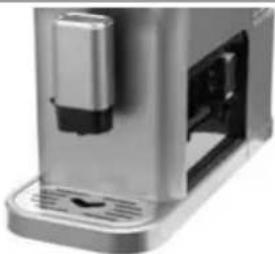
natural_image
Close-up of a modern stainless steel water dispenser with a black handle and ventilation grilles (no visible text or symbols)natural_image
Close-up of a stainless steel coffee maker with a black lid and ventilation grilles (no visible text or symbols)Taca ociekowa:
natural_image
Close-up of a stainless steel kitchen appliance with a black plastic clip attached to its side (no visible text or symbols)
PARZENIE POJEDYNCZEJ FILIŻANKI ESPRESSO
natural_image
Modern stainless steel coffee maker with glass cup and black lid (no visible text or symbols)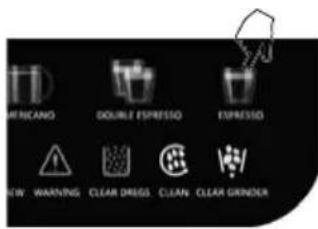
natural_image
Close-up of a stainless steel industrial water dispenser with control panel and side cups (no visible text or symbols)
natural_image
Close-up of a stainless steel coffee maker with a glass mug inside (no visible text or symbols)
PARZENIE CAPPUCCINO
natural_image
Close-up of a modern stainless steel water dispenser with a glass cup (no visible text or symbols)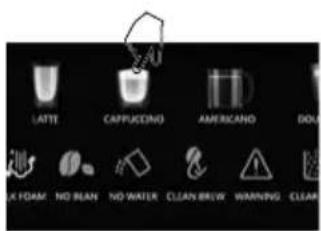
natural_image
Close-up of a modern glass water dispenser with a black handle and clear glass inside (no visible text or symbols)
natural_image
Close-up of a stainless steel water dispenser with a clear glass cup (no visible text or symbols)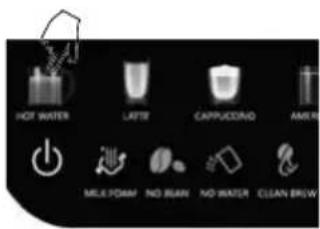
natural_image
Close-up of a stainless steel appliance with a black handle and blue lid, mounted on a stand (no visible text or symbols)natural_image
Close-up of a modern stainless steel coffee maker with a glass cup and side grater (no visible text or symbols)
OPRÓŻNIANIE KOMORY NA KAWĘ ZIARNISTĄ
natural_image
Pure mechanical component diagram without any text, numbers, or symbolsCZYSZCZENIE TACY OCIEKOWEJ
PROBLEMY I SPOSÓB ICH ROZWIAZANIA
PROBLEM PRZYCZYNA SPOSÓB USUNIĘCIA
natural_image
Close-up of a transparent plastic container with a black lid (no visible text or symbols)Rezervor de apă:
natural_image
Close-up of a stainless steel coffee maker with a black lid and ventilation grilles (no visible text or symbols)Tava de scurgere:
natural_image
Close-up of a stainless steel kitchen appliance with a visible power outlet plug (no text or symbols)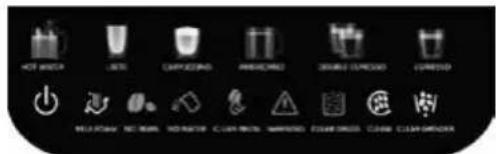
natural_image
Close-up of a stainless steel coffee maker with a glass cup, no visible text or symbols on the device itself.
PREPARAREA UNEI CEŞTI DUBLE DE ESPRESSO
natural_image
Exterior view of a modern stainless steel coffee maker with glass cups (no text or symbols visible)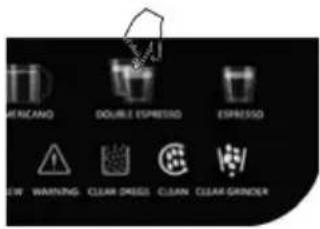
FABRICAREA BERII AMERICANO
natural_image
Close-up of a stainless steel water dispenser with a glass pitcher and black lid (no visible text or symbols)
PREPARAREA UNUI CAPPUCCINO
natural_image
Close-up of a stainless steel water dispenser with a glass cup and black handle (no visible text or symbols)
natural_image
Close-up of a modern stainless steel water dispenser with a clear glass volume (no visible text or symbols)
natural_image
Close-up of a modern glass water dispenser with a black lid, mounted on a metal base (no visible text or symbols)
SPUMAREA MANUALĂ A LAPTELUI
natural_image
Close-up of a stainless steel water dispenser with a black handle (no visible text or symbols)natural_image
Close-up of a modern stainless steel coffee maker with a glass cup and side grilles (no visible text or symbols)
GOLIREA COMPARTIMENTULUI PENTRU FASOLE
natural_image
Pure mechanical component diagram without any text, numbers, or symbolsCURĂȚAREA TĂVII DE SCURGERE
natural_image
Close-up of a metallic industrial device with a side panel and vented base (no visible text or symbols)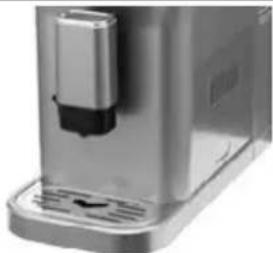
natural_image
Close-up of a modern stainless steel water dispenser with a black handle and control panel (no visible text or symbols)natural_image
Close-up of a metallic device with a black cable inserted into a plug (no visible text or symbols)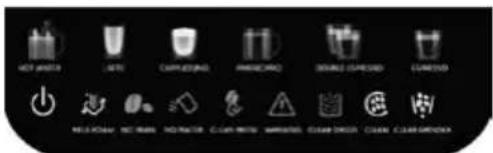
natural_image
Modern stainless steel coffee maker with glass cup and black lid (no visible text or symbols)
natural_image
Exterior view of a modern stainless steel coffee maker with two cups at the base (no visible text or symbols)
natural_image
Close-up of a stainless steel coffee maker with a glass pitcher inside (no visible text or symbols)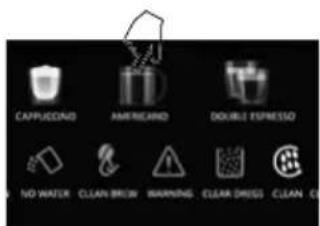
natural_image
Close-up of a stainless steel water dispenser with clear glass and black lid (no visible text or symbols)
natural_image
Close-up of a modern stainless steel water dispenser with a clear glass cup (no visible text or symbols)
natural_image
Close-up of a stainless steel appliance with a black handle and blue lid (no visible text or symbols)natural_image
Close-up of a stainless steel water dispenser with a glass bulb and ventilation grilles (no visible text or symbols)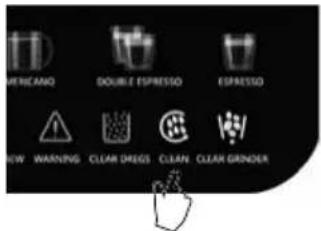
natural_image
Pure mechanical component diagram without any text, numbers, or symbolsnatural_image
Close-up of a transparent plastic container with a black lid (no visible text or symbols)Nádrž na vodu:
natural_image
Close-up of a mechanical component with a circular top and central hub (no visible text or symbols)natural_image
Close-up of a metallic electronic device with a small attached component and visible wiring (no text or symbols)
VARENIE JEDNEJ ŠÁLKY ESPRESSA
natural_image
Close-up of a modern stainless steel coffee maker with a glass cup and black lid (no visible text or symbols)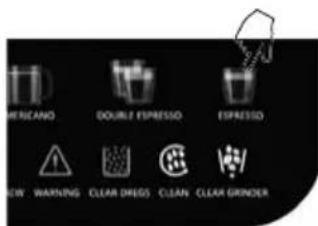
natural_image
Exterior view of a modern stainless steel water dispenser with internal components (no visible text or symbols)
natural_image
Close-up of a modern stainless steel coffee maker with a glass mug inside (no visible text or symbols)
VARENIE CAPPUCCINA
natural_image
Close-up of a stainless steel water dispenser with clear glass inside (no visible text or symbols)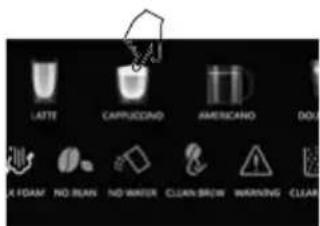
natural_image
Close-up of a modern stainless steel water dispenser with a glass cup (no visible text or symbols)
- Správne vložte trubicu na mlieko do veka nádoby.
- Namontujte hadicu do veka nádoby a potom druhý koniec pripojte k napeneniu mlieka.
- Stlačte a podržte tlačidlo Latte ▼ najmenej 2 sekundy a stroj začne varit' Latte.
- Po dokončení varenia latte zariadenie automaticky prejde do pohotovostného režimu.
- Ak chcete zrušit' aktuálnu funkciu, stlačte a podržte tlačidlo Latte najmenej 1 sekundu POZNÁMKY
natural_image
Close-up of a stainless steel water dispenser with a glass cup (no visible text or symbols)
RUČNÉ NAPENENIE MLIEKA
natural_image
Close-up of a stainless steel wall-mounted device with a black handle, next to a glass container (no visible text or symbols)natural_image
Close-up of a modern stainless steel coffee maker with a glass cup and side grates (no visible text or symbols)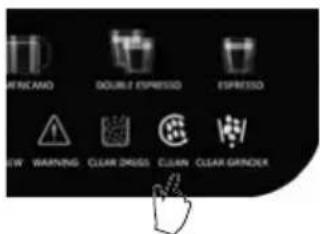
VYPRÁZDNENIE PRIEHRADKY NA KÁVOVÉ ZRNÁ
natural_image
Pure mechanical component diagram without any text, numbers, or symbolsČISTENIE ODKVAPKÁVACEJ MISKY
natural_image
Close-up of a transparent plastic container with a black lid and internal compartments (no visible text or symbols)Резервуар для води 1,8л
natural_image
Close-up of a black plastic fan or vent with a circular button, no visible text or symbols
natural_image
Hand inserting a black component into a metallic cylindrical device (no text or symbols visible)
natural_image
Close-up of a stainless steel milk dispenser with black lid and white tank (no visible text or symbols)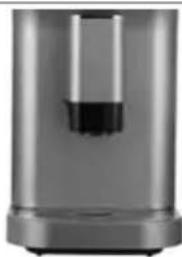
natural_image
Close-up of a metallic cylindrical device with a black internal component (no visible text or symbols)
natural_image
Close-up of a metallic industrial device with visible internal components and mounting base (no text or symbols)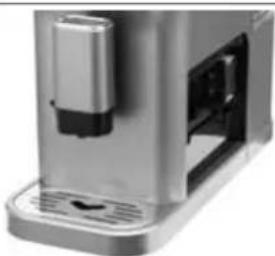
natural_image
Close-up of a silver water dispenser with a black handle and ventilation grilles (no visible text or symbols)natural_image
Close-up of a stainless steel coffee maker with a black lid and ventilation grilles (no visible text or symbols)Піддон для крапель:
natural_image
Close-up of a stainless steel kitchen appliance with a small electronic device attached (no visible text or symbols)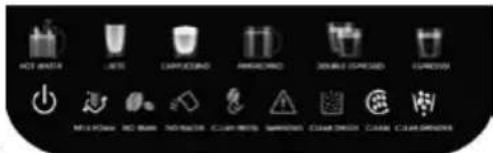
natural_image
Close-up of a stainless steel laboratory glassware device with a small transparent container (no visible text or symbols)
natural_image
Close-up of a metallic cylindrical device with a black vertical component and three white cups at the base (no visible text or symbols)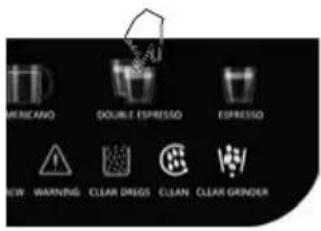
natural_image
Close-up of a stainless steel coffee maker with a glass pitcher inside (no visible text or symbols)
natural_image
Close-up of a modern stainless steel water dispenser with clear glass volume (no text or symbols visible)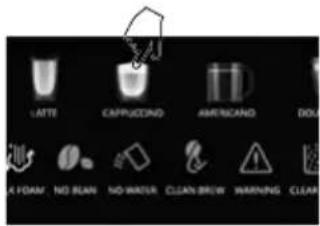
natural_image
Close-up of a stainless steel water dispenser with a clear glass volume (no text or symbols visible)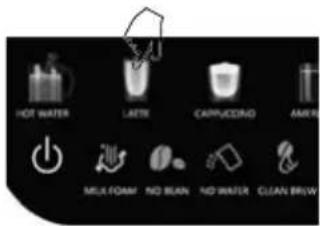
natural_image
Close-up of a modern stainless steel water dispenser with a glass cup and black handle (no visible text or symbols)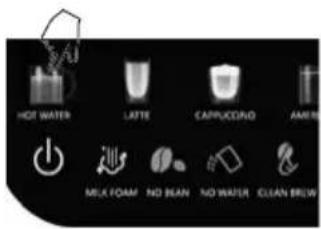
natural_image
Close-up of a stainless steel water dispenser with a black handle, mounted on a stand (no visible text or symbols)natural_image
Close-up of a modern stainless steel water dispenser with a clear glass bottle and control panel (no visible text or symbols)