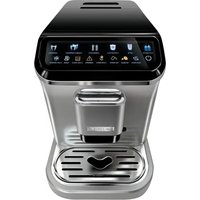
MKW-14M - Coffee machine MPM - Free user manual and instructions
Find the device manual for free MKW-14M MPM in PDF.

| Product Type | Espresso coffee machine with built-in milk frother |
| Brand | MPM |
| Model | MKW-14M |
| Power supply | 220-240 V ~ 50 Hz |
| Rated power | 1230-1470 W |
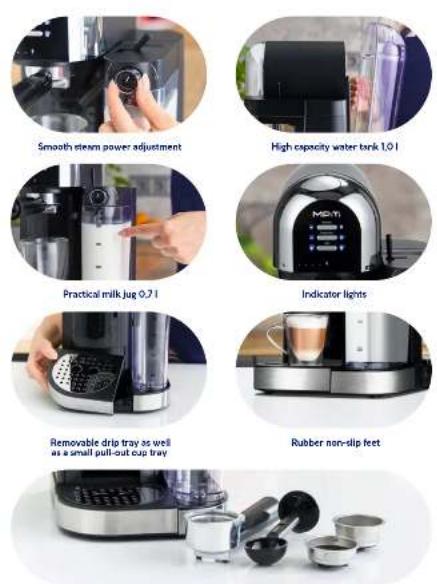
| Water tank capacity | 1.8 L (recommended max 1.2 L) |
| Milk container capacity | 0.7 L (min 0.1 L) |
| Programmed coffee types | Espresso, Cappuccino, Latte |
| Milk froth function | Yes, with foam quantity adjustment |
| Programmable quantities | Single espresso 35 ml, double 70 ml; Single cappuccino 170 ml, double 285 ml; Single latte 340 ml, double 425 ml |
| Descaling system | Automatic with light reminder |
| Automatic milk circuit cleaning | Yes, via dedicated program |
| Automatic shut-off | Yes, after 21 min 20 s in standby mode |
| Standby consumption | 0.44 W |
| Power cord length | 1.0 m |
| Included filters | Small (10 g) and large (20 g) |
| Filter holder | Removable with locking lever |
| Safety | Hot surface indicator, automatic shut-off, protection against operation without water |
| Included accessories | Measuring scoop/tamper, pull-out cup support |
| Repairability | Authorized service center recommended for any repairs |
Frequently Asked Questions - MKW-14M MPM
User questions about MKW-14M MPM
0 question about this device. Answer the ones you know or ask your own.
Ask a new question about this device
Download the instructions for your Coffee machine in PDF format for free! Find your manual MKW-14M - MPM and take your electronic device back in hand. On this page are published all the documents necessary for the use of your device. MKW-14M by MPM.
USER MANUAL MKW-14M MPM
EN We wish you satisfaction from using the product and invite you to check a wide range of other MPM appliances
MACCHINA DA CAFFE ESPRESSO
SI ECONIE KAVOS APARATAS
N = N + O
CIGNIENIOWY EK5ERES DO KAWY
APARAI DE CAI - A SUU PRESIUNL
НАКУМНАЯ КОСГ БАРКА
LAKONY KAVONAR
natural_image
Exterior view of a modern MDTI coffee maker with black and white casing (no visible text or symbols)cz NAVOD K OBSLUZE 3
Includes: 1 cup filter (10 g), 2 cups filter (20 g), coffee measuring spoon with tamper, portafilter
BEZPEČNOSTNÍ POKYNY PŘI POUŽÍVÁNÍ
natural_image
Illustration of a hand using a tool to measure a small object, with an arrow indicating downward motion (no text or symbols present)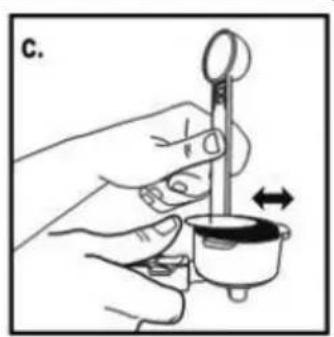
natural_image
Illustration of a hand holding a small object with a pointer and a magnified view, no text or symbols presentnatural_image
Technical line drawing of a portable solar or geothermal device with control panel and fan (no text or symbols)
natural_image
Line drawing of a portable water heater with control panel and spout (no text or symbols)natural_image
Illustration of a hand using a tool to measure a small object, with an arrow indicating downward motion (no text or symbols present)
natural_image
Illustration of a hand using a dropper to measure a small object, with no visible text or symbols.natural_image
Line drawing of a portable water heater with control panel and fan (no text or symbols)natural_image
Illustration of a hand using a tool to measure a small object, with an arrow indicating downward motion (no text or symbols present)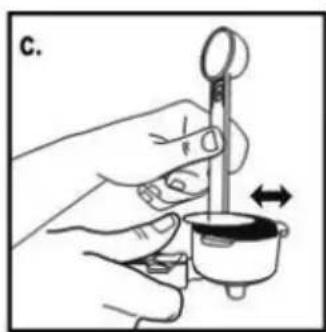
natural_image
Illustration of a hand holding a small object with a pointer and a magnifying glass, no text or symbols present- Read the instructions carefully before use.
- Do not immerse the device, cable or plug in water or other liquids!
- Take special care when children are near the device!
- Fill the tank only with cold water.
- Never use a damaged device, including one with a damaged cord or plug, in which case have it repaired at an authorised service centre.
- Use of accessories not recommended by the manufacturer may cause damage to the device, fire or personal injury.
- Do not hang the cable on sharp edges or allow it to come into contact with hot surfaces.
- You must not place the working device in a cabinet.
- Do not use the device outdoors.
- Before cleaning, first unplug the device from the mains socket and wait until it has cooled down completely.
- Never leave the device connected to a power source unattended.
- Do not start the device without water.
- Do not place the device near electric or gas cookers, burners, ovens, etc.
- After the device is switched on, do not pour water into the tank.
- Always unplug when not in use or before cleaning.
- The device should be switched off when finished working!
- Do not use the device for purposes other than those for which it was intended.
- The device is intended for domestic use only.
- The device should be connected to a mains socket outlet with a grounding pin.
- This equipment may be used by children of at least 8 years of age and by persons of diminished physical, mental capacity and lack of experience and knowledge of the equipment if supervision or instruction is provided regarding the safe use of the equipment so that the hazards involved are understood.
Cleaning and maintenance must not be performed by children, unless they are over 8 years old and supervised by an adult.
Unsupervised children can not perform cleaning/maintenance of the product.
- Keep the device and its cord out of reach of children under 8 years of age.
- Children should be supervised to ensure that they do not play with the equipment/device.
- The temperature of the device's surfaces may be higher during operation.
- Use the device on a smooth and stable surface.
- Do not pull the plug out of the power socket by pulling the cord.
- Do not connect the plug to the power socket with wet hands.
- For the safety of children, please do not leave freely accessible parts of the packaging (plastic bags, cardboard boxes, polystyrene, etc.).
-WARNING! Do not allow children to play with the film. Danger of suffocation!
- CAUTION! The portafiler is hot during operation. Use portafilter holders.
- Caution! in order to maintain the efficiency of the appliance and to prevent food contamination, clean the appliance regularly, as indicated in the section „CLEANING AND MAINTENANCE”.
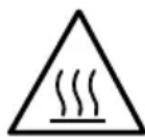
CAUTION! Hot surface! The symbol on the appliance indicates that its components may become hot during operation.
- CAUTION! Do not start the coffee maker without the portafilter mounted with the selected filter.
DESCRIPTION OF THE APPLIANCE
- Coffee maker housing
- Control panel
a. single/double "Espresso" coffee selection button with indicator lights
b. single/double "Cappuccino" coffee selection button with indicator lights
c. single/double "Latte" coffee selection button with indicator lights
- On / off switch
- Storage space for storing a portafilter and filter
- Slot for assembling the portafilter and filter
- Pull-out cup support for small cup(s)
- Assembly place of the drip tray
-
Drip tray
-
Drip tray grille
- Portafilter for the filter with coffee
- Filter lock lever
- Portafilter holder
- Coffee filter
a. small coffee filter
b. large coffee filter
- Water container assembly slot
- 1 L water tank:
- Water valve
- Water container lid
- Milk container assembly slot
- 0.7L milk tank
- Milk container lid
- Milk suction tube
- Milk/steam dispensing nozzle
- Milk dispensing knob
- Foaming nozzle lever
- Measuring cup - kneader
- Steam connector
FUNCTIONS OF A COFFEE MAKER, QUANTITIES OF BREWED COFFEE QUANTITIES AND HOW TO ACTIVATE TH
TYPE OF BREWED COFFEE AMOUNT
Espresso
Single

35 ml
Double

70 ml
Cappuccino
Single

170 ml
Double

285 ml
Latte
Single

340 ml
Double

425 ml
CAUTION!
– depending on the setting of the milk dosing knob, the indicated quantities of CAPPUCCI - NO and LATTE can be different
- the quantity of coffee brewed depends on the coarseness of the coffee bean grind and the degree of compaction in the portafilter.
BEFORE FIRST USE
- Remove the device from the packaging, remove all labels, stickers, fillers and shipping safeguards. Make sure the device has not been damage during transport. Contact the seller in case of any doubts.
- Clean the device following the instructions in the "CLEANING AND MAINTENANCE" section.
- Fit all components of the coffee maker into place.
- Place the device on a hard, dry, stable, even and horizontal surface that is resistant to a high surface temperature.
- Perform the operation of heating the internal wiring of the coffee maker (see: "CLEANING AND MAINTENANCE").
DRIP TRAY ASSEMBLY
- Fit the drip tray (8) in place and place the grille (9) on the tray at the place where the drip tray is to be fit (7).
- The two large holes in the grille (9) are directly below the holes from which the coffee flows in the portafilter (10) – this is an indication of how to position a cup on the tray or two small cups when brewing a double “Espresso”.
- Depending on the size of the cups you are using, you can also make use of the additional pull-out support (6).
CAUTION! Remove liquid from the drip tray on a regular basis.
FILLING THE WATER TANK
- Disconnect the device from the mains.
- Remove the lid (17) from the tank, then grab the tank (15) and pull it up.
CAUTION! The water valve (16) in the water tank (15) is secured with a rubber orange protective plug. Remove it before the first use of the stove-pot espresso maker and put it on in the case of a longer period of break in the use of the coffee maker. - Pour no more than 11 (MAX level) of cold drinkable water but no less than 0.2 l (MIN level).
- Fit the tank into a slot in the rear part of the stove-pot espresso maker (14). When fitting the tank, make sure that the hook on the tank housing rests against the hinge in the rear part of the coffee maker.
CAUTION! Do not fill the water tank above the "MAX" level. Do not start the device when the tank is empty or when there is no tank. Use cold drinkable water only. Do not pour in hot water.
FILLING THE MILK TANK
- Pull the milk tank gently towards yourself (19), and then pull it up.
- Remove the lid from the milk tank (20).
- Pour no more than 0.7 l (MAX level) of milk but no less than 0.1l (MIN level).
- Replace the lid (20) on the milk tank.
- Place the tank where the milk container (18) is mounted and then slide it gently backwards.
SELECTION OF FILTER AND FILLING WITH COFFEE
- Select a suitable filter according to the following criterion: - small coffee filter (13a) – for a single cup of coffee
- large coffee filter (13b) – for two single coffees (ESPRESSO) or one double coffee (CAP-UCCINO, LATTE).
- Place the selected filter (13) in the portafilter (10).
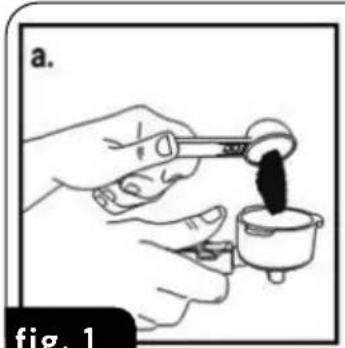
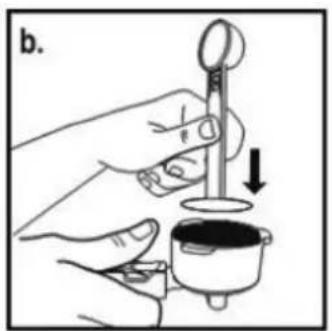
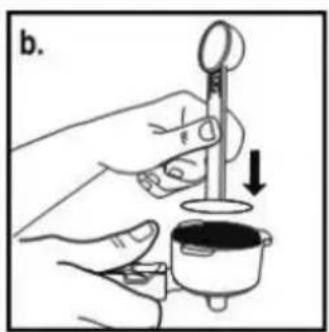
- Fill up the selected filter with fresh, finely ground coffee (fig.1a).
- Use the kneader (25) to knead the poured coffee and then clean the excess coffee from the rim to ensure a proper fit (fig.2b and 2c).
natural_image
Illustration of hands using a spoon to extract dark liquid from a small container (no text or symbols)fig. 1
natural_image
Illustration of a hand using a tool to measure a small object, with an arrow indicating downward motion (no text or symbols present)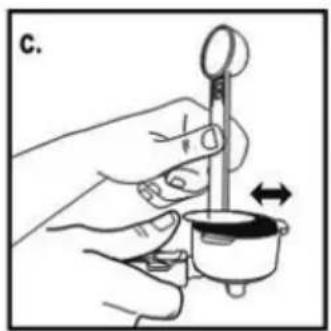
natural_image
Illustration of a hand using a dropper to measure a small object, with no visible text or symbols.CAUTION! The coffee must not exceed the “MAX” mark inside the filter. With a highly compact coffee, this corresponds to a weight of approximately 10g of coffee for the small filter and 20g for the large filter.
ASSEMBLY/DISASSEMBLY OF THE PORTAFILTER WITH A FILTER IN THE COFFEE MAKER
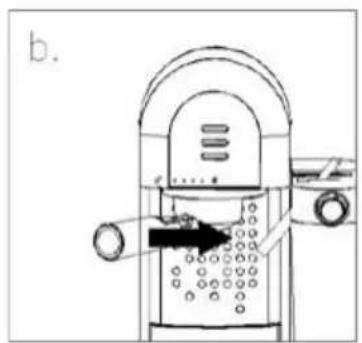
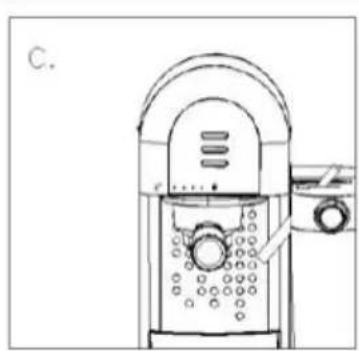
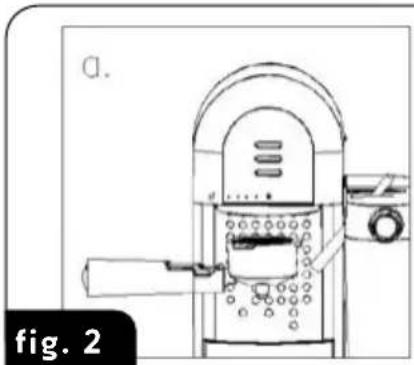
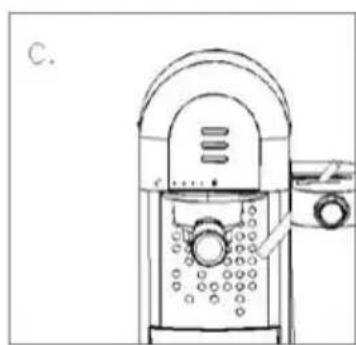
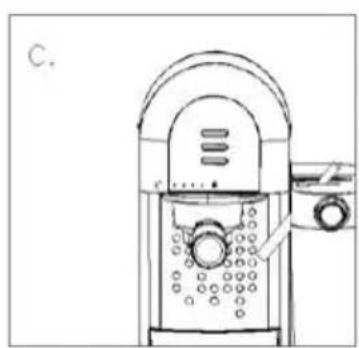
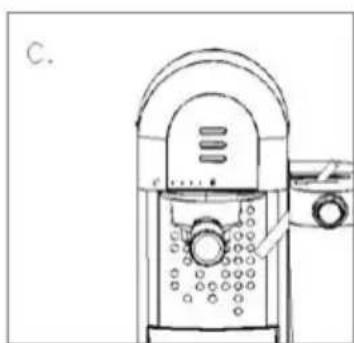
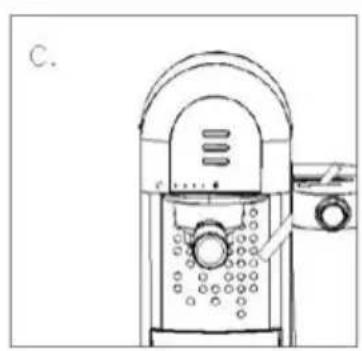
- Place the portafilter (10) with the installed filter (13) in the portafilter mounting slot (5) so that the portafilter holder (12) aligns with the open padlock symbol on the front panel of the coffee maker (fig.2).
natural_image
Technical line drawing of a mechanical device with no visible text or symbols
natural_image
Diagram of a mechanical device with internal components and a directional arrow (no text or symbols)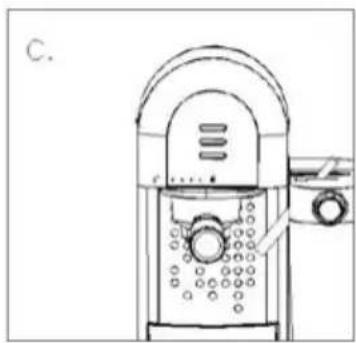
natural_image
Line drawing of a kitchen toaster with water level indicator (no text or symbols)- Turn the portafilter holder (12) slightly to the right so that it aligns with the closed padlock symbol on the front panel of the coffee maker.
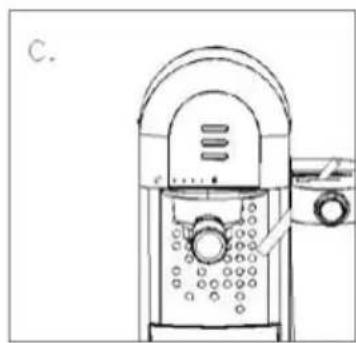
- Removal of the portafilter from the coffee maker and the filter from the portafilter is done in the reverse order of assembly, i.e. turn the portafilter holder (12) slightly to the left, remove the portafilter (10) from the portafilter mounting slot (5) and remove the filter from the portafilter.
CAUTION! Always hold the portafilter by its holder (12). There is a lever (11) in the holder that allows the filter to be locked when it is shaken during cleaning. The portafilter may be hot. Exercise caution.
PLACING CUPS IN THE COFFEE MAKER
- Place small cups on the pull-out support (6) after pulling the support out first.
- The two large holes in the support (6) and the grille (9) are located directly under the outlet of the coffee from the portafilter – they indicate the place for the correct positioning of the two small cups.
- Place a large cup directly on the grille of the drip tray (9) – the support (6) should then be pushed inside the appliance.
CAUTION! When brewing CAPPUCCINO or LATTE, make sure that you have correctly directed the frothing tube nozzle (22) into the cup.
USING THE DEVICE
- Place the device on a flat, stable and even surface.
- Connect the coffee maker to the mains (grounded).
-
Switch on the coffee maker using the switch (3) – all the indicator lights next to the buttons start to flash – the coffee maker is now warming up. After approximately 45 seconds, the indicator lights next to the ESPRESSO buttons illuminate continuously, indicating that the device is ready to brew ESPRESSO coffee. After about 90 seconds, all the lights are now on continuously – the coffee maker is also ready to brew CAPPUCCINO and LATTE.
-
When you have finished working with the coffee maker, switch it off using the switch (3).
CAUTION! If you take no further action on the device within 15 minutes, it will go into sleep mode. Pressing any button will result in exiting the sleep mode.
BREWING ESPRESSO
- Fit the selected filter (13) in the portafilter (10), fill it with coffee and fit the portafilter in the coffee maker.
- Make sure that the amount of water in the water tank (15) is sufficient.
- Place the desired cup(s) on the base and start the brewing process with the corresponding button (2a). Press the Espresso button once to brew one coffee or twice to brew a double portion.
- The brewing process is signalled by an indicator light next to the button used.
- When all the indicator lights illuminate again, coffee brewing has been finished.
- For more coffee, you can repeat the brewing process or press and hold the Espresso button for 3 seconds to adjust the amount of coffee to your preferences. When finished, press the Espresso button again to stop the coffee brewing process.
NOTE! To brew less coffee than the set portion, press the function button to stop the brewing process when the desired amount of coffee is reached.
BREWING CAPPUCCINO
CAUTION! Before preparing CAPPUCCINO, adjust the amount of frothed milk according to your preferences by turning the dosing knob (23) to the left for more foam or to
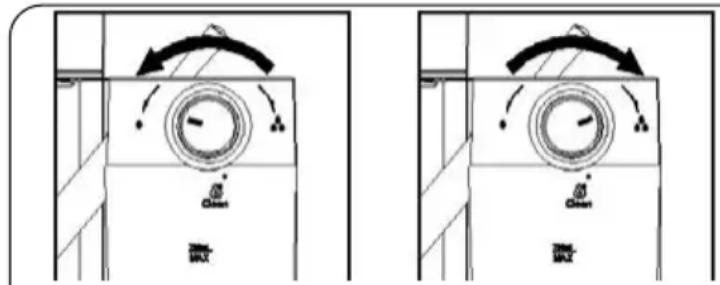
fig. 3
the right for less foam (fig.3). You can also adjust the intensity of the foam during the frothing process.
CAUTION! Use cold milk (at a temperature of approximately 5^ C) with a fat content of at least 3.2% to ensure an optimal frothing effect.
- Fit the selected filter (13) in the portafilter (10), fill it with coffee and fit the portafilter in the coffee maker.
- Make sure there is the right amount of water in the water tank (15) and the right amount of milk in the milk tank (19).
- Place the desired cup on the base and start the brewing process with the button (2b). Press the Cappuccino button once to brew a small cup of cappuccino or twice to brew a large cup of cappuccino. The machine will start brewing cappuccino according to the selection made.
- The brewing process is signalled by an indicator light next to the button used.
- When all the indicator lights illuminate again, coffee brewing has been finished.
BREWING LATTE
CAUTION! Before preparing LATTE, adjust the amount of frothed milk according to your preferences by turning the dosing knob (23) to the left for more foam or to the right for less foam (fig.3). You can also adjust the intensity of the foam during the frothing process.
CAUTION! Use cold milk (at a temperature of approximately 5^ C) with a fat content of at least 3.2% to ensure an optimal frothing effect.
- Fit the selected filter (13) in the portafilter (10), fill it with coffee and fit the portafilter in the coffee maker.
- Make sure there is the right amount of water in the water tank (15) and the right amount of milk in the milk tank (19).
- Place the desired cup on the base and start the brewing process with the button (2c). Press the Latte button once to brew a small cup of latte or twice to brew a large cup of latte.
- The brewing process is signalled by an indicator light next to the button used.
- When all the indicator lights illuminate again, coffee brewing has been finished.
MILK FROTHING
The device also enables the preparation of foamed milk only. Press and hold the Cappuccino button (2a) for 3 seconds if you want to add more froth to your drink or prepare frothed milk for another drink, e.g. macchiato, hot chocolate, tea latte, etc. When finished, press the Cappuccino button again to stop the milk frothing process.
CAUTION! When you have finished preparing the milk drink, you can keep the milk container directly in the fridge (ready to use next time).
TERMINATION OF WORK WITH THE COFFEE MAKER
- Once the work is finished, use the switch (3) to switch off the coffee maker and disconnect it from the mains.
- As soon as the coffee maker has cooled down, clean it following the instructions in the cleaning and maintenance section.
- Keep the tank with unused milk in the fridge.
PRACTICAL ADVICE WHEN BREWING COFFEE
- Brew your ESPRESSO in a hot cup. You will have your cup quickly heated by previously pouring hot water into it. A classic ESPRESSO coffee should be brewed from a mixture of several
varieties of coffee in a cup of approximately 70 ml and should not be poured more than half-way. Double ESPRESSO also bears the name DOPPIO.
- For a better visual effect you may brew your CAPPUCCINO in a transparent cup.
- Use cold milk (at a temperature of approximately 5^ C) with a fat content of at least 3.2% to ensure an optimal frothing effect. Froth the milk in a cup as small in diameter as possible so that the foam does not spread to the sides. The frothed milk can increase its volume significantly.
- Always remove residues of coffee from previous brewing from filters. Even small amounts of old coffee have a negative effect on the taste of the newly brewed coffee.
- Do not use ground coffee with sugar, as this may clog the filter and damage the device.
- The ground coffee will preserve its taste for only 7-8 days provided that it is kept in a leak-tight container in a cool and dark place. Do not keep in the fridge or freezer. It is recommended to grind whole beans just before use. Coffee beans kept in a leak-tight container preserve their taste for 4 weeks.
- The ground coffee must not be too „powdery” as it can block the flow of water in the filter even under high pressure, while too coarse a grind will not fully release the coffee’s flavour.
CLEANING AND MAINTENANCE
CAUTION! Unplug the device from the mains and wait for it to cool down before cleaning. CAUTION! Do not submerge the coffee maker housing in water or other liquids.
- Clean the machine after each use, only in this way will the coffee maker be able to release the full flavour of the brewed coffee.
- Wipe the housing with a soft and damp cloth. Neither use abrasive nor scouring cleaning agents, as they may scratch the housing of the coffee maker.
- Remove used coffee from the filters (13) then wash the filters and portafilter (10) in warm water with mild detergent, rinse and dry. Do not wash the filters and the portafilter in a dishwasher.
- Wipe the flat filter located in the portafilter mounting slot (5) with a paper towel in order to remove coffee residues. Periodically, use a screwdriver to unscrew the filter and rinse it in water. Check the patency of holes in the filter. Screw it back in place.
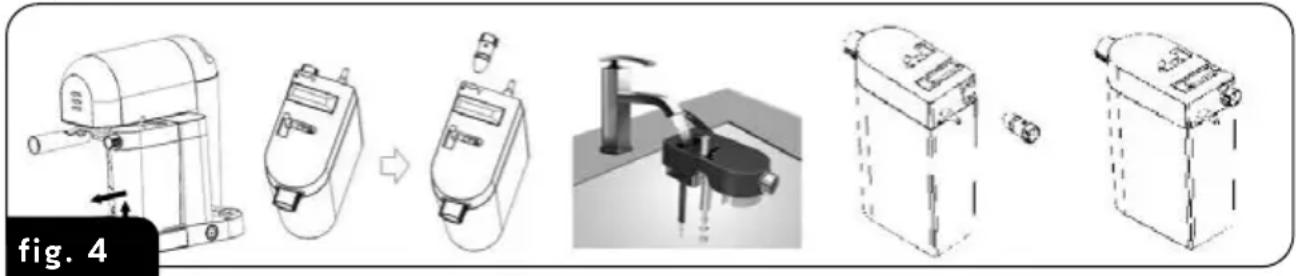
- To clean the milk tank and the frothing system, act in accordance with the following guidelines (fig.4):
natural_image
Illustration of a mechanical device assembly process showing step-by-step assembly from motor to battery (no text or symbols)- remove the milk tank from the device
Caution! To remove the milk tank, lift it up slightly, and then pull it out.
- remove the container lid (20)
- remove the milk suction line (21) and steam connection (26) from the lid – see markings on the lid and lift the silicone flat seal on the lid.
- wash the container lid (20), milk tube (21), steam connection (26) and its seal under running water and dry them.
- after the milk tube and steam connection are washed, mount them in the lid, close the silicone flat seal on the lid.
CAUTION! Make sure that the rubber seal of the steam connection (26) is correctly seated on the connection before fitting.
- wash the milk container (19) in warm water with detergent, rinse it and dry it, the container can be washed in the dishwasher
- pour about 200ml of water into the milk container and fit the container with the lid on the machine
- place a large empty cup on the drip tray, direct the frothing nozzle (22) towards the cup
- turn the milk volume dosing knob (23) to the "Clean" position
- Connect the coffee maker to the mains and start the self-cleaning programme:
Press and hold the Latte button (2c) for 3 seconds, then release it to activate the cleaning function. The device will start releasing water and steam through the frothing tube. Once the milk frothing system has been cleaned, the machine will go into the standby mode. -
switch off the device, disconnect it from the mains and remove the water from the milk container.
-
Wash the water tank (15) and its cover (17) in warm water with detergent, rinse it and dry it. You can wash the tank in dishwashers.
-
Wash the drip tray (8), tray grille (9) and pull-out tray (6) in warm water with detergent, rinse them and dry them.
-
Before starting the coffee maker for the first time, and always after an extended break in use, carry out a pre-heating procedure for the internal wiring. Perform the following activities:
- fill the water tank (15) with water so that the water is between the "MIN" and "MAX" levels
- fill the milk tank (19) with water so that the water is between the "MIN" and "MAX" levels
- fit the portafilter with filter (without coffee) in the coffee maker
- place the cup for coffee on the drip tray and place the frothing nozzle (22) in it.
- connect the device to an earthed power supply, switch it on (3) and wait for all the indicator lights to come on continuously
- start the “Cappuccino” brewing process using the button (2b) – steam will start to come out of the nozzle (or steam and water, depending on the setting of knob “22”) and hot water will start to come out of the portafilter. When the process is complete, all the indicator lights illuminate continuously – then repeat the process three more times.
DECALCIFICATION
The coffee maker is fitted with the decalcification function. When the milk container is empty, the device will remind you of the need for decalcification by means of six rapidly flashing indicators on the control panel (2a,2b and 2c). Then, perform the following activities:
- Fill the water tank with approx. 600 ml of clean water and descaling agent for coffee makers CAUTION! Use commercially available descaling agents for coffee makers. Observe the recommendations of the descaling agent manufacturer. Other agents may damage the materials from which parts of the coffee maker are made and/or have the zero descaling effect.
- press the Espresso (2a) and Latte (2c) buttons simultaneously. The device will automatically enter the descaling mode, and then the six indicators will slowly flash alternately. After about 10 minutes of operation, the process will end
- remove any residues of the decalcification mixture from the water tank, rinse the tank and fill it with 600 ml of clean water, then press the Espresso (2a) and Latte (2c) buttons simultaneously again and the device will continue cleaning, during which time the six indicators will
slowly flash alternately. After approximately 10 minutes of operation, the device will complete the descaling process and return to the standby state.
CAUTION!
You can press any function key to make the corresponding coffee when the machine reminds you to perform the descaling process. Once the corresponding coffee has been made, the device will continue to remind you to perform the descaling process.
The descaling process can be stopped at any time by pressing any button, after which the device will continue to remind the user about the necessity to carry out the descaling process. The device will go into the standby mode only after the whole descaling process has come to an end.
TROUBLESHOOTING
| PROBLEM CAUSE SOLUTION | ||
| Coffee does not flow out during the brewing process | No water in the tank Replenish water | |
| Coffee ground too finely Change the coffee in the filter to a finer grind | ||
| Too much coffee in the filter Fill the filter with a smaller amount of coffee | ||
| Coffee pressed too much in the filter | Fill the filter with coffee and tamp the coffee with less force | |
| Coffee flows out on the sides of the portafilter | Portafilter not blocked in the final position | Pull the portafilter to the final position |
| Coffee on the edge of the portafilter | Remove the portafilter and clean the portafilter edge | |
| Too much coffee in the filter Fill the filter with a smaller amount of coffee | ||
| Milk is not frothed, it does not flow out of the nozzle | Shortage of steam Replenish water | |
| Milk is not cold enough. Use cooled milk | ||
| Blocked frothing nozzle Clean the frothing nozzle | ||
| Coffee flows out too fast Coffee | Ground too coarsely Grind the coffee more finely | |
| Too little coffee in the filter Fill the filter with a larger amount of coffee | ||
| Coffee too weak Small filter | was used for double coffee | Use the large filter |
| Coffee ground too coarsely Grind the coffee more finely | ||
| Rapid pulsation of all indicator lights | No water in the tank Replenish water | |
Pulsation of indicator lights for Espresso, Cappucino and Latte (2a,2b,2c)
Reminder to descale the coffee machine
Perform the descaling procedure
TECHNICAL DATA
| Model | MKW-14M |
| Power supply 220-240V~ 50Hz | |
| Power 1230-1470W | |
| Off and standby mode available available | |
| Power consumption in standby mode 0,44W | |
| Power consumption in off mode 0W | |
| Power consumption in network standby mode | - |
| It automatically goes into standby mode after - | |
| Automatically goes into shutdown mode after 21 min 20s | |
| Network standby mode, if the device has a connection function with the application | - |
| Length of mains cable 1,0 m |
CE
CAUTION! MPM agd S.A. reserves the right to technical changes!
Proper disposal of the product (waste electrical and electronic equipment)
Marking on the product indicates that after the service-life of the product expires, it should not be disposed with other type of municipal waste. Used equipment may have a negative impact on the environment and health of people due to potentially containing hazardous substances, mixtures and components. Mixing electric waste with other types of waste or disassembling those in an unprofessional manner may cause a release of substances that are hazardous to the environment and health.
Used equipment should be handed-over to a point for collection of electric waste. In order to obtain detailed information regarding the electric waste collection points, the user should contact the municipal point of electric waste collection or used equipment processing department.
natural_image
Illustration of hands using a pipette to extract dark liquid from a small container (no text or symbols)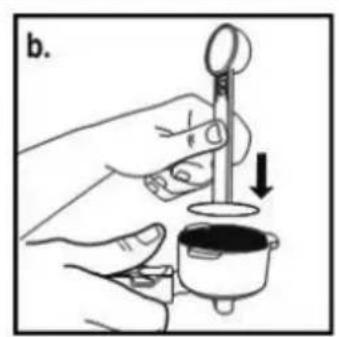
natural_image
Illustration of a hand using a tool to measure a small object, with an arrow indicating downward motion (no text or symbols present)
natural_image
Illustration of a hand using a dropper to measure a small container with an arrow indicating rotation (no text or symbols)natural_image
Technical line drawing of a mechanical device with no visible text or symbols
natural_image
Line drawing of a portable water heater with control panel and buttons (no text or symbols)natural_image
Illustration of a mechanical device transformation process, showing step-by-step assembly from motor to battery unit (no text or symbols)natural_image
Illustration of hands using a tool to extract dark liquid from a small container (no text or symbols)Figure 1

natural_image
Illustration of a hand using a tool to measure a small object, with an arrow indicating downward motion (no text or symbols present)
natural_image
Illustration of a hand holding a small object with a magnifying glass, showing motion direction (no text or symbols)natural_image
Technical line drawing of a mechanical device with labeled components (no readable text or symbols)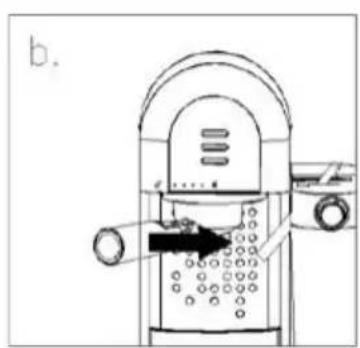
natural_image
Line drawing of a portable water heater with control panel and air vent (no text or symbols)natural_image
Two identical diagrams showing a circular device with directional arrows, labeled 'Figure 3' (no text or symbols on the devices themselves)natural_image
Illustration of a mechanical device transformation process, showing step-by-step assembly from motor to final box (no text or symbols)natural_image
Illustration of hands using a spoon to extract dark liquid from a small container (no text or symbols)Fig. 1

natural_image
Illustration of a hand using a dropper to measure a small container with liquid, no text or symbols present
natural_image
Illustration of a hand holding a small object with a pointer, showing motion direction (no text or symbols)natural_image
Line drawing of a portable water heater with control panel and air vent (no text or symbols)natural_image
Illustration of a motor and pump assembly process, showing step-by-step assembly from fan to container (no text or symbols)PROBLEMA CAUSA SOLUZIONE
natural_image
Illustration of a hand using a tool to measure a small object, with an arrow indicating downward motion (no text or symbols present)
natural_image
Illustration of a hand holding a small object with a pointer, showing motion direction (no text or symbols)natural_image
Illustration of a hand using a tool to measure a small object, with an arrow indicating downward motion (no text or symbols present)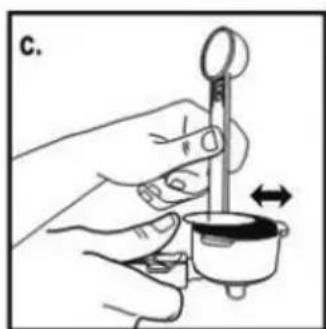
natural_image
Illustration of a hand using a dropper to measure a small container with a pointer (no text or symbols)UZMANIBU! Kafija nedrikst pārsniegt "MAX" atzīmi filtra iekšpusē. Ja kafija ir stipri saberzta, tas atbilst aptuveni 10 g kafijas svara mazajam filtram un 20 g lielajam filtram.
FILTRA KOLBAS UZSTĀDĪŠANA/NOŅEMŠANA NO KAFIJAS AUTOMĀTA
BESCHRIJVING VAN HET APPARAAT
natural_image
Illustration of a hand pouring dark liquid into a container (no text or symbols)Fig. 1
natural_image
Illustration of a hand using a measuring instrument to measure a small container (no text or symbols present)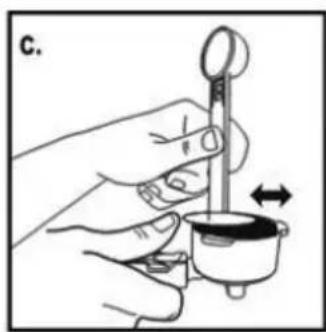
natural_image
Illustration of a hand using a dropper to measure a small container with an arrow indicating rotation (no text or symbols)natural_image
Technical line drawing of a mechanical device with no visible text or symbols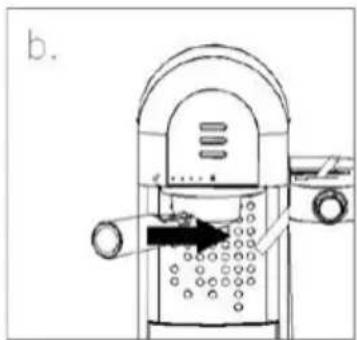
natural_image
Line drawing of a mechanical device with internal components and a directional arrow (no text or symbols)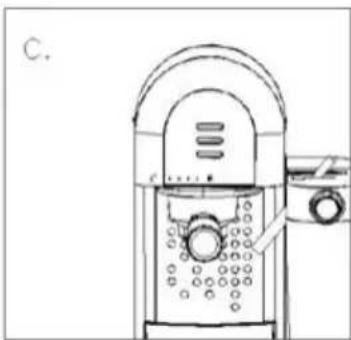
natural_image
Line drawing of a portable water purifier with control panel and fan (no text or symbols)ESPRESSO KOFFIE MAKEN
natural_image
Two identical diagrams showing a circular device with directional arrows, no text or symbols present.CAPPUCCINO KOFFIE ZETTEN
natural_image
Illustration of a motor and pump assembly process, showing step-by-step assembly from fan to container (no text or symbols)PROBLEEM OORZAAK OPLOSSING
natural_image
Illustration of a hand pouring liquid into a container with a dropper (no text or symbols)rys. 1

natural_image
Illustration of a hand using a tool to measure a small object, with an arrow indicating downward motion (no text or symbols present)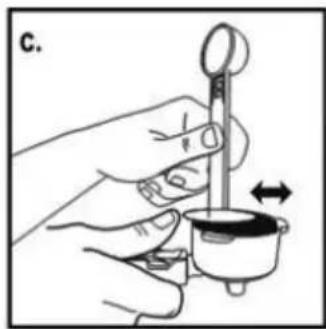
natural_image
Illustration of a hand using a dropper to measure a small container with a pointer (no text or symbols)natural_image
Technical line drawing of a mechanical device with labeled components (no readable text or symbols)
natural_image
Line drawing of a portable radio with buttons and dials (no text or symbols)PROBLEMY ISPOSÓB ICH ROZWIAZANIA
natural_image
Illustration of hands using a pipette to extract dark liquid from a small container (no text or symbols)Fig. 1

natural_image
Illustration of a hand using a tool to measure a small object, with an arrow indicating downward motion (no text or symbols present)
natural_image
Illustration of a hand holding a small object with a pointer, showing motion direction (no text or symbols)natural_image
Technical line drawing of a mechanical device with labeled components (no readable text or symbols)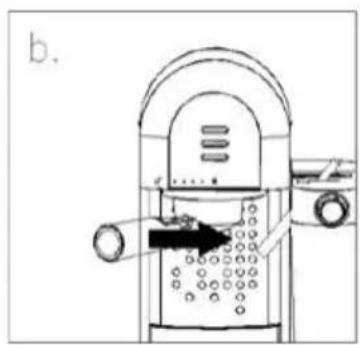
natural_image
Diagram of a mechanical device with internal components and directional arrow (no text or symbols)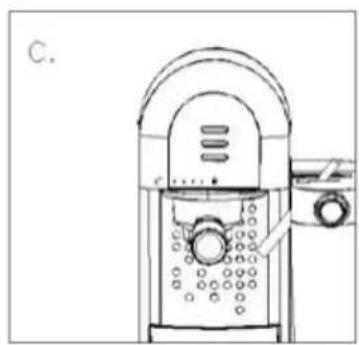
natural_image
Line drawing of a portable water heater with control panel and water tank (no text or symbols)natural_image
Illustration of a kitchen machine with various components and parts, shown in sequential steps from top view to bottom view (no text or labels)natural_image
Illustration of a hand using a tool to measure a small object, with an arrow indicating downward motion (no text or symbols present)
natural_image
Illustration of a hand using a dropper to measure a small object, with no visible text or symbols.natural_image
Illustration of a hand using a tool to measure a small object, with an arrow indicating downward motion (no text or symbols present)
natural_image
Illustration of a hand holding a small object with a pointer, showing motion direction (no text or symbols)natural_image
Technical line drawing of a mechanical device with no visible text or symbols
natural_image
Line drawing of a portable water heater with control panel and fan (no text or symbols)- Otočte držiak páky (12) mierne v smere hodinových ručičiek tak, aby sa zhodoval so symbolom zatvoreného visiaceho zámku na prednom paneli zariadenia.
- Demontáž páky z kávovaru a filtra z páky sa vykonáva v opačnom poradí ako pri montáži, t.j. mierne pootočte držiak páky (12) dolava, vyberte páku (10) z držiaka páky (5) a vyberte filter z páky.
natural_image
Illustration of a hand using a dropper to measure a small container with a downward arrow (no text or symbols)
natural_image
Illustration of a hand using a dropper to measure a small container with an arrow indicating rotation (no text or symbols)natural_image
Technical line drawing of a mechanical device with no visible text or symbols