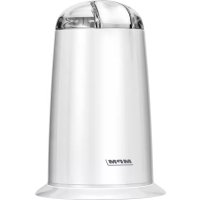
MKW08M - Coffee machine MPM - Free user manual and instructions
Find the device manual for free MKW08M MPM in PDF.

| Product type | Espresso coffee machine |
| Brand | MPM |
| Model | MKW08M |
| Water tank capacity | 1.2 L (max), 0.4 L (min) |
| Maximum pressure | 20 bars |
| Filter types | Small filter (10 g) and large filter (20 g) |
| Functions | Preparation of one or two cups, steam distribution for frothing milk |
| Preheating | Preheating of the machine, filter holder, and cups |
| Automatic shut-off | 30 minutes after last use |
| Brew time programming | Adjustable up to 60 seconds |
| Pressure gauge | Pressure indicator during brewing |
| Steam wand | With rubber protection for frothing milk |
| Cup warmer | Heating tray on top of the appliance |
| Drip tray | With removable grid |
| Safety | Overheat protection, automatic shut-off, filter holder lock |
| Maintenance | Descaling recommended every 4 to 5 weeks |
| Cleaning | Regular cleaning of filters, filter holder, steam wand, and drip tray |
| Spare parts | Filters, filter holder, drip tray, water tank |
| Repairability | Repair by an authorized service center |
| Use | Household use only |
| Power cord length | 0.8 m |
Frequently Asked Questions - MKW08M MPM
User questions about MKW08M MPM
0 question about this device. Answer the ones you know or ask your own.
Ask a new question about this device
Download the instructions for your Coffee machine in PDF format for free! Find your manual MKW08M - MPM and take your electronic device back in hand. On this page are published all the documents necessary for the use of your device. MKW08M by MPM.
USER MANUAL MKW08M MPM
Read carefully this manual before using the appliance.
-
Do not immerse the appliance, its cord and plug in water or any other liquids!
-
Close supervision is necessary when using the appliance near children!
-
Fill the container only with cold water.
Do not use the appliance if it is damaged, also if the power cord or plug is damaged - return the appliance for repair to an authorized service centre.
- To avoid the risk of damage, fire or injury, always use the attachments recommended by the manufacturer.
Do not hang the power cord over sharp edges and do not allow the power cord to touch hot surfaces.
Do not use the appliance outdoors.
Before cleaning, pull out the plug from the outlet and allow the appliance to cool down completely.
Never leave the plugged appliance unattended.
Do not switch on the appliance without water.
Do not place the appliance in vicinity of electric and gas cookers, burners, ovens, etc.
-
Do not pour water into the container after switching on the appliance.
-
Cup heater is hot. Take extreme care while placing and retrieving cups.
Always unplug the appliance when it is not in use or before cleaning.
After finishing operation the appliance should be unplugged!
- Do not use the appliance for the purposes different than it was designed for.
This coffee maker is designed for domestic use only.
- The appliance shall be plugged to an outlet with a protective earth pin.
This appliance is not intended for use by children under 8 years of age and individuals with reduced physical, sensory or mental capabilities, or lack of experience and knowledge, unless they have been given supervision or instruction concerning use of the appliance in a safe way and if they understand the hazards involved. Cleaning and user maintenance shall not be carried out by children without supervision.
- Store the appliance and its cord out of reach of children under 8 years of age.
Children should be supervised to ensure that they do not play with the appliance.
The temperature of surfaces may be higher when the appliance is in use.
Use the appliance on a flat and stable surface.
Do not pull the plug by holding the power cord.
Do not connect the power plug with wet hands.
In order to ensure your children's safety, please keep all packaging (plastic bags, boxes, polystyrene etc.) out of their reach.
WARNING! Do not allow small children to play with the foil as there is a danger of suffocation!
Fill the water tank with cold water only.
Do not exceed the maximum fill level mark.
Do not turn on the coffee maker with the water tank empty.
Do not fill the water tank if the coffee maker is turned on.
Warning! Hot surface!
ATTENTION! Do not start the espresso machine without the portafilter with a selected filter.
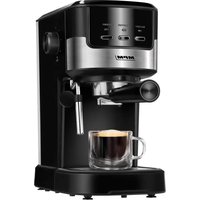
OVERVIEW

- Espresso machine housing
- Control panel
a. power switch with LED
b. 1-cup button with LED
c. 2-cup button with LED
d. steam heating button with LED
- Cup warmer
- Steam dosage knob
- Manometer
- Filter baskets
a. small filter basket (10 g)
b. large filter basket (20 g)
- Portafilter
-
Filter lock lever
-
Portafilter handle
- Group head
- Drip tray mounting space
- Drip tray
- Drip tray grate
- Steam jet nozzle
- Rubber nozzle handle
- Nozzle guard
- Water tank housing
- 1.2 L water tank
- Water tank cover
- Non-slip feet
- Coffee measuring spoon with tamper
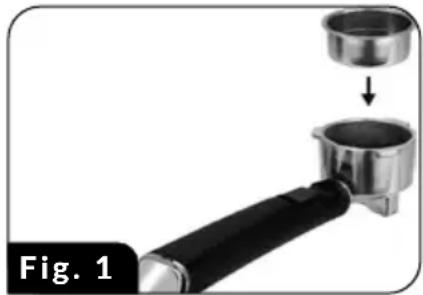
ATTACHING/DETACHING THE FILTER WITH THE HOLDER
- Choose a filter (6) and place it in the filter holder (7) (Fig. 1).
- Place the portafilter (7) with a filter basket (6) inside the group head (10) so that the portafilter handle (9) aligns with the open lock symbol on the front panel of the espresso machine.
- Gently turn the portafilter handle (9) to the right so that it aligns with the closed lock symbol on the frontal panel of the coffee maker (Fig. 2).
- Detach the filter holder and the filter in the reverse order: gently turn the filter holder handle (9) to the left to stop, remove the filter holder (7) from the receptacle (10) and remove the filter from the holder.
CAUTION! Always hold the filter holder by the handle (9). The handle features a latch lever (8) to keep the filter in the holder while shaking it empty. The filter holder can be hot. Handle with care.
FILLING THE WATER TANK
- Unplug the espresso machine from the mains.
- Lift the water tank (18) by pulling up on the handle.
- Open the water tank cover and pour in no more than 1.2L (bottom edge of the black tank handle) of cold drinking water, but in any case no less than 0.4L .
- Place the water tank back in the espresso machine. While reinserting the water tank make sure that the two hooks on the water tank engage the two hinges in the back of the espresso machine.
- You can also fill the water tank without removing it — move water from a container. Be careful not to spill water on the espresso machine. The espresso machine must be unplugged
from the mains to do this safely! If you spill water on the espresso machine, leave it until completely dry before use.
CAUTION! Do not fill the water tank above the 1.2 l. Do not power on the espresso machine with the water tank empty or removed. Use only cold drinking water. Do not use hot water.
BEFORE FIRST USE
- Remove the espresso machine from the packaging. Remove all plastic bags, fillers, safety locks and packaging labels.
- Inspect the espresso machine for damage which may have been caused in transport. If you suspect that the espresso machine is damaged, do not use it. Consult the seller.
- Verify that your power mains match the nameplate ratings of the espresso machine.
-
To ensure the best flavour of the coffee, carry out the steaming procedure. Follow these steps:
-
Remove the water tank (18) from the espresso machine, pour about 1 litre of cold drinking water. Place the water tank back in the espresso machine.
- Place the filter (6) in the filter holder (7) and attach the filter holder to its receptacle, and secure. The filter must be empty. Do not add any coffee yet.
- Place the drip tray (11) in the drip tray seat (12) and place the drip tray grate (13) on the tray. Place an empty cup on the grate. Make sure that the steam level knob (4) is set at its the position "0".
CAUTION! The espresso machine does not come with any coffee cups. Use your own cups.
- plug the espresso machine to a power source and switch it on by pressing the power switch (2a) – the appliance is now warming up, which is signalled by the slow flashing of the indicators on the (2b) and (2c) buttons. Once the appliance has warmed up, the indicators will illuminate solid. Press the 1-cup button (2b) – hot water will begin to flow into the cup. When the water stops pouring, empty the cup and repeat the process twice more.
- use the steam heating button (2d) to heat up steam and once heated up (the indicator on the button has illuminated solid), release some steam to a dish placed under the nozzle.
CAUTION! When the water pump is turned on for the first time with the pressure switch, unusual sound may be heard which will stop in approximately 30 seconds. This is the water pump being vented and it is perfectly normal.
CAUTION! The released steam jet is hot. Handle with care. Risk of burns!
USING THE APPLIANCE
ESPRESSOMACHINE WARMING
In order to achieve the best coffee aroma, warm the portafilter with the filtering basket and the cup by following these steps:
- Remove the water tank and fill it with cold drinking water. Replace the tank in the appliance.
-
Choose a filter basket (6), place it in the portafilter (7) and position the portafilter in the group head (10). Do not put coffee in the chosen filter basket.
-
Place the drip tray (12) in the drip tray mounting space (11) and install the grate (13) on the tray. Place a cup on the grate.
- Make sure that the steam dosage knob (4) is set to "0". Connect the device to the mains.
- Plug the appliance to a power source and switch on by pressing the power switch (2a) – the appliance is now warming up, which is signalled by the slow flashing of the indicators on the (2b) and (2c) buttons. Once the appliance has warmed up, the indicators will illuminate solid. Press the 1-cup button (2b) – hot water will begin to flow into the cup. Empty the cup when the water stops pouring. The appliance has been initially warmed up and you can brew coffee now.
MAKING COFFEE
- Warm up the device in accordance with the instructions above.
-
Detach the portafilter (7) with the warmed filter basket (6). Use the scoop (21) to fill the filter basket with the appropriate amount of coffee:
-
small filter basket (6a) - max. 10g of fresh, well-ground coffee (for one cup)
- large filter basket (6b) - max. 20g of fresh, well-ground coffee (for two cups)
Tamp the coffee in the basket using the tamper (21).
ATTENTION! Do not exceed the amount of 10g of coffee for the small basket or 20g for the large basket.
ATTENTION! The portafilter is hot. Use the portafilter handle. Take extreme care - scalding risk.
- Attach the portafilter with the appropriate filter basket filled with coffee to the appliance.
- Place a cup in the centre of the drip tray grate or two cups next to each other under the portafilter, if you wish to make two cups of coffee. The round holes in the grate (13) are located directly below the coffee dispensing spout. Cups can be warmed using the cup warmer (3).
- Start the brewing by pressing the (2b) button for one cup or the (2c) button for two cups of coffee. If the indicators on the (2b) and (2c) buttons are flashing slowly, the water is being heated up – do not start brewing until the lights illuminate solid. When the desired button is pressed, the appliance starts pouring water under high pressure through the portafilter with tamped coffee in the basket.
ATTENTION! Water heating does not exceed 70 seconds at a time.
The default pouring (brewing) time for one cup is set to approximately 20 seconds or 40 seconds for two cups. Depending on various circumstances (coffee variety, coffee grind size and tamp level), this corresponds to approximately 35 and 70ml of coffee. Five short alarm sounds will indicate that the pouring is complete. The pouring time may be programmed within a 60 second range (see: "PROGRAMMING POURING TIME").
- The manometer (5) indicates the pressure during brewing, which may reach up to 20 bar. However, the pressure during brewing depends on several factors, such as: the ambient temperature, atmospheric pressure, coffee variety, grind size or tamp level, and, therefore, the value may be lower.
- If you want to make more coffee from the same dose, repeat the brewing process. Note that the coffee will be weaker.
- When the brewing is complete, proceed to milk frothing or turn the appliance off by pressing the (2a) button, unplug it, detach the portafilter, remove the filter basket and immediately rinse and dry it for the next use.
ATTENTION! The portafilter, filter baskets and group head are hot. Proceed with care to avoid scalding. Always hold the portafilter by the handle. Regularly empty the drip tray.
ATTENTION! Regularly control the quantity of water in the tank. Do not allow the espresso machine to operate without water. Do not remove the water tank while operating the espresso machine.
ATTENTION! The espresso machine is equipped with an automatic deactivation function after 30 minutes of operation.
FROTHING MILK
The milk frothing feature helps make milk froth or heat milk for the coffee. The milk is frothed with a jet of hot steam forced under pressure from the steam jet nozzle (14). Make your coffee first, then process the milk.
CAUTION! The released steam jet is hot. Handle with care. Risk of burns!
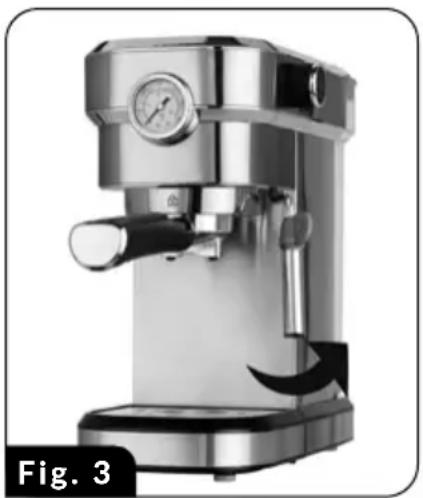
- Swivel the steam jet nozzle to the right of the espresso machine by handling the steam jet rubber sleeve (15), as shown in Fig. 3. This way the nozzle can be easily put in the container with milk.
- Turn on the steaming switch (2d) and wait until its LED is steadily on. Now, hot steam is ready.
CAUTION! The water heater is automatically turned off when the steam heater is running. This is to provide more heat for the steam.
- Place an empty container under the nozzle (14) and gently turn the steam level knob (4) to the left to vent residual water from the nozzle. The nozzle will blow steam with water droplets, followed by steam only. Turn the steam level knob (4) off, to the uppermost position 0.
CAUTION! The steam jet nozzle (14) has a guard (16). The guard (16) must be installed on the nozzle when in use. Risk of burns!
- Put the container with milk under the nozzle (14) and immerse the nozzle tip in the milk. Now, gradually increase the steam level with the knob (4) while gently swirling the milk in the container. Gradually immerse the nozzle deeper in the milk. Do not froth milk longer than one minute at a time.
- When milk frothing is complete, turn steam heating off by pressing the (2d) button. When heating is off, the (2b) and (2c) button indicators are flashing quickly, indicating that the temperature is too high for another brewing process. Wait until the espresso machine cools down (the indicators have illuminated solid) before next brewing. You can speed up the cooling process by releasing some steam into a dish placed under the nozzle. After use, turn the appliance off by pressing the (2a) button, unplug it, wait until cooled down, and clean.
CAUTION! Before unplugging from the mains, place a container with water under the steam jet nozzle, immerse it in the water, and flush the nozzle and its guard clean. This will prevent persistent milk stains.
PROGRAMMING POURING TIME
- Switch the espresso machine on and wait until ready for use (the indicators on the 2b and 2c buttons have illuminated solid).
- Start brewing your coffee by pressing the (2b) button. After 3 seconds, press the button again and hold until you fill the cup with the desired amount of coffee (max. 60 seconds). When you release the button, the pouring time is programmed into the appliance memory.
- Follow the same steps when programming the pouring time for two cups - button (2c).
- To delete the programmed times from the memory and restore default settings, press the steam jet button (2d) and 1-cup button (2b) at the same time. Hold the buttons for approximately 3 seconds – the espresso machine will produce a short sound to confirm that default settings have been restored.
ESPRESSOMAKINGTIPS
- Use warm cups to make espresso. Heat them up with the cup heater (3). You can also quickly heat up a cup by pouring hot water out of the espresso machine (with the filter holder and a filter secured in the receptacle without any coffee). Classic espresso should be made of a blend of various types of coffee and poured into a 70ml cup, but only up to a half of it.
- The espresso machine has a functionality allowing dosing hot water from the nozzle (14), which may also be used for warming cups. Hot water is shot when the steam dosage knob is turned to the left and the appliance is in the standby mode (the (2b) and (2c) button indicators are illuminated).
- When frothing milk for your cappuccino, use 100ml of milk at a time. Pour the frothed milk into the brewed coffee. Sprinkle with a bit of cocoa powder on top. A classic cappuccino recipe requires 25-35 ml of espresso.
- For a better visual effect, make cappuccino in a transparent cup.
- Always thoroughly remove coffee grain residues from the filters. Even trace amounts of old coffee disrupt the taste of a fresh brew.
- Froth semi-skimmed or fat milk, pre-cooled in a refrigerator. Froth milk in a small diameter vessel so that the froth does not spray around. Milk can significantly increase its volume by frothing.
- Do not brew coffee after frothing your milk; the espresso maker will output water too hot to enjoy a good taste and aroma.
CLEANING AND MAINTENANCE
CAUTION! Before cleaning, always unplug the espresso machine from the mains and wait until it has completely cooled down.
CAUTION! Do not immerse the espresso machine in water or other liquids!
- Clean the espresso machine after every use.
- Clean the espresso machine housing with a damp cloth and thoroughly wipe it dry.
-
Clean the filter holder (7) and the handle (9), the filters (6a) (6b), the drip tray (12), the grate (13) and the water tank (18) in warm water with mild detergent. Next, rinse clean and thoroughly dry.
-
Clean the steam jet nozzle (14) after every use. Immerse the steam jet nozzle in water and turn on the steam. Next, remove the guard (16) from the steam jet nozzle and wash it in warm water, rinse it clean and dry. Reinstall afterwards.
-
Periodically clean and inspect the operation of the tapped valve at the bottom of the water tank. Clean the poppet valve under running water and gently press it several times in the process. Inspect and periodically clean the valve seat in the housing of the espresso machine.
-
Clean the flat filter located in the portafilter socket (10) after every 50 cups of coffee or so. In order to clean the filter, follow these steps:
-
use a screwdriver to loosen the screw holding the flat, round filter in the group head
-
wash the filter in warm water with a detergent, then rinse and dry, check that filter mesh is unobstructed
-
replace the clean filter and tighten the screw:
-
Descale the espresso machine every 4 or 5 weeks. Regular descending ensures a better taste and aroma of your coffee and extends the operating life of your espresso machine. Follow these steps for descending:
Prepare a water solution of citric acid: use 1 litre of water and 4 tablespoons of citric acid. Pour the mixture into the water tank.
- Attach the filter holder with an empty filter to the receptacle and install the drip tray with the grate. Place an empty container on the grate.
Plug the espresso machine to the mains and turn on. Wait for the water to preheat.
- turn the water flow on by pressing the (2c) button, wait for some time, repeat three times, empty the dish as needed
- Turn on the steaming switch (2d). Wait for the steam to preheat. Place an empty container under the steam jet nozzle and release hot steam for about 1 minute.
Discard the unused water with citric acid. Add clean drinking water to the tank.
-
Repeat the descending process with pure water only (by passing hot water through the filter holder and venting steam) to remove residues of citric acid.
-
Remove the drip tray, turn off the espresso machine, unplug it from the mains and wait until it cools down completely.
TROUBLESHOOTING
| PROBLEM CAUSE SOLUTION | ||
| Water leaks from underneath the espresso machine | Drip tray overflow Empty the drip tray | |
| Espresso machine does not work properly | Contact an authorised service centre | |
| Espresso machine fails to work | No power | Turn on the espresso machine, check the connection to the mains, and contact an authorised service centre, if necessary |
| Steam does not froth milk Steam temperature too low Wait until the espresso machine is ready to vent hot steam | ||
| The milk container is too big Use a tall mug with a narrow mouth | ||
| Skimmed and warm milk is used | Use fat or semi-skimmed cold milk | |
| The coffee tastes sour The espresso machine was not rinsed of all citric acid | Pass hot water several times through an empty filter attached to the receptacle | |
| The coffee was poorly kept Use fresh ground coffee Keep coffee in an air-tight container | ||
| Machine does not draw water despite full tank. | Air in the system Blood the system through the steam nozzle using the knob (4) | |
| Brewing does not start | Appliance memory error | Switch the machine off and back on |
TECHNICAL SPECIFICATION
See the product's nameplate for technical specifications. Length of the power cord: 0.8m

NOTE! MPM agd S.A. reserves its right to modify the technical data!
PROPER DISPOSAL OF THE PRODUCT (waste electrical and electronic equipment)

This symbol on the product indicates that the product, after its lifetime, should not be disposed with other household wastes. To avoid harmful influence on the environment and human health due to uncontrolled waste disposal, dispose the waste device to the service point of waste household appliances or report collecting it from home. In order to obtain detailed information about the location and how to dispose the
waste electrical and electronic equipment in a safe way, contact your retailer or local Department of Environmental Protection. Do not dispose the device with other municipal waste.
CONSIGNES DE SECURITE
He Beisha Te npoBOD Ha ocTpbie KpaI He NpO3BOJTe emy COnpKacTbC C TropaUMN NOBepXHOCTaMn.
He nCnoJIb3yIte yCTpoIcTBO Ha OTKpbITOM pOcTpaHCTBe.
Ipeed hauanom ouinueHn, npexde Bcero, BbInbTe 7TeNCelb n3 ceTeBOrO rHe3da ndoKdntecb pONHO OCTbIBaHn yCTPOINCTBa.
HnKoIa He OCTabJIaIte yCTPOiCTBO, NOcOeINHeHHoe K NCTOuHInKy nITaHnA, 6e3 Ha30pa.
He 3aynckaiTe yctpoiCTBO 6e3 BOjbl.
He cTaBbTe yCTpoIcTBO B6JIIN3n 3JIeKTpUpeCKNX Ira3OBbIX KyxOHbIX PJIIT, ropeJOK, dYXOBOK I T.I.
Iocne BkIIOueHn yCTPOiCTBa He BInBaITe B eMKoCTb BOy.
Bcerda BbHMaIte WTeNcIb n3 CeTeBOrO rHe3da, KOrda He noJIb3YeTeCb yCTPOIcTBOM IIN npexJe Yem PnIcTpyNTb Keero OUnIeHNIO.
Pocne OKOHuaHnpa6OtbyyCTpoiCTBO Heo6xOIMOBbIKIOHTb!
He nCnoIb3yIte yCTpoIcTBO dIa HeCBOIcTBeHHbIX eMy cIeIe.
KoefeBapka npedHa3Haueha nckIouHTeJbHO dJa DomaShero Nolb3ObaHnra.
VCTPOIcTBO IOJXHO 6bITb IODCOeINHeHO K CTeBOMy THe3dy C 3a3emJIIOUIM 6oJtOM.
Данhoe оборудане может Испльзоватбая DeТьМВ BOЗразе He Младше 8 leт и ЛюдмС орраичehныIMn ΦиЗИчЕСКIMN, ИNTeЛпЕКТУАльHBыIMN BO3MOЖНOCТЯМ, Людм, He ИмeЮшIMN OпыТa N He O3HaKOMЛeHHbIMN CobopydOBaHnEM, ecn byet obecneueh KOHTpoJIb ЛIDO пobeDEн INHCTpyKTajk OTHOCITIELBO 6e3ОпаCHOTo IcNoIb3OBAHnIA好象OBaHnA TaKIM OБpa3OM,ЧTOБы CBЯЗAHьe C ИСпльзованe m yrpo3bl 6bln ПОнЯТь. Be3 NaДЗopa detn
He DoJIxHbI BblIOJIHrTb OUHCTKy I O6CnyJXnBaHne O6OpyIDOBaHn. CoXpaHnTe yCTpOiCTBO n eTo npOBoD B MeCTe, HeoCTuHOM dJa DeTeMnaAdwe 8 JeT.
CneyuT o6paatb BnMaHHe, yTo6bI dTeH He nrgaN C o6OpydoBaHnEM/ yCTPOYCTBOM.
TeMnepaTpa DoCTyHbIX NOBepxHOCTeIMoKet 6bITb 6OJIee BBICOKO, KOrda.
obOpudOBaHne pa6OtaET.
IcnoJIb3yIte yCTpoIcTBO Ha IpaIKoI yCTOuINBOI NOBepxHOCTN.
He BbITaIbAaiTe 13 cTeBOrO rHe3da 3a npOBoJ.
He coeHnHnTe wTeNceIb C cTeBbIM rHe3dOM MOKpbIM pyKaMn.
Для 6e3oNaChOCTn DeTei, noXaIyIcTa, He OCTaBJIaIe CBO6OJHO DoCTuINHbIe yactn ypaKOBKn (PnaCTIKOBbIe MeuKN, KapTOHHbIe KOpO6Kn, noJIncTIpOJI n T.D.).
DCTOPOXHO! He pa3pewaite deTm nrgatb c pIeHko. Onacnoctb yduxb!
3aonHnIe pe3epByap TOnbKO XoIoHNo BODoN.
He npebbiawte MaKcImaHbI yPoBeHb 3aONHeHn, yKa3aHHbI Ha np6ope.
He nCnoJb3yIte np6op 6e3 BoIbl.
Iocne BkIoueHn np6opa He BInBaIte B pe3epByap BOy.
He npikacaiTecb K HargBeBATEbHOn PnactInHe BO Bpemr pa60tbI np60pa n cpa3y nocJe ee OKOHuaHn - npikacAHne rpo3nt CINbHbIM OxKOrom.
IodorpeBaemoe MeCTO nIy aWeK c ropye. BydbTe OCTOpOxHbI CTaBn 3a6npaY aWKcN C 3TOrO MeCTa.
- KaJdbie 4-5 HeIb BbInonHnIe npOceDpy ydaIeHnHaKUnn. LcKlnuecka Ounchka ot HaKUnn oBecneuBaet lyuWn BKyc KoFe, a TaKke BnIeT Ha cPOK cLyX6bl KoFemaunHbI. YTo6bI ydaIINb HAcNb n3 KoFemaunHbI, cIeNyIte npUBeDeHHbIM HNXe INHCTpyKzIyM:
DnpuroToBbTe Cmecb BObl (1 nITp) IN NIMOHHOI KNCNtbl (YeTbIpe KxOHHbIe IoxKn), a 3aTem BneIte ee B pe3epByap dJIra BObl
DyCTaHOBnTe KO6y C ΦnIbTpOM (nyCTbIM, 6e3 KoΦe) B TOM MeCTe, rDe yCTaHOBnHa KOJI6a, IV BByDNHbTe KaIIneYnAbNtBaTeJb BMeCTe C peWetKoI, NOMEcTlTe Ha KaIIneYnAbNtBaTeJe NcyTyo Nocdy
IOnKJIIOUChTe yCTpoiCtBO K 3JeKTPocetN, BKJIIOUChTe n DoJxNTecb erO HarpeBa
BKNIOHTe npOINB BObI KHOIKoN (2c), NOIOXJNTe HEMHORO I NOBOTOpTE ONEpaCNU TOxKDbI, BCE BpeMg ONOPOXHRA NODCTaBNeHHyIO NocuDy
C NOMOJIIO KHOJIKI (2d) BKNIOHTe HArpeB npa, NOIOXINTe, NOKa OH nporpeETc, NOCTaBBte NocUy IOI cOnIO NODaUN papa I Do3npyIte nap chepe3 cOnIO B TeueHne PnpMepHO MNHyTbI
BbIeTe OCTaBsyOc HEnCnObl3OBaHHyIO BDOy CO CpeCTBOM IJy ydaJIeHnHaKIN N3 pe3epByapa N 3aJeTe erO CBExKe YnCToB BOIoN.
NOBTOPNE HeCKoJIbKO pa3 npOeCC 3aINBKn BOIy chepe3 KOJIb y n noaun npa uepe3 COJIIO, YTO6bl IpOMbITb MaUNHy OT OCTaTKOB JIMMOHOn KNCLOTBI
BbHbTe KaJIeYIaBnBaTeIb, BblKIOUHTe yCTPOINCTBO, OTCOeHNHTe OT cETN I NOIOXdNTe, NOKa OHO NOLHOCTbIO He OCTbIHET
We wish you satisfaction from using the product and invite you to check a wide range of other MPM appliances
Keiaem noIyumb ydoobolcbmue om ucnolb3oBaHua Haue2o npodykma u npuznaaem BocnoIb3oBambcra uupokum KOMMepueckum npedloxehuem KOMnahuu MPM