
PerfectView CAM 35 NAV - Rear Camera DOMETIC - Free user manual and instructions
Find the device manual for free PerfectView CAM 35 NAV DOMETIC in PDF.

| Product type | Vehicle reversing camera |
| Model | PerfectView CAM 35 NAV |
| Brand | Dometic |
| Image sensor | 1/4" CMOS, approx. 345,000 pixels |
| Video standard | NTSC |
| Sensitivity | 1.5 lux |
| Viewing angle | approx. 150° horizontal, 60° vertical (diagonal) |
| Operating voltage | 10 V to 16 V DC |
| Power consumption | 1 W |
| Operating temperature | -30 °C to +70 °C |
| Protection type | IP69k (waterproof, resistant to high-pressure cleaner) |
| Vibration resistance | 10 g |
| Dimensions (W x H x D with bracket) | 80 x 30 x 33 mm |
| Weight | approx. 0.25 kg |
| Intended use | Mounting on Fiat Ducato, Citroën Jumper, Peugeot Boxer (2006+); console between body and stop light |
| Main functions | Reversing camera with NTSC signal; compatible with Fiat Uconnect navigation systems; NAV adapter included for third-party screens |
| Delivery contents | Camera, system cable, Y adapter, NAV adapter, screws, manual |
| Maintenance and cleaning | Clean with a soft, damp cloth; do not use sharp or hard objects |
| Safety | Do not open the camera (risk of loss of watertightness); disconnect the battery before installation; follow the vehicle's safety instructions |
| Warranty | Legal warranty; contact the dealer or Dometic |
| Country of manufacture | Not specified |
Frequently Asked Questions - PerfectView CAM 35 NAV DOMETIC
User questions about PerfectView CAM 35 NAV DOMETIC
0 question about this device. Answer the ones you know or ask your own.
Ask a new question about this device
Download the instructions for your Rear Camera in PDF format for free! Find your manual PerfectView CAM 35 NAV - DOMETIC and take your electronic device back in hand. On this page are published all the documents necessary for the use of your device. PerfectView CAM 35 NAV by DOMETIC.
USER MANUAL PerfectView CAM 35 NAV DOMETIC
Rear View Video Camera
Installation and Operating Manual .9
DF
Rückfahrvideokamera
© 2022 Domatic Group. The visual appearance of the contents of this manual is protected by copyright and design law. The underlying technical design and the products contained herein may be protected by design, patent or be patent pending. The trademarks mentioned in this manual belong to Domatic Sweden AB. All rights are reserved.
1
2
3
4
5


Please read these instructions carefully and follow all instructions, guidelines, and warnings included in this product manual in order to ensure that you install, use, and maintain the product properly at all times. These instructions MUST stay with this product.
By using the product, you hereby confirm that you have read all instructions, guidelines, and warnings carefully and that you understand and agree to abide by the terms and conditions as set forth herein. You agree to use this product only for the intended purpose and application and in accordance with the instructions, guidelines, and warnings as set forth in this product manual as well as in accordance with all applicable laws and regulations. A failure to read and follow the instructions and warnings set forth herein may result in an injury to yourself and others, damage to your product or damage to other property in the vicinity. This product manual, including the instructions, guidelines, and warnings, and related documentation, may be subject to changes and updates. For up-to-date product information, please visit documents.dometic.com.
Table of contents
1 Explanation of symbols. 9
2 Safety and installation instructions 10
3 Scope of delivery 11
4 Intended use 12
5 Technical description 12
6 Fitting the camera 12
7 Cleaning and caring for the camera. 14
8 Warranty 14
9 Disposal. 15
10 Technical data. 15
1 Explanation of symbols

WARNING!
Safety instruction: Indicates a hazardous situation that, if not avoided, could result in death or serious injury.

NOTICE!
Indicates a situation that, if not avoided, can result in property damage.

NOTE
Supplementary information for operating the product.
2 Safety and installation instructions

WARNING!
Danger of personal injury by vehicle.
Reversing video systems are designed merely as an additional aid for reversing, however this does not relieve you of the duty to take proper care when reversing.
Please observe the prescribed safety instructions and stipulations from the vehicle manufacturer and service workshops.
Please note the following:
- To prevent the risk of short circuits, always disconnect the negative terminal of the vehicle's electrical system before working on it.
If the vehicle has an additional battery, its negative terminal should also be disconnected.
- Inadequate supply cable connections could result in short circuits, causing:
Cable fires
- The airbag being triggered
- Damage to electronic control equipment
- Electrical malfunctions (indicators, brake light, horn, ignition, lights)
-
When working on the following cables, only use insulated cable terminals, plugs and flat sockets:
-
30 (direct supply from positive battery terminal)
- 15 (connected positive terminal, behind the battery)
- 31 (return cable from the battery, earth)
- 58 (reversing light)
Do not use porcelain wire connectors.
- Use a crimping tool to connect the cables.
-
Screw the cable when connecting cable 31 (earth)
-
Screw on the cable using a cable terminal and serrated washer to one of the vehicle's earth bolts or
Screw the cable to the bodywork using a cable terminal and a self-tapping screw
Make sure there is a good earth connection.
If you disconnect the negative terminal of the battery, all data stored in the volatile memories will be lost.
- The following data must be reset, depending on the vehicle equipment options:
Radio code
- Vehicle clock
- T i m e r
- On-board computer
- Seat position
You can find instructions for making these settings in the operating manual.
Observe the following installation instructions:
- Secure the parts of the camera which are installed in the vehicle in such a way that they cannot become loose under any circumstances (sudden braking, accidents) and cause injuries to the occupants of the vehicle.
- Secure any parts of the system concealed by the bodywork in such a manner that they cannot be come loose or damage other parts or cables, or impair vehicle functions (steering, pedals, etc).
- To prevent damage when drilling, make sure there is sufficient space on the other side for the drill head to emerge.
-
De burr all drill holes and treat them with a rust-protection agent.
-
Always follow the safety instructions of the vehicle manufacturer.
Some work (e.g. on retention systems such as the AIRBAG etc.) may only be performed by qualified specialists.
Observe the following instructions when working with electrical parts:
- When testing the voltage in electrical cables, only use a diode test lamp or a voltmeter.
Test lamps with a bulb consume too much voltage, which can damage the vehicle's electronic system.
-
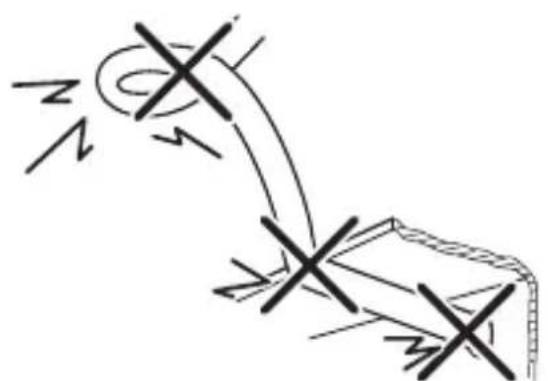
When making electrical connections, ensure that:
-
they are not kinked or twisted
- they do not rub on edges
they are not laid in sharp-edged ducts without protection (fig. 1, page 3).
Insulate all connections.
- Secure the cables against mechanical wear by using cable binders or insulating tape, for example on existing cables.
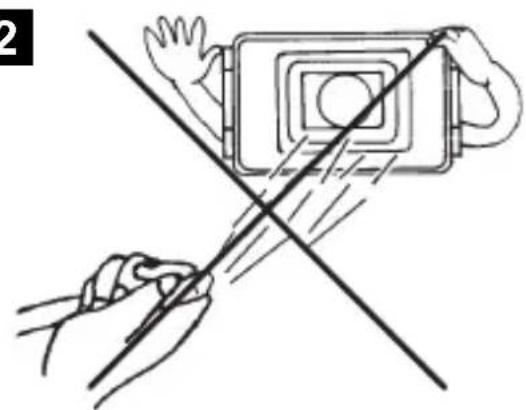
The camera is watertight. However, the seals on the camera cannot withstand a high-pressure cleaner (fig. 2, page 3). Therefore, you should observe the following instructions when handling the camera:
- People (including children) whose physical, sensory or mental capacities or whose lack of experience or knowledge prevent them from using this product safely should not use it without the supervision or instruction of a responsible person.
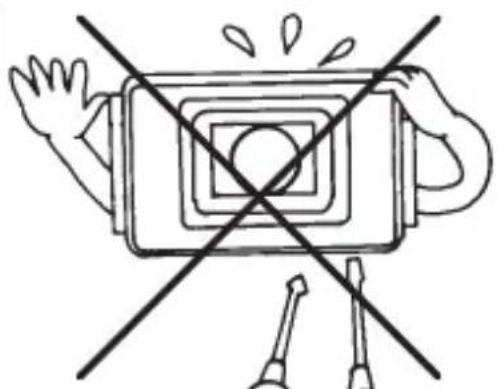
- Do not open the camera, as this impairs the leak tightness and the function of the camera (fig. 3, page 3).
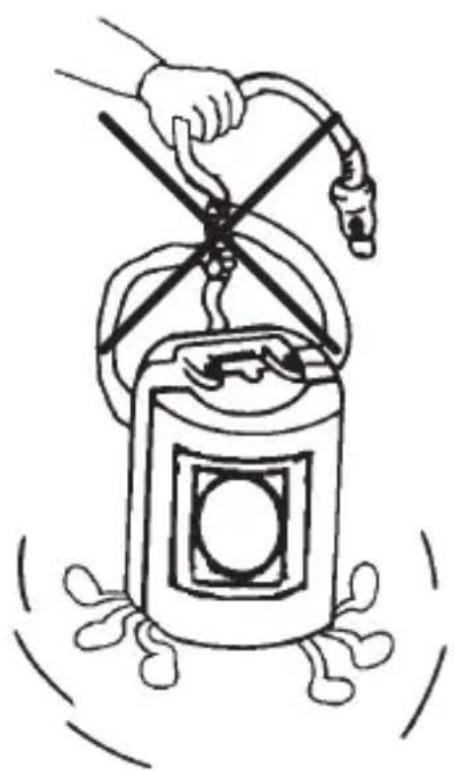
- Do not pull at the cables, as this impairs the tightness and the function of the camera (fig. 4, page 3).
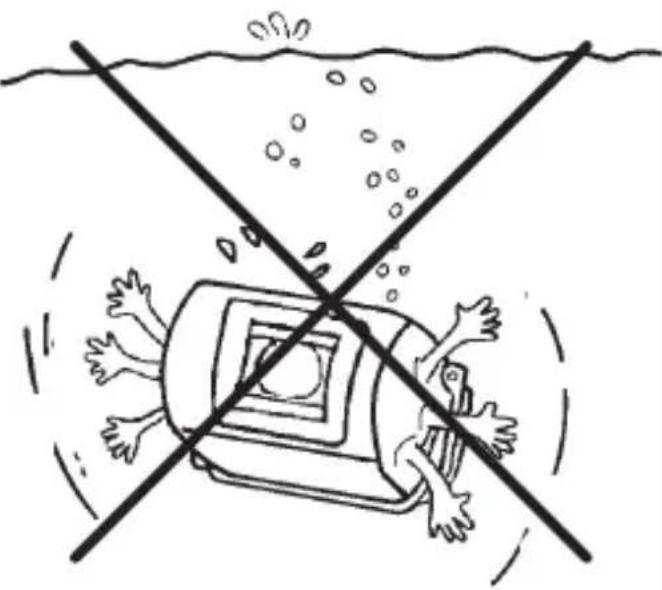
The camera is not suitable for use under water (fig. 5, page 3)!
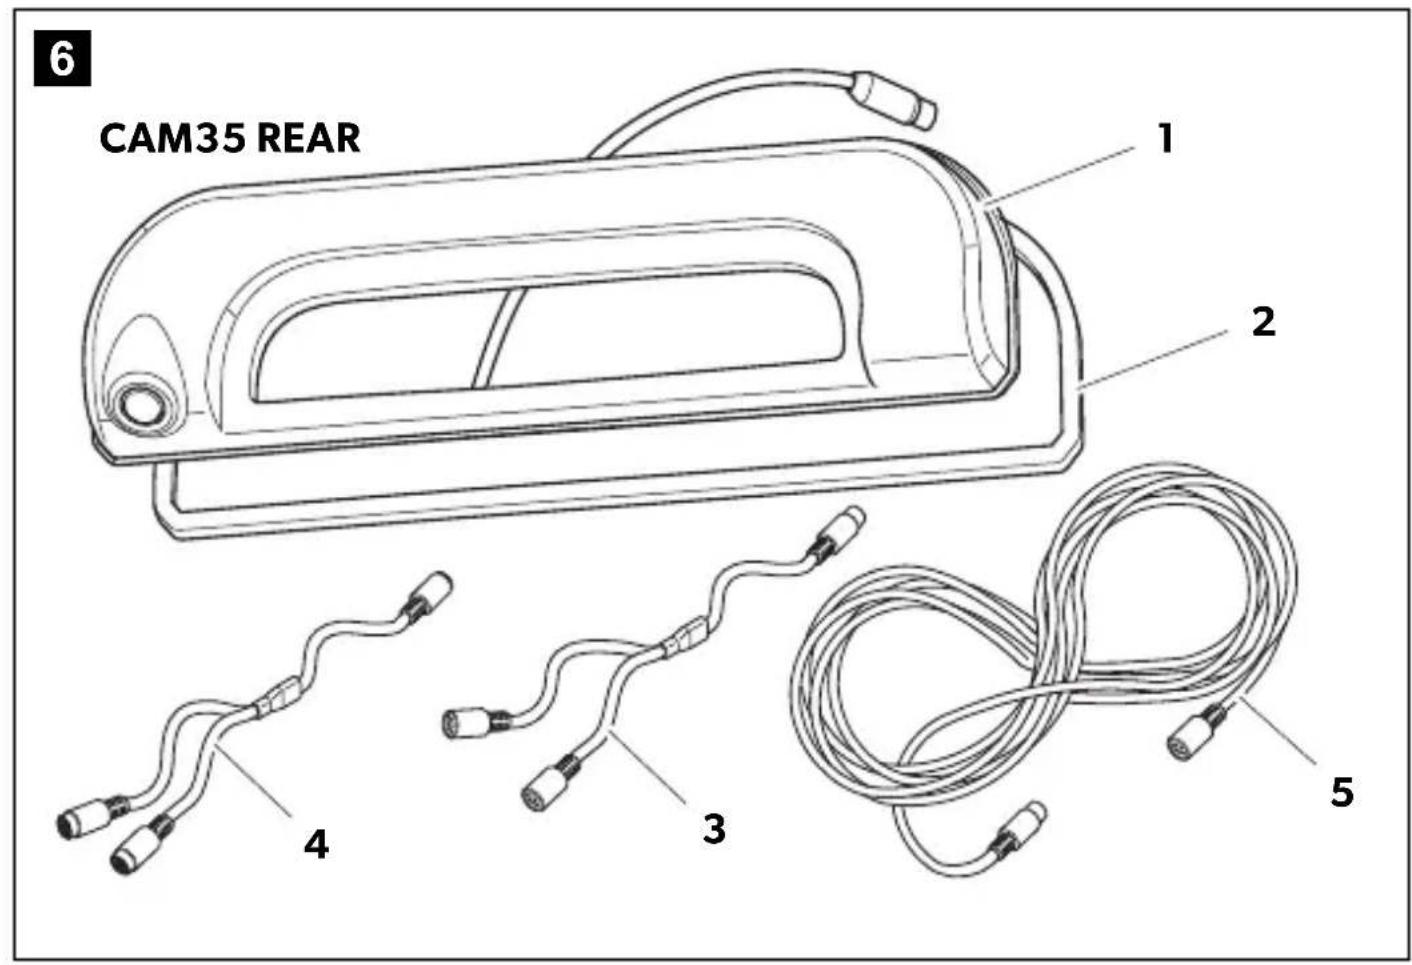
No. in Quantity Description Ref. no.
11 Camera CAM35
CAM35 REAR
9102000134
CAM35 REAR NAV
9102000133
CAM35 TWIN
9102000132
CAM35 TWIN NAV
9102000131
21 Seal -
31 CAM35YadapterCAM9600000552
41 CAM35 Y adapter MON 9600000553
51 System cable 9600000137
- 1 NAV adapter (only CAM35 REAR NAV or
CAM35 TWIN NAV)
- 2 Fastening bolts 6 × 25 ~mm
-- Installation and operating manual
9600000554
4 Intended use
The double camera CAM35 is primarily intended for use in the vehicles Fiat Ducato, Citroën Jumper, Peugeot Boxer starting from model year 2006 with single roof. The camera console is mounted between the bodywork and the brake light. It can be used in video systems to observe the space around the vehicle from the driver's seat when maneuvering or parking, for example.
This product is only suitable for the intended purpose and application in accordance with these instructions.
This manual provides information that is necessary for proper installation and/or operation of the product. Poor installation and/or improper operating or maintenance will result in unsatisfactory performance and a possible failure.
The manufacturer accepts no liability for any injury or damage to the product resulting from:
- Incorrect assembly or connection, including excess voltage
Incorrect maintenance or use of spare parts other than original spare parts provided by the manufacturer - Alterations to the product without express permission from the manufacturer
- Use for purposes other than those described in this manual
Dometic reserves the right to change product appearance and product specifications.
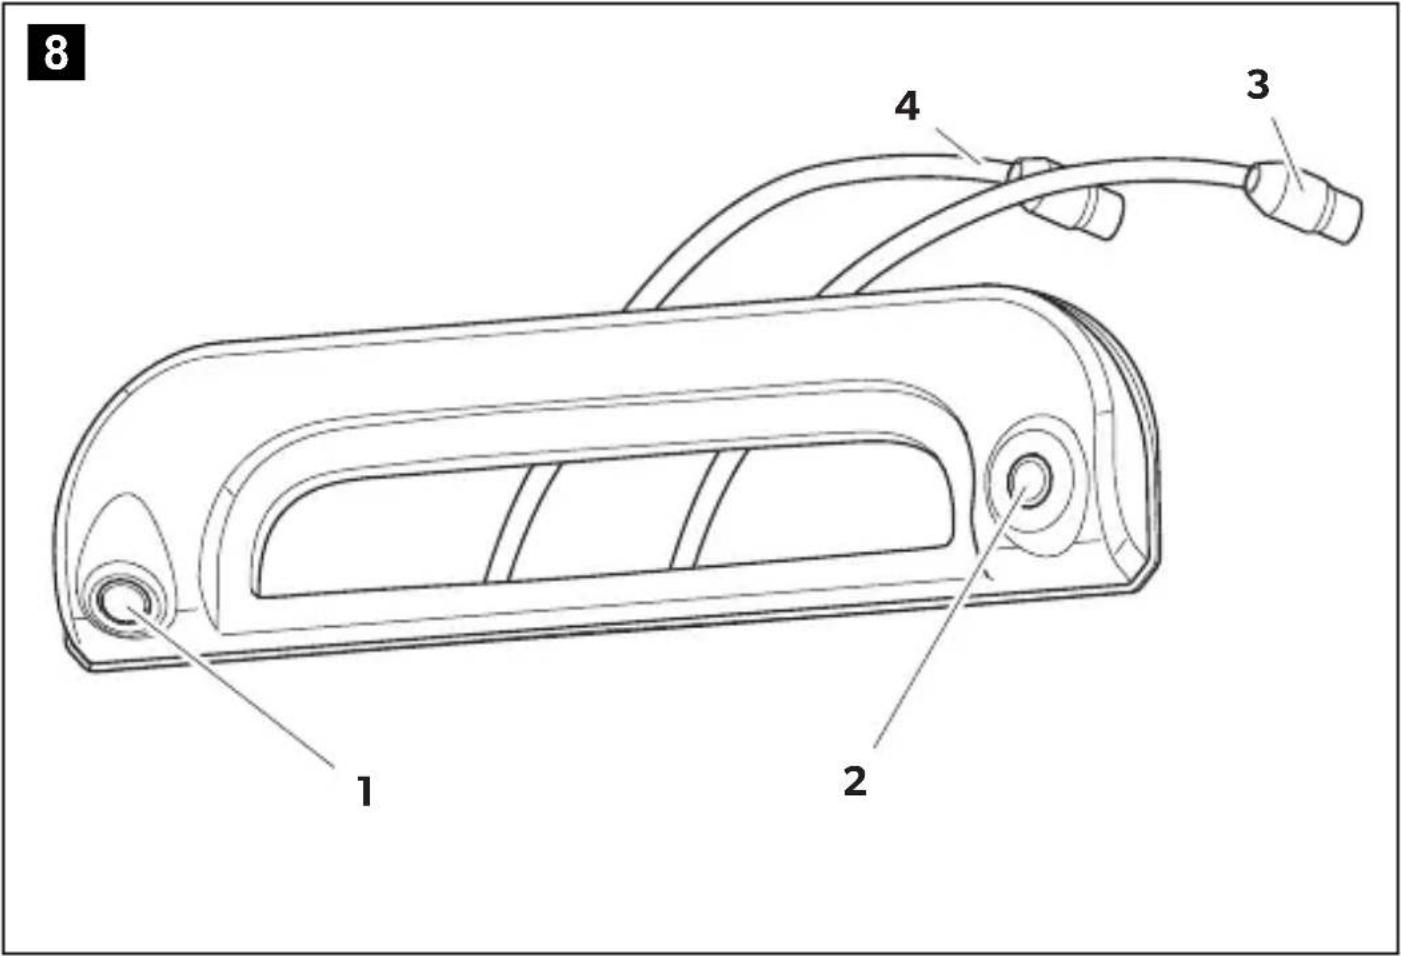
5 Technical description
The reversing camera and the long-distance camera (only CAM35 TWIN) are housed in one console for the original brake light. The camera image is transferred to a monitor via a system cable. The CAM35 is also suitable for connection to the original Fiat navigation system Uconnect, as the cameras provide an NTSC video signal.
The camera consists of the following elements:
| No. in fig. 8, page 5 | Description |
| 1 | Reversing camera |
| 2 | Long-distance camera (only CAM35 TWIN) |
| 3 | 6-pin connection cable for long-distance camera (only CAM35 TWIN) |
| 4 | 6-pin connection cable for reversing camera |
Only for CAM35 TWIN
In the CAM 35 TWIN, a monitor with two video inputs must be connected that can be switched between the image of the reversing and the long-distance cameras.
The long-distance camera transmits the image as if you were looking in the rear view mirror.
Only for CAM35 NAV
The cameras CAM35REAR NAV and CAM35 TWIN NAV can be connected to monitors from other manufacturers. A universal adapter is included (CAM35 NAV adapter).
6 Fitting the camera
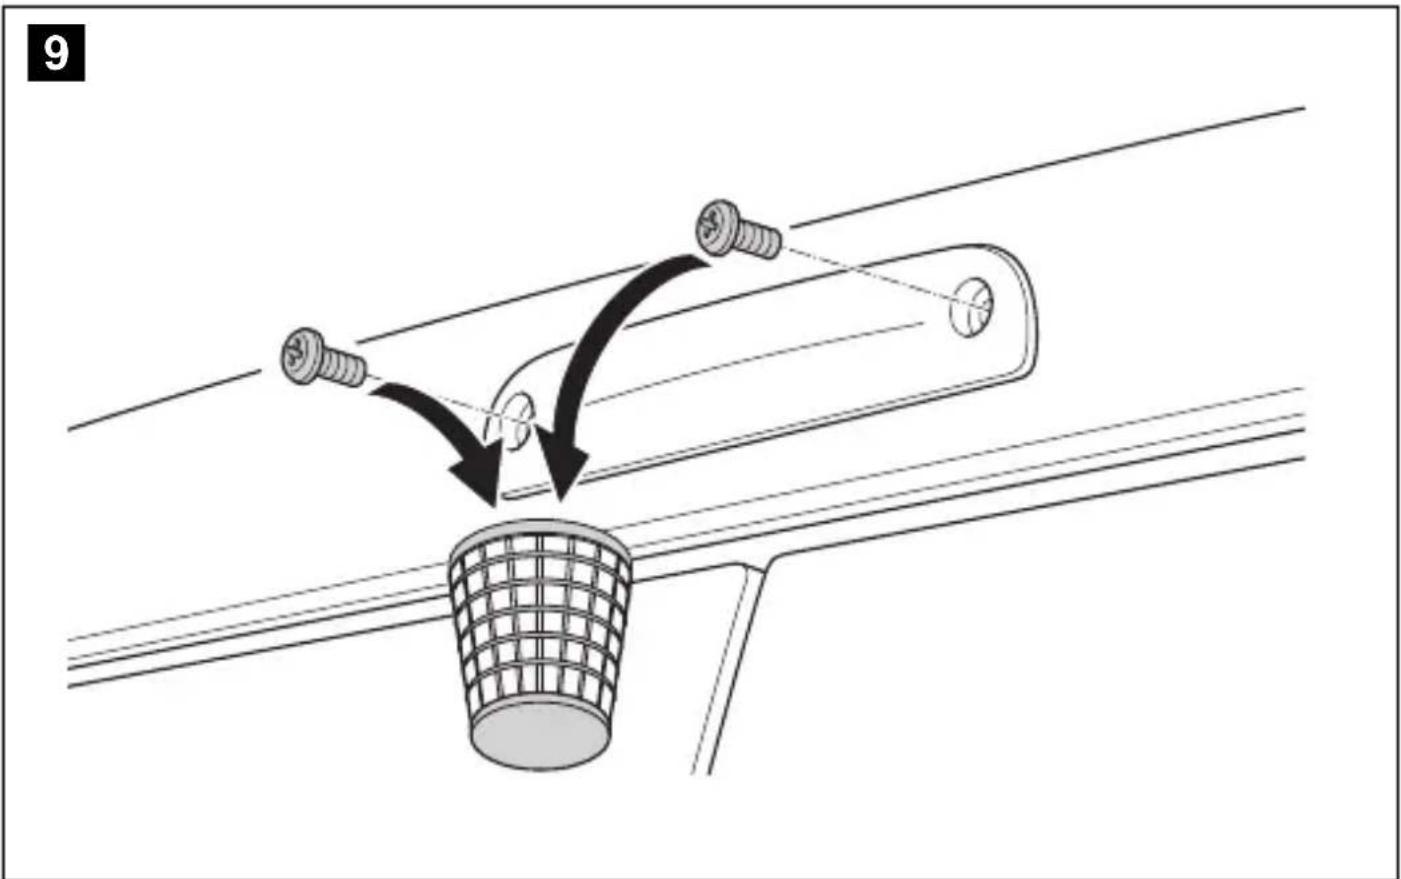
6.1 Dismantling the brake light
- Remove the two screws of the brake light (fig. 9, page 5).
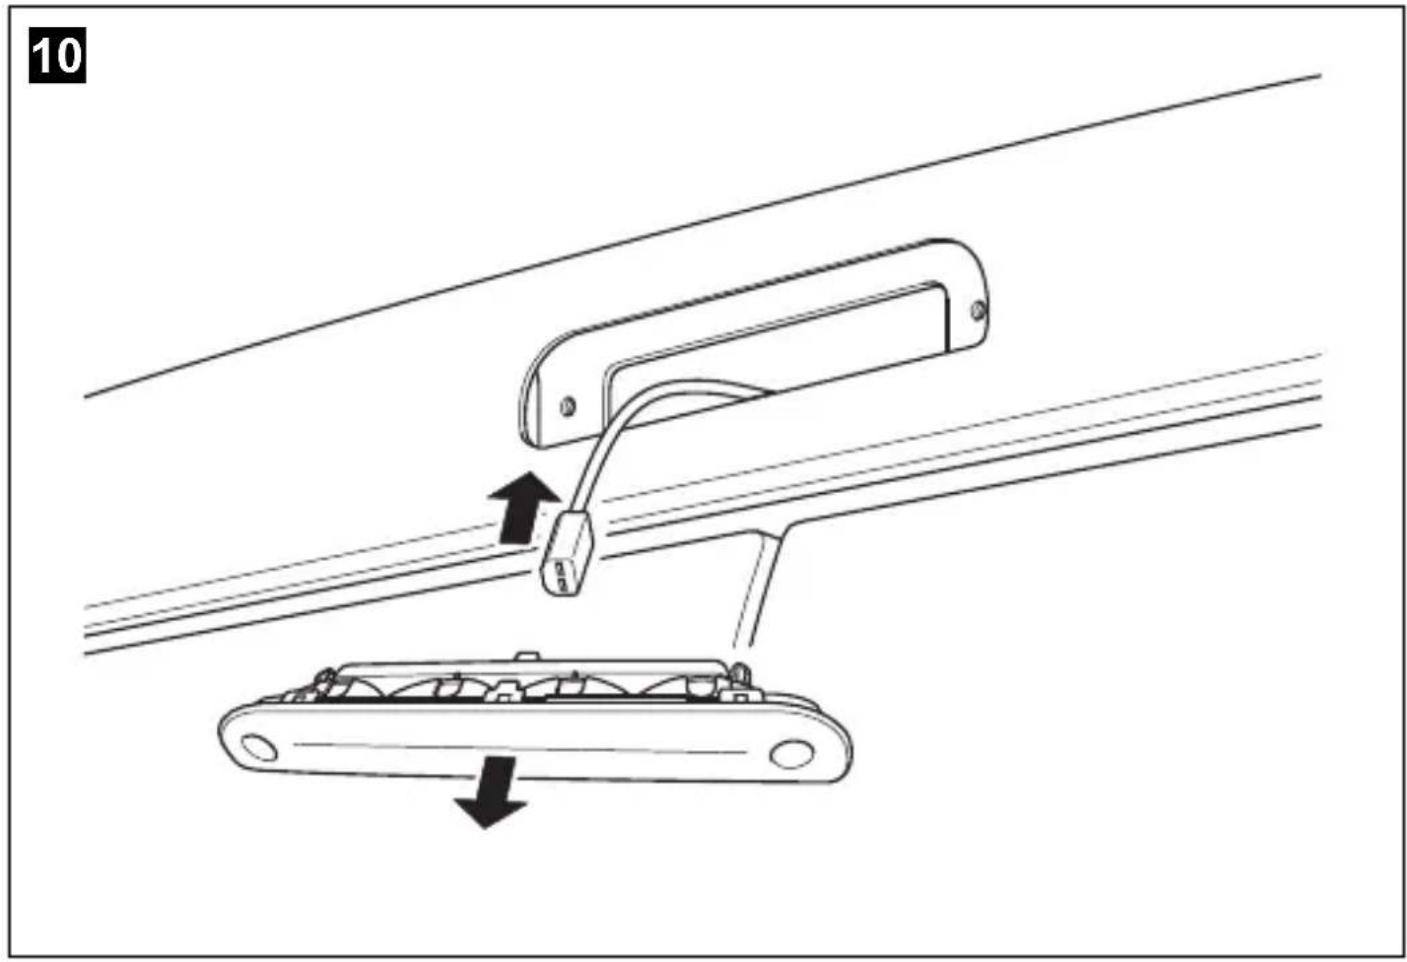
- Remove the plug of the brake light (fig. 10, page 6).
6.2 Laying cables

NOTICE! Beware of damage.
- When drilling holes, check beforehand that there is sufficient space on the other side for the drill head to come out.
- Cables and connections that are not properly installed will cause malfunctions or damage to components. Correct installation of cables and connections ensures lasting and trouble-free operation of the retrofitted components.
- The cables may not be exposed for long periods to solvents such as benzene, since solvents can damage the cable.
Therefore, please observe the following instructions:
- As far as possible, use original ducts for laying the cables, or other suitable options such as paneling edges, ventilation grilles or dummy plugs. If no openings are available, you must drill holes for the cables. Check beforehand that there is sufficient space on the other side for the drill head to emerge.
- Wherever possible, lay cables inside the vehicle, as they are better protected there than outside. If you do need to lay a cable outside the vehicle, ensure that it is well fastened (use additional cable ties, insulating tape etc.).
- To prevent damage to the cables when laying them, ensure that they are far enough away from hot or moving vehicle components (exhaust pipes, drive shafts, light systems, fans, heaters, etc.). Use corrugated piping or other protective materials to protect against mechanical wear.
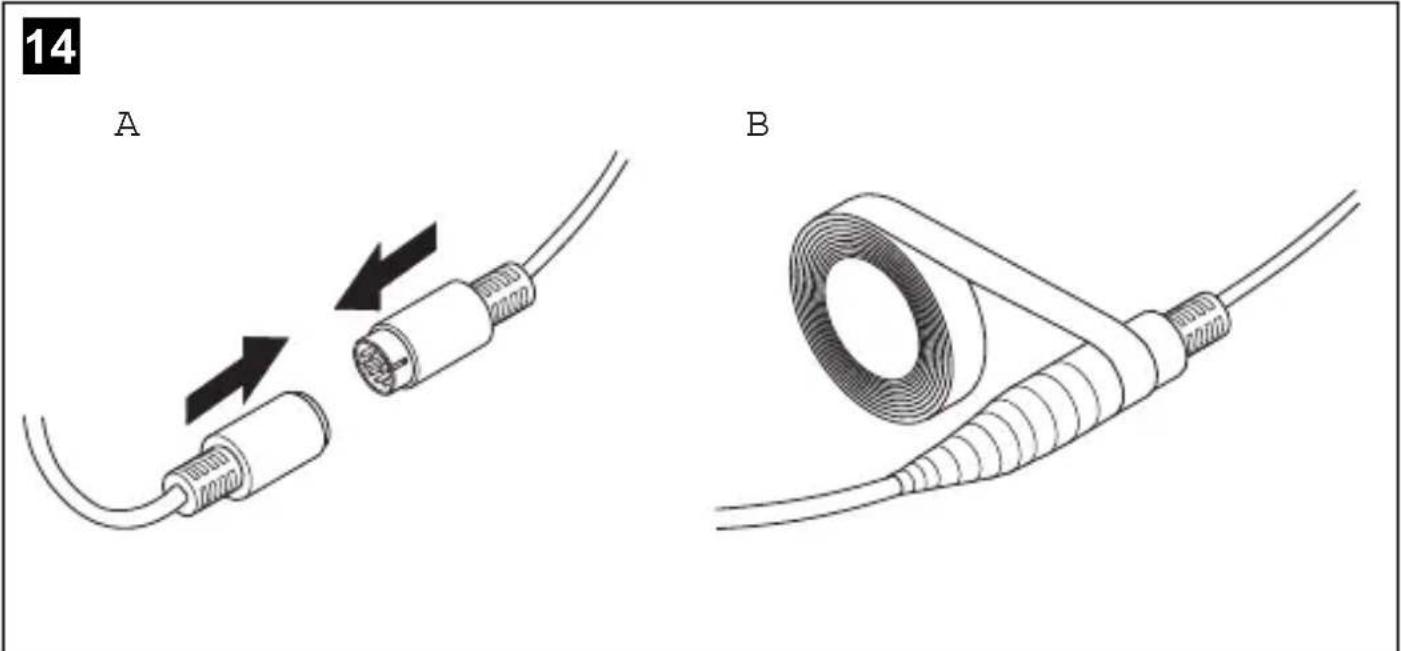
- Screw on the plug connections for the connecting cables to protect them against water penetration (fig. 14, page 7).
-
When laying the cables, make sure:
-
they are not kinked or twisted
- they do not rub on edges
-
they are not laid in sharp-edged ducts without protection.
-
Attach the cables securely in the vehicles to prevent tripping hazards. This can be performed by using cable binders, insulating tape or gluing in place with adhesives.
Lay the system cable.
6.3 Establishing the electrical connection for the camera

NOTE
- Lay the camera cable so that, should you need to remove the camera, you can access the plug connection between the camera and the extension cable easily. This greatly facilitates the disassembly.
-
To minimize corrosion in the plug, apply a small amount of grease, such as pin grease, in one of the plugs.
-
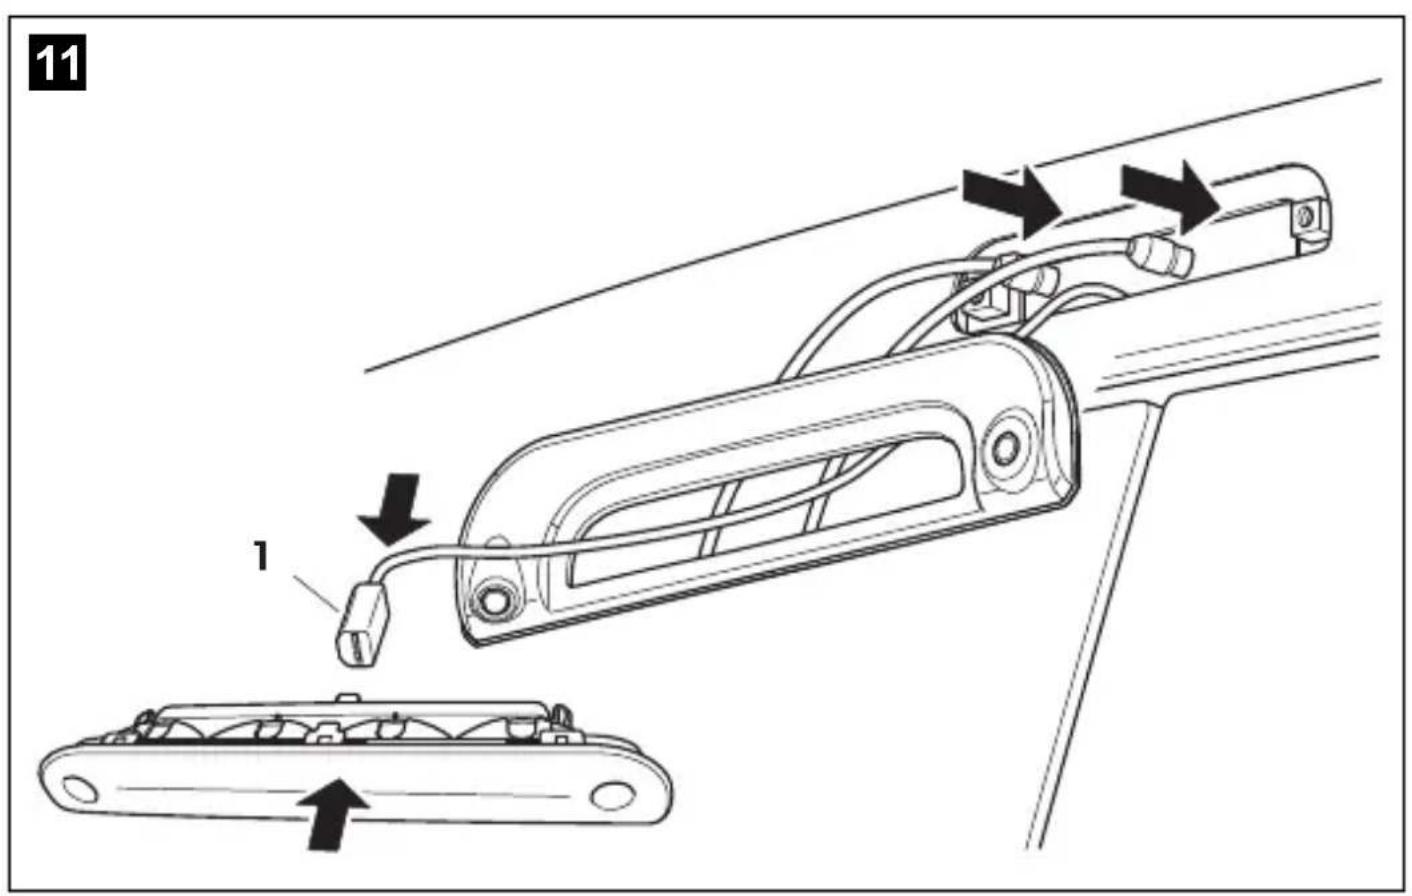
Guide the connector of the brake light through the console.
- Re-attach the plug (fig. 11 1, page 6) of the brake light onto the brake light.
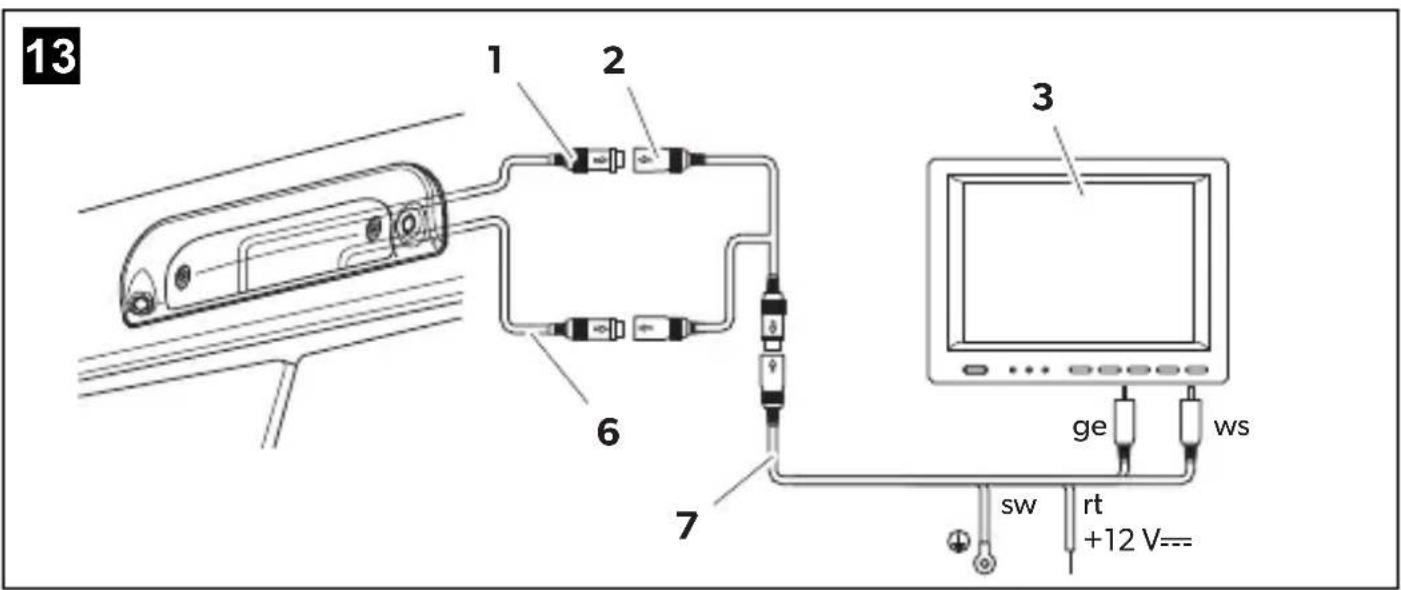
- Connect the camera as shown in fig. 12, page 7 to fig. 14, page 7.
Legend to fig. 12, page 7 and fig. 13, page 7:
No.Description
16-pin connection cable for reversing camera
2 Y-adapter camera
3 Monitor
4 Y-adapter monitor
5 System cable
6 6-pin connection cable for long-distance camera (only CAM35 TWIN)
7 NAV adapter (only CAM35 NAV)
ws white, video signal 1
ge yellow, video signal 2
sw black
rt red
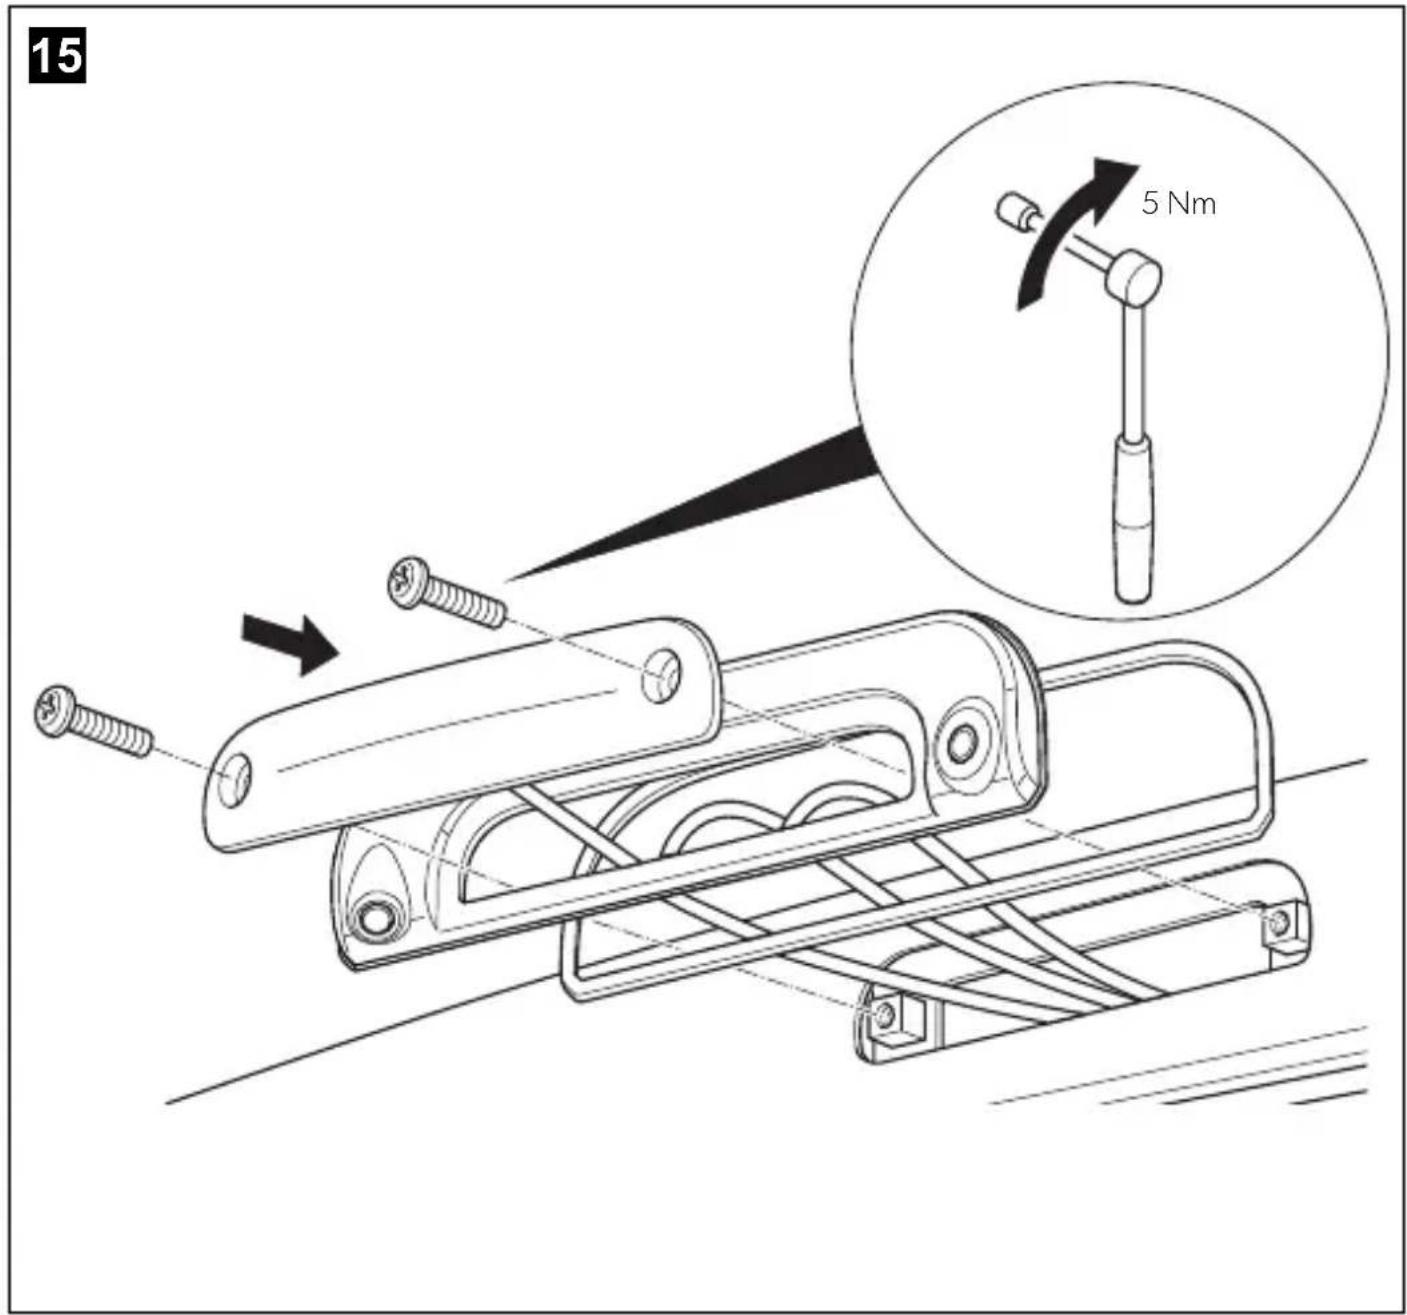
6.4 Fitting the camera

NOTICE!
Make sure to guide the camera cables in the console bottom up to the notches so that the cables are not pinched.
Proceed as follows (fig. 15, page 8):
Secure the brake light and the console with two 6 × 25 mm fastening screws.
7 Cleaning and caring for the camera

NOTICE! Beware of damage.
Do not use any sharp or hard objects for cleaning since they may damage the device.
Clean the camera with a soft, damp cloth from time to time.
8 W a r r a n t y
The statutory warranty period applies. If the product is defective, please contact the manufacturer's branch in your country (see sometic.com/dealer) or your retailer.
For repair and warranty processing, please send the following items:
- Defect components
- A copy of the receipt with purchasing date
- A reason for the claim or description of the fault
9 Disposal
Recycling products with non-replaceable batteries, rechargeable batteries or light sources
If the product contains any non-replaceable batteries, rechargeable batteries or light sources, you don't have to remove them before disposal.
If you wish to finally dispose of the product, ask your local recycling center or specialist dealer for details about how to do this in accordance with the applicable disposal regulations.
The product can be disposed free of charge.
Recycling packaging material

Place the packaging material in the appropriate recycling waste bins wherever possible.
10 Technical data
| PerfectView CAM35 REAR | PerfectView CAM35 REAR NAV | |
| Ref. no.: 9102000134 9102000133 | ||
| Image sensor: 1/4" CMOS | ||
| Pixels: Approx. 345.000 pixels | ||
| Video standard: NTSC | ||
| Sensitivity: 1.5 lux | ||
| Viewing angle: Approx. 150°/60° diagonal | ||
| Operating voltage: | 10 V--- to 16 V--- | |
| Consumption: | 1 W | |
| Operating temperature: | -30 °C to +70 °C | |
| Protection class: | IP69k | |
| Vibration resistance: | 10g | |
| Dimensions W x H x D (with bracket): | 80 x 30 x 33 mm | |
| Weight: | Approx. 0.25 kg | |
| PerfectView CAM35 TWIN | PerfectView CAM35 TWIN NAV | |
| Ref. no.: 9102000132 9102000131 | ||
| Image sensor: 1/4" CMOS | ||
| Pixels: Approx. 345000 pixels | ||
| Video standard: NTSC | ||
| Sensitivity: 1.5 lux | ||
| Viewing angle: Approx. 150°/60° diagonal | ||
| Operating voltage: | 10 V--- to 16 V--- | |
| Consumption: 1 W | ||
| Operating temperature: -30 °C to +70 °C | ||
| Protection class: IP69k | ||
| Vibration resistance: 10g | ||
| Dimensions W x H x D (with bracket): | 80 x 30 x 33 mm | |
| Weight: Approx. 0.25 kg | ||
CAM35TWINNAV 9102000131
21Dichtung -
31 CAM35 Y-Adapter CAM 9600000552
41 CAM35 Y-Adapter MON 9600000553
51 Systemkabel 9600000137
5 Description technique
ge Gul, videosignal 2
swSort
rt Rod
ge Gul, videosignal 2
sw Svart
rt Rod
6.4 Montere kameraet

PASS PÄ!
Pass på ä före kamerakablene på konsollens underside helt til Åpningene, sik at kablene ikke klemmes.
Gåfram pà følgende mæte (fig. 15, side 8):
Fest bremselyset og konsollen med de to festeskruene 6× 25mm
Yka3bIbaet Ha cnTyauuO, KOtopa, ecn ee He n36exaTb, MoXeT npNBecTN K MaTePnaIbHomy yUep6y.

YKA3AHNE
He NCnonb3ynte KneMMHbIe KONoDKN.
-Дя coeHHeHЯ ka6eHЯ nCNoB3yIte o6xHMhIe KJIeIHI.
- PpNBHTnte Ka6eB, ecn npoN3BOIDTCs COeINHeHne K npoBOy 31 (kopnyc):
C NOMOJIbIO Ka6eJIbHOrO 3aXIMa I 3y6UaToI npYxIHHOJ 7aI6bIK BnHTy dIra CoeINHeHr c Kopnycom, IMeIOJIeMycr Ha aBTOMoBUNe INI
C NOMOUIKabenbHO 3aXIMaN CaMOHape3aIOUeIero BnHTa K NICTy Ky3OBA.
O6ecneuBaIte xopoIee coeINHeHne c kOpnycom!
Ipn OTCOeINHeHn KIeMMbl OTPncaTeBHO rnoNIOCA aKKyMnyTOpHNO 6aTapeN Bce 3Hepro3aBNCIMbIe 3aONMHaIOUne yCTpOiCTBa 3NeKtPOHNI CnCTem KOMoPOpTa TepAOT COxpaHeHHbE B HNX DaHHbIe.
B 3aBnCIMOCTN OT OChAeHnRAbTOMo6nI, Bam pnpTeTc 3aHOBO HAcTPONTb CneDyUOIne daHHbe:
-KoIpaanOpnpneMnka
- YacbI abTomO6nIa
-TaMep
-BoPTOBONKOMNbIOTeP
-Полжени сидени
Yka3aHnI NO HacTPOKe InpBedeHb B COOTBeTCTByIOUeI INHCTpyKUIN IO 3KcPnYaTaUN.
PnMOHTaxe co6IIOaIte cneJeIOuIe yka3aHnI:
3aKpeHnTe yCTaHabnBaemble BHytpn ABTomO6nJa DeTaN KaMepb TaK, YTO6bl OHn Hn npKaKnx ycNoBnX (pe3- KOM TOpMOxHeHn, abapn) He MOIIN OTCoEHNHTbcra N pNBeCTN K TpaBMam naccaknpoB.
- KpeHnTe cKpbItbIe, yCTaHaBnIBaEMbIe nOd o6uHBKOJ DeTaN CnCTeMbI TaK, YTO6bl OHn He MoTI N OTCoEINHHTbcr nnIOBpeDnTb dpyHne DetanN n npOBoA n HapyUHTb cyHKUIn ABTomO6nJI (pyneBOe ynpabNeHne, neDaII n T. n.).
-Bo n36exaHne noBpeXeHn npn CBeprHeHH nCpeHte 3a DOCTaTOUHbIM CBO6OHNpOcTpaHCTBOM IINBbIXoHa CBePna. - 3aunctte BCE OTBepCTnI n CmaXbTe INx aHTNKoppo3NOHHbIM cpeDCTBOM.
Bcerda co6nOaIte yka3aHnN 13ROTOBNTeN ABTOMO6nN NO TexHnke 6e3OnaCHOCTN. HeKOTOpbIe pa6oTb (Ha npImep, Ha cnctemax 6e3OnaCHOCTN, B T. Y. Ha HnyBbIX NODyUkX 6e3OnaCHOCTN) pa3pe7aetc BblONHrTb TOnbKO OByeHHOMy nepcoHany.
Ppna60tax Ha 3neKtpnuecko cnTeMe co6nOaIte CneDyUOne yka3aHnA:
- Дя поверки наразжени в зашистричесхлиня И спогьшу ТОлько ДИODHyю KOHTPONBHyю Ламни ВОЛьТМETР. КонтPORьные яамы снгlio Накала NOTpe6ngIOT сишКOM 6OЛьшоJ TOK, BCNEДCTBVE YERO MOxET 6bITb ПOBpe-ЖдЕна зашисторонika abTomO6ия.
- Пиnpoknaдke 3neKtpnuecknx nHHn cpeHte 3a TeM, yTO6bl OHN
- He nepern6bainc b Hc KpyuINBaIINc b,
- He Tepnnc b O Kpa,
- He npoknaDbIbainc b 6e3 3aunTbI uepe3 BBOdbI, ImeIOUne ocTpble KpOMKn (pnc. 1, ctp. 3).
3aun3oJnpyIe Bce IINHn N COeHNHeHna. - Предхсан Te Ka6eN O T MexaHnuecknx HaRpy3OK, 3aФнКсИpoBab Nx Ka6eNbHbIMN CTaXKaMn INN IN3OJIauHHOH NOHToH, HApPImep, 3a IMeUOnieCra INHIN.
Kamepa YBnEeTc BDOHePOnHuaem. Ho yIIOThENHa Kamepb He BbIePxAIoT OUNCKn BbICOKM DaBHeHEm (pnc. 2, ctp. 3). NToTMy co6nOaIte CneDuOuNe yKa3aHn no o6paueHIO C kamepoi:
- Пица (В ТОМ YИССЕ ДЕТИ), KOTOPьE B CBЯЗИ С ORpaHNYeHHbIMN ФиЗИЧЕCKIMN, CEHCOPHBIM NПИ YMCTBEHHbIMN CпOCO6HOCТЯМ ИПС HeДОCTaTKOM OпыТА ИПИ 3HaHIN He B COCTOуHIN ПОьБОВaTсДаHHbIM N3ДeПЕМ, He ДОЛЖНИ NGONь3OBaTb 3TO ИЗДЕПЕ 6e3 ПпсмOTра ИПИ INHCTpyKТжА OTBETCTBEHHORI ПИZA.
He BCKpbBaIte KaMepy, T. K. 3TO OTPnuaTeNbHO cKa3bIbAeTcH a RepMeTuHocHTn pa6OTocNOC6HocTn (pnc. 3, cTp. 3).
He TAHHTe 3a Ka6en, T. K. 3TO OTPuataTeNbHO Cka3bBaetc Ha repMeTHUHOCn pa6OTocNOC6HOCTn KaMEpb (pnc.4, ctp.3). - Kamepa He npedHa3HaeHa Ira pa6OtI IOI BOOn (pnc. 5, ctp. 3).
3 KomnjeKT NOCTaBKn
| № ha рис. 6,ст. 4 | Кол-во Наименьане Apт. № | |
| 11 Камера CAM35 | CAM35 REAR | 9102000134 |
| CAM35 REAR NAV | 9102000133 | |
| CAM35 TWIN | 9102000132 | |
| CAM35 TWIN NAV | 9102000131 | |
| 21 Улnotене - | ||
| 31 Перекорник CAM35 Y-Adapter CAM 9600000552 | ||
| 41 Перекорник CAM35 Y-Adapter MON 9600000553 | ||
| 51 Системный kaбел 9600000137 | ||
| № ha рис. 6,ст. 4 | Кол-во Нaimеньане标明. № | |
| -1 Пекховник NAV (товко ддя CAM35 REAR NAV ини CAM35 TWIN NAV) | 9600000554 | |
| -2 Кенихные вnettы 6 x 25 мм | ||
| -- Рожавостvo по Экпунатуни и монтajу | ||
4 NcnoIb3OBaHne no Ha3HaueHHIO
Двоная камерсam35празданachedашипекд Всero ДгИСПОьань в abTomobnix Fiat Ducato, Citroen Jumper, Peugeot Boxer (moeNBHy roJ 2006 n Bblse) c npocToI KpbIeN. KoHcONb KaMepbI yCTaHaBnBaETcmaMeJy Ky3OBOMиФapOi CTOn CINHaJa. KaMepa MoXeT NcPONb3OBaTbC8 B VInDeOCnCTeMax, NO3BOJIIOUx BODITeIO Ha6NIOdA Tb 3a 3OHOB BOKpy aBtOMo6nI, HApPIMep, pRn MaHeBpnpOBaHN INI napKOBKe.
TOI3dEINe IODXoDNT TOnbKO IINCNoB3OBAHnI NO Ha3HaueHnIO INPIMHeHnB B COOTBeTCTBnN C DaHHoINHCTpyKUnei.
B daHHO IHCTpyKuIN COePXTc HOpMaUra, Heo6xoImaI nI npAunbHOro MOHTaxa I/II IN 3denn. HenpaBnblbM oMTax I/II IN HeaIpeXaIaIg A KcPiyaTaUN I/II TexHnueckoe O6cnjxNBaHne npINBOJr K HeydoBnetBopNTbHOJ pa6ote I BO3MOXHomy OTKa3y.
N3rOToBnteH He Hecet OTBeTCTBeHHOctn 3a KaKne-116o TpaBMbl ININ NOBpeXdEHNe IPOdyKTa B pe3yIbTaTe CneDyIOx npuH:
- Henpabnibha c6opka nnn noKnIOyeHne, BKNIOyaa NOBbIeHHoe Hapjxehne
- HenpaBnIbHoe Texnueckoe 06cnyxuBaHne nIN nCnObl3OBaHne 3anaChbIX qacteN, OTnUHbIX OT opRnHaNbHbIX 3anaChbIX qacteN, ppeoCTaBnEHbIX n3rTOBOTeJIem
- 13meHnB npdyKte, BbINONHeHHbIe 6e3 OdHO3NaHOrO pa3peUeHnN 13rotOBtTeTn
- IcnoNb3OBaHnE B UeIyX, OTNNUHbIX OT yKa3aHHbIX B DaHHo INHCTpyKuIN
Kompania Dometic octablaer 3a co6o npabo N3MeHbBHeHn Bn d texHnueckne xaapKepncTKn npOdykTa.
- CHINMITE IBA BINTa c opapbl CTON-CnHana (pnc. 9, ctp. 5).
- BbItaunTe BnKy cappbI CTOn-cnHaHa (pnc. 10, ctp. 6).
6.2Прokладka ka6eilei

BHIMAHHE! Onachoctb nobpexdeHn!
- При С蜱ерпейни OTверстий п体现在доварпельно убадитесь в том, что ямeeся достаTOUHO CBO6ODHOrO npoCTpaHCTBa ДЯ BbIXOda CBepna.
Bpe3yntaTe He npabnblHO npOKnI COeHNHeHna Ka6eNe B03MOxHbI Heno- NaKn I NOBpeXdHn IAteane. PpaBnblNaH a npOKnAka I COeHNHeHna Ka6eNe - OCHOBHOcNOBHe dNITeNBHO, 6ecnepe6oHn PA6OTb I DOONHHTeNbHO yCTaHOBJIeHHbIX KOMNOHEHTOB. - Ka6eHn He DoJXHbI dNITeNbHOe BpeMHaXoDHTbcB KONTaKTe C paCTBOpNTeIMn, HapnMeP, 6eH3INHom, T. K. paCTBOpNTeN IOBpeXdaIOT Ka6eHn.
NoTOMy co6nIaIte cneIyIOUHne yka3aHnIa:
-ДЯВБОДа COeINHHTeNBbIX Ka6eNe IcNoIb3yIte, NO BO3MOxHOCTN, OpINHANbHbIe BBOdI INn DpyrIne CKBO3HbIe OTBepCTN, HApPIMeP, KpaO6uINBKN, BeHTINaUNoHNbIe peWTeK Nn 3aTnyuKn. EcnN cKBo3HbIe OTBepCTN,OTcyTCTByIOT, Heo6XoIMMo IpocBepNTb IdrKaJDoTO Ka6eNn PoXoJUne OTBepCTN. PpeBaPITeNbHO npOBepTe, IMeETcR Nn DoCTaTOH CBO6OdHOrO MeCTa Idr BbIXOda CBepNa.
- IO BO3MOXHOCTN, Bcerda npOKnaDbIbaiTe Ka6eHn BHyTpN aBTOMO6Hn, T. K. TaM OHN 3aunueHbI NyUHe, Yem Cha-pyKn.
EcnH,TeM He MeHee,Bb npoknaBbAte Ka6en ChapxN aBTOMo6nIa,TO o6ecneuBaIe HaedXHoe KpePnneHne (c NOMOsbIO DOONHHTbHbIX Ka6enbHbIX CTJxek,N30EnTbI NT. ).
Bo n36exaHne noBpeXeHn Ka6ene Bcerda co6nIaTe npn IX npoknaKe DoCTaToHoe pacctOAHne DO ropaNX I NOBHXbIX y3NOB aBTOMo6nIa (BbIXNoHbIX Tpy6, npINBOHbIX BaIOB, reHEpatopa, HarpeBaTeNe, BeHTNlAToPOB IN. ).ДЯ MEXAHueCKo 3aunTbI NCNoJIb3yIte rOoPpnpOBaHHbIe Tpy6Kn IIn aHaIOnrHuHbIe 3aunHbIe MaTePnAnbl.
CnHTnte 1teKepehhe coedHHeHna coedHntEnbHbIX Ka6eneI nra 3aunTbI OT nonaHaHn BOdbi.(pnc.14,ctp.7).
- Пи пoknaдke ka6eNei спДITE 3a Tem,чTo6bl OHI
-He npeern6anncb HcckpyuHbaNNcb,
-He TepnCb Okpa,
-He npoknaIbIbIaIIc6e3 3aIITbI uepe3 BBOIbI, IMeIOJIne OCTpbIE KpOMKn.
HaexHo Kpenite Ka6enB aBTOMo6nne, yTo6bI npeDorBpaNTb 3anyTbBaHne (onachoctb naeHna). HaexHoe KpenHe HmKHO oecneHTb, nONb3yKa6enbHbIE CTXKN, n3oneHTy INN Knei.
PpONoXHTe CnCTeMHbI Ka6eJIb.
6.3 Θlektprueckoe nodkloucheHne KaMepbI

YKA3AHNE
- Пролохи-te Ka6eNB KaMepbI TaK, YTO6bI OBeCneuHTb DoCTyN K WTeKePHOMy CoeHHeHnIO MexMy KaMepo N yDInHInTeNbHbIM Ka6eNeM Ha CnyaN, ecNn Notpe6yeTcR ChrTb KaMepy. 3To 3HaunTeNbHO O6nerYaeT demOHTax.
-ДяУMeHbIeHnЯKoppO3nIdo6aBbTe B ODNH n3 IITeKePOB HEMHO KOHCNCteHTHOcMa3KN,HaNPIMep,CMa3KNДЯ NOJIOCOB aKKyMylTOpHbIX 6aTapeN.
1.ПровадиTe BnIkyфapbl cTOn-cnHaHaаYepe3 KOHcONb.
2. BCTaBbTe BnIKy (pnc. 11 1, cTp. 6) cbapb CTON-CINHaNa B pa3beM cbapbl.
3.ПоdkлioчnteKaМepy,Кak noka3aHoHa pnc.12,cTp.7-pnc.14,cTp.7.
He nCnoB3OBaTb dnn OunchKn OCTpbie nn TBepdbie INHCTpyMeHTbl, KOToPbIe MOyT NOBpeDNTb np6Op.
PepnoDnueckn OunuaiTe KaMepy MraKoN, BnaXHO TprKnOi.
8 TapaHTn
IeINCTBNTeHn yCTaHOBHeHHb 3aKOHm cPOK rapaHTn. Ecnn npOdyKT HeNCpPaBeH, o6paTntecb B npeiCTaBNTeBCTBO n3rOTOBtTeB BaWeJ cTpaHe (cm. dometic.com/dealer) nnB TOpROByo opraHn3aunio.
Buejx npoeHnpeMOHTa nIraHTnHoro o6cnyXnBaHHa BblonXbTaKke noCnTa cneDyUoee:
HeINcnpaBhble KOMNOHEHTbl,
- KONNU Cueta C daToN NOKyKN,
- npnHy peKnamaun nn OnpcaHne HncpnaBHOCTn.
9ytnln3aun
Ipepea60ka n3denn c hecbemhbim 6aTapeamn, aKKymyIaTOPAMN n NCTOCHKamn CBeta
EcnB n3deHn coepxatc Hecbemhle 6aTapeu, aKKyMyIaTOPbN NCTOCHNK CBeTa, n3BneKaTb ux neped ytnnn3auee He HyxHO.
EcnBbOKOHaTeNbHO BbIOHTe N3deneN3 3KcNpyatauH, NOyUHTe HOpMaUBO6nKaIWeM UeHTpe NO BTOpHuON nepepa6OTKe ININ B TOPROBcETN O COOTBeTCTByOUnNX npednscAHnx NO yTnIN3auHN.
13dennme MoXeT 6bTb yTnN3uPoBaHo 6ecnnaTHo.
Ipepepa6otka ynaKOBOCHoro mATEpna

IIO BO3MOXHOCTN, BbIKnIbIBaIte yNaKOBOUHbIM MaTePnaI B MyCOp, NOIeXaIIN BTOpNUHON nepepa6oTKe.
10 TexHnueckne daHHbIe
bl biela, video signal 1
Zl Zltá, video signal 2
cr cierna
ce cervena
6.4 Montáž kamery

POZOR!
4 Y-adapter, monitor
5 Rendszerkábel
dometic.com/sales-offices


- Rear View Video Camera
- Rückfahrvideokamera
- Table of contents
- Explanation of symbols
- WARNING!
- NOTICE!
- NOTE
- Safety and installation instructions
- Please observe the prescribed safety instructions and stipulations from the vehicle manufacturer and service workshops.
- Intended use
- Technical description
- Only for CAM35 TWIN
- Only for CAM35 NAV
- Fitting the camera
- Dismantling the brake light
- Laying cables
- NOTICE! Beware of damage.
- Establishing the electrical connection for the camera
- No.Description
- Fitting the camera
- Cleaning and caring for the camera
- Disposal
- Recycling products with non-replaceable batteries, rechargeable batteries or light sources
- Recycling packaging material
- Technical data
- Description technique
- Montere kameraet
- PASS PÄ!
- YKA3AHNE
- KomnjeKT NOCTaBKn
- NcnoIb3OBaHne no Ha3HaueHHIO
- 6.2Прokладka ka6eilei
- BHIMAHHE! Onachoctb nobpexdeHn!
- Θlektprueckoe nodkloucheHne KaMepbI
- TapaHTn
- 9ytnln3aun
- Ipepea60ka n3denn c hecbemhbim 6aTapeamn, aKKymyIaTOPAMN n NCTOCHKamn CBeta
- Ipepepa6otka ynaKOBOCHoro mATEpna
- TexHnueckne daHHbIe
- Montáž kamery
- POZOR!
Brand : DOMETIC
Model : PerfectView CAM 35 NAV
Category : Rear Camera