USER MANUAL HD7900 PHILIPS
natural_image
Black Philips 100ml water heater with digital display showing 07:30, no visible text or symbols on the device itself.
natural_image
Simple line drawing of an open book with a grid pattern on the left and a closed page on the right (no text or symbols)
-1
-1
1_
1
-1
1_
-1
1
English 6
Čeština 33
Dansk 59
Deutsch 85
Eesti 113
Español 140
Français 167
Hrvatski 193
Italiano 220
Latviešu 248
Lietuviškai 275
Magyar 302
Nederlands 329
Norsk 356
Polski 382
Português 409
Română 436
Shqip 463
Slovenščina 490
Slovensky 516
Srpski 543
Suomi 570
Svenska 596
Türkçe 622
Ελληνικά 648
Български 676
Македонски 703
Русский 731
Українська 759
Қазақша 786
הכלה 814
6 English
Introduction
Congratulations on your purchase and welcome to Philips!
To fully benefit from the support that Philips offers, register your product at www.philips.com/welcome.
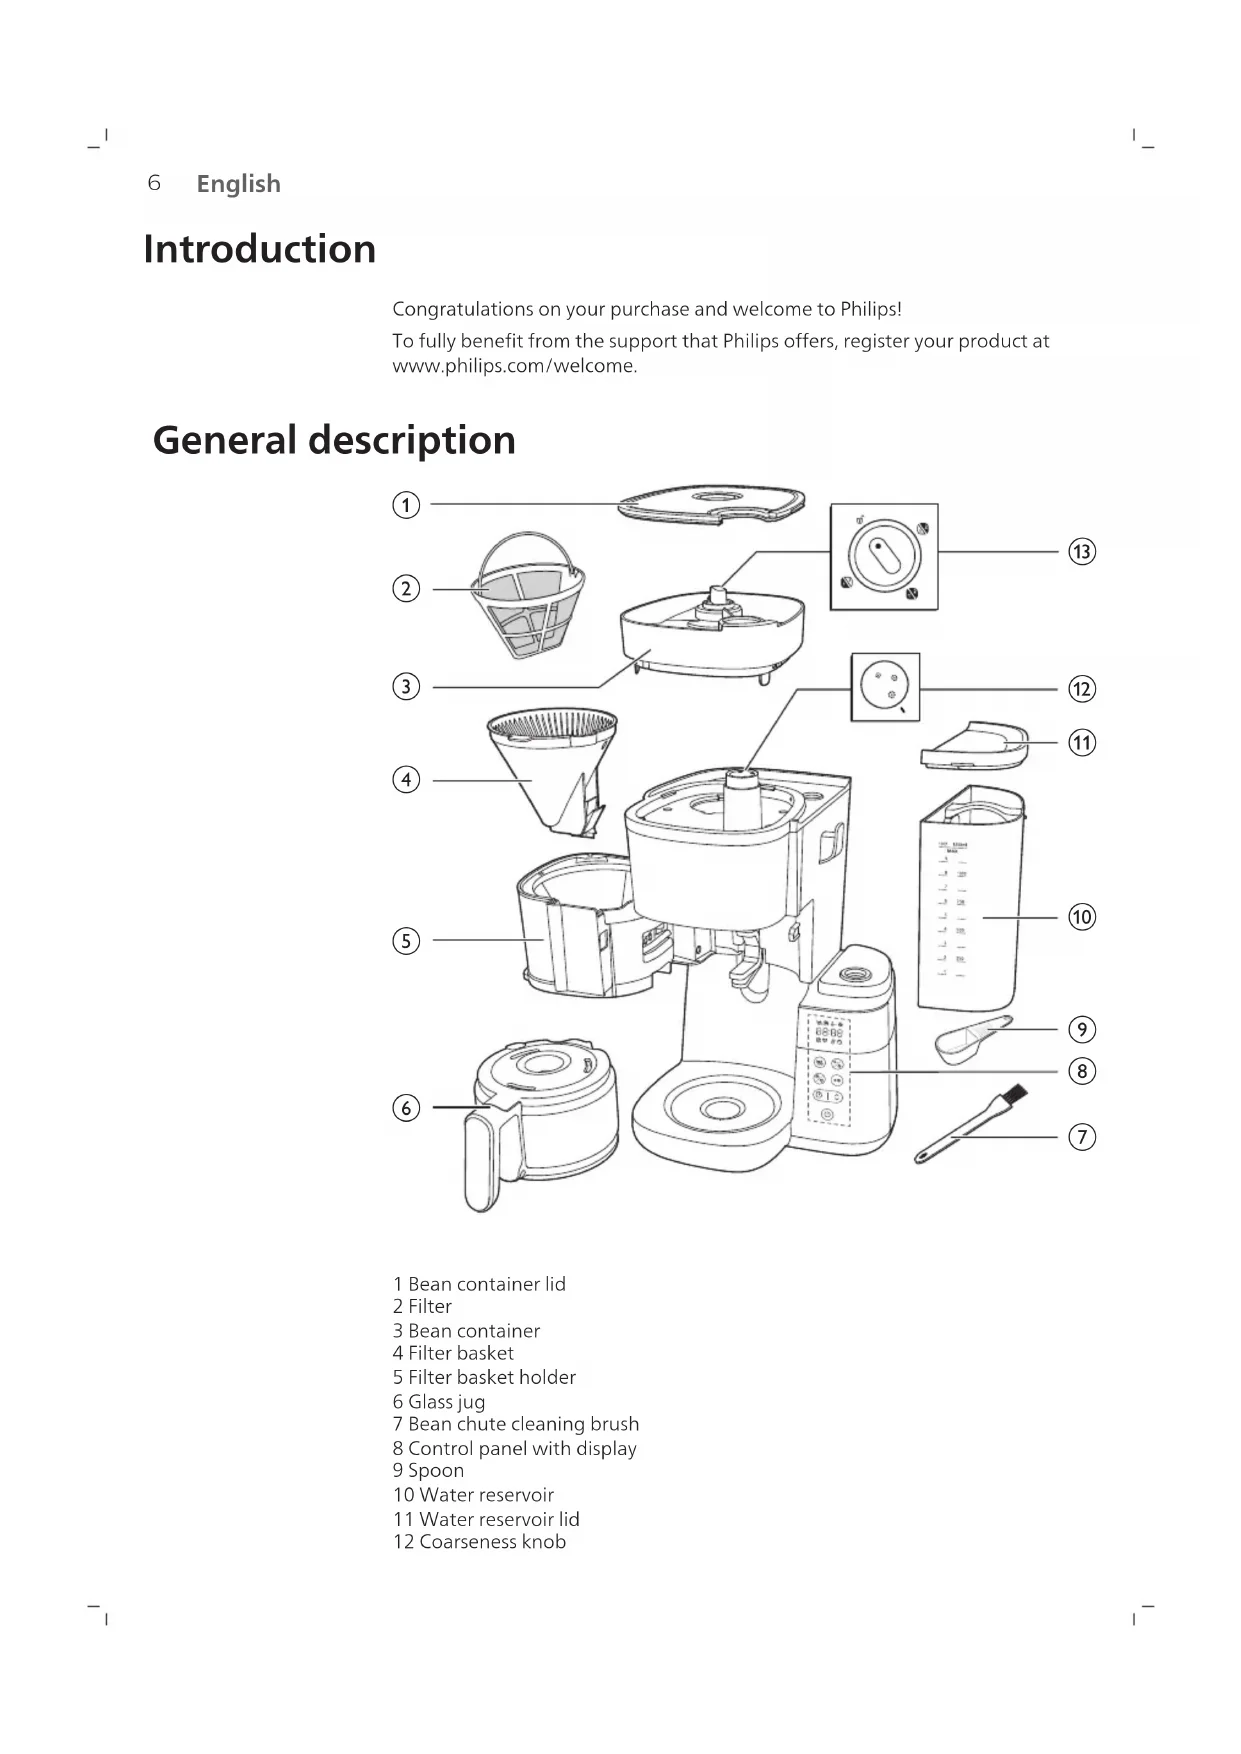
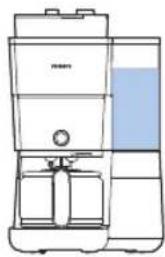
General description
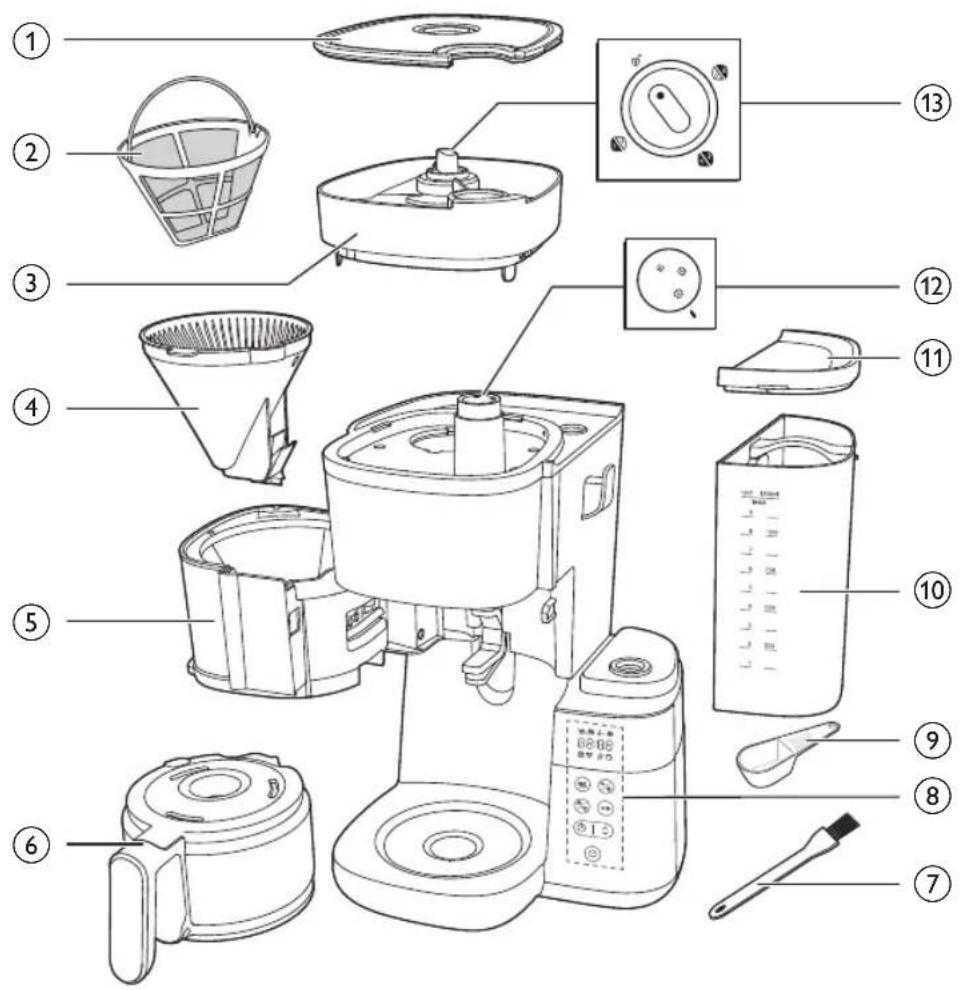
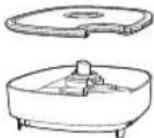
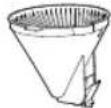
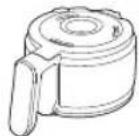
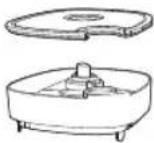
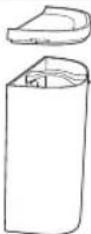
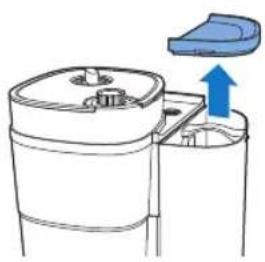
1 Bean container lid
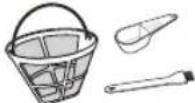
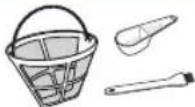
2 Filter
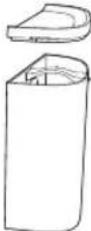
3 Bean container
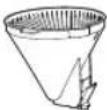
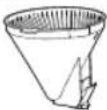
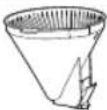
4 Filter basket
5 Filter basket holder
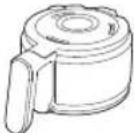
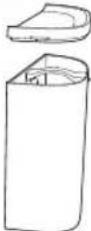
6 Glass jug
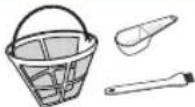
7 Bean chute cleaning brush
8 Control panel with display
9 Spoon
10 Water reservoir
11 Water reservoir lid
12 Coarseness knob
13 Container selector knob
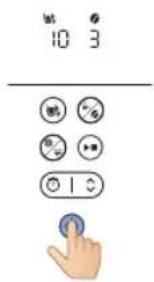
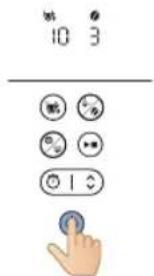
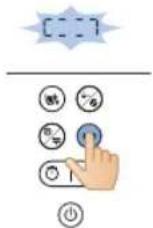
Control panel
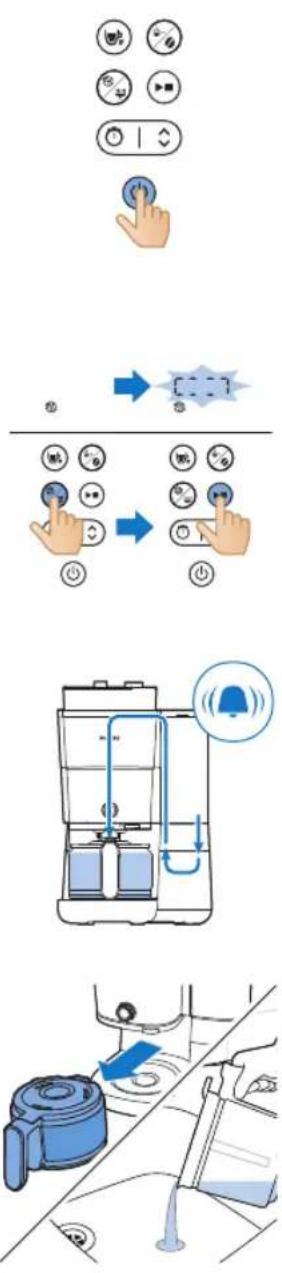
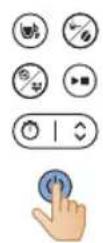
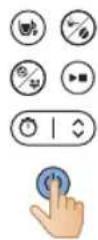
| Power button |
| Timer button and arrow button for time adjustment |
| Start/pause button |
| Cleaning button |
| Pre-ground and coffee strength button |
| Cup selection button |
Display icon
 | Number of cups |
 | Keep warm mode |
 | Pre-ground coffee |
 | Coffee strength |
 | Descaling |
 | Manual cleaning alert |
8 English


Low water reservation
Timer
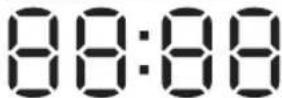
Time display
The first two digits represent the hours and the last two digits represent the minutes.
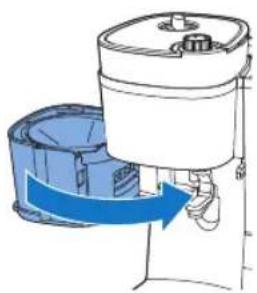
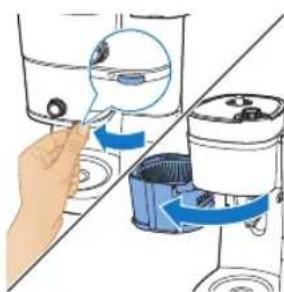
Turn the knob to unlock position, then you can remove the bean contain from the appliance.
This knob selects coffee coarseness, with larger size indicating coarser processing.
Jug mode
Drip stop function exists in jug mode.
Note: The brewing process does not stop when you remove the jug. If you do not put the jug back into the appliance within 20 seconds, the filter basket overflows.
Cup mode
Manually switch the knob from cup to jug mode to open the drip stop to prevent the dripping once the brew cycle is finished
Note: Cold ceramic mug will steal heat from the coffee as it warms itself up, please pre-warmed cup with hot water.
Important
Warning
- Check if the voltage indicated on the appliance corresponds to the local mains voltage before you connect the appliance.
- Connect the appliance to an earthed wall socket.
- Do not use the appliance if the plug, the mains cord or the appliance itself is damaged.
-
If the mains cord is damaged, you must have it replaced by Philips, a service center authorized by Philips or similarly qualified persons in order to avoid a hazard.
-
This appliance can be used by children aged from 8 years and above and by persons with reduced physical, sensory or mental capabilities or lack of experience and knowledge if they have been given supervision or instruction concerning use of the appliance in a safe way and if they understand the hazards involved. Cleaning and user maintenance shall not be made by children unless they are older than 8 and supervised. Keep the appliance and its cord out of reach of children aged less than 8 years.
- Children shall not play with the appliance.
- Do not let the mains cord hang over the edge of the table or worktop on which the appliance stands.
- Only use this appliance for its intended purpose to avoid potential hazard or injury.
Caution
- Always flush the appliance with fresh water before first use.
- Do not place the appliance on a hot surface and do not let the mains cord come into contact with hot surfaces.
- Do not place the appliance in a cabinet when in use.
- Unplug the appliance before you clean it and if problems occur during brewing.
- Always clean the appliance after the appliance cools down.
- During brewing and keeping warm, the water tank, the filter holder, the hotplate, the lower part of the appliance, and the jug filled with coffee are hot even some time after.
- Do not put the jug on a stove or in a microwave to reheat coffee.
- This appliance is intended to be used in household and similar applications such as farm houses, bed and breakfast type environments, staff kitchen areas in shops, offices and other working environments, and by clients in hotels, motels and other residential type environments.
- Always return the appliance to a service centre authorised by Philips for examination or repair. Do not open the appliance or attempt to repair the appliance yourself.
- The heating element surface, the filter holder, the lower part of the appliance, the hotplate, and the jug filled with coffee are subject to residual heat last for some time after use.
- Unless otherwise indicated, all packaging material in the box is made of recycled paper; see the PAP marking on the box.
Descaling
- Descale the coffee machine when you notice there is a descaling alert appeared on the display. Only use white vinegar to descale, as other products may cause damage to the appliance.
Electromagnetic fields (EMF)
This Philips appliance complies with the standards regarding electromagnetic fields (EMF).
Recycling
This symbol means that this product shall not be disposed of with normal household waste (2012/19/EU).
Follow your country's rules for the separate collection of electrical and electronic products. Correct disposal helps prevent negative consequences for the environment and human health.
Unless otherwise indicated, all packaging material in the box is made of recycled paper; see the PAP marking on the box.
Warranty and support
Versuni offers a two-year warranty after purchase on this product. This warranty is not valid if a defect is due to incorrect use or poor maintenance. Our warranty does not affect your rights under law as a consumer. For more information or for invoking the warranty, please visit our website www.philips.com/support.
Before first use
Make sure clean the filter holder and permanent filter after every use.
Wipe the filter holder thoroughly with a dry cloth after each use. Make sure clean it of any condensate buildup.

natural_image
Illustration of a blue electrical plug connecting a wall socket with a blue arrow indicating direction (no text or symbols)
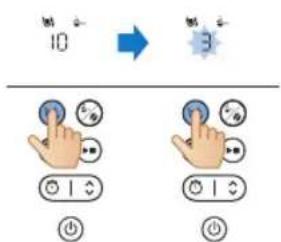
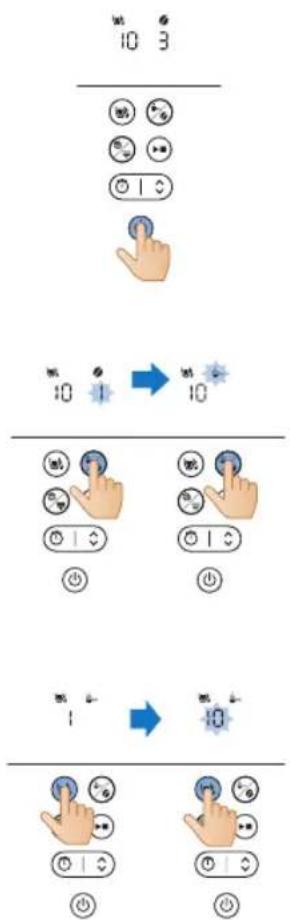
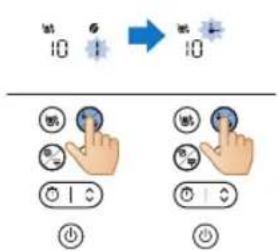
Setting the clock
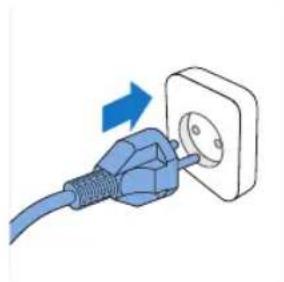
1 Plug in the appliance.
- The hour display will start flashing.

2 Use the arrow button to adjust the hour.

3 Once the hour is set, press the timer button to confirm the hour.
4 The minutes indication will start flashing. Use the arrow button to adjust the minutes.
5 Press the timer button to confirm the minutes.
- The current time is now set and saved.
6 To adjust timer in standby mode, you can choose between two approaches below:
- Plug off the appliance and and plug in again.
- Press and hold timer button until hour digits starts flash.
Note
The appliance always saves the last setting.
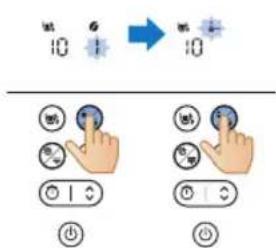
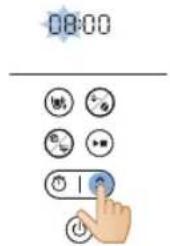
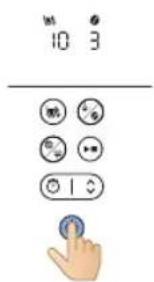
Keep warm time
You can choose how long you want your coffee to stay hot after brewing by adjusting the time after the appliance automatically switches off. The default automatic switch-off time is 30 minutes. The maximum automatic switch-off time is 300 minutes.
To adjust the automatic switch-off time, follow the steps below:
1 Power off the appliance and keep it plugged.
2 Press and hold cleaning button until keep warm icon is shown and hour starts flash.
3 Use the arrow button to adjust the hour.
4 Once the hour is set, press cleaning button to save the hour setting.
5 The minutes indication will start flashing. Use the arrow button to adjust the minutes.
12 English
6 Press cleaning button to save the minute setting.
The keep warm function does not activate when brewing one or two 2 cups.
Your appliance will keep your drink hot until it goes into standby mode automatically. If you don't want your drink to stay hot anymore, press the on/off button to turn off the appliance.
Flushing the appliance
Always flush the coffeemaker once before first use by following the steps below.
Warning: Never pour water into the bean container, as this damages the coffeemaker.
natural_image
Diagram showing a mechanical assembly with blue arrows indicating direction of motion or force (no text or symbols present)
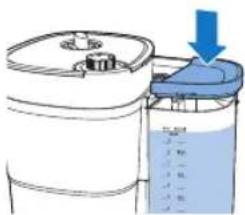
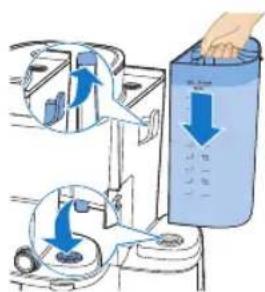
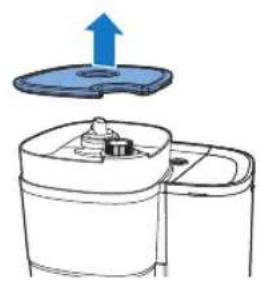
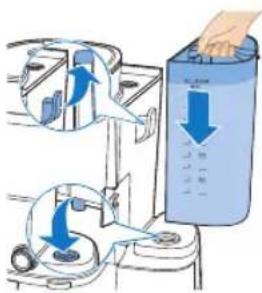
1 Open the water reservoir lid.
Caution: Do not put coffee beans or pre-ground coffee in the water reservoir
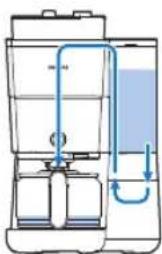
2 You can fill the water reservoir with water in either way below:
natural_image
Illustration of hands using a water dispenser to dispute liquid into a container (no text or symbols visible)
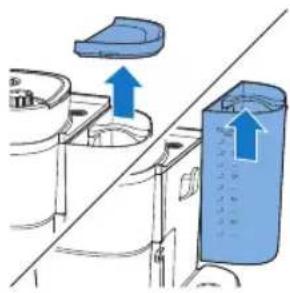
- Lift the tank from the appliance and place it under tap to fill in water.

- Make sure the hook is attached properly when placing back.
- Grab the lid tab to pull up the jug lid. Place the coffee jug under tap to fill in water. Fill the water tank with coffee jug.
- Make sure the water is below maximum level.
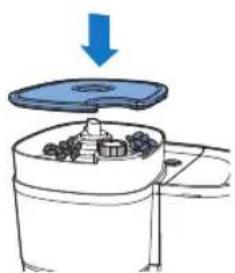
3 Close the water reservoir lid.

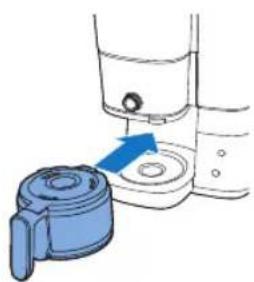
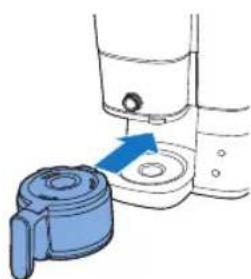
4 Put the coffee jug in the appliance.
5 Rotate the central knob to jug setting.
6 Press the on/off button.
- The appliance is powered on.
14 English
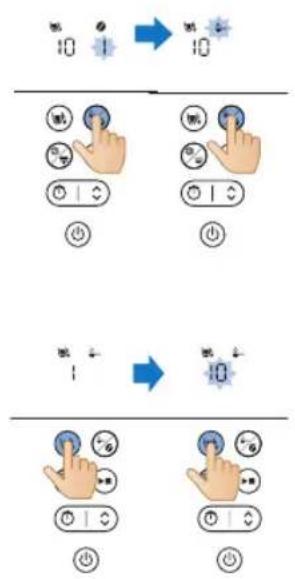
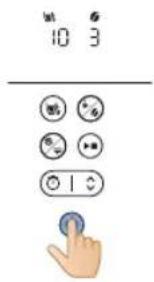
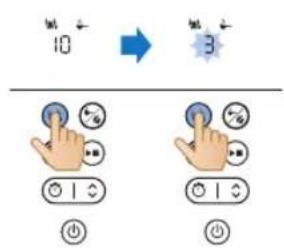
7 Press the coffee strength button and select pre-ground coffee.
8 Press cup button and select 10 cups.
9 Press the start button.

10 The appliance starts the flushing process.
11 Let the appliance operate until the flushing process is finished.
natural_image
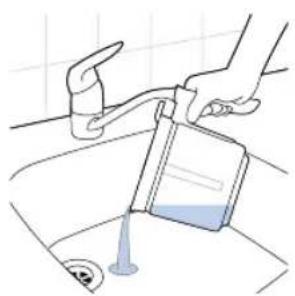
Illustration of a hand pouring liquid into a basin with a faucet (no text or symbols)
12 Empty the glass jug.
Using the appliance
Using coffee beans
Note: the coffee machine will use required amount of water based on no. of coffee cups to be prepared
Follow steps below to use:
1 Open the lid of the water reservoir and lift the tank from the appliance.

natural_image
Diagram showing a blue plastic container being lifted by an upward arrow, with no text or symbols present.

natural_image
Illustration of a hand washing a water dispenser into a container with a blue liquid, placed on a kitchen sink (no text or symbols visible)
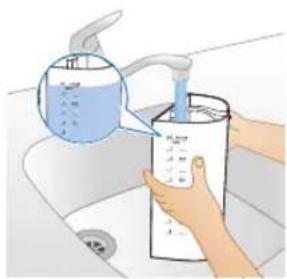
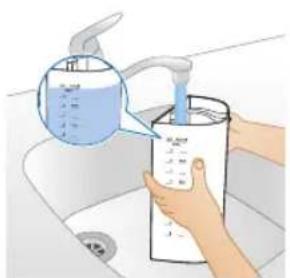
2 Fill the tank with water from the tap.
- Make sure that the water level is below the maximum level.

3 Place the tank back on the appliance.
- Make sure the hook is properly attached.
4 Close the lid of the water container.
English

natural_image
Diagram of a kitchen appliance with a blue lid and upward arrow, shown from top and side (no text or symbols)
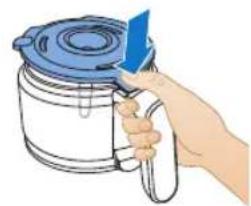
5 Lift the lid of bean container.
natural_image
Illustration of two containers pouring liquid into a container with a small container inside (no text or symbols)
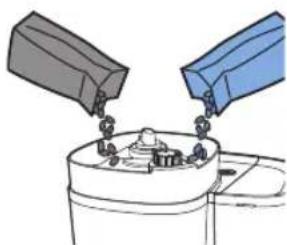
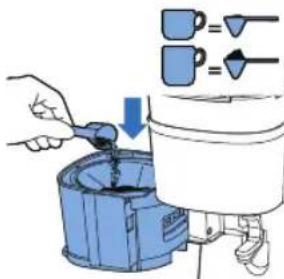
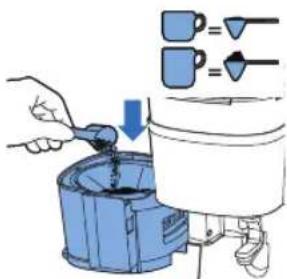
6 Add your desired coffee beans to the container.
Note: Always make sure that the fresh bean duo bean container is at least half full.
Warning: To prevent the grinder from jamming, do not use unroasted or caramelized beans. Use coffee beans instead of espresso beans, as espresso beans may damage the grinder.
natural_image
Diagram of a kitchen appliance with a blue lid and arrow indicating downward motion (no text or symbols)
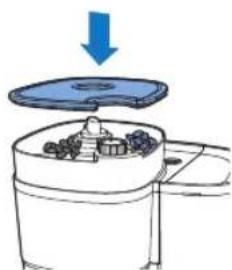
7 Close the lid of bean container.
8 Turn the container selector knob to choose desired beans between the two containers.
- You can even mix two different types of beans for a unique blend.
Note: Whenever you switch between coffee bean containers or coffee beans, there will always be traces of coffee left of the previously ground type of coffee beans. Clean the grinder funnel after you switch to a new type of coffee bean to prevent this.
natural_image
Simple line drawing of a container with a blue lid and a magnified view of a circular object (no text or symbols)
9 Choose your desired coarseness level by using the knob.

natural_image
Illustration of a hand inserting a container into a shared device (no text or symbols visible)
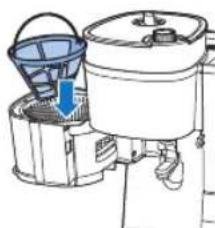
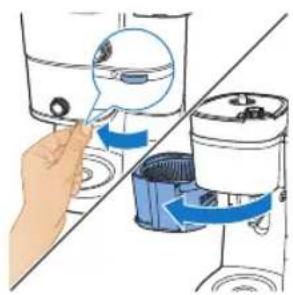
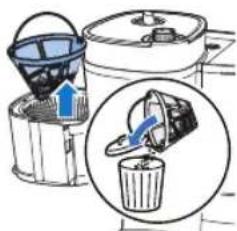
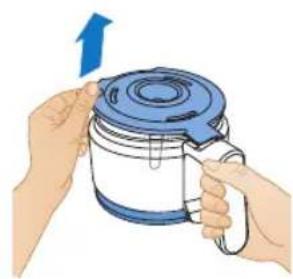
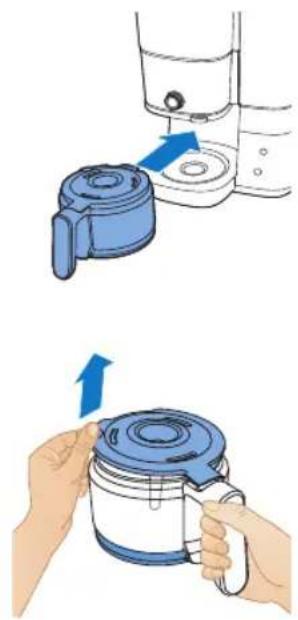
10 Grab the tab to open the filter holder.

natural_image
Diagram of a cleaning or cleaning machine with buckets and a handle, showing no text or symbols.
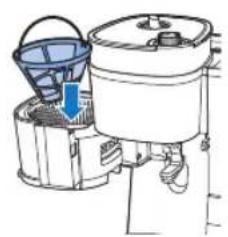
11 Place the filter in the filter basket.

natural_image
Diagram of a water purifier with blue flow arrow indicating internal circulation (no text or symbols)
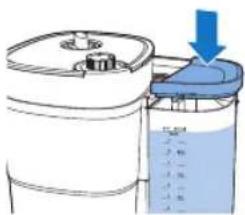
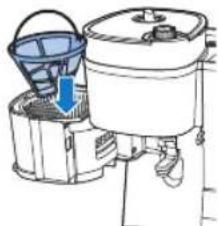
12 Close the filter holder.

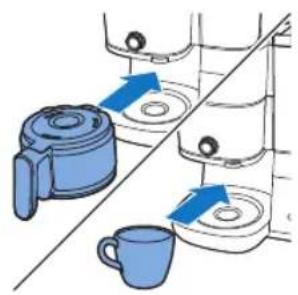
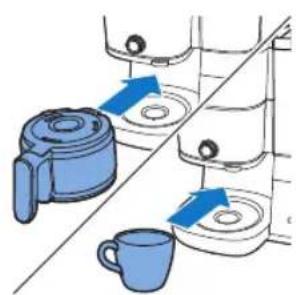
13 Place the coffee jug or your cup under the dispenser.
natural_image
Diagram showing two kitchen utensils with blue circular indicators and a diagonal line, no text or symbols present.
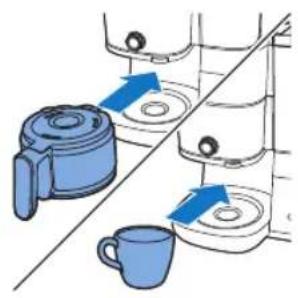
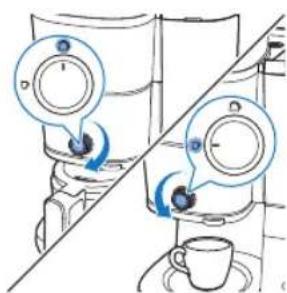
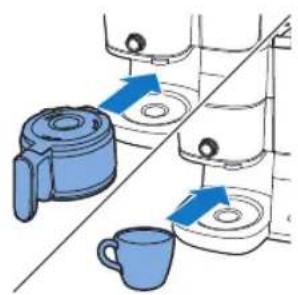
14 Use the knob to select cup/ jug mode.
"Cup" mode is for making smaller quantities of coffee and "Jug" mode is for brewing larger amounts using a jug.
When using brew into cup function, you can use either glass or ceramic mugs, as well as glasses. Ensure that you use cups with less than 10 cm in height.
18
English

15 Power on the appliance.
16 Select the number of cups you want to make by pressing the cup button.
17 Press the strength button to choose your preferred coffee strength.
- 1: Bean for mild coffee
- 2: beans for medium strong coffee
- 3: beans for strong coffee
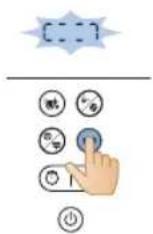
18 Start the process by pressing the start/pause button.
19 The appliance starts processing.
- The appliance will beep when it's done.

20 Remove your cup or the coffee jug from the appliance.
The drip stop function enables you to remove the jug from the coffeemaker before the brewing process is finished. When you remove the jug, the drip stop stops the flow of coffee into the jug.
The brewing process does not stop when you remove the jug. If you do not put the jug back into the appliance within 20 seconds, the filter basket overflows.
natural_image
Illustration of a hand pouring liquid into a cup (no text or symbols)
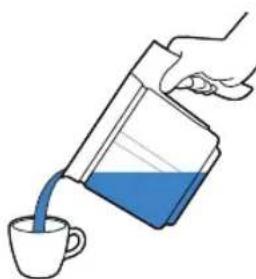
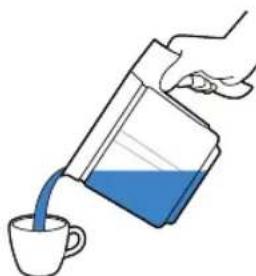
21 Enjoy your freshly brewed coffee.

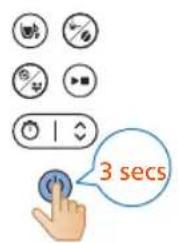
22 To turn off the appliance, press and hold the power button for three seconds.

natural_image
Illustration of a hand inserting a device into a washing machine (no text or symbols visible)
23 Open the filter holder.

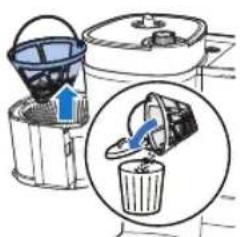
24 Remove the filter.
Using pre-ground coffee
Follow steps below to use:
20 English
natural_image
Line drawing of a modern kitchen appliance with a blue liquid and control panel (no text or symbols)
1 Check that the appliance has enough water to make your desired amount of coffee.

natural_image
Illustration of a hand inserting a small object into a container with blue arrows indicating flow (no text or symbols)
2 Grab the tab to open the filter holder.
natural_image
Diagram of a water purifier with bucket and filter unit (no text or labels)
3 Place the filter in the filter basket.
4 Add the amount of pre-ground coffee in the permanent filter you use depends on personal preference.

natural_image
Diagram of a portable air purifier with blue airflow direction indicated (no text or symbols)
5 Close the filter holder.
natural_image
Illustration of kitchen equipment including a blender, water dispenser, and mug with blue arrows indicating movement (no text or symbols)
6 Place the coffee jug or your cup under the dispenser.

7 Use the knob to select cup/jug mode.
- "Cup" mode is for making smaller quantities of coffee and "Jug" mode is for brewing larger amounts using a jug.
8 Power on the appliance.
9 Choose to use pre-ground coffee by pressing the mode selection button.
10 Select the number of cups you want to make by pressing the cup button.
22 English

11 Start the process by pressing the start/pause button.
12 The appliance starts processing.
- The appliance will beep when it's done.

13 Remove your cup or the coffee jug from the appliance.
- Be careful when handling the coffee jug after brewing. The heating plate reaches high temperatures and may cause scalding. Take extra care to avoid burns.
natural_image
Illustration of a hand pouring liquid from a container into a cup (no text or symbols)
14 Enjoy your freshly brewed coffee.

15 To turn off the appliance, press and hold the power button for three seconds.

natural_image
Illustration of a hand inserting a device into a water dispenser, showing fluid flow direction (no text or symbols)
16 Open the filter holder.

17 Remove the filter.

Setting the timer
To set the timer on the appliance, follow these steps:
1 Turn on the coffee machine.
2 Press the timer button and the timer icon will appear on the display. The hour digits flash to indicate setting hour.
3 Use the arrow button to adjust the hours. If you need to adjust quickly, long-press the arrow button.
24 English
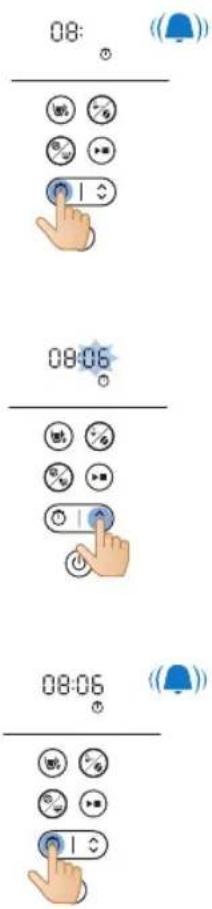
4 Press the timer button to confirm the hour setting. The minutes digits indicate setting minute.
5 Use the arrow button again to adjust the minutes. If you need to adjust quickly, long-press the arrow button.
6 Press the timer button again to confirm the minute setting.
To cancel the timer, simply press the timer button, and the timer icon will disappear from the display.
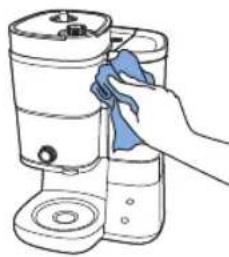
Cleaning and Maintenance
Cleaning after every use
Never immerse the coffee machine in water or any other liquid, nor rinse it under the tap.
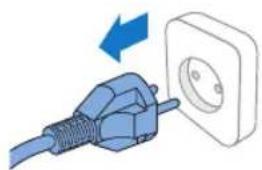
1 Remove the mains plug from the wall socket.
natural_image
Illustration of a blue electrical plug connecting a wall socket with a blue arrow indicating direction (no text or symbols)

natural_image
Hand cleaning a water dispenser with a blue cloth (no text or symbols visible)

natural_image
Illustration of a kitchen sink with buckets and a faucet, no text or symbols present
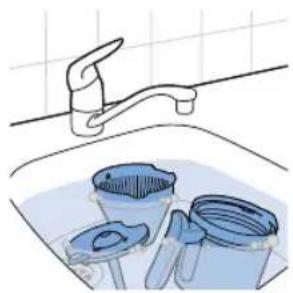
2 Wipe the outside of the coffee machine with a damp cloth.
3 Clean the filter basket with hot water and some washing-up liquid or clean them in the dishwasher.
4 Clean the coffee jug & lid to rinse under tap. Or clean them in the dishwasher.
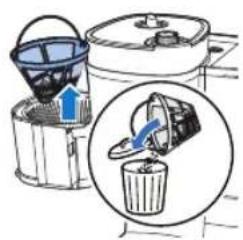
Cleaning the grinder funnel
Important:
Clean the grinder funnel every 1 to 2 weeks to prevent clogging with ground coffee. This is easily and quickly done by following the steps below.
Clean the grinder funnel when you notice there is a brush alert appeared on the display.
Note: Make sure the coffee bean container is empty before you start the cleaning procedure.
English
natural_image
Illustration of a blue cable inserted into a white socket with an arrow indicating direction (no text or symbols)
1 Plug in the appliance.

natural_image
Illustration of a hand inserting a device into a water container with blue arrows indicating flow direction (no text or symbols)
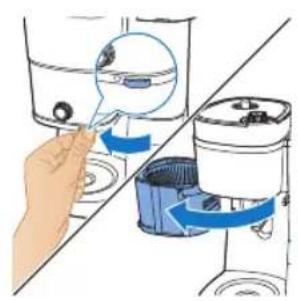
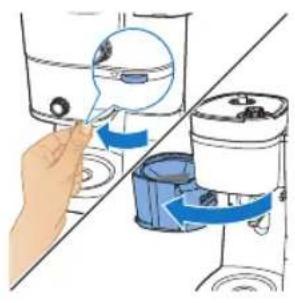
2 Open the filter holder to access the ground funnel chute.
3 Turn on the coffee machine.
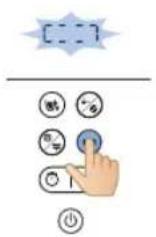
4 Press the clean button on the machine's control panel.
5 Select the brush setting on the display screen.
6 Press the start button. This will cause the ground funnel chute flap to open, allowing you to clean the chute with a brush.
natural_image
Diagram of a hand using a tool to rotate or rotate a component, showing blue arrows indicating rotation direction (no text or symbols present)

7 Use a brush to remove any coffee grounds or residue that may have accumulated in the chute.
8 After cleaning the chute, press the start button again to close the flap.
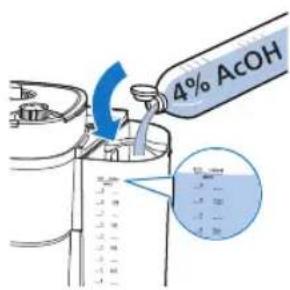
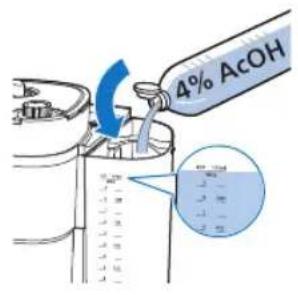
Descaling the coffee machine
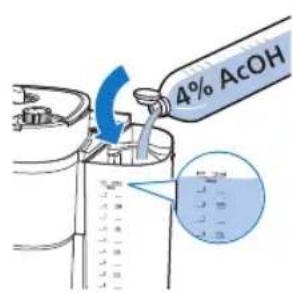
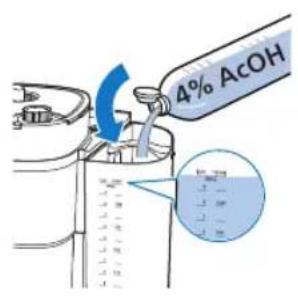
Descale the coffee machine when you notice there is a descaling alert appeared on the display. Only use white vinegar to descale, as other products may cause damage to the coffee machine.
Warning: Never use vinegar with an acetic acid content of 8% or more, natural vinegar, powder descalers or tablet descalers to descale the machine, as this may cause damage.
1 Open the water reservoir lid.
natural_image
Diagram of a mechanical device with a blue arrow indicating upward motion, showing internal components and housing (no text or symbols)
English
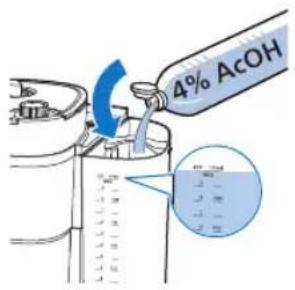
2 Fill the water reservoir with white vinegar (4 % acetic acid) up to the 10-cup indication.
3 Close the lid of the water container.

natural_image
Illustration of a hand inserting a filter into a water dispenser, showing mechanical components and blue arrows indicating motion (no text or symbols)
4 Grab the tab to open the filter holder.
5 Place the filter in the filter basket and close the filter basket holder.

natural_image
Diagram of a water purifier with bucket and filter components (no text or labels)

natural_image
Illustration of a hand operating a water dispenser with a blue pump component (no text or symbols)
6 Put the empty jug in the coffee machine.
7 Put the mains plug in the wall socket.
8 Press the power button to switch on the coffee machine. The display lights up.
9 Press the cleaning button on the coffee machine.
10 Select the descaling setting.
11 Press the start button to confirm your selection.
- The coffee machine will automatically begin the descaling process.
12 Wait for the machine to finish brewing the descaling solution.
13 Once the descaling process is complete, rinse the machine twice with the maximum amount of water to completely remove any deposits.
14 Empty the jug and remove the permanent filter with the scale residues.
15 Fill the water reservoir with fresh cold water and press start button to start another brewing process.
Let the coffee machine complete the entire brewing process and empty the jug.
Note: If necessary, repeat step 14 until the water that comes out of the coffee machine no longer tastes or smells of vinegar.
16 Clean the filter basket and the jug with hot water and some washing-up liquid.
17 Press the power button to switch off the appliance.
Troubleshooting
This chapter summarizes the most common problems you could encounter with the machine. If you are unable to solve the problem with the information below, visit www.philips.com/support for a list of frequently asked questions or contact the Consumer Care Center in your country.
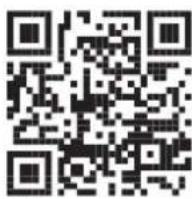
You can also scan this QR code for more online support.
Problem Solution
| The coffee machine does not work. | Put the mains plug in the wall socket and press the on/off button to switch on the coffee machine. |
| Make sure that the voltage indicated on the coffee machine corresponds to the local mains voltage. |
| Fill the water reservoir with water. |
| Close the lid of the grinder funnel. |
| The grinder does not work or does not work properly. | Make sure that you did not select pre-ground coffee. If the symbol for pre-ground coffee is visible on the display, you selected pre-ground coffee. |
| Clean the grinder funnel by following the instructions. |
| When I use the grinder, the coffee is too weak. | Turn the coarseness knob to select the desired type of grind from fine to coarse. |
| Use the strength select button to set the coffee strength from 1 to 3 , the larger digit means stronger strength. |
| Use coffee beans of a stronger blend or flavor. |
| When I use pre-ground coffee, the coffee is too weak. | Make sure the amount of pre-ground coffee in the filter is enough, properly increase the amount of pre-ground coffee will increase the coffee strength. |
| Use ground coffee of a stronger blend or flavor. |
| The filter overflows when I remove the jug from the coffee machine while it is brewing coffee. | If you remove the jug for more than 20 seconds during the brewing process, the drip stop causes the filter basket to overflow. Also note that the coffee does not reach its full taste before the end of the brewing process. Therefore we advise you not to remove the jug and pour out the coffee before the end of the brewing process. |
| The coffee machine continues to drip long after the brewing process has ended. | The dripping is caused by condensation of steam. It is completely normal that the coffee machine drips for some time. |
| Can't wait for the last few drops. | Switch the knob from cup to jug mode to open the drip stop function, drip stop will stop the dripping from the filter basket. |
| If the dripping does not stop, the drip stop may be clogged. To clean the drip stop, open the filter basket holder and take out the filter basket. Rinse the filter basket and the drip stop under the tap. |
| The coffee is not hot enough. | The coffee in the jug cools down faster if you brew only a few cups. The coffee stays hot longer if you brew 10 cups, which is a full jug. |
| Descale the coffee machine. |
| The coffee beans seem to be used up quickly. | To brew a perfect cup of coffee, the coffee machine needs a certain amount of ground coffee. The amount of coffee beans the coffee machine uses to obtain the optimal amount of ground coffee per cup is normal. |
| The timer does not work. Make sure you complete all steps for brewing coffee with coffee beans or pre-ground coffee before you set the timer. |
Error code
| Error code Description | Solution Remark | |
| E1 Water shortage | Press any button to put the appliance on standby mode. Refill the water tank and restart the appliance. | If this problem persists, follow these steps: Press and hold the cleaning and start button simultaneously for three seconds, until the appliance automatically starts pumping water for one minute. Repeat this process 3 times. Contact customer service if the problem still persists. |
| E2 Bean | container unavailable | Press any button to put the appliance on standby mode. Attach bean container securely and restart the appliance | Contact customer service if the problem persists. |
| E3 Heating tube malfunctioning | Unplug the appliance. Plug and power on the appliance again until it is cooled down completely. | Contact customer service if the problem persists. |
| E4 Grinding | wheel blockage | Unplug the appliance. Plug and power on the appliance again. Follow steps in "Cleaning the grinder funnel" to clean grinding wheel and ground funnel chute. | Contact customer service if the problem persists. |
32 English
| E5 Ground | funnel chute blockage | Unplug the appliance.Plug and power on the appliance again.Follow steps in "Cleaning the grinder funnel" to clean ground funnel chute. | Contact customer service if the problem persists. |
| E6/E7/ E8 Program error | | Unplug the appliance.Plug and power on the appliance again. | Contact customer service if the problem persists. |
Úvod
natural_image
Illustration of a blue electrical plug connecting a wall socket with a blue arrow indicating direction (no text or symbols)
natural_image
Diagram showing a mechanical assembly with blue components and directional arrows, no text or symbols present.
natural_image
Illustration of a hand pouring liquid into a water bottle in a kitchen sink (no text or symbols visible)
40
Čeština

natural_image
Illustration of a hand operating a water dispenser with a blue pump component (no text or symbols)

natural_image
Illustration of hands holding a blue and white kettle with a blue lid, no text or symbols present
natural_image
Illustration of a hand holding a blue tool next to a container with a lid (no text or symbols)
natural_image
Illustration of a hand pouring liquid into a sink with a faucet (no text or symbols)
natural_image
Diagram showing a mechanical assembly with blue components and directional arrows, no text or symbols present.
natural_image
Illustration of a hand washing a water dispenser into a container with a blue liquid, placed on a kitchen sink (no text or symbols visible)
natural_image
Diagram of a kitchen appliance with a blue upward arrow indicating rotation (no text or symbols)
natural_image
Illustration of two containers pouring liquid into a container with granular contents (no text or symbols)
natural_image
Diagram of a kitchen appliance with a blue lid and arrow indicating downward motion (no text or symbols)
natural_image
Simple line drawing of a container with a blue lid and a magnified inset showing particles (no text or symbols)
natural_image
Illustration of a hand using a magnifying glass to interact with a cleaning machine (no text or symbols visible)
natural_image
Diagram of a cleaning or cleaning machine with buckets and a handle, showing no text or symbols.
natural_image
Diagram of a water purifier with blue flow arrow indicating internal circulation (no text or symbols)
natural_image
Diagram showing two kitchen utensils with blue circular indicators and a diagonal line, no text or symbols present.
natural_image
Illustration of a hand pouring liquid into a cup (no text or symbols)
natural_image
Illustration of a hand using a water dispenser to lift a container, showing fluid flow direction (no text or symbols)
24 Vyjměte filtr.
Použití mleté kávy
natural_image
Line drawing of a modern kitchen appliance with a blue liquid and control panel (no text or symbols)
natural_image
Illustration of a hand inserting a container into a water dispenser, showing fluid flow direction (no text or symbols)
natural_image
Diagram of a water purifier with bucket and filter unit (no text or labels)
natural_image
Diagram of a portable air purifier with blue airflow direction indicated (no text or symbols)
natural_image
Illustration of kitchen utensils and a cup with blue arrows indicating movement or force (no text or symbols)
natural_image
Illustration of a hand pouring liquid into a blue liquid from a container onto a mug (no text or symbols)
natural_image
Illustration of a hand using a tool to lift a water level from a pump into a washing machine (no text or symbols present)
17 Vyjměte filtr.

Nastavení časovače
natural_image
Illustration of a blue electrical plug connecting a wall socket with a blue arrow indicating direction (no text or symbols)
52
Čeština
natural_image
Illustration of a hand cleaning or cleaning a cylindrical container with a blue cloth (no text or symbols)

natural_image
Illustration of a kitchen sink with buckets and a faucet, no text or symbols present
natural_image
Illustration of a blue cable inserted into a white socket with a blue arrow indicating direction (no text or symbols)
natural_image
Illustration of a hand using a tool to lift water from a bowl into a washing machine (no text or symbols present)
natural_image
Illustration of a hand using a tool to lift a component, showing blue arrows indicating rotation (no text or symbols present)

natural_image
Diagram of a mechanical device with a blue upward arrow indicating motion or force (no text or symbols present)

natural_image
Illustration of a hand inserting a device into a washing machine (no text or symbols present)
natural_image
Diagram of a washing machine with buckets and a handle, showing internal components without any text or labels.
natural_image
Diagram showing a blue mechanical component inserted into a container with a blue arrow indicating direction (no text or symbols present)
natural_image
Diagram showing a blue mechanical component with a blue arrow pointing to a circular feature, alongside a tool and pipe (no text or symbols present)
1 Låg til beholder til bønner
2 Filter
3 Beholder til bønner
4 Filterkurv
5 Holder til filterkurv
6 Glaskande
7 Rengøringsbørste til bønneslisken
8 Betjeningspanel med display
9 Ske
10 Vandtank
11 Låg til vandtank
12 Knap til formalingsgrad
natural_image
Illustration of a blue electrical plug connecting a wall socket with a blue arrow indicating direction (no text or symbols)
natural_image
Diagram showing two blue plastic containers connected by a diagonal line, with arrows indicating upward movement (no text or symbols present)
natural_image
Illustration of hands washing a cup with a hand pouring liquid from a bottle into it (no text or symbols)
Dansk

natural_image
Illustration of a hand washing a small appliance with a blue handle, showing no text or symbols.
4 Placer kaffekanden i apparatet.

natural_image
Illustration of a hand pouring liquid into a sink with a faucet (no text or symbols)
natural_image
Diagram showing a device with a lid and a container, both with blue arrows indicating direction (no text or symbols present)
Dansk

natural_image
Illustration of hands washing a water dispenser into a sink (no text or symbols visible)
natural_image
Illustration of a container with liquid and a blue lid, showing a drop in the top portion (no text or symbols)
natural_image
Diagram of a device with a blue upward arrow above it, showing internal components (no text or symbols)

natural_image
Illustration of two containers pouring liquid from a container into a tank (no text or symbols)
natural_image
Simple line drawing of a kitchen appliance with a blue lid and arrow indicating downward motion (no text or symbols)
natural_image
Diagram of a mechanical component with a magnified inset showing internal components (no text or symbols)
natural_image
Illustration of a hand inserting a blue magnifying glass into a container, showing fluid behavior (no text or symbols)
10 Tag fat i tappen for at åbne filterholderen.

natural_image
Diagram of a water purifier with bucket and pump components, showing fluid flow direction (no text or labels)
11 Sæt filteret i filterkurven.
Dansk

12 Luk filterholderen.
13 Sæt kaffekanden eller koppen under dispenseren.
natural_image
Diagram of a water purifier with inlet and outlet pipes (no text or labels)
natural_image
Illustration of a hand pouring liquid from a container into a cup (no text or symbols)
natural_image
Illustration of a hand inserting a device into a water container with blue arrows indicating rotation (no text or symbols)
23 Luk filterholderen op.
24 Fjern filteret.
natural_image
Line drawing of a modern kitchen appliance with a blue liquid container (no text or symbols)
natural_image
Illustration of a hand inserting a blue object into a water dispenser, showing mechanical components (no text or symbols)
2 Tag fat i tappen for at åbne filterholderen.
3 Sæt filteret i filterkurven.
natural_image
Illustration of a cleaning machine with buckets and a bucket cover, showing no text or symbols.
natural_image
Diagram of a water purifier with blue flow arrow indicating fluid direction (no text or symbols)
5 Luk filterholderen.

6 Sæt kaffekanden eller koppen under dispenseren.
natural_image
Illustration of a coffee machine with two cups and a side mirror, showing no text or symbols
natural_image
Diagram of a portable water heater with blue tubing and control panel (no text or labels)
natural_image
Illustration of a hand pouring liquid into a cup (no text or symbols)
natural_image
Illustration of a hand inserting a blue sphere into a container, showing mechanical components (no text or symbols)
16 Luk filterholderen op.
natural_image
Illustration of a bucket pump with a magnified inset showing the drop in liquid into a bin (no text or symbols)
17 Fjern filteret.

natural_image
Illustration of a blue electrical plug connecting a wall socket with a blue arrow indicating direction (no text or symbols)

natural_image
Illustration of a hand cleaning a cylindrical container with a blue cloth (no text or symbols)
natural_image
Illustration of a kitchen sink with buckets and a faucet, no text or symbols present
natural_image
Illustration of a blue electrical plug connecting a wall socket with a blue arrow indicating direction (no text or symbols)

natural_image
Illustration of a hand inserting a component into a water dispenser, showing fluid flow direction (no text or symbols)
2 Åbn filterholderen for at få adgang kværnens tragtsliske.
natural_image
Illustration of a hand using a tool to lift a component, with blue arrows indicating rotation (no text or symbols)
natural_image
Diagram of a kitchen appliance with a blue lid and upward arrow indicating a component (no text or symbols)
natural_image
Illustration of a hand inserting a small object into a water dispenser, with no text or symbols present.
4 Tag fat i tappen for at åbne filterholderen.
5 Placer filteret i filterkurven, og luk holderen til filterkurven.

natural_image
Diagram of a water purifier with buckets and a bucket cover, showing internal components without any text or labels.

natural_image
Illustration of a hand operating a water dispenser with a blue arrow indicating the process (no text or symbols present)
natural_image
Diagram showing a blue plastic container being inserted into a mixing bowl, with a hand holding a tool nearby (no text or symbols)
natural_image
Illustration of a blue electrical plug connecting a wall socket with a blue arrow indicating direction (no text or symbols)
90 Deutsch

natural_image
Diagram showing a blue plastic bag being inserted into a rack, with arrows indicating direction (no text or symbols present)

natural_image
Illustration of hands washing a water dispenser into a sink (no text or symbols visible)
92 Deutsch

natural_image
Diagram showing a blue plastic door handle interacting with a water dispenser (no text or symbols present)
natural_image
Illustration of hands holding a blue and white kettle with a blue lid, no text or symbols present

natural_image
Illustration of a hand holding a blue tool above a white container with a lid (no text or symbols)
natural_image
Illustration of a hand pouring liquid into a water bottle from a faucet into a sink (no text or symbols)
natural_image
Diagram showing a blue plastic bag being inserted into a container, with arrows indicating direction (no text or symbols present)
natural_image
Illustration of hands washing a water dispenser into a sink (no text or symbols visible)
natural_image
Diagram of a device with a blue lid and an upward arrow, showing internal components (no text or symbols)
natural_image
Illustration of two containers pouring liquid into a container with items inside (no text or symbols)
natural_image
Diagram of a food processor with a blue lid and arrow indicating downward motion (no text or symbols)
natural_image
Diagram of a device with a blue component and a magnified view of a circular component (no text or symbols)
natural_image
Illustration of a hand inserting a magnifying glass into a water dispenser, showing fluid flow direction (no text or symbols)
natural_image
Diagram of a cleaning machine with buckets and handle, showing internal components without any text or labels
natural_image
Diagram of a portable air conditioner unit with blue airflow direction indicated (no text or symbols)
natural_image
Illustration of kitchen equipment including a blender, water dispenser, and mug with blue arrows indicating movement (no text or symbols)
natural_image
Diagram of a portable water heater with inlet/outlet ports and internal flow paths (no text or labels)
natural_image
Illustration of a hand pouring liquid into a cup (no text or symbols)
natural_image
Illustration of a hand using a device to lift water from a container, showing fluid flow direction (no text or symbols)
natural_image
Line drawing of a modern kitchen appliance with a blue liquid container (no text or symbols)
natural_image
Illustration of a hand inserting a filter into a water dispenser, showing mechanical components and blue arrows indicating rotation (no text or symbols)
natural_image
Diagram of a bucket pump system with buckets and a bucket, showing internal components and a downward arrow indicating flow direction (no text or labels)
natural_image
Diagram of a water purifier with blue flow arrows indicating internal circulation (no text or symbols)
natural_image
Illustration of kitchen equipment including a blender, mug, and water dispenser with blue arrows indicating movement (no text or symbols)
natural_image
Diagram of a water pump or scrubber with blue flow lines indicating internal components (no text or labels)
natural_image
Illustration of a hand pouring liquid into a blue container over a cup (no text or symbols)
natural_image
Illustration of a hand inserting a water droplet into a container with blue arrows indicating flow direction (no text or symbols)
natural_image
Illustration of a blue electrical plug connecting a wall socket with a blue arrow indicating direction (no text or symbols)

natural_image
Line drawing of a hand cleaning a cylindrical container with a blue cloth (no text or symbols)
natural_image
Illustration of a kitchen sink with buckets and a faucet, no text or symbols present
Reinigen des Mahltrichters
Wichtig:
natural_image
Illustration of a blue electrical plug connecting a wall socket with a blue arrow indicating direction (no text or symbols)
106 Deutsch

natural_image
Illustration of a hand using a tool to lift a water level from a pump into a collection tank (no text or symbols present)
natural_image
Illustration of a hand using a tool to lift a machine, showing blue arrows indicating rotation (no text or symbols present)
natural_image
Diagram of a water dispenser with a blue cover and upward arrow indicating flow or movement (no text or symbols)


natural_image
Illustration of a hand inserting a small object into a water-filled container, with no text or symbols present.
natural_image
Diagram of a cleaning machine with buckets and a handle, showing internal components without any text or labels.
natural_image
Illustration of a hand inserting a blue plastic bag into a water dispenser (no text or symbols)
natural_image
Diagram showing a blue device with a blue arrow pointing to a component, connected to a mechanical lever (no text or symbols present)
Problem Lösung
Deutsch
natural_image
Illustration of a blue electrical plug connecting a wall socket with a blue arrow indicating direction (no text or symbols)
natural_image
Diagram showing a hand operating a device with blue arrows indicating direction (no text or symbols present)

natural_image
Illustration of hands washing a water dispenser into a sink (no text or symbols visible)

120 Eesti
natural_image
Illustration of two hands holding a blue kettle, one with a lid and arrow indicating process (no text or symbols)
4 Asetage kohvikann seadmesse.
natural_image
Illustration of a hand holding a blue tool next to a cylindrical container (no text or symbols visible)

natural_image
Line drawing of a hand pouring liquid from a container into a sink (no text or symbols)
natural_image
Diagram showing a mechanical assembly with blue components and directional arrows, no text or symbols present.
natural_image
Illustration of a hand washing a water dispenser into a container with a blue liquid, placed on a kitchen sink (no text or symbols visible)
3 Pange paak seadmesse tagasi.
natural_image
Diagram of a kitchen appliance with a blue lid and upward arrow, shown from an exploded view (no text or symbols)
natural_image
Illustration of two containers pouring liquid into a container with a lid (no text or symbols)
natural_image
Diagram of a kitchen appliance with a blue lid and arrow indicating downward motion (no text or symbols)
natural_image
Simple line drawing of a container with a blue lid and a speech bubble containing three small icons (no text or symbols)
natural_image
Illustration of a hand using a tool to lift water from a washing machine (no text or symbols present)
10 Filtrihoidiku avamiseks tömmake sakist.

natural_image
Diagram of a cleaning or cleaning machine with buckets and a handle, showing no text or symbols.
11 Asetage filter filtrikorvi.
natural_image
Diagram of a water pump system with blue flow arrow indicating direction (no text or symbols)
12 Sulgege filtrihoidik.

natural_image
Diagram showing two hands operating a washing machine with a cup, no text or symbols present
natural_image
Illustration of a hand pouring liquid into a cup (no text or symbols)
natural_image
Illustration of a hand inserting a device into a water dispenser, showing blue arrows indicating rotation (no text or symbols present)
23 Avage filtrihoidik.
24 Eemaldage filter.
natural_image
Line drawing of a modern kitchen appliance with a blue liquid and control panel (no text or symbols)
natural_image
Illustration of a hand inserting a small object into a container with blue arrows indicating flow (no text or symbols)
2 Filtrihoidiku avamiseks tömmake sakist.

natural_image
Diagram of a water purifier with bucket and filter unit (no text or labels)
3 Asetage filter filtrikorvi.

natural_image
Diagram of a portable air purifier with blue airflow direction indicated (no text or symbols)
5 Sulgege filtrihoidik.
natural_image
Illustration of kitchen equipment including a kettle, mug, and water dispenser with blue arrows indicating movement (no text or symbols)
natural_image
Diagram of a water purifier with inlet and outlet pipes (no text or labels)
natural_image
Illustration of a hand pouring liquid from a container into a cup (no text or symbols)
natural_image
Illustration of a hand inserting a device into a washing machine (no text or symbols visible)
16 Avage filtrihoidik.
17 Eemaldage filter.

Taimeri seadistamine
natural_image
Illustration of a blue electrical plug connecting a wall socket with a blue arrow indicating direction (no text or symbols)

natural_image
Illustration showing a hand cleaning a kitchen appliance with a blue cloth, alongside a close-up of cleaning buckets in a basin (no text or symbols)
natural_image
Illustration of a blue electrical plug with a power outlet, showing a blue arrow indicating direction (no text or symbols present)
natural_image
Illustration of a hand inserting a small object into a water dispenser, with no text or symbols present.
2 Avage filtrihoidik, et pääseda ligi kohviveski lehtrile.

3 Lülitage kohvimasin sisse.

natural_image
Diagram of a hand using a tool to rotate or rotate a component, showing blue arrows indicating rotation direction (no text or symbols present)

natural_image
Diagram of a kitchen appliance with a blue upward arrow indicating a component (no text or symbols present)

4 Filtrihoidiku avamiseks tömmake sakist.

natural_image
Illustration of a hand inserting a device into a water dispenser, showing internal components and blue arrows indicating flow direction (no text or symbols)
5 Asetage filter filtrikorvi ja sulgege filtrihoidik.

natural_image
Diagram of a kitchen appliance with buckets and a handle, showing no text or symbols
natural_image
Illustration of a hand operating a water dispenser with a blue pump component (no text or symbols)
natural_image
Illustration of a blue electrical plug connecting a wall socket with a blue arrow indicating direction (no text or symbols)

natural_image
Diagram showing a kitchen appliance with blue lifting parts and directional arrows indicating movement (no text or symbols)

natural_image
Diagram of a kitchen sink with a blue tool inserted, showing water level and a blue arrow indicating direction (no text or symbols)
natural_image
Illustration of a hand pouring liquid into a basin with a faucet (no text or symbols)
natural_image
Diagram showing a mechanical assembly with two blue components and directional arrows indicating motion (no text or symbols)
natural_image
Illustration of a hand washing a water bottle in a sink, with a magnified inset showing liquid being poured into it (no text or symbols present)
natural_image
Diagram of a device with a blue upward arrow above it, showing top-down view of a mechanical component (no text or symbols)
natural_image
Illustration of two containers with liquid being poured into a container (no text or symbols)
natural_image
Diagram of a kitchen appliance with a blue lid and arrow indicating downward motion (no text or symbols)
natural_image
Diagram of a device with a magnified view showing internal components (no text or symbols)
natural_image
Diagram of a water purifier with inlet and outlet pipes (no text or labels)
natural_image
Illustration of a hand pouring liquid into a cup (no text or symbols)
natural_image
Illustration of a hand inserting a device into a washing machine, showing internal components and blue arrows indicating motion (no text or symbols)
natural_image
Line drawing of a modern kitchen blender with a side panel and control unit (no text or symbols)
Uso de café molido previamente
natural_image
Illustration of a hand using a magnifying glass to interact with a cleaning machine (no text or symbols visible)
natural_image
Diagram of a washing machine with buckets and a handle, showing internal components without any text or labels.
natural_image
Diagram of a water purifier with blue flow arrow indicating internal circulation (no text or symbols)
1.
natural_image
Illustration of a kitchen setup with a kettle, cup, and tiered storage unit (no text or symbols)
natural_image
Diagram of a water pump or reactor system with internal components and fluid flow paths (no text or labels)
natural_image
Illustration of a hand pouring liquid into a cup (no text or symbols)
natural_image
Illustration of a hand inserting a component into a water dispenser, showing fluid flow direction (no text or symbols)
natural_image
Illustration of a blue electrical plug connecting a wall socket with a blue arrow indicating direction (no text or symbols)

natural_image
Line drawing of a hand cleaning a cylindrical container with a blue cloth (no text or symbols)
natural_image
Illustration of a kitchen sink with buckets and a faucet, no text or symbols present
natural_image
Illustration of a blue electrical plug connecting a wall socket with a blue arrow indicating direction (no text or symbols)
natural_image
Illustration of a hand inserting a device into a water container with blue arrows indicating flow (no text or symbols)
natural_image
Illustration of a hand using a tool to lift a component, with blue arrows indicating rotation (no text or symbols)

natural_image
Diagram of a mechanical device with a blue arrow indicating upward motion (no text or symbols)
162 Español

natural_image
Diagram of a container with liquid and a blue lid, showing internal components (no text or symbols)

natural_image
Illustration of a hand inserting a small object into a container with blue arrows indicating flow direction (no text or symbols)
natural_image
Diagram of a cleaning machine with buckets and a handle, showing internal components without any text or labels.
natural_image
Illustration of a hand washing a small appliance with a blue handle, showing no text or symbols.
natural_image
Illustration of a blue electrical plug connecting a wall socket with a blue arrow indicating direction (no text or symbols)
172 Français

natural_image
Diagram of a cleaning or cleaning process with blue arrows indicating direction (no text or symbols)


natural_image
Diagram of a kitchen sink with a blue tool inserted, showing water level and component (no text or symbols)
10 La machine lance le cycle de rinçage.
natural_image
Illustration of a hand pouring liquid into a basin with a faucet (no text or symbols)
natural_image
Diagram showing a blue plastic bag being inserted into a container, with arrows indicating direction (no text or symbols present)
natural_image
Illustration of a hand washing a water bottle in a kitchen sink, with a hand pouring liquid from a bottle into the cup (no text or symbols visible)
natural_image
Diagram of a device with a blue upward arrow and a component, shown from top and side (no text or symbols)
natural_image
Illustration of two hands pouring liquid from a container into a container (no text or symbols)
natural_image
Diagram of a kitchen appliance with a blue lid and arrow indicating downward motion (no text or symbols)
natural_image
Diagram of a device with a magnified view showing internal components (no text or symbols)
natural_image
Illustration of a hand inserting a filter into a water dispenser, showing the process with blue arrows indicating rotation (no text or symbols present)
natural_image
Diagram of a blender with blue liquid and inlet/outlet pipes (no text or labels)
natural_image
Illustration of a hand pouring liquid into a cup (no text or symbols)

natural_image
Illustration of a hand using a water dispenser to lift a container, showing fluid flow direction (no text or symbols)
24 Retirez le filtre.
natural_image
Line drawing of a modern kitchen appliance with a blue liquid container (no text or symbols)
natural_image
Illustration of a hand inserting a container into a shared tank, showing fluid flow direction (no text or symbols)
natural_image
Diagram of a washing machine with buckets and a handle, showing internal components without any text or labels.
natural_image
Diagram of a water purifier with blue flow arrow indicating internal circulation (no text or symbols)


natural_image
Diagram of a water purifier with inlet and outlet pipes (no text or labels)
natural_image
Illustration of a hand pouring liquid into a cup (no text or symbols)
natural_image
Illustration of a hand inserting a blue object into a container with liquid, showing mechanical components (no text or symbols)
17 Retirez le filtre.
natural_image
Illustration of a blue electrical plug connecting a wall socket with a blue arrow indicating direction (no text or symbols)

natural_image
Line drawing of a hand cleaning a cylindrical container with a blue cloth (no text or symbols)
natural_image
Illustration of a kitchen sink with buckets and a faucet, no text or symbols present
natural_image
Illustration of a blue cable being inserted into an electrical outlet with a blue arrow indicating direction (no text or symbols)

natural_image
Illustration of a hand inserting a container into a shared tank, showing fluid flow direction (no text or symbols)
natural_image
Illustration of a hand using a tool to lift a component, with blue arrows indicating rotation (no text or symbols)
natural_image
Diagram of a kitchen appliance with a blue lid and upward arrow indicating a component (no text or symbols)

natural_image
Illustration of a hand inserting a small object into a water dispenser, with no text or symbols present.
natural_image
Diagram of a water purifier with buckets and a bucket cover, showing internal components without any text or labels.

natural_image
Illustration of a hand washing a blue plastic door with a blue arrow indicating the process (no text or symbols present)
natural_image
Diagram showing a blue mechanical device with a blue arrow pointing to a component, connected to a tool (no text or symbols present)
Problème Solution
1 Poklopac spremnika za kavu u zrnu
2 Filtar
3 Spremnik za kavu u zrnu
4 Košara za filtar
5 Držač košare za filtar
6 Stakleni vrč
7 Četka za čišćenje prolaza za kavu u zrnu
8 Upravljačka ploča sa zaslonom
9 Žlica
10 Spremnik za vodu
11 Poklopac spremnika za vodu
12 Regulator grubosti zrna
13 Regulator za odabir spremnika
Upravljačka ploča
| Gumb napajanja |
| Gumb mjerača vremena i gumb sa strelicom za podešavanje vremena |
| Gumb za pokretanje/pauziranje |
| Gumb za čišćenje |
| Gumb za prethodno mljevenje i jačinu kave |
| Gumb za odabir šalice |
Ikona na zaslonu
| Broj šalica |
 | Način rada za održavanje topline |
 | Mljevena kava |
| Jačina kave |
| Uklanjanje kamenca |
 | Upozorenje za ručno čišćenje |


Niska razina vode u spremniku
Mjerač vremena
Prikaz vremena
Prve dvije znamenke predstavljaju sate, a druge dvije minute.
Okrenite regulator u položaj za otključavanje, zatim iz aparata možete izvaditi spremnik za zrna kave.
natural_image
Illustration of a blue electrical plug connecting a wall socket with a blue arrow indicating direction (no text or symbols)
2 Sat podesite s pomoću gumba sa strelicom.

198
Hrvatski

natural_image
Diagram of a cleaning or packaging process with blue components and directional arrows (no text or symbols)

- Podignite spremnik iz aparata i stavite ga pod slavinu kako biste ga napunili vodom.

- Prilikom vraćanja pazite da kuka bude pravilno pričvršćena.
- Uhvatite ručkicu poklopca kako biste poklopac vrča povukli prema gore. Vrč za kavu postavite ispod slavine kako biste ga napunili vodom. Napunite spremnik za vodu vodom.
- Pazite da razina vode bude ispod maksimalne razine.
200 Hrvatski
natural_image
Illustration of a hand holding a blue tool next to a container with a lid (no text or symbols visible)

5 Okrenite središnji regulator na postavku vrča.
natural_image
Illustration of a hand pouring liquid into a water bottle from a faucet into a sink (no text or symbols)
12 Ispraznite stakleni vrč.
Uporaba aparata
Uporaba kave u zrnu
natural_image
Diagram showing a blue plastic bag being inserted into a container, with arrows indicating direction (no text or symbols present)
natural_image
Illustration of hands washing a water dispenser into a bottle on a sink (no text or symbols visible)
2 Napunite spremnik vodom iz slavine.
- Pazite da razina vode bude ispod maksimalne razine.

3 Vratite spremnik na aparat.
natural_image
Diagram of a kitchen appliance with a blue upward arrow indicating rotation or movement (no text or symbols)
5 Podignite poklopac spremnika za kavu u zrnu.

natural_image
Illustration of two containers pouring liquid into a container with a small container inside (no text or symbols)
6 Napunite spremnik željenom kavom u zrnu.
Napomena: Obavezno pazite da dvostruki spremnik svježe kave u zrnu bude barem dopola napunjen.
Upozorenje: Kako se mlinac ne bi zaglavio, nemojte upotrebljavati zrna koja nisu ispržena niti karamelizirana zrna. Upotrebljavajte kavu u zrnu umjesto espresso kave u zrnu jer espresso zrna mogu oštetiti mlinac.
natural_image
Diagram of a kitchen appliance with a blue lid and arrow indicating downward motion (no text or symbols)
7 Zatvorite poklopac spremnika za kavu u zrnu.
natural_image
Diagram of a device with a blue button and a magnified view of circular components (no text or symbols)
natural_image
Illustration of a hand using a water dispenser to lift a container, showing mechanical components and fluid flow (no text or symbols)
natural_image
Diagram of a kitchen appliance with buckets and a handle, showing no text or symbols
11 Postavite filtar u košaru za filtar.

natural_image
Diagram of a water purifier with blue flow arrow indicating internal circulation (no text or symbols)
12 Zatvorite držač filtra.
natural_image
Illustration of kitchen equipment including a kettle, mug, and tiered storage unit with blue arrows indicating movement (no text or symbols)
14 Regulatorom odaberite način rada šalice/vrča.
Način rada „Cup" (Šalica) služi za pripremu manjih količina kave, a način rada „Jug" (Vrč) služi za kuhanje većih količina uz uporabu vrča.
Za funkciju kuhanja u šalicu možete upotrebljavati staklene ili keramičke šalice, kao i čaše. Pazite da upotrebljavate šalice visine manje od 10 cm.

15 Uključite aparat.
16 Odaberite broj šalica koje želite pripremiti pritiskom gumba za šalice.
natural_image
Diagram of a water purifier with inlet and outlet pipes (no text or labels)
19 Aparat započinje s obradom.
20 Uklonite šalicu ili vrč za kavu s aparata.
Funkcija za zaustavljanje kapanja omogućuje vam uklanjanje vrča s aparata za kavu prije završetka kuhanja. Kad uklonite vrč, funkcija zaustavljanja kapanja zaustavit će protok kave u vrč.
natural_image
Illustration of a hand pouring liquid into a cup (no text or symbols)
natural_image
Illustration of a hand inserting a blue object into a container with arrows indicating motion (no text or symbols)
23 Otvorite držač filtra.
24 Uklonite filtar.
natural_image
Line drawing of a modern kitchen appliance with a blue liquid level (no text or symbols)
1 Provjerite ima li u aparatu dovoljno vode za spremanje željene količine kave.

natural_image
Illustration of a hand inserting a filter into a washing machine (no text or symbols present)
natural_image
Diagram of a cleaning or laundry machine with buckets and a bucket cover, no text or symbols present
3 Postavite filtar u košaru za filtar.

4 U trajni filtar dodajte željenu količinu mljevene kave.
208 Hrvatski
natural_image
Diagram of a mechanical device with blue arrows indicating motion or force direction (no text or symbols)
5 Zatvorite držač filtra.
natural_image
Diagram showing two kitchen equipment setups with circular gauges and a coffee mug, no text or symbols present
7 Regulatorom odaberite način rada šalice/vrča.
- Način rada „Cup“ (Šalica) služi za pripremu manjih količina kave, a način rada „Jug“ (Vrč) služi za kuhanje većih količina uz uporabu vrča.
8 Uključite aparat.
9 Upotrebu mljevene kave odaberite pritiskom gumba za odabir načina rada.
10 Odaberite broj šalica koje želite pripremiti pritiskom gumba za šalice.
11 Pokrenite postupak pritiskom gumba za pokretanje/pauziranje.
natural_image
Diagram of a water pump or reactor system with internal flow paths (no text or labels)
12 Aparat započinje s obradom.
13 Uklonite šalicu ili vrč za kavu s aparata.
- Budite pažljivi prilikom rukovanja vrčem za kavu nakon kuhanja. Grijaća ploča doseže visoke temperature i može uzrokovati opekline. Budite posebno oprezni kako biste izbjegli opekline.
natural_image
Illustration of a hand pouring liquid into a blue container over a small cup (no text or symbols)
natural_image
Illustration of a hand inserting a plug into a water dispenser, showing fluid flow direction (no text or symbols)
16 Otvorite držač filtra.

17 Uklonite filtar.

Postavljanje mjerača vremena
Za postavljanje mjerača vremena na aparatu slijedite ove korake:
natural_image
Illustration of a blue electrical plug connecting a wall socket with a blue arrow indicating direction (no text or symbols)

natural_image
Hand cleaning a cylindrical container with a blue cloth (no text or symbols visible)
natural_image
Illustration of a kitchen sink with a faucet and three blue buckets (no text or symbols)
natural_image
Illustration of a blue electrical plug connecting a wall socket with a blue arrow indicating direction (no text or symbols)
1 Ukopčajte aparat.
natural_image
Illustration of a hand inserting a blue object into a water-filled container using a tool (no text or symbols present)
natural_image
Diagram of a cleaning or cleaning device with a blue upward arrow indicating the component (no text or symbols present)
1 Otvorite poklopac spremnika za vodu.
2 U spremnik za vodu ulijte bijeli ocat (4 % octene kiseline) do oznake za 10 šalica.
natural_image
Illustration of a hand inserting a component into a water dispenser, showing fluid flow direction (no text or symbols)
5 Stavite filtar u košaru za filtar i zatvorite držač košare za filtar.
natural_image
Diagram of a kitchen appliance with a bucket and filter unit (no text or labels)
Hrvatski

natural_image
Illustration of a hand washing a water dispenser with a blue plastic bag attached (no text or symbols)
9 Pritisnite gumb za čišćenje na aparatu za kavu.
10 Odaberite postavku za uklanjanje kamenca.
11 Za potvrdu odabira pritisnite gumb za pokretanje.
- Aparat za kavu automatski će pokrenuti postupak uklanjanja kamenca.
12 Pričekajte da aparat završi s obradom otopine za uklanjanje kamenca.
13 Po dovršetku postupka uklanjanja kamenca dvaput isperite aparat maksimalnom količinom vode kako biste potpuno uklonili sve naslage.
natural_image
Diagram showing a blue plastic container being inserted into a container with a tool, no text or symbols present
natural_image
Illustration of a blue electrical plug with a circular socket connected to its terminal (no text or symbols)
Italiano 225

natural_image
Diagram showing a mechanical device with two blue components and upward arrows indicating motion (no text or symbols)
natural_image
Illustration of a hand pouring liquid into a water dispenser in a kitchen (no text or symbols)

natural_image
Illustration of a hand washing a small blue plastic door with a blue arrow indicating the process (no text or symbols present)

natural_image
Illustration of hands holding a blue and white kettle with a blue lid, no text or symbols present

natural_image
Illustration of a hand holding a blue tool next to a white container with a lid (no text or symbols)

natural_image
Illustration of a hand pouring liquid into a water bottle from a faucet into a sink (no text or symbols)
natural_image
Diagram showing a blue plastic bag being inserted into a container, with arrows indicating direction (no text or symbols present)
natural_image
Illustration of hands washing a water bottle in a kitchen sink (no text or symbols visible)
230 Italiano
natural_image
Diagram of a container with liquid and a blue lid, showing a downward arrow (no text or symbols)
natural_image
Diagram of a device with an upward arrow and internal components, no text or symbols present

natural_image
Illustration of two containers pouring liquid into a container with food items (no text or symbols)
natural_image
Diagram of a kitchen appliance with a blue lid and arrow indicating downward motion (no text or symbols)
natural_image
Simple line drawing of a container with a blue lid and a magnified view of a circular object (no text or symbols)
natural_image
Illustration of a hand inserting a magnifying glass into a water-filled container (no text or symbols)
natural_image
Diagram of a cleaning machine with buckets and handle, showing internal components without any text or labels
natural_image
Diagram of a portable air conditioner unit with blue airflow direction arrow (no text or symbols)
natural_image
Illustration of kitchen equipment including a kettle, mug, and tiered storage unit (no text or symbols)
natural_image
Diagram of a water pump system with inlet and outlet pipes (no text or labels)
natural_image
Illustration of a hand pouring liquid into a cup (no text or symbols)
natural_image
Illustration of a hand inserting a device into a water dispenser, showing fluid flow direction (no text or symbols)
natural_image
Line drawing of a modern kitchen appliance with a blue liquid container (no text or symbols)
natural_image
Illustration of a hand inserting a component into a water dispenser, showing fluid flow direction (no text or symbols)
natural_image
Diagram of a bucket pump system with buckets and a bucket, showing internal components and a downward arrow indicating flow direction (no text or labels)
natural_image
Diagram of a water purifier with blue flow arrows indicating internal circulation (no text or symbols)
natural_image
Illustration of kitchen utensils and a cup with blue arrows indicating movement or force (no text or symbols)
natural_image
Diagram of a water purifier with inlet and outlet pipes (no text or labels)
natural_image
Illustration of a hand pouring liquid into a blue container over a cup (no text or symbols)
natural_image
Illustration of a hand inserting a water droplet into a container with blue arrows indicating flow direction (no text or symbols)
natural_image
Illustration of a blue electrical plug connecting a white wall socket with a blue arrow indicating direction (no text or symbols)

natural_image
Line drawing of a hand cleaning a cylindrical container with a blue cloth (no text or symbols)
natural_image
Illustration of a kitchen sink with buckets and a faucet, no text or symbols present
natural_image
Illustration of a blue cable inserted into an electrical outlet with a blue arrow indicating direction (no text or symbols)
natural_image
Illustration of a hand inserting a small object into a water dispenser, with no text or symbols present.
natural_image
Diagram of a hand using a tool to rotate or rotate a component, showing blue arrows indicating rotation direction (no text or symbols present)

natural_image
Diagram of a hand holding a blue plastic bag above a cylindrical container with a handle (no text or symbols)
natural_image
Illustration of a hand inserting a blue arrow into a water dispenser, showing mechanical components (no text or symbols)
natural_image
Diagram of a kitchen appliance with a bucket and fan, showing internal components without any text or labels.
natural_image
Illustration of a hand operating a water dispenser with a blue pump component (no text or symbols)
natural_image
Illustration of a blue mechanical device with a blue arrow pointing to a component, alongside a hand holding a tool (no text or symbols present)
1 Pupinu tvertnes väks
2 Filtrs
3 Pupinu tvertne
4 Filtra grozs
5 Filtra groza turētājs
6 Stikla krüze
7 Pupinu teknes tirišanas suka
8 Vadības panelis ar displeju
9 Karote
10 Üdens tvertne
11 Ūdens tvertnes väks
12 Maluma regulators
13 Tvertnes selektora poga
Vadības panelis
natural_image
Illustration of a blue electrical plug connecting a wall socket with a blue arrow indicating direction (no text or symbols)
08:00


natural_image
Diagram showing a blue plastic bag being inserted into a rack, with arrows indicating direction (no text or symbols present)
1 Nonemiet udens tvertnes vaku.
natural_image
Illustration of hands washing a water dispenser into a basin (no text or symbols visible)
- Izceliet tvertni no ierices un novietojiet to zem üdens krāna, lai piepildītu üdeni.

Latviešu 255

natural_image
Illustration of a hand pouring liquid into a water bottle from a faucet into a sink (no text or symbols)
natural_image
Diagram showing two blue plastic containers with upward arrows, connected by a diagonal line (no text or symbols)
natural_image
Illustration of hands washing a water dispenser into a sink (no text or symbols visible)
natural_image
Diagram of a kitchen appliance with a blue lid and upward arrow, shown from an open side (no text or symbols)
natural_image
Illustration of two containers pouring liquid into a container with a lid (no text or symbols)
natural_image
Diagram of a food storage machine with a blue lid and arrow indicating downward flow (no text or symbols)
natural_image
Simple line drawing of a container with a blue lid and a magnified view of particles (no text or symbols)
natural_image
Illustration of a hand inserting a container into a shared device (no text or symbols visible)
natural_image
Diagram of a cleaning or cleaning machine with buckets and a handle, showing no text or symbols.
11 levietojiet filtru grozā.

natural_image
Diagram of a water purifier with blue flow arrow indicating internal circulation (no text or symbols)
natural_image
Diagram showing two kitchen utensils with blue circular indicators and a diagonal line, no text or symbols present.
natural_image
Illustration of a hand pouring liquid into a cup (no text or symbols)
21 Izbaudiet svaigi pagatavoto kafiju.

natural_image
Illustration of a hand inserting a device into a water dispenser, showing blue arrows indicating rotation (no text or symbols present)
24 Iznemiet filtru.
natural_image
Line drawing of a modern kitchen appliance with a blue liquid and control panel (no text or symbols)
natural_image
Illustration of a hand inserting a small object into a container using a filter, showing fluid behavior (no text or symbols)
natural_image
Diagram of a water purifier with bucket and filter unit (no text or labels)
3 levietojiet filtru grozā.

natural_image
Diagram of a portable air purifier with blue airflow direction indicated by arrows (no text or symbols)
natural_image
Illustration of kitchen equipment including a blender, water dispenser, and mug with blue arrows indicating movement (no text or symbols)
6 Novietojiet kafijas krūzi vai tasīti zem dozatora.

9 Izvelieties izmantot maltu kafiju, nospiežot režima izveles pogu.

natural_image
Diagram of a water purifier with inlet and outlet pipes (no text or labels)
natural_image
Illustration of a hand pouring liquid from a container into a cup (no text or symbols)
14 Izbaudiet svaigi pagatavoto kafiju.

15 Lai izslęgtu ierici, tris sekundes turiet nospiestu barošanas pogu.
natural_image
Illustration of a hand inserting a device into a washing machine (no text or symbols visible)
17 Iznemiet filtru.

Taimera iestatīšana
natural_image
Illustration of a blue electrical plug connecting a wall socket with a blue arrow indicating direction (no text or symbols)

natural_image
Line drawing of a hand cleaning a water dispenser with a blue cloth (no text or symbols)

natural_image
Illustration of a kitchen sink with a faucet and three buckets (no text or symbols)
natural_image
Illustration of a blue cable inserted into a white socket with a blue arrow indicating direction (no text or symbols)
natural_image
Illustration of a hand inserting a device into a water container with blue arrows indicating flow direction (no text or symbols)
natural_image
Illustration of a hand using a tool to lift a component, with blue arrows indicating rotation (no text or symbols)
natural_image
Diagram of a kitchen appliance with a blue upward arrow indicating a component (no text or symbols present)
270 Latviešu

natural_image
Diagram of a container with liquid and a blue lid, showing internal components (no text or symbols)

natural_image
Illustration of a hand inserting a small object into a water-filled container, with no text or symbols present.
natural_image
Diagram of a cleaning machine with buckets and a handle, showing internal components without any text or labels.

natural_image
Illustration of a blender with a blue handle and arrow indicating the process (no text or symbols)
natural_image
Illustration of a blue electrical plug connecting a wall socket with a blue arrow indicating direction (no text or symbols)
natural_image
Diagram showing a kitchen appliance with a lid and a side-mounted container, both with blue arrows indicating direction (no text or symbols present)

natural_image
Illustration of hands washing a water dispenser into a sink (no text or symbols visible)
natural_image
Illustration of a hand holding a blue tool next to a container with a lid (no text or symbols visible)

natural_image
Illustration of a hand pouring liquid into a water bottle from a sink (no text or symbols)
12 Ištuštinkite stiklinj asotj.
natural_image
Diagram showing a blue plastic bag being inserted into a container, with arrows indicating direction (no text or symbols present)
natural_image
Illustration of hands washing a water dispenser into a bottle on a sink (no text or symbols visible)
2 Pripildykite bakelj vandentiekio vandeniu.
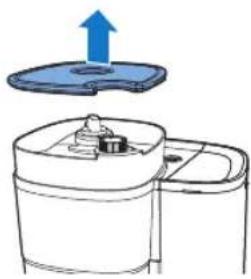
natural_image
Diagram of a device with a blue lid and an upward arrow, shown in two views (no text or symbols)
natural_image
Illustration of two containers with liquid being poured into a container (no text or symbols)
natural_image
Diagram of a food storage machine with a blue lid and arrow indicating downward motion (no text or symbols)
natural_image
Diagram of a device with a blue button and surrounding virus-like symbols (no text or labels)
natural_image
Illustration of a hand using a water dispenser to lift a container, showing mechanical components and fluid flow (no text or symbols)
natural_image
Diagram of a kitchen appliance with buckets and a handle, showing no text or symbols
natural_image
Diagram of a water purifier with blue flow arrow indicating internal circulation (no text or symbols)
natural_image
Illustration of kitchen equipment including a kettle, mug, and tiered storage unit with blue arrows indicating movement (no text or symbols)
natural_image
Diagram of a water purifier with inlet and outlet pipes (no text or labels)
19 Prietaisas pradeda virti.
- Prietaisas supypsès, kai baigs.
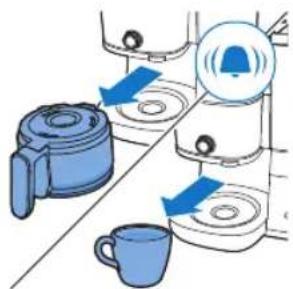
natural_image
Illustration of a hand pouring liquid into a cup (no text or symbols)
natural_image
Illustration of a hand inserting a blue object into a container with arrows indicating motion (no text or symbols)
24 Išimkite filtrą.
natural_image
Line drawing of a modern kitchen appliance with a blue liquid level (no text or symbols)
natural_image
Illustration of a hand inserting a filter into a washing machine (no text or symbols present)
natural_image
Diagram of a cleaning machine with buckets and a handle, showing internal components without any text or labels.
natural_image
Diagram of a water pump or reactor with internal flow paths and no visible text or symbols
12 Prietaisas pradeda virti.
- Prietaisas supypsès, kai baigs.

natural_image
Illustration of a hand pouring liquid from a container into a cup (no text or symbols)
natural_image
Illustration of a hand inserting a plug into a water dispenser, showing fluid flow direction (no text or symbols)
17 Išimkite filtrą.
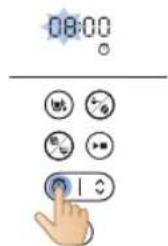
natural_image
Illustration of a blue electrical plug connecting a wall socket with a blue arrow indicating direction (no text or symbols)

natural_image
Line drawing of a hand cleaning a cylindrical container with a blue cloth (no text or symbols)
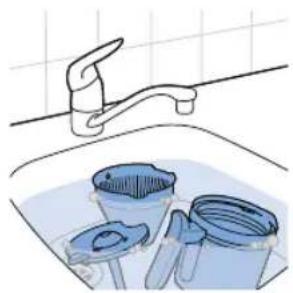
natural_image
Illustration of a kitchen sink with buckets and a faucet, no text or symbols present
natural_image
Illustration of a blue cable inserted into an electrical outlet with a blue arrow indicating direction (no text or symbols)
natural_image
Illustration of a hand inserting a small object into a water-filled container using a filter (no text or symbols present)
natural_image
Diagram of a device with a blue plastic lid and an upward arrow indicating motion (no text or symbols)
3 Uždarykite vandens indo dangtj.
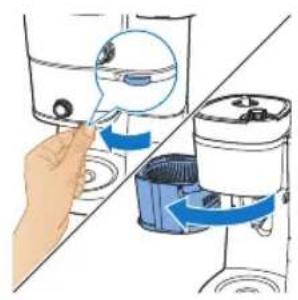
natural_image
Illustration of a hand inserting a component into a water dispenser, showing fluid flow direction (no text or symbols)
natural_image
Diagram of a kitchen appliance with a bucket and filter unit (no text or labels)
natural_image
Illustration of a hand washing a small appliance with a blue handle, showing no text or symbols.


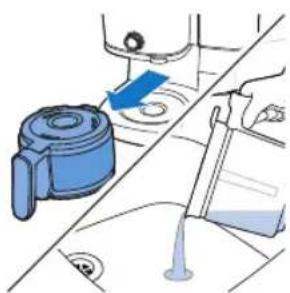
natural_image
Illustration of a blue mechanical device with a blue arrow pointing to a component, alongside a hand holding a tool (no text or symbols visible)
natural_image
Illustration of a blue electrical plug connecting a wall socket with a blue arrow indicating direction (no text or symbols)
Az óra beállítása
natural_image
Diagram showing a blue plastic bag being lifted by an upward arrow, with no text or symbols present.
natural_image
Illustration of hands washing a cup with a water dispenser pouring liquid into it (no text or symbols visible)
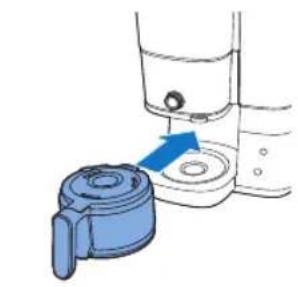
natural_image
Illustration of a blue plastic bag attached to a container with a blue arrow indicating direction (no text or symbols)
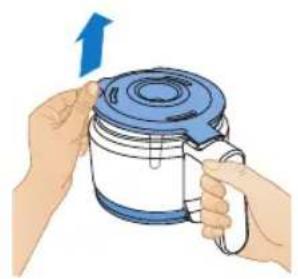
natural_image
Illustration of hands holding a blue and white kettle with a blue lid, no text or symbols present
natural_image
Illustration of a hand holding a blue tool next to a cylindrical container (no text or symbols visible)

natural_image
Illustration of a hand pouring liquid into a basin with a faucet (no text or symbols)
natural_image
Diagram showing a mechanical assembly with two blue components and directional arrows, no text or symbols present.
natural_image
Illustration of hands washing a water dispenser into a sink (no text or symbols visible)
natural_image
Diagram of a kitchen appliance with a blue lid and upward arrow, shown from an open side (no text or symbols)
natural_image
Illustration of two containers pouring liquid into a container (no text or symbols)
natural_image
Diagram of a kitchen appliance with a blue lid and arrow indicating downward motion (no text or symbols)
natural_image
Simple line drawing of a container with a blue lid and a magnified view of circular components (no text or symbols)
natural_image
Illustration of a hand inserting a container into a shared device (no text or symbols visible)
natural_image
Diagram of a cleaning or cleaning machine with buckets and a handle, showing no text or symbols.
natural_image
Diagram of a water purifier with blue flow arrow indicating internal circulation (no text or symbols)
natural_image
Diagram showing two kitchen utensils with blue circular indicators and a diagonal line, no text or symbols present.
natural_image
Illustration of a hand pouring liquid into a cup (no text or symbols)
natural_image
Illustration of a hand using a tool to lift water from a bowl into a second container (no text or symbols present)
natural_image
Line drawing of a modern kitchen appliance with a blue liquid and control panel (no text or symbols)
natural_image
Illustration of a hand inserting a device into a water container with blue arrows indicating rotation (no text or symbols)
natural_image
Diagram of a kitchen appliance with a bucket and fan (no text or symbols)
natural_image
Diagram of a water purifier with blue flow arrows indicating fluid movement (no text or symbols)
natural_image
Illustration of kitchen equipment including a blender, water dispenser, and mug with blue arrows indicating movement (no text or symbols)
natural_image
Diagram of a water pump system with inlet and outlet pipes (no text or labels)
natural_image
Illustration of a hand pouring liquid from a container into a cup (no text or symbols)
natural_image
Illustration of a hand inserting a device into a washing machine (no text or symbols visible)
natural_image
Illustration of a blue electrical plug connecting to an open electrical socket (no text or symbols)

natural_image
Line drawing of a hand cleaning a water dispenser with a blue cloth (no text or symbols)

natural_image
Illustration of a kitchen sink with a faucet and three buckets (no text or symbols)
natural_image
Illustration of a blue electrical plug connecting a wall socket with a blue arrow indicating direction (no text or symbols)
natural_image
Illustration of a hand inserting a container into a water dispenser, showing fluid flow direction (no text or symbols)
natural_image
Illustration of a hand using a tool to lift a cylindrical component, with blue arrows indicating rotation (no text or symbols present)

natural_image
Diagram of a kitchen appliance with a blue lid and arrow indicating upward motion (no text or symbols)
324 Magyar


natural_image
Illustration of a hand inserting a plug into a water dispenser into a shared device (no text or symbols present)
natural_image
Diagram of a water purifier with bucket and filter components (no text or labels)

natural_image
Illustration of a hand operating a water dispenser with a blue pump component (no text or symbols)
natural_image
Illustration of a blue electrical plug connecting a wall socket with a blue arrow indicating direction (no text or symbols)
334 Nederlands

natural_image
Diagram showing a blue plastic bag being lifted by an upward arrow, with no text or symbols present.

natural_image
Illustration of a hand pouring liquid into a water dispenser bottle on a sink (no text or symbols visible)
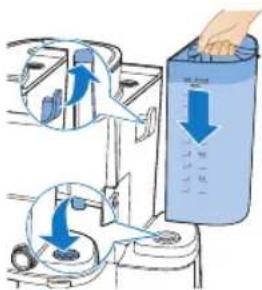
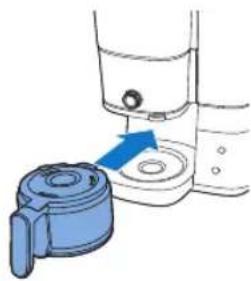
natural_image
Diagram of a hand pump device with blue handle and blue casing, showing fluid level control (no text or symbols)
natural_image
Illustration of a hand pouring liquid into a basin with a faucet (no text or symbols)
12 Leeg de glazen kan.
natural_image
Diagram showing two blue containers with upward arrows, connected by a diagonal line (no text or symbols)
natural_image
Illustration of hands washing a water dispenser into a sink (no text or symbols visible)
natural_image
Diagram of a device with a blue upward arrow and a component, shown from top and side (no text or symbols)
natural_image
Illustration of two hands pouring liquid from a container into a container (no text or symbols)
natural_image
Diagram of a kitchen appliance with a blue lid and arrow indicating downward motion (no text or symbols)
natural_image
Diagram of a device with a magnified view showing internal components (no text or symbols)
natural_image
Illustration of a hand inserting a filter into a water dispenser, showing the process with blue arrows indicating rotation (no text or symbols present)
natural_image
Illustration of a cleaning machine with buckets and a bucket cover, showing no text or symbols.
natural_image
Diagram of a mechanical device with blue arrows indicating flow or movement, no text or symbols present
natural_image
Diagram showing two kitchen appliances with blue arrows indicating rotation or movement, no text or symbols present
natural_image
Diagram of a portable water heater with internal tubing and control panel (no text or labels)
natural_image
Illustration of a hand pouring liquid into a cup (no text or symbols)
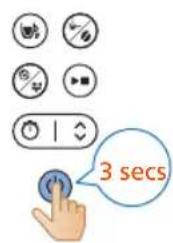
natural_image
Illustration of a hand using a water dispenser to lift a container, showing fluid flow direction (no text or symbols)
23 Open de filterhouder.
natural_image
Line drawing of a modern kitchen or blender with a blue liquid container (no text or symbols)
natural_image
Illustration of a hand inserting a container into a shared tank, showing fluid flow direction (no text or symbols)
natural_image
Diagram of a washing machine with bucket and filter components (no text or labels)
natural_image
Diagram of a water purifier with blue flow arrow indicating internal circulation (no text or symbols)

natural_image
Diagram of a water heater system with inlet and outlet pipes (no text or labels)
natural_image
Illustration of a hand pouring liquid into a cup (no text or symbols)
natural_image
Illustration of a hand inserting a blue object into a container with liquid, showing mechanical components (no text or symbols)
16 Open de filterhouder.
346 Nederlands

natural_image
Illustration of a blue electrical plug connecting a wall socket with a blue arrow indicating direction (no text or symbols)

natural_image
Line drawing of a hand cleaning a cylindrical container with a blue cloth (no text or symbols)
natural_image
Illustration of a kitchen sink with buckets and a faucet, no text or symbols present
natural_image
Illustration of a blue electrical plug connecting a wall socket with a blue arrow indicating direction (no text or symbols)
natural_image
Illustration of a hand inserting a component into a washing machine, showing blue arrows indicating rotation (no text or symbols present)
natural_image
Illustration of a hand using a tool to rotate or rotate a component, with blue arrows indicating rotation direction (no text or symbols present)

natural_image
Diagram of a kitchen appliance with a blue lid and arrow indicating upward motion (no text or symbols)

natural_image
Illustration of a hand inserting a device into a washing machine (no text or symbols present)
natural_image
Diagram of a washing machine with buckets and a handle, showing internal components without any text or labels.
natural_image
Diagram showing a blue mechanical component inserted into a container with a blue arrow indicating direction (no text or symbols present)
natural_image
Illustration of a blue mechanical device with a blue arrow pointing to a component, alongside a hand holding a tool (no text or symbols present)
natural_image
Illustration of a blue electrical plug connecting a wall socket with a blue arrow indicating direction (no text or symbols)
natural_image
Diagram showing a blue plastic bag being lifted by an upward arrow, with no text or symbols present.
natural_image
Illustration of a hand washing a water bottle from a sink, with a hand pouring liquid from a bottle (no text or symbols visible)

natural_image
Illustration of a blue plastic bag attached to a container with a blue arrow indicating direction (no text or symbols)

natural_image
Illustration of hands holding a blue and white kettle with a blue lid, no text or symbols present
4 Sett kaffekannen tilbake i apparatet.
natural_image
Hand holding a blue tool next to a container with a lid (no text or symbols visible)
5 Vri på den midtre knotten til kanne-innstillingen.

10 Apparatet starter skylleprosessen.
natural_image
Illustration of a hand pouring liquid into a basin with a faucet (no text or symbols)
12 Tøm glasskannen.
Bruke apparatet
Bruke kaffebønner
Merk: Kaffemaskinen vil bruke nødvendig mengde vann basert på antall kaffekopper som skal tilberedes

natural_image
Diagram showing a blue plastic container being lifted by an upward arrow, with no text or symbols present.
natural_image
Illustration of a hand washing a water dispenser into a container with a blue liquid, placed on a kitchen sink (no text or symbols visible)
2 Fyll tanken med vann fra springen.
- Kontroller at vannivået er under maksimumsnivået.

4 Lukk lokket på vannbeholderen.
366 Norsk
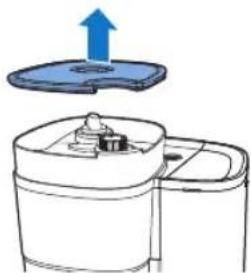
natural_image
Diagram of a kitchen appliance with a blue lid and upward arrow, shown from an exploded view (no text or symbols)
natural_image
Illustration of two containers pouring liquid into a container (no text or symbols)
6 Tilsett de ønskede kaffebønnene i beholderen.
natural_image
Diagram of a kitchen appliance with a blue lid and arrow indicating downward motion (no text or symbols)
natural_image
Simple line drawing of a container with a blue lid and a speech bubble containing three small icons (no text or symbols)
natural_image
Illustration of a hand inserting a container into a shared device (no text or symbols visible)
natural_image
Diagram of a cleaning or cleaning machine with buckets and a handle, showing no text or symbols.
11 Legg filteret i filterkurven.

natural_image
Diagram of a water purifier with blue flow arrow indicating internal circulation (no text or symbols)
12 Lukk filterholderen.

13 Plasser kaffekannen eller koppen under kaffeutgangen.
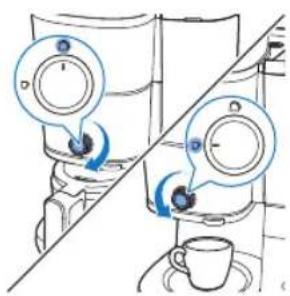
natural_image
Illustration of a hand pouring liquid into a blue container over a small cup (no text or symbols)
natural_image
Illustration of a hand inserting a device into a water dispenser, showing blue arrows indicating rotation (no text or symbols present)
23 Åpne filterholderen.

24 Fjern filteret.
natural_image
Line drawing of a modern kitchen appliance with a blue liquid and control panel (no text or symbols)
natural_image
Illustration of a hand inserting a small object into a container using a brush (no text or symbols present)
natural_image
Diagram of a water purifier with bucket and filter unit (no text or labels)
3 Legg filteret i filterkurven.

natural_image
Diagram of a portable air purifier with blue airflow direction indicated by arrows (no text or symbols)
5 Lukk filterholderen.

natural_image
Illustration of kitchen equipment including a blender, water dispenser, and mug with blue arrows indicating movement (no text or symbols)
6 Plasser kaffekannen eller koppen under kaffeutgangen.
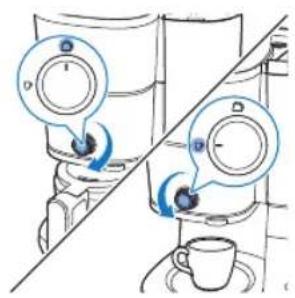
12 Apparatet setter i gang prosessen.
natural_image
Illustration of a hand pouring liquid into a blue liquid from a container onto a mug (no text or symbols)
natural_image
Illustration of a hand inserting a device into a water dispenser, showing fluid flow direction (no text or symbols)
16 Åpne filterholderen.

17 Fjern filteret.

Stille inn timeren
natural_image
Illustration of a blue electrical plug connecting a wall socket with a blue arrow indicating direction (no text or symbols)
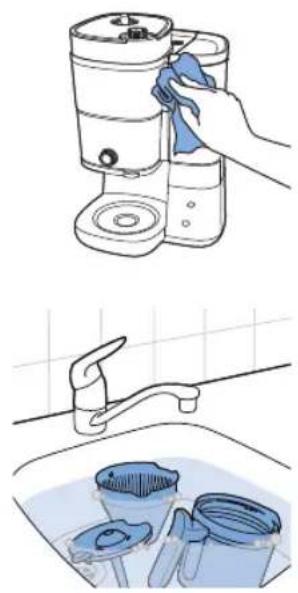
natural_image
Illustration showing a hand cleaning a kitchen appliance with a blue cloth, alongside a close-up of cleaning buckets in a sink (no text or symbols)
natural_image
Illustration of a blue electrical plug connecting a wall socket with a blue arrow indicating direction (no text or symbols)
natural_image
Illustration of a hand inserting a container into a water dispenser, showing fluid flow direction (no text or symbols)
natural_image
Diagram of a hand using a tool to lift a component, showing blue arrows indicating rotation (no text or symbols present)

natural_image
Diagram of a mechanical device with a blue lid and upward arrow indicating motion (no text or symbols)
378 Norsk


natural_image
Illustration of a hand inserting a small object into a water-filled container, with no text or symbols present.
natural_image
Diagram of a cleaning machine with buckets and a handle, showing internal components without any text or labels.

natural_image
Illustration of a blender with a blue handle and arrow indicating the process (no text or symbols)
6 Sett den tomme kannen i kaffemaskinen.
7 Sett i støpselet i en jordet veggkontakt.
natural_image
Blue electrical plug with a cable plugged into a socket, showing a blue arrow indicating direction (no text or symbols)

natural_image
Diagram of a kitchen appliance with a lid and side panel, showing blue arrows indicating movement or assembly (no text or symbols)
natural_image
Illustration of hands using a water dispenser to clean a water bottle in a sink (no text or symbols visible)

natural_image
Diagram showing a blue door handle interacting with a water dispenser (no text or symbols present)

natural_image
Illustration of hands holding a blue and white container with a blue lid, no text or symbols present

natural_image
Illustration of a hand holding a blue tool above a white container with a lid (no text or symbols)

natural_image
Illustration of a hand pouring liquid into a water bottle from a faucet into a sink (no text or symbols)
natural_image
Diagram showing a blue plastic bag being inserted into a container, with arrows indicating direction (no text or symbols present)

natural_image
Illustration of hands washing a water bottle in a sink (no text or symbols visible)
natural_image
Diagram of a device with an upward arrow and internal components, no text or symbols present

natural_image
Illustration of two containers pouring liquid into a container with food items (no text or symbols)
natural_image
Diagram of a kitchen appliance with a blue lid and arrow indicating downward motion (no text or symbols)
natural_image
Simple line drawing of a container with a blue lid and a magnified view of a circular object (no text or symbols)
natural_image
Illustration of a hand inserting a magnifying glass into a water-filled container (no text or symbols)
natural_image
Diagram of a cleaning machine with buckets and handle, showing internal components (no text or labels)
natural_image
Diagram of a portable air conditioner unit with blue airflow direction indicated (no text or symbols)
12 Zamknij uchwyt filtra.
394 Polski

natural_image
Illustration of kitchen equipment including a kettle, mug, and tiered storage unit (no text or symbols)
natural_image
Illustration of a hand pouring liquid from a container into a mug (no text or symbols)
natural_image
Illustration of a hand using a tool to lift a water level from a pump into a washing machine (no text or symbols present)
natural_image
Illustration of a bucket pump and a recycling bin with an arrow indicating flow (no text or symbols)
24 Wyjmij filtr.
natural_image
Line drawing of a modern kitchen blender with blue liquid (no text or symbols)
natural_image
Illustration of a hand inserting a component into a water dispenser, showing fluid flow direction (no text or symbols)
natural_image
Diagram of a bucket pump system with buckets and a bucket, showing no text or symbols
natural_image
Diagram of a water purifier with blue flow arrows indicating internal circulation (no text or symbols)
5 Zamknij uchwyt filtra.
natural_image
Illustration of kitchen utensils and a cup with blue arrows indicating movement or force (no text or symbols)
natural_image
Diagram of a blender with blue tubing and control panel (no text or symbols)
natural_image
Illustration of a hand pouring liquid into a blue container over a cup (no text or symbols)
natural_image
Illustration of a hand inserting a blue arrow into a container with a magnified inset (no text or symbols)
17 Wyjmij filtr.
Ustawianie zegara
natural_image
Illustration of a blue electrical plug connecting a wall socket with a blue arrow indicating direction (no text or symbols)

natural_image
Line drawing of a hand cleaning a cylindrical container with a blue cloth (no text or symbols)
natural_image
Illustration of a kitchen sink with buckets and a faucet, no text or symbols present
natural_image
Blue electrical plug with a power outlet, showing an arrow indicating direction (no text or symbols)
natural_image
Illustration of a hand inserting a container into a shared tank, showing fluid flow direction (no text or symbols)
natural_image
Illustration of a hand using a tool to lift a component, with blue arrows indicating rotation or motion (no text or symbols)
natural_image
Diagram of a kitchen appliance with a blue lid and upward arrow indicating a component (no text or symbols)


natural_image
Illustration of a hand inserting a small object into a water dispenser, showing the process with blue arrows indicating rotation (no text or symbols present)
natural_image
Diagram of a water purifier with buckets and a bucket cover, showing internal components without any text or labels.

natural_image
Illustration of a hand washing a blue plastic bag attached to a water dispenser (no text or symbols)
natural_image
Diagram showing a blue mechanical component with a blue arrow indicating direction, alongside a hand holding a tool (no text or symbols present)
natural_image
Illustration of a blue electrical plug connecting a wall socket with an arrow indicating power input (no text or symbols)
414
Português

natural_image
Diagram showing a blue plastic container being lifted by an upward arrow, with no text or symbols present.
natural_image
Illustration of a hand washing a water bottle in a sink (no text or symbols visible)
Português

natural_image
Illustration of a hand holding a blue tool next to a white container with a lid (no text or symbols)

natural_image
Illustration of a hand pouring liquid into a water bottle from a faucet into a sink (no text or symbols)
12 Evvazie o jarro de vidro.
Utilizar o aparelho
natural_image
Diagram showing a blue plastic bag being inserted into a container, with arrows indicating direction (no text or symbols present)

natural_image
Illustration of hands using a water dispenser to dispute liquid into a container (no text or symbols visible)
natural_image
Diagram of a water dispenser with an upward arrow indicating flow or movement (no text or symbols present)
natural_image
Illustration of two containers pouring liquid into a container with food items (no text or symbols)
natural_image
Diagram of a kitchen appliance with a blue lid and arrow indicating downward motion (no text or symbols)
natural_image
Diagram of a mechanical device with a blue component and a magnified view of a circular component (no text or symbols)
natural_image
Illustration of a hand inserting a magnifying glass into a water-filled container (no text or symbols)
natural_image
Diagram of a cleaning machine with buckets and handle, showing internal components without any text or labels
11 Coloque o filtro no cesto do filtro.
natural_image
Diagram of a portable air conditioner unit with blue airflow direction indicated (no text or symbols)
natural_image
Illustration of kitchen equipment including a kettle, mug, and tiered storage unit (no text or symbols)
natural_image
Illustration of a hand pouring liquid into a cup (no text or symbols)
21 Desfrute do seu café acabado de preparar.
natural_image
Illustration of a hand using a device to lift water from a container, showing fluid flow direction (no text or symbols)
natural_image
Illustration of a bucket pump and a recycling bin with an arrow indicating flow (no text or symbols)
24 Remova o filtro.
Utilizar café pré-moído
natural_image
Line drawing of a modern kitchen appliance with a blue liquid container (no text or symbols)
natural_image
Illustration of a hand inserting a component into a water dispenser, showing fluid flow direction (no text or symbols)
natural_image
Diagram of a bucket pump system with buckets and a bucket, showing internal components and a downward arrow indicating flow direction (no text or labels)
3 Coloque o filtro no cesto do filtro.
424 Português
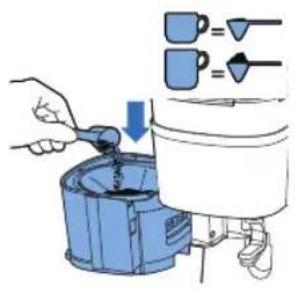
natural_image
Diagram of a water purifier with blue flow arrows indicating internal circulation (no text or symbols)
natural_image
Illustration of kitchen equipment including a blender, mug, and water dispenser with blue arrows indicating movement (no text or symbols)
natural_image
Diagram of a water purifier with inlet and outlet pipes (no text or labels)
natural_image
Illustration of a hand pouring liquid into a blue container over a cup (no text or symbols)
14 Desfrute do seu café acabado de preparar.
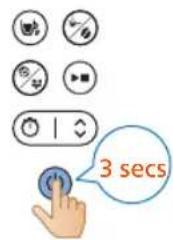
natural_image
Illustration of a hand inserting a water droplet into a container with blue arrows indicating flow direction (no text or symbols)
17 Remova o filtro.
natural_image
Illustration of a blue electrical plug connecting a wall socket with a blue arrow indicating direction (no text or symbols)

natural_image
Line drawing of a hand cleaning a cylindrical container with a blue cloth (no text or symbols)
natural_image
Illustration of a kitchen sink with buckets and a faucet, no text or symbols present
natural_image
Illustration of a blue electrical plug connecting a wall socket with a blue arrow indicating direction (no text or symbols)
430 Português

natural_image
Illustration of a hand inserting a blue arrow into a water dispenser, showing mechanical components (no text or symbols)
natural_image
Diagram of a hand using a tool to lift a machine, showing blue arrows indicating rotation (no text or symbols present)
natural_image
Diagram of a kitchen appliance with a blue lid and upward arrow indicating a component (no text or symbols)


natural_image
Illustration of a hand inserting a small object into a water-filled container, with no text or symbols present.
natural_image
Diagram of a cleaning machine with buckets and a handle, showing internal components without any text or labels.
natural_image
Illustration of a hand inserting a blue plastic bag into a water dispenser (no text or symbols)
natural_image
Diagram showing a blue mechanical component being inserted into a container, with a hand holding a tool nearby (no text or symbols present)
Problema Solução
natural_image
Illustration of a blue electrical plug connecting a wall socket with a blue arrow indicating direction (no text or symbols)

natural_image
Diagram showing a blue plastic bag being inserted into a container, with arrows indicating direction (no text or symbols present)

natural_image
Illustration of hands washing a water dispenser into a sink (no text or symbols visible)

natural_image
Diagram showing a blue door handle interacting with a water dispenser (no text or symbols present)

natural_image
Illustration of hands holding a blue and white container with a blue lid, no text or symbols present

natural_image
Illustration of a hand holding a blue tool above a white container with a lid (no text or symbols)

natural_image
Illustration of a hand pouring liquid into a water bottle from a faucet into a sink (no text or symbols)
natural_image
Diagram showing a blue plastic bag being inserted into a container, with arrows indicating direction (no text or symbols present)
natural_image
Illustration of hands washing a water bottle in a kitchen sink (no text or symbols visible)
446 Română

natural_image
Diagram of a device with a blue lid and an upward arrow, shown from top and side (no text or symbols)

natural_image
Illustration of two containers pouring liquid into a container with food items (no text or symbols)
natural_image
Diagram of a kitchen appliance with a blue lid and arrow indicating downward motion (no text or symbols)
natural_image
Simple line drawing of a container with a blue component and a magnified view of a circular object (no text or symbols)
natural_image
Illustration of a hand inserting a magnifying glass into a water-filled container (no text or symbols)
natural_image
Diagram of a cleaning machine with buckets and handle, showing internal components without any text or labels
natural_image
Diagram of a portable kitchen appliance with blue airflow arrow indicating direction (no text or symbols)
natural_image
Illustration of kitchen equipment including a kettle, mug, and tiered storage unit (no text or symbols)
13 Pune cana de cafea sau ceasca sub dozator.

natural_image
Illustration of a hand pouring liquid from a container into a cup (no text or symbols)
natural_image
Illustration of a hand inserting a device into a washing machine (no text or symbols visible)
23 Deschide suportul de filtru.

natural_image
Illustration of a bucket being poured into a water dispenser, showing the process with a magnified inset (no text or symbols)
24 Scoate filtrul.
natural_image
Line drawing of a modern kitchen appliance with a blue liquid container (no text or symbols)
natural_image
Illustration of a hand inserting a blue magnifying glass into a container (no text or symbols)
natural_image
Diagram of a cleaning machine with buckets and a bucket cover, showing internal components and alignment lines (no text or labels)
natural_image
Diagram of a water purifier with blue flow arrows indicating internal circulation (no text or symbols)
natural_image
Illustration of kitchen utensils and a cup with blue arrows indicating movement or force (no text or symbols)
6 Pune cana de cafea sau ceasca sub dozator.

natural_image
Diagram of a water pump or scrubber with blue flow lines indicating internal components (no text or labels)
natural_image
Illustration of a hand pouring liquid into a cup (no text or symbols)
natural_image
Illustration of a hand inserting a blue arrow into a container with a magnified inset (no text or symbols)
16 Deschide suportul de filtru.
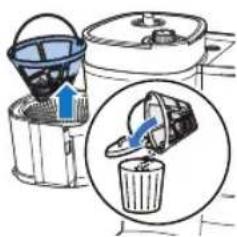
17 Scoate filtrul.
natural_image
Illustration of a blue electrical plug connecting a wall socket with a blue arrow indicating direction (no text or symbols)
natural_image
Illustration of a hand cleaning a water dispenser with a blue cloth (no text or symbols)
natural_image
Illustration of a kitchen sink with three blue buckets and a faucet, no text or symbols present
natural_image
Illustration of a blue electrical plug connecting a wall socket with a blue arrow indicating direction (no text or symbols)

natural_image
Illustration of a hand inserting a component into a water dispenser, showing fluid flow direction (no text or symbols)
natural_image
Illustration of a hand using a tool to lift a component, with blue arrows indicating rotation (no text or symbols)
natural_image
Diagram of a water dispenser with a blue cover and upward arrow indicating flow or movement (no text or symbols)
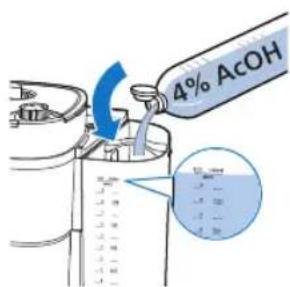

natural_image
Illustration of a hand inserting a small object into a water dispenser, showing the process with blue arrows indicating rotation (no text or symbols present)
natural_image
Diagram of a water purifier with buckets and a bucket cover, showing internal components without any text or labels.
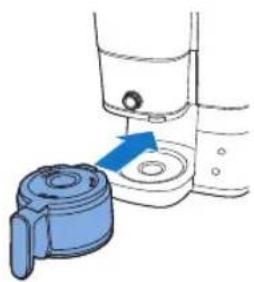
natural_image
Illustration of a hand washing a blue plastic container with a blue arrow indicating the process (no text or symbols present)
natural_image
Diagram showing a blue mechanical component being inserted into a container, with no visible text or symbols.
natural_image
Illustration of a blue electrical plug connecting a wall socket with a blue arrow indicating direction (no text or symbols)
natural_image
Diagram showing two blue plastic containers with upward arrows, connected by a diagonal line (no text or symbols)

natural_image
Illustration of hands using a water dispenser to clean a bottle (no text or symbols visible)

natural_image
Illustration of a hand holding a blue lid over a container with a handle (no text or symbols)

natural_image
Illustration of a hand pouring liquid into a water bottle from a sink (no text or symbols)
natural_image
Diagram showing a blue plastic bag being inserted into a container, with arrows indicating direction (no text or symbols present)
natural_image
Illustration of hands washing a water dispenser into a bottle on a sink (no text or symbols visible)
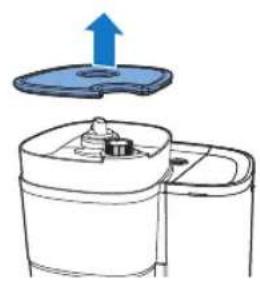
natural_image
Diagram of a device with a blue lid and upward arrow, showing internal components (no text or symbols)
natural_image
Illustration of two containers pouring liquid into a container with a small container inside (no text or symbols)
natural_image
Diagram of a kitchen appliance with a blue lid and arrow indicating downward motion (no text or symbols)
natural_image
Diagram of a device with a blue button and a magnified view of circular components (no text or symbols)
natural_image
Illustration of a hand using a water dispenser to lift a container, showing mechanical components and fluid flow (no text or symbols)
natural_image
Diagram of a cleaning or dust removal device with buckets and a bucket cover (no text or symbols)
natural_image
Diagram of a water purifier with blue flow arrow indicating internal circulation (no text or symbols)
natural_image
Illustration of kitchen equipment including a kettle, mug, and tiered storage unit with blue arrows indicating movement (no text or symbols)
natural_image
Diagram of a water purifier with inlet and outlet pipes (no text or labels)
20 Hiqni filxhanin ose ibrikun tuaj nga pajisja.
natural_image
Illustration of a hand pouring liquid into a cup (no text or symbols)
natural_image
Illustration of a hand inserting a blue object into a water-filled container (no text or symbols)
24 Hiqni filtrin.
natural_image
Line drawing of a modern kitchen appliance with a blue liquid level (no text or symbols)
natural_image
Illustration of a hand inserting a filter into a washing machine (no text or symbols present)
natural_image
Diagram of a cleaning or laundry system with buckets and a mixer (no text or symbols)
natural_image
Diagram of a water pump or reactor with internal flow paths and no visible text or symbols
13 Hiqni filxhanin ose ibrikun tuaj nga pajisja.
natural_image
Illustration of a hand pouring liquid from a container into a cup (no text or symbols)
natural_image
Illustration of a hand inserting a plug into a water dispenser, showing fluid flow direction (no text or symbols)
17 Hiqni filtrin.

natural_image
Illustration of a blue electrical plug connecting a wall socket with a blue arrow indicating direction (no text or symbols)

natural_image
Hand cleaning a cylindrical container with a blue cloth (no text or symbols visible)

natural_image
Illustration of a kitchen sink with buckets and a faucet, no text or symbols present
natural_image
Illustration of a blue electrical plug connecting a socket to a wall, with a blue arrow indicating direction (no text or symbols)
natural_image
Illustration of a hand inserting a magnifying glass into a container with blue arrows indicating flow (no text or symbols)
natural_image
Diagram of a device with a blue upward arrow indicating a process or operation, no text or symbols present.
natural_image
Diagram of a container with a lid and a blue arrow indicating downward motion (no text or symbols)
natural_image
Illustration of a hand inserting a blue plastic component into a water dispenser, showing fluid flow direction (no text or symbols)
natural_image
Diagram of a cleaning machine with bucket and filter components (no text or labels)
natural_image
Illustration of a hand washing a small water dispenser with a blue handle (no text or symbols)


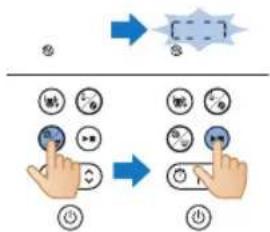
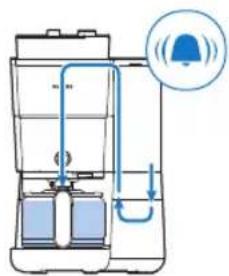

natural_image
Illustration of a blue mechanical device with a blue arrow pointing to a component, alongside a hand holding a tool (no text or symbols present)
natural_image
Illustration of a blue cable inserted into an electrical socket with a blue arrow indicating direction (no text or symbols)
Nastavitev ure
natural_image
Diagram showing two blue containers with upward arrows, connected by a diagonal line (no text or symbols)
Opozorilo: nikoli ne nalivajte vode v posodo za zrna, saj bi s tem poškodovali aparat za kavo.
- Vzemite posodo iz aparata ter jo postavite pod pipo, da jo napolnite z vodo.
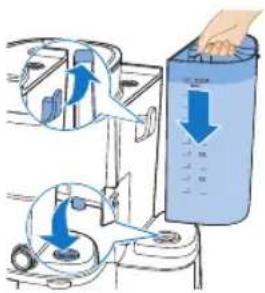

natural_image
Illustration of a hand pump device with a blue handle and arrow indicating direction (no text or symbols)
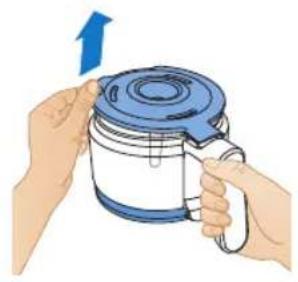
natural_image
Illustration of hands holding a blue lid with a blue arrow indicating upward motion (no text or symbols)
4 Vrč za kavo postavite v aparat.

natural_image
Illustration of a hand holding a blue tool next to a container with a lid (no text or symbols)
5 Sredinski gumb zavrtite v položaj za vrč.
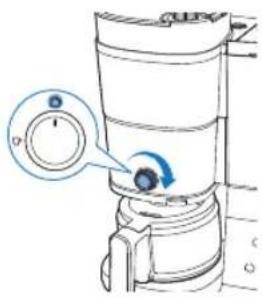
8 Pritisnite gumb skodelice in izberite 10 skodelic.

9 Pritisnite gumb za zagon.
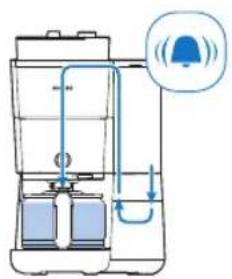
natural_image
Illustration of a hand pouring liquid into a basin with a faucet (no text or symbols)
12 Izpraznite stekleni vrč.
Uporaba aparata
Uporaba kavnih zrn
natural_image
Diagram showing two blue containers with upward arrows, connected by a diagonal line (no text or symbols)
1 Odprite pokrov posode za vodo in dvignite posodo iz aparata.

natural_image
Illustration of a hand washing a water bottle in a sink, with a magnified inset showing liquid being poured into it (no text or symbols present)
3 Posodo postavite nazaj v aparat.
- Prepričajte se, da je kljuka pravilno nameščena.
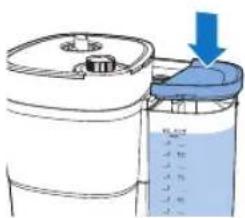
4 Zaprite pokrov posode za vodo.

natural_image
Diagram of a device with a blue upward arrow above it, showing top-down view of a mechanical component (no text or symbols present)
5 Dvignite pokrov posode za zrna.
500 Slovenščina

natural_image
Illustration of two containers with chains hanging from each other, no text or symbols present
6 V posodo dodajte želena kavna zrna.
natural_image
Diagram of a kitchen appliance with a blue lid and arrow indicating downward motion (no text or symbols)
7 Zaprite pokrov posode za zrna.
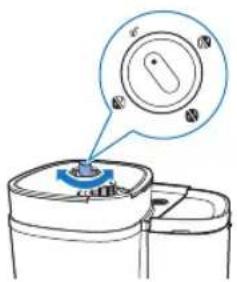
natural_image
Diagram of a mechanical device with a blue component and a magnified view of a circular component (no text or symbols)
natural_image
Illustration of a hand inserting a magnifying glass into a water dispenser, showing fluid flow direction (no text or symbols)
10 Primate jeziček, da odprete nosilec filtra.

11 Namestite filter v košaro filtra.
12 Zaprite nosilec filtra.
13 Pod dozirnik postavite vrč ali skodelico za kavo.
natural_image
Diagram of a portable water heater with internal tubing and control panel (no text or labels)
20 Iz aparata vzemite skodelico oz. vrč s kavo.
natural_image
Illustration of a hand pouring liquid into a cup (no text or symbols)
21 Uživajte v sveže pripravljeni kavi.

22 Za izklop aparata za tri sekunde pridržite gumb za vklop/izklop.

natural_image
Illustration of a hand inserting a device into a water dispenser, showing the process with blue arrows indicating rotation (no text or symbols present)
23 Odprite nosilec filtra.

24 Odstranite filter.
Uporaba mlete kave
natural_image
Line drawing of a modern kitchen appliance with a blue liquid level (no text or symbols)
1 Prepričajte se, da je v aparatu dovolj vode za pripravo želene količine kave.
504 Slovenščina

natural_image
Illustration of a hand inserting a device into a water dispenser, showing the process with blue arrows indicating movement (no text or symbols present)
2 Primate jeziček, da odprete nosilec filtra.

natural_image
Diagram of a water purifier with bucket and filter unit (no text or labels)
3 Namestite filter v košaro filtra.
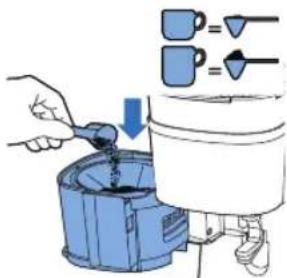
4 V trajni filter dodajte količino mlete kave po svojem okusu.

natural_image
Diagram of a portable device with blue airflow arrow indicating direction (no text or symbols)
5 Zaprite nosilec filtra.
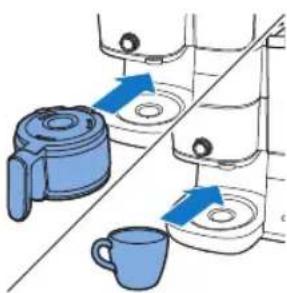
natural_image
Illustration of kitchen equipment including a kettle, mug, and tiered storage unit (no text or symbols)
6 Pod dozirnik postavite vrč ali skodelico za kavo.
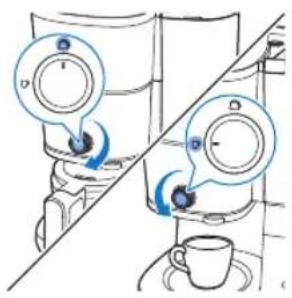

natural_image
Diagram of a water heater system with inlet and outlet pipes (no text or labels)
13 Iz aparata vzemite skodelico oz. vrč s kavo.
natural_image
Illustration of a hand pouring liquid into a blue liquid from a cup (no text or symbols)
14 Uživajte v sveže pripravljeni kavi.

15 Za izklop aparata za tri sekunde pridržite gumb za vklop/izklop.
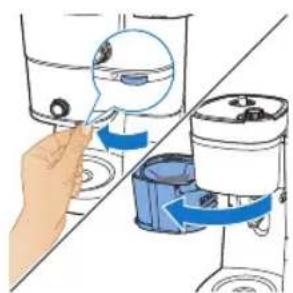
natural_image
Illustration of a hand inserting a blue object into a container with liquid, showing mechanical components (no text or symbols)
16 Odprite nosilec filtra.
17 Odstranite filter.

508 Slovenščina
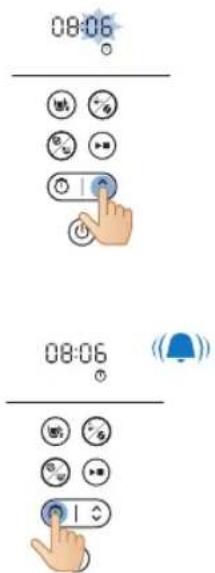
natural_image
Illustration of a blue electrical plug connecting a wall socket with a blue arrow indicating direction (no text or symbols)

natural_image
Line drawing of a hand cleaning a cylindrical container with a blue cloth (no text or symbols)
natural_image
Illustration of a kitchen sink with buckets and a faucet, no text or symbols present
natural_image
Illustration of a blue electrical plug connecting a wall socket with an arrow indicating direction (no text or symbols)
510 Slovenščina

natural_image
Illustration of a hand inserting a device into a water dispenser, showing the process with blue arrows indicating rotation (no text or symbols present)
2 Odprite nosilec filtra, da pridete do kanala z lijakom mlinčka.

3 Vklopite kavni aparat.

natural_image
Illustration of a hand using a tool to lift a component, with blue arrows indicating rotation (no text or symbols)
natural_image
Diagram of a kitchen appliance with a blue lid and upward arrow indicating a component (no text or symbols)

2 Posodo za vodo napolnite z belim kisom (4 % ocetne kisline) do oznake za 10 skodelic.
512 Slovenščina
3 Zaprite pokrov posode za vodo.
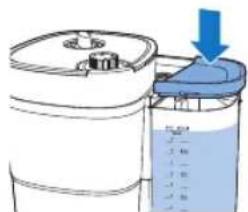

natural_image
Illustration of a hand inserting a small object into a water-filled container, with no text or symbols present.
4 Primate jeziček, da odprete nosilec filtra.
5 Namestite filter v košaro filtra in zaprite nosilec košare filtra.

natural_image
Diagram of a cleaning machine with buckets and a handle, showing internal components without any text or labels.
natural_image
Illustration of a hand inserting a blue plastic bag into a water dispenser (no text or symbols)
6 Postavite prazen vrč v kavni aparat.
natural_image
Diagram showing a blue mechanical component being inserted into a container, with no visible text or symbols.
Težava Rešitev
natural_image
Illustration of a blue cable inserted into an electrical socket with a blue arrow indicating direction (no text or symbols)

natural_image
Diagram showing a mechanical assembly with blue components and directional arrows, no text or symbols present.
natural_image
Illustration of hands using a water dispenser to dispute liquid into a container (no text or symbols visible)
- Uistite sa, že je hák pri opätovnom umiestnení správne pripojený.
- Aby ste vytiahli veko kanvice, chytte jazýček veka. Aby ste kanvicu naplnili, položte ju pod tečúcu vodu. Zásobník na vodu naplňte pomocou kanvice.
- Uistite sa, že hladina vody je pod značkou maximálnej úrovne.

4 Vložte kanvicu do zariadenia.
natural_image
Illustration of a hand pouring liquid into a basin with a faucet (no text or symbols)
natural_image
Diagram showing a blue plastic container being lifted by two upward arrows, with no visible text or symbols.
natural_image
Illustration of a hand washing a water dispenser into a container with a blue liquid, placed on a kitchen sink (no text or symbols visible)
natural_image
Diagram of a water dispenser with a blue upward arrow indicating flow or movement (no text or symbols)
natural_image
Illustration of two containers pouring liquid into a container (no text or symbols)
natural_image
Diagram of a kitchen appliance with a blue lid and arrow indicating downward motion (no text or symbols)
7 Zatvorte veko nádoby na zrnká.

natural_image
Simple line drawing of a container with a blue lid and a speech bubble containing three small icons (no text or symbols)
natural_image
Illustration of a hand inserting a container into a shared device (no text or symbols visible)
10 Pre otvorenie držiaka filtra chytte jazýček.

natural_image
Diagram of a cleaning or cleaning machine with buckets and a handle, showing no text or symbols.
11 Vložte filter do košíka.
natural_image
Diagram of a water purifier with blue flow arrow indicating internal circulation (no text or symbols)
12 Zatvorte držiak filtra.
natural_image
Diagram showing two kitchen utensils with blue circular indicators and a diagonal line, no text or symbols present.
20 Vyberte šálku alebo kanvicu zo spotrebiča.
natural_image
Illustration of a hand pouring liquid into a cup (no text or symbols)
21 Vychutnajte si čerstvo uvarenú kávu.
22 Pre vypnutie spotrebiča stlačte a tri sekundy podržte tlačidlo spustenia.
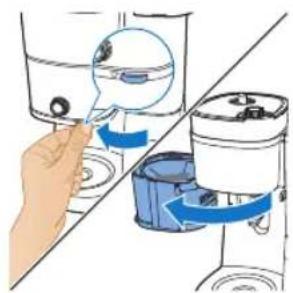
natural_image
Illustration of a hand inserting a device into a container with blue arrows indicating rotation (no text or symbols present)
23 Otvorte držiak filtra.

24 Vyberte filter.
natural_image
Line drawing of a modern kitchen appliance with a blue liquid and control panel (no text or symbols)
natural_image
Illustration of a hand inserting a container into a water dispenser, showing fluid flow direction (no text or symbols)
2 Pre otvorenie držiaka filtra chytte jazýček.

natural_image
Diagram of a water purifier with bucket and filter unit (no text or labels)
3 Do košíka na filter vložte filter.

natural_image
Diagram of a portable air purifier with blue airflow direction indicated by arrows (no text or symbols)
natural_image
Illustration of kitchen equipment including a blender, water dispenser, and mug with blue arrows indicating movement (no text or symbols)
12 Spotrebič začne pracovat.
13 Vyberte šálku alebo kanvicu zo spotrebiča.
natural_image
Illustration of a hand pouring liquid from a container into a cup (no text or symbols)
14 Vychutnajte si čerstvo uvarenú kávu.

15 Pre vypnutie spotrebiča stlačte a tri sekundy podržte tlačidlo spustenia.

natural_image
Illustration of a hand inserting a device into a water dispenser, showing fluid flow direction (no text or symbols)
16 Otvorte držiak filtra.

17 Vyberte filter.

Nastavenie časovača
natural_image
Illustration of a blue electrical plug connecting a wall socket with a blue arrow indicating direction (no text or symbols)

natural_image
Illustration showing a hand cleaning a kitchen appliance with a blue cloth, alongside a close-up of cleaning buckets in a sink (no text or symbols)
natural_image
Illustration of a blue electrical plug connecting a wall socket with a blue arrow indicating direction (no text or symbols)
natural_image
Illustration of a hand inserting a small object into a water-filled container, with no text or symbols present.
natural_image
Illustration of a hand using a tool to lift a cylindrical component, with blue arrows indicating rotation (no text or symbols)
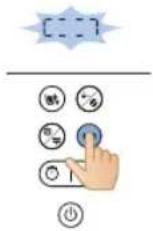
natural_image
Diagram of a kitchen appliance with a blue lid and arrow indicating upward motion (no text or symbols)
538 Slovensky

natural_image
Diagram of a container with liquid and a blue lid, showing a downward arrow (no text or symbols)

natural_image
Illustration of a hand inserting a component into a water dispenser, showing fluid flow direction (no text or symbols)
4 Pre otvorenie držiaka filtra chytte jazýček.
5 Do košíka na filter vložte filter a zatvorte držiak košíka na filter.
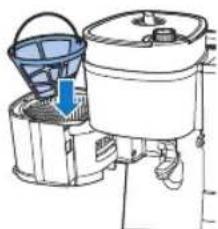
natural_image
Diagram of a cleaning machine with buckets and handle, showing internal components (no text or labels)

natural_image
Illustration of a hand operating a water dispenser with a blue tool nearby (no text or symbols)
1 Poklopac posude za kafu u zrnu
2 Filter
3 Posuda za kafu u zrnu
4 Nosač filtera
5 Držač nosača filtera
6 Stakleni bokal
7 Četka za čišćenja kanala za kafu u zrnu
8 Kontrolna tabla sa ekranom
9 Kašika
10 Rezervoar za vodu
11 Poklopac rezervoara za vodu
12 Regulator finoće mlevenja
natural_image
Illustration of a blue electrical plug connecting a wall socket with a blue arrow indicating direction (no text or symbols)
2 Pomoću dugmeta sa strelicom podesite sate.

548 Srpski

natural_image
Diagram showing a cleaning or packaging process with blue arrows indicating direction (no text or symbols present)
natural_image
Illustration of hands pouring liquid from a water dispenser into a container (no text or symbols visible)
- Izvadite rezervoar iz aparata i stavite ga pod česmu da biste ga napunili vodom.
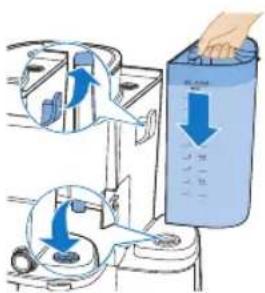
- Proverite da li je kuka pravilno pričvršćena prilikom vraćanja.
- Povucite jezičak poklopca da biste podigli poklopac bokala. Stavite bokal za kafu pod česmu da biste ga napunili vodom. Napunite rezervoar za vodu vodom.
- Vodite računa da nivo vode bude ispod maksimalnog nivoa.
550 Srpski

natural_image
Illustration of a hand washing a water dispenser with a blue plastic container (no text or symbols)
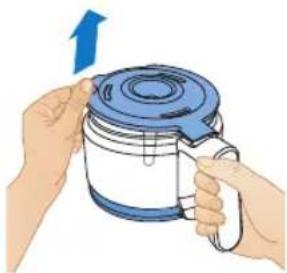
natural_image
Illustration of hands holding a blue kettle with a blue lid and upward arrow indicating rotation (no text or symbols)
4 Stavite bokal za kafu u aparat.
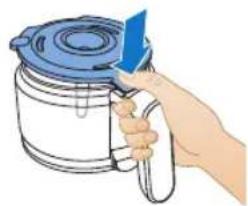
natural_image
Illustration of a hand holding a blue tool next to a container with a lid (no text or symbols)

7 Pritisnite dugme za jačinu kafe, a zatim izaberite unapred samlevenu kafu.
8 Pritisnite dugme sa simbolom šolje i izaberite 10 šolja.

9 Pritisnite dugme za pokretanje.
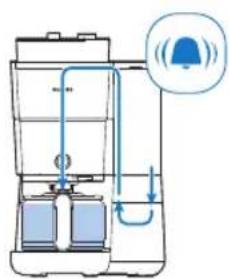
natural_image
Illustration of a hand pouring liquid into a sink with a faucet (no text or symbols)
12 Ispraznite stakleni bokal.
552 Srpski
Upotreba aparata
Korišćenje kafe u zrnu
natural_image
Diagram showing a blue plastic container being lifted by an upward arrow, with no text or symbols present.
Pratite korake u nastavku za upotrebu:
1 Otvorite poklopac rezervoara za vodu, a zatim podignite rezervoar za vodu iz aparata.

natural_image
Illustration of a hand washing a water dispenser into a container with a blue liquid, placed on a kitchen sink (no text or symbols visible)
3 Postavite posudu za vodu u aparat.
4 Zatvorite poklopac posude za vodu.
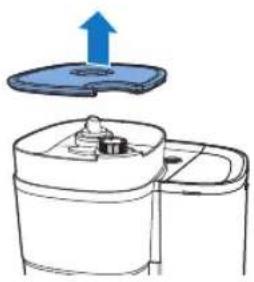
natural_image
Diagram of a kitchen appliance with a blue upward arrow indicating rotation (no text or symbols)
5 Podignite poklopac posude za kafu u zrnu.
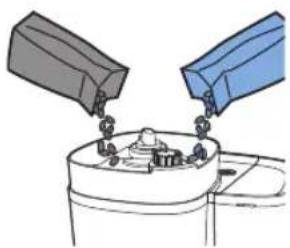
natural_image
Illustration of two containers pouring liquid into a container with granular contents (no text or symbols)
6 Dodajte željenu kafu u zrnu u posudu.
natural_image
Simple line drawing of a container with food inside and a blue lid above it, no text or symbols present.
7 Zatvorite poklopac posude za kafu u zrnu.
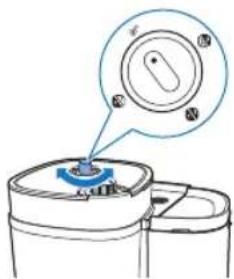
8 Okrenite točkić za izbor na posudi da biste izabrali željenu kafu u zrnu iz jedne od posuda.
natural_image
Simple line drawing of a container with a blue lid and a magnified view of a circular object (no text or symbols)
9 Pomoću točkića izaberite željeni nivo finoće mlevenja.
554 Srpski

natural_image
Illustration of a hand inserting a device into a water dispenser, showing internal components and blue arrows indicating flow (no text or symbols present)
10 Uhvatite jezičak da biste otvorili ležište filtera.
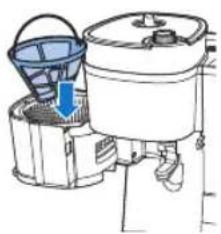
natural_image
Diagram of a water purifier with bucket and filter components (no text or labels)
11 Stavite filter u korpu filtera.

natural_image
Diagram of a water purifier with blue flow arrow indicating internal circulation (no text or symbols)
12 Zatvorite ležište filtera.

natural_image
Diagram showing two hands operating a washing machine with a cup, no text or symbols present
20 Uklonite šolju ili bokal za kafu iz aparata.
Funkcija za zaustavljanje kapanja omogućava da uklonite bokal iz aparata za kafu pre nego što se postupak kuvanja završi. Kada uklonite bokal, funkcija za zaustavljanje kapanja zaustavlja isticanje kafe u bokal.
natural_image
Illustration of a hand pouring liquid into a cup (no text or symbols)
natural_image
Illustration of a hand inserting a device into a water dispenser, showing blue arrows indicating rotation (no text or symbols present)
23 Otvorite ležište filtera.
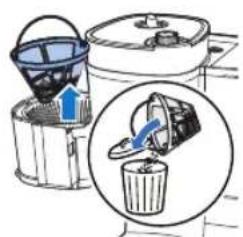
24 Uklonite filter.
Korišćenje prethodno samlevene kafe
Pratite korake u nastavku za upotrebu:

natural_image
Line drawing of a modern kitchen appliance with a blue liquid and control panel (no text or symbols)
1 Proverite da li aparat ima dovoljno vode za kuvanje željene količine kafe.

natural_image
Illustration of a hand inserting a container into a water dispenser, showing fluid flow direction (no text or symbols)
2 Uhvatite jezičak da biste otvorili ležište filtera.
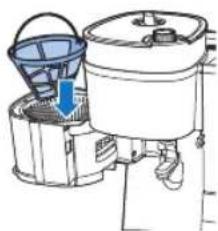
natural_image
Diagram of a water purifier with buckets and a handle, showing internal components without any text or labels.
3 Stavite filter u korpu filtera.
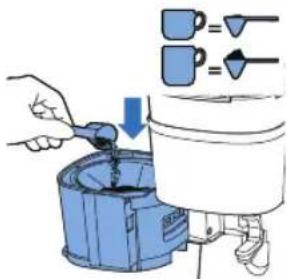
4 Dodajte količinu prethodno samlevene kafe u trajni filter u skladu sa svojim ukusom.

natural_image
Diagram of a water purifier with blue flow arrows indicating fluid movement (no text or symbols)
5 Zatvorite ležište filtera.
Srpski
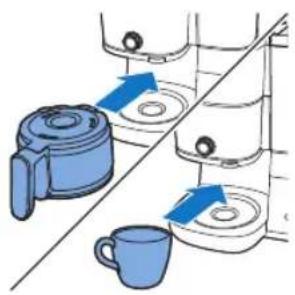
natural_image
Illustration of kitchen utensils and a cup with blue arrows indicating movement or force (no text or symbols)
13 Uklonite šolju ili bokal za kafu iz aparata.
- Budite pažljivi dok rukujete bokalom za kafu nakon kuvanja. Grejna ploča dostiže visoke temperature i može da dovede do opekotina. Budite veoma pažljivi kako biste izbegli opekotine.

natural_image
Illustration of a hand pouring liquid from a container into a cup (no text or symbols)
natural_image
Illustration of a hand inserting a device into a washing machine (no text or symbols visible)
16 Otvorite ležište filtera.

natural_image
Illustration of a bucket being inserted into a trash bin, showing the process with an arrow indicating direction (no text or symbols present)
17 Uklonite filter.

Podešavanje tajmera
natural_image
Illustration of a blue electrical plug connecting a wall socket with a blue arrow indicating direction (no text or symbols)

natural_image
Illustration of a hand cleaning or cleaning a cylindrical container with a blue cloth (no text or symbols)
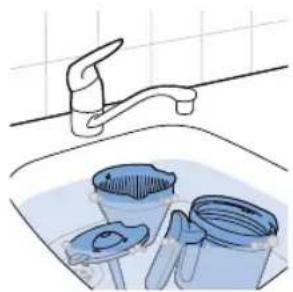
natural_image
Illustration of a kitchen sink with buckets and a faucet, no text or symbols present
2 Spoljašnjost aparata za kafu obrišite vlažnom krpom.
3 Očistite korpu filtera vrućom vodom sa malo tečnosti za pranje sudova ili ih operite u mašini za sudove.
4 Očistite bokal za kafu i poklopac, pa ih isperite pod mlazom vode. Ili ih očistite u mašini za sudove.
Čišćenje levka mlina
Važno:
natural_image
Illustration of a blue cable inserted into a white socket with a blue arrow indicating direction (no text or symbols)
natural_image
Illustration of a hand using a tool to lift water from a bowl into a washing machine (no text or symbols present)
2 Otvorite ležište filtera da biste pristupili kanalu levka mlina.
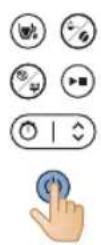
natural_image
Illustration of a hand using a tool to rotate or rotate a component, with no text or symbols present.

7 Pomoću četke uklonite samlevenu kafu ili ostatke koji su se nakupili u kanalu.
8 Nakon čišćenja kanala, ponovo pritisnite dugme za pokretanje da biste zatvorili krilce.
Čišćenje aparata za kafu od kamenca
Očistite aparat za kafu od kamenca kada primetite da se na ekranu pojavilo upozorenje za čišćenje kamenca. Za čišćenje koristite isključivo alkoholno sirće, pošto drugi proizvodi mogu da oštete aparat za kafu.
Upozorenje: Za čišćenje kamenca iz aparata nikada nemojte koristiti alkoholno sirće sa sadržajem sirćetne kiseline od 8% ili većim, prirodno sirće, sredstva za čišćenje kamenca u prahu niti u tabletama, pošto to može da dovede do oštećenja aparata.
natural_image
Diagram of a kitchen appliance with a blue lid and upward arrow indicating a component (no text or symbols)

3 Zatvorite poklopac posude za vodu.
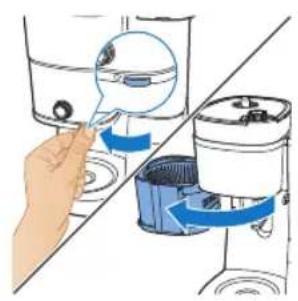
natural_image
Illustration of a hand inserting a device into a washing machine (no text or symbols present)
4 Uhvatite jezičak da biste otvorili ležište filtera.

natural_image
Diagram of a kitchen appliance with a bucket and side-mounted fan (no text or symbols)
5 Stavite filter u korpu filtera i zatvorite držač nosača filtera.
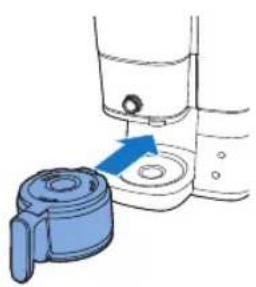
natural_image
Diagram showing a blue mechanical component being inserted into a water dispenser (no text or symbols present)
8 Pritisnite dugme za napajanje da biste uključili aparat za kafu. Ekran se uključuje.
9 Pritisnite dugme za čišćenje na aparatu za kafu.
10 Izaberite postavku za čišćenje kamenca.
11 Pritisnite dugme za pokretanje da biste potvrdili izbor.
- Aparat za kafu će automatski započeti proces čišćenja kamenca.
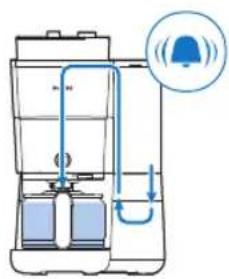
12 Sačekajte da aparat završi sa kuvanjem rastvora za čišćenje kamenca.
natural_image
Diagram showing a blue mechanical component with a blue arrow pointing to a circular feature, alongside a tool and partial view of a container (no text or symbols present)
14 Ispraznite bokal i uklonite trajni filter sa naslagama kamenca.
15 Rezervoar napunite svežom hladnom vodom i pritisnite dugme za pokretanje da biste započeli još jedan proces kuvanja.
Ostavite aparat za kafu da obavi ceo proces kuvanja i ispraznite bokal.
natural_image
Illustration of a blue electrical plug with a circular socket connected to its terminal (no text or symbols)
natural_image
Diagram showing a mechanical assembly with two blue components and directional arrows indicating motion (no text or symbols)
natural_image
Illustration of hands washing a water bottle in a sink with a hand pouring liquid from a pump (no text or symbols visible)
natural_image
Diagram of a container with liquid and a blue lid, showing a downward arrow (no text or symbols)
natural_image
Illustration of a hand operating a water dispenser with a blue plastic container (no text or symbols)


natural_image
Illustration of a hand pouring liquid into a water bottle from a sink (no text or symbols)
natural_image
Diagram showing a blue plastic bag being inserted into a container, with arrows indicating direction (no text or symbols present)
natural_image
Diagram of a water dispenser with an upward arrow indicating flow or movement (no text or symbols present)
natural_image
Illustration of two containers pouring liquid into a container with a tray (no text or symbols)
natural_image
Diagram of a kitchen appliance with a blue lid and arrow indicating downward motion (no text or symbols)
natural_image
Simple line drawing of a container with a blue component and a magnified view of a circular object (no text or symbols)
natural_image
Illustration of a hand inserting a magnifying glass into a water-filled container (no text or symbols)
natural_image
Diagram of a cleaning machine with buckets and handle, showing internal components (no text or labels)
natural_image
Diagram of a portable air conditioner unit with blue airflow direction indicated (no text or symbols)
12 Sulje suodatinteline.

natural_image
Illustration of kitchen equipment including a blender, water dispenser, and mug with blue arrows indicating movement (no text or symbols)
natural_image
Illustration of a hand pouring liquid into a blue container over a cup (no text or symbols)
natural_image
Illustration of a hand using a tool to lift water from a container, showing fluid flow direction (no text or symbols)
natural_image
Illustration of a bucket cover and a recycling bin with an arrow indicating direction (no text or symbols)
24 Poista suodatin.
natural_image
Line drawing of a modern kitchen blender with water level indicator (no text or symbols)
natural_image
Illustration of a hand inserting a component into a water dispenser, showing fluid flow direction (no text or symbols)
natural_image
Diagram of a water purifier with a bucket and filter unit, showing internal components without any text or labels.
natural_image
Diagram of a mechanical device with blue components and a blue arrow indicating rotation (no text or symbols)
5 Sulje suodatinteline.

natural_image
Illustration of kitchen equipment including a kettle, mug, and tiered storage unit (no text or symbols)
natural_image
Diagram of a water purifier with inlet and outlet pipes (no text or labels)
natural_image
Illustration of a hand pouring liquid into a cup (no text or symbols)

natural_image
Illustration of a hand inserting a water droplet into a washing machine (no text or symbols)
natural_image
Illustration of a blue electrical plug connecting to an open electrical socket (no text or symbols)

natural_image
Line drawing of a hand cleaning a cylindrical container with a blue cloth (no text or symbols)
natural_image
Illustration of a kitchen sink with buckets and a faucet, no text or symbols present
natural_image
Illustration of a blue electrical plug connecting a wall socket with a blue arrow indicating direction (no text or symbols)
590 Suomi

natural_image
Illustration of a hand inserting a device into a water dispenser, showing the process with blue arrows indicating movement (no text or symbols present)
natural_image
Illustration of a hand using a tool to lift a component, with blue arrows indicating rotation (no text or symbols)
natural_image
Diagram of a kitchen appliance with a blue lid and upward arrow indicating a component (no text or symbols)
natural_image
Diagram of a water purifier with buckets and a bucket cover, showing internal components without any text or labels.

natural_image
Illustration of a hand operating a water dispenser with a blue tool inserted (no text or symbols)
natural_image
Diagram showing a blue device with a blue arrow pointing to a circular component, connected to a mechanical lever (no text or symbols present)
Ongelma Ratkaisu
natural_image
Illustration of a blue electrical plug connecting a wall socket with a blue arrow indicating direction (no text or symbols)
natural_image
Diagram showing a cleaning or packaging process with blue arrows indicating direction (no text or symbols present)
natural_image
Illustration of hands washing a water bottle from a sink with a hand pouring liquid into it (no text or symbols visible)
natural_image
Diagram of a container with liquid and a blue arrow indicating flow or movement (no text or symbols)
Svenska 603

natural_image
Illustration of a blue mechanical component being inserted into a container with a blue arrow indicating direction (no text or symbols)

natural_image
Illustration of hands holding a blue and white container with a blue lid, no text or symbols present
natural_image
Hand holding a blue tool next to a container with a lid (no text or symbols visible)

6 Tryck på på/av-knappen.
10 Apparaten startar sköljprocessen.
natural_image
Illustration of a hand pouring liquid into a basin with a faucet (no text or symbols)
12 Töm glaskannan.
Använda apparaten
Använda kaffebönor
natural_image
Diagram showing a blue plastic container being lifted by an upward arrow, with no text or symbols present.
natural_image
Illustration of a hand washing a water dispenser into a container with a blue liquid, placed on a kitchen sink (no text or symbols visible)
natural_image
Diagram of a water dispenser with a blue upward arrow indicating flow or movement (no text or symbols)
natural_image
Illustration of two containers pouring liquid into a container with a lid (no text or symbols)
natural_image
Simple line drawing of a kitchen appliance with a blue lid and arrow indicating downward motion (no text or symbols)
natural_image
Simple line drawing of a mechanical component with a blue component and a speech bubble containing particles (no text or symbols)
9 Välj önskad grovhet med vredet.

natural_image
Illustration of a hand inserting a container into a shared device (no text or symbols visible)
natural_image
Diagram of a cleaning or cleaning machine with buckets and a handle, showing no text or symbols.
natural_image
Diagram of a water purifier with blue flow arrow indicating internal circulation (no text or symbols)
natural_image
Diagram showing two hands operating a coffee machine with a coffee cup, no text or symbols present
natural_image
Illustration of a hand pouring liquid into a blue container over a cup (no text or symbols)
natural_image
Illustration of a hand inserting a device into a water dispenser, showing blue arrows indicating rotation (no text or symbols present)
24 Ta bort filtret.
natural_image
Line drawing of a modern kitchen appliance with a blue liquid and control panel (no text or symbols)
natural_image
Illustration of a hand inserting a small object into a container using a blue brush (no text or symbols present)
natural_image
Line drawing of a cleaning machine with bucket and filter (no text or symbols)
natural_image
Diagram of a water purifier with blue flow arrows indicating fluid movement (no text or symbols)
natural_image
Illustration of kitchen equipment including a blender, water dispenser, and mug with blue arrows indicating movement (no text or symbols)
natural_image
Illustration of a hand pouring liquid from a container into a cup (no text or symbols)
natural_image
Illustration of a hand inserting a device into a water dispenser, showing fluid flow direction (no text or symbols)
17 Ta bort filtret.

Ställa in timern
natural_image
Illustration of a blue electrical plug connecting a wall socket with a blue arrow indicating direction (no text or symbols)

natural_image
Hand cleaning a water dispenser with a blue cloth (no text or symbols visible)

natural_image
Illustration of a kitchen sink with a faucet, buckets, and a bucket (no text or symbols)
natural_image
Illustration of a blue electrical plug connecting a wall socket with a blue arrow indicating direction (no text or symbols)
1 Anslut apparaten.

natural_image
Illustration of a hand inserting a device into a water container with blue arrows indicating flow direction (no text or symbols)
natural_image
Diagram of a hand using a tool to lift a component, showing blue arrows indicating rotation (no text or symbols present)
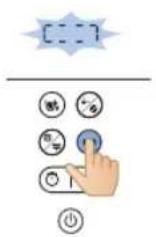
natural_image
Diagram of a mechanical device with a blue lid and upward arrow indicating motion (no text or symbols)
Svenska


natural_image
Illustration of a hand inserting a plug into a water dispenser into a shared device (no text or symbols present)
natural_image
Diagram of a water purifier with bucket and filter components (no text or labels)

natural_image
Illustration of a hand operating a water dispenser with a blue pump component (no text or symbols)
natural_image
Illustration of a blue electrical plug with a cable, showing an arrow indicating power or connection (no text or symbols present)
natural_image
Diagram showing two blue plastic containers connected by a diagonal line, with arrows indicating upward movement (no text or symbols present)
natural_image
Illustration of hands washing a water dispenser into a sink (no text or symbols visible)

natural_image
Illustration of a washing machine with a blue tool inserted into the base (no text or symbols)
natural_image
Illustration of a hand pouring liquid into a sink with a faucet (no text or symbols)
Cihazı kullanma
natural_image
Diagram showing a device with a lid and a container, both with blue arrows indicating direction (no text or symbols present)
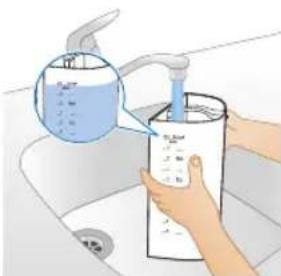
natural_image
Illustration of hands washing a water bottle from a sink with a hand pouring liquid into it (no text or symbols visible)
natural_image
Illustration of a container with liquid and a blue arrow indicating flow or movement (no text or symbols)
natural_image
Diagram of a water purifier with an upward arrow indicating flow or movement (no text or symbols present)
natural_image
Illustration of two containers pouring liquid into a container with a small container inside (no text or symbols)
natural_image
Diagram of a food storage machine with a blue lid and container, showing a drop in the top section (no text or symbols)
natural_image
Diagram of a mechanical device with a blue component and a magnified view of a circular component (no text or symbols)
natural_image
Illustration of a hand inserting a device into a water dispenser, showing fluid flow and component placement (no text or symbols)
natural_image
Diagram of a water purifier with buckets and a pump, showing internal components without any text or labels.
natural_image
Diagram of a mechanical device with blue arrows indicating motion or force direction (no text or symbols)
natural_image
Diagram of a water pump or reactor system with internal flow paths (no text or labels)
natural_image
Illustration of a hand pouring liquid from a container into a cup (no text or symbols)
natural_image
Illustration of a hand inserting a device into a water container with blue arrows indicating rotation (no text or symbols)
natural_image
Line drawing of a portable water dispenser with control panel and side arm (no text or symbols)
natural_image
Illustration of a hand inserting a small object into a water dispenser, showing mechanical components and fluid flow (no text or symbols)
natural_image
Illustration of a cleaning machine with buckets and a bucket cover, showing no text or symbols.
natural_image
Diagram of a mechanical device with a blue arrow indicating motion or force, showing internal components and no text or symbols.
natural_image
Illustration of kitchen equipment including a kettle, cup, and tiered storage unit (no text or symbols)
natural_image
Illustration of a coffee machine with two cups and a side mirror, showing no text or symbols
natural_image
Diagram of a portable kitchen or oven with blue pipes and control panel (no text or labels)
638 Türkçe
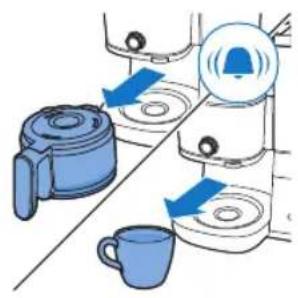
natural_image
Illustration of a hand pouring liquid into a cup (no text or symbols)
natural_image
Illustration of a hand inserting a blue sphere into a container, showing mechanical components (no text or symbols)
natural_image
Illustration of a bucket pump with a magnified inset showing the drop in liquid into a bin (no text or symbols)
natural_image
Illustration of a blue electrical plug connecting a wall socket with a blue arrow indicating direction (no text or symbols)

natural_image
Illustration of a hand cleaning a cylindrical container with a blue cloth (no text or symbols)
natural_image
Illustration of a kitchen sink with buckets and a faucet, no text or symbols present
natural_image
Illustration of a blue electrical plug connecting a wall socket with a blue arrow indicating direction (no text or symbols)
642 Türkçe

natural_image
Illustration of a hand inserting a device into a water dispenser, showing the process with blue arrows indicating movement (no text or symbols present)
natural_image
Illustration of a hand using a tool to lift a component, with blue arrows indicating rotation (no text or symbols)
natural_image
Diagram of a kitchen appliance with a blue lid and upward arrow indicating a component (no text or symbols)


natural_image
Illustration of a hand inserting a small object into a water dispenser, showing mechanical components and blue arrows indicating motion (no text or symbols)
natural_image
Diagram of a cleaning machine with buckets and a handle, showing internal components without any text or labels.

natural_image
Illustration of a hand inserting a blue plastic bag into a water dispenser (no text or symbols)
natural_image
Diagram showing a blue cylindrical device connected to a glass rod, with a blue arrow indicating motion or force direction (no text or symbols present)
Sorun Çözüm
natural_image
Illustration of a blue cable inserted into a white electrical socket with a blue arrow indicating direction (no text or symbols)
Ρύθμιση ρολογιού
natural_image
Diagram showing a cleaning or packaging process with blue arrows indicating direction (no text or symbols present)

natural_image
Illustration of hands washing a cup with a water dispenser, no text or symbols present

natural_image
Diagram showing a blue plastic door handle interacting with a water dispenser (no text or symbols present)

natural_image
Illustration of hands holding a blue and white container with a blue lid, no text or symbols present

natural_image
Illustration of a hand holding a blue tool above a white container with a lid (no text or symbols)

natural_image
Illustration of a hand pouring liquid into a sink with a faucet (no text or symbols)
natural_image
Diagram showing a blue plastic bag being inserted into a container, with arrows indicating direction (no text or symbols present)

natural_image
Illustration of hands washing a water bottle in a sink (no text or symbols visible)
natural_image
Diagram of a device with an upward arrow and internal components, no text or symbols present

natural_image
Illustration of two containers pouring liquid into a container with food items (no text or symbols)
natural_image
Diagram of a kitchen appliance with a blue lid and arrow indicating downward motion (no text or symbols)
natural_image
Simple line drawing of a container with a blue lid and a speech bubble containing three small icons (no text or symbols)
natural_image
Illustration of a hand inserting a magnifying glass into a water-filled container (no text or symbols)
natural_image
Diagram of a cleaning machine with buckets and a handle, showing internal components without any text or labels.
natural_image
Diagram of a portable kitchen appliance with blue airflow arrow indicating internal flow (no text or symbols)
natural_image
Illustration of kitchen equipment including a kettle, mug, and tiered storage unit (no text or symbols)
natural_image
Illustration of a hand pouring liquid into a blue container with a blue liquid, accompanied by a small cup (no text or symbols)
natural_image
Illustration of a hand using a tool to lift water from a container, with no visible text or symbols.
natural_image
Line drawing of a modern kitchen appliance with a blue liquid container (no text or symbols)
natural_image
Illustration of a hand inserting a blue object into a water dispenser, showing mechanical components (no text or symbols)
natural_image
Diagram of a water purifier with buckets and a pump, showing internal components without any text or labels.
natural_image
Diagram of a mechanical device with blue components and a blue arrow indicating rotation (no text or symbols)
natural_image
Illustration of kitchen equipment including a kettle, mug, and water dispenser with blue arrows indicating movement (no text or symbols)
natural_image
Diagram of a water pump or scrubber with blue flow lines indicating internal components (no text or labels)
natural_image
Illustration of a hand pouring liquid into a blue container over a cup (no text or symbols)
natural_image
Illustration of a hand inserting a water droplet into a washing machine (no text or symbols)
natural_image
Illustration of a blue electrical plug connecting a wall socket with a blue arrow indicating direction (no text or symbols)

natural_image
Line drawing of a hand cleaning a cylindrical container with a blue cloth (no text or symbols)
natural_image
Illustration of a kitchen sink with buckets and a faucet, no text or symbols present
natural_image
Illustration of a blue cable inserted into an electrical outlet with a blue arrow indicating direction (no text or symbols)

natural_image
Illustration of a hand inserting a blue arrow into a water dispenser, showing mechanical components (no text or symbols)

natural_image
Diagram of a hand using a tool to lift a machine, showing blue arrows indicating rotation (no text or symbols present)
natural_image
Diagram of a kitchen appliance with a blue lid and upward arrow indicating a component (no text or symbols)
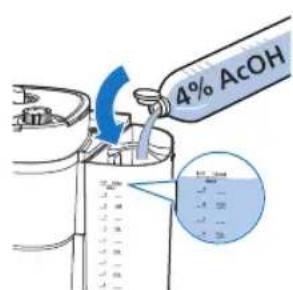
natural_image
Technical line drawing of a mechanical device with a bucket and housing (no text or symbols)
natural_image
Illustration of a hand inserting a blue plastic bag into a water dispenser (no text or symbols)
natural_image
Diagram showing a blue mechanical device with a blue arrow pointing to a component, connected to a tool (no text or symbols present)
Πρόβλημα Λύση
natural_image
Illustration of a blue electrical plug connecting a wall socket with a blue arrow indicating direction (no text or symbols)
natural_image
Diagram showing two blue plastic containers with upward arrows, connected by a diagonal line (no text or symbols)
natural_image
Illustration of a hand washing a cup with a water dispenser, no text or symbols present
natural_image
Diagram of a washing machine with a blue handle and blue plastic container, showing water level (no text or symbols)

natural_image
Illustration of a hand pouring liquid into a sink with a faucet (no text or symbols)
natural_image
Diagram showing a blue plastic container being lifted by an upward arrow, with no text or symbols present.
natural_image
Illustration of a hand washing a water dispenser into a container with a blue liquid, placed on a kitchen sink (no text or symbols visible)
natural_image
Diagram of a kitchen appliance with a blue lid and upward arrow, shown from top and side (no text or symbols)
natural_image
Illustration of two containers pouring liquid into a container with a small container inside (no text or symbols)
natural_image
Diagram of a kitchen appliance with a blue lid and arrow indicating downward motion (no text or symbols)
natural_image
Simple line drawing of a container with a blue lid and a magnified view of a circular object (no text or symbols)
natural_image
Illustration of a hand inserting a device into a water dispenser, showing fluid flow direction (no text or symbols)
natural_image
Illustration of a cleaning machine with buckets and a bucket cover, no text or symbols present
natural_image
Diagram of a water purifier with blue flow arrow indicating internal circulation (no text or symbols)
natural_image
Diagram showing two kitchen utensils with blue arrows indicating rotation or movement, no text or symbols present
natural_image
Illustration of a hand pouring liquid into a cup (no text or symbols)
natural_image
Illustration of a hand inserting a device into a washing machine (no text or symbols visible)
natural_image
Line drawing of a modern kitchen appliance with a blue liquid and control panel (no text or symbols)
natural_image
Illustration of a hand inserting a container into a water dispenser, showing fluid flow direction (no text or symbols)
natural_image
Line drawing of a cleaning machine with bucket and filter (no text or symbols)
natural_image
Diagram of a water purifier with blue flow arrows indicating fluid movement (no text or symbols)
natural_image
Illustration of kitchen equipment including a blender, water dispenser, and mug with blue arrows indicating movement (no text or symbols)
natural_image
Diagram of a water purifier with inlet and outlet pipes (no text or labels)
natural_image
Illustration of a hand pouring liquid from a container into a cup (no text or symbols)
natural_image
Illustration of a hand inserting a device into a water dispenser, showing fluid flow direction (no text or symbols)
natural_image
Illustration of a bucket being inserted into a trash bin, showing the process with an arrow indicating direction (no text or symbols present)
natural_image
Illustration of a blue electrical plug connecting a wall socket with a blue arrow indicating direction (no text or symbols)
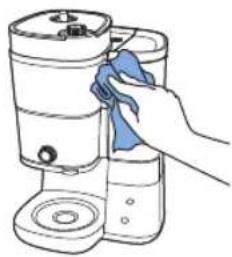
natural_image
Line drawing of a hand cleaning a water dispenser with a blue cloth (no text or symbols)
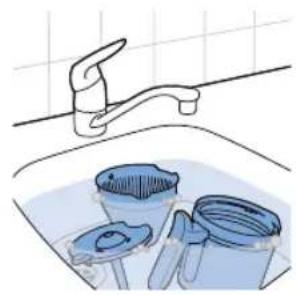
natural_image
Illustration of a kitchen sink with a faucet and three buckets (no text or symbols)
natural_image
Illustration of a blue electrical plug connecting a wall socket with a blue arrow indicating direction (no text or symbols)
natural_image
Illustration of a hand inserting a container into a washing machine (no text or symbols present)
natural_image
Diagram of a hand using a tool to rotate or rotate a component, showing blue arrows indicating rotation direction (no text or symbols present)
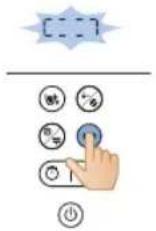
natural_image
Diagram of a water dispenser with a blue cover and upward arrow indicating flow or movement (no text or symbols)
Български


natural_image
Illustration of a hand inserting a plug into a water dispenser into a shared device (no text or symbols present)
natural_image
Diagram of a water purifier with bucket and filter components (no text or labels)
natural_image
Illustration of a hand operating a water dispenser with a blue pump component (no text or symbols)
natural_image
Illustration of a blue cable inserted into a white socket with a blue arrow indicating direction (no text or symbols)
708
Македонски

natural_image
Diagram showing a divided mechanical assembly with blue arrows indicating upward motion (no text or symbols present)
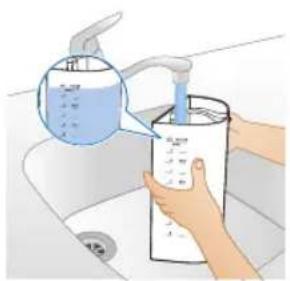
natural_image
Illustration of hands using a water dispenser to dispute liquid into a cylindrical container (no text or symbols visible)
Македонски
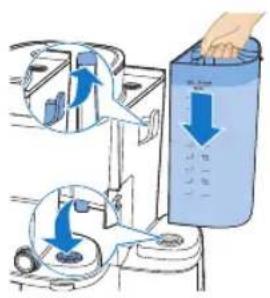
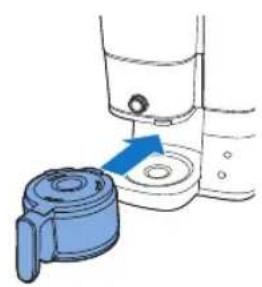
natural_image
Illustration of a hand mixer with a blue handle and arrow indicating action (no text or symbols)

natural_image
Illustration of hands holding a blue and white kettle with a blue lid, no text or symbols present

natural_image
Illustration of a hand holding a blue tool next to a white container with a lid (no text or symbols)

natural_image
Illustration of a hand pouring liquid into a sink with a faucet (no text or symbols)
natural_image
Diagram showing a blue plastic bag being inserted into a container, with arrows indicating direction (no text or symbols present)
natural_image
Illustration of hands washing a water bottle in a kitchen sink (no text or symbols visible)
natural_image
Diagram of a kitchen appliance with a blue lid and upward arrow, shown from an open side (no text or symbols)

natural_image
Illustration of two containers pouring liquid into a container with a tray (no text or symbols)
natural_image
Diagram of a kitchen appliance with a blue lid and arrow indicating downward motion (no text or symbols)
natural_image
Simple line drawing of a container with a blue lid and a magnified view of a circular object (no text or symbols)
natural_image
Illustration of a hand inserting a blue plastic component into a water dispenser (no text or symbols)
natural_image
Diagram of a cleaning machine with buckets and a handle, showing internal components without any text or labels.
natural_image
Diagram of a water purifier with blue flow arrow indicating internal circulation (no text or symbols)
natural_image
Illustration of kitchen equipment including a kettle, mug, and tiered storage unit (no text or symbols)
natural_image
Diagram of a water pump system with inlet and outlet pipes (no text or labels)
natural_image
Illustration of a hand pouring liquid from a container into a cup (no text or symbols)
natural_image
Illustration of a hand using a tool to lift a water level from a container, showing blue arrows indicating flow direction (no text or symbols present)
natural_image
Illustration of a bucket pump and a recycling bin with a magnified inset showing the drop in the bin (no text or symbols)
natural_image
Line drawing of a modern kitchen appliance with a blue liquid container (no text or symbols)
natural_image
Illustration of a hand inserting a component into water containers, showing fluid flow direction (no text or symbols)
natural_image
Diagram of a bucket pump system with buckets and a bucket, showing internal components and a downward arrow indicating flow direction (no text or labels)
natural_image
Diagram of a water purifier with blue flow arrows indicating internal circulation (no text or symbols)
natural_image
Illustration of kitchen utensils and a cup with blue arrows indicating movement or force (no text or symbols)
natural_image
Diagram of a water purifier with inlet and outlet pipes (no text or labels)
natural_image
Illustration of a hand pouring liquid into a blue container over a cup (no text or symbols)
natural_image
Illustration of a hand inserting a water droplet into a washing machine (no text or symbols)
natural_image
Illustration of a blue electrical plug connecting a wall socket with a blue arrow indicating direction (no text or symbols)

natural_image
Line drawing of a hand cleaning a cylindrical container with a blue cloth (no text or symbols)
natural_image
Illustration of a kitchen sink with buckets and a faucet, no text or symbols present
natural_image
Illustration of a blue electrical plug connecting a wall socket with a blue arrow indicating direction (no text or symbols)
724 Македонски

natural_image
Illustration of a hand inserting a device into a water dispenser, showing the process with blue arrows indicating movement (no text or symbols present)

natural_image
Illustration of a hand using a tool to lift a component, with blue arrows indicating rotation (no text or symbols)
natural_image
Diagram of a kitchen appliance with a blue lid and upward arrow indicating a component (no text or symbols)


natural_image
Illustration of a hand inserting a small object into a water dispenser, with no text or symbols present.
natural_image
Diagram of a cleaning machine with buckets and handle, showing internal components without any text or labels
natural_image
Illustration of a hand operating a water dispenser with a blue arrow indicating the process (no text or symbols present)
natural_image
Diagram showing a blue mechanical device with a blue arrow pointing to a component, connected to a tool (no text or symbols present)
natural_image
Illustration of a blue cable inserted into an electrical outlet with a blue arrow indicating direction (no text or symbols)
736
Русский

natural_image
Diagram showing a blue plastic bag being inserted into a container, with arrows indicating direction (no text or symbols present)

natural_image
Illustration of a hand washing a water bottle in a sink (no text or symbols visible)
Русский
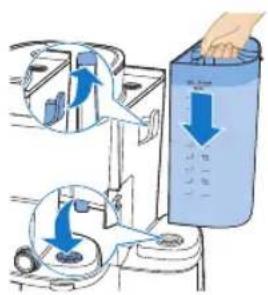
natural_image
Illustration of a hand holding a blue tool next to a white container with a lid (no text or symbols)


natural_image
Illustration of a hand pouring liquid into a water bottle from a faucet into a sink (no text or symbols)
natural_image
Diagram showing a blue plastic bag being inserted into a container, with arrows indicating direction (no text or symbols present)
natural_image
Illustration of hands using a water dispenser to dispense liquid into a container (no text or symbols visible)
natural_image
Diagram of a water purifier with an upward arrow indicating flow or movement (no text or symbols present)
natural_image
Illustration of two containers pouring liquid into a container with items inside (no text or symbols)
natural_image
Diagram of a food storage or processing device with a blue lid and arrow indicating downward motion (no text or symbols)
natural_image
Diagram of a device with a blue component and a magnified view of a circular component (no text or symbols)
natural_image
Illustration of a hand inserting a magnifying glass into a water-filled container (no text or symbols)
natural_image
Diagram of a cleaning machine with buckets and handle, showing internal components without any text or labels
natural_image
Diagram of a portable water heater with blue airflow direction indicated by arrows (no text or symbols)
natural_image
Illustration of kitchen equipment including a blender, water dispenser, and mug with blue arrows indicating movement (no text or symbols)
natural_image
Diagram of a water pump or filter unit with internal components and fluid flow paths (no text or labels)
natural_image
Illustration of a hand pouring liquid into a cup (no text or symbols)
natural_image
Illustration of a hand inserting a small object into a device, showing internal components and directional arrows (no text or symbols)
natural_image
Illustration of a bucket pump and a recycling bin with a magnified inset showing the drop in the bin (no text or symbols)
24 Извлеките фильтр.
natural_image
Line drawing of a modern kitchen appliance with a blue liquid container (no text or symbols)
natural_image
Illustration of a hand inserting a component into a water dispenser, showing fluid flow direction (no text or symbols)
natural_image
Diagram of a bucket pump system with buckets and a bucket, showing internal components and a downward arrow indicating flow direction (no text or labels)
natural_image
Diagram of a water purifier with blue flow arrows indicating internal circulation (no text or symbols)
natural_image
Illustration of kitchen utensils and a cup with blue arrows indicating movement or force (no text or symbols)
natural_image
Diagram of a water pump or scrubber with internal components and fluid flow paths (no text or labels)
natural_image
Illustration of a hand pouring liquid into a cup (no text or symbols)

natural_image
Illustration of a hand inserting a water droplet into a washing machine (no text or symbols)
Установка таймера
natural_image
Illustration of a blue electrical plug connecting a white wall socket with a blue arrow indicating direction (no text or symbols)

natural_image
Line drawing of a hand cleaning a cylindrical container with a blue cloth (no text or symbols)
natural_image
Illustration of a kitchen sink with buckets and a faucet, no text or symbols present
natural_image
Illustration of a blue electrical plug connecting a wall socket with a blue arrow indicating direction (no text or symbols)
752 Русский
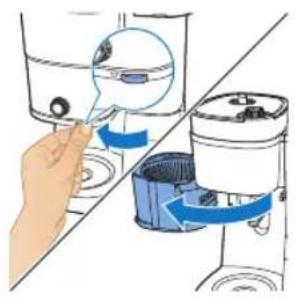
natural_image
Illustration of a hand inserting a device into a blender jar, showing blue and white color scheme (no text or symbols)
natural_image
Illustration of a hand using a tool to lift a component, with blue arrows indicating rotation (no text or symbols)
natural_image
Diagram of a kitchen appliance with a blue lid and upward arrow indicating a component (no text or symbols)
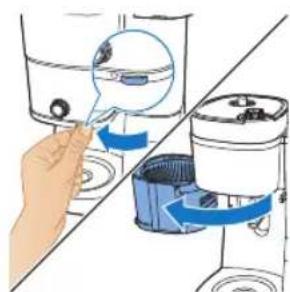
natural_image
Illustration of a hand inserting a small object into a water-filled container, showing fluid flow direction (no text or symbols)
natural_image
Diagram of a kitchen appliance with a bucket and fan (no text or symbols)
natural_image
Illustration of a hand inserting a blue plastic bag into a water dispenser (no text or symbols)
natural_image
Diagram showing a blue mechanical device with a blue arrow pointing to a component, connected to a tool (no text or symbols present)
natural_image
Illustration of a blue electrical plug with a circular socket, showing an arrow indicating power input (no text or symbols present)
764 Українська

natural_image
Diagram showing a blue plastic bag being lifted by an upward arrow, with no text or symbols present.
natural_image
Illustration of a hand washing a water bottle in a sink (no text or symbols visible)

natural_image
Illustration of a kitchen appliance with a blue handle and blue lid, showing a step with an arrow pointing to the base (no text or symbols present)
natural_image
Illustration of a hand pouring liquid into a basin with a faucet (no text or symbols)
natural_image
Diagram showing a blue plastic bag being inserted into a container, with arrows indicating direction (no text or symbols present)
natural_image
Illustration of a hand pouring liquid into a container with a piping bag (no text or symbols visible)
natural_image
Diagram of a device with a blue lid and an upward arrow, showing internal components (no text or symbols)
natural_image
Illustration of two hands pouring liquid from a container into a container (no text or symbols)
natural_image
Diagram of a kitchen appliance with a blue lid and arrow indicating downward motion (no text or symbols)
natural_image
Diagram of a device with a magnified view showing internal components (no text or symbols)
natural_image
Illustration of a hand inserting a device into a washing machine (no text or symbols visible)
natural_image
Diagram of a blender with blue liquid and inlet/outlet pipes (no text or labels)
natural_image
Illustration of a hand pouring liquid from a container into a cup (no text or symbols)

natural_image
Illustration of a hand using a water dispenser to lift a container, showing fluid flow direction (no text or symbols)
24 Вийміть фільтр.
natural_image
Line drawing of a portable water heater with control panel and side arm (no text or symbols)
natural_image
Illustration of a hand inserting a container into a shared tank, showing fluid flow direction (no text or symbols)
natural_image
Diagram of a washing machine with bucket and filter components (no text or labels)
natural_image
Diagram of a water purifier with blue flow arrow indicating internal circulation (no text or symbols)
natural_image
Diagram of a water heater system with inlet and outlet pipes (no text or labels)
natural_image
Illustration of a hand pouring liquid into a cup (no text or symbols)
natural_image
Illustration of a hand inserting a blue object into a container with liquid, showing mechanical components (no text or symbols)
17 Вийміть фільтр.

natural_image
Illustration of a blue electrical plug connecting a wall socket with a blue arrow indicating direction (no text or symbols)

natural_image
Line drawing of a hand cleaning a cylindrical container with a blue cloth (no text or symbols)
natural_image
Illustration of a kitchen sink with buckets and a faucet, no text or symbols present
natural_image
Illustration of a blue electrical plug connecting a wall socket with a blue arrow indicating direction (no text or symbols)
natural_image
Illustration of a hand inserting a small object into a water dispenser, with no text or symbols present.
natural_image
Illustration of a hand using a tool to rotate or rotate a component, with no visible text or symbols.

natural_image
Diagram of a kitchen appliance with a blue lid and upward arrow indicating a component (no text or symbols)
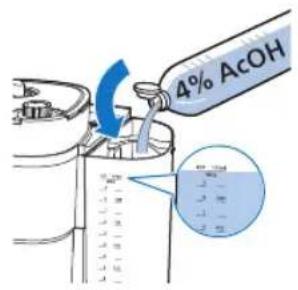
natural_image
Illustration of a hand inserting a device into a washing machine (no text or symbols present)
natural_image
Diagram of a washing machine with buckets and a handle, showing internal components without any text or labels.
natural_image
Diagram showing a blue mechanical component inserted into a container with a blue arrow indicating direction (no text or symbols present)
natural_image
Diagram showing a blue plastic pump with a blue arrow pointing to a water level, alongside a hand holding a glass and a valve (no text or symbols present)
natural_image
Illustration of a blue electrical plug with a cable, showing an open socket connected by a blue arrow (no text or symbols present)
Сағат уақытын қою
natural_image
Diagram showing a blue plastic bag being lifted by an upward arrow, with no text or symbols present.

natural_image
Illustration of a hand washing a water dispenser into a sink (no text or symbols visible)
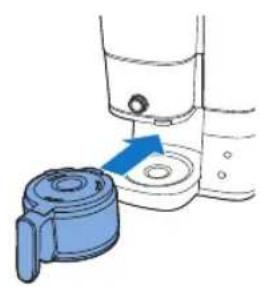
natural_image
Illustration of a hand mixer with a blue handle and arrow indicating action (no text or symbols)

natural_image
Illustration of hands holding a blue and white kettle with a blue lid, no text or symbols present

natural_image
Illustration of a hand holding a blue tool above a white container with a lid (no text or symbols)

natural_image
Illustration of a hand pouring liquid into a sink with a faucet (no text or symbols)
natural_image
Diagram showing a blue plastic bag being inserted into a container, with arrows indicating direction (no text or symbols present)
natural_image
Illustration of hands washing a water dispenser into a sink (no text or symbols visible)
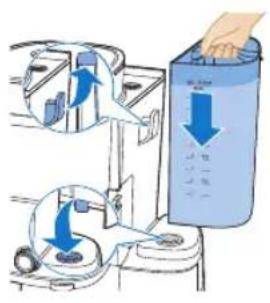
natural_image
Diagram of a device with a blue lid and an arrow indicating upward motion (no text or symbols)

natural_image
Illustration of two containers pouring liquid into a container with a tray (no text or symbols)
natural_image
Diagram of a kitchen appliance with a blue lid and arrow indicating downward motion (no text or symbols)
natural_image
Simple line drawing of a container with a blue component and a magnified view of a circular object (no text or symbols)
natural_image
Illustration of a hand inserting a magnifying glass into a water-filled container (no text or symbols)
natural_image
Diagram of a cleaning machine with buckets and handle, showing internal components without any text or labels
natural_image
Diagram of a portable air conditioner unit with blue airflow direction indicated (no text or symbols)
natural_image
Illustration of kitchen utensils and a cup with blue arrows indicating movement or force (no text or symbols)
natural_image
Illustration of a hand pouring liquid from a container into a mug (no text or symbols)
natural_image
Illustration of a hand inserting a device into a water dispenser, showing fluid flow direction (no text or symbols)
natural_image
Line drawing of a modern kitchen appliance with a blue liquid container (no text or symbols)
natural_image
Illustration of a hand inserting a component into a water dispenser, showing fluid flow direction (no text or symbols)
natural_image
Diagram of a bucket pump system with buckets and a bucket, showing internal components and a blue arrow indicating direction (no text or labels)
natural_image
Diagram of a water purifier with blue flow arrows indicating internal circulation (no text or symbols)
natural_image
Illustration of kitchen utensils and a cup with blue arrows indicating movement or force (no text or symbols)
natural_image
Diagram of a blender with blue tubing and control panel (no text or symbols)
natural_image
Illustration of a hand pouring liquid into a cup (no text or symbols)
natural_image
Illustration of a hand inserting a blue arrow into a container with a magnified inset (no text or symbols)
natural_image
Illustration of a blue electrical plug connecting a wall socket with a blue arrow indicating direction (no text or symbols)
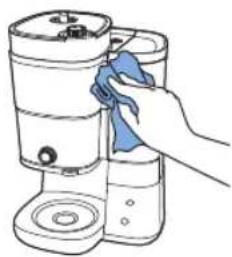
natural_image
Line drawing of a hand cleaning a cylindrical container with a blue cloth (no text or symbols)
natural_image
Illustration of a kitchen sink with buckets and a faucet, no text or symbols present
natural_image
Illustration of a blue electrical plug connecting a wall socket with a blue arrow indicating direction (no text or symbols)

natural_image
Illustration of a hand inserting a device into a blender jar, showing blue and white components (no text or symbols)


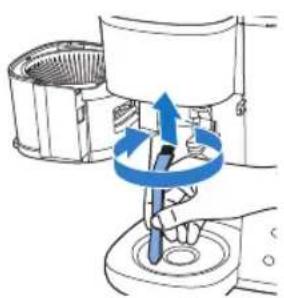
natural_image
Illustration of a hand using a tool to lift a component, with blue arrows indicating rotation (no text or symbols)
natural_image
Diagram of a water dispenser with a blue lid and upward arrow indicating flow or movement (no text or symbols)


natural_image
Illustration of a hand inserting a small object into a water-filled container, with no text or symbols present.
natural_image
Diagram of a cleaning machine with buckets and a handle, showing internal components without any text or labels.
natural_image
Illustration of a hand inserting a blue plastic bag into a water dispenser (no text or symbols)
6 Бос кұмыраны кофе машинасына салыңыз.
natural_image
Diagram showing a blue mechanical device with a blue arrow pointing to a component, connected to a tool (no text or symbols present)
natural_image
Illustration of a blue cable being inserted into an electrical socket with a blue arrow indicating direction (no text or symbols)
08:00
08:

08:06
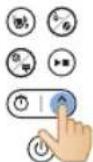
.הכלההוּרָהוּרָהוּרָהוּרָהוּרָהוּרָהוּרָהוּרָהוּרָהוּרָהוּרָהוּרָהוּרָהוּרָהוּרָה
6:הכלה
natural_image
Diagram of a kitchen appliance with a blue lid and adjacent storage unit, showing directional arrows (no text or symbols)

natural_image
Illustration of hands washing a water dispenser into a sink (no text or symbols visible)
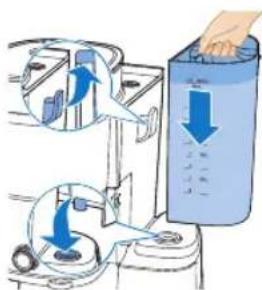
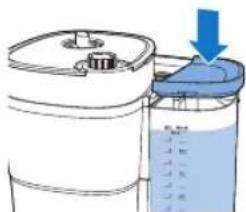
natural_image
Diagram of a container with a lid and liquid level, showing an arrow pointing to the lid (no text or symbols present)

natural_image
Illustration of a hand washing a small appliance with a blue handle, showing no text or symbols.
- מְקַרָה
natural_image
Illustration of hands holding a blue and white container with a blue lid, no text or symbols present
- מַרְשׁה
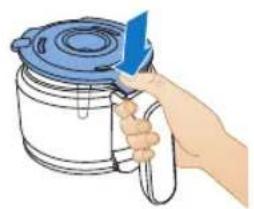
natural_image
Illustration of a hand holding a blue tool next to a container with a lid (no text or symbols visible)
5.177 177
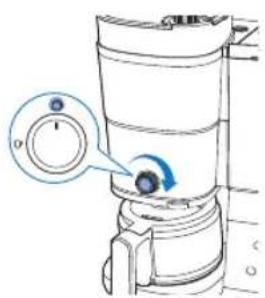
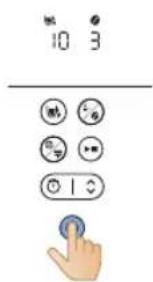
- אַרְשָׁהוֹתָם
822

- NIDD 10
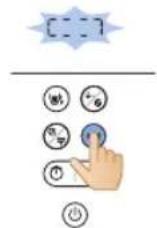
- כרִיְהָה אַעֹן
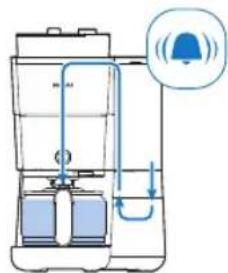
10.תְרַעָה בּוֹ
- מַרְשָׁת הַל

natural_image
Illustration of a hand pouring liquid into a sink with a faucet (no text or symbols)
- מַרְשָׁהִיָם
אַרְשָׁה
natural_image
Diagram showing a blue plastic bag being lifted by a diagonal line, with no text or symbols present.
- כרִי אַבְרָה

natural_image
Illustration of a hand washing a water bottle from a sink, with a blue liquid being poured into it (no text or symbols visible)
- מַרְׁעֹת בְּוֹ
- כרִיְבָה
natural_image
Diagram of a container with liquid and a blue arrow indicating downward flow (no text or symbols)
5.הַרְשׁוֹתָּלִי
natural_image
Diagram of a kitchen appliance with a blue upward arrow indicating rotation or movement (no text or symbols)
6.707 D'17
natural_image
Illustration of two containers pouring liquid into a container (no text or symbols)
natural_image
Diagram of a mechanical device with a blue lid and arrow indicating downward motion (no text or symbols)

natural_image
Diagram of a mechanical component with a blue knob and a magnified inset showing internal components (no text or symbols)
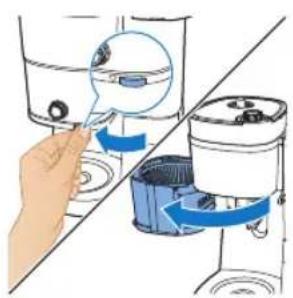
natural_image
Illustration of a hand inserting a small device into a washing machine, showing the process with blue arrows indicating rotation (no text or symbols present)
natural_image
Diagram of a portable water heater with inlet/outlet pipes and control panel (no text or labels)
- מַרְׁתָה
natural_image
Illustration of a hand pouring liquid into a cup (no text or symbols)


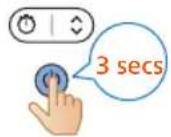
22
.刀刀刀
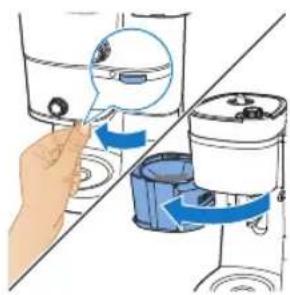
natural_image
Illustration of a hand using a water dispenser to lift a bucket, showing mechanical components and blue directional arrows (no text or symbols)
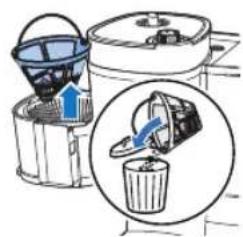
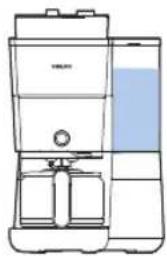
natural_image
Line drawing of a modern kitchen or oven with a blue liquid container (no text or symbols)
-
707'97
-
בַרְשָׁה
natural_image
Illustration of a hand inserting a blue arrow into a water dispenser, showing mechanical components and a magnified view (no text or symbols)
-
כְרַעֹה
-
כְרַעֹבָה

natural_image
Illustration of a kitchen appliance with buckets and a handle, showing no text or symbols
4תְרַעָהִיָם
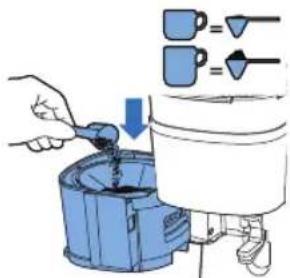
- 7079
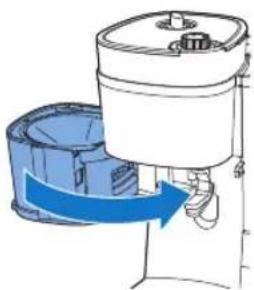
natural_image
Diagram of a water purifier with blue flow arrow indicating internal process (no text or symbols)
- מַתְרָה בְּבָּוֹ
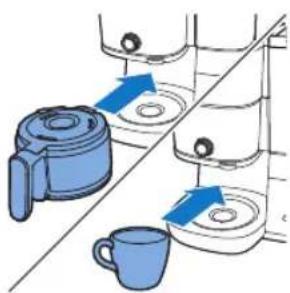
natural_image
Illustration of kitchen equipment including a blender, water dispenser, and mug with blue arrows indicating movement (no text or symbols)
הכלה 829
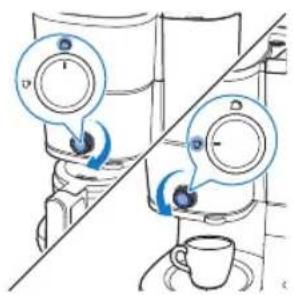
natural_image
Diagram of a vertical container with internal flow pipes and a blue liquid level, no text or symbols present
- מַרְׁבָה בְּוֹת
ucamlı ####找到.
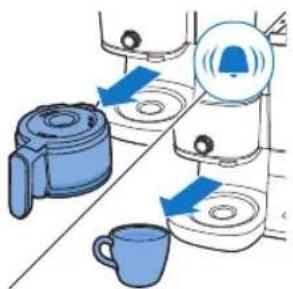
- מַרְשׁה
natural_image
Illustration of a hand pouring liquid into a cup (no text or symbols)
14.ロボウ ノゴ

15מַרְשָׁ בִיַת

.刀刀刀
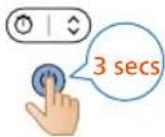
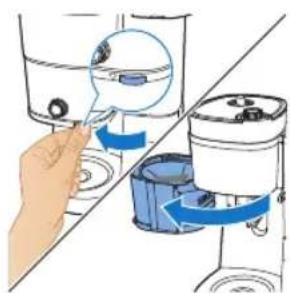
natural_image
Illustration of a hand inserting a small object into a water dispenser, with no visible text or symbols.
16.תְקּרָה
- כְרִי אַב
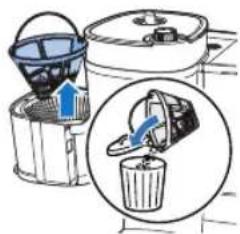
תְרָה בְרָה
natural_image
Illustration of a blue electrical plug connecting a wall socket with a blue arrow indicating direction (no text or symbols)
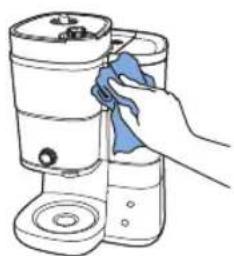
natural_image
Illustration of a hand cleaning a cylindrical container with a blue cloth (no text or symbols)
- מַרְתָה לַרְתָה
30116 7
בִרְה אַלְאָה.
4
.ロウコシ
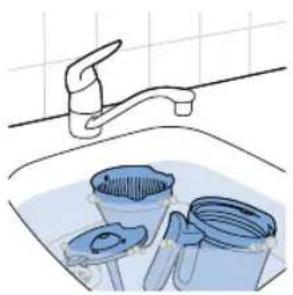
natural_image
Illustration of a kitchen sink with buckets and a faucet, no text or symbols present
בַרְשָׁה בַרְשָׁה
:בְרַע
natural_image
Illustration of a blue electrical plug with a cable and arrow indicating power input (no text or symbols)
834
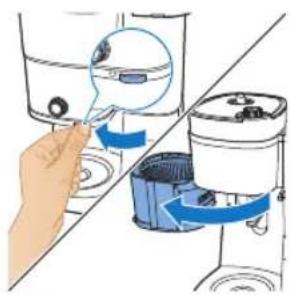
natural_image
Illustration of a hand using a water dispenser to lift a bucket, showing the brush and water level (no text or symbols)

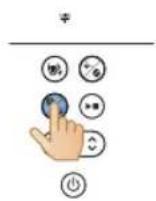
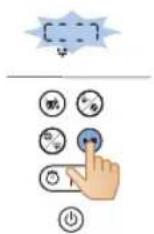
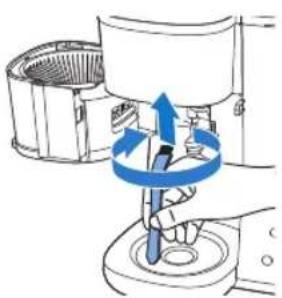
natural_image
Illustration of a hand using a tool to lift a component, with blue arrows indicating rotation (no text or symbols)
- מַרְׁת אָבִי
3.הַרְהָהִיָה
natural_image
Diagram of a kitchen appliance with a blue lid and upward arrow indicating a component (no text or symbols)
210 n91 nor.
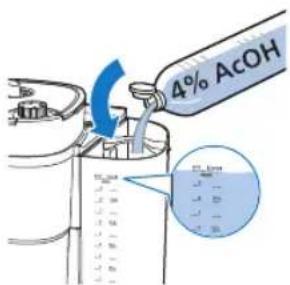
.NIOD
836
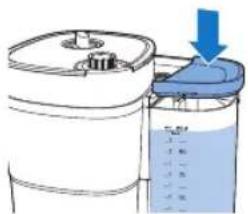
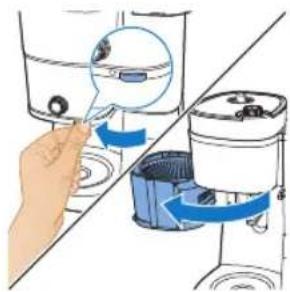
natural_image
Illustration of a hand using a magnifying glass to interact with a water dispenser, showing fluid flow and cleaning steps (no text or symbols)

natural_image
Diagram of a water dispenser with buckets and a bucket cover, showing internal components (no text or labels)
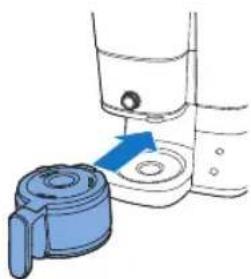
natural_image
Illustration of a blue mechanical component being inserted into a container with liquid, no text or symbols present
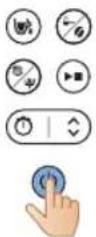
3.ロイヤル 70%
12.הכלה
13ロナリカロ
natural_image
Diagram showing a blue mechanical component being inserted into a container with a blue arrow indicating motion (no text or symbols present)
14.
157'inn'7'TDi
PHILIPS and the Philips Shield Emblem are registered trademarks of Koninklijke Philips N.V. and are used under license.
This product has been manufactured by and is sold under the responsibility of Versuni Holding B.V., and Versuni Holding B.V. is the warrantor in relation to this product.
(11/2024)