
67950 - Food Processor Lund - Free user manual and instructions
Find the device manual for free 67950 Lund in PDF.
| Product type | Food processor |
| Brand | Lund |
| Model | 67950 |
| Rated voltage | 220-240 V~ |
| Rated frequency | 50/60 Hz |
| Rated power | 550 W |
| Electrical protection class | II |
| Capacity of mixer bowl | 1.2 L |
| Capacity of blender jar | 1.5 L |
| Capacity of mill container | 0.5 L |
| Dimensions (mixer configuration) | 210 x 240 x 420 mm |
| Dimensions (blender configuration) | 180 x 190 x 420 mm |
| Dimensions (mill configuration) | 185 x 190 x 340 mm |
| Weight of drive unit | 1.8 kg |
| Main functions | Mixing, chopping, grating, whisking, blending, grinding |
| Speeds | 2 speeds + pulse mode |
| Safety | Device preventing startup if lid or bowl is improperly mounted |
| Blade material | Stainless steel |
| Cleaning | Removable parts dishwasher-safe (max 60°C); wipe housing with damp cloth |
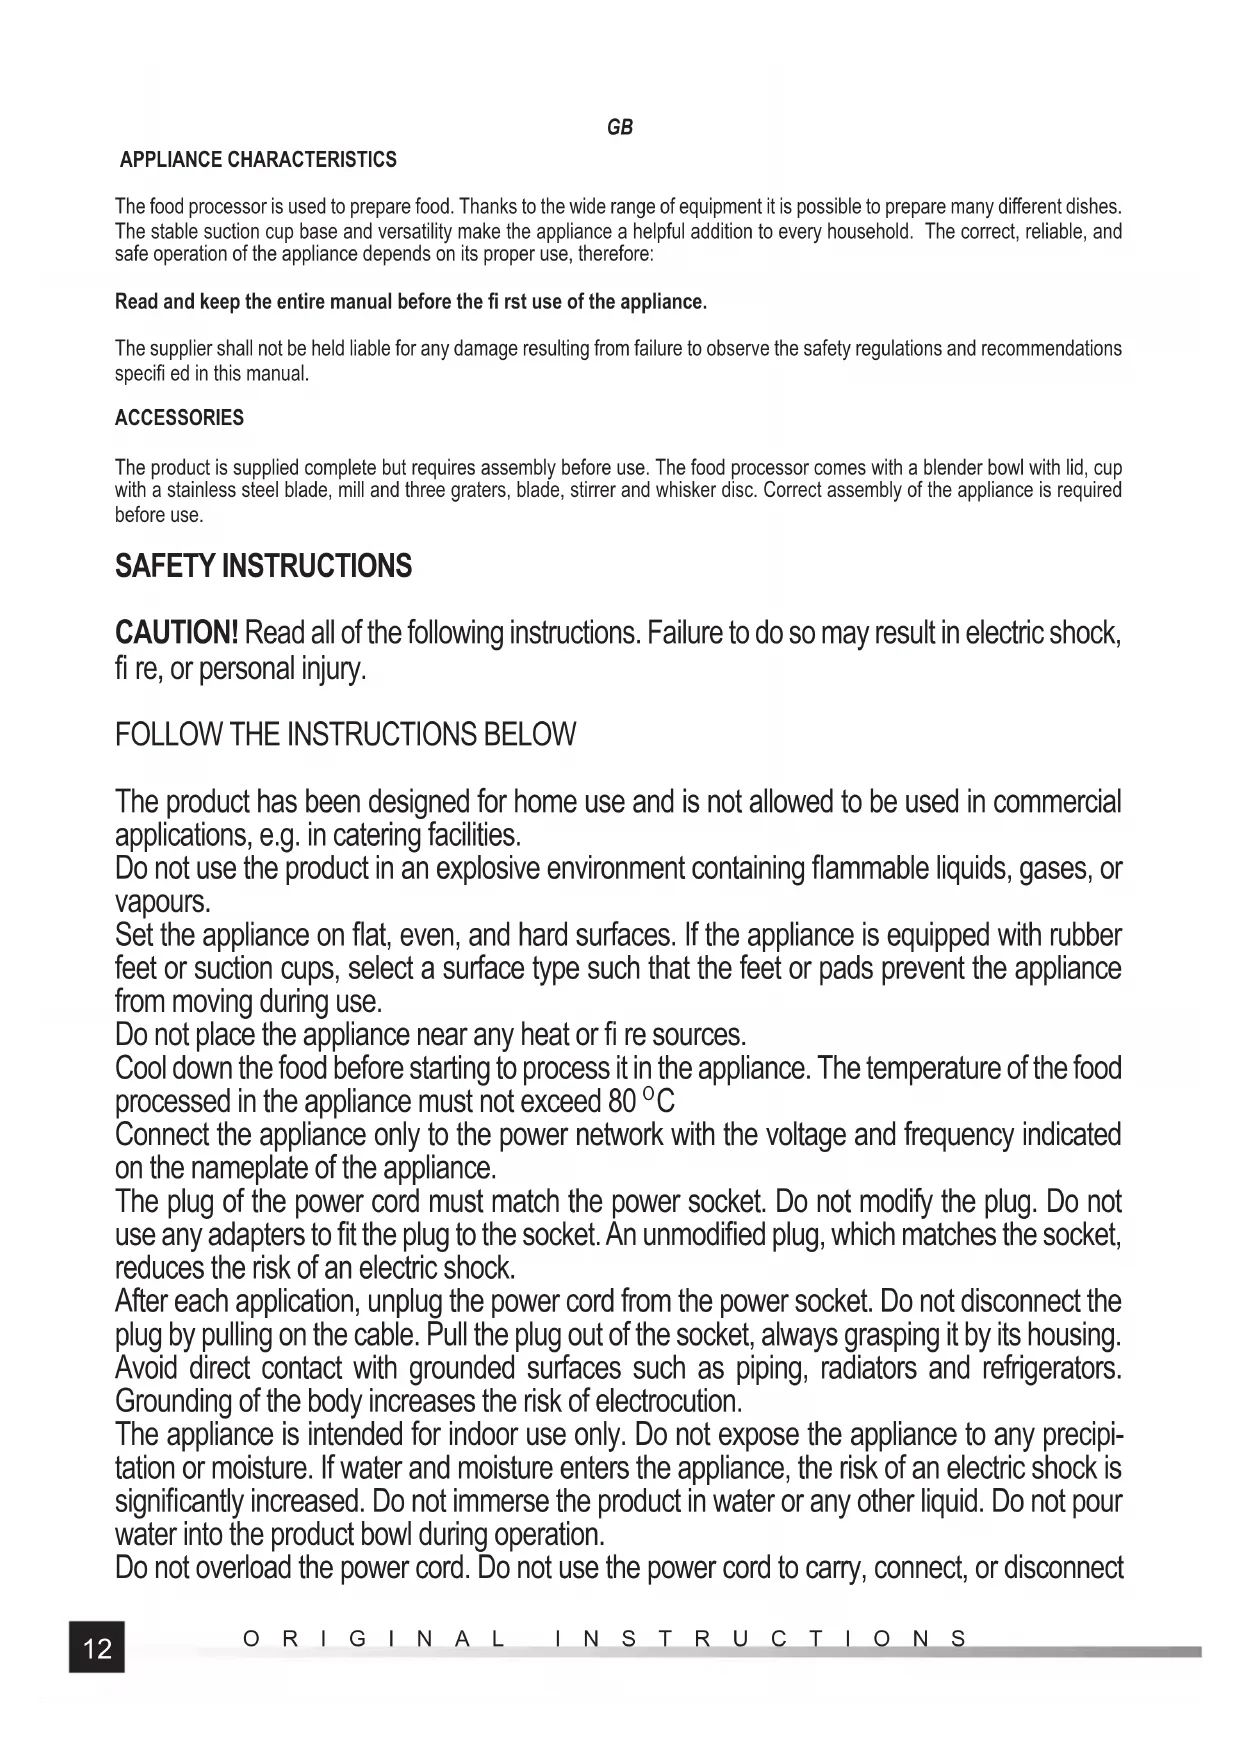
| Included accessories | Mixing bowl with lid, blender jar with lid, mill, grater, chopping blade, kneading paddle, whisk disc, pusher |
| Max. continuous operating time | 6 minutes, then 20 minutes rest |
| Maximum food temperature | 80°C |
| Use | Household use only |
Frequently Asked Questions - 67950 Lund
User questions about 67950 Lund
0 question about this device. Answer the ones you know or ask your own.
Ask a new question about this device
Download the instructions for your Food Processor in PDF format for free! Find your manual 67950 - Lund and take your electronic device back in hand. On this page are published all the documents necessary for the use of your device. 67950 by Lund.
USER MANUAL 67950 Lund
natural_image
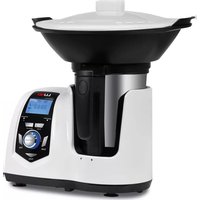
Lund blender with two kitchen utensils: one serving food, the other holding a smoothie (no visible text or symbols)CE
PL GB D RUS UA LT LV CZ SK H RO E F I NL GR
natural_image
Close-up of a car wheel rim with directional arrows indicating motion or movement (no text or symbols)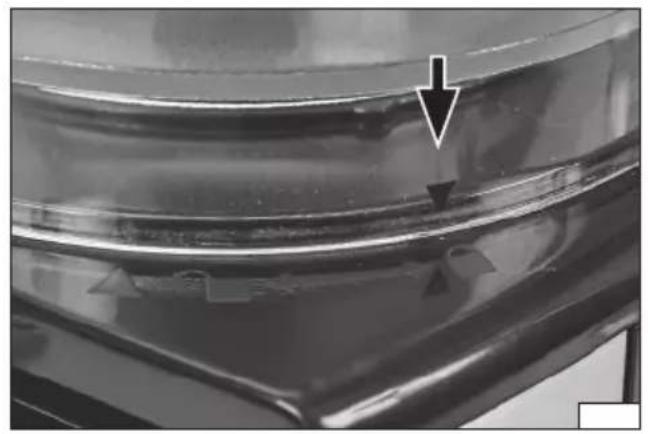
natural_image
Close-up of a metallic surface with a white arrow pointing to a specific layer (no text or symbols visible)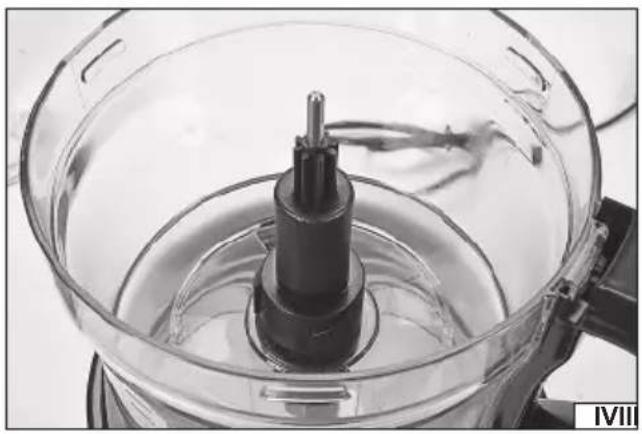
natural_image
Close-up of a kitchen appliance with a central cylindrical component and a side-mounted handle, placed on a stovetop (no visible text or symbols)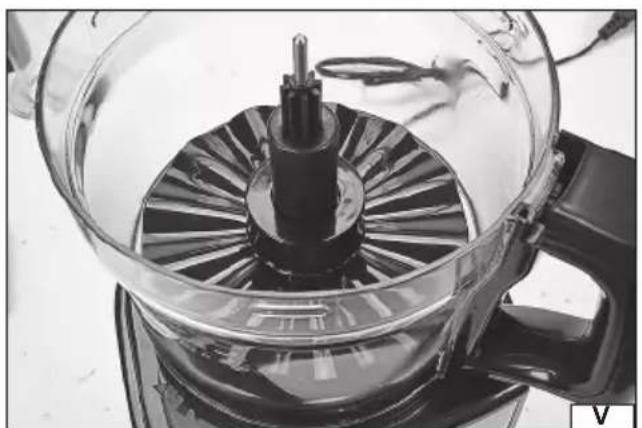
natural_image
Close-up of a glass coffee maker with a rotating fan on a stovetop (no visible text or symbols)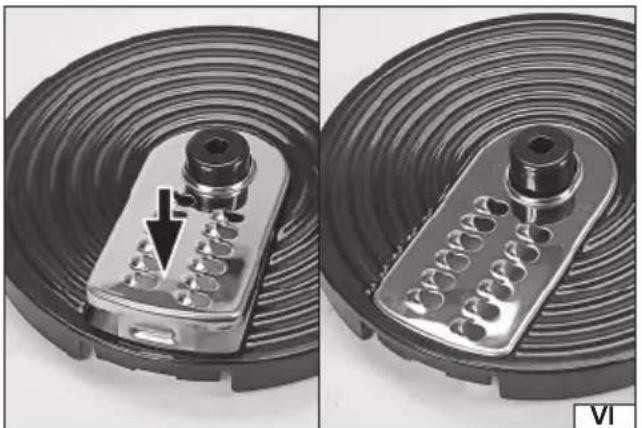
natural_image
Close-up of two mechanical components with metallic parts and a black arrow indicating a detail (no text or symbols)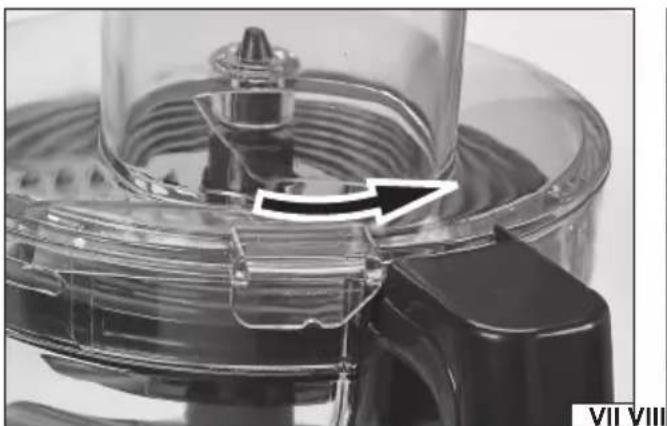
natural_image
Close-up of a kitchen knife with a white arrow indicating a turning point (no text or symbols visible)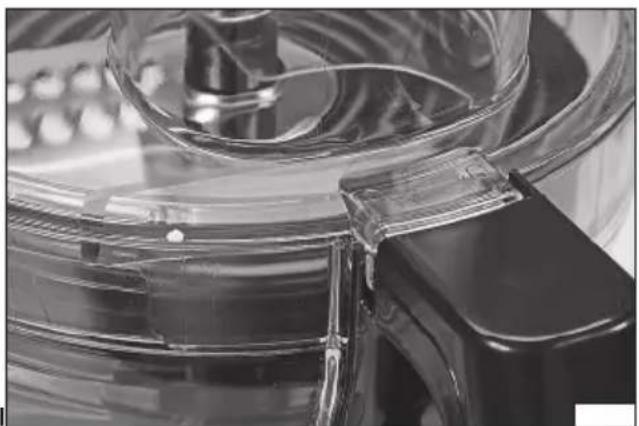
natural_image
Close-up of a transparent plastic kitchen appliance with a black handle and lid (no visible text or symbols)natural_image
Three-panel black-and-white photo showing a hand holding a transparent cylindrical container over a transparent base, with no visible text or symbols.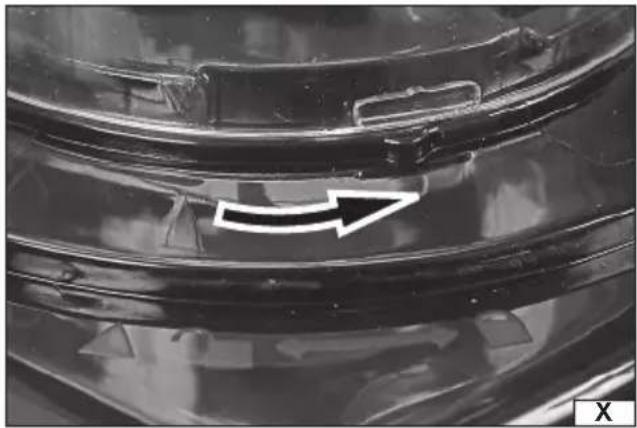
natural_image
Close-up of a car wheel rim with a white arrow pointing to the rim area (no text or symbols visible)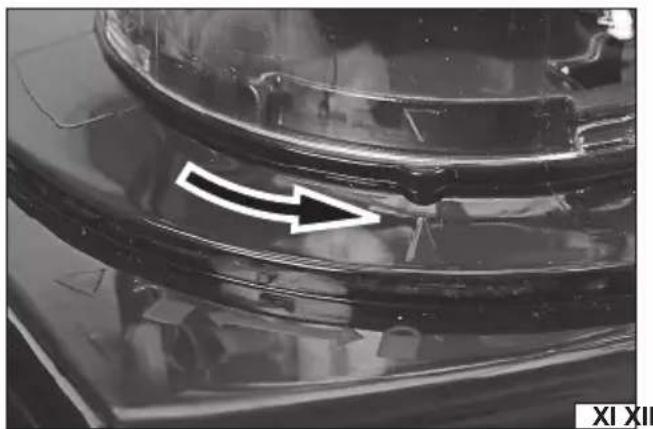
natural_image
Close-up of a car's front wheel rim with a white arrow pointing to the rim area (no text or symbols visible)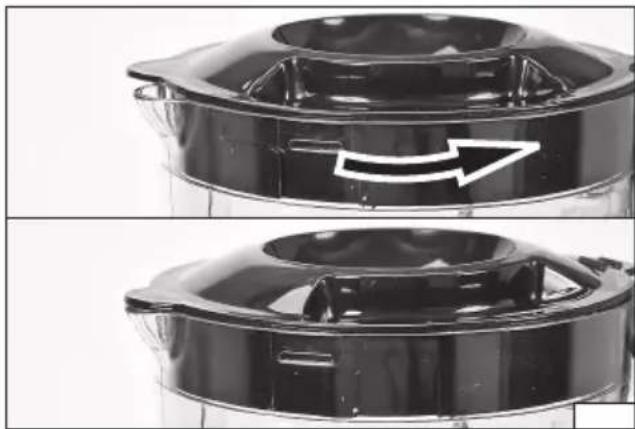
natural_image
Two black-and-white photos showing a kitchen brush head with a white arrow indicating rotation (no text or symbols)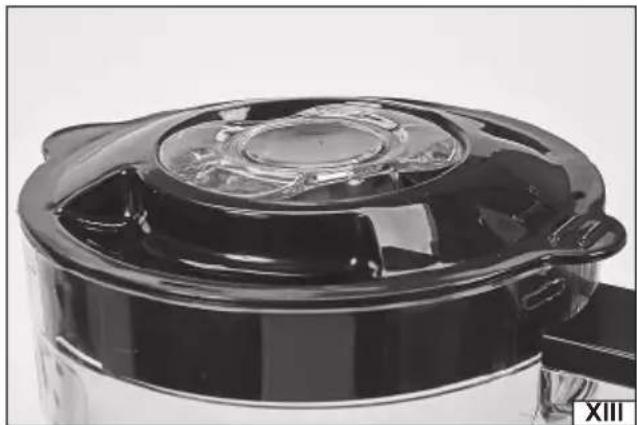
natural_image
Close-up of a black and white kitchen pot with lid and side handle (no visible text or symbols)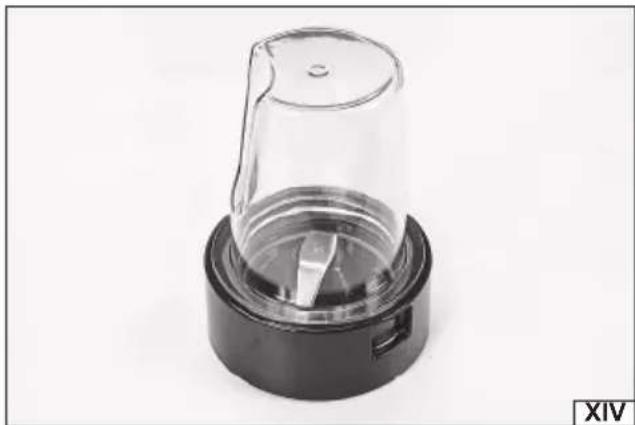
natural_image
Close-up of a black plastic blender with a lid and blade, no visible text or symbols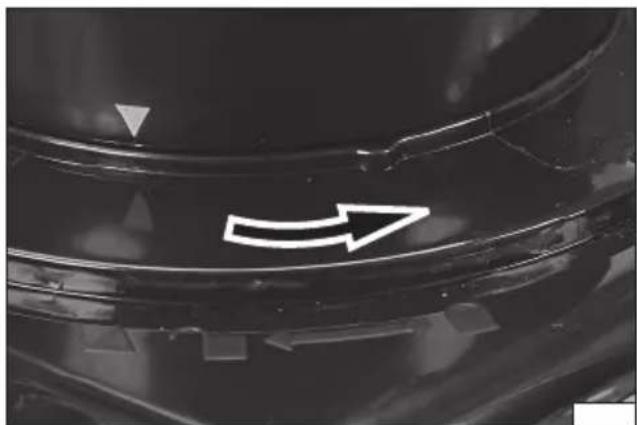
natural_image
Close-up of a mechanical component with a white arrow pointing right, no visible text or symbols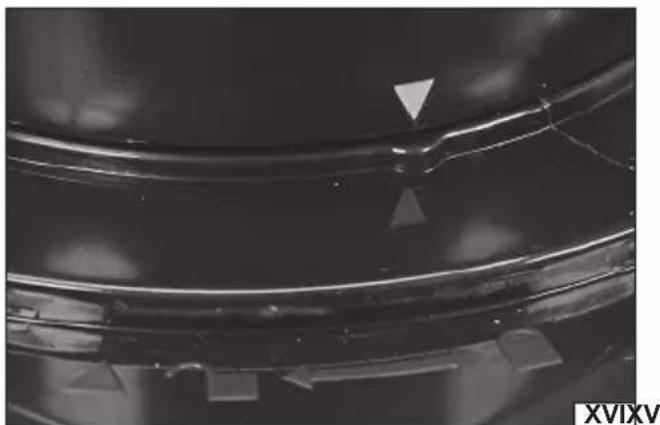
natural_image
Close-up of a metallic mechanical component with triangular features and a central defect (no text or symbols visible)PL
Read the operating instruction
Safe contact with food
This symbol indicates that waste electrical and electronic equipment (including batteries and storage cells) cannot be disposed of with other types of waste. Waste equipment should be collected and handed over separately to a collection point for recycling and recovery, in order to reduce the amount of waste and the use of natural resources. Uncontrolled release of hazardous components contained in electrical and electronic equipment may pose a risk to human health and have adverse effects for the environment. The household plays an important role in contributing to reuse and recovery, including recycling of waste equipment. For more information about the appropriate recycling methods, contact your local authority or retailer.
APPLIANCE CHARACTERISTICS
The food processor is used to prepare food. Thanks to the wide range of equipment it is possible to prepare many different dishes. The stable suction cup base and versatility make the appliance a helpful addition to every household. The correct, reliable, and safe operation of the appliance depends on its proper use, therefore:
Read and keep the entire manual before the first use of the appliance.
The supplier shall not be held liable for any damage resulting from failure to observe the safety regulations and recommendations specified in this manual.
ACCESSORIES
The product is supplied complete but requires assembly before use. The food processor comes with a blender bowl with lid, cup with a stainless steel blade, mill and three graters, blade, stirrer and whisker disc. Correct assembly of the appliance is required before use.
SAFETY INSTRUCTIONS
CAUTION! Read all of the following instructions. Failure to do so may result in electric shock, fire, or personal injury.
FOLLOW THE INSTRUCTIONS BELOW
The product has been designed for home use and is not allowed to be used in commercial applications, e.g. in catering facilities.
Do not use the product in an explosive environment containing flammable liquids, gases, or vapours.
Set the appliance on flat, even, and hard surfaces. If the appliance is equipped with rubber feet or suction cups, select a surface type such that the feet or pads prevent the appliance from moving during use.
Do not place the appliance near any heat or fire sources.
Cool down the food before starting to process it in the appliance. The temperature of the food processed in the appliance must not exceed 80 °C
Connect the appliance only to the power network with the voltage and frequency indicated on the nameplate of the appliance.
The plug of the power cord must match the power socket. Do not modify the plug. Do not use any adapters to fit the plug to the socket. An unmodified plug, which matches the socket, reduces the risk of an electric shock.
After each application, unplug the power cord from the power socket. Do not disconnect the plug by pulling on the cable. Pull the plug out of the socket, always grasping it by its housing.
Avoid direct contact with grounded surfaces such as piping, radiators and refrigerators.
Grounding of the body increases the risk of electrocution.
The appliance is intended for indoor use only. Do not expose the appliance to any precipitation or moisture. If water and moisture enters the appliance, the risk of an electric shock is significantly increased. Do not immerse the product in water or any other liquid. Do not pour water into the product bowl during operation.
Do not overload the power cord. Do not use the power cord to carry, connect, or disconnect
GB
the plug from the power socket. Avoid any contact between the power cord and heat sources, oil, sharp edges, and moving parts. Damage to the power cord increases the risk of an electric shock. If the power cord is damaged (e.g. it is cut or its insulation is melted), immediately unplug it from the wall socket and return it to an authorised service facility. It is not allowed to use the product with a damaged power cord. It is not allowed to have the power cord repaired. It must be changed for a new one at an authorized service centre. When using extension cords, use extension cords with power parameters such as those shown on the appliance's nameplate. The cross-section of the extension wires shall not be less than the cross-section of the wires of the power cord of the appliance. This should be checked on the insulation of the power cord and the extension cord, or contact the manufacturer of the appliance and/or the extension cord.
Do not use the appliance with damaged equipment parts If you notice any damage to any part of the appliance or accessory, you must discontinue using it. In this case, the appliance must be taken to an authorised service centre or replaced by yourself, if this is permitted by the user's manual.
Turn off the appliance and unplug the power cord from the wall socket before you start any work on replacing, cleaning, or adjusting moving parts.
The appliance must not be used by children. This appliance may be used by persons with reduced physical, mental abilities and persons with no experience or knowledge of the appliance, if supervised or instructed on its safe use so that the risks associated with it were understandable. Children should not play with the appliance. Unattended children should not be allowed to perform the cleaning and maintenance of the appliance.
The appliance contains sharp parts (blender blade, mill blade, chopping blade, grater blades) and special care should be taken when assembling, disassembling and cleaning such parts. The appliance is intended for home use only. It is recommended not to exceed 6 minutes of continuous operation, after which the appliance should be left to cool down for about 20 minutes. During cool-down, unplug the power cord from the power socket.
APPLIANCE OPERATION
CAUTION! Turn off the appliance and unplug the power cord from the socket during all equipment assembly and disassembly activities.
Preparing for operation
Remove the product from its packaging, remove all parts and then wash all parts in contact with the food according to the instructions in the section entitled "Product maintenance".
Mixer assembly and disassembly
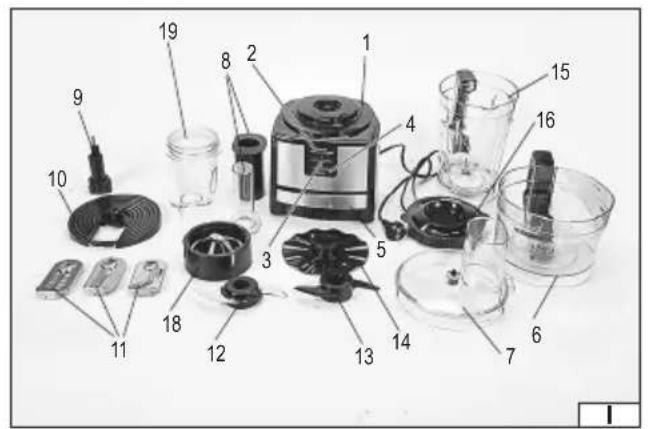
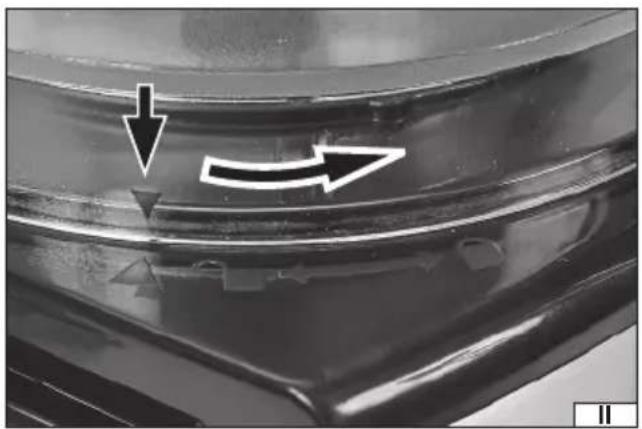
Place the drive housing on level and stable surface. Make sure that all suction cups in the base have attached themselves to the surface. Place the mixer bowl on top of the drive housing so that the bowl's bottom edge is fully flush with the drive housing wall along the entire circumference and the marker at the bottom edge of the bowl points to the open padlock symbol (X), and then rotate the bowl so that the marker points to the closed padlock symbol (XI). The correctly installed bowl's lower edge is flush with the entire circumference of the upper wall of the drive housing. A correctly mounted bowl cannot be dismantled except by turning it, so that the marker indicates the open padlock symbol, and lifting. The drive housing has a safety device which, in case of improper installation, will not allow to start the appliance rotation.
Place the spindle on the drive shaft inside the bowl (IV).
One of the following accessories can be attached to the spindle as required: grater holder with mounted grater, chopping blade, kneading stirrer or whisker disc (V).
The grater must be mounted in the holder in such a manner that the hook at the rounded edge of the grater hits the gap in the holder, and the axis of the holder passes through the opening in the grater (VI). Then press the grater into the holder so that the
GB
upper surface of the grater is aligned with the upper surface of the holder. Due to the sharp edges of the grater, special care must be taken when installing and removing the grater in the holder. It is recommended to use protective gloves during assembly. Close the mixer bowl with the lid. Place the lid on the bowl so that it is flush with the mixer bowl along its entire circumference, and the tab of the safety device is next to the handle of the mixer bowl (VII). Then rotate the lid in the direction indicated by the closed padlock symbol (VIII).
The safety device will not allow the drive to start if the lid is removed or incorrectly mounted.
Insert the pusher into the lid inlet opening (IX). The pusher consists of two elements, an external and an internal one. The opening in the external pusher can be used for placing small food products in the bowl.
Installation and removal of the blender cup
Place the drive housing on level and stable surface. Make sure that all suction cups in the base have attached themselves to the surface. Place the cup on top of the drive housing so that the cup's bottom edge is fully flush with the drive housing wall along the entire circumference and the marker at the bottom edge of the cup points to the open padlock symbol (X), and then rotate the cup so that the marker points to the closed padlock symbol (XI). The correctly installed cup's lower edge is flush with the entire circumference of the upper wall of the drive housing. A correctly mounted cup cannot be dismantled except by turning it, so that the marker indicates the open padlock symbol, and lifting. The drive housing has a safety device which, in case of improper installation, will not allow to start the appliance rotation.
Mount the lid on the cup so that it is fully flush with the edge of the cup along its entire circumference and the tabs inside the cup hit the notches in the lid and then rotate the lid in the direction indicated by the closed padlock symbol (XII). The cup spout should be covered by the lid tab in such a manner as to limit the possibility of spilling the contents of the cup.
The lid is equipped with a plug (XIII), which allows to add food ingredients while the blender is in operation. The plug can also be used as a measure to dose the amount of ingredients.
Mill assembly and disassembly
Place the drive housing on level and stable surface. Make sure that all suction cups in the base have attached themselves to the surface. Fill the container of the mill with food intended for grinding to half the height of the container. Screw the mill base onto the container (XIV). The base thread is counterclockwise, so in order to connect the base with the container, hold the container and turn the base counterclockwise. Removing the base and container will require rotation in the opposite direction.
Then rotate the assembled base and container 180^ and place the mill base on top of the drive housing so that the base's bottom edge is fully flush with the drive housing wall along the entire circumference and the marker at the bottom edge of the cup points to the open padlock symbol (XV), and then rotate the base so that the marker points to the closed padlock symbol (XVI).
The safety device will not allow the mill to operate without the container or with the base of the mill incorrectly mounted on the base.
Using the appliance
CAUTION! Before using the appliance for the first time, all parts which come into contact with food should be thoroughly washed and dried. Please read the maintenance instructions beforehand.
The appliance has a control panel with buttons which allow to switch the appliance on and off, set two speeds and start the pulse mode. The ON/OFF button is used to turn the appliance on and off. If the appliance is switched on, the red backlighting of the ON/OFF button will indicate that the appliance is switched on.
The buttons marked "I" and "II" are used to select the speed mode of the appliance. The button marked "I" allows a lower speed to be set and the button marked "II" allows a higher speed to be set. The selected speed mode is indicated by the blue backlighting of the button pressed.
The button marked "PULSE" is used to start the pulse mode. Press and hold to activate the maximum speed. Releasing the button stops the appliance.
When finished, always turn off the product power supply using the ON/OFF button, wait for the moving parts to stop completely, and then unplug the power cord from the socket. Only then can you proceed with the removal of the accessories.
Recommendations and tips for working with the food processor
Connect the appliance to the power supply after it has been assembled and filled with food. When using the mixer, only add food through the inlet opening. When using the grater, allow the full speed to be reached and only then add food through the inlet opening. Do not exceed the maximum capacity of bowls, cups and containers. If the vessel has a capacity scale, do not fill it above the maximum capacity mark. If the vessel is filled with liquid, the rotary movement will cause the liquid level to rise. If the vessel is overflied it can result in spilling the contents.
The chopping blade is not used for fragmenting hard food products such as coffee beans, nuts, ice cubes. Too hard food products can cause the blade to deform.
Starting the drive at a lower speed will reduce the risk of spillage or scattering food while the food processor is running. If necessary, the speed can be changed during operation by pressing the corresponding switch.
Do not excessively prolong the working time when chopping hard cheese or chocolate. If the working time is too long, the cheese or chocolate will start to heat up and melt, which may cause the chopped food to clump.
GB
It is recommended to prepare the food for grinding by cutting it into cubes with an edge of approx. 3 cm.
The kneading stirrer can be used to prepare dough, e.g. for bread or pizza.
The whisker disc can be used to whisk egg white foam, whipped cream or to prepare creams. Do not use the whisker disc to prepare hard food such as ice cubes. The disc may crack when in contact with hard food.
When using the grater, do not press too hard on the grated food. Only the pusher should be used to press food. Do not use hands, fingers, cutlery or any other objects for this purpose. They can be caught by the grater and lead to damage to the appliance, as well as injuries.
The blender cup can be used to prepare drinks, juices, sauces, mix food, e.g. for children and mix soft food ingredients. During operation, the cup should always be covered with a lid. If it is necessary to add ingredients during food preparation, use the opening in the lid.
In the case of large ingredients, they should be divided into smaller portions, and if this is not possible, they should be placed in the cup before turning the appliance on, then the lid should be mounted and the appliance turned on. Do not remove the cup lid while the blender is running.
Do not use the blender to crush ice or frozen food. It is not recommended to use the blender for longer than 3 minutes.
When using the blender, the ingredients should be added to the cup through the opening in the lid to minimise the cup content spillage.
Do not place too much food in the mill container. It is recommended to divide the food to be ground into several portions and to grind each portion separately. If there is too much food in the mill container, the grinding can take a very long time and result in uneven grinding results.
MAINTENANCE AND STORAGE
CAUTION! Never immerse the drive housing in water or other liquids. The drive housing must also never be exposed to jets of water or other liquids. Doing so may result in electric shock.
Other parts and accessories can be washed under running water or in dishwashers. The temperature of water during washing must not exceed 60 °C. This should be taken into account when selecting the dishwasher programme. When using a dishwasher, expect faster matting of plastic surfaces. Washing parts with elastic seals in the dishwasher (mill base and blender cup) can lead to faster wear of the seals. It is recommended to clean these parts under running water.
Care must be taken to avoid injury when manually cleaning parts with sharp edges. Brushes and protective gloves are recommended.
Turn the appliance off after finishing work, wait for the rotating parts to stop completely, unplug the power cord from the socket, disassemble the device, empty its contents, and proceed with maintenance.
Parts of the appliance which have been in contact with food should be cleaned immediately after use. Dried food residues can clog the stirrers and blades, which can lead to a loss of performance of the appliance or even its damage. If this happens, immerse these parts which were described as immersible in warm water with dishwashing liquid and leave it to soak, then clean with a soft sponge or a brush and water with dishwashing liquid. Clean the appliance housing and the outer surfaces of the cup with a soft cloth dampened with a water and mild detergent solution. Wipe dry. Do not use abrasive cleaning agents.
CAUTION! Due to the sharp edges of the blades, avoid hand contact with the blades during cleaning. The blades can cut both skin and kitchen gloves made of synthetic material. The blades should be washed with a brush or sponge.
Make sure all parts are cleaned and dried before connecting the appliance to the power supply. Store the product in dry, shaded conditions. Protect the storage place from unauthorised access, especially by children. It is recommended to store the product in the unit packaging provided with the product. The drive housing has a drawer which can be used to store small accessories of the food processor.
TECHNICAL PARAMETERS
| Parameter Units Value | ||
| Catalogue No. 67950 | ||
| Rated voltage [V~] 220 – 240 | ||
| Rated frequency [Hz] 50/60 | ||
| Rated power [W] 550 | ||
| Electrical protection class II | ||
| Mixer bowl capacity [I] 1.2 | ||
| Cup capacity [I] 1.5 | ||
| Mill container capacity | [I] 0.5 | |
| External dimensions of the appliance prepared to work as a mixer (W x D x H) | [mm] | 210 x 240 x 420 |
| External dimensions of the appliance prepared to work as a blender (W x D x H) | [mm] | 180 x 190 x 420 |
| External dimensions of the appliance prepared to work as a mill (W x D x H) | [mm] | 185 x 190 x 340 |
| Drive housing weight | [kg] | 1.8 |
GERÄTEBESCHREIBUNG

- PL
- APPLIANCE CHARACTERISTICS
- ACCESSORIES
- SAFETY INSTRUCTIONS
- FOLLOW THE INSTRUCTIONS BELOW
- GB
- APPLIANCE OPERATION
- Preparing for operation
- Mixer assembly and disassembly
- Installation and removal of the blender cup
- Mill assembly and disassembly
- Using the appliance
- Recommendations and tips for working with the food processor
- MAINTENANCE AND STORAGE
- GERÄTEBESCHREIBUNG
Brand : Lund
Model : 67950
Category : Food Processor