
67811 - Food Processor Lund - Free user manual and instructions
Find the device manual for free 67811 Lund in PDF.
| Product type | Multifunction stand mixer |
| Brand | Lund |
| Model | 67811 |
| Rated power | 1000 W |
| Maximum power | 1500 W |
| Supply voltage | 220-240 V ~ 50/60 Hz |
| Protection class | II |
| Bowl capacity | 4.5 L |
| Blender capacity | 1.5 L |
| Dimensions (mixer mode) | 375 x 225 x 315 mm |
| Dimensions (blender mode) | 315 x 175 x 540 mm |
| Dimensions (mincer mode) | 450 x 175 x 315 mm |
| Weight | 4.6 kg |
| Max continuous operation time | 6 minutes |
| Cooling time | 20 minutes |
| Included accessories | Whisk, dough mixer, spatula, blender with lid, mincer with filter and pusher, sausage and kibbe kit |
| Functions | Mixing, kneading, whisking, blending, mincing, sausage and meatball preparation |
| Safety | Safety switch, non-slip suction cups, automatic overload shut-off |
| Maintenance | Hand wash removable parts (bowl, accessories); do not immerse the housing |
| Repairability | Spare parts available via authorized service center |
Frequently Asked Questions - 67811 Lund
User questions about 67811 Lund
0 question about this device. Answer the ones you know or ask your own.
Ask a new question about this device
Download the instructions for your Food Processor in PDF format for free! Find your manual 67811 - Lund and take your electronic device back in hand. On this page are published all the documents necessary for the use of your device. 67811 by Lund.
USER MANUAL 67811 Lund
natural_image
Black LUND kitchen blender with metal mixing bowl and side blade, no visible text or symbols on the device itself.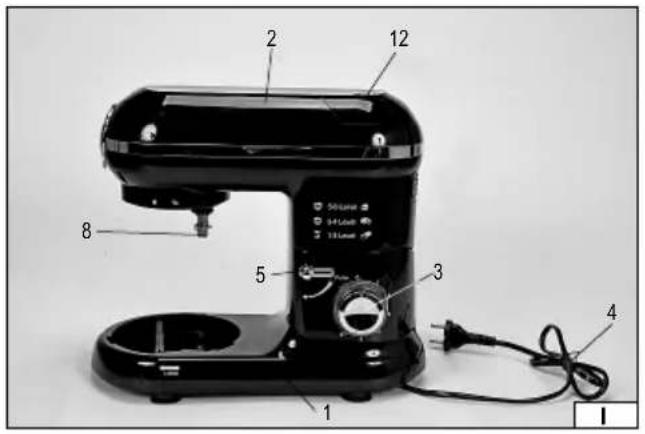
natural_image
Three identical black containers with metallic cylindrical objects and curved arrows indicating motion or movement (no text or symbols)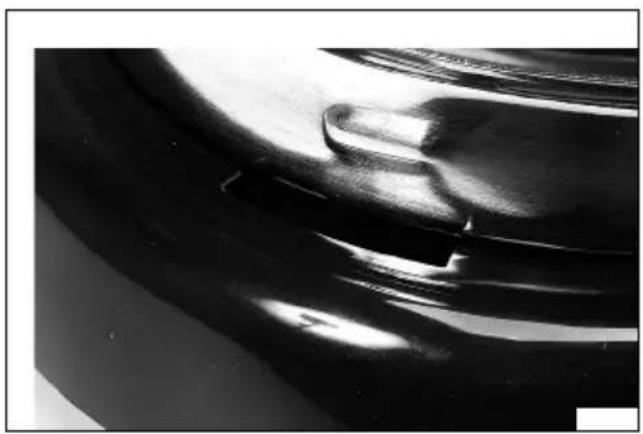
natural_image
Close-up of a reflective surface with smooth, curved ridges and highlights (no text or symbols)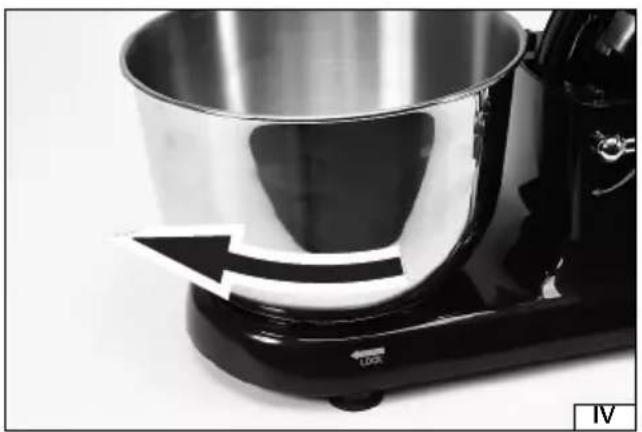
natural_image
Close-up of a kitchen mixer with a black handle and arrow indicator (no text or symbols)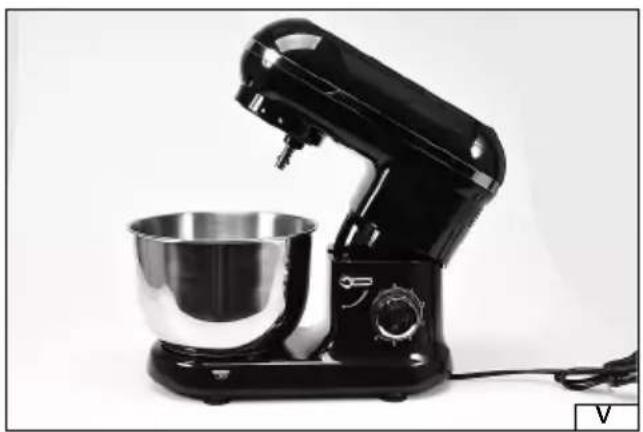
natural_image
Black kitchen stand mixer with a metal bowl, shown against a plain white background (no text or symbols visible)natural_image
Exploded view diagram of a mechanical assembly with multiple components (no text or labels)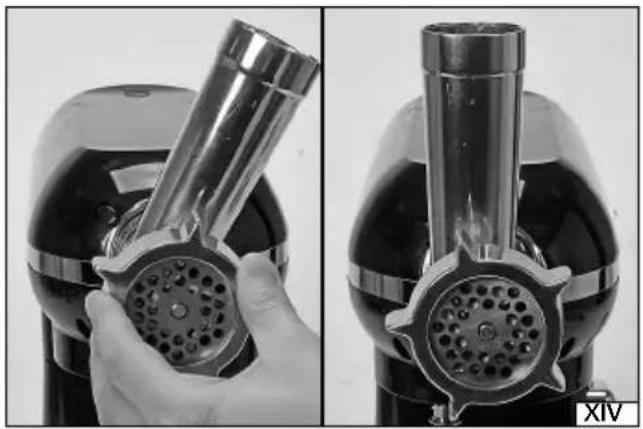
natural_image
Two black-and-white photos showing a hand holding a metallic tool inside a device, with no visible text or symbols.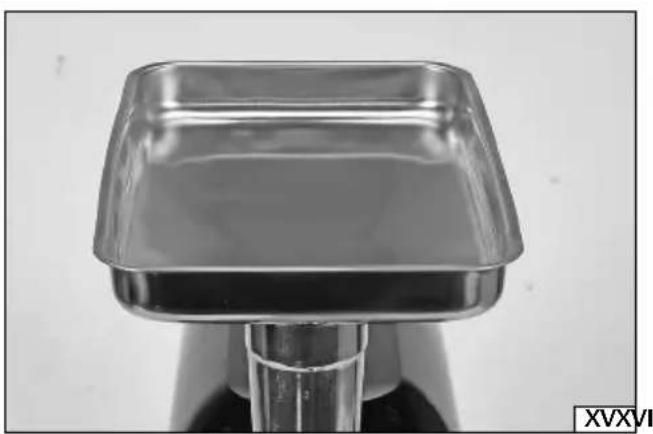
natural_image
Close-up of a metallic square container with a cylindrical base, no visible text or symbols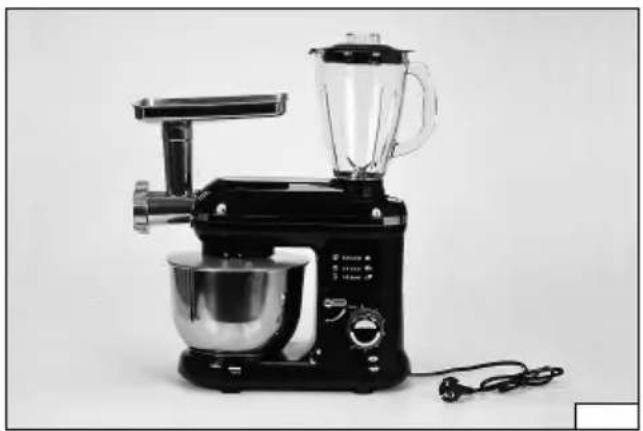
natural_image
Black kitchen mixer with blender and bowl on a plain background (no text or symbols visible)PL GB
Read the operating instruction
Second class of insulation
Safe contact with food
Correct disposal of this product: This marking shown on the product and its literature indicates this kind of product mustn't be disposed with household wastes at the end of its working life in order to prevent possible harm to the environment or human health. Therefore the customers is invited to supply to the correct disposal, differentiating this product from other types of refusals and recycle it in responsible way, in order to re - use this components. The customer therefore is invited to contact the local supplier office for the relative information to the differentiated collection and the recycling of this type of product.
UMWELTSCHUTZ
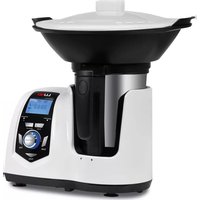
The planetary mixer is intended for food preparation. Thanks to the rich variety of accessories it is possible to prepare many different dishes. A stable base with suction cups and device versatility makes that the mixer will be helpful in every household. The product is designed for domestic use only and may not be used in commercial applications. Correct, reliable and safe operation of the device depends on its proper use, therefore:
Please read the entire manual carefully before using the device and keep it around.
The supplier is not responsible for any damage caused by failure to observe the safety regulations and recommendations of this manual.
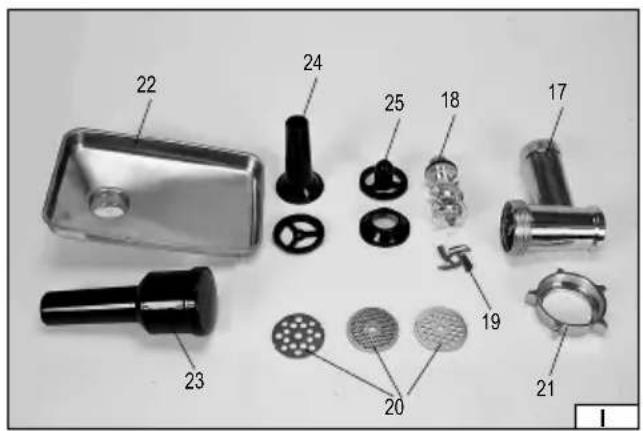
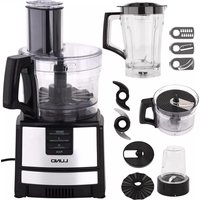
ACCESSORIES
The product is delivered complete but must be assembled before use.
The mixer is supplied with a bowl with a cover, three mixer tips, a blender jug with a cover and a grinding attachment.
SAFETY INSTRUCTIONS
CAUTION! Read all the instructions below. Failure to do so may result in an electrical shock, fire or a personal injury.
OBSERVE THE FOLLOWING INSTRUCTIONS
CAUTION! The product may only be used in one capacity at a time. It is forbidden to use the product in two or three applications at the same time, e.g. as a mixer, blender and grinding machine. Product performance does not allow for simultaneous use in more than one application. Failure to do so may result in product damage, electrical shock, fire and personal injury.
Do not use the device in an explosive environment that contains flammable liquids, gases or vapours.
Place the unit on flat, level and hard surfaces. If the device is equipped with rubber feet or suction cups, select a surface that prevents the feet or pads from moving during use.
Do not place the device near heat sources or fire.
Connect the unit only to the mains of voltage and frequency shown on the rating plate of the device.
The power cord plug must fit into the mains outlet. Do not modify the plug. Do not use any adapters in order to adapt the plug to the outlet. An unmodified plug that fits into the outlet reduces the risk of an electric shock.
After each use, unplug the power cord from the mains outlet.
Avoid contact with earthed surfaces such as pipes, radiators and refrigerators. Earthing of the body increases the risk of electric shock.
This device is intended for indoor use only. Do not expose the device to precipitation or moisture. Water and moisture that gets inside the device increases the risk of an electric shock. Do not immerse the device in water or any other liquid.
Do not cover the ventilation holes and ensure their patency.
Do not overload the power cord. Do not use the power cord for carrying, connecting and disconnecting the plug from the mains outlet. Avoid contact of the power cord with heat, oil, sharp edges and moving parts. Damage to the power cord increases the risk of an electric shock. In the event of damage to the power cord (e.g. cutting, melting of the insulation), unplug the power cord from the mains outlet immediately and return the product to an authorised repair facility. Do not use the device with a damaged power cord. Do not repair the power cord. When damaged, replace it with a new one at an authorised service point. If extension cords are used, use extension cords with such power supply parameters as these shown on the nameplate of the device. The cross section of extension cord wires should be not smaller than the cross section of the wires of the device power cord. Check this on the insulation of the power cord and extension cord or contact the manufacturer of the device and/or of the extension cord.
If any part of the device is found to have been damaged, it may not be further used. If this is the case, forward the device to an authorised service point or replace the part yourself, provided that the user manual allows for such corrective action.
Before carrying out any activities related to the replacement, cleaning or adjustment of moving parts, turn off the device and unplug the power cord from the mains outlet.
The device must not be used by children. Keep the device and its power cord away from children.
The device may be used by persons with reduced physical, mental capabilities and persons with no experience or knowledge of the device, provided that supervision or instruction is given on how to use the device in a safe manner so that the associated hazards are understood. Children should not play with the device. Children should not clean and maintain the device unattended.
The appliance is suitable for domestic use only. The duration of continuous operation may not exceed 6 minutes, after which the device should be left to cool for approx. 20 minutes. During this time, unplug the power cord from the mains outlet.
The device contains sharp parts (blender blades), caution should be exercised when installing, removing and cleaning such parts.
CAUTION! Switch off the device and unplug the power cord from the mains outlet during all assembly and disassembly operations.
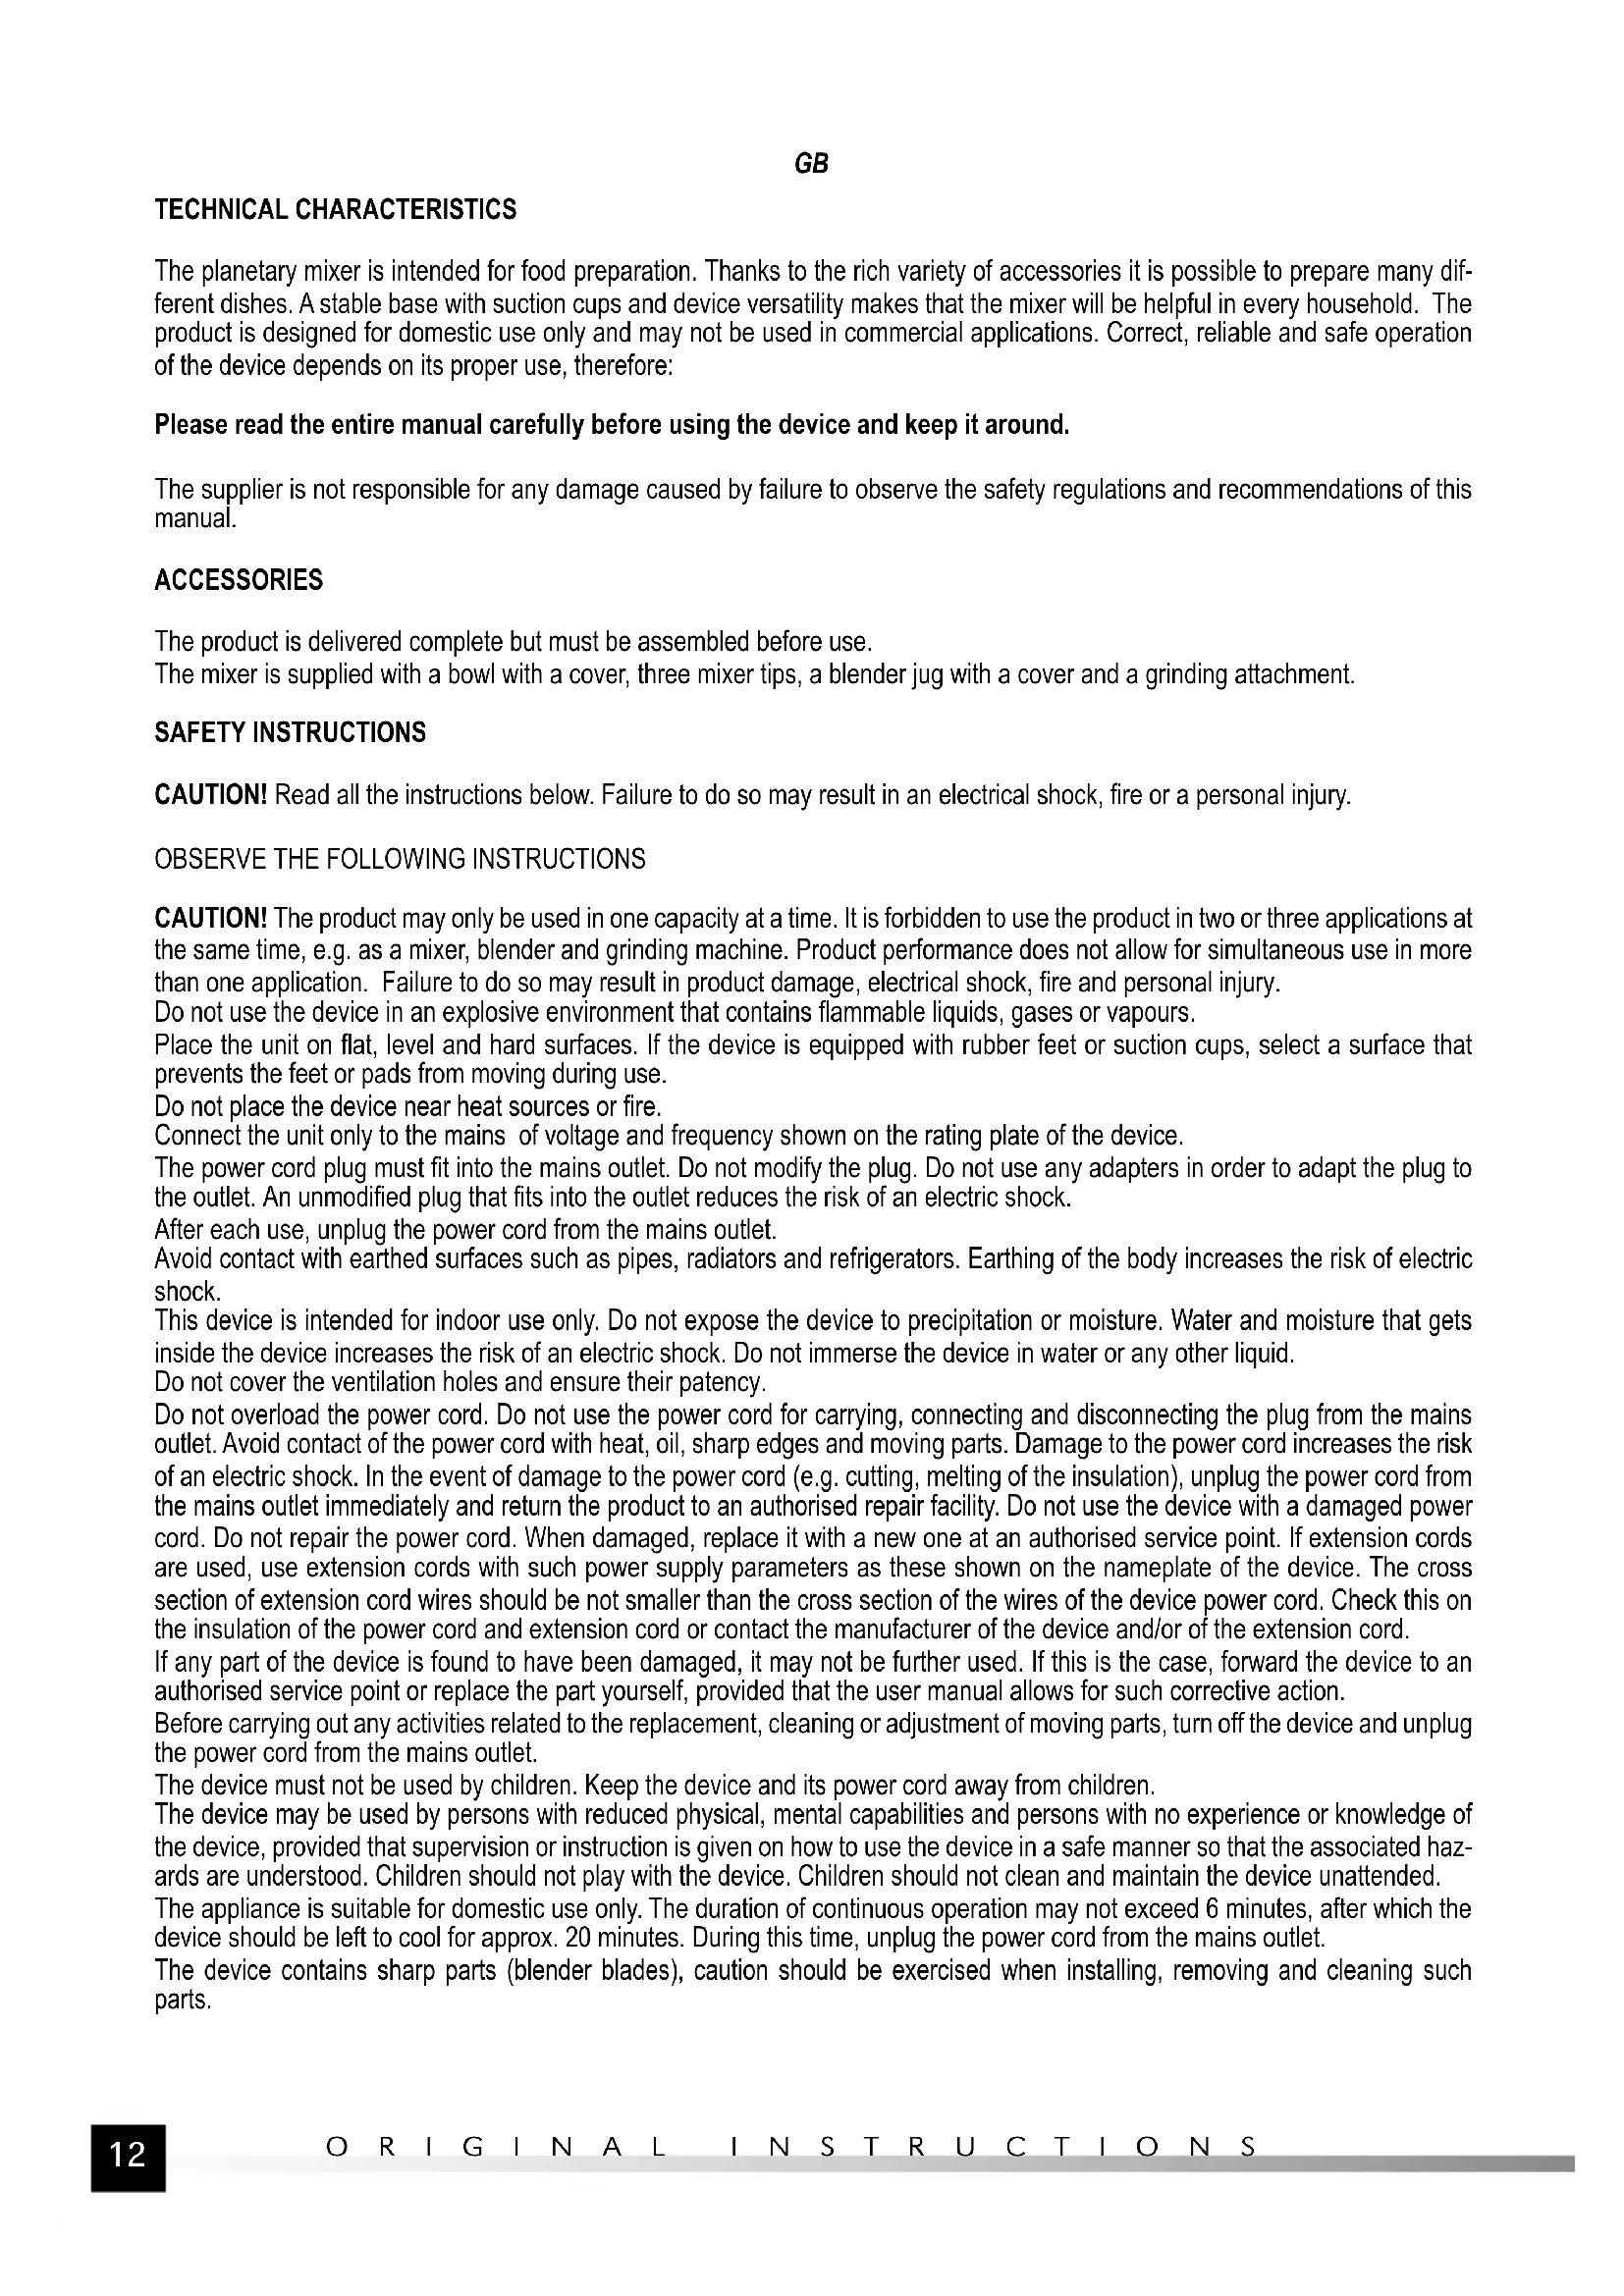
Installing and removing the mixer
Place the mixer on a level and stable surface. Make sure that all the suction cups at the base have gripped the ground.
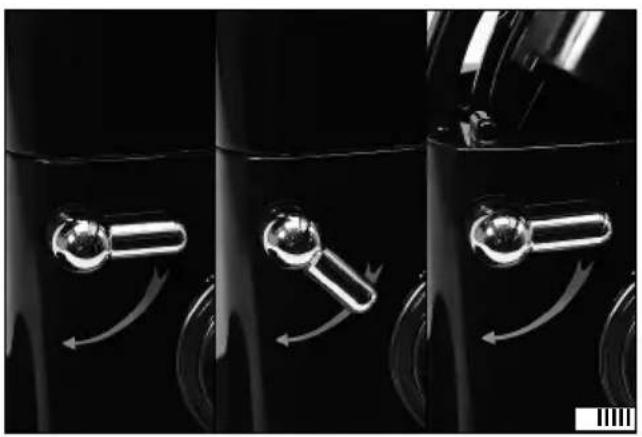
Press the lever (II) according to the arrow direction, this lever releases the latch of the working head and causes it to lift. The head lifts up automatically with the spring, but lift it by hand and make sure that the top position of the mixer head is locked. It is not possible to lower the head without pressing the lever again.
Install the bowl in the base opening. Insert the tongues in the base of the bowl into the grooves on the circumference of the base opening (III) and then turn the bowl in the direction indicated by the arrow in the base (IV). This will block the bowl at the base of the mixer. Check that installation is correct, if the bowl is secured evenly and cannot be lifted, this means correct installation (V). Around the mixer handle tip you should install the bowl cover. Put the head cover so that the arrow, which is visible on the cover, points to the open padlock symbol on the mixer head (VI). Make sure that the cover evenly adheres to the head and turn it, so that the arrow points to the closed padlock icon (VI).
At the end of the spindle you should install the appropriate tip. The spindle tongues must cover the grooves around the tip hole (VII). Push the tip upwards and turn it in the direction of the locked padlock symbol visible on the upper part of the tip flange (VIII).
Press the lever and lower the mixer head, the device is ready for operation (IX).
Remove the mixer in reverse sequence to the assembly procedure.
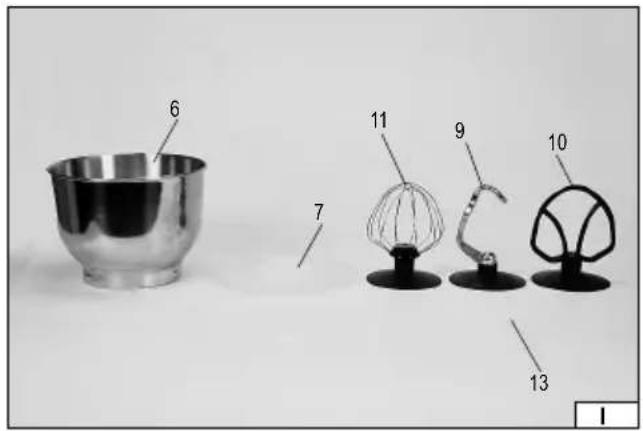
Installing and removing the blender
CAUTION! Since the device also starts the mixer when using the blender, install the mixing bowl and its cover before starting to install the blender. It is not necessary to mount the tip. This will protect the mixer spindle when using the blender and reduce the risk of injury by the rotating spindle.
Place the mixer on a level and stable surface. Make sure that all the suction cups at the base have gripped the ground. Make sure that the head is locked in the lower position.
Remove the cover of the blender slot by lightly pressing and holding in the place marked with a triangle, and then pull the cover outside the mixer housing (X). Place the jug of the blender on the installation slot and after finding a position where the base of the jug will be evenly aligned with the installation slot turn the jug in the direction of the arrow described as "CLOSE" (XI). This will allow to lock the jug in the installation slot. To make sure that installation is carried out correctly, check that the jug is flush against the mixer casing and cannot be lifted by tearing it away from the mixer casing.
Since it is possible to install the jug in four positions, you should rely on the position of the jug handle. Choose them so that it will be not necessary to reach behind the device when grasping the jug handle.
The jug has a cover with a seal and opening with a separate plug. Press the cover and check that it is flush against the edge of the jug (XII). The cover has a rounded protrusion the shape of which has been adjusted for covering of the jug outflow. This prevents splashing the contents of the blender during its operation.
The plug must be inserted so that the tongues on its circumference match the grooves located on the cover opening and then turned clockwise. The plug should be removed in reverse order.
The plug allows to supplement the content of the blender without interrupting its work, minimizing splashing the contents of the jug. The plug can also be used as a small measuring cup.
CAUTION! When the blender is installed, do not lift the mixer head. The weight of the jug may cause the whole device to tip over, spillage of the jug contents, breakage and increase the risk of an injury.
Remove the blender jug in reverse order to the installation procedure.
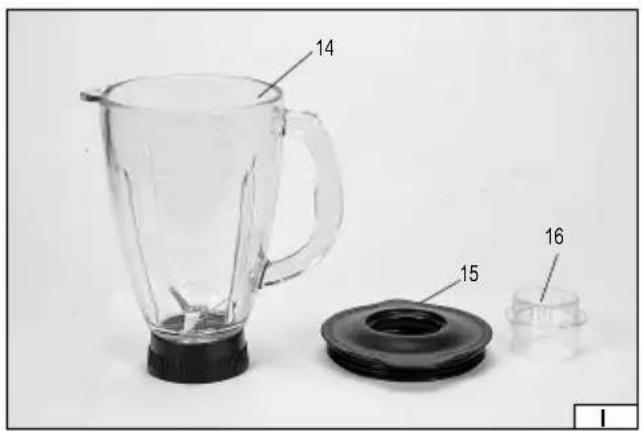
Assembling the grinding attachment
Assemble the attachment in the order shown in the illustration (XIII): insert the feeding screw, blade, plate inside the attachment and fix it using a ring.
Do not attach more than one plate at a time. Plates have a groove on the edge which should be adjusted to the tongue inside the casing of the grinding attachment.
Remove the slot cover of the grinding attachment and then install the assembled grinding attachment. Insert the attachment into the slot at an angle and then turn it so that the inlet opening is pointed upwards (XIV).
Install the feeding tray (XV) on top of the opening and direct it so that it is convenient to place food products intended for grinding.
Products intended for grinding should only be inserted into the opening with the supplied pusher.
GB
The grinding attachment can be used to stuff sausages or make kibbeh balls. This can be obtained by installing appropriate tips to the grinding attachment. A tip consists of a clamping ring and an operating tip. The clamping ring also has grooves on the edge which must also be adjusted to the tongue.
Use of the device
CAUTION! Wash and dry all food contact parts thoroughly before using the machine for the first time. You must first learn the method of device maintenance.
CAUTION! Do not use more than one working attachment at the same time. Such a situation can lead to overheating of the device and its irreversible damage.
The device has a switch that allows you to set several rotational speeds and the turbo gear. By setting the switch to the desired position you can determine the rotation speed of the agitator and blender. The turbo position allows to use the maximum rotational speed. To use it, turn the control switch and hold it in the position described as "Turbo". After releasing the pressure, the switch will automatically return to the "0" position, and device will shut down the engine speed. The positions described as 0 - 6 do not require the switch to be held.
CAUTION! Before connecting the plug, make sure that the power switch is in position "0" – OFF.
When the plug of the power cord is plugged into the mains outlet, a control light flashes around the switch when the "0" setting is set. Any other setting in the range 1-6 and "Turbo" causes the control light to illuminate with a standby light.
Due to the exchangeable tips, the mixer can be used to mix different food products.
The dough agitator is used to mix ingredients into medium density mixtures (e.g. yeast dough), it is recommended to use the switch settings from the 1 – 2 range during operation with this tip.
The whipping agitator is used to mix ingredients into low density mixtures (e.g. sponge cake), it is recommended to use the switch settings from the 1 – 4 range during operation with this tip.
The beating agitator is used for whipping foam and whipped cream, it is recommended to use the switch settings from the 5-6 range during operation with this tip.
It is advisable to gradually increase the tip rotational speed in order to avoid excessive splashing of the mixed components. The cover of the bowl has an opening, thanks to which you can add further components without lifting the mixer head. Do not exceed the maximum operating time of 6 minutes. Longer operating time can lead to overheating and irreparable damage of the device.
The device is equipped with safety switches which do not allow to start the device when the head is lifted or when the blender or the blender slot cover is not properly installed. This minimises the risk of user exposure to moving parts of the device. However, it should be taken into account that after switching the engine off, moving parts may still rotate for some time.
Do not exceed the maximum capacity of the bowl and jug, and take into account that ingredients can increase their volume when mixed with air. It is advisable to prepare several smaller portions instead of one large.
CAUTION! When using the blender you should avoid contact of any body part with the blades. It is forbidden to touch any objects with blades. This can lead to a serious injury.
When using the blender, the ingredients should be thrown into the jug through a hole in the cover to minimize spillage. It is recommended to not exceed a volume of 1.2 litre, this will allow to avoid the excessive splashing of jug contents.
In the case of large ingredients, divide them into smaller portions and if this is not possible, insert them into the jug before starting the machine, install the cover and then start the machine. Do not remove the jug cover while the blender is working.
Do not use the blender for crushing ice or frozen food. It is not recommended to use the blender for more than 3 minutes.
The temperature of the ingredients placed in the jug may not exceed 80 degrees Celsius.
The grinding attachment should be used for grinding meat or other food products. Products must be thawed and free from hard parts such as bones. The grinding accuracy depends on the mesh diameter of the plate used. Smaller mesh diameter ensure better grinding.
If the attachments for stuffing sausages and kibbeh balls are used, already ground food products should be used. If this attachment is used, and no plate installed, the knife only allows to obtain a correct attachment and does not perform the cutting function.
No grinding takes place, but only transfer of previously ground food products to the attachment outlet.
Start the device and start feeding ground food products to the grinder attachment inlet. Once the products begin to extract from the attachment outlet, stop the device and put a sausage casing on the stuffing tip. This will prevent air bubbles from forming in the finished product. Hold the sausage casing with your hand and gradually release its excess to ensure that the ground products fill the casing uniformly. Sausage may be divided into pieces of any length, e.g. by twisting the casing.
CONSERVATION AND STORAGE
CAUTION! Never immerse the housing and head in water or any other liquid. This may cause an electric shock.
The parts that are suitable for immersion are: the bowl, the bowl cover, all the agitators, the jug cover and cover plug and all the
GB
elements of the grinding attachment. The jug does not have a removable base, therefore water can be poured into the jug, but it should not be completely immersed in water.
After use, turn off the unit, wait until the moving parts have come to a complete stop, unplug the power cord from the mains outlet, disassemble the device, empty the bowl or the jug from its contents, and proceed with maintenance.
Clean the parts of the device that have come into contact with food immediately after use. Dry food residues can jam agitators and blades, which can lead to a decrease in the efficiency of the device or even damage it. However, if such a case occurs, immerse those parts which are described as being capable of being immersed in warm water with the addition of dishwashing liquid and allow them to soak, then clean with a soft sponge or brush and water with dishwashing liquid. None of the device parts is suitable for washing in a dishwasher. This may lead to the loss of shape, colour, texture of the materials from which they are made.
Clean the device housing and jug external surfaces with a soft cloth, moistened with solution of water and mild cleanser. Wipe it dry. Do not use abrasive cleaning agents.
CAUTION! Due to the sharp edges of the blender blades you should avoid hand contact with the blades during washing. The blades can cut through the skin and kitchen gloves made out of plastic as well. Clean the blades with a brush or sponge.
Make sure that all parts have been cleaned and dried before connecting the device to the power supply. Store the product in dry and shaded places. Protect the storage area from unauthorised access, especially from children. Store the product in unit packs supplied with the product.
TECHNICAL PARAMETERS
| Parameter Measurement unit Value | ||
| Catalogue number 67811 | ||
| Rated voltage [V~] 220 – 240 | ||
| Rated Frequency [Hz] 50/60 | ||
| Rated power [W] 1000 | ||
| Maximum power [W] 1500 | ||
| Electrical protection class II | ||
| Operating mode: S2 (KB) short-time duty [min] 6 | ||
| Bowl capacity [l] 4.5 | ||
| Jug capacity | [l] | 1.5 |
| External dimensions of the device ready for use as a mixer (width x depth x height) | [mm] | 375 x 225 x 315 |
| External dimensions of the device ready for use as a blender (width x depth x height) | [mm] | 315 x 175 x 540 |
| External dimensions of the device ready for use as a meat grinder (width x depth x height) | [mm] | 450 x 175 x 315 |
| Weight | [kg] | 4.6 |
GERÄTEBESCHREIBUNG


Brand : Lund
Model : 67811
Category : Food Processor