
67860 - Food Processor Lund - Free user manual and instructions
Find the device manual for free 67860 Lund in PDF.

| Product type | Food processor |
| Brand | Lund |
| Model | 67860 |
| Power supply | 220-240 V, 50/60 Hz |
| Motor power | 800 W |
| Heating power | 1300 W |
| Jug capacity | 2 L |
| Dimensions (without steamer bowl) | 340 x 285 x 340 mm |
| Dimensions (with steamer bowl) | 440 x 285 x 465 mm |
| Net weight | 4.7 kg |
| Protection class | IPX0 |
| Automatic functions | Soup, Jam, Sauce, Dough, Steam cooking |
| Manual functions | Temperature, time and speed adjustment |
| Turbo function | Maximum momentary speed |
| Integrated scale | Weighing up to 4000 g |
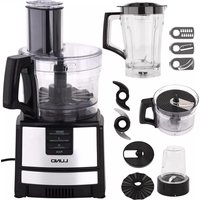
| Included accessories | Jug with lid and measuring cap, steamer bowl with tray and lid, stirrer blade, spatula, strainer, plastic key |
| Safety | Overload, overheating and incorrect lid closure detection |
| Maintenance and cleaning | Removable parts dishwasher safe (except base). Removable blades with key |
| Repairability | Spare parts available via authorized service. Replaceable power cord |
| General information | Household use only. Stable and flat surface required |
Frequently Asked Questions - 67860 Lund
User questions about 67860 Lund
0 question about this device. Answer the ones you know or ask your own.
Ask a new question about this device
Download the instructions for your Food Processor in PDF format for free! Find your manual 67860 - Lund and take your electronic device back in hand. On this page are published all the documents necessary for the use of your device. 67860 by Lund.
USER MANUAL 67860 Lund
natural_image
Exterior view of a modern kitchen appliance with digital display and control panel (no visible text or symbols)CE
PL GB D RUS UA LT LV CZ SK H RO E F I NL GR
natural_image
White electric oven with labeled parts (2 and 4) and wiring, shown against a plain background (no text or symbols on body)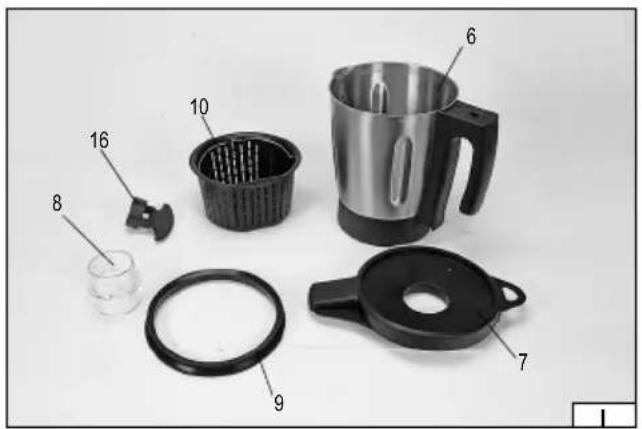
natural_image
Two views of a white appliance with a black arrow indicating a process or transformation (no text or symbols visible)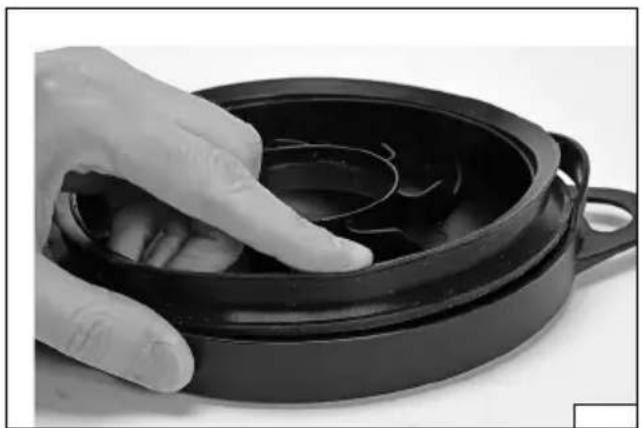
natural_image
Close-up of a hand pressing down on a black ceramic bowl with a curved handle (no text or symbols visible)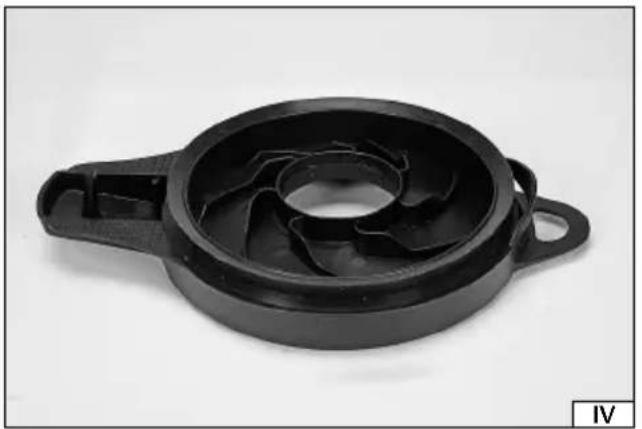
natural_image
Black plastic mechanical component with a circular top and flange, labeled IV in the corner (no text or symbols on the object itself)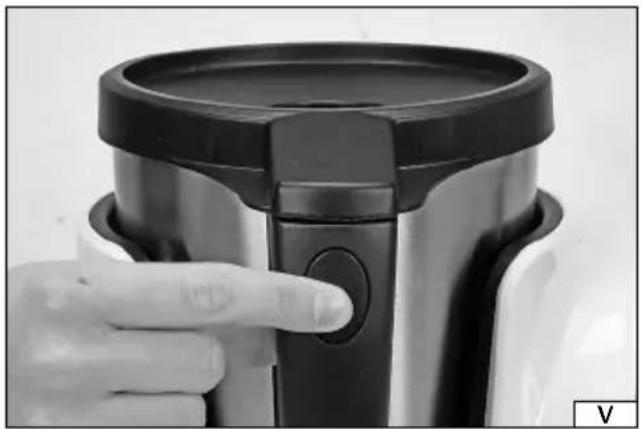
natural_image
Close-up of a hand pressing a button on a black and white ceramic container (no text or symbols visible)temperature indicator
- weight indicator
D
Read the operating instruction
Caution! Hot surfaces. Keep hands away. Risk of scalding.
Safe contact with food
Correct disposal of this product: This marking shown on the product and its literature indicates this kind of product mustn't be disposed with household wastes at the end of its working life in order to prevent possible harm to the environment or human health. Therefore the customers is invited to supply to the correct disposal, differentiating this product from other types of refusals and recycle it in responsible way, in order to re - use this components. The customer therefore is invited to contact the local supplier office for the relative information to the differentiated collection and the recycling of this type of product.
UMWELTSCHUTZ
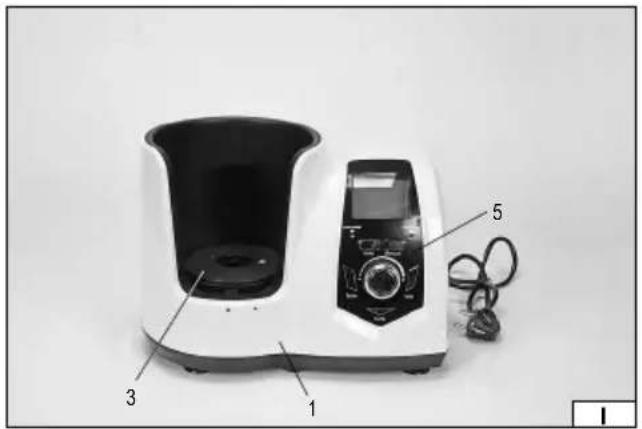
Multi-Purpose Food Processor is purposed for food processing and many accessories enable preparation of different meals. A stable base with suction cups, as well as flexibility make it very helpful in any household. It can be used for slicing, mixing and heating of food, what facilitates works and shortens time of work. Product has been designed for household use only and any use for commercial purposes is not allowed. Adherence to instructions ensures proper, reliable and safe operation, therefore:
Before operation, firstly read carefully user manual and keep it for future.
Supplier does not take responsibility for damages that result from failure to follow safety regulations and guidelines in this user manual.
ACCESSORIES
Product is delivered as a complete system, and shall be assembled before use.
The product is delivered along with: the pot along with cover and cap/measure, bowl for steaming along with tray and cover, butterfly stirrer, spatula, pot sieve and plastic key.
SAFETY NOTES
CAUTION! Before operation and use, firstly read carefully user manual. Failure to follow instructions may result in electric shock, fire, scalding or body injury.
ALWAYS ADHERE TO THE FOLLOWING INSTRUCTIONS
Caution! During food processing always monitor device operation. Before leaving a workplace, firstly switch off the product with main switch and then disconnect the plug from the outlet.
Product is not designed for use in atmosphere that poses risk of explosion or with flammable liquids, gases or vapour.
Place the product on flat, even and hard surface. If product is fitted with rubber suction cups or feet, place it on the surface appropriate for rubber suction cups or feet to prevent displacement of product during operation.
Do not place product close to fire or heat sources.
Plug the product to power network of parameters specified on rating plate.
Cord plug shall be appropriate for the outlet. Any modification of plug is not permitted. Do not use any adapter purposed for use with plug. An original plug ensures safety and prevents risk of electric shock.
Following every use, disconnect the plug from the outlet.
Always avoid contact with earthed surfaces including pipes, heating radiators and fridges. Earthing poses risk of electric shock.
Product is purposed for indoor use only. Always prevent exposure of product to precipitation or humidity. Contact with water and exposure to humidity poses risk of electric shock. Do not put the product into water or other liquid.
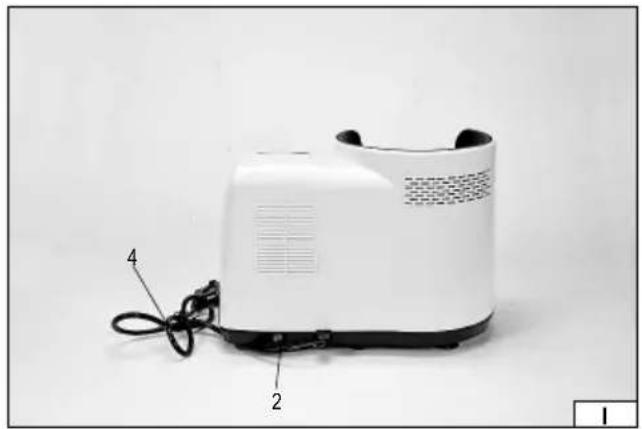
Do not cover air inlets and clean them on regular basis.
Do not overload the cord. Do not hold the cord when carrying, connecting and disconnecting the plug from the outlet. Prevent contact of cord with heat, oils, sharp edges and moving parts. Damaged cord poses risk of electric shock. In case of power cable damage (e.g. cutting, insulation damage) immediately disconnect the plug from the outlet, and deliver the product to authorised service for repair. Do not operate the product with damaged cord. Do not repair the cord in case of any damage. Damaged cord shall be replaced with new one by authorised service. If extension is used, note to ensure extension of parameters as specified on rating plate. Extension conductor size shall be not smaller than product cord conductor size. Always check core size of cord and extension or consult product and/or extension manufacturer.
Do not operate the product with any damaged part. In case of any damaged or faulty part, deliver the product to authorised service for repair or replace the part pursuant to instructions in user manual.
Before any work related to replacement, cleaning or adjustment of rotating parts, firstly switch off the product and disconnect the plug from the outlet.
Operation by children is not allowed. Keep the product and cord away from children.
Product may be operated by person with impaired physical or mental skills or persons not possessing experience and unfamiliar with the product, under supervision or if training was provided regarding safe use of product and prevention of possible hazards.
Prevent children from operation and playing with product. Cleaning and maintenance by children is not allowed, unless under supervision.
Product is purposed for household use only.
Product is delivered with sharp parts (pot tip), and extra caution is necessary during assembly, dismantling and cleaning. Product operation may result in exposure to high temperature, so always take caution after meal preparation. Use of oven glove and appropriate clothing is recommended.
OPERATION
CAUTION! Before assembly and dismantling, firstly switch product off and disconnect the plug from the outlet.
Assembly and dismantling
Place the product on even and stable surface. Make sure that all suction cups adhere to the surface. The surface shall be smooth and clean. If suction cups fail to adhere to the surface, check if suction cups are clean and then slightly moisten them.
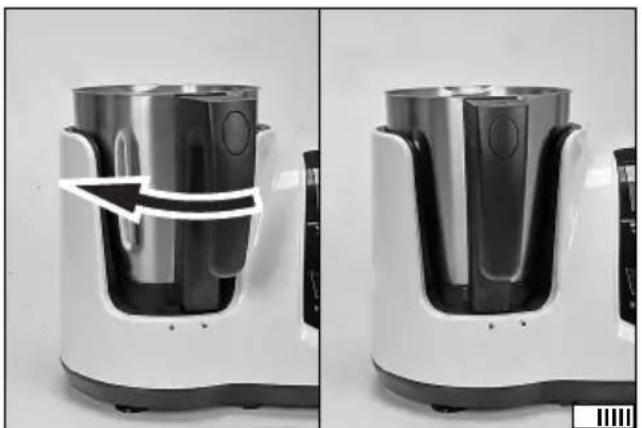
To place the pot on the base, insert the pot so that handle was towards open padlock symbol, and then turn it to closed padlock symbol (II). Proper position of pot prevents lifting thereof and couples the pot to the base. To release the pot, turn and set the handle towards the open padlock symbol, and then lift the pot over the base.
Pot cover is provided with the gasket that shall be placed on the cover flange perimeter so that it adheres evenly to the whole flange, and narrow flange of gasket is positioned towards cover lower part (III). Place the cover on the pot, so that it adheres evenly to pot edge (IV), and so that latch was activated that prevents against cover accidental opening. Product is provided with sensor indicating an improper position of cover or improper position of pot. Flashing „E01” symbol on display indicates improper cover position that prevents product operation. Product operation will be possible, if cover is positioned properly. To remove the cover, press and hold the button that releases the latch (V), and then take off the cover.
Caution! Proper position of pot locks the cover and prevents cover removal. You can remove the cover only, if the pot is unlocked.
The cover is provided with the hole that enables to add some food products, e.g. during product operation. To close the hole, place the cap on the cover and then turn it so that tongues of pin couple with tongues inside the hole (VI). You can also use the pin to measure quantity of used food products.
You can install the butterfly stirrer inside the pot, by placing it on pot blade screw so that stirrer wings are positioned between the blades (VII).
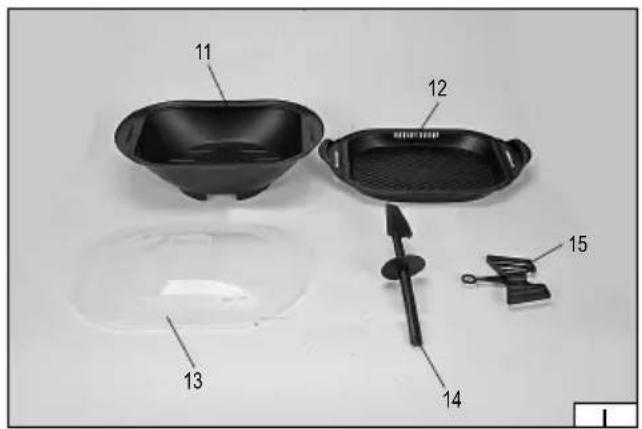
Product may be used for steaming thanks to the sieve and bowl delivered for that purpose. To install the sieve insert in into the pot, so that sieve flange rests against pot walls (VIII). You can remove the sieve by pulling with the folding holder. The holder may be very hot so always take caution and wear an oven glove.
CAUTION! You can operate the product with installed sieve or butterfly stirrer.
To install the bowl on the pot cover, remove the cap, and then place bowl bottom on the cover. You can install the bowl in proper position only. The base it provided with tongues. The narrow tongue indicates position of pot holder (IX).
The bowl is provided with insert and cover. The insert shall be placed inside the cover to increase the working surface when steaming. Insert sides are provided with holes that couple bowl tongues (X). The cover shall be placed on the bowl (XI).
Simultaneous use of sieve and bowl for steaming is not recommended, as it compromises processing efficiency. For steaming purposes, the pot may be filled with max. 0.5L of water.
Control Panel
After assembly completion in proper configuration, product operation may follow with control panel provided with buttons, knob and display. Upon activation the display test will follow and all readings will be shown for a few seconds, and it does not indicate any malfunction.
"OVERLOADING" indicator will light to indicate excessive weight. This abnormality is indicated also with "E04" symbol on display. In this case weight of food products shall be reduced.
"OVERHEATING" indicator will light to indicate product overheating, namely pot temperature over 150^ . This abnormality is indicated also with "E03" symbol on display. In this case, wait until temperature of the product will be within permitted range.
Press "AUTO" button to select the mode: soup, jam, sauce, dough, steaming.
Press "MANUAL" button to manually program the following settings: temperature, time, speed.
Press "SCALE" button to weigh food products.
Press "START/PAUSE" button—inside the control knob to switch the product on and off. Press the button again to restore operation.
Press "STOP" button to interrupt product operation.
Press "TURBO" button to activate maximum rotational speed of blades for some time. For this purpose press and hold this button.
Release of button will switch off maximum rotational speed.
The control knob enables to program settings. To increase the setting, turn the control knob clockwise and to reduce the setting turn the control knob anti-clockwise.
Control panel
When "AUTO" button is presses, soup mode will start flashing, and press the button again to select available mode: soup, jam, sauce, dough, steaming.
To activate the mode press "START/PAUSE" button, and then the product operation will follow in the selected mode.
To interrupt operation in current mode, press "START/PAUSE" button. Then the clock stops, and symbol of selected mode will start flashing on display. To restore operations, press "START/PAUSE" button again.
To stop product operation press "STOP" button.
GB
After pressing "MANUAL" button it is possible to input the following parameters: blade rotational speed, temperature, operation time. You can change parameter setting with the knob, and you can select another parameter by pressing "MANUAL" button. To program the time of operations, firstly press the button to set minutes and then press the button to set seconds.
To bypass any parameter and select the next parameter just press "MANUAL" button.
To start product operation press "START/PAUSE" button. When in auto mode you can interrupt operation and restore operation in the same manner.
The end of operation is indicated with repeated sound signal. To turn the sound off press "STOP" button. The sound signal will switch off automatically following ca. 1 minute.
Note
Time measurement follows (max. 60 minutes) after manual temperature or rotation speed setting and pressing "START/PAUSE" button.
Counting down will start, if manual time setting was programmed.
After manual temperature or rotation speed setting and switching on, pressing "MANUAL" button will enable change of programmed setting: speed, temperature and operation time. Any setting change will be applied immediately. If heating was activated, maximum permitted rotational speed setting 05.
Food or water placed inside the pot shall not be over 2L or 2kg. Always adhere to limits regarding pot maximum capacity.
Scale Operation
Product is provided with scale that ensures weighing of food products placed inside the pot. After pressing "SCALE" button, and then reading in grams will be displayed, and scale indicator will start flashing.
For calibration press and hold "SCALE" button for ca. 2 seconds.
Do not use the scale, when engine is in operation—rotation of blades.
Maximum weight of food products is 4000g. If weight is over maximum limit, the display will show "F0FF".
When weighing, the product shall be on stable surface, otherwise readings may be inaccurate.
Do not place into or onto the pot, food products whose weigh is over 6 kg, as it may result in product damage.
Other tips
Do not use the butterfly stirrer when mixing the dough. Do not use the butterfly stirrer for rotational speed setting over 04.
Do not use the butterfly stirrer for auto modes.
When dough mode is selected, the program will not activate, if heater temperature is over 50°C.
Do not program manually settings for dough kneading.
Flour weight shall not be over 500g, and water weight shall not be over 300g.
Continuous operation during dough mixing shall not be over three cycles, and after each cycle at least 5 min. pause is required.
During dough mixing the processor shall be on stable and even surface, at safe distance from edge (of table etc.).
Before adding flour, firstly dry carefully the pot to prevent sticking of flour to pot walls. Flour and water mixing ratio is 10 to 6.
Recipes in auto mode
Caution! Completion of each step in the given mode is indicated with sound signal.
| Recipe Step Required Activity Temperature [ | °C] Time (min) Speed | ||||
| Jam(20 min.) | 1 Pur seafood and other products into the pot 0 3 05 | ||||
| 2 Add sugar and honey and wait until boiling 100 17 01 | |||||
| Soup(22 min.) | 1 Heat the empty pot | 100 2 00 | |||
| 2 | Add butter or oil for frying, onion and garlic | 100 | 1.5 | 01 | |
| 3 Add pumpkin and water | 100 14 01 | ||||
| 4 | Slicing | - | 3 | 07 | |
| 5 | Add milk, salt grinded cinnamon or other spices | 100 | 1.5 | 05 | |
| Sauce26 min | 1 Heat the empty pot | 120 2 00 | |||
| 2 | Add olive oil, onion and garlic | 120 | 1.5 | 01 | |
| 3 | Add sliced pork, tomato sauce, vine, chilli sauce, salt and other spices | 100 | 4 + 5 | 01 | |
| 4 Add seafood | 100 | 13.5 | 01 | ||
| Dough | 1 | 1: 500g of flour and 300g of water2: in case of high gluten flour the limit is 300g. | Ambient | 1.5 | 05/02 |
| Steaming | 1 Fish, corn, potatoes etc. | 100 60 00 | |||
Recipes recommended for manual mode
Food product processing:
Time setting: 45 min,
Temperature setting: 120°C,
Rotational speed setting: 03,
Press "START/PAUSE" button".
Vegetable slicing:
Time setting: 30 seconds,
Rotational speed setting: 06
Press "START/PAUSE" button.
Ice crushing:
Place max 300g of ice inside the pot.
Press and hold "TURBO" bottom for ca. 10 sec., release the button, wait ca. 1 sec., Repeat the cycle ca. 6 times.
Carrot juice:
Place max 800g of carrot and add 1200g of water.
Time setting: 1 min,
Rotational speed setting: 10,
Press "START/PAUSE" button.
Coffee grinding:
Place max. 200g of coffee beans.
Time setting: 2 min,
Rotational speed setting: 10,
Press "START/PAUSE" button".
MAINTENANCE AND STORAGE
CAUTION! Never put product base in water or other liquid due to risk of electric shock.
All parts whose dismantling procedure is described in user manual, as well as accessories including a sieve, spatula may be washed by hand with water, water or in the dishwasher.
CAUTION! Before washing the pot in dishwasher, firstly dismantle blades.
You can dismantle blades with the key delivered along with product. For this purpose screw off the nut fixing the blade, by turning anti-clockwise, and then remove the blade (XII). Take caution when handling blades as sharp edges may cause body injury. During works related to dismantling wear an oven glove.
Following end of work, firstly switch off the product, then wait until rotational parts movement is stopped, and disconnect the cord from the outlet, dismantle the product, empty the bowl or pot, wait until parts cool down, and then proceed with maintenance.
Any product parts having contact with food products shall be washed immediately after use. Food remains baked on stirrer or blades may compromise product performance or result in product damage. To remove baked food deposits, wash product parts (if allowed) with warm water and dishwashing liquid and leave them immersed in water for some time, and then wash by hand with soft sponge or brush and water with dishwashing liquid or in the dishwasher.
Product casing and external surfaces of pot shall be cleaned with soft cloth lightly moistened with a mild detergent solution. Wipe all surfaces dry. Do not use abrasive cleaners.
CAUTION! Always take caution when handling the pot due to sharp edges that pose risk of injury. Blades may cut the skin or plastic oven gloves. Wash blades with a brush or sponge.
Before connecting the product to power supply, firstly make sure that all parts are clean and dry. Store the product in dry spaces protected against sunshine. During storage keep the product away from unauthorized persons, in particular children. Store the product in original packaging.
TECHNICAL DATA
| Parameter Unit Value | ||
| Catalogue number 67860 | ||
| Rated voltage [V~] 220 – 240 | ||
| Rated frequency [Hz] 50/60 | ||
| Engine power [W] 800 | ||
| Heater power [W] 1300 | ||
| Protection Class I | ||
| Protection Rating IPX0 | ||
| Pot capacity [L] 2 | ||
| Outer dimensions of product ready for operation (W x D x H) | [mm] | 340 x 285 x 340 |
| Outer dimensions of product ready for operation along with bowl for steaming (W x D x H) | [mm] | 440 x 285 x 465 |
| Mass | [kg] | 4.7 |
PRODUKTBESCHREIBUNG
CARACTERISTIQUES DU PRODUIT


Brand : Lund
Model : 67860
Category : Food Processor