
67790 - Food Processor Lund - Free user manual and instructions
Find the device manual for free 67790 Lund in PDF.

| Product type | Food processor (stand mixer) |
| Brand | Lund |
| Model | 67790 |
| Rated voltage | 220-240 V~ |
| Rated frequency | 50-60 Hz |
| Rated power | 200 W |
| Electrical protection class | II (double insulation) |
| Protection rating | IPX0 |
| Net weight | 0.73 kg |
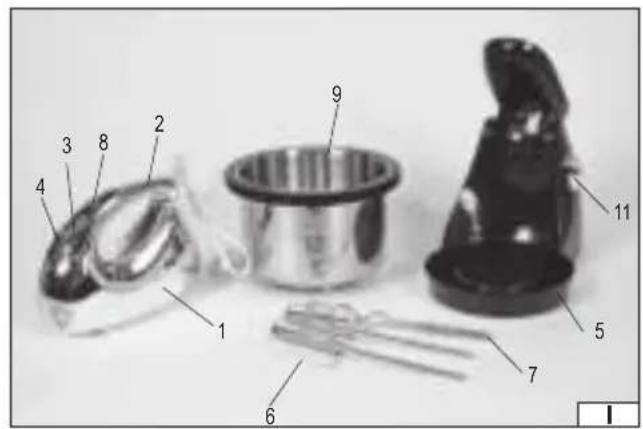
| Included accessories | Base, bowl, 1 pair of beaters, 1 pair of spiral whisks |
| Number of speeds | Multiple (trigger with numbered positions + Turbo function) |
| Turbo function | Yes (TURBO button for temporary maximum speed) |
| Whisk types | Beaters (for creams, egg whites) and spiral whisks (for dense doughs) |
| Bowl | With rotating housing, gear drive |
| Usage | Household only, for mixing and kneading moderate quantities |
| Maintenance and cleaning | Whisks and bowl dishwasher safe; motor unit wiped with a damp cloth |
| Safety | Automatic shutdown in case of overload (via switch); mixer locking; do not immerse the unit |
| Country of manufacture | Not specified |
| Warranty | Not specified |
Frequently Asked Questions - 67790 Lund
User questions about 67790 Lund
0 question about this device. Answer the ones you know or ask your own.
Ask a new question about this device
Download the instructions for your Food Processor in PDF format for free! Find your manual 67790 - Lund and take your electronic device back in hand. On this page are published all the documents necessary for the use of your device. 67790 by Lund.
USER MANUAL 67790 Lund
natural_image
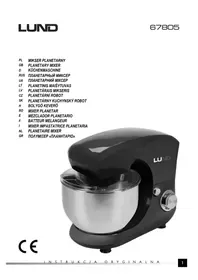
Black and white photo of a LUND mixer with a meshing bowl (no visible text or symbols)CE
PL GB D RUS UA LT LV CZ SK H RO E F I NL GR
natural_image
Close-up of two handwheels with metallic handles, one showing a black object on the other (no text or symbols visible)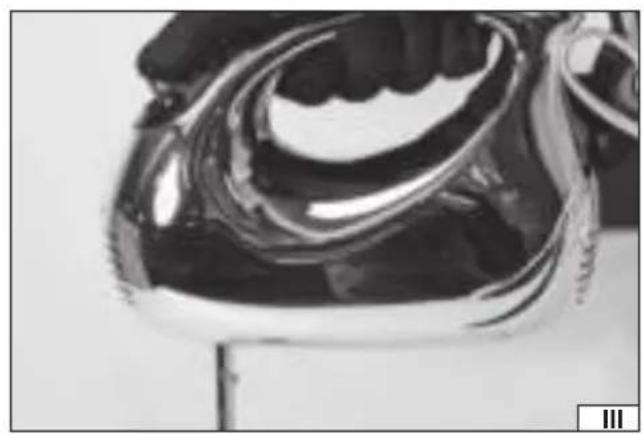
natural_image
Close-up of a metallic object with reflective surfaces and a circular opening (no visible text or symbols)
natural_image
Close-up of a car wheel rim and side panel, no visible text or symbols
natural_image
Close-up of a mechanical component with no visible text or symbols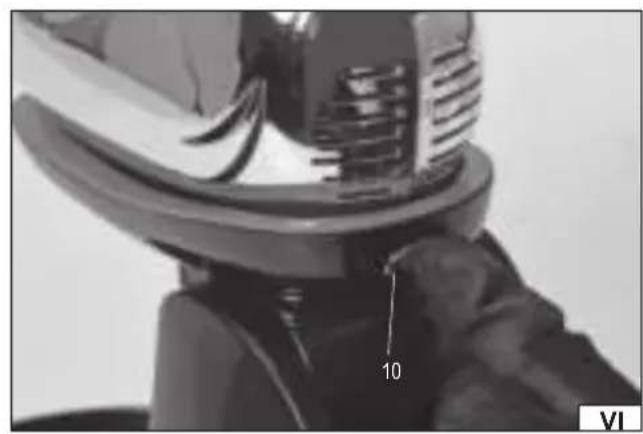
natural_image
Close-up of a mechanical component with a numbered label '10' on the base (no readable text or symbols beyond the number)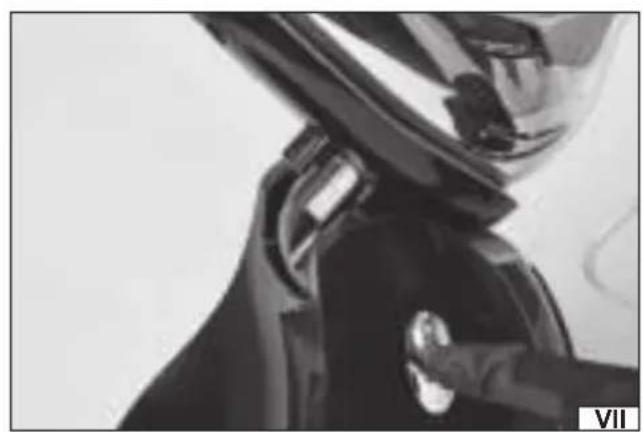
natural_image
Close-up of a mechanical component with reflective surfaces and a small metallic knob (no visible text or symbols)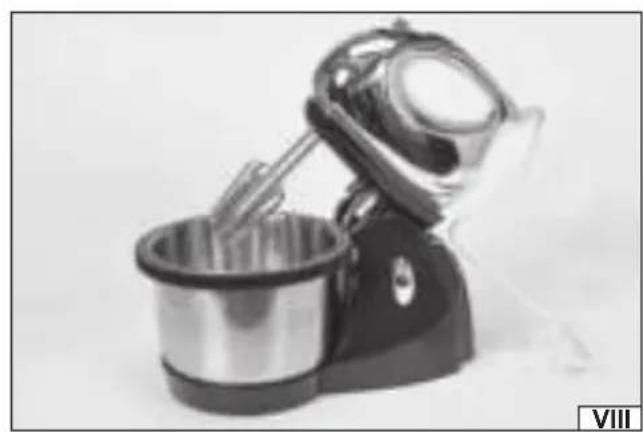
natural_image
Black-and-white photo of a hand mixer with metal components, no visible text or symbolsnatural_image
Close-up of a mechanical component with metallic surfaces and a curved handle (no visible text or symbols)PL
Read the operating instruction
Safe contact with food
Second class of insulation
This symbol indicates that waste electrical and electronic equipment (including batteries and storage cells) cannot be disposed of with other types of waste. Waste equipment should be collected and handed over separately to a collection point for recycling and recovery, in order to reduce the amount of waste and the use of natural resources. Uncontrolled release of hazardous components contained in electrical and electronic equipment may pose a risk to human health and have adverse effects for the environment. The household plays an important role in contributing to reuse and recovery, including recycling of waste equipment. For more information about the appropriate recycling methods, contact your local authority or retailer.
PRODUCT CHARACTERISTICS
This hand blender is designed to prepare food. Two sets of stirrers for different purposes make kitchen work involving intensive mixing of food ingredients easier. The product is intended for domestic applications only, and not for any commercial use. The correct, reliable, and safe operation of the appliance depends on its proper use, therefore:
Read and keep the entire manual before the first use of the product.
The supplier will not be held liable for any damage resulting from failure to observe the safety regulations and recommendations specified in this manual.
ACCESSORIES
The product is delivered complete, but requires carrying out a number of preliminary actions described in further sections of the manual, before starting operation.
The accessories shown in the figure (I) are supplied with the product.
SAFETY INSTRUCTIONS
Caution! Read all of the following instructions. Failure to do so may result in electric shock, fire, or personal injury.
FOLLOW THE INSTRUCTIONS BELOW
Do not use the product in an explosive environment containing flammable liquids, gases or vapours.
Before starting the product for the first time, make sure that the product, its accessories, and the power cord have not been damaged. If any damage is discovered, it is not allowed to start working with the product. It is not allowed to have the power cord repaired. It must be changed for a new one. Any damaged components, including the power cord, must be replaced at an authorized facility. It is not allowed to repair the product on your own.
The product is intended for indoor use only. Do not expose the product to any precipitation or moisture. If water and moisture enter the product, the risk of an electric shock is significantly increased. Do not immerse the product in water or any other liquid.
Connect the product only to a power network providing the voltage and frequency indicated on the nameplate of the appliance. The plug of the power cord must match the power socket. Do not modify the plug. Do not use any adapters to fit the plug to the socket. An unmodified plug, which matches the socket, reduces the risk of an electric shock.
After each application, unplug the power cord plug from the socket. Always disconnect the product from the power supply, if it is left unattended, and before putting it away, disassembling, or cleaning.
Keep the power cord away from the attachments of the product. This will reduce the risk of pulling in, cutting, or otherwise damaging the power cord.
Do not overload the power cord. Do not use the power cord to carry, connect, or disconnect the plug from the power socket. Avoid any contact between the power cord and heat sources, oil, sharp edges or moving parts. Damage to the power cord increases the risk of an electric shock. If the power cord is damaged (e.g. it is cut or its insulation is melted), immediately unplug it from the wall socket and return it to an authorised service facility. NEVER use the product if its power cord is damaged. NEVER repair the power cord. It must be replaced with a new one at an authorised service centre.
Disconnect the power cord from the power socket, before installing, removing, or adjusting any of the product accessories. Exercise special care, when handling sharp parts of the product. Do not touch blades in motion. The blades are very sharp and there is a risk of injury, even if the blades are not moving. Special care must be taken when handling any accessories equipped with blades.
Make sure that the selected accessory has been installed correctly, before starting the product.
Do not place the containers supplied with the product on hot surfaces. This can lead to melting of the containers.
Do not overload the product. The temperature of the housing must not exceed 60^ C. Overloading the product will accelerate its wear and tear, lead to its damaging, and increase the risk of an electric shock.
Do not use the product to prepare hot food. When preparing food, it may splash around. Splashing of hot food can lead to burns. The appliance is not to be used by children. Keep the product and its power cord out of the reach of children. It is important to ensure that children do not see the product as a toy.
Children should not be allowed to clean or maintain the product without the supervision of an adult.
This product cannot be used by people with impaired physical and/or mental abilities, or by people without experience in or understanding of the operation of the product, unless they are supervised or instructed in the safe use of the product, so that they understand the relevant operating risks.
PRODUCT OPERATION
Preparing for operation
The product must be unpacked and all parts of the packaging completely removed. It is recommended to keep the packaging, as
GB
it can be helpful for further transport and storage of the product.
Check the product for damage. If any damage is detected, do not use the product until the damage has been repaired or the damaged components replaced with new ones that are free of defects.
Clean the product according to the instructions specified in the "Product Maintenance" section.
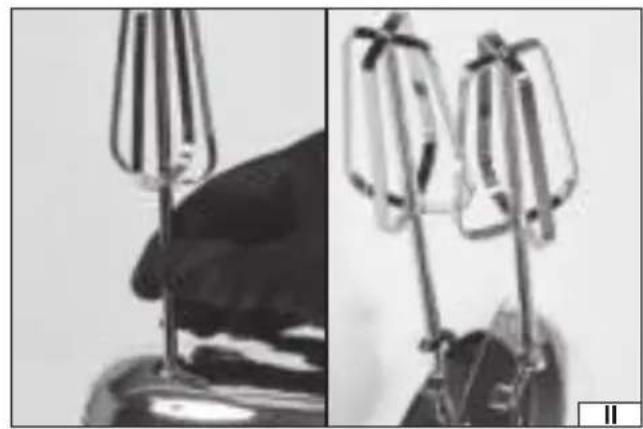
Caution! Make sure that the power cord is unplugged from the socket, before attempting to install or remove the stirrers.
Select a pair of identical stirrers. It is forbidden to use different stirrers at the same time. The stirrers are paired-up so that they can work together. Using two different stirrers will cause them to block each other, which can damage the stirrers and the blender, and cause fi re and/or electrical shock.
The stirrer handles have small tabs, which must be inserted into the notches in the stirrer socket of the blender (II). The stirrer is fastened by a snap-in mechanism when a characteristic "click" is heard. Properly fitted stirrer does not fall out of the socket automatically, and its disassembly is possible only after pressing the "EJECT" stirrer lock button (III).
After fixing the stirrers, make sure that the on/off switch is in the "off" position, marked "0" (zero).
The blender can also be used together with the supplied bowl and base. In this case, there is no need to hold the blender in your hand all the time. This can prove useful for long mixing.
Place the base on a flat, level and hard surface. Mount the blender without the stirrers on the base so that the latches on the front of the blender socket hit the openings in the blender housing first (IV). Then push down the rear part of the blender so that the latch engages (V). A correctly mounted blender cannot be removed from the socket otherwise than by pressing the blender lift lock button (VI).
Press and hold the blender lift lock button (VII), lift the socket with the blender mounted, and then release the blender lift lock button. The blender will be locked in the upper position.
Mount the selected stirrers in the same manner as when attaching directly to the blender.
Place the bowl in the bowl socket (VIII), then lower the blender by pressing and holding the blender lift lock button. The gears around the edge of the bowl and at the base hinge should interlock (IX). When lowering the blender, the gears may block each other and not allow the blender to be fully lowered. In this case, turn the bowl slightly by hand until the gears stop blocking each other.
Product operation
Mount the selected pair of same-type stirrers or mount the blender and bowl in the base.
Check that the on/off switch is in the position marked "0" (zero).
When using the blender without a base, grasp the blender by the handle so that the stirrers do not come into contact with any object. If the base will also be used, lower the blender to the bottom position.
Plug the power cord plug into the socket.
Make sure that the stirrers are not in contact with any object, move the on/off switch to the position marked “1” and check if the stirrers and, possibly, the bowl are rotating freely. In case of any symptoms of improper operation, e.g. stirrers catching on each other during rotation, increased noise, increased vibrations, immediately turn off the blender with the on/off switch, disconnect the power cord plug from the socket and investigate the cause of improper operation, e.g. repeat the installation of the stirrers. Stop using the blender if it is not possible to determine and eliminate the cause of improper operation. In such a case, contact an authorised maintenance service of the manufacturer.
The on/off switch has several positions described by digits. The greater the setting digit, the higher the stirrers' rotation speed.
Press and hold the “TURBO” button to start the mixing process at the highest speed. Release the “TURBO” button to return to the speed set in the on/off switch setting.
The whisk stirrers should be used to whisk the egg whites, whipped cream, butter, creams, etc. Do not use this type of stirrers to mix hard food ingredients or dense masses. This may cause damage to the stirrer blades. It is forbidden to use damaged, e.g. deformed or cracked, stirrers.
Spiral blenders can be used for whipping up dense masses or doughs.
Mixing should be carried out using vessels of sufficient depth to avoid spillage of food ingredients. After mixing, first turn the blender off with the on/off switch, wait until the stirrers have stopped rotating completely and then pull them out of the mixed substance. This will prevent spillage of food ingredients which would occur when pulling out the rotating stirrers from the vessel.
When mixing bulk ingredients, e.g. flour, with liquids, stop mixing for a while and add bulk material in small portions, preferably spreading it in a thin layer over the entire surface of the mixed liquid. The mixing should be resumed at the lowest speed and possibly increased after the bulk ingredient has been mixed with the liquid. This will help reduce the occurrence of food ingredient powder clouds.
It is not recommended to use the blender with only one stirrer installed. The blender is designed for use with a pair of stirrers and using only one stirrer will lead to faster wear of the blender and can also cause damage to the blender.
Use only the stirrers supplied with the blender or approved by the manufacturer. Using other stirrers may damage the blender.
Product maintenance
CAUTION! Every time before cleaning, turn off the product, unplug the power cord plug from the socket, wait for the appliance to cool down and then proceed with maintenance.
CAUTION! It is recommended to clean the stirrers immediately after all dishes have been prepared. This will prevent food residues
GB
from drying up and make cleaning easier.
If the drive housing is contaminated with processed food during operation, stop your work, clean the product, and only then resume operation.
Use only mild kitchen cleaning agents to clean it. NEVER use abrasive cleaning agents, e.g. cleaning powder or milk, or agents containing corrosive substances. Do not use any solvents, petrol or alcohol to clean the product.
Dilute the cleaning agent with water, according to the instructions supplied with the agent. Then, apply it on a soft cloth, wring out the excess amount so that the fabric is slightly damp and clean the outside of the drive housing.
Remove any residues of the cleaning agent with a soft cloth slightly soaked in clean water. Then, dry all surfaces with a dry soft cloth.
CAUTION! The drive housing is not designed for water jet cleaning. Do not immerse the drive housing in water.
You can clean the stirrers and the bowl, when detached from the base, with a water jet or by submerging in water.
The stirrers can also be cleaned in mechanical dishwashers.
CAUTION! If you are preparing different dishes one after another, using the same pair of stirrers, you can dispose of food residues by immersing the stirrers in a container with clean, lukewarm water, and activating them for a short period of time.
Transport and storage
Before commencing storage or transport of the product, clean it thoroughly from food residues.
If stored, keep the product indoors, and make sure it is not exposed to dust, dirt, or moisture. It is recommended to store the product in its original packaging.
TECHNICAL DATA
| Parameter Unit Value | ||
| Catalogue No. 67790 | ||
| Rated voltage [V~] 220 - 240 | ||
| Rated frequency [Hz] 50 - 60 | ||
| Rated power [W] 200 | ||
| Insulation class II | ||
| Net weight [kg] 0.73 | ||
| Protection rating IPX0 |
PRODUKTBESCHREIBUNG
CARACTÉRISTIQUES DU PRODUIT

Brand : Lund
Model : 67790
Category : Food Processor