X-16 - Elliptical bike ADIDAS - Free user manual and instructions
Find the device manual for free X-16 ADIDAS in PDF.



| Brand | Adidas |
| Model | X-16 |
| Product type | Elliptical trainer |
| Power supply | Mains |
| Display | LCD with data display (speed, distance, time, calories, heart rate, level) |
| Training programs | Manual, Gradient, Calorie Burn, Cardio, Strength, Interval, Heart Rate Control (HRC1/HRC2), User programs (2 profiles) |
| Resistance adjustment | Levels adjustable during workout via Up/Down buttons |
| Heart rate sensors | Integrated hand pulse sensors |
| Audio input | MP3 input for listening to music |
| Control buttons | Start, Stop, Select, Up, Down, Cardio, Calorie Burn, Manual, Gradient, Strength, Interval, Heart Rate, Users, MP3 input |
| Units of measurement | Kilometers or miles (configurable) |
| Stop function | Pause up to 5 minutes via Stop button |
| Reset | Start button to reset the workout |
| Manual languages | French, Czech, Danish, German, Greek, English, Spanish, Finnish, Italian, Japanese, Dutch, Norwegian, Polish, Portuguese, Russian, Swedish, Turkish, Chinese |
| Manual pages | 134 pages |
Frequently Asked Questions - X-16 ADIDAS
User questions about X-16 ADIDAS
0 question about this device. Answer the ones you know or ask your own.
Ask a new question about this device
Download the instructions for your Elliptical bike in PDF format for free! Find your manual X-16 - ADIDAS and take your electronic device back in hand. On this page are published all the documents necessary for the use of your device. X-16 by ADIDAS.
USER MANUAL X-16 ADIDAS
natural_image
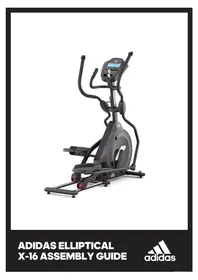
Exterior view of a black X-16 stationary exercise bike with red feet and control panel (no text or symbols visible)ADIDAS ELLIPTICAL X-16 ASSEMBLY GUIDE
ELLIPTICAL X-16
ASSEMBLY GUIDE

adidas

ADIDASHARDWARE.COM



ADIDASHARDWARE.COM
ELLIPTICAL X-16
ASSEMBLY GUIDE

ADIDASHARDWARE.COM
4

ADIDASHARDWARE.COM
5
ELLIPTICAL X-16
ASSEMBLY GUIDE


ADIDASHARDWARE.COM
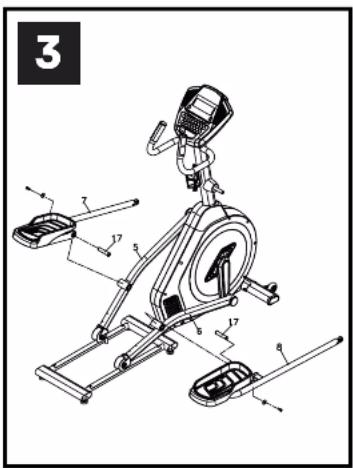
| ITEM | DESCRIPTION | QTY | ITEM | DESCRIPTION | QTY |
| 1 | Mail Frame | 1 | 53 | Handgrip End Cap | 2 |
| 2 | Front Stabilizer Bar | 1 | 56 | Canade Mail Cover | 1 |
| 3 | Crank Arm Assembly | 2 | 53 | Sica Case [1] | 1 |
| 5 | Pedal Arm [L] | 1 | 56 | Side Case [R] | 1 |
| 6 | Pedal Arm [R] | 1 | 57 | Side Case Plate[ L] | 1 |
| 7 | Connecting Arm [L] | 1 | 58 | Side Case Plate[R] | 1 |
| 8 | Connecting Arm [R] | 1 | 59 | Pedal Arm Cover [L] | 1 |
| 9 | Console Mast | 1 | 60 | Pedal Arm Cover [R] | 1 |
| 10 | Lower Handle Bar [L] | 1 | 61 | Pedal Foam [L] | 1 |
| 11 | Lower Handle Bar [R] | 1 | 62 | Portal Foam [R] | 1 |
| 12 | Crank Axle | 1 | 63 | Crank Arm End Cap | 2 |
| 13 | Idler Wheel Assembly | 1 | 64 | Connecting Arm Cover [L] | 2 |
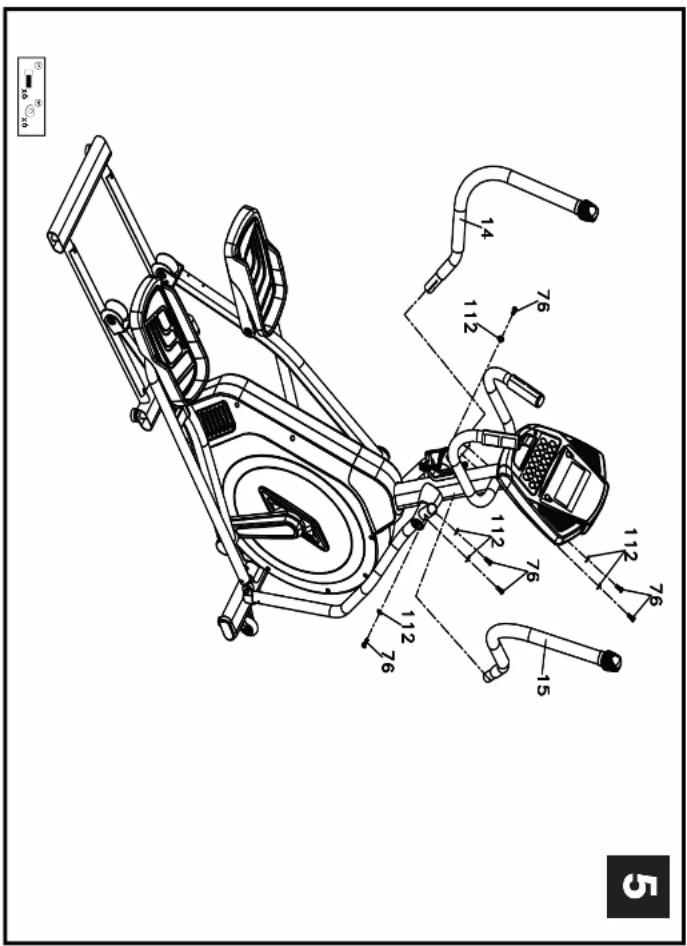
| 14 | Swing Arm [L] | 1 | 65 | Connecting Arm Cover [R] | 2 |
| 15 | Swing Arm [R] | 1 | 68 | Slide Wheel Cover | 2 |
| 16 | Axle Stopper | 1 | 69 | Front Handle Bar Cover [L] | 1 |
| 17 | Axle for Padal | 2 | 70 | Rear Handle Bar Cover [L] | 1 |
| 18 | Axle for Slide Wheel | 2 | 71 | Front Handle Bar Cover [R] | 1 |
| 19 | 11.9 × 8.5 × 1bm/m\_Rad End Sleeve | 3 | 72 | Rear Handle Bar Cover [R] | 1 |
| 20 | 6004 Bearing | 2 | 73 | 7 × 7 × 19mm Wocsnuff Key | 2 |
| 21 | 6203 Bearing | 6 | 74 | 3/8" × 2" Flat Head Socket Bolt | 4 |
| 22 | 6003 Bearing | 12 | 75 | 1/4" × UNC20 × 3/4" , Hex Head Bolt | 4 |
| 23 | M12 × P1.75, Rad End Bearing | 2 | 76 | 5/16" × UNC18 × 3/16" , Hex Head Bolt | 26 |
| 24 | Aluminum Rail | 2 | 77 | 5/16" × 1 - 1/4" , Hex Head Bolt | 2 |
| 25 | 360m/m Steel Cable | 1 | 78 | 3/8" × 3-3/4" Hex Head Bolt | 2 |
| 26 | Drive Bell | 1 | 79 | M8 × 35m/m, Socket Head Cap Bolt | 2 |
| 27 | Flywheel | 1 | 81 | 5/16" × UNC18 × 1-3/16" , Button Head Socket Bolt | 2 |
| 28 | Magnet | 1 | 82 | M5 × 10m/m, Phillips Head Screw | 10 |
| 29 | Handgrip Foam | 2 | 83 | M5 × 10m/m, Phillips Head Screw | 4 |
| 30 | Drink Bottle Roller | 1 | 84 | M5 × 15m/m, Phillips Head Screw | 14 |
| 31 | 62 × 8.2 × 1.0T\_Bushing Washer | 2 | 85 | 5 × 19m/m , Tapping Screw | 11 |
| 32 | Console Assembly | 1 | 86 | 3.5 × 12m/m , Shoot Metal Screw | 18 |
| 32-1 | Console Top Cover | 1 | 87 | 3.5 × 16m/m , Sheet Meal Screw | 9 |
| 32-2 | Console Bottom Cover | 1 | 88 | 3 × 20m/m , Tapping Screw | 4 |
| 32-3 | Console Display Board | 1 | 89 | 17 _C Ring | 1 |
| 32-4 | Key Board | 1 | 90 | 20 _C Ring | 2 |
| 32-5 | Amplifier Controllers | 1 | 91 | E7_E-Clip | 2 |
| 32-6 | 300m/m Sound Board [Red] | 1 | 92 | 1/4" × BT Nylon Nut. | 4 |
| 32-7 | 250m/m_Senator W/Cable | 2 | 93 | 5/16" × 7T Nylon Nut | 4 |
| 32-8 | 200m/m Amplifier Cable | 1 | 94 | M8 × TT Nylon Nut. | 1 |
| 32-9 | Interface Board | 1 | 95 | M8 × 9T Nylon Nut. | 1 |
| 32-10 | Speaker Drill Anchor | 4 | 97 | M8 × 6.3T_Luck Nut. | 4 |
| 32-11 | 300m/m_W/Receiver, AR | 1 | 98 | 3/8" × UNF26 × 4T\_Luck Nut | 2 |
| 33 | 1650m/m Computer Cable | 1 | 99 | 2/8" × UNF26 × 1TUT Nut. | 2 |
| 34 | 500m/m DC Power Card | 1 | 100 | 3/8" × "7T Luck Nut | 8 |
| 35 | Gear Motor | 1 | 101 | 5 × 15 × 1.5T\_Flat Washer | 9 |
| 36 | 700m/m_Sensor W/Cable | 1 | 103 | 5/16" × 23 × 1.5T\_Flat Washer | 10 |
| 37 | 850m/m Handpulse W/Cable Assembly | 1 | 104 | 8.5 × 26 × 2.0T\_Flat Washer | 2 |
| 37-1 | 650m/m Handpulse W/Cable Assembly [Rad] | 1 | 105 | 3/8" × 19 × 1.5T\_Flat Washer | 4 |
| 38 | Power Adaptor | 1 | 106 | 17 × 23.5 × 1.0T\_Flat Washer | 1 |
| 39 | 430m/m_Acicle Cable | 1 | 107 | 20 × 30 × 2T\_Flat Washer | 1 |
| 40 | Sensor Rack | 1 | 108 | 17 Wave Washer | 6 |
| 41 | 32 × 2.5T\_Round Cap | 2 | 109 | M8 × P1.25 × 155L_Bull | 1 |
| 42 | 63 Transportation Wheel | 2 | 110 | M6 × 20m/m Carriage Bolt | 1 |
| 43 | 78 _Slide Wheel, Urethane | 2 | 111 | M6 × 10m/m Slotted Set Screw | 2 |
| 44 | 330\_Drive Pulley | 1 | 112 | 8 × 23 × 1.5T\_Curved Washer | 8 |
| 45 | 40 × 60 Oval End Cap | 6 | 113 | 3/8" × 23 × 2.0T Curved Washer | 2 |
| 46 | 23 × 23 Rubber Foot Pad | 2 | 114 | 10 × 2T\_Spring Washer | 2 |
| 47 | 32/1.8T\_Button Head Plug | 2 | 117 | 3/16" × 23 × 3.0T\_Flat Washer | 8 |
| 48 | 35 × 10 Rubber Fact | 4 | 118 | 12/14m/m Wrench | 1 |
| 49 | Cover Swing Arm Axle | 2 | 119 | 13/14m/m Wrench | 1 |
| 50 | 15 × 8.5 × 38.5 Sleeve | 2 | 120 | Phillips Hense Screw Driver | 1 |
| 51 | Bushing Cover | 2 | 121 | Combination McAllen Wrench & Phillips Head Screw Driver | 1 |
ADIDASHARDWARE.COM

adidas

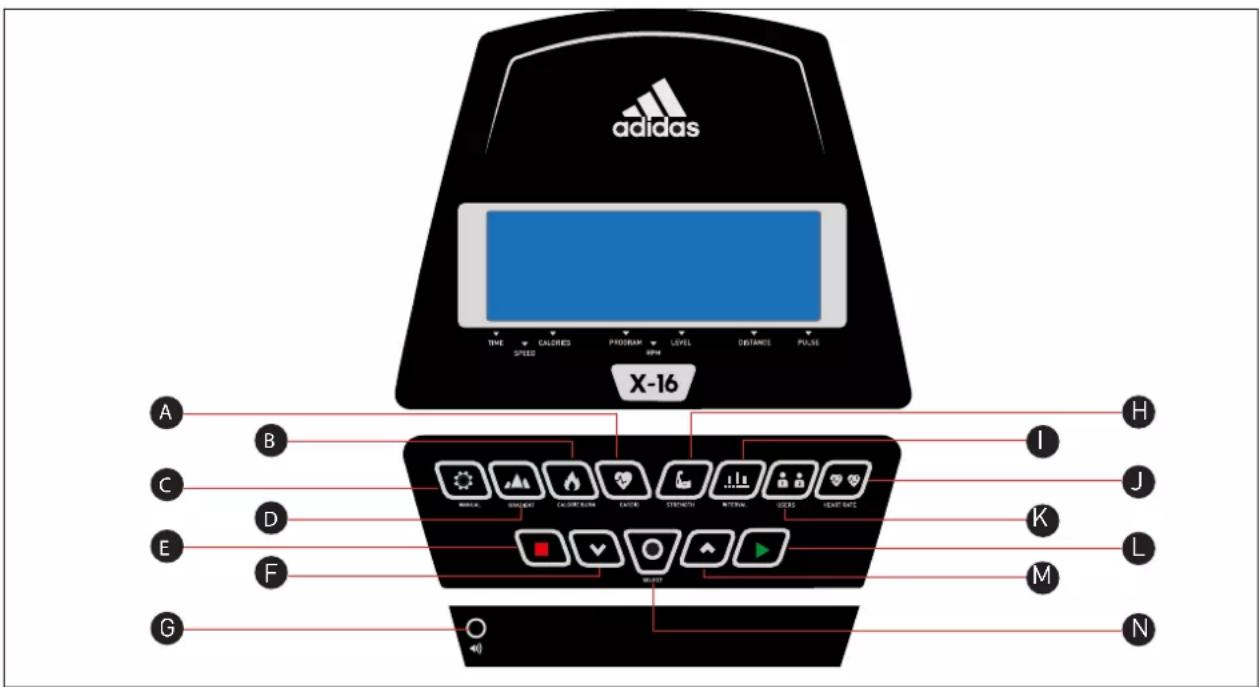
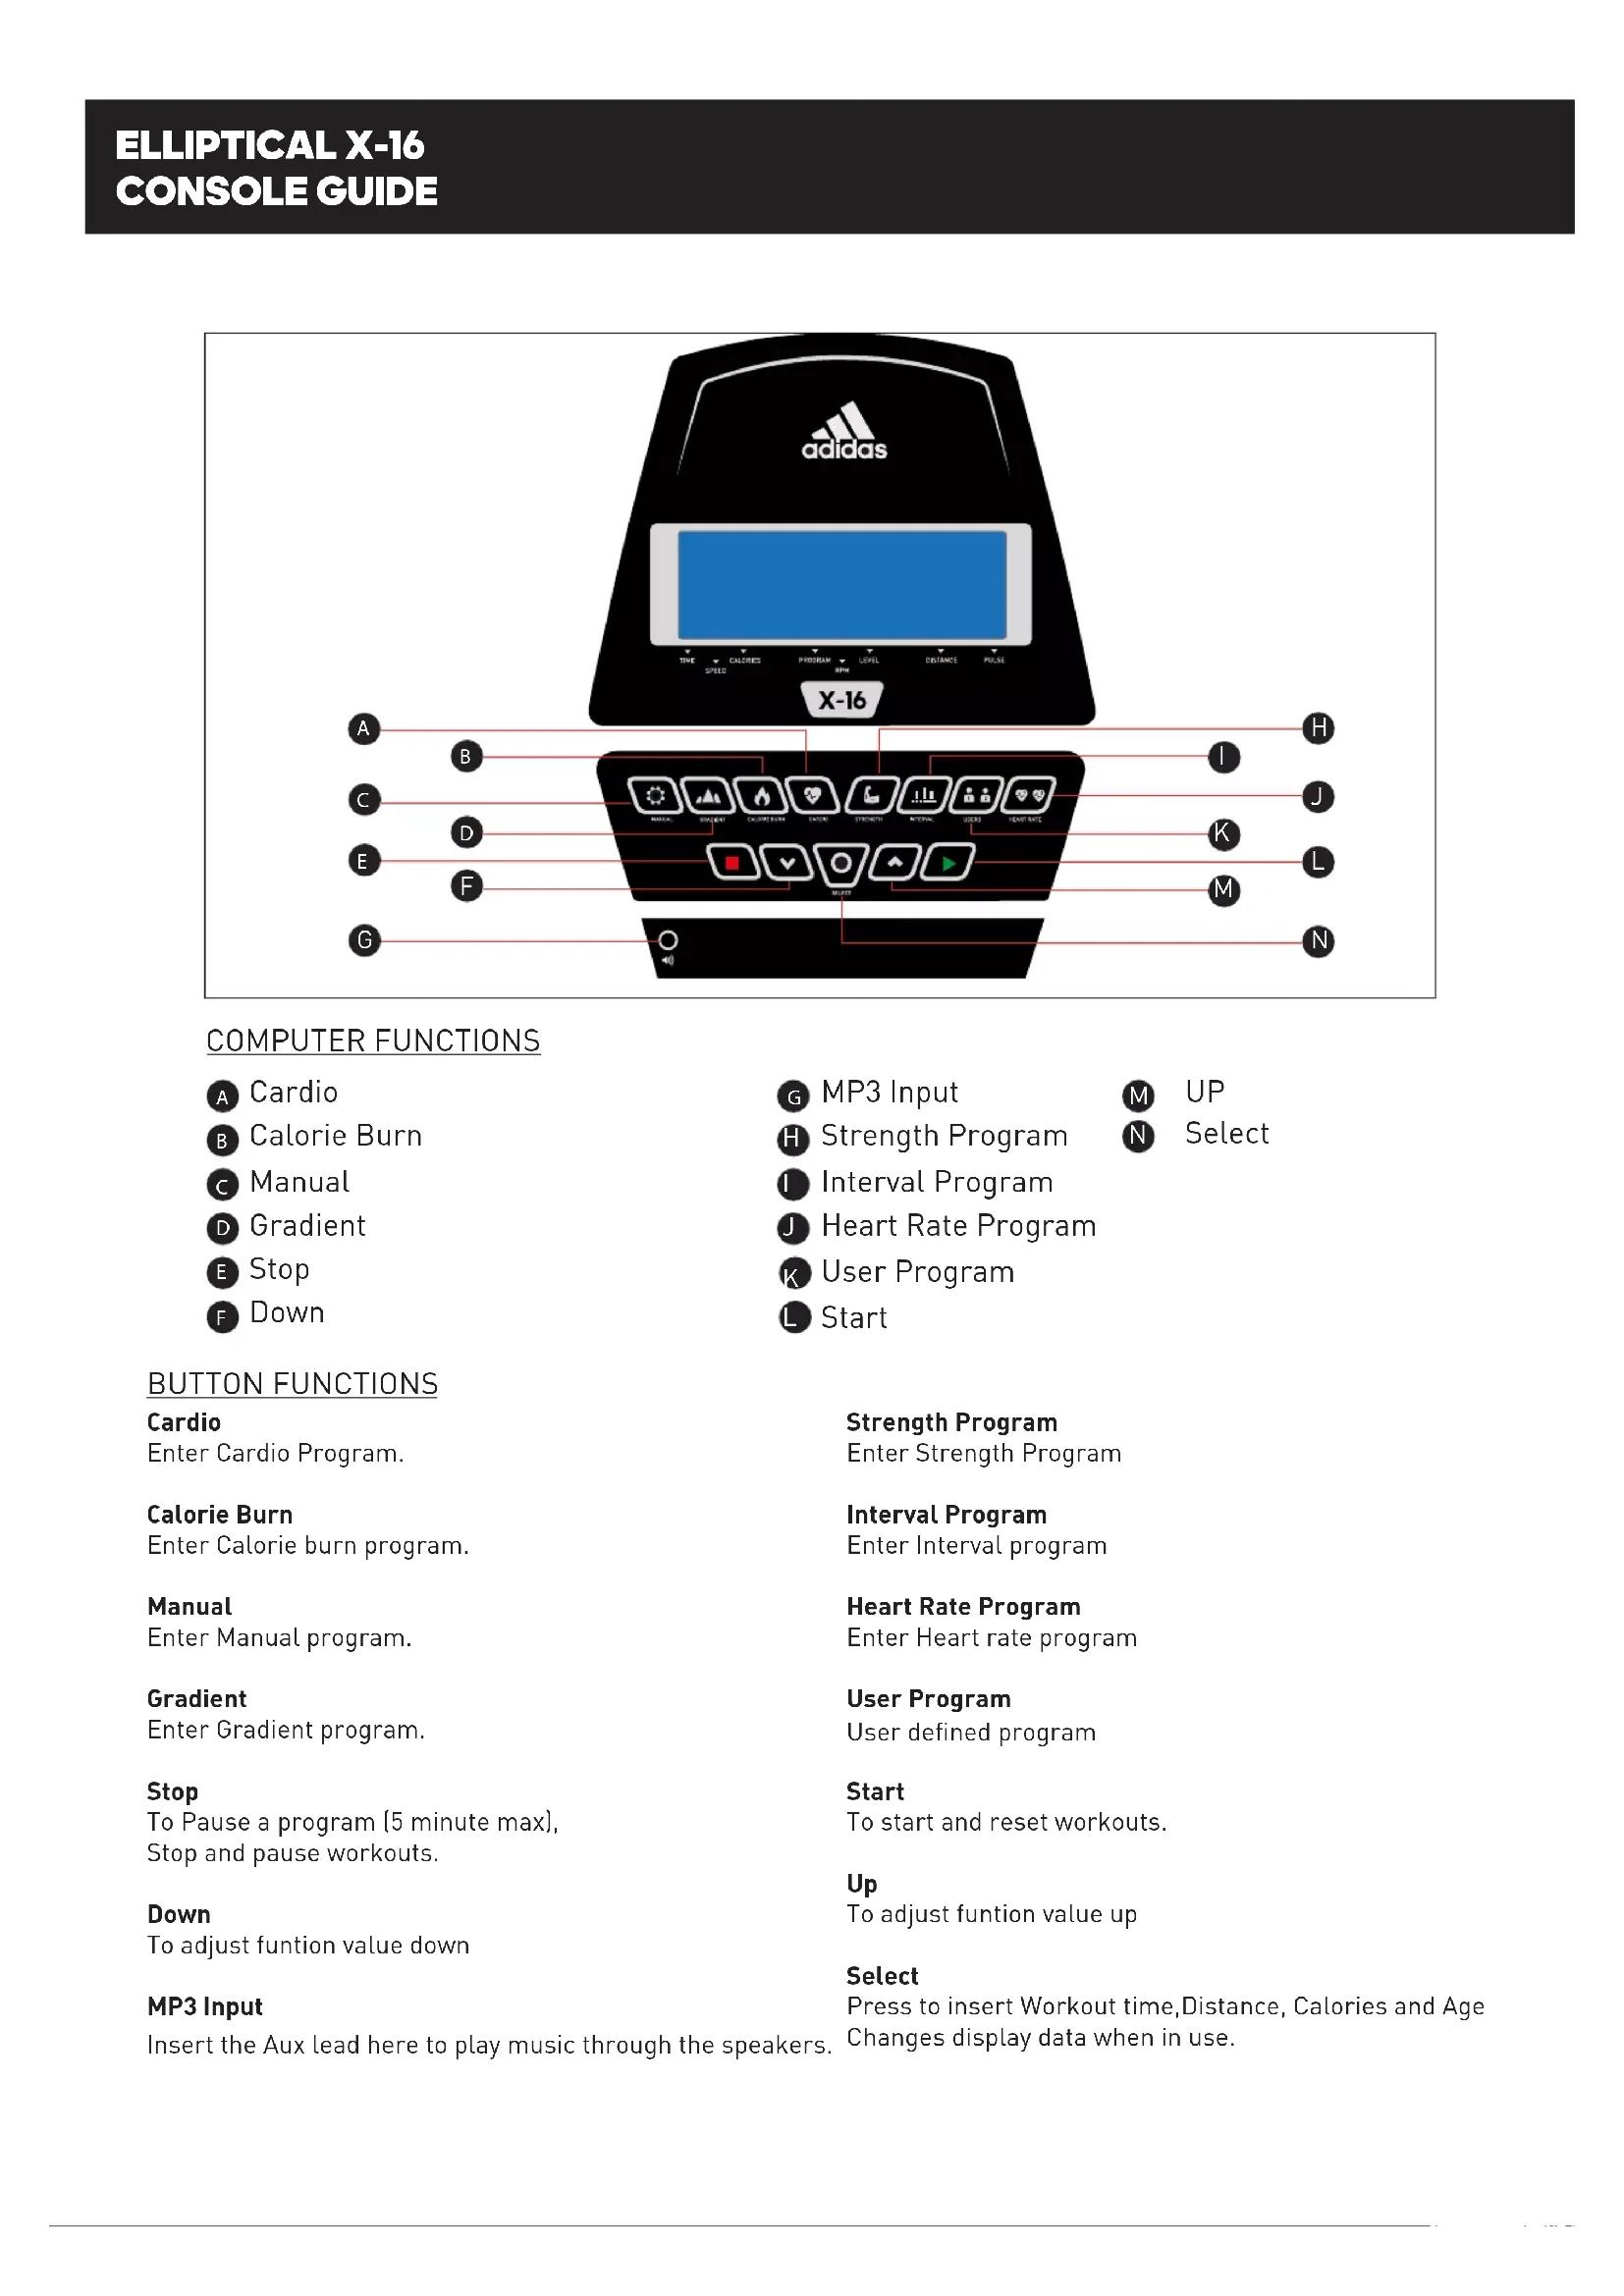
COMPUTER FUNCTIONS
A Cardio
B Calorie Burn
c Manual
D Gradient
E Stop
F Down
G MP3 Input
H Strength Program
1 Interval Program
J Heart Rate Program
User Program
L Start
M UP
N Select
BUTTON FUNCTIONS
Cardio
Enter Cardio Program.
Calorie Burn
Enter Calorie burn program.
Manual
Enter Manual program.
Gradient
Enter Gradient program.
Stop
To Pause a program (5 minute max), Stop and pause workouts.
Down
To adjust funtion value down
MP3 Input
Insert the Aux lead here to play music through the speakers.
Strength Program
Enter Strength Program
Interval Program
Enter Interval program
Heart Rate Program
Enter Heart rate program
User Program
User defined program
Start
To start and reset workouts.
Up
To adjust funtion value up
Select
Press to insert Workout time, Distance, Calories and Age Changes display data when in use.
OPERATION PROCEDURE
01
When the power supply is connected to the machine the computer will power on with a beep sound. All segments of the LCD display will light up for 2 seconds then a dot matrix will display the software version of the console. The console will then display the odometer reading, total time (in hours) on the left and virtual distance will be on the right.
02
The main menu will be displayed. The user can press START to begin immediately in the manual mode. All values (SPEED, DISTANCE, TIME) will count up from Zero. Resistance level can be changed at any time during exercise by pressing the UP or DOWN key. in the centre of the screen shows a 1/4 mile or 0.4KM track with a lap counter as you progress.

To Change the console from MPH to KPH.
- Hold down the START, STOP and SELECT keys together for 5 seconds.
- Press the SELECT key
• use the UP/DOWN keys to select FUNCTIONS - Press SELECT
- Use UP/DOWN keys to select UNITS
- Press SELECT
- Use UP/DOWN to select Miles or Kilometers, then press SELECT
- Press STOP to exit
- Use UP/DOWN keys to select EXIT, then press SELECT.
Before beginning the manual exercise the user can set the desired workout for TIME
03
- From main menu press then MANUAL PROGRAM.
- Enter your WEIGHT using the UP/DOWN keys, then press SELECT.
- Enter your AGE using the UP/DOWN keys, then press SELECT.
- Adjust the desired workout duration using the UP/DOWN keys.
- Now press START to begin.
- The program will now start on level one resistance, to adjust the resistance use the UP/DOWN keys.
- During the program you will be able to switch the displayed data by pressing the SELECT key.
- When the program ends the message window will show a summary of your workout, then will go back to the main menu.
04
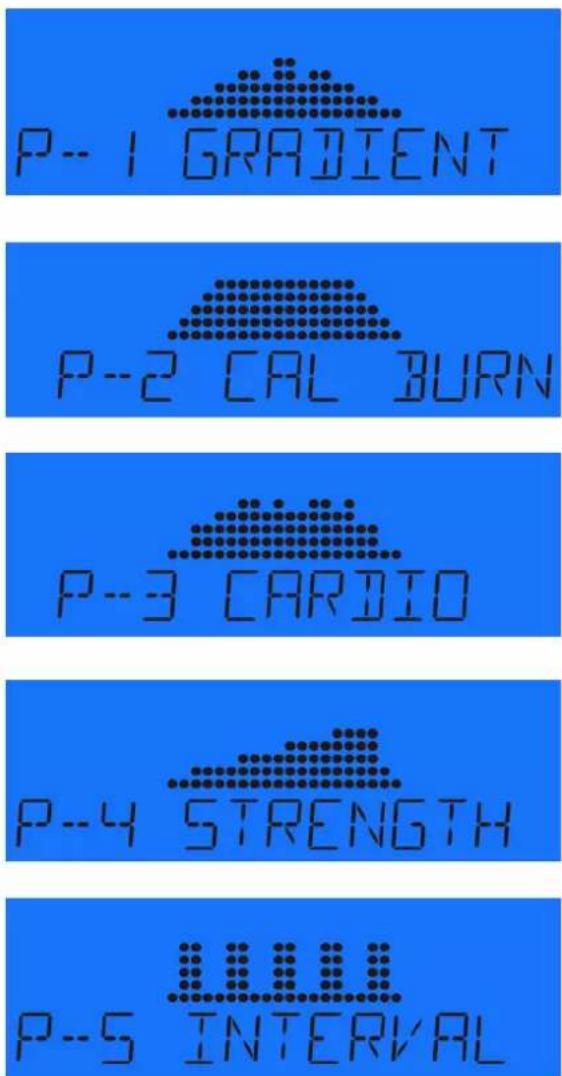
PRESET PROGRAM
• In main menu press Gradient, Calorie Burn, Cardio, Strength or Interval
- Press SELECT
- Enter your WEIGHT using the UP/DOWN keys, then press SELECT.
- Enter your AGE using the UP/DOWN keys, then press SELECT.
- Adjust the desired workout duration using the UP/DOWN keys, press SELECT to continue.
- Select the MAX level, this will be the peak exertion level you will experience during the program. Use the UP/DOWN keys to adjust this then press SELECT
- Now you have finished editing the settings, press START
- You can increase or decrease the workload at any time by using the UP/DOWN keys,
- During the program you will be able to switch the displayed data by pressing the SELECT key.
- When the program ends the message window will show a summary of your workout, then will go back to the main menu.
06
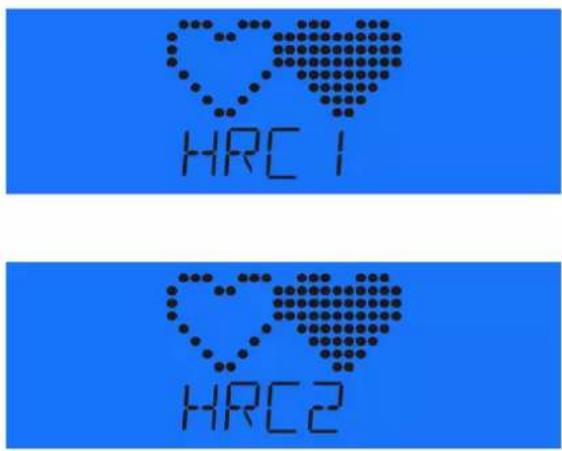
H.R.C Heart rate Control

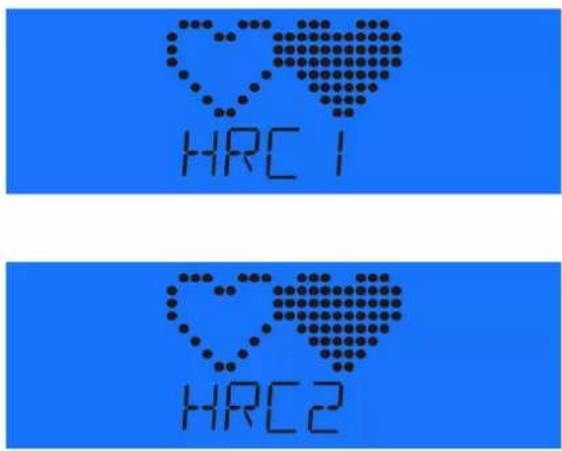
- In Main menu press Heart Rate to select HRC1 / HRC2.
- Press Select.
- Enter your WEIGHT using the UP/DOWN keys, then press SELECT.
- Enter your AGE using the UP/DOWN keys, then press SELECT.
- Enter your workout TIME using the UP/DOWN keys, then press SELECT.
- Enter your workout heart rate 60%, 70% or 80% of your MHR.
- Enter your Target heart rate.
- Press Start to begin.
- Both hands need to on the pulse sensors to record H.R

Maximum users heart rate is worked out at 220 - age = total. TARGET HEART RATE this is the maximum your heart rate (MHR) should be. You can then work out at 60%, 70%, 80% of this. For example:
• 220 - 40 (users age) = 180 MHR
- 180 × 0.6 = 108 BPM
• That calculates 60% of your MHR
- The computer will record the TARGET HEART RATE and allow the user to work out within this, the resistance level will automatically be changed.
- If the heart rate is too high the computer will beep to indicate this.
- If no heart rate is being recorded the below will be displayed on the screen.
07
User Program
User can create own workout profile.
- In Main menu press User button to select USER 1 or USER 2.
- Press Select.
- Enter your WEIGHT using the UP/DOWN keys, then press SELECT.
- Enter your AGE using the UP/DOWN keys, then press SELECT.
- Adjust the desired workout duration using the UP/DOWN keys, press SELECT to continue.
- The first column will now blink, you can adjust the resistance level for this segment using the UP/DOWN key.
- Press SELECT again to adjust each segment.
- Adjust each bar by pressing UP/DOWN then SELECT to move onto next segment.
- Continue the above for all segments (20 Segments).
- Press START to begin exercise once complete.
- You can increase or decrease the workload at any time by using the UP/DOWN keys,
- During the program you will be able to switch the displayed data by pressing the SELECT key.
- When the program ends the message window will show a summary of your workout, then will go back to the main menu.
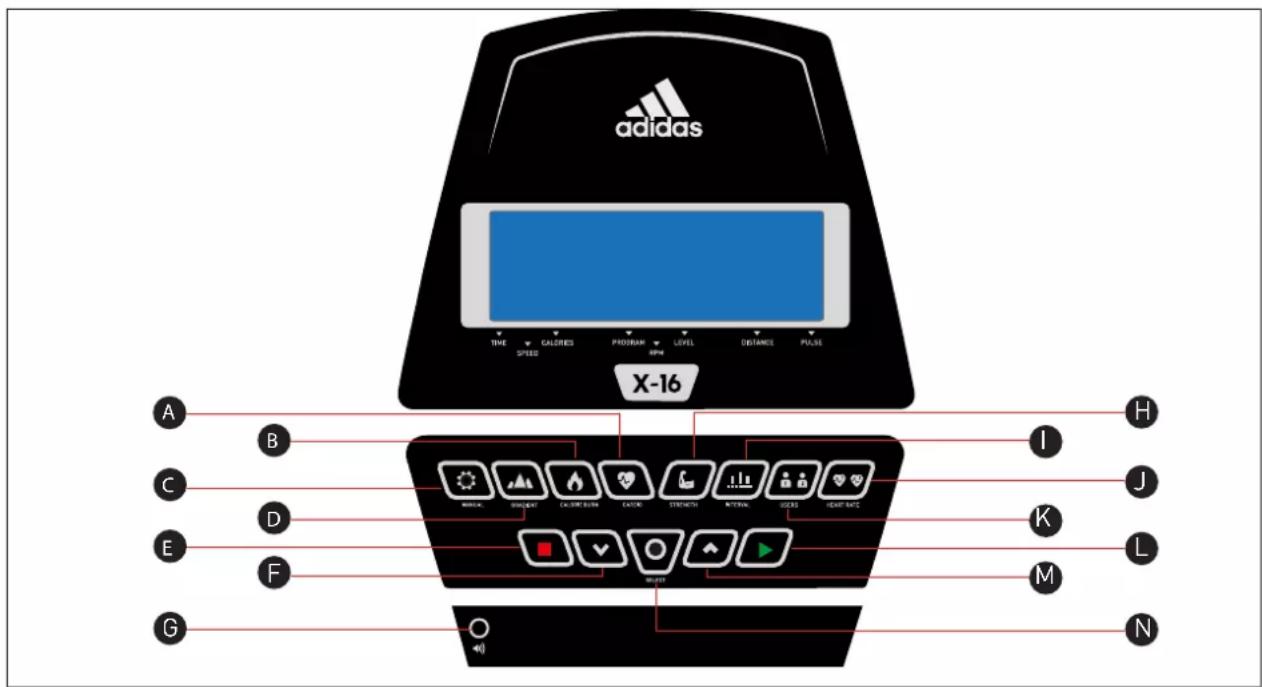
FUNKCE POČÍTAČE
Strength Program (Styrkeprogram)
Äbn Styrkeprogram.
Interval Program (Intervalprogram)
Åbn Intervalprogram.
Heart Rate Program (Hjertefrekvensprogram)

06
H.R.C. (Control del ritmo cardíaco)
TIETOKONEEN TOIMINNOT
PAINIKKEIDEN TOIMINNOT
Cardio
Strength (Musculation)

06


G MP3-inngang
H Strength Program (Styrkeprogram)
● Interval Program (Intervallprogram)
J Heart Rate Program (Pulsprogram)
K User Program (Brukerprogram)
L Start
M Opp
N Select (Velg)
KNAPPFUNKSJONER
Cardio (Kardio)
Angi kardioprogram.
Calorie Burn (Kaloriforbrenning)
Angi kaloriforbrenningsprogram.
Manual (Manuell)
Angi manuelt program.
Gradient (Hellingsgrad)
Angi hellingsgradsprogram.
Stopp
For å pause et program (maks. 5 minutter), kan du stoppe og pause treningen.
Ned
For å justere verdien ned.
MP3-inngang
Strength Program (Styrkeprogram)
Angi styrkeprogram.
Interval Program (Intervallprogram)
Angi intervallprogram.
Heart Rate Program (Pulsprogram)
Angi pulsprogram.
User Program (Brukerprogram)
04 FORHÅNDSINNSTILT PROGRAM

06
H.R.C-pulskontroll
04 WSTĘPNIE USTAWIONY PROGRAM
Strength Program (强化训练)
进入强化训练。
Interval Program (间歇性训练)
进入间歇性训练。
Heart Rate Program (心率训练)
进入心率训练
User Program (用户程序)
用户定义训练。
开始
开始和重置锻炼。
向上
调整升高功能值。
Select (选择)
User Program (Korisnički program)

06
H.R.C. (Heart Rate Control - kontrola

- U glavnom meniju pritisnite puls (Heart Rate) da biste izabrali HRC1/HRC2.
• Pritisnite SELECT (BIRANJE). - Unesite težinu pomoću dugmadi GORE/DOLE, a zatim pritisnite SELECT (BIRANJE).
- Unesite starost pomoću dugmadi GORE/DOLE, a zatim pritisnite SELECT (BIRANJE).
- Unesite vreme (TIME) pomoću dugmadi GORE/DOLE, a zatim pritisnite SELECT (BIRANJE).
- Unesite puls za vežbanje kao 60%, 70% ili 80% maksimalnog pulsa (MHR).
- Unesite ciljni puls.
- Pritisnite START da biste započeli.
- Obe ruke moraju da budu na senzorima pulsa da bi se zabeležio puls (H.R.).

Maksimalni puls se izračunava po formuli 220 - starost = ukupan broj. Ciljni puls (TARGET HEART RATE) je maksimalan broj za vaš puls (MHR). Zatim možete da vežbate pri 60%, 70% ili 80% ove vrednosti. Na primer:
• 220-40 (starost korisnika) = 180 MHR
- 180x0,6 = 108 BPM
• To izračunava 60% vašeg MHR
HANDHAVANDEPROCEDURE
01
M Yukari
N Select (Seç)
DÜĞME FONKSİYONLARI
Cardio (Kardio)

06


- ADIDAS ELLIPTICAL X-16 ASSEMBLY GUIDE
- adidas
- COMPUTER FUNCTIONS
- BUTTON FUNCTIONS
- Cardio
- Calorie Burn
- Manual
- Gradient
- Stop
- Down
- MP3 Input
- Strength Program
- Interval Program
- Heart Rate Program
- User Program
- Start
- Up
- Select
- OPERATION PROCEDURE
- 01
- 02
- 03
- 04
- PRESET PROGRAM
- H.R.C Heart rate Control
- 07
- FUNKCE POČÍTAČE
- Strength Program (Styrkeprogram)
- Interval Program (Intervalprogram)
- Heart Rate Program (Hjertefrekvensprogram)
- TIETOKONEEN TOIMINNOT
- PAINIKKEIDEN TOIMINNOT
- Strength (Musculation)
- 06
- KNAPPFUNKSJONER
- Cardio (Kardio)
- Calorie Burn (Kaloriforbrenning)
- Manual (Manuell)
- Gradient (Hellingsgrad)
- Stopp
- Ned
- MP3-inngang
- Interval Program (Intervallprogram)
- Heart Rate Program (Pulsprogram)
- User Program (Brukerprogram)
- FORHÅNDSINNSTILT PROGRAM
- WSTĘPNIE USTAWIONY PROGRAM
- User Program (Korisnički program)
- HANDHAVANDEPROCEDURE
- DÜĞME FONKSİYONLARI
Brand : ADIDAS
Model : X-16
Category : Elliptical bike