
C7BU3 - Saw HiKOKI - Free user manual and instructions
Find the device manual for free C7BU3 HiKOKI in PDF.

| Product Type | Circular Saw |
| Brand | HiKOKI |
| Model | C7BU3 |
| Blade Diameter | 190 mm |
| Max Cutting Depth | Approx. 64 mm (at 90°) |
| No-Load Speed | 5000 rpm (estimated) |
| Power Supply | 220-240 V, 50/60 Hz |
| Power Consumption | 1300 W (estimated) |
| Weight (without cord) | 4.5 kg (estimated) |
| A-Weighted Sound Pressure Level | 98 dB(A) |
| A-Weighted Sound Power Level | 109 dB(A) |
| Vibration Emission Value (cutting) | 2.5 m/s² (uncertainty K=1.5 m/s²) |
| Electric Brake | Yes |
| Riving Knife | Yes, adjustable |
| Lower Guard | Yes, spring-loaded |
| Dust Extraction Function | Yes (on C7BU3 models) |
| Guiding | Parallel guide supplied, guide rail optional |
| Bevel Angle | 0° to 45° |
| Blade Arbor | 20 mm (estimated) |
| Maintenance | Regular cleaning of ventilation openings, replacement of carbon brushes |
| Warranty | In accordance with national regulations, covers manufacturing defects |
Frequently Asked Questions - C7BU3 HiKOKI
User questions about C7BU3 HiKOKI
0 question about this device. Answer the ones you know or ask your own.
Ask a new question about this device
Download the instructions for your Saw in PDF format for free! Find your manual C7BU3 - HiKOKI and take your electronic device back in hand. On this page are published all the documents necessary for the use of your device. C7BU3 by HiKOKI.
USER MANUAL C7BU3 HiKOKI
Read all safety warnings, instructions, illustrations and specifi cations provided with this power tool.
Failure to follow all instructions listed below may result in electric shock, fire and/or serious injury.
Save all warnings and instructions for future reference.
The term "power tool" in the warnings refers to your mains-operated (cored) power tool or battery-operated (cordless) power tool.
1) Work area safety
a) Keep work area clean and well lit.
Cluttered or dark areas invite accidents.
b) Do not operate power tools in explosive atmospheres, such as in the presence of flammable liquids, gases or dust.
Power tools create sparks which may ignite the dust or fumes.
c) Keep children and bystanders away while operating a power tool.
Distractions can cause you to lose control.
2) Electrical safety
a) Power tool plugs must match the outlet. Never modify the plug in any way. Do not use any adapter plugs with earthed (grounded) power tools.
Unmodified plugs and matching outlets will reduce risk of electric shock.
b) Avoid body contact with earthed or grounded surfaces, such as pipes, radiators, ranges and refrigerators.
There is an increased risk of electric shock if your body is earthed or grounded.
c) Do not expose power tools to rain or wet conditions.
Water entering a power tool will increase the risk of electric shock.
d) Do not abuse the cord. Never use the cord for carrying, pulling or unplugging the power tool.
Keep cord away from heat, oil, sharp edges or moving parts.
Damaged or entangled cords increase the risk of electric shock.
e) When operating a power tool outdoors, use an extension cord suitable for outdoor use.
Use of a cord suitable for outdoor use reduces the risk of electric shock.
f) If operating a power tool in a damp location is unavoidable, use a residual current device (RCD) protected supply.
Use of an RCD reduces the risk of electric shock.
3) Personal safety
a) Stay alert, watch what you are doing and use common sense when operating a power tool.
Do not use a power tool while you are tired or under the influence of drugs, alcohol or medication.
A moment of inattention while operating power tools may result in serious personal injury.
b) Use personal protective equipment. Always wear eye protection.
Protective equipment such as a dust mask, non-skid safety shoes, hard hat or hearing protection used for appropriate conditions will reduce personal injuries.
c) Prevent unintentional starting. Ensure the switch is in the off -position before connecting to power source and/or battery pack, picking up or carrying the tool.
Carrying power tools with your finger on the switch or energising power tools that have the switch on invites accidents.
d) Remove any adjusting key or wrench before turning the power tool on.
A wrench or a key left attached to a rotating part of the power tool may result in personal injury.
e) Do not overreach. Keep proper footing and balance at all times.
This enables better control of the power tool in unexpected situations.
f) Dress properly. Do not wear loose clothing or jewellery. Keep your hair and clothing away from moving parts.
Loose clothes, jewellery or long hair can be caught in moving parts.
g) If devices are provided for the connection of dust extraction and collection facilities, ensure these are connected and properly used.
Use of dust collection can reduce dust-related hazards.
h) Do not let familiarity gained from frequent use of tools allow you to become complacent and ignore tool safety principles.
A careless action can cause severe injury within a fraction of a second.
4) Power tool use and care
a) Do not force the power tool. Use the correct power tool for your application.
The correct power tool will do the job better and safer at the rate for which it was designed.
b) Do not use the power tool if the switch does not turn it on and off. Any power tool that cannot be controlled with the switch is dangerous and must be repaired.
c) Disconnect the plug from the power source and/ or remove the battery pack, if detachable, from the power tool before making any adjustments, changing accessories, or storing power tools.
Such preventive safety measures reduce the risk of starting the power tool accidentally.
d) Store idle power tools out of the reach of children and do not allow persons unfamiliar with the power tool or these instructions to operate the power tool.
Power tools are dangerous in the hands of untrained users.
e) Maintain power tools and accessories. Check for misalignment or binding of moving parts, breakage of parts and any other condition that may affect the power tool's operation. If damaged, have the power tool repaired before use.
Many accidents are caused by poorly maintained power tools.
f) Keep cutting tools sharp and clean.
Properly maintained cutting tools with sharp cutting edges are less likely to bind and are easier to control.
g) Use the power tool, accessories and tool bits etc. in accordance with these instructions, taking into account the working conditions and the work to be performed.
Use of the power tool for operations diff erent from those intended could result in a hazardous situation.
h) Keep handles and grasping surfaces dry, clean and free from oil and grease.
Slippery handles and grasping surfaces do not allow for safe handling and control of the tool in unexpected situations.
5) Service
a) Have your power tool serviced by a qualified repair person using only identical replacement parts.
This will ensure that the safety of the power tool is maintained.
PRECAUTION
Keep children and infirm persons away.
When not in use, tools should be stored out of reach of children and infirm persons.
SAFETY INSTRUCTIONS FOR ALL SAWS
Cutting procedures
a) DANGER: Keep hands away from cutting area and the blade. Keep your second hand on auxiliary handle, or motor housing.
If both hands are holding the saw, they cannot be cut by the blade.
b) Do not reach underneath the workpiece.
The guard cannot protect you from the blade below the workpiece.
c) Adjust the cutting depth to the thickness of the workpiece.
Less than a full tooth of the blade teeth should be visible below the workpiece.
d) Never hold the workpiece in your hands or across your leg while cutting. Secure the workpiece to a stable platform.
It is important to support the work properly to minimize body exposure, blade binding, or loss of control.
e) Hold the power tool by insulated gripping surfaces, when performing an operation where the cutting tool may contact hidden wiring or its own cord.
Contact with a "live" wire will also make exposed metal parts of the power tool "live" and could give the operator an electric shock.
f) When ripping, always use a rip fence or straight edge guide.
This improves the accuracy of cut and reduces the chance of blade binding.
g) Always use blades with correct size and shape (diamond versus round) of arbour holes.
Blades that do not match the mounting hardware of the saw will run off -centre, causing loss of control.
h) Never use damaged or incorrect blade washers or bolt.
The blade washers and bolt were specially designed for your saw, for optimum performance and safety of operation.
Kickback causes and related warnings
-
kickback is a sudden reaction to a pinched, jammed or misaligned saw blade, causing an uncontrolled saw to lift up and out of the workpiece toward the operator;
-
when the blade is pinched or jammed tightly by the kerf closing down, the blade stalls and the motor reaction drives the unit rapidly back toward the operator;
-
if the blade becomes twisted or misaligned in the cut, the teeth at the back edge of the blade can dig into the top surface of the wood causing the blade to climb out of the kerf and jump back toward the operator.
Kickback is the result of saw misuse and/or incorrect operating procedures or conditions and can be avoided by taking proper precautions as given below.
a) Maintain a firm grip with both hands on the saw and position your arms to resist kickback forces. Position your body to either side of the blade, but not in line with the blade.
Kickback could cause the saw to jump backwards, but kickback forces can be controlled by the operator, if proper precautions are taken.
b) When blade is binding, or when interrupting a cut for any reason, release the trigger and hold the saw motionless in the material until the blade comes to a complete stop.
Never attempt to remove the saw from the work or pull the saw backward while the blade is in motion or kickback may occur.
Investigate and take corrective actions to eliminate the cause of blade binding.
c) When restarting a saw in the workpiece, centre the saw blade in the kerf so that the saw teeth are not engaged into the material.
If a saw blade binds, it may walk up or kickback from the workpiece as the saw is restarted.
d) Support large panels to minimise the risk of blade pinching and kickback.
Large panels tend to sag under their own weight. Supports must be placed under the panel on both sides, near the line of cut and near the edge of the panel.
e) Do not use dull or damaged blades.
Unsharpened or improperly set blades produce narrow kerf causing excessive friction, blade binding and kickback.
f) Blade depth and bevel adjusting locking levers must be tight and secure before making the cut.
If blade adjustment shifts while cutting, it may cause binding and kickback.
g) Use extra caution when sawing into existing walls or other blind areas.
The protruding blade may cut objects that can cause kickback.
Lower guard function
a) Check the lower guard for proper closing before each use. Do not operate the saw if the lower guard does not move freely and close instantly. Never clamp or tie the lower guard into the open position.
If the saw is accidentally dropped, the lower guard may be bent.
Raise the lower guard with the retracting handle and make sure it moves freely and does not touch the blade or any other part, in all angles and depths of cut.
b) Check the operation of the lower guard spring. If the guard and the spring are not operating properly, they must be serviced before use.
Lower guard may operate sluggishly due to damaged parts, gummy deposits, or a build-up of debris.
c) The lower guard may be retracted manually only for special cuts such as "plunge cuts" and "compound cuts". Raise the lower guard by the retracting handle and as soon as the blade enters the material, the lower guard must be released.
For all other sawing, the lower guard should operate automatically.
d) Always observe that the lower guard is covering the blade before placing the saw down on bench or floor.
An unprotected, coasting blade will cause the saw to walk backwards, cutting whatever is in its path. Be aware of the time it takes for the blade to stop after switch is released.
Riving knife function
a) Use the appropriate saw blade for the riving knife.
For the riving knife to function, the body of the blade must be thinner than the riving knife and the cutting width of the blade must be wider than the thickness of the riving knife.
b) Adjust the riving knife as described in this instruction manual.
Incorrect spacing, positioning and alignment can make the riving knife ineffective in preventing kickback.
c) Always use the riving knife except when plunge cutting.
The riving knife must be replaced after plunge cutting. The riving knife causes interference during plunge cutting and can create kickback.
d) For the riving knife to work, it must be engaged in the workpiece.
The riving knife is ineffective in preventing kickback during short cuts.
e) Do not operate the saw if the riving knife is bent.
Even a light interference can slow the closing rate of a guard.
ADDITIONAL SAFETY WARNINGS
- Use only blade diameter specified on the machine.
- Do not use any abrasive wheel.
- Do not use saw blades which are deformed or cracked.
- Do not use saw blades made of high speed steel.
- Do not use saw blades which do not comply with the characteristics specified in these instructions.
- Do not stop the saw blades by lateral pressure on the disc.
- Always keep the saw blades sharp.
- Ensure that the lower guard moves smoothly and freely.
- Never use the circular saw with its lower guard fixed in the open position.
- Ensure that the retraction mechanism of the guard system operates correctly.
- The saw blades body must be thinner than the riving knife and the width of cut, or kerf (with teeth set) must be greater than the thickness of the riving knife.
- Never operate the circular saw with the saw blade turned upward or to the side.
- Ensure that the material is free of foreign matters such as nails.
- The riving knife should always be used except when plunging in the middle of the workpiece.
- Disconnect the plug from the receptacle before carrying out any adjustment, servicing or maintenance.
- For models C6BU3, C6BUM, C7BU3 and C7BUM, be careful of brake kickback.
C6BU3, C6BUM, C7BU3 and C7BUM models feature an electric brake that functions when the switch is released. As there is some kickback when the brake functions, be sure to hold the main body securely. - Sparks can sometimes appear caused by braking operation when the switch is turned off since C6BU3, C6BUM, C7BU3 and C7BUM models employ electric brakes. Be informed, however, that this phenomenon is not a machine trouble.
- For models C6BU3, C6BUM, C7BU3 and C7BUM, when the brake becomes ineffective, replace the carbon brushes with new ones.
- Ensure that the power source to be utilized conforms to the power requirements specified on the product nameplate.
- Before the tool is plugged in to the receptacle, ensure that the power switch is in the OFF position.
If the plug is connected to a receptacle while the power switch is in the ON position, the power tool will start operating immediately, which could cause a serious accident.
- When the work area is removed from the power source, use an extension cord of sufficient thickness and rated capacity. The extension cord should be kept as short as practicable.
- Since the saw blade will extend beyond the lower surface of the lumber, place the lumber on a workbench when cutting. If a square block is utilized as a workbench, select level ground to ensure it is properly stabilized. An unstable workbench will result in hazardous operation. (Fig. 3)
To avoid possible accident, always ensure that the portion of lumber remaining after cutting is securely anchored or held in position.
-
Should knob remain loosened, it will create a very hazardous situation. Always thoroughly clamp it. (Fig. 4)
-
It is very hazardous to allow wing bolt to remain loosened. Always thoroughly clamp it. (Fig. 5)
-
Prior to cutting operation, make sure the material you are going to cut. If the material to be cut is expected to generate harmful / toxic dusts, make sure the dust bag or appropriate dust extraction system is connected with dust outlet tightly.
Wear the dust mask additionally, if available.
Before starting to saw, confirm that the saw blade has attained full-speed revolution.
Should the saw blade stop or make an abnormal noise while operating, promptly turn OFF the switch.
Always take care in preventing the power cord from coming near to the revolving saw blade.
Using the circular saw with the saw blade facing upwards or sideways is very hazardous. Such uncommon applications should be avoided.
- When cutting materials, always wear protective glasses.
- When finished with a job, pull out the plug from the receptacle.
-
After having attached the saw blade, reconfirm that the lock lever is firmly secured in the prescribed position.
-
Models C6U3, C6BU3, C7U3 and C7BU3 are equipped with a blower function. However, do not use the tool for the blower function only. (Fig. 8)
- Check that there are no nicks or scratches in the cord.
- Check the exterior and ensure that there is no damage.
- Use a chip saw that is for cutting wood.
- Use a chip saw with a displayed speed that is equal to or higher than the rotation speed displayed on the tool.
- Do not leave the saw placed on top of the guide rail.
NAME OF PARTS (Fig. 1 - Fig. 23)
| ① | Switch trigger Incline wing-hut | M4 screw Machine screw | w M5x12 | 40 | |
| ② | Saw cover Brush cap Premarked line Guide rail adapter | 28 | 41 | ||
| ③ | Lower guard lever Handle | 29 | Front scale at 45° incline | 42 | Rail bar |
| ④ | Riving knife | 30 | Front scale when not inclined | 43 | Bar (A) |
| ⑤ | M8 bolt | 31 | Lock spring | 44 | Bar (B) |
| ⑥ | Washer (B) | 32 | Dust collector | 45 | Wing-bolt |
| ⑦ | Saw blade Knob | 33 | Lever (short type) | 46 | Base square socket |
| ⑧ | Lower guard | 34 | M4 Screw | 47 | Mounting screw |
| ⑨ | Guide | 35 | M5 Screw | 48 | Wood chip |
| ⑩ | Guide piece | 36 | 6 mm Hex. bar wrench | 49 | Parallelism adjustment screw |
| ⑪ | Base | 37 | Washer (A) | 50 | Square |
| ⑫ | Inclined gauge | 38 | Guide rail | 51 | Hex. socket set screw |
| ⑬ | Guide fastener wing-bolt | 39 | Rubber lip | 52 | 3 mm Hex. bar wrench |
SYMBOLS
WARNING
The following show symbols used for the machine. Be sure that you understand their meaning before use.
| C6U3 / C6BU3 / C6UM / C6BUM / C7U3 / C7BU3 / C7UM / C7BUM : Circular Saw | |
| To reduce the risk of injury, user must read instruction manual. | |
| Always wear eye protection. | |
| Always wear hearing protection. | |
| Only for EU countries Do not dispose of electric tools together with household waste material! In observance of European Directive 2012/19/EU on waste electrical and electronic equipment and its implementation in accordance with national law, electric tools that have reached the end of their life must be collected separately and returned to an environmentally compatible recycling facility. | |
| V | Rated voltage |
| Cutting depth | |
| P | Power Input |
| n0 | No-Load speed |
| kg | Weight (without cord) |
| I | Switching ON |
| O | Switching OFF |
| Disconnect mains plug from electrical outlet | |
| Blower | |
| Prohibited action | |
| Class II tool |
STANDARD ACCESSORIES
In addition to the main unit (1 unit), the package contains the accessories listed in the below.
O Saw Blade (mounted on tool) 1
Dia. 165 mm ......C6U3, C6BU3, C6UM, C6BUM Dia. 190 mm ......C7U3, C7BU3, C7UM, C7BUM
O Hex.Bar wrench 1
O Guide 1
O Wing-bolt 1
Lock Spring 1
Lever (short type) 1
O Dust collector 1
Standard accessories are subject to change without notice.
APPLICATIONS
Cutting various types of wood.
SPECIFICATIONS
The specifications of this machine are listed in the Table on page 142.
NOTE
Due to HiKOKI's continuing program of research and development, the specific cations herein are subject to change without prior notice.
MOUNTING AND OPERATION
| Action Figure Page | ||
| Adjusting the cutting depth 4 143 | ||
| Adjusting the angle of inclination 5 143 | ||
| Adjusting the riving knife (C6U3, C6BU3, C6UM, C6BUM) | 6 143 | |
| Adjusting the riving knife (C7U3, C7BU3, C7UM, C7BUM) | 7 144 | |
| Do not use the tool with only the blower function. (C6U3, C6BU3, C7U3 and C7BU3 only) | 8 144 | |
| Adjusting the guide piece (C6U3, C6BU3, C7U3 and C7BU3 only) | 9 144 | |
| Cutting line 10 144 | ||
| Regulating the guide 11 144 | ||
| Using the cord holder 12 144 | ||
| Mounting the dust collector set 13 144 | ||
| Switch operation*1 | 14 144 | |
| Cutting at right angles 15 145 | ||
| Inclined cutting (+45° direction) 16 145 | ||
| Dismounting the saw blade 17 145 | ||
| Mounting the Saw Blade*2 | 18 146 | |
| Using the guide rail*3 (C6UM, C6BUM, C7UM and C7BUM only) (optional accessories) | 19 146 | |
| Using the guide rail adapter*4 (C6U3, C6BU3, C7U3 and C7BU3 only) (optional accessories) | 20 147 | |
| Adjusting the base and saw blade to maintain parallelism (C6UM, C6BUM, C7UM and C7BUM only) | 21 147 | |
| Adjusting the base and saw blade to maintain perpendicularity (C6U3, C6BU3, C7U3 and C7BU3 only) | 22 147 | |
| Adjusting the base and saw blade to maintain perpendicularity (C6UM, C6BUM, C7UM and C7BUM only) | 23 147 | |
| Selecting accessories — 149 |
1 Before beginning work, check to ensure that operating the switch correctly turns the tool ON and OFF. While the tool is plugged in to the receptacle, ensure that the sawblade stops when the switch is turned OFF. In some regions, it is not necessary to perform step 1
2 Usable sawblade diameter: C6U3, C6BU3, C6UM, C6BUM 165 to 162 mm C7U3, C7BU3, C7UM, C7BUM 190 to 185 mm Body thickness: up to 1.5 mm, tip width: at least 1.9 mm Riving knife thickness: 1.8 mm
*3 Use the guide rail when cutting in long, straight lines. The rubber lip of the guide rail works to prevent splintering on the cut surface. When using the guide rail
for the first time, cut the rubber lip as follows: Set the tool's cutting depth to the maximum and the saw blade angle to perpendicular (0^) , pull the switch completely, and cut at a slow, constant speed.
After the rubber lip is cut, it can also be used for 45^ angle cutting.
*4 Use with C6U3, C6BU3, C7U3 and C7BU3 when using the guide rail.
NOTE
When performing cutting operation using the guide rail, remember that the cutting depth decreases as the thickness of the guide rail increases.
MAINTENANCE AND INSPECTION
1. Inspecting the saw blade
Since use of as dull saw blade will degrade efficiency and cause possible motor malfunction, sharpen or replace the saw blade as soon as abrasion is noted.
2. Inspecting the mounting screws
Regularly inspect all mounting screws and ensure that they are properly tightened. Should any of the screws be loose, retighten them immediately. Failure to do so could result in serious hazard.
3. Inspecting the carbon brushes (Fig. 24)
The motor employs carbon brushes which are consumable parts. Since an excessively worn carbon brush can result in motor trouble, replace the carbon brushes with new ones having the same carbon brush No. ⑧ shown in the figure when it becomes worn to or near the "wear limit" ⑥ . In addition, always keep carbon brushes clean and ensue that they slide freely within the brush holders.
CAUTION
- When replacing the new carbon brushes, always use genuine HiKOKI carbon brushes with the number specified in the drawing.
For models C6BU3, C6BUM, C7BU3 and C7BUM, the brake may not work if other than the specified carbon brushes are used.
When the brake becomes ineffective, replace the carbon brushes with new ones.
4. Replacing carbon brushes
Disassemble the brush caps with a slotted-head screwdriver. The carbon brushes can then be easily removed.
5. Replacing supply cord
If the replacement of the supply cord is necessary, this has to be done by the manufacturer of this agent in order to avoid a safety hazard.
6. Motor unit maintenance
The motor winding is an important part of this tool. Avoid damaging and be careful to avoid contact with cleaning oil or water.
After 50 hours of use, clean the motor by blowing into the ventilation holes of the motor housing with dry air from an air gun or other tool (Fig. 25).
Dust or particle accumulation in the motor can result in damage.
7. Inspecting and maintaining the lower guard
Always make sure that the lower guard moves smoothly. In the event of any malfunction, immediately repair the lower guard.
For cleaning and maintenance, use an air gun or other tool to blow clean the space between the lower guard and gear cover as well as the rotation part of the lower guard with dry air (Fig. 25).
Doing so is effective for the emission of chips or other particles.
Accumulation of chips or other particles around the lower guard may result in malfunction or damage.
WARNING
To prevent dust inhalation or eye irritation, wear protective safety goggles and a dust mask when using an air gun or other tool to clean the lower guard, ventilation holes or other parts of the product.
Ensure smooth movement of lower guard
Rotation part of the lower guard
Space between lower guard and gear cover
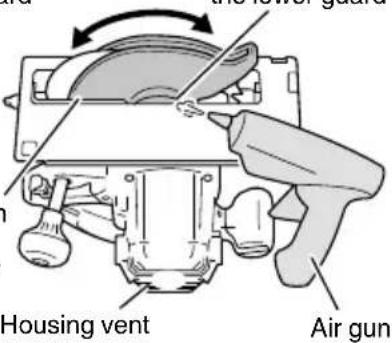
Fig. 25
CAUTION
In the operation and maintenance of power tools, the safety regulations and standards prescribed in each country must be observed.
GUARANTEE
We guarantee HiKOKI Power Tools in accordance with statutory/country specific regulation. This guarantee does not cover defects or damage due to misuse, abuse, or normal wear and tear. In case of complaint, please send the Power Tool, undismantled, with the GUARANTEE CERTIFICATE found at the end of this Handling instruction, to a HiKOKI Authorized Service Center.
IMPORTANT
Correct connection of the plug
The wires of the main lead are coloured in accordance with the following code:
Blue: — Neutral
Brown:Live
As the colours of the wires in the main lead of this tool may not correspond with the coloured markings identifying the terminals in your plug proceed as follows:
The wire coloured blue must be connected to the terminal marked with the letter N or coloured black. The wire coloured brown must be connected to the terminal marked with the letter L or coloured red. Neither core must be connected to the earth terminal.
NOTE
This requirement is provided according to BRITISH STANDARD 2769:1984.
Therefore, the letter code and colour code may not be applicable to other markets except The United Kingdom.
Information concerning airborne noise and vibration
The measured values were determined according to EN62841 and declared in accordance with ISO 4871.
Measured A-weighted sound power level: 109 dB (A)
Measured A-weighted sound pressure level: 98 dB (A)
Uncertainty K: 3 dB (A).
Wear hearing protection.
Vibration total values (triax vector sum) determined according to EN62841.
Cutting chipboard:
Vibration emission value ah = 2.5m / s^2
Uncertainty K = 1.5m / s2
The declared vibration total value has been measured in accordance with a standard test method and may be used for comparing one tool with another. It may also be used in a preliminary assessment of exposure. WARNING
The vibration emission during actual use of the power tool can differ from the declared total value depending in the ways in which the tool is used.
- Identify safety measures to protect the operator that are based on an estimation of exposure in the actual conditions of use (taking account of all parts of the operating cycle such as the times when the tool is switched off and when it is running idle in addition to the trigger time).
NOTE
Due to HiKOKI's continuing program of research and development, the specifi cations herein are subject to change without prior notice.
VOORZORGSGMAATREGELEN
VEILIGHEIDSWAARSCHUWINGEN
El polvo o la acumulación de partículas en el motorSEOSEOSEOSEOSEOSEOSEOSEOSEOSEOSEOSEOSEOSEOSEOSEOSEOSEOSEOSEOSEOSEOSEOSEOSEOSEOSEOSEOSEOSEOSEOSEOSEOSEOSEOSEOSEOSEOSEOSEOSEOSEOSEOSEOSEOSEOSEOSEOSEOSEOSEOSEOSEOSEOSEOSEOSEOSEOSEOSEOSEOSEOSEOSEOSEOSEOSEOSEOSEOSEOSEOSEOSEOSEOSEOSEOSEOSEOSEOSEOSEOSEOSEOSEOSEOSEOSEOSEOSEOSEOSEOSEOSEOSEOSEOSEOSEOSEOSEOSEO SEOEO SEOEO SEOEO SEOEO SEOEO SEOEO SEOEO SEOEO SEOEO SEOEO SEOEO SEOEO SEOEO SEOEO SEOEO SEOEO SEOEO SEOEO SEOEO SEOEO SEOEO SEOEO SEOEO SEOEO SEOEO SEOEO SEOEO SEOEO SEOEO SEOEO SEOEO SEOEO SEOEO SEOEO SEOEO SEOEO SEOEO SEOEO SEOEO SEOEO SEOEO SEOEO SEOEO SEOEO SEOEO SEOEO SEOEO SEOEO SEOEO SEOEO SEOEQ
VEDLIKEHOLD OG INSPEKSJON
1. Inspisere sagbladet
Pnpoopoe nou apopov Tov EKNToEvO 0poo kaTn dovnon
Oi tuec uertnknav ouphiwva e to EN62841 kau peynkav ouuwovec e to ISO 4871.
Mtpnθεiaσαθμn nxtukncIoxuoc A:109 dB (A) Mtpnθεiaσαθμn nxtukncπεoNc A:98 dB (A)
d) CbxpahraBaIte HeH3nO13BaHHTe eIeHTpuYeCHN HhCTpyMeHTn DaIeY OT DocTbn Ha DeuHa He N03BOJRABaTe Ha INuca, He3aNo3HaTHn C HauHHa Ha pa6oTa c HhCTpyMeHTne H Te3n HhCTpyKcHn, da pa6oTAre Tax.
EneKtpnuecknte HNCTpyMeHTn npedctablaBAt ONaCHOCT B pBuTe Ha HeONTHN LInua.
e) NpOdIbPkaHte eJeHTpOHcTpyMeHTnTe n aHcecoapHe. PpOBepBaHte ueHTPOBkata H 3aKpenBaHeto Ha NOdBHNHe T qACTn, npOBepBaHte 3a NOBpeHn qACTn, HONTo MORaT Da ce OTPa3rT Ha pa6oTaT ha eJeHTpueChHe mHCTpyMeHTn.AKO yCTaHOBnTe NOBpeHn,OTcPaHete rnpedn da H3noJ3BaTe eJeHTpueChHe mHCTpyMeHTn.
MHoro 3IIOJOnyNc Ce IbJHaT Ha loa nOdpbHKHa eJeKTPnueckHte HnCTpyMeHTn.
f) PoiDbPkaHapeKeIeHTn HcTpymEnTH 3aTOueHN uHCTN.
PpaBnHO NOIbPkaHnte peKeu INHCtpymeHTN, C HatoyeHN peKeu eIemEHn, Ce ynpabJIraBaT N KOHTPOIIpaT No-JeCHO.
g) H3noI3BaIe eIeHTpUyeCn HNCTpyMeHTn, npHcTaBHN n aHceCoapn, n T.H., cbrIaCHO Te3n HNCTpyKUnn, KaTO B3EmTe NpeBnD pa60THte ycIOBnH n BnDa pa6OTn, KOHTO ue ce H3BbPWBat.
H3no3BaHe Ha eIeKtpnueeCHNTe HNCTpyMeHTn 3a pa60TN, pa3IuHN OT Te3N, 3a KOnTO Ca npEdbNdeH, MoKe Da IIOBeDe Do NOBuWeH pNCK H onaChn CHTyaCnn.
h) Pn3eTe pBHOXBaTHNte N NOBbpxHOCHTe 3a 3axBaUaHe cyxN, YnCTn, 6e3 MacNo n rpec.
Xlb3raBHTpe pbKoXBaTHN NOBbpxHocTN 3a 3axBa7aHe He N03BOJRABat 6e3OnacHata pa6Ota H npabIeHne Ha INHCTpyMeHTa B HeOyakBaHN CNTyaU.
5) 06cIyHbAHe
a) 06cIyKBaHeTo Ha eIeHTpNueCKeHte HhCTpyMeHTn Tpa6Ba Da ce N3BbPwBa cMo OT KBaJIHΦHnPaHN cepBN3HN pa6OTHnCi, pN H3NoJ3BaHe HaOpHnHaJIH pe3epBHN qAcTn.
Toba ue rapaHTnpa 6e3oNaChocCTTa npn pa60ta c eIeHTpnueeCHnte INHCTpyMeHTN.
BHIMAHNE
He donychaite B 30HaTa Ha pa6ota dea N Bb3pacTHN Xopa. Horato He n3no13BaTe eIeKtpnuecknte HnCTpyMeHTN, cbxpaHbAte rHa daJeu OT DOCTbN Ha deua N Bb3pacTHN Xopa.
HNCHTPYKUN 3A BE3OJACHOCT 3A BCNUHNI CHPYJAPN
PpoeDpyn 3a pR3aHe
a) ONACHOCT: Na3eTe pBcTe CN OT 3OHATA Ha p3aHe n octpneTo. DpbHKeDpyrata CN PbHa Bbpxy NOMUHATA pBHOXBaTHa, HIN KOxyHa MOTopa.
Ako DbprHnTe cnpKynpa c DBe pBue ue n36eHHeTepopraBaHe.
b) He ce nperaTe noD deTaNla, npedMeT ha p3aHe c uHpyIpa.
PpeIpa3nteIaHau npHyIpa He moKe da Bn 3aunTn OT OCTpneTO NOI DeTaIIa.
c) PerylnpaIte IbIbOuHHata Ha pI3aHe Do Ta3n Ha pa60THN aTeaII.
Iod deTaunla Tp8Ba da ce noDaBa n BnKda He nobuee OT noOBHH peKeew 3b6 Ha cnRPyJpa.
d) HnHora He dpbKHe DeTaIa B pbcTe Cn HnN CpeuSy KpaKa cn,doHaTo peKeHe. YkpeTe DeTaIa Bbpxy yctOuHbA PtaOpMa.
YkpenBaHTo Ha DetaHa e OcoBHO BaxKHO 3a MNHMn3npaHe Ha HapaHbAHn NO OTkpNTu Yactn OT TnIOTo, paOTHn DaNck N IpeDOrbPaTBAHe Ha 3ary6a HA KOHTpOJ.
e)Дрьнт eelenKtpnueechn ypecd cmo 3a n30lnpaHata pBkoXBatha,Horato N3BbpuBaTe onepaun, npn HOrTo HMa onachocT peHecuHT nHCTpyMeHT Da Bne3e BdoNp Cbc ChpTN npoBODHnIu nn da 3acerHe camn Ha eJenKtpnueechn ypeD.
KoHTaKT C npOBODHn Kno HAppeKeHne ue DoBeDe Do npOBeKDaHe Ha HAppeKeHneTo N Bbpxy MetaJIHnTe Yactn Ha eLeEeTpueeCKn INcTpyMeHT N do eJeKtpueeCKn ydap 3a OepaTopa
f) Pn HndJIbKHN pa3pe3H, n3NoI3BaIe BoaH nn npab bIbn.
Toba noobopraBa ToHocTTa HamaJIraBa BepoTHocTTa OT deOpMnpaHe Ha dNcKa.
g) BnHaHn 3noJ3BaIte dIncOBe cNoDxOJa p3Mep HΦopMa (pOM6oBnIeH IIN KpbIbJI) Ha OTbopa 3a pa6oTHnI WnHdJI.
ДИСКОBE, KONTO He OTROBAPr Hb MOHTaKHITe OTBOPn Ha UINPKyIpa, Ye pa6OTr EKcUeHTpNHO, KOETo BODn Do 3aγ6a Ha ynpabJIeHne.
h) HnKora He n3noJ3BaIte NOBpeJeHn HnHnOxOJaUdN DnCHObE, Wai6b nn 6oNTObE.
Wai6nte n 6oIbTe Ha dNcKa ca cneuaHn npoeKTHpaHN 3a Baunu znpkynap, 3a maKcmaHa efeKTHBHOCT n 6e3OnacHOCT npi pa6Ota.
IpeynpeHn H npuHHn 3a ,6neHe " n OTHaT.
- OTKaTbTe BHe3aHa peaKun Ha npuynanH, 3aKleueH Nn HEnoDpaBHeN DNCK, KOEtO BOIN Do HeKoHTpoJInpaoHO nIIm3aHe Ha DnCKa OT pa60THn J DetaiI NO nocKa Ha onepaTopa;
-Korato octpneTo e 3akLeucho nn 3aceHaNo B cpe3nna KaHai Ha DpbBOTO,TO cnnpa da Ce BbpTN, a peakyraHa MOTopa e Da 3abpTu ypea 6bP3o Ha3ad KbM ONepaTopa; - Ako dinckbt ce okpmbn nI npa3eHTpoBa no BpeMe Ha pR3aHe, 3aHnrt 3b6 MoKe da ce 3a6ne B nbpbecnHaTa n Da hakapa dNcKa da n3Je3e OT cpe3Hn KaHaJ, nI I da OTCKOuN KbM OepaTopa.
OThaTbTepe3yIITatOT HenpabNlHO n3nol3BaHe Ha cnPkyIpa H/INHn HEnpabNlHa npoJeypa Ha pR3aHe M0Ke Da ce N36BerHe npn Cna3BaHe Ha INHCTpyKunTe, npedocTabeHN NO-dOJy.
a) YnpaHHBaIte 3dpab 3axBaat Bpxy DBeTe dpbHH Ha cIpyKynpa, Hato pueTe Bn Tpr6ba da 6bdaT B No3uqra, B KOrTO MOrat Da npOTNBoDEcTBaT Ha OTHaHIN ,6HeHe". POn3HNoHpaTe TAnoto Cn Taka, Ye da 6bde OT KOrTo n da e cTpapa Ha DNCA, HO He N B npaba JInnna C dNCA.
OTKaTbMOHe Da HaKapa UpKyIpa Da OTCKOu HA3a, HO Te3n CmN MORa T da Ce ynpabIraBAT OT onepaTopa, aKO 6bDat B3eTN ppeNa3Hm MepKn.
b) Horato duckbT 3aHnnn, nnn npn ppeKbcBaHe Ha pr3aHTo no HkBaTo n da 6nlo npuHa, ocbo6oTe cnycbHa n dpbhte uhpkyIpa HeNoDBHHO B detaJa, KOHTo peKeTe, DOHATO duckbT cnpe HanbIHO.
HnKora He onNTBaHTe da OTCTpaHnte uNpHyIraPa OT pa60THnA Detai, Hn Da ro n3DbPnate Ha3aD OHOtO DnCHbT Ce BbpTN, TbN Hato MoHe da ce NOJyHn OTHaT.
PpOBepTe npuHaTa n B3eMeTe MepKn 3a da eJIIMHHnPate npuHnHaTa 3a 3aKInHraBaHe Ha DnCKa.
c) Horato Bb3o6HOBnTe OTHOBo pa6Ota C npKynpa Bbpxy pa6OTHnI DeaII, cHTpnpaIte Dncha B cpe3HN KaHaI Taka, ye 3b6bT da He 3anipa B MaTePnala.
Ako octpneTo Ha znpknyra ce 3aHleu,TO MOHe Da H3Je3e Hn Da dae OTHaT OT DeTaHa PnBb3o6HOBRAHe Ha pa6Ota.
d) PnpdbpkaHte nIOcKoCTHe C roJIeMn pa3MePn 3a Da n36eHete pNcHa OT 3aHJIINHbHe Ha dNcKa N NOJyUbaHeto Ha OTHaT.
TolEMTe NIOCKOCTN O6NKHOBEHO NPOBNCBAT B KpaHnata NOcOBCTBeHaTc N TeXeCT. Tp6Ba Da ce NoCTaBt ONOpH NOd NIOCKOCTNe OT DBeTe CTPaH, B 6JIIN3OCT Do LINHnTA Ha Cpr3BaHe Ha NIOCKOCTTa.
e) He n3noJ3BaIte TbIu nn noBpeDeHn dNCHOBe.
He3aToeHnTe Hn HnPaBnHn NOCTaBeHN DnCKOB MoRat Da HnPaBnT TeCen nPope3, KaTO NOBnBaBAT PteHeTo, a NcKbT Ue 3aKnHbA N daBa OTKaT.
f) Perynpaunte 6loKnupaun loctobe 3a bIb6ouHa n bTbn Ha p3aHe Ha dncHa Tp6Ba da 6bDat cterHn 3actonopeHH npedn 3anoYbaHe Ha pr3aHe.
Ako HacptpoHKeTc Ce npomeHrT NO BpeMe Ha p3aHe, TOBa MoHe Da DOBeDe Do 3aKJIINHbAHe N OTKaT Ha DnCKa.
g)БdTe Oco6eHO BHHMaTeHn npn p3aHe BCbIeCTByBaunCTeHN HIN dpyrN 30HN.
BnIMrT p6 Ha dHa MoKe da npopeKe oBeHTN, KOTo Da npuHrT OTHa.
ФунциHadoJHnI npednaHTeI
a) PpeH ynoTpe6a, npOBepete daH DoHNHT npedna3nte 3aTBOpen n3qraNo. He n3noN3BaTe UnpKynpa, aHO DoHNHT npedna3nte Hc Ce DbHHn CBO6OJHO n He ce 3aTBapr BeDHara. HNKora He 3actnopBae Tne H npHBp3BaTe DOHNH npedna3nte B OTBopeHo noIooHeHne.
Ako npHpynpaBb6bde cnyaH No3nychaT,doHHnT npedna3nt MoKe da ce orbHe.
IobHHeTe DOnHHn IpeDnA3nTeI CbC CbBaemata dpBHKa n ce yBepeTe, ye Ce DBNHN CBO6oJHO n He OInpa O DnCKa Hn Dpyra YAcT, NOB BCNUKN BnN n Dbl6OuHHn Ha pr3aHe.
b) PpOBepete pa6oTata Ha npyHHaTa Ha doJHnnpedna3nteI. Ako npedna3nteIaTn npyHHaTHe pa6oTATdo6pe, Tpr6Ba da 6bdaT peMOHTnpaHn npedynoTpe6aHa cnPkyIpa.
DolnHnT npedna3nte MoKe da pa6oTH No-tpyHNOpapn NOBpeDeHH qactN, HATpyPbAHe Ha FHNOTlaRaHnI Nn CTpyKKn.
c) DOnHHnT npedna3nte MoHe da 6bDe pBHyo npH6paH cAmO 3a CneuHaHN BnDObe p3aHe, KaTO ,BpR3BaHe" n ,CNoHNO H3Pra3BaHe". NOBnHrTe DoHHnI npedna3nteJ, KaTO CBHeTe pBHOXBaTHaTa, a OOM dNCHbT HabJe3e B MaTePhaNa, DOHNHT npedna3nte Tp86Ba da 6bDe nychat.
3aBCnKn DpyrBnBDObpe3aHe,DOJHnT npeNa3NTe Tp6Ba Da pa6OTn ABTomATNoHO.
d) Bnharu ce yBepBaTe, ye DoHNrT npedna3nteI noHpNBA OCTpneTo Ha dNcKa npeDn Da NOCTaBtE UHPKynpa Ha pa6oTHata Maca HnHa 3emrTa.
He3aIHTeHOTO OCTPnHe Ha DNCKa MoKe Da cTaHe npuHa 3a npDnBnKBaHe Ha UnpKpyIpa Ha3a, KaTO npopeKe BCnUk NpeDMETn NO PbTaN. BnHarN mAaTe npedBnD Heo6XoDMOTO DOnbJIHITeJIHO Bpeme 3a nJbIHO TcnpaHe Ha DNCKa CneI HaNTCKaHe Ha 6yToHa 3a N3KlIOUBAHe.
Функиянацрkyларнгтрон
a) N3noJ3BaIte noXoJrOTo peHeIoo ocTpne 3a cnPKyJIaRPNr TpNOH.
3a Da DeiCTBa CnPKyIaRPhHrT TpNOH, KOpNcBT Ha ocTpneTo Tpr6Ba Da 6bDe NO-TbHbK OT Hero, a WnpOuHata Ha cPra3BaHe Ha ocTpneTo da 6bDe noWnpoka OT De6eJIHaTa Ha TpNoHa
b) PerynipaTe znpHyjApHn TpnoH, KaHTo e onncahOB TOBa pBkoBOcTBO 3a yNoTpe6a.
Iorpeuho octabeHH pa3ctoHnH, no3nHIOHnpaHe n HacTpoBaHe Morat nonpeHa Ha cHpKyIrpHn TpnoH da npedOTbpaTH OTKaT.
c) BnHaHn n3noJ3BaIte cnpKyIaepHHr TpNOH,OCBeH npn ,noTbBaioo" p3aHe.
LpKpynHnT Tpnoh Tp6Ba Da 6bde Noctaeh
ObaTHo Cnei npNKIOUbaHe Ha ,NOTbBAIoTO
P3aHe. LpKpynHnT Tpnoh BnIe Ha pa6oTaTa np
,NotBaOo" P3aHe N MOKe Da DOBeDe DO OTKaT.
d) 3a da pa6botn cnpkylnpHnT TpnoH, ToT Tp6Ba da e B KOHTAHT C OTpa6OTbaHH enEMeNT.
Urknyarphnrt TpnoH He MoKe Da npedotbpaTH OTKaT Pn KbcO CbeDInHeHne.
e) He n3noJ3BaIte pe3aHkata, aHO uNpHyIaPnHrT TpNOH e N3KpNBeH.
Dopn neko cmyuene MoKe da 3a6abN cKOpocTtHa 3aTBaprHe Ha npedna3nteJIA.
ДОПьЛНITEЛНМЕРКИЗАБЕЗПАСHОCT
- Ⅲπολ3BaTe cAmO peJHeuДИС C dIaMeTbP, yKa3aH Na MaunHaTa.
- He n3noJ3BaIte KaKBInTo n da 6nlo a6pa3NBHn DnCKOBe.
3.He n3no3BaITe DeΦopMnpaHn HnyKaHn DnCKOBe.
4.He n3noJ3BaIte dncKObe, n3pa60TeHn OT HNCTpyMeHTaJIHa CTOMaHa. - He ΜΙπολBaJIte ΜικΟBE, ΚΟΥΤΟ ΕΟΓΟΒΑΡΤΗ CπεύηΦικαζινιτε, ΜαδΕΝΗ ΒΕΤΗ ένχργΚυμι.
- He cnpaTe DNcHOBeTe ue3 ynpaHnBaHe Ha cTpaHnueH HATNCBbpxy TxAx.
- BnHaHn noDdBpKaIte DnCKOBTe 3aToeHN.
- YBepete ce, ye DoJIHnIr IpeJna3nteI ce DBrHH 6e3npenTCTBeHO u CBO6OdHo.
- HnKora He n3noJ3BaTe cnpKyIpa c fHKcpanB OTBOpeHO nOLOKeHHe dOJeH npdna3nteI.
- YBepete ce, ye npnbpaunr MexaH3bM Ha cntemata Ha npednataTeIra paotn do6pe.
- KopnycBT Ha peKeuHte ocTpneTa Tp6Ba Da 6bDe no-TbHbK OT uPhyIaRPhNr TpNOH uNpoUHaT aHa npope3a, Hn pa3ctOarHneTo MeHy 3b6uHte Tp6Ba Da e NO-foJMAO OT De6eJIiHaT a HcPHyIaRPhNr TpNOH.
Быларсн
- Hnkora He n3noJ3BaIe cIpyIpa npn HacOyeHO octpne Ha dNcKa Harope nnHacTpaHn.
13.YBepete ce,Ye MaTePnaJIbT,KoITo ue peKeTe,He CbIbPka YUxN TeJa,KaTO TBO3dEi. - LcIpykynpHnT Tpnoh Tpr6Ba Da ce NOL3Ba BNHaRn, OCBeH npn,poTbBaO" pR3aHe B cpeDaTa Ha pa6oTHnE elemEHT.
15.ИЗнluоуе Te иencela OT KOHTaKTe npeDn Da n3BbPbBaTe HAcTpoHKn, O6cIyKBaHe NIn DeHOCrN NO NOdPbKHa.
16.3a MoJeHn C6BU3,C6BUM,C7BU3 n C7BUM 6bTe BHNMaTeJIHH 3a OTHaT Ha cNIPAqKHTe. MoJeHnTe C6BU3,C6BUM,C7BU3 n C7BUM pa3noJarat C eIeKtpnuecha cNIPAqKa, KOrTO ce 3aJeHCTBa,Korato KInOyT ce OCBo6On.Ipn 3aJeHCTBaHeTo Ha cNIPAqKaTa ce NOLyHaba Jek OTKaT, 3aTOBa DpbHKe Te ypeDa 3dpaBO.
17.Пи pa6oTaHa cHnpaKaHa nI3KJIIOHe HJIIOu MoRaT Da ce noB8rNcKpn, TbH KaTO moDeJIInTe C6BU3, C6BUM,C7BU3 nC7BUM non3BaT eJeKTpUYeCKn cHnpaKn. Tpr6Ba Da 3Haete, Ye TOBa He e DeΦeKT Ha MaunHaTa.
18.3a moJen C6BU3,C6BUM,C7BU3 n C7BUM,korato cnipauKHTe npecTaHaT da pa6OTr efeKTnBHO, 3ameHeTe BblpeOpHNTe yeTKn C HOBN. - YbepeTe ce, Ye n3ToCHNKbT Ha HanpeXeHne, KOTo ⅢnOJI3BaTe, OTROBApHa N3NCHBAHNrTa No CneuΦnKaun, NOCoUeHn Bbpxy INHBentapHaTa Ta6eIka.
20.Ппeн ИСТPyМENTbT Da 6БДЕ BКЛIOЧЕВ 3axpaHBAHTo, ce yBepTe, Ye npeBkJIIOyBaTeJrT 3a 3axpaHBAHTo e B NOLOKeHne OFF.
Ako 6bde BHKUoyen UeNCeLa KbM KOHTaKTA, ypeBt 1ue 3anoYHe da pa6oTN BeHnra, npN 6yTOH B NO3nua BRJ., KOETOMKe Da DOBeDe Do cepno3Hn HnDuJeHTn.
-
Korato pa60thata nlou da e daJeue ot n3ToHnK Ha 3axpaHbAe, n3IOJ3BaIte yIbJIHKeI C DOCTaTBHa Na6eJIHa HOMHaIeH KanaIHTe. YIbJIHKeIeHHrT Ka6e Tpr6Ba Da 6bIe Bb3MOKHO Ha-NKc.
-
TbI Kato peHeuT Dnck ue ce NokaHe NOd NOBbpxHOCCTTa Ha DbpBeHHa MaTePnaJI, npn pRa3aHe, NoCTaBeTe MaTePnaJI BbPxy pa6oTHa Maca. Ako Ce H3NoJ3BaT DbpBEHN TpyNHeTa KaTo pa6oTHa NOBbpxHOCr IN Onopa, H36epeTe paBEN TepeH, 3a Da 6bDat Do6pe Cta6nIn3npaHn. HeCt6nHa pa6oTHa NOBbpxHOCr MOKe Da DOBeEe Do NOBuWeHa ONaCHOCT npn pa6oTa.(Fnr.3)
3a da n36eHHeTe eBeHTyaJIHN HnCnDEHTN, BnHaI npOBepraBaIte DaJIIN OCTaTBHyIIT DbPBEH MaTepeHaI CJIeI pR3aHcE cTaBnHO NoCTaBEH Bbpxpy pa6oTHata NOBbpxHOCT.
23.Ako npbHKata ocTahe pa3xla6eHa, ce ce cb3dae npednoCTaBA 3a Oc06eHO rJMA ONaCHOCT OT HnHdENT.BHarnro 3actOnopBaIte CtaBnHO.(Fnr.4)
24.Oco6eHO onaCHO e To3n KpHuaT 6oT Ja ocTaBa pa3Xla6eH. BnHaRr ro 3actonopraBte cta6uHIO. (Фиг.5)
25.Ппеди onepaши no рязан,уberete ce, KaHB e MaTePnaJIbT,КоТTO UIe O6pa6OtBaTe.AKO MaTePnaJIbT, KOHTO UIe O6pa6OtBaTe,ce OuaKBA Da reHepnpa Bpehen /ToKCHuEN npax,yberete ce,ye Top6uHaTa Ha CBOTBeTHaTo OuHCTBaUa CnCTema e CBbp3aHa 3dpaBO KbM N3XODa 3a npaxOBN YAcTNI.
Ocbeh TOBa, HocTe MaCKa, aKo e HaJIuHa.
O Ppei Da 3anoHHe Ta peKeTe, yBepeTe ce, Ye DnCKbT e NOCTnHaI PbJHaTa Cn CKOpOCT Ha potaun.
Ako DnCKbT Cnpe, HIN 3anoHHe Da H3daBa HeTNnueH Wym npi pa60Ta, BeHara HaTnCHTe 6yToHa N3KJI.
BnHaHn 6pb7aTe BnHMaHne Ka6eNbT Ha ypeDa da He 6bDe B 6n3OCT Do 3OHata Ha p3aHe Ha nCka.
O H3noJ3BaHe Ha uIpyKa C nick Hacoye Harope nn HactpaHn e oocboHO onaCHO. Da ce 36raBt TaKnBA HeTINuHn HauHHn Ha 3noJ3BaHe.
O Pn p3aHe Ha KaKBTo n Da 6nIO MaTePnaJIN, BHaHn HocTe npedna3Hn OyJla.
HoraTo npnKIOUChTe p3aHeTo, n3KIOUcTe ypeDa OT 3axpaHbAHeTo.
- Cnei KaTo NoCTaBnTe peKeuHr DNCH, yBepeTe ce, Ye 6loKupaunr loCT e 3dpabo 3aTeHaT IN B yKa3aHaTa I03nui.
- Mojenn C6U3, C6BU3, C7U3 n C7BU3 ca obopydBaHn cФyHKuJЯ 3a BeHTnlaTop. BbnpeKn ToBa, He H3NoI3BaIte INcTpymEHTa caMo 3a ФункиЯТа Ha BEHTnlaTopa. (Фиr.8)
- IpoBepeTe DaJIH HЯMa IIpope3N IIN dpacKOTnH No Ka6ena.
29.Поверетe Вьншнite ча'tи,за дa ce увepиTe,чЕ HЯMa UeTeN.
30.Използайтциркунязра рэза HeДьрBO.
31.ИзлбьаiteцнрсспocоунбopOTn,paBnHиПО-BuCOHn OT ChOpOCTTa Ha BbPteHe,poKa3aHa HaHHCTpyMeHTa. - He octabraye TpnoHa noctabEn Ha Bbpxa Ha BOdeuata Ta HnHa.
Siemensring 34, 47877 willich, Germany
Tel: +49 2154 49930
Fax: +49 2154 499350
URL: http://www.hikoki-powertools.de
Hikoki Power Tools Norway AS
Kjeller Vest 7, N-2007 Kjeller, Norway
Tel: (+47) 6692 6600
Fax: (+47) 6692 6650
URL: http://www.hikoki-powertools.no
Hikoki Power Tools Netherlands B.V.
Brabanthaven 11, 3433 PJ Nieuwegein, The Netherlands
Tel: +31 30 6084040
Fax: +31 30 6067266
URL: http://www.hikoki-powertools.nl
Hikoki Power Tools Sweden AB
Rotebergsvagen 2B SE-192 78 Sollentuna, Sweden
Tel: (+46) 859899900
Fax: (+46) 859899940
URL: http://www.hikoki-powertools.se
Hikoki Power Tools (U.K.) Ltd.
Precedent Drive, Rooksley, Milton Keynes, MK 13, 8PJ,
United Kingdom
Tel: +44 1908 660663
Fax: +44 1908 606642
URL: http://www.hikoki-powertools.uk
Hikoki Power Tools Denmark A/S
Lillebaeltsvej 90, 6715 Esbjerg N, Denmark
Tel: (+45) 75 14 32 00
Fax: (+45) 75 14 36 66
URL: http://www.hikoki-powertools.dk
Hikoki Power Tools France S.A.S.
Hikoki Power Tools Belgium N.V./S.A.
Koningin Astridlaan 51, B-1780 Wemmel, Belgium
Tel: +32 2 460 1720
Fax: +32 2 460 2542
URL http://www.hikoki-powertools.be
Hikoki Power Tools Italia S.p.A
Via Piave 35, 36077, Altavilla Vicentina (VI), Italy
Tel: +39 0444 548111
Fax: +39 0444 548110
URL: http://www.hikoki-powertools.it
Hikoki Power Tools Ibérica, S.A.
C/ Puigbarral, 26-28, Pol. Ind. Can Petit, 08227 Terrassa
(Barcelona), Spain
Tel: +34 93 735 6722
Fax: +34 93 735 7442
URL: http://www.hikoki-powertools.es
Hikoki Power Tools Romania S.R.L.
Ring Road, No. 66, Mustang Traco Warehouses, Warehouse No.1, Pantelimon City, 077145, Ilfov County, Romania

- SAFETY INSTRUCTIONS FOR ALL SAWS
- Cutting procedures
- Kickback causes and related warnings
- Lower guard function
- Riving knife function
- ADDITIONAL SAFETY WARNINGS
- SYMBOLS
- WARNING
- STANDARD ACCESSORIES
- APPLICATIONS
- SPECIFICATIONS
- NOTE
- MOUNTING AND OPERATION
- MAINTENANCE AND INSPECTION
- Inspecting the saw blade
- Inspecting the mounting screws
- Inspecting the carbon brushes (Fig. 24)
- CAUTION
- Replacing carbon brushes
- Replacing supply cord
- Motor unit maintenance
- Inspecting and maintaining the lower guard
- GUARANTEE
- IMPORTANT
- Information concerning airborne noise and vibration
- VOORZORGSGMAATREGELEN
- VEILIGHEIDSWAARSCHUWINGEN
- VEDLIKEHOLD OG INSPEKSJON
- Inspisere sagbladet
- Pnpoopoe nou apopov Tov EKNToEvO 0poo kaTn dovnon
- 5) 06cIyHbAHe
- BHIMAHNE
- HNCHTPYKUN 3A BE3OJACHOCT 3A BCNUHNI CHPYJAPN
- PpoeDpyn 3a pR3aHe
- IpeynpeHn H npuHHn 3a ,6neHe " n OTHaT.
- ФунциHadoJHnI npednaHTeI
- Функиянацрkyларнгтрон
- ДОПьЛНITEЛНМЕРКИЗАБЕЗПАСHОCT
- Быларсн
- Hikoki Power Tools Norway AS
- Hikoki Power Tools Netherlands B.V.
- Hikoki Power Tools Sweden AB
- Hikoki Power Tools (U.K.) Ltd.
- Hikoki Power Tools Denmark A/S
- Hikoki Power Tools France S.A.S.
- Hikoki Power Tools Belgium N.V./S.A.
- Hikoki Power Tools Italia S.p.A
- Hikoki Power Tools Ibérica, S.A.
- Hikoki Power Tools Romania S.R.L.
Brand : HiKOKI
Model : C7BU3
Category : Saw