CTM Midi I - Vacuum Cleaner FESTOOL - Free user manual and instructions
Find the device manual for free CTM Midi I FESTOOL in PDF.
| Product Type | Mobile vacuum cleaner |
| Brand | Festool |
| Model | CTM Midi I |
| Dimensions (L x W x H) | 1470 x 320 x 495 mm |
| Weight | 11.3 kg |
| Power consumption | 350 - 1200 W |
| Max. connection rating (device socket) | 2200 W (EU, KR, CN); 1150 W (CH, DK); 1610 W/770 W (GB 230 V/110 V) |
| Max. airflow | 130 m³/h (vacuum cleaner) / 222 m³/h (extraction unit) |
| Max. vacuum pressure (extraction unit) | 24,000 Pa |
| Filter area | 3369 cm² |
| Suction hose | D 27/32 mm x 3.5 m |
| Connection cable length | 7.5 m |
| Sound pressure level | 70 dB(A) (uncertainty K 3 dB) |
| Hand-arm vibration | < 2.5 m/s² (uncertainty K 1.5 m/s²) |
| Protection rating | IP X4 |
| Container volume | 15 l |
| Dust class | M (up to 0.1 mg/m³) |
| Connectivity | Bluetooth® for mobile device and remote control |
| Functions | Automatic start/stop, power adjustment, flow monitoring, filter cleaning, thermal fuse, automatic shut-off in case of liquid |
| Filter type | Main filter (drawer) + filter bag |
| Maintenance and cleaning | Manual filter cleaning, replacement of filter bag and main filter |
| Safety | Disconnect before maintenance, water level monitoring, protection against harmful dust, thermal fuse |
| Spare parts and repairability | Original Festool spare parts, authorized service center |
Frequently Asked Questions - CTM Midi I FESTOOL
User questions about CTM Midi I FESTOOL
0 question about this device. Answer the ones you know or ask your own.
Ask a new question about this device
Download the instructions for your Vacuum Cleaner in PDF format for free! Find your manual CTM Midi I - FESTOOL and take your electronic device back in hand. On this page are published all the documents necessary for the use of your device. CTM Midi I by FESTOOL.
USER MANUAL CTM Midi I FESTOOL
natural_image
Exterior view of a white industrial vacuum cleaner with green ventilation slots and control panel (no visible text or symbols)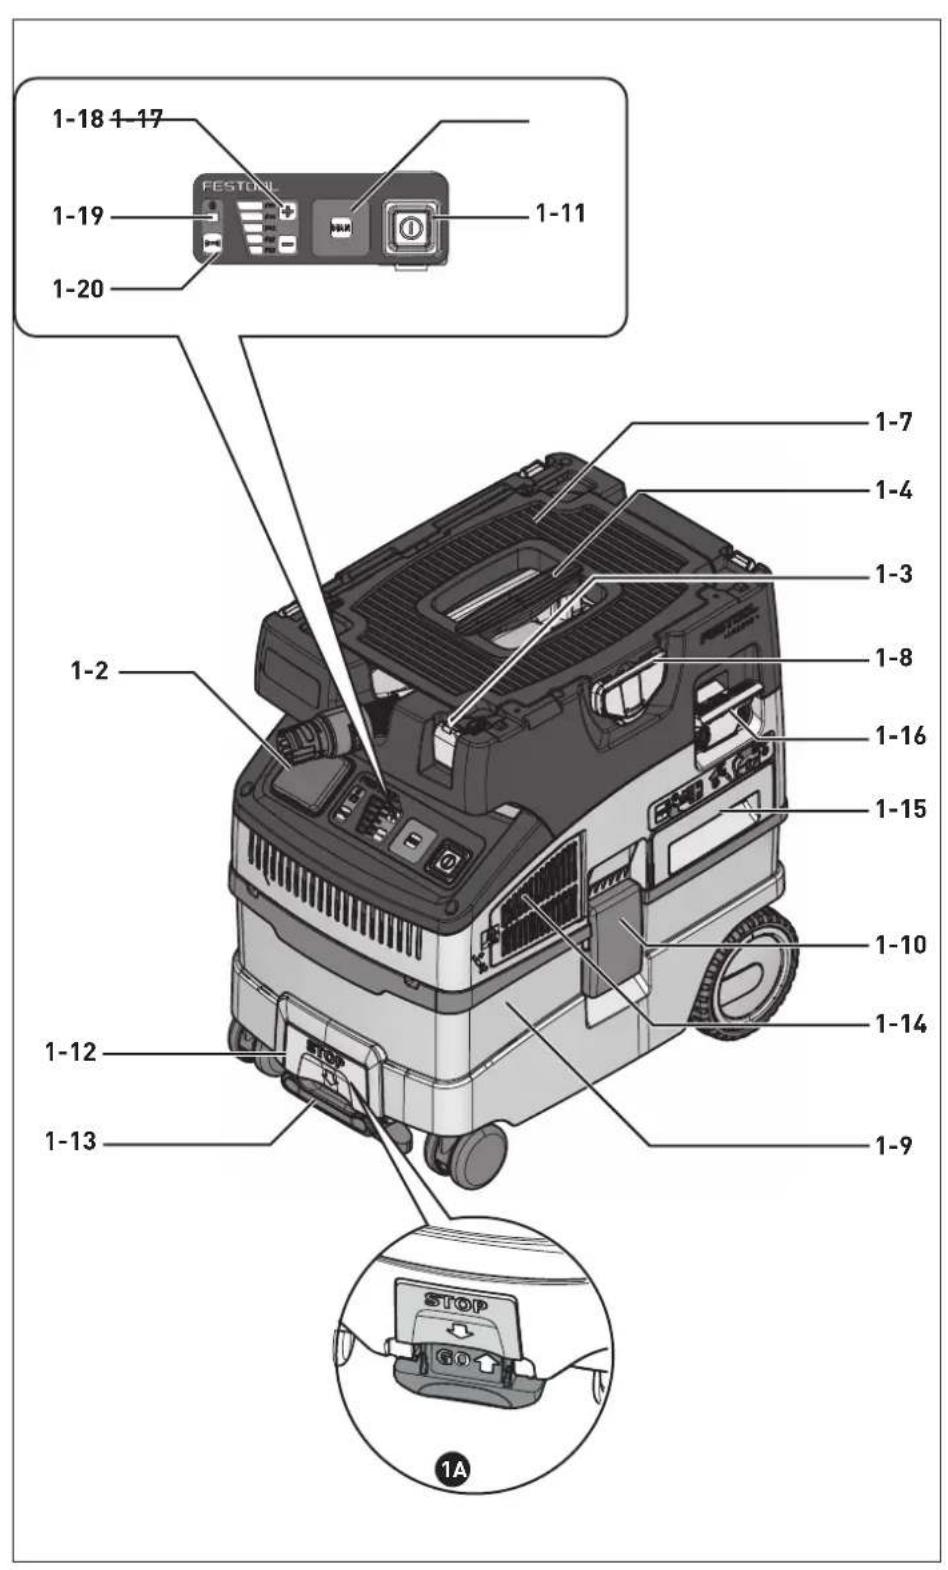
text_image
1-18 1-17 FESTON 1-19 1-20 1-11 1-7 1-4 1-3 1-8 1-16 1-15 1-10 1-14 1-12 1-9 1-13 STOP 1A2
natural_image
Technical line drawing of a vehicle chassis showing internal components and airflow direction (no text or symbols)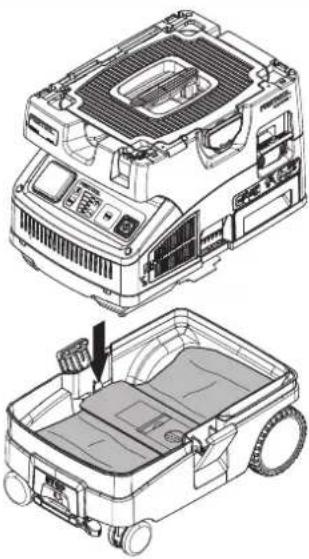
natural_image
Technical illustration of a vehicle's internal components, showing top and side views with no visible text or symbols.3

natural_image
Technical line drawing of a mechanical assembly with a lever and base component (no text or symbols)
natural_image
Technical line drawing of a vehicle chassis with visible tire, valve, and mounting bracket (no text or symbols)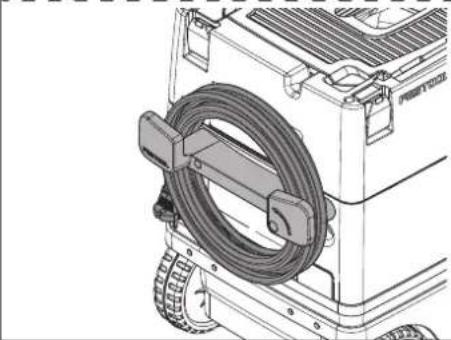
natural_image
Technical line drawing of a mechanical device with a coiled cable and wheels (no text or symbols)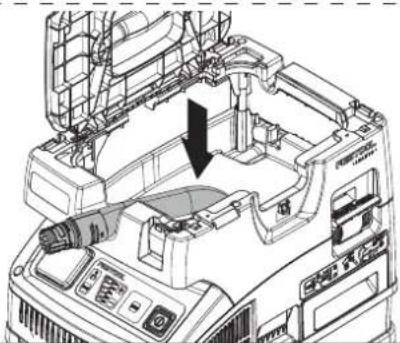
natural_image
Technical line drawing of a mechanical assembly with no visible text or symbols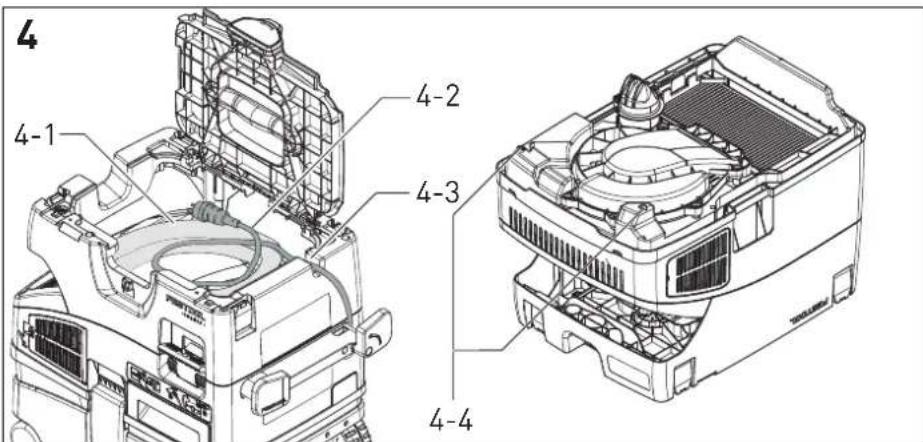
text_image
4 4-1 4-2 4-3 4-45
natural_image
Technical illustration of a mechanical assembly with a gear and housing component (no text or symbols)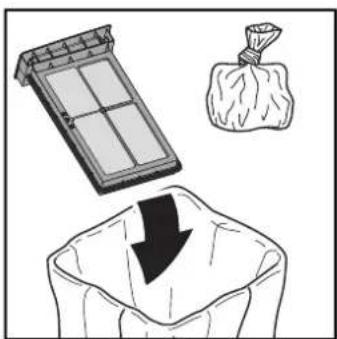
natural_image
Illustration showing a solar panel, a bag of cotton, and a sack with a downward arrow (no text or symbols)
natural_image
Diagram of a car air conditioner unit with a partially assembled fan and cooling rack (no text or labels)
HF-CT MINI/MIDI-2
No.: 204200
| AbsaugmobilMobile dust extractorsAspirateurs | Seriennummer *Serial number *N° de série *(T-Nr.) |
| CTL Mini 203448 | |
| CTL Midi 203449 | |
| CTL Mini I 201918, 201919,201917, 201931 | |
| CTL Midi I 201926, 204379,201922, 201925,201924 | |
| CTM Midi I 201934, 201933,10019662, 201935, |
de EG-Konformitätserklärung. Wir erklären in alleiniger Verantwortung, dass dieses Produkt allen einschlägigen Bestimmungen der folgenden Richtlinien einschließlich ihrer Änderungen entspricht und mit den folgenden Normen übereinstimmt:
en EC-Declaration of Conformity. We declare under our sole responsibility that this product is in conformity with all relevant provisions of the following directives including their amendments and complies with the following standards:
fr CE-Déclaration de conformité communautaire. Nous déclarons sous notre propre responsabilité que ce produit est conforme aux normes ou documents de normalisation suivants:
es CE-Declaración de conformidad. Declaramos bajo nuestra exclusiva responsabilidad que este producto corresponde a las siguientes normas o documentos normalizados:
it CE-Dichiarazione di conformità. Dichiariamo sotto la nostra esclusiva responsabilità che il presente prodotto e conforme alle norme e ai documenti normativi seguenti:
nl EG-conformiteitsverklaring. Wij verklaren op eigen verantwoordelijkheid dat dit produkt voldoet aan de volgende normen of normatieve documenten:
SV EG-konformitetsförklaring. Vi förklarar i eget ansvar, att denna produkt stämmer överens med följande normer och normativa dokument:
fi EY-standardinmukaisuusvakuutus. Va-kuutamme yksinvastuullisina, etta tuote on seuraavien standardien ja normatiivisten ohjeiden mukainen:
da EF-konformitetserklæring Vi erklærer at have alene ansvaret for, at dette produkt er i overensstemmelse med de følgende normer eller
normative dokumenter:
nb CE-Konformitetserklæring Vi erklærer på eget ansvar at dette produktet er i overensstemmelse med følgende normer eller normative dokumenter:
pt CE-Declaração de conformidade: Declaramos, sob a nossa exclusiva responsabilidade, que este produto corresponde às normas ou aos documentos normativos citados a seguir:
ru Декларация соответствия EC: Мы заявляем с исключительной ответственностью, что данный продукт соответствует следующим нормам или нормативным документам:
CS ES prohlašeni o shodě: Prohlašujeme s veškerou odpovědnosti, že tento vyrobek je ve shodě s nasledujicimi normami nebo normativnimi dokumenty:
pl Deklaracja o zgodności z normami UE: Niniejszym oświadczamy na własną odpowiedzialność, że produkt ten spełnia następujące normy lub dokumenty normatywne:
2006/42/EG, 2014/53/EU, 2011/65/EU
text_image
i.V. R. BoxrockRalf Brandt
Head of Standardization & Approbation
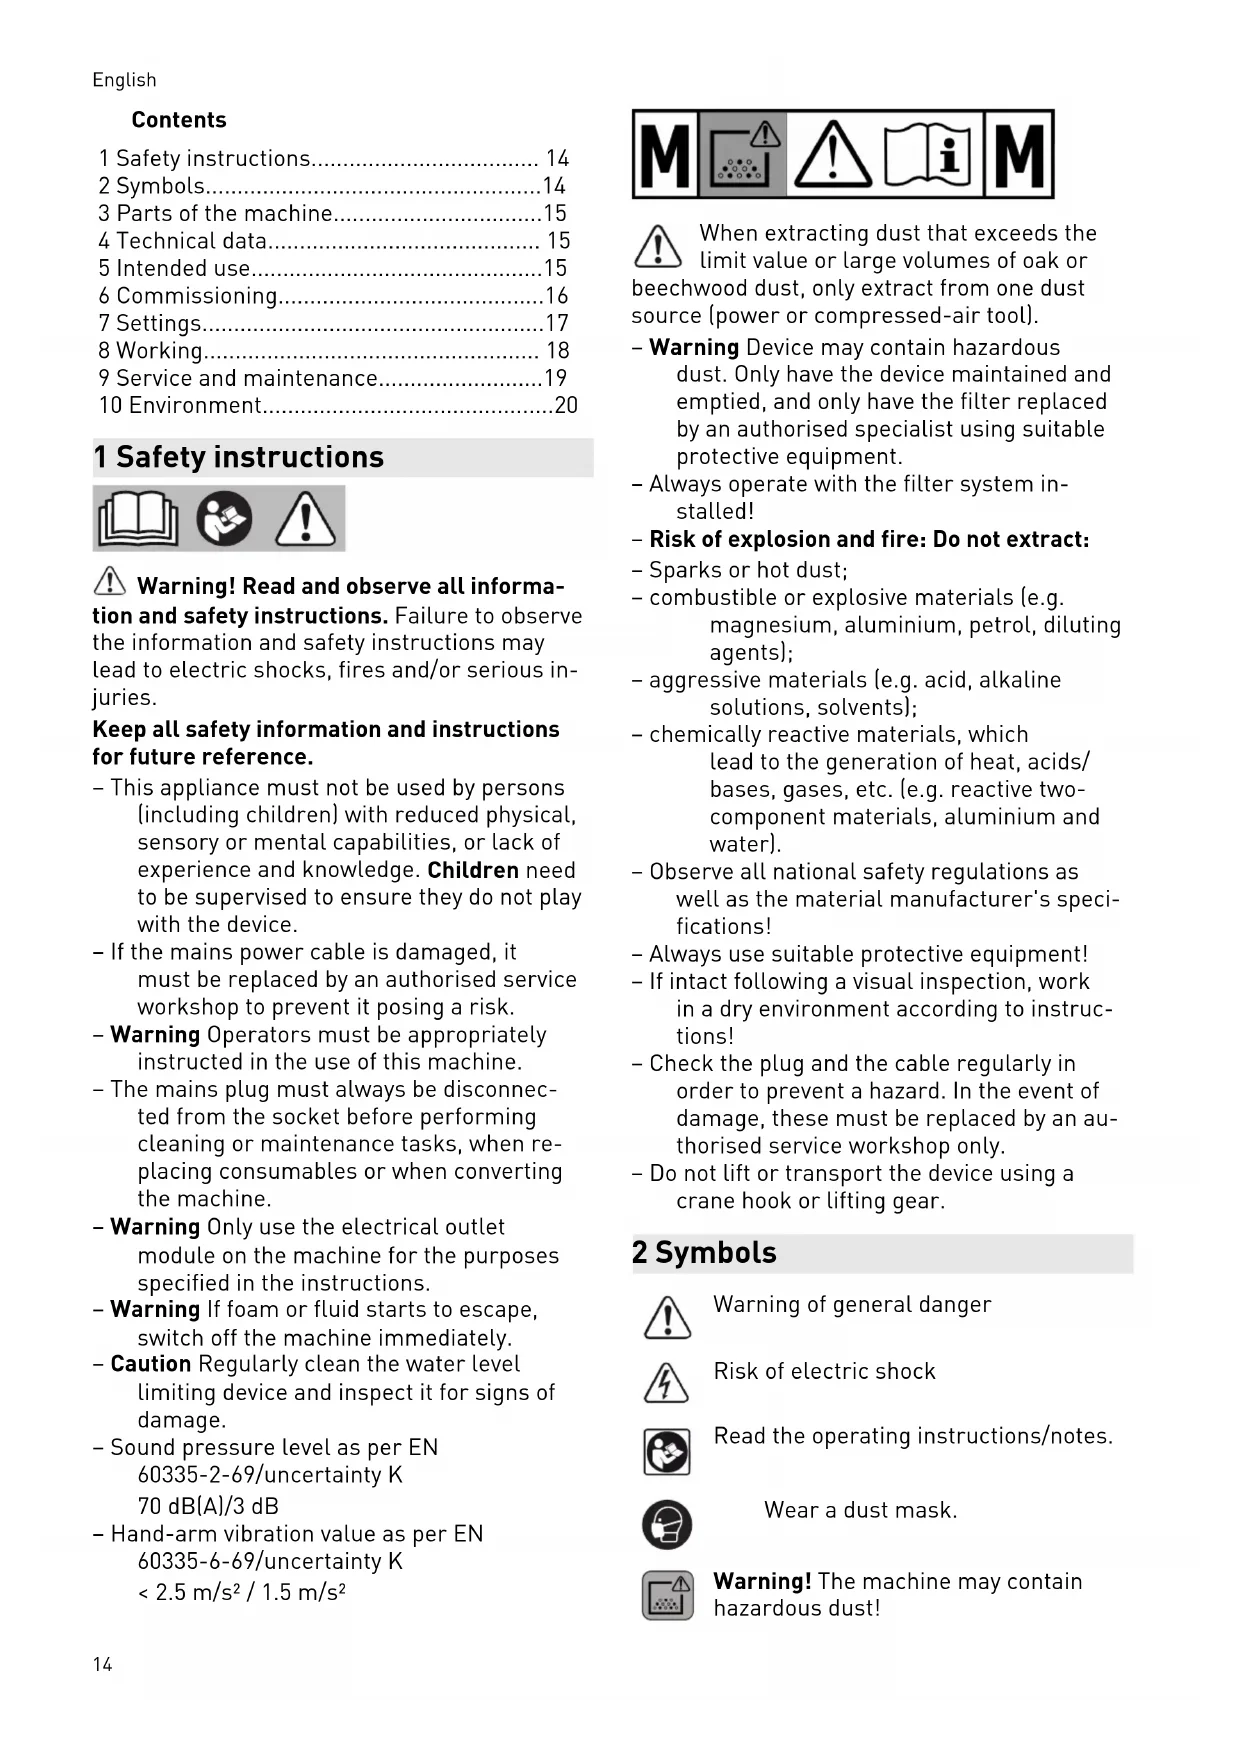
1 Safety instructions.... 14
2 Symbols....14
3 Parts of the machine....15
4 Technical data.... 15
5 Intended use....15
6 Commissioning....16
7 Settings....17
8 Working.... 18
9 Service and maintenance....19
10 Environment....20
1 Safety instructions


Warning! Read and observe all informa-
tion and safety instructions. Failure to observe the information and safety instructions may lead to electric shocks, fires and/or serious injuries.
Keep all safety information and instructions for future reference.
- This appliance must not be used by persons (including children) with reduced physical, sensory or mental capabilities, or lack of experience and knowledge. Children need to be supervised to ensure they do not play with the device.
- If the mains power cable is damaged, it must be replaced by an authorised service workshop to prevent it posing a risk.
- Warning Operators must be appropriately instructed in the use of this machine.
- The mains plug must always be disconnected from the socket before performing cleaning or maintenance tasks, when replacing consumables or when converting the machine.
- Warning Only use the electrical outlet module on the machine for the purposes specified in the instructions.
- Warning If foam or fluid starts to escape, switch off the machine immediately.
- Caution Regularly clean the water level limiting device and inspect it for signs of damage.
- Sound pressure level as per EN 60335-2-69/uncertainty K 70 dB(A)/3 dB
- Hand-arm vibration value as per EN 60335-6-69/uncertainty K < 2.5m / s^2 / 1.5m / s^2


When extracting dust that exceeds the limit value or large volumes of oak or beechwood dust, only extract from one dust source (power or compressed-air tool).
- Warning Device may contain hazardous dust. Only have the device maintained and emptied, and only have the filter replaced by an authorised specialist using suitable protective equipment.
- Always operate with the filter system installed!
– Risk of explosion and fire: Do not extract: - Sparks or hot dust;
- combustible or explosive materials (e.g. magnesium, aluminium, petrol, diluting agents);
- aggressive materials (e.g. acid, alkaline solutions, solvents);
- chemically reactive materials, which lead to the generation of heat, acids/ bases, gases, etc. (e.g. reactive two-component materials, aluminium and water).
- Observe all national safety regulations as well as the material manufacturer's specifications!
- Always use suitable protective equipment!
- If intact following a visual inspection, work in a dry environment according to instructions!
- Check the plug and the cable regularly in order to prevent a hazard. In the event of damage, these must be replaced by an authorised service workshop only.
- Do not lift or transport the device using a crane hook or lifting gear.
2 Symbols

Warning of general danger

Risk of electric shock

Read the operating instructions/notes.

Wear a dust mask.

Warning! The machine may contain hazardous dust!

Suitable for separation of dust with an exposure limit value greater than 0,1 mg/m ^3

Do not dispose of it with domestic waste.

Climbing prohibited
3 Parts of the machine
| [1-2] | Appliance socket |
| [1-3] | SysDoc |
| [1-4] | Handle |
| [1-7] | Hose holder |
| [1-8] | T-Loc lock for Systainers |
| [1-9] | Dirt trap |
| [1-10] | Locking clip |
| [1-11] | On/off switch |
| [1-12] + [1-13] | Brake |
| [1-14] | Exhaust opening |
| [1-15] | Filter drawer |
| [1-16] | Dedusting |
| [1-17] | MAN button |
| [1-18] | Manual suction hose adjustment (standby mode) or suction power adjustment (extraction mode) |
| [1-19] | Connection display |
| [1-20] | Connection button |
The specified figures appear at the beginning of the operating manual.
4 Technical data
| Mobile dust extractors | |
| Power consumption 350–1200 W | |
| Max. electrical outlet module connected load EU, KR, CN | 2200 W |
| CH, DK | 1150 W |
| GB 230 V/110 V | 1610 W/770 W |
| Max. suction capacity (air), extractor/turbine 130 m3/h / 222 m3/h | |
| Max. vacuum, turbine 24,000 Pa | |
| Filter surface area 3369 cm2 | |
| Suction hose D 27/32 mm x 3.5 m-AS | |
| Mains power cable length 7.5 m | |
| Sound pressure level as per EN 60335-2-69/uncertainty K 70 dB(A)/3 dB | |
| Hand-arm vibration value as per EN 60335-6-69/uncertainty K < 2.5 m/s2 / 1.5 m/s2 | |
| Degree of protection IP X4 | |
| Container capacity CTM MIDI I 15 l | |
| Dimensions L x W x H CTM MIDI I 470 × 320 × 495 mm | |
| Weight CTM MIDI I 11.3 kg | |
5 Intended use
Mobile dust extractor suitable for
- extracting dust up to 0.1 mg/m ^3 according to dust class M including wood and paint dust,
- extracting water,
- for increased loads during commercial use,
according to IEC/EN 60335-2-69.

The user is liable for improper or non-in-tended use.
6 Commissioning

WARNING
Unauthorised voltage or frequency! Risk of accidents
▶ Observe the specifications on the machine's name plate.
▶ Observe country-specific regulations.
6.1 Initial commissioning
▶ Insert the filter/disposal bag [2].
▶ Fit the cord holder [3].
▶ Connect the suction hose [3].
6.2 Connecting the mobile dust extractor

WARNING
Risk of injury from uncontrolled tool start-up
▶ Before switching on ensure that the connected tool is switched off.

WARNING
Risk of injury from electric current
▶ Insert the mains plug into an earthed socket.
▶ Do not reach into the electrical outlet module on the mobile dust extractor.

While the mobile dust extractor is connected to the mains socket, an electric current is running through electrical outlet module on the mobile dust extractor at all times.
Connecting the mobile dust extractor to a mains socket
The mobile dust extractor is switched off.
- Connect the power cable to a mains socket. The electrical outlet module [1-2] is live.
Switching the mobile dust extractor to standby mode
▶ Press the on/off switch[1-11]. The electrical outlet module [1-2] is live.

The green LED [1-18] indicates standby mode.
Starting the mobile dust extractor automatically
The mobile dust extractor is in standby mode.
▶ To start the mobile dust extractor automatically: Switch on the connected tool.
Starting the mobile dust extractor manually
The mobile dust extractor is in standby mode.
▶ Press the MAN button [1-17].
Pull the mains plug from the socket when you are not using the mobile dust extractor and before performing any cleaning and maintenance work.
6.3 Connecting a power tool

WARNING
Risk of injury
▶ Observe the maximum electrical outlet module connected load (see chapter "Technical data").
▶ Switch off the power tool.
Connecting a mains-powered power tool to the mobile dust extractor
- Connect the power tool to the electric outlet module [1-2].
The power tool is connected the to mobile dust extractor via the power cable.
Connecting a battery-powered power tool to the mobile dust extractor (MINI I / MIDI I)
▶ In standby mode, press the connection button [1-20].
The connection display [1-19] flashes slowly. For a period of 60 seconds, the mobile dust extractor is ready for connection.
▶ Turn on the battery-powered power tool.
The mobile dust extractor starts up and the battery-powered power tool is connected until the mobile dust extractor is manually switched off or the mains plug is disconnected. The battery-powered tool must then be connected again.
Connecting a new battery-powered power tool overwrites the previous connection.
6.4 Connecting a mobile device (MINI I / MIDI I)
A mobile device (e.g. smartphone) can be connected to the mobile dust extractor via Bluetooth® (e.g. for a software update with the Fes-tool app).
- Hold down the connection button [1-20] on the mobile dust extractor for three seconds in standby mode. The connection display [1-19] flashes rapidly.
For a period of 60 seconds, the mobile dust extractor is ready for connection.
▶ Follow the instructions provided in the Festool app.
6.5 Remote control (MINI I / MIDI I)
Connecting the remote control and mobile dust extractor
To be able to connect a remote control to a mobile dust extractor, the remote control must be reset (see "Resetting the remote control").
Remote controls that have not been connected previously can be connected directly.

A connection that has been created between remote controls and the mobile dust extractor will persist even after the mobile dust extractor has been manually switched off or the mains plug has been disconnected.

The mobile dust extractor can be connected to as many as five remote controls at the same time. The mobile dust extractor can only be connected to one cordless power tool at a time.
▶ Hold down the connection button [1-20] on the mobile dust extractor for three seconds in standby mode.
The connection display [1-19] flashes rapidly.
For a period of 60 seconds, the mobile dust extractor is ready for connection.
▶ Press the MAN button on the remote control.
The remote control is permanently stored in the mobile dust extractor.
Switching on/off
Once the remote control is connected to the mobile dust extractor, the mobile dust extractor can be switched on and off with the remote control.
▶ Press the MAN button on the remote control to switch the device on and off.
7.3 Volumetric flow monitoring
For safety reasons, an acoustic warning signal sounds if the air speed in the suction hose falls below 20 m/s (dust class M only).
Resetting the remote control
Resetting deletes the connection between a remote control and the mobile dust extractor.
▶ Hold down the connection button and the MAN button for 10 seconds.
The LED indicator lights up purple, if the reset has taken place.
6.6 Delete all saved devices. (MINI I / MIDI I)
▶ Press and hold the connection button [1-20] for at least three seconds.
The connection display [1-19] flashes rapidly.
▶ Press and hold both the plus and minus button [1-18] for at least three seconds.
The mobile dust extractor confirms the command by rapidly flashing three times.
7 Settings
7.1 Setting the suction hose diameter

The suction hose diameter is detected automatically for suction hoses with an RFID chip.
For suction hoses without an RFID chip, the suction hose diameter must be set manually in standby mode.
▶ Press the plus or minus button [1-18] until the required diameter is set.
An LED lights up in the field with the required diameter.

If a suction hose with an RFID chip is connected, the manual settings are overwritten.
7.2 Adjusting the suction power
▶ Press the plus or minus button [1-18] while extracting.
Possible causes Solution
Suction power adjustment [1-18] not set to a high enough value.
Suction hose adjustment [1-18] not set to the diameter of the connected suction hose (only for suction hoses without an RFID chip).
Set the suction power adjustment to a higher value (see chapter 7.2).
Set the correct suction hose diameter (see chapter 7.1).
Possible causes Solution
Suction hose blocked or kinked. Eliminate the block or straighten the hose.
Filter bag full. Insert a new filter bag (see chapter 8.5).
Dirty main filter. Clean the main filter (see chapter 8.4).
Change the main filter (see chapter 8.6).
Electronic monitoring malfunction. Have the fault rectified by a Festool service workshop.
Wet extraction. Function not impaired, no measures required.
7.4 Temperature cut-out
A temperature cut-out switches the mobile dust extractor off when it reaches a critical temperature to prevent overheating. The bottom LED [1-18] indicates a fault.
LED lights up red Excessive temperature
▶ Switch off the mobile dust extractor, let it cool down.
▶ Switch on the mobile dust extractor again after approx. five minutes.
7.5 Locking the brake [1A]
- Raise the front of the mobile dust extractor slightly.
▶ Push down the brake [1-13] until it engages into position.
▶ Actuate the button [1-12] to release it.
7.6 SysDoc

WARNING
Risk of injury
- Do not stand on the storage area of the mobile dust extractor.

CAUTION
Risk of injury
▶ Ensure that the T-Loc or the four SysDoc locks are closed during transport.
A Systainer can be fastened to the storage area [1-7] with the T-Loc lock [1-8] . Systainers without T-Loc can be secured with the four Sys-Doc locks [1-3] .
8 Working
8.1 Extracting dry materials


UTION
Hazardous dust
Damage to the respiratory passage
▶ Always use a filter bag!


UTION
Hazardous dust
Damage to the respiratory passage
▶ Check that the main filter is undamaged before extracting.

When extracting dust that exceeds the limit value, only extract from one dust source (power or compressed-air tool).
Observe the following when extracting dust generated by operating power tools:
Ensure there is adequate ventilation! Observe regional regulations!
Limit values: Exhaust air max. 50% of the fresh air volume
Equation: Room volume V_R x air renewal rate L_W
8.2 Extracting wet materials/liquids

Remove the filter bag!
Use a special wet filter.
The dust extractor stops automatically when the maximum fill level is reached.
The bottom LED [1-18] lights up red.
▶ Switch off the mobile dust extractor [1-11].
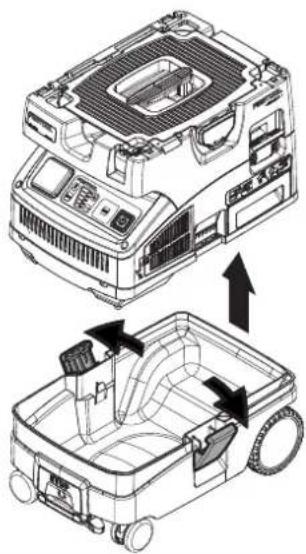
▶ Open the locking clips [1-10] and remove the top section of the machine.
▶ Empty the dirt trap [1-9].
After wet extraction, allow the main filter to dry! Dry the mobile dust extractor before extracting dry dust.


UTION
Hazardous dust
Damage to the respiratory passage
▶ After extracting wet materials, remove the wet filter and replace it with the main filter for dry materials.

CAUTION
Escaping foam and fluids
- Switch off and empty the machine immediately.
8.3 Exhaust-air outlet


UTION
Hazardous dust
Damage to the respiratory passage
▶ Do not blow off any dust!
The exhaust-air outlet offers the option of diverting the exhaust air outside a building using the suction hose.
▶ Open the grille in front of the exhaust opening [1-14].
▶ Insert the suction hose in the exhaust opening [1-14].
8.4 Cleaning the filter and filter bag manually
▶ In standby mode, press the MAN button [1-17].
▶ Set the suction power to the maximum setting [1-18].
▶ Cover the suction hose with your hand while at the same time briefly pressing down the cleaning lever [1-16] three times.
8.5 Changing the filter bag with minimal dust
▶ Open the locking clips and remove the top section of the machine [2].
▶ Pull the tab on the filter bag until the filter bag opening is fully closed.
The filter bag is now securely closed and can be removed.
▶ Fit the top section of the machine and close the locking clips.
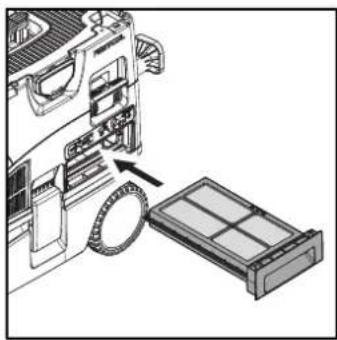
8.6 Changing the filter element
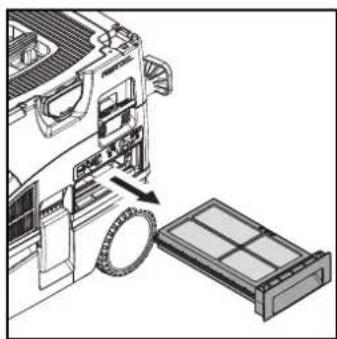
▶ Pull out the used filter drawer [1-15].
▶ Dispose of the used filter drawer in accordance with statutory regulations.
▶ Insert the new filter drawer [1-15].

Order numbers for accessories, filters and consumables in the Festool catalogue or online at "www.fes-tool.com".
NOTICE
Damage to the motor
▶ Never extract material without a main filter or with a damaged main filter, as this can damage the motor.
8.7 After finishing work
▶ Switch off the mobile dust extractor and pull out the mains plug.
▶ Wind up the mains power cable.
▶ Empty the dirt trap.
- Place the suction hose [4-1] in the sealable hose holder [1-7]. Place the mains power cable [4-2] in the sealable hose holder [1-7] or wind it up on the cord holder. To do so, lay the power cable through the recess [4-3].
▶ Vacuum and wipe the inside and outside of the mobile dust extractor to clean it.
▶ Place the mobile dust extractor in a dry room inaccessible to unauthorised users.

The lid of the hose holder also serves as a storage area for tools.
9 Service and maintenance

WARNING
Risk of injury, electric shock
▶ Always pull the mains plug from the socket before performing any servicing and maintenance work.
▶ All maintenance and repair work which requires the motor housing to be opened should always be carried out by an authorised service workshop.

Customer service and repairs must only be carried out by the manufacturer or service workshops: Find the nearest address at: www.festool.com/service
Always use original Festool spare parts. Order no. at: www.festool.com/service
▶ Regularly clean the fill level sensors [4-4] and empty the dirt trap [1-9].
Observe the following information:
- Dust-related inspection (e.g. for filter damage, tightness of the machine and function of the control devices) by the manufacturer or an instructed person at least once a year.
- Dispose of components that cannot be cleaned. Use impermeable bags to do so. Observe the applicable disposal provisions!
10 Environment

Do not dispose of the device in the household waste! Recycle devices, accessories and packaging. Observe applicable national regulations.
EU only: In accordance with European Directive on waste electrical and electronic equipment and implementation in national law, used power tools must be collected separately and handed in for environmentally friendly recycling.
Information on REACH: www.festool.com/reach
The Bluetooth ^® word mark and the logos are registered trademarks of Bluetooth SIG, Inc.; they are used by TTS Tooltechnic Systems AG & Co. KG, and therefore by Festool, under licence.
Sommaire
Causes possibles Solution