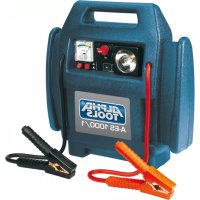
A-ES 1700/1 - Battery charger Alpha Tools - Free user manual and instructions
Find the device manual for free A-ES 1700/1 Alpha Tools in PDF.
| Product Type | Battery charger / Multi-function energy box |
| Brand | Alpha Tools |
| Model | A-ES 1700/1 |
| Built-in battery | 12 V / 17 Ah (lead-gel, maintenance-free) |
| Main functions | 12 V jump starter, 12 V compressor, 230 V voltage transformer, LED lighting, cigarette lighter socket |
| Jump start assistance | 12 V / max 600 A (3 seconds) |
| Compressor | Max pressure 18 bars, with pressure gauge and accessories |
| Voltage transformer (inverter) | Input 12 V DC, output 230 V / 50 Hz, modified sine wave, peak power 200 W, continuous 80 W |
| Lighting | 12 LEDs |
| 12 V output | Cigarette lighter socket, max 15 A (protected by 10 A fuse) |
| Mains power supply | 230 V ~ 50 Hz, output 15 V DC / 1000 mA (charger included) |
| Charge indicator | LED display (green = full, red = empty), touch button |
| Protections | Overvoltage, short-circuit, undervoltage, overheating (audible alarm) |
| Operating temperature | 0 °C to +40 °C |
| Thermal shutdown | 55 °C ± 5°C, automatic restart at 30 °C ± 5°C |
| Included accessories | Spiral air hose, adapters (long, short, ball, bicycle valve), flat fuse 15 A, 230 V charger, car adapter cable |
| Maintenance | Clean with a dry soft cloth; recharge the battery every 3 to 5 months even if not used |
| Warranty | 60 months (under conditions, excluding professional use) |
| Wear parts | Flat fuse, fine fuse, adapters, bulb, battery |
| Standards | EU compliant (WEEE directive 2012/19/EC) |
Frequently Asked Questions - A-ES 1700/1 Alpha Tools
User questions about A-ES 1700/1 Alpha Tools
0 question about this device. Answer the ones you know or ask your own.
Ask a new question about this device
Download the instructions for your Battery charger in PDF format for free! Find your manual A-ES 1700/1 - Alpha Tools and take your electronic device back in hand. On this page are published all the documents necessary for the use of your device. A-ES 1700/1 by Alpha Tools.
USER MANUAL A-ES 1700/1 Alpha Tools
GB Original operating instructions Energy Station
text_image
1 2 3 4 5 6 7 8 9 10 11 12 Radio Station Signal Control Signal Signal Signal Signal Signal Signal Signal Signal Signal Signal Signal Signal Signal Signal Signal Signal Signal Signal Signal Signal
text_image
2 2 14 13 15 16-2-
text_image
3 26 27 20 21 22 23 24 25-3-
DE

Danger! - Read the operating instructions to reduce the risk of inquiry

Insert fuse before fi rst use!
-15-
GB
Danger!
When using the equipment, a few safety precautions must be observed to avoid injuries and damage. Please read the complete operating instructions and safety regulations with due care. Keep this manual in a safe place, so that the information is available at all times. If you give the equipment to any other person, hand over these operating instructions and safety regulations as well. We cannot accept any liability for damage or accidents which arise due to a failure to follow these instructions and the safety instructions.
1. Safety regulations
Danger!
Read all safety regulations and instructions.
Any errors made in following the safety regulations and instructions may result in an electric shock, fi re and/or serious injury.
Keep all safety regulations and instructions in a safe place for future use.
- Test the energy station for damage before each use.
- Only ever use the supply voltage specified (230V \~50Hz).
- Please remember that if electrical appliances are used in an inappropriate manner, dangers could arise, which children may not be aware of.
- Keep children away from vehicle batteries and energy stations.
- Check the equipment for damage. Unless otherwise stated in the operating instructions, defective or damaged parts must be repaired or replaced by a customer service workshop. Damaged switches have to be replaced by a customer service workshop.
• Protect from rain, spray and moisture. - Do not position the appliance on a hot surface.
- If not in use, always switch the energy station off.
- When charging the vehicle battery as well as when filling up with acid, or refilling with distilled water, always wear safety goggles and acid-proof gloves! The caustic acid presents a high risk of injury.
- Caution! Battery acid is corrosive. Should any acid splash onto hands or clothing, wash off immediately with soap solution. Should any acid splash into your eyes, wash it out imme-
diately with water (for 15 minutes) and seek the advice of a doctor.
- Do not wear any items of clothing made of synthetic materials so as to avoid spark formation caused by electrostatic discharge when charging the battery.
- Important! Avoid flames and sparks. Explosive gas is released during the charging process.
- The charger contains components such as the switch and fuse which may generate arcs and sparks. It is essential to ensure that there is good ventilation in the garage or room.
- Important! If you smell an acrid odor of gas, this indicates that there is an acute danger of explosion. Do not switch the appliance off Do not remove the charger clamps. Ventilate the room immediately. Have the battery checked by customer service staff.
- Do not charge more than one battery at any one time.
• Never charge non-rechargeable batteries.
• Refer to the instructions supplied by the battery manufacturer.
• Refer to the information and instructions provided by the vehicle manufacturer relating to charging the battery.
Voltage transformer
- Read the operating instructions before using the appliance for the first time. The appliance may only be used as described therein. All other usages are not permitted.
- Keep the instructions in a safe place and give them to third parties if necessary.
- Never use the appliance in a damp environment.
- Never open the appliance or touch live parts – danger of death!
• Never use the appliance with wet hands. - Do not use the appliance in rooms in which inflammable materials (for example solvents, etc.) or gases are used or stored.
- Keep highly inflammable substances and gases away from the appliance.
- Do not insert foreign bodies into openings of the appliance - Danger of electric shock or damage to the appliance.
- Keep children and people on medication or under the influence of alcohol away from the appliance.
- Maintenance and repair work may only be carried out by authorized trained personnel.
• Water or other fluids must never come into contact with the appliance - Danger of death!
GB
- If the appliance is used for a lengthy time the housing can become very hot. The appliance must be positioned so that additional warming is not possible.
• Children or infirm persons may use the appliance only under supervision. - Children are not allowed to use the appliance as a toy.
- Always make sure that the appliance is in a safe condition for operation. The appliance must be positioned and situated so that it cannot topple or fall down
- For cable ducts/bushings on sharp-edged walls, use special duct grommets.
• Cables should not be laid slackly or sharply buckled on electro-conductive materials. - Do not pull on electric cables or suspend a tensile load.
- 230 V cables must not be laid together with 12 V DC cables in the same empty conduit.
• Always fasten electrical cables securely. - Lay electric cables in a manner safely preventing tripping and cable damage.
- Check that the appliance has been delivered in perfect condition. If it has suffered any damage, do not connect the appliance to the power supply.
- Never cover up the appliance. Air inlets and outlets must always be clear.
- Never attach the 230 V output of the voltage transformer to another 230 V power source.
- When releasing integrated protection devices, parts of the appliance remain electrically charged.
• Always pay attention to the safety information for the connected 230 V consumer.
Compressor
- Do not clean your clothes with compressed air.
- Never blow compressed air at people or animals.
- Keep the air vents clean.
- The compressor should not take in dust or other impurities.
- Do not use the compressor for high pressure tyres such as lorry tyres, tractor tyres or trailer tyres.
- If you wish to fill several tyres, let the compressor cool off for 20 minutes between inflations. The maximum runtime of the appliance must not rise above 10 minutes.
Important!
- The energy station is supplied with a maintenance-free, leak-proof lead-gel rechargeable battery. It is delivered partially charged.
• Before first use, the battery for the energy station must be fully charged! - If the energy station is not used for longer periods, the battery automatically loses its charge.
- Only use the supplied power supply unit to recharge the battery.
- The warning triangle is not in accordance with the ECE standard.
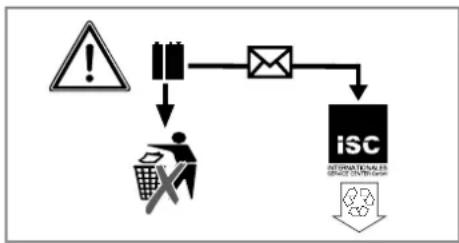
Disposal
Batteries: Only dispose of these items through motor vehicle workshops, special collection points or special waste collection points. Ask your local council.
Environmental protection
Please take care that packaging, used batteries or defective batteries are not disposed of with household waste. Always dispose of them correctly.
2. Layout and items supplied
2.1 Layout (Fig. 1/2)
1 Jumper cable, black (-)
2 ON/OFF switch jumper cable
3 Battery charge level indicator
4 Pushbutton for battery charge level indicator
5 Flat fuse 15 A
6 Charging socket/LED
7 Light
8 Accessory storage compartment
9 Compressor - pressure indicator
10 Light - ON/OFF switch
11 Compressor - ON/OFF switch
12 Cigarette lighter socket
13 Voltage transformer- ON/OFF switch
14 Socket 230 V
15 Jumper cable, red (+)
16 Warning triangle (integrated)
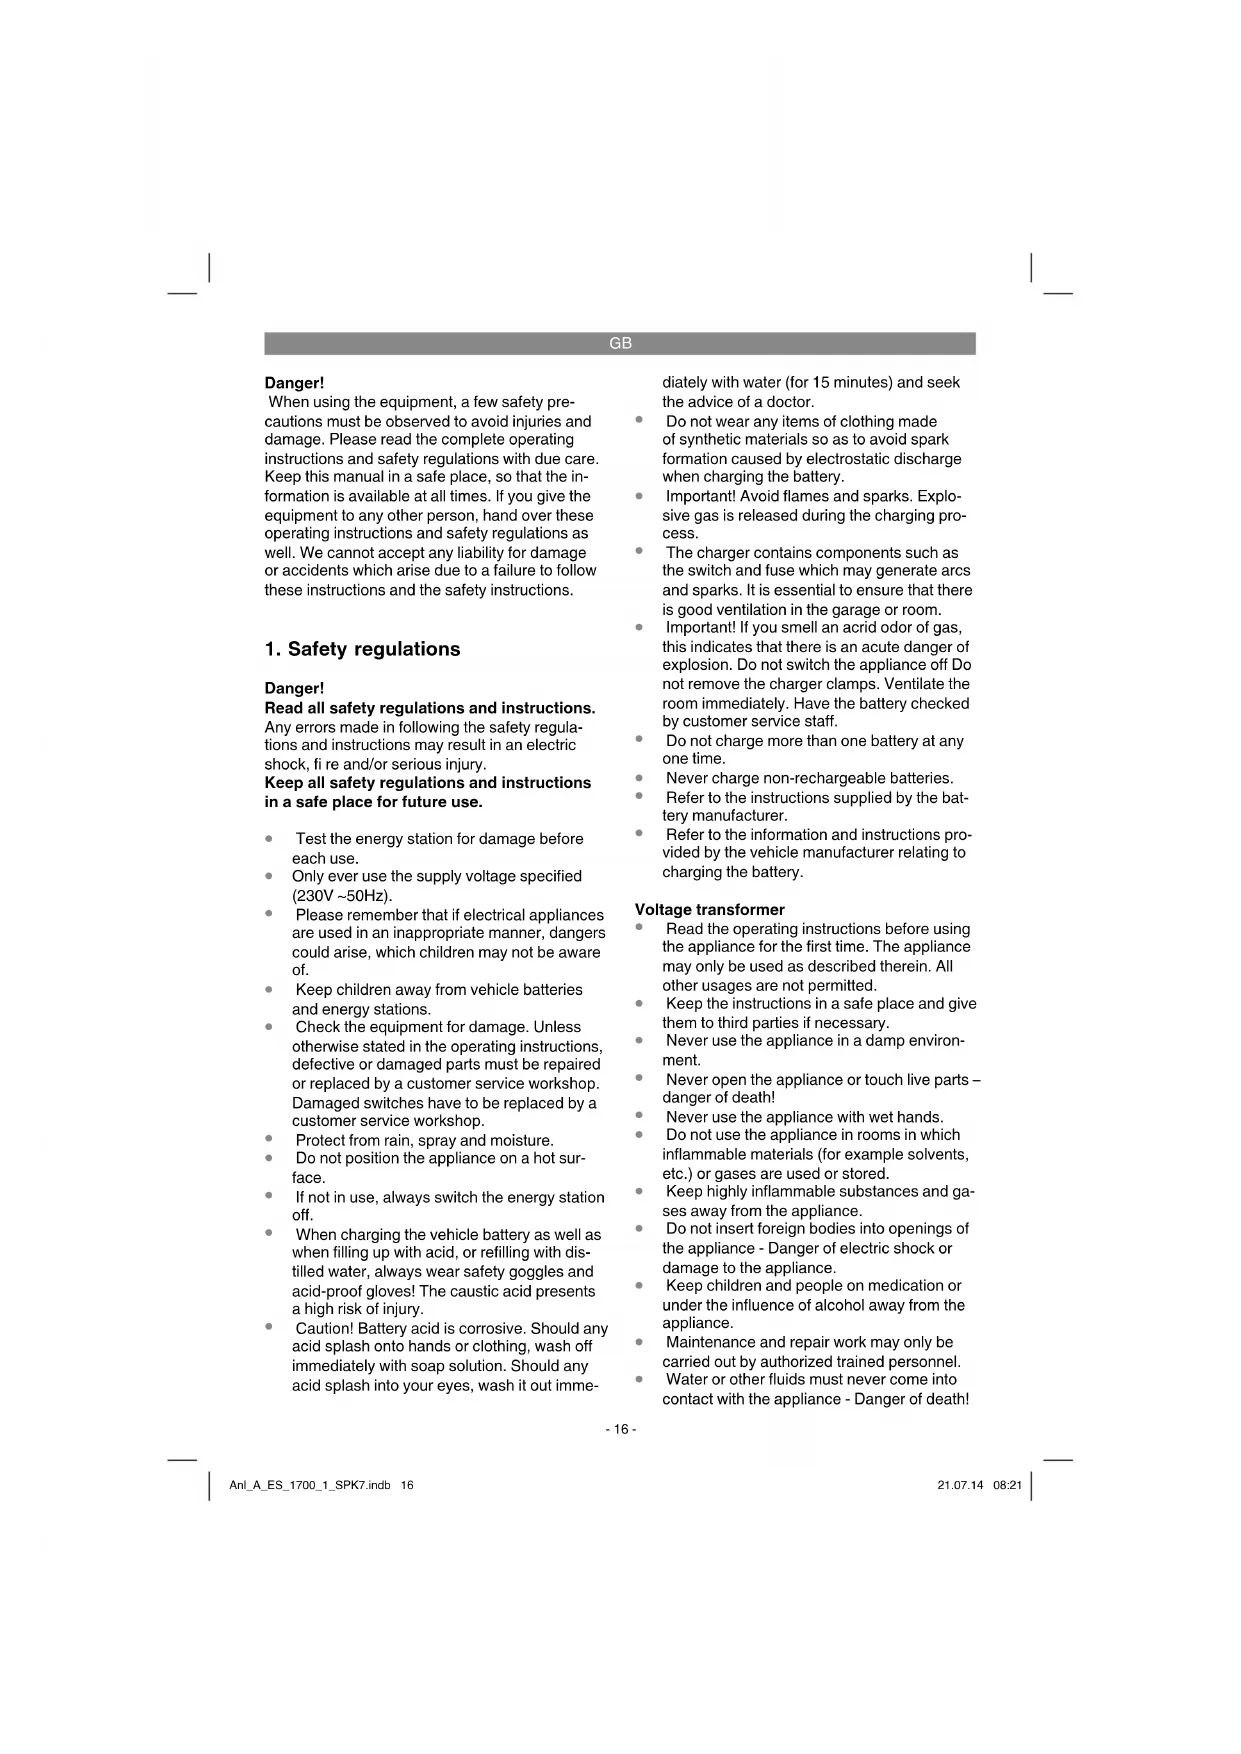
2.2 Items supplied (Fig. 3)
Please check that the article is complete as specified in the scope of delivery. If parts are missing, please contact our service center or the sales outlet where you made your purchase at the latest within 5 working days after purchasing the product and upon presentation of a valid bill
GB
of purchase. Also, refer to the warranty table in the service information at the end of the operating instructions.
- Open the packaging and take out the equipment with care.
- Remove the packaging material and any packaging and/or transportation braces (if available).
- Check to see if all items are supplied.
- Inspect the equipment and accessories for transport damage.
- If possible, please keep the packaging until the end of the guarantee period.
Danger!
The equipment and packaging material are not toys. Do not let children play with plastic bags, foils or small parts. There is a danger of swallowing or suffocating!
• 20 Spiral air hose
• 21 Long adapter
• 22 Short adapter
23 Ball adapter
24 Flat fuse
• 25 Bicycle valve adapter
• 26 230 V Charger
• 27 Motor vehicle adaptor cable
• Original operating instructions
3. Proper use
The appliance is designed for jumpstarting 12 V starter batteries (lead acid batteries) which have low battery capacity, as well as for direct or indirect connection to 12 V consumers with max. 15A power input at the cigarette lighter socket. Always observe the operating instructions for the connected appliance. With the integrated 12 V automatic compressor, car, motorbike and bicycle tyres, sport balls, small water balls, small air mattresses or similar can be inflated.
The voltage transformer serves as a transformer of the 12 V D.C. from a starter battery into a 230 V / 50 Hz modified A.C. Because of the minimal weight and the compact build, the appliance can be used in cars, motor homes etc. The output voltage is equivalent to the household voltage.
Voltage transformers are ideal for operation of electrical appliances such as notebooks, game consoles, audio, video or TV appliances or for
charging mobile telephone batteries or notebooks. Please observe possible notes about limitations for connection to voltage transformers with modified sine values in the operating instructions for the connecting appliance.
The appliance is not designed for capacitive consumers, controllers and regulators.
The equipment is to be used only for its prescribed purpose. Any other use is deemed to be a case of misuse. The user / operator and not the manufacturer will be liable for any damage or injuries of any kind caused as a result of this.
Please note that our equipment has not been designed for use in commercial, trade or industrial applications. Our warranty will be voided if the machine is used in commercial, trade or industrial businesses or for equivalent purposes.
4. Technical data
Battery pack: 12V/17 Ah
Output voltage / max. power consumption: .... 12V/15A from 1 cigarette lighter socket
Light: 12 LED
Compressor: max. 18 bar
Jump start: 12 V / max. 600 A (3s)
Power supply unit:
Input: ...... Rated voltage: 230V \~ 50Hz
Output: ......Output voltage: 15 V D.C.
Rated current: 1000 mA
Power rating: 15 VA
Inverter:
Nominal input voltage: 12 V D.C.
Peak output power (25ms) 200 W
Output power (ca. 25 min) 100 W
Constant output rating (approx 90min); ..... 80 W
Output voltage: 230 V
Output frequency: .....50 Hz modifi ed sine wave
Maximum coeffi cient: 90%
Idling power input: 400 mA
Input voltage: ....> 10.5 V; < 15 V
Temperature of the operational environment: .....
0^ - + 40^
Overheating signal / overheating cutout: ....
55^ + / - 5^
GB
Restart temperature (automatic): .... 30°C +/- 5°C
5. Charging the energy station
(Fig. 1)
Notice! Switch all switches to position "0".
By pressing this pushbutton (4) the LEDs (3) on the built-in battery are lit up to show the charging status (green=full / red=empty).
5.1 Charging the energy station with the power supply unit
- Connect the power cable of the included power supply unit to the battery charging socket (6).
- Plug the power supply unit into a 230V/50Hz socket outlet. The LED will come on.
5.2 Charging the energy station with vehicle adapter cables
It is possible to charge the energy station with the vehicle cigarette lighter plug.
Notice! The charging process should only take place during a journey, as the car battery will discharge. Never start the vehicle if the motor vehicle adapter cable is inserted into the cigarette lighter plug.
Insert the 12 V plug of the motor vehicle adapter cable into the motor vehicle cigarette lighter plug and the other end into the charging socket “(6)” on the energy station.
6. Outputs
Caution!
Output 12 V through the cigarette lighter plug connection.
15 Amperes max.:
- The 12 V output (Fig. 1 / Item 12) is designed to handle 15 A, i.e. there are max. 15 A available to use.
- Observe the power/electricity consumption values of the consumer, to prevent overloading the energy station. If only the power data of the consumer is known, the maximum electricity value can be easily calculated.
Example calculation:
Consumer: 12V / 50W
The electricity consumption is equal to: 50W / 12V = 4.17A
- The cigarette lighter cable provided can be used to connect a suitable consumer. It is protected by a 10 A fuse.
• In order to use the 12 V output, remove the protective cap and connect the consumer.
Observe the voltage and electricity values of the appliances to be used, in order not to overload the energy station.
Overload could lead to destruction of the appliance.
The ON/OFF switch (2) for the jump-start cable must be in position "0".
7. Using the light
To switch the light on, proceed as follows:
The light (Fig. 1 Item 7) is switched ON and OFF with the switch (Fig.1/Item 10).
8. Jump-start for motor vehicles
Danger!
- The charging cable with pole clips are situated on the side of the appliance.
- If you do not need the charging cable, do not remove this from the appliance.
- Important. Danger of short-circuit if pole clips are contacted.
- The energy station can only be used to jump-start partially discharged motor vehicle batteries. This means you can only convey a limited capacity into the motor vehicle battery.
• The energy station is NOT designed to start completely discharged batteries!
The terminals are insulated to prevent accidental short-circuiting when connecting the terminals to the vehicle's battery and parts. Short-circuits must be avoided at all costs.
The jump-start feature of the energy station offers a welcome helping hand when having start-up difficulties because of low battery capacity in the motor vehicle battery.
We would like to point out that even standard
GB
vehicles are fitted with a whole host of electronic equipment (such as ABS, ASR, injection pump, on-board computer and car phone). The raised starting voltage and occurrence of voltage peaks could possibly lead to defects in the electronic components when starting up. Subsequent damage caused by jump-starting cannot be covered by the product liability insurance. Please also refer to the instructions in the owner's manuals for the car, radio, navigation system, etc.
Only if the energy station is at full capacity can it be used for jump-starting.
Use of the energy station for jump-starting:
- Connect the red cable (+) of the energy station with the POSITIVE pole (+) of the battery.
- Connect the black lead (-) of the energy station to the body of the vehicle, e.g. to the ground strap or another free position on the motor block, as far as possible away from the battery, to avoid possible ignition of built up explosive gas.
- The switch (Fig.1 Item 2) must be in the "ON" position when jump-starting.
- Switch on ignition, wait approx. 5 min. DO NOT START THE CAR!
- Now you can try to start the motor with the energy station connected. Make sure that the start attempt does not last more than 3 seconds, as a very high electric current flows, when starting a car.
- First remove the pole clips on the ground strap (negative pole)
- Finally remove the jump-start cable from the POSITIVE pole (+) of the car battery.
- After this start attempt, the energy station must be recharged.
9. Battery status indicator
(Fig. 1)
The LED (3) indicates the charge state of the built-in battery. By pushing the push button (4) the LEDs are lit from green to red.
Red
The battery is discharged. The battery can reach this state after jump starting a vehicle, for example. The battery must be recharged. Continuing to operate the unit from this point may damage the battery. In order to preserve the operating life of the battery, it should be recharged at least once every 3 - 5 months, irrespective of the amount of usage.
10. 12 Volt compressor
10.1 Inflating tyres
Danger! Use an air pressure measuring device to measure the actual tyre pressure. Always observe the operating instructions when inflating the tyres.
- Remove the valve cap from the valve.
- Open the accessory storage compartment and connect the spiral air hose to the compressor hose.
- Screw the connecting part of the spiral air hose to the car tyre valve.
10.2 Inflation of air mattresses etc.
Warning! Because of the material composition of air mattresses, dinghys etc, no exact air pressure indication can be given. Therefore make sure not to infl ate these objects too far, as they could burst.
- Choose the appropriate adapter and screw this onto the connecting part of the air hose.
10.3 Starting the compressor
Notice! Before starting the compressor, please read the "important notes" under point 1. After 10 minutes compressor runtime, a cooling off phase of 20 minutes is necessary.
• Before switching on, test the pressure gauge (Fig.1 Item 9).
• To switch on, move the ON/OFF switch (Fig. 1/Pos. 11) to ON (I).
- To switch off, push the ON/OFF switch (Fig. 1/Item 11) to 0.
11. Voltage transformer
Caution!
11.1. Before starting the equipment
- Before you connect the appliance to the mains supply make sure that the data on the rating plate are identical to the mains data of the 230 V consumer.
• Always pull the power plug before making adjustments to the 230 V consumer.
Notes:
- Observe the values from the provided output and peak output rating (startup rating). Appliances with higher power requirements must not be connected.
- Please note that appliances with an electric motor (e.g. drills, etc.) need a significantly
GB
higher startup rating than indicated on the rating plate. For this reason it may be necessary to switch the voltage transformer on and off several times. If the 230 V consumer still does not start up, it cannot be used because of the high startup rating.
- Only one 230 V consumer is permitted to be connected to each socket.
• The use of multi-sockets is not permitted.
Features:
• Surge protection / short circuit-protection
• Undervoltageprotection
• Overheatingguard
• Acousticalarm
11.2 Operation
11.2.1 Switching the voltage transformer ON/OFF
- To switch ON, push the ON/OFF switch (Fig. 2/Item 13) into position "ON" (I). The red LED lights up, the voltage transformer is switched on and ready for operation.
- To switch OFF, push the ON/OFF switch into position OFF (0). The red LED goes out, the voltage transformer is switched off.
11.2.2 Switching off in case of error
Under the following circumstances the voltage transformer automatically switches off :
• Input voltage is lower than 10-10.5 V
- The appliance overheats.
In these situations, switch OFF the appliance using the ON/OFF switch and remove the attached 230 V consumer. Check whether all of the ventilation openings on the voltage transformer are clear and switch the voltage transformer back on after about 10 minutes waiting time.
12. Care and maintenance
Danger!
- When carrying out cleaning or servicing, the energy station must be switched off and all connections must be removed from the appliance.
- Use a soft dry cloth to clean the surface, and do not use any caustic solvents. If completely necessary, you can remove dirt with a slightly damp cloth.
13. Repairs
Only let an authorised expert from a customer services workshop test the appliance if there are possible errors.
14. Ordering replacement parts:
Please quote the following data when ordering replacement parts:
• Type of machine
• Article number of the machine
• Identification number of the machine
- Replacement part number of the part required For our latest prices and information please go to www.isc-gmbh.info
15. Waste disposal
Appliance, accessories and packaging should be recycled in an environmentally friendly manner. Plastic parts are coded for purposes of separation when recycling.
flowchart
graph TD
    A["Warning"] --> B["Error"]
    B --> C["ISC"]
    C --> D["Recycle/Discharge"]
Accumulators and battery-powered electrical appliances contain materials which are harmful to the environment. Do not dispose of batteries in normal household refuse. If the appliance has a fault or shows wear, remove the battery and send to ISC GmbH, Eschenstraße 6, D-94405 Landau, or if inseparable, send the battery pack. There, the manufacturer will dispose of the batteries in a professionally appropriate manner.
GB

For EU countries only
Never place any electric power tools in your household refuse.
To comply with European Directive 2012/19/EC concerning old electric and electronic equipment and its implementation in national laws, old electric power tools have to be separated from other waste and disposed of in an environment-friendly fashion, e.g. by taking to a recycling depot.
Recycling alternative to the return request:
As an alternative to returning the equipment to the manufacturer, the owner of the electrical equipment must make sure that the equipment is properly disposed of if he no longer wants to keep the equipment. The old equipment can be returned to a suitable collection point that will dispose of the equipment in accordance with the national recycling and waste disposal regulations. This does not apply to any accessories or aids without electrical components supplied with the old equipment.
The reprinting or reproduction by any other means, in whole or in part, of documentation and papers accompanying products is permitted only with the express consent of the iSC GmbH.
Subject to technical changes
GB
Service information
We have competent service partners in all countries named on the guarantee certificate whose contact details can also be found on the guarantee certificate. These partners will help you with all service requests such as repairs, spare and wearing part orders or the purchase of consumables.
Please note that the following parts of this product are subject to normal or natural wear and that the following parts are therefore also required for use as consumables.
| Category Example | |
| Wear parts* Adapter, light bulb, rechargeable battery | |
| Consumables* Flat fuse, miniature fuse | |
| Missing parts |
* Not necessarily included in the scope of delivery!
In the effect of defects or faults, please register the problem on the internet at www.isc-gmbh.info. Please ensure that you provide a precise description of the problem and answer the following questions in all cases:
• Did the equipment work at all or was it defective from the beginning?
• Did you notice anything (symptom or defect) prior to the failure?
• What malfunction does the equipment have in your opinion (main symptom)?
Describe this malfunction.
GB
Warranty certifi cate
Dear Customer,
All of our products undergo strict quality checks to ensure that they reach you in perfect condition. In the unlikely event that your device develops a fault, please contact our service department at the address shown on this guarantee card or the sales outlet from where you bought the device. Please note the following terms under which guarantee claims can be made:
- These guarantee conditions regulate additional guarantee services. Your statutory guarantee claims are not affected by this guarantee. Our guarantee is free of charge to you.
-
Our guarantee only covers defects suffered by the device which have been verifiably caused by a material or manufacturing fault and is limited to the rectification of such defects or the replacement of the device at our discretion.
Please note that our devices are not designed for use in commercial, trade or professional applications. A guarantee contract will not be created if the device has been used by commercial, trade or industrial business or has been exposed to similar stresses during the guarantee period. -
The following are not covered by our guarantee:
- Damage to the device caused by a failure to follow the assembly instructions or due to incorrect installation, a failure to follow the operating instructions (for example connecting it to an incorrect mains voltage or current type) or a failure to follow the maintenance and safety instructions or by exposing the device to abnormal environmental conditions or by lack of care and maintenance.
- Damage to the device caused by abuse or incorrect use (for example overloading the device or the use or unapproved tools or accessories), ingress of foreign bodies into the device (such as sand, stones or dust, transport damage), the use of force or damage caused by external forces (for example by dropping it).
- Damage to the device or parts of the device caused by normal or natural wear or tear or by normal use of the device.
- Damage to the device caused by abuse or incorrect use (for example overloading the device or the use or unapproved tools or accessories), ingress of foreign bodies into the device (such as sand, stones or dust, transport damage), the use of force or damage caused by external forces (for example by dropping it). - Damage to the device or parts of the device caused by normal or natural wear or tear or by normal use of the device.
-
The guarantee is valid for a period of 60 months starting from the purchase date of the device. Guarantee claims should be submitted before the end of the guarantee period within two weeks of the defect being noticed. No guarantee claims will be accepted after the end of the guarantee period. The original guarantee period remains applicable to the device even if repairs are carried out or parts are replaced. In such cases, the work performed or parts fitted will not result in an extension of the guarantee period, and no new guarantee will become active for the work performed or parts fitted. This also applies if an on-site service is used.
-
Please report the defective device on the following internet address to register your guarantee claim: www.isc-gmbh.info. If the defect is covered by our guarantee, then the item in question will either be repaired immediately and returned to you or we will send you a new replacement device.
Also refer to the restrictions of this warranty concerning wear parts, consumables and missing parts as set out in the service information in these operating instructions.
FR

Akumulator: 12V/17 Ah
flowchart
graph TD
    A["Warning"] --> B["Donkey"]
    B --> C["Email"]
    C --> D["iSC International Environmental Protection Agency"]
    D --> E["Recycle Bin Symbol"]
flowchart
graph TD
    A["Warning"] --> B["Person in trash bin"]
    C["Warning"] --> D["Email"]
    D --> E["ISC"]
    style A fill:#fff,stroke:#000
    style C fill:#fff,stroke:#000
    style E fill:#000,stroke:#000
flowchart
graph TD
    A["Warning Symbol"] --> B["Warning Icon"]
    B --> C["Email Icon"]
    C --> D["iSC (International Environmental Protection Agency)"]
    D --> E["Recycle Bin Symbol"]
flowchart
graph TD
    A["Warning"] --> B["Red Box"]
    B --> C["Email"]
    C --> D["iSC Icon"]
    D --> E["Green Dash Icon"]
    style A fill:#fff,stroke:#000
    style D fill:#fff,stroke:#000
    style E fill:#fff,stroke:#000
NO
2.2 Innihald (myndir 3)
flowchart
graph TD
    A["Warning"] --> B["Email"]
    B --> C["iSC"]
    C --> D["Recycle Bin"]
flowchart
graph TD
    A["Warning"] --> B["Person in trash bin"]
    C["Warning"] --> D["Email"]
    D --> E["ISC"]
    style A fill:#fff,stroke:#000
    style C fill:#fff,stroke:#000
    style E fill:#000,stroke:#000
flowchart
graph TD
    A["Warning"] --> B["Error"]
    B --> C["ISC"]
    C --> D["Transmission to Environmental Protection"]
flowchart
graph TD
    A["Warning"] --> B["Email"]
    B --> C["iSC International Environmental Protection Agency"]
    D["Trash Bin Symbol"] --> B
87/404/EC_2009/105/EC
2005/32/EC_2009/125/EC
2006/95/EC
2006/28/EC
X 2004/108/EC
2004/22/EC
□1999/5/EC
□97/23/EC
□90/396/EC_2009/142/EC
□89/686/EC_96/58/EC
X 2011/65/EC
□2006/42/EC
Annex IV
Notified Body:
Notified Body No.:
Reg. No.
□ 2000/14/EC_2005/88/EC
Annex V
Annex VI
Noise: measured L_ = dB(A) ; guaranteed L_ = dB(A)
P = KW; L/∅ = cm
Notified Body:
□2004/26/EC
Emission No.:
Standard references: EN 60950-1; EN 60335-2-29; EN 62233;
EN 55014-1; EN 55014-2; EN 61000-3-2; EN 61000-3-3; EN 61000-6-1; EN 61000-6-3; EN 55011
Subject to change without notice
Archive-File/Record: NAPR007350
Documents registrar: Landauer Josef
Wiesenweg 22, D-94405 Landau/Isar
EH 07/2014 (02)