RP150YB - Industrial vacuum cleaner HiKOKI - Free user manual and instructions
Find the device manual for free RP150YB HiKOKI in PDF.
| Brand | HiKOKI |
| Model | RP150YB |
| Product type | Wet and dry industrial vacuum cleaner |
| Power supply | Single-phase AC 50/60 Hz, 230 V / 240 V |
| Power | 1140 W |
| Automatic start socket | 2400 W max |
| Max. air flow | 3.5 m³/min |
| Max. vacuum pressure | 22 kPa |
| Dust capacity | 15 L |
| Liquid capacity | 12 L |
| Dimensions (L × W × H) | 334 mm × 366 mm × 400 mm |
| Weight (without cord and accessories) | 7.8 kg |
| Cable length | 8 m |
| Motor | Single-phase commutator motor |
| Standard filter | Fabric filter |
| Optional filter | Paper filter |
| Float mechanism | Yes, automatic shut-off preventing water from entering the motor |
| Mode selector | Manual (M) and Automatic (A) |
| Filter cleaning function | Automatic, by filter vibration after stop |
| Included accessories | Liquid suction nozzle, round brush nozzle, seal (D), adapter |
| Usage | Indoor, suction of fine dust and liquids |
| Warranty | Compliant with regulations, manufacturing defects |
Frequently Asked Questions - RP150YB HiKOKI
User questions about RP150YB HiKOKI
0 question about this device. Answer the ones you know or ask your own.
Ask a new question about this device
Download the instructions for your Industrial vacuum cleaner in PDF format for free! Find your manual RP150YB - HiKOKI and take your electronic device back in hand. On this page are published all the documents necessary for the use of your device. RP150YB by HiKOKI.
USER MANUAL RP150YB HiKOKI
natural_image
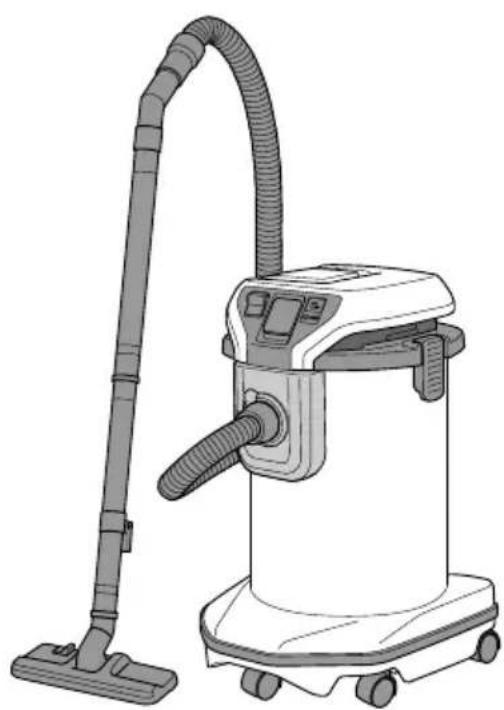
Line drawing of a vacuum cleaner with coiled hose and control panel (no text or symbols)RP150YB RP350YE
natural_image
Line drawing of a vacuum cleaner with attached hose and control panel (no text or symbols)
en Handling instructions
de Bedienungsanleitung
fr Mode d'emploi
it Istruzioni per l'uso
nl Gebruiksaanwijzing
es Instrucciones de manejo
pt Instruções de uso
sv Bruksanvisning
da Brugsanvisning
no Bruksanvisning
fi Käyttöohjeet
el Οδηγίες χειρισμού
pl Instrukcja obsługi
hu Kezelési utasítás
cs Návod k obsluze
tr Kullanım talimatları
ro Instructiuni de utilizare
⑤ Navodila za rokovanje
sk Pokyny na manipuláciu
bg Инструкция за експлоатация
sr Uputstvo za rukovanje
hr Upute za rukovanje

6
7
8
9
10
11 12
13 14
15 16
17
| English Deutsch Français Italiano | ||||
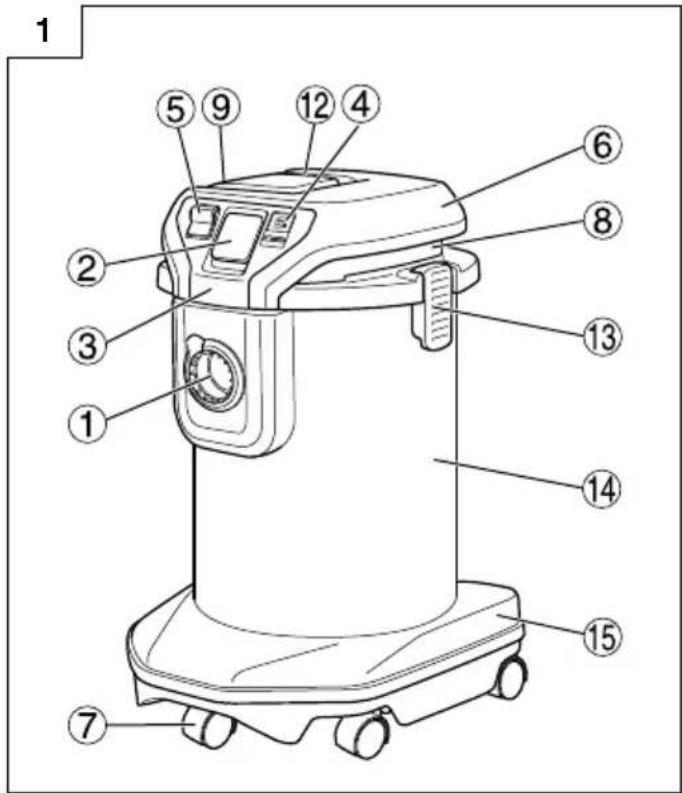
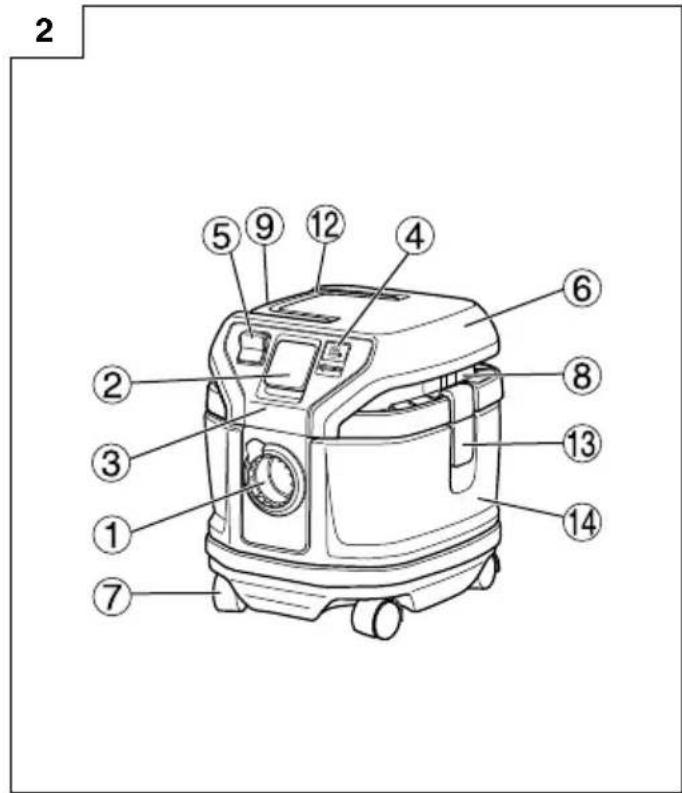
| 1 | Suction opening Saugöffnung | Orifi ce d'aspiration | Bocchetta di aspirazione | |
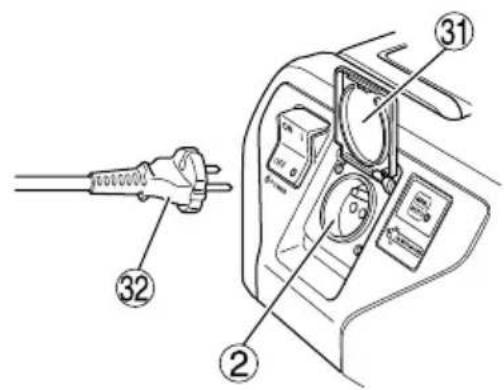
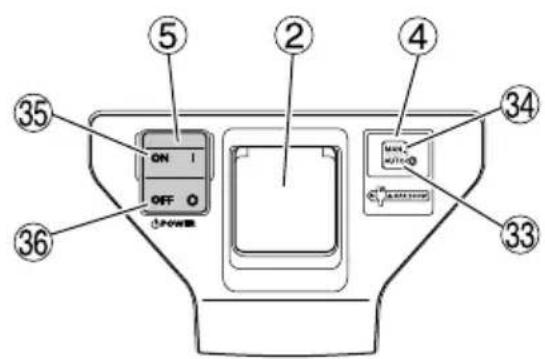
| 2 | Interlocking electric outlet | interlocking-Anschluss | Prise électrique d'asservissement | Presa elettrica di collegamento |
| 3 | Operation panel Bedienfeld | Tableau d'exploitation Pannello di comando | ||
| 4 | Mode selection switch Moduswahlschalter | Sélecteur de mode | Interruttore di selezione modalità di funzionamento | |
| 5 | Vacuum switch Saugschalter | Interrupteur de l'aspirateur | Interruttore aspirazione | |
| 6 | Head Oberteil Tête Unità principale | |||
| 7 | Caster Fußröllchen | Roulette Rotella | ||
| 8 | Suction opening / Exhaust opening | Saugöffnung / Abluftöffnung | Orifice d'aspiration / orifice d'extraction | Bocchetta di aspirazione / Bocchetta di scarico |
| 9 | Name plate | Typenschild | Plaque signalétique | Targhetta di identificazione |
| 10 | Cord | Kabel | Cordon | Cavo |
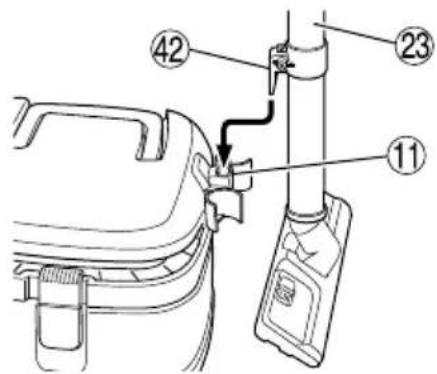
| 11 | Hook Haken | Crochet Portacavo | ||
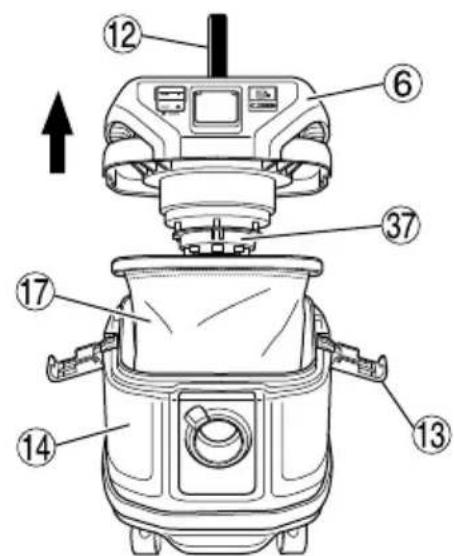
| 12 | Handle | Griff | Poignée | Maniglia |
| 13 | Clamp | Klemme | Dispositif de serrage | Morsetto |
| 14 | Tank | Tank | Réservoir | Bidone |
| 15 | Base | Sockel | Base | Base |
| 16 | Button | Knopf | Bouton | Pulsante |
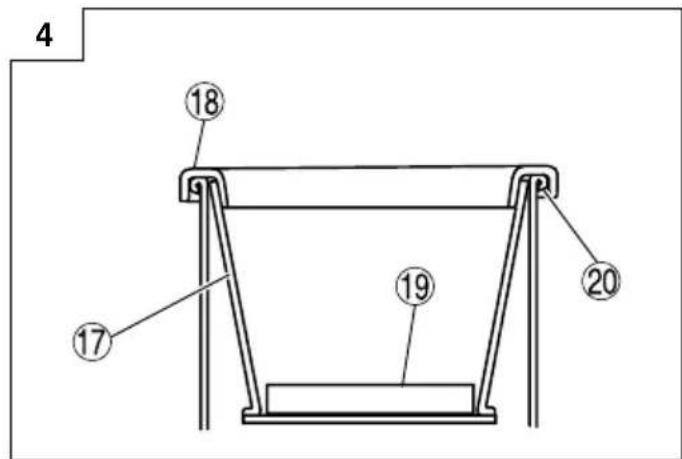
| 17 | Filter | Filter | Filtre | Filtro |
| 18 | Filter packing | Filterdichtung | Garniture de filtre | Guarnizione del filtro |
| 19 | Filter cage | Filtergehäuse | Cage de filtre | Gabbia del filtro |
| 20 | Mouth of the tank | Tanköffnung | Bouche du réservoir | Bocchetta del bidone |
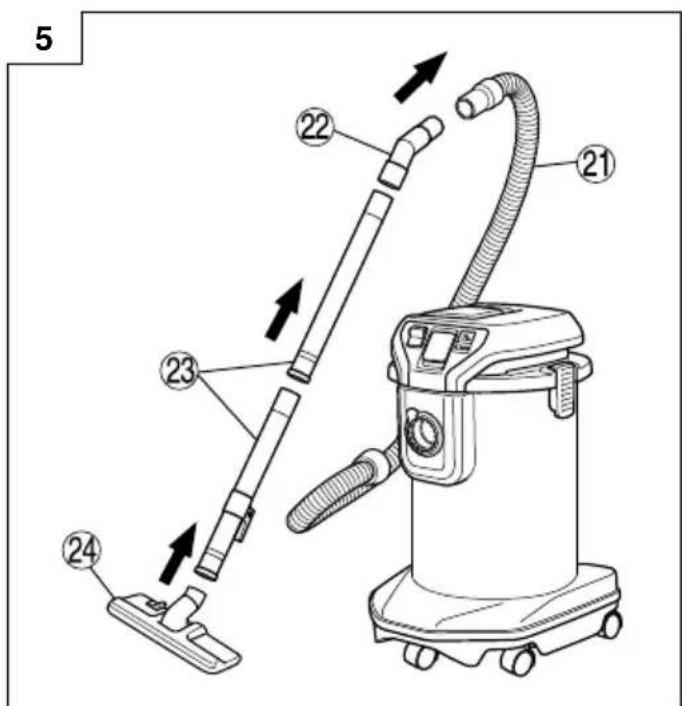
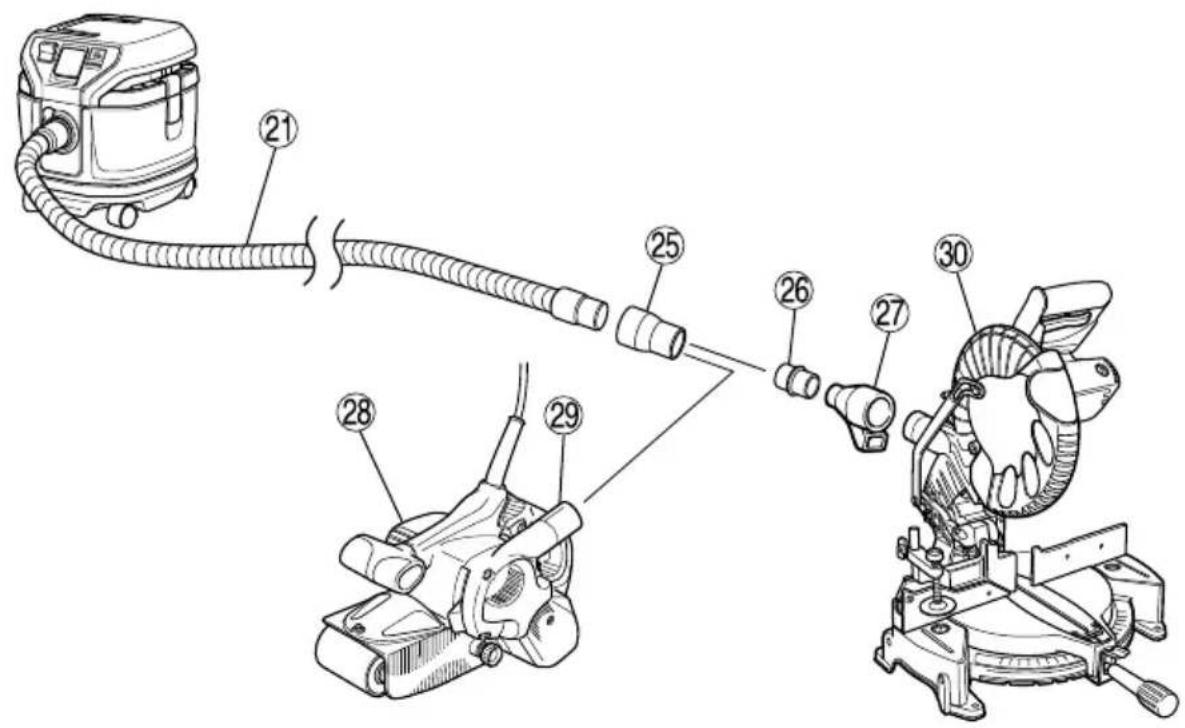
| 21 | Hose (id 38 mm × 3 m long) | Schlauch (ID 38 mm x 3 m lang) | Tuyau flexible (Di 38 mm x 3 m long) | Tubo (id 38 mm × 3 m lunghezza) |
| 22 | Joint handle | Verbindungsstückgriff | Poignée de raccord | Maniglia del giunto |
| 23 | Pipe | Rohr | Tuyau rigide | Tubo |
| 24 | Master Nozzle | Hauptdüse | Suceur principal Spazzola | principale |
| 25 | Adapter (Standard Accessory) | Adapter (mitgeliefertes Zubehör) | Adaptateur (accessoire standard) | Adattatore (accessorio standard) |
| 26 | Joint (Optional Accessory) | Verbindungsstück (Sonderausstattung) | Raccord (accessoire en option) | Giunto (accessorio opzionale) |
| 27 | Dust collection adapter (Optional Accessory) | Staubabsaugungsadapter (Sonderausstattung) | Adaptateur de récupération de poussière (accessoire en option) | Adattatore di aspirazione (accessorio opzionale) |
| 28 | Power tool | Elektrowerkzeug | Outil électrique | Utensile elettrico |
| 29 | Dust exhaust opening | Staubauslassöffnung | Orifice d'extraction de poussière | Scarico della polvere |
| 30 | Power tool | Elektrowerkzeug | Outil électrique | Utensile elettrico |
| 31 | Cover | Deckel | Couvercle | Coperchio |
| 32 | Plug of the power tool | Stecker des Elektrowerkzeugs | Fiche de l'outil électrique | Presa per utensile |
| 33 | A (Auto) A (Automatik) | A (Automatique) A (Automatico) | ||
| 34 | M (Manual) | M (Manuell) | M (Manuel) | M (Manuale) |
| 35 | ON | ON (Ein) ON (Marche) | ON (Attivato) | |
| 36 | OFF OFF (Aus) OFF (Arrêt) | OFF (Disattivato) | ||
| 37 | Float holder | Schwimmerhalterung | Porte-flotteur | Supporto galleggiante |
| 38 | Caster (with Stopper) Fußröllchen (mit Stopper) Roulette | (avec frein) Rotella (con blocco) | ||
| 39 | Lever Hebel | Bras | Levetta | |
| 40 | Release | Lösen | Libérer | Sblocca |
| 41 | Fix | Feststellen | Bloquer Blocca | |
| 42 | Pipe holder | Rohrhalterung | Porte-tuyau | Supporto per tubo |
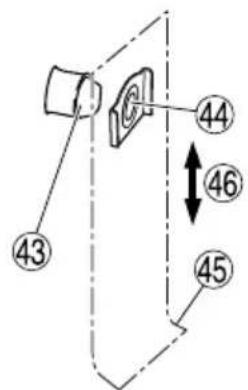
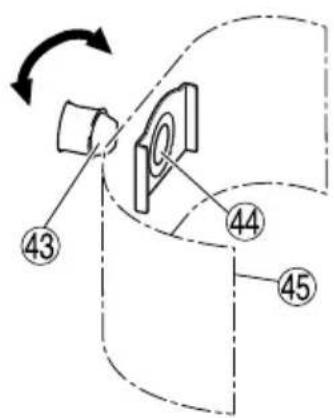
| 43 | Suction opening | Saugöffnung | Bouche d'aspiration | Bocchetta di aspirazione |
| 44 | Suction hole | Saugloch | Orifice d'aspiration | Foro di aspirazione |
| 45 | Paper filter | Papierfilter | Filtre en papier | Filtro in carta |
| 46 | Vertical direction | Vertikale Richtung | Direction verticale | Senso verticale |
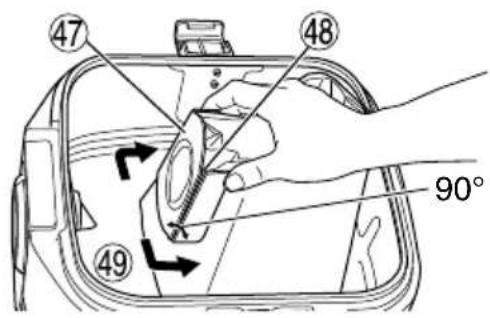
| 47 | Cardboard | Pappe | Carton | Cartoncino |
| 48 | Fold Falz | Pli | Piega | |
| 49 | BendNederlands Español | BiegungPortuguês Svenska | Plier | Piegare |
| 1 | Aanzuigopening | Apertura de succión Abertura de sucção | da sucção | Öppning insug |
| 2 | Automatisch aan/uit stopcontact | Salida eléctrica interconectada | Tomada eléctrica protegida | Inbyggt eluttag |
| 3 | Bedieningspaneel Panel de funcionamiento Painel de operação | Styrpanel | ||
| 4 | Moduskeuzeschakelaar | Interruptor de selección de modo | Interruptor de selecção de modo | Brytare för val av läge |
| 5 | Vacuümschakelaar Interruptor de aspirado Interruptor de aspiração | Vakuumbrytare | ||
| 6 | Bovenstuk Cabezal Cabeça | Överdel | ||
| 7 | Zwenkwieltje Ruedecita Roda | Hjul | ||
| 8 | Aanzuigopening / Uitlaatopening | Apertura de succión / Apertura de escape | Abertura da sucção / abertura da saída | Öppning insug / Utblås |
| 9 | Naamplaatje | Placa de identificación | Placa de identificação | Namnplåt |
| 10 | Netsnoer Cable | Cabo | Kabel | |
| 11 | Haak | Gancho | Gancho | Krok |
| 12 | Handvat | Asa | Pega | Handtag |
| 13 | Klem | Abrazadera | Engate | Klämma |
| 14 | Reservoir | Depósito | Depósito | Tank |
| 15 | Voetstuk | Base | Base | Bas |
| 16 | Knop | Botón | Botão | Knapp |
| 17 | Filter | Filtro | Filtro | Filter |
| 18 | Filterpakking | Embalaje del filtro | Elemento filtrante | Filterpackning |
| 19 | Filterkooi | Caja del filtro | Compartimento do filtro | Filterfoder |
| 20 | Reservoirmondstuk | Boca del depósito | Boca do depósito | Öppningen på tanken |
| 21 | Slang (38 mm binnendiam. × 3 m lengte) | Manguera (id 38 mm × 3 m de largo) | Tubo flexível (id 38 mm × 3 m comprimento) | Slang (id 38 mm × 3 m lång) |
| 22 | Verbindingshandvat | Asa de la junta | Pega de união | Foghandtag |
| 23 | Buis | Tubo | Tubo | Rör |
| 24 | Hoofdzuigmond | Boquilla principal | Bocal principal | Huvudmunstycke |
| 25 | Adapter (standaard accessoire) | Adaptador (Accesorio estándar) | Adaptador (Acessório de série) | Adapter (standardtillbehör) |
| 26 | Verbindingsstuk (optioneel accessoire) | Junta (Accesorio opcional) | Junta (Acessório opcional) | Fog (extratillbehör) |
| 27 | Stofopvangadapter (optioneel accessoire) | Adaptador colector del polvo (Accesorio opcional) | Adaptador de recolha de pó (Acessório opcional) | Adapter till stoftinsamling (extratillbehör) |
| 28 | Elektrisch gereedschap | Herramienta eléctrica | Ferramenta eléctrica | Elektriskt verktyg |
| 29 | Stofuitlaatopening | Apertura de salida del polvo | Abertura da saída de pó | Stoftutblås öppning |
| 30 | Elektrisch gereedschap | Herramienta eléctrica | Ferramenta eléctrica | Elektriskt verktyg |
| 31 | Deksel | Tapa | Tampa | Lock |
| 32 | Stekker van elektrisch gereedschap | Enchufe de la herramienta eléctrica | Ficha da ferramenta eléctrica | Kontakten för det elektriska verktyget |
| 33 | A (Automatisch) | A (Automático) | A (Automático) | A (Automatisk) |
| 34 | M (Handbediening) | M (Manual) | M (Manual) | M (Manuell) |
| 35 | ON (Aan) ON (Encendido) | ON (Ligado) | ON (På) | |
| 36 | OFF (Uit) | OFF (Apagado) | OFF (Desligado) | OFF (Av) |
| 37 | Vlotterhouder Soporte fl otante | Suporte da bóia | Flottörhållare | |
| 38 | Zwenkwieltje (met aanslag) | Ruedecita (con tope) Roda (com bloqueio) | Hjul (med broms) | |
| 39 | Hendel Palanca Patilha | Spak | ||
| 40 | Ontgrendelen Soltar Soltar | Frigör | ||
| 41 | Vastzetten Fijar Fixar | Låser | ||
| 42 | Buishouder Soporte del tubo | Suporte do tubo | Rörhållare | |
| 43 | Aanzuigopening | Apertura de succión | Abertura de sucção | Öppning insug |
| 44 | Aanzuiggat | Orificio de succión | Orifício de sucção | Insugningshål |
| 45 | Papierenfilter | Filtro de papel | Filtro de papel | Pappersfi Iter |
| 46 | Verticale richting | Dirección vertical | Direcção vertical | Vertikal riktning |
| 47 | Karton | Cartón | Cartão | Papp |
| 48 | Vouwen | Plegar | Dobrar | Veck |
| 49 | Buigen | Doblar | Dobra | Böj |
| Dansk | Norsk Suomi | Ελληνικά | ||
| 1 | Sugeåbning | Innsugsåpning | Imuaukko ́Ανοιγμα αναρρόφησης | |
| 2 | Afl åsende el-udtag Kraftuttak Yhteiskytkentäpistorasia | Ηλεκτρική παροχή ενδοασφάλισης | ||
| 3 | Betjeningspanel | Operasjonspanel | Käyttöpaneeli | Πίνακας λειτουργίας |
| 4 | Tilstandsvælgerkontakt | Modus bryter | Toimintatilan valintakytkin | Διακόπτης επιλογής λειτουργίας |
| 5 | Støvsugningskontakt | Vakuumbryter | Imurointikytkin | Διακόπτης σκούπας |
| 6 | Topdel Maskinens hode | Yläosa Κεφαλή | ||
| 7 | Drejehjul | Lenkehjul | Rullapyörä | Τροχός μετακίνησης |
| 8 | Sugeåbning / Udblæsningsåbning | Innsugsåpning / Avtrekksåpning | Imuaukko / Poistoaukko | Άνοιγμα αναρρόφησης / Εξαγωγή αέρα |
| 9 | Navneplade | Navn plate | Nimilaatta | Πλακέτα προϊόντος |
| 10 | Ledning | Ledning | Johto | Καλώδιο |
| 11 | Krog | Hake | Koukku | Άγκιστρο |
| 12 | Håndtag | Bærehåndtak | Kahva | Χειρολαβή |
| 13 | Låseanordning | Klemme | Kiinnitin | Συσφιγκτήρας |
| 14 | Tank | Beholder | Säiliö | Δεξαμενή |
| 15 | Underdel | Ramme | Jalusta | Βάση |
| 16 | Knap | Knapp | Painike | Κουμπί |
| 17 | Filter | Filter | Suodatin | Φίλτρο |
| 18 | Filterpakning | Filter mansjett | Suodattimen tiiviste | Υποδοχή φίλτρου |
| 19 | Filterkurv | Filterhus | Suodatinkoppa | Θήκη φίλτρου |
| 20 | Munding på tank | Beholder munning | Säiliön suu | Στόμιο δεξαμενής |
| 21 | Slange (38 mm × 3 m lang) | Slange (innerdiameter 38 mm × 3 m lang) | Letku (sisäläpimitta 38 mm × 3 m pitkä) | Εύκαμπτος σωλήνας (διάμετρος 38 mm × 3 m μήκος) |
| 22 | Samlehåndtag | Forbindelseshåndtak | Liitoskahva | Χειρολαβή άρθρωσης |
| 23 | Rør | Rør | Putki | Σωλήνας |
| 24 | Hovedmundstykke | Hovedmunnstykke | Pääsuutin | Κύριο ακροφύσιο |
| 25 | Adapter (Standardudstyr) | Adapter (Standard Tilbehør) | Liitin (Perusvaruste) | Προσαρμογέας (Στάνταρ Εξάρτημα) |
| 26 | Samleled (Ekstraudstyr) | Forbindelse (Valgfritt Tilleggsutstyr) | Liitoskappale (Lisävaruste) | Άρθρωση (Προαιρετικό Εξάρτημα) |
| 27 | Støvopsamlingsadapter (Ekstraudstyr) | Støvoppsamler adapter (Valgfritt Tilleggsutstyr) | Pölynimurin liitin (Lisävaruste) | Προσαρμογέας συλλογής σκόνης (Προαιρετικό Εξάρτημα) |
| 28 | El-værktøj | Elektroverktøy | Konetyökalu | Εργαλείο |
| 29 | Støvudblæsningsåbning | Støv avtrekksåpning | Pölynpoistoaukko | Άνοιγμα εξαγωγής σκόνης |
| 30 | El-værktøj | Elektroverktøy | Konetyökalu | Εργαλείο |
| 31 | Dæksel | Deksel | Kansi | Κάλυμμα |
| 32 | El-værktøjets stik | Elektroverktøyets støpsel | Konetyökalun pistoke | Βύσμα εργαλείου |
| 33 | A (Automatisk) | A (Auto) | A (Automaattinen) | A (Αυτόματη λειτουργία) |
| 34 | M (Manuel) | M (Manuell) | M (Manuaalinen) | M (Χειροκίνητη λειτουργία) |
| 35 | ON (Til) | ON (På) | ON (Päällä) | ON |
| 36 | OFF (Fra) | OFF (Av) | OFF (Pois) | OFF |
| 37 | Flyderholder | Flottør holder | Uimurin pidin | Θάλαμος φλοτέρ |
| 38 | Drejehjul (med bremse) | Lenkehjul (med stopper) | Rullapyörä (lukitsijalla) | Τροχός (με Φρένο) |
| 39 | Låsemekanisme Hevarm Vipu Moχλός | |||
| 40 | Udløs Frikoblet Vapauta Ελεύθερος | |||
| 41 | Fastlås | Låst | Lukitse | Σταθερός |
| 42 | Rørholder | Rør-holder | Putken pidin | Άγκιστρο στερέωσης σωλήνα |
| 43 | Sugeåbning | Innsugningsåpning | Imuaukko | Άνοιγμα αναρρόφησης |
| 44 | Sugehul | Innsugningshull | Imureikä | Οπή αναρρόφησης |
| 45 | Papirfilter | Papirfilter | Paperisuodatin | Χάρτινο φίλτρο |
| 46 | Lodret retning | Vertikal retning | Pystysuunta | Κάθετη διεύθυνση |
| 47 | Papstykke | Kartong Pahviosa | Χαρτόνι | |
| 48 | Fold | Brett | Taite | Πτυχή |
| 49 | Bøjning | Bend | Taivuta | Διπλώστε |
| Polski Magyar Čeština | Türkçe | |||
| 1 | Otwór zasysania Szívónyílas | Sací otvor Emme ağızı | ||
| 2 | Gniazdo zasilania z blokadą | Beépített dugóscsatlakozó | Blokovací elektrický vývod | Ara bağlantı prizi |
| 3 | Panel sterowania Vezérlöpanel | Panel obsluhy Kumanda paneli | ||
| 4 | Przełącznik trybu pracy | Üzemmod-választó kapcsoló | Volič režimu Mod seçim düğmesi | |
| 5 | Wyłącznik główny | Vákuum kapcsoló | Vakuový spínač | Vakum düğmesi |
| 6 | Głowica | Fej | Hlava | Baslik |
| 7 | Kółko | Görgő | Rejdovací kolečko | Tekerlek |
| 8 | Otwór zasysania / Otwór wylotowy | Szívónyílas / Kivezető nyílas | Sací otvor / Výfukový otvor | Emme ağızı / Hava boşaltma ağızı |
| 9 | Tabliczka znamionowa | Típusjelző lap | Typový štítek | Ísim plakası |
| 10 | Przewód | Tápkábel | Šňůra | Kablo |
| 11 | Hak | Kampó | Hák | Kanca |
| 12 | Uchwyt | Fogantyú | Rukojeť | Tutma kolu |
| 13 | Zacisk | Rögzítő bilincs | Svěrka | Kelepçe |
| 14 | Zbiornik Tartály Nádrž | Depo | ||
| 15 | Podstawa | Talp | Základ | Taban |
| 16 | Przycisk | Gomb | Tlačítko | Düğme |
| 17 | Filtr | Szűrő | Filtr | Filtre |
| 18 | Uszczelka filtra | Szűrő tömítés | Těsnění filtru | Filtre kovanı |
| 19 | Komora filtra | Szűrő keret | Kryt filtru | Filtre kafesi |
| 20 | Wlot zbiornika | Tartály nyílasa | Otvor nádrže | Depo ağızı |
| 21 | Wąż giętki (śr. 38 mm x długość 3 m) | Tömlő (belső átmérő 38 mm x 3 m hossz) | Hadice (světlost 38 mm x délka 3 m) | Hortum (iç çap 38 mm x 3 m uzunluk) |
| 22 | Uchwyt przegubowy | Fogantyú | Spojená rukojeť | Kollu bağlanti |
| 23 | Rura | Cső | Trubka | Boru |
| 24 | Dysza główna | Fő szívófej | Hlavní tryska | Emme borusu baslığı |
| 25 | Złączka (akcesorium standardowe) | Adapter (standard tartozék) | Adaptér (standardní příslušenství) | Adaptör (Standart Aksesuar) |
| 26 | Element połączeniowy (akcesorium opcjonalne) | Csatlakozó (opcionális tartozék) | Spoj (doplňkové příslušenství) | Bağlantı parçası (Opsiyonel Aksesuar) |
| 27 | Złącze odprowadzania pyłu (akcesorium opcjonalne) | Porgyűjtő adapter (opcionális tartozék) | Adaptér odsávače prachu (doplňkové příslušenství) | Toz toplayıcı adaptörü (Opsiyonel Aksesuar) |
| 28 | Narzędzie elektryczne | Szerszámgép | Mechanický nástroj | Elektrikli aygít |
| 29 | Otwór wylotowy pyłu | Porkivezető nyílas | Odprašovací otvor | Toz bosaltma ağızı |
| 30 | Narzędzie elektryczne | Szerszámgép | Mechanický nástroj | Elektrikli aygít |
| 31 | Osłona | Burkolat | Kryt | Kapak |
| 32 | Wtyczka narzędzia elektrycznego | Szerszámgép dugasza | Zástrčka mechanického nástroje | Elektrikli aygítin fisi |
| 33 | A (Automatyczny) | A (Automatikus) | A (Automaticky) | A (Otomatik) |
| 34 | M (Reczny) | M (Kézi) | M (Ručně) | M (Manuel) |
| 35 | ON (Wł.) | ON (Be) | ON (Zapnuto) | ON (Açik) |
| 36 | OFF (Wyt.) | OFF (Ki) | OFF (Vypnuto) | OFF (Kapali) |
| 37 | Uchwyt pływaka | Úszótartó | Držák plováku | Kayar tutucu |
| 38 | Kółko (z hamulcem) | Görgő (rögzítő fékkel) | Rejdovací kolečko (se zarážkou) | Tekerlek (Kilitli) |
| 39 | Dźwignia Kar Páka Kol | |||
| 40 | Zwalnianie | Kioldás | Uvolnění | Serbest birakma yönü |
| 41 | Zaciskanie Rögzítés Upevnění Kilitleme yönü | |||
| 42 | Uchwyt rury Csőtartó elem | Držák trubky Boru Tutucusu | ||
| 43 | Wylot zasysania | Szívónyílás | Sací otvor | Emme girisi |
| 44 | Otwór zasysania | Szívólyuk | Sací štěrbina | Emme deliği |
| 45 | Filtr papierowy | Papírszűrő | Papírový filtr | Kağıt filtre |
| 46 | Kierunek pionowy | Függőleges irány | Svislý směr | Dikey yön |
| 47 | Karton Karton Lepenka Karton | |||
| 48 | Zagiąć | Meghajtás | Přeložit | Katlayın |
| 49 | Wygiąć Meghajlítás | Ohnout Bükün | ||
| Română | Slovenščina | Slovenčina | Български | |
| 1 | Orificiu de aspirare | Odprtina za sesanje | Sací otvor | Смукателен отвор |
| 2 | Priză electrică cu cuplare | Medzaklepna električna vtičnica | Vstavaná elektrická zásuvka | Контакт за електроинструменти |
| 3 | Panou de operare | Delovna plošča | Panel obsluhy | Контролен панел |
| 4 | Comutator selectare mod | Stikalo za izbiro načina | Volič režimu | Режимен превключвател |
| 5 | Comutator de aspirare | Stikalo za vakuum | Vákuový spínač | Пусков ключ |
| 6 | Cap | Glava | Hlava | Горна част |
| 7 | Roți pivotante | Kolesje | Koliesko | Колело |
| 8 | Orificiu aspirare / Orificiu evacuare | Odprtina za sesanje / Izpušna odprtina | Sací otvor / Výfukový otvor | Смукателен отвор / Изпускателен отвор |
| 9 | Plăcuța cu specificații | Imenska ploščica | Typový štítok | Заводска табела |
| 10 | Cablu | Kabel | Kábel | Кабел |
| 11 | Cârlig | Kljuka | Hák | Кука |
| 12 | Mâner | Ročica | Rukovăť | Ръкохватка |
| 13 | Clemă | Sponka | Svorka | Скоба |
| 14 | Rezervor | Rezervoar Nádrž | Контейнер | |
| 15 | Bază | Osnova | Podstavec | Основа |
| 16 | Buton | Tipka | Tlačidlo | Копче |
| 17 | Filtru | Filter | Filter | Филтър |
| 18 | Ambalaj filtru | Embalaža filtra | Tesnenie filtra | Филтърен пакет |
| 19 | Cutie filtru | Kletka filtra | Kryt filtra | Филтърна касета |
| 20 | Gura rezervorului | Ustje rezervoarja | Otvor nádrže | Отвор на контейнера |
| 21 | Furtun (diam. interior 38 mm x 3 m) | Cev (id 38 mm x 3 m dolžine) | Hadica (vn. priemer 38 mm x dlžka 3 m) | Маркуч (в.д. 38 мм, дължина 3 м) |
| 22 | Mâner articulație | Ročica spoja | Spojená rukovăť | Съединителна ръкохватка |
| 23 | Teavă | Cev | Rúrka | Тръба |
| 24 | Duză principală | Glavna šoba | Hlavná tryska | Основен накрайник |
| 25 | Adaptor (Accesoriu standard) | Adapter (standarden dodatek) | Adaptér (Štandardné príslušenstvo) | Адаптер (стандартен аксесоар) |
| 26 | Articulație (Accesoriu opțional) | Spoj (opcijski dodatek) | Spoj (Voliteľné príslušenstvo) | Съединителен елемент (стандартен аксесоар) |
| 27 | Adaptor colectare praf (Accesoriu opțional) | Adapter za zbiranje prahu (Opcijski dodatek) | Adaptér odsávača prachu (Voliteľné príslušenstvo) | Адаптер за събиране на прах (допълнителен аксесоар) |
| 28 | Unealtă electrică | Električno orodje | Elektrické náradie | Електрически инструмент |
| 29 | Deschidere | Odprtina izpuha za prah | Otvor na odsávanie prachu | Изпускателен отвор |
| 30 | Unealtă electrică | Električno orodje | Elektrické náradie | Електрически инструмент |
| 31 | Capac | Pokrov | Kryt | Капачка |
| 32 | Stecărul sculei electrice | Vtikač električnega orodja | Zástrčka elektrického náradia | Щепсел на електроинструмента |
| 33 | A (Auto) | A (Samodejno) | A (Automaticky) | A (автом.) |
| 34 | M (Manual) | M (Ročno) | M (Ručne) | M (ръчно) |
| 35 | ON (Pornit) | ON (Vklop) | ON (Zap.) | Вкл. |
| 36 | OFF (Oprit) OFF (Izklop) OFF | (Vyp.) Изкл. | ||
| 37 | Suport plutitor | Nosilec visečega mehanizma | Držiak plaváku | Държач на поплавъка |
| 38 | Roată (cu opritor) | Kolesje (z zaustavljalcem) | Koliesko (so zarážkou) | Колело (с ограничител) |
| 39 | Manetă | Ročica za zaklep | Páka | Лостче |
| 40 | Eliberare | Sprostitev | Uvol'nenie | Освобождаване |
| 41 | Fixare | Popravilo | Upevnenie Фиксиране | |
| 42 | Susținător țeavă | Nosilec cevi | Držiak rúrky | Държач на тръбата |
| 43 | Orificiu pentru aspirație | Sesalna odprtina | Sací otvor | Смукателен отвор |
| 44 | Deschizătură pentru aspirație | Sesalna luknja | Sací otvor | Смукателен отвор |
| 45 | Filtru din hârtie | Papirnat filter | Papierový filter | Хартиен филтър |
| 46 | Direcție verticală | Navpična smer | Zvislý smer | Вертикална посока |
| 47 | Carton | Karton | Lepenka | Картон |
| 48 | Pliere | Pregib | Preložit | Прегъвка |
| 49 | îndoire | Upogib | Ohnút | Огъване |
| Srpski Hrvatski | |||
| 1 | Otvor usisavanja UKLJUČENO | ||
| 2 | Blokiranje električnog izlaza | 36 | ISKLJUČENO |
| 3 | Panel operacija | 37 | Držač za plovak |
| 4 | Prekidač režima izbora | 38 | Točkić (sa zaustavljačem) |
| 5 | Prekidač vakuuma Poluga | ||
| 6 | Glava Otpuštanje Glava Otpusti | ||
| 7 | Točkić | 41 | Fiksiranje |
| 8 | Otvaranje usisavanja / otvaranje izduva | 42 | Držač za cev |
| 9 | Natpisna pločica | 43 | Otvor usisavanja |
| 10 | Kabl | 44 | Rupa usisavanja |
| 11 | Kuka | 45 | Papir filter |
| 12 | Ručka | 46 | Vertikalan smer |
| 13 | Klešta Karton | 47 | Spona Karto |
| 14 | Rezervoar | 48 | Presaviti |
| 15 | Postolje | 49 | Saviti |
| 16 | Dugme | ||
| 17 | Filter | ||
| 18 | Pakovanje filtera | ||
| 19 | Kavez filtera | ||
| 20 | Otvor rezervoara | ||
| 21 | Crevo (id 38 mm × 3 m dugo) | ||
| 22 | Spojna ručka | ||
| 23 | Cev | ||
| 24 | Glavni rasprskivač | ||
| 25 | Adapter (standardni dodatak) | ||
| 26 | Spojnica (opcioni dodatak) | ||
| 27 | Adapter za prikupljanje prašine (Opcioni dodatak) | ||
| 28 | Električni alat | ||
| 29 | Otvor za izduv prašine | ||
| 30 | Električni alat | ||
| 31 | Poklopac | ||
| 32 | Utičnik električnog alata | ||
| 33 | A (Automatski) | ||
| 34 | M (Manuelno) | ||
| 1 | Otvaranje usisavanja | 35 | ON |
| 2 | Sigurnosna električna utičnica | 36 | OFF |
| 3 | Upravljačka ploča | 37 | Držač plovka |
| 4 | Prekidač za odabir načina rada | 38 | Kotačić (sa zaustavljačem) |
| 5 | Vakuumski prekidač | 39 | Poluga |
| 6 | 40 | ||
| 7 | Kotačić | 41 | Učvrstiti |
| 8 | Otvaranje usisavanja / otvaranja ispuha | 42 | Držač cijevi |
| 9 | Tipska pločica | 43 | Otvaranje usisavanja |
| 10 | Žica | 44 | Otvor usisavanja |
| 11 | Kuka | 45 | Papirnati filtar |
| 12 | Ručka | 46 | Vertikalni smjer |
| 13 | 47 | ||
| 14 | Spremnik | 48 | Presaviti |
| 15 | Baza | 49 | Iskriviti |
| 16 | Gumb | ||
| 17 | Filtar | ||
| 18 | Pakiranje filtra | ||
| 19 | Kutija filtra | ||
| 20 | Vrh spremnika | ||
| 21 | Crijevo (promjer 38 mm × 3 m dugačko) | ||
| 22 | Zajednička ručka | ||
| 23 | Cijev | ||
| 24 | Glavna mlaznica | ||
| 25 | Adapter (Standardni dodatak) | ||
| 26 | Spoj (Dodatna oprema) | ||
| 27 | Adapter za skupljanje prašine (Dodatna oprema) | ||
| 28 | Električni alat | ||
| 29 | Otvor za ispuhivanje prašine | ||
| 30 | Električni alat | ||
| 31 | Pokrov | ||
| 32 | Utikač električnog uređaja | ||
| 33 | A (Auto) | ||
| 34 | M (Ručno) | ||
| English Deutsch | Français Italiano | |||
| Symbols⚠ WARNINGThe following show symbols used for the machine. Be sure that you understand their meaning before use. | Symbole⚠ WARNUNGDie folgenden Symbole werden für diese Maschine verwendet. Achten Sie darauf, diese vor der Verwendung zu verstehen. | Symboles⚠ AVERTISSEMENTLes symboles suivants sont utilisés pour l’outil.Bien se familiariser avec leur signifi cation avant d’utiliser l’outil. | Simboli⚠ AVVERTENZADi seguito mostriamo i simboli usati per la macchina. Assicurarsi di comprenderne il signifi cato prima dell’uso. | |
 | Read all safety warnings and all instructions.Failure to follow the warnings and instructions may result in electric shock, fi re and/or serious injury. | Lesen Sie sämtliche Sicherheitshinweise und Anweisungen durch.Wenn die Warnungen und Anweisungen nicht befolgt werden, kann es zu Stromschlag, Brand und/oder ernsthaften Verletzungen kommen. | Lire tous les avertissements de sécurité et toutes les instructions.Tout manquement à observer ces avertissements et instructions peut engendrer des chocs électriques, des incendies et/ou des blessures graves. | Leggere tutti gli avvertimenti di sicurezza e tutte le istruzioni.La mancata osservanza degli avvertimenti e delle istruzioni potrebbe essere causa di scosse elettriche, incendi e/o gravi lesioni. |
 | Always wear eye protection. | Tragen Sie immer einen Augenschutz. | Toujours porter des verres de protection. | Indossate sempre le protezioni oculari. |
 | Always wear hearing protection. | Stets Gehörschutz tragen. | Porter des protections anti-bruit en permanence. | Indossare sempre I dispositivi di protezione acustica. |
 | Only for EU countriesDo not dispose of electric tools together with household waste material!In observance of European Directive 2012/19/EU on waste electrical and electronic equipment and its implementation in accordance with national law, electric tools that have reached the end of their life must be collected separately and returned to an environmentally compatible recycling facility. | Nur für EU-Länder Werfen Sie Elektrowerkzeuge nicht in den Hausmüll!Gemäss Europäischer Richtlinie 2012/19/EU über Elektro- und Elektronik-Altgeräte und Umsetzung in nationales Recht müssen verbrauchte Elektrowerkzeuge getrennt gesammelt und einer umweltgerechten Wiederververtung zugeführt werden. | Pour les pays européens uniquementNe pas jeter les appareils électriques dans les ordures ménagères!Conformément à la directive européenne 2012/19/UE relative aux déchets d’équipements électriques ou électroniques (DEEE), et à sa transposition dans la législation nationale, les appareils électriques doivent être collectés à part et être soumis à un recyclage respectueux de l’environnement. | Solo per Paesi UENon gettare le apparecchiature elettriche tra i rifi uti domestici.Secondo la Direttiva Europea 2012/19/UE sui rifi uti di apparecchiature elettriche ed elettroniche e la sua attuazione in conformità alle norme nazionali, le apparecchiature elettriche esauste devono essere raccolte separatamente, al fi ne di essere reimpiegate in modo eco-compatibile. |
 | Never stand on the dust extractor. | Stehen Sie niemals auf der Staub-Absaugung. | Ne jamais se tenir sur l’extracteur de poussière. | Non sostare mai sull’estrattore di polvere. |
 | Warning Warnung Avertissement Avvertenza | |||
 | Nederlands Español | Português Svenska | ||
| Symbolen⚠ WAARSCHUWINGHieronder staansymbolen afgebeeld dievan toepassing zijn opdeze machine. U moetde betekenis hiervanbegrijpen voor gebruik. | Símbolos⚠ ADVERTENCIAA continuación semuestran los símbolosusados para lamáquina. Asegúresede comprender susignifi cado antes del uso. | Símbolos⚠ AVISOA seguir aparecem ossímbolos utilizados pelamáquina. Assimile bemseus signifi cados antesdo uso. | Symboler⚠ WARNINGNedan visas de symbolersom används förmaskinen. Se till att duförstår vad de betyderinnan verktyget används. | |
 | Lees allewaarschuwingen instructies aandachtigdoor.Nalating om dewaarschuwingen instructies op te volgenkan in een elektrischeschok, brand en/of ernstigletsel resulteren. | Lea todas lasinstrucciones yadvertencias deseguridad.Si no se siguenlas advertencias einstrucciones, podríaproducirse una descargaeléctrica, un incendio y/odaños graves. | Leia todas asinstruções e avisos desegurança.Se não seguir todas asinstruções e os avisos,pode provocar um choqueeléctrico, incêndio e/ouferimentos graves. | Läs allasäkerhetsvarningar ochalla instruktioner.Underlåtenhet attfölja varningarna ochinstruktionerna nedan kanresultera i elstötar, brandoch/eller allvarliga skador. |
 | Draag altijdoogbescherming. | Utilice siempre unaprotección ocular. | Utilize sempre protecçãopara os olhos. | Ha alltid ögonskydd. |
 | Draag altijd gehoorbescherming. | Utilice siempreprotecciones auriculares. | Use sempre proteçãoauditiva. | Bär alltid hörselskydd. |
 | Alleen voor EU-landenGeef elektrisch gereedschap nietmet het huisvuil mee!Volgens de Europese richtlijn2012/19/EU inzake oudeelektrische en elektronischeapparaten en de toepassingdaarvan binnen de nationalewetgeving, dient gebruiktelektrisch gereedschapgescheiden te wordeningezameld en te wordena fgevoerd naar een recycle bedrijfdat voldoet aan de geldendemilieu-eisen. | Sólo para países de la UniónEuropea¡No deseche los aparatoseléctricos junto con los residuosdomésticos!De conformidad con la DirectivaEuropea 2012/19/UE soberesiduos de aparatos eléctricosy electrónicos y su aplicaciónde acuerdo con la legislaciónnacional, las herramientaseléctricas cuya vida útil hayalllegado a su fi n se deberánrecoger por separado y trasladara una planta de reciclaje quecumpla con las exigenciasecológicas. | Apenas para países da UENão deite ferramentas eléctricasno lixo doméstico!De acordo com a directivaeuropeia 2012/19/UE sobreferramentas eléctricas electrónicas usadas e atransposição para as leisnacionais, as ferramentaseléctricas usadas devem serrecolhidas em separado eencaminhadas a uma instalaçãode reciclagem dos materiaisecológica. | Gäller endast EU-länderElektriska verktyg får intekastas i hushållssoporna!Enligt direktivet 2012/19/EU som avser äldreelektrisk och elektroniskutrustning och desstillämpning enligt nationellagstiftning ska uttjäntaelektriska verktygsorteras separat ochlämnas till miljövänligåtervinning. |
 | Ga nooit op destofafzuiger staan. | Nunca permanezca en elextractor de polvo. | Nunca se coloque noextrator de pó. | Stå aldrig pådammutsuget. |
 | Waarschuwing Advertencia | Aviso Varning | ||
| Dansk Norsk Suomi Ελληνικά | ||||
| Symboler⚠ ADVARSELDet følgende visersymboler, som anvendesfor maskinen. Vær sikker på, at du forstårderes betydning, indendu begynder at brugemaskinen. | Symboler⚠ ADVARSELFølgende symbolerbrukes for maskinen. Sørgfor å forstå betydningenav disse symbolene førmaskinen tas i bruk. | Symbolit⚠ VAROITUSSeuraavassa on näytettykoneessa käytetytsymbolit. Varmista,ettå ymmärrät niidenmerkityksen ennen kuinaloitat koneen käytön. | Σύμβολα⚠ ΠΡΟΣΟΧΗΤα παρακάτω δείχνουντα σύμβολα πουχρησιμοποιούνται στομηχάνημα. Βεβαιωθείτεότι κατανοείτε τησημασίας τους πριν τηχρήση. | |
 | Læs allesikkerhedsadvarsler oginstruktioner.Det kan medføre elektriskstød, brand og/elleralvorlig personskade,hvis alle advarslerne oginstruktionerne nedenforikke overholdes. | Les alle advarsler ogsikkerhetsinstruksjoner.Hvis du ikke følger alleadvarsler og instruksjonerkan bruk av utstyretresultere i elektrisk støt,brann og/eller alvorligpersonskade. | Lue kaikki turvallisuuttakoskevat varoitukset jakaiikki ohjeet.Jos varoituksia jaohjeita ei noudateta, onolemassa sähköiskun,tulipalon ja/tai vakavanhenkilövahingon vaara. | Διαβάζετε όλες τιςπροειδοποιήσειςασφαλείας και όλες τιςοδηγίες.Η μη τήρηση τωνπροειδοποιήσεων καιοδηγιών μπορεί ναπροκαλέσειηλεκτροπληξία, πυρκαγιάκαι/ή σοβαρό τραυματισμό. |
 | Brug altidbeskyttelsesbriller. | Ha alltid på degvernebriller. | Käytä aina suojalaseja. | Φοράτε πάντα τονκατάλληλο εξοπλισμόγια την προστασία τωνματιών. |
| [ЭYW2] | Brug altid høreværn. | Bruk alltid hørselsvern. | Käytä aina kuulosuojainta. | Φοράτε πάνταπροστατευτικά ακοής. |
 | Kun for EU-landeElværktøj må ikkebortskaff es somalmindeligt aff ald!I henhold til deteuropæiske direktiv2012/19/EU ombortskaff else af elektriskeog elektroniske produkterog gældende nationalovgivning skal brugtelværktøj indsamlesseparat og bortskaff espå en måde, der skånermiljøet mest muligt. | Kun for EU-landKast aldri elektroverktøy ihusholdningsavfallet!I henhold til EU-direktiv2012/19/EU om kasserteelektriske og elektroniskeprodukter og direktivetsiverksetting i nasjonalrett, må elektroverktøysom ikke lengerskal brukes, samlesseparat og returnerestil et miljøvennliggjenvinningsanlegg. | Koskee vain EU-maitaÄlä hävitä sähkötyökaluatavallisen kotitalousjätteenmukana!Vanhoja sähkö- jaelektroniikkalaitteitakoskevan EU-direktiivin2012/19/EU jasen maakohtaistensovellusten mukaisestikäytetyt sähkötyökaluton toimitettavaongelmajätteenkeräyspisteeseenja ohjattavaympåristöystävälliseenkierrätykseen. | Μόνο για τις χώρες της ΕΕΜην πετάτε τα ηλεκτρικάεργαλεία στον κάδο οικιακώναπορριμμάτων!Σύμφωνα με την ευρωπαϊκήοδηγία 2012/19/ΕΕ περίηλεκτρικών και ηλεκτρονικώνσυσκευών και την ενσωμάτωσήτης στο εθνικό δικαιο, ταηλεκτρικά εργαλεία πρέπει νασυλλέγονται ξεχωριστά και ναεπιστρέφονται για ανακύκλωσημε τρόπο φιλικό προς τοπεριβάλλον. |
 | Stå aldrig påspånsugeren. | Du må aldri stå påstøvsugeren. | Älä koskaan seisopölynerottimen päällä. | Ποτέ μη στέκεστε πάνωστον απορροφητήρασκόνης. |
 | Advarsel Advarsel Varoitus Προσοχη | |||
| Polski Magyar Čeština Türkçe | ||||
| Symbole⚠ OSTRZEŻENIENastępujące oznaczenia to symbole używane w instrukcji obsługi maszyny. Upewnij się, że rozumiesz ich znaczenie zanim użyjesz narzędzia. | Jelölések⚠ FIGYELEMAz alábbiakban a géphez alkalmazott jelölések vannak felsorolva. A gép használata előtt feltétlenül ismerje meg ezeket a jelöléseket. | Symboly⚠ UPOŻORNĚNÍNásledující text obsahuje symboly, které jsou použity na zařizení.Ujistěte se, že rozumíte jejich obsahu před tím, než začnete zařizení používat. | Simgeler⚠ DÍKKATAşağıda, bu alet için kullanılan simgeler gösterilmiştir. Aleti kullanmadan önce bu sigelerin ne anlama geldiğini anladiğınızdan emin olun. | |
 | Należy dokładnie zapoznać się ze wszystkimi ostrzeżeniami i wskazówkami bezpieczeństwa.Nieprzestrzeganie ostrzeżeń oraz wskazówek bezpieczeństwa może spowodować porażenie prądem elektrycznym, pożar i/lub odniesienie poważnych obrażeń. | Olvasson el minden biztonsági fi gyelmeztetést és minden utasítást.A fi gyelmeztetések és utasítások be nem tartása áramütést, tüzet és/vagy súlyos sérülést eredményezhet. | Přečtěte si všechna varování týkající se bezpečnosti a všechny pokyny.Nedodržení těchto varování a pokynů může mít za následek elektrický šok, požár a/nebo vážné zranění. | Tüm güvenlik uyarılarının ve tüm talimatları okuyun.Uyarılara ve talimatlara uyulmaması elektrik çarpmasına, yangına ve/ veya ciddi yaralanmaya neden olabilir. |
 | Zawsze nosić okulary ochronne. | Mindig viseljen védőszemüveget. | Vždy noste ochranu očí. Daima koruyucu gözlük takın. | |
 | Zawsze nosić słuchawki ochronne. | Mindig viseljen a hallást védő védőfelszerelést. | Vždy používejte chráníče sluchu. | Daima koruyucu kulaklık takın. |
 | Dotyczy tylko państw UE Nie wyrzucaj elektronarzędzi wraz z odpadami z gospodarstwa domowego!Zgodnie z Europejską Dyrektywą 2012/19/UE w sprawie zużytego sprzętu elektrotechnicznego i elektronicznego oraz dostosowaniem jej do prawa krajowego, zużyte elektronarzędzia należy posegregować i zutylizować w sposób przyjazny dla środowiska. | Csak EU-országok számára Az elektromos kéziszerszámokat ne dobja a háztartási szemétbe!A használt villamos és elektronikai készülékekról szóló 2012/19/EU irányelv és annak a nemzeti jogba való átültetése szerint az elhasznált elektromos kéziszerszámokat külön kell gyűjteni, és környezetbarát módon újra kell hasznosítani. | Jen pro státy EUElektrické nářadí nevyhazujte do komunálního odpadu!Podle evropské směrnice 2012/19/EU o nakládání s použitými elektrickými a elektronickými zařizeními a odpovídajících ustanovení právních předpisů jednotlivých zemí se použitá elektrická nářadí musí sbírat odděleně od ostatního odpadu a podrobit ekologicky šetrnému recyklování. | Sadece AB ülkeleri için Elektrikli el aletlerini evdeki çöp kutusuna atmayınız!Kullanılmış elektrikli aletleri, elektrik ve elektronikli eski cihazlar hakkındaki 2012/19/AB Avrupa yönergelerine göre ve bu yönergeler ulusal hukuk kurallarına göre uyarlanarak, ayrı olarak toplanmali ve çevre şartlarına uygun bir şekilde tekrar değerlendirmeye gönderilmelidir. |
 | Nigdy nie należy stawać na odkurzaczu. | Soha ne álljon a portalanítóra. | Nikdy nestůjte na odsávači prachu. | Asla toz çekicinin üzerinde durmayın. |
 | Ostrzeżenie | Figyelem | Upozornění | Dikkat |
| Română | Slovenščina | Slovenčina | Български | |
| Simboluri⚠ AVERTISMENTÎn cele ce urmează sunt prezentate simbolurile folosite pentru mașină.Înainte de utilizare, asigurați-vă că înțelegeți semnificația acestora. | Simboli⚠ OPOZORILOV nadaljevanju so prikazani simboli, uporabljeni pri stroju. Pred uporabo se prepričajte, da jih razumete. | Symboly⚠VYSTRAHANižšie sú zobrazené symboly, ktoré sa v prípade strojného zariadenia použivaju. Pred použitím náradia sa oboznámte s významom týchto symbolov. | Символи⚠ПРЕДУПРЕЖДЕНИЕЗа машината са използвани следните символи. Уверете се, че разбирате значението им, преди употреба. | |
 | Citiți toate avertismentele privind siguranța și toate instrucțiunile.Nerespectarea avertismentelor și a instrucțiunilor poate avea ca efect producerea de șocuri electrice, incendii și/sau vătămări grave. | Preberite vas varnostna opozorila in navodila.Z neupoštevanjem opozoril in navodil tvegate električni udar, požar in/ali resne telesne poškodbe. | Prečítajte si všetky bezpećnostné výstrahy a všetky pokyny.Nedodržanie výstrah a pokynov môže viest’ k zasiahnutiu elektrickým prúdom, požiaru a/alebo vážnemu poraneniu. | Прочетете всички предупреждения за безопасност и инструкции.Неспазването на предупрежденията и инструкциите може да доведе до електрически удар, пожар и/или сериозни наранявания. |
 | Purtați întotdeauna protectie pentru ochi. | Uporaba zaščite za oči je obvezna. | Vždy si nasad’te ochranu na oči. | Винаги носете защитни очила или маска. |
 | Purtați întotdeauna protectie auditivă. | Obvezna je uporaba zaščite za ušesa. | Vždy si nasad’te chrániče sluchu. | Винаги носете антифони. |
 | Numai pentru țările membre UE Nu aruncați această sculă electrică împreună cu deșeurile menajere!În conformitate cu Directiva Europeană 2012/19/UE referitoare la deșeurile reprezentând echipamente electrice și electronice și la implementarea acesteia în conformitate cu legislațiile naționale, sculele electrice care au ajuns la fi nalul duratei de folosire trebuie colectate separat și duse la o unitate de reciclare compatibilă cu mediul înconjurător. | Samo za države EU Električnih orodij ne zavržite skupaj z gospodinjskimi odpadki!V skladu z evropsko direktivo 2012/19/EU o odpadni električni in elektronski opremi in izvedbi v skladu z državnimi zakoni, je treba električna orodja, ki so dosegla življenjsko dobo ločeno zbirati in vrnitiv z okoljem združljivo ustanovo za recikliranje. | Iba pre krajiny EÚElektrické náradie nelikvidujte spolu s domácim odpadom!Aby ste dodržali ustanovenia európskej smernice 2012/19/EU o odpadových elektrických a elektronických zariadeniach a jej implementáciu v zmysle národnej legislativy, je potrebné elektrické náradie po uplynuti jeho doby životnosti separovať a doručit’ na environmentálne prijateľné miesto recyklovania. | Само за страни от ЕСНе изхвърляйте електрически инструменти заедно с битовите отпадъци! Във връзка с разпоредбите на Европейска Директива 2012/19/ЕС за електрическо и електронно оборудване и нейното приложение съгласно националното законодательство електрически инструменти, излизащи от употреба трябва да се събират отдельно и предават в специализирани пунктове за рециклиране. |
 | Nu stați niciodată pe extractorul de praf. | Nikoli ne stojte na ekstraktorju prahu. | Nikdy sa nestavajte na odsávač prachu. | Никога не стъпвайте върху прахосмукачката. |
 | Avertisment Opozorilo Výstraha Предупреждение | |||
| Srpski Hrvatski | ||
| Oznake⚠UPOZORENJEOvde su prikazane oznake koje se koriste na mašini. Postarajte se da razumete njihovo značenje pre upotrebe. | Simboli⚠UPOZORENJEZa uređaj se koriste sljedeći simboli. Uvjerite se da prije uporabe razumijete njihovo značenje. | |
 | Pročitajte sva bezbednosna upozorenja i sva uputstva.Propust da se slede upozorenja i uputstva može da izazove strujni udar, požar i/ili teške povrede. | Pročitajte sva sigurnosna upozorenja i sve upute.Nepoštivanje upozorenja i uputa može uzrokovati strujni udar, požar i/ili teške ozljede. |
 | Uvek nosite zaštitu za oči. | Uvijek nosite zaštitne naočale. |
 | Uvek nosite zaštitu za sluh. | Uvijek nosite zaštitu sluha. |
 | Samo za zemlje EU Nemojte odlagati električni alat zajedno sa smećem iz domaćinstva! Na osnovu Evropske direktive 2012/19/EU o dotrajaloj električnoj i elektronskoj opremi, kao i njene primene u skladu s državnim propisima, električni alat koji je došao do kraja svog radnog veka mora se prikupiti zasebno i odneti u postrojenje za reciklažu koje ispunjava ekološke zahteve. | Samo za zemlje EU Električni alat ne bacajte zajedno s ostalim kućnim otpadom! Sukladno europskim direktivama 2012/19/EU o otpadnoj električnoj i elektroničkoj opremi, te provedbi u skladu s nacionalnim zakonima i propisima, električni alat i baterije koji su dostigli kraj korisnog radnog vijeka potrebno je prikupljati odvojeno i predati u ustanove za recikliranje. |
 | Nikada nemojte da stojite na vadiocu prašine. | Nikada nemojte stajati na uređaju za sakupljanje prašine. |
 | Upozorenje Upozorenje |
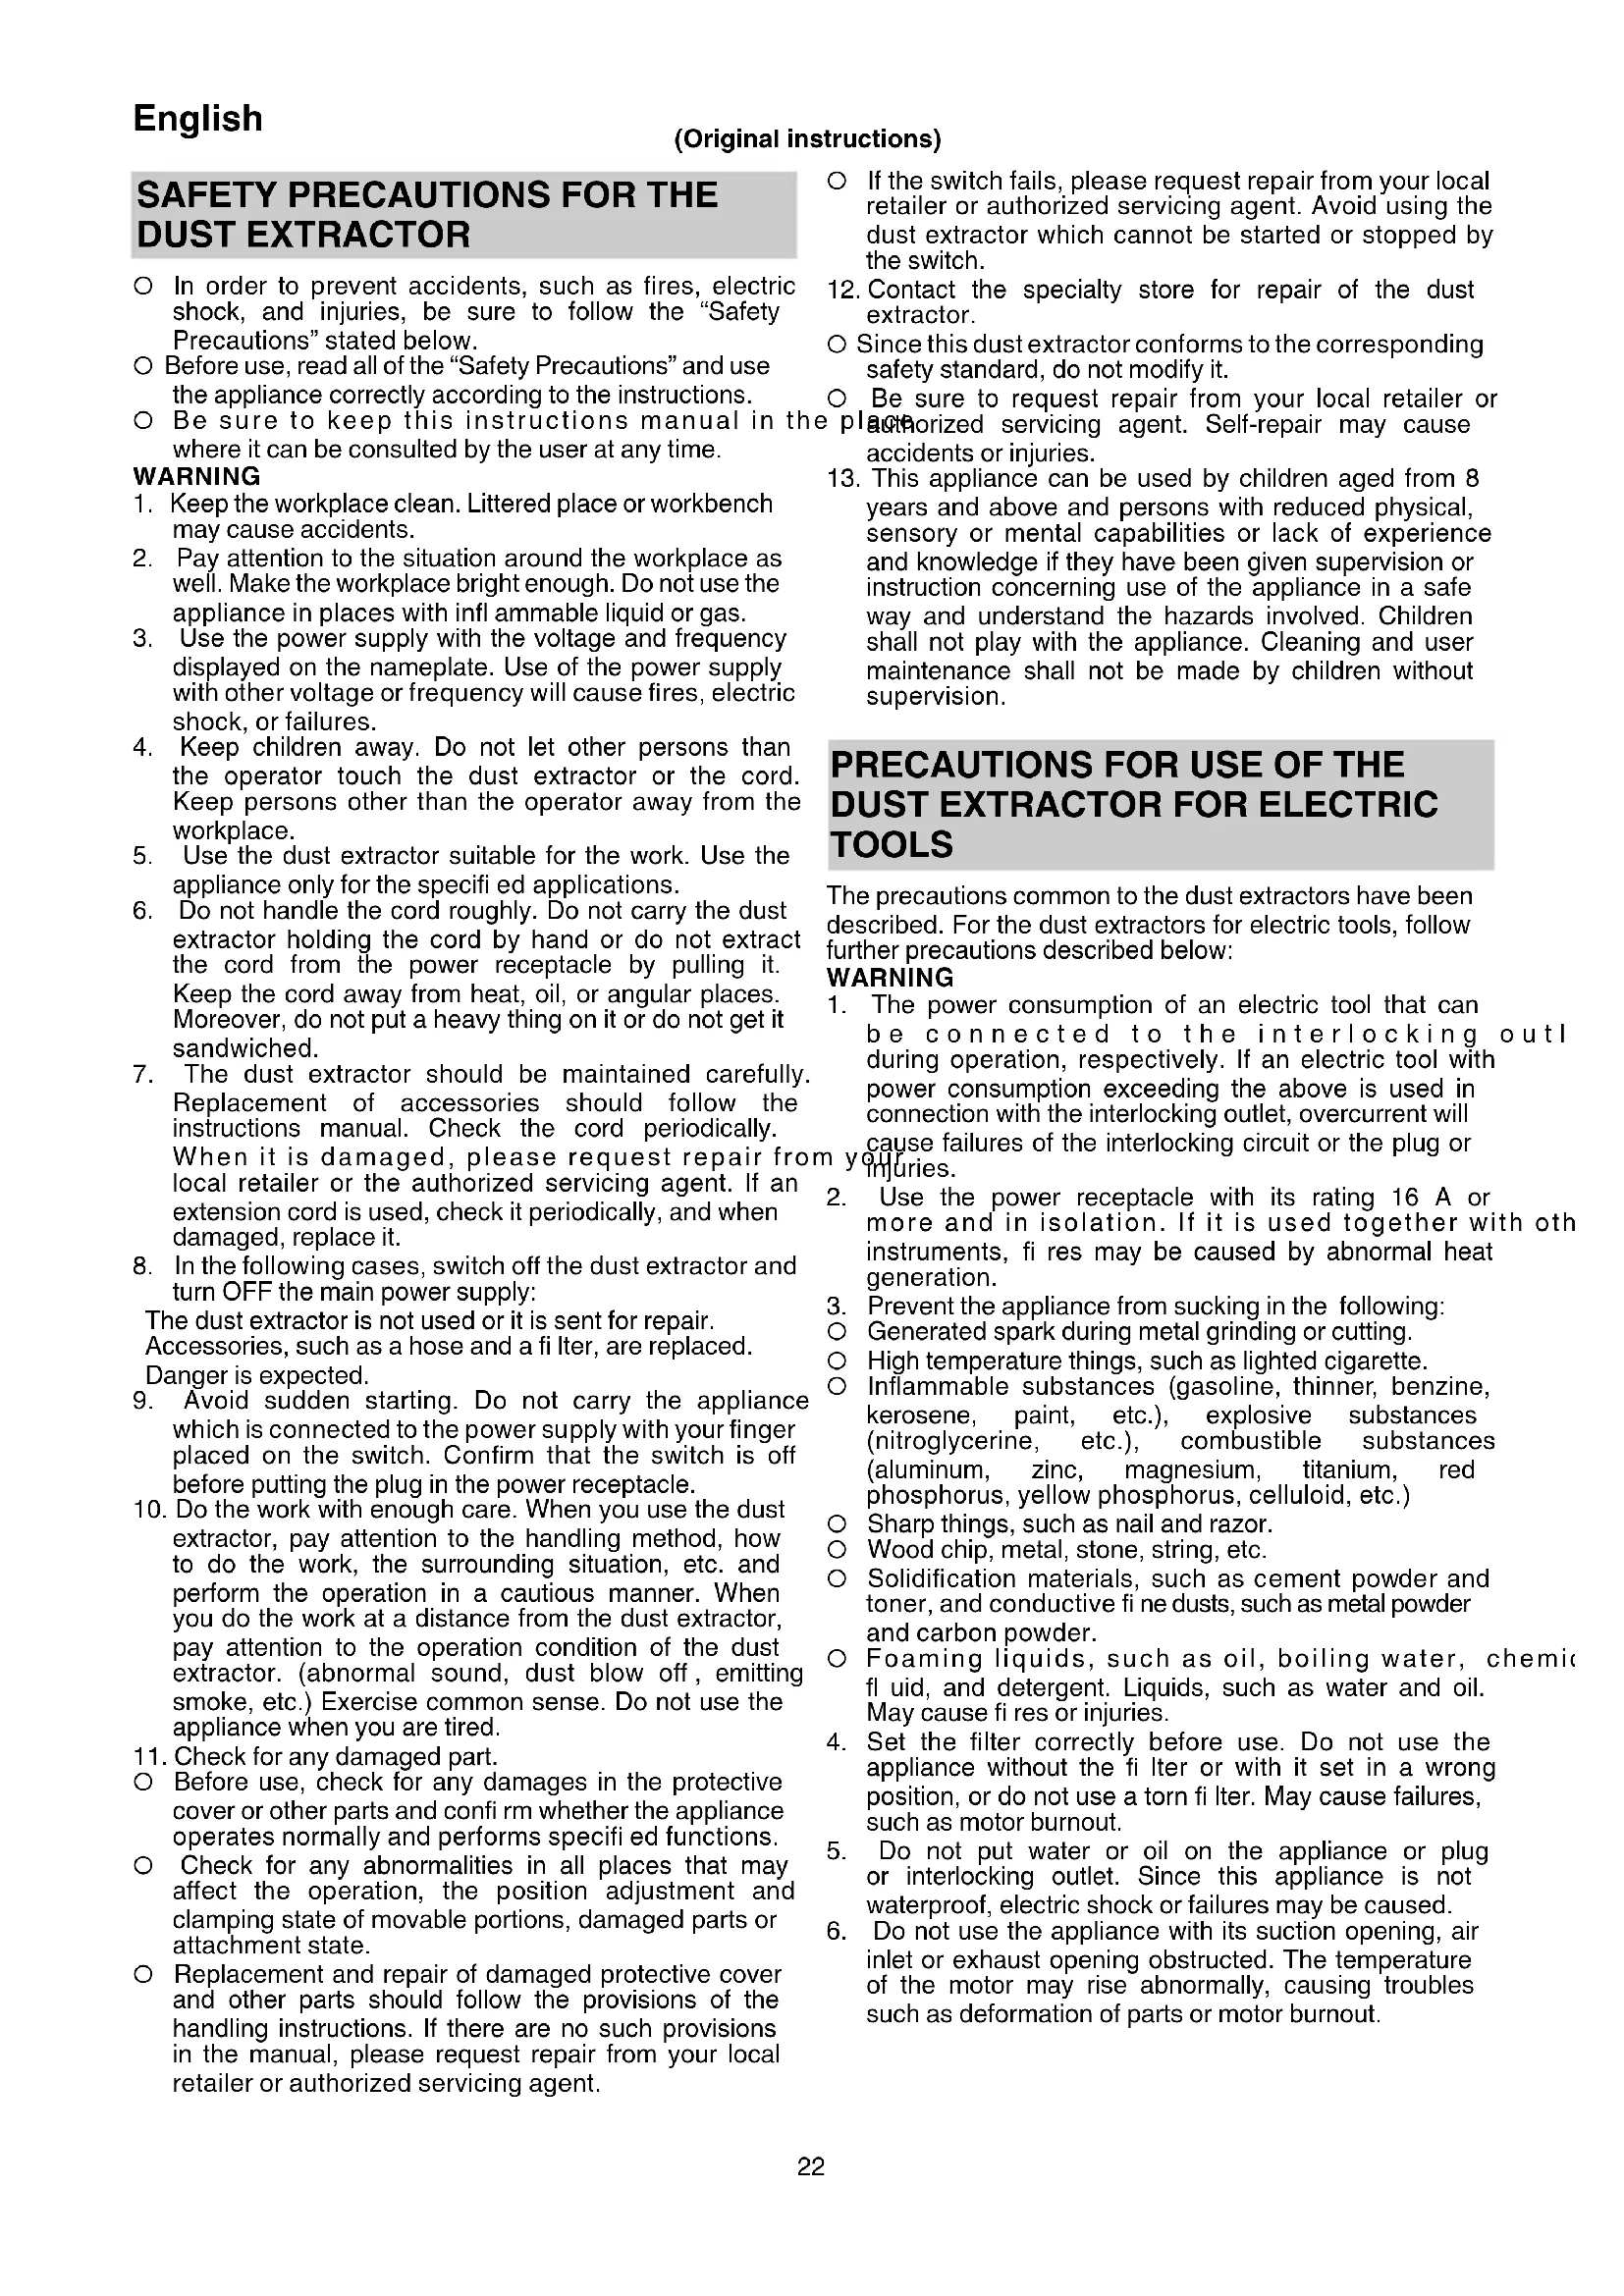
SAFETY PRECAUTIONS FOR THE DUST EXTRACTOR
☐ In order to prevent accidents, such as fires, electric shock, and injuries, be sure to follow the “Safety Precautions” stated below.
Before use, read all of the "Safety Precautions" and use the appliance correctly according to the instructions.
- Be sure to keep this instructions manual in where it can be consulted by the user at any time.
WARNING
- Keep the workplace clean. Littered place or workbench may cause accidents.
- Pay attention to the situation around the workplace as well. Make the workplace bright enough. Do not use the appliance in places with infl ammable liquid or gas.
- Use the power supply with the voltage and frequency displayed on the nameplate. Use of the power supply with other voltage or frequency will cause fires, electric shock, or failures.
- Keep children away. Do not let other persons than the operator touch the dust extractor or the cord. Keep persons other than the operator away from the workplace.
- Use the dust extractor suitable for the work. Use the appliance only for the specified applications.
- Do not handle the cord roughly. Do not carry the dust extractor holding the cord by hand or do not extract the cord from the power receptacle by pulling it. Keep the cord away from heat, oil, or angular places. Moreover, do not put a heavy thing on it or do not get it sandwiched.
- The dust extractor should be maintained carefully. Replacement of accessories should follow the instructions manual. Check the cord periodically. When it is damaged, please request repair from local retailer or the authorized servicing agent. If an extension cord is used, check it periodically, and when damaged, replace it.
- In the following cases, switch off the dust extractor and turn OFF the main power supply:
The dust extractor is not used or it is sent for repair. Accessories, such as a hose and a filter, are replaced. Danger is expected.
-
Avoid sudden starting. Do not carry the appliance which is connected to the power supply with your finger placed on the switch. Confirm that the switch is off before putting the plug in the power receptacle.
-
Do the work with enough care. When you use the dust extractor, pay attention to the handling method, how to do the work, the surrounding situation, etc. and perform the operation in a cautious manner. When you do the work at a distance from the dust extractor, pay attention to the operation condition of the dust extractor. (abnormal sound, dust blow off, emitting smoke, etc.) Exercise common sense. Do not use the appliance when you are tired.
-
Check for any damaged part.
Before use, check for any damages in the protective cover or other parts and confi rm whether the appliance operates normally and performs specifi ed functions.
☐ Check for any abnormalities in all places that may affect the operation, the position adjustment and clamping state of movable portions, damaged parts or attachment state.
○ Replacement and repair of damaged protective cover and other parts should follow the provisions of the handling instructions. If there are no such provisions in the manual, please request repair from your local retailer or authorized servicing agent.
☐ If the switch fails, please request repair from your local retailer or authorized servicing agent. Avoid using the dust extractor which cannot be started or stopped by the switch.
12. Contact the specialty store for repair of the dust extractor.
○ Since this dust extractor conforms to the corresponding safety standard, do not modify it.
Be sure to request repair from your local retailer or authorized servicing agent. Self-repair may cause accidents or injuries.
13. This appliance can be used by children aged from 8 years and above and persons with reduced physical, sensory or mental capabilities or lack of experience and knowledge if they have been given supervision or instruction concerning use of the appliance in a safe way and understand the hazards involved. Children shall not play with the appliance. Cleaning and user maintenance shall not be made by children without supervision.
PRECAUTIONS FOR USE OF THE DUST EXTRACTOR FOR ELECTRIC TOOLS
The precautions common to the dust extractors have been described. For the dust extractors for electric tools, follow further precautions described below:
WARNING
- The power consumption of an electric tool that can be connected to the interlocking out during operation, respectively. If an electric tool with power consumption exceeding the above is used in connection with the interlocking outlet, overcurrent will cause failures of the interlocking circuit or the plug or injuries.
- Use the power receptacle with its rating 16 A or more and in isolation. If it is used together with other instruments, fires may be caused by abnormal heat generation.
- Prevent the appliance from sucking in the following:
○ Generated spark during metal grinding or cutting.
○ High temperature things, such as lighted cigarette.
○ Inflammable substances (gasoline, thinner, benzine, kerosene, paint, etc.), explosive substances (nitroglycerine, etc.), combustible substances (aluminum, zinc, magnesium, titanium, red phosphorus, yellow phosphorus, celluloid, etc.)
○ Sharp things, such as nail and razor.
○ Wood chip, metal, stone, string, etc.
Solidification materials, such as cement powder and toner, and conductive fi ne dusts, such as metal powder and carbon powder.
○ Foaming liquids, such as oil, boiling water, chemical fluid, and detergent. Liquids, such as water and oil. May cause fires or injuries. - Set the filter correctly before use. Do not use the appliance without the fi Iter or with it set in a wrong position, or do not use a torn fi Iter. May cause failures, such as motor burnout.
- Do not put water or oil on the appliance or plug or interlocking outlet. Since this appliance is not waterproof, electric shock or failures may be caused.
-
Do not use the appliance with its suction opening, air inlet or exhaust opening obstructed. The temperature of the motor may rise abnormally, causing troubles such as deformation of parts or motor burnout.
-
Do not operate the appliance when its float is operating or when its hose or suction mouth, etc. is clogged with foreign matter. The temperature of the motor may rise abnormally, causing troubles such as deformation of parts or motor burnout.
- Do not topple the appliance or do not use it on its side. May cause electric shock or failures.
-
To prevent deformation or breakage of the appliance due to toppling etc., the appliance should be moved calmly. Breakage, crack, or deformation may cause injuries.
-
When you drop or bump the appliance accidentally, check for breakage, crack, or deformation in the appliance. Breakage, crack or deformation may cause injuries.
-
When the appliance is out of condition or emits abnormal sound during use, immediately turn off the switch and request repair from your local retailer or authorized servicing agent. If you continue to use the appliance as it is, it may lead to injuries.
-
When you use an extension cord, use a triplex cabtyre cable equipped with an earth wire. Duplex cable without earth wire may cause electric shock.
-
This appliance is only used indoors. Never use it outdoors. Insulation deterioration may cause electric shock or electrical fire.
SPECIFICATIONS
| Item\Model | RP150YB RP250YE | RP350YE | |
| Power supply used Single phase AC 50/60 Hz common use, Voltage 230 V / 240 V | |||
| Motor Single phase series commutator motor | |||
| Application Wet and Dry type | |||
| Power input 1140 W | |||
| Interlocking electric outlet*1 | 2400 W / 1700 W / 1200 W | ||
| Max. Airflow 3.5 m | 3/min | ||
| Max. Vacuum 22 kPa | |||
| Details-Dry 15 L | 25 L | 35 L | |
| Details-Wet | 12 L | 22 L | 30 L |
| Dimensions (W × D × H) | 334 mm × 366 mm × 400 mm | 390 mm × 469 mm × 550 mm | 390 mm × 469 mm × 665 mm |
| Weight*2 | 7.8 kg | 9.4 kg | 9.7 kg |
| Cord | 8 m | ||
*1 Be sure to check the nameplate and mode selection switch on product as it is subject to change by areas.
*2 Excluding cord and accessories.
STANDARD ACCESSORIES
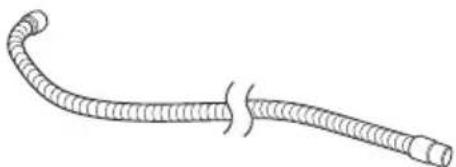
(1) Hose (id 38 mm × 3 m long) ....1
(2) Pipe....2
(3) Joint handle 1
(4) Master nozzle....1
(5) Crevice nozzle ....1
(6) Wet nozzle 1
(7) Round Brush nozzle....1
(8) Joint (D) 1
(9) Adapter....1
Standard accessories are subject to change without notice.
OPTIONAL ACCESSORIES (sold separately)
○ Paper filter
○ Cartridge filter
Optional accessories are subject to change without notice.
APPLICATIONS
○ General cleaning in workplaces and others.
○ Collection of fine dusts generated during grinding, cutting or drilling of concrete or wood using power tools.
○ Suction of liquid such as water spilt on the floor.
UNPACKING
○ Carefully unpack the power tool.
○ Take out the accessories in the tank before work.
PRIOR TO OPERATION
WARNING
Before use, check the following. 1 to 3 should be checked before putting the plug in the power receptacle.
-
Confirm the power supply used.
Be sure to use the appliance with the voltage indicated on the nameplate. If it is used with the voltage exceeding the indication, the rotation of the motor may be abnormally fast, damaging the appliance. Moreover, do not use the appliance with transformers, such as a DC power supply, an engine generator, and a booster, or not only the appliance will be damaged, but accidents may be caused. -
Confirm that the vacuum switch is OFF.
If, without knowing that the vacuum switch is ON, the plug is put in the power receptacle, the appliance will start suddenly, causing unexpected accidents. The vacuum switch will be turned on by pushing "ON" and it will be turned off by returning it to "OFF". Be sure to check that the vacuum switch is OFF. (Fig. 8)
- Check the filter
Referring to "2. Attaching the Filter" the filter should be correctly attached.
English
4. Inspection of the power receptacle
If, when the plug is inserted, the power receptacle is shaky or the plug readily comes off, repair is required. Consult the electrical work shop nearest you. If such a power receptacle is used as it is, it will be overheated, and causing accidents.
5. Extension cord
WARNING
Use undamaged extension cord. If the power supply is distant, use an extension cord which is thick enough to pass an electric current and is as short as possible.
HOW TO USE
CAUTION
Do not use the head top as a footstool or do not sit on it. Otherwise the appliance begins to move suddenly, causing an injury.
NOTE
Handle the hose with care. Do not bend the hose by force, or do not trample it, or do not pull it to move dust extractor. Moreover, do not put away the hose as it is bent. Otherwise troubles such as its deformation may be caused.
1. Connecting the hose
Press the attached hose into the suction opening of the tank until it clicks and connect it. When removing the hose, pull out the hose while pushing the button of the suction opening. (Fig. 3)
2. Attaching the fi Iter (Fig. 4)
WARNING
- Be sure to attach the filter. (cloth filter or filter for dusts)
Otherwise the motor will be damaged.
When you collect fine dusts, such as siding powder and stone powder, use the optional paper filter.
○ Since it is a filter for dry and wet suction, do not remove it when you suck up liquids, such as water.
NOTE
If the filter is wet, leave it to dry out of direct sunlight. Using the filter when wet will conspicuously reduce the suction power.
(1) Check that the filter packing is put on the mouth of the tank.
(2) Check that the filter cage is on the bottom of the filter.
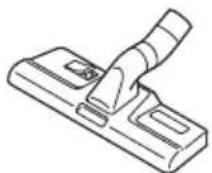
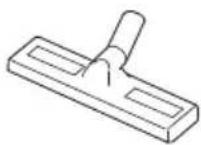
3. Attach the master nozzles, pipes, etc.
When it is used as a cleaner (Fig. 5)
Connect in order of Hose (id 38 mm × 3 m long), Joint handle, Pipes, and Master nozzle. Connection is done by pressing in the direction of the arrow. The suction mouth for crevices can also be attached depending on the application.
4. Connect power tools (Fig. 6)
Connect in order of Hose (id 38 mm × 3 m long) and Adapter or Joint (D) (Standard Accessory). Connection is done by pressing in the direction of the arrow.
5. How to use the interlocking electric outlet WARNING
○ Voltage is applied to the interlocking electric outlet irrespective of the position of the vacuum switch or mode selection switch in this appliance. When you put the plug of a power tool in the interlocking electric outlet, check that the switch of the power tool is OFF. If, without knowing that the vacuum switch is ON, the plug is put in the power receptacle, the appliance will start suddenly, causing unexpected accidents.
Do not connect the power tool exceeding the following power consumption to the interlocking electric outlet. Otherwise an overcurrent will cause failures of the interlocking circuit or plug or an injury. Connect the power tool exceeding the following power consumption to an outlet other than the power receptacle to which the plug of this appliance is connected. 2400 W of the power consumption for the power tool.
NOTE
If a product containing a winding transformer is connected to the interlocking electric outlet, the appliance will be interlocked for about 5 seconds, which does not mean any failure.
(1) Check the power consumption of the power tool to be connected
This appliance can be connected to a power tool whose power consumption is 2400 W. Check the power consumption of the power tool to be connected. For a power tool exceeding the above, connect it to an outlet other than the power receptacle to which the plug of the appliance is connected. In this case, the appliance cannot be operated or stopped by the operation of the switch of the power tool.
(2) Connect the plug of a power tool (Fig. 7)
Raising the cover, put the plug of the power tool in the interlocking electric outlet.
6. Operation of mode selection switch, vacuum switch (Fig. 8)
(1) Mode selection switch
By pushing "A"(Auto) this appliance can be operated and stopped by the operation of the switch of the power tool connected. By pushing "M" (Manual) this appliance can be operated and stopped by the operation of its switch.
(2) Vacuum switch
By pushing "ON" the appliance will be operated. By returning the switch to "OFF" the appliance will stop. When the mode selection switch is in "M" (Manual) the appliance will operate and stop by the operation of the vacuum switch.
(3) Procedure of operation of each switch
(a) When using the appliance with a power tool interlocked
① Push "ON" of the vacuum switch.
② Push "A"(Auto) of the mode selection switch.
③ By operation of the switch of the connected power tool, this appliance also operates and stops interlockedly. In addition, in order to suck up the dusts remaining in the hose, the appliance runs for several seconds even after turning off the switch of the power tool, and then the appliance stops.
(b) When using the appliance as a cleaner
① Push "M" (Manual) of the mode selection switch.
② If "ON" of the vacuum switch is pushed, the appliance will operate. To stop it, return the switch to "OFF".
7. Filter cleaning
WARNING
Be sure to turn off the vacuum switch and disconnect the plug from the power receptacle.
CAUTION
If the tank is filled with dusts, the suction power declines. Dump dusts as early as possible when they reach the half of the tank height.
When the suction power declines during use, remove dusts in the following procedure:
(1) Remove the clamp and detach the head. For the procedure, refer to "8. Dump dusts".
(2) Remove attached dusts by striking the inner side of the filter several times with the filter mounted in the tank. The suction power will be recovered.
(3) Attach the head and the clamp in the original position. For the method of attachment, refer to "8. Dump dusts".
NOTE
Since the filter cleaning device operates when the suction power declines to some extent, it also operates in the following cases:
○ When the suction mouth at the tip of the hose is closed.
○ When the hose is clogged with foreign matter.
(1) When the suction power of the appliance declines to some extent during use, its filter cleaning device will operate automatically and its suction power will be recovered as follows:
(a) When using the appliance as a cleaner
After the motor is stopped by putting the mode selection switch in "A" (Auto) the filter cleaning device operates for several seconds.
(b) When using the appliance with a power tool connected Put the switch of the power tool in "OFF" and run the appliance in full operation for several seconds. Then, after the motor is stopped, the fi Iter cleaning device operates for several seconds. Depending on the power tool connected and the thickness of the attachment adapter at the tip of the hose, the filter cleaning device may operate whenever the switch of the power tool is put in "OFF". This is not a failure, however.
(2) If the filter cleaning device is repeatedly operated and the suction power is not recovered, the tank is almost filled with dusts. Dump dusts in the tank.
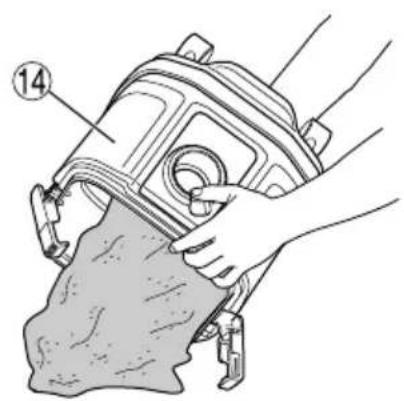
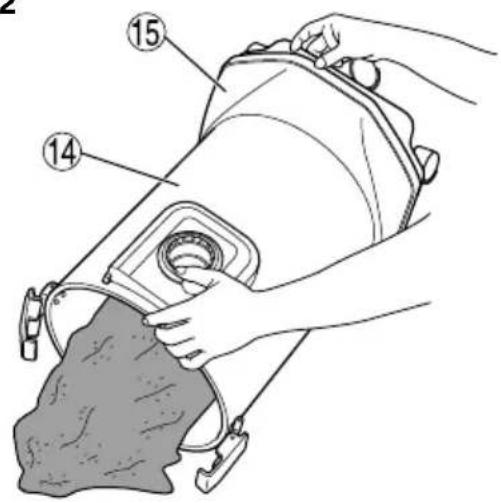
8. Dump dusts
WARNING
Be sure to turn off the vacuum switch and disconnect the plug from the power receptacle.
CAUTION
○ Do not impact the tank, the filter, or the head. Otherwise they will be deformed or damaged.
Although it is based on the amount of suction of dusts and liquids, dump dusts and liquids in the tank at least once a day and keep the appliance, the filter, etc. clean. Otherwise suction power fall, motor failure, bad smell or rusting may be caused.
○ Do not hold the clamps when you dump dusts in the tank. Otherwise the clamps may be damaged.
NOTE
Do not tilt the tank with accessories (Pipe, Master nozzle, etc.) inserted in the base or in the tank. Otherwise any part may be damaged.
WARNING
If the appliance is pushed on its side while the tank contains liquid, the liquid will get inside the motor or switch region, causing an electric shock or motor failure.
(1) Remove the clamps (2 pieces) and raise the handle of the head. (Fig. 9)
(2) Lightly striking the inner side of the filter several times, remove dusts attached to the filter.
(3) Tilt the tank and dump dusts. (Fig. 10, 11)
(4) Attach the filter, the filter cage, the head, and the clamp in the initial positions.
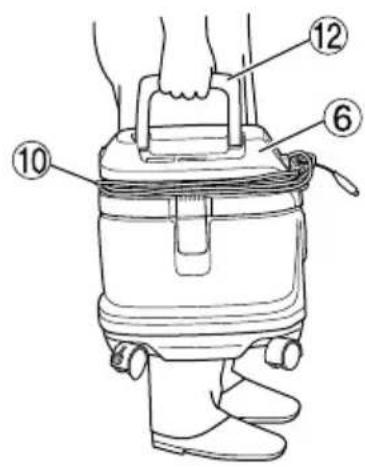
9. Transportation and storage
(1) How to use the handle
When carrying or moving the appliance, hold the handle of the head part as shown in the Fig. 12. When you do not use the handle, put it in the head part.
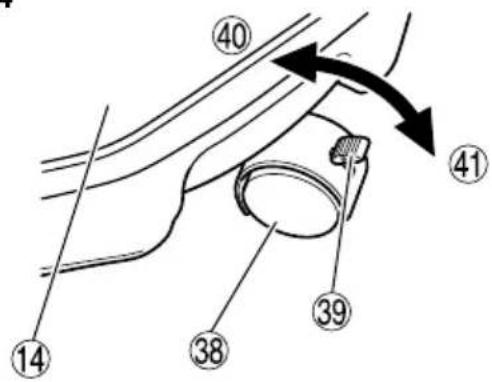
(2) Fixation and release of the caster
By lowering the lever of the caster with the brake, the rotation of the wheel is fixed. When releasing the fixed wheel, raise the lever. (Fig. 13) When moving with the appliance on a vehicle, fi x the caster to retain the appliance. However, when you move the appliance, check that the caster is released, or the caster will be damaged.
(3) When the appliance is stored
When you want to interrupt cleaning for a moment, you can hook the pipe holder of the pipe. The appliance can be then stored. The cord can also be bundled and hooked. (Fig. 14)
10. How to attach the paper fi Iter (Optional)
WARNING
○ Be sure to turn off the appliance and remove the plug from the electric outlet.
When using a paper filter, use it in combination with the standard cloth filter.
If the paper filter gets torn, dust may get inside the motor, causing abnormal noise or fire due to overheating.
CAUTION
When using a paper filter, avoid sucking in liquids such as water or wet dust, as this may lead to tearing of the filter.
(1) Open the paper filter horizontally so that the suction hole in the paper filter is over the top of the tank. (Fig. 15)
(2) Before attaching the filter to the appliance, bend the two folds in the cardboard approx. 90^ in the direction of the arrow. (Fig. 16)
(3) Match the suction hole in the paper filter with the suction opening of the appliance. Insert the filter in the direction of the arrow as shown in the illustration, so that the cardboard of the paper filter goes past the stopper on the suction opening. (Fig. 17)
FLOAT MECHANISM
This appliance is equipped with a float mechanism to prevent water from entering in the motor when it sucks in more than a specific quantity of water. When the float operates not to suck in water, turn off the switch promptly and throw away water in the tank.
WARNING
With the float working, do not continue operation. Otherwise the temperature of the motor may rise abnormally causing troubles such as deformation of parts or motor burnout.
○ Avoid sucking in foaming liquid such as detergent or foams. Before the fl oat works, foams may spurt from the air outlet. If you continue to use the appliance as it is, it will lead to electric shock or failure.
MAINTENANCE AND INSPECTION
WARNING
☐ For inspection and maintenance, be sure to turn off the vacuum switch and disconnect the plug from the power receptacle.
○ Do not work with wet hands. May cause electric shock or injuries.
1. Maintenance of filter
NOTE
○ Since a filter is a consumable, we recommend you to prepare spares.
The cloth filter should simply be tapped even if it is considerably clogged. Strong brushing will shorten its life.
☐ Do not hurl a filter. May break its resin part.
A clogged filter will decrease the suction power remarkably. Tap the inner side of the filter to drop off dusts regularly.
2. Inspecting the mounting screws
Regularly inspect all mounting screws and ensure that they are properly tightened. Should any of the screws be loose, retighten them immediately. Failure to do so could result in serious hazard.
3. Maintenance of the motor
The motor unit winding is the very "heart" of the power tool.
Exercise due care to ensure the winding does not become damaged and/or wet with oil or water.
4. Check for Dust
Dust may be removed with a soft cloth or a cloth dampened with soapy water. Do not use bleach, chlorine, gasoline or thinner, for they may damage the plastics.
5. Service and repairs
All quality power tools will eventually require servicing or replacement of parts because of wear from normal use. To assure that only authorized replacement parts will be used, all service and repairs must be performed by a HiKOKI AUTHORIZED SERVICE CENTER, ONLY.
English
If the supply cord is damaged, it must be replaced by the manufacturer, its service agent of similarly qualified persons in order to avoid a hazard.
SELECTING ACCESSORIES
The accessories of this machine are listed on page 134.
CAUTION
In the operation and maintenance of power tools, the safety regulations and standards prescribed in each country must be observed.
GUARANTEE
We guarantee HiKOKI Power Tools in accordance with statutory/country specific regulation. This guarantee does not cover defects or damage due to misuse, abuse, or normal wear and tear. In case of complaint, please send the Power Tool, undismantled, with the GUARANTEE CERTIFICATE found at the end of this Handling instruction, to a HiKOKI Authorized Service Center.
NOTE
Due to HiKOKI's continuing program of research and development, the specifications herein are subject to change without prior notice.
(1) Tuyau flexible (Di 38 mm × 3 m long) ....1
(2) Tuyau rigide 2
(3) Poignée de raccord....1
(4) Suceur principal ....1
(5) Suceur plat ....1
(8) Verbinding (D) ....1
(9) Adapter ....1
8. Despeje as poeiras
AVISO
VEDLIKEHOLD OG KONTROLL
ADVARSEL
5. Service and repairs
natural_image
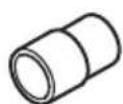
Simple line drawing of a cylindrical object with flanges, labeled 337519 and 337520 (no other text or symbols)
337521
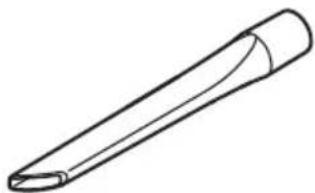
natural_image
Simple line drawing of a pen-like object with a curved tip and pointed tip (no text or symbols)337523
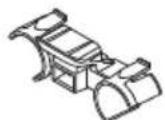
320994 337518 337527

337522 326127 321984
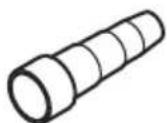
natural_image
Illustration of a coiled, flexible filament or tube with no text or symbols337513
| English Dansk Română | ||||
| GUARANTEE CERTIFICATE1 Model No.2 Serial No.3 Date of Purchase4 Customer Name and Address5 Dealer Name and Address(Please stamp dealer name and address) | GARANTIBEVIS1 Modelnummer2 Serienummer3 Købsdato4 Kundes navn og adresse5 Forhandlers navn og adresse(Indsæt stempel med forhandlers navn og adresse) | CERTIFICAT DE GARANTIE1 Model nr.2 Nr. de serie3 Data cumpărării4 Numele și adresa cliențului5 Numele și adresa distribuitorului(Vă rugăm aplicati ștampila cu numele și adresa distribuitorului) | ||
| Deutsch Norsk Slovenščina | ||||
| GARANTIESCHEIN1 Modell-Nr.2 Serien-Nr.3 Kaufdatum4 Name und Anschrift des Kunden5 Name und Anschrift des Händlers(Bitte mit Namen und Anschrift des Handlers abstempeln) | GARANTISERTIFIKAT1 Modellnr.2 Serienr.3 Kjøpsdato4 Kundens navn og adresse5 Forhandlerens navn og adresse(Vennligst stemple forhandlerens navn og adresse) | GARANCIJSKO POTRDILO1 Št. modela2 Serijska št.3 Datum nakupa4 Ime in naslov kupca5 Ime in naslov prodajalca(Prosimo visnite žig z imenom in naslovom prodajalca) | ||
| Français Suomi Slovenčina | ||||
| CERTIFICAT DE GARANTIE1 No. de modèle2 No de série3 Date d'achat4 Nom et adresse du client5 Nom et adresse du revendeur(Cachet portant le nom et l'adresse du revendeur) | TAKUUTODISTUS1 Malli nro2 Sarja nro3 Ostopäivämäärä4 Asiakkaan nimi ja osoite5 Myyjän nimi ja osoite(Leimaa myyjän nimi ja osoite) | ZÁRUČNÝ LISTA1 Č. modelu2 Sériové č.3 Dátum zakúpenia4 Meno a adresa zákaznika5 Názov a adresa predajcu(Pečiatka s názvom a adresou predajcu) | ||
| Italiano Ελληνικά Български | ||||
| CERTIFICATO DI GARANZIA1 Modello2 N° di serie3 Data di acquisto4 Nome e indirizzo dell'acquirente5 Nome e indirizzo del rivenditore(Si prega di apporre il timbro con questi dati) | ПІЕТОПОІНТІКО ЕГГУНЗНΣ1 Ap. Movтёлou2 Auξων Ap.3 Нμερομηνία αγοράς4 О́оума кαι διεύθυνση πελάτη5 О́оума кαι διεύθυνση μεταπωλητή(Паракалоўме va χρησιμοποιηθεί σφραγίδα) | ГАРАНЦИОНЕН СЕРТИФИКАТ1 Модел No2 Сериен No3 Дата за закупуване4 Име и адрес на клиента5 Име и адрес на търговеца(Моля, отпечатайте името и адрес на дилъра) | ||
| Nederlands Polski Srpski | ||||
| GARANTIEBEWIJS1 Modelnummer2 Seriennummer3 Datum van aankoop4 Naam en adres van de gebruiker5 Naam en adres van de handelaar(Stempel a.u.b. naam en adres vande de handelaar) | GWARANCJA1 Model2 Numer seryjny3 Data zakupu4 Nazwa klienta i adres5 Nazwa dealera i adres(Pieczęć punktu sprzedažy) | GARANTNI SERTIFIKAT1 Br. modela.2 Serijski br.3 Datum kupovine4 Ime i adresa kupca5 Ime i adresa prodavca(Molimo da stavite pečat na ime i adresu trgovca) | ||
| Español Magyar Hrvatski | ||||
| CERTIFICADO DE GARANTÍA1 Número de modelo2 Número de serie3 Fecha de adquisición4 Nombre y dirección del cliente5 Nombre y dirección del distribuidor(Se ruega poner el sello del distribuidor con su nombre y dirección) | GARANCIA BIZONYLAT1 Tipusszám2 Sorozatszám3 A vásárlás dátuma4 A Vásárló neve és címe5 A Kereskedő neve és címe(Kérjük ide elhelyezni a Kereskedő nevének és címěnek pecsétjét) | JAMSTVENI CERTIFIKAT1 Br modela.2 Serijski br.3 Datum kupnje4 Ime i adresa kupca5 Ime i adresa trgovca(Molimo stavite pečat na ime i adresu trgovca) | ||
| Português Čeština | ||||
| CERTIFICADO DE GARANTIA1 Número do modelo2 Número do série3 Data de compra4 Nome e morada do cliente5 Nome e morada do distribuidor(Por favor, carimbe o nome e morada do distribuidor) | ZÁRUČNÍ LIST1 Model č.2 Série č.3 Datum nákupu4 Jméno a adresa zákazníka5 Jméno a adresa prodejce(Prosíme o razitko se jménem a adresou prodejce) | |||
| Svenska Türkçe | ||||
| GARANTICERTIFIKAT1 Modellnr2 Serienr3 Inköpsdatum4 Kundens namn och adress5 Försäljarens namn och adress(Stàmpla försäljarens namn och adress) | GARANTI SERTÍFÍKASI1 Model No.2 Seri No.3 Satin Alma Tarihi4 Müşteri Adi ve Adresi5 Bayi Adi ve Adresi(Lütfen bayi adini ve adresini kaşe olarak basin) | |||
HiKOKI
| 1 | |
| 2 | |
| 3 | |
| 4 | |
| 5 |
Siemensring 34, 47877 willich, Germany
Tel: +49 2154 49930
Fax: +49 2154 499350
URL: http://www.hikoki-powertools.de
Hikoki Power Tools Netherlands B.V.
Brabanthaven 11, 3433 PJ Nieuwegein, The Netherlands
Tel: +31 30 6084040
Fax: +31 30 6067266
URL: http://www.hikoki-powertools.nl
Hikoki Power Tools (U.K.) Ltd.
Precedent Drive, Rooksley, Milton Keynes, MK 13, 8PJ,
United Kingdom
Tel: +44 1908 660663
Fax: +44 1908 606642
URL: http://www.hikoki-powertools.uk
Hikoki Power Tools France S.A.S.
Hikoki Power Tools Belgium N.V./S.A.
Koningin Astridlaan 51, B-1780 Wemmel, Belgium
Tel: +32 2 460 1720
Fax: +32 2 460 2542
URL http://www.hikoki-powertools.be
Hikoki Power Tools Italia S.p.A
Via Piave 35, 36077, Altavilla Vicentina (VI), Italy
Tel: +39 0444 548111
Fax: +39 0444 548110
URL: http://www.hikoki-powertools.it
Hikoki Power Tools Ibérica, S.A.
C/ Puigbarral, 26-28, Pol. Ind. Can Petit, 08227 Terrassa
(Barcelona), Spain
Tel: +34 93 735 6722
Fax: +34 93 735 7442
URL: http://www.hikoki-powertools.es
Kjeller Vest 7, N-2007 Kjeller, Norway
Tel: (+47) 6692 6600
Fax: (+47) 6692 6650
URL: http://www.hikoki-powertools.no
Hikoki Power Tools Sweden AB
Rotebergsvagen 2B SE-192 78 Sollentuna, Sweden
Tel: (+46) 8 598 999 00
Fax: (+46) 8 598 999 40
URL: http://www.hikoki-powertools.se
Hikoki Power Tools Denmark A/S
Lillebaeltsvej 90, 6715 Esbjerg N, Denmark
Tel: (+45) 75 14 32 00
Fax: (+45) 75 14 36 66
URL: http://www.hikoki-powertools.dk
Hikoki Power Tools Finland Oy
Tupalankatu 9, 15680 Lahti, Finland
Tel: (+358) 20 7431 530
Fax: (+358) 20 7431 531
URL: http://www.hikoki-powertools.fi
Hikoki Power Tools Hungary Kft.
Hikoki Power Tools Romania S.R.L.
Ring Road, No. 66, Mustang Traco Warehouses, Warehouse
No.1, Pantelimon City, 077145, Ilfov County, Romania