BELLE RPC 45/60 - Vibratory plate ALTRAD - Free user manual and instructions
Find the device manual for free BELLE RPC 45/60 ALTRAD in PDF.
| Product type | Reversible vibratory plate |
| Brand | Altrad (Belle Group) |
| Model | BELLE RPC 45/60 |
| Weight (depending on engine) | 275 kg (Honda GX270), 291 kg (Hatz 1B30), 303 kg (Hatz 1B30 electric start) |
| Available engine | Honda GX270 (petrol) or Hatz 1B30 (diesel) |
| Engine power | 9 hp / 6.7 kW (Honda); 6.3 hp / 4.7 kW (Hatz) |
| Engine speed | 3600 rpm (Honda), 3000 rpm (Hatz) |
| Vibration force | 45 kN |
| Vibration frequency | 70 Hz |
| Max. travel speed | >24 m/min |
| Sound power level | 108 dB(A) |
| Vibration on 3 axes | Approx. 13 m/s² |
| Petrol tank capacity (Honda) | 3.6 L (unleaded) |
| Engine oil type | SAE 10W30 |
| Engine oil capacity | 0.6 L (Honda), 0.9 L (Hatz) |
| Gearbox oil | SAE 75W90, 1.2 L |
| Hydraulic oil | Shell Tellus 32 or Fuchs Renolin MR520, 0.2 L |
| Spark plug type (Honda) | BM6ES or BPR6ES, gap 0.6-0.7 mm |
| Periodic maintenance | Change engine oil every 50 h then 250 h; check belt every 8 h; clean air filter every 8 h; change spark plug as needed |
| Safety | Emergency stop, belt guard, control handle with automatic return to forward, lifting ring |
| Warranty | 12 months for the original purchaser |
Frequently Asked Questions - BELLE RPC 45/60 ALTRAD
User questions about BELLE RPC 45/60 ALTRAD
0 question about this device. Answer the ones you know or ask your own.
Ask a new question about this device
Download the instructions for your Vibratory plate in PDF format for free! Find your manual BELLE RPC 45/60 - ALTRAD and take your electronic device back in hand. On this page are published all the documents necessary for the use of your device. BELLE RPC 45/60 by ALTRAD.
USER MANUAL BELLE RPC 45/60 ALTRAD
We, Belle Group Sheen UK, Sheen, Nr. Buxton, Derbyshire, SK17 0EU, GB, hereby certify that if the product described within this certificate is bought from an authorised Altrad Belle dealer within the EEC, it conforms to the following EEC directives: 2006/42/CE (This directive replaces directive 98/37/EC), Electromagnetic Compatibility Directive 2014/30/UE (as amended by 89/336/EEC, 92/31/EEC, 93/68 EEC & 2004/108/CE). The Waste Electrical and Electronic Equipment (WEEE) 2012/19/UE (as amended by 2002/96/CE), the low voltage directive 2014/35/UE (as amended by 2006/95/CE), BS EN ISO 12100-1:2003 Safety of machinery and associated harmonised standards, where applicable. Noise emissions conform to directives 2000/14/EC Annex VI & 2005/88/EC, for machines under article 12 the notified body is AVT Reliability, Unit 2 Easter Court, Europa Boulevard, Warrington, Cheshire, WA5 7ZB, GB. Noise Technical files are held by Ray Neilson at the Belle group Head Office address which is stated above.

PRODUCT TYPE. TYPE DE PRODUIT. TIPO DE PRODUCTO.
MODEL MODELE MODELO
TIPO DE PRODUCTO....PRODUCTTYPE.. PRODUKTTYPE.
MODELO.. MODEL
NO. DE SÉRIE SERIENUMMER SERIENR.
DATA DE FABRIC. .FABRICAGEDATUM. FREMSTILLINGSDATO.
NIVEL DE POTÊNCIA GEMETEN LYDEFFEKTNIVEAU
DE SOM MEDIDO / GELUIDSSTERKTKENIVEAU / MÁLT /
............(GARANTIDO)............(GEGARANDEERD)............(GARANTERET)
PESO. GEWICHT. VEGT

Signed by:
Signature:
Medido por:
Assinado por:
Getekend door: Uunderskrevetaf.

Place of Declaration - Sheen, Nr. Buxton, Derbyshire, SK17 0EU, UK
Lieu de déclaration - Sheen, Nr. Buxton, Derbyshire, SK17 0EU, UK
Date of Declaration - 2007
GARSO STIPRUMO LYGIS ISMATUOTAS/
HMBO HA CUNIATA HA 3BYKA N3MEPEHO/ (TAPAHTNPAHO)
TaOopou KaTynHepoynvia Kaatakeun/(Eyyuyn)
SVORIS.
TEOR.
Bapoc


Ray Neilson
HONHHTBbI DnpeKTO-OT MEnH BENII Epyu WINH (BEINKOBPATAHIA).
Tegevdirektor-BELLEGROUP(SHEEN)UKpoolt.
Vadošais direktors - Pärstāvot BELLE GROUP (SHEEN) UK.
Generalinis direktorius - BELLE GROUP (SHEEN) UK vardu.
PeHnCbh -YnpabnBaau. dIpeKTop OT mMeTo Ha BELLE GROUP (SHEEN) UK.
- BELLE GROUP (SHEEN) M B .
ES PROHLÁŠENI O SHODE / DECLARATIE DE CONFORMITATE CE /
EU MEGFELELOSEGI NYILATKOZAT / EC UYUM BILDIRGESI / EC IZJAVA O USKLADENOSTI /
PREHLASENIE O ZHODE

My, Belle Group Sheen UK, Sheen, Nr. Buxton, Derbyshire, SK 17 0EU, Velké Britanie, tpotvrzuji, ze v priapdeVyrobku uvedenych v tomto osvddeni je koupil od autorizovaneho dealera Altrad Belle v ramci EHS, ze splnjuhe nasledujici smernic EHS: 2006/42/CE (tato smernice nahrazuju smernici 98/37/ES) Elektromagneticka kompatilita Smernice 2014/30/UE (ve zneni 89/336/EEC, 92/31/EEC, 93/68 EHS & 2004/108/CE). Odpadniclektrichy a elektronickych zaifenich (OEEZ), 2012/19/UE (ve zneni 2002/96/CE), nizkonapefov smernice 2014/35/UE (ve zneni 2006/95/CE), BS EN ISO 12100-1:2003 Bezpecnost strojni zafizeni a souwisejci harmonizovanene normy, popipade. Hlukovych emisi v souladu se smemici 2000/14/ES pflhoha VI & 2005/88/ES, pro stroje podle clanku 12 oznameny subjekt AVT
Reliability, Unit 2 Easter Court, Europa Boulevard, Warrington, Cheshire, WA5 7ZB, Velká Británie.
Director General - in numele BELLE GROUP (SHEEN), UK
Ugyvezetogiazgato - A BELLE GROUP (SHEEN) UK nevben
Izvršni Direktor - U ime BELLE GROUP (SHEEN) UK
Yönetici-BELLE GROUP (SHEEN) UK adina.
Generány riaditel - menom BELLE GROUP (SHEEN) UK
Misto Deklarace - Sheen, Nr. Buxton, Derbyshire, SK17 0EU, UK
Locul declaratiei - Sheen, Nr. Buxton, Derbyshire, SK17 0EU, UK
Kiallitas Helye - Sheen, Nr. Buxton, Derbyshire, SK17 0EU, UK
Mjesto izjave o uskladenosti - Sheen, Nr. Buxton, Derbyshire, SK17 0EU, UK
Declaration Yeri - Sheen, Nr. Buxton, Derbyshire, SK17 0EU, UK
Miesto Deklaracia - Sheen, Nr. Buxton, Derbyshire, SK17 0EU, UK
Datum Deklarace - 2003
Data declaratiei - 2003
Kiallitas Ideje - 2003
This manual has been written to help you operate and service the 'RPC' safely. This manual is intended for dealers and operators of the 'RPC'.
Foreword
The 'Machine Description' section helps you to familiarise yourself with the machine's layout and controls.
The 'Environment' section gives instructions on how to handle the recycling of discarded apparatus in an environmentally friendly way.
The 'General Safety' and 'Health and Safety' sections explain how to use the machine to ensure your safety and the safety of the general public.
The 'Start and Stop Procedure' helps you with starting and stopping the machine.
The 'Trouble Shooting Guide' helps you if you have a problem with your machine.
The 'Service & Maintenance' section is to help you with the general maintenance and servicing of your machine.
The Warranty Section details the nature of the warranty cover and the claims procedure.
The 'Declaration of conformity' section shows the standards that the machine has been built to.
Directives with regard to the notations.
Text in this manual to which special attention must be paid are shown in the following way:

CAUTION
The product can be at risk. The machine or yourself can be damaged or injured if procedures are not carried out in the correct way.

WARNING
The life of the operator can be at risk.

WARNING

WARNING
Before you operate or carry out any maintenance on this machine YOU MUST READ and STUDY this manual.
KNOW how to safely use the unit's controls and what you must do for safe maintenance. (NB Be sure that you know how to switch the machine off before you switch on, in case you get into difficulty.)
ALWAYS wear or use the proper safety items required for your personal protection. If you have ANY QUESTIONS about the safe use or maintenance of this unit, ASK YOUR SUPERVISOR OR CONTACT: Altrad Belle (UK): +44 (0) 1298 84606

Contents
How To Use This Manual 6
Warning 6
Machine Description. 7
Technical Data. 7
Environment 7
Reasons For Compaction 7
General Safety 8
Health and Safety 8
Pre-Start Checks 8
Start and Stop Procedure 9
Operating Instructions 10
Trouble Shooting Guide 11
Service & Maintenance 112-13
Warranty 13
Declaration of conformity 2
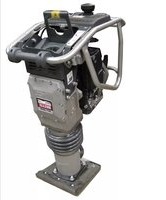
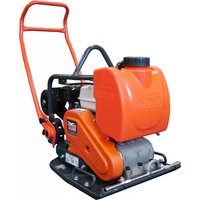
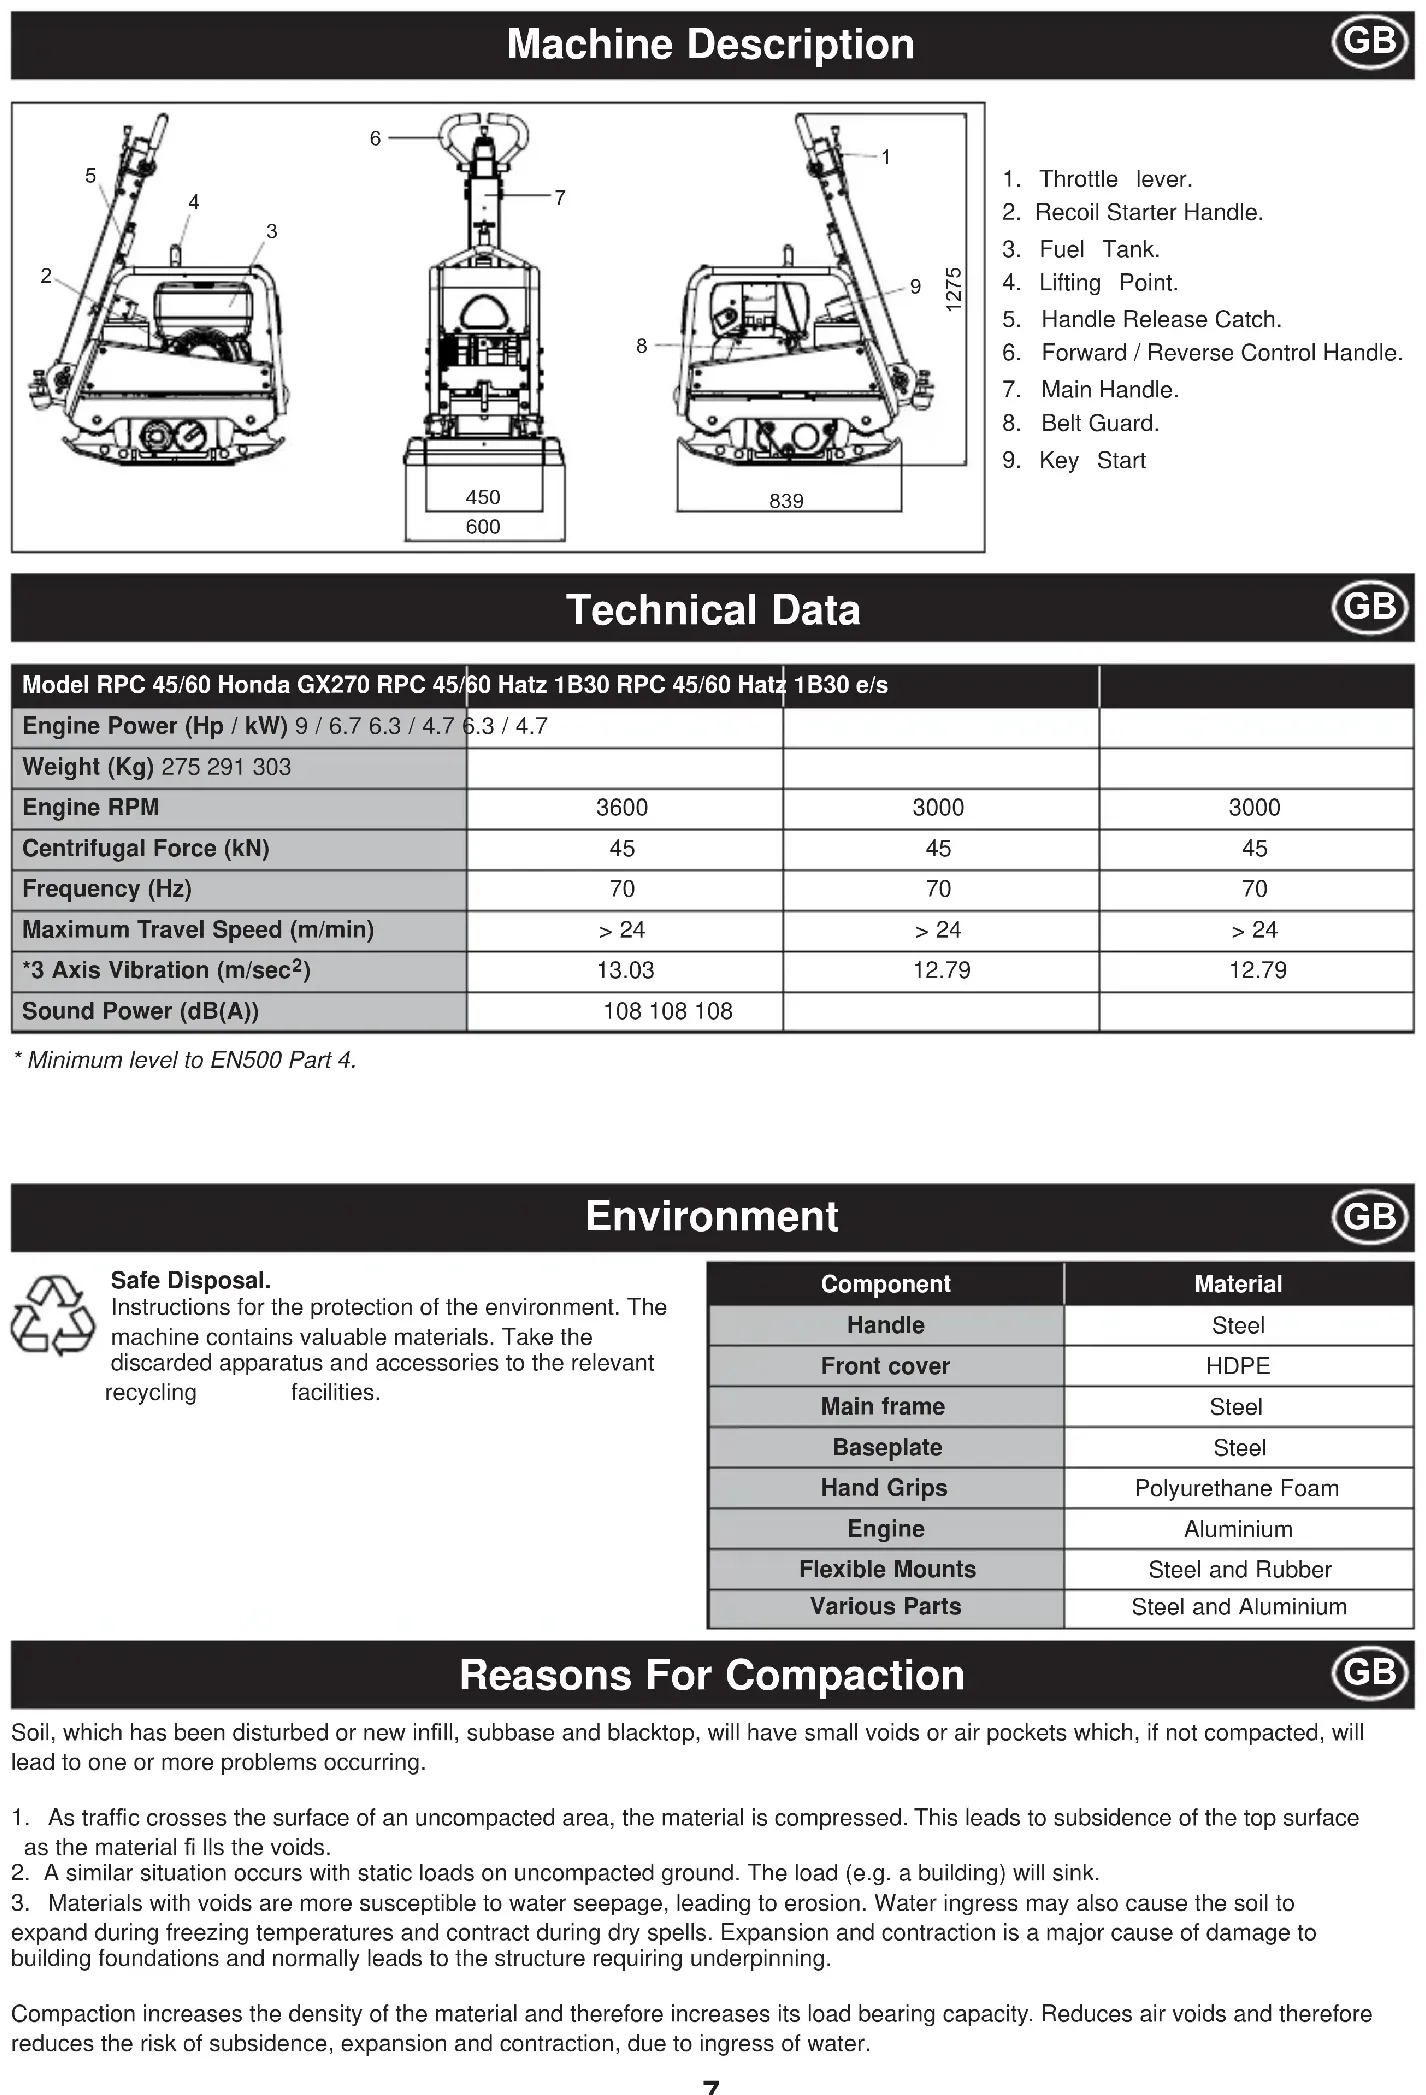
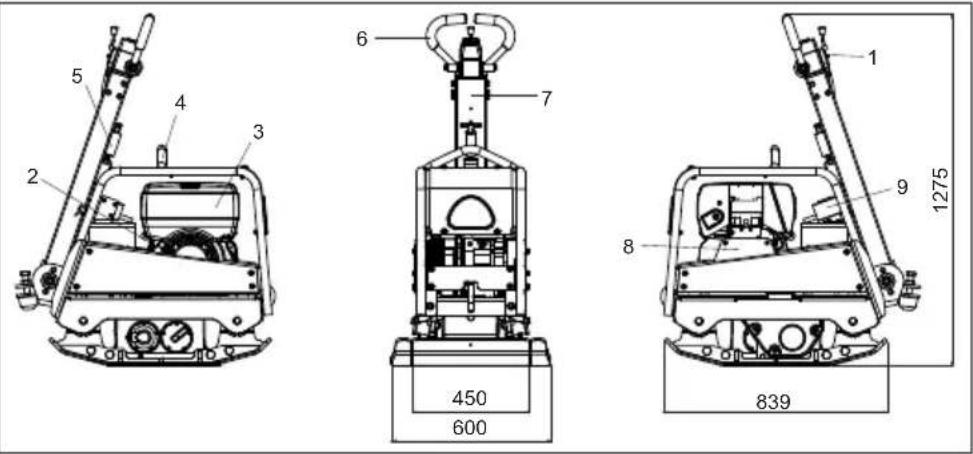
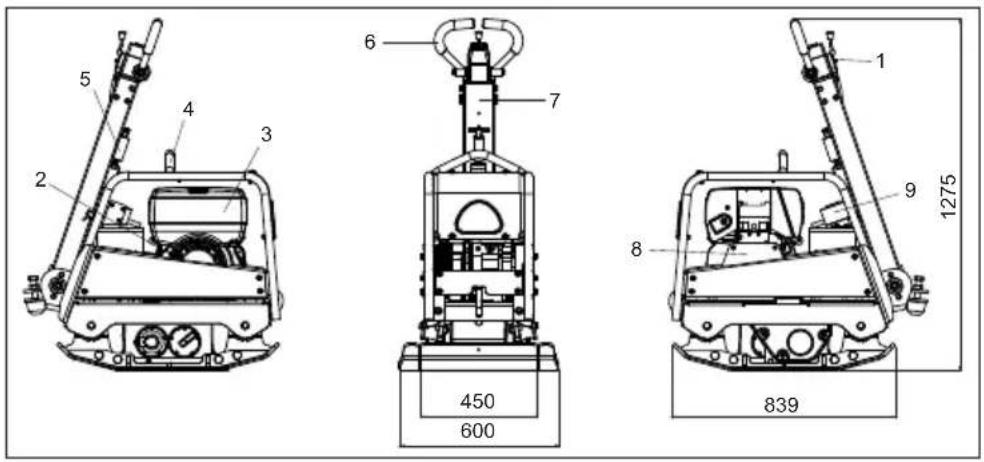
Machine Description

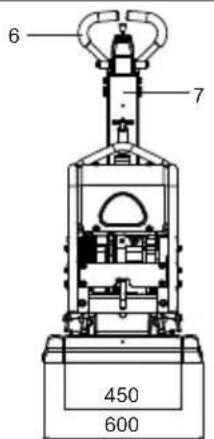
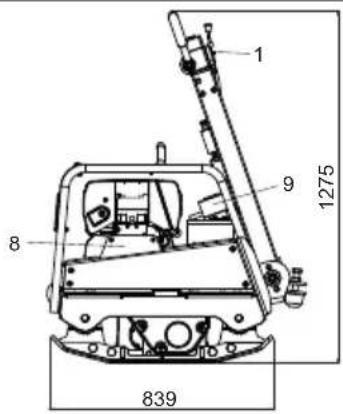
- Throttle lever.
- Recoil Starter Handle.
- Fuel Tank.
- Lifting Point.
- Handle Release Catch.
- Forward/Reverse Control Handle.
- Main Handle.
- Belt Guard.
- Key Start
Technical Data
GB
Environment
| Model RPC 45/60 Honda GX270 RPC 45/60 Halz 1B30 RPC 45/60 Halz 1B30 e/s | |||
| Engine Power (Hp / kW) 9 / 6.7 6.3 / 4.7 | 6.3 / 4.7 | ||
| Weight (Kg) 275 291 303 | |||
| Engine RPM | 3600 | 3000 | 3000 |
| Centrifugal Force (kN) | 45 | 45 | 45 |
| Frequency (Hz) | 70 | 70 | 70 |
| Maximum Travel Speed (m/min) | >24 | >24 | >24 |
| *3 Axis Vibration (m/sec²) | 13.03 | 12.79 | 12.79 |
| Sound Power (dB(A)) | 108 108 108 | ||
- Minimum level to EN500 Part 4.
GB

Safe Disposal.
Instructions for the protection of the environment. The machine contains valuable materials. Take the discarded apparatus and accessories to the relevant recycling facilities.
| Component | Material |
| Handle | Steel |
| Front cover | HDPE |
| Main frame | Steel |
| Baseplate | Steel |
| Hand Grips | Polyurethane Foam |
| Engine | Aluminium |
| Flexible Mounts | Steel and Rubber |
| Various Parts | Steel and Aluminium |
Reasons For Compaction
GB
Soil, which has been disturbed or new infill, subbase and blacktop, will have small voids or air pockets which, if not compacted, will lead to one or more problems occurring.
- As traffic crosses the surface of an uncompacted area, the material is compressed. This leads to subsidence of the top surface as the material fills the voids.
- A similar situation occurs with static loads on uncompacted ground. The load (e.g. a building) will sink.
- Materials with voids are more susceptible to water seepage, leading to erosion. Water ingress may also cause the soil to expand during freezing temperatures and contract during dry spells. Expansion and contraction is a major cause of damage to building foundations and normally leads to the structure requiring underpinning.
Compaction increases the density of the material and therefore increases its load bearing capacity. Reduces air voids and therefore reduces the risk of subsidence, expansion and contraction, due to ingress of water.
For your own personal protection and for the safety of those around you, please read and ensure you fully understand the following safety information. It is the responsibility of the operator to ensure that he/she fully understands how to operate this equipment safely. If you are unsure about the safe and correct use of the 'RPC', consult your supervisor or Altrad Belle.

CAUTION
Improper maintenance can be hazardous. Read and Understand this section before you perform any maintenance, service or repairs.
This equipment is heavy and must not be lifted single-handedly, either GET HELP or use suitable lifting equipment.
Cordon off the work area and keep members of the public and unauthorised personnel at a safe distance.
Personal Protective Equipment (PPE) must be worn by the operator whenever this equipment is being used (see Health & Safety).
Make sure you know how to safely switch this machine OFF before you switch it ON in case you get into difficulty.
Always switch OFF the engine before transporting, moving it around the site or servicing it.
During use the engine becomes very hot, allow the engine to cool before touching it. Never leave the engine running and unattended.
- Never remove or tamper with any guards fitted, they are there for your protection. Always check guards for condition and security, if any are damaged or missing, DO NOT USE THE COMPACTOR until the guard has been replaced or repaired.
Do not operate the Compactor when you are ill, feeling tired, or when under the influence of alcohol or drugs.

CAUTION
Fuel is flammable. It may cause injury and property damage. Shut down the engine, extinguish all open flames and do not smoke while filling the fuel tank. Always wipe up any spilled fuel.
Fuel Safety.
- Before refuelling, switch off the engine and allow it to cool.
- When refuelling, DO NOT smoke or allow naked flames in the area.
- Spilt fuel must be made safe immediately, using sand. If fuel is spilt on your clothes, change them.
- Store fuel in an approved, purpose made container away from heat and ignition sources.

Health & Safety
Vibration
Some vibration from the compaction operation is transmitted through the handle to the operator's hands. The Altrad Belle RPC range has been specifically designed to reduce hand/arm vibration levels. Refer to specifications & technical data for vibration levels and usage times (recommended maximum daily exposure time). DO NOT exceed the maximum usage times.
PPE (Personal Protective Equipment)
Suitable PPE must be worn when using this equipment i.e. Safety Goggles, Gloves, Ear Defenders, Dust Mask and Steel Toe capped footwear. Wear clothing suitable for the work you are doing. Tie back long hair and remove any jewellery which may catch in the equipment's moving parts. Always protect skin from contact with concrete.
Dust
The compacting process will occasionally produce dust, which may be hazardous to your health. Always wear a mask that is suited to the type of dust being produced.
Fuel
Do not ingest fuel or inhale fuel vapours and avoid contact with your skin. Wash fuel splashes immediately. If you get fuel in your eyes, irritate with copious amounts of water and seek medical attention as soon as possible.
Exhaust Fumes
Do not operate the compactor indoors or in a confined space, make sure the work area is adequately ventilated.

WARNING
The exhaust fumes produced by this equipment are highly toxic and can kill!

Pre-Start Checks
Pre start-up inspection
The following Pre-start-up inspection must be performed before the start of each work session or after every four hours of use, whichever is first. Please refer to the service section for detailed guidance. If any fault is discovered, the compactor must not be used until the fault is rectified.
- Thoroughly inspect the compactor for signs of damage. Check components are present and secure. Pay special attention to the belt guard.
- Check the engine oil and hydraulic oil level and top up as necessary.
- Check the engine fuel level and top up as necessary.
- Check for fuel, oil and hydraulic leaks.
Start And Stop Procedure
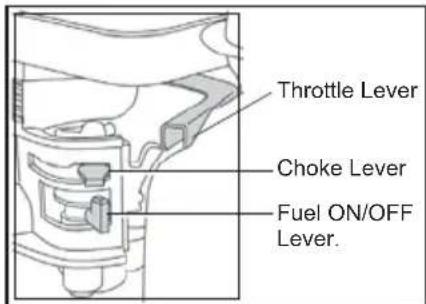
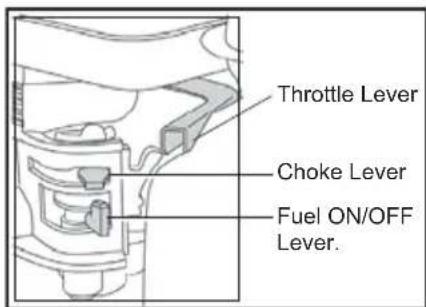
Honda Petrol Engine
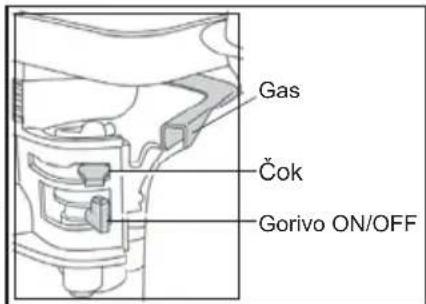
- Open the fuel tap by moving the fuel ON / OFF lever fully to the right.
- If starting the engine from cold, set the choke ON by moving the choke lever fully to the left. If restarting a warm engine, the choke is usually not required, however, if the engine has cooled to a degree, partial choke may be required.
- Turn the engine ON / OFF switch clockwise to the 'I' position.
- Set the throttle to the idle position by moving the throttle lever fully to the right. Do not start the engine on full throttle, as the compactor will vibrate as soon as the engine starts.
- Taking a firm hold of the control handle with one hand, grasp the recoil starter handle with the other. Pull the recoil starter until engine resistance is felt, then let starter return.
- Taking care not to pull the starter's rope fully out, pull the starter handle briskly.
- Repeat until the engine fires.
- Once the engine fires gradually set the choke lever to the OFF position by moving it to the right.
- If the engine fails to fire after several attempts, follow the troubleshooting guide.
- To stop the engine, set the throttle to idle and turn the engine ON / OFF switch anticlockwise to the '0' position.
- Turn the fuel off.
Hatz Diesel Engine
- Turn ON the fuel by moving the fuel ON/OFF lever fully to the right.
- Set the engine speed control to start.
- Taking a firm hold of the control handle with one hand, grasp the recoil starter handle with the other. Pull the handle until engine resistance is felt, then let the starter return.
- Taking care not to pull the starter's rope fully out, pull the starter handle briskly with both hands.
- Repeat this procedure until the engine fires.
- If the engine fails to start after several attempts, Follow the troubleshooting guide.
- To stop the engine, set the throttle control to idle, then press and hold the red stop button until the engine stops.
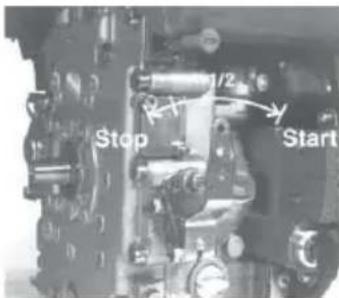
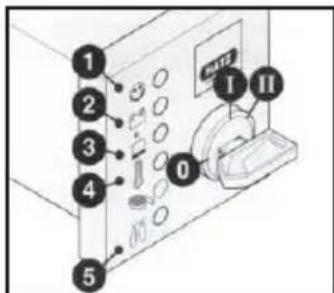
Hatz Diesel Engine (Electric Start)
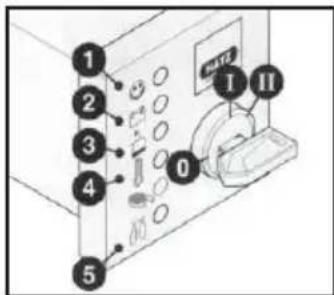
- With the decompression lever in position '0', insert the key and turn to position 'I' (Battery charge and oil pressure warning lights but light up)
- Turn start key to position 'll'
- As soon as the engine runs, release the start key. It must return to position '1' by itself and remain in this position during operation. The battery charge and oil pressure warning lights musst go out immediately after starting. Indicator light '1' is on when the engine is in operation.
- If anything seems to be incorrect, stop the engine immediately and rectify the fault. (See the Troubleshooting Guide)
- The engine temperature display '4' (additional equipment) lights up if the temperature at the cylinder head is too high. Switch off the engine and trace the cause of the problem.

CAUTION
Never operate the electric starter when the engine is running or coasting to a standstill. There is a risk of broken starter pinion or ring gear teeth. Never stop the engine by moving the decopression lever. During breaks in work or at the end of the working period, keep the starting handle and starting key in a safe place, out of reach of unauthorized persons.
- Always turn the start key back to position '0' before re-starting the engine. The repeat lock prevents the starter motor from engaging and possibly being damaged whilst the engine is still running.
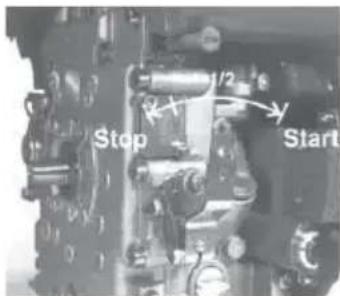
- Move speed control lever to '1' back to the STOP position.
- On engines with the lower engine speeds not accessible, move speed control lever '1' back, then move stop lever '2' in the STOP direction. Hold it there until the engine has stopped.
- Release the stop lever '2' when the engine has stopped, making sure that the lever returns to its normal position. (The charge and oil pressure lights will come on)
- Turn the key to the 0 position and pull it out. The lights must then go out.
Take the compactor to where it is required.
Where it is necessary to use lifting equipment to position the compactor, make sure the lifting equipment has a WLL (Working Load Limit) suitable for the compactors weight (see Technical Data section or the machine serial plate). Attach suitable chains or slings ONLY to the lifting point on the top of the compactor.
- Having carried out the checks listed in the 'Pre start' section, you may start the engine.
The Altrad Belle 'RPC' range of compactors are fitted with a centrifugal clutch, this allows the engine to run at idle without driving the gearbox.
As the engine speed is increased the clutch will engage and will drive the gearbox. For correct operation, the engine speed should be set to maximum.
- Set the throttle to maximum and use the control handle for direction and to steer or turn the compactor.
The control handle has been designed so that when it is being used in reverse and the operator lets go for any reason, the handle automatically moves into forward mode. This is a significant safety feature of the machine.
During normal operation you should not have to push the compactor but allow it to travel at its own pace.
The speed of travel will be determined by the condition of the surface being compacted.
Caution must be used when operating the compactor in reverse. Ensure that there are no obstructions or trip hazards when operating in reverse.
If the surface to be compacted is on a slope, great care must be taken when controlling the compactor's direction of travel. If necessary, use a suitable rope attached to the compactor at a low point on the chassis, to allow a helper to take part of the compactor's weight. Work up and down a slope not across.
- Work the compactor over the surface in an organised pattern until the required compaction has been achieved.
Where there are a number of different layers to be compacted on top of each other, compact each layer individually.
- To stop the compactor vibrating, set the throttle to idle. To stop the engine refer to the relevant start / stop procedure.
Trouble Shooting Guide
| Problem Cause Remedy | ||
| Engine will not start. | No fuel. | Open fuel tap. |
| Fill fuel tank. | ||
| Engine switched off. Switch engine on. | ||
| Spark plug fouled. Clean and reset plug gap. | ||
| Engine cold. Close choke. | ||
| Engine flooded. | Honda, open choke, fully open throttle, pull recoil starter until engine fi res. | |
| Hatz, move speed control to stop, pull recoil starter 5 times then repeat start procedure. | ||
| Engine still will not start. Major Fault. Contact Agent or Altrad Belle. | ||
| Unit will not move. | Engine speed too slow. Set engine speed | control to fast. |
| Drive belt tension loose. Adjust belt tension | ||
| Air filter blocked. | Clean or renew air filter. | |
| Worn or Damaged Clutch. Repair or Replace | as necessary. | |
| Drive failure. Contact Agent or Altrad Belle. | ||
| Gearbox failure. Contact Agent or Altrad Belle. | ||
| Forward speed too slow. | Too much oil in hydraulic head. | Reduce oil level. |
| Wrong adjustment of control system | Contact Agent or Altrad Belle. | |
| Reverse speed too slow. | Not enough oil in hydraulic head. | Fill and bleed system. |
| Air in control system. | Bleed control system. | |
| Wrong adjustment of control system | Contact Agent or Altrad Belle. | |
| Loss of Hydraulic Oil. | Connectors leaking. | Rseal connectors. |
| Defective hydraulic hose. | Replace hose. | |
| Piston seal in gearbox defective. | Contact Agent or Altrad Belle. | |
| Machine operates erratically. | Shock mounts damaged. | Replace all four mounts. |
Service & Maintenance
The Altrad Belle 'RPC' range of Reversible Plate Compactors are designed to give many years of trouble free operation. It is, however, important that the simple regular maintenance listed in this section is carried out. It is recommended that an approved Altrad Belle dealer carries out all major maintenance and repairs. Always use genuine Altrad Belle replacement parts, the use of spurious parts may void your warranty.
Before any maintenance is carried out on the machine, switch off the engine. If working on a diesel engine, make sure that the stop switch is in the stop position.
Always set the compactor on level ground to ensure any fluid levels will be correctly read. Only use recommended oils (see chart on following page).
Running In Period
When the compactor is first used from new, the engine oil must be changed after the initial running in period (see engine manufacturer's manual for full detail). The belt tension should be checked after 4 hours use.
Drive Belt
Remove the belt guard then check the belt tension by placing light finger pressure on the top of the belt, as near central between the engine drive and gearbox pulley. The belt should deflect by approx. 10 to 15mm . If the belt tension requires adjustment, loosen the setscrew on the Belt Tensioning device and slide to the right. Once set, retighten the setscrew and check belt tension a second time. Finally, replace the belt guard ensuring it is correctly and securely fitted.
| Routine Maintenance | Every 8 Hours | First Month / 50 Hours | 150 Hours | 250 Hours | 500 Hours | |
| Engine Oil | Check Level | ✓ | ||||
| Change | ✓ | ✓ | ||||
| Air Filter | Check Condition / Clean | ✓ | ||||
| Replace when necessary / Every 12 months | ||||||
| Spark Plug Change | ✓ | |||||
| Drive Belt Tension | ✓ | ✓ | ||||
Oil / Fuel Type & Quantity - Spark Plug Type
| Oil Type | Quantity (Litre) | Fuel Type | Capacity (Litre) | Spark Plug Type | Electrode Gap (mm) | |
| Petrol Honda GX270 S.A.E. 10 | W 30 0.6 Unleaded | 3.6 | BM6ES or BPR6ES | 0.6 - 0.7 | ||
| Diesel Hatz 1B30 | S.A.E. 10W 30 0.9 | Diesel (BS2869) | Refer to Manual | N/A N/A |
Oil Type & Quantity
| Component Oil Type | Honda GX270 (Litres) | Hatz 1B30 (Litres) | |
| Gearbox | S.A.E. 75W 90 | 1.2 | 1.2 |
| Hydraulic Control | Shell Tellus 32 | 0.2 | 0.2 |
| Fuchs Renolin MR520 | 0.2 | 0.2 |

CAUTION
WHILST RUNNING THIS MACHINE DURING THIS PROCEDURE, IT IS ADVISIBLE TO PUT THE MACHINE ONTO A RUBBER MAT OR EQUIVALENT TO ABSORB SOME OF THE VIBRATION.
Bleeding the Hydraulic System
- Ensure the machine is in a stationary position, and situated on level ground.
- Remove the filler cap, and fill the control pump head with oil. Stop once you have reached the maximum level indicator, which is within the head.
- Slowly pump the control handle from the 'Forward Motion' position, to the 'Reverse Motion' position, until the oil level drops.
- Re-fill the control pump head up to the maximum level. Continue to pump the handle until resistance is felt, and the handle locks in the 'Reverse Motion' position.
- Again, re-fill the control pump head up to the maximum level.
- Re-fi t the Filler Bung, and test the machine.
Service & Maintenance
Assembly of the Control Pump
- Carefully clean the housing with compressed air on the inside. Check for scratches on sliding bores for O Rings and there are no sharp edges.
- Press the Bushing in to Housing.
- Lubricate the Lip Seal with Hydraulic Oil and slip it on the Rack (open side away from the rack).
- Lubricate the Rack with Hydraulic Oil and slide it into the Housing until the Lip Seal is in the groove, making sure the teeth are in the right position. When the Lip Seal is in the Groove this represents forward motion.

CAUTION
In reverse motion the Control Handles run parallel with the Housing in the direction of the operator.
- After lubricating the Pinion (without O Rings), insert it into the Housing and Rack. Check the movement of the Rack from Forward to Reverse. (See CAUTION).
6 Take the Pinion out and fit the two O Rings, making sure they are not damaged. - Lubricate the Pinion and O Rings with hydraulic oil and carefully insert in to the Housing. Make sure the Rack is in the right position and this is easiest when in reverse motion.
- Fit the Shim and Retaining Ring. It may be necessary to push the Pinion from the opposite side to get them assembled.
- Place the Housing on the filler side and fit the O Rings to the bottom face. LOCTITE seal 518 is recommended.
- Assemble the Hydraulic Connector and Dowty Washer using LOCTITE 243.
- Assemble the Bracket and fix with 4 screws and washers using LOCTITE 243.
- Loosely fit the Plug Screw and Washer DO NOT TIGHTEN.
Warranty

Your new Altrad Belle 'RPC' plate compactor is warranted to the original purchaser for a period of one-year (12 months) from the original date of purchase.
The Altrad Belle warranty is against defects in design, materials and workmanship.
The following are not covered under the Altrad Belle warranty:
- Damage caused by abuse, misuse, dropping or other similar damage caused by or as a result of failure to follow assembly, operation or user maintenance instructions.
- Alterations, additions or repairs carried out by persons other than Altrad Belle or their recognised agents.
- Transportation or shipment costs to and from Altrad Belle or their recognised agents, for repair or assessment against a warranty claim, on any machine.
- Materials and/or labour costs to renew, repair or replace components due to fair wear and tear.
The following components are not covered by warranty.
Drivebelt/s
- Engine Air Filter
- Engine Spark Plug
Altrad Belle and/or their recognised agents, directors, employees or insurers will not be held liable for consequential or other damages, losses or expenses in connection with or by reason of or the inability to use the machine for any purpose.
Warranty Claims
All warranty claims should firstly be directed to Altrad Belle or Altrad Belle Inc., either by telephone, by Fax, by E-mail, or in writing.
For Warranty claims:
Altrad Belle Warranty Department,
Sheen, N Buxton
Derbyshire
SK170EU
England
Tel: +44 (0)1298 84606
Fax: +44 (0)1298 84722
Email: warranty@belle-group.co.uk
This manual has been written to help you operate and service the 'RPC' safely. This manual is intended for dealers and operators of the 'RPC'.
Foreword
The 'Machine Description' section helps you to familiarise yourself with the machine's layout and controls.
The 'Environment' section gives instructions on how to handle the recycling of discarded apparatus in an environmentally friendly way.
The 'General Safety' and 'Health and Safety' sections explain how to use the machine to ensure your safety and the safety of the general public.
The 'Start and Stop Procedure' helps you with starting and stopping the machine.
The 'Trouble Shooting Guide' helps you if you have a problem with your machine.
The 'Service & Maintenance' section is to help you with the general maintenance and servicing of your machine.
The 'Warranty' Section details the nature of the warranty cover and the claims procedure.
The 'Declaration of conformity' section shows the standards that the machine has been built to.
Directives with regard to the notations.
Text in this manual to which special attention must be paid are shown in the following way:

CAUTION
The product can be at risk. The machine or yourself can be damaged or injured if procedures are not carried out in the correct way.

WARNING
The life of the operator can be at risk.
US
WARNING

WARNING
Before you operate or carry out any maintenance on this machine YOU MUST READ and STUDY this manual.
KNOW how to safely use the unit's controls and what you must do for safe maintenance. (NB Be sure that you know how to switch the machine off before you switch on, in case you get into difficulty.)
ALWAYS wear or use the proper safety items required for your personal protection. If you have ANY QUESTIONS about the safe use or maintenance of this unit, ASK YOUR SUPERVISOR OR CONTACT: Altrad Belle (UK): +44 (0) 1298 84606
US
Contents
How To Use This Manual 14
Warning 14
Machine Description. 15
Technical Data. 15
Environment 15
General Safety 15
Health and Safety. 16
Pre-Start Checks 16
Reasons For Compaction. 16
Start and Stop Procedure 17
Operating Instructions 18
Trouble Shooting Guide 19
Service & Maintenance 20-21
Warranty 21
Machine Description
- Throttle lever.
- Recoil Starter Handle.
- Fuel Tank.
- Lifting Point.
- Handle Release Catch.
- Forward/Reverse Control Handle.
- Main Handle.
- Belt Guard.
- Key Start
Technical Data
US
Environment
| Model | RPC 45/60 Honda GX270 | RPC 45/60 Hatz 1B30 | RPC 45/60 Hatz 1B30 e/s |
| Engine Power (Hp / kW) | 9 / 6.7 | 6.3 / 4.7 | 6.3 / 4.7 |
| Weight (lbs) | 606 | 641.5 | 668 |
| Engine RPM | 3600 3000 3000 | ||
| Centrifugal Force (kN) | 45 | 45 | 45 |
| Frequency (Hz) | 70 | 70 | 70 |
| Maximum Travel Speed (ft/min) | >78.7 | >78.7 | >78.7 |
| *3 Axis Vibration (m/sec²) | 13.03 | 12.79 | 12.79 |
| Sound Power (dB(A)) | 108 | 108 | 108 |
- Minimum level to EN500 Part 4.
US

Safe Disposal.
Instructions for the protection of the environment. The machine contains valuable materials. Take the discarded apparatus and accessories to the relevant recycling facilities.
| Component Material | |
| Handle Steel | |
| Front cover HDPE | |
| Main frame Steel | |
| Baseplate Steel | |
| Hand Grips Polyurethane Foam | |
| Engine Aluminium | |
| Flexible Mounts | Steel and Rubber |
| Various Parts | Steel and Aluminium |
Reasons For Compaction
US
Soil, which has been disturbed or new infill, subbase and blacktop, will have small voids or air pockets which, if not compacted, will lead to one or more problems occurring.
- As traffic crosses the surface of an uncompacted area, the material is compressed. This leads to subsidence of the top surface as the material fills the voids.
- A similar situation occurs with static loads on uncompacted ground. The load (e.g. a building) will sink.
- Materials with voids are more susceptible to water seepage, leading to erosion. Water ingress may also cause the soil to expand during freezing temperatures and contract during dry spells. Expansion and contraction is a major cause of damage to building foundations and normally leads to the structure requiring underpinning.
Compaction increases the density of the material and therefore increases its load bearing capacity. Reduces air voids and therefore reduces the risk of subsidence, expansion and contraction, due to ingress of water.
For your own personal protection and for the safety of those around you, please read and ensure you fully understand the following safety information. It is the responsibility of the operator to ensure that he/she fully understands how to operate this equipment safely. If you are unsure about the safe and correct use of the 'RPC', consult your supervisor or Altrad Belle.

CAUTION
Improper maintenance can be hazardous. Read and Understand this section before you perform any maintenance, service or repairs.
This equipment is heavy and must not be lifted single-handedly, either GET HELP or use suitable lifting equipment.
Cordon off the work area and keep members of the public and unauthorised personnel at a safe distance.
Personal Protective Equipment (PPE) must be worn by the operator whenever this equipment is being used (see Health & Safety).
Make sure you know how to safely switch this machine OFF before you switch it ON in case you get into difficulty.
Always switch OFF the engine before transporting, moving it around the site or servicing it.
During use the engine becomes very hot, allow the engine to cool before touching it. Never leave the engine running and unattended.
- Never remove or tamper with any guards fitted, they are there for your protection. Always check guards for condition and security, if any are damaged or missing, DO NOT USE THE COMPACTOR until the guard has been replaced or repaired.
Do not operate the Compactor when you are ill, feeling tired, or when under the influence of alcohol or drugs.

CAUTION
Fuel is flammable. It may cause injury and property damage. Shut down the engine, extinguish all open flames and do not smoke while filling the fuel tank. Always wipe up any spilled fuel.
Fuel Safety.
- Before refuelling, switch off the engine and allow it to cool.
- When refuelling, DO NOT smoke or allow naked flames in the area.
- Spilt fuel must be made safe immediately, using sand. If fuel is spilt on your clothes, change them.
- Store fuel in an approved, purpose made container away from heat and ignition sources.

Health & Safety
Vibration
Some vibration from the compaction operation is transmitted through the handle to the operator's hands. The Altrad Belle RPC range has been specifically designed to reduce hand/arm vibration levels. Refer to specifications & technical data for vibration levels and usage times (recommended maximum daily exposure time). DO NOT exceed the maximum usage times.
PPE (Personal Protective Equipment)
Suitable PPE must be worn when using this equipment i.e. Safety Goggles, Gloves, Ear Defenders, Dust Mask and Steel Toe capped footwear. Wear clothing suitable for the work you are doing. Tie back long hair and remove any jewellery which may catch in the equipment's moving parts. Always protect skin from contact with concrete.
Dust
The compacting process will occasionally produce dust, which may be hazardous to your health. Always wear a mask that is suited to the type of dust being produced.
Fuel
Do not ingest fuel or inhale fuel vapours and avoid contact with your skin. Wash fuel splashes immediately. If you get fuel in your eyes, irritate with copious amounts of water and seek medical attention as soon as possible.
Exhaust Fumes
Do not operate the compactor indoors or in a confined space, make sure the work area is adequately ventilated.

WARNING
The exhaust fumes produced by this equipment are highly toxic and can kill!

Pre-Start Checks
Pre start-up inspection
The following Pre-start-up inspection must be performed before the start of each work session or after every four hours of use, whichever is first. Please refer to the service section for detailed guidance. If any fault is discovered, the compactor must not be used until the fault is rectified.
- Thoroughly inspect the compactor for signs of damage. Check components are present and secure. Pay special attention to the belt guard.
- Check the engine oil and hydraulic oil level and top up as necessary.
- Check the engine fuel level and top up as necessary.
- Check for fuel, oil and hydraulic leaks.
Start And Stop Procedure
Honda Petrol Engine
- Open the fuel tap by moving the fuel ON / OFF lever fully to the right.
- If starting the engine from cold, set the choke ON by moving the choke lever fully to the left. If restarting a warm engine, the choke is usually not required, however, if the engine has cooled to a degree, partial choke may be required.
- Turn the engine ON / OFF switch clockwise to the 'I' position.
- Set the throttle to the idle position by moving the throttle lever fully to the right. Do not start the engine on full throttle, as the compactor will vibrate as soon as the engine starts.
- Taking a firm hold of the control handle with one hand, grasp the recoil starter handle with the other. Pull the recoil starter until engine resistance is felt, then let starter return.
- Taking care not to pull the starter's rope fully out, pull the starter handle briskly.
- Repeat until the engine fires.
- Once the engine fires gradually set the choke lever to the OFF position by moving it to the right.
- If the engine fails to fire after several attempts, follow the troubleshooting guide.
- To stop the engine, set the throttle to idle and turn the engine ON / OFF switch anticlockwise to
- Turn the fuel off.
the 0^ position.
Hatz Diesel Engine
- Turn ON the fuel by moving the fuel ON/OFF lever fully to the right.
- Set the engine speed control to start.
- Taking a firm hold of the control handle with one hand, grasp the recoil starter handle with the other. Pull the handle until engine resistance is felt, then let the starter return.
- Taking care not to pull the starter's rope fully out, pull the starter handle briskly with both hands.
- Repeat this procedure until the engine fires.
- If the engine fails to start after several attempts, Follow the troubleshooting guide.
- To stop the engine, set the throttle control to idle, then press and hold the red stop button until the engine stops.

Hatz Diesel Engine (Electric Start)
- With the decompression lever in position '0', insert the key and turn to position 'I' (Battery charge and oil pressure warning lights but light up)
- Turn start key to position 'll'
- As soon as the engine runs, release the start key. It must return to position 'I' by itself and remain in this position during operation. The battery charge and oil pressure warning lights musst go out immediately after starting. Indicator light '1' is on when the engine is in operation.
- If anything seems to be incorrect, stop the engine immediately and rectify the fault. (See the Troubleshooting Guide)
- The engine temperature display '4' (additional equipment) lights up if the temperature at the cylinder head is too high. Switch off the engine and trace the cause of the problem.

CAUTION
Never operate the electric starter when the engine is running or coasting to a standstill. There is a risk of broken starter pinion or ring gear teeth. Never stop the engine by moving the decopression lever. During breaks in work or at the end of the working period, keep the starting handle and starting key in a safe place, out of reach of unauthorized persons.
- Always turn the start key back to position '0' before re-starting the engine. The repeat lock prevents the starter motor from engaging and possibly being damaged whilst the engine is still running.
- Move speed control lever to '1' back to the STOP position.
- On engines with the lower engine speeds not accessible, move speed control lever '1' back, then move stop lever '2' in the STOP direction. Hold it there until the engine has stopped.
- Release the stop lever '2' when the engine has stopped, making sure that the lever returns to its normal position. (The charge and oil pressure lights will come on)
- Turn the key to the 0 position and pull it out. The lights must then go out.
Take the compactor to where it is required.
Where it is necessary to use lifting equipment to position the compactor, make sure the lifting equipment has a WLL (Working Load Limit) suitable for the compactors weight (see Technical Data section or the machine serial plate). Attach suitable chains or slings ONLY to the lifting point on the top of the compactor.
- Having carried out the checks listed in the 'Pre start' section, you may start the engine.
The Altrad Belle 'RPC' range of compactors are fitted with a centrifugal clutch, this allows the engine to run at idle without driving the gearbox.
As the engine speed is increased the clutch will engage and will drive the gearbox. For correct operation, the engine speed should be set to maximum.
- Set the throttle to maximum and use the control handle for direction and to steer or turn the compactor.
The control handle has been designed so that when it is being used in reverse and the operator lets go for any reason, the handle automatically moves into forward mode. This is a significant safety feature of the machine.
During normal operation you should not have to push the compactor but allow it to travel at its own pace.
The speed of travel will be determined by the condition of the surface being compacted.
Caution must be used when operating the compactor in reverse. Ensure that there are no obstructions or trip hazards when operating in reverse.
If the surface to be compacted is on a slope, great care must be taken when controlling the compactor's direction of travel. If necessary, use a suitable rope attached to the compactor at a low point on the chassis, to allow a helper to take part of the compactor's weight. Work up and down a slope not across.
- Work the compactor over the surface in an organised pattern until the required compaction has been achieved.
Where there are a number of different layers to be compacted on top of each other, compact each layer individually.
To stop the compactor vibrating, set the throttle to idle. To stop the engine refer to the relevant start / stop procedure.
Trouble Shooting Guide
| Problem Cause Remedy | ||
| Engine will not start. | No fuel. | Open fuel tap. |
| Fill fuel tank. | ||
| Engine switched off. Switch engine on. | ||
| Spark plug fouled. Clean and reset plug gap. | ||
| Engine cold. Close choke. | ||
| Engine fl ooded. | Honda, open choke, fully open throttle, pull recoil starter until engine fi res. | |
| Hatz, move speed control to stop, pull recoil starter 5 times then repeat start procedure. | ||
| Engine still will not start. Major Fault. Contact Agent or Altrad Belle. | ||
| Unit will not move. | Engine speed too slow. Set engine speed control to fast. | |
| Drive belt tension loose. Adjust belt tension | ||
| Air filter blocked. | Clean or renew air filter. | |
| Worn or Damaged Clutch. Repair or Replace as necessary. | ||
| Drive failure. Contact Agent or Altrad Belle. | ||
| Gearbox failure. Contact Agent or Altrad Belle. | ||
| Forward speed too slow. | Too much oil in hydraulic head. | Reduce oil level. |
| Wrong adjustment of control system | Contact Agent or Altrad Belle. | |
| Reverse speed too slow. | Not enough oil in hydraulic head. | Fill and bleed system. |
| Air in control system. | Bleed control system. | |
| Wrong adjustment of control system | Contact Agent or Altrad Belle. | |
| Loss of Hydraulic Oil. | Connectors leaking. | Reseal connectors. |
| Defective hydraulic hose. | Replace hose. | |
| Piston seal in gearbox defective. | Contact Agent or Altrad Belle. | |
| Machine operates erratically. | Shock mounts damaged. | Replace all four mounts. |
The Altrad Belle 'RPC' range of Reversible Plate Compactors are designed to give many years of trouble free operation. It is, however, important that the simple regular maintenance listed in this section is carried out. It is recommended that an approved Altrad Belle dealer carries out all major maintenance and repairs. Always use genuine Altrad Belle replacement parts, the use of spurious parts may void your warranty.
Before any maintenance is carried out on the machine, switch off the engine. If working on a diesel engine, make sure that the stop switch is in the stop position.
Always set the compactor on level ground to ensure any fluid levels will be correctly read. Only use recommended oils (see chart on following page).
Running In Period
When the compactor is first used from new, the engine oil must be changed after the initial running in period (see engine manufacturer's manual for full detail). The belt tension should be checked after 4 hours use.
Drive Belt
Remove the belt guard then check the belt tension by placing light finger pressure on the top of the belt, as near central between the engine drive and gearbox pulley. The belt should deflect by approx. 10 to 15mm . If the belt tension requires adjustment, loosen the setscrew on the Belt Tensioning device and slide to the right. Once set, retighten the setscrew and check belt tension a second time. Finally, replace the belt guard ensuring it is correctly and securely fitted.
| Routine Maintenance | Every 8 Hours | First Month / 50 Hours | 150 Hours | 250 Hours | 500 Hours | |
| Engine Oil | Check Level | ✓ | ||||
| Change | ✓ | ✓ | ||||
| Air Filter | Check Condition / Clean | ✓ | ||||
| Replace when necessary / Every 12 months | ||||||
| Spark Plug Change | ✓ | |||||
| Drive Belt Tension | ✓ | ✓ | ||||
Oil / Fuel Type & Quantity - Spark Plug Type
| Oil Type | Quantity (Gal) | Fuel Type | Capacity (Gal) | Spark Plug Type | Electrode Gap (mm) | |
| Petrol Honda GX270 S.A.E. 10 | W 30 0.16 Unleaded 0.95 | BM6ES or BPR6ES | 0.6 - 0.7 | |||
| Diesel Hatz 1B30 | S.A.E. 10W 30 0.24 | Diesel (BS2869) | Refer to Manual | N/A N/A | ||
Oil Type & Quantity
| Component Oil Type | Honda GX270 (Gals) | Hatz 1B30 (Gals) | |
| Gearbox S.A.E. 75W 90 0.3 0.3 | |||
| Hydraulic Control | Shell Tellus 32 | 0.05 | 0.05 |
| Fuchs Renolin MR520 | 0.05 | 0.05 |

CAUTION
WHILST RUNNING THIS MACHINE DURING THIS PROCEDURE, IT IS ADVISIBLE TO PUT THE MACHINE ONTO A RUBBER MAT OR EQUIVALENT TO ABSORB SOME OF THE VIBRATION.
Bleeding the Hydraulic System
- Ensure the machine is in a stationary position, and situated on level ground.
- Remove the filler cap, and fill the control pump head with oil. Stop once you have reached the maximum level indicator, which is within the head.
- Slowly pump the control handle from the 'Forward Motion' position, to the 'Reverse Motion' position, until the oil level drops.
- Re-fill the control pump head up to the maximum level. Continue to pump the handle until resistance is felt, and the handle locks in the 'Reverse Motion' position.
- Again, re-fill the control pump head up to the maximum level.
- Re-fi t the Filler Bung, and test the machine.
Service & Maintenance
Assembly of the Control Pump
- Carefully clean the housing with compressed air on the inside. Check for scratches on sliding bores for O Rings and there are no sharp edges.
- Press the Bushing in to Housing.
- Lubricate the Lip Seal with Hydraulic Oil and slip it on the Rack (open side away from the rack).
- Lubricate the Rack with Hydraulic Oil and slide it into the Housing until the Lip Seal is in the groove, making sure the teeth are in the right position. When the Lip Seal is in the Groove this represents forward motion.

CAUTION
In reverse motion the Control Handles run parallel with the Housing in the direction of the operator.
- After lubricating the Pinion (without O Rings), insert it into the Housing and Rack. Check the movement of the Rack from Forward to Reverse. (See CAUTION).
6 Take the Pinion out and fit the two O Rings, making sure they are not damaged. - Lubricate the Pinion and O Rings with hydraulic oil and carefully insert in to the Housing. Make sure the Rack is in the right position and this is easiest when in reverse motion.
- Fit the Shim and Retaining Ring. It may be necessary to push the Pinion from the opposite side to get them assembled.
- Place the Housing on the filler side and fit the O Rings to the bottom face. LOCTITE seal 518 is recommended.
- Assemble the Hydraulic Connector and Dowty Washer using LOCTITE 243.
- Assemble the Bracket and fix with 4 screws and washers using LOCTITE 243.
- Loosely fit the Plug Screw and Washer DO NOT TIGHTEN.
Warranty

Your new Altrad Belle 'RPC' plate compactor is warranted to the original purchaser for a period of one-year (12 months) from the original date of purchase.
The Altrad Belle warranty is against defects in design, materials and workmanship.
The following are not covered under the Altrad Belle warranty:
- Damage caused by abuse, misuse, dropping or other similar damage caused by or as a result of failure to follow assembly, operation or user maintenance instructions.
- Alterations, additions or repairs carried out by persons other than Altrad Belle or their recognised agents.
- Transportation or shipment costs to and from Altrad Belle or their recognised agents, for repair or assessment against a warranty claim, on any machine.
- Materials and/or labour costs to renew, repair or replace components due to fair wear and tear.
The following components are not covered by warranty.
Drivebelt/s
- Engine Air Filter
- Engine Spark Plug
Altrad Belle and/or their recognised agents, directors, employees or insurers will not be held liable for consequential or other damages, losses or expenses in connection with or by reason of or the inability to use the machine for any purpose.
Warranty Claims
All warranty claims should firstly be directed to Altrad Belle or Altrad Belle Inc., either by telephone, by Fax, by E-mail, or in writing.
For Warranty claims:
Altrad Belle Inc.
3959 Electric Road, Roanoke
VA, 24018
USA
Tel: +1 540.345.5090
Fax: +1 540.345.5091
E-mail: Bellegroupinc@aol.com
PPE (Personal Protective Equipment) - Equipement de protection
Altrad Belle Warranty Department,
Sheen, N2Buxton
Derbyshire
SK17 0EU
England
Tel: +44 (0)1298 84606 Fax: +44 (0)1298 84722
Email: warranty@belle-group.co.uk

Uso de este manual
Altrad Belle Warranty Department,
Sheen, No Buxton
Derbyshire
SK170EU
England
Tel: +44 (0)1298 84606 Fax: +44 (0)1298 84722
Email: warranty@belle-group.co.uk
Altrad Belle Warranty Department,
Sheen, No Buxton
Derbyshire
SK17 0EU
England
Tel: +44 (0)1298 84606 Fax: +44 (0)1298 84722
Email: warranty@belle-group.co.uk
Altrad Belle Warranty Department,
Sheen, N2 Buxton
Derbyshire
SK17 0EU
England
Tel: +44 (0)1298 84606 Fax: +44 (0)1298 84722
Email: warranty@belle-group.co.uk
Altrad Belle Warranty Department,
Sheen, No Buxton
Derbyshire
SK17 0EU
England
Tel: +44 (0)1298 84606 Fax: +44 (0)1298 84722
Email: warranty@belle-group.co.uk
Altrad Belle Warranty Department,
Sheen, NQ Buxton
Derbyshire
SK17 0EU
England
Tel: +44 (0)1298 84606 Fax: +44 (0)1298 84722
Email: warranty@belle-group.co.uk
Altrad Belle Warranty Department,
Sheen, No Buxton
Derbyshire
SK170EU
Inghilterra
Tel: +44 (0)1298 84606 Fax: +44 (0)1298 84722
Email: warranty@belle-group.co.uk
Altrad Belle Warranty Department,
Sheen, No Buxton
Derbyshire
SK17 0EU
England
Tel: +44 (0)1298 84606 Fax: +44 (0)1298 84722
Email: warranty@belle-group.co.uk
Altrad Belle Warranty Department,
Sheen, No Buxton
Derbyshire
SK170EU
England
Tel: +44 (0)1298 84606 Fax: +44 (0)1298 84722
Email: warranty@belle-group.co.uk
Altrad Belle Warranty Department,
Sheen, N° Buxton
Derbyshire
SK170EU
England
Tel: +44 (0)1298 84606 Fax: +44 (0)1298 84722
Email: warranty@belle-group.co.uk
Procedura Start & Stop. 105
Praca Ubijarki 106
Altrad Belle Warranty Department,
Sheen, N2 Buxton
Derbyshire
SK17 0EU
England
Tel: +44 (0)1298 84606 Fax: +44 (0)1298 84722
Email: warranty@belle-group.co.uk
Kak noJIb3OBAtbcra PykoBoDCTBOM
Dahnoe pykoOIOCTBO 6bIIO HanicaHO C cIbIIO NMOyBAM B 6e3OnaCHO pa6ote n 06cnyKBAHN PJK. DaHHOe pyKOBOCTBO npedHa3NaHeO dIra NoctabUKNOB n OepaTopoB PIK.
PpeinncIOBne
Pa3dIe I OncaHne Maunhbl) NOMOKET Bam O3HaKOMITbcyCTPOJCTBOM MaunHbI ee ynpaBHeHem.
Pa3dIe I Okpykaoza cpea" npedeocabT Bam HcTpykun no nobody yTuIn3aun cncaHoro annapata C yHeTOM 3auntbokpykaoue i cpebl.
Pa3dJIbI «O6uaa Be3oNaacHocTb» n «3dOpOBbe n Be3oNaacHocTb» o6bAcHJOT, KaK noJIb3ObaTbcra DaHHoMaunHO C yHTOM BaWee co6CTBeHHoB 6e3oNaacHocTn n 6e3oNaacHocTn OkpykaUoiX.
Pa3dEeI'PpOeDpya no 3anycky u octahOBke NOMOXET Bam 3anyCTnTb N OCTaHOBnTB MaunHy.
Pa3dEe CObEtHa cnyaB 03MoKhbIX HenoJaOK' NOMOKeT Bam B cNyuae Bo3HKnHOBeHnI npoBnem C Baue MaHHoH.
Pa3dIeTExHnueckoe 06cnyxuBaHHe NOMOKeT BaM C BOpocamN IO O6eMy TeXnueckomy 06cnyxuBaHIO BaWei MaunHbI.
Pa3dEe 工 RapaHTnra 1aet detaHoe onncahne ochoBbIX npHcunOB rapaHTn, a TaKKe npOceDpybl nIpeDbABeHHra paHTnHbIX npTeH3ni.
Bpa3dene «Ceptnfikat cooTBetCTBn» npuBeHebl cTahdapTbI, no KOTOpblm daHHa MaHHa 6bla nocTpOeHa.
Yka3aHnO O Beuax, Tpe6yUoIx NOBbiueHHoro BHMaHnA.
TeKCT B daHHOM pyKOBOcTBe, Ha KOTOpbI Heo6xOJIMo o6paTtB O06EHoe BHMaHHe, BblJeHcNeDyUOUM 6pa3OM:

BHIMAHHE
Daanna npodykuiy moxem codepka b ce6e 3neMeHmbl pucka. B cnyuae, ecnu npouedypb bblonnHmcm HeepHo, moxem nocmpadamb kak Maunu, mak u bbl camu.

PpeynpexdeHne
Ku3Hb onepamopao Moem nooepaHymbocnacnocmu.
PpeDynpexKdEHNHe!


PpeynpeKdHne
Ppejde yem npoeodumkakue-nubo paobmbu unu ebinnohmb mexo6cnykauehaue daHHou mawunbbl BblONXHbI PPOHTATb u N3yUTb daHHoe pyko8ocm80.
Heo6xOIMO 3HATb, k6 6e3oNaCHO noJIb3OBaTbC8 ynpabNeHem daHHo MaunHb I uTo HaIO deJaTB dIg 6e3oNaCHO BblOnHeHHa pa60T NO TEXHnueckOMy o6cJnyKuBaHHIO.
NB! UTo6bI He nonactb B 3aTpudHITeNbHOe nIoXeHHe, y6eDNTecb B TOM, YTO Bbl 3HaTe KaK 6e3oNaCHO BbIKIOHTb MaunHy, Do TORO, KAK Bbl ee BKJIOHTe.
BCEHDA HOCHTE INCNOJb3yIte COOTBETCTBYUOUINE 3auiNTHbIe BeuN, HeoXODIMbIe Inla ObecneHnBaWei 6eONACHOCTN.
Ecni y Bac Bo3HKnHy KaKne-Jn6o BonpocbI no NOBdy 6e3onachoro nCnONb3OBAHHaN I Texo6cnyXnBaHHaN daHHo MaunHbl, o6paTntecb K CBOemy pykoBDCTBy uIN CBxNTEcb C BeJIne Fpyn
OrnaBJIeHne

Kak noJIb3OBAtbcra daHhbIM PykoBocTBOM 110
IpeDynpexKdene. 110
Onicahne Maunhbl 111
Texnueckne daHbIe 111
Okpkaoua cpea 111
PpUHHbI dIy yTpaMboBbBaHnI 111
Hnctpykun no 6e3oNaChoctn 112
3dopobbe n 6e3oNaChocTb. 112
KoHTpOJIb nped 3aynckom. 112
IpoceDpya no 3anycky n ocTaHOBke 113
PykoBoDCTBO no npimHeHIO 114
CobetbHa cnyaB BO3MOXHbIX HenonaDOK 115
Texnueckoe obcnykubane 116-117
Tapaantna 117
Ceptnuikat cooTBeCTBnA 4
- Pbyar npoccejra.
- RykOa Ka CTapTepa.
- TOnnBb6ak.
- Touka dnia noDbema.
- 3anop pykoTkn.
- PyKoTka DnIa KOHTpOJIHaI NOCTynatelbHbIM N BO3BpaTHbIM DnIXeHNEM.
- OchOBHb pyKoRTka.
- PpeoXpaHntBbHbI uHTOK pemHra.
- Be3 nepebOda

TexHnueckne daHHbIe
OkpykaIOUaIcpeHa
Altrad Belle Warranty Department,
Sheen, No Buxton
Derbyshire
SK17 0EU
AHJIN
TelepoH: +44 (0)1298 84606
fa: +44 (0)1298 84722
3-nouta: warranty@belle-group.co.uk
Tehnilised andmed. 119
Keskkonnakaitse 119
Altrad Belle Warranty Department,
Sheen, No Buxton
Derbyshire
SK17 0EU
England
Tel: +44 (0)1298 84606 Fax: +44 (0)1298 84722
Email: warranty@belle-group.co.uk
Altrad Belle Warranty Department,
Sheen, N2 Buxton
Derbyshire
SK17 0EU
England
Tel: +44 (0)1298 84606 Fax: +44 (0)1298 84722
Email: warranty@belle-group.co.uk
AAP (asmenines apsaugos priemones)
Naudojantis jrenginiu, butina deveti tinkamas AAP, t. y. apsauginius akinius, pirstines, ausines, kaukes nuo dulkiu bei apsaugine evalyne su pirstuy apsauga.
Altrad Belle Warranty Department,
Sheen, No Buxton
Derbyshire
SK17 0EU
England
Email: warranty@belle-group.co.uk
Hatz 1B20-7 (dieselovy motor)
(presnejsi informace vhyledje t navodu k obsluze k tomuto motoru)
Altrad Belle Warranty Department,
Sheen, No Buxton
Derbyshire
SK17 0EU
England
Tel: +44 (0)1298 84606 Fax: +44 (0)1298 84722
Email: warranty@belle-group.co.uk
Altrad Belle Warranty Department,
Sheen, Nr. Buxton
Derbyshire
SK17 0EU
England
Tel: +44 (0)1298 84606 Fax: +44 (0)1298 84722
Email: warranty@belle-group.co.uk
Start i Stop procedure
Honda benzinski motor
- Otvorite dovod goriva okretanjem ručice ventila ON / OFF u desnu stranu do kraja.
- Ako startate hladan motor, postavite cok na ON pomicanjem ručice coka do kraja u lijev. Ako startate topli motor, cok obicno nije potreban, ali ak se motor na pola ohladio, djelomíćno otvoreni cok moze biti potreban.
- Okrenite prekidač motora ON/OFF u smjeru kretanja kazalji sata u položaj 'I'.
- Podesite gas u prazan hod pomicuci ruicu gasa do kraja u desno. Nemojte startati motor pri punom gasu, jer ce vibroploca pocei nabijati cim se motor upali.
- Čvrdsto držeči upravljačku dršku Jednom rukom, primite hvataljku poteznog startera drugom rukom. Povucite potezni starter sve dok ne osjetite otpor motora, i tada pustite da se starter vrati u početni položaj.
- Pazeci da uze startera ne izvučete u potpunosti, snažno povucite hvataljku startera.
- Ponavljajte sve dok se motor ne upali.
- Kada motor počne ravnomjerno raditi, pomaknite ručicu Čoka u položaj OFF pomicuci ji u desno.
- Ako se motor ne upali nakon nekoliko pokušaja, provjerite odjeljak Rjesavanje problema.
- Motor se gasi tako da postavite ruicu gasa u prazan hod i okretene prekidac motora ON / OFF u polozaj '0'.
- Zatvorite dovod goriva.
Hatz dizel motor
- Otvorite dovod goriva pomicuci ruiciu dovoda ON/OFF do kraja u desno.
- Podesite kontrolu brziine motora u položaj start.
- Cvrsto drzeci upravljačku drsku Jednom rukom, primite hvataljku poteznog startera drugom rukom. Povucite potezni starter sve dok ne osjetite otpor motora, i tada pustite da se starter vrati u početni položaj.
- Pazeci da uze startera ne izvucete u potpunosti, snazo povucite hvataljku startera sa obje ruke.
- Ponavljajte ovu proceduru sve dok se motor ne upali.
- Ako se motor ne upali nakon nekoliko pokušaja, provjerite odjeljak Rješavanje problema.
- Motor se gasi takao da postavite ruiciu gasa u prazan hod, a zatim pritisnite i drzite crveno dugme za zaustavljanje sve dok se motor ne ugasi.
Hatz dizei motor (Elektro start)
- Sa ručicom za dekompresiju u položaju '0', utaknite ključ i okrenite u položaj 'I' (Kontrolne lampice akumulatora i pritiska ulja ce se upaliti)
- Okrenite ključ za startanje u položaj 'll'
- Cim se motor upali, opustite ključ za startanje. Mora se vratiti u položaj 'I' sam od sebe i ostati um položaju za vrijeme rada. Kontrolne lampice akumulatora i pritiska ulja moraju se ugasiti odmah nakon startanja. Lampica indicatora 'I' je stalno upaljena kada motor radi.
- Ako Vam se cini da nesto nije u redu, ugasite motor i odmah ispravite grešku. (Vidi odjeljak Vodič za rjesavanje problema)
- Displej temperature motora '4' (dodatna oprema) se pali ako je temperatura glave cilindra previsoka. Ugasite motor i pronadite uzrok problema.

PAZNJA
Nikada nePokrecite elektostarter kada motor radi ili se gasi. Postoji rizik da se osovina startera ili zupcanik prijenosa slomi. Nikada ne gasite motor pomicuci ruicu za dekcompresiju. Za vrijeme pauzi u radu ili na kraju radnog perioda drzite ručku za starti ključ za startanje na sigurnom mestreu, vam dosegane neovlaštenih osoba.
- Uvijek vratite kluč za startanje u položaj '0' prije ponovnog startanja motora. Povratna brava štiti starter motora od ukljucivanja i moguceg oštećenja za vrijeme dok motor još radi.
- Pomaknite ručicu kontrole brziine u položaj '1' i onda natrag do položaja STOP.
- Na motorim sa nizom brzinom motora, pomaknite ruicu kontrrole brzine natrag u položaj '1', a onda pomaknite ruicu za zaustvljanje u položaj '2' u smjenru znaka STOP. Drzite ju u tom položaju sve dok se motor ne zaustavi.
- Otpustite ruicu za zaustavljanje 2' kada se motor ugasio, budite sigurni da se ruica vratila u normalni položaj (lampice punjenja i pritiska ulja ce se upaliti)
-
Okrenite ključ u položaj 0 i onda ga izvucite iz brave. Tada se lampice morajuugasiti.
-
Postavljanje vibro ploce na mjesto rada.
Kada je neophodno koritisti opremu za podizanje vibro ploce, provjerie da li oprema za podizanje ima nosivost odgovarjuću težini vibro ploce (vidi odjeljak Tehnički podaci ili pločicu sa serijskim podacima stroja). Prikvačite odgovarajući lanac ili uže ISKLJUCIVO na točku za podizanje na vrhu vibro ploce.
- Kada ste izvršili pregled opisan u odjeljku „provjere prije startanja“, možete startati motor.
U asortiman RPC vibro ploča tvrtke Altrad Belle ugradeno je centrifugalno kvačilo, što omogucije da radi u praznom hodu bezPokretanja mehanizma radilice. Kako se brzina motora povecava kvačilo ce se ukljuci i motor cePokrenuti mehanizam radilice. Za spravan rad, brzina rada motora treba biti poděsena na maksimum.
Altrad Belle Warranty Department,
Sheen, No Buxton
Derbyshire
SK17 0EU
England
Tel: +44 (0)1298 84606 Fax: +44 (0)1298 84722
Email: warranty@belle-group.co.uk
Baseplate Assembly, Plaque d'embase, Cto. Placa base, Conj. da Placa de Base
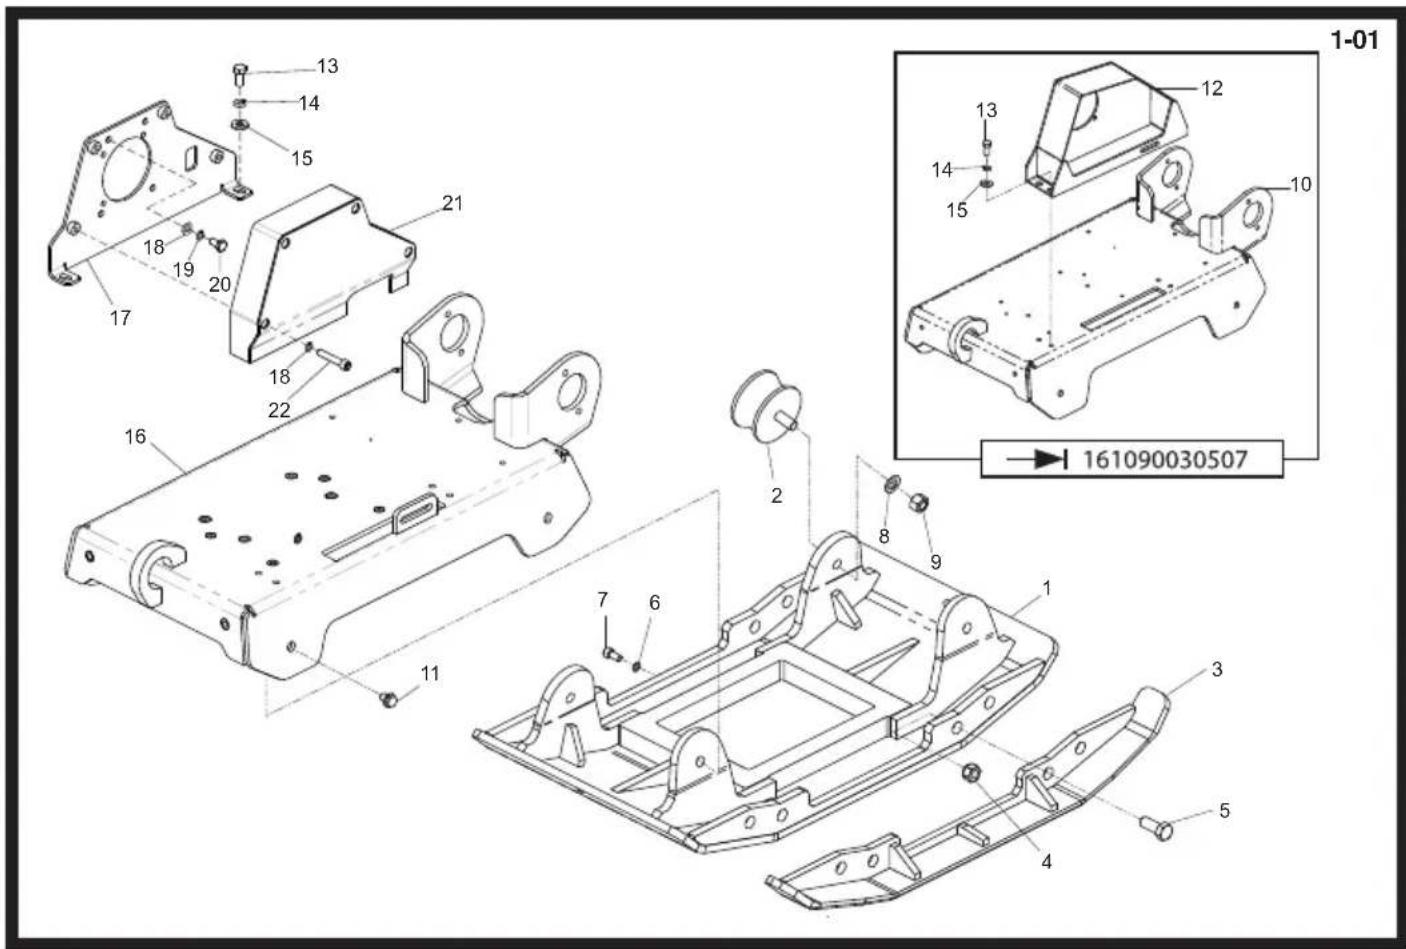
| 1 | 161/05800 | ...Baseplate | Plaque d'embase | Placa de base | Placa de Base | 022107 | 1 |
| 1 | 161/09800 | ...Baseplate | Plaque d'embase | Placa de base | Placa de Base | 022108 | 1 |
| 2 | 21/0139 | ...Anti-Vibration Mount | Tampon antivibratoire | Montura antivibratoria | Bloco Anti-vibração | 4 | |
| 3 | 161/05900 | ...Baseplate Extension | Plaque d'embase - Extension | Placa de base - Extensa | Placa de base - Extensa | 2 | |
| 4 | 8/20003 | Nut | Ecrou | Tuerca | Porca | M20 | 8 |
| 5 | 9/20002 | Screw | Vis | Tornillo | Parafuso | M20 x 50 | 8 |
| 6 | 4/1008 | ...Washer | Rondelle | Arandela | Aniha | M10 | 1 |
| 7 | 7/10018 | ...Screw | Vis | Tornillo | Parafuso | M10 x 20 | 1 |
| 8 | 4/1601 | ...Washer | Rondelle | Arandela | Aniha | M16 | 4 |
| 9 | 8/16005 | ...Nut | Ecrou | Tuerca | Porca | M16 x 30 | 4 |
| 10 | 161/06000 | Bedplate | Plaque d'Assise | Placa de Base | Placa de Apio | 1 | |
| 11 | 9/16007 | ...Screw | Vis | Tornillo | Parafuso | M16 x 20 | 4 |
| 12 | 161/02000 | ...Belt Guard | Capot e Courroie. | Protector de la Correa | Guarda da Cinta | Honda | 1 |
| 12 | 161/06800 | ...Belt Guard | Capot e Courroie. | Protector de la Correa. | Guarda da Cinta | Hatz | 1 |
| 13 | 7/12004 | ...Screw | Vis | Tornillo | Parafuso | M12 x 25 | 4 |
| 14 | 4/1202 | ...Washer | Rondelle | Arandela | Aniha | M12 | 4 |
| 15 | 4/1201 | ...Washer | Rondelle | Arandela | Aniha | M12 | 4 |
| 16 | 161/09300 | ...Bedplate | Plaque d'Assise | Placa de Base | Placa de Apio | 1 | |
| 17 | 161/08900 | ...Backplate | Plaque d'Arrière | Placa Trasera | Placa de Apio | 1 | |
| 18 | 4/8006 | ...Washer | Rondelle | Arandela | Aniha | Honda | 4 |
| 18 | 4/1005 | ...Washer | Rondelle | Arandela | Aniha | Hatz | 4 |
| 19 | 4/8003 | ...Washer | Rondelle | Arandela | Aniha | Honda | 4 |
| 19 | 4/1003 | ...Washer | Rondelle | Arandela | Aniha | Hatz | 8 |
| 20 | 02.3.020 | ...Screw | Vis | Tornillo | Parafuso | Honda | 4 |
| 20 | 7/10004 | ...Screw | Vis | Tornillo | Parafuso | Hatz | 4 |
| 21 | 161/10200 | ...Belt Guard | Capot e Courroie | Protector de la Correa. | Guarda da Cinta | 1 | |
| 22 | 7/10037 | ...Screw | Vis | Tornillo | Parafuso | M10 x 55 | 4 |

Vloerplaat, Ruttelplatten-Zsb., Bundplade, Gruppo Piastra di Base
| 1 | 161/05800 | .Vloerplaat | Rüttelplatten | Bundplade | Piastra di Base | → 022107 | 1 |
| 1 | 161/09800 | .Vloerplaat | Rüttelplatten | Bundplade | Piastra di Base | → 022108 | 1 |
| 2 | 21/0139 | .Anti-trilbevestiging | Schwingungsdämpfer | Antivibrationsophäng | Supporto antivibrazioni | 4 | |
| 3 | 161/05900 | .Bundplata - Tätingende | Grundplatte - Veränderung | Vloerplaat - Achtervoegsel | Piastra base - Estensione | 2 | |
| 4 | 8/20003 | .Moer | Mutter | Motrik | Dado | M20 | 8 |
| 5 | 9/20002 | .Schroef | Schraube | Skrue | Vite | M20 x 50 | 8 |
| 6 | 4/1008 | .Afdichtring | Scheibe | Späendeskive | Rondella | M10 | 1 |
| 7 | 7/10018 | .Schroef | Schraube | Skrue | Vite | M10 x 20 | 1 |
| 8 | 4/1601 | .Afdichtring | Scheibe | Späendeskive | Rondella | M16 | 4 |
| 9 | 8/16005 | .Moer | Mutter | Motrik | Dado | M16 x 30 | 4 |
| 10 | 161/06000 | .Grondplaat | Sohlplatte | Fundamentplade | Piastra di base | 1 | |
| 11 | 9/16007 | .Schroef | Schraube | Skrue | Vite | M16 x 20 | 4 |
| 12 | 161/02000 | .Riembeschemkap | Treibieren-Schutzabdeckung | Rembeskyttele | Protezione della cinghia | Honda | 1 |
| 12 | 161/06800 | .Riembeschemkap | Treibieren-Schutzabdeckung | Rembeskyttele | Protezione della cinghia | Hatz | 1 |
| 13 | 7/12004 | .Schroef | Schraube | Skrue | Vite | M12 x 25 | 4 |
| 14 | 4/1202 | .Afdichtring | Scheibe | Späendeskive | Rondella | M12 | 4 |
| 15 | 4/1201 | .Afdichtring | Scheibe | Späendeskive | Rondella | M12 | 4 |
| 16 | 161/09300 | .Grondplaat | Sohlplatte | Fundamentplade | Piastra di base | 1 | |
| 17 | 161/08900 | .Achterplaat | Rückwand | Bagplade | Piastra di rinsforzo | 1 | |
| 18 | 4/8006 | .Afdichtring | Scheibe | Späendeskive | Rondella | Honda | 4 |
| 18 | 4/1005 | .Afdichtring | Scheibe | Späendeskive | Rondella | Hatz | 4 |
| 19 | 4/8003 | .Afdichtring | Scheibe | Späendeskive | Rondella | Honda | 4 |
| 19 | 4/1003 | .Afdichtring | Scheibe | Späendeskive | Rondella | Hatz | 8 |
| 20 | 02.3.020 | .Schroef | Schraube | Skrue | Vite | Honda | 4 |
| 20 | 7/10004 | .Schroef | Schraube | Skrue | Vite | Hatz | 4 |
| 21 | 161/10200 | .Riembeschemkap | Treibieren-Schutzabdeckung | Rembeskyttele | Protezione della cinghia | 1 | |
| 22 | 7/10037 | .Schroef | Schraube | Skrue | Vite | M10 x 55 | 4 |
Frame Assembly, Ensemble Chássis, Conjunto de Estructura, Conjunto da Estrutura
1030507
1 161/01000.....Frame Chassis.. Estructura Estrutura
2 161.0.332...Edging Strip.. Gaine Protection Banda Protectora Fita de rebordo
3 161.0.289.....Front Cover - Orange .. Capot Avant - Orange.... Cubierta Delantera - Naranja... Tampa Frontal - Laranja..
3 161.0.431.....Front Cover - Green ....... Capot Avant - Vert.... Cubierta Delantera - Verde.. Tampa Frontal - Verde
3 161.0.432.....Front Cover - Yellow... Capot Avant - Jaune.... Cubierta Delantera - Amarillo ... Tampa Frontal - Amarelo..
3 161.0.433.....Front Cover - Blue... Capot Avant - Bleu.... Cubierta Delantera - Azul ... Tampa Frontal - Azul..
4 161/99569....Cover - Orange.... Covercle - Orange .... Cubierta - Naranja. Tampa - Laranja..
4 161/99570....Cover - Green.... Couvercle - Grun .... Cubierta - Verde .... Tampa - Verde.
4 161/99571.....Cover - Yellow.... Couvercle - Jaune.... Cubierta - Amarillo... Tampa - Amarelo.
4 161/99572....Cover - Blue.... Couvercle - Bleu .... Cubierta - Azul .... Tampa - Azul
5 161.0.287...Belt Guard ...Capot de couroie...Protector de la correa...Guarda da Cinta...
6 161.0.417....Cover - Orange (Left) .... Covercle -Orange (Gauge) Cubierta - Naranja (Iqzuleria).. Tampa - Laranja (Lado Esquerdo)
6 161.0.418.....Cover - Green (Left) ......... Couvercle - Grun (Gauche) .. Cubierta - Verde (Iqzuierda) .... Tampa - Verde (Lado Esquito)
6 161.0.419....Cover - Yellow (Left)..... Couvercle - Jaune (Gauge)... Cubierta - Amarillo (Iqzuierra).. Tampa - Amarelo (Lado Esquerdo)
6 161.0.420.....Cover - Blue (Left).... Couvercle - Bleu (Gauge) .... Cubierta - Azul (Iqzuierda) .... Tampa - Azul (Lado Esquero) .... 1
7 161.0.421.....Cover-Orange(Right)....Couvercle-Orange(Droit)....Cubierta-Naranja(Derecha)....Tampa-Laranja(Lado Direito)
1 161.0422....Cover-Green(Higt).....Couercie-Grun(Droit)....Cubierra-verde(Urecha)...Tampa-Verde(Lado Direto)..
161.0.423....Cover-Yellow(High)...Couvcie-Jauné(Droit).....Cubierra-Amarillo(Derecna)...Tampa-Amarelo(Lado Direto)
/161.0.424.....Cover-Blue(Higt)....Couvercie-Bieu(Droit)...Cubierta-Azui(Derecha)...Lampa-Azui(Lado Direto)
8 4/8007 .Washer Fondelle Arandela Anilha M8 3
9 8/8008 .Nut. Ecrou Tuerca Porca M8 3
10 21.0.337...Edging Strip.. Gaine Protection Banda Protectora. Fita de rebordo .
11 7/8037...Screw.. Vis. Tornillo. Parafuse M8 x 20 12
12 4/5002...Washer Rondelle.. Arandela . Anilha. M5. 4
13 07.0.403...Screw.. Vis Tornillo Parafuse M5 x 16 4
14 05.3.017.Washer Rondelle Arandela Anilha M5
15 4/1201...Washer Rondelle Arandela Anilha M12.4
16 4/1202.Washer Rondelle Arandela Anilha M12 4
17 7/12013...Screw. Vis Tornillo Parafuse M12 x 35 4
2-01
Frame, Rahmen Kpl.,
030507
Decals, Autocollant, Rótulo, Decalque
1 800/99985 .Decal . Autocollant . Rottolo . Decalque . RPC 45/60
2 800/99985 Decal Autocollant Rtolo Decalque RPC 45/60 1
3 161/0.293 Decal Autocollat Control Rctol Decalqnt Coots
4 01154 Decal - Noise Autocollant - Bruits Rótilo - Ruidos Decalque - Ruido 108dBA 1
5 161.0.293....Decal-Throttle.....Autocollant-Accelerateur... Rotulo-Acelerador... Decalque-Estrangulador... Non EPA Only
5 800/99505 . Decal - Throttle .. Autocollant - Accelerateur . Rótulo - Accelerador . Decalque - Estrangulador . EPA Only
6 161.0.293. Decal Autocollant Rótulo Decalque
7 161.0.293..Decal - Warning ..Autocollant - Avertissement... Rotulo - Aviso . Decalque - Aviso
8-01
Label, Abziehbild, Skilt, Decalcoman
1 800/99985 Label Abziehbild Skilt Decalcomania RPC 45/60
2 800/99985 Label Abziehbild Skilt Decalcomania RPC 45/60
3 161.0.293....Label - Heerschappij... Abziehbild - Bowden... Skilt - Regere... Decalcomania - Controle
4 01154.......Label - Guluid.....Abziehbild-Gerauschpegelschild Skilt - Skilt Stej .Decalcomania - Sulla rumorosita...108dBA.
5 161.0.293....Label-Gashendel...Abziehbild-Drossel...Skilt-Gashandtags...Decalcomania-Acceleratore...NonEPAOnly
5 800/99505 Label - Gashendel... Abziehbild - Drossel... Skilt - Gashandtaq ... Decalcomania - Acceleratore... EPA Only 1
6 161.0.293...Label ...Abziehbild ...Skilt... Decalcomania...
7 161.0.293....Label - Waarschuwing... Abziehbild - Warnung.... Skilt - Adversel.... Decalcomania - Awertenza....