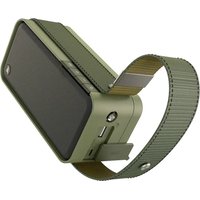
Soundcup-Z - Docking station HAMA - Free user manual and instructions
Find the device manual for free Soundcup-Z HAMA in PDF.

User questions about Soundcup-Z HAMA
0 question about this device. Answer the ones you know or ask your own.
Ask a new question about this device
Download the instructions for your Docking station in PDF format for free! Find your manual Soundcup-Z - HAMA and take your electronic device back in hand. On this page are published all the documents necessary for the use of your device. Soundcup-Z by HAMA.
USER MANUAL Soundcup-Z HAMA
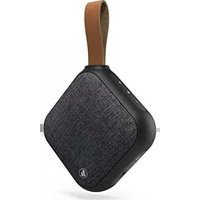
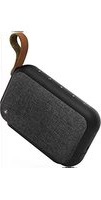
MobileBluetooth ® Speaker
Soundcup-Z
Operating Instructions
Bedienungsanleitung
Moded'employoi
Instruccionesdeuso
PykoBODCTBOIO3KcnpnyatauH
Pa6OTHaHnHCTpyKcIa
Istruzioniperl'uso
Gebruiksaanwijzing
O8nyiecxponc
Instrukcjaobsfugi
Hasznalatiutmutato
Návodk p oužiti
Návodnapoužitie
Manualdeinstruções
Kullanmakilavuzu
Manualdeutilizare
Bruksanvisning
Käyttoohje
GB
D
F
E
RUS
BG
1
NL
GR
PL
H
CZ
SK
P
TR
RO
S
FIN
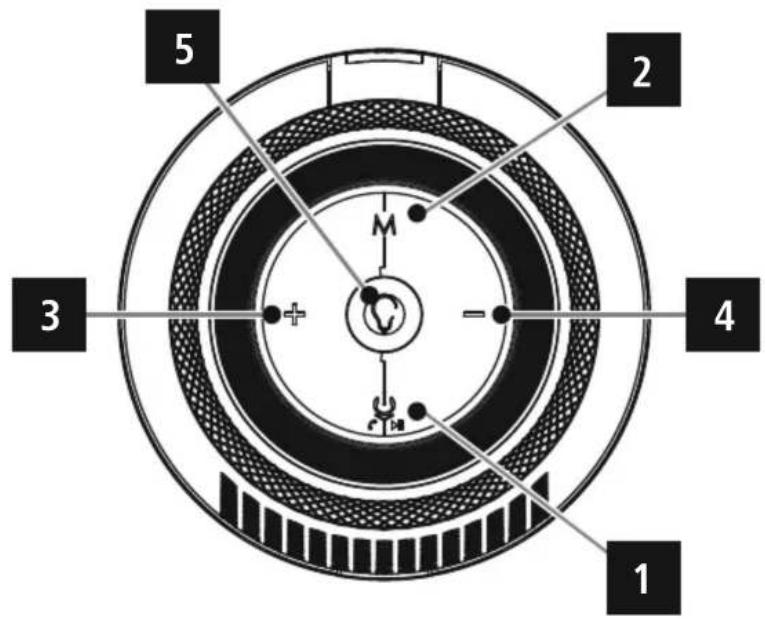
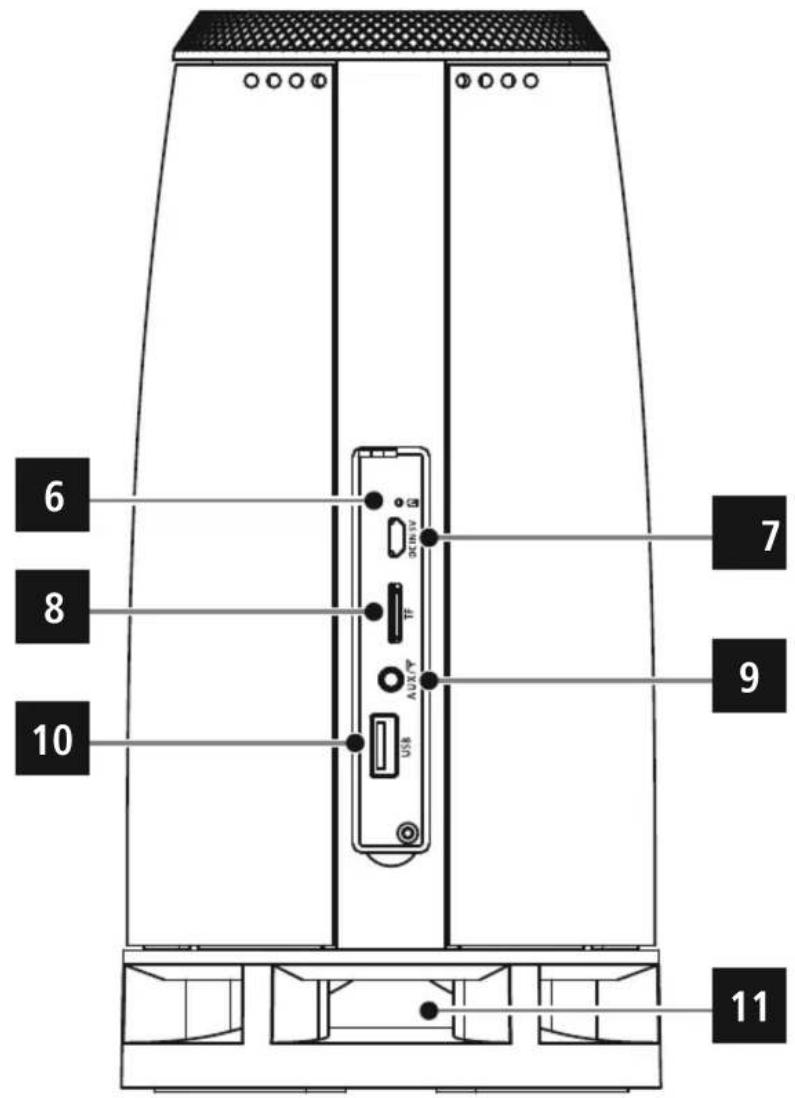
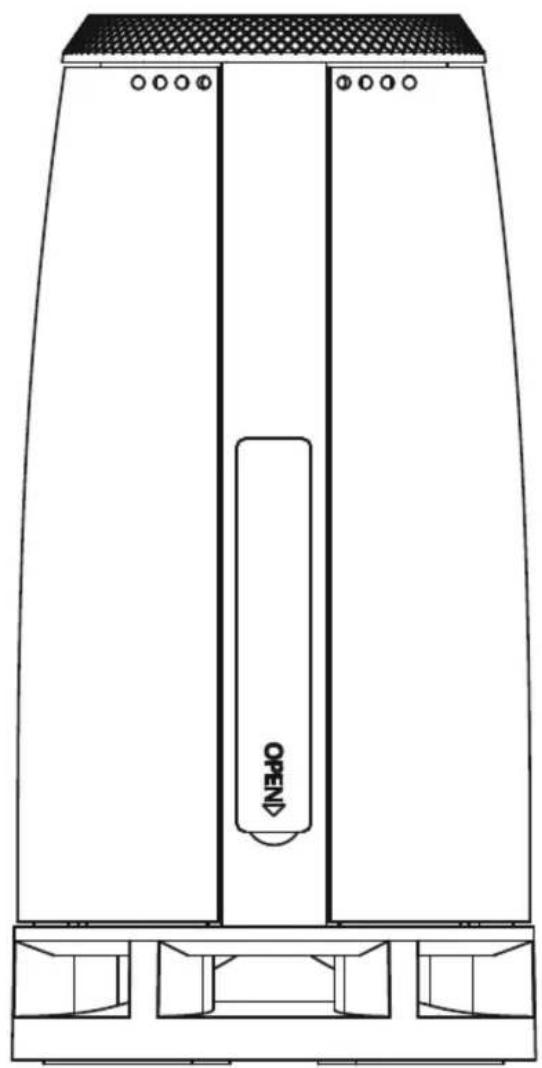
ControlsandDisplays
- On/Off, PAUSEbutton
2.MODEbutton
3.+functionbutton
4.-functionbutton
5.LEDmode
6.StatusLEDindicator
7.Micro-USBChargingconnection
8.microSDcard s lot
9.AUX-Insocket
10.USBType-A (host)reader - MulticolourLEDlighting
Thankyouforchoosinga H amaproduct.
Takeyourtimeandreadthefollowinginstructionsandinformation completely. Please keep these instructions in a safe place for future reference.Ifyouseldthedevice,pleasepasstheseoperating instructionsontohenewowner.
1.ExplanationofWarningSymbolsandNotes

Warning
Thissymbolisusedtoindicatesafetyinstructionsortdrawyour attentionospecific h azardsandrisks.

Note
Thisisusedtoindicateadditionalinformationorimportantnotes.
2.PackageContents
Mobile Bluetooth SpeakerSoundcup-Z
- Micro-USBChargingcable
-3.5mmaudiocable
Theseoperatinginstructions
3.SafetyNotes
The productisintendedforprivate,non-commercialuseonly.
- Donotusetheproductintheimmediatevicinityofheatersorther heatsourcesorindirectsunlight.
- Keep this product, as all electrical products, out of the reach of children!
- Donotdropheproductanddonotexposeittoanymajorshocks.
- Donotoperatetheproductoutsidethepowerlimitsgiveninthe specifications.
- Do not use the product in areas where the use of electronic devices isnot permitted.
- Be considerate. Loud volumes can have a detrimental effect on your surroundings.
- Donotopenthedevicerecontinuetooperatietitifitbecomes damaged.
- Since the battery is integrated and cannot be removed, you will need to dispose of the product as a waste. Do this in compliance with the legal requirements.
- Keep the packaging material out of the reach of children due to the riskof suffocation.
- Disposeofpackagingmaterialimmediatelyaccompanyingtolocally applicable regulations.
- Do not modify the product in any way. Doing so voids the warranty.
- Do not throw the battery or the product into fire.
- Donot tamper with hordamage/heat/disassemble the batteries/rechargeablebatteries.
4.GettingStartedandOperation
4.1Switchingtheproductionandoff
PresstheFunctionbutton(1)toswitchthespeakeron/off. An acousticsignalsoundsandthebuttonsbegintolightup/ t helights goout.

Note-A automaticsshutdown
Notethatthespeakerwillautomaticallyswitchoffer10 minuteswithoutaction(noaudiplayback/no Bluetooth® function).
4.2Chargingthebattery

Warning- R rechargeablebattery
OnlyusesuitablechargingdeviceswithUSBconnectionsfor charging.
- As a rule, do not use charging devices or USB connections that are d effectiveanddonottrytorepairthemyourselves.
- Avoidstoring, charging or using the device in extreme temperatures and extremely low atmospheric pressure (for example, athighaltitudes).
- When stored for a long period of time, batteries should be chargedregularly(atleasteverythree months).
- Charge the speaker fully before using it for the first time.
ConnecttheincludedMicro-USBchargingcabletothespeaker's Micro-USBport(3). - Connect the unused connector on the Micro-USB charging cable to a suitable USB charger. Please refer to the operating instructions for the USB charger used.
The status LED (6) is constantly lit red during charging.

Note-Charging
- Ittakesapprox.3 - 5 hourstocompletelychargetheproduct.
- The speaker's battery can be charged whether the speaker is onoroff.
- If the battery capacity is less than 10% , the speaker willemit two acoustic signals. You will only receive this information if the speakerison.
Theactualbatterylifevariesdependingonuseofthedevicethe settingsandtheambientconditions(rechargeablebatterieshavea limitedservicelife).
4.3 Audiplaybackviatheincludedaudiocable(3.5mmjack)
- Ensure t hatthespeakerisswitchedoff.
- Connect your mobile terminal device (MP3 player, smartphone, etc.) and the AUXinput(9) of the speaker using the included 3.5mm audiocable.
- Set the volume on your terminal device to a low level.
- Switchthespeakersasdescribedin 4.1,Switchingthe productonandoff.
- Start and control audio playback on the connected terminal device accordingly.
- IfthedevicedsnotautomaticallystartinAUXmode, pressthe Modebutton(2)repeatedlyuntilyouare a bletoplayaudiofrom thedesiredsource.
- Briefly press the Plus button (3) to increase the volume. Briefly press theMinusbutton(4)toreducethevolume.
- Briefly press the Function button (1) to pause playback.
4.4 Bluetooth® pairing

Note
- Check whether your mobile device (MP3 player, mobile phone, etc.) is Bluetooth® capable.
- Ifnot, you can only use the speaker for playback using the included audiocable.
-
Notethatthemaximumrangefor Bluetooth®is10metres withoutobstaceessuchaswalls,people,etc.
-
Makes sure that your Bluetooth® capable terminal device is on and Bluetooth® is activated.
- Make sure that the speaker is located within the Bluetooth® range of max.10metres.
- Switchonthespeakersasdescribedin 4.1Switchingthe productonandoff.
- Anacousticsignalsounds, the buttonsbegintolightupandthe Functionbutton(1)beginstoflash.
- Ifthedevicedsnotautomaticallystartin Bluetooth mode, presstheModebutton(2)repeatedlyuntiltheacousticsignalfor Bluetooth modesounds. Thedevicethenautomaticallysearches fora c onnction.
-Openthe Bluetooth® settingsonyourterminaldeviceandwait untilHamaSoundcup-Zappearsinthelistof Bluetooth® devices found. - SelectHamaSoundcup-Zandwaituntilthespeakerislistedas connectedinthe Bluetooth® settingsonyourterminaldevice.An acousticsignalconfirmsthatconnectionwassuccessful.
TheFunctionbutton(1),whichwaspreviouslyflashing,isnow constantlylitblue.

Note-Bluetooth® password
- Some terminal devices require a password in order to connect to another Bluetooth® device.
- If your terminal device requests a password for connection to the speaker, e nter0000.

Note
- Thespeakeralwaysstoresthestelasteightterminaldevicespaired.
- Thespeaker will automatically connect to the last terminal devicepaired when it is switched on then next time.
4.5 Automatic Bluetooth® connection(aftersuccessful pairing)
- Makes sure that your Bluetooth® capableterminaldeviceison and Bluetooth® isactivated.
- Make sure that the speaker is located within the Bluetooth® range of max.10metres.
- Switchthespeakersasdescribedin 4.1Switchingthe productonandoff.
After a connection has been automatically set up, the Function button(1), which was previously flashing, is constantly litblue. An acousticsignalconfirmsthatconnectionwassuccessful.

Note-C onnnectionimpaired
- Afterthespeakerandterminaldevicehavebeenpaired, a connectionistablishedautomatically. If the Bluetooth connectionisnotestablishedautomatically, check the following:
- Checkthe Bluetooth® settingsofyourterminaldevicetosee whetherHamaSoundcup-Zisconnected.Ifnot,repeatthe stepslistedunderBluetooth®pairing.
- Checkwhetheryourterminaldeviceandthespeakerare les s than10metresapart.Ifnot,movethemclosertogether.
- Check whether obstacles are impairing the range. If so, move the devices closer together.
- Checkwhethertheaudiocableisconnectedtothespeaker. If so, disconnect it.
4.6 Audiplayback(via Bluetooth®)
Startandcontrolaudiplaybacktheconnectedterminaldevice accordingly. Alternatively, audio playback can also be controlled on thespeaker(iftheconnecteddevicesupportsthisfunction).
Pressthe functionbutton(1)tostartorpauseaudiplayback.
- HoldthePlusbutton(3)toplaythenexttrack.HoldtheMinus button(4)toplaythepreviousrack.
- Briefly press the Plus button (3) to increase the volume. Briefly press theMinusbutton(4)toreducethevolume.
4.7Audiplayback(viamicroSDcard)
It is also possible to start audio playback directly from a microSD card. For this purpose, insert a microSD card containing your audio files into themicroSDcard s lot(8).
- Ifthedevice doesnotautomaticallystartinmicroSDmode,press theModebutton(2) repeatedly untiltheacousticsignalformicroSD modesounds.
You s electtracksandcontrolthevolumeinthismodejustas describedinpoint4.6,Audiplayback(via Bluetooth®).
4.8Audiplayback(viaUSBdevice)
Itisalsoposibletostartaudiplaybackdirectlyfroma U SBdata medium(forexample,USBstick).
For this purpose, insert a USB data medium containing your audio filesintotheslotforUSBdevices(10).
- IfthedevicedsnotautomaticallystartinUSBmode,pressthe Modebutton(2)repeatedlyuntiltheacousticsignalforUSBmode sounds.
You s electtracksandcontrolthevolumeinthismodejustas describedinpoint4.6,Audiplayback(via Bluetooth®).
4.9Hands-freefunction
You can use the speaker as a hands-free set for your mobile phone. For this function, themobilephonemustbeconnectedtothespeaker via Bluetooth®.
Pressthefunctionbutton (1)oncetoansweranincom ingcall.
- Holddownthe'M button(2)torejecttheincom ingcall.
- During a telephone call, press the Function button (1) once to endthecall.

Note-C allquality
To increase the call quality, make sure that you are near the speakerwithyourmobilephoneduringthecall.
5. ControloftheLEDlighting
TheLightingbutton(5)allowsyoutochangethecolouroftheLED lighting(11).
- Briefly press the Lighting button (5) to switch to the next colour setting.
- With the last colour setting, the LED lighting automatically switches to themusic's bassandpulsates.
- For this effect to come into its own, a minimum volume of 30% is required.
6.CareandMaintenance
- Only clean this product with a slightly damp, lint-free cloth and do notuseaggressivecleaningagents.
7.WarrantyDisclaimer
Hama GmbH & Co KG assumes no liability and provides no warranty for damagersresultingfromimproperinstallation/mounting,improper useoftheproductormalfailure to observetheoperatinginstructions and/orsafetynotes.
8. Service and Support
PleasecontactHamaProductConsultingifyouhaveanyquestions aboutthisproduct.
Hotline: +499091502-115 (German/English)
Furthersupportinformationcanbefoundhere:www.hama.com
9.TechnicalData
| Mobile Bluetooth® SpeakerSoundcup-Z | |
| Bluetooth® TechnologyV4.2 | |
| SupportedprofilesA2DPV1.2,AVRCPV1.4,HFPV1.5 | |
| Frequency180Hz-20 kHz | |
| Range< 10 m | |
| Maximumnumberofpaired devices | 8 |
| Output16W | |
| Chargingvoltage~5 V | ---1,75A |
| SoundSystemStereo | |
| Impedance4Ω | |
| Distortion(THD)≤1% | |
| Size | 114 x 114 x 240 mm |
| Weight1225g | |
| Connections | 3.5-mm stereoplug, Micro-USB, microSDcard s lot, USBType-A reader |
| Battery | |
| Type7.4VLi-Ion2000mAh/ 1 4.8Wh | |
| Chargingtime | ~3-5 h |
| Playback | Via Bluetooth®: ~12 h ViaAUX/USB/microSD: ~16 h (dependentlyvolumeandaudio content) |
10.RecyclingInformation
Noteonenvironmentalprotection:

AftertheimplementationoftheEuropeanDirective 2012/19/EUand2006/66/EUnthenationallegalsystem, thefollowingapplies: Electricandelectronicdevicesaswellasbatteriesmustnot
bedispensedofwithhouseholdwaste.Consumersareobligeblylaw toreturnelectricalandecronicdevicesaswellasbatteryssathe endoftheirservicelivestothepubliccollectingpointsetupforthis purpose or point of sale. Details to this are defined by the national lawoftherespectivecountry.
Thisssymbolontheproduct, theinstructionmanualorthepackage indicates that a product is subject to these regulations. Byrecycling,reusingthematerialsorotherformsofutilisingold devices/Batteries, you are making an important contribution protectingourenvironment.
11.DeclarationofConformity

Hereby, Hama GmbH & Co KG declares that the radio equipmenttype[00173161]isincompliancewithDirective 2014/53/EU. The full text of the EU declaration of conformityisavailableathefollowinginternetaddress:
www.hama.com->00173161->Downloads.
| Frequencyband(s) | 2400- 2 483.5 MHz |
| Maximum radio-frequency power transmitted | 4 dBm |
4.6Lectureaudio(via Bluetooth®)
YUHTbIaIe, YTO nOcIe 10 MmHyT 6e3JeCTBnA (OTCYTCBHe BOCpOn3BeDeHn/pa6oTbI Bluetooth®)rpOMKOrOBOpntJIb OKJIIOuHaETC.
4.23apädkaaKKymyITopa

BHMaHHe!AkkymyIaTOp
-ПпменгийТOTько COOTBETCTByIOUие 3apЯные yctpoiCTBa cpa3bemOMUSB.
Kateropnueckn 3anpeaaetcncnloh30BaTb n pemOHnpoBaTb HncnPabHbIe3apdHbIeYcTPOJCTBaNINUSB-pa3bEmbl!
ИЗбeraTeXapAHIN3apdKN INCNoJIb3OBAHIN npN 3KCTpeMaJIbHbIX TemnepaTypx INKCTpeMaJIbHO HN3KOM aTMOCΦePHOM dABJIeHN (HAnpIMep, HAn6JIbWOn Blycote).
-Придпгельногхаразилзаржайтakkyмлгторпес
ODHOrO p3aВТрИMEcaUa.
IpeepnepbIMNCIOJIb3OBAHmEHEo6xOIMO OINHpa3 nonHOCTbHO3apdNTbTgPOMKOrOBOpHTeB.
-ПодклочиkeKa6eNB MнКpo-USB(ВkomплікTe)к раЗыМнКpo-USBbrpOMKorOBopHTeTn7).
-ПоdkлioчпгВТОРиКонeцКабeЯМИкpo-USBKnoIxOДиEуму
3apAДHOMyUCTpoIcTBYUSB.Co6NIOДaHTeINHcTpyKuINnO
3KcNlIyatauIM 3apAДHOrO yCTpoIcTba USB.
BoBpeM3aPAnKCBETOINIOHbIMHHNkKatOp(6)HeNPpepbIBHO CBETNCKpaChblM.

Yka3aHne -npoecc 3apdKn
Длгплногзардн Heo6xOIMn npm.3-5acob.
- AkkyMylTOp MOxHO 3apJxTa b Ka K np BkIIOeHHOM, TaK n PnBbIKHOHcHOMuHaMKe.
EclnoctatoTHaHareMkOCTbAkkMyTJrTOpAcOCTabNtmeHee 10%,rpmKorOBOpNTeJIbNoaETDbOHHOHBKOBOCnHaI. DAnHHaФyHKUra pa6oTaetToJIbKO npB KNIuHcHOM rpmKorOBOpNTe.
ФakTnueckOeBpeMa60TbIaKKMyJToPaaBcNtOT
HcNoJIb3oBaHnYyCTpoiCTBa,HaCTpoEKNyCNOBNI KcCnIyatauIN
(aKKMyJToPbIMMeIOTOTpAHHeHHbCpOKcNyKbI).
4.3Bocnpoun3BeHeHne3ByKaIOnpIlaRaemomy aydnokabelIO(wnTekep3,5mm)
- Y6eIITecb TOM, YTO INHaMVK BbIKJIOueH.
C NOMOJIbIO npnIaRaemOrKa6eJIa (UTeKepe3,5 MM) NOkKIOHHTe YcTPOCTBO BOCpOnu3BeDHeNIA (PONrPbIbATEJB MP3, cMaprFOH T.D.) K BXOyAUX (9) rpoMkoRorOBopNTeJIA. - YCTAHOBITHe HaYCTPOINCTBe MUNHIMaNbHyI rPoMKOCTb.
BkIOHte yCTPOIcTB0, KaK OINcaHO B pa3dene 4.1«BKnIOUeHne N B bIKIOUeHne»
3anyckBOcnpn3BeDHeHnYypabHeHneIMOCyIeCTBJIHOITcHa YcTPOINCTBE,KKOTOPOMYNOKNIOHCHINHAMIK.
EcnIyCTPONCTBO He 3aynckaeTcB ATOMaTHueCKN B peKnME AUX, HaxmImaTeKHONkypeKmAm(2)DToExnp,NOKaHeHaHTeTcBOCNPOn3BEdHMeBBb6paHHoro N CToHNka.
-ДяувенийгрмкостинхмITEиOTNYCTITEKHOKNY(+)3).ДяуMeньшенягрмкOSTинхмITEиOTNYCTITEKHOKNY(一)4)
YTO6bI pInoCTaHOBnT BOCpON3BeDeHne, HaxMNTE IOTNcyTNE ΦyHKUHOHaJIbHyOKNOHky(1).
4.4CorlacobAHueyctpOoiCTBnonpoToKoIy Bluetooth

Приимеанно
- YbEaNTecB TOM, YTO MObINbHOe YcTPOiCTBO (MP3-NIIeep, MObINbHbI TeJeFOH N T. N.) NOJIePKeXBnBaET FyHKUIO Bluetooth®.
EcnHt, rpmKOrOBopntb MoXHO NcIOnb3ObaTb ToIbKO C BxOJaUMB KOMnKeT aynokaBeJem. -
Obpatnte BHIMaHHe, YTO MAKcIMaIbHbI paDnyc DeiCTBnBluTooth coCTaJIraTe10MeTpOBe3npenTCTBn(CTeH, IIOJeN T. D.).
-
Y6eIntecb TOM, YTO yCTPOINCTBO BOCIPON3BeHnna C noDepKkoi Bluetooth® BKIOUeHON Φ yHKuia Bluetooth® akTUBnpoBaHa.
Pa3mecntte 06a yctpoicTBA B npedeJax paDnyca JeICTBnBluetooth@HapacctOHHHe6Oone10MetpoB.
BkIOHTe yCTPOIcTBO, KaK OINCAHO B pa3dJe 4.1 «BKnIOUeyHne N BbIKIOUYehne>.
3ByHT 3ByKOBo CnHAn N KHOKN 3aRopaIOTc, a yHKUHOHaJIbHaRAKHOKA(1)HaHnHaETMnIATb. - Ecln yctpoCTBO He 3anyckaetcABTOMaTHueckn B pexmme Bluetooth, Haxmaite KhoNky peXmua (2) do tex nop, noka Henpo3BvHT3ByKOBOcmHaj Bluetooth.3anyCTncr ABTomaTHuecknNoCKCOeDHeHHa.
-OTKpOTeHaCTPOKn Bluetooth HAYcTPOnCTBEBOCnPOUN3BeENH N B C INCKe H aIJeHHbIXyCTPOnCTB BLUetooth BBi6epnteHama Soundcup-Z.
Bb6epnte Hama Soundcup-Z nnoOxndTe, noka rpomKorOBOpnteIbe He noBnTcB CnncKE pNOKJIOueHbIX yCTPOiCTBNONPOTOKONY Bluetooth3byKOBOICnHaj NOITBEpXdAeTYCneUHOeOeDHeHHe.
MnraBwaJIO 3TOO FyHKUHOHaJIbHaa KHOKka (1) HENpepbIBHO CBETITCRINHMUBETOM.

Yka3aHne-napOJIb Bluetooth
-ДяуctahOBKm COeINHeHnC HekOTOpbIMN yCTpoICTBaMm MOXET nTpe6ObaTbCR npaJIb Bluetooth
EcnnoTpebyetc,lae coeHHeHnC rPOMKOrOBOpTeJIEM BBeDnTapOJbNoyMOJUaHnO:0000.

Yka3aHne
10.IHcIpyKcunnoyTuJn3aun
OxpaHaokpykaHoueIcpeBbI:

CMoMeHTa IepexOda HaIIOHaJIbHOrO 3aKHOJaTeJIbCTBa HaeBpOeIckNeHOpMaTINb2012/19/EUn2006/66/EU DeICTBtEJIbHOCNeJyUooee:
3neKtpnueckne n 3neKtpoHhBie npnbopb, a taKke 6atapen 3anpeaetcra ytnin3npobatc c0bHbM Mycopom. Notpebntb, cornacho3akohy,083aHytun3npobatb3neKtpnueckne 3neKtpoHhBie np6bp, a taKke 6atapen n akkymJrtoptb noCte nx MCnoJIb3OBAHn B CnueaIbHo npEHa3HaueHHbx IIN 3TOI NYkTAX c6opa, IN60 B nyHKtax npodax. DeTalbHaa perlanentauia 3TNxpe6oBaHnIOcUyIeCTBnRETCAOOBETCTBYIOUMMECTHBIM 3aKOHOaTeNBCTBM.Heo6xOJIMOCb6IOJeHNDAHbIX npdncnAHHo6O3HaayetcOc6bIm3HaKOMHaN3DeNIn, HnCTpyKuIN NO EKnIyataum INy ynakOBKe. Ppi nepepabokte, NOBTOPHOMnCNoJIb3OBAHnIMATEpaIaNIOINpNDpyRoiΦOpme ytni3aun6blBUnxB y notpe6leHnnp6bpOBBInOMORAe Oxpane OKpykaoue Cpebl. B COOTBCTBN C npdeNcaHnMI N 06paueHIO C batapeRM, B FepMaHN BblSeHa3BaHbHe HopmatNBb DeCTByOT Dn ytni3aun6batape n AKKMyIATOPOB.
11.Deknapaunnpon3Bodnten

Hactoim KOMnHa Hama Gmb& Co KG 3aBJIeT,TO paAnoo6opyoBaHMeTIna[00173161]OTBeHaET Tpe6oBaHnM DnpeKTHBb2014/53/EC.C NOJHbIM TEKTOM dEklapaunco CootBetCTBNMTpe6oBaHnMaMECMoxHo
O3HaKOMMTbC83DECb:
www.hama.com->00173161->Downloads.
PepdunpexdeHne-akymyataOpHn6aTepeHH
- ⅢnOJI3BaIte cAmO nIOxOJaIuN 3aPAnH yCTpOJCTBa C USB N3BOUIN3a3ApexJaHe.
-NonpHnHnHnHn3nON3BaTedeDfekTHn3apAHymctBa nIN USB H3BOnn He ce ONtBAite da rN nonpaBATE.
ИЗБЯВаTe CBxPahEnHe,3ApexJaHe И nI3NoI3BaH e npI ekCTpeMn TempePaTyI IN3KJIIOHTeJIHO HNCO Bb3DyUHO HAnraHc(Hanp.HaToJEMBICOHnH) -
PnDbIroTpaHNO cbxpaHHe Npe3apeKdaTe peDobHO (nohe BeHNbXHaTpIMeceua).
-
Pnpn npBTO BbBexdane B Eeknloataa 3apeTe TOHKoIHOHaTaHbJIHO.
CbpxeBKnIOUeHnB DIOCTABKaTl Mlro-USB Ka6en 3a 3apeXdane KbM Micro-USB n3B0da (7) Ha ToHKoONHaTa.
Cbpxte Cbo60nna 1ekep Ha Micro-USB ka6ena 3a 3apexdahe KbM npirodoHO USB 3apAIOHO yctpoiCTBO. 3a ceTt c6bIIOaBAHpe pBkoBOIDCTBOTo 3a 06cnyBaHe Ha n3noI3BaHO USB 3apAIOHO yctpoiCTBO.
-ПОВЕМЕHAПОUECAH3aPEXKaHc3aCETOДIOJbT3aCTaYCa(6) CBETINNOCTOHHOBuepBEHO.

Yka3aHHe-npouecha3apeKdahe
-
LéniéT pioec Ha 3apekxdane Tpae okoi 3 - 5 yaca.
AkymyaTophata 6aTeepna HA TOHKoHOra MoKe da ce 3apeKJa KaKTO BB BKJIOUeHO, Taka N B N3KJIIOUeHO CbCTOHe.
Korato kanaunTebHa akymyatopnata 6atepe n e no-Hncbk ot 10% ,ce yBa Dbyctenehen akcytneH cnHai. Ta3n Hfopmaunue noLuynte camo npn BKIOUeHa TOHKOHOA. -
PpOdbJxKInTeHNOCTHa paBoTa Ha akymyIaTOphNte BatePm MoKe Da Bapnpa Cnopei EKcnloataunrHa yCTpoiCTBOTO, HAcTPOkNtE n YCLOBnRA Ta HA OKoJIHATA Cpeda (akymyIaTOphNte 6aTePNIMat ORpaHnueh KINBOT Ha paBOta).
4.3Aynobb3pnon3BexkaHaepe3npnIeKauaayaNo Ka6en(3.5MMKOMyHkaQnoHeJkaK)
- YBepeTeCe, Ye ToHKOJOnHaTa e N3KJIIOUeHa.
Cbpxe TaBtO Mo6nH0 yCTpOCTBO (MP3 nIeNbp, cMapTFOH n T.H.) uAUX BxOda (9) Ha ToHKoJOhata Upe3 npJIeKaunr 3,5MM ayDIOKApEn.
HacpoTe CnIata Ha 3Byka Ha BaWeto KpaHNO yCTPOCTBO Ha Hau-HNCKOTOHBO.
BkIOUOte ToHKOIOHaTakKaKTo e OINcAHO B 4.1 OINcaHne BkIOUOBAHe/3KIOUOBAHe-BKJ.
CtaptnpaTne HACTPOITE ayINOB3PON3BExJaHETO CbOTBEHO HAcBbP3aHOTOKpAHoyCTPOICTBO.
B CnyaH Ye yCTPOHCTBO THe CE BKLHOH ABOTMAHTHO BPEKIM AUX, HATNCKaIte MHOROKPAtho 6yToHa 3a pexkMa (2),IOKOt CTAPTnpa B3npon3BExKaDe O XeJAHnO T Bac n3TOHNK.
HaTnCHete 3a KpaTko 6yToH "PiIOc" (3), 3a da yBemnHTe cnIata Ha 3Byka. HATnCHete 3a KpaTko 6yToH "MmHyC" (4), 3a da hAmJIte cnIataHa3Byka.
HaTnCHete3aKpaTkoФyHKUHOHnn6yTOH(1),3a da cnpete Ha nay3aBb3npoN3BExJaHeto.
4.4ПьрвонаанноBluetooth®CBbp3Bahe(Pairing)

3a6eJekka
-
PpOBepTe DaJIH BaWeto MoBUNHO KpaHIO yCTPOCTBO (MP3- nIeBp,MoBUNHe TeneoH N.T.H.) NOIaBpXa Bluetooth
Ako He noDbpxka, MoKe Ja n3nONBATE ToHKOIOHaTa 3a Bb3POn3BExKaDaHeCaMoPe3npuEnEkaunaydnoKa6en.
-06bpheTBHmAHnHe,yeo6ceraHa BluteotheMaKc.10 MeTpα,6e3 npenTCTBnA KATO CTHeN,Xopa NT.H. -
YBepete ce, Ye BaaIaTn noIbpbkaIu Bluetooth® ypeIe B KJIIOUeHIN ΦyHKUra Ta Bluetooth® e a KTIbUpaHa.
- YBepete ce, Ye ToHkoNoHaTa ce HAMpa B Bluetooth® 6cera Ha a MAXc. 10 Metpa.
BkIOUOHTOKOIOHATA,KAKTOeONICAHOB 4.1 ONCAHNE BKNIOUOBAHE/N3KIOUOBAHE-BKn.
CneBa 3BkyOB CnHaJI,6yToHnTE 3aOnuBt Da CBETaT,a
ФнкuaOHaJIHHaTbYToH(1)3aOnuBaJaAMrA.
B CnyaH Ye yCTpoiCTBOTo He CE BkIoHn ABTomAtuHO BpeXm Bluteoth,HaTnCKaIeTMHoRokpaTHo6yToHa3apeXmMa(2),
DOKatoHeHyyeTe3ByKOBnCRHaI3apexMMA Bluteoth.CneJ TOBA yCTpoiCTBOTo ABTomAtuH0 3aOnuBa Da TbpcN Bpb3ka.
-HabaunnypeoTbopete Bluteothn HactpoKHTEN m 3aKaHTe, DOKaTOHaJIcTAtaHaHaMepeHte BluteothyCTPOINCTBace nokaxeHamaSoundcup-Z. - 136epete Hama Soundcup-Z n m3yakaite,doKato TOnKoNoHaTa 6bDenokka3aHaKaTOCBbp3aHAB BLeuTooth HaCTpoiKITE Ha BaWeto KpaHIO yCTpoiCTBO. YcNeUHOTo CBbp3BaHe 6nBa NOTBbpDneHoc a KcyTneHCmIHajI.
MrraIHTDO MOMENTa FyHKUHOHEn 6yTOH(1)3anoYBa Da CBETN HENpeKbCHaTOB C INbO.

3a6eJekka-Bluetooth®napona
Hakon KpaHnYcTpoCTBaCe HxKdAaT O npoJa npn HacTPOBaHTo Ha Bp3KaTa Cdpyro Bluetooth yctpoCTBO.
3a Cbbp3BaHETO c TOnKoIohata BBeDeTe npolata 0000, KOrato 6bJeTe noKaHeH da a BBeDeTe OT BaWeTo kpaHo yCTpoiCTBO.

3a6eJekka-Cbbp3BaHeHaHOBOyCTPOCTBO
ToHKoJIOHaT3aNaMaTeBA BnHaTn OCEMeTneNo Cbbp3AH KpaHNUCTpoCTBA.
- PnCnEDbauTo CN BkIIOUbaHe ToHKOJIOHaTa Ce CbBp3Ba ABTomATmHO C NocJeHNO CBbp3aHOTO KpaHNo yCTpoCTBO.
4.5ABTomaTnHOb Bluetooth Cbbp3BaHe(cJeBBeYcneWeH Pairing)
- YBepete ce, Ye BaaMnT noDbPkaaL Bluetooth® ypee B KJIoueHn Фуннкшета Bluetooth® e a KTNBUPaHa.
- YBepete ce, Ye ToHkonohata ce HAMnpa B Bluetooth® 06cera Ha a MAKC.10 METpa.
BkIOUoyTe TOHKOIOHOta KaKTo e ONIcaHO B 4.1 ONICAHe BKNIOUyBaHE/IMKIOUyBaHe-BKJ.
CnEynCnENoHOBaTOMuHOCBp3BaHeMraUHrTOMoMeHTa yHKnOHaJIe6yToH(1) ceraCBTeHN HeIpeKbCHaTO B CmHo. YcneHOTOCbP3BaHe ce notBpbJdaBAOTakCyTHeCNrHan.

3a6eKKa-Bpb3Ka H apyuSha
CneI ycneIHO nbpBOHaHJHO Cbpb3BaHe Ha ToHKoHOHATA KpainHOYCTPOINCTBOTO OTCera HAATAk CBpb3BaHETo CE N3BbPbBaABTOMaTHNO.AKO Bluetooth Bp6KATAHeCE BB3CTAHOBRA ABTomaTHNO, npOBepete CneHNTE TOKN:
B Bluetooth® HAcTPOKnTEHaKpAHyTOyCTPoIcTBONPObepete DaHamaSoundcup-Z e CbBy3Ha. Korato He, NOBTopeTe NocOueHHTecTbHnNoD Bluetooth® nbpBOHaayJHIOCBbP3BaHe.
- PpOBepTe dAnK KpaHnOTo yCTPOINCTBO n ToHKOJIOnHaTa ca OTaJIeueHn Ha No-MaIko OTo 10 MeTp a ENo oT pyro. Korato He e, HamaJIeTe pa3CToRnHMeTO MEXyypeDNTe.
- PpOBepTe dAnI mMa npEnrTCTBnA, KOtO npEaT Ha o6cera. Korato mMa, nOCTaBeY cTpoCTbTa no-6n3o eHDo do npyro.
- PnpoBepete daIIM ayIIO ka6eIa e BkIIOueH B TOHKOIOHaTa. Koratoe,IN3BaTekeA6eIa.
4.6AynOBp3npOn3Bedahe(npe 3 Bluetooth®)
CtaptnapeIy npablaBaIte ayIOBB3PON3BExdHaETO CbOTBeHO HA cBp3aHOTo kpaHNO yCTPOINCTBO.MoKTe aNTepHnatMBHO da ynpablaBaTe ayIOBB3PON3BExdHaETO n OT TOHKoJHOHa (AKO fHKUraT e noDlbpxHa o TcBp3aHOTo yCTPOINCTBO).
HATINCHETepyHKUHOHAHH6yTOH (1),3aIactaptnpateuIN CNpeTeayIOBb3POn3BExdAHeTo.
3a npbxte 6ytoh ,PiioC (3), 3a da nycheTe cneBaata neceH. 3a npbxte 6ytoh ,MnHyc" (4), 3a da nycheTe npdeXoHaTata neceH.
- Hatnche 3a kpaTko 6ytoh „Plloc" (3), 3a da ybeenuite cnata ha 3Byka. Hatnche 3a kpaTko 6ytoh „MmHyc" (4), 3a da hamaJnte cnataHa3Byka.
4.7 Bb3npon3Bewdane Ha aydno (Upe3 MicroSD Kapta)
AInTePHaTINBHO MoKTe Da Bb3npOn3BeDte Aeynu N DnpeKTHOOT MicroSDkapTa.
3a ueIta noctabete MicroSD KapTa namet cbc cbOTBeHTHnTe aydno
paJIOBE B CNOTA 3a MicroSD Kaptn (8)
B CnyaH Ye yCtpoNCTBOTo He CE BKJIOUAn ABTOMaTNUHO B pexM MicroSD-kapTa nAmTe, HATNCKaIte MHOROKpaTHO 6yTOHa 3a peXmMa(2),DOKaTOHeYeTe3ByKOBnCnHaJI3apeXmMa MicroSD.
Ynpableneto Ha n360paHa neChn H Cnata Ha 3Bvka ce OcbseCTBa KaTO e oNcHb TOUka 4.6.B3npOn3BexJaHe Ha aytno(ype3 Bluetooth®).
4.8 Bb3npoun3Bexkdahe Ha aydno (ype3 USB yctpoiCTBO)
AInTePHaTnBHOMOXeTeJaCTaTnpaTeBb3pnOn3BExKaDaHeHaayDnOu npeKTHoOT USB Hocnten Ha daHHn (Hanp.USB CTNK). 3a ceIta Noctabete USB Hocnten Ha daHHn Cbc CbOTBeHTnTe ayDnO paJIOBE B cNOTa 3a USB yCTpoiCTBa (10)
B Cnyaaye yctpoCTBOTo He ce BkIOUH ABTOMaTHoBpeKIM USB, HATnCKaIte MHOROKpaTHO 6yToHa 3a peKIma (2), DOkato He yeTe3ByKObMnCnHAn3apeKIMUSB.
YnpabJIeHMeTo Ha 360paHa neChn H cnlaHa 38yKa ce OcbIeCTBBA KaKTo e ONCaHO B ToKa 4.6.Bb3pOn3BExJaHe Ha ayDIO(ype3 Bluteoth)
4.9Функць,СвобODинрьe"
CbIeCTByBa B3MOXHOCTT Da n3N0J3BATE TOHKOJHOHa KaTO pa3ROBOPa CnCTema CBo6OJHn Pbue". 3a Ta3n fYHKUma MOBUNHna TelefoHTpRbBadae C BbP3aHnpe3 Bluetooth C T OHKOJHOHa.
HaTNCHTe eDIN nBt fynHKUHOHJIHHa6yTOH 01)3aJa npneMeTeBXOJNUOONOBKBAHe.
3aIpbkTeHaTnCHaT 6yToH M" (2), 3aJaOTXBpNITe BXOJrOTo NOBnKBaHe.
-ⅠOBpeMeHaTeNeΦoHepa3rObOpHaTnCHeBeNbX ΦyHKuHOHaHHm6byToH (1),3a da npeKpaTne pa3rObopa.

3a6eexka-KaueCTBOHapa3RObopa
-ObpheBnHMaHne,yeNoBpeMeHaapa3rObopaTpa6Ba Da ce HAMnPate C BaUNa MOuINe TeneoH B 6nI30CT TOHKoJHOHaTA,3a Da NOBUnITE KauCTBOTo Ha pa3rObopa.
5.YnpabLeHnHeLALEDocBtneHneto
- ByTohT 3a ocBetJeHneTO (5) npOMeHa CBeta HA LED ocBetJeHneTO (11).
- Hatnche 3a KpaTko 6ytoHa 3a OCBetneHneto (5), 3a da npemHeTeKbMcNEBaUcaTaHaCTPOKaHaCBeTOBete.
-Последнатан actpoKaHaHcBETOBeTaeBOMaTHHONpeBkIIOUBA LEDOCBETeHnEToKbM6acnteHaMy3NKataN3aOuBa da nyIcnipa.
3a da ce noCTnHre To3n eFekT, e Heo6xOJMa CnJa Ha 38yKa OT MNHMym30%nnnoBee.
6.Texnueckoo6cnyXbaen n oDpBXka
-ПочntВаиTeTO3n npOуKT cAmO cNeko HablaЖнHeHa Kbpna,КоТо He nycKa BlnacnHKn,И He nI3NoI3BaIte aRpeCnBn NpOuNCTBaUIn npenapaTn.
7.I3KIOUBAHeHarapaHua
XamaΓm6X&Ko.KT He noema HnKaKaBA OTROBOPHOCT mIraHua 3a NOBpei n B pe3ynta Ha HnPaBnHa HnCTaNaUa,MOHTax n HnPaBnHaaynoptpebHaanpOkyTA n IInHeCna3BaHeaaynbTaHeto 3a06cnykBaHeu/nnHCTpykUnTe3a6e3onacHocT.
8.CepBn3n Cbnpot
3a Bbnpocn BbB Bp3ka C npdykTa ce 06bhpN KbM OTenla 3a KOHCyTTaunra3anpoDkyTInaXama.
Topeua TelefoHnHa IHHN: +49 9091 502-115 (Hemckn/aHrIiNCKn) DOnbHInTeHnHa HΦOpMaun 3a CbnpT ue HaMepuTe Tk: www.hama.com
9.TexHnueckndaHHN
| Ctepeo TOHKOLOH Soundcup-Z Bluetooth® | |
| Bluetooth® TexhologniaV4.2 | |
| Повдьрханлpopфим | A2DPV1.2,AVRCPV1.4,HFP V1.5 |
| Чебota180Hz-20kHz | |
| Оьсer<10м | |
| М配电чбьрзануреди8 | |
| Мошноct16W | |
| Наразжениназарожданe~5 | V --- 1,75A |
| ОзвунiteлнасистемаСtlepeo | |
| Импесданс4Ω | |
| ИзравванeTHD≤1% | |
| Размери | 78x74.5x191MM |
| Терло | 580r |
| Извочи | 3.5mmStereoPlug,Micro U SB, с intoler за MicroSD кaptаслот,USB TypeA Re a d e r |
| Актулаторнастетя | |
| Тун | 7.4V Li-Ion 2000mAh / 14.8 Wh |
| В��е'mЗаразжданe | ~3-5ч |
| В��е'mенapabotsa | празеBluetooth®:~12чпразеAUX/USB/microSD:~16ч(B завис moot OT силatable на 3byka и 3bykoBOTO сьдьрханиe) |
10.yka3aHnHa3aXbBpIha
Yka3aHHe OTOHO Cho 3aunTaHa OKOHnA tcpa:

OT MOMENTHa npinlaraheto Ha eBponecknte DnpekTMB 2012/19/EU n 2006/66/EO B hauoohnoTO npabo HA cbOBtEHNTecpaHbaxKneJeHDto:EKeTpuuecknte eKeTPOHNHTe ypeNi batePnTe He bNa da ce
m3XbprnTc6bTOBITEOTnAbu. NOpTe6nTeT e nJbXeH NO 3aKOH da BbPHe enEeKTPnueCKNTE n EeKTPoHNITE ypeNi bATEpNTBE KpaHa TAnxHATANbIroTpainHOCT Ha N3rpaJeHNTe 3a CenTA 06bcTeHn NpyHKTOB3aCb6bpAneHaOTnabuINInHaTbPROBCKN 06ekt. POnpo6HoCTnToENOBbnpocaperlAmeteHpaHNB 3aKoHOdaTeNCTBOTo HA cBoTBeTHata Ctpana.CMBOblb Vbpx npOykTA, YnbTBaHEto 3a ynotpe6a INOn OAKOBkATA HAcOyBa KbM Te3n pAsopoe6b.4pe3 peunKnipaheto, npepa6OtKaTa ha MATEpnaJIte INnDpyrNΦopMNHaONON3tBOPBAhe Hactapite yepi/6aepinB WBe DOnpHnACTe 3a aUniTata Ha Hauata OKoHa cpea.cTte 3a 3aUniTata Ha Hauata OKoHa cpeda. cTte 3a 3aUniTata Ha Hauata OKoHa cpeda.
11.Deknapaun3acb0TBeTCTBnE

C hactoaTo Hama GmbH & Co KG deKnapupa, ye TnntbT paanocCTema [00173161]cbotBetCTbaHaoCHOBHnTe n3CKBaHnHa Na dIpeKTuBa 2014/53/EO. IIJIHNrT KeCT Ha EC DeKlapaunrTa 3a cbotBetCTBne e Ha pa3nOnoXeHne Ha nHTepHetaDpec: ma.com->00173161->Downloads.
TtQxieayeipooukaevdEiEc
- Evepyoinon/antvepyoinon, nkipto PAUSE
2.MODE/πλικτορλειουργία
3.IInktpoaleitoupyw+
4.IInktpoleiertoupyiwv
5.AuxviaLEDAertoupyia - Auyvia LED katataang
7.Ytdoxhfoptionmicro U S B
8.YtnofoxjnkaptacmicroSD
9.Ytno8oxnAUX-In - Suakeun avaywongc (diavopae) USB tumou A
- C LEDIOAawvXPwauTWM
Zac euyapiotouye iayyapao autou tou npoiovtoc. tnc Hama!
Aiaabaote npooektika ticnapakatw odnyiec kai unodEiEc. 2n
ouvexia, pfalste auto to yxepidio ae oafalec epoc ia
eavotikipnaneepintwnoutouanoeetcnouakeun,
napadote auto to yxepidio otov etnoevo ayopatn.
1.EnEiynoanouoβλoovnpoεdonoianckauonooδeixeov

PpoEoiOioJn
Xpnoioeitai ytnnunavon unoedeieevw oaoaiaic n yi va etniotneivipooxni 01dialtepuoc KIVDuvouc.

Yπoδειη
XpnoionoieitaiyatnojnaovoninIeovnInpoopiov nogavtkvunoeiEevv.
2.πeixóμεvaovokεuaoia
-Σερεοφωνικό n ηειo Bluetooth® Soundcup-Z
-Kaλωδiophoptionmicro-USB
Kaλδiαxou3,5mm
Auto to eyyxepiio xepiaou
3.Yno8eiEicaoaia
To npoiov npoopicietai yia okoitou oikiaknc xpnonc.
Mny xnpoiomoeite to npioov kovtae kaolopiepe, aalec tinyec 0epuotntac n oaneia onou dexetai aleonnlaiknktivoBoia
Mny aphiive ta naiaia va ayicouv autn n oioaohntote aaan nAekpiikoukeun.
To npioov dev enitipenetai va nedei katw, oute kai va dexetai duvata x tunjuate.
Mnyxpnoiouoeitnauoknektocwovpiwanodooanctou npiaipaovtaiotaexviakapaktniotika.
Mynxnpoioite to npoiov o nepioxc onou devenitpntovta nkekpoivicocaukeuc.
IpoaeEe. Oi uynAe c eTaoic mnoepi va evoxnaouv n va baiouv toucyupwaac.
Mny aoviyet to npioiv kai my to xnpnooiite av xaalaoi.
H mntapia evai evomegaatwve n kai dev mnpoei va aphiapeo, y' auto npiei va anoppipseote ooknpo to npoiov ouuowva me tioxouooecovikcdiataEIC.
Ta naiiai dev nipentetai va epoxovtae naojnto uikto oukeuaiaic, unapxki kivduoc aouieac.
AnoppiTe kateuBeiav to uIko oukeuaiaoc uMwva e touc ixouvtocnIOKcuovioouc anoppic.
Mny kavete metatponie ctnoukeun. Kat' autov tov tponto nauei valoxuein Eyyuon.
Mny pivvete nnu unatapia n kal to npoiov otn t i a
Mny metapentene Ka/nu npapopopwve/0epmuivte/aoviyete t anlεc/evavaopoptoεveecμatapeic.
4.EvapEnxpnockaeitoupyia
4.1EvEpyooin/anEvEpyooin
Pntote to nktpo laitoupyw (1), yia va evepyoioe/ anevpyoioaote to nxie. Oa akoutei eva nntik o nma kal ta nktpaaaavawouwthetaaouov.

YnOeIeAuroaTnaeVepyOnoin
AβeunoyntoTnxEio aneepyoioietai meta ano 10 aeia, evdvuvapEkeiakoiiaobpaotniptta(6evyiveiavanapayyn nou/evxpnaiouointheit o Bluetooth®).
4.2Φρτησητηματαριας

PpoEiOnoinan-Mnatapia
- Γι φόρτια έρησιομιοίει τόνο κατάλληλους φόρτισές μεύπουδχέςUSB.
-
Evika μην χροιμοίοει έλασμένους φόρτιοτές ἡιθόδαχε USB kal μην προσιαθείνα τούς επιοκυασετε.
Mny anoThkevete, optitee kai uny xpoaiooneite tnovada oe akpaie cepuokpaies kai utepboikacayunan atooaaipikniieon (ntwC. x. oe yalauh).Otav to pioiov anoThekeetai via meyalo xpvivok diaoeta npenei va ophiietai ava taktxpvikdaiaotnata (oulambdaotov kahepinuo). -
Piv tv EvapEn xpionc fopitote nipowto nxieo.
- Suδéσe to napexóμεvo kαλδio φóptionc micro-USB στην unδoxn micro-USB (7) tou ηεiou.
- UvδéoTe to eλeθερο βuαμa tou kαλωdiou φóptianc micro-USB oε εναν katαληλo φóptiπT USB. Aβεte oxetiká unöψn to éyεipidio tou x pηοιμοιομενουφóptiπT USB.
H Luyvia LED katataaoc (6) avabeouvexwC ME KOKivo xpuka katatnfoption.

YnOdelta-ΦOpTio
Mia nipnC foipion diapkei nepinou 3-5 wpc.
H mpatia tou nyieoiu nopei va optatei too auto eiva evepytoinjevo 00 ka otav eivai anevepytoinjevo.
Otav n xwpntikotnta tnc mntapiaac eivai lyotiepn ano 10%, akouyetai eva dinAo nxntiko onma. Autoyivetai mvo otav to nxeioivevepyoionmuovo.
O npayatikoc xpovc aeitoupyiac tnc ptataic diahepei avaloyae ntn xponn tnc ouakeunc tic puthetaieic kai tic ouvtheke npiaalovtoc (oi mtapiec exuvnpioipuevni diapkeia zmc).
4.3Avanapaywynxyoueowotounapexóevoukaλwδiou nyou(ioβuσμa3,5mm)
Bεβαιωθείτε οτι τηχείο εἰναι απενργοποιμεν。
ΣuδδeTe ηφopnt Σασακειη (αωκειη MP3, smartphone, κλπ.) σην ειαδo AUX (9) τοῦ έχειου μεω του παρεχόμενου kalωδiouŋχο3,5mm.
Puroe tvv evtaon tnc oukeunoc ae xanlo eninefo.
Evpyonoinote to nxiio -otwnc nepiypafetai oto 4.1 Evpyonoinanevpyonoin
- EKIVNTE Tn avanapaywn nXou kai eEyEe Tnv otnv ouvdeedeevn ouakeun.
Av oukeunDev Eekivnoi autouata otn aeitoupia AUX, patote to nktpo aeitoupiac (2) enaveuummueva mexoi va npayatoinoieneianapaywyntncenuuntctinyic
- Patnote otiyuaia to nAnktpo ouv (3), ia va auEnoeTe tvv evtaonxou. Patnote otiyuaia to nAnktpo eiov (4), ia va eioeTe tvv evtaonxou.
- Patnote otiyia to nIktpo Ieitoupywv (1), yia va theaetoe naunynavanapaywyh.