Attentiv 26230-56 - Coffee machine RUSSELL HOBBS - Free user manual and instructions
Find the device manual for free Attentiv 26230-56 RUSSELL HOBBS in PDF.

User questions about Attentiv 26230-56 RUSSELL HOBBS
0 question about this device. Answer the ones you know or ask your own.
Ask a new question about this device
Download the instructions for your Coffee machine in PDF format for free! Find your manual Attentiv 26230-56 - RUSSELL HOBBS and take your electronic device back in hand. On this page are published all the documents necessary for the use of your device. Attentiv 26230-56 by RUSSELL HOBBS.
USER MANUAL Attentiv 26230-56 RUSSELL HOBBS
natural_image
Russell Hobbs coffee maker with clear glass and black handle, no visible text or symbols on the device itself.26230-56
text_image
Technical diagram of a coffee maker with numbered parts and exploded view of its internal components.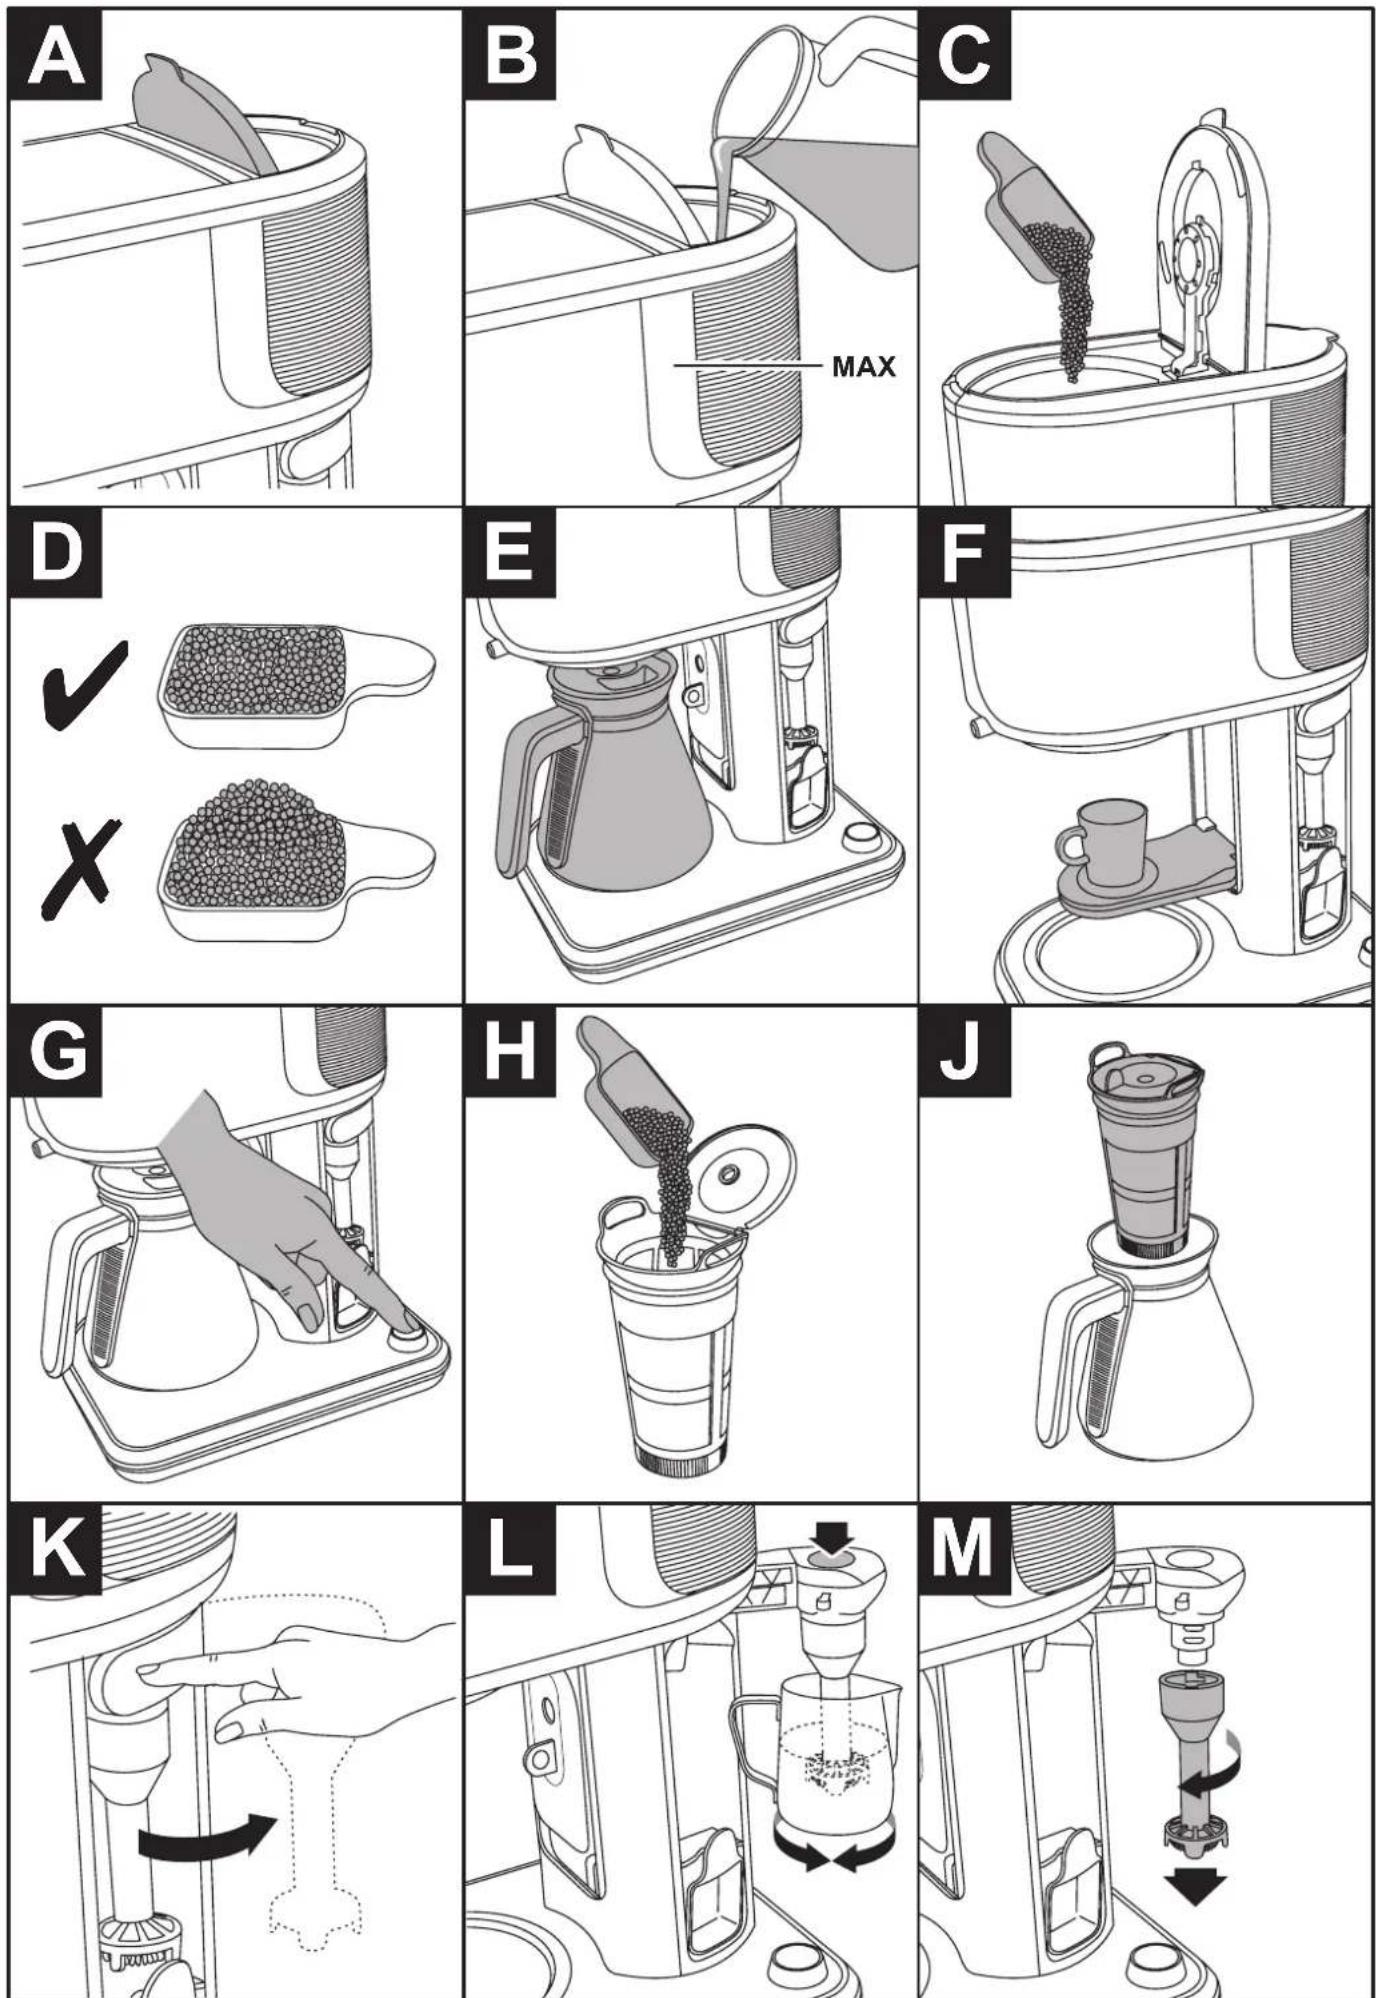
IMPORTANT SAFEGUARDS
Follow basic safety precautions, including:
This appliance can be used by children aged from 8 years and above and persons with reduced physical, sensory or mental capabilities or lack of experience and knowledge if they have been supervised/instructed and understand the hazards involved.
Children shall not play with the appliance.
Cleaning and user maintenance shall not be done by children unless they are older than 8 and supervised.
Keep the appliance and cable out of reach of children under 8 years.
Misuse of the appliance may cause injury.
The coffee-maker shall not be placed in a cabinet during use.
The surfaces of the appliance will get hot. Residual heat will keep the surfaces hot after use.
If the cable is damaged, it must be replaced by the manufacturer, its service agent, or someone similarly qualified, to avoid hazard.
The surface of the heating element is subject to residual heat after use.
Use the appliance according to these instructions. Any misuse may cause potential injury, electric shock or other hazards.
This appliance can be used by persons with reduced physical, sensory or mental capabilities or lack of experience and knowledge if they have been given supervision or instruction concerning use of the appliance in a safe way and understand the hazards involved.
Clean the product and all other accessories after each use.
Do not immerse in any liquid.
This appliance is intended to be used in household and similar applications such as:
- staff kitchen areas in shops, offices and other working environments;
- by clients in hotels, motels and other residential type environments;
• bed and breakfast type environments; - farm houses.
- Sit the appliance on a stable, level, heat-resistant surface.
- Don't use the appliance for any purpose other than those described in these instructions.
- Don't use the appliance if it's damaged or malfunctions.
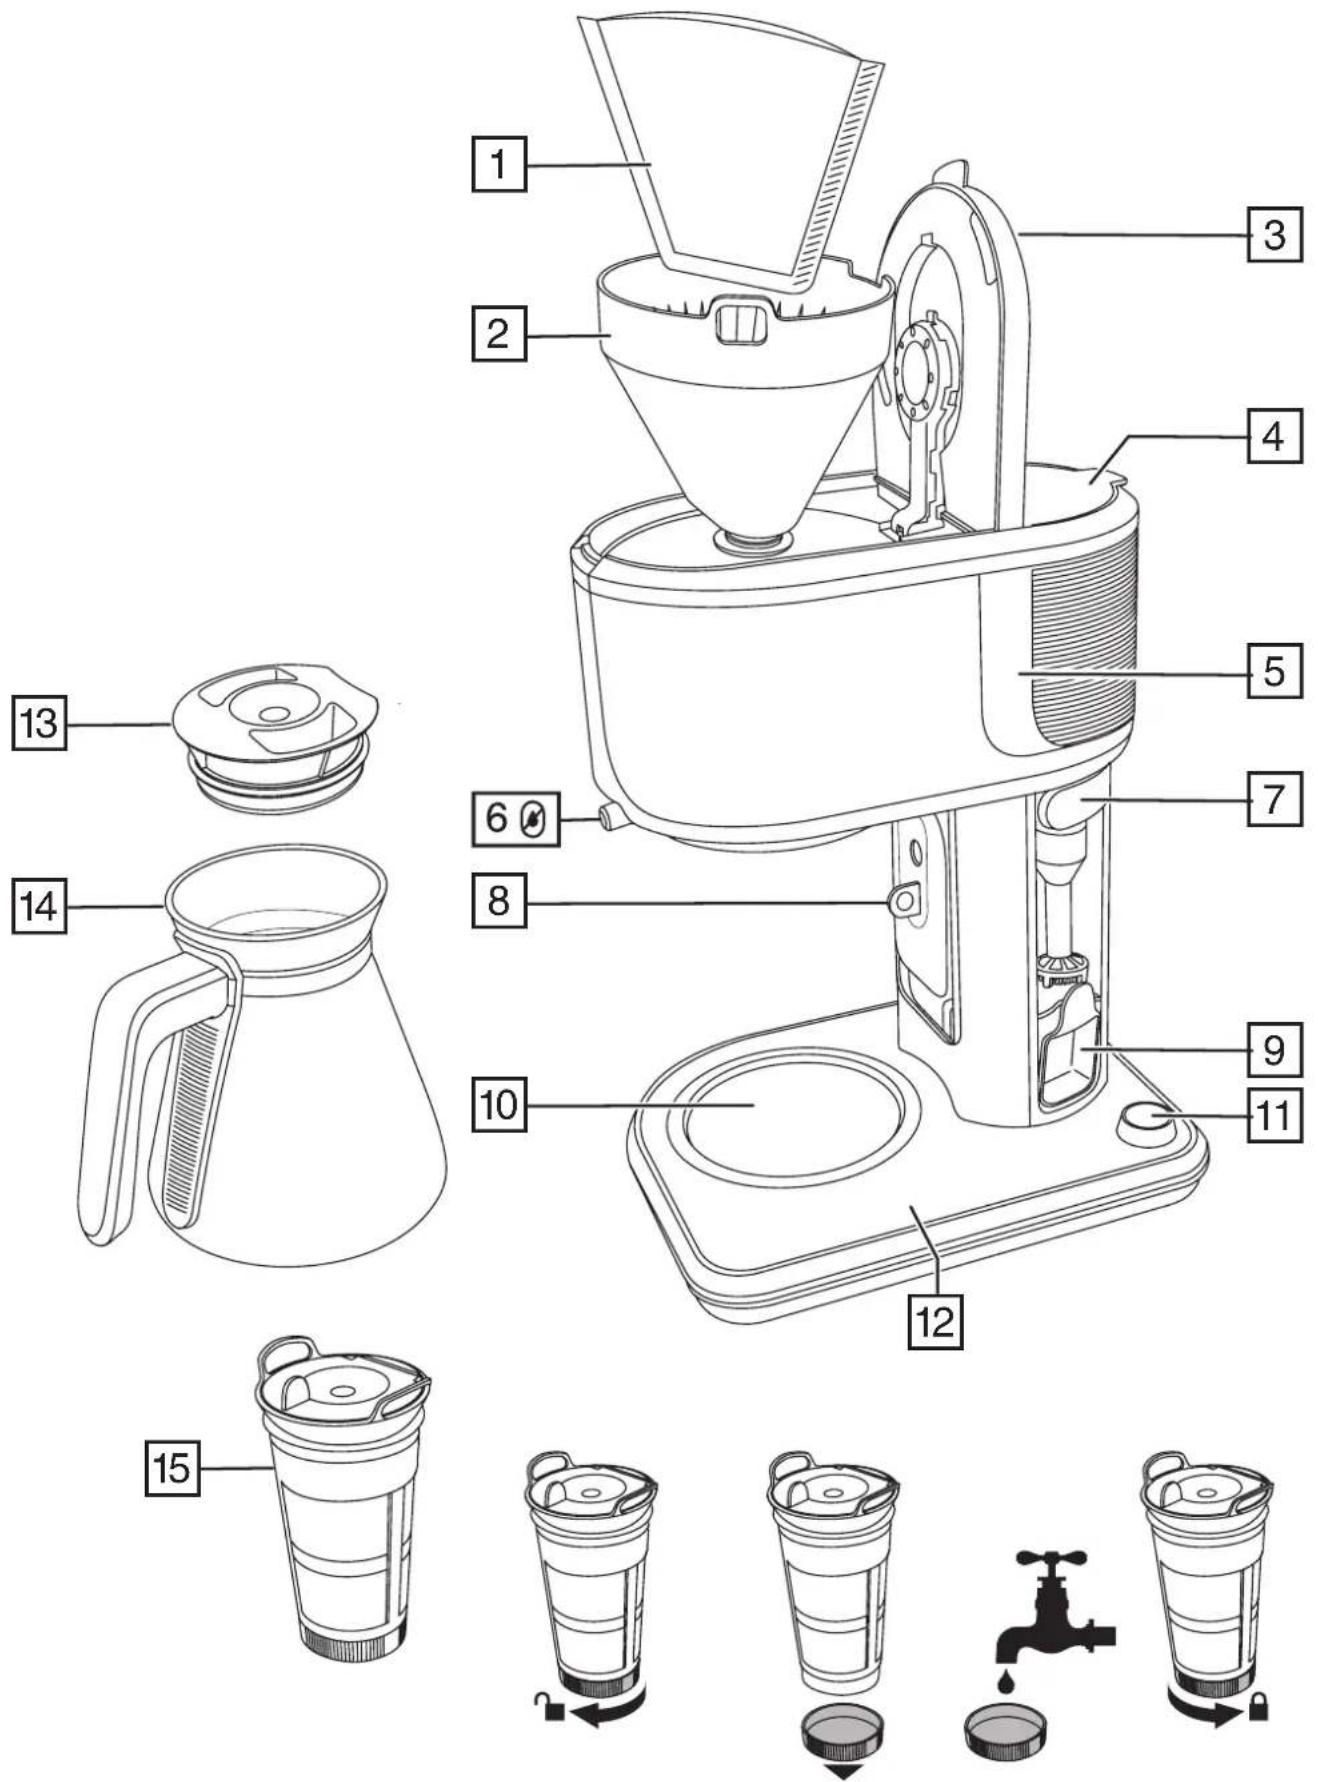
PARTS
| 1. Filter | 9. Scoop (~7g) |
| 2. Filter holder | 10. Warming plate |
| 3. Filter compartment lid | 11. Select/confirm knob |
| 4. Water tank lid | 12. Touch controls and display |
| 5. Water level gauge | 13. Carafe lid |
| 6. Anti drip lever | 14. Carafe |
| 7. Milk frother release | 15. Cold brew filter |
| 8. Small cup stand |
BEFORE USING FOR THE FIRST TIME
- Wash the carafe, filter holder and filter in warm soapy water. Rinse and dry.
- Before using for the first time, or if the appliance has not been used for a long time:
- Fill the reservoir with water to the 10-15 marking.
-
Place the carafe onto the warming plate.
-
Tap the cold brew 📋 icon.
- Use the select/confirm knob to select full carafe 📁.
- Press the select/confirm knob √ to start the brewing cycle.
This will clean and prime your coffee maker ready for use.
CONTROLS AND DISPLAY
In general, to activate a function, touch its icon. The icon will light up brightly and the remaining icons will be dimly lit to show that they are available for use.
Your coffee maker will revert to the standby mode if no controls are touched or settings changed within 5 minutes. You can also select standby mode at any time by touching the ⏻ icon for 1 second. Your coffee maker will remember the last settings selected.
An audible alert will sound at the beginning and end of each brewing cycle.
| ICON FUNCTION | |
| 💡 | Power/Standby - Touch and hold for 1 second to switch on. Touch and hold for 1 second to enter standby mode. |
| 💡 | Settings - tap to access the clock set, timer or clean functions |
| ⊗ | Cancel - touch and hold for 1 second to cancel brewing |
| 💡 | Clock set - tap Settings then tap to enter the clock setting mode |
| 💡 | Timer - tap Settings then tap to enter the timed brewing mode. You can program a brewing cycle to occur at a specific time. |
| 💡 | Clean - tap Settings then tap to enter the cleaning mode |
| Warming plate active light - when lit, the warming plate is HOT! | |
| 88:88 | Numerical display shows current time or the time that a brewing cycle has been programmed. After brewing, it will count up for 40 minutes to show the amount of time the coffee has been on the warming plate. |
| 💡 | Coffee strength - cold brew |
| 💡 | Coffee strength - regular |
| 💡 | Coffee strength - strong |
| 💡 | Coffee strength - concentrate (shot) |
| 💡 | Coffee volume light - full carafe |
| 💡 | Coffee volume light - half carafe |
| 💡 | Coffee volume light - travel mug |
| 💡 | Coffee volume light - single cup |
| ✓ | Confirm button. Press to start the brewing cycle. |
| 💡 | Drip stop lever status light |
SETTING THE CLOCK
You don't have to set the clock to make coffee but you will need to set it if you want to use the timer function of your coffee maker.
- If your coffee maker is in standby, touch and hold the ⏻ icon for 1 second.
- Tap the setting ⚙ icon.
- Tap the clock set ⏻ icon. The display will slowly flash.
- Turn the select/confirm knob until the correct time is displayed (the clock is in 24 hour format). Turning the knob slowly will increase or decrease the time in 1 minute steps. Turning it quickly will change the time in 15 minute steps.
- Press the select/confirm knob √ to accept the time.
- The display will stop flashing and the time you have set will be displayed.
PREPARATION
- Open the water tank lid (Fig A).
-
Fill the water tank with the desired quantity of cold, fresh water. Don't exceed the max markings (Fig. B).
-
Close the lid.
- Open the filter compartment lid.
- Add the desired amount of coffee using the scoop provided (Fig. C).
- Coffee in the scoop should be level and not heaped (Fig. D).
- Place the carafe onto the warming plate (Fig. E). If you are making a single cup, or are using a travel mug, place it onto the warming plate. For small cups, use the small cup stand by pulling it downwards into position (Fig. F).
COFFEE QUANTITY
Use the provided scoop to add ground coffee into the filter. For guidance:
| Icon Description Scoops of coffee (level) | ||
| Full carafe (10 large or 15 small cups) 8-9 | ||
| Half carafe (5 large or 8 small cups) 4-5 | ||
| Travel mug 2 | ||
| Single cup 1-2 | ||
MAKING COFFEE
You can control the coffee strength and quantity to make a variety of barista-style drinks.
Basic coffee
- If you have not already done so, prepare your coffee maker as described under PREPARATION.
- If your coffee maker is in standby, touch and hold the ⏻ icon for 1 second.
- Tap the coffee strength icon to select the desired coffee strength.
| ∅ | Coffee strength - regular |
| ∞ | Coffee strength - strong |
- Use the select/confirm knob to select the quantity of coffee.
| Full carafe | |
| Half carafe | |
| Travel mug | |
| Single cup |
-
When ready, press the select/confirm knob √ to start the brewing cycle.
-
To cancel the brewing cycle at any time, touch and hold the cancel ⊗ icon for 1 second.
- The warming plate will keep the brewed coffee warm for approximately 40 minutes. The display will count upwards from 0 to show how long the coffee has been on the warming plate.
Concentrate (shot)
The concentrate selection makes an extra-strength 'shot' of coffee that can be used like an espresso to drink on its own, or used to make barista-style drinks (latte, cappuccino, etc.) You can make it in a small or large cup size. A small cup gives approximately 118 ml of concentrate. A large cup gives approximately 148 ml.
- Prepare your coffee maker.
- Add the coffee to the filter. For a small cup, use 2 level scoops; for a travel mug, use 2-3 level scoops.
- Tap the concentrate strength 🎨 icon.
- Use the select/confirm knob to select single cup ▶ or a travel mug ■.
- Place a small cup onto the cup platform.
- When ready, press the select/confirm knob √ to start the brewing cycle.
- To cancel the brewing cycle at any time, touch and hold the cancel ⊗ icon for 1 second.
Making ECBC Coffee
Your coffee maker is capable of making coffee to the exacting standards of the European Coffee Brewing Centre (ECBC) and carries their prestigious gold seal of approval. To do this, follow these steps:
- Fill the reservoir to the 1.25l marking.
- Add 75 grams of coffee into the filter. For 1.0l of water add 60g of coffee.
- Place the carafe onto the warming plate.
- Tap the regular strength 🔗 icon.
- Use the select/confirm knob to select ☐ Full Carafe.
- Press the select/confirm knob √ to start the brewing cycle.
COLD BREWING
Cold brewing is a method of brewing coffee using cold water to slowly extract the flavour from the ground coffee. This gives a smoother, sweeter flavour which can last in the fridge for up to a week without becoming bitter. Cold brewed coffee can be enjoyed as a cold drink, or you can use it as a concentrate adding hot water to create a traditional but smooth hot coffee. You can add milk, frothed milk, sugar - even soda water for a fizzy cold coffee! It can also be used as an ingredient in cooking and cocktails.
Use the cold brew filter to make cold brew coffee.
- Open the cold brew filter lid and add coffee (Fig H). Close the lid when finished.
| Icon Scoops of coffee (level) | |
| 13 | |
| 6-7 | |
- Remove the carafe lid and fit the cold brew filter into the carafe (Fig. J).
- Place the carafe onto the warming plate.
- Tap the cold brew 📋 icon.
- Use the select/confirm knob to select full or half carafe as required.
- When ready, press the select/confirm knob √ to start the brewing cycle.
- To cancel the brewing cycle at any time, touch and hold the cancel Ⓧ icon for 1 second.
Notes
- IMPORTANT: During cold brewing, cold water is pumped intermittently with pauses of up to 30 seconds between pumping cycles. This is to wet the ground coffee slowly to ensure the best extraction of flavour and aroma.
- Once brewed, you can leave the carafe on the warming plate (which will be switched off), or you can place the carafe in the fridge. However, placing the brew in the fridge can slow down the extraction process.
• We recommend leaving the brew for approximately 8-12 hours for it to develop its full flavour. Longer periods than this are permissible. - If you are making a cold brew that you want to keep and use over a period of time, then put the carafe into the fridge. You can also transfer the brew to another container if you want to use the carafe for normal brewing.
- The coffee quantities listed are for guidance only. We recommend that you experiment to find the amount that suits you.
MILK FROTHER
Frothed milk is used in many barista-style coffee drinks like latte, cappuccino, etc. The built-in milk frother aerates the milk to produce a thick foam making it lighter in texture and increasing its volume.
- Press the top of the milk frother to release it (Fig. K) then swing the milk frother out.
- Put the milk into a small jug or something similar and hold it under the milk frother until it is immersed in the milk.
- Press and hold the button on the top of the milk frother to activate it (Fig. L). Use long presses and make circular motions with the jug until the desired result is achieved.
Cleaning the milk frother after use
- Clean the milk frother after every use.
- Immerse the milk frother in a cup of clean water.
- Press the button several times to activate it.
- Repeat several times if necessary.
- Swivel the milk frother into its compartment and press it until it clicks into place.
- You can also remove the lower section of the milk frother for cleaning. Twist the shaft to the left and pull it away from the button section (Fig. M). To replace, fit the shaft over the button section and twist it to the right to lock it.
USING THE TIMER
The timer can be used to make coffee at a predetermined time. The clock needs to be set to the correct time before you can use the timer function.
- Prepare your coffee maker as required.
- Tap the setting ⚙ icon.
- Tap the timer 🔒 icon. The display will slowly flash.
- Turn the select/confirm knob until the time you want your coffee maker to start is displayed. Turning the knob slowly will increase or decrease the time in 1 minute steps. Turning it quickly will change the time in 15 minute steps.
- Press the select/confirm knob √ to accept the time.
- The display will stop flashing and return to show the current time.
- The Timer icon Ⓧ will be lit to show that you have set the timer.
- To cancel the timer at any time, tap the cancel ⊗ icon.
ANTI DRIP
The anti drip lever closes a valve to prevent any drips splashing onto the warming plate when you remove the carafe.
- Moving the lever to the left will close the valve and the anti drip icon Ⓞ will be displayed.
- Moving the lever to the right will open the valve and the icon will go out.
- If you attempt to brew coffee when the lever is in the closed position, your coffee maker will sound an alert tone and the icon will flash until you open the valve.
CARE AND MAINTENANCE
Cleaning
- Unplug the appliance and let it completely cool down.
- Clean the exterior surfaces with a slightly damp cloth and then dry them thoroughly.
- Remove the filter and filter holder and empty out the coffee grounds. Wash under running water and dry thoroughly.
- Wipe the filter holder compartment with kitchen paper.
- The bottom cap of the cold brew filter can be removed to assist in cleaning. Twist it clockwise to unlock and remove. Twist it counterclockwise to lock.
Descaling
After approximately 60 cycles, the cleaning ⚙️ icon will pulse on and off indicating that the unit should be cleaned/descaled. This is a warning and will not affect coffee making. You can temporarily cancel the warning by tapping the cancel Ⓧicon, but to reset the cycle count, you need to run the cleaning function. We recommend descaling your coffee maker regularly to maintain performance.
Never use a descaling product based on mineral acids such as sulphuric acid, hydrochloric acid, sulphamic acid and acetic acid (e.g. vinegar). These descalers may damage the machine. Use a descaling product recommended for appliances with plastic parts.
Products returned under guarantee with faults due to scale will be subject to a repair charge.
- Descale your product regularly depending on your water's lime content and frequency of use.
- Use a proprietary descaling product and follow the manufacturer's instructions.
- Follow the manufacturer's instructions and prepare the descaling solution. Add it to the water tank (not exceeding the 10-15 markings), and place the carafe onto the warming plate.
- Tap the settings icon.
- Tap the cleaning 🎨️ icon. The icon will light up.
- Press the select/confirm knob √ to start the cleaning cycle.
- Your coffee maker will stop and start during the cleaning process. This is normal. When the water tank is empty, the cycle will stop.
- Discard the water in the carafe.
- After descaling, rinse your coffee maker several times by brewing water with no coffee. This will remove any descaler residue.
• To cancel the cleaning cycle before it has ended normally, touch and hold the cancel Ⓧ icon for 1 second.
TROUBLESHOOTING
| Problem Possible Cause Solution | ||
| No coffee is made Water tank empty Fill the water tank | ||
| Anti drip lever is in the closed position Move the anti drip lever to the right | ||
| Excessive steam is produced Scale build-up Run the cleaning function with a descaling product to remove scale | ||
| Coffee is weak or the quantity seems incorrect | Scale build-up Run the cleaning function with a descaling product to remove scale | |
| Control panel doesn’t respond to touch | Control panel dirty | Wipe the control panel with a damp cloth then dry thoroughly |
| Coffee dripping onto warming plate when the carafe is removed | Anti drip valve open | Move the lever to the left to close the valve |
| "Err 01" shown in display. Unit has overheated You can wait for your coffee maker to cool down, or you can run a cold brew cycle. Descaling may also be needed. | ||
| "Err 02" shown in display. Machine malfunction Please contact customer service. | ||

RECYCLING
To avoid environmental and health problems due to hazardous substances, appliances and rechargeable and non-rechargeable batteries marked with one of these symbols must not be disposed of with unsorted municipal waste. Always dispose of electrical and electronic products and, where applicable, rechargeable and non-rechargeable batteries, at an appropriate official recycling/collection point.