
Aspire P5P4A - Saw HUSQVARNA - Free user manual and instructions
Find the device manual for free Aspire P5P4A HUSQVARNA in PDF.
| Brand | Husqvarna |
| Model | Aspire P5-P4A |
| Product type | Battery-powered pole pruner |
| Power source | 18 V lithium-ion battery (POWER FOR ALL system) |
| Recommended battery capacity | At least 4.0 Ah |
| Chain speed | 4.9 m/s |
| Guide bar length | 5 inches (12.7 cm) |
| Chain pitch | 1/4 inch |
| Chain gauge | 1.1 mm |
| Weight (without battery) | 1.3 kg (pruner only) / 2.7 kg (with pole) |
| Telescopic function | Yes |
| Angle adjustment | 7 positions |
| Guaranteed sound power level | 91 dB(A) |
| Vibration level at handles | 0.5 m/s² (front/rear) |
| Motor type | PMDC 18 V |
| Lubrication | Automatic (chain oil) |
| Safety devices | Trigger lock, chain guard, safety stop |
| Compatible batteries | All POWER FOR ALL 18 V batteries (P4A 18-B45, P4A 18-B72) |
| Compatible chargers | P4A 18-C50, P4A 18-C70, P4A 18-C100 |
| Intended use | Cutting branches and twigs |
Frequently Asked Questions - Aspire P5P4A HUSQVARNA
User questions about Aspire P5P4A HUSQVARNA
0 question about this device. Answer the ones you know or ask your own.
Ask a new question about this device
Download the instructions for your Saw in PDF format for free! Find your manual Aspire P5P4A - HUSQVARNA and take your electronic device back in hand. On this page are published all the documents necessary for the use of your device. Aspire P5P4A by HUSQVARNA.
USER MANUAL Aspire P5P4A HUSQVARNA
Aspire P5-P4A, Aspire P5-P4A + Aspire Pole-P4A

EN Operator's manual 11-32
text_image
Technical diagram of a mechanical device with numbered parts and exploded view, including hand tools and component labels.
text_image
2 6 7
text_image
8 1 12 V No Rain Drain ← Car Warning Triangle
text_image
14 17 CE dB
text_image
20 23
text_image
24 yyyywwxxxxx POWER FOR ALL 18V ALLIANCE
text_image
27 max.50°C29

text_image
QR code image containing encoded data, no visible human-readable text
natural_image
Line drawing of a person wearing safety gear and holding a tool (no text or symbols)31

natural_image
Line drawing of a person in protective gear using a long-handled tool (no text or symbols)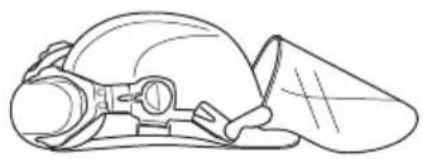
natural_image
Line drawing of a helmet with visor and seat (no text or symbols)33
natural_image
Line drawing of a mechanical device with no visible text or symbols

natural_image
Line drawing of a mechanical component or bracket (no text or symbols)35
natural_image
Line drawing of a pair of gloves with bandages and shaded areas (no text or symbols)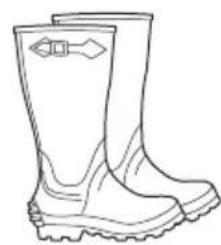
natural_image
Line drawing of a pair of boots with visible tread pattern and buckles (no text or symbols)
text_image
37 FIRST AID KIT
text_image
38 C A B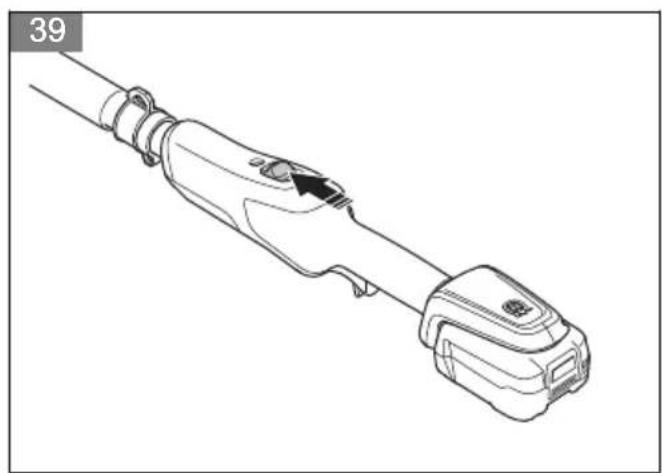
natural_image
Line drawing of a mechanical device with a handle and connector (no text or symbols)
natural_image
Line drawing of a mechanical component with an arrow indicating direction (no text or symbols)
natural_image
Line drawing of a handheld device with a black arrow indicating a point of motion (no text or symbols)
natural_image
Line drawing of a mechanical device with an inset showing a hand holding a tool (no text or symbols present)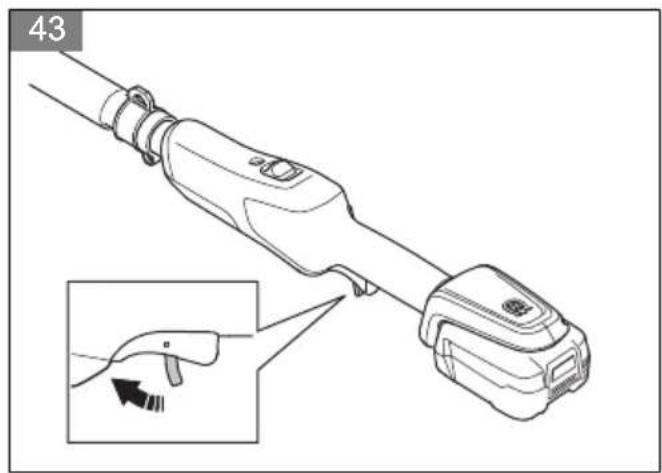
natural_image
Line drawing of a medical or laboratory device with an inset showing a cable being inserted (no text or symbols present)
text_image
44 ① ②
text_image
45 ① ②
natural_image
Simple line drawing of a VR headset with a starburst effect (no text or symbols)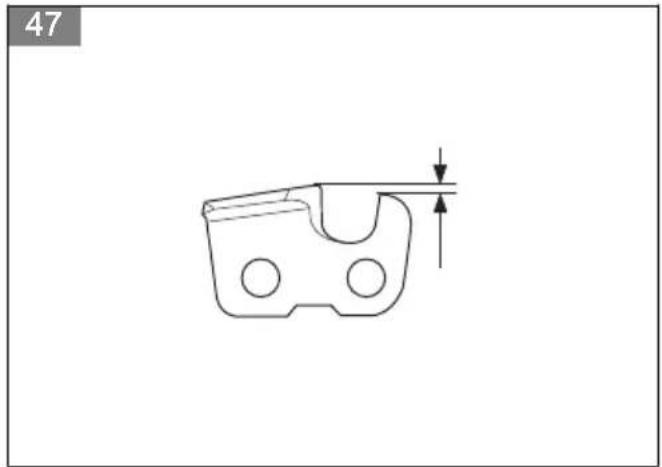
natural_image
Technical line drawing of a mechanical component with a dimension arrow (no text or symbols)
text_image
12 010 010 010 12 010 010 010 12 010 010 010 12 010 010 010 12 010 010 010 12 12 010 010 010 12 010 010 010 12 010 010 010 12 010 010 010 12
natural_image
Simple line drawing of a device with a droplet above it and a container (no text or symbols)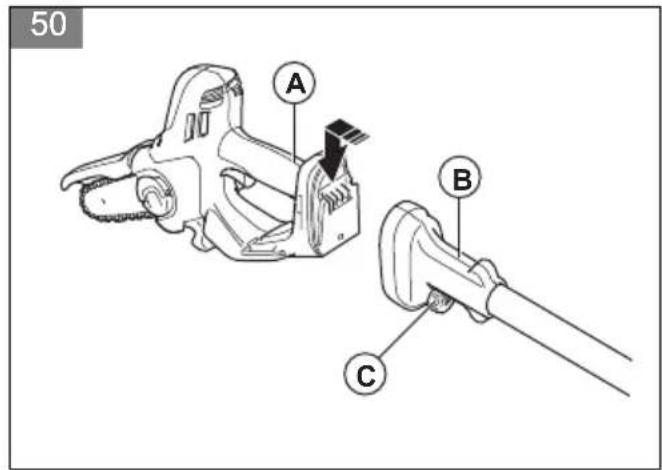
text_image
50 A B C
text_image
51 A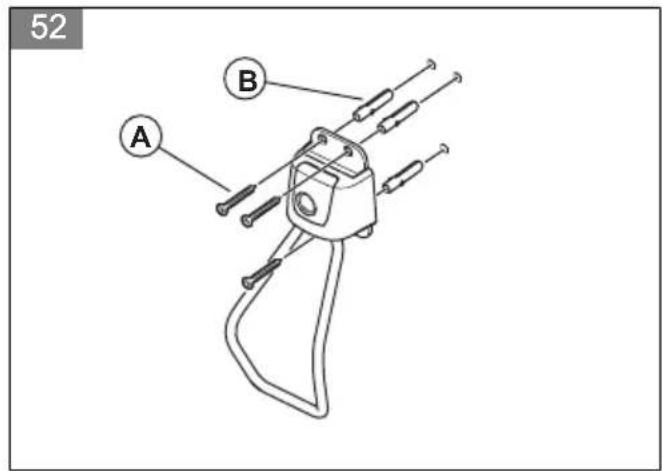
text_image
52 A B
text_image
53 A B
natural_image
Line drawing of a mechanical device with no visible text or symbols
natural_image
Technical line drawing of a vertical pole-mounted device with an inset showing its internal components (no text or symbols)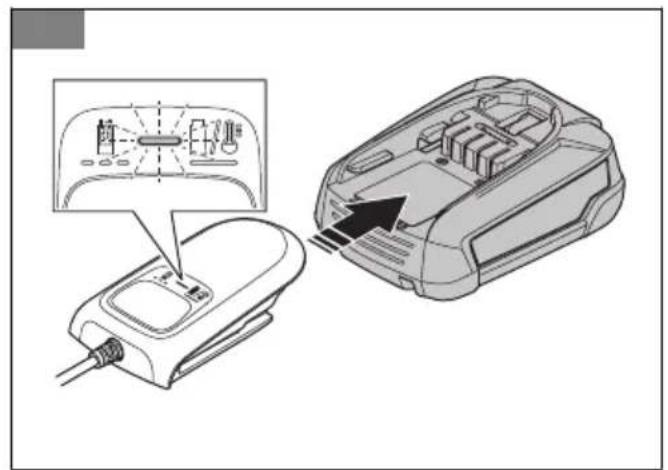
text_image
Diagram showing a device with a control panel and an open rear-mounted device, with Chinese text labels indicating components.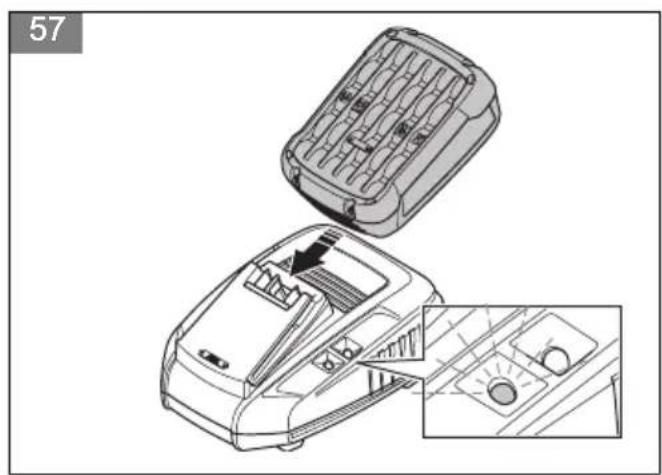
natural_image
Technical line drawing of a cleaning or cleaning device with an inset close-up showing internal components (no text or symbols)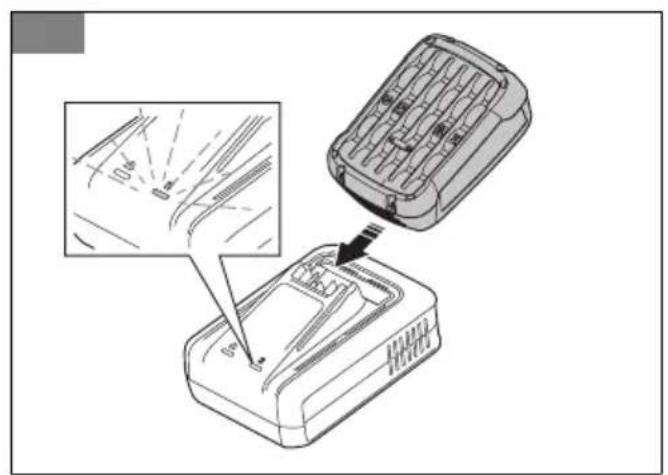
text_image
Technical diagram showing a device with internal components and a magnified inset highlighting a detail of the component's edge.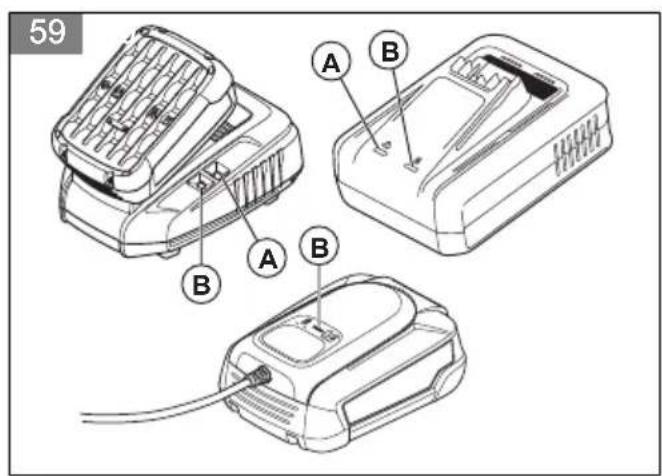
text_image
Diagram showing a battery with three cells and an exclamation mark symbol, likely indicating a warning or alert.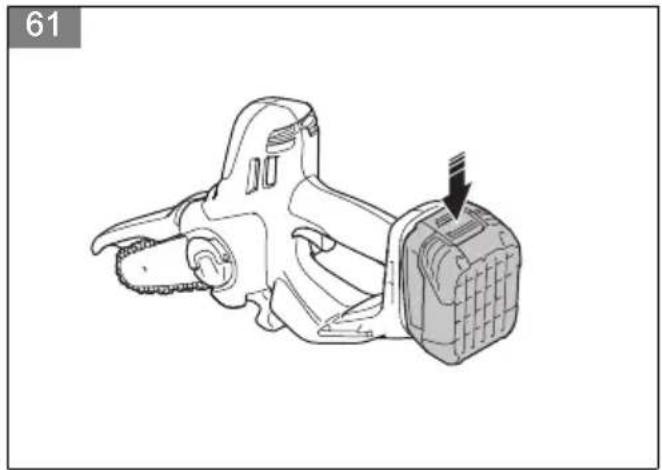
natural_image
Line drawing of a mechanical device with a button and arrow indicating action (no text or symbols)
natural_image
Technical line drawing of a mechanical device with a handle and connector (no text or symbols)
text_image
63 B C A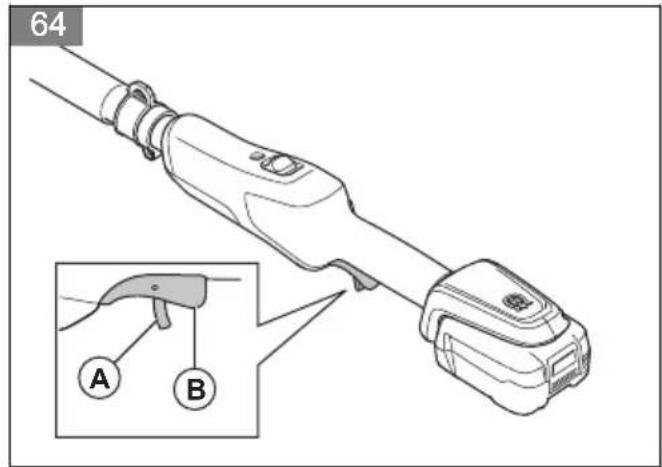
text_image
64 A B
text_image
65 90°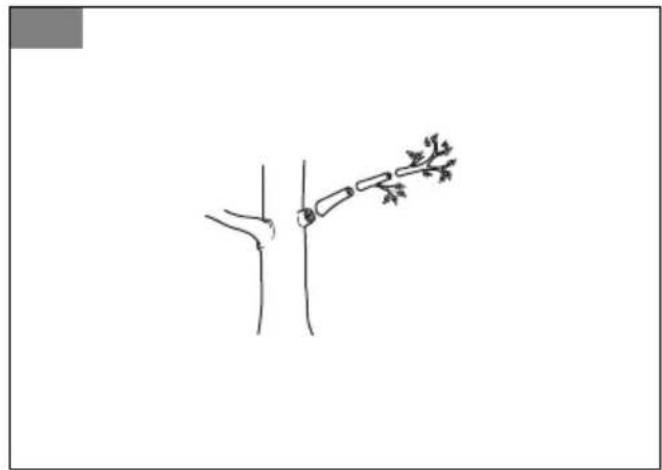
natural_image
Simple line drawing of a human leg with a branch and leafy branch (no text or symbols)
natural_image
Line drawing of a mechanical clamp or bracket assembly with a cross mark, no text or symbols present
natural_image
Line drawing of a mechanical tool or device with a black arrow pointing to a component (no text or symbols present)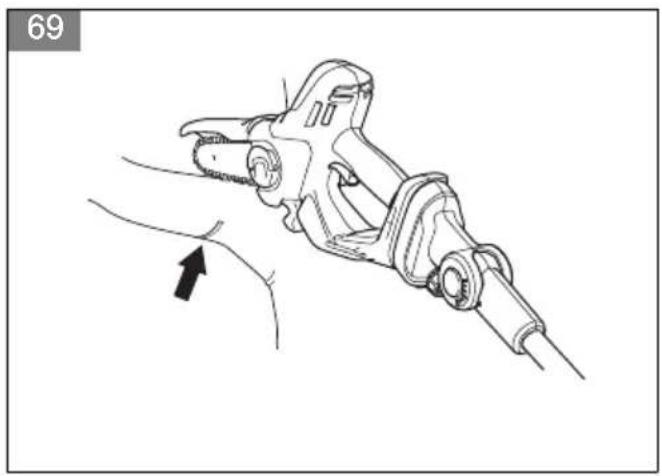
natural_image
Line drawing of a hand holding a mechanical tool, with an arrow indicating the movement direction (no text or symbols present)
natural_image
Diagram of a hand holding a device with directional arrows indicating movement or force (no text or symbols present)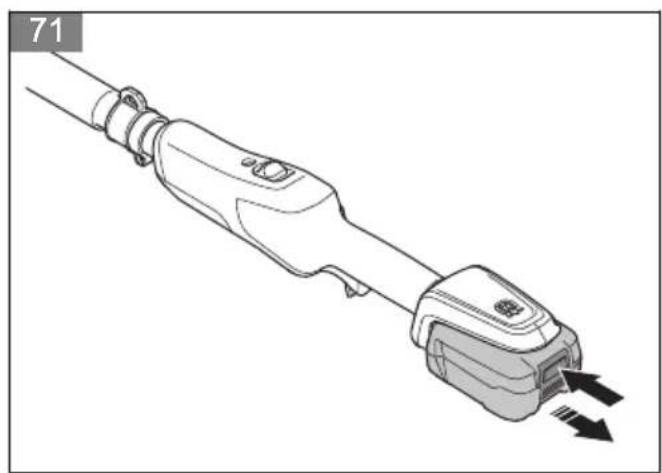
natural_image
Technical illustration of a medical device with two connectors and directional arrows indicating movement (no text or symbols)
text_image
72 A B
text_image
73
natural_image
Pure technical line drawing of a mechanical part with no text or symbols
text_image
75 C B D E F A
text_image
57/13cm SP110 320L77
text_image
PITCH = D/2 D
natural_image
Pure mechanical linkage diagram without any text, numbers, or symbols79

natural_image
Technical line drawing of a mechanical component with an inset showing a vertical rod and a close-up view of its tip (no text or symbols)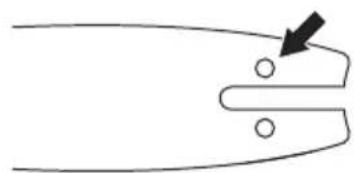
natural_image
Pure diagram of a curved pipe or channel with two circular nodes and an arrow indicating direction (no text or symbols)81
natural_image
Technical line drawing of a mechanical component with two circular holes and a vertical rod, showing dimension arrows (no text or symbols)
natural_image
Technical line drawing of a screwdriver and a mechanical component (no text or symbols)83
natural_image
Technical line drawing of a mechanical clamp or tool with a threaded rod inserted, resting on a rectangular base (no text or symbols present)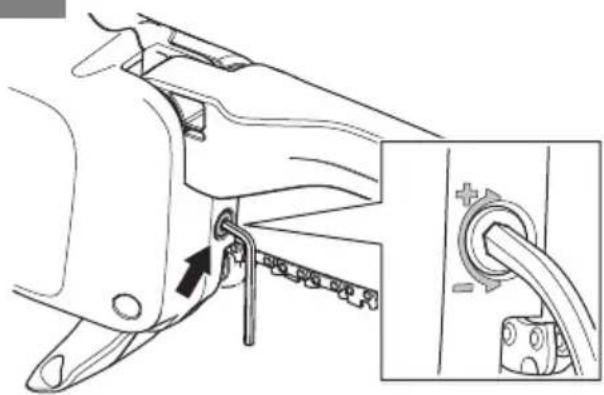
natural_image
Technical line drawing of a mechanical component with a close-up inset showing a cable and spring (no text or symbols)
natural_image
Illustration of two hands performing a massage or grip technique with directional arrows indicating motion (no text or symbols)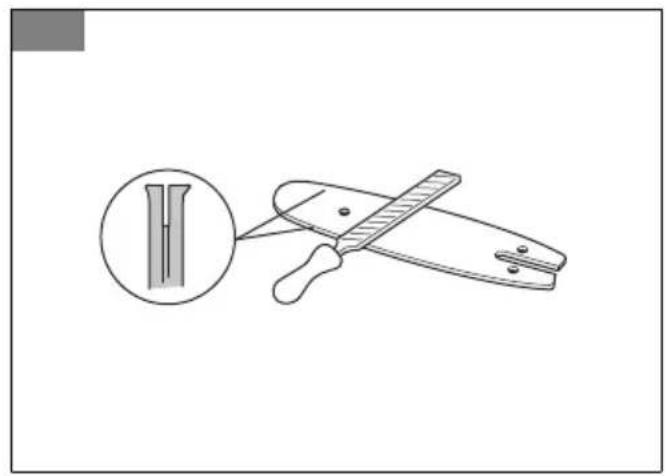
natural_image
Diagram of a tool cutting through a slot, showing a magnified view of the blade (no text or symbols present)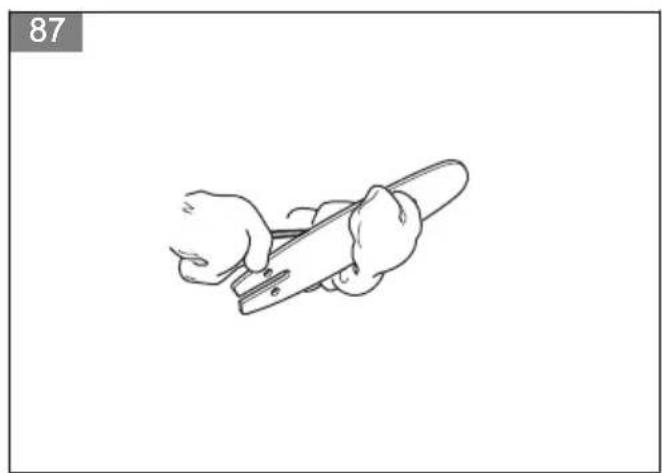
natural_image
Line drawing of a hand using a tool to cut or spread a cylindrical object (no text or symbols)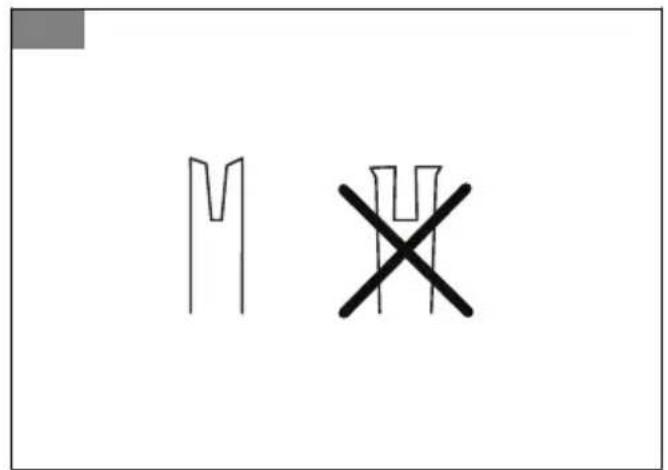
text_image
M ×
text_image
89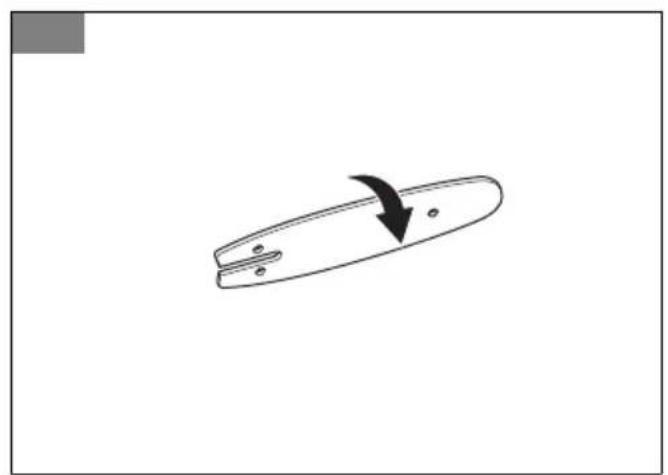
natural_image
Simple line drawing of a curved object with a black arrow indicating direction (no text or symbols)Contents
Introduction....11
Safety....12
Assembly.... 20
Operation....20
Maintenance.... 22
Troubleshooting....26
Transportation and storage....27
Technical data.... 27
Accessories.... 29
Declaration of Conformity.... 30
Licenses....31
Introduction
Product description
The product Husqvarna Aspire P5-P4A is a battery pruner.
The product Husqvarna Aspire Pole-P4A is a battery operated power unit with telescopic function and angle adjustment.
The product Husqvarna Aspire P5-P4A + Aspire Pole-P4A is a battery pole pruner with telescopic function and angle adjustment.
Work is constantly in progress to increase your safety and efficiency during operation. Speak to your servicing dealer for more information.
Intended use
Use the product to cut branches and twigs. Do not use the product for other tasks.
Quick guide
Scan the QR code for advice on how to use the product.
(Fig. 29)
Product overview
(Fig. 1)
-
Pruner
-
Saw chain guard
-
Guide bar
-
Locking knob for protective cover
-
Power trigger lockout, pruner
-
Power trigger, pruner
-
User interface
-
Main handle, pruner
-
Battery
-
Locking knob for pruner
-
Rotation joint
-
Lever for telescopic function
-
Shaft
-
Soft sleeve
-
Harness hook
-
Lock button for power trigger lockout
-
Power trigger lockout, pole pruner
-
Power trigger, pole pruner
-
Battery release button
-
Connector
-
Battery charger P4A 18-C70
-
Power on and warning indicator
-
Transport guard
-
Operator's manual
-
Hook for pruner, screws and wall plugs
-
Hook for pole pruner, screws and wall plugs
- Bio chain oil
- Hex key
- Battery charger P4A 18-C50
- Battery charger P4A 18-C100
Symbols on the product
(Fig. 2) WARNING: This product can be dangerous and cause serious injury or death to the operator or others. Be careful and use the product correctly.
(Fig. 3) Read the operator's manual carefully and make sure that you understand the instructions before you use the product.
(Fig. 4) Use approved eye protection.
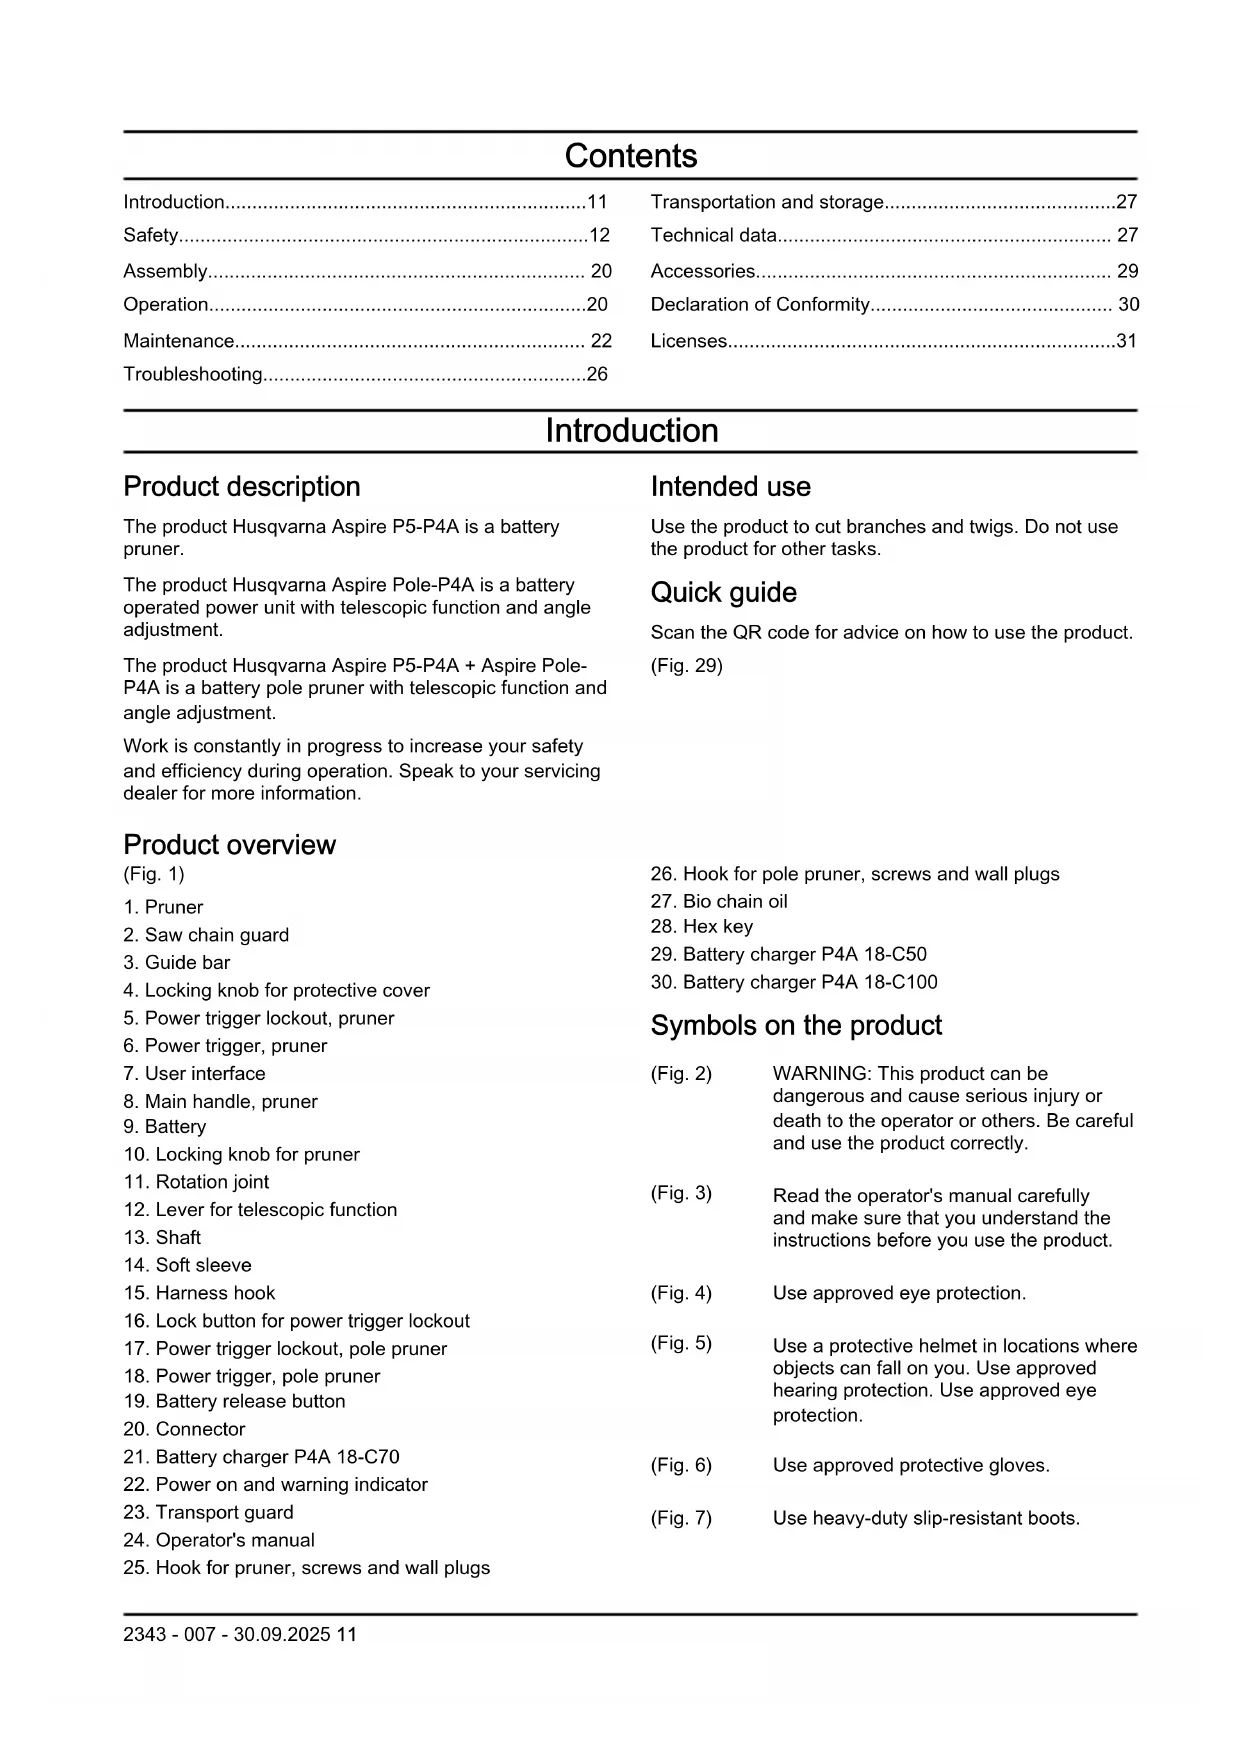
(Fig. 5) Use a protective helmet in locations where objects can fall on you. Use approved hearing protection. Use approved eye protection.
(Fig. 6) Use approved protective gloves.
(Fig. 7) Use heavy-duty slip-resistant boots.
(Fig. 8) Direct current.
(Fig. 9) Rated voltage, V
(Fig. 10) Do not expose to rain.
(Fig. 11) Chain oil fill.
(Fig. 12) Direction of rotation, saw chain.
(Fig. 13) Risk of injury. Keep hands away from saw chain.
(Fig. 14) Turn left to loose the knob, turn right to tighten the knob.
(Fig. 15) The product complies with the applicable EU directives.
(Fig. 16) Noise emission to the environment label as per EU, and New South Wales legislation "Protection of the Environment Operations (Noise Control) Regulation 2017". The guaranteed sound power level of the product is specified in Technical data on page Technical data on page 27 and on the label.
(Fig. 17) The product or package of the product is not domestic waste. Recycle it at a recycling station for electrical and electronic equipment.
(Fig. 18) DANGER - Keep sufficient distance away from electrical power lines
(Fig. 19) Keep persons and animals at a safe distance from the work area and the product
(Fig. 20) WARNING - Disconnect the battery before maintenance
(Fig. 24) The rating plate shows serial number. yyyy is the production year, ww, and xxxxx is the sequential number.
Note: Other symbols/decals on the product refer to special certification requirements for certain markets.
Symbols on the battery and/or on the battery charger
(Fig. 21) Fail-safe transformer.
(Fig. 22) Use and keep the battery charger indoors only.
(Fig. 23) Double insulation.
(Fig. 25) Recycle this product at a recycling station for electrical and electronic equipment. (Applies to Europe only)
(Fig. 26) Use the battery only in products from POWER FOR ALL System partners.
(Fig. 27) Protect the battery against heat, e.g.
(Fig. 28) against continuous intense sunlight, fire, dirt, water and moisture. There is a risk of explosion and short-circuiting.
Product damage
We are not responsible for damages to our product if:
• the product is incorrectly repaired.
- the product is repaired with parts that are not from the manufacturer or not approved by the manufacturer.
- the product has an accessory that is not from the manufacturer or not approved by the manufacturer.
- the product is not repaired at an approved service center or by an approved authority.
Manufacturer
Husqvarna AB
Warnings, cautions and notes are used to point out specially important parts of the manual.

WARNING: Used if there is a risk of injury or death for the operator or bystanders
if the instructions in the manual are not obeyed.

CAUTION: Used if there is a risk of damage to the product, other materials or the adjacent area if the instructions in the manual are not obeyed.
Note: Used to give more information that is necessary in a given situation.
General machine safety warnings

WARNING: Read all safety warnings, instructions, illustrations and specifications provided with this machine. Failure to follow all instructions listed below may result in electric shock, fire and/or serious injury.
Save all warnings and instructions for future reference.
Note: The term "machine" in the warnings refers to your mains-operated (corded) machine or battery-operated (cordless) machine.
Work area safety
- Keep work area clean and well lit. Cluttered or dark areas invite accidents.
- Do not operate machine in explosive atmospheres, such as in the presence of flammable liquids, gases or dust. Machines create sparks which may ignite the dust or fumes.
- Keep children and bystanders away while operating a machine. Distractions can cause you to lose control.
Electrical safety
- Machine plugs must match the outlet. Never modify the plug in any way. Do not use any adapter plugs with earthed (grounded) machines. Unmodified plugs and matching outlets will reduce risk of electric shock.
- Avoid body contact with earthed or grounded surfaces, such as pipes, radiators, ranges and refrigerators. There is an increased risk of electric shock if your body is earthed or grounded.
- Do not expose machines to rain or wet conditions. Water entering a machine will increase the risk of electric shock.
- Do not abuse the cord. Never use the cord for carrying, pulling or unplugging the machine. Keep cord away from heat, oil, sharp edges or moving parts. Damaged or entangled cords increase the risk of electric shock.
- When operating a machine outdoors, use an extension cord suitable for outdoor use. Use of a cord suitable for outdoor use reduces the risk of electric shock.
- If operating a machine in a damp location is unavoidable, use a ground fault circuit interrupter (GFCI) protected supply. Use of an GFCI reduces the risk of electric shock.
Personal safety
- Stay alert, watch what you are doing and use common sense when operating a machine. Do not use a machine while you are tired or under the influence of drugs, alcohol or medication. A moment of inattention while operating machines may result in serious personal injury.
- Use personal protective equipment. Always wear eye protection. Protective equipment such as dust mask, non-skid safety shoes, hard hat or hearing protection used for appropriate conditions will reduce personal injuries.
- Prevent unintentional starting. Ensure the switch is in the OFF-position before connecting to a power source and/or battery pack, picking up or carrying the machine. Carrying machines with your finger on the switch or energising machines that have the switch on invites accidents.
- Remove any adjusting key or wrench before turning the machine on. A wrench or a key left attached to a rotating part of the machine may result in personal injury.
- Do not overreach. Keep proper footing and balance at all times. This enables better control of the machine in unexpected situations.
- Dress properly. Do not wear loose clothing or jewellery. Keep your hair and clothing away from moving parts. Loose clothes, jewellery or long hair can be caught in moving parts.
- If devices are provided for the connection of dust extraction and collection facilities, ensure these are connected and properly used. Use of dust collection can reduce dust-related hazards.
- Do not let familiarity gained from frequent use of machines allow you to become complacent and ignore machine safety principles. A careless action can cause severe injury within a fraction of a second.
Machine use and care
- Do not force the machine. Use the correct machine for your application. The correct machine will do the job better and safer at the rate for which it was designed.
- Do not use the machine if the switch does not turn it on and off. Any machine that cannot be controlled with the switch is dangerous and must be repaired.
- Disconnect the plug from the power source and/or remove the battery pack, if detachable, from the machine before making any adjustments, changing accessories, or storing machines. Such preventive safety measures reduce the risk of starting the machine accidentally.
- Store idle machines out of the reach of children and do not allow persons unfamiliar with the machine or these instructions to operate the machine. Machines are dangerous in the hands of untrained users.
- Maintain machines and accessories. Check for misalignment or binding of moving parts, breakage of parts and any other condition that may affect the
machine's operation. If damaged, have the machine repaired before use. Many accidents are caused by poorly maintained machines.
- Keep cutting machines sharp and clean. Properly maintained cutting machines with sharp cutting edges are less likely to bind and are easier to control.
- Use the machine, accessories and tool bits etc. in accordance with these instructions, taking into account the working conditions and the work to be performed. Use of the machine for operations different from those intended could result in a hazardous situation.
- Keep handles and grasping surfaces dry, clean and free from oil and grease. Slippery handles and grasping surfaces do not allow for safe handling and control of the machine in unexpected situations.
Battery machine use and care
- Recharge only with the charger specified by the manufacturer. A charger that is suitable for one type of battery pack may create a risk of fire when used with another battery pack.
- Use machines only with specifically designated battery packs. Use of any other battery packs may create a risk of injury and fire.
- When battery pack is not in use, keep it away from other metal objects, like paper clips, coins, keys, nails, screws or other small metal objects, that can make a connection from one terminal to another. Shorting the battery terminals together may cause burns or a fire.
- Under abusive conditions, liquid may be ejected from the battery; avoid contact. If contact accidentally occurs, flush with water. If liquid contacts eyes, additionally seek medical help. Liquid ejected from the battery may cause irritations or burns.
- Do not use a battery pack or machine that is damaged or modified. Damaged or modified batteries may exhibit unpredictable behaviour resulting in fire, explosion or risk of injury.
- Do not expose a battery pack or machine to fire or excessive temperature. Exposure to fire or temperature above 130^ / 265^ may cause explosion.
- Follow all charging instructions and do not charge the battery pack or machine outside the temperature range specified in the instructions. Charging improperly or at temperatures outside the specified range may damage the battery and increase the risk of fire.
Service
- Have your machine serviced by a qualified repair person using only identical replacement parts. This will ensure that the safety of the machine is maintained.
- Never service damaged battery packs. Service of battery packs should only be performed by the manufacturer or authorized service providers.
General pruner saw safety warnings
- Keep all parts of the body away from the saw chain when the pruner saw is operating. Before you start the pruner saw, make sure the saw chain is not contacting anything. A moment of inattention while operating pruner saws may cause entanglement of your clothing or body with the saw chain.
• Always hold the pruner saw with one hand on the control handle and the other hand on the auxiliary handle. - Hold the pruner saw by insulated gripping surfaces only, because the saw chain may contact hidden wiring. Saw chains contacting a "live" wire may make exposed metal parts of the pruner saw "live" and could give the operator an electric shock.
- Wear eye protection. Further protective equipment for hearing, head, hands, legs and feet is recommended. Adequate protective equipment will reduce personal injury from flying debris or accidental contact with the saw chain.
- Do not operate a pruner saw in a tree, on a ladder, from a rooftop, or any unstable support. Operation of a pruner saw in this manner could result in serious personal injury.
- Always keep proper footing and operate the pruner saw only when standing on fixed, secure and level surface. Slippery or unstable surfaces may cause a loss of balance or control of the pruner saw.
- When cutting a branch that is under tension, be alert for spring back. When the tension in the wood fibres is released, the spring loaded branch may strike the operator and/or throw the pruner saw out of control.
- Use extreme caution when cutting brush and saplings. The slender material may catch the saw chain and be whipped toward you or pull you off balance.
- Carry the pruner saw with the pruner saw switched off and away from your body. When transporting or storing the pruner saw, always fit the guide bar cover. Proper handling of the pruner saw will reduce the likelihood of accidental contact with the moving saw chain.
- Follow instruction for lubrication, chain tensioning and changing the bar and chain. Improperly tensioned or lubricated chain may either break or increase the risk of kickback.
- Cut wood only. Do not use pruner saw for purposes not intended. For example: do not use pruner saw for cutting metal, plastic, masonry or non-wood building materials. Use of the pruner saw for operations different than intended could result in a hazardous situation.
- This pruner saw is not intended for tree felling. Use of the pruner saw for operations different than intended could result in serious injury to the operator or bystanders.
- Follow all instructions when clearing jammed material, storing or servicing the pruner saw. Make
sure the switch is off and the battery pack is removed.
Pole-mounted pruner safety warnings:
- Keep all parts of the body away from the saw chain or saw blade when the pole-mounted pruner is operating. Before you start the pole mounted pruner, make sure the saw chain or saw blade is not contacting anything. A moment of inattention while operating the pole-mounted pruner may result in injury to yourself or others.
- Always use two hands when operating the pole mounted pruner. Hold the pole-mounted pruner with both hands to avoid loss of control.
- To reduce the risk of electrocution, never use the pole mounted pruner near any electrical power lines. Contact with or use near power lines may cause serious injury or electric shock resulting in death.
- Hold the pole-mounted pruner by insulated gripping surfaces only, because the saw chain or saw blade may contact hidden wiring. Saw chains or saw blades contacting a "live" wire may make exposed metal parts of the machine "live" and could give the operator an electric shock.
- Wear eye and ear protection. Further protective equipment for hands and slip-resistant footwear is recommended. Adequate protective equipment will reduce the risk of personal injury.
- Always use head protection when operating the pole mounted pruner overhead. Falling debris can result in serious personal injury.
- Always keep proper footing and operate the pole-mounted pruner only when standing on the ground. Slippery or unstable surfaces may cause a loss of balance or control of the machine.
- Do not operate a pole-mounted pruner in a tree, on a ladder, or any unstable support. Operation of a pole-mounted pruner in this manner may result in loss of balance, loss of control and personal injury.
- Keep all power cords and cables away from cutting area. Power cords or cables may be hidden in trees and can be accidentally cut by the saw chain or saw blade.
- Do not use the pole-mounted pruner in bad weather conditions, especially when there is a risk of lightning. This decreases the risk of being struck by lightning.
- When cutting a limb that is under tension, be alert for spring back. When the tension in the wood fibres is released, the spring-loaded limb may strike the operator and/or throw the pole-mounted pruner out of control.
- Use extreme caution when cutting brush and saplings. The slender material may catch the saw chain or saw blade and be whipped toward you or pull you off balance.
- When carrying the pole-mounted pruner with the machine switched off, take care not to operate any power switch and keep the saw chain or saw
blade away from your body. Proper carrying of the pole-mounted pruner will reduce the likelihood of accidental contact with the saw chain or saw blade.
- When transporting or storing the pole-mounted pruner, always fit the guide bar or saw blade cover. Proper handling of the pole-mounted pruner will reduce the likelihood of accidental contact with the moving saw chain or saw blade.
- When clearing jammed material, storing or servicing the pole-mounted pruner, make sure the switch is off and all battery packs are removed. Unexpected actuation of the machine while clearing jammed material or servicing may result in serious personal injury.
- Cut wood only. Do not use pole-mounted pruner for purposes not intended. For example: do not use the pole-mounted pruner for cutting plastic, metal, masonry or non-wood building materials. Use of the pole-mounted pruner for operations different than intended could result in a hazardous situation.
General safety instructions

WARNING: Read the warning instructions that follow before you use the product.
- Remove the battery to prevent the product from being started by accident.
- This product is a dangerous tool if you are not careful or if you use the product incorrectly. This product can cause serious injury or death to the operator or others.
- Do not use the product if it is changed from its initial specification. Do not change a part of the product without approval from the manufacturer. Only use parts that are approved by the manufacturer. Injury or death is a possible result of incorrect maintenance.
- Do a check of the product before use. See, Safety devices on the product on page 17 and Maintenance on page 22. Do not use a product that is damaged or does not operate correctly. Do the safety checks, maintenance and service instructions described in this manual.
- Children should be supervised to ensure that they do not play with the product. Never allow children or other persons not trained in the use of the product and/or the battery to use or service it. Local laws may regulate the age of the user.
- Keep the product in a locked area to prevent access for children or persons that are not approved.
- Store the product out of reach of children.
-
Under no circumstances may the design of the product be modified without the permission of the manufacturer. Always use original accessories. Non-authorized modifications and/or accessories can result in serious personal injury or the death of the operator and others.
-
Before using the product and after any impact, do a check for signs of wear or damage and repair as necessary.
- If anything jams in the cutting attachment while you operate the product, stop and deactivate the product. Make sure that the cutting attachment stops completely. Remove the battery before you clean, inspect or repair the product and/or the cutting equipment.
• Overexposure to vibration can lead to circulatory damage or nerve damage in persons who have poor circulation. Speak to your physician if you experience symptoms of overexposure to vibration. Such symptoms include numbness, loss of feeling, tingling, pricking, pain, loss of strength, changes in skin color or condition. These symptoms usually show in the fingers, hands or wrists. - Danger! Do not operate near electrical power lines. The unit has not been designed to provide protection from electric shock in the event of contact with overhead electric lines. Consult local regulations for safe distances from overhead electric power lines and ensure that the operating position is safe and secure before operating the saw chain pole pruner.
Note: National or Local laws can regulate the use. Comply to given regulations.
Safety instructions for operation

WARNING: Read and obey the warning instructions that follow before you use the product.
- Ensure that no people or animals come closer than 15 m (50 ft.) while you work. When several operators are working in the same area the safety distance should be at least 15 m. Otherwise there is a risk of serious personal injury. Stop the product immediately if anyone approaches. Never swing the product around without first checking behind you to make sure that no one is within the safety zone.
- Never use the product in bad weather, for instance in dense fog, in heavy rain, strong winds, intense cold, etc. Extremely hot weather may cause overheating of the product. Working in bad weather is tiring and often brings added risks, such as icy ground, unpredictable felling direction, etc.
- Do not allow children to use or be in the vicinity of the product. Since the product is easy to start, children may be able to start it if they are not kept under full surveillance. This can mean a risk of serious personal injury. Disconnect the battery when the product is not under close supervision.
-
Ensure that people, animals or other things can not affect your control of the product or that they do not come in contact with the cutting attachment or loose objects that are thrown out by the cutting attachment.
-
Listen out for warning signals or shouts when you wear hearing protection. Always remove your hearing protection as soon as the product stops.
• Overexposure to vibration can lead to circulatory damage or nerve damage in persons who have poor circulation. Speak to your physician if you experience symptoms of overexposure to vibration. Such symptoms include numbness, loss of feeling, tingling, pricking, pain, loss of strength, changes in skin colour or condition. These symptoms usually show in the fingers, hands or wrists. - Never use a cutting attachment without an approved guard. If an incorrect or faulty guard is fitted this can cause serious personal injury.
• Always stop the product, remove the battery and make sure that the cutting equipment stops completely before you start to do any work on the product. Departure from the sharpening instructions considerably increase the risk of kickback. - If you encounter a situation where you are uncertain how to proceed you should ask an expert. Contact your dealer or your service workshop. Avoid all usage which you consider to be beyond your capability.
- Avoid all usage which you consider to be beyond your capability.
- Never use the product if you are fatigued, while under the influence of alcohol or drugs, medication or anything that could affect your vision, alertness, coordination or judgment.
- The product can be thrown violently to the side when the tip of the guide bar comes in contact with a fixed object. This is called kickback. A kickback can be violent enough to cause the product/operator to be propelled in any direction, and possibly lose control of the product. Avoid cutting with the guide bar tip.
- Do not use the product unless you are able to call for help in case of an accident.
- Keep a good balance and a firm foothold. Make sure that you can move and stand safely. Check the area around you for possible obstacles (roots, rocks, branches, ditches, etcetera) in case you have to move suddenly. Take great care when you work on sloping ground.
• Take great care when cutting a tree that is in tension. A tree that is in tension may spring back to its normal position before or after being cut. If you position yourself incorrectly or make the cut in the wrong place the tree may hit you or the product and cause you to lose control. Both situations can cause serious personal injury. - Use the harness to support the weight of the product and make it easier to handle.
- For Aspire P5-P4A: Hold the product with your right or left hand. Keep hands and other body parts away from the saw chain.
(Fig. 30)
- For Aspire P5-P4A + Aspire Pole-P4A: Always hold the product with both hands. Hold the product on the right side of your body.
(Fig. 31)
- Before you remove unwanted materials from the product, stop the motor and make sure that the saw chain does not turn.
- Stop the product before you move to another area. Attach the transport guard before carrying or transporting the product any distance.
- Never put the product down when it is activated unless you have it in clear sight.
- If the product is operated at temperatures below -10^ the product and the battery must be stored in a heated space for at least 24 hours before starting work.
- Never stand directly under underneath a branch that is being cut. This could lead to serious or even fatal personal injury.
- Observe the applicable safety regulations for work in the vicinity of overhead power lines.
- This product is not electrically insulated. If the product touches or comes close to high-voltage power lines it could lead to death or serious bodily injury. Electricity can jump from one point to another by arcing. The higher the voltage, the greater the distance electricity can jump. Electricity can also travel through branches and other objects, especially if they are wet. Always keep a distance of at least 10 m between the product and high voltage power lines and/or objects that are touching them. If you have to work within this safe distance you should always contact the relevant power company to make sure the power is switched off before you start work.
- A dull saw chain may increase the risk of accidents.
Personal protective equipment

WARNING: Read the warning instructions that follow before you use the product.
• Always use approved personal protective equipment when you use the product. Personal protective equipment cannot fully prevent injury but it decreases the degree of injury if an accident does occur. Let your dealer help you select the right equipment.
- Use a helmet if it is possible that objects can fall on you.
(Fig. 32)
- Use approved hearing protection.
(Fig. 33)
- Use approved eye protection. If you use a visor, you must also use approved protective goggles. Approved protective goggles must agree with the ANSI Z87.1 standard in the USA or EN 166 in EU countries.
(Fig. 34)
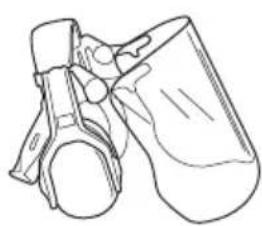
- Use gloves when it is necessary, for example when you attach, examine or clean the cutting equipment.
(Fig. 35)
- Use protective boots, or shoes, with non-slip soles.
(Fig. 36)
- Use pants with saw protection.
- Use clothing made of a strong fabric. Always use heavy, long pants and long sleeves. Do not use loose clothing that can catch on twigs and branches. Do not wear jewelry, short pants, open shoes or go with bare feet. Put your hair up safely above your shoulders.
- Keep first aid equipment close at hand.
(Fig. 37)
Safety devices on the product

WARNING: Read the warning instructions that follow before you use the product.
In this section the product's safety features, its purpose and how checks and maintenance should be carried out to ensure that it operates correctly. See instructions under the heading Product overview on page 11 to find where these parts are located on your product.
The life span of the product can be reduced and the risk of accidents can increase if product maintenance is not carried out correctly and if service and/or repairs are not carried out professionally. If you need further information please contact your nearest servicing dealer.

WARNING: Never use a product with damaged safety components. The product's safety equipment must be inspected and maintained as described in this section. If your product fails any of these checks, contact your service agent to get it repaired.

CAUTION: All servicing and repair work on the machine requires special training. This is especially true of the machine's safety equipment. If your machine fails any of the checks described below you must contact your service agent. When you buy any of our products we guarantee the availability of professional repairs and service. If the retailer who sells your machine is not a servicing dealer, ask him for the address of your nearest service agent.
To do a check of the user interface Aspire P5-P4A
The green LEDs (A) show the state of charge. The green LEDs also show that the product is on.
- Push and hold the on/off button (B). (Fig. 38)
a) The product is on when the green LEDs (A) are on.
b) The product is off when the green LEDs (A) are off.
- Refer to Troubleshooting on page 26 if the warning indicator (C) flashes.
To do a check of the power trigger lockout
The power trigger lockout prevents accidental operation. When you release the handle, the power trigger and the power trigger lockout move back to their initial position.
- For Aspire P5-P4A + Aspire Pole-P4A: Push the lock button forward. (Fig. 39)
- Make sure that the power trigger is locked when the power trigger lockout is in its initial position.
a) For Aspire P5-P4A: (Fig. 40)
b) For Aspire P5-P4A + Aspire Pole-P4A: (Fig. 41)
- Push the power trigger lockout. Make sure that the power trigger lockout moves back to its initial position.
a) For Aspire P5-P4A: (Fig. 42)
b) For Aspire P5-P4A + Aspire Pole-P4A: (Fig. 43)
- Make sure that the power trigger and the power trigger lockout move freely and that the return spring operates correctly.
a) For Aspire P5-P4A: (Fig. 44)
b) For Aspire P5-P4A + Aspire Pole-P4A: (Fig. 45)
-
Start the product, refer to Operation on page 20.
-
Apply full speed.
-
Release the power trigger and make sure that the saw chain stops fully.
Safety instructions for the cutting equipment

WARNING: Read the warning instructions that follow before you use the product.
- Only use approved guide bar/saw chain combinations and filing equipment. Refer to Maintenance on page 22 for instructions.
- Use protective gloves when you use or do maintenance on the saw chain. A saw chain that does not move can also cause injuries.
- Keep the cutting teeth correctly sharpened. Obey the instructions and use the recommended file gauge. A saw chain that is damaged or incorrectly sharpened increases the risk of accidents.
(Fig. 46)
- Keep the correct depth gauge setting. Obey the instructions and use the recommended depth gauge
setting. Too large depth gauge setting increases the risk of kickback.
(Fig. 47)
- Make sure that the saw chain has the correct tension. If the saw chain is not tight against the guide bar, the saw chain can derail. An incorrect saw chain tension increases wear on the guide bar, saw chain and chain drive sprocket. Refer to Accessories on page 29.
(Fig. 48)
- Do maintenance on the cutting equipment regularly and keep it correctly lubricated. Lubricate the saw chain before each operation. If the saw chain is not correctly lubricated, the risk of wear on the guide bar, saw chain and chain drive sprocket increases.
(Fig. 49)
Battery safety

WARNING: Read all the safety and general instructions. Failure to observe the safety and general instructions may result in electric shock, fire and / or serious injury. Keep all the safety information and general instructions for future reference.
• These safety instructions apply only to 18V Li-ion rechargeable batteries for the POWER FOR ALL system.
- Use the rechargeable battery only in products from POWER FOR ALL System partners. 18 V rechargeable batteries labelled with POWER FOR ALL are fully compatible with the following products:
- All products of the 18V POWER FOR ALL battery system.
- All 18 V products from POWER FOR ALL System partners.
- Observe the battery recommendations in the operating manual of your product. Only this way can the rechargeable battery and the product be operated without danger and the rechargeable batteries protected from hazardous overloading.
- Only charge the batteries using chargers recommended by the manufacturer or by POWER FOR ALL system partners. A charger that is suitable for one type of battery may pose a fire risk when used with a different battery.
- The battery is supplied partially charged. To ensure full battery capacity, fully charge the battery in the charger before using your power tool for the first time.
- Keep battery packs out of the reach of children.
- Do not open the battery. There is a risk of shortcircuiting.
- In case of damage and improper use of the battery, vapours may be emitted. The battery can set alight or explode. Ensure the area is well ventilated
and seek medical attention should you experience any adverse effects. The vapours may irritate the respiratory system.
- If used incorrectly or if the battery is damaged, flammable liquid may be ejected from the battery. Contact with this liquid should be avoided. If contact accidentally occurs, rinse off with water. If the liquid comes into contact with your eyes, seek additional medical attention. Liquid ejected from the battery may cause irritation or burns.
- If the battery is damaged liquid can be ejected and cover nearby surfaces. Check affected parts. Clean these parts or change them if necessary.
- Do not short-circuit the battery pack. When the battery pack is not in use, keep it away from other metal objects, like paper clips, coins, keys, nails, screws or other small metal objects, that can make a connection from one terminal to another. Shorting the battery terminals together may cause burns or a fire.
- The battery can be damaged by pointed objects such as nails or screwdrivers or by force applied externally. An internal short circuit may occur, causing the battery to burn, smoke, explode or overheat.
- Never service damaged battery packs. Service of battery packs should only be performed by the manufacturer or authorized service providers.
- Protect the battery against heat, e. g. against continuous intense sunlight, fire, dirt, water and moisture. There is a risk of explosion and short-circuiting.
- Use the battery in the product only when the ambient temperature is between -5^ - 40^ .
- Only store the battery at an ambient temperature between -20^ - 50^ . Do not leave the battery in your car in the summer, for example. At temperatures of < 0^ some devices may experience a loss of power.
- Only charge the battery at an ambient temperature which is between 0^ - 35^ . Charging outside of this temperature range can increase the risk of damage to the battery and pose a fire hazard.
Battery charger safety

WARNING: Read all the safety and general instructions. Failure to observe the safety and general instructions may result in electric shock, fire and / or serious injury. Store these instructions in a safe place. Only use the charger if you can fully evaluate all functions and carry them out without restrictions, or if you have received corresponding instructions.
- This charger is not intended for use by children or persons with physical, sensory or mental limitations or a lack of experience or knowledge. This charger can be used by children aged 8 or older and
by persons who have physical, sensory or mental limitations or a lack of experience or knowledge if a person responsible for their safety supervises them or has instructed them in the safe operation of the charger and they understand the associated dangers. Otherwise, there is a risk of operating errors and injuries.
- Supervise children during use, cleaning and maintenance. This will ensure that children do not play with the charger.
- Only charge 18V POWER FOR ALL system batteries with a capacity of 1.5 Ah and above. The battery voltage must match the battery charging voltage of the charger. Do not charge any non-rechargeable batteries. Otherwise there is a risk of fire and explosion.
- Only use the charger in enclosed spaces and do not expose it to wet conditions. Water entering a power tool will increase the risk of electric shock.
- Keep the charger clean. Dirt poses a risk of electric shock.
• Always check the charger, cable and plug before use. Stop using the charger if you discover any damage. Do not open the charger yourself, and have it repaired only by Husqvarna or by an authorised after-sales service centre using only original replacement parts. Damaged chargers, cables and plugs increase the risk of electric shock. - Do not operate the charger on an easily ignited surface (e. g. paper, textiles, etc.) or in a flammable environment. There is a risk of fire due to the charger heating up during operation.
- Do not cover the ventilation slots of the charger. Otherwise, the charger may overheat and no longer function properly.
- Recharge only with the charger specified by the manufacturer. A charger that is suitable for one type of battery pack may create a risk of fire when used with another battery pack.
- In case of damage and improper use of the battery, vapours may also be emitted. Ensure the area is well ventilated and seek medical attention should you experience any adverse effects. The vapours may irritate the respiratory system.
- Under abusive conditions, liquid may be ejected from the battery. Contact with this liquid should be avoided. If contact accidentally occurs, rinse off with water. If the liquid comes into contact with your eyes, seek additional medical attention. Liquid ejected from the battery may cause irritation or burns.
- Products sold in GB only: Your product is fitted with an BS 1363/A approved electric plug with internal fuse (ASTA approved to BS 1362). If the plug is not suitable for your socket outlets, it should be cut off and an appropriate plug fitted in its place by an authorised customer service agent. The replacement plug should have the same fuse rating as the original plug. The severed plug must be disposed of to avoid a possible shock hazard and should never be inserted into a mains socket elsewhere.
Safety instructions for maintenance

WARNING: Read the warning instructions that follow before you do maintenance on the product.
- Remove the battery before you do maintenance, other checks or assemble the product.
- The operator must only do the maintenance and servicing shown in this operator's manual. Turn to your servicing dealer for maintenance and servicing of a larger extension.
-
Do not clean the battery or the battery charger with water. Strong detergent can cause damage to the plastic.
-
If you do not do maintenance, it decreases the life cycle of the product and increases the risk of accidents.
- Special training is necessary for all servicing and repair work, especially for the safety devices on the product. If not all checks in this operator's manual are approved after you have done maintenance, turn to your servicing dealer. We guarantee that there are professional repairs and servicing available for your product.
- Only use original spare parts.
Assembly
Introduction

WARNING: Read and understand the safety chapter before you assemble the product.
To attach the pruner to the telescopic shaft
-
Attach the pruner (A) to the telescopic shaft (B). The pruner must move into the holder on the telescopic shaft easily, if not, it is not installed correctly. (Fig. 50)
-
Tighten the knob (C).
Note: When the pruner is attached to the telescopic shaft, the user interface of the pruner is disconnected.
To adjust the length of the telescopic shaft
- Lift the lever (A) on the shaft. (Fig. 51)
- Adjust the telescopic shaft to an applicable length.
- Push the lever down to lock the telescopic shaft.
To install the hook on the wall
• Install the hook indoors.
- Keep the hook out of sunlight and in ambient temperature of -10^ to 70^ .
• Install the hook on a drywall, wood or concrete wall.

CAUTION: Make sure that the wall can hold loads of minimum 30 kg.
- Install the hook on the wall with the 3 screws (A). Use wall plugs (B) if it is necessary.

CAUTION: Make sure that the screws are applicable for your wall type.
a) For Aspire P5-P4A: (Fig. 52) b) For Aspire P5-P4A + Aspire Pole-P4A: (Fig. 53)
- Speak to your Husqvarna service agent for information about available storage accessories for your product.
To hang the product on the hook
- Hang the pruner on the hook as shown in the illustration. (Fig. 54)
- Hang the pole on the hook as shown in the illustration. (Fig. 55)
Operation
To do a function check before you use the product
-
Examine the air intake for dirt and damage. Remove dirt and unwanted material from the product with a brush.
-
Tighten all nuts and screws.
- Make sure that the pruner is attached correctly.
- Examine the pruner for damages, for example, cracks. Replace pruner if it is damaged.
-
Make sure that the covers are attached correctly and not damaged.
-
Make sure that the product operates correctly.
Battery

WARNING: Before you use the battery, you must read and understand the safety chapter. You must also read and understand the operator's manual for the battery and the battery charger.
Keep the battery and the battery charger in correct ambient temperatures.
| Ambient temperature | |
| Operation of the battery in the product | -5 °C – 40 °C |
| Charging of the battery | 0 °C – 35 °C |
To charge the battery
Charge the battery before the first use.
Note: The charging process is only possible when the temperature of the battery is within the permitted charging temperature range (0 °C – 35 °C).
- Put the battery in the battery charger. The battery is connected to the battery charger when the green LED flashes. (Fig. 56) (Fig. 57) (Fig. 58)
- The battery is fully charged when the green LED on the battery charger is on. Charge the battery for maximum 24 hours.
- Disconnect the battery charger from the mains.

CAUTION: Do not pull the power cord.
- Remove the battery from the battery charger.
Battery status LED on the battery charger
The red LED (A) and the green LED (B) on battery charger show the battery status. Refer to To charge the battery on page 21.
(Fig. 59)
| Battery charger | LED Battery status | |
| P4A 18-C50 | The green LED flashes. | The battery is charging. |
| P4A 18-C70 | The green LED flashes quickly. | The battery is charging. |
| P4A 18-C100 | The green LED flashes slowly. | The battery is 80% charged. |
| Battery charger LED Battery status | ||
| P4A 18-C50P4A 18-C70P4A 18-C100 | The green LED is on. | The battery is fully charged. |
| P4A 18-C70P4A 18-C100 | The red LED is on. | Refer to Battery charger on page 26. |
| The red LED flashes quickly. | Refer to Battery charger on page 26. | |
Battery status LED on the product
When the battery is installed in the product, the LEDs on the product show the battery status.
(Fig. 60)
| LED | Battery status |
| LED 1, 2 and 3 are lit. | Fully charged. |
| LED 1 and 2 are lit. | Sufficiently charged |
| LED 1 is lit. The battery power is low. | |
| LED 1 flashes. The battery is empty. The battery status indicator flashes. Charge the battery. Refer to To charge the battery on page 21. | |
To connect the battery to the product

WARNING: Only use lithium-ion batteries of the POWER FOR ALL system P4A 18 V in the product.
- Make sure that the battery is fully charged.
- Put the battery into the battery holder of the product. The battery must move into the holder easily, if not, it is not installed correctly.
a) For Aspire P5-P4A: (Fig. 61)
b) For Aspire P5-P4A + Aspire Pole-P4A: (Fig. 62) - Push the battery fully into the battery holder. The battery locks into position when you hear a click.
- Make sure that the latch locks in position correctly.
To start the product Aspire P5-P4A
- Push the on/off button on the user interface (A). The LED lights come on. (Fig. 63)
- Push the power trigger lockout (B) and hold the power trigger (C).
To start the product Aspire P5-P4A + Aspire Pole-P4A
- Push the lock button forward. (Fig. 39)
- Push the power trigger lockout (A) and hold the power trigger (B). (Fig. 64)
To cut branches

WARNING: Observe great care when working close to overhead power lines. Falling branches can result in short circuiting.
- Whenever possible, position yourself so that you can make the cut at right angles to the branch. (Fig. 65)
- Cut large branches in sections so that you have better control over where they fall. You should also pay attention to the fact that falling branches can bounce in the direction of the user after hitting ground. (Fig. 66)
- Never cut through the swelling at the root of the branch as this will slow down healing and increase the risk of fungal attack. (Fig. 67)
- Use the stop at the base of the cutting head to provide support during cutting. This will help prevent the cutting attachment from bouncing on the branch. (Fig. 68)
- Make an initial cut on the underside of the branch before cutting through the branch. This will prevent tearing of the bark, which could lead to slow healing and cause permanent damage to the tree. The cut should not be deeper than 13 of the branch thickness to prevent jamming. Keep the chain running while you withdraw the cutting attachment from the branch to prevent it jamming. (Fig. 69)
- Make sure you have a firm footing and that you can work without being hampered by branches, stones and trees.

WARNING: Never activate the power trigger without having the cutting attachment in full view.
To stop the product Aspire P5-P4A
- Release the power trigger.
- Push the on/off button on the user interface. The LED lights go off.
- Push the release button and pull out the battery. (Fig. 70)
To stop the product Aspire P5-P4A + Aspire Pole-P4A
- Release the power trigger.
- Push the lock button for the power trigger lockout rearward to lock the product.
- Push the battery release button and pull out the battery. (Fig. 71)
- If it is necessary, remove the telescopic shaft from the product.
To adjust the angle of the product
The product can be adjusted in 7 different positions.

WARNING: Do not adjust the angle when you operate the product.
- Stop the product and remove the battery.
- Hold the pruner holder (A) tightly. (Fig. 72)
- Push and hold the rotation joint (B).
- Set the pruner holder to the correct position.
- Release the rotation joint to lock the pruner holder.
- Move the pruner holder up and down until it locks into position.
Maintenance
Introduction

WARNING: Read and understand the safety chapter before you do maintenance work on the product.

WARNING: Remove the battery before you do maintenance on the product.
Maintenance schedule
| Maintenance Daily Weekly Monthly | |||
| Clean the external parts of the product with a dry cloth. Do not use water. | X | ||
| Make sure that the start and stop button operate correctly and are not damaged. | X | ||
| Make sure that the power trigger and the power trigger lockout operate correctly from a safety point of view. | X | ||
| Make sure that all controls operate correctly and are not damaged. | X | ||
| Keep the handles dry and clean. Makes sure that there is no oil and grease on the handles. | X | ||
| Make sure that the saw chain cover is not damaged. Replace the saw chain cover if it is damaged. | X | ||
| Make sure that the screws and nuts are tight. X | |||
| Make sure that the battery release buttons on the battery operate correctly and lock the battery in the product. | X | ||
| Make sure that the battery charger operates correctly. | X | ||
| Make sure that the battery is not damaged. X | |||
| Make sure that the battery is charged. X | |||
| Make sure that the battery charger is not damaged. | X | ||
| Do a check of the saw chain. X | |||
| Sharpen the saw chain. X | |||
| Do a check of the tension in the saw chain. X | |||
| Lubricate the saw chain. X | |||
| Make sure that the saw chain does not turn without operation of the power trigger. | X | ||
| Examine all cables, couplings and connec-tions. Make sure that there is no damage or dirt. | X | ||
| Clean the saw chain cover. X | |||
| Remove burrs from the edges of the guide bar. | X | ||
| Do a check of the connections between the battery and the product. Do a check of the connection between the battery and the bat-tery charger. | X | ||
| Make sure that the pruner is not damaged. Replace the pruner if it is damaged. | An approved Husqvarna dealer must do all servicing on the pruner. | ||
| Examine the wear of the chain drive sprocket. | Replace the chain drive sprocket after approximately 20 hours of operation or more frequently if it is necessary. | ||
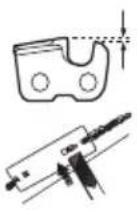
To examine the cutting equipment
- Make sure that there are no cracks in rivets and links and that no rivets are loose. Replace if it is necessary. (Fig. 73)
- Make sure that the saw chain is easy to bend. Replace the saw chain if it is rigid.
- Compare the saw chain with a new saw chain to examine if the rivets and links are worn.
- Replace the saw chain when the longest part of the cutting tooth is less than 4 mm/0.16 in. Also replace the saw chain if there are cracks on the cutters. (Fig. 74)
To replace the guide bar and the saw chain
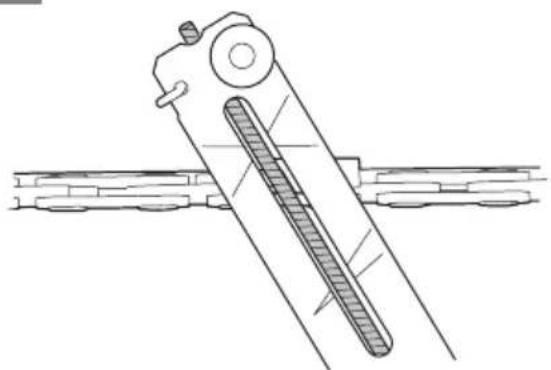
- Turn the locking knob counterclockwise and remove the protective cover (A). (Fig. 75)
- Remove the guide bar with the saw chain attached.
- Remove the saw chain from the guide bar.
- Put a new saw chain in the groove of the guide bar.
- Install the new guide bar with the groove (B) onto the bolt (E) and the hole (D) onto the guide bar pin (F).
- Install the saw chain around the drive sprocket (G). Make sure that the cutting teeth point in the direction away from the drive sprocket (C).
- Install the protective cover (A) and turn the locking knob clockwise.
- Tighten the saw chain. Refer to To adjust the tension of the saw chain on page 25 for instructions.
To sharpen the saw chain
Information about the guide bar and saw chain

WARNING: Use protective gloves when you use or do maintenance on the saw chain. A saw chain that does not move can also cause injuries.
Replace a worn or damaged guide bar or saw chain with the guide bar and saw chain combination recommended by Husqvarna. This is necessary to keep the safety functions of the product. Refer to Accessories on page 29, for a list of replacement bar and chain combinations that we recommend.
- Guide bar length, in/cm. Information about the guide bar length and chain type can usually be found on the rear end of the guide bar.
(Fig. 76)
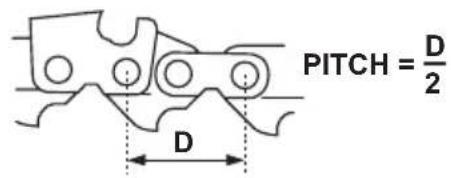
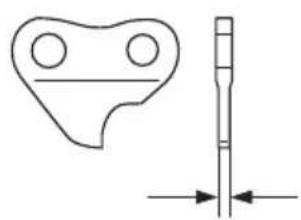
- Chain pitch, in. The distance between the drive links of the saw chain must align with the distance of the teeth on the bar tip sprocket and drive sprocket.
(Fig. 77)
- Number of drive links. The number of drive links is decided by the type of guide bar.
(Fig. 78)
- Bar groove width, in/mm. The groove width in guide bar must be the same as the chain drive links width.
(Fig. 79)
- The guide bar must align with product.
(Fig. 80)
- Drive link width, mm/in.
(Fig. 81)
General information about how to sharpen the cutters
Do not use a blunt saw chain. If the saw chain is blunt, you must apply more pressure to push the guide bar through the wood. If the saw chain is very blunt, there will be no wood chips but sawdust.
A sharp saw chain eats through the wood and the wood chips becomes long and thick.

WARNING: The force of the kickback increases a lot if you do not follow the sharpening instructions.
Note: Refer to To sharpen the cutters on page 24 for information about sharpening of the saw chain.
To sharpen the cutters
- Use a round file and a file gauge to sharpen the cutting teeth. (Fig. 82)
Note: Refer to Accessories on page 29 for information about which file and file gauge that Husqvarna recommends for your saw chain.
-
Apply the file gauge correctly on to the cutter. Refer to the instruction supplied with the file gauge.
-
Move the file from the inner side of the cutting teeth and out. Decrease the pressure on the pull stroke. (Fig. 83)
- Remove material from one side of all the cutting teeth.
- Turn the product around and remove material on the other side.
- Make sure that all cutting teeth are the same length.
To adjust the tension of the saw chain

WARNING: A saw chain with an incorrect tension can come loose from the guide bar and cause serious injury or death.
A saw chain becomes longer when you use it. It is important to adjust the tension of the saw chain regularly to make sure that it is correct. Do a check of the tension of the saw chain before you operate the product. Tighten the saw chain as tightly as possible, but it must be possible to pull the saw chain around freely by hand.
Note: A new saw chain has a running-in period. Do a check of the tension more frequently during this period.
- Turn the chain tension adjuster clockwise to tighten the saw chain. Apply as much tension to the saw chain as possible. It must be tight against the guide bar. (Fig. 84)
Note: Turn the adjuster up (+) for more tension and down (-) for less tension. The saw chain is tightened correctly when you can turn it easily by hand but it is tight against the guide bar.
- Make sure that you can pull the saw chain around freely by hand and that it does not hang from the guide bar. (Fig. 85)
To lubricate cutting equipment

WARNING: Poor lubrication of cutting equipment may cause the chain to snap, which could lead to serious, even fatal injuries.

WARNING: Do not use waste oil! Waste oil is dangerous for persons, the product and for the environment.
Saw chain oil
- Use saw chain oil of good adherence to the saw chain. The saw chain oil must keep its viscosity in all weather, for example, during hot summer or cold winter.
- Use Husqvarna chain oil for maximum saw chain life and to keep environmental damage to a minimum. If Husqvarna saw chain oil is not available, use a standard saw chain oil.
- In areas where oil for lubrication of saw chains is not available, use X-GUARD BIO chain oil.
- Make sure that the lubrication of the saw chain works correctly. Fill with saw chain oil and examine the saw chain lubrication if it is necessary.
To do a check of the guide bar
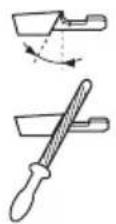
- Examine if there are burrs on the edges of the guide bar. Remove the burrs using a file. (Fig. 86)
- Clean the groove in the guide bar. (Fig. 87)
- Examine the groove in the guide bar for wear. Replace the guide bar if it is necessary. (Fig. 88)
- Examine if the guide bar tip is rough or very worn. (Fig. 89)
- Turn the guide bar daily to extend its life cycle. (Fig. 90)
To clean the product, the battery and the battery charger
- Clean the product with a dry cloth after use.
- Clean the battery and battery charger with a dry cloth. Keep the battery guide tracks clean.
- Make sure that the terminals on the battery and the battery charger are clean before use.
- Clean the inner surface of the protective cover with a brush.
To examine the battery and the battery charger
- Examine the battery for damages, for example cracks.
- Examine the battery charger for damages, for example cracks.
- Make sure that the connection cord of the battery charger is not damaged and that there are no cracks in it.
Troubleshooting
User interface Aspire P5-P4A
| Problem Possible faults | Possible solution | |
| Green start LED flashes. | Low battery voltage. Charge the battery. | |
| Red error LED flashes. | Overload. The cutting attachment is blocked. stop the product. Remove the battery. Clean the cutting attachment from unwanted materials. Loosen the chain. | |
| Temperature deviation. Let the product become cool. | ||
| The power trigger and the start button are pushed at the same time. | Release the power trigger and push the start button. | |
| Green LED and red LED flash alternately. | The battery is empty. Charge the battery. | |
| The battery is damaged. Speak to your servicing agent. | ||
Battery charger
| LED on the battery charger | Cause Solution | |
| The green LED is on. (For P4A 18-C50) | The battery is not correctly installed in the battery charger. | Remove the battery from the charger and install the battery in the battery charger again. |
| The green LED is on and the red LED flashes. (For P4A 18-C70 and P4A 18-C100) | The battery connectors and the battery charger connectors are dirty. | Clean the battery connectors and the battery charger connectors. For example, insert and remove the battery from the battery charger several times. |
| The battery is damaged. Replace the battery. | ||
| The charger identifies an internal error. | Make sure that all batteries are fully inserted. Remove the mains plug and reinsert. If the error occurs again, ask an authorized after-sales service center for Husqvarna products to do a check of the battery charger. | |
| The green LED is on. (For P4A 18-C50) | The battery temperature is out of the charging range. | Wait until the battery temperature drops to the permitted charging temperature (0-35 °C). |
| The red LED is on. (For P4A 18-C70 and P4A 18-C100) | ||
| The green LED is off. (For P4A 18-C50) | The battery charger is not correctly connected to the mains outlet. | Connect the battery charger to a mains outlet. |
| The green LED and the red LED are off. ((For P4A 18-C70 and P4A 18-C100) | Faulty mains outlet. Connect the battery charger to the voltage and frequency that is specified on the rating plate. | |
| The plug socket, mains cable or battery charger is damaged. | Do a check of the mains voltage. If necessary, speak to an approved service agent. | |
| Other errors. If other errors occur, make sure that the product is off, remove the battery and speak to an approved service agent. | ||
Transportation and storage
Transportation and storage
- The supplied Li-ion batteries obey the Dangerous Goods Legislation requirements.
- Obey the special requirement on package and labels for commercial transportation, including by third parties and forwarding agents.
- Speak to a person with special training in dangerous material before you send the product. Obey all applicable national regulations.
- Use tape on open contacts when you put the battery in a package. Put the battery in the package tightly to prevent movement.
- Remove the battery for storage or transportation.
- Put the battery and the battery charger in a space that is dry and free from moisture and frost.
- Do not keep the battery in an area where static electricity can occur. Do not keep the battery in a metal box.
- Put the battery in storage where the temperature is between -20^ / -4^ and +50^ / 122^ and away from open sunlight.
- Put the battery charger in storage where the temperature is between 5^ / 41^ and 45C / 113^ and away from open sunlight.
- Use the battery charger only when the surrounding temperature is between 0^ / 32^ and 35^ / 95^ .
- Put the product in storage where the temperature is between -40^ / -40^ and +60^ / 140^
- Charge the battery 30% to 50% before you put it in storage for long periods.
-
Put the battery charger in storage in a space that is closed and dry.
-
Keep the battery away from the battery charger during storage. Do not let children and other not approved persons to touch the equipment. Keep the equipment in a space that you can lock.
- Clean the product and do a full servicing before you put the product in storage for a long time.
- Use the transportation guard on the product to prevent injuries or damage on the product during transportation and storage.
- Attach the product safely during transportation.
- Keep the product in storage horizontally or hang the product on the supplied hook. Refer to To hang the product on the hook on page 20.
Disposal
The symbol means that the product is not domestic waste. Recycle it through your local collection system for electrical and electronic equipment. This contributes to proper end of life waste management. Contact local authorities, domestic waste services, your dealer or retailer for information. Incorrect disposal may have potential negative effects on the environment and human health, due to the potential presence of hazardous substances.

Note: The symbol shows on the product or package of the product.
Technical data
Technical data
| Aspire P5-P4A | Aspire P5-P4A + As-pire Pole-P4A | |
| Motor | ||
| Type PMDC 18V PMDC 18V | ||
| Chain speed, m/sec 4.9 4.9 | ||
| Weight | ||
| Without battery, cutting equipment and guide bar cover kg/lb 1.3 2.7 | ||
| Noise emissions ^1 | ||
| Sound power level, measured dB(A) 88 88 | ||
| Sound power level, guaranteed LWA dB(A) 91 91 | ||
| Sound levels ^2 | ||
| Equivalent sound pressure level at the operator's ear, dB(A) 75 74 | ||
| Vibration levels ^3 | ||
| Vibration levels at handles, measured according to EN 62841-1 and ISO 22867, m/s ^2 | ||
| Collapsed, front handle/rear handle – 0.5/0.5 | ||
| Extended, front handle/rear handle – 0.3/0.3 | ||
| Main handle/Auxiliary handle 0.8/0.4 – | ||
Note: The declared vibration total value and declared noise emission values have been measured in accordance with a standard test method and can be used for comparing on tool with another.
Note: The declared vibration total value and declared noise emission values can also be used in a preliminary assessment of exposure.
Note: The vibration emission and noise emission during actual use of the product can differ from the declared total value depending on the ways in which the product is used; and need to identify safety measures to protect the operator that are based on an estimation of exposure in the actual conditions of use (taking account of all parts of the operating cycle such as the times when the product is switched off and when it is running idle in addition to the trigger time).
Approved batteries
This product can be operated with all POWER FOR ALL batteries. For best performance it is recommended to use batteries with a minimum of 4.0 Ah.
| Battery P4A 18-B45 P4A 18-B72 | ||
| Type Lithium-ion Lithium-ion | ||
| Battery capacity, Ah 2.5 4.0 | ||
| Nominal voltage, V 18 | 18 |
1 Noise emissions in the environment measured as sound power ( L_WA ) in conformity with EC directive 2000/14/EC. The difference between guaranteed and measured sound power is that guaranteed sound power also includes dispersion in the measurement result and the variations between different products of the same model refer to Directive 2000/14/EC.
2 Equivalent sound pressure level, according to EN 62841-1 and ISO 22868, is calculated as the time-weighted energy total for different sound pressure levels under various working conditions. Typical statistical dispersion for equivalent sound pressure level is a standard deviation of 3 dB (A).
3 Reported data for equivalent vibration level has a typical statistical dispersion (standard deviation) of 1.5 m/s ^2 .
| Battery P4A 18-B45 P4A 18-B72 | ||
| Weight, kg 0.35 0.65 | ||
| Number of cells (Li-Ion) 5 10 |
Approved battery chargers
| Battery charger P4A 18-C50 P4A 18-C70 P4A 18-C100 | |||
| Input voltage, V Refer to charger rating information. | Refer to charger rating information. | Refer to charger rating information. | |
| Frequency, Hz 50–60 50–60 50–60 | |||
| Power, W 50 70 105 | |||
| Output Voltage, V d.c./Amps, A | 14.4-18/2 | 14.4-18/3 | 14.4-18/4.4 |
Accessories
Guidebar and saw chain combinations
The following combinations are CE approved.
| Guide bar | Saw chain | |||
| Length, inch | Pitch, inch | Gauge, mm | Type | Length, number of drive links |
| 5 | 1/4” | 1.1 | SP11G | 32 |
Saw chain filing and file gauge
Use the recommended file gauge to get the correct filing angles. We recommend you to always use the recommended file gauge to restore the sharpness of the saw chain.
If you do not know which saw chain you have on your product, speak to your servicing dealer.
 |  |  |  |  |  | [mm+1] |
| mm/in | mm/in | |||||
| SP11G | 3.5 / 9/64 | 60° | 30° | 0° | 0.4/0.016 | 5299371-01 |
Declaration of Conformity
EU Declaration of Conformity
We, Husqvarna AB, SE-561 82 Huskvarna, Sweden, tel: +46-36-146500, declare on our sole responsibility that the product:
| Description Battery-operated pruner and pole pruner | |
| Brand Husqvarna | |
| Type / Model Aspire P5-P4A, Aspire Pole-P4A, Aspire P5-P4A + Aspire Pole-P4A | |
| Identification Serial numbers dating from 2025 and onwards | |
is in conformity with the following EU directives and regulations as amended:
| Directive/Regulation Description | |
| 2006/42/EC "relating to machinery" | |
| 2014/30/EU "relating to electromagnetic compatibility" | |
| 2011/65/EU | “on the restriction of the use of certain hazardous substances in electrical and electronic equipment” |
| 2000/14/EC "relating to the noise emissions in the environment" |
and that the following standards and/or technical specifications are applied: EN 62841-1:2015/A11:2022, EN ISO 11680-1:2021, EN ISO 12100:2010, EN IEC 55014-1:2021, EN IEC 55014-2:2021, EN IEC 63000:2018.
DEKRA Testing and Certification GmbH, Handwerkstraße 15, 70565 Stuttgart, Germany, 0158, has carried out voluntary EC type examination in accordance with machinery directive's (2006/42/EC) article 12, point 3b. The certificate for EC type examination has the number: 4815039.22006.
Applied conformity assessment procedure in accordance with Directive 2000/14/EC, Annex V.
For information relating to noise emissions, refer to Technical data on page 27.
Huskvarna, 2025-10-31
$$ \Delta \operatorname {d u} $$
Claes Losdal, R&D Manager, Husqvarna AB
Responsible for technical documentation

Licenses
Copyright © 2012–2020 STMicroelectronics
The warranty does not cover defects which are the result of normal wear and tear, negligence, defective use, unauthorised repair or the suction apparatus being connected to the incorrect voltage.
All rights reserved.
Redistribution and use in source and binary forms, with or without modification, are permitted provided that the following conditions are met:
- Redistributions of source code must retain the above copyright notice, this list of conditions and the following disclaimer.
- Redistributions in binary form must reproduce the above copyright notice, this list of conditions and the following disclaimer in the documentation and/or other materials provided with the distribution.
- Neither the name of STMicroelectronics nor the names of its contributors may be used to endorse or promote products derived from this software without specific prior written permission.
THIS SOFTWARE IS PROVIDED BY THE COPYRIGHT HOLDERS AND CONTRIBUTORS "AS IS" AND ANY EXPRESS OR IMPLIED WARRANTIES, INCLUDING, BUT NOT LIMITED TO, THE IMPLIED WARRANTIES OF MERCHANTABILITY AND FITNESS FOR A PARTICULAR PURPOSE ARE DISCLAIMED. IN NO EVENT SHALL THE COPYRIGHT OWNER OR CONTRIBUTORS BE LIABLE FOR ANY DIRECT, INDIRECT, INCIDENTAL, SPECIAL, EXEMPLARY, OR CONSEQUENTIAL DAMAGES (INCLUDING, BUT NOT LIMITED TO, PROCUREMENT OF SUBSTITUTE GOODS OR SERVICES; LOSS OF USE, DATA, OR PROFITS; OR BUSINESS INTERRUPTION) HOWEVER CAUSED AND ON ANY THEORY OF LIABILITY, WHETHER IN CONTRACT, STRICT LIABILITY, OR TORT (INCLUDING NEGLIGENCE OR OTHERWISE) ARISING IN ANY WAY OUT OF THE USE OF THIS SOFTWARE, EVEN IF ADVISED OF THE POSSIBILITY OF SUCH DAMAGE.
Apache 2.0 License
Copyright © 2009-2019 Arm Limited. All rights reserved.
Version 2.0, January 2004 http://www.apache.org/licenses/
TERMS AND CONDITIONS FOR USE, REPRODUCTION, AND DISTRIBUTION
1. Definitions.
"License" shall mean the terms and conditions for use, reproduction, and distribution as defined by Sections 1 through 9 of this document. "Licensor" shall mean the copyright owner or entity authorized by the copyright owner that is granting the License. "Legal Entity" shall mean the union of the acting entity and all other
entities that control, are controlled by, or are under common control with that entity. For the purposes of this definition, "control" means (i) the power, direct or indirect, to cause the direction or management of such entity, whether by contract or otherwise, or (ii) ownership of fifty percent (50%) or more of the outstanding shares, or (iii) beneficial ownership of such entity. "You" (or "Your") shall mean an individual or Legal Entity exercising permissions granted by this License. "Source" form shall mean the preferred form for making modifications, including but not limited to software source code, documentation source, and configuration files. "Object" form shall mean any form resulting from mechanical transformation or translation of a Source form, including but not limited to compiled object code, generated documentation, and conversions to other media types. "Work" shall mean the work of authorship, whether in Source or Object form, made available under the License, as indicated by a copyright notice that is included in or attached to the work (an example is provided in the Appendix below). "Derivative Works" shall mean any work, whether in Source or Object form, that is based on (or derived from) the Work and for which the editorial revisions, annotations, elaborations, or other modifications represent, as a whole, an original work of authorship. For the purposes of this License, Derivative Works shall not include works that remain separable from, or merely link (or bind by name) to the interfaces of, the Work and Derivative Works thereof. "Contribution" shall mean any work of authorship, including the original version of the Work and any modifications or additions to that Work or Derivative Works thereof, that is intentionally submitted to Licensor for inclusion in the Work by the copyright owner or by an individual or Legal Entity authorized to submit on behalf of the copyright owner. For the purposes of this definition, "submitted" means any form of electronic, verbal, or written communication sent to the Licensor or its representatives, including but not limited to communication on electronic mailing lists, source code control systems, and issue tracking systems that are managed by, or on behalf of, the Licensor for the purpose of discussing and improving the Work, but excluding communication that is conspicuously marked or otherwise designated in writing by the copyright owner as "Not a Contribution." "Contributor" shall mean Licensor and any individual or Legal Entity on behalf of whom a Contribution has been received by Licensor and subsequently incorporated within the Work.
2. Grant of Copyright License.
Subject to the terms and conditions of this License, each Contributor hereby grants to You a perpetual, worldwide, non-exclusive, no-charge, royalty-free, irrevocable copyright license to reproduce, prepare Derivative Works of, publicly display, publicly perform, sublicense, and distribute the Work and such Derivative Works in Source or Object form.
3. Grant of Patent License.
Subject to the terms and conditions of this License, each Contributor hereby grants to You a perpetual, worldwide, nonexclusive, no-charge, royalty-free, irrevocable (except as stated in this section) patent license to make, have made, use, offer to sell, sell, import, and otherwise transfer the Work, where such license applies only to those patent claims licensable by such Contributor that are necessarily infringed by their Contribution(s) alone or by combination of their Contribution(s) with the Work to which such Contribution(s) was submitted. If You institute patent litigation against any entity (including a crossclaim or counterclaim in a lawsuit) alleging that the Work or a Contribution incorporated within the Work constitutes direct or contributory patent infringement, then any patent licenses granted to You under this License for that Work shall terminate as of the date such litigation is filed.
4. Redistribution.
You may reproduce and distribute copies of the Work or Derivative Works thereof in any medium, with or without modifications, and in Source or Object form, provided that You meet the following conditions:
- You must give any other recipients of the Work or Derivative Works a copy of this License; and
- You must cause any modified files to carry prominent notices stating that You changed the files; and – You must retain, in the Source form of any Derivative Works that You distribute, all copyright, patent, trademark, and attribution notices from the Source form of the Work, excluding those notices that do not pertain to any part of the Derivative Works; and
- If the Work includes a "NOTICE" text file as part of its distribution, then any Derivative Works that You distribute must include a readable copy of the attribution notices contained within such NOTICE file, excluding those notices that do not pertain to any part of the Derivative Works, in at least one of the following places: within a NOTICE text file distributed as part of the Derivative Works; within the Source form or documentation, if provided along with the Derivative Works; or, within a display generated by the Derivative Works, if and wherever such third-party notices normally appear. The contents of the NOTICE file are for informational purposes only and do not modify the License. You may add Your own attribution notices within Derivative Works that You distribute, alongside or as an addendum to the NOTICE text from the Work, provided that such additional attribution notices cannot be construed as modifying the License. You may add Your own copyright statement to Your modifications and may provide additional or different license terms and conditions for use, reproduction, or distribution of Your modifications, or for any such Derivative Works as a whole, provided Your use, reproduction, and distribution of the Work otherwise complies with the conditions stated in this License.
5. Submission of Contributions.
Unless You explicitly state otherwise, any Contribution intentionally submitted for inclusion in the Work by You to the Licensor shall be under the terms and conditions of this License, without any additional terms or conditions. Notwithstanding the above, nothing herein shall supersede or modify the terms of any separate license agreement you may have executed with Licensor regarding such Contributions.
6. Trademarks.
This License does not grant permission to use the trade names, trademarks, service marks, or product names of the Licensor, except as required for reasonable and customary use in describing the origin of the Work and reproducing the content of the NOTICE file.
7. Disclaimer of Warranty.
Unless required by applicable law or agreed to in writing, Licensor provides the Work (and each Contributor provides its Contributions) on an "AS IS" BASIS, WITHOUT WARRANTIES OR CONDITIONS OF ANY KIND, either express or implied, including, without limitation, any warranties or conditions of TITLE, NON-INFRINGEMENT, MERCHANTABILITY, or FITNESS FOR A PARTICULAR PURPOSE. You are solely responsible for determining the appropriateness of using or redistributing the Work and assume any risks associated with Your exercise of permissions under this License. 8. Limitation of Liability. In no event and under no legal theory, whether in tort (including negligence), contract, or otherwise, unless required by applicable law (such as deliberate and grossly negligent acts) or agreed to in writing, shall any Contributor be liable to You for damages, including any direct, indirect, special, incidental, or consequential damages of any character arising as a result of this License or out of the use or inability to use the Work (including but not limited to damages for loss of goodwill, work stoppage, computer failure or malfunction, or any and all other commercial damages or losses), even if such Contributor has been advised of the possibility of such damages.
9. Accepting Warranty or Additional Liability.
While redistributing the Work or Derivative Works thereof, You may choose to offer, and charge a fee for, acceptance of support, warranty, indemnity, or other liability obligations and/or rights consistent with this License. However, in accepting such obligations, You may act only on Your own behalf and on Your sole responsibility, not on behalf of any other Contributor, and only if You agree to indemnify, defend, and hold each Contributor harmless for any liability incurred by, or claims asserted against, such Contributor by reason of your accepting any such warranty or additional liability. END OF TERMS AND CONDITIONS
Съдържание
Въведение.... 33
Безопасност....35
Монтаж....44
Операция.... 45
Copyright © 2012–2020 STMicroelectronics
Copyright © 2012–2020 STMicroelectronics
Copyright © 2012–2020 STMicroelectronics
Copyright © 2012–2020 STMicroelectronics
Copyright © 2012–2020 STMicroelectronics
Copyright © 2012-2020 STMicroelectronics
Claes Losdal, responsible R&D, Husqvarna AB
Responsable de la documentation technique

Licences
Copyright © 2012-2020 STMicroelectronics
Copyright © 2012–2020 STMicroelectronics
Copyright © 2012–2020 STMicroelectronics
DEKRA Testing and Certification GmbH,
Handwerkstraße 15, 70565 Stuttgart, Germany, 0158
Copyright © 2012-2020 STMicroelectronics
All rights reserved.
Copyright © 2009-2019 Arm Limited. All rights reserved.
DEKRA Testing and Certification GmbH,
Handwerkstraße 15, 70565 Stuttgart, Germany, 0158
Copyright © 2012-2020 STMicroelectronics
Sikkerhetsadvarsler for stangmontert grenkutter:
Copyright © 2012–2020 STMicroelectronics
Copyright © 2012–2020 STMicroelectronics
Copyright © 2012–2020 STMicroelectronics
Copyright © 2012–2020 STMicroelectronics
Copyright © 2012–2020 STMicroelectronics
Avtorske pravice © 2012–2020 STMicroelectronics
IEC 55014-1:2021, EN IEC 55014-2:2021, EN IEC
63000:2018.
DEKRA Testing and Certification GmbH,
Handwerkstraße 15, 70565 Stuttgart, Germany, 0158
Copyright © 2012–2020 STMicroelectronics
Telif Hakki © 2012–2020 STMicroelectronics
Copyright © 2012–2020 STMicroelectronics
Original instructions
Оригинални инструкции
Původní pokyny


