Braam - Car seat Lionelo - Free user manual and instructions
Find the device manual for free Braam Lionelo in PDF.
| Product type | Universal/semi-universal child car seat, groups 0+ (0-13 kg), I (9-18 kg), II (15-25 kg), III (22-36 kg) |
| Brand | Lionelo |
| Model | Braam |
| Approval | ECE R44/04 |
| Mounting direction | Rearward facing (0-18 kg) and forward facing (9-36 kg) |
| Rotation | 360° with rotating base and locking button |
| Recline | 5 positions (including semi-reclined position 5 rearward facing) |
| Harness | 5-point, adjustable in height and tension |
| Headrest | Adjustable in height with lever, coordinated with shoulder straps |
| Reducer cushion | Removable, suitable for newborns (up to ~9 kg) |
| Vehicle fixation | 3-point seat belt or ISOFIX system (with connectors and support leg) |
| Support leg | Height adjustable, ground contact indicator (green when correct) |
| Max child weight | 36 kg |
| Dimensions (approx) | ~44 x 45 x 65 cm (height variable with headrest) |
| Weight (approx) | ~10 kg |
| Power supply | None (non-electric) |
| Cover maintenance | Hand wash in warm water with mild soap, do not dry in sun |
| Buckle maintenance | Clean with warm water to avoid jamming |
| Padding | Removable, only replace with manufacturer-recommended parts |
| Repairability | After an accident, the seat must be replaced. No repairs allowed |
| Storage | Dry place away from heat and sun, do not place heavy objects on it |
| Manufacturer contact | help@lionelo.com / BrandLine Group Sp. z o.o. |
Frequently Asked Questions - Braam Lionelo
User questions about Braam Lionelo
0 question about this device. Answer the ones you know or ask your own.
Ask a new question about this device
Download the instructions for your Car seat in PDF format for free! Find your manual Braam - Lionelo and take your electronic device back in hand. On this page are published all the documents necessary for the use of your device. Braam by Lionelo.
USER MANUAL Braam Lionelo
natural_image
Top-down view of a baby car seat with 'lisrelo' branding and white base (no text or symbols on the car itself)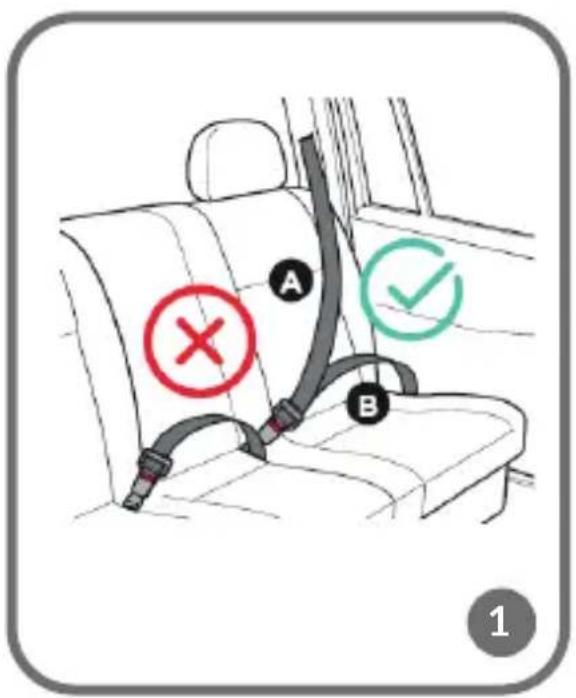
text_image
A B 1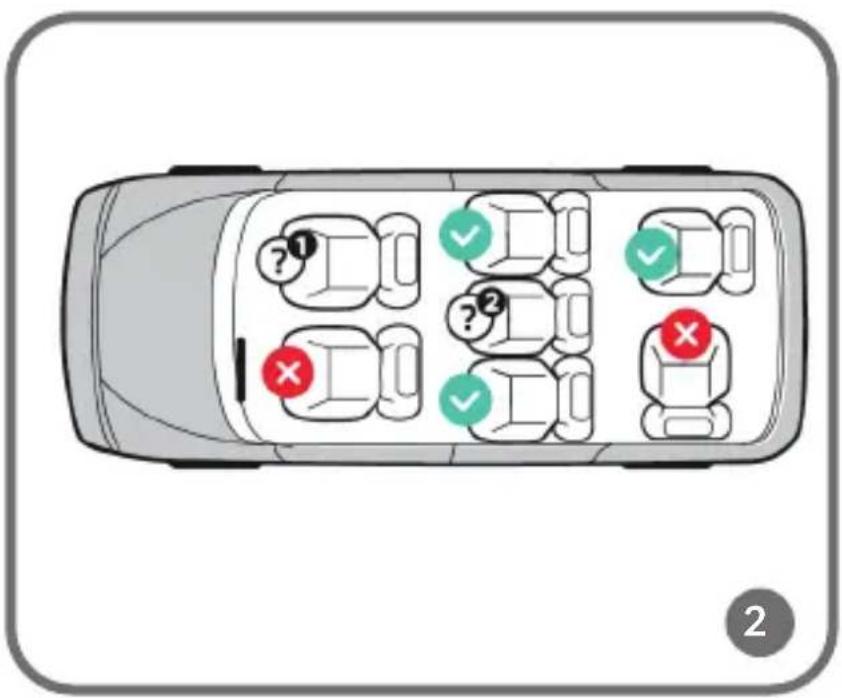
text_image
Diagram of a car with multiple driver seats and checkmarks indicating status or failure, labeled with question marks and red/green checkmarks.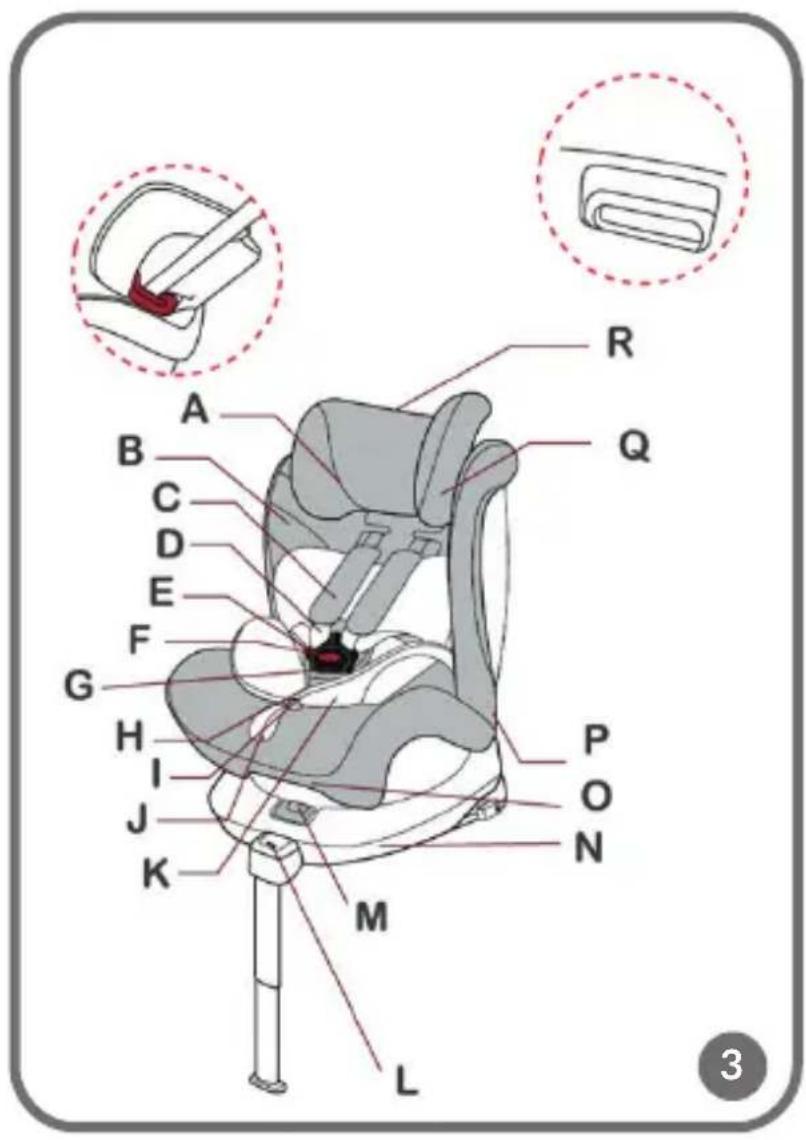
text_image
A B C D E F G H I J K M L R Q P O N 3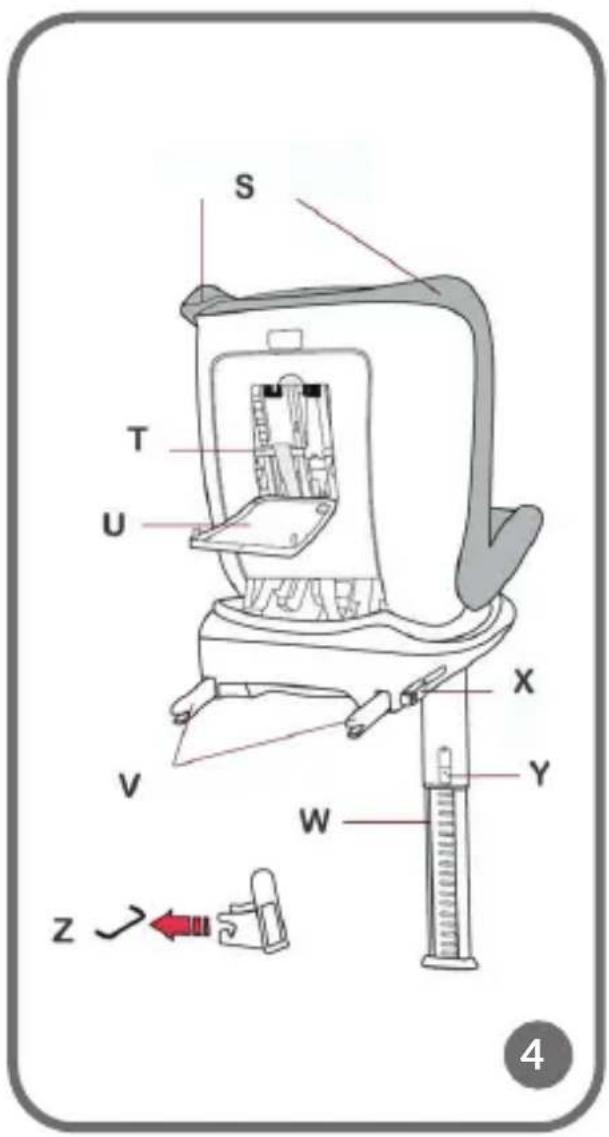
text_image
S T U V X Y W Z ↕ ← 4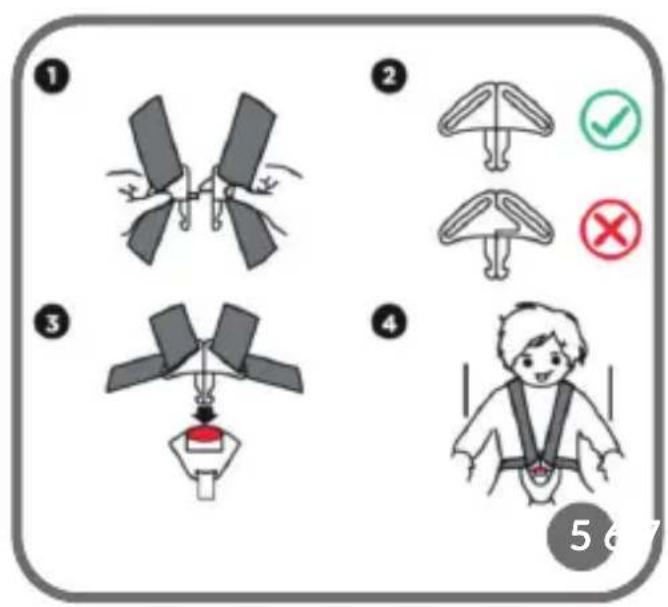
text_image
Diagram illustrating four different types of seatbelting techniques with numbered steps and safety symbols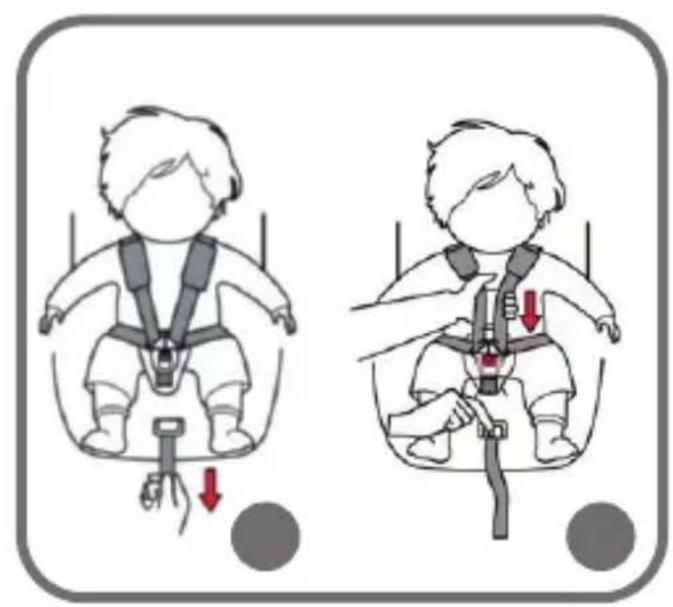
text_image
Illustration showing two child car seatbelt scenarios with red arrows indicating down or up movement, likely for safety or comfort improvement.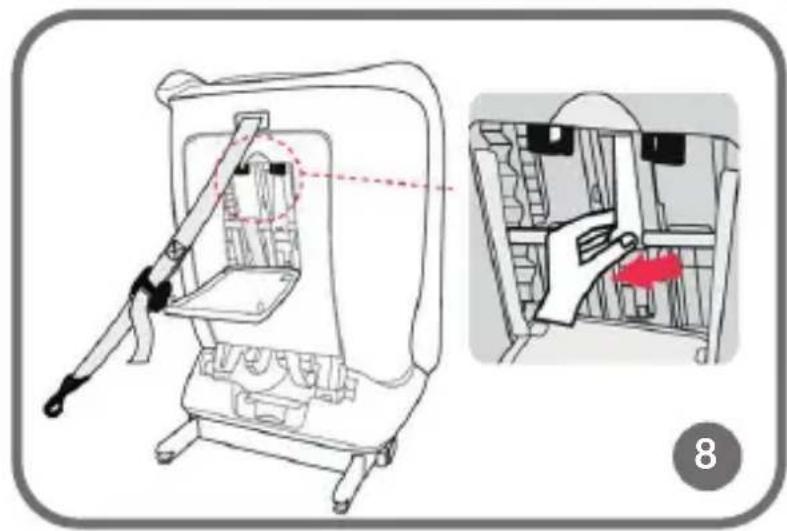
natural_image
Diagram showing a device interior with a tool and a close-up of its internal components, no text or symbols present.
text_image
Diagram showing a baby car seat with a magnified inset highlighting the seatbelt mechanism, labeled with number 10.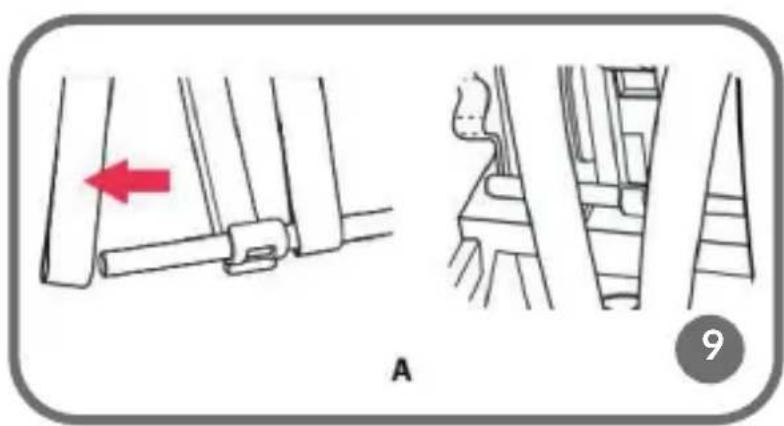
text_image
A 9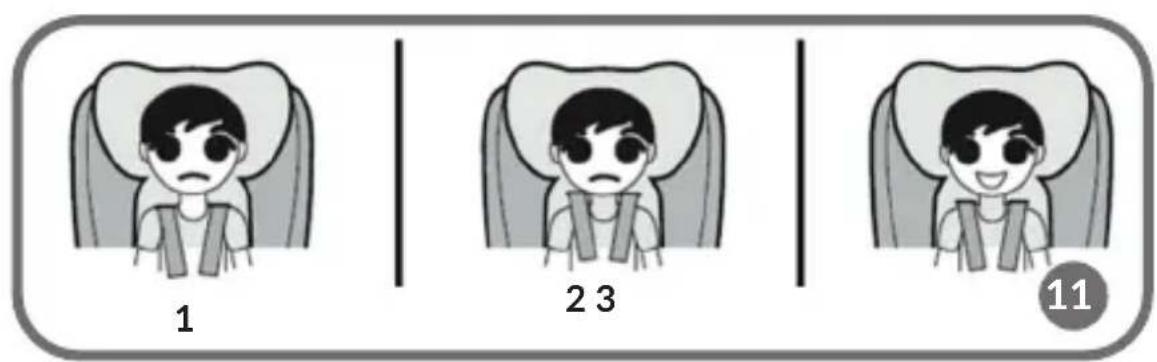
text_image
1 2 3 11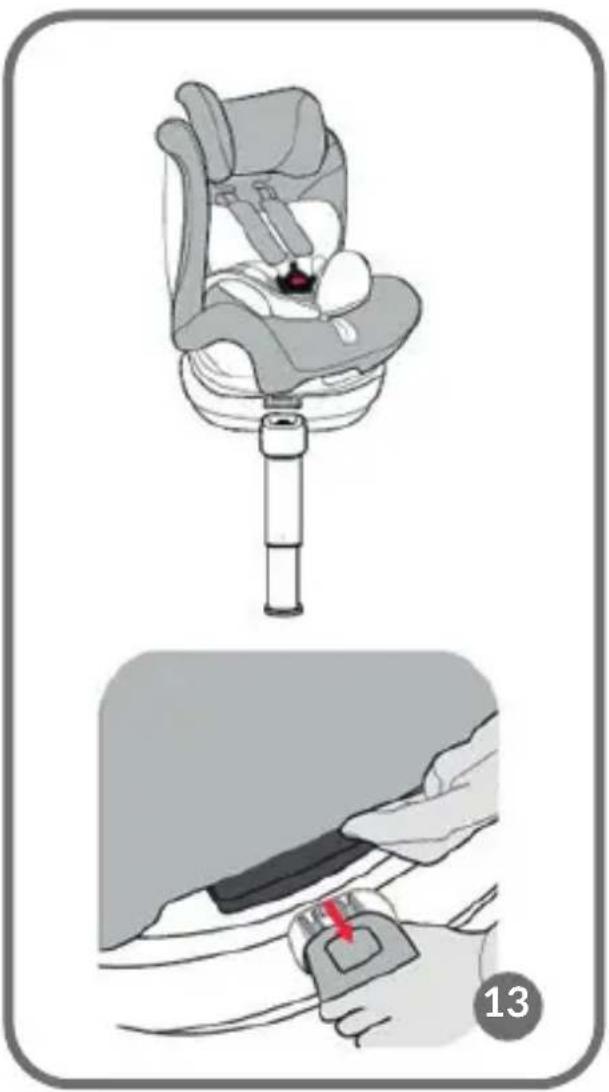
natural_image
Illustration of a car seatbelt buckle being adjusted for a person's seatbelt, showing the mechanism and safety symbol (no text or labels present)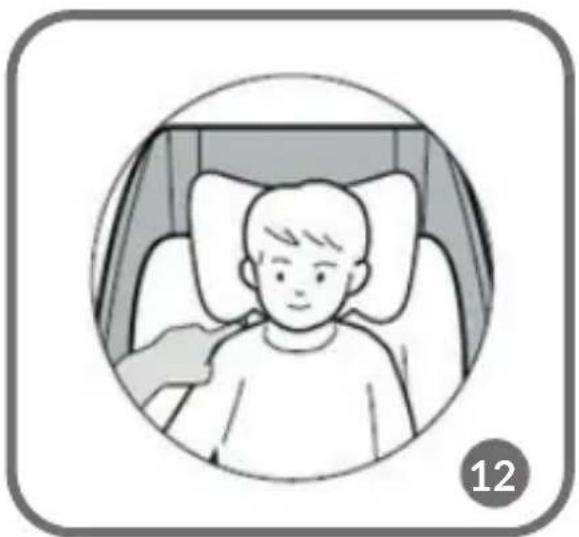
natural_image
Illustration of a child sitting in a car seat, viewed through a circular frame (no text or symbols)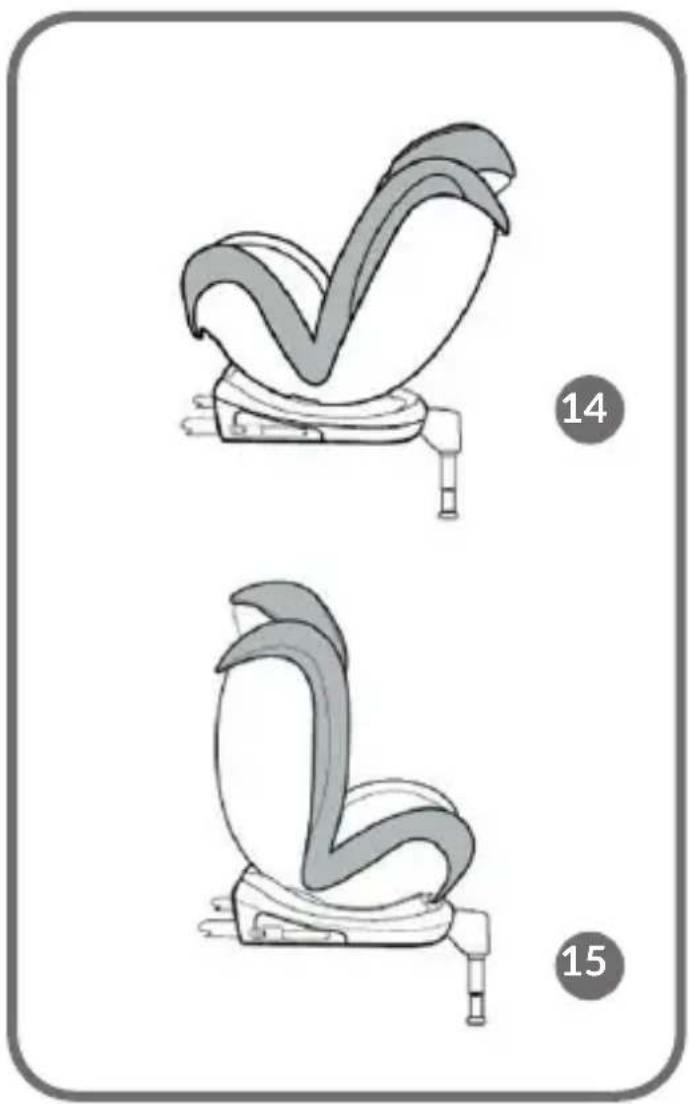
natural_image
Illustration of a baby seat with two different views (14 and 15), no text or symbols present.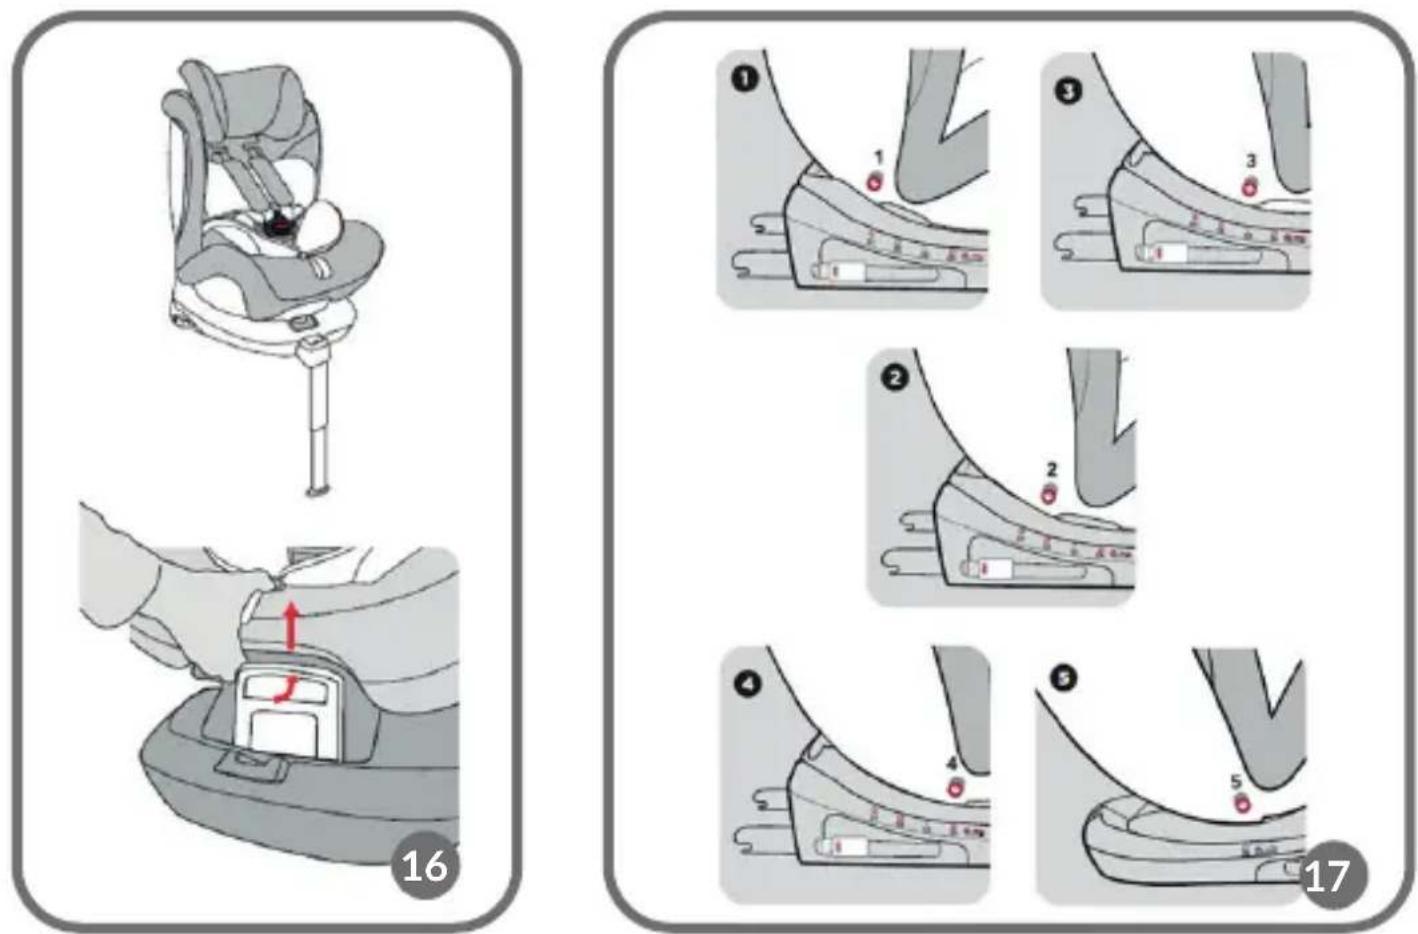
text_image
Illustration showing four steps of a mechanical or electrical device operation with red arrows indicating downward movement.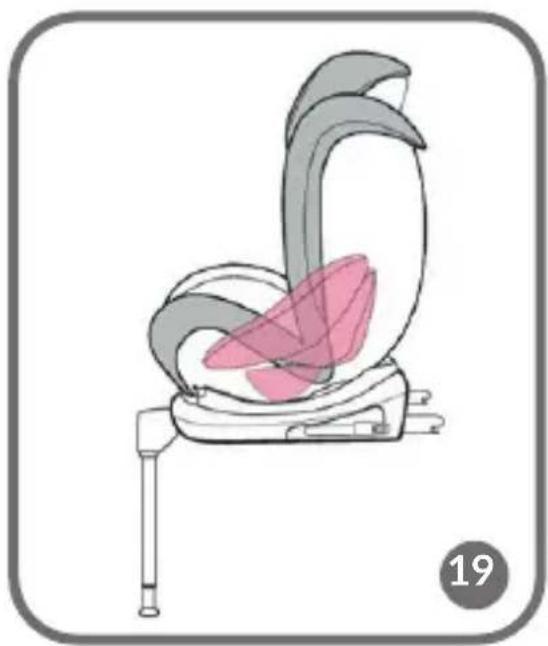
natural_image
Illustration of a baby car seat with pink overlay and gray body, no text or symbols present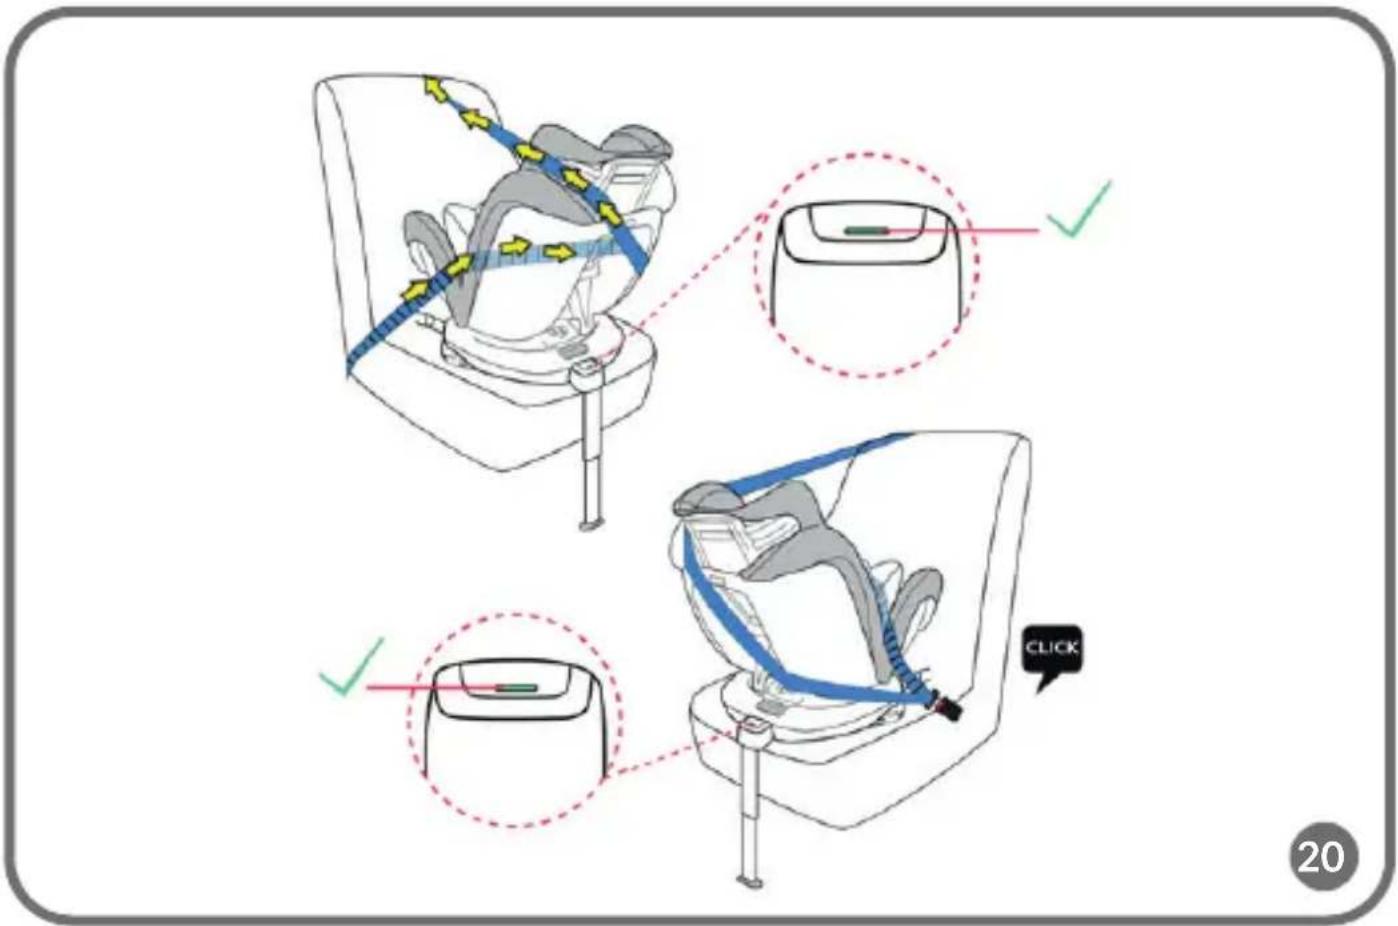
text_image
Diagram illustrating car seatbelt usage with arrows and checkmark instructions, showing two scenarios of seatbelting.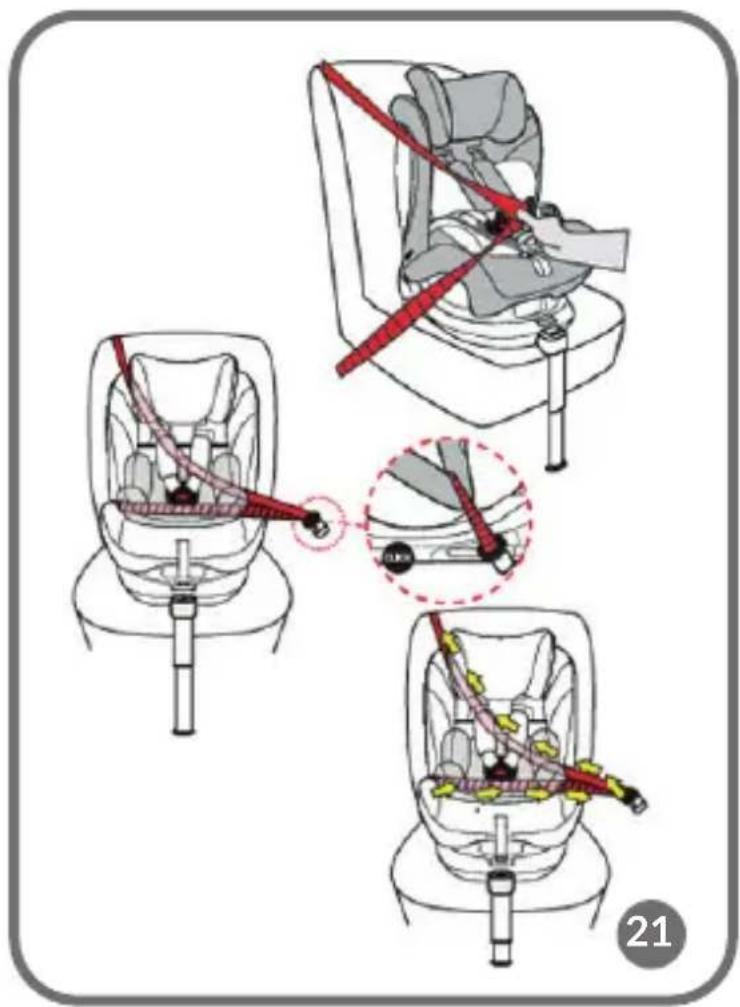
text_image
Medical illustration showing steps to adjust car seatbelt using a red bandage, with magnified detail and numbered label 21.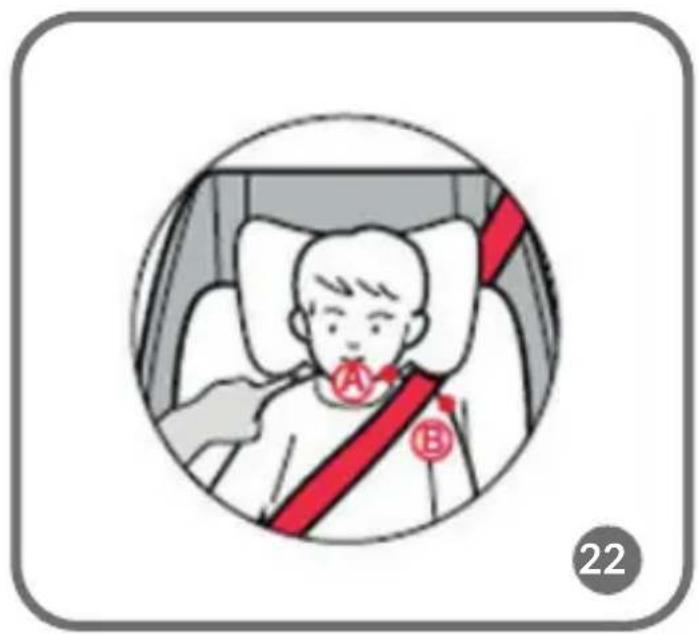
text_image
A B 22
text_image
Illustration showing a child wearing a car seatbelt with a red belt, accompanied by a close-up of the seatbelt being held.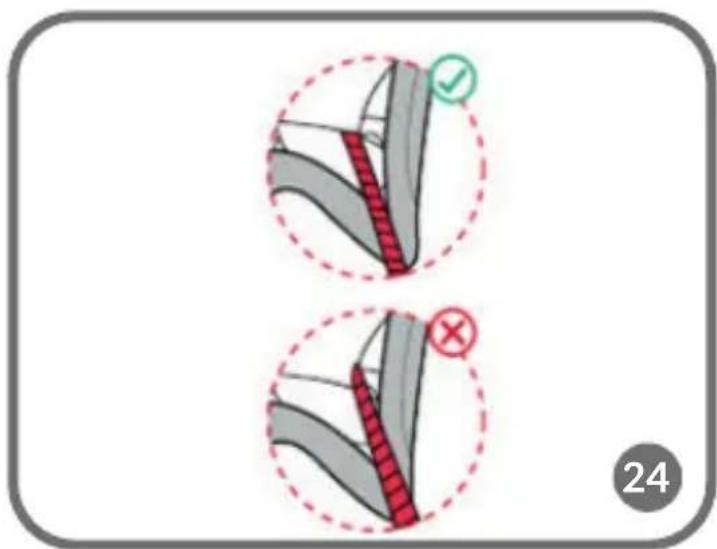
text_image
Diagram illustrating two steps of a hairpin or sewing technique, with checkmark and cross symbols indicating specific points.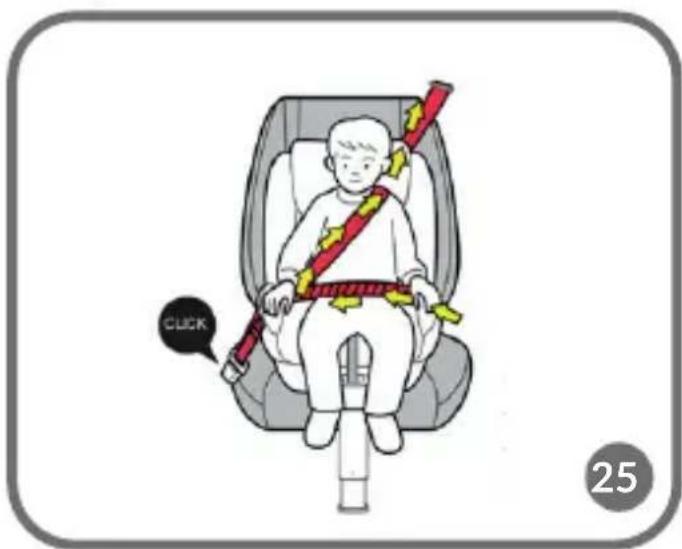
text_image
CLICK 25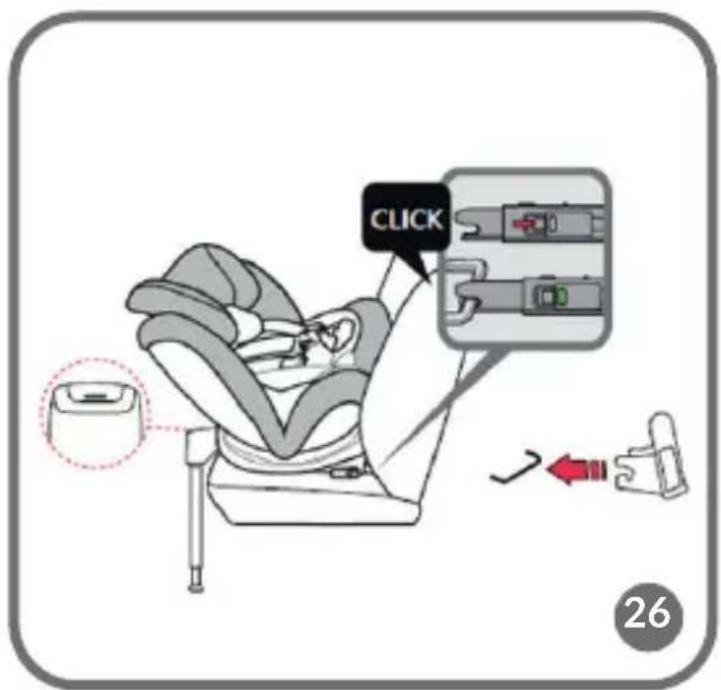
text_image
CLICK 26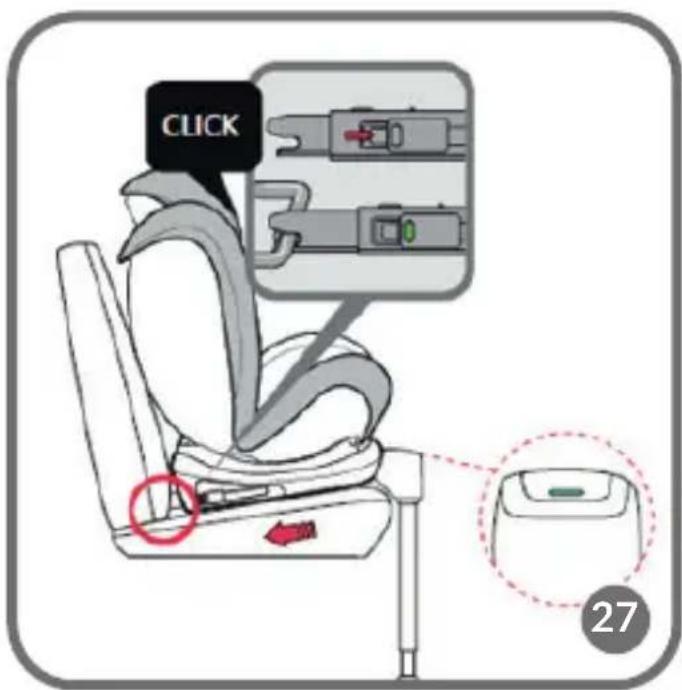
text_image
CLICK 27Information NOTE
The child restraint belongs to the categories ‘universal’. Approved in accordance with UN Regulation No. 44, series of amendments 04, for general vehicle use and suitable for mounting on most car seats.
Correct installation is possible if the vehicle manufacturer has stated in the vehicle's instruction manual that the vehicle is suitable for the installation of ‘universal’ child restraints for this age group. This child restraint has been classified as ‘universal’ under more demanding conditions in relation to conditions applying to previous designs that do not have this information. In case of doubt, consult the manufacturer or the retailer of the device.
Suitable for installation only if type-approved vehicles are equipped with three-point seat belts fitted with a retractor that has been approved in accordance with UN Regulation No. 16 or other equivalent standards.
Information about the ISOFIX system:
- NOTE! This is an ISOFIX CHILD RESTRAINT SYSTEM. It is approved in accordance with UN Regulation No. 44, 04 series of amendments for general use on vehicles equipped with ISOFIX anchorages.
- It fits vehicles with positions approved as ISOFIX positions (according to the vehicle's instruction manual) depending on the child seat category and attachment.
- ISOFIX weight group and size class for which the device is intended:
• D for group 0+, I (0 - 18 kg)
• B1 for group I (9 - 18 kg)
When used for groups 0+, I, II, III - category "semi-universal"
This child restraint system is classified for use in the “semi-universal” category and is suitable for installation in the following cars:
| Car Front Back | ||
| (Model) External/central | NO / NO | External/centralYES / NO |
See the user manual for a list of models. This device can also be installed in seating positions in other car models. If in doubt, consult the device manufacturer or retailer. Rearward-facing installation: do not install the device on seats equipped with active front airbags.
Dear customer!
Should you have any remarks or questions concerning the product, please do not hesitate to contact us: help@lionelo.com
Before you use the child safety seat for the first time, please read this manual carefully.
Producer:
BrandLine Group Sp. z o. o.
Please read this manual before the use and keep it. The manual can help you properly assemble the child safety seat. A wrong assembly may pose a threat to the child's health. The manufacturer is not held responsible for potential hazards arising from wrong assembly of the product.
This child safety seat is intended for weight groups 0+, I, II and III, which means it can be used by children whose weight ranges from 0 to 36 kg.
- Rearward-facing installation: do not install the device on seats equipped with active front airbags.
- Hard elements and plastic parts of the child restraint system must be placed and installed so that they do not get trapped by sliding seat or vehicle door in normal conditions of use.
- Any belts which attach the product to the vehicle must be tight, while those which secure the child must be adapted to its body, the belts must not be twisted.
- Make sure the hip belts go low so that the pelvis is properly secured.
- If the product has been subject to sudden loads during an accident, please replace it.
- Do not alter the child safety seat or install any additional elements, unless relevant authorities agreed on it. A failure to follow the manual supplied by the manufacturer may pose a threat to the user.
- Protect the child safety seat against sunlight. Otherwise the product may be too hot to your child's skin.
- Never leave the child in the product unattended.
- Luggage and other items which may cause bodily injuries in case of accident must be properly secured.
- It is not advisable to use the child restraint system without its upholstery. It is forbidden to replace the upholstery with other than recommended by the manufacturer as it is an integral part of the device and influences its functions.
- Keep the child safety seat manual when you use the product. Store it in the manual holder in the child safety seat.
- It is forbidden to use other points of contact than those described in the manual and marked on the child restraint system.
- Should you have any doubts about position of the adult safety belt buckle in relation to
main points of contact, please consult the child safety seat manufacturer.
- For assembly with ISOFIX: please read the vehicle manufacturer's manual.
- Assemble the child safety seat in a rear-facing position if the child's weight is lower than 9 kg or when other size value is not exceeded.
Safety in the car:
To provide top safety to you and your passengers during the travel, make sure:
- Folding elbow rests are folded (verti cal positi on).
- Any items which may cause damage in the car in case of collision have been properly secured.
- All passengers have fastened their seat belts.
Do not install the child safety seat on seats equipped with two-point safety belts!
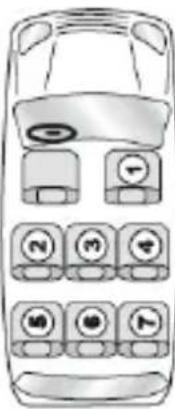
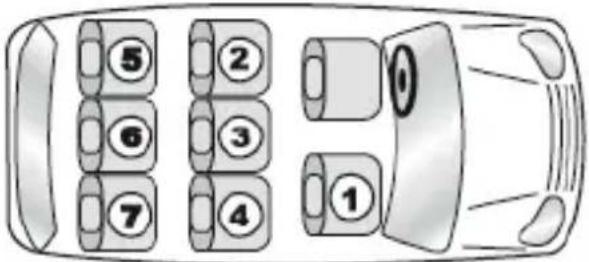
See: fig. 1

Installati on in this place is allowed

Installati on in this place is forbidden
A - shoulder belt
B - hip belt
C - ISOFIX grips (required when assembling the child safety seat with belts and ISOFIX system)
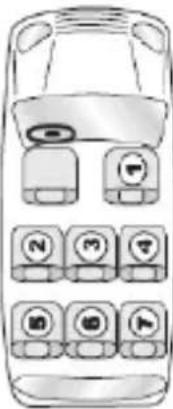
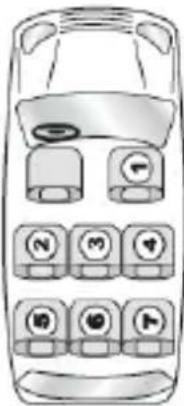
See: fig. 2

Installati on is this place is allowed

Installati on in this place is forbidden

Installati on in this place is allowed provided the airbag is inacti ve

Installati on in this place is allowed provided the seat is equipped with three-point safety belts and ISOFIX fasteners.
Description (fi g. 3 and 4)
A. Shoulder belt guide
B. Child safety seat covering
C. Belt protecti ve cushions
D. Shoulder belt
E. Buckle holder
F. Belt unfastening butt on
G. Belt buckle
H. Crotch cover
I. Belt tension adjustment butt on
J. Belt tension adjustment
K. Seat liner
L. Support leg indicator
M. Base 360° rotation button
N. Base
O. Seat tilting handle
P. Hip belt guide
Q. Headrest
R. Headrest height adjustment lever
S. Shoulder belt guides
T. Top belt connector
U. Manual locker
V. ISOFIX arms
W. Support leg
X. ISOFIX button
Y. Support leg adjustment button
Z. ISOFIX sheaths
How to use
HOW TO FASTEN BELTS OF THE CHILD SAFETY SEAT
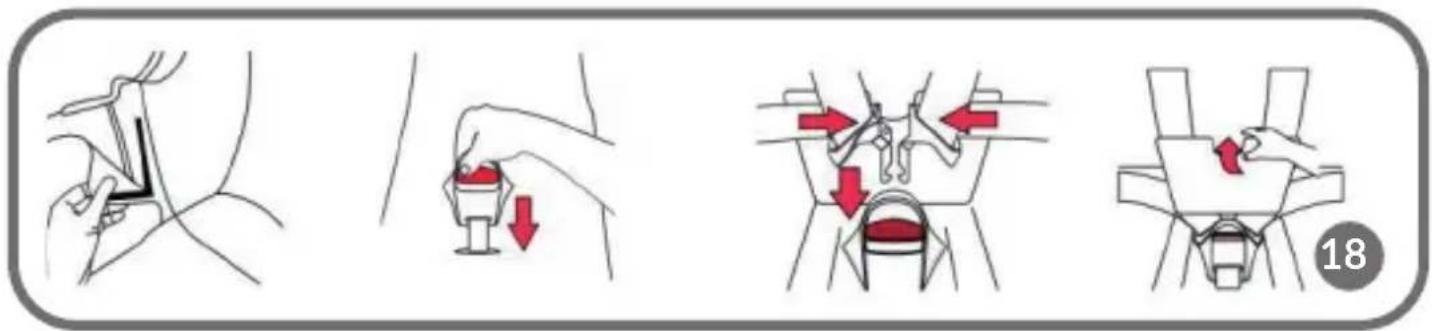
To fasten belts of the child safety seat (fig. 5):
- Join belt buckles.
-
Insert them in the buckle (G), you will hear a distinctive „click”.
-
Make sure the belts have been properly tightened and are not twisted.
To unfasten 5-point belts of the child safety seat, press the red button (F) on the buckle and loosen the belts.
HOW TO ADJUST TENSION OF THE CHILD SAFETY SEAT BELTS
- To tighten the belts, pull the tension adjustment strap (J) (fig. 6).
- To loosen the belts, press adjustment button (I) and pull the shoulder belts (D) (fig. 7).
Note! Make sure the child safety seat belts fit tight the child's body and are not twisted.
Make sure the hip belts go low and protect the child's pelvis. The belts must fit tight the child's body but must not be too tight and cause discomfort.
HOW TO DISASSEMBLE CHILD SAFETY SEAT BELTS
- Open the manual locker.
- Pull the metal belt connector (T) out of the plastic fastener, and then remove the belts (fig. 8).
- Loosen the belts as much as you can (see chapter: HOW TO ADJUST TENSION OF THE CHILD SAFETY SEAT BELTS).
- The metal belt connector must be placed in a special spot for future use (see: fig. 9).
- Unfasten Velcros on belt protective cushions.
- Unfasten child safety seat covering Velcros. Pull the buckle through the hole in the covering.
- Fasten belts and hide them in the glovebox in the child safety seat.
Installation of belts must be performed in a reversed order.
HOW TO ADJUST THE HEADREST
- Loosen the shoulder belts as much as you can.
- To change height of the headrest, grab and pull the headrest height adjustment lever (R).
- Choose the headrest height you desire. (See: fig. 12).
Note! The height of shoulder belts is integrated with the headrest height. A properly set headrest provides optimal protection to your child in the child safety seat:
The headrest must be adjusted so that shoulder belts and child's arms are at the same level. The belts must not be too high (at the ears level or higher) or too low (e.g. behind the child's back). (See: fig. 11)
- Headrest is too low.
- Headrest is too high.
- Headrest is adjusted correctly.
HOW TO ROTATE THE CHILD SAFETY SEAT
To take the child out or place the child in the child safety seat comfortably:
- Pull out the base 360° rotation button (M).
- Next rotate the child safety seat in any direction (360°).
- When you can hear a distinctive „click”, it means the child safety seat has been secured as desired. Then you can be sure the product is safe. (See: fig. 13)
Note! Make sure the base rotation button is secured in its place after changing direction of the child safety seat.
- Correct position of the child safety seat in relation to driving direction and applicable groups:
a. Rear-facing position - group 0+, I (0 - 18 kg) (See: fig. 14)
b. Forward-facing position - group I, II, III, (9 - 36 kg) (See: fig. 15)
HOW TO ADJUST INCLINATION ANGLE OF THE CHILD SAFETY SEAT
Grab the lever (O), pull up and change inclination angle of the child safety seat. (See: fig. 16) You can choose 5 levels of child safety seat inclination, depending on the child's size:
| Group 0+, I (0 - 18kg) Group I (9 - 18kg) Group II, III (15 - 36kg) | ||
| Position 5 Position 1 - 4 | Position 1 | |
To set the child safety seat in position 5:
- Press the base rotation button (M), rotate the child safety seat to the rear-facing position.
- Pull the seat tilting grip (O) and tilt the product to position 5. It is a half-lying position dedicated to small children from group 0+, I (0-18 kg). See: fig. 16 and 17
- Children from group I (9 - 18 kg) can be in a forward- or rear-facing position. Suitable positions of the seat inclination for these children are positions 1-5 (1-4 in a forward-facing position, 5 in a rear-facing position). See: fig. 17
- Children from group II, III, (15 - 36 kg) can be in a forward-facing position in position 1 only.
SEAT LINER
The seat liner is intended for babies, raises their comfort and serves as additional support (see: fig. 19). If the child needs more space in the child safety seat, remove the seat liner.
HOW TO REMOVE COVERING
- Remove 5-point belts of the child safety seat. (See: fig. 8 and 9)
- Lift the headrest as high as possible.
- Unfasten Velcros and remove the covering from the child safety seat.
To put the cover back on, follow the steps above in a reversed order.
HOW TO INSTALL IN THE CAR
A. ASSEMBLY WITH SAFETY BELTS
-
Installation in a rear-facing position, the child secured with safety belts of the child safety seat (group 0+, 0 - 13 kg).
-
Place the child safety seat on the car seat.
- Turn the child safety seat to the rear-facing position; to do so, press the base rotation button (M) (see: fig. 13).
- Press the support leg adjustment button (Y), then extend the leg and adjust its length so that it contacts the vehicle floor (the indicator will turn green when the support leg is sufficiently extended).
- Pull the car seat belt.
- Carry the shoulder part of the belt (D) through the shoulder belt guide (A) marked in blue.
- Carry the hip part of the belt through the hip belt guide (P) marked in blue.
- Press the child safety seat against the car seat as much as you can. Pull the hip belt towards the buckle in order to tighten it as much as possible. Next pull the shoulder belt to tighten other parts of the belt. Make sure the belts are not twisted and properly hold the child safety seat.
- Put the child in the child safety seat and secure it with product's safety belts. (See: fig. 20)
Information:
- For children from group 0+, the child safety seat must be fixed in a rear-facing position only, and inclination angle must be as high as possible (position no. 5). To make sure the child safety seat is properly installed, try to move it before use.
- Make sure the car seat belt is not twisted!
- Make sure the belts have been properly fastened. After fastening, you should hear a distinctive „click”. (See: fig. 20)
- Do not assemble the child safety seat on a front seat if its airbag is active.
2. Installation in a forward-facing position, the child is secured with safety belts of the child safety seat (group I, 9 - 18 kg).
- Set the child safety seat in a forward-facing position.
- Rotate the child safety seat to the forward-facing position. To do so, press the base 360° rotation button (M) (see: fig. 13).
- Press the support leg adjustment button (Y), next extend the leg and adjust its length so that it contacts the vehicle floor (the indicator will turn green when the support leg is properly extended).
- Pull the car seat belt.
- Carry the shoulder part of the belts (D) through the shoulder belt guide (A) marked in red.
- Carry the hip part of the belt through the hip belt guide (P) marked in red.
- Press the child safety seat against the car seat as much as you can. Pull the hip belt towards the buckle to tighten it as much as possible. Next pull the shoulder belt to tighten other parts of the belt; make sure the belts are not twisted and properly secure the child safety seat.
- Put the child in and secure with safety belts of the child safety seat. (See: fig. 2)
3. Installation in a forward-facing position, the child secured with car seat belts (group II, III, 15 - 36 kg).
- Remove 5-point safety belts. (see: fig. 8 and 9)
- Place the child safety seat on the car seat.
- Turn the child safety seat to a forward-facing position. To do so, press the base 360° rotation button (M) (see: fig. 13).
- Press the support leg adjustment button (Y), next slide the leg in and adjust its length so that it is as short as possible and the indicator turns red.
- Put the child in the child safety seat.
- Pull the car seat belt.
- Carry the shoulder belts (D) through the guide in the headrest (A) marked in red. (See: fig. 23)
- Carry the hip part of the belt through the hip belt guide (P) marked in red.
- Press the child safety seat against the car seat as much as you can.
- Carry both belts through the hip belt guide (P) marked in red and fasten the belts. (See: fig. 25)
Information:
- Check if the safety belt goes through the shoulder and if it is at a relevant distance between the neck and shoulder – mark A and B (see: fig. 22).
- After you have fastened the belts, you will hear a distinctive „click”.
- Try to move the child safety seat to check its stability.
B. ASSEMBLY WITH ISOFIX
4. Installation in a rear-facing position, the child is secured with safety belts of the child safety seat (group 0+, I, 0 - 18 kg).
- If necessary, put ISOFIX sheaths (Z) on ISOFIX connectors in the car.
- They facilitate sticking ISOFIX fasteners of the product when car connectors are hard to access.
- Rotate the child safety seat to the rear-facing position. To do so, press the base 360° rotation button (M). (see: fig. 13)
- Press ISOFIX button (X) to extend both ISOFIX arms (V). Next grab the seat with both hands, slide two ISOFIX arms into the fasteners located in the car seat until arms (V) anchor and you can hear a distinctive „click”.
- Push the product towards the seat, press it against the car seat as much as you can.
- Green indicator on ISOFIX button (X) must be visible on both sides; then you can be sure the seat has been properly secured and fixed.
- Press the support leg adjustment button (Y), next extend the leg and adjust its length so that it contacts the vehicle floor (the indicator will turn green when the support leg is sufficiently extended).
- Put the child in the child safety seat and secure it with safety belts of the child safety seat. (See: fig. 26)
5. Installation in a forward-facing position, the child secured with safety belts of the child safety seat (group I, 9 - 18 kg).
- If necessary, put ISOFIX sheaths (Z) on ISOFIX connectors in the car.
- They facilitate stocking ISOFIX fasteners of the child safety seat when car connectors are hard to access.
- Turn the child safety seat to a forward-facing position. To do so, press the base 360° rotation button (M). (see: fig. 13)
- Press ISOFIX button (X) to extend both ISOFIX arms (V). Next grab the seat with both hands, slide two ISOFIX arms (V) firmly in fasteners in the car seat until arms anchor and you can hear a distinctive „click”.
- Push the product towards the car seat, press it against the car seat as much as you can.
- Green indicator on ISOFIX button (X) must be visible on both sides; then you can be sure the seat has been properly secured and fixed.
- Press the support leg adjustment button (Y), next extend the leg and adjust its length so that it contacts the vehicle floor (the indicator will turn green when the support leg is sufficiently extended).
- Put the child in the child safety seat and secure with safety belts of the child safety seat. (See: fig. 27)
6. Installation in a forward-facing position, the child is secured with car seat belts (group II, III, 15 - 36 kg).
- Remove 5-point safety belts (see: fig. 8 and 9)
- Place the child safety seat on the car seat.
- Turn the child safety seat to a forward-facing position. To do so, press the base 360° rotation button (M). (see: fig. 13)
- If necessary, put ISOFIX sheaths (Z) on ISOFIX connectors in the car. They facilitate sticking ISOFIX fasteners of the child safety seat when car connectors are hard to access.
- Press ISOFIX button (X) to extend both ISOFIX arms (V). Next grab the seat with both hands, slide both ISOFIX arms firmly in the fasteners in the car seat until the arms anchor and you can hear a distinctive „click”.
- Push the product towards the car seat, press it against the car seat as much as you can.
- Green indicator on ISOFIX button (X) must be visible on both sides, then you can be sure the seat has been properly secured and fixed.
- Press the support leg adjustment button (Y), then slide the leg in and adjust its length so that it is as short as possible and the indicator turns red.
- Put the child in the child safety seat.
- Pull the car seat belt.
- Carry shoulder belts (D) through the guide in the headrest (A) marked in red.
- Carry hip part of the belt through the hip belt guide (P) marked in red.
- Carry both belts through the hip belt guide marked in red and fasten them.
- Fasten car seat belts (see: fig. 6). Check if the child safety seat has been properly fixed. (See: fig. 25)
Information:
- Check if the safety belt goes through the shoulder and if it is at a relevant distance between the neck and shoulder – marker A and B (see: fig. 22).
- When fastening belts, you will hear a distinctive „click”.
- Tighten the belts; to do so, follow the direction of arrows (see: fig. 25).
- Try to move the child safety seat to check its stability.
CLEANING AND MAINTENANCE:
- Periodically check the seat for damage and wear.
- If you find any damaged parts, replace the seat.
- Keep the child safety seat clean to prolong its life.
-
Do not expose the seat to sunlight for a long time.
-
Wash the seat fabric with warm water, use soap or soft cleaning agents.
- After washing, do not let the seat dry off in the sun.
How to clean a buckle:
- Food, drinks or other pollutants may accumulate inside the buckle and cause it to malfunction.
- Wash in warm water.
- After washing, make sure the buckle emits a distinctive „click”; this way you can be sure the buckle works properly.
How to clean a belt and base:
Use a sponge, wash with a soap and warm water – do not use other cleaning agents.
Storage:
Store in a safe and dry place, away from heat and sunlight.
Do not place any heavy items on the seat.
The product has been tested and meets all the requirements of the: ECE R44.04
The pictures are for reference only. The real design of the products may differ from the pictures presented.
PL
Informacja
UWAGA
JUSTERING AV NACKSTÖDET
- Lossa axelbältena maximalt.
text_image
Diagram of a car with labeled buttons arranged in a grid layout| ALFA ROMEO * | ||
| 156 Wagon | 2003 | 24 |
| 156(Face Bt 2003) | 1997-2005 | 24 |
| 158 Sportswagon | 1997-2006 | 24 |
| 159 SW(Face Bt 2006) | 2005 | 24 |
| Giujetta 940 | 2010 | 24 |
| GT Sportcoupe | 2004 | 24 |
| M To | 2006 | 124 |
| AUDI * | ||
| A1 (BX) 3 | 08/10 | 24 |
| A1 (BX) 5 | 02/12 | 24 |
| A2 | 1996-2005 | 24 |
| A3, S3 (AB1)3+5 | 1996-2003 | 24 |
| A3, S3 (A02)3+5 | 2003 | 24 |
| A3 (A02) | 2006 | 24 |
| A3 (Pacodin 3) (SP) | 2010 | 124 |
| A4 Award (B5) | 1996-2001 | 24 |
| A4 (B6) | 2002-2004 | 124 |
| A4 (B6) | 2000-2004 | 24 |
| Pradira (Facalt 2009) | 2002 | 24 | |
| Thema | 11/11 | 24 | |
| Ysilon (Facalt 2007) | 2003 | 24 | |
| Ysilon (402) | 08/11 | 24 | |
| LANDROVER * | |||
| Discovery 4(Facalt 10/11) | 2009 | 24 | |
| Fleetlander 2(Facalt 03/15) | 2006 | 24 | |
| Range Rover | 09/12 | 24 | |
| Range RoverEnvoque 5 3+5 | 2011 | 24 | |
| Range Rover Sport(Facalt 2010) | 2005 | 24 | |
| LEXUS * | |||
| CT 200h (A10(A)) | 03/11 | 24 | |
| GS 450h (HL10(A)) | 08/12 | 24 | |
| IS (XE2) (Passif) | 11/10 | 24 | |
| RX 400h | 2006 | 24 | |
| RX 450h | 2008 | 24 | |
| MASERATI * | |||
| Quattroporte | 2008 | 24 | |
| Gran Turismo | 2008 | 24 | |
| MAZDA * | |||
| 2 DE | 2007 | 24 | |
| 2 DY | 2003-2007 | 24 | |
| 2 (Passif) | 10/10 | 24 | |
| 3 | 2003 | 24 | |
| 3 (Passif) | 11/10 | 24 | |
| 3 BL | 04/09 | 24 | |
| 323 | 01/01 | 24 | |
| 5 (Passif 2008) | 2005 | 24 | |
| 5 CW | 09/10 | 24 | |
| INFINITI * | ||
| M35h (V51H) | 09/11 | 24 |
| ISUZU * | ||
| D-MAX Doulo Cap | 2007 | 24 |
| KIA * | ||
| Carans | 2006 | 24 |
| CarnivIII | 2006 | 2457 |
| Ceed | 12/06 | 24 |
| Ceed | 2007 | 24 |
| Ceed | 03/12 | 24 |
| Ceed (JD) | 08/12 | 24 |
| Ceed sw (JD) | 09/12 | 24 |
| Pro Ceed | 01/11 | 24 |
| Cpinus (FacalII 2008) | 2003 | 24 |
| Picante (FacalII 2007) | 2004-2011 | 24 |
| Rio | 05/05 | 24 |
| Rio UB | 2012 | 24 |
| Soul | 02/09 | 24 |
| Soul (FacalII) | 10/11 | 24 |
| Sorento | 10/09 | 24 |
| Sorento (XLI)(Face II) | 10/12 | 24 |
| Sportage(Face II 05/2008) | 2005 | 24 |
| Sportage SL | 2010 | 24 |
| Venga | 11/09 | 24 |
| LANCIA * | ||
| Delta 3 | 2008 | 24 |
| Flavia (JS) | 06/12 | 24 |
| Muse (Face II 2007) | 2004 | 24 |
| FR-X L 6 | 2005 | 24 |
| Insight | 04/09 | 24 |
| Jazz 5 | 11/08 | 24 |
| Jazz (AA) | 04/11 | 24 |
| HYUNDAI * | ||
| Gatz | 2002-2005 | 24 |
| Gatz | 2005-2008 | 24 |
| HI | 2008 | 24 |
| I10 | 2008 | 24 |
| I20 | 2009 | 24 |
| I20 (PIBT)3+5 (Pierdom) | 06/12 | 24 |
| I30 | 2007 | 24 |
| I30 (FCH) | 07/10 | 24 |
| I30 (GD) | 03/12 | 24 |
| I30 CW (GD) | 08/12 | 24 |
| I40 | 10/11 | 24 |
| IX20 (JC) | 11/10 | 24 |
| IX35 | 2010 | 24 |
| IX55 | 2009 | 24 |
| Matrix | 2008 | 24 |
| Santa Fe | 04/08 | 24 |
| Santa Fe (Forelim) | 01/10 | 24 |
| Santa Fe | 03/12 | 24 |
| Santa Fe (DM) | 09/12 | 24 |
| Santa Fe I40 | 2008 | 24 |
| Tucson 2) 5 | 03/04 | 24 |
| Velloster | 06/11 | 24 |
text_image
Diagram of a mobile phone keypad layout with labeled buttons and function keys| Mondoo Tumer(BAY) (F=40) | 1/1/10 | 21 | |
| Mondoo(Faxcl In 2010) | 2007-2010 | 21 | |
| Mondoo (BAT)(F=40) | 12/10 | 21 | |
| Ranger | 06/11 | 21 | |
| S-Max(Faxcl In 2010) | 2000 | 231 | |
| Taurnoe Correct(Faxcl In 2009) | 2003 | 21 | |
| TransitTransit Correct | 2008 | 23 | |
| Transit Kombi | 11/11 | 23 | |
| Transit Custom | 08/12 | 236 | |
| HONDA * | |||
| Accord | 2008 | 21 | |
| Accord 4+5 | 2009 | 21 | |
| Accord: | 06/11 | 21 | |
| City 4 | 2009 | 21 | |
| Chic Typ R EP3 | 2001-2006 | 21 | |
| Chic 4+5 | 2008 | 21 | |
| Chic 40 | 11/11 | 21 | |
| Chic 50 | 01/12 | 21 | |
| CR-V | 01/02 | 21 | |
| CR-V | 2006 | 21 | |
| CR-V | 10/12 | 214 | |
| CR-Z | 08/10 | 214 | |
| 2003-2012 | ||
| Panda (Typ 169) | 1999-2007 | |
| Punto 168 (Fao#lt 2020) | 3+5 | |
| Punto 166 (Fao#lt 2012) | 32/12 | |
| Sedid II | 2007 | 2457 |
| Sedid (Fao#lt 2000) | 2006 | 24 |
| Stjo | 2001-2007 | |
| FORD * | ||
| B-Max | 09/12 | 24 |
| C-Max | 2010 | 24 |
| C-Max (DXA) | 12/10 | 4 |
| Eco Sport | 12/10 | 24 |
| Fisela (MK7)3+5 | 10/08 | 24 |
| Fisela | 10/12 | 24 |
| Focus | 11/04 | 24 |
| Focus (Fao#lt 2000) | 2005-2008 | 24 |
| Focus | 2011 | |
| Galaxy (Fao#lt 2010) | 2006 | 24 |
| Galaxy | 2011 | 24 |
| Grand C-Max | 2011 | 24 |
| Grand C-Max (DXA) | 12/10 | 15 |
| KA | 02/09 | 24 |
| Kuga (394) | 2008 | 24 |
| Kuga | 10/12 | 24 |
| Maverick | 2000-2007 | 24 |
| Lotgr | 2005 | 234 |
| Lotgr (SD) | 06/12 | 234 |
| Logren MCV(Fac#In 2008) | 2005 | 24 |
| Sandero | 2008 | 24 |
| Sandero Steperty | 2009 | 24 |
| DAIHATSU * | ||
| Cuare | 09/07 | 24 |
| Marens | 03/06 | 24 |
| Sirion | 02/05 | 24 |
| Terlos | 05/05 | 24 |
| Trevis | 09/05 | 24 |
| FIAT * | ||
| Soo | 2007 | 24 |
| Soog | 2009 | 24 |
| Brevo (Typ 198) | 2007 | 24 |
| Croma | 2008 | 24 |
| Dolo (Fac#In 2005) | 2001 | 24 |
| Dolo I | 2010 | 24 |
| Fiorino Qubo | 2008 | 24 |
| Freemont | 2011 | 24 |
| Grande Punto € | 2005-2009 | 24 |
| Grande Punto EVO | 19/09 | 24 |
| Grande Punto(Typ 199) | 06/05 | 24 |
| Ides | 2003-2007 | 24 |
| Lina | 2007 | 24 |
| Multipla | 2004-2007 | 24 |
| Pacifica(Facafin 2006) | 2003-2008 | 24 | |
| Seltrng(○○○) | 2007 | 24 | |
| Voyager | 2001-2007 | 257 | |
| Voyager Show in Go | 2005 | 6 | |
| CITROEN * | |||
| Bedlingo | 2008 | 124 | 24 |
| Bedlingo Muispace | 2009 | 13 | 24 |
| C1 (Facafin 2008) | 2005 | 24 | |
| C2 | 2003 | 24 | |
| C3 (T) | 01/10 | 24 | |
| C4 Picasso | 2007 | 14 | |
| 34 | |||
| C4 Grand Picasso | 2006 | 14 | |
| 34 | |||
| C4 I | 10/10 | 24 | |
| C4 Aircross | 08/12 | 24 | |
| C5 | 2008 | 124 | |
| C5 (R) Facafin | 12/10 | 24 | |
| C-Crosser | 2007 | 24 | |
| DS4 | 03/11 | 24 | |
| DS5 | 03/12 | 24 | |
| Evision(Facafin 1998) | 1994-2002 | 257 | |
| Jumpy | 2007 | 257 | |
| Nano | 2007 | 24 | |
| DACIA * | |||
| Duster | 2010 | 24 | |
| Duster (SD) | 04/10 | 24 | |
text_image
Diagram of a car interior with numbered compartments and control buttons| Luceté | 02/04 | 24 |
| Malibu | 12/11 | 24 |
| Malibu (LCTG) | 07/12 | 24 |
| Malitz 3 | 08/05 | 24 |
| Nubira | 2004-2009 | 24 |
| Nubira | 2004-09/08 | 24 |
| Orlando | 01/11 | 24 |
| Spark | 03/10 | 24 |
| Trax | 01/13 | 24 |
| Volk (D1 JCF) | 10/11 | 24 |
| CHRYSLER * | ||
| 300C | 2008 | 24 |
| Dodge Calliber | 2006 | 24 |
| Dodge Nive | 2006 | 24 |
| Dodge Ram (1500) | 2002-2008 | 24 |
| Grand Voyager | 2001-2007 | 24 |
| Jeep Commander | 2008 | 24 |
| Jeep Grand Chevrolet (WK) | 12/10 | 24 |
| Jeep Wongler (Umbel) (Freelby) | 11/11 | 24 |
| Antara | 11/06 | 24 |
| Astra | 2004 | 24 |
| Astra GTC | 09/11 | 24 |
| Astra J | 12/09 | 24 |
| Astra J wedan (P-J) | 09/12 | 24 |
| Astra J Sport Tourer | 2010 | 24 |
| Astra J Sport Tourer (PJSW) | 10/10 | 24 |
| Combo C(Fascalin 2003) | 2001-2010 | 24 |
| Corsa C | 2000-2006 | 24 |
| Corsa D (OPC) | 2006 | 24 |
| Corsa D FL (S-D) | 01/11 | 2 |
| Insignia | 2008 | 24 |
| Insignia | 2009 | 24 |
| Insignia | 08/11 | 24 |
| Nativa (Fascalin 2008) | 2003 | 24 |
| Nativa B | 2010 | 24 |
| Nokia | 09/12 | 24 |
| Sognum(Fascalin 2005) | 2003-2008 | 24 |
| Vwaro (Fascalin 2008) | 2001 | 3 |
| Zafira B (Fascalin 2008) | 05/05 | 24 |
| Zafira C | 09/11 | 24 |
| Zafira C Tourer | 01/12 | 24 |
| PEUGEOT* | ||
| 107 | 2005 | 24 |
| 206 | 12/08 | 24 |
| 206 CC | 2000-2007 | 1 |
| Colt (230) 5(Facell 2006) | 2008 | 24 |
| Granda | 2004-2011 | 24 |
| Lampar | 2007 | 24 |
| Lampar FL | 11/11 | 24 |
| Outfender | 2008 | 24 |
| Pajero V80 | 02/07 | 4 |
| NISSAN * | ||
| Cube 212 | 2008 | 24 |
| Luke (F15) | 2010 | 24 |
| Leaf (ZEG) | 04/12 | 24 |
| Maxima (A35) | 2000-2004 | 24 |
| Mora (K11) | 1993-2003 | 24 |
| Mora (K12) | 2003 | 24 |
| Mora CC | 2005 | 1 |
| Mora (K13) | 11/10 | 24 |
| Murare (Foo#ll 2008) | 2003 | 24 |
| Note | 2004 | 24 |
| Pathfinder (R51) | 2007 | 24 |
| Pixo | 2009 | 24 |
| Primera (P11) | 1996-2002 | 24 |
| Qochqai-2 | 19/08 | 24 |
| Qochqai-2 (Facell) | 03/10 | 24 |
| Tida | 2004 | 24 |
| OPEL / VAUXHALL * | ||
| Agila E | 2008 | 24 |
| Ampera | 10/11 | 24 |
| C (C204) | 06/11 | 24 |
| C (W 204) | 03/11 | 24 |
| Clan | 09/12 | 24 |
| CL (Facell) | 07/10 | 4 |
| CLC 180 | 2008 | 24 |
| CLS (Fasci 2006) | 10/04 | 24 |
| CLS (C218) | 01/11 | 24 |
| E | 03/02 | 24 |
| E (W 211) | 2006 | 24 |
| E (S 211) | 2006 | 24 |
| E (W212; 8212) | 2009 | 24 |
| E (C207) | 2009 | 24 |
| E (A207) | 2010 | 24 |
| G (W483)(Facell 2008) | 1980 | 24 |
| GLK | 2008 | 24 |
| GLK (X204) (Facell) | 08/12 | 24 |
| M (W169) | 11/11 | 24 |
| R (W251/V251) | 12/05 | 24(5)7 |
| R (V251) | 09/10 | 24 |
| S (W211)(Facell 2009) | 2005 | 24 |
| Viano (W414) | 2001-2005 | 24(5)7 |
| Viano L6 | 09/03 | 24(5)7 |
| Viano (Facell 2010) | 09/03 | 24(5)6 |
| Viano (W209)(Facell) | 10/10 | 24(5)6 |
| Vito (W53)(Facell) | 10/10 | 24(5)6 |
| MITSUBISHI | ||
| AGX | 2010 | 24 |
| Col (Z30) | 2004-2008 | 24 |
text_image
Diagram of a mobile phone keypad layout with numbered buttons for function or operation| 05/02-2008 | ||
| 6(Faxel 2008) | 2008 | 24 |
| 6(Faxel) | 2009 | 24 |
| 6(Faxel 2008) | 2010 | 24 |
| CX5 | 12/11 | 24 |
| CXT | 2007 | 24 |
| CXT (Faxel) | 2009 | 24 |
| MX5 L 2 Typ NB | 1998-2005 | |
| Pharmacy | 1999-2005 | 24 |
| RX8 | 2003 | 24 |
| RX8 (Faxel) | 2008 | 24 |
| MERCEDES * | ||
| A (W168) | 03/01 | 24 |
| A (W169)(Faxel 2008) | 05/05 | 24 |
| A (776) | 09/12 | 24 |
| B (Faxel 2008) | 06/05 | 24 |
| B (W248) | 11/11 | 24 |
| C (W203) | 05/00 | 24 |
| C (S203) | 05/01-2007 | 24 |
| C (W 204) | 2007 | 24 |
| C (S 204) | 2007 | 24 |
| C (T 204) | 03/11 | 24 |
| Aldea | 2004 | 24 |
| Aldea Freelback(Facolin 2006) | 2007 | 24 |
| Aldea XL | 2006 | 24 |
| Exeo | 2000 | 124 |
| Exeo | 2009 | 24 |
| Exeo (Facolin)(2008) | 12/11 | 24 |
| Ibiza (6K) | 1993-2002 | 24 |
| Ibiza (6L)Facolin 2008 | 2002-2008 | 24 |
| Ibiza (6J) | 2008 | 24 |
| Ibiza | 2010 | 24 |
| Leon (1P) | 2005 | 24 |
| Leon 3+5 | 05/12 | 24 |
| Vii 3(baugleich VW Uo) | 2011 | 24 |
| Vii 5(baugleich VW Uo) | 05/12 | 24 |
| Tolede M1 5 | 1999-2004 | 24 |
| Tolede | 2004 | 24 |
| Tolede | 05/12 | 24 |
| SKODA * | ||
| Citigo(baugleich VW Uo) | 2011 | 24 |
| Citigo 3+5(2008) | 05/12 | 24 |
| Fabla I (Fascin 2004)(2007) | 1999-2007 | 24 |
| Fabla II(2008) | 2007 | 24 |
| Megane II3+5 | 09/02 | |
| Megane III3+5 | 2008 | 24 |
| Megane IIIGrandou | 06/09 | 24 |
| Megane III CC (Z) | 06/10 | 24 |
| Modus | 08/04 | 24 |
| Modus (Facidit) | 2008 | 24 |
| Sandeto III | 12/12 | 24 |
| Scenic II▼ | 2003-2006 | 124 |
| Scenic II▼(Facidit) | 09/05 | 124 |
| Scenic III▼ | 2009 | 234 |
| Trafic II Phase 1 | 2001-2006 | 36 |
| Trafic II Phase 2(Facidit in 2007) | 2007-07/10 | 3 |
| Trafic II Phase 3 | 08/10 | 23 |
| Twingo | 1998-2007 | 124 |
| Twingo II | 2008 | 124 |
| Veli Satis(Facidit in 2005) | 2002 | 24 |
| ZCE | 10/12 | 124 |
| ZCE | 05/13 | 124 |
| SAAB* | ||
| 9-3 Sporthombi | 2005-2007 | 24 |
| 9-5 Sporthombi | 2005-2010 | 24 |
| BEAT* | ||
| Alramors(Facidit) | 2005 | 234 |
| Alramors (7N) | 10/10 | 23457 |
| PORSCHE | ||
| Cayenne (Fox-III 2007) | 2003 | 124 |
| Panamera | 2009 | 24 |
| RENAULT | ||
| Captur | 04/13 | 124 |
| Clto III 3-5 | 2007 | 24 |
| Clto II | 09/082006 | 17 |
| Clto II | 19982005 | 24 |
| Clto III (Fox-III 2009) | 05/05 | 24 |
| Clto IV | 08/12 | 124 |
| Clto Grandtsur III | 20082009 | 24 |
| Clto Grandtsur | 2009 | 24 |
| Espace IVGranda Espaiva IV(Face III 2006) | 20022010 | 23457 |
| Espace (K) | 12/10 | 23457 |
| Fluence (Z) | 08/10 | 24 |
| Fluence (ZE) | 2011 | 24 |
| Grand Modus | 2008 | 24 |
| Grand Socric III ▼ | 2009 | 234 |
| Kengaro III | 2008 | 124 |
| Kengaro be bop | 2009 | 24 |
| Kolcos ▼ | 2008 | 24 |
| Laguna Grand Tour(II) (FazdaIII) | 11/10 | 24 |
| Laguna Grand Tour(III) (T) (FazdaIII) | 11/1019992003 | 2424 |
| Megane I Grand Tour | 24 | |
| Megane CC (Z) | 06/10 | 24 |
text_image
Diagram of a mobile phone keypad with numbered buttons arranged in rows and columns| 207 | 2006 | 24 |
| 3+5 | ||
| 207 CG | 04/07 | 1 |
| 207 SW | 2006 | 24 |
| 208 C | 04/12 | 24 |
| 3+5 | ||
| 308 | 2007 | 124 |
| 308 CC | 2009 | 24 |
| 308 CC FL | 11/11 | 24 |
| 308 SW | 2007 | 124 |
| 308 SW (Swein) | 05/11 | 24 |
| 508 (B) | 03/11 | 24 |
| 508 SW (B) | 03/11 | 24 |
| 508 RXF SW (B) | 02/12 | 24 |
| 60T(Freckln 2008) | 20022010 | 2457 |
| 1007 21 | 01/05 | 24 |
| 4007 | 2007 | 24 |
| 4008 (B) | 06/12 | 24 |
| 5008 | 09/09 | 2 |
| Export | 2007 | 2457 |
| Partner | 1996 | 3 |
| Partner Tapea | 2008 | 1 |
| PONTIAC | ||
| Grand AM | 1998 | 24 |
| 2004 | ||
| S60 (R) | 03/10 | 24 |
| S80 (Typ AS)(Fascill 2009) | 2008 | 24 |
| V40(Fascill 2000) | 1996-2004 | 24 |
| V40 (M) | 09/12 | 24 |
| V60 | 2004 | 24 |
| V60 (F) | 2010 | 24 |
| V70 | 2000-2007 | 24 |
| V70 | 2007 | 24 |
| V70 | 08/11 | 24 |
| XC600 | 2000 | 24 |
| XC70 | 2007 | 24 |
| XC70 | 08/11 | 24 |
| XC90 L547 | 2002 | 24 |
| * | ||
| Aramark | 2010 | 24 |
| Beetle | 1998 | 24 |
| Beetle | 2002 | 24 |
| Beetle (Fascill) | 2009 | 24 |
| Beetle 3 | 07/11 | 24 |
| Caddy 7) | 2004 | 24 |
| Caddy 7) | 09/10 | 24 |
| Cross Polo IV(Typ 9N3) | 2006-2010 | 24 |
| EOS(Fascill 2019) | 2006 | 124 |
| EOS (IF) (Facill) | 10/10 | 1 |
| Fax | 04/05 | 24 |
| Golf IV | 08/07-2003 | 24 |
| Core In Verso | 2000 | 24 |
| 2004-2009 | 24 | |
| IQ | 2009 | 24 |
| Land Cruiser (J12) | 2002 | 24 |
| Land Cruiser (V8) | 2008 | 24 |
| Land Cruiser | 11/09 | 24 |
| Previa (Forder 2003) | 2000-2009 | 24 |
| Prius | 2003-2009 | 24 |
| Prius (Facelit 04/12) | 2009 | 24 |
| Prius+ (XIV4)(A) | 06/12 | 24 |
| RAV4 | 2000-2005 | 24 |
| RAV4 (Facelit) | 05/10 | 24 |
| Urban Cruiser | 2009 | 4 |
| Verso S (XP12)(A) | 03/11 | 24 |
| Yaris 3+5 | 1999-2005 | 24 |
| Yaris 3+5(Facelit 2003) | 2005 | 24 |
| Yaris 3+5 | 05/11 | 24 |
| Yaris Verso(Facelit 2003) | 1999-2005 | 24 |
| VOLVO * | ||
| C30 | 2006 | 24 |
| G70 | 2005 | 24 |
| XC70 | 2007 | 24 |
| S40 (Facelit 2007) | 2003 | 24 |
| SUBARU * | ||
| Forester III | 2008 | 24 |
| Impteza | 2007 | 24 |
| Legacy (Faxin 2307) | 2004 | 24 |
| Legacy | 08/09 | 24 |
| Outrack(Facift 2007) | 2003 | 24 |
| Outrack | 08/09 | 24 |
| Treats | 06/11 | 24 |
| SUZUKI * | ||
| Alto VII | 2009 | 24 |
| Kozash (FR) | 09/10 | 24 |
| Splash | 2007 | 24 |
| Splash (EX) (Facalt) | 05/12 | 24 |
| Swift | 02/05-10/10 | 24 |
| Swift | 09/10 | 24 |
| SX4 | 2005 | 24 |
| TATA * | ||
| Indica Vista | 2008 | 24 |
| TOYOTA * | ||
| Auris (Taxaft 2012) | 2007-2010 | 24 |
| Auris (Taxaft) | 03/10 | 24 |
| Auris Hybrid | 09/10 | 24 |
| Avenes (T22) | 2009-2003 | 24 |
| Avenes (T27) | 2009 | 24 |
| Avenes (T27) | 01/12 | 24 |
natural_image
Line drawing of a mobile phone keypad with control buttons (no text or symbols)| Factiv II Combi (5J)(Facsim) | 09/10 | 24 |
| Felcia | 1994-2001 | 24 |
| Octavia II | 2004 | 123 |
| Octavia II (Facsim) | 2009 | 124 |
| Octavia Scout | 2007-2012 | 24 |
| Octvia | 11/12 | 124 |
| Rapid | 05/12 | 24 |
| Rapid (NH) | 10/12 | 24 |
| Roemster | 2006 | 24 |
| Roemster (Facsim) | 05/10 | 24 |
| Superb I(Facsim 2008) | 10/01-2008 | 24 |
| Superb II | 2008 | 24 |
| Superb | 2010 | 24 |
| Superb (ST) | 02/10 | 124 |
| Yehi | 2009 | 24 |
| SMART * | ||
| Fortour 4 Typ 454 | 2004-2006 | 24 |
| Fortwo Typ 451 | 2007 | 1 |
| Fortwo Typ 451 (FL) | 10/10 | 1 |
text_image
Diagram of a vehicle front panel with numbered compartments and labeled ports| Golf IV Variant | 1999-2006 | 24 |
| Golf V | 2003 | 24 |
| Golf V (R32) | 09/05 | 24 |
| Golf V Plus7) | 2005 | 24 |
| Golf V Plus | 2006-2009 | 24 |
| Golf V Variant | 2007 | 24 |
| Golf VI | 08/08 | 24 |
| Golf VI Variant(Facelift 2009) | 2009 | 24 |
| Golf VI (1K) | 06/11 | 24 |
| Golf VI Plus(Facelift) | 2009 | 24 |
| Golf VII | 08/12 | 24 |
| Jetta VI | 01/11 | 24 |
| Passat (B6)(Facelift 2010) | 2005 | 24 |
| Passat B7 | 2010 | 24 |
| Passat B7 Alltrack | 02/12 | 24 |
| Passat CC | 2008 | 24 |
| Phaeton | 2002 | 24 |
| Polo III(Facelift 1999) | 1994-2001 | 24 |
| Polo III(Facelift 1999) | 1999-2001 | 24 |
| Polo IV | 2005 | 24 |
| Polo V | 2009 | 24 |
| Scirocco III | 08/08 | 24 |
| Sharan (Facelift) | 2004 | 234 |
| Sharan II^7) | 2010 | 23457 |
| T5 California(Facelift 2010) | 2003 | 467 |
| T5 Multivan | 2003 | 2457 |
| T5 Multivan(Facelift 2010) | 2003 | 2457 |
| Tiguan | 2007 | 24 |
| Tiguan (Facelift) | 07/11 | 24 |
| Touareg (7L)(Facelift 2006) | 2002-2010 | 24 |
| Touareg II (C2) | 2010 | 24 |
| Touran7) | 2003 | 24 |
| Touran7) | 2007 | 24 |
| Touran FL (1T)7) | 09/10 | 24 |
| Touran GP27) | 2010 | 24 |
| UP! (Lupo I) 3 | 08/11 | 24 |
| UP! (Lupo I) 5 | 05/12 | 24 |
Szczegółowe warunki gwarancji dostępne są na stronie: Detailed warranty conditions are available on the website: Detaillierte Garantiebedingungen finden Sie auf der Website: Подробные условия гарантии доступны на сайте: Le condizioni di garanzia dettagliate sono disponibili sul sito web: Les conditions de garantie détaillées sont disponibles sur le site: Las condiciones de garantía detalladas están disponibles en el sitio web: Gedetailleerde garantievoorwaarden zijn beschikbaar op de website: Išsamias garantijos sąlygas rasite svetainėje: Podrobné záruční podmínky jsou k dispozici na webových stránkách: A részletes garanciális feltėtelek elérhetők a weboldalon: Condiții detaliate de garanție sunt disponibile pe site: Detaljerade garantivillkor finns tillgängliga på hemsidan: Detaljerte garantibetingelser er tilgjengelige på hjemmesiden: Detajerede garantibetingelser kan ses på hjemmesiden: Yksityiskohtaiset takuuehdot on luettavissa verkkosivuilla:
www.lionelo.com